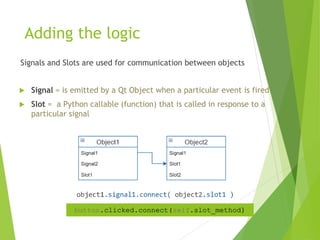
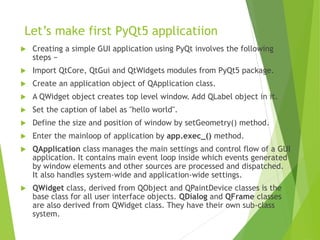
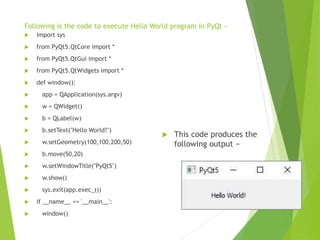
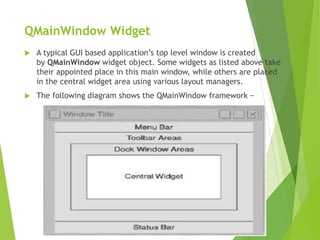
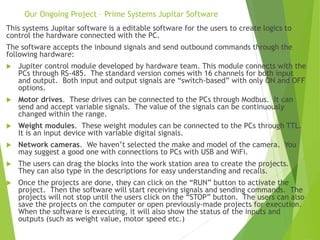
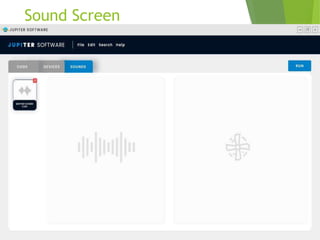
PyQt – The GUI Application
We will look at:
 Introduction and Installation
 Using the Qt Designer
Approaches for using the automatically generated UI code from
the designer
 Adding Logic
Architectures for adding logic to our Widgets
 Project
Introduction
 PyQt is a GUI widgets toolkit. It is a Python interface for Qt, one of the
most powerful, and popular cross-platform GUI library. PyQt was
developed by Phil Thompson of British firm RiverBank Computing Ltd. The
latest version of PyQt can be downloaded from its official website
− riverbankcomputing.com
 PyQt API is a set of modules containing a large number of classes and
functions. While QtCore module contains non-GUI functionality for
working with file and directory etc., QtGui module contains all the
graphical controls.
 PyQt is compatible with all the popular operating systems including
Windows, Linux, and Mac OS. It is dual licensed, available under
GPL(General Public License) as well as commercial license. Since PyQt is
available on GPL license, therefore open source can freely use it. The
latest stable version is PyQt5-5.13.2.
 PyQt5 was released in April 2016 and last updated in October 2021.
 It costs about $550 to buy a permanent PyQt5 commercial license with a
year of support.
 PyQt is widely used for creating large-scale GUI-based programs.
Supporting Environment for Installation
 Wheels for 32-bit or 64-bit architecture are provided that are
compatible with Python version 3.5 or later. The recommended way
to install is using PIP utility −
pip3 install PyQt5
 To install development tools such as Qt Designer to support PyQt5
wheels, following is the command −
pip3 install pyqt5-tools
 You can also build PyQt5 on Linux/macOS from the source
code www.riverbankcomputing.com/static/Downloads/PyQt5
Design the look of the GUI and automatically generate the Python code.
Qt Designer can be extended by writing plugins (in C++ or Python)
Qt Designer
A plugin is used to expose a custom widget to Designer so that it
appears in Designer’s widget box just like any other widget.
Using the Qt Designer
1. Use the Qt Designer to design the visual
part of the widget (without logic).
2. Using the “pyuic5” command transform
the generated XML .ui file into python
code.
3. Extend generated code to add logic to the
widget using signals and slots mechanism.
Designing small, reusable UI widgets
Automatically Generated Ui.py Code Structure
 The code is structured as a single class that is derived from the Python object type.
 The class contains a method called:
setupUi(self, parentWidget)
which builds the widget tree from the parent widget.
 This file should only be imported, never edited.
Adding the logic
Signals and Slots are used for communication between objects
 Signal = is emitted by a Qt Object when a particular event is fired
 Slot = a Python callable (function) that is called in response to a
particular signal
button.clicked.connect(self.slot_method)
Let’s make first PyQt5 applicatiion
 Creating a simple GUI application using PyQt involves the following
steps −
 Import QtCore, QtGui and QtWidgets modules from PyQt5 package.
 Create an application object of QApplication class.
 A QWidget object creates top level window. Add QLabel object in it.
 Set the caption of label as "hello world".
 Define the size and position of window by setGeometry() method.
 Enter the mainloop of application by app.exec_() method.
 QApplication class manages the main settings and control flow of a GUI
application. It contains main event loop inside which events generated
by window elements and other sources are processed and dispatched.
It also handles system-wide and application-wide settings.
 QWidget class, derived from QObject and QPaintDevice classes is the
base class for all user interface objects. QDialog and QFrame classes
are also derived from QWidget class. They have their own sub-class
system.
Following is the code to execute Hello World program in PyQt −
 import sys
 from PyQt5.QtCore import *
 from PyQt5.QtGui import *
 from PyQt5.QtWidgets import *
 def window():
 app = QApplication(sys.argv)
 w = QWidget()
 b = QLabel(w)
 b.setText("Hello World!")
 w.setGeometry(100,100,200,50)
 b.move(50,20)
 w.setWindowTitle("PyQt5")
 w.show()
 sys.exit(app.exec_())
 if __name__ == '__main__':
 window()
 This code produces the
following output −
QMainWindow Widget
 A typical GUI based application’s top level window is created
by QMainWindow widget object. Some widgets as listed above take
their appointed place in this main window, while others are placed
in the central widget area using various layout managers.
 The following diagram shows the QMainWindow framework −
Create a PyQt Application with Qt Designer
 The designed form is saved as demo.ui. This ui file contains XML representation
of widgets and their properties in the design. This design is translated into
Python equivalent by using pyuic5 command line utility. This utility is a wrapper
for uic module of Qt toolkit. The usage of pyuic5 is as follows −
 pyuic5 -x demo.ui -o demo.py
In the previous pyuic5 command, -x switch adds a small amount of
additional code to the generated Python script (from XML) so that
it becomes a self-executable standalone application.
 if __name__ == "__main__":
 import sys
 app = QtGui.QApplication(sys.argv)
 Dialog = QtGui.QDialog()
 ui = Ui_Dialog()
 ui.setupUi(Dialog)
 Dialog.show()
 sys.exit(app.exec_())
The resultant python script is executed to
show the following dialog box −
 python demo.py
Let’s Understand Signal/Slot
 Let’s understand it with simple design.
 Our Target is to make this design
When b2 is clicked, the clicked() signal is connected to
b2_clicked() function.
 import sys
 from PyQt5.QtCore import *
 from PyQt5.QtGui import *
 from PyQt5.QtWidgets import *
 def window():
 app = QApplication(sys.argv)
 win = QDialog()
 b1 = QPushButton(win)
 b1.setText("Button1")
 b1.move(50,20)
 b1.clicked.connect(b1_clicked)
 b2 = QPushButton(win)
 b2.setText("Button2")
 b2.move(50,50)
 b2.clicked.connect(b2_clicked)
 win.setGeometry(100,100,200,100)
 win.setWindowTitle("PyQt5")
 win.show()
 sys.exit(app.exec_())
 def b1_clicked():
 print ("Button 1 clicked")
 def b2_clicked():
 print ("Button 2 clicked")
 if __name__ == '__main__':
 window()
Output on console:
Button 1 clicked
Button 2 clicked
Our Ongoing Project – Prime Systems Jupitar Software
This systems Jupitar software is a editable software for the users to create logics to
control the hardware connected with the PC.
The software accepts the inbound signals and send outbound commands through the
following hardware:
 Jupiter control module developed by hardware team. This module connects with the
PCs through RS-485. The standard version comes with 16 channels for both input
and output. Both input and output signals are “switch-based” with only ON and OFF
options.
 Motor drives. These drives can be connected to the PCs through Modbus. It can
send and accept variable signals. The value of the signals can be continuously
changed within the range.
 Weight modules. These weight modules can be connected to the PCs through TTL.
It is an input device with variable digital signals.
 Network cameras. We haven’t selected the make and model of the camera. You
may suggest a good one with connections to PCs with USB and WiFi.
 The users can drag the blocks into the work station area to create the projects.
They can also type in the descriptions for easy understanding and recalls.
 Once the projects are done, they can click on the “RUN” button to activate the
project. Then the software will start receiving signals and sending commands. The
projects will not stop until the users click on the “STOP” button. The users can also
save the projects on the computer or open previously-made projects for execution.
When the software is executing, it will also show the status of the inputs and
outputs (such as weight value, motor speed etc.)
Logic Layout
Device Screen
Sound Screen
Thanks!

PyQt.pptx

  • 1.
    PyQt – TheGUI Application
  • 2.
    We will lookat:  Introduction and Installation  Using the Qt Designer Approaches for using the automatically generated UI code from the designer  Adding Logic Architectures for adding logic to our Widgets  Project
  • 3.
    Introduction  PyQt isa GUI widgets toolkit. It is a Python interface for Qt, one of the most powerful, and popular cross-platform GUI library. PyQt was developed by Phil Thompson of British firm RiverBank Computing Ltd. The latest version of PyQt can be downloaded from its official website − riverbankcomputing.com  PyQt API is a set of modules containing a large number of classes and functions. While QtCore module contains non-GUI functionality for working with file and directory etc., QtGui module contains all the graphical controls.  PyQt is compatible with all the popular operating systems including Windows, Linux, and Mac OS. It is dual licensed, available under GPL(General Public License) as well as commercial license. Since PyQt is available on GPL license, therefore open source can freely use it. The latest stable version is PyQt5-5.13.2.  PyQt5 was released in April 2016 and last updated in October 2021.  It costs about $550 to buy a permanent PyQt5 commercial license with a year of support.  PyQt is widely used for creating large-scale GUI-based programs.
  • 4.
    Supporting Environment forInstallation  Wheels for 32-bit or 64-bit architecture are provided that are compatible with Python version 3.5 or later. The recommended way to install is using PIP utility − pip3 install PyQt5  To install development tools such as Qt Designer to support PyQt5 wheels, following is the command − pip3 install pyqt5-tools  You can also build PyQt5 on Linux/macOS from the source code www.riverbankcomputing.com/static/Downloads/PyQt5
  • 5.
    Design the lookof the GUI and automatically generate the Python code. Qt Designer can be extended by writing plugins (in C++ or Python) Qt Designer A plugin is used to expose a custom widget to Designer so that it appears in Designer’s widget box just like any other widget.
  • 6.
    Using the QtDesigner 1. Use the Qt Designer to design the visual part of the widget (without logic). 2. Using the “pyuic5” command transform the generated XML .ui file into python code. 3. Extend generated code to add logic to the widget using signals and slots mechanism. Designing small, reusable UI widgets
  • 7.
    Automatically Generated Ui.pyCode Structure  The code is structured as a single class that is derived from the Python object type.  The class contains a method called: setupUi(self, parentWidget) which builds the widget tree from the parent widget.  This file should only be imported, never edited.
  • 8.
    Adding the logic Signalsand Slots are used for communication between objects  Signal = is emitted by a Qt Object when a particular event is fired  Slot = a Python callable (function) that is called in response to a particular signal button.clicked.connect(self.slot_method)
  • 9.
    Let’s make firstPyQt5 applicatiion  Creating a simple GUI application using PyQt involves the following steps −  Import QtCore, QtGui and QtWidgets modules from PyQt5 package.  Create an application object of QApplication class.  A QWidget object creates top level window. Add QLabel object in it.  Set the caption of label as "hello world".  Define the size and position of window by setGeometry() method.  Enter the mainloop of application by app.exec_() method.  QApplication class manages the main settings and control flow of a GUI application. It contains main event loop inside which events generated by window elements and other sources are processed and dispatched. It also handles system-wide and application-wide settings.  QWidget class, derived from QObject and QPaintDevice classes is the base class for all user interface objects. QDialog and QFrame classes are also derived from QWidget class. They have their own sub-class system.
  • 10.
    Following is thecode to execute Hello World program in PyQt −  import sys  from PyQt5.QtCore import *  from PyQt5.QtGui import *  from PyQt5.QtWidgets import *  def window():  app = QApplication(sys.argv)  w = QWidget()  b = QLabel(w)  b.setText("Hello World!")  w.setGeometry(100,100,200,50)  b.move(50,20)  w.setWindowTitle("PyQt5")  w.show()  sys.exit(app.exec_())  if __name__ == '__main__':  window()  This code produces the following output −
  • 11.
    QMainWindow Widget  Atypical GUI based application’s top level window is created by QMainWindow widget object. Some widgets as listed above take their appointed place in this main window, while others are placed in the central widget area using various layout managers.  The following diagram shows the QMainWindow framework −
  • 12.
    Create a PyQtApplication with Qt Designer  The designed form is saved as demo.ui. This ui file contains XML representation of widgets and their properties in the design. This design is translated into Python equivalent by using pyuic5 command line utility. This utility is a wrapper for uic module of Qt toolkit. The usage of pyuic5 is as follows −  pyuic5 -x demo.ui -o demo.py
  • 13.
    In the previouspyuic5 command, -x switch adds a small amount of additional code to the generated Python script (from XML) so that it becomes a self-executable standalone application.  if __name__ == "__main__":  import sys  app = QtGui.QApplication(sys.argv)  Dialog = QtGui.QDialog()  ui = Ui_Dialog()  ui.setupUi(Dialog)  Dialog.show()  sys.exit(app.exec_()) The resultant python script is executed to show the following dialog box −  python demo.py
  • 14.
    Let’s Understand Signal/Slot Let’s understand it with simple design.  Our Target is to make this design
  • 15.
    When b2 isclicked, the clicked() signal is connected to b2_clicked() function.  import sys  from PyQt5.QtCore import *  from PyQt5.QtGui import *  from PyQt5.QtWidgets import *  def window():  app = QApplication(sys.argv)  win = QDialog()  b1 = QPushButton(win)  b1.setText("Button1")  b1.move(50,20)  b1.clicked.connect(b1_clicked)  b2 = QPushButton(win)  b2.setText("Button2")  b2.move(50,50)  b2.clicked.connect(b2_clicked)  win.setGeometry(100,100,200,100)  win.setWindowTitle("PyQt5")  win.show()  sys.exit(app.exec_())  def b1_clicked():  print ("Button 1 clicked")  def b2_clicked():  print ("Button 2 clicked")  if __name__ == '__main__':  window() Output on console: Button 1 clicked Button 2 clicked
  • 16.
    Our Ongoing Project– Prime Systems Jupitar Software This systems Jupitar software is a editable software for the users to create logics to control the hardware connected with the PC. The software accepts the inbound signals and send outbound commands through the following hardware:  Jupiter control module developed by hardware team. This module connects with the PCs through RS-485. The standard version comes with 16 channels for both input and output. Both input and output signals are “switch-based” with only ON and OFF options.  Motor drives. These drives can be connected to the PCs through Modbus. It can send and accept variable signals. The value of the signals can be continuously changed within the range.  Weight modules. These weight modules can be connected to the PCs through TTL. It is an input device with variable digital signals.  Network cameras. We haven’t selected the make and model of the camera. You may suggest a good one with connections to PCs with USB and WiFi.  The users can drag the blocks into the work station area to create the projects. They can also type in the descriptions for easy understanding and recalls.  Once the projects are done, they can click on the “RUN” button to activate the project. Then the software will start receiving signals and sending commands. The projects will not stop until the users click on the “STOP” button. The users can also save the projects on the computer or open previously-made projects for execution. When the software is executing, it will also show the status of the inputs and outputs (such as weight value, motor speed etc.)
  • 17.
  • 18.
  • 19.
  • 20.

Editor's Notes

  • #2 Explain and Demonstrate the use of PyQt with QtDesigner We will explore approaches for the creation of small modular reusable Widgets for our applications
  • #3 Before the demonstration, in these slides, we’ll see different ways of: - How to use the designer and the code it generates - How to add logic to our Widgets
  • #6 Screenshot of what we see on startup: -Open or Create a new “Form” (Main Window, Dialog, Widget) -from the left sidebar  simple drag and drop elements(widgets) to our design space -On the right side  edit properties for our Widgets (Margin, Spacing…..) Useful for us: extension (example: wheel switch)
  • #7 First steps for using the designer
  • #8 1) The name of the class is the name of the toplevel object set in Designer with Ui_ prepended. 2) This takes a single argument which is the widget in which the user interface is created. ---The type of this argument (typically QDialog, QWidget or QMainWindow) is set in Designer. We refer to this type as the Qt base class. Qt uses a tree structure for memory management (A “Ui Form” is this tree) 3)Never edit this flie --Change something in the design  delete and regenerate this file
  • #9 Moving on to the next section, adding the logic To do that we use signals and slots Drawing: --Signal doesn’t care if anyone is listening --Connect one to many….. --Typesafe: the signal type must match the slot type Widgets have some predefined signals, we can add our own Next: How to organize code when making these connections…..