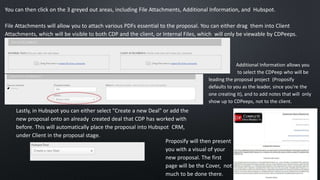
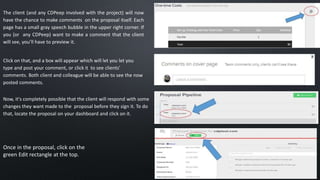
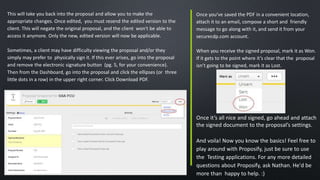
(COD) ̄Young Call Girls In Defence Colony , New Delhi꧁❤ 7042364481❤꧂ Escorts S...
Proposify
1.
2. Time to learn Proposify!
As a CDPeep, Proposify will be a very nifty and
helpful tool when it comes to crafting and
sending proposals. It's super straightforward,
which, when this creative writer can create a
proposal on it with no difficulty, says a lot! So
sit back, relax, and let's explore the basics of
Proposify.
First, go to https://cdp.proposify.biz and log in
using your CDP email and your trusty password.
Once in, you will be taken to the Dashboard, on which
will be something called the Proposal Pipeline. This
shows the history of all CDP proposals: those still in
draft stage, those sent, and those signed and won. To
make a new one, click on the big green button in the
upper righthand corner that has a white + sign and,
fittingly enough, says New Proposal.
3. This leads you to Step 1: Choose a
template. You will have the option to pick
from one of 2 templates: Basic or Basic
Plus M&S. For most purposes, you'll be
using the Basic Plus M&S, so select that
one.
Once in, you will be presented with Step 2: Enter some
basic details. The Basic Settings boxes will already be
present on the screen and, as you can see from the red
parentheses beside it, are required in order for the
proposal to proceed.
Fill in the name of your proposal, and use the already
documented list to select the client to whom you're
pitching, and a due date for the proposal.
4. You can then click on the 3 greyed out areas, including File Attachments, Additional Information, and Hubspot.
File Attachments will allow you to attach various PDFs essential to the proposal. You can either drag them into Client
Attachments, which will be visible to both CDP and the client, or Internal Files, which will only be viewable by CDPeeps.
Additional Information allows you
to select the CDPeep who will be
leading the proposal project (Proposify
defaults to you as the leader, since you're the
one creating it), and to add notes that will only
show up to CDPeeps, not to the client.
Lastly, in Hubspot you can either select "Create a new Deal" or add the
new proposal onto an already created deal that CDP has worked with
before. This will automatically place the proposal into Hubspot CRM,
under Client in the proposal stage.
Proposify will then present
you with a visual of your
new proposal. The first
page will be the Cover, not
much to be done there.
5. Next is Subscriptions and M&S.
If the client is purchasing something that requires
multiple payments or yearly contracts, such as
encryption services, this is where you would put those
fees. To do so, hover your arrow over the Fee Title, right
click, and select Import Fees.
You can then scroll through and select
the appropriate boxes to add those fees
to the proposal.
6. Once added, hover the arrow over Fee Title once more. On each end of the greyed box will appear a rounded little tab.
Select the little trashcan on the end of the rightmost one.
That will get rid of the example Fee Title
field, and only leave the actual required
fee box.
You can adjust the Quantity and Price simply by clicking on each and
entering the appropriate number. The Subtotal will be automatically
calculated.
This exact same process is how to handle the Onetime Costs field. The only
difference is that this one is used for payments that only require a single oneoff
payment, such as if the client is purchasing a signature pad. Refer to the
previous Subscriptions and M&S instructions if you need a reference.
Hover over it, and the option to Remove will
appear. Simply click on that, and the page
you are currently on will be removed.
If one of these sections is not needed, it can easily
be deleted by going to the Signature and Proposal
box on the greyedout righthand column.
7. On the last page, there is a solid black line that craves a signature.
To do so, click on the little pen symbol at the bottom
of the dark column of tools on the left.
Find the name of the person whose
signature you need and hover over it. A
green rectangle will appear on the right that
says Drag to Place. Click on that rectangle.
8. Then, drag the signature box down onto
that solid black line, and drop it. A yellow
box with a pen and the words Sign Here
with the client's name will appear.
Once everything is all set to your satisfaction,
click the green arrow that says Send in the
upper left corner of the screen.
The client whose signature is required will
automatically be added as a recipient (denoted by a
little pen symbol by their name). You may then check
the boxes of anyone else, client or CDPeep, that you
wish to receive this proposal. The email template will
always be Default Send Email, though you can go in
and edit the wording and subject to your satisfaction.
9. You can even add the option to send your
client(s) a reminder in a certain number of days.
If you want, you can click the white button with the
Erlenmeyer flask to send yourself a test email, just to see
what it will look like to the client.
When you're all ready to go, click the green arrow
with the letter to send to client.
You will be alerted via email when your client opens the
email, and when they sign it.
This information also gets updated in Proposify itself, as
well as HubSpot. Once the proposal is signed, it moves
automatically into the Closed Won category.
10. The client (and any CDPeep involved with the project) will now
have the chance to make comments on the proposal itself. Each
page has a small gray speech bubble in the upper right corner. If
you (or any CDPeep) want to make a comment that the client
will see, you’ll have to preview it.
Click on that, and a box will appear which will let you let you
type and post your comment, or click it to see clients'
comments. Both client and colleague will be able to see the now
posted comments.
Now, it's completely possible that the client will respond with some
changes they want made to the proposal before they sign it. To do
that, locate the proposal on your dashboard and click on it.
Once in the proposal, click on the
green Edit rectangle at the top.
11. This will take you back into the proposal and allow you to make the
appropriate changes. Once edited, you must resend the edited version to the
client. This will negate the original proposal, and the client won't be able to
access it anymore. Only the new, edited version will now be applicable.
Sometimes, a client may have difficulty viewing the proposal and/or they
simply may prefer to physically sign it. If this ever arises, go into the proposal
and remove the electronic signature button (pg. 5, for your convenience).
Then from the Dashboard, go into the proposal and click the ellipses (or three
little dots in a row) in the upper right corner. Click Download PDF.
Once you’ve saved the PDF in a convenient location,
attach it to an email, compose a short and friendly
message to go along with it, and send it from your
securecdp.com account.
When you receive the signed proposal, mark it as Won.
If it gets to the point where it’s clear that the proposal
isn’t going to be signed, mark it as Lost.
Once it’s all nice and signed, go ahead and attach
the signed document to the proposal’s settings.
And voila! Now you know the basics! Feel free to
play around with Proposify, just be sure to use
the Testing applications. For any more detailed
questions about Proposify, ask Nathan. He'd be
more than happy to help. :)
;