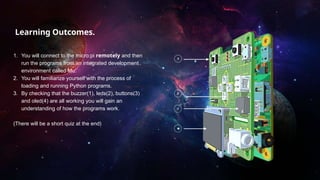
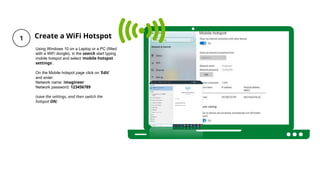
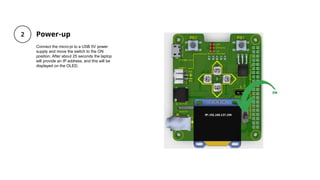
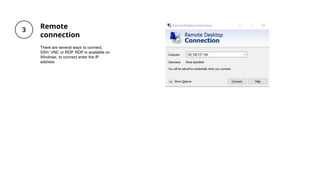
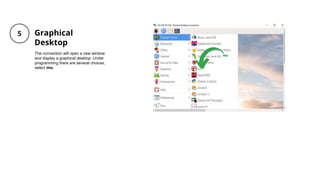
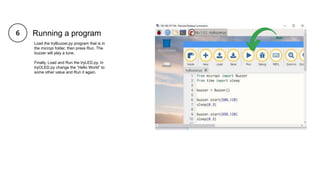
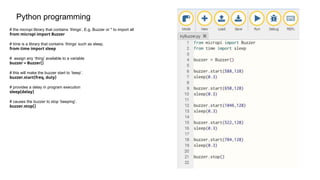
KS3 Computing (Physical Computing)
Created by: Dr Anwar Bashir
This introductory lesson is set to get learners
acquainted with the micro:pi. They will explore some
of its components so that they develop an awareness
of its capabilities. They will also execute their first
Python programs.
Learning Outcomes.
1. You will connect to the micro:pi remotely and then
run the programs from an integrated development
environment called Mu.
2. You will familiarize yourself with the process of
loading and running Python programs.
3. By checking that the buzzer(1), leds(2), buttons(3)
and oled(4) are all working you will gain an
understanding of how the programs work.
(There will be a short quiz at the end)
Create a WiFi Hotspot
Using Windows 10 on a Laptop or a PC (fitted
with a WiFi dongle), in the search start typing
mobile hotspot and select 'mobile hotspot
settings’.
On the Mobile hotspot page click on 'Edit'
and enter:
Network name: imagineer
Network password: 123456789
(save the settings, and then switch the
hotspot ON)
Power-up
Connect the micro:pi to a USB 5V power
supply and move the switch to the ON
position. After about 25 seconds the laptop
will provide an IP address, and this will be
displayed on the OLED.
Remote
connection
There are several ways to connect,
SSH, VNC or RDP. RDP is available on
Windows, to connect enter the IP
address
Xrdp
The micro:pi responds to RDP with an
authentication request:
username: pi
password: imagineer
(you may be asked to confirm proceeding
without a certificate, just press yes to confirm)
Graphical
Desktop
The connection will open a new window
and display a graphical desktop. Under
programming there are several choices,
select mu.
Running a program
Load the tryBuzzer.py program that is in
the micropi folder, then press Run. The
buzzer will play a tune.
Finally, Load and Run the tryLED.py. In
tryOLED.py change the “Hello World” to
some other value and Run it again.
Python programming
# the micropi library that contains ‘things’. E.g. Buzzer or * to import all
from micropi import Buzzer
# time is a library that contains ‘things’ such as sleep.
from time import sleep
# assign any ‘thing’ available to a variable
buzzer = Buzzer()
# this will make the buzzer start to ‘beep’.
buzzer.start(freq, duty)
# provides a delay in program execution
sleep(delay)
# causes the buzzer to stop ‘beeping’.
buzzer.stop()
Quiz
Click the Quiz button to edit this object
In the next lesson
Well done, in the next lesson you will make
the RGB LED’s sparkle and develop a sound-
to-light system.

Ks3 computing-l1

  • 1.
    KS3 Computing (PhysicalComputing) Created by: Dr Anwar Bashir This introductory lesson is set to get learners acquainted with the micro:pi. They will explore some of its components so that they develop an awareness of its capabilities. They will also execute their first Python programs.
  • 2.
    Learning Outcomes. 1. Youwill connect to the micro:pi remotely and then run the programs from an integrated development environment called Mu. 2. You will familiarize yourself with the process of loading and running Python programs. 3. By checking that the buzzer(1), leds(2), buttons(3) and oled(4) are all working you will gain an understanding of how the programs work. (There will be a short quiz at the end)
  • 4.
    Create a WiFiHotspot Using Windows 10 on a Laptop or a PC (fitted with a WiFi dongle), in the search start typing mobile hotspot and select 'mobile hotspot settings’. On the Mobile hotspot page click on 'Edit' and enter: Network name: imagineer Network password: 123456789 (save the settings, and then switch the hotspot ON)
  • 5.
    Power-up Connect the micro:pito a USB 5V power supply and move the switch to the ON position. After about 25 seconds the laptop will provide an IP address, and this will be displayed on the OLED.
  • 6.
    Remote connection There are severalways to connect, SSH, VNC or RDP. RDP is available on Windows, to connect enter the IP address
  • 7.
    Xrdp The micro:pi respondsto RDP with an authentication request: username: pi password: imagineer (you may be asked to confirm proceeding without a certificate, just press yes to confirm)
  • 8.
    Graphical Desktop The connection willopen a new window and display a graphical desktop. Under programming there are several choices, select mu.
  • 9.
    Running a program Loadthe tryBuzzer.py program that is in the micropi folder, then press Run. The buzzer will play a tune. Finally, Load and Run the tryLED.py. In tryOLED.py change the “Hello World” to some other value and Run it again.
  • 10.
    Python programming # themicropi library that contains ‘things’. E.g. Buzzer or * to import all from micropi import Buzzer # time is a library that contains ‘things’ such as sleep. from time import sleep # assign any ‘thing’ available to a variable buzzer = Buzzer() # this will make the buzzer start to ‘beep’. buzzer.start(freq, duty) # provides a delay in program execution sleep(delay) # causes the buzzer to stop ‘beeping’. buzzer.stop()
  • 11.
    Quiz Click the Quizbutton to edit this object
  • 12.
    In the nextlesson Well done, in the next lesson you will make the RGB LED’s sparkle and develop a sound- to-light system.