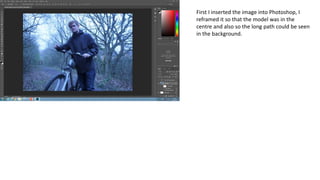
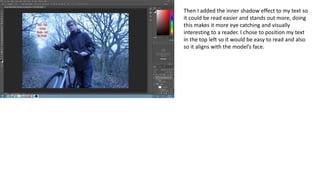
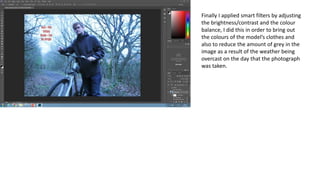
First I inserted the image into Photoshop, I
reframed it so that the model was in the
centre and also so the long path could be seen
in the background.
Next I inserted the information about the model’s
clothes, this is conventional of a fashion spread so it
had to be included. I chose to have this information
in red so it would stand out on the white patch of
the image.
Then I added the inner shadow effect to my text so
it could be read easier and stands out more, doing
this makes it more eye catching and visually
interesting to a reader. I chose to position my text
in the top left so it would be easy to read and also
so it aligns with the model’s face.
Finally I applied smart filters by adjusting
the brightness/contrast and the colour
balance, I did this in order to bring out
the colours of the model’s clothes and
also to reduce the amount of grey in the
image as a result of the weather being
overcast on the day that the photograph
was taken.

Production process 2

  • 1.
    First I insertedthe image into Photoshop, I reframed it so that the model was in the centre and also so the long path could be seen in the background.
  • 2.
    Next I insertedthe information about the model’s clothes, this is conventional of a fashion spread so it had to be included. I chose to have this information in red so it would stand out on the white patch of the image.
  • 3.
    Then I addedthe inner shadow effect to my text so it could be read easier and stands out more, doing this makes it more eye catching and visually interesting to a reader. I chose to position my text in the top left so it would be easy to read and also so it aligns with the model’s face.
  • 4.
    Finally I appliedsmart filters by adjusting the brightness/contrast and the colour balance, I did this in order to bring out the colours of the model’s clothes and also to reduce the amount of grey in the image as a result of the weather being overcast on the day that the photograph was taken.