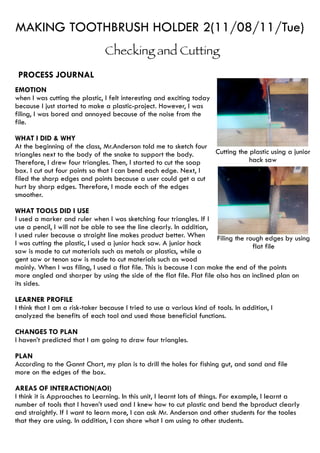
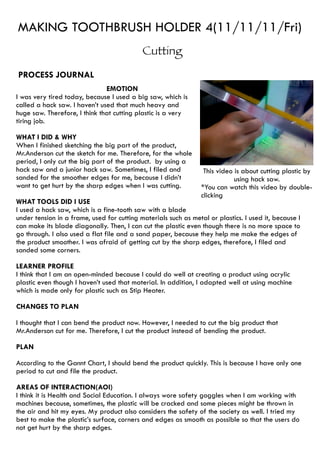
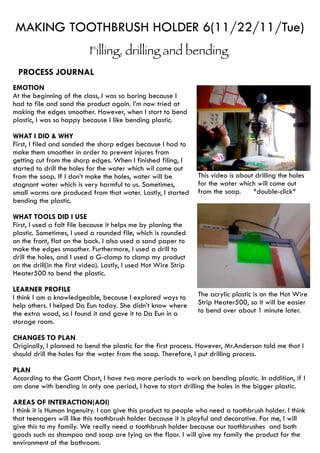
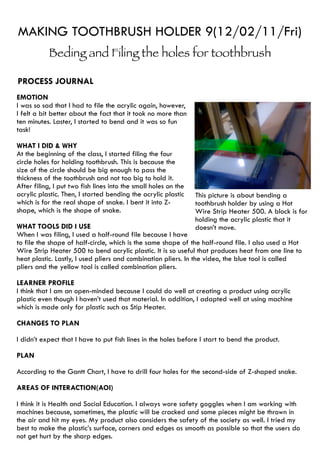
MAKING TOOTHBRUSH HOLDER 1(11/04/11/Fri)
                             Marking and Measuring
 PROCESS JOURNAL
EMOTION

I was so happy because I just started to create a new project.
Even though I don’t like measuring and marking, it was fun
because I not am doing a theory stuff anymore.

WHAT I DID & WHY

I marked and measured the sketch of my product on a new
plastic like picture 2. This is because I can make a mistake and      Using a ruler and square-ruler
get a new plastic if I cut it without drawing lines. In addition, I           by measuring
also marked out drill holes by drawing circles and filling them
with black color. That is because I might bend plastic first when I
need to drill the holes.
I also calculated the length of the whole product. Since I haven’t
done with calculating exact size of the product, I had to
calculate them such as snake’s head part, middle-body part,
and tail.

WHAT TOOLS DID I USE

I used a pencil, eraser, square-ruler, and ruler for today’s work.      Done with sketching
Pencil was for sketching, and eraser was for erasing mis-drawn
lines. Moreover, I can draw a straight, which is exactly 90 to
another line, and clear line by using a square-ruler. A ruler also
works similar to a square-ruler but a normal ruler doesn’t make me to draw a

LEARNER PROFILE

I think I am a knowledgeable, because I explored ways to help others. I helped Da Eun today.
She didn’t know where the extra wood, so I found it and gave it to Da Eun in a storage room.

PLAN

According to the Gannt Chart, I am going to start cutting and filing the soap box.

AREAS OF INTERACTION(AOI)

I think it is Human Ingenuity. I can give this product to people who need a toothbrush holder. I
think that teenagers will like this toothbrush holder because it is playful and decorative. For me,
I will give this to my family. We really need a toothbrush holder because our toothbrushes and
bath goods such as shampoo and soap are lying on the floor. I will give my family the product
for the environment of the bathroom.
MAKING TOOTHBRUSH HOLDER 2(11/08/11/Tue)
                                Checking and Cutting
 PROCESS JOURNAL
EMOTION
when I was cutting the plastic, I felt interesting and exciting today
because I just started to make a plastic-project. However, I was
filing, I was bored and annoyed because of the noise from the
file.

WHAT I DID & WHY
At the beginning of the class, Mr.Anderson told me to sketch four
triangles next to the body of the snake to support the body.            Cutting the plastic using a junior
Therefore, I drew four triangles. Then, I started to cut the soap                   hack saw
box. I cut out four points so that I can bend each edge. Next, I
filed the sharp edges and points because a user could get a cut
hurt by sharp edges. Therefore, I made each of the edges
smoother.

WHAT TOOLS DID I USE
I used a marker and ruler when I was sketching four triangles. If I
use a pencil, I will not be able to see the line clearly. In addition,
I used ruler because a straight line makes product better. When        Filing the rough edges by using
I was cutting the plastic, I used a junior hack saw. A junior hack                  flat file
saw is made to cut materials such as metals or plastics, while a
gent saw or tenon saw is made to cut materials such as wood
mainly. When I was filing, I used a flat file. This is because I can make the end of the points
more angled and sharper by using the side of the flat file. Flat file also has an inclined plan on
its sides.

LEARNER PROFILE
I think that I am a risk-taker because I tried to use a various kind of tools. In addition, I
analyzed the benefits of each tool and used those beneficial functions.

CHANGES TO PLAN
I haven’t predicted that I am going to draw four triangles.

PLAN
According to the Gannt Chart, my plan is to drill the holes for fishing gut, and sand and file
more on the edges of the box.

AREAS OF INTERACTION(AOI)
I think it is Approaches to Learning. In this unit, I learnt lots of things. For example, I learnt a
number of tools that I haven’t used and I knew how to cut plastic and bend the bproduct clearly
and straightly. If I want to learn more, I can ask Mr. Anderson and other students for the tooles
that they are using. In addition, I can share what I am using to other students.
MAKING TOOTHBRUSH HOLDER 3(11/10/11/Thur)
                                  Sanding and Drilling
 PROCESS JOURNAL
EMOTION
Today, I was annoyed because filing makes a lot of noises. I
also felt ashamed when I created noises over two classes. This is
because I felt very sorry to the students who were working in
another class.

WHAT I DID & WHY
At the beginning of the class, I sanded the sharp edges of the
soap box, because users could get a cut from sharp edges and
points. Not only I sanded them, but also I filed them. This is             Sanding the soap box to make
because filing allows the edges to be smooth naturally.                           edges smoother
In addition, I drilled the holes for fishing gut. When I drilled the
holes, I was very careful because the plastic is very easy to be
broken. I used a driller very slowly.
Furthermore, Mr.Anderson cut the big box of the product instead
of me, because the machine for cutting plastic is too dangerous
for me to use.

WHAT TOOLS DID I USE
I used a small drillbit in oder to drill tiny holes for the fishing gut
which will connect the soap box and the big box together.
I also used a sandpaper because it makes the rough side                  Drilling the holes for fishing gut
smoother. Not only I used a small sandpaper, but also I used a
large sandpaper which is shown in the first picture. It is very convenient, since it can be hold by
holding device, and it doesn’t move.
I used a drill, as you can see in the second picture, to drill small holes. Even though you cannot
see in the picture, I wore goggles in order to protect my eyes.

LEARNER PROFILE
I think that I am a career because I tried not to waste plastic. One method that I used to save
plastic is to drill the holes very carefully. Otherwise, it will be broken and I would have to get a
new plastic.

PLAN
According to the Gannt Chart, I need to bend the part where I marked by dotted-lines(you can
see those lines in the first picture).

AREAS OF INTERACTION(AOI)
I think it is Environment. I can save the materials such as paint, plastic, sand paper, glue and
screw during creating the product. If only I do not waste the plastic, people have to cut the
plastic little bit. If all the students save the plastic and try not to waste it, lots of materials that
were used to make plastic will be wasted. The more I save the materials, the more I save the
environment.
MAKING TOOTHBRUSH HOLDER 4(11/11/11/Fri)
                                            Cutting
PROCESS JOURNAL
                               EMOTION
I was very tired today, because I used a big saw, which is
called a hack saw. I haven’t used that much heavy and
huge saw. Therefore, I think that cutting plastic is a very
tiring job.

WHAT I DID & WHY
When I finished sketching the big part of the product,
Mr.Anderson cut the sketch for me. Therefore, for the whole
period, I only cut the big part of the product. by using a
hack saw and a junior hack saw. Sometimes, I filed and            This video is about cutting plastic by
sanded for the smoother edges for me, because I didn’t                       using hack saw.
want to get hurt by the sharp edges when I was cutting.          *You can watch this video by double-
                                                                 clicking
WHAT TOOLS DID I USE
I used a hack saw, which is a fine-tooth saw with a blade
under tension in a frame, used for cutting materials such as metal or plastics. I used it, because I
can make its blade diagonally. Then, I can cut the plastic even though there is no more space to
go through. I also used a flat file and a sand paper, because they help me make the edges of
the product smoother. I was afraid of getting cut by the sharp edges, therefore, I filed and
sanded some corners.

LEARNER PROFILE
I think that I am an open-minded because I could do well at creating a product using acrylic
plastic even though I haven’t used that material. In addition, I adapted well at using machine
which is made only for plastic such as Stip Heater.

CHANGES TO PLAN

I thought that I can bend the product now. However, I needed to cut the big product that
Mr.Anderson cut for me. Therefore, I cut the product instead of bending the product.

PLAN

According to the Gannt Chart, I should bend the product quickly. This is because I have only one
period to cut and file the product.

AREAS OF INTERACTION(AOI)
I think it is Health and Social Education. I always wore safety goggles when I am working with
machines because, sometimes, the plastic will be cracked and some pieces might be thrown in
the air and hit my eyes. My product also considers the safety of the society as well. I tried my
best to make the plastic’s surface, corners and edges as smooth as possible so that the users do
not get hurt by the sharp edges.
MAKING TOOTHBRUSH HOLDER 5(11/15/11/Tue)
                                   Filing and Sanding
 PROCESS JOURNAL
EMOTION
I was annoyed and tired today, because I kept filing, which
might create a lot of noises. In addition, it needs lots of
strength.

WHAT I DID & WHY
Today, I filed the product, because I cut the product little
bit far from the line that I sketched. Therefore, I filed the
edges of the product to make the edges are right the top
of the line. As you can see in the video, I hold the file with     This video is about filing the edges
two hands to keep it straight. Otherwise, the edge will be         of the product by using a flat file.
filed diagonally.                                                *You can watch this video by double-
In addition, I also sanded the product, because I wanted to      clicking
make the edges smoother by using 360grits-sand paper. If
the edges are rough and sharp, I can get cut by the edges.

WHAT TOOLS DID I USE
First, I used a falt file because it helps me by planing the plastic. Sometimes, I used a rounded
file, which is rounded on the front, flat on the back. I also used a sand paper to make the edges
smoother. I used a 360grits-sand paper, because it is the most delicate paper. 100girts-sand
paper will plane the face a lot. At that time, I used a sand block, because a sand paper
becomes so hot when I rub it with the plastic. In addition, I used a brush to make the
environment of my bench clean.

LEARNER PROFILE
I think that I am a communicator because I asked Mr.Anderson if I don’t know how to use the tool
or what kind of tool is suitable to use. Of course, Mr.Anderson always answered me.

CHANGES TO PLAN
I thought that I can bend the product now. However, I needed to file and sand the sharp edges
and corners after I cut the product. Otherwise, the users will get cut by them. Therefore, I filed
and sanded instead of bending.

PLAN
According to the Gantt Chart, I should bend the product quickly. This is because I have only one
period to cut and file the product.

AREAS OF INTERACTION(AOI)
I think it is Community and Service. My product’s function is to be able to arrange the
toothbrushes and some other small objects put in one spot. This function will hemp the community
by making their environments cleaner and more organized. Also, in the process of creating, I did
not only concentrate on my work. Some of my friend came and helped me. Then, it is a part of
service.
MAKING TOOTHBRUSH HOLDER 6(11/22/11/Tue)
                           Filling, drilling and bending
 PROCESS JOURNAL
EMOTION
At the beginning of the class, I was so boring because I
had to file and sand the product again. I’m now tried at
making the edges smoother. However, when I start to bend
plastic, I was so happy because I like bending plastic.

WHAT I DID & WHY
First, I filed and sanded the sharp edges because I had to
make them smoother in order to prevent injures from
getting cut from the sharp edges. When I finished filing, I
started to drill the holes for the water which wil come out
from the soap. If I don’t make the holes, water will be           This video is about drilling the holes
stagnant water which is very harmful to us. Sometimes,            for the water which will come out
small worms are produced from that water. Lastly, I started       from the soap.     *double-click*
bending the plastic.

WHAT TOOLS DID I USE
First, I used a falt file because it helps me by planing the
plastic. Sometimes, I used a rounded file, which is rounded
on the front, flat on the back. I also used a sand paper to
make the edges smoother. Furthermore, I used a drill to
drill the holes, and I used a G-clamp to clamp my product
on the drill(in the first video). Lastly, I used Hot Wire Strip
Heater500 to bend the plastic.

LEARNER PROFILE
I think I am a knowledgeable, because I explored ways to          The acrylic plastic is on the Hot Wire
help others. I helped Da Eun today. She didn’t know where         Strip Heater500, so it will be easier
the extra wood, so I found it and gave it to Da Eun in a          to bend over about 1 minute later.
storage room.

CHANGES TO PLAN
Originally, I planned to bend the plastic for the first process. However, Mr.Anderson told me that I
should drill the holes for the water from the soap. Therefore, I put drilling process.

PLAN
According to the Gantt Chart, I have two more periods to work on bending plastic. In addition, if I
am done with bending in only one period, I have to start drilling the holes in the bigger plastic.

AREAS OF INTERACTION(AOI)
I think it is Human Ingenuity. I can give this product to people who need a toothbrush holder. I think
that teenagers will like this toothbrush holder because it is playful and decorative. For me, I will
give this to my family. We really need a toothbrush holder because our toothbrushes and bath
goods such as shampoo and soap are lying on the floor. I will give my family the product for the
environment of the bathroom.
MAKING TOOTHBRUSH HOLDER 7(11/25/11/Fri)
                                    Filing and bending
 PROCESS JOURNAL
EMOTION
I was so sad that I had to file the acrylic again, however, I felt
a bit better about the fact that it took no more than ten
minutes. Laster, I started to bend and it was so fun task!

WHAT I DID & WHY
At the beginning of the class, I started filing little four triangles
for supporting z-shape of snake’s body. This is because snake’s This video is about filing out the
body has to be curved, and the final product will look curved         half-circle shape by using a
if I file those supporting triangles. In addition, I continued        half-round file. *double-click*
bending process to make flat acrylic plastic to an acrylic box.
At that time, I tied a string and tightened it to put those into
the holes for the string before I bend acrylic plastic.
Otherwise, I will not be able to put strings.

WHAT TOOLS DID I USE
When I was filing, I used a half-round file because I have to
file the shape of half-circle, which is the same shape of the
half-round file. I also used a Hot Wire Strip Heater 500 to
bend acrylic plastic. It is so useful that produces heat from one
line to heat plastic. Lastly, I used pliers and combination pliers.
In the video, the blue tool is called pliers and the yellow tool is   Tying a string and tightening it
called combination pliers.                                            with pliers and combination
                                                                      pliers            *double-click*
LEARNER PROFILE
I think that I am a risk-taker because I tried to use a various kind of tools. In addition, I
analyzed the benefits of each tool and used those beneficial functions.

CHANGES TO PLAN

I didn’t consider about filing the little supporting parts.

PLAN

According to the Gantt Chart, I have one more period to work on bending. If I am finished with
bending, I have to start drilling.

AREAS OF INTERACTION(AOI)

I think it is Approaches to Learning. In this unit, I learnt lots of things. For example, I learnt a
number of tools that I haven’t used and I knew how to cut plastic and bend the product clearly
and straightly. If I want to learn more, I can ask Mr. Anderson and other students for the tools
that they are using. In addition, I can share what I am using to other students.
MAKING TOOTHBRUSH HOLDER 8(11/29/11/Tue)
                  Drilling and Filing Toothbrush Holes
PROCESS JOURNAL
EMOTION
Today was fun because I like drilling. However, it was so
tiring job that I had to spend all my strength to hold the
product tight.

WHAT I DID & WHY
From the start of the class to the end, I was only focusing on
the holes. This is because making holes properly is the most
important task in my procedure, as the aim of this product is
to keep the toothbrush from the contaminated water. I           This video is about clamping the
drilled the holes with different drill bits first. Then, I made part of product by using a G-clamp
the holes bigger by using a rounded file because there is no to fix on the bench.
enough drill bit that could drill the size that I expected.

WHAT TOOLS DID I USE
First, I used a drill and different sizes of drill bits. I used
different sizes of drill bits because plastic will be easily
break if I use big drill bit at the first time. The order of the
sizes of drill bits should be small to big. When I was filing, I
used a G-clamp to fix a product on the bench tightly. I also
used a rounded file because the shape of this file is round,
wich is the same shape of the holes.

LEARNER PROFILE                                                      This video is about using a
I think that I am a career because I tried not to waste              rounded file to make the holes for
plastic. One method that I used to save plastic is to drill the      toothbrush bigger.
holes very carefully. Otherwise, it will be broken and I
would have to get a new plastic.

CHANGES TO PLAN
One thing that was changed is that I didn’t expect that I have to file the holes to make them
bigger, because there is not drill bit that is suitable for expected-size holes.

PLAN
According to the Gantt Chart, I have to finish making holes bigger and start to bend the
product.

AREAS OF INTERACTION(AOI)
I think it is Environment. I can save the materials such as paint, plastic, garnet paper, glue and
screw during creating the product. If only I do not waste the plastic, people have to cut the
plastic little bit. If all the students save the plastic and try not to waste it, lots of materials that
were used to make plastic will be wasted. The more I save the materials, the more I save the
environment.
MAKING TOOTHBRUSH HOLDER 9(12/02/11/Fri)
           Beding and Filing the holes for toothbrush

PROCESS JOURNAL
EMOTION
I was so sad that I had to file the acrylic again, however,
I felt a bit better about the fact that it took no more than
ten minutes. Laster, I started to bend and it was so fun
task!

WHAT I DID & WHY
At the beginning of the class, I started filing the four
circle holes for holding toothbrush. This is because the
size of the circle should be big enough to pass the
thickness of the toothbrush and not too big to hold it.
After filing, I put two fish lines into the small holes on the
acrylic plastic. Then, I started bending the acrylic plastic     This picture is about bending a
which is for the real shape of snake. I bent it into Z-          toothbrush holder by using a Hot
shape, which is the shape of snake.                              Wire Strip Heater 500. A block is for
                                                                 holding the acrylic plastic that it
WHAT TOOLS DID I USE                                             doesn’t move.
When I was filing, I used a half-round file because I have
to file the shape of half-circle, which is the same shape of the half-round file. I also used a Hot
Wire Strip Heater 500 to bend acrylic plastic. It is so useful that produces heat from one line to
heat plastic. Lastly, I used pliers and combination pliers. In the video, the blue tool is called
pliers and the yellow tool is called combination pliers.

LEARNER PROFILE
I think that I am an open-minded because I could do well at creating a product using acrylic
plastic even though I haven’t used that material. In addition, I adapted well at using machine
which is made only for plastic such as Stip Heater.

CHANGES TO PLAN

I didn’t expect that I have to put fish lines in the holes before I start to bend the product.

PLAN

According to the Gantt Chart, I have to drill four holes for the second-side of Z-shaped snake.

AREAS OF INTERACTION(AOI)

I think it is Health and Social Education. I always wore safety goggles when I am working with
machines because, sometimes, the plastic will be cracked and some pieces might be thrown in
the air and hit my eyes. My product also considers the safety of the society as well. I tried my
best to make the plastic’s surface, corners and edges as smooth as possible so that the users do
not get hurt by the sharp edges.
MAKING TOOTHBRUSH HOLDER 10(12/06/11/Tue)
       Connecting Strings and Making Wooden Supporters

 PROCESS JOURNAL
EMOTION
I was annoyed a bit because it was really hard to connect
two ends of fish lines by using a glue gun. This is because a
bunch of glue for connecting fish line melts when it goes
close to Hot Wire Strip Heater 500.

WHAT I DID & WHY, WHAT TOOLS DID I USE
At the beginning of the class, I tired to connect two ends of
fish lines together by glueing them with a glue gun. This is
because I want to connect two blocks together with the
strings. Since the lengths of each fish line were so short, I  Glueing two fish lines together by
couldn’t tie lines that cannot go through the holes.           using a glue gun.
Therefore, I used a glue gun because it makes it available
for me to connect lines together without tying.
Next, I started to bend the end part of the block, but it
didn’t work well. This is because the glue was melted by the
heat from the machine, so I just bend the block without
connecting lines.
Then, I began to create wooden supporters because I have
to drill four holes on the second side of the z-shape of
product. If I do not make supporters, the acrylic plastic will
break when I drill the holes. I used a tenon saw and pull
saw to cut them, because a tenon saw makes me to cut
straightly much easier. A pull saw helps me cut fast.          Cutting a wooden supporter by
                                                               using a tenon saw.
LEARNER PROFILE
I think that I am a communicator because I asked Mr.Anderson if I don’t know how to use the tool
or what kind of tool is suitable to use. Of course, Mr.Anderson always answered me.

CHANGES TO PLAN
I had to connect the lines first and then bend the end of the block. In addition, I didn’t know that
I have to make supporters before I drill the holes.

PLAN
According to the Gantt Chart, I have to drill the holes on the second side of a z-shape plastic.

AREAS OF INTERACTION(AOI)
I think it is Community and Service. My product’s function is to be able to arrange the
toothbrushes and some other small objects put in one spot. This function will hemp the community
by making their environments cleaner and more organized. Also, in the process of creating, I did
not only concentrate on my work. Some of my friend came and helped me. Then, it is a part of
service.
MAKING TOOTHBRUSH HOLDER 11(01/03/12/Tue)
    Making Wooden Supporters and Connecting Two Boxes

 PROCESS JOURNAL
EMOTION
Today was annoying because I couldn’t figure out the way
of connecting two boxes together with a fishing gut. In
addition, when I was screwing, I was so tired.

WHAT I DID & WHY, WHAT TOOLS DID I USE
At the beginning of the class, I continued to make the
wooden supporter. The length of the wooden supporter from
the last class was shorter than the length of my product.   Putting a piece of fishing gut
Therefore, I added a piece of triangle-shaped wood on that into the hole of the box
supporter. At that time, I used PVA glue to glue two pieces
of wood together. After glueing, I drilled two holes which
go through two pieces at the same time, and screwed in
those holes. I used a cross-screwdriver.
Next, as soon as Mr.Anderson told me an idea to unfold the
edge of the box and connect all the holes with one piece of
fishing gut. At that time, I used a Hot Wire Strip Heater
500 to unfold the edges of two boxes. When I make a nut,
I used pilers to make a nut tighter, because pilers help me
hold a slippery fishing gut very tightly.

LEARNER PROFILE                                                  Screwing to make two wood
I think I am a knowledgeable, because I explored ways to         pieces hold each other tighter
help others. I helped Da Eun today. She didn’t know where
the extra wood, so I found it and gave it to Da Eun in a
storage room.

CHANGES TO PLAN
Originally, I planned to drill the second side of Z-shape.
However, since I haven’t done making the supporters yet, I
had to work on making them instead of drilling holes.

PLAN
According to the Gantt Chart, I have to drill the holes on the
second side of a z-shape plastic.                                Glueing by using PVA glue to glue
                                                                 two pieces together
AREAS OF INTERACTION(AOI)
I think it is Human Ingenuity. I can give this product to
people who need a toothbrush holder. I think that teenagers
will like this toothbrush holder because it is playful and decorative. For me, I will give this to my
family. We really need a toothbrush holder because our toothbrushes and bath goods such as
shampoo and soap are lying on the floor. I will give my family the product for the environment
of the bathroom.
MAKING TOOTHBRUSH HOLDER 12(01/05/12/Thur)
           Clamping the Supporters and Drilling the Holes

 PROCESS JOURNAL

EMOTION
Today, I found the process is very new and interesting,
because I used a new tool that I haven’t used before. I
used a new long clamp.

WHAT I DID & WHY, WHAT TOOLS DID I USE
From the beginning of the class, I started to clamp the
wooden supporters and the product to start to drill
the holes on the second side of Z-shape of product. At
that time, I used two G-clamps and a long clamp with
red-colored handle. This is because clamp helps me      Clamping the supporters and the
hold the supporters and product very tightly.           product to make them tighter
Next, I started to drill the holes through the wooden
supporters and finally get to the second side of the
product. At that time, I used a cordless drill and many
types of drill bits. This is because a cordless drill is so
comfortable that I can move it wherever I want and I
don’t have to plug in to operate it. I used many kinds
of drill bits because the plastic will be broken very
easily if I use a big drill bit for the first time.
Therefore, when I have to drill the plastic, I have to
use the drill bits from the smallest to the largest to
prevent from breaking.
                                                              Drilling the holes in the second side
LEARNER PROFILE                                               of the product through the wood
I think that I am a risk-taker because I tried to use a       supporters
various kind of tools. In addition, I analyzed the
benefits of each tool and used those beneficial functions.

CHANGES TO PLAN
There was no change actually, but the small thing is that I didn’t know that I have to clamp the
wooden supporters and the product.

PLAN
Next class, according to the Gantt Chart, I have to finish drilling the holes and start to file the
holes to make them bigger.

AREAS OF INTERACTION(AOI)
I think it is Approaches to Learning. In this unit, I learnt lots of things. For example, I learnt a
number of tools that I haven’t used and I knew how to cut plastic and bend the product clearly
and straightly. If I want to learn more, I can ask Mr. Anderson and other students for the tools
that they are using. In addition, I can share what I am using to other students.

Process journal(dt)

  • 1.
    MAKING TOOTHBRUSH HOLDER1(11/04/11/Fri) Marking and Measuring PROCESS JOURNAL EMOTION I was so happy because I just started to create a new project. Even though I don’t like measuring and marking, it was fun because I not am doing a theory stuff anymore. WHAT I DID & WHY I marked and measured the sketch of my product on a new plastic like picture 2. This is because I can make a mistake and Using a ruler and square-ruler get a new plastic if I cut it without drawing lines. In addition, I by measuring also marked out drill holes by drawing circles and filling them with black color. That is because I might bend plastic first when I need to drill the holes. I also calculated the length of the whole product. Since I haven’t done with calculating exact size of the product, I had to calculate them such as snake’s head part, middle-body part, and tail. WHAT TOOLS DID I USE I used a pencil, eraser, square-ruler, and ruler for today’s work. Done with sketching Pencil was for sketching, and eraser was for erasing mis-drawn lines. Moreover, I can draw a straight, which is exactly 90 to another line, and clear line by using a square-ruler. A ruler also works similar to a square-ruler but a normal ruler doesn’t make me to draw a LEARNER PROFILE I think I am a knowledgeable, because I explored ways to help others. I helped Da Eun today. She didn’t know where the extra wood, so I found it and gave it to Da Eun in a storage room. PLAN According to the Gannt Chart, I am going to start cutting and filing the soap box. AREAS OF INTERACTION(AOI) I think it is Human Ingenuity. I can give this product to people who need a toothbrush holder. I think that teenagers will like this toothbrush holder because it is playful and decorative. For me, I will give this to my family. We really need a toothbrush holder because our toothbrushes and bath goods such as shampoo and soap are lying on the floor. I will give my family the product for the environment of the bathroom.
  • 2.
    MAKING TOOTHBRUSH HOLDER2(11/08/11/Tue) Checking and Cutting PROCESS JOURNAL EMOTION when I was cutting the plastic, I felt interesting and exciting today because I just started to make a plastic-project. However, I was filing, I was bored and annoyed because of the noise from the file. WHAT I DID & WHY At the beginning of the class, Mr.Anderson told me to sketch four triangles next to the body of the snake to support the body. Cutting the plastic using a junior Therefore, I drew four triangles. Then, I started to cut the soap hack saw box. I cut out four points so that I can bend each edge. Next, I filed the sharp edges and points because a user could get a cut hurt by sharp edges. Therefore, I made each of the edges smoother. WHAT TOOLS DID I USE I used a marker and ruler when I was sketching four triangles. If I use a pencil, I will not be able to see the line clearly. In addition, I used ruler because a straight line makes product better. When Filing the rough edges by using I was cutting the plastic, I used a junior hack saw. A junior hack flat file saw is made to cut materials such as metals or plastics, while a gent saw or tenon saw is made to cut materials such as wood mainly. When I was filing, I used a flat file. This is because I can make the end of the points more angled and sharper by using the side of the flat file. Flat file also has an inclined plan on its sides. LEARNER PROFILE I think that I am a risk-taker because I tried to use a various kind of tools. In addition, I analyzed the benefits of each tool and used those beneficial functions. CHANGES TO PLAN I haven’t predicted that I am going to draw four triangles. PLAN According to the Gannt Chart, my plan is to drill the holes for fishing gut, and sand and file more on the edges of the box. AREAS OF INTERACTION(AOI) I think it is Approaches to Learning. In this unit, I learnt lots of things. For example, I learnt a number of tools that I haven’t used and I knew how to cut plastic and bend the bproduct clearly and straightly. If I want to learn more, I can ask Mr. Anderson and other students for the tooles that they are using. In addition, I can share what I am using to other students.
  • 3.
    MAKING TOOTHBRUSH HOLDER3(11/10/11/Thur) Sanding and Drilling PROCESS JOURNAL EMOTION Today, I was annoyed because filing makes a lot of noises. I also felt ashamed when I created noises over two classes. This is because I felt very sorry to the students who were working in another class. WHAT I DID & WHY At the beginning of the class, I sanded the sharp edges of the soap box, because users could get a cut from sharp edges and points. Not only I sanded them, but also I filed them. This is Sanding the soap box to make because filing allows the edges to be smooth naturally. edges smoother In addition, I drilled the holes for fishing gut. When I drilled the holes, I was very careful because the plastic is very easy to be broken. I used a driller very slowly. Furthermore, Mr.Anderson cut the big box of the product instead of me, because the machine for cutting plastic is too dangerous for me to use. WHAT TOOLS DID I USE I used a small drillbit in oder to drill tiny holes for the fishing gut which will connect the soap box and the big box together. I also used a sandpaper because it makes the rough side Drilling the holes for fishing gut smoother. Not only I used a small sandpaper, but also I used a large sandpaper which is shown in the first picture. It is very convenient, since it can be hold by holding device, and it doesn’t move. I used a drill, as you can see in the second picture, to drill small holes. Even though you cannot see in the picture, I wore goggles in order to protect my eyes. LEARNER PROFILE I think that I am a career because I tried not to waste plastic. One method that I used to save plastic is to drill the holes very carefully. Otherwise, it will be broken and I would have to get a new plastic. PLAN According to the Gannt Chart, I need to bend the part where I marked by dotted-lines(you can see those lines in the first picture). AREAS OF INTERACTION(AOI) I think it is Environment. I can save the materials such as paint, plastic, sand paper, glue and screw during creating the product. If only I do not waste the plastic, people have to cut the plastic little bit. If all the students save the plastic and try not to waste it, lots of materials that were used to make plastic will be wasted. The more I save the materials, the more I save the environment.
  • 4.
    MAKING TOOTHBRUSH HOLDER4(11/11/11/Fri) Cutting PROCESS JOURNAL EMOTION I was very tired today, because I used a big saw, which is called a hack saw. I haven’t used that much heavy and huge saw. Therefore, I think that cutting plastic is a very tiring job. WHAT I DID & WHY When I finished sketching the big part of the product, Mr.Anderson cut the sketch for me. Therefore, for the whole period, I only cut the big part of the product. by using a hack saw and a junior hack saw. Sometimes, I filed and This video is about cutting plastic by sanded for the smoother edges for me, because I didn’t using hack saw. want to get hurt by the sharp edges when I was cutting. *You can watch this video by double- clicking WHAT TOOLS DID I USE I used a hack saw, which is a fine-tooth saw with a blade under tension in a frame, used for cutting materials such as metal or plastics. I used it, because I can make its blade diagonally. Then, I can cut the plastic even though there is no more space to go through. I also used a flat file and a sand paper, because they help me make the edges of the product smoother. I was afraid of getting cut by the sharp edges, therefore, I filed and sanded some corners. LEARNER PROFILE I think that I am an open-minded because I could do well at creating a product using acrylic plastic even though I haven’t used that material. In addition, I adapted well at using machine which is made only for plastic such as Stip Heater. CHANGES TO PLAN I thought that I can bend the product now. However, I needed to cut the big product that Mr.Anderson cut for me. Therefore, I cut the product instead of bending the product. PLAN According to the Gannt Chart, I should bend the product quickly. This is because I have only one period to cut and file the product. AREAS OF INTERACTION(AOI) I think it is Health and Social Education. I always wore safety goggles when I am working with machines because, sometimes, the plastic will be cracked and some pieces might be thrown in the air and hit my eyes. My product also considers the safety of the society as well. I tried my best to make the plastic’s surface, corners and edges as smooth as possible so that the users do not get hurt by the sharp edges.
  • 5.
    MAKING TOOTHBRUSH HOLDER5(11/15/11/Tue) Filing and Sanding PROCESS JOURNAL EMOTION I was annoyed and tired today, because I kept filing, which might create a lot of noises. In addition, it needs lots of strength. WHAT I DID & WHY Today, I filed the product, because I cut the product little bit far from the line that I sketched. Therefore, I filed the edges of the product to make the edges are right the top of the line. As you can see in the video, I hold the file with This video is about filing the edges two hands to keep it straight. Otherwise, the edge will be of the product by using a flat file. filed diagonally. *You can watch this video by double- In addition, I also sanded the product, because I wanted to clicking make the edges smoother by using 360grits-sand paper. If the edges are rough and sharp, I can get cut by the edges. WHAT TOOLS DID I USE First, I used a falt file because it helps me by planing the plastic. Sometimes, I used a rounded file, which is rounded on the front, flat on the back. I also used a sand paper to make the edges smoother. I used a 360grits-sand paper, because it is the most delicate paper. 100girts-sand paper will plane the face a lot. At that time, I used a sand block, because a sand paper becomes so hot when I rub it with the plastic. In addition, I used a brush to make the environment of my bench clean. LEARNER PROFILE I think that I am a communicator because I asked Mr.Anderson if I don’t know how to use the tool or what kind of tool is suitable to use. Of course, Mr.Anderson always answered me. CHANGES TO PLAN I thought that I can bend the product now. However, I needed to file and sand the sharp edges and corners after I cut the product. Otherwise, the users will get cut by them. Therefore, I filed and sanded instead of bending. PLAN According to the Gantt Chart, I should bend the product quickly. This is because I have only one period to cut and file the product. AREAS OF INTERACTION(AOI) I think it is Community and Service. My product’s function is to be able to arrange the toothbrushes and some other small objects put in one spot. This function will hemp the community by making their environments cleaner and more organized. Also, in the process of creating, I did not only concentrate on my work. Some of my friend came and helped me. Then, it is a part of service.
  • 6.
    MAKING TOOTHBRUSH HOLDER6(11/22/11/Tue) Filling, drilling and bending PROCESS JOURNAL EMOTION At the beginning of the class, I was so boring because I had to file and sand the product again. I’m now tried at making the edges smoother. However, when I start to bend plastic, I was so happy because I like bending plastic. WHAT I DID & WHY First, I filed and sanded the sharp edges because I had to make them smoother in order to prevent injures from getting cut from the sharp edges. When I finished filing, I started to drill the holes for the water which wil come out from the soap. If I don’t make the holes, water will be This video is about drilling the holes stagnant water which is very harmful to us. Sometimes, for the water which will come out small worms are produced from that water. Lastly, I started from the soap. *double-click* bending the plastic. WHAT TOOLS DID I USE First, I used a falt file because it helps me by planing the plastic. Sometimes, I used a rounded file, which is rounded on the front, flat on the back. I also used a sand paper to make the edges smoother. Furthermore, I used a drill to drill the holes, and I used a G-clamp to clamp my product on the drill(in the first video). Lastly, I used Hot Wire Strip Heater500 to bend the plastic. LEARNER PROFILE I think I am a knowledgeable, because I explored ways to The acrylic plastic is on the Hot Wire help others. I helped Da Eun today. She didn’t know where Strip Heater500, so it will be easier the extra wood, so I found it and gave it to Da Eun in a to bend over about 1 minute later. storage room. CHANGES TO PLAN Originally, I planned to bend the plastic for the first process. However, Mr.Anderson told me that I should drill the holes for the water from the soap. Therefore, I put drilling process. PLAN According to the Gantt Chart, I have two more periods to work on bending plastic. In addition, if I am done with bending in only one period, I have to start drilling the holes in the bigger plastic. AREAS OF INTERACTION(AOI) I think it is Human Ingenuity. I can give this product to people who need a toothbrush holder. I think that teenagers will like this toothbrush holder because it is playful and decorative. For me, I will give this to my family. We really need a toothbrush holder because our toothbrushes and bath goods such as shampoo and soap are lying on the floor. I will give my family the product for the environment of the bathroom.
  • 7.
    MAKING TOOTHBRUSH HOLDER7(11/25/11/Fri) Filing and bending PROCESS JOURNAL EMOTION I was so sad that I had to file the acrylic again, however, I felt a bit better about the fact that it took no more than ten minutes. Laster, I started to bend and it was so fun task! WHAT I DID & WHY At the beginning of the class, I started filing little four triangles for supporting z-shape of snake’s body. This is because snake’s This video is about filing out the body has to be curved, and the final product will look curved half-circle shape by using a if I file those supporting triangles. In addition, I continued half-round file. *double-click* bending process to make flat acrylic plastic to an acrylic box. At that time, I tied a string and tightened it to put those into the holes for the string before I bend acrylic plastic. Otherwise, I will not be able to put strings. WHAT TOOLS DID I USE When I was filing, I used a half-round file because I have to file the shape of half-circle, which is the same shape of the half-round file. I also used a Hot Wire Strip Heater 500 to bend acrylic plastic. It is so useful that produces heat from one line to heat plastic. Lastly, I used pliers and combination pliers. In the video, the blue tool is called pliers and the yellow tool is Tying a string and tightening it called combination pliers. with pliers and combination pliers *double-click* LEARNER PROFILE I think that I am a risk-taker because I tried to use a various kind of tools. In addition, I analyzed the benefits of each tool and used those beneficial functions. CHANGES TO PLAN I didn’t consider about filing the little supporting parts. PLAN According to the Gantt Chart, I have one more period to work on bending. If I am finished with bending, I have to start drilling. AREAS OF INTERACTION(AOI) I think it is Approaches to Learning. In this unit, I learnt lots of things. For example, I learnt a number of tools that I haven’t used and I knew how to cut plastic and bend the product clearly and straightly. If I want to learn more, I can ask Mr. Anderson and other students for the tools that they are using. In addition, I can share what I am using to other students.
  • 8.
    MAKING TOOTHBRUSH HOLDER8(11/29/11/Tue) Drilling and Filing Toothbrush Holes PROCESS JOURNAL EMOTION Today was fun because I like drilling. However, it was so tiring job that I had to spend all my strength to hold the product tight. WHAT I DID & WHY From the start of the class to the end, I was only focusing on the holes. This is because making holes properly is the most important task in my procedure, as the aim of this product is to keep the toothbrush from the contaminated water. I This video is about clamping the drilled the holes with different drill bits first. Then, I made part of product by using a G-clamp the holes bigger by using a rounded file because there is no to fix on the bench. enough drill bit that could drill the size that I expected. WHAT TOOLS DID I USE First, I used a drill and different sizes of drill bits. I used different sizes of drill bits because plastic will be easily break if I use big drill bit at the first time. The order of the sizes of drill bits should be small to big. When I was filing, I used a G-clamp to fix a product on the bench tightly. I also used a rounded file because the shape of this file is round, wich is the same shape of the holes. LEARNER PROFILE This video is about using a I think that I am a career because I tried not to waste rounded file to make the holes for plastic. One method that I used to save plastic is to drill the toothbrush bigger. holes very carefully. Otherwise, it will be broken and I would have to get a new plastic. CHANGES TO PLAN One thing that was changed is that I didn’t expect that I have to file the holes to make them bigger, because there is not drill bit that is suitable for expected-size holes. PLAN According to the Gantt Chart, I have to finish making holes bigger and start to bend the product. AREAS OF INTERACTION(AOI) I think it is Environment. I can save the materials such as paint, plastic, garnet paper, glue and screw during creating the product. If only I do not waste the plastic, people have to cut the plastic little bit. If all the students save the plastic and try not to waste it, lots of materials that were used to make plastic will be wasted. The more I save the materials, the more I save the environment.
  • 9.
    MAKING TOOTHBRUSH HOLDER9(12/02/11/Fri) Beding and Filing the holes for toothbrush PROCESS JOURNAL EMOTION I was so sad that I had to file the acrylic again, however, I felt a bit better about the fact that it took no more than ten minutes. Laster, I started to bend and it was so fun task! WHAT I DID & WHY At the beginning of the class, I started filing the four circle holes for holding toothbrush. This is because the size of the circle should be big enough to pass the thickness of the toothbrush and not too big to hold it. After filing, I put two fish lines into the small holes on the acrylic plastic. Then, I started bending the acrylic plastic This picture is about bending a which is for the real shape of snake. I bent it into Z- toothbrush holder by using a Hot shape, which is the shape of snake. Wire Strip Heater 500. A block is for holding the acrylic plastic that it WHAT TOOLS DID I USE doesn’t move. When I was filing, I used a half-round file because I have to file the shape of half-circle, which is the same shape of the half-round file. I also used a Hot Wire Strip Heater 500 to bend acrylic plastic. It is so useful that produces heat from one line to heat plastic. Lastly, I used pliers and combination pliers. In the video, the blue tool is called pliers and the yellow tool is called combination pliers. LEARNER PROFILE I think that I am an open-minded because I could do well at creating a product using acrylic plastic even though I haven’t used that material. In addition, I adapted well at using machine which is made only for plastic such as Stip Heater. CHANGES TO PLAN I didn’t expect that I have to put fish lines in the holes before I start to bend the product. PLAN According to the Gantt Chart, I have to drill four holes for the second-side of Z-shaped snake. AREAS OF INTERACTION(AOI) I think it is Health and Social Education. I always wore safety goggles when I am working with machines because, sometimes, the plastic will be cracked and some pieces might be thrown in the air and hit my eyes. My product also considers the safety of the society as well. I tried my best to make the plastic’s surface, corners and edges as smooth as possible so that the users do not get hurt by the sharp edges.
  • 10.
    MAKING TOOTHBRUSH HOLDER10(12/06/11/Tue) Connecting Strings and Making Wooden Supporters PROCESS JOURNAL EMOTION I was annoyed a bit because it was really hard to connect two ends of fish lines by using a glue gun. This is because a bunch of glue for connecting fish line melts when it goes close to Hot Wire Strip Heater 500. WHAT I DID & WHY, WHAT TOOLS DID I USE At the beginning of the class, I tired to connect two ends of fish lines together by glueing them with a glue gun. This is because I want to connect two blocks together with the strings. Since the lengths of each fish line were so short, I Glueing two fish lines together by couldn’t tie lines that cannot go through the holes. using a glue gun. Therefore, I used a glue gun because it makes it available for me to connect lines together without tying. Next, I started to bend the end part of the block, but it didn’t work well. This is because the glue was melted by the heat from the machine, so I just bend the block without connecting lines. Then, I began to create wooden supporters because I have to drill four holes on the second side of the z-shape of product. If I do not make supporters, the acrylic plastic will break when I drill the holes. I used a tenon saw and pull saw to cut them, because a tenon saw makes me to cut straightly much easier. A pull saw helps me cut fast. Cutting a wooden supporter by using a tenon saw. LEARNER PROFILE I think that I am a communicator because I asked Mr.Anderson if I don’t know how to use the tool or what kind of tool is suitable to use. Of course, Mr.Anderson always answered me. CHANGES TO PLAN I had to connect the lines first and then bend the end of the block. In addition, I didn’t know that I have to make supporters before I drill the holes. PLAN According to the Gantt Chart, I have to drill the holes on the second side of a z-shape plastic. AREAS OF INTERACTION(AOI) I think it is Community and Service. My product’s function is to be able to arrange the toothbrushes and some other small objects put in one spot. This function will hemp the community by making their environments cleaner and more organized. Also, in the process of creating, I did not only concentrate on my work. Some of my friend came and helped me. Then, it is a part of service.
  • 11.
    MAKING TOOTHBRUSH HOLDER11(01/03/12/Tue) Making Wooden Supporters and Connecting Two Boxes PROCESS JOURNAL EMOTION Today was annoying because I couldn’t figure out the way of connecting two boxes together with a fishing gut. In addition, when I was screwing, I was so tired. WHAT I DID & WHY, WHAT TOOLS DID I USE At the beginning of the class, I continued to make the wooden supporter. The length of the wooden supporter from the last class was shorter than the length of my product. Putting a piece of fishing gut Therefore, I added a piece of triangle-shaped wood on that into the hole of the box supporter. At that time, I used PVA glue to glue two pieces of wood together. After glueing, I drilled two holes which go through two pieces at the same time, and screwed in those holes. I used a cross-screwdriver. Next, as soon as Mr.Anderson told me an idea to unfold the edge of the box and connect all the holes with one piece of fishing gut. At that time, I used a Hot Wire Strip Heater 500 to unfold the edges of two boxes. When I make a nut, I used pilers to make a nut tighter, because pilers help me hold a slippery fishing gut very tightly. LEARNER PROFILE Screwing to make two wood I think I am a knowledgeable, because I explored ways to pieces hold each other tighter help others. I helped Da Eun today. She didn’t know where the extra wood, so I found it and gave it to Da Eun in a storage room. CHANGES TO PLAN Originally, I planned to drill the second side of Z-shape. However, since I haven’t done making the supporters yet, I had to work on making them instead of drilling holes. PLAN According to the Gantt Chart, I have to drill the holes on the second side of a z-shape plastic. Glueing by using PVA glue to glue two pieces together AREAS OF INTERACTION(AOI) I think it is Human Ingenuity. I can give this product to people who need a toothbrush holder. I think that teenagers will like this toothbrush holder because it is playful and decorative. For me, I will give this to my family. We really need a toothbrush holder because our toothbrushes and bath goods such as shampoo and soap are lying on the floor. I will give my family the product for the environment of the bathroom.
  • 12.
    MAKING TOOTHBRUSH HOLDER12(01/05/12/Thur) Clamping the Supporters and Drilling the Holes PROCESS JOURNAL EMOTION Today, I found the process is very new and interesting, because I used a new tool that I haven’t used before. I used a new long clamp. WHAT I DID & WHY, WHAT TOOLS DID I USE From the beginning of the class, I started to clamp the wooden supporters and the product to start to drill the holes on the second side of Z-shape of product. At that time, I used two G-clamps and a long clamp with red-colored handle. This is because clamp helps me Clamping the supporters and the hold the supporters and product very tightly. product to make them tighter Next, I started to drill the holes through the wooden supporters and finally get to the second side of the product. At that time, I used a cordless drill and many types of drill bits. This is because a cordless drill is so comfortable that I can move it wherever I want and I don’t have to plug in to operate it. I used many kinds of drill bits because the plastic will be broken very easily if I use a big drill bit for the first time. Therefore, when I have to drill the plastic, I have to use the drill bits from the smallest to the largest to prevent from breaking. Drilling the holes in the second side LEARNER PROFILE of the product through the wood I think that I am a risk-taker because I tried to use a supporters various kind of tools. In addition, I analyzed the benefits of each tool and used those beneficial functions. CHANGES TO PLAN There was no change actually, but the small thing is that I didn’t know that I have to clamp the wooden supporters and the product. PLAN Next class, according to the Gantt Chart, I have to finish drilling the holes and start to file the holes to make them bigger. AREAS OF INTERACTION(AOI) I think it is Approaches to Learning. In this unit, I learnt lots of things. For example, I learnt a number of tools that I haven’t used and I knew how to cut plastic and bend the product clearly and straightly. If I want to learn more, I can ask Mr. Anderson and other students for the tools that they are using. In addition, I can share what I am using to other students.