The SI base
units
• This International System
of Units is necessary to
ensure that our everyday
measurements remain
comparable and
consistent worldwide.
Standardizing such
measurements not only
helps to keep them
consistent and accurate,
but also helps society
have confidence in data.
Base Quantity Name Symbol
Length meter m
Mass kilogram kl
Time second s
Electric Current ampere A
Temperature kelvin K
Amount of Substance mole mol
Intensity candela cd
The SI
derived units
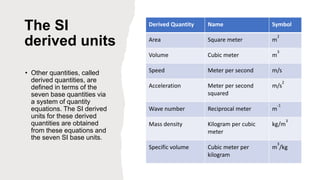
• Other quantities, called
derived quantities, are
defined in terms of the
seven base quantities via
a system of quantity
equations. The SI derived
units for these derived
quantities are obtained
from these equations and
the seven SI base units.
Derived Quantity Name Symbol
Area Square meter m
2
Volume Cubic meter m
3
Speed Meter per second m/s
Acceleration Meter per second
squared
m/s
2
Wave number Reciprocal meter m
-1
Mass density Kilogram per cubic
meter
kg/m
3
Specific volume Cubic meter per
kilogram
m
3
/kg
Conversion
Standard Form vs Significant
Figures
Standard form allows you to
represent very large and
very small numbers by using
a system of numerical
notation. It is similar to the
use of SI prefixes.
Significant figures are the
number of digits important
to determine the accuracy
and precision of
measurement, such as
length, mass, or volume.
Standard Form
• Write 56,000 in standard form.
• Ignore the zero at the end only, insert your decimal point and your
power of 10 based on the amount of places you have moved.
• 5.6 x 10⁵
• Write 370,200,000 in standard form.
• Ignore the zero at the end only, insert your decimal point and
your power of 10 based on the amount of places you have moved.
• 3.702 x 10⁸
Standard Form
• Write 56.2 in standard form.
• Ignore the zero at the end only, insert your decimal point ( between 1 and
10( and your power of 10 based on the amount of places you have moved.
• 5.62 x 101
• Write 0.00043 in standard form. (very small number)
• Ignore the zero at the end and the beginning, insert your decimal point (
between 1 and 10) and your power of 10 based on the amount of places
you have moved. For this we move to the right so we add a negative
number.
• 4.3 x 10⁻⁴
Significant Figures
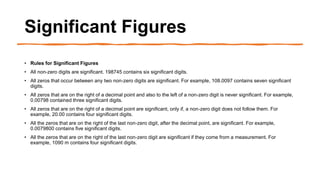
• Rules for Significant Figures
• All non-zero digits are significant. 198745 contains six significant digits.
• All zeros that occur between any two non-zero digits are significant. For example, 108.0097 contains seven significant
digits.
• All zeros that are on the right of a decimal point and also to the left of a non-zero digit is never significant. For example,
0.00798 contained three significant digits.
• All zeros that are on the right of a decimal point are significant, only if, a non-zero digit does not follow them. For
example, 20.00 contains four significant digits.
• All the zeros that are on the right of the last non-zero digit, after the decimal point, are significant. For example,
0.0079800 contains five significant digits.
• All the zeros that are on the right of the last non-zero digit are significant if they come from a measurement. For
example, 1090 m contains four significant digits.
Significant Figures
• 846
• How many significant figures are they? 3 (every non-zero number is
sig)
• 704
• How many significant figures are they? 3 (every zero in between
a number is sig)
• 0.075
• How many significant figures are they? 2
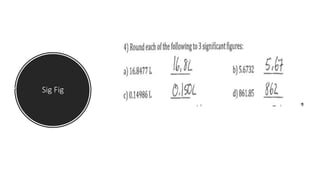
Sig Fig
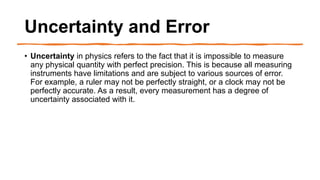
Uncertainty and Error
• Uncertainty in physics refers to the fact that it is impossible to measure
any physical quantity with perfect precision. This is because all measuring
instruments have limitations and are subject to various sources of error.
For example, a ruler may not be perfectly straight, or a clock may not be
perfectly accurate. As a result, every measurement has a degree of
uncertainty associated with it.
Accuracy vs Precision
• Accuracy refers to how close a measurement is to the true or
accepted value.
• Precision refers to how close measurements of the same item are to
each other. Precision is independent of accuracy.
Accuracy vs Precision Demonstration
This Photo by Unknown author is licensed under CC BY-SA.
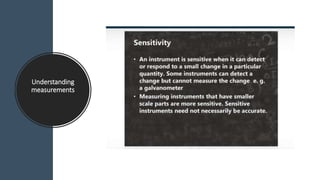
Understanding
measurements
Understanding
measurements
Understanding
measurements
Understanding
measurements
Measurements and Scales
A linear scale is one on which
equal changes in the value of
the physical quantity being
measured are indicated by
equal distances on the scale of
the measuring instrument.
Ruler
A non-linear scale is one on
which equal changes in the
value of the physical quantity
being measured are indicated by
unequal distances on the scale
of the measuring
instrument. conical flask
Measurements and Scales
A digital scale is a digital device
used to measure mass of objects
or substances. The scale works by
utilizing an internal strain gauge.
The scale is design so that the load
is evenly distributed on the strain
gauge in order to obtain the mass
of the object or substance.
Analog scale possess no power
supply and display readings using
dials or needle pointer. They are
made up of springs and pieces that
work together to produce readings.
Analog scales enable their users to
read the dials or needle pointer
located on the scale to obtain
readings.
Micrometer Screw
Gauge
• A micrometer screw gauge, is a tool used for
measuring small widths, thicknesses or
diameters
• For example, the diameter of a copper wire
• It has a resolution of 0.01 mm
• The micrometer is made up of two scales:
• The main scale - this is on the sleeve
(sometimes called the barrel)
• The thimble scale - this is a rotating scale
on the thimble
Vernier Calipers
Vernier calipers are another distance measuring
tool that uses a sliding vernier scale
• They can also be used to measure
diameters and thicknesses, just like the
micrometer
• However, they can also measure the
length of small objects such as a screw or
the depth of a hole
• Vernier calipers generally have a resolution
of 0.1 mm, however, some are as small as 0.02
mm - 0.05 mm
• The calipers are made up of two scales:
• The main scale
• The vernier scale
• The two upper or lower jaws are clamped
around the object
• The sliding vernier scale will follow this
and can be held in place using the locking
screw.
Triple Beam Balance
• The triple beam balance is a typical instrument
used to measure the mass of various objects.
• It consists of three beams, each of which is
provided with a single sliding weight that has a
size corresponding to the gradations of the
notched scale on each beam.
• The largest scale has 100 gram divisions, the next
smallest has 10 gram divisions and the smallest
scale is graduated into gram and 0.1 gram
divisions.
• The balance can be read to 0.05 grams by
carefully estimating the final decimal place.
Random Errors
Random error is a type of error that is random in nature. Random errors
affect the precision of the observation in the measurements. Reasons to
occur random errors in the measurement can be of different types, like
changes in environmental factors, variations in the testing procedure, etc.
• Reading taken in different directions is a different value and comes into the
category of random error.
• Measurement of the weight of a body through analytical balance
technique.
• Measurement of a particular person's height may slightly differ while
taking two or more observations due to the gesture changes.
• As the random error is not predicted, multiple measurements need to be
taken, and the most probable value is determined.
Systematic Errors
• Systematic errors affect the accuracy of the observation. Reasons to
occur systematic errors in the measurement can be of different types,
like observational factors, calibration in instruments, etc.
• During the measurement of the weight of a body forgot to set out the
zero. It will cause the measurements to differ by the same amount.
• Measuring the length of a chain in cold and hot weather.
• Measuring the distance between the two different types
manufactured with different materials.
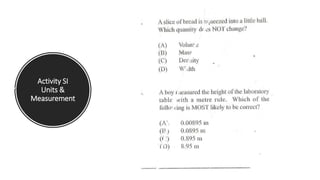
Activity SI
Units &
Measurement
Activity SI
Units &
Measurement
Activity SI
Units &
Measurement
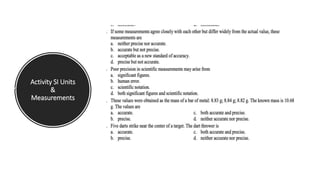
Activity SI Units
&
Measurements
Activity SI Units
&
Measurements
Activity SI Units
&
Measurements
Activity SI Units
&
Measurements
Activity SI
Units & Measurements
Activity SI Units
&
Measurements
Activity SI
Units & Measurements
Activity
SI Units & Measurements
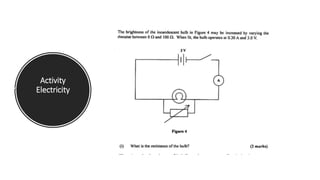
Activity
Electricity
Break
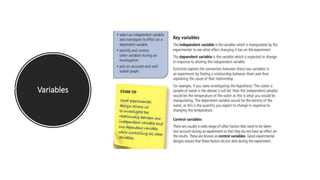
Variables
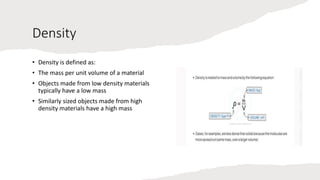
Density
• Density is defined as:
• The mass per unit volume of a material
• Objects made from low density materials
typically have a low mass
• Similarly sized objects made from high
density materials have a high mass
Variables
Graphs
• Used to show the relationship between two
variables.
• Criteria (title, labels, types of plotted points,
scale of axes)
Graphs
Graphs
Physics 2023
question
Steps in Drawing this graph?

Physics.pptx

  • 1.
    The SI base units •This International System of Units is necessary to ensure that our everyday measurements remain comparable and consistent worldwide. Standardizing such measurements not only helps to keep them consistent and accurate, but also helps society have confidence in data. Base Quantity Name Symbol Length meter m Mass kilogram kl Time second s Electric Current ampere A Temperature kelvin K Amount of Substance mole mol Intensity candela cd
  • 2.
    The SI derived units •Other quantities, called derived quantities, are defined in terms of the seven base quantities via a system of quantity equations. The SI derived units for these derived quantities are obtained from these equations and the seven SI base units. Derived Quantity Name Symbol Area Square meter m 2 Volume Cubic meter m 3 Speed Meter per second m/s Acceleration Meter per second squared m/s 2 Wave number Reciprocal meter m -1 Mass density Kilogram per cubic meter kg/m 3 Specific volume Cubic meter per kilogram m 3 /kg
  • 3.
  • 4.
    Standard Form vsSignificant Figures Standard form allows you to represent very large and very small numbers by using a system of numerical notation. It is similar to the use of SI prefixes. Significant figures are the number of digits important to determine the accuracy and precision of measurement, such as length, mass, or volume.
  • 5.
    Standard Form • Write56,000 in standard form. • Ignore the zero at the end only, insert your decimal point and your power of 10 based on the amount of places you have moved. • 5.6 x 10⁵ • Write 370,200,000 in standard form. • Ignore the zero at the end only, insert your decimal point and your power of 10 based on the amount of places you have moved. • 3.702 x 10⁸
  • 6.
    Standard Form • Write56.2 in standard form. • Ignore the zero at the end only, insert your decimal point ( between 1 and 10( and your power of 10 based on the amount of places you have moved. • 5.62 x 101 • Write 0.00043 in standard form. (very small number) • Ignore the zero at the end and the beginning, insert your decimal point ( between 1 and 10) and your power of 10 based on the amount of places you have moved. For this we move to the right so we add a negative number. • 4.3 x 10⁻⁴
  • 7.
    Significant Figures • Rulesfor Significant Figures • All non-zero digits are significant. 198745 contains six significant digits. • All zeros that occur between any two non-zero digits are significant. For example, 108.0097 contains seven significant digits. • All zeros that are on the right of a decimal point and also to the left of a non-zero digit is never significant. For example, 0.00798 contained three significant digits. • All zeros that are on the right of a decimal point are significant, only if, a non-zero digit does not follow them. For example, 20.00 contains four significant digits. • All the zeros that are on the right of the last non-zero digit, after the decimal point, are significant. For example, 0.0079800 contains five significant digits. • All the zeros that are on the right of the last non-zero digit are significant if they come from a measurement. For example, 1090 m contains four significant digits.
  • 8.
    Significant Figures • 846 •How many significant figures are they? 3 (every non-zero number is sig) • 704 • How many significant figures are they? 3 (every zero in between a number is sig) • 0.075 • How many significant figures are they? 2
  • 9.
  • 10.
    Uncertainty and Error •Uncertainty in physics refers to the fact that it is impossible to measure any physical quantity with perfect precision. This is because all measuring instruments have limitations and are subject to various sources of error. For example, a ruler may not be perfectly straight, or a clock may not be perfectly accurate. As a result, every measurement has a degree of uncertainty associated with it.
  • 11.
    Accuracy vs Precision •Accuracy refers to how close a measurement is to the true or accepted value. • Precision refers to how close measurements of the same item are to each other. Precision is independent of accuracy.
  • 12.
    Accuracy vs PrecisionDemonstration This Photo by Unknown author is licensed under CC BY-SA.
  • 13.
  • 14.
  • 15.
  • 16.
  • 17.
    Measurements and Scales Alinear scale is one on which equal changes in the value of the physical quantity being measured are indicated by equal distances on the scale of the measuring instrument. Ruler A non-linear scale is one on which equal changes in the value of the physical quantity being measured are indicated by unequal distances on the scale of the measuring instrument. conical flask
  • 18.
    Measurements and Scales Adigital scale is a digital device used to measure mass of objects or substances. The scale works by utilizing an internal strain gauge. The scale is design so that the load is evenly distributed on the strain gauge in order to obtain the mass of the object or substance. Analog scale possess no power supply and display readings using dials or needle pointer. They are made up of springs and pieces that work together to produce readings. Analog scales enable their users to read the dials or needle pointer located on the scale to obtain readings.
  • 19.
    Micrometer Screw Gauge • Amicrometer screw gauge, is a tool used for measuring small widths, thicknesses or diameters • For example, the diameter of a copper wire • It has a resolution of 0.01 mm • The micrometer is made up of two scales: • The main scale - this is on the sleeve (sometimes called the barrel) • The thimble scale - this is a rotating scale on the thimble
  • 20.
    Vernier Calipers Vernier calipersare another distance measuring tool that uses a sliding vernier scale • They can also be used to measure diameters and thicknesses, just like the micrometer • However, they can also measure the length of small objects such as a screw or the depth of a hole • Vernier calipers generally have a resolution of 0.1 mm, however, some are as small as 0.02 mm - 0.05 mm • The calipers are made up of two scales: • The main scale • The vernier scale • The two upper or lower jaws are clamped around the object • The sliding vernier scale will follow this and can be held in place using the locking screw.
  • 21.
    Triple Beam Balance •The triple beam balance is a typical instrument used to measure the mass of various objects. • It consists of three beams, each of which is provided with a single sliding weight that has a size corresponding to the gradations of the notched scale on each beam. • The largest scale has 100 gram divisions, the next smallest has 10 gram divisions and the smallest scale is graduated into gram and 0.1 gram divisions. • The balance can be read to 0.05 grams by carefully estimating the final decimal place.
  • 22.
    Random Errors Random erroris a type of error that is random in nature. Random errors affect the precision of the observation in the measurements. Reasons to occur random errors in the measurement can be of different types, like changes in environmental factors, variations in the testing procedure, etc. • Reading taken in different directions is a different value and comes into the category of random error. • Measurement of the weight of a body through analytical balance technique. • Measurement of a particular person's height may slightly differ while taking two or more observations due to the gesture changes. • As the random error is not predicted, multiple measurements need to be taken, and the most probable value is determined.
  • 23.
    Systematic Errors • Systematicerrors affect the accuracy of the observation. Reasons to occur systematic errors in the measurement can be of different types, like observational factors, calibration in instruments, etc. • During the measurement of the weight of a body forgot to set out the zero. It will cause the measurements to differ by the same amount. • Measuring the length of a chain in cold and hot weather. • Measuring the distance between the two different types manufactured with different materials.
  • 24.
  • 25.
  • 26.
  • 27.
  • 28.
  • 29.
  • 30.
  • 31.
    Activity SI Units &Measurements
  • 32.
  • 33.
    Activity SI Units &Measurements
  • 34.
    Activity SI Units &Measurements
  • 35.
  • 36.
  • 37.
  • 38.
    Density • Density isdefined as: • The mass per unit volume of a material • Objects made from low density materials typically have a low mass • Similarly sized objects made from high density materials have a high mass
  • 39.
  • 40.
    Graphs • Used toshow the relationship between two variables. • Criteria (title, labels, types of plotted points, scale of axes)
  • 41.
  • 42.
  • 43.
  • 44.
    Steps in Drawingthis graph?