1. PCR Protocol Page 1 of 9
Protocols for working with Phytoplasmas
These are the methods we use to work with Phytoplasmas in our lab
"PCR for Dummies"
(Mary E. Lee - 8/18/98)
For a description of the mechanism of PCR
(polymerase chain reaction), see many basic
textbooks and excellent websites. This write-up
was developed to guide persons in the Grau
lab to do PCR the "right" way (a.k.a. "Mary's
way"). Everyone will develop their own style,
but I'll attempt to explain some of the reasoning
behind why I do it the way I do.
Introduction
First, PCR for phytoplasma using the universal
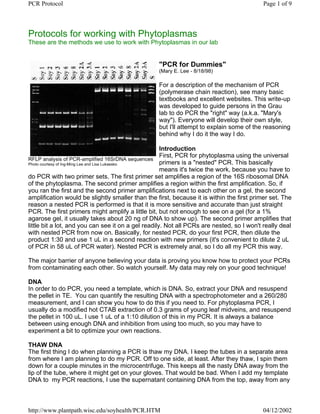
RFLP analysis of PCR-amplified 16SrDNA sequences
Photo courtesy of Ing-Ming Lee and Lisa Lukaesko primers is a "nested" PCR. This basically
means it's twice the work, because you have to
do PCR with two primer sets. The first primer set amplifies a region of the 16S ribosomal DNA
of the phytoplasma. The second primer amplifies a region within the first amplification. So, if
you ran the first and the second primer amplifications next to each other on a gel, the second
amplification would be slightly smaller than the first, because it is within the first primer set. The
reason a nested PCR is performed is that it is more sensitive and accurate than just straight
PCR. The first primers might amplify a little bit, but not enough to see on a gel (for a 1%
agarose gel, it usually takes about 20 ng of DNA to show up). The second primer amplifies that
little bit a lot, and you can see it on a gel readily. Not all PCRs are nested, so I won't really deal
with nested PCR from now on. Basically, for nested PCR, do your first PCR, then dilute the
product 1:30 and use 1 uL in a second reaction with new primers (it's convenient to dilute 2 uL
of PCR in 58 uL of PCR water). Nested PCR is extremely anal, so I do all my PCR this way.
The major barrier of anyone believing your data is proving you know how to protect your PCRs
from contaminating each other. So watch yourself. My data may rely on your good technique!
DNA
In order to do PCR, you need a template, which is DNA. So, extract your DNA and resuspend
the pellet in TE. You can quantify the resulting DNA with a spectrophotometer and a 260/280
measurement, and I can show you how to do this if you need to. For phytoplasma PCR, I
usually do a modified hot CTAB extraction of 0.3 grams of young leaf midveins, and resuspend
the pellet in 100 uL. I use 1 uL of a 1:10 dilution of this in my PCR. It is always a balance
between using enough DNA and inhibition from using too much, so you may have to
experiment a bit to optimize your own reactions.
THAW DNA
The first thing I do when planning a PCR is thaw my DNA. I keep the tubes in a separate area
from where I am planning to do my PCR. Off to one side, at least. After they thaw, I spin them
down for a couple minutes in the microcentrifuge. This keeps all the nasty DNA away from the
lip of the tube, where it might get on your gloves. That would be bad. When I add my template
DNA to my PCR reactions, I use the supernatant containing DNA from the top, away from any
http://www.plantpath.wisc.edu/soyhealth/PCR.HTM 04/12/2002
2. PCR Protocol Page 2 of 9
protein junk that might have gotten through the extraction (protein should be in a pellet at the
bottom of the tube, unless your extraction was REALLY clean). A good thing to note now is to
CHANGE GLOVES CONSTANTLY. Especially after handling DNA, and going to your "clean"
tubes. I like to use the blue (nitrile) gloves for PCR, because they are more tactile. But they're
expensive, so I only use them for PCR. But I'm getting ahead of myself…
RECORD SAMPLES
Now, write down on a piece of notebook paper the numbers 1-48 (which will fit in our
thermalcycler), and assign each DNA sample a number. This will make labeling tubes easier.
Put everything in order in your microfuge tube rack. Remember to leave number #46=negative
control, #47=positive control, #48=water control. We do them in this order for a reason. The
negative control so it's not contaminated from early samples (or if it is, you're in trouble). This
negative control should not amplify. It's also a control for whether your soybean or other DNA
will amplify with your primers (which you would not want, since we want to amplify
phytoplasma in this case, not soybeans). The positive control is next, before the water, so you
can tell if you're contaminating your reactions, and to be sure your PCR worked, even if none
of your experimental DNA amplified. Include these three controls in EVERY PCR you perform.
They can save a lot of work and worry.
CLEAN AREA
Spray windex or another ammonia-based cleaner on the surface you are about to work on.
This will cut down contaminating DNA on the countertop. Wipe it off. Be sure to spray the
ledge nearest you.
CLEAN EQUIPMENT
Use "DNA-Away" to clean outside of pipet barrels. Just put a few drops on a kimwipe, and
wipe the barrel, the metal tip-ejector, the handle, the plunger, and the ejection button. Wipe
dry, if necessary. Do this for all the pipets, and the microfuge tube opener (the "wisconsin"
beer opener keychains). Don't forget to wipe in the cracks (that's where all the nasties are).
MYTHS REVEALED
Some people say that human DNA will not amplify with their primers, and some go so far as to
do PCR without gloves. This is stupid for a couple of reasons. The first is that something might
be on your hands (we're not exactly sterile) that WILL amplify. The second is that doing PCR
without gloves increases the chance of contamination because, unlike gloves, you cannot
change your hands if you get some target DNA on them. So do PCR with gloves, and be
careful where you put your hands. After you've done this a while, you'll acquire an instinct and
a weird memory of where your hands have been and what they have been doing (relevant to
possible contamination, don't be sick). But until that happens to you, be careful. And change
your gloves as often as you feel it's necessary.
So, you're ready to do PCR?
Hah, not yet. So far you've gotten rid of major contamination risks. By the way, clean out the
centrifuge with ethanol every once in a while--I can show you how.
Now, calculate how much reagent you'll need. You will need a few basic components:
Reagent components
PCR water (let me show you how to aliquot this without
contaminating it)
http://www.plantpath.wisc.edu/soyhealth/PCR.HTM 04/12/2002
3. PCR Protocol Page 3 of 9
10X PCR buffer for whatever brand Taq polymerase you use
(abbreviated as 10XB)--to buffer the reaction, which must be
above pH 8.0, among other things….
25 mM MgCl2 (Taq polymerase needs divalent cations to
function, and they are not provided in the buffer I use--you can
do a titration with adding 1uL, 2 uL,….etc. to figure out
optimum)
2.5 mM dNTPs (I will make these always and keep stocks)
Primer A (first primer)
Primer B (second primer)
Taq polymerase (the enzyme you need for PCR)
Protocols vary, but this is mine (in uL):
Amount (uL) for
Component
one reaction
water 32.75
10XB 5.00
MgCl2 5.00
dNTP 4.00
Primer A 1.00
Primer B 1.00
Taq 0.25
Total volume = 49 uL + 1 uL DNA = total volume of 50 uL
So these values are for ONE reaction (1X). Say you want to do 48 PCRs. Doing these all
individually in each tube would be a real hassle. So we make what's called a "master mix" and
aliquot (or distribute) it to the tubes. A little bit of the master mix gets caught on the pipet tip
and etc, so you always calculate for at least one or two more reactions than you are going to
run. So, if I was going to run 10 PCRs, I would calculate my master mix for about 12 reactions.
Since I'm going to run 48, from experience I know a LOT gets caught on the tip, so I usually
calculate it for 54 reactions. So, to do this, simply multiply the 1X value by 54:
Amount for 54
Component
reactions (uL)
water 1768.5
10XB 270.0
MgCl2 270.0
dNTP 216.0
Primer A 54.0
Primer B 54.0
Taq 13.5
http://www.plantpath.wisc.edu/soyhealth/PCR.HTM 04/12/2002
4. PCR Protocol Page 4 of 9
Always add up the total and divide by the number you multiplied by to make sure you
calculated everything right. Otherwise you get stuck doing the PCR, running out of mix or
having way too much left, and you wonder if it's the pipet or a miscalculation…then you're PCR
doesn't work, or you have to mix up the last three tubes individually….just add them up and
divide.
1768.5 + 270 + 270 + 216 + 54 + 54 + 13.5 = 2646 / 54 = 49!
Now you're ready to go into the freezer and get reagents
Now is the time you get out your reagents to thaw. Take a clean microfuge rack (these you
always rinse off and put on the dish rack to dry after use to prevent any DNA on the rack from
contaminating your next PCR. Every once in a while I soak them in bleach overnight, too.) and
go to the freezer. You should have your OWN box of reagents. This prevents cross-
contamination of everyone's stocks and the phenomenon of everyone's PCR not working at
the same time. Everything is aliquoted in 0.5 mL microfuge tubes, to prevent contamination of
the original stock tube. NEVER use the big tubes of buffer or primer or anything, or else you'll
run the risk of contaminating it for everyone else. The only thing you should take from the
original tube is the Taq.
Get out enough of each reagent to do your PCR. It's a bugger to realize when you're doing up
the master mix that you don't have enough of your dNTPs and you have to go back to the
freezer and "quick thaw" another tube.
Put these reagents in their own rack, and set it aside on the bench. Preferably away from your
DNA. You don't know when those double strands are going to decide to have a pool party and
leap into your buffer…
Now you can label tubes!!
Perhaps the most tedious part of the job…Before labeling tubes, however, you must get them
out cleanly. So….take a clean microfuge tube rack, and the paper bag of autoclaved thin wall
PCR tubes. Thin wall tubes are used because they conduct heat better than the regular 0.5
mL microfuge tubes. Lay out two kimwipes to get a wide surface, and shake the tubes out on
the kimwipes. If the lip of any of the tubes falls off the kimwipe, throw it away. It is a
contamination risk. I buy colored microfuge tubes just so I can keep a lot of things color coded:
it makes things easier for me. If you want to do a "rainbow" PCR, feel free. Place the tubes in
the microfuge tube rack, every other row. After you have the number of tubes you need, put
the rest back in the paper bag. If there are just a few tubes left in the bag, though you may be
tempted, DO NOT put them into another, fuller bag. It's a contamination risk. Now, close the
caps of the tubes not all the way. This makes them much easier to open later and decreases
the contamination risk, if you open them by pressing on the hinge.
Label the tops with the number of the sample, the date, and the primer used. Then, place them
every other cell on the top and bottom rows of three clean microfuge racks (if you are doing 48,
you'll need this many racks, if not, adjust). Putting them every other cell prevents your dirty
little gloves from touching the lip of the neighboring tube and contaminating it while aliquoting
the DNA.
The dangerous part…aliquoting the DNA! *horrific scream*
This is the second most careful thing you must do. The only other part you have to be MORE
careful is when distributing the master mix. This is a close race, however--be REALLY
http://www.plantpath.wisc.edu/soyhealth/PCR.HTM 04/12/2002
5. PCR Protocol Page 5 of 9
CAREFUL!!
First, use the same technique as with the thin-wall tubes to arrange 0.5mL microfuge tubes
EVERY OTHER place in the microfuge rack. You will need three microfuge racks for your 48
samples. Aliquot water into them (for a 1:10 dilution, 90uL water). Then comes the DNA….
This would be a good time to say: watch your tip and especially the metal tip ejector. I’ve
caught myself dragging it along the side of a tube as I remove a tip from a tube, and this would
contaminate the rest of your DNA if you keep doing this. So if you catch yourself doing this,
use "DNA-away" on it. I am extremely anal about this!!
Open the microfuge tube containing DNA with the microfuge tube opener. Bend the lid back
with the opener, if necessary. We use the microfuge tube opener for handling the tubes
containing DNA. Place the metal part as far from the lip of the tube as possible, to prevent
contaminating the microfuge tube opener. We use the microfuge tube opener to save
contaminating our gloves. At least the tube opener you can control a lot better than popping
tubes open with your thumb. And it saves a sore thumb at the end of the day, too.
Use a P20 pipet (with cotton-plugged tips!!—cotton plugging prevents aerosolization of your
DNA into the barrel of the pipet, and rampant contamination) to draw up 10 uL of DNA. Pick up
the aliquot of water tube, and insert tip from the top, without hitting the walls of the tube,
especially the lip of the tube. Push the plunger down, and mix using the tip—don’t vortex! Put
tube down carefully, avoiding the lip of the tube with your fingers. Repeat as necessary.
Making the master mix
I'll assume you know how to pipet this properly (down to the first stop, the second stop is for
blowing out excess, use the appropriate pipet—see "proper use of pipetmen" protocol if you
have questions). The only things I'll mention are that you should use plugged tips for
EVERYTHING INVOLVING PCR! Also, you should add water, then buffer, then the rest of your
reagents--don't add the Taq until LAST. The buffer must be added after the water to keep the
taq and other components "happy ".
Keep this mixture on ice the whole time. Once all reagents except Taq are in the tube, go to
the freezer, quickly take out your Taq (using a plugged P20), and pipet it into the master mix.
The Taq is stored in glycerol, so it will sink to the bottom of the tube. Put the Taq back in the
freezer right away. [If it's a new tube of Taq, you may have to centrifuge it for a second to get it
off the lid of the tube (I can show you a quick-and-not-very-good-for-the-centrifuge method). If
you think you're out of Taq, centrifuge the tube for a second and you'll discover a bunch more
Taq then you thought you had. Close the microfuge tube with master mix right away, and I
usually mix it as I move over to the vortexer. I vortex it for about five seconds, to make sure all
the reagents are mixed thoroughly. I then centrifuge it quickly, and place it directly back on ice.
It likes to be cold. An increase in temperature causes a change in pH, which activates the Taq,
and that’s just bad. Trust me.
Pipetting the master mix and mineral oil
Set your P200 for 49 uL, or whatever volume (some people do 25 or 20 uL volume reactions--
use your judgement). Open the master mix tube (keeping it on ice). You should have a fresh
pair of gloves before doing that, especially after touching the vortexer and centrifuge, and
there's usually a grease spot somewhere on your gloves by now…. Balance the tube carefully
so no ice will fall into the master mix tube. If ice does happen to fall in, do the whole previous
shebang over again. I think most reasonable people would consider ice a contaminant…
http://www.plantpath.wisc.edu/soyhealth/PCR.HTM 04/12/2002
6. PCR Protocol Page 6 of 9
Get out one or two tubes of autoclaved, aliquoted mineral oil and leave open, away from what
you’re doing.
Pick up the appropriate thin-wall PCR tube by the hinge, below the lip. Keep your dirty little
fingers away from the lip of the PCR tube. Use your index finger to pop open the half-closed
thin wall tube by pressing down on the hinge. Place the tip of the pipet at the bottom of the
PCR tube (but far enough off the bottom that you don't ram the tip in and you can't get your
sample out!) and decant master mix. Put tube back on ice immediately (I usually use a rack
that has been chilled on ice for some time). Close the lid half way again. You have a lot more
stuff to put in it. Place it back in the rack, and do the same for the rest of your samples and
water.
Carefully, carefully, carefully, pipet DNA into the master mix. In numerical order. All the
"careful-contamination!" rules apply.
Pipet mineral oil (with a new tip each time!) on top of the reaction mixture. This prevents the
mixture from evaporating. You just need enough to cover the top of the reaction mixture, no
exact amount. If you pipet it against the wall of the tube, it falls down nicely on top. For my 50
uL reactions, the 49 uL seems to work well for the amount of mineral oil I use, too. Be careful,
open by the hinge, yada, yada, yada….
Place the PCR mix + mineral oil on ice until you finish the rest of the samples.
Thermalcycler
An essential part of any PCR. I can show you how to program it, or there's a manual. Just turn
it on, wait a few seconds for the screen with the file to come up, press "file", type in your file
name, press "enter", and "start", load your tubes, and wait. It takes 3-5 hours, depending on
cycle conditions and thermalcycler. The thermalcycler has a four degree celsius cycle at the
end. This is basically a refrigerator. So if you see 4C on the screen, it's a hold, and your PCR
is done. And, by intuition, if someone else's PCR is at 4C, it is perfectly acceptable to take their
PCR out and put it in an agreed-upon spot in the refrigerator if you need the thermalcycler. Be
sure to leave a note for the user, though: it's only courteous.
Running a Gel
This is done various ways by various people. I usually use a 1% agarose, 1/2 X TBE gel. I
have a stock of 10XTBE (which I would be only too glad to show you how to make -- the recipe
is in Maniatis, or "molecuar cloning"--the three big, expensive reference books we purchased
for just this purpose) which you dilute to 1/2 X. To make one liter, add 50 mL of 10X TBE to a 1
L graduated cylinder, and fill with Milli-Q water to the one liter line. Try to use a graduated
cylinder a little more accurate than the 1 L to measure your 50 mL. Pour the 1 L of 1/2 X TBE
into the 1L flask to mix it. This can then be used for a gel. If there is enough left in the bottle
from a previous gel-running, then you can use that and make another liter of buffer.
First, tape your mold and put the combs in. I can show you how to do this while minimizing the
risk of leakage (which is a major pain).
Add 200 mL of 1/2 X TBE and 2 g of agarose to a 500 mL erlenmyer flask with a 25 or 50 mL
flask inverted on top (kinda like an odd-shaped hourglass). This makes a 1% gel. The flask on
top prevents boiling over and evaporation during storage. Microwave this concoction until
every single bit and particle of agarose has dissolved: you can see it refracted if you swirl it
while holding the flask up to the light. If you leave some particles in there, they may block your
lane and your DNA will be retarded in the gel. It's Murphy's Law. Intermittantly stop the
http://www.plantpath.wisc.edu/soyhealth/PCR.HTM 04/12/2002
7. PCR Protocol Page 7 of 9
microwave and swirl to mix. Use rubber hot pads or an autoclave glove--it gets pretty hot. You
will develop your own "heating style" as experience teaches you how long you can leave it in
before it boils over and you have to clean up the mess.
To cool rapidly, run the flask under cold water until it's cool enough to touch without causing
exclamations of pain (about 55C). Swirl constantly so you don't get little chunks of cool
agarose floating in there that you have to fish out when you pour the gel.
Pour the gel slowly to prevent the formation of bubbles. After pouring, check for bubbles and
take a pipet tip to get rid of them. Especially the ones around and beneath your comb. They
will warp the well and your DNA won't migrate properly.
Let set for 45-60 minutes or more. This can be quickened by pouring in the refrigerator or cold
room, but it still takes at least a half hour for the thick gels to set.
Take the tape off, throw it away--don't just leave it on the bench!
Slowly remove the comb, lifting straight up so you don't warp the wells. CLEAN the comb of
any fragments of agarose that may remain, or they will dry on the comb and cause warped
wells. Put the combs back where they belong so they don't get damaged.
Put the gel in the buffer chamber, pour 1/2X TBE in until the gel is completely covered, and
about a centimeter of buffer is above the surface of the gel. The buffer in the gel and the
chamber are the same, and have salts that provide for conduction of high voltages. Some
people say they can re-use TBE, but I never do. Too much hassle and cleaning all the salt that
tends to evaporate and crystallize on the equipment.
Load the gel
Load 4 uL of ladder (I've made them up with TE and loading buffer to have a concentration of
50ng/uL, so you're loading 200 ng). Try to load at least two ladders at either end of the gel, so
you can tell if the current is running funny.
The DNA will not stay in the well by itself, so you have to add loading buffer. There is 6XLB
(LB=loading buffer) already made up (ficoll recipe, molecular cloning, sambrook et. al.). I use a
piece of parafilm and a P20 set to 10 uL. I draw up 10 uL and make 5 dots on the parafilm of
6XLB, of approximately 2 uL each. Separate these by at least a few millimeters so one DNA
sample will not run into the next. Putting these in groups of five also helps you keep track of
what you have loaded.
I load 10 uL of my PCR reaction. You don't have to use plugged tips or even gloves for this
stuff--we're not that worried about contamination anymore. Push down the pipet plunger to the
first stop, put the tip in the tube past the mineral oil, draw up your PCR mixture. Lift the tip out,
and I drag it along the microfuge tube wall to get rid of the worst of the mineral oil. Pipet this
onto a drop of 6XLB, draw up and down a couple of times to mix, then load the wells. I can
show you how to do this the first few times, then you'll get the hang of it. Dispense into the
well, the mixture will sink because of the ficoll in the 6X LB. Lift the pipet out, then release the
plunger. I usually eject the tip before releasing the plunger with the knuckle of my thumb: it
prevents contaminating the barrel for your next PCR, and I just picked it up a while ago to
prevent radiation contamination. It works well.
http://www.plantpath.wisc.edu/soyhealth/PCR.HTM 04/12/2002
8. PCR Protocol Page 8 of 9
Load all your samples, then hook up the electrodes and turn on the power source. Run the gel
from 80-100 volts, but not above 120, because you run the risk of melting the gel. Trust me, it's
happened. Run the samples about 2/3 the way down the gel (you'll gain experience at telling
when to stop the gel).
Staining
There is a gel staining area in the fume hood. Put your gel in with minimal splashing. Add 20-
50 uL ethidium bromide (toxic, hazard, cancerous!!!!). I will show you how to do this properly.
Swish with spatula to mix the ethidium in, stain 30 min-2hr or overnight (overnight your bands
will blur, but hopefully you can still see something).
Photograph (I can show you how to use the equipment on eight floor).
References on PCR:
Gunderson, D. E. and I. M. Lee. 1996. Ultrasensitive detection of phytoplasmas by nested-
PCR assays using two universal primer pairs.Phytopath. Medit. 35:144-151. (This has the
sequences for R16mF2/R1and R16F2n/R2, the "universal with a bias towards aster
yellows"nested PCR that I use)
Gunderson, D. E., I. M. Lee, D. A. Schaff, N. A. Harrison, C. J. Chang, R. E. Davis, D. T.
Kingsbury. 1996. Genomic diversity and differentiation among phytoplasma strains in 16S
rRNA groups I (aster yellows and related phytoplasmas) and III (X-disease and related
phytoplasmas). International J. of Syst. Bact. 46 (1): 64-75.(sequence for CN1-10F1/R1 "aster
yellows specific" primer I used to use)
Lee, I. M., R. E. Davis, C. Hiruki. 1991. Genetic Interrelatedness among clover proliferation
mycoplasmalike organsims (MLOs) and other MLOs investigated by nucleic acid hybridization
and restriction fragment length polymorphism analyses. Appl. Environ. Micro. 57 (12): 3565-
3569. (original DNA extraction protocol)
Lee, I. M., R. W. Hammond, R. E. Davis, D. E. Gunderson. 1993. Universal amplification and
analysis of pathogen 16S rDNA for classification and identification of mycoplasmalike
organisms. Phytopathology. 83: 834-842.
Schaff, D., I. M. Lee, R. E. Davis. 1992. Sensitive detection and identification of mycoplasma-
like organisms in plants by polymerase chain reactions. Biochem. Biophys. Res. Comm. 186:
1503-1509.
Zhang, Y., J. K. Uyemoto, B. C. Kirkpatrick. 1998. A small-scale procedure for extracting
nucleic acids from woody plants infected with various phytopathogens for PCR assay. J. Virol.
Methods. 71: 45-50. (I modified this protocol for my extraction)
For more information contact Mary Lee (mel@plantpath.wisc.edu or 608-262-1393) or Craig
Grau (cg6@plantpath.wisc.edu or 608-262-6289)
|Return to
lPhytoplasma Home Page |Soybean Health Home Page | Data Tables l Bulletins | Soybean
Researchers | Internet Sites
http://www.plantpath.wisc.edu/soyhealth/PCR.HTM 04/12/2002
9. PCR Protocol Page 9 of 9
Last update October 10,1998
http://www.plantpath.wisc.edu/soyhealth/PCR.HTM 04/12/2002
10. This document was created with Win2PDF available at http://www.daneprairie.com.
The unregistered version of Win2PDF is for evaluation or non-commercial use only.