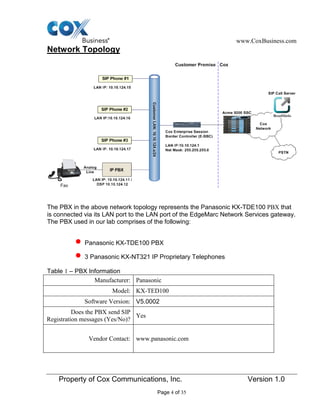
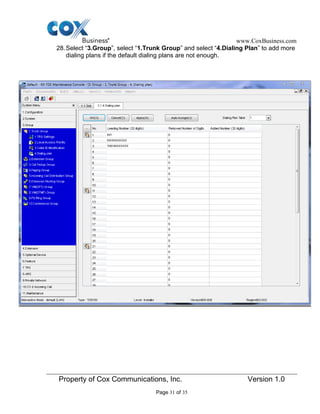
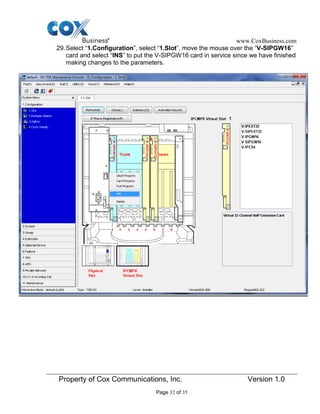
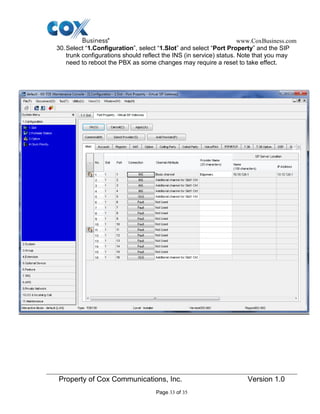
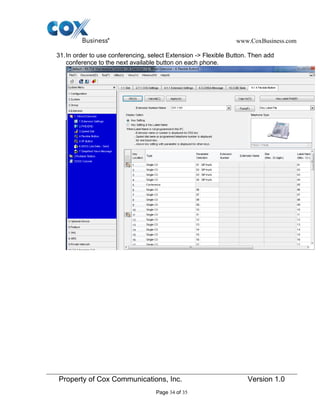
www.CoxBusiness.com
Property of Cox Communications, Inc. Version 1.0
Page 1 of 35
October 10th, 2012
SIP Trunking using the
EdgeMarc Network Services
Gateway and the
Panasonic KX-TDE100 IP-PBX
© 2013, Cox Communications, Inc. All rights reserved.
This documentation is the confidential and proprietary intellectual property of Cox Communications, Inc.
Any unauthorized use, reproduction, preparation of derivative works,
www.CoxBusiness.com
Property of Cox Communications, Inc. Version 1.0
Page 2 of 35
Table of Contents
Overview…………………………………………………………………………………………. 3
Prerequisites……………………………………………………………………………………..3
Network Topology……………………………………………………………………………… 4
Description of Basic Operation and Call Flows……………………………………………5
KX-TDE 100 PBX Configuration……………………………………………………………….5
PBX Unified Maintenance Console...............................................................................6-9
Configuration Slot...........................................................................................................10
Card Property...................................................................................................................11
Default Gateway...............................................................................................................12
IPCMPR Virtual Slot.........................................................................................................13
V-SIPGW16.......................................................................................................................14
V-SIPGW16 Shelf Property.............................................................................................15
V-SIPGW Warning............................................................................................................16
SIP Client Port Number...................................................................................................17
Manual DNS Server Address..........................................................................................18
DNS Common Settings...................................................................................................19
SIP Trunk Configuration Parameters.............................................................................20
Channel Attribute............................................................................................................21
User Name Authentication ID and Password...............................................................22
SIP Registration...............................................................................................................23
Voice/FAX.........................................................................................................................24
Calling Party.....................................................................................................................25
IP Phone Registration.....................................................................................................26
DID Table..........................................................................................................................27
Caller ID…........................................................................................................................28
Trunk Group Number......................................................................................................29
Local Access Priority......................................................................................................30
Dialing Plan......................................................................................................................31
V-SIPGW16 INS................................................................................................................32
Port Property Virtual SIP Gateway.................................................................................33
Call Forwarding………………………………………………………………………………...35
Call Park and Call Retrieval……………..……………………………………………………35
www.CoxBusiness.com
Property of Cox Communications, Inc. Version 1.0
Page 3 of 35
Overview
The purpose of this configuration guide is to describe the steps needed to configure the
Panasonic KX-TDE100 IP-PBX for proper operation in a SIP Trunking application. Please
note that this guide documents the basic configuration needed in the PBX and that the
requirements of your specific SIP Trunking environment may require modifications to the
configuration steps provided in this document.
Prerequisites
SIP Trunking information provided by the VoIP service provider:
SIP proxy server IP address or DNS name.
Trunking Direct Inward Dial (DID) phone numbers
o Calls to the Trunking DID(s) are forwarded from the service provider to the
wide area network (WAN) IP address of the EdgeMarc. There may be a
single “Pilot” phone number used for all inbound calls and/or multiple DIDs
depending on the service ordered.
SIP authentication credentials (optional)
o Some SIP Trunking service providers require a unique username and
password to be supplied for IP PBX registrations and/or SIP signaling using
P-Asserted Identity (RFC 3325). This guide provides the configuration
steps for both PBX registration and static or non-registration modes of PBX
operation.
Panasonic KX-TDE100 – v5.0002
www.CoxBusiness.com
Property of Cox Communications, Inc. Version 1.0
Page 4 of 35
Network Topology
The PBX in the above network topology represents the Panasonic KX-TDE100 PBX that
is connected via its LAN port to the LAN port of the EdgeMarc Network Services gateway.
The PBX used in our lab comprises of the following:
Panasonic KX-TDE100 PBX
3 Panasonic KX-NT321 IP Proprietary Telephones
Table 1 – PBX Information
Manufacturer: Panasonic
Model: KX-TED100
Software Version: V5.0002
Does the PBX send SIP
Registration messages (Yes/No)?
Yes
Vendor Contact: www.panasonic.com
www.CoxBusiness.com
Property of Cox Communications, Inc. Version 1.0
Page 5 of 35
Table 2 – E-SBC Information
Manufacturer: Edgewater Network, Inc.
Model: EdgeMarc 4550
Software Version: 11.6.14
Description of Basic Operation and Call Flows
Basic Call Flow:
All phones connect to the KX-TDE100 PBX. The KX-TDE100 PBX will interface with the
service provider using a SIP trunk.
Internal calls:
Calls between phones on the LAN
LAN phone  KX-TDE100 PBX  LAN phone
Outbound calls:
Call is initiated by a LAN phone to a WAN phone.
LAN phone  KX-TDE100 PBX <SIP trunk>  Edgemarc SIP trunk service
provider  WAN phone
Inbound call:
Call is initiated by a WAN phone to a LAN phone.
WAN phone  SIP trunk service provider Edgemarc  <SIP trunk> KX-TDE100
PBX  LAN phone
KX-TDE100 PBX Configuration
The steps below describe the minimum configuration required to enable the PBX to use a
SIP trunk for inbound and outbound calling. Please refer to the KX-TDE100 product
documentation for more information on SIP Trunking or other advanced PBX features.
The configuration described here assumes that the PBX is already configured and
operational with station side phones using assigned extensions or DIDs. This
configuration is based on KX-TDE100 v5.0002
www.CoxBusiness.com
Property of Cox Communications, Inc. Version 1.0
Page 6 of 35
1. The PBX, the phones and the EdgeMarc should be in the same LAN segment. The
PBX is shipped with 2 default IP addresses for the LAN port, one for the IPCMPR
card (10.10.124.11) and the other the VoIP DSP card (10.10.124.12). The
IPCMPR card is used to communicate with the SIP trunk service provider using
SIP protocol and to communicate with the phones. The phones in this test setup
communicate with the PBX using MGCP protocol. The VoIP DSP card is used to
send and receive media traffic between the phones and the PBX. The PBX should
have its gateway set to EdgeMarc’s port 1 LAN IP address (i.e.: 10.10.124.1).
2. To configure the PBX, a configuration GUI, PBX Unified Maintenance Console, is
needed. From the CD that shipped with the PBX, install the configuration GUI by
running the “UPCMCv5.1.2.3_US_R1.exe” program.
3. Invoke the PBX Unified Maintenance Console program from the PC and you
should see a screen with different level of Programmer Code and Password.
Always use the Installer level of Programmer Code and Password when
configuring the PBX. Click the “OK” button to continue.
www.CoxBusiness.com
Property of Cox Communications, Inc. Version 1.0
Page 7 of 35
4. Enter the installer-level Programmer Code (i.e.: “INSTALLER”) in the “Enter
Programmer Code” field and click the “OK” button.
www.CoxBusiness.com
Property of Cox Communications, Inc. Version 1.0
Page 8 of 35
5. Click the “Connect” button to set up a connection with the PBX.
www.CoxBusiness.com
Property of Cox Communications, Inc. Version 1.0
Page 9 of 35
6. Select the “LAN” radio button, enter the “IP address of the IPCMPR card” in the “IP
Address” field, enter the “installer-level password” in the “Enter Password” field
and hit the “Connect” button.
www.CoxBusiness.com
Property of Cox Communications, Inc. Version 1.0
Page 10 of 35
7. To start configuration of the PBX for SIP trunk service from the initial configuration
screen, select “1.Configuration” and click on “1.Slot”.
www.CoxBusiness.com
Property of Cox Communications, Inc. Version 1.0
Page 11 of 35
8. Move the mouse over the “IPCMPR card” and select “card property” to
verify/configure the LAN Setting.
www.CoxBusiness.com
Property of Cox Communications, Inc. Version 1.0
Page 12 of 35
9. Enter “EdgeMarc’s IP address” in the “Default Gateway” field and hit the “OK”
button.
www.CoxBusiness.com
Property of Cox Communications, Inc. Version 1.0
Page 13 of 35
10.Move the mouse over the “IPCMPR Virtual Slot” and select “Select Shelf”.
www.CoxBusiness.com
Property of Cox Communications, Inc. Version 1.0
Page 14 of 35
11.Move the mouse over the “V-SIPGW16” card and select “OUS” as we need to take
the V-SIPGW16 card out of service before making changes to the parameters.
www.CoxBusiness.com
Property of Cox Communications, Inc. Version 1.0
Page 15 of 35
12.Move the mouse over the “V-SIPGW16” card and select “shelf property” to
access the parameters on the SIP gateway.
www.CoxBusiness.com
Property of Cox Communications, Inc. Version 1.0
Page 16 of 35
13.Note the warning messages about taking the V-SIPGW cards out of service before
changing the parameters would appear if you had not taken the card out of service.
Click “OK” to continue.
www.CoxBusiness.com
Property of Cox Communications, Inc. Version 1.0
Page 17 of 35
14.Enter “5060” in the “SIP Client Port Number” field, make sure the “NAT
Traversal” field is set to “Off” and the “STUN Ability” field is set to “Disable” and
hit the “OK” button.
www.CoxBusiness.com
Property of Cox Communications, Inc. Version 1.0
Page 18 of 35
15.Select “1.Configuration”, select “1.Slot” and select “Card Property” to manually
set the DNS server addresses.
www.CoxBusiness.com
Property of Cox Communications, Inc. Version 1.0
Page 19 of 35
16.Click the “Common Settings” button. The “DNS Server IP Address Method” field
should be set to “Manual”. Enter the DNS IP addresses in the “Manual Preferred
DNS Server IP Address” field and the “Manual Preferred DNS Server IP
Address” field and hit the “OK” button.
www.CoxBusiness.com
Property of Cox Communications, Inc. Version 1.0
Page 20 of 35
17.Select “1.Configuration”, select “1.Slot” and select “Port Property” to access SIP
trunk configuration parameters.
www.CoxBusiness.com
Property of Cox Communications, Inc. Version 1.0
Page 21 of 35
18.Select the “Main” tab to start configuring the SIP trunk parameters.
a. From entry number 1 (Slot 1 – Port 1), select “Basic channel” in the “Channel
Attribute” field, enter a descriptive name for EdgeMarc in the “Provider Name”
field, enter EdgeMarc’s IP address in both the “IP Address” field and the ”SIP
Service Domain” field, enter “5060” in the “SIP Server Port Number” field and
enter the subscriber number in the “Subscriber Number” field. Note that the
subscriber number we entered in this example is the same as the Pilot DID.
b. From entry number 2 to 5 (Slot 1 – Port 2 to 5), select “Additional channel for
Ch1” in the “Channel Attribute” field and enter “5060” in the “SIP Server Port
Number” field. Note that the number of additional channel to add depends on
the number of SIP trunks you are licensed to have. In this example:, the
number of licensed SIP trunks is 4.
c. Hit the “OK” button.
www.CoxBusiness.com
Property of Cox Communications, Inc. Version 1.0
Page 22 of 35
19.Select the “Account” tab to configure User Name, Authentication ID and
Authentication Password for the SIP Trunk Service. From entry number 1 (Slot 1 –
Port 1), enter username in the “User Name” field, enter password in the
“Authentication Password” field and hit the “OK” button. In this example:, the
pilot DID, 67823840008, is used for both the username and the password. Note
that these configurations are used only when the EdgeMarc is configured to expect
SIP registration from the PBX.
www.CoxBusiness.com
Property of Cox Communications, Inc. Version 1.0
Page 23 of 35
20.Select the “Register” tab to configure the PBX for SIP registration mode or static
IP address mode. From entry number 1 (Slot 1 – Port 1), select “Enable” in both
the “Register Ability” field and the “Un-Register Ability when port INS” field if
EdgeMarc is configured to receive SIP registration from the PBX; select “Disable” if
EdgeMarc is configured to communicate with the PBX via the PBX’s static IP
address.
www.CoxBusiness.com
Property of Cox Communications, Inc. Version 1.0
Page 24 of 35
21.Select the “Voice/FAX” tab to configure codec priority. For each entry, G.711A and
G.711Mu should be used for IP Codec Priority’s “1st
” and “2nd
” fields. Hit the “OK”
button if you make any changes.
www.CoxBusiness.com
Property of Cox Communications, Inc. Version 1.0
Page 25 of 35
22.Select the “Calling Party” tab to configure CLIP (Calling Line Identification
Presentation) for the outbound calls. In entry number 1, select “PBX-CLIP” for the
From Header’s “User Part” field and hit the “OK” button. This configuration tells the
PBX to use the extension’s “CLIP ID” as the outbound call’s caller ID.
www.CoxBusiness.com
Property of Cox Communications, Inc. Version 1.0
Page 26 of 35
23.Select “1.Configuration”, select “1.Slot” and click on the “IP Phone Registration”
button to see the extensions that are used by the registered phones.
www.CoxBusiness.com
Property of Cox Communications, Inc. Version 1.0
Page 27 of 35
24.Select “10.CO Line & Incoming Call”, select “DID Table” to assign DID for each
extension in use. For each extension in use, enter the assigned DID number in the
“DID Number” field, enter a DID name in the “DID Name” field, enter the same
extension number in the “Day/Lunch/Break/Night” fields. Hit the “OK” button after
you finish assigning DIDs for all the extensions.
www.CoxBusiness.com
Property of Cox Communications, Inc. Version 1.0
Page 28 of 35
25. Select “4.Extensiion”, select “1.Extension Settings” and select “ISDN CLIP” to
assign CLIP ID (Caller ID) for each extension. For each extension in use, enter the
extension name in the “Extension Name” field and enter a DID number in the
“CLIP ID” field. Hit the “OK” button after you finish assigning CLIP ID for all the
extensions.
www.CoxBusiness.com
Property of Cox Communications, Inc. Version 1.0
Page 29 of 35
26.Select “10.CO Line & Incoming Call”, select “1.CO Line Settings” to prepare for
dialing “9” to access the SIP trunks. For each SIP trunk in use (i.e.: the “Shelf” field
set to “Virtual”), enter “SIP trunk” or some descriptive name in the “CO Name” field
and enter “1” or some other number in the “Trunk Group Number” field. Hit the
“OK” button after you finish assigning a same trunk group number for each SIP
trunk. Note that the trunk group number must be the same for all the SIP trunks.
www.CoxBusiness.com
Property of Cox Communications, Inc. Version 1.0
Page 30 of 35
27.Select “3.Group”, select “1.Trunk Group” and select “2.Local Access Priority” to
configure dialing “9” to access the SIP trunks only. Select the “trunk group number
and SIP trunk” in the “Trunk Group No. & Name” field for the Priority 1 entry,
select blank in the “Trunk Group No. & Name” field for the Priority 2 entry and hit
the “OK” button.
www.CoxBusiness.com
Property of Cox Communications, Inc. Version 1.0
Page 31 of 35
28.Select “3.Group”, select “1.Trunk Group” and select “4.Dialing Plan” to add more
dialing plans if the default dialing plans are not enough.
www.CoxBusiness.com
Property of Cox Communications, Inc. Version 1.0
Page 32 of 35
29.Select “1.Configuration”, select “1.Slot”, move the mouse over the “V-SIPGW16”
card and select “INS” to put the V-SIPGW16 card in service since we have finished
making changes to the parameters.
www.CoxBusiness.com
Property of Cox Communications, Inc. Version 1.0
Page 33 of 35
30.Select “1.Configuration”, select “1.Slot” and select “Port Property” and the SIP
trunk configurations should reflect the INS (in service) status. Note that you may
need to reboot the PBX as some changes may require a reset to take effect.
www.CoxBusiness.com
Property of Cox Communications, Inc. Version 1.0
Page 34 of 35
31.In order to use conferencing, select Extension -> Flexible Button. Then add
conference to the next available button on each phone.
www.CoxBusiness.com
Property of Cox Communications, Inc. Version 1.0
Page 35 of 35
32. Call Forwarding Always/Busy, go to Extension -> FWD/DND.
33. Call Park – Call Retrieval. Form phone 1, place or receive a call. Hit the transfer
button and transfer the call to *5201 then hang up phone 1. To retrieve the call
from the Parking lot, pick up any local phone and dial *5201.
For advanced configurations and support please contact the Edgewater Technical Assistance
Center support@edgewaternetworks.com or call 408.351.7255.

Panasonic kx tde100_config-guide

  • 1.
    www.CoxBusiness.com Property of CoxCommunications, Inc. Version 1.0 Page 1 of 35 October 10th, 2012 SIP Trunking using the EdgeMarc Network Services Gateway and the Panasonic KX-TDE100 IP-PBX © 2013, Cox Communications, Inc. All rights reserved. This documentation is the confidential and proprietary intellectual property of Cox Communications, Inc. Any unauthorized use, reproduction, preparation of derivative works,
  • 2.
    www.CoxBusiness.com Property of CoxCommunications, Inc. Version 1.0 Page 2 of 35 Table of Contents Overview…………………………………………………………………………………………. 3 Prerequisites……………………………………………………………………………………..3 Network Topology……………………………………………………………………………… 4 Description of Basic Operation and Call Flows……………………………………………5 KX-TDE 100 PBX Configuration……………………………………………………………….5 PBX Unified Maintenance Console...............................................................................6-9 Configuration Slot...........................................................................................................10 Card Property...................................................................................................................11 Default Gateway...............................................................................................................12 IPCMPR Virtual Slot.........................................................................................................13 V-SIPGW16.......................................................................................................................14 V-SIPGW16 Shelf Property.............................................................................................15 V-SIPGW Warning............................................................................................................16 SIP Client Port Number...................................................................................................17 Manual DNS Server Address..........................................................................................18 DNS Common Settings...................................................................................................19 SIP Trunk Configuration Parameters.............................................................................20 Channel Attribute............................................................................................................21 User Name Authentication ID and Password...............................................................22 SIP Registration...............................................................................................................23 Voice/FAX.........................................................................................................................24 Calling Party.....................................................................................................................25 IP Phone Registration.....................................................................................................26 DID Table..........................................................................................................................27 Caller ID…........................................................................................................................28 Trunk Group Number......................................................................................................29 Local Access Priority......................................................................................................30 Dialing Plan......................................................................................................................31 V-SIPGW16 INS................................................................................................................32 Port Property Virtual SIP Gateway.................................................................................33 Call Forwarding………………………………………………………………………………...35 Call Park and Call Retrieval……………..……………………………………………………35
  • 3.
    www.CoxBusiness.com Property of CoxCommunications, Inc. Version 1.0 Page 3 of 35 Overview The purpose of this configuration guide is to describe the steps needed to configure the Panasonic KX-TDE100 IP-PBX for proper operation in a SIP Trunking application. Please note that this guide documents the basic configuration needed in the PBX and that the requirements of your specific SIP Trunking environment may require modifications to the configuration steps provided in this document. Prerequisites SIP Trunking information provided by the VoIP service provider: SIP proxy server IP address or DNS name. Trunking Direct Inward Dial (DID) phone numbers o Calls to the Trunking DID(s) are forwarded from the service provider to the wide area network (WAN) IP address of the EdgeMarc. There may be a single “Pilot” phone number used for all inbound calls and/or multiple DIDs depending on the service ordered. SIP authentication credentials (optional) o Some SIP Trunking service providers require a unique username and password to be supplied for IP PBX registrations and/or SIP signaling using P-Asserted Identity (RFC 3325). This guide provides the configuration steps for both PBX registration and static or non-registration modes of PBX operation. Panasonic KX-TDE100 – v5.0002
  • 4.
    www.CoxBusiness.com Property of CoxCommunications, Inc. Version 1.0 Page 4 of 35 Network Topology The PBX in the above network topology represents the Panasonic KX-TDE100 PBX that is connected via its LAN port to the LAN port of the EdgeMarc Network Services gateway. The PBX used in our lab comprises of the following: Panasonic KX-TDE100 PBX 3 Panasonic KX-NT321 IP Proprietary Telephones Table 1 – PBX Information Manufacturer: Panasonic Model: KX-TED100 Software Version: V5.0002 Does the PBX send SIP Registration messages (Yes/No)? Yes Vendor Contact: www.panasonic.com
  • 5.
    www.CoxBusiness.com Property of CoxCommunications, Inc. Version 1.0 Page 5 of 35 Table 2 – E-SBC Information Manufacturer: Edgewater Network, Inc. Model: EdgeMarc 4550 Software Version: 11.6.14 Description of Basic Operation and Call Flows Basic Call Flow: All phones connect to the KX-TDE100 PBX. The KX-TDE100 PBX will interface with the service provider using a SIP trunk. Internal calls: Calls between phones on the LAN LAN phone  KX-TDE100 PBX  LAN phone Outbound calls: Call is initiated by a LAN phone to a WAN phone. LAN phone  KX-TDE100 PBX <SIP trunk>  Edgemarc SIP trunk service provider  WAN phone Inbound call: Call is initiated by a WAN phone to a LAN phone. WAN phone  SIP trunk service provider Edgemarc  <SIP trunk> KX-TDE100 PBX  LAN phone KX-TDE100 PBX Configuration The steps below describe the minimum configuration required to enable the PBX to use a SIP trunk for inbound and outbound calling. Please refer to the KX-TDE100 product documentation for more information on SIP Trunking or other advanced PBX features. The configuration described here assumes that the PBX is already configured and operational with station side phones using assigned extensions or DIDs. This configuration is based on KX-TDE100 v5.0002
  • 6.
    www.CoxBusiness.com Property of CoxCommunications, Inc. Version 1.0 Page 6 of 35 1. The PBX, the phones and the EdgeMarc should be in the same LAN segment. The PBX is shipped with 2 default IP addresses for the LAN port, one for the IPCMPR card (10.10.124.11) and the other the VoIP DSP card (10.10.124.12). The IPCMPR card is used to communicate with the SIP trunk service provider using SIP protocol and to communicate with the phones. The phones in this test setup communicate with the PBX using MGCP protocol. The VoIP DSP card is used to send and receive media traffic between the phones and the PBX. The PBX should have its gateway set to EdgeMarc’s port 1 LAN IP address (i.e.: 10.10.124.1). 2. To configure the PBX, a configuration GUI, PBX Unified Maintenance Console, is needed. From the CD that shipped with the PBX, install the configuration GUI by running the “UPCMCv5.1.2.3_US_R1.exe” program. 3. Invoke the PBX Unified Maintenance Console program from the PC and you should see a screen with different level of Programmer Code and Password. Always use the Installer level of Programmer Code and Password when configuring the PBX. Click the “OK” button to continue.
  • 7.
    www.CoxBusiness.com Property of CoxCommunications, Inc. Version 1.0 Page 7 of 35 4. Enter the installer-level Programmer Code (i.e.: “INSTALLER”) in the “Enter Programmer Code” field and click the “OK” button.
  • 8.
    www.CoxBusiness.com Property of CoxCommunications, Inc. Version 1.0 Page 8 of 35 5. Click the “Connect” button to set up a connection with the PBX.
  • 9.
    www.CoxBusiness.com Property of CoxCommunications, Inc. Version 1.0 Page 9 of 35 6. Select the “LAN” radio button, enter the “IP address of the IPCMPR card” in the “IP Address” field, enter the “installer-level password” in the “Enter Password” field and hit the “Connect” button.
  • 10.
    www.CoxBusiness.com Property of CoxCommunications, Inc. Version 1.0 Page 10 of 35 7. To start configuration of the PBX for SIP trunk service from the initial configuration screen, select “1.Configuration” and click on “1.Slot”.
  • 11.
    www.CoxBusiness.com Property of CoxCommunications, Inc. Version 1.0 Page 11 of 35 8. Move the mouse over the “IPCMPR card” and select “card property” to verify/configure the LAN Setting.
  • 12.
    www.CoxBusiness.com Property of CoxCommunications, Inc. Version 1.0 Page 12 of 35 9. Enter “EdgeMarc’s IP address” in the “Default Gateway” field and hit the “OK” button.
  • 13.
    www.CoxBusiness.com Property of CoxCommunications, Inc. Version 1.0 Page 13 of 35 10.Move the mouse over the “IPCMPR Virtual Slot” and select “Select Shelf”.
  • 14.
    www.CoxBusiness.com Property of CoxCommunications, Inc. Version 1.0 Page 14 of 35 11.Move the mouse over the “V-SIPGW16” card and select “OUS” as we need to take the V-SIPGW16 card out of service before making changes to the parameters.
  • 15.
    www.CoxBusiness.com Property of CoxCommunications, Inc. Version 1.0 Page 15 of 35 12.Move the mouse over the “V-SIPGW16” card and select “shelf property” to access the parameters on the SIP gateway.
  • 16.
    www.CoxBusiness.com Property of CoxCommunications, Inc. Version 1.0 Page 16 of 35 13.Note the warning messages about taking the V-SIPGW cards out of service before changing the parameters would appear if you had not taken the card out of service. Click “OK” to continue.
  • 17.
    www.CoxBusiness.com Property of CoxCommunications, Inc. Version 1.0 Page 17 of 35 14.Enter “5060” in the “SIP Client Port Number” field, make sure the “NAT Traversal” field is set to “Off” and the “STUN Ability” field is set to “Disable” and hit the “OK” button.
  • 18.
    www.CoxBusiness.com Property of CoxCommunications, Inc. Version 1.0 Page 18 of 35 15.Select “1.Configuration”, select “1.Slot” and select “Card Property” to manually set the DNS server addresses.
  • 19.
    www.CoxBusiness.com Property of CoxCommunications, Inc. Version 1.0 Page 19 of 35 16.Click the “Common Settings” button. The “DNS Server IP Address Method” field should be set to “Manual”. Enter the DNS IP addresses in the “Manual Preferred DNS Server IP Address” field and the “Manual Preferred DNS Server IP Address” field and hit the “OK” button.
  • 20.
    www.CoxBusiness.com Property of CoxCommunications, Inc. Version 1.0 Page 20 of 35 17.Select “1.Configuration”, select “1.Slot” and select “Port Property” to access SIP trunk configuration parameters.
  • 21.
    www.CoxBusiness.com Property of CoxCommunications, Inc. Version 1.0 Page 21 of 35 18.Select the “Main” tab to start configuring the SIP trunk parameters. a. From entry number 1 (Slot 1 – Port 1), select “Basic channel” in the “Channel Attribute” field, enter a descriptive name for EdgeMarc in the “Provider Name” field, enter EdgeMarc’s IP address in both the “IP Address” field and the ”SIP Service Domain” field, enter “5060” in the “SIP Server Port Number” field and enter the subscriber number in the “Subscriber Number” field. Note that the subscriber number we entered in this example is the same as the Pilot DID. b. From entry number 2 to 5 (Slot 1 – Port 2 to 5), select “Additional channel for Ch1” in the “Channel Attribute” field and enter “5060” in the “SIP Server Port Number” field. Note that the number of additional channel to add depends on the number of SIP trunks you are licensed to have. In this example:, the number of licensed SIP trunks is 4. c. Hit the “OK” button.
  • 22.
    www.CoxBusiness.com Property of CoxCommunications, Inc. Version 1.0 Page 22 of 35 19.Select the “Account” tab to configure User Name, Authentication ID and Authentication Password for the SIP Trunk Service. From entry number 1 (Slot 1 – Port 1), enter username in the “User Name” field, enter password in the “Authentication Password” field and hit the “OK” button. In this example:, the pilot DID, 67823840008, is used for both the username and the password. Note that these configurations are used only when the EdgeMarc is configured to expect SIP registration from the PBX.
  • 23.
    www.CoxBusiness.com Property of CoxCommunications, Inc. Version 1.0 Page 23 of 35 20.Select the “Register” tab to configure the PBX for SIP registration mode or static IP address mode. From entry number 1 (Slot 1 – Port 1), select “Enable” in both the “Register Ability” field and the “Un-Register Ability when port INS” field if EdgeMarc is configured to receive SIP registration from the PBX; select “Disable” if EdgeMarc is configured to communicate with the PBX via the PBX’s static IP address.
  • 24.
    www.CoxBusiness.com Property of CoxCommunications, Inc. Version 1.0 Page 24 of 35 21.Select the “Voice/FAX” tab to configure codec priority. For each entry, G.711A and G.711Mu should be used for IP Codec Priority’s “1st ” and “2nd ” fields. Hit the “OK” button if you make any changes.
  • 25.
    www.CoxBusiness.com Property of CoxCommunications, Inc. Version 1.0 Page 25 of 35 22.Select the “Calling Party” tab to configure CLIP (Calling Line Identification Presentation) for the outbound calls. In entry number 1, select “PBX-CLIP” for the From Header’s “User Part” field and hit the “OK” button. This configuration tells the PBX to use the extension’s “CLIP ID” as the outbound call’s caller ID.
  • 26.
    www.CoxBusiness.com Property of CoxCommunications, Inc. Version 1.0 Page 26 of 35 23.Select “1.Configuration”, select “1.Slot” and click on the “IP Phone Registration” button to see the extensions that are used by the registered phones.
  • 27.
    www.CoxBusiness.com Property of CoxCommunications, Inc. Version 1.0 Page 27 of 35 24.Select “10.CO Line & Incoming Call”, select “DID Table” to assign DID for each extension in use. For each extension in use, enter the assigned DID number in the “DID Number” field, enter a DID name in the “DID Name” field, enter the same extension number in the “Day/Lunch/Break/Night” fields. Hit the “OK” button after you finish assigning DIDs for all the extensions.
  • 28.
    www.CoxBusiness.com Property of CoxCommunications, Inc. Version 1.0 Page 28 of 35 25. Select “4.Extensiion”, select “1.Extension Settings” and select “ISDN CLIP” to assign CLIP ID (Caller ID) for each extension. For each extension in use, enter the extension name in the “Extension Name” field and enter a DID number in the “CLIP ID” field. Hit the “OK” button after you finish assigning CLIP ID for all the extensions.
  • 29.
    www.CoxBusiness.com Property of CoxCommunications, Inc. Version 1.0 Page 29 of 35 26.Select “10.CO Line & Incoming Call”, select “1.CO Line Settings” to prepare for dialing “9” to access the SIP trunks. For each SIP trunk in use (i.e.: the “Shelf” field set to “Virtual”), enter “SIP trunk” or some descriptive name in the “CO Name” field and enter “1” or some other number in the “Trunk Group Number” field. Hit the “OK” button after you finish assigning a same trunk group number for each SIP trunk. Note that the trunk group number must be the same for all the SIP trunks.
  • 30.
    www.CoxBusiness.com Property of CoxCommunications, Inc. Version 1.0 Page 30 of 35 27.Select “3.Group”, select “1.Trunk Group” and select “2.Local Access Priority” to configure dialing “9” to access the SIP trunks only. Select the “trunk group number and SIP trunk” in the “Trunk Group No. & Name” field for the Priority 1 entry, select blank in the “Trunk Group No. & Name” field for the Priority 2 entry and hit the “OK” button.
  • 31.
    www.CoxBusiness.com Property of CoxCommunications, Inc. Version 1.0 Page 31 of 35 28.Select “3.Group”, select “1.Trunk Group” and select “4.Dialing Plan” to add more dialing plans if the default dialing plans are not enough.
  • 32.
    www.CoxBusiness.com Property of CoxCommunications, Inc. Version 1.0 Page 32 of 35 29.Select “1.Configuration”, select “1.Slot”, move the mouse over the “V-SIPGW16” card and select “INS” to put the V-SIPGW16 card in service since we have finished making changes to the parameters.
  • 33.
    www.CoxBusiness.com Property of CoxCommunications, Inc. Version 1.0 Page 33 of 35 30.Select “1.Configuration”, select “1.Slot” and select “Port Property” and the SIP trunk configurations should reflect the INS (in service) status. Note that you may need to reboot the PBX as some changes may require a reset to take effect.
  • 34.
    www.CoxBusiness.com Property of CoxCommunications, Inc. Version 1.0 Page 34 of 35 31.In order to use conferencing, select Extension -> Flexible Button. Then add conference to the next available button on each phone.
  • 35.
    www.CoxBusiness.com Property of CoxCommunications, Inc. Version 1.0 Page 35 of 35 32. Call Forwarding Always/Busy, go to Extension -> FWD/DND. 33. Call Park – Call Retrieval. Form phone 1, place or receive a call. Hit the transfer button and transfer the call to *5201 then hang up phone 1. To retrieve the call from the Parking lot, pick up any local phone and dial *5201. For advanced configurations and support please contact the Edgewater Technical Assistance Center support@edgewaternetworks.com or call 408.351.7255.