This document provides information about the Linux boot process and basic Linux commands.
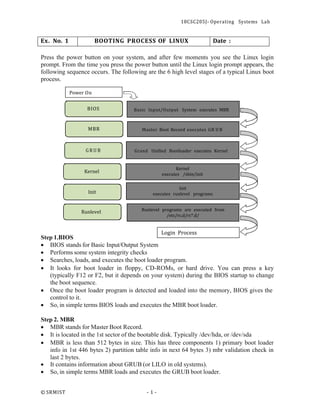
1. The Linux boot process involves six main stages: BIOS, MBR, GRUB, kernel, init, and runlevel programs. BIOS loads the MBR which loads GRUB, GRUB loads the kernel and initrd, the kernel loads init, and init executes programs based on the specified runlevel.
2. Basic Linux commands demonstrated include echo, date, cal, passwd, ls, cat, wc, cp, mv, rm, head, tail, mkdir, cd, pwd, chmod, and commands using pipes, redirection, and variables.
3. The vi editor commands demonstrated are for inserting,
![18CSC205J- Operating Systems Lab
© SRMIST - 5 -
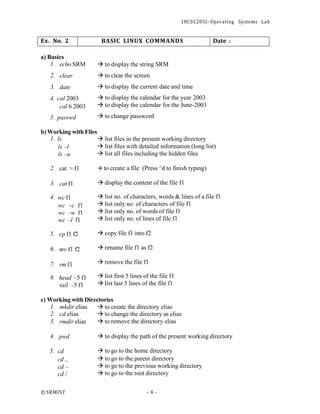
d) File name substitution
1. ls f?
2. ls *.c
3. ls [gpy]et
→ list files start with ‘f’and followed by any one character
→ list files with extension ‘c’
→ list files whose first letter is any one of the character g, p
or y and followed by the word et
4. ls [a-d,l-m]ring → list files whose first letter is any one of the character
from a to d and l to m and followed by the word ring.
e) I/O Redirection
1. Input redirection
wc –l < ex1 → To find the number of lines of the file ‘ex1’
2. Output redirection
who > f2 → the output of ‘who’will be redirected to file f2
3. cat >> f1 → to append more into the file f1
f) Piping
Syntax : Command1 | command2
Output of the command1 is transferred to the command2 as input. Finally
output of the command2 will be displayed on the monitor.
ex. cat f1 | more → list the contents of file f1 screen by screen
head –6 f1 |tail –2 → prints the 5th & 6th lines of the file f1.
g) Environment variables
1. echo $HOME → display the path of the home directory
2. echo $PS1
3. echo $PS2
4. echo $LOGNAME
5. echo $PATH
→ display the prompt string $
→ display the second prompt string ( > symbol by default )
→ login name
→ list of pathname where the OS searches for an
executable file](https://image.slidesharecdn.com/oslabfile-230705050407-99d8e416/85/OS_lab_file-pdf-8-320.jpg)
![18CSC205J- Operating Systems Lab
© SRMIST - 6 -
Date :
Staff In-charge Sign :
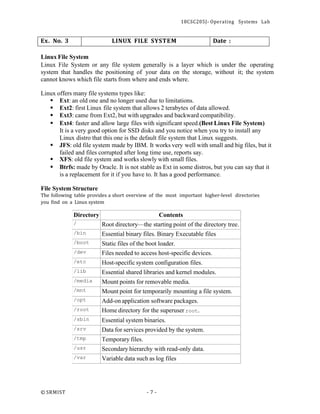
h) File Permission
-- chmod command is used to change the access permission of a file.
Method-1
Syntax : chmod [ugo] [+/-] [ rwxa ] filename
u : user, g : group, o : others
+ : Add permission - : Remove the permission
r : read, w : write, x : execute, a : all permissions
ex. chmod ug+rw f1
adding ‘read & write’permissions of file f1 to both user and group
members.
Method-2
Syntax : chmod octnum file1
The 3 digit octal number represents as follows
• first digit
• second digit
• third digit
-- file permissions for the user
-- file permissions for the group
-- file permissions for others
Each digit is specified as the sum of following
4 – read permission, 2 – write permission, 1 – execute permission
ex. chmod 754 f1
it change the file permission for the file as follows
• read, write & execute permissions for the user ie; 4+2+1 = 7
• read, & execute permissions for the group members ie; 4+0+1 = 5
• only read permission for others ie; 4+0+0 = 4
Verified by](https://image.slidesharecdn.com/oslabfile-230705050407-99d8e416/85/OS_lab_file-pdf-9-320.jpg)

![18CSC205J- Operating Systems Lab
© SRMIST - 11 -
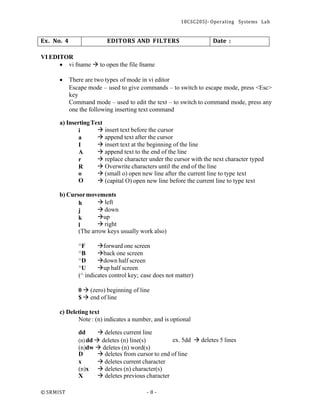
8. diff
▪ Used to differentiate two files
Syntax : diff f1 f2
compare two files f1 & f2 and prints all the lines that are differed between f1
& f2.
9. comm
▪ Used to compare two sorted files
Syntax : comm file1 file2
-1
-2
-3
-12
-13
-23
Three columns of output will be displayed.
First column displays the lines that are unique to file1
Second column displays the lines that are unique to file2
Third column displays the lines that are appears in both the files
option suppress first column
option suppress second column
option suppress third column
option display only third column
option display only second column
option display only first column
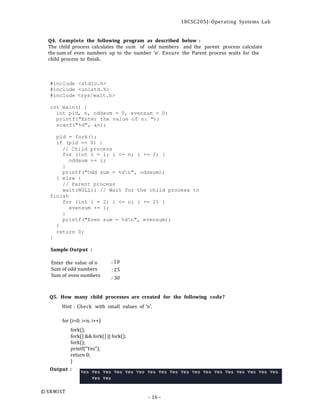
Q1. Write a command to cut 5 to 8 characters of the file f1.
$ cut -c < characters> f1
Q2. Write a command to display user-id of all the users in your system.
$ cut -d: -f1 /etc/passwd | sort
Q3. Write a command to paste all the lines of the file f1 into single line
$ paste -s f1
Q4. Write a command to cut the first field of file f1 and second field of file f2 and paste into
the file f3.
$ paste <(cut -d' ' -f1 f1) <(cut -d' ' -f2 f2) > f3
Q5. Write a command to change all small case letters to capitals of file f2.
$ tr '[:lower:]' '[:upper:]' < f2 > f2_uppercase
Q6. Write a command to replace all tab character in the file f2 by :
$ tr 't' ' ' < f2 > f2_no_tabs
Q7. Write a command to check whether the user judith is available in your system or not.
(use grep)
$grep -q "^judith:" /etc/passwd && echo "User judith exists" || echo "User judith does not
exist"](https://image.slidesharecdn.com/oslabfile-230705050407-99d8e416/85/OS_lab_file-pdf-14-320.jpg)
![18CSC205J- Operating Systems Lab
© SRMIST - 24 -
Ex. No. 9 SHELL PROGRAMS Date :
How to run a Shell Script
▪ Edit and save your program using editor
▪ Add execute permission by chmod command
▪ Run your program using the name of your program
./program-name
Important Hints
• No space before and after the assignment operator Ex. sum=0
• Single quote ignores all special characters. Dollar sign, Back quote and Back slash are
not ignored inside Double quote. Back quote is used as command substitution. Back
slash is used to remove the special meaning of a character.
• Arithmetic expression can be written as follows : i=$((i+1) or i=$(expr
$i + 1)
• Command line arguments are referred inside the programme as $1, $2, ..and so on
• $* represents all arguments, $# specifies the number of arguments
• read statement is used to get input from input device. Ex. read a b
Syntax for if statement
if [ condition ]
then
...
elif [ condition ]
then
...
else
...
fi
Syntaxfor case structure
case value in
pat1) ...
pat2) ...
*) ...
esac
Syntaxfor for-loop
statement;;
Statement;;
Statement;;
for var in list-of-values
do
...
...
done
Syntax forWhile loop
while commandt
do
...
...
done](https://image.slidesharecdn.com/oslabfile-230705050407-99d8e416/85/OS_lab_file-pdf-27-320.jpg)
![18CSC205J- Operating Systems Lab
© SRMIST - 25 -
Syntax for printf statement
printf “string and format” arg1 arg2 … …
• Break and continue statements functions similar to C programming
• Relational operators are –lt, -le, -gt, -ge, -eq,-ne
• Ex. (i>= 10) is written as [ $i -ge 10 ]
• Logical operators (and, or, not) are -o, -a, !
• Ex. (a>b) && (a>c) is written as [ $a –gt $b –a $a –gt $c ]
• Two strings can be compared using = operator
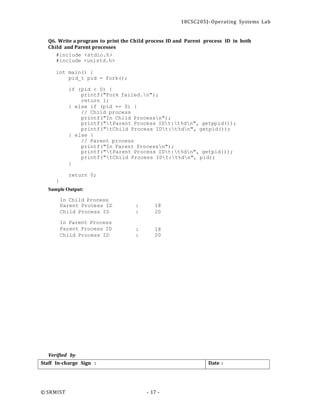
Q1. Given the following values
num=10, x=*, y=`date` a="Hello, 'he said'"
Execute and write the output of the following commands
Command Output
echo num Num
echo $num 10
echo $x *
echo ‘$x’ $x
echo “$x” *
echo $y Mon may 02 11:57:13 IST 2023
echo $(date) Mon may 02 11:57:13 IST 2023
echo $a Hello, “he said”
echo $num $num
echo $$num $10
Q1. Find the output of the following shell scripts
$ vi ex51
echo Enter value for n
read n
sum=0
i=1
while [ $i –le $n ]
do
done
sum=$((sum+i))
i=$((i+2))
echo Sum is $sum
Output :](https://image.slidesharecdn.com/oslabfile-230705050407-99d8e416/85/OS_lab_file-pdf-28-320.jpg)
![18CSC205J- Operating Systems Lab
© SRMIST - 26 -
Q2. Write a program to check whether the file has execute permission or not. If not, add the
permission.
vi ex52
#!/bin/bash
# get the file name from user
echo "Enter file name:"
read file
# check if the file has execute permission
if [[ -x "$file" ]]; then
echo "File already has execute permission"
else
# add execute permission to the file
chmod +x "$file"
echo "Execute permission added to file"
fi
Q3. Write a shell script to print a greeting as specified below.
If hour is greater than or equal to 0 (midnight) and less than or equal to 11 (up to 11:59:59),
"Good morning" is displayed.
If hour is greater than or equal to 12 (noon) and less than or equal to 17 (up to 5:59:59
p.m.), "Good afternoon" is displayed.
If neither of the preceding two conditions is satisfied, "Good evening" is displayed.
#!/bin/bash
hour=$(date | cut -c12-13)
if [ "$hour" -ge 0 -a "$hour" -le 11 ]
then
echo "Good morning"
elif [ "$hour" -ge 12 -a "$hour" -le 17 ]
then
else
fi
echo "Good afternoon"
echo "Good evening"](https://image.slidesharecdn.com/oslabfile-230705050407-99d8e416/85/OS_lab_file-pdf-29-320.jpg)
![18CSC205J- Operating Systems Lab
© SRMIST - 27 -
Date :
Staff In-charge Sign :
Q4. Write a shell script to list only the name of sub directories in the present working
directory
for file in *; do
# Check if the file is a directory
if [ -d "$file" ]; then
# Print the name of the directory
echo "$file"
fi
done
Q5. Write a program to check all the files in the present working directory for a pattern
(passed through command line) and display the name of the file followed by a message
stating that the pattern is available or not available.
pattern=$1
for file in *
do
if grep -q "$pattern" "$file"; then
echo "$file: Pattern found"
else
echo "$file: Pattern not found"
fi
done
Verified by](https://image.slidesharecdn.com/oslabfile-230705050407-99d8e416/85/OS_lab_file-pdf-30-320.jpg)
![18CSC205J- Operating Systems Lab
© SRMIST - 28 -
int execl(const char* path, const char* arg, …)
int execlp(const char* file, const char* arg, …)
int execv(const char* path, const char* argv[])
int execvp(const char* file, const char* argv[])
int execvpe(const char* file, const char* argv[], char *const envp[])
int execle(const char* path, const char* arg, …, char* const envp[])
Ex. No. 10 OVERLAY CONCEPTS Date :
Exec() System Call – Overlay Calling process and run new Program
The exec() system call replaces (overwrites) the current process with the new process
image. The PID of the new process remains the same however code, data, heap and stack of
the process are replaced by the new program.
There are 6 system calls in the family of exec().All of these functions mentioned below are
layered on top of execve(), and they differ from one another and from execve() only in the
way in which the program name, argument list, and environment of the new program are
specified.
Syntax
• The names of the first five of above functions are of the form execXY.
• X is either l or v depending upon whether arguments are given in the list format (arg0,
arg1, ..., NULL) or arguments are passed in an array (vector).
• Y is either absent or is either a p or an e. In case Y is p, the PATH environment variable
is used to search for the program. If Y is e, then the environment passed in envp array is
used.
• In case of execvpe, X is v and Y is e. The execvpe function is a GNU extension. It is
named so as to differentiate it from the execve system call.
Q1. Execute the Following Program and write the output
$vi ex61.c
#include <stdio.h>
#include<unistd.h>
int main()
{
printf("Transfer to execlp function n");
execlp(“head”, “head”,”-2”,”f1”,NULL);
printf("This line will not execute n”);
return 0;
}
Output :
Why second printf statement is not executing?
The program will not execute the printf() statement after the execlp() function call, as the
execlp() function replaces the current process image with a new process image specified by the
command argument.](https://image.slidesharecdn.com/oslabfile-230705050407-99d8e416/85/OS_lab_file-pdf-31-320.jpg)
![18CSC205J- Operating Systems Lab
© SRMIST - 29 -
Q2. Rewrite question Q1 with execl() function. Pass the 3rd=and 4th=argument=of the=
function execl() through command line arguments.
$vi ex62.c
#include <stdio.h>
#include <unistd.h>
int main(int argc, char *argv[]) {
printf("Transfer to execl function n");
execl("/usr/bin/head", "head", argv[1], argv[2], NULL);
printf("This line will not execute n");
return 0;
}
Input : ./a.out -3 f1
Output : Transfer to execl function
This is line 1
This is line 2
Q3. Rewrite question Q1 with execv() function.$vi=ex63.c
#include <stdio.h>
#include <unistd.h>
int main() {
printf("Transfer to execv functionn");
char *args[] = {"head", "-2", "f1", NULL};
execv("/usr/bin/head", args);
printf("This line will not executen");
return 0;
}
Output:
Q4. Rewrite question Q1 with execv() function.$vi=ex64.c
#include <stdio.h>
#include <unistd.h>
int main() {
printf("Transfer to execv functionn");
char *args[] = {"head", "-2", "f1", NULL};
execv("/usr/bin/head", args);
printf("This line will not executen");
return 0;
}
Output:](https://image.slidesharecdn.com/oslabfile-230705050407-99d8e416/85/OS_lab_file-pdf-32-320.jpg)
![18CSC205J- Operating Systems Lab
© SRMIST - 30 -
Q5. a. Write a program (ex651.c) to find the factorial of a given number.
b. Write a program (ex652.c) to find the sum of numbers from 1 to n.
c. Write a program (ex653.c) to execute the program ex651.c in child process and
the program ex562.c in parent process
Note : Pass the values through command line arguments for the above programs
$vi ex651.c
#!/bin/bash
# Read the input from the user
read -p "Enter a number: " num
# Initialize the result to 1
result=1
# Calculate the factorial
for (( i=1; i<=$num; i++ ))
do
result=$((result * i))
done
# Print the result
echo "The factorial of $num is $result"
$vi ex652.c
#!/bin/bash
echo "Enter the value of n:"
read n
sum=0
i=1
while [ $i -le $n ]
do
sum=$((sum + i))
i=$((i + 1))
done](https://image.slidesharecdn.com/oslabfile-230705050407-99d8e416/85/OS_lab_file-pdf-33-320.jpg)
![18CSC205J- Operating Systems Lab
© SRMIST - 32 -
Ex. No. 11 PIPES Date :
Pipe is a communication medium between two or more processes. The system call for
creating pipe is
int pipe(int p[2]);
This system call would create a pipe for one-way communication i.e., it creates two
descriptors, first one is connected to read from the pipe and other one is connected to write
into the pipe.
Descriptor p[0] is for reading and p[1] is for writing. Whatever is written into p[1] can be
read from p[0].
Q1. Write the output of the following program
#include <stdio.h>
#include<unistd.h>
#include<sys/wait.h> int
main()
{
int p[2];
char buff[25];
if(fork()==0)
{
printf("Child : Writing to pipe n");
write(p[1],”Welcome”,8);
printf("Child Exitingn");
}
else
{
wait(NULL);
printf("Parent : Reading from pipe n");
read(p[1],buff,8);
printf("Parent Exitingn");
}
Output:
return 0;
}
Implementing command line pipe using exec() family of functions00
Follow the steps to transfer the output of a process to pipe:
(i) Close the standard output descriptor
(ii) Use the following system calls, to take duplicate of output file descriptor of the pipe
int dup(int fd);
int dup2(int oldfd, int newfd);
(iii) Close the input file descriptor of the pipe
(iv) Now execute the process](https://image.slidesharecdn.com/oslabfile-230705050407-99d8e416/85/OS_lab_file-pdf-35-320.jpg)
![18CSC205J- Operating Systems Lab
© SRMIST - 33 -
Follow the steps to get the input from the pipe for a process:
(i) Close the standard input descriptor
(ii) Take the duplicate of input file descriptor of the pipe using dup() system call
(iii) Close the output file descriptor of the pipe
(iv) Now execute the process
Q2. Write a program to implement the following command line pipe using pipe() and dup()
ls –l | wc -l
#include <stdio.h>
#include <stdlib.h>
#include <unistd.h>
int main() {
int pipefd[2];
pid_t pid;
if (pipe(pipefd) == -1) {
perror("pipe");
exit(EXIT_FAILURE);
}
pid = fork();
if (pid == -1) {
perror("fork");
exit(EXIT_FAILURE);
} else if (pid == 0) { // Child process
close(pipefd[1]); // Close unused write end
dup2(pipefd[0], STDIN_FILENO); // Redirect stdin to
pipe
execlp("wc", "wc", "-l", NULL); // Execute wc command
perror("exec wc");
exit(EXIT_FAILURE);
} else { // Parent process
close(pipefd[0]); // Close unused read end
dup2(pipefd[1], STDOUT_FILENO); // Redirect stdout to
pipe](https://image.slidesharecdn.com/oslabfile-230705050407-99d8e416/85/OS_lab_file-pdf-36-320.jpg)
![18CSC205J- Operating Systems Lab
© SRMIST - 35 -
Date :
Staff In-charge Sign :
Q3. Write the output of the following program
#include<fcntl.h>
#include<sys/types.h>
#include<sys/stat.h>
#include<unistd.h>
int main()
{
char buff[25];
int rfd,wfd;
mkfifo("fif1",O_CREAT|0644);
if (fork()==0)
{
printf("Child writing into FIFOn");
wfd=open("fif1",O_WRONLY);
write(wfd,”Hello”,6);
}
else
{
rfd=open("fif1",O_RDONLY);
read(rfd,buff,6);
printf("Parent reads from FIFO : %sn",buff);
}
return 0;
}
Output :Child writing into FIFO
Parent reads from FIFO : Hello
Verified by](https://image.slidesharecdn.com/oslabfile-230705050407-99d8e416/85/OS_lab_file-pdf-38-320.jpg)
![18CSC205J- Operating Systems Lab
© SRMIST - 36 -
Ex. No. 12 & 13 MESSAG E QUEUE & SHARED MEMORY Date :
Message Queue
Message queue is one of the interprocess communication mechanisms. here are two
varieties of message queues, System V message queues and POSIX message queues. Both
provide almost the same functionality but system calls for the two are different.
There are three system wide limits regarding the message queues. These are, MSGMNI,
maximum number of queues in the system, MSGMAX, maximum size of a message in bytes
and MSGMNB, which is the maximum size of a message queue. We can see these limits with
the ipcs -l command
Include the following header files for system V message queues
<sys/msg.h>, <sys/ipc.h>, <sys/types.h>
System V Message Queue System Calls
To create a message queue,
int msgget (key_t key, int msg_flags);
key
flags
→ Message queue identifier ex. (key_t)77
→ IPC_CREAT|0664 : to create a message queue with permission 0644
IPC_CREATE|IPC_EXCL|0664 : to create message if doesn’t exists
To control the message queue,
int msgctl(int msqid, int cmd, struct msqid_ds *buf);
msquid→ Message id returned by msgget()
cmd → IPC_STAT : to get the status of a message queue
IPC_SET : to change the properties of a message queue
IPC_RMID : to remove a message queue
To send a message into message queue,
int msgsnd(int msquid, const void *msgp, size_t msqsz, int
msgflg);
msquid→ Message id returned by msgget()
msgp → message to be sent. Buffer or message structure is used here.
struct buffer {
int len;
int mtype;
char buf[50];
}x;
msqsz → size of the message
//lengthofthemessage
//messagenumber
// bufer
msgflg → IPC_NOWAIT or IPC_WAIT for blocking/non-blocking I/O
To receive a message from message queue,
int msgrcv(int msquid, void
msgtyp, int msgflg);
*msgp, size_t msqsz, long
msqp → the buffer/message structure to receive the message
msgtyp → message number
msquid, msqsz, msgflg arguments are similar to msgsnd()](https://image.slidesharecdn.com/oslabfile-230705050407-99d8e416/85/OS_lab_file-pdf-39-320.jpg)
![18CSC205J- Operating Systems Lab
© SRMIST - 37 -
Q1. Write a program to send a message (pass through command line arguments) into a
message queue. Send few messages with unique message numbers
$ vi ex81.c
import pika
import sys
connection =
pika.BlockingConnection(pika.ConnectionParameters('localhost
'))
channel = connection.channel()
channel.queue_declare(queue='my_queue')
message = ' '.join(sys.argv[1:]) or 'Hello World!'
channel.basic_publish(exchange='', routing_key='my_queue',
body=message)
print(f"Sent message: {message}")
connection.close()
Q2. Write a program to receive a particular message from the message queue. Use message
number to receive the particular message
$ vi ex82.c
import pika
# Establish a connection to the RabbitMQ server
connection =
pika.BlockingConnection(pika.ConnectionParameters('localhost'))
channel = connection.channel()
# Declare the message queue
channel.queue_declare(queue='my_queue')
def callback(ch, method, properties, body):
# Process the received message
print("Received message:", body.decode())
def receive_message_by_number(message_number):
# Set the message number to receive
channel.basic_qos(prefetch_count=1)
channel.basic_consume(queue='my_queue',
on_message_callback=callback)
# Start consuming messages
channel.start_consuming()](https://image.slidesharecdn.com/oslabfile-230705050407-99d8e416/85/OS_lab_file-pdf-40-320.jpg)
![18CSC205J- Operating Systems Lab
© SRMIST - 39 -
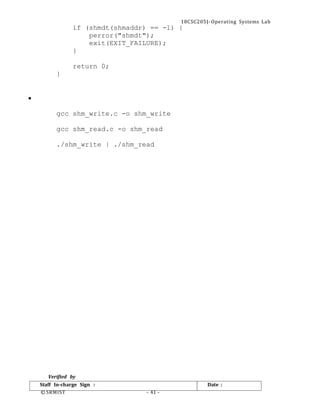
Q3. Write a program to do the following:
• Create two processes, one is for writing into the shared memory (shm_write.c)
and another is for reading from the shared memory (shm_read.c)
• In the shared memory, the writing process, creates a shared memory of size 1K
(and flags) and attaches the shared memory
• The write process writes the data read from the standard input into the shared
memory. Last byte signifies the end of buffer
• Read process would read from the shared memory and write to the standard
output
$ vi ex82.c
•
#include <stdio.h>
#include <stdlib.h>
#include <unistd.h>
#include <sys/ipc.h>
#include <sys/shm.h>
int main() {
// Create shared memory segment
int shmid = shmget(IPC_PRIVATE, 1024, IPC_CREAT | 0666);
if (shmid == -1) {
perror("shmget");
exit(EXIT_FAILURE);
}
// Attach shared memory segment
char* shmaddr = shmat(shmid, NULL, 0);
if (shmaddr == (char*) -1) {
perror("shmat");
exit(EXIT_FAILURE);
}
// Read data from standard input and write to shared
memory
char buffer[1024];
int nbytes;
while ((nbytes = read(STDIN_FILENO, buffer,
sizeof(buffer))) > 0) {
buffer[nbytes-1] = '0'; // Add null terminator
strcpy(shmaddr, buffer); // Copy to shared memory
}
// Detach shared memory segment
if (shmdt(shmaddr) == -1) {](https://image.slidesharecdn.com/oslabfile-230705050407-99d8e416/85/OS_lab_file-pdf-42-320.jpg)

![18CSC205J- Operating Systems Lab
© SRMIST - 44 -
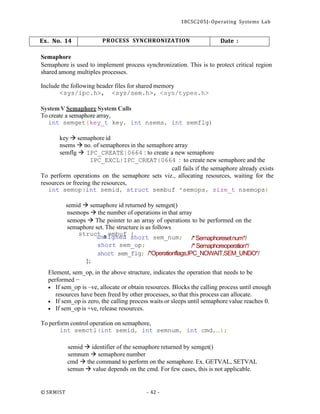
Q2. Write a program to perform process synchronization in producer-consumer problem
import threading
import time
import random
# Buffer class to hold items
class Buffer:
def __init__(self):
self.buffer = []
self.max_size = 5
self.lock = threading.Lock()
self.full = threading.Semaphore(0)
self.empty = threading.Semaphore(self.max_size)
# Add an item to the buffer
def add_item(self, item):
self.empty.acquire()
self.lock.acquire()
self.buffer.append(item)
print("Producer produced", item)
self.lock.release()
self.full.release()
# Remove an item from the buffer
def remove_item(self):
self.full.acquire()
self.lock.acquire()
item = self.buffer.pop(0)
print("Consumer consumed", item)
self.lock.release()
self.empty.release()
return item
# Producer class
class Producer(threading.Thread):
def __init__(self, buffer):
threading.Thread.__init__(self)
self.buffer = buffer
def run(self):
while True:
item = random.randint(0, 100)
self.buffer.add_item(item)
time.sleep(random.randint(1, 3))
# Consumer class
class Consumer(threading.Thread):](https://image.slidesharecdn.com/oslabfile-230705050407-99d8e416/85/OS_lab_file-pdf-47-320.jpg)