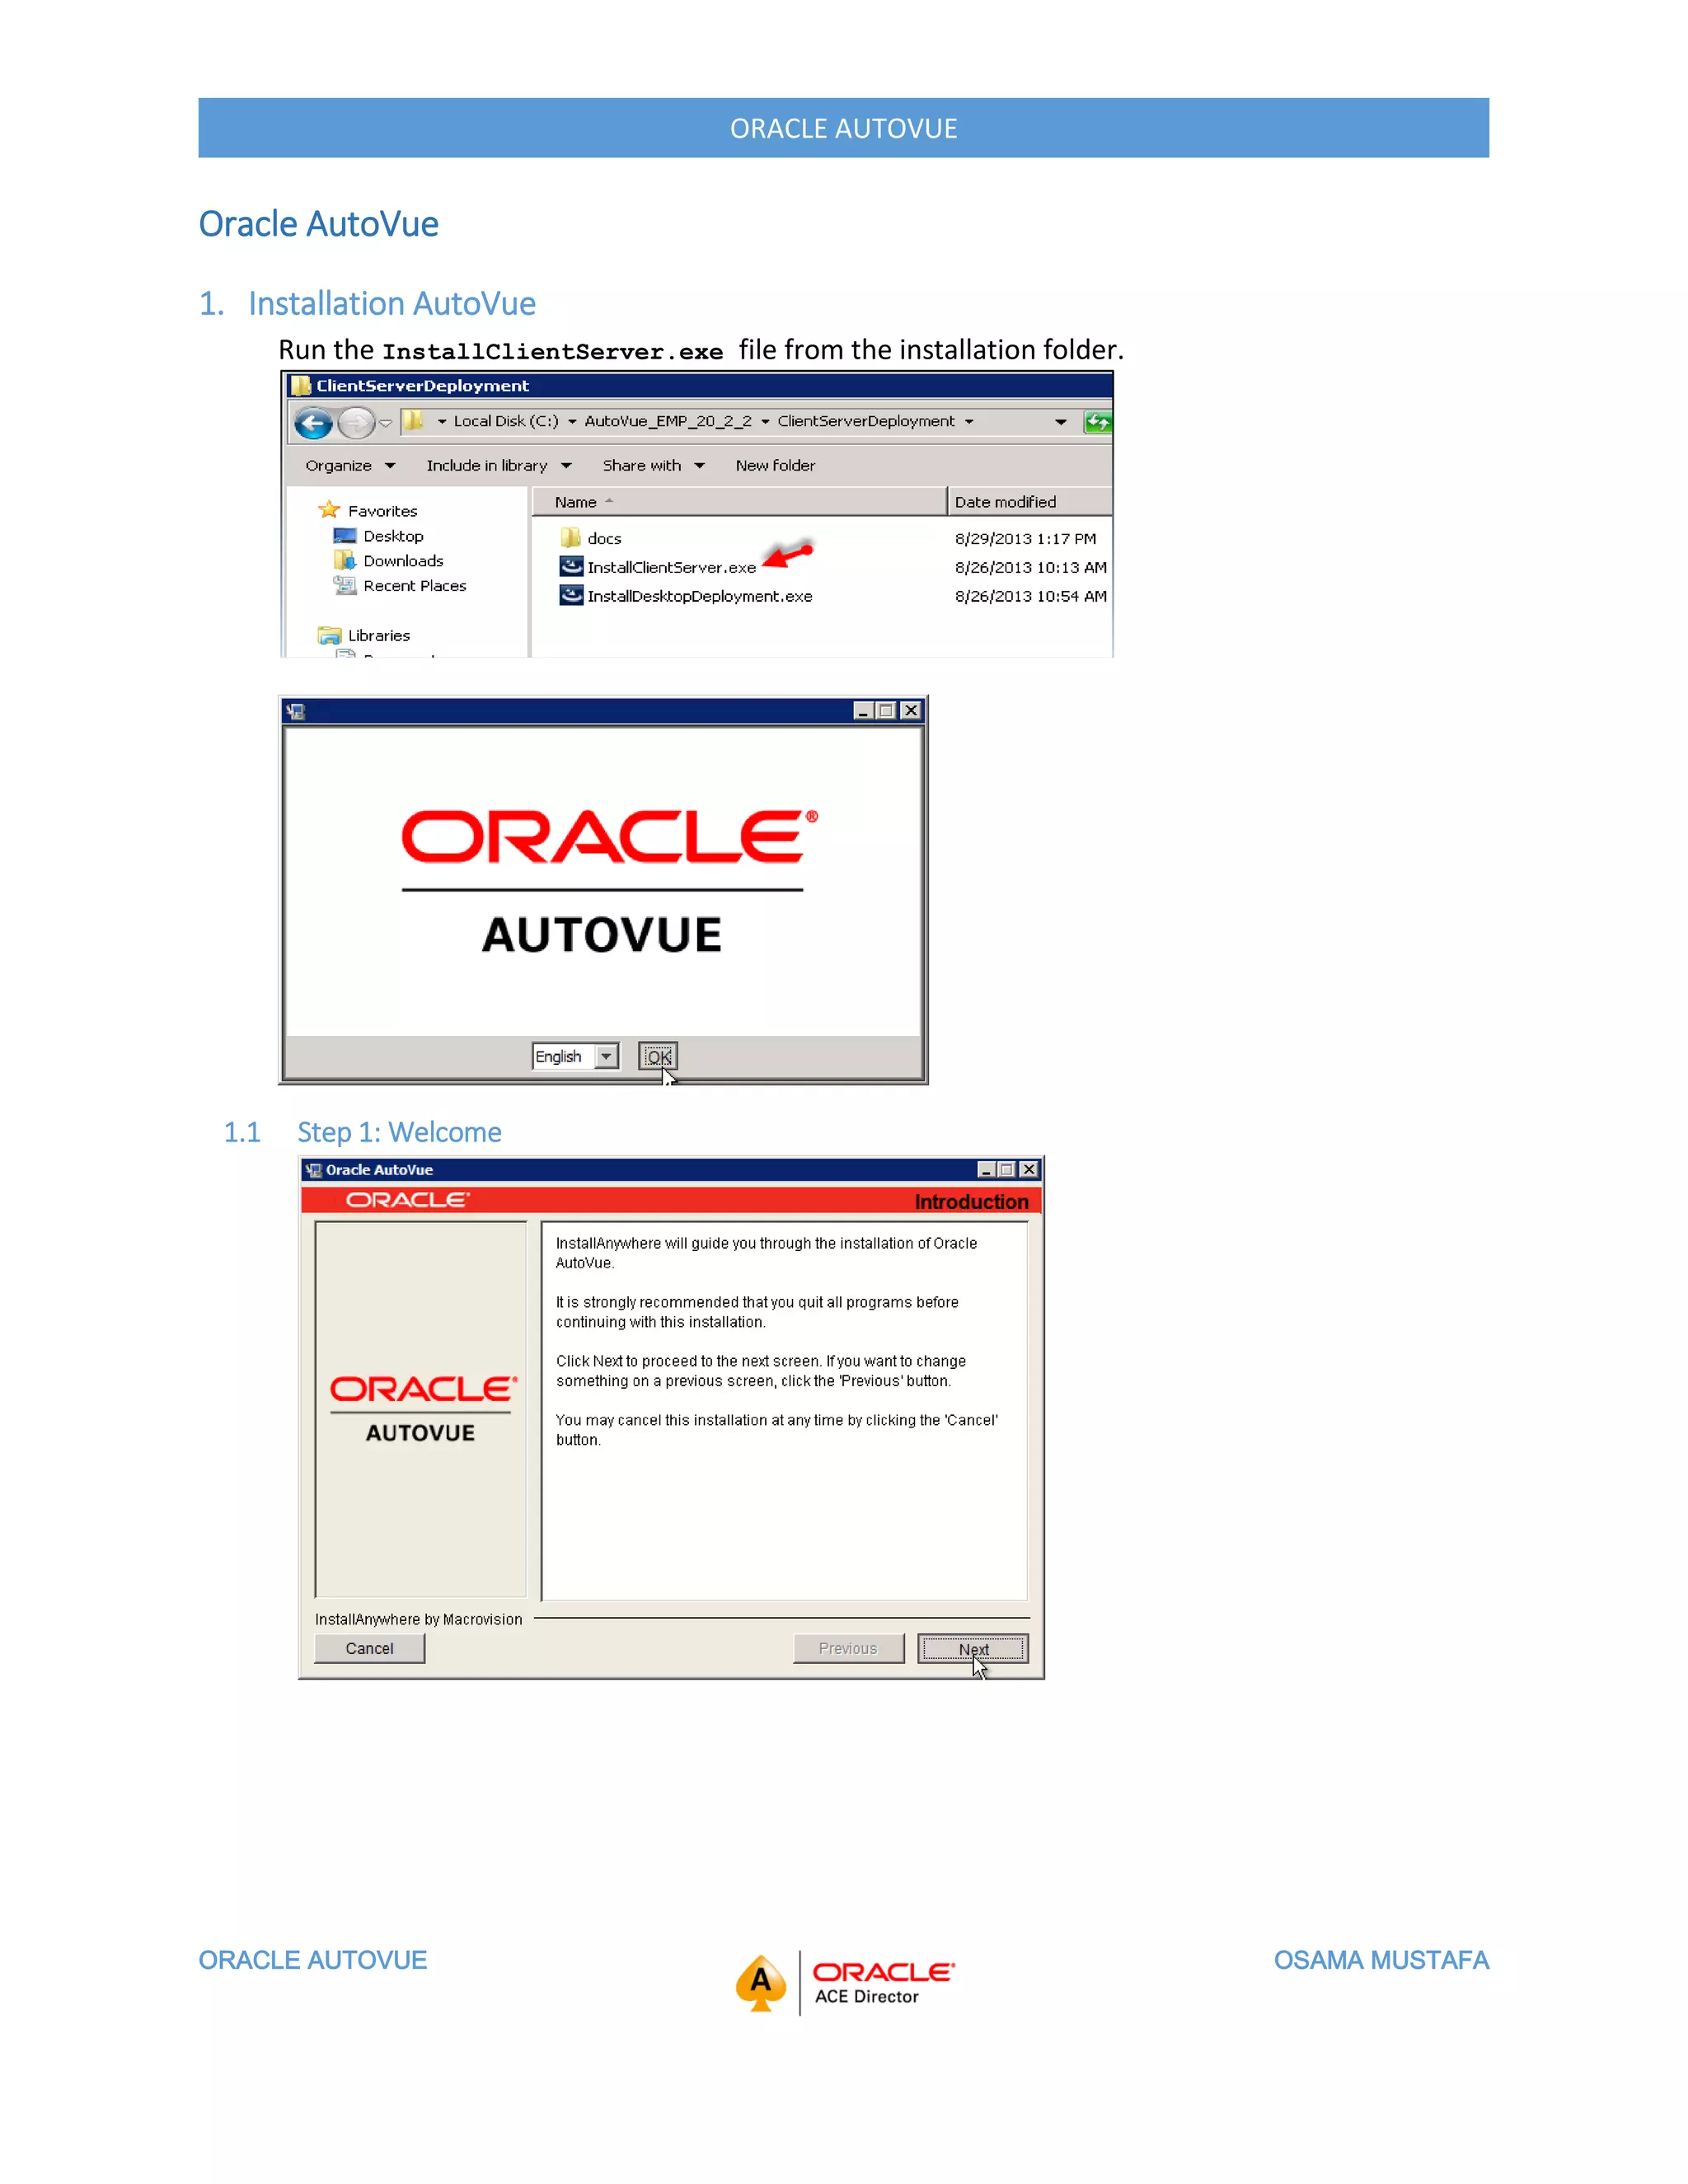
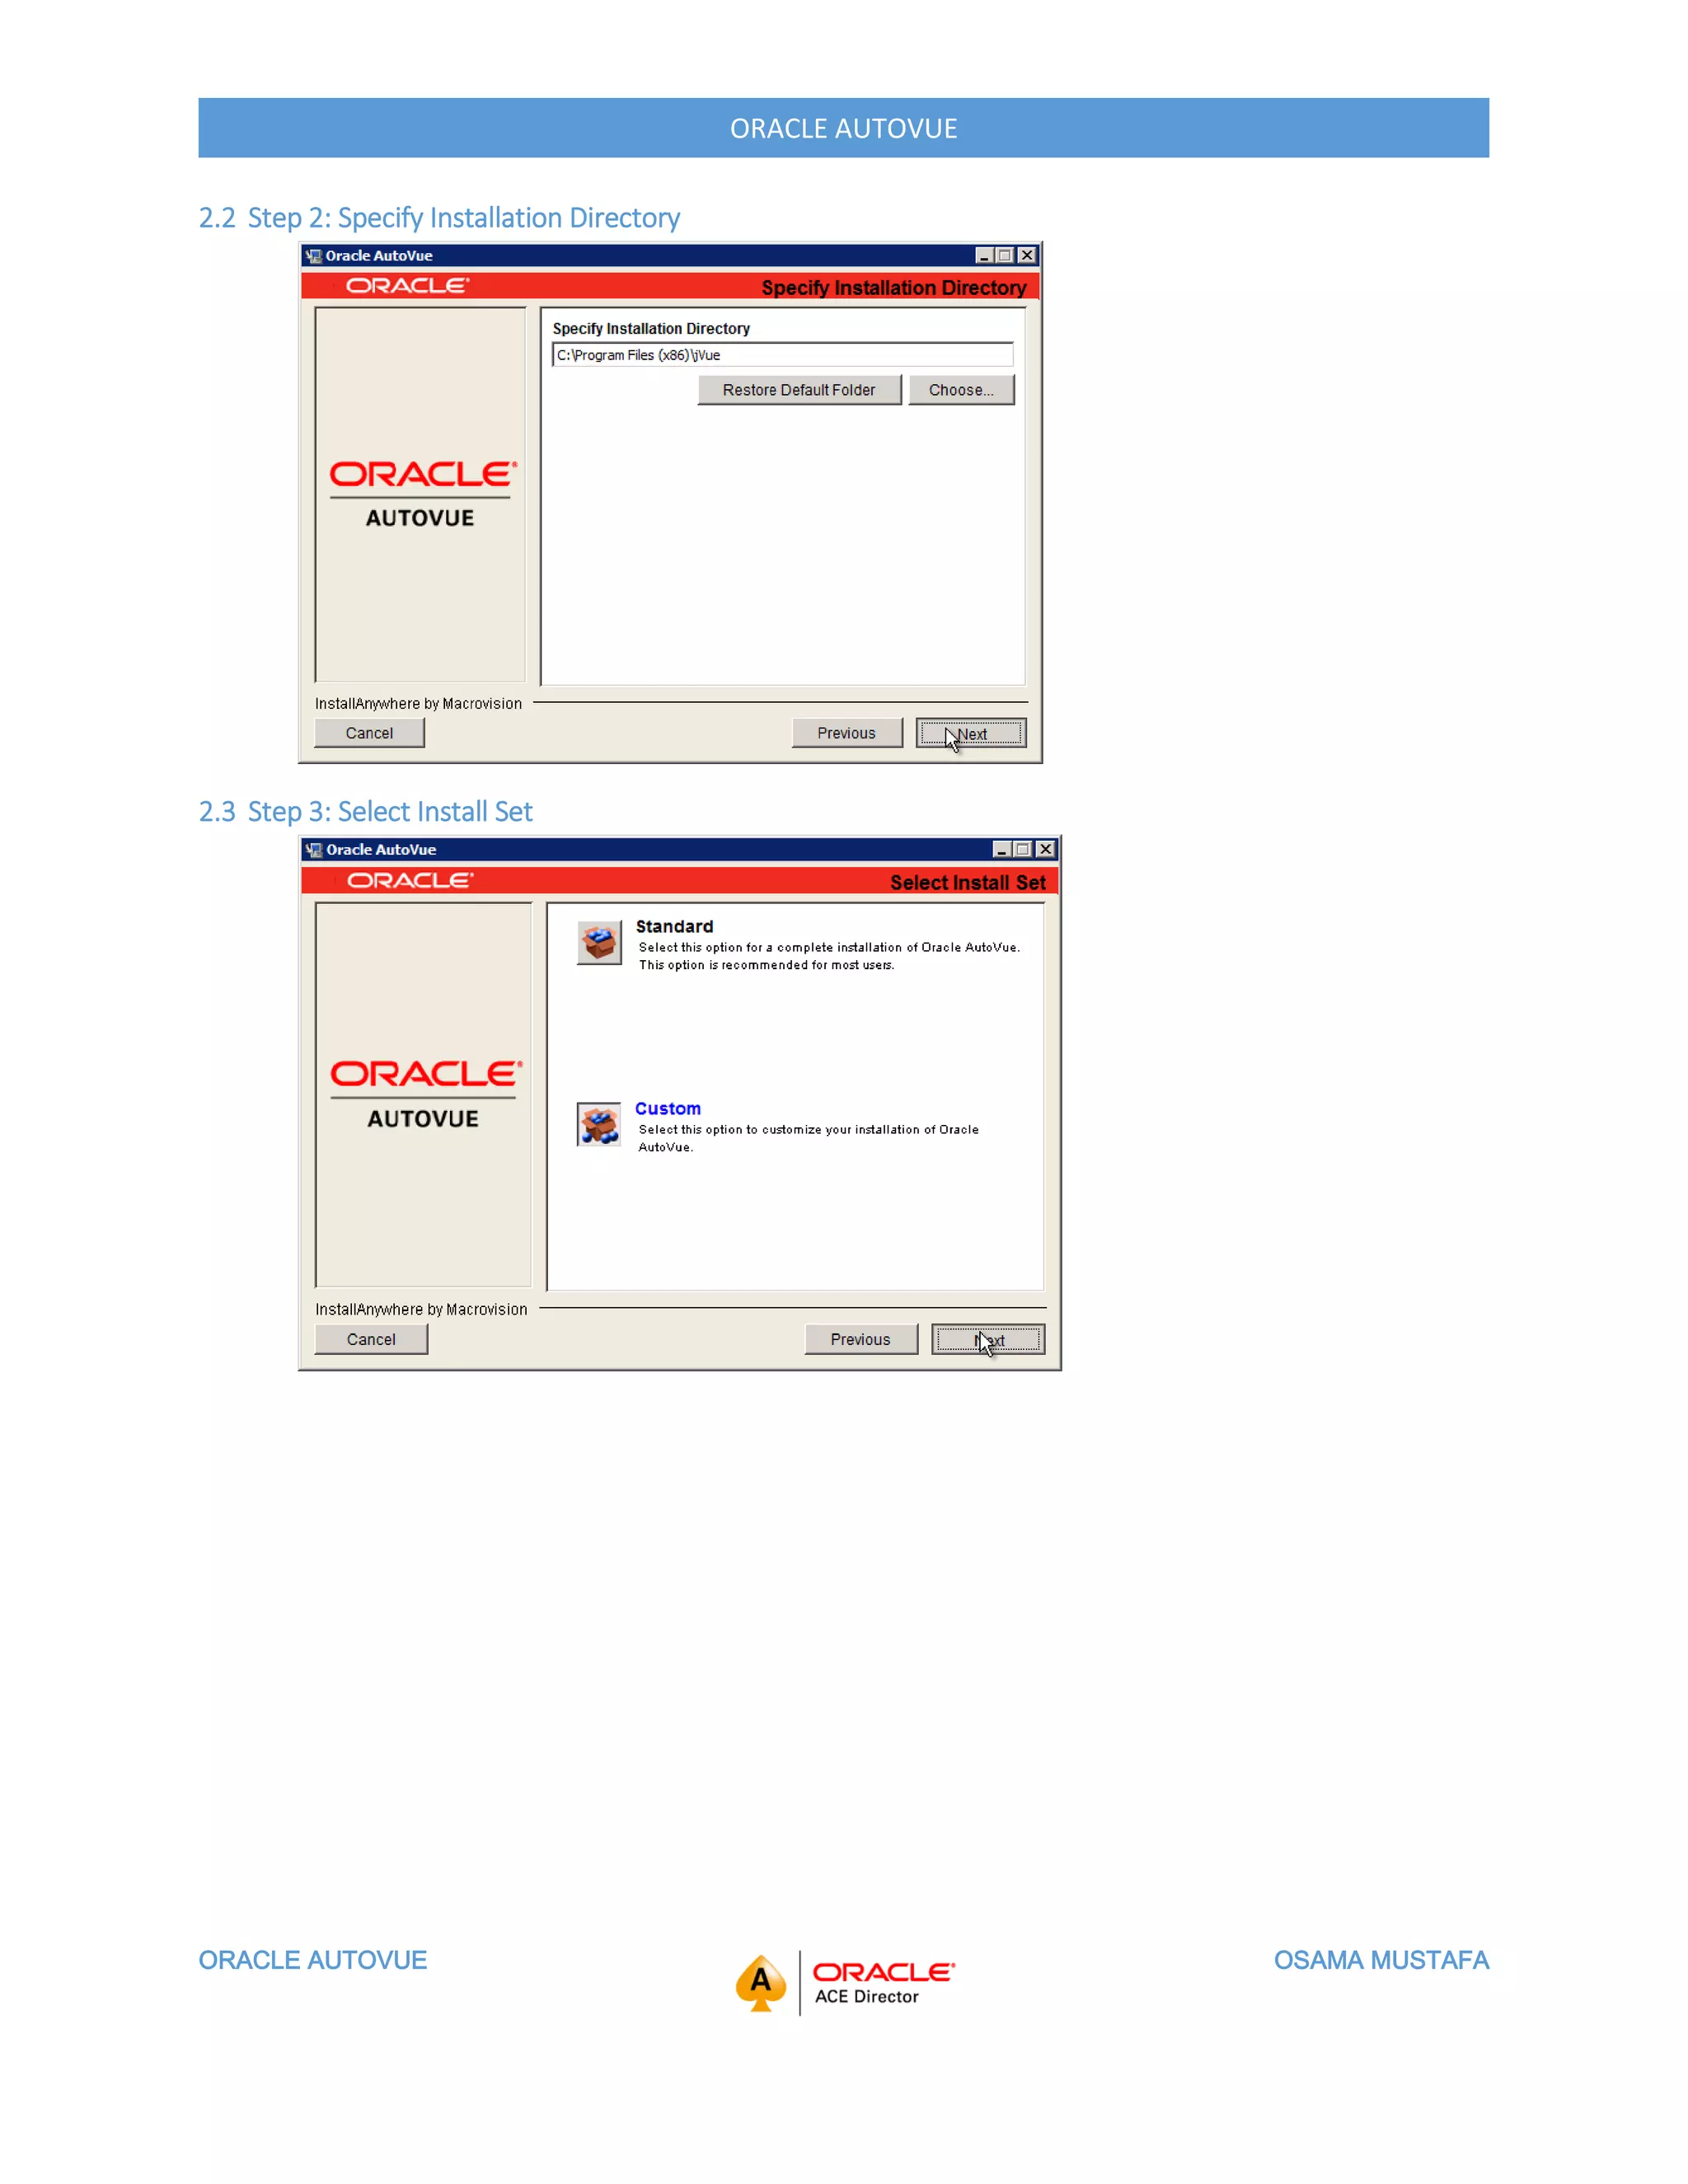
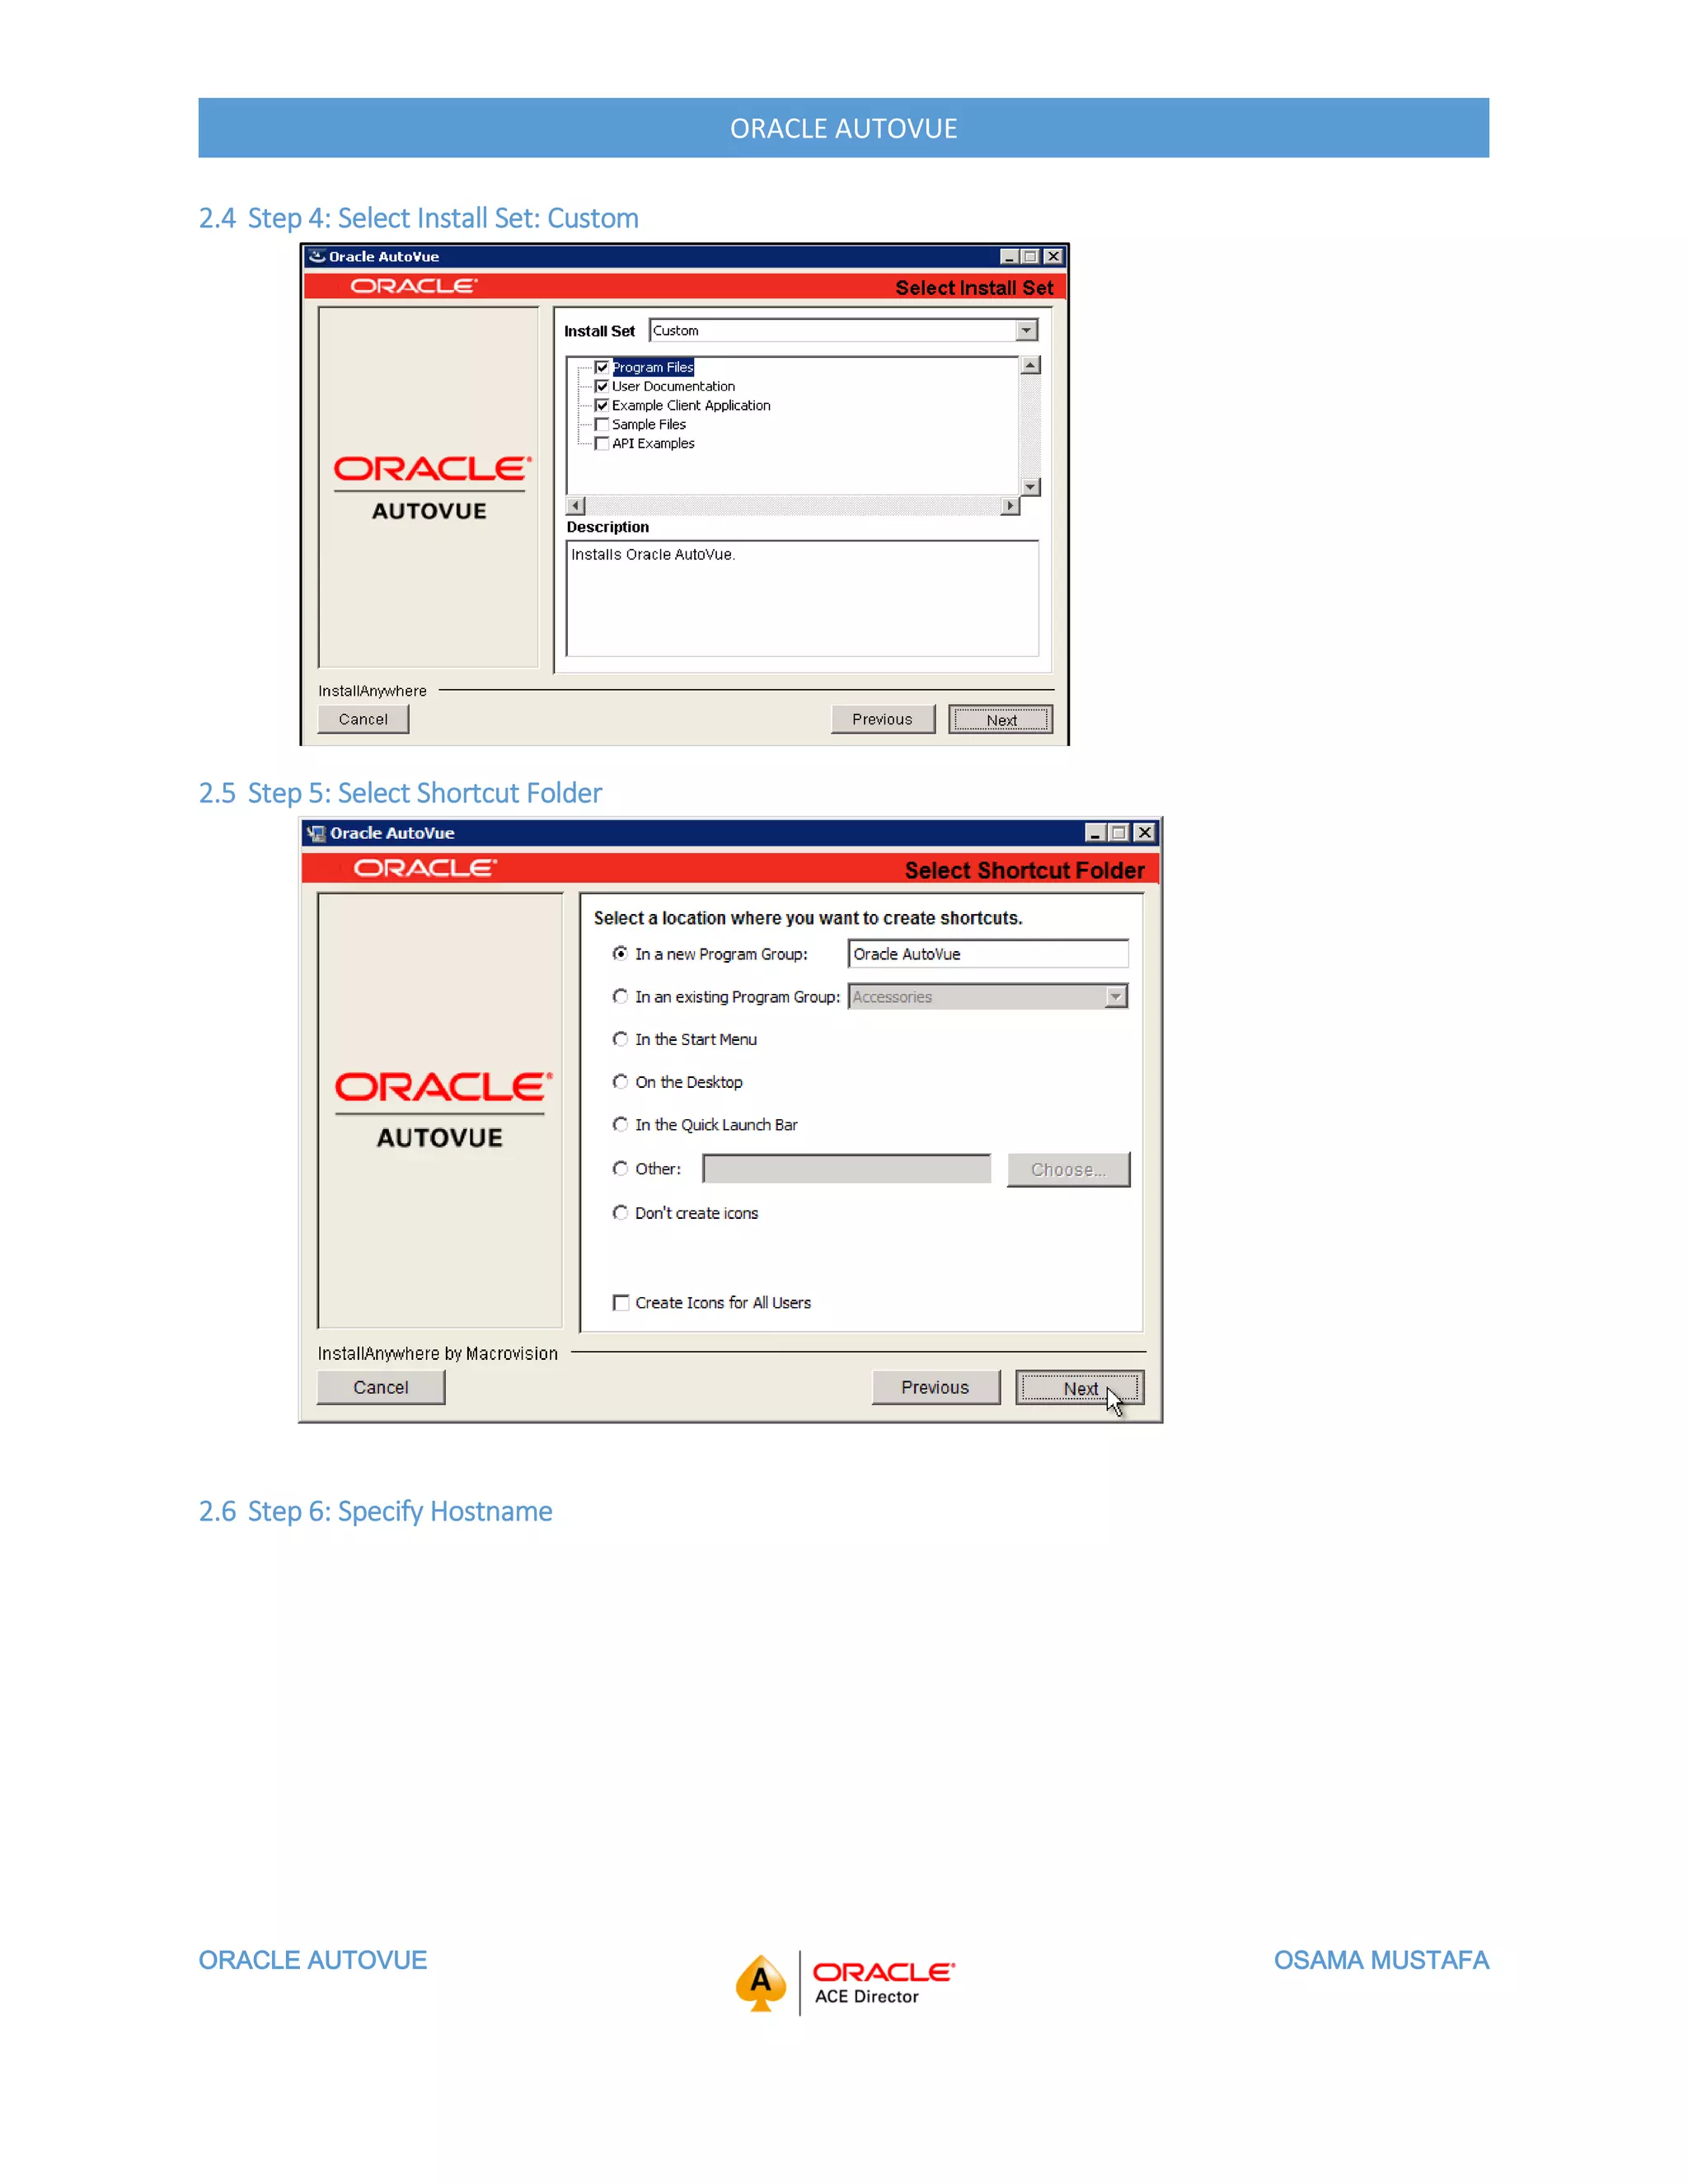
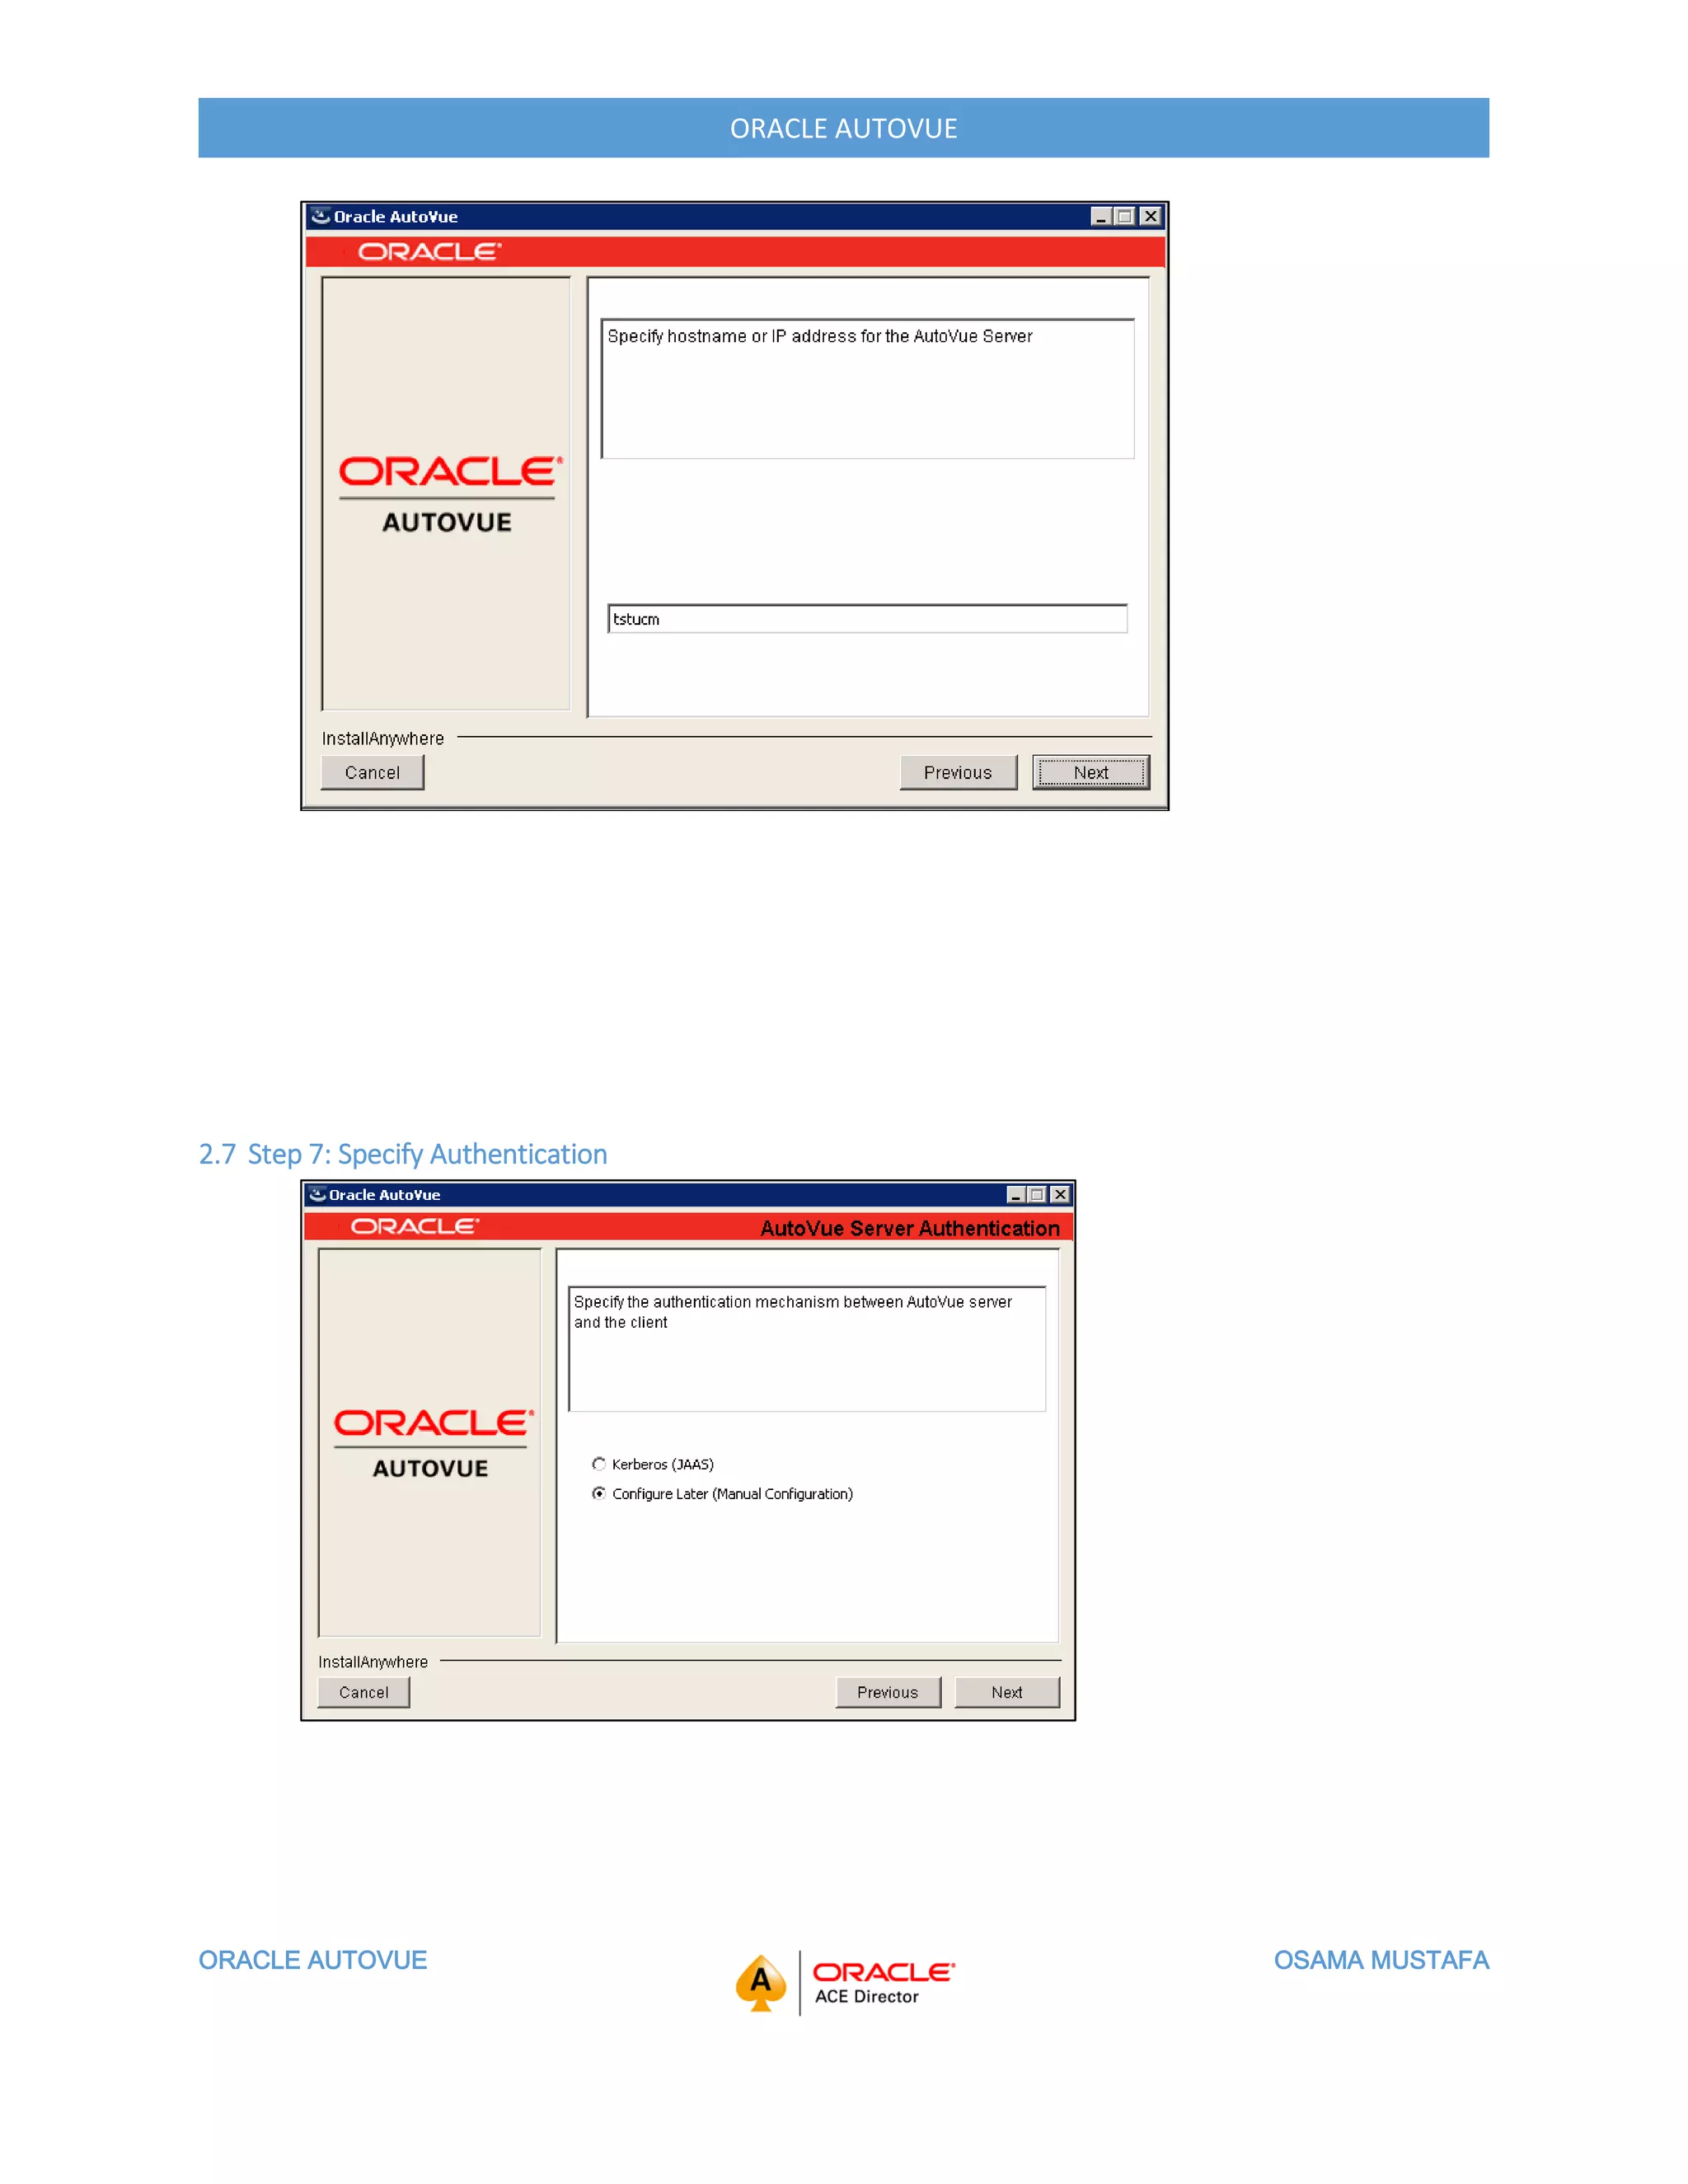
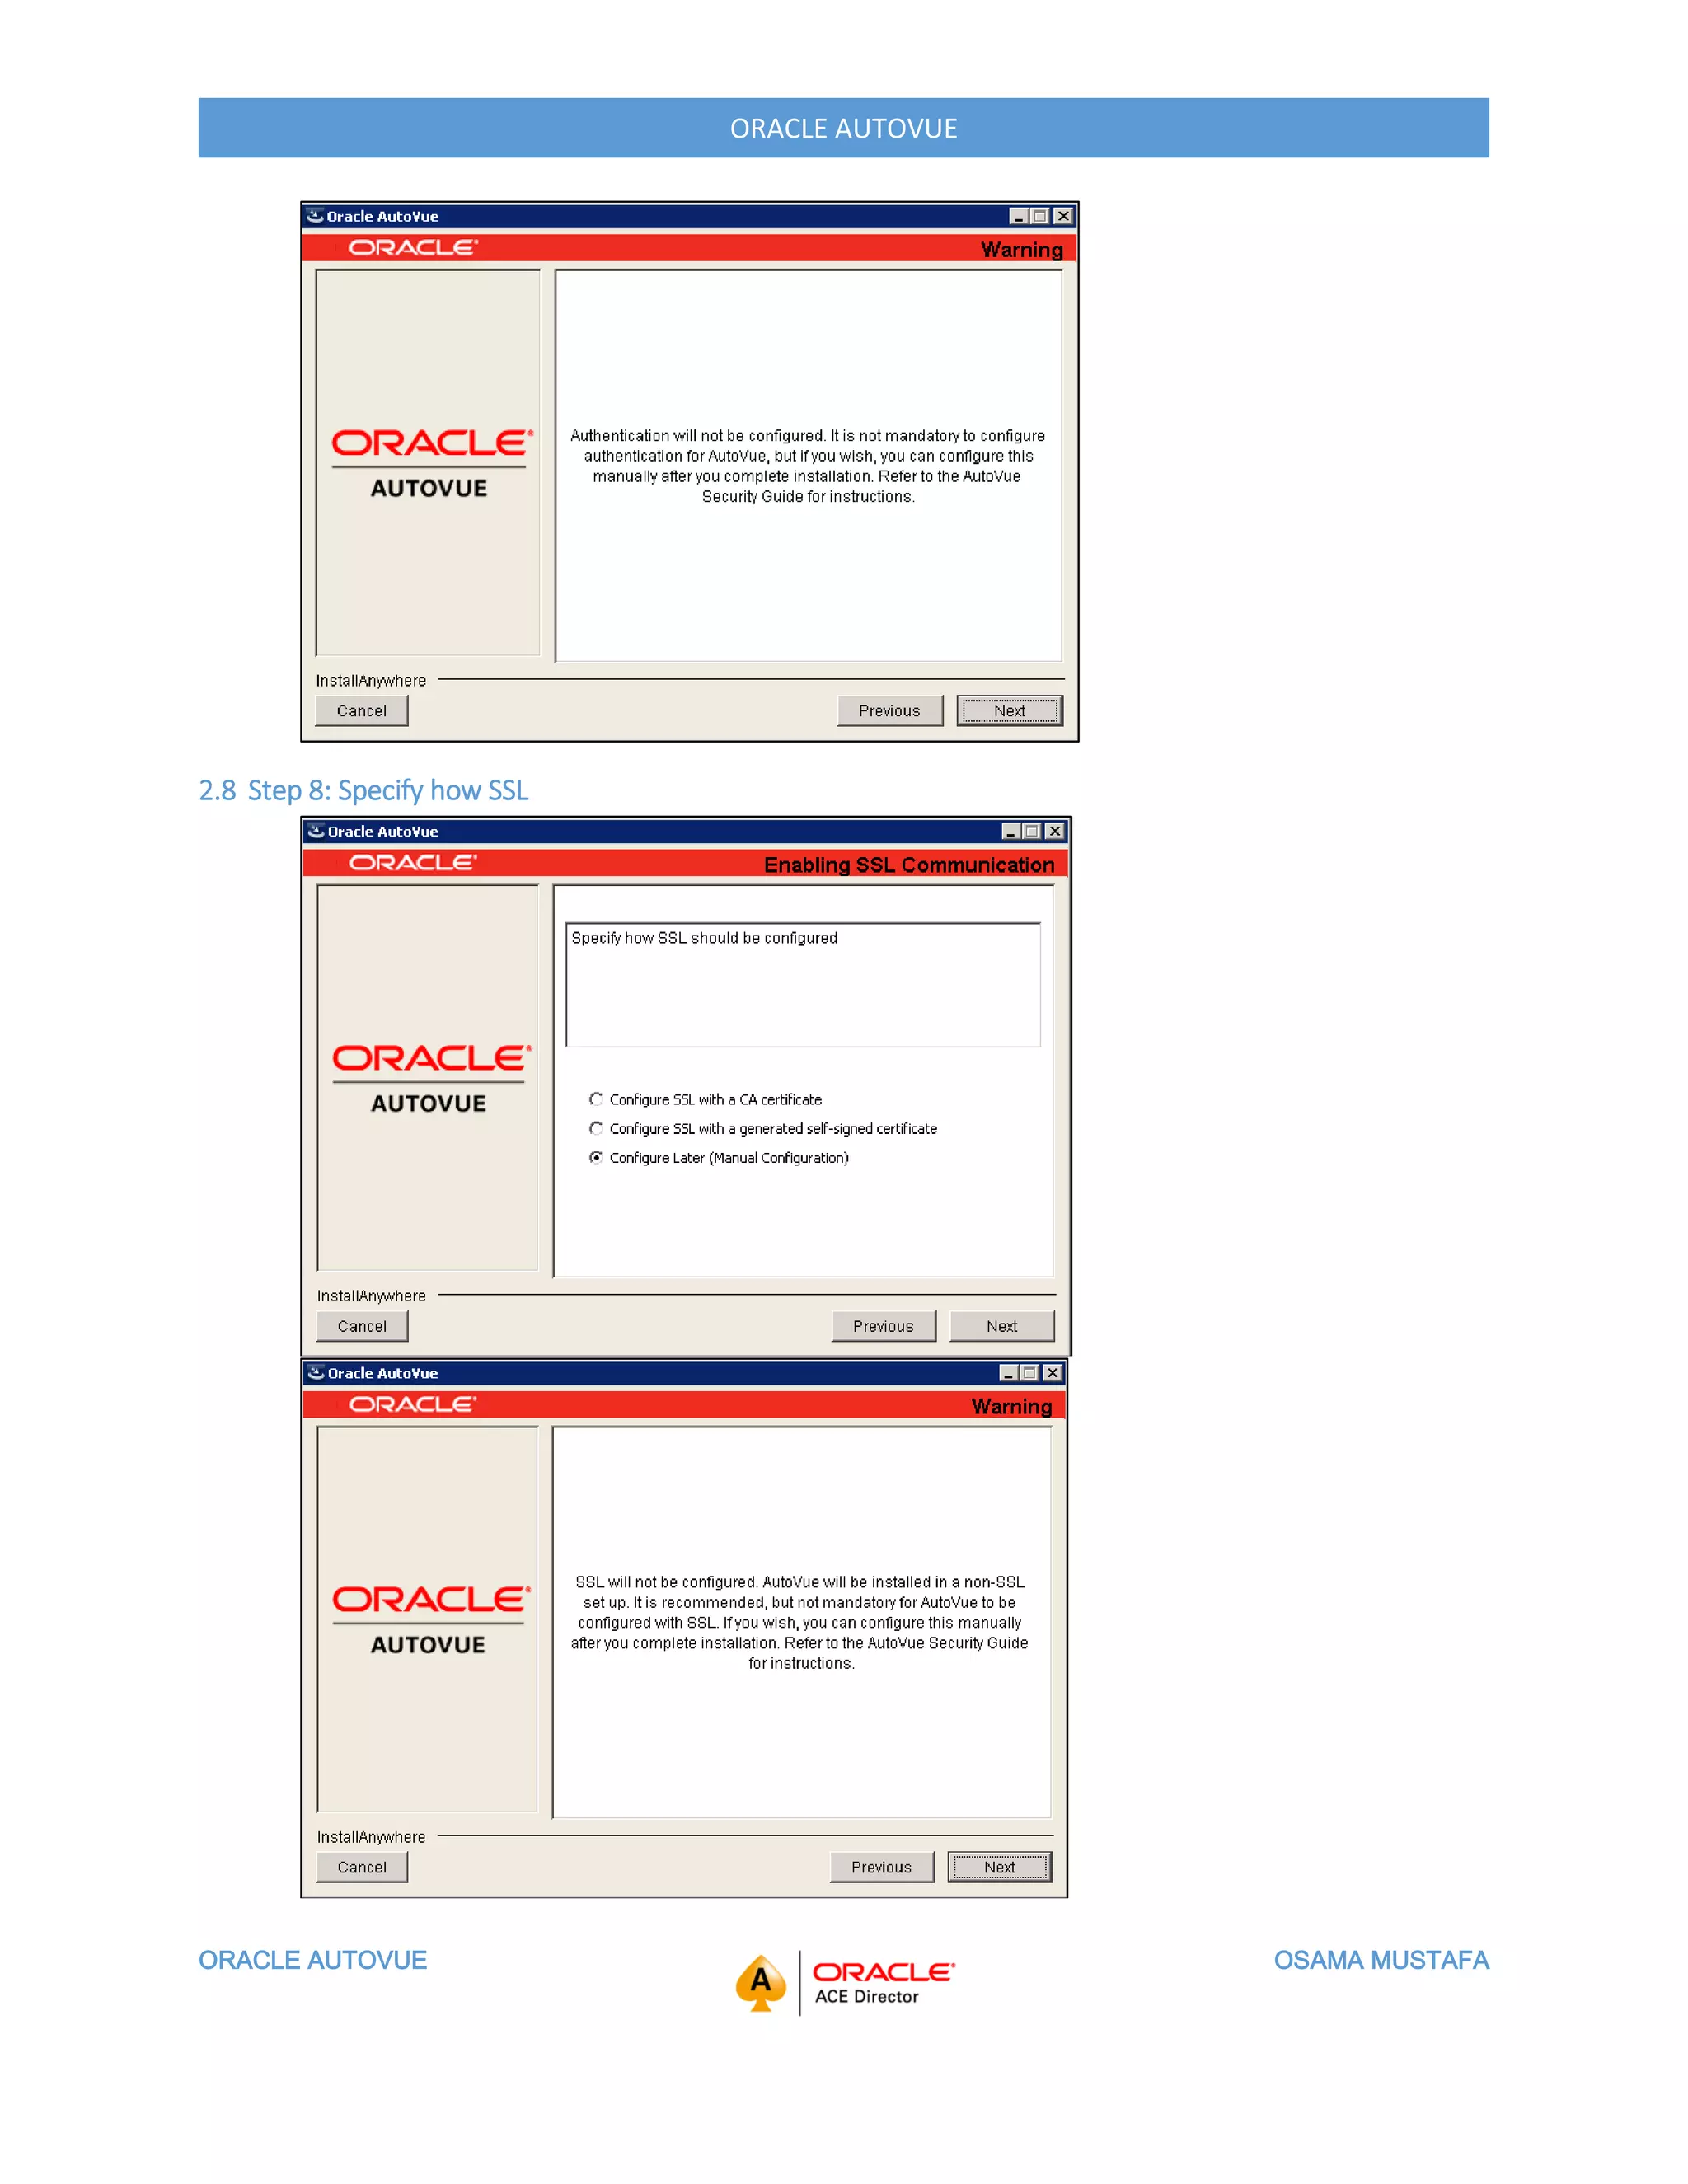
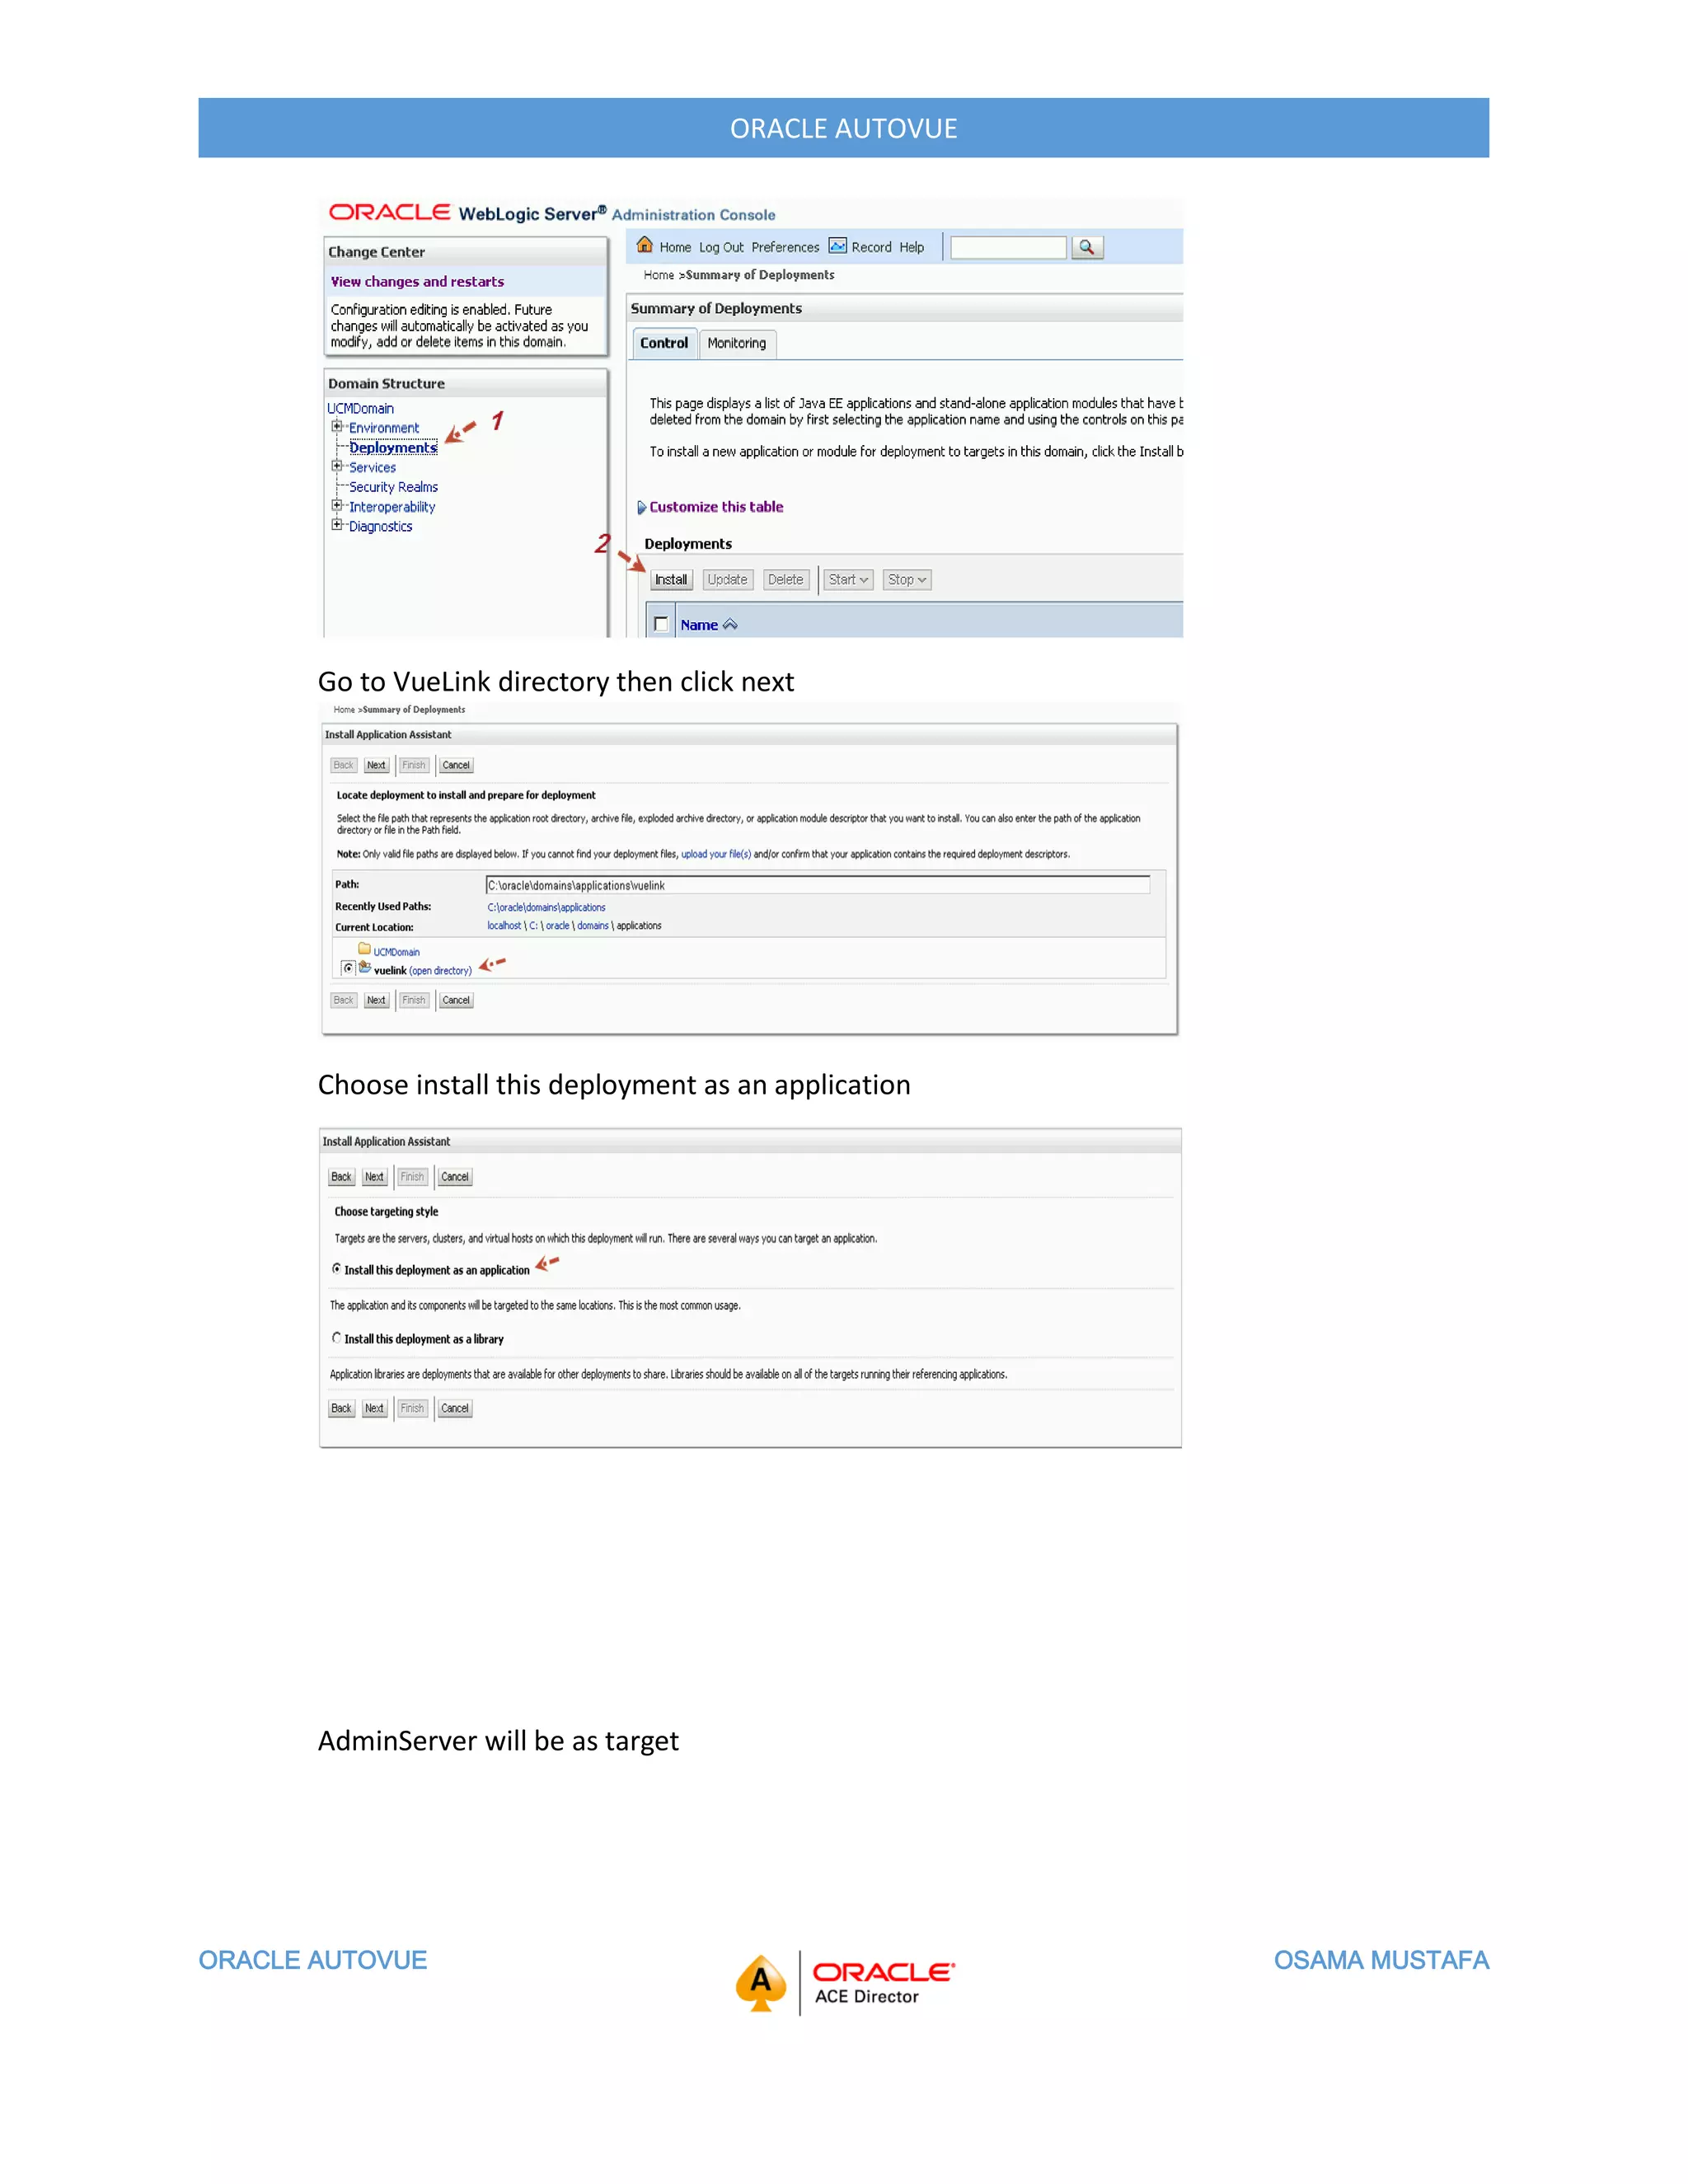
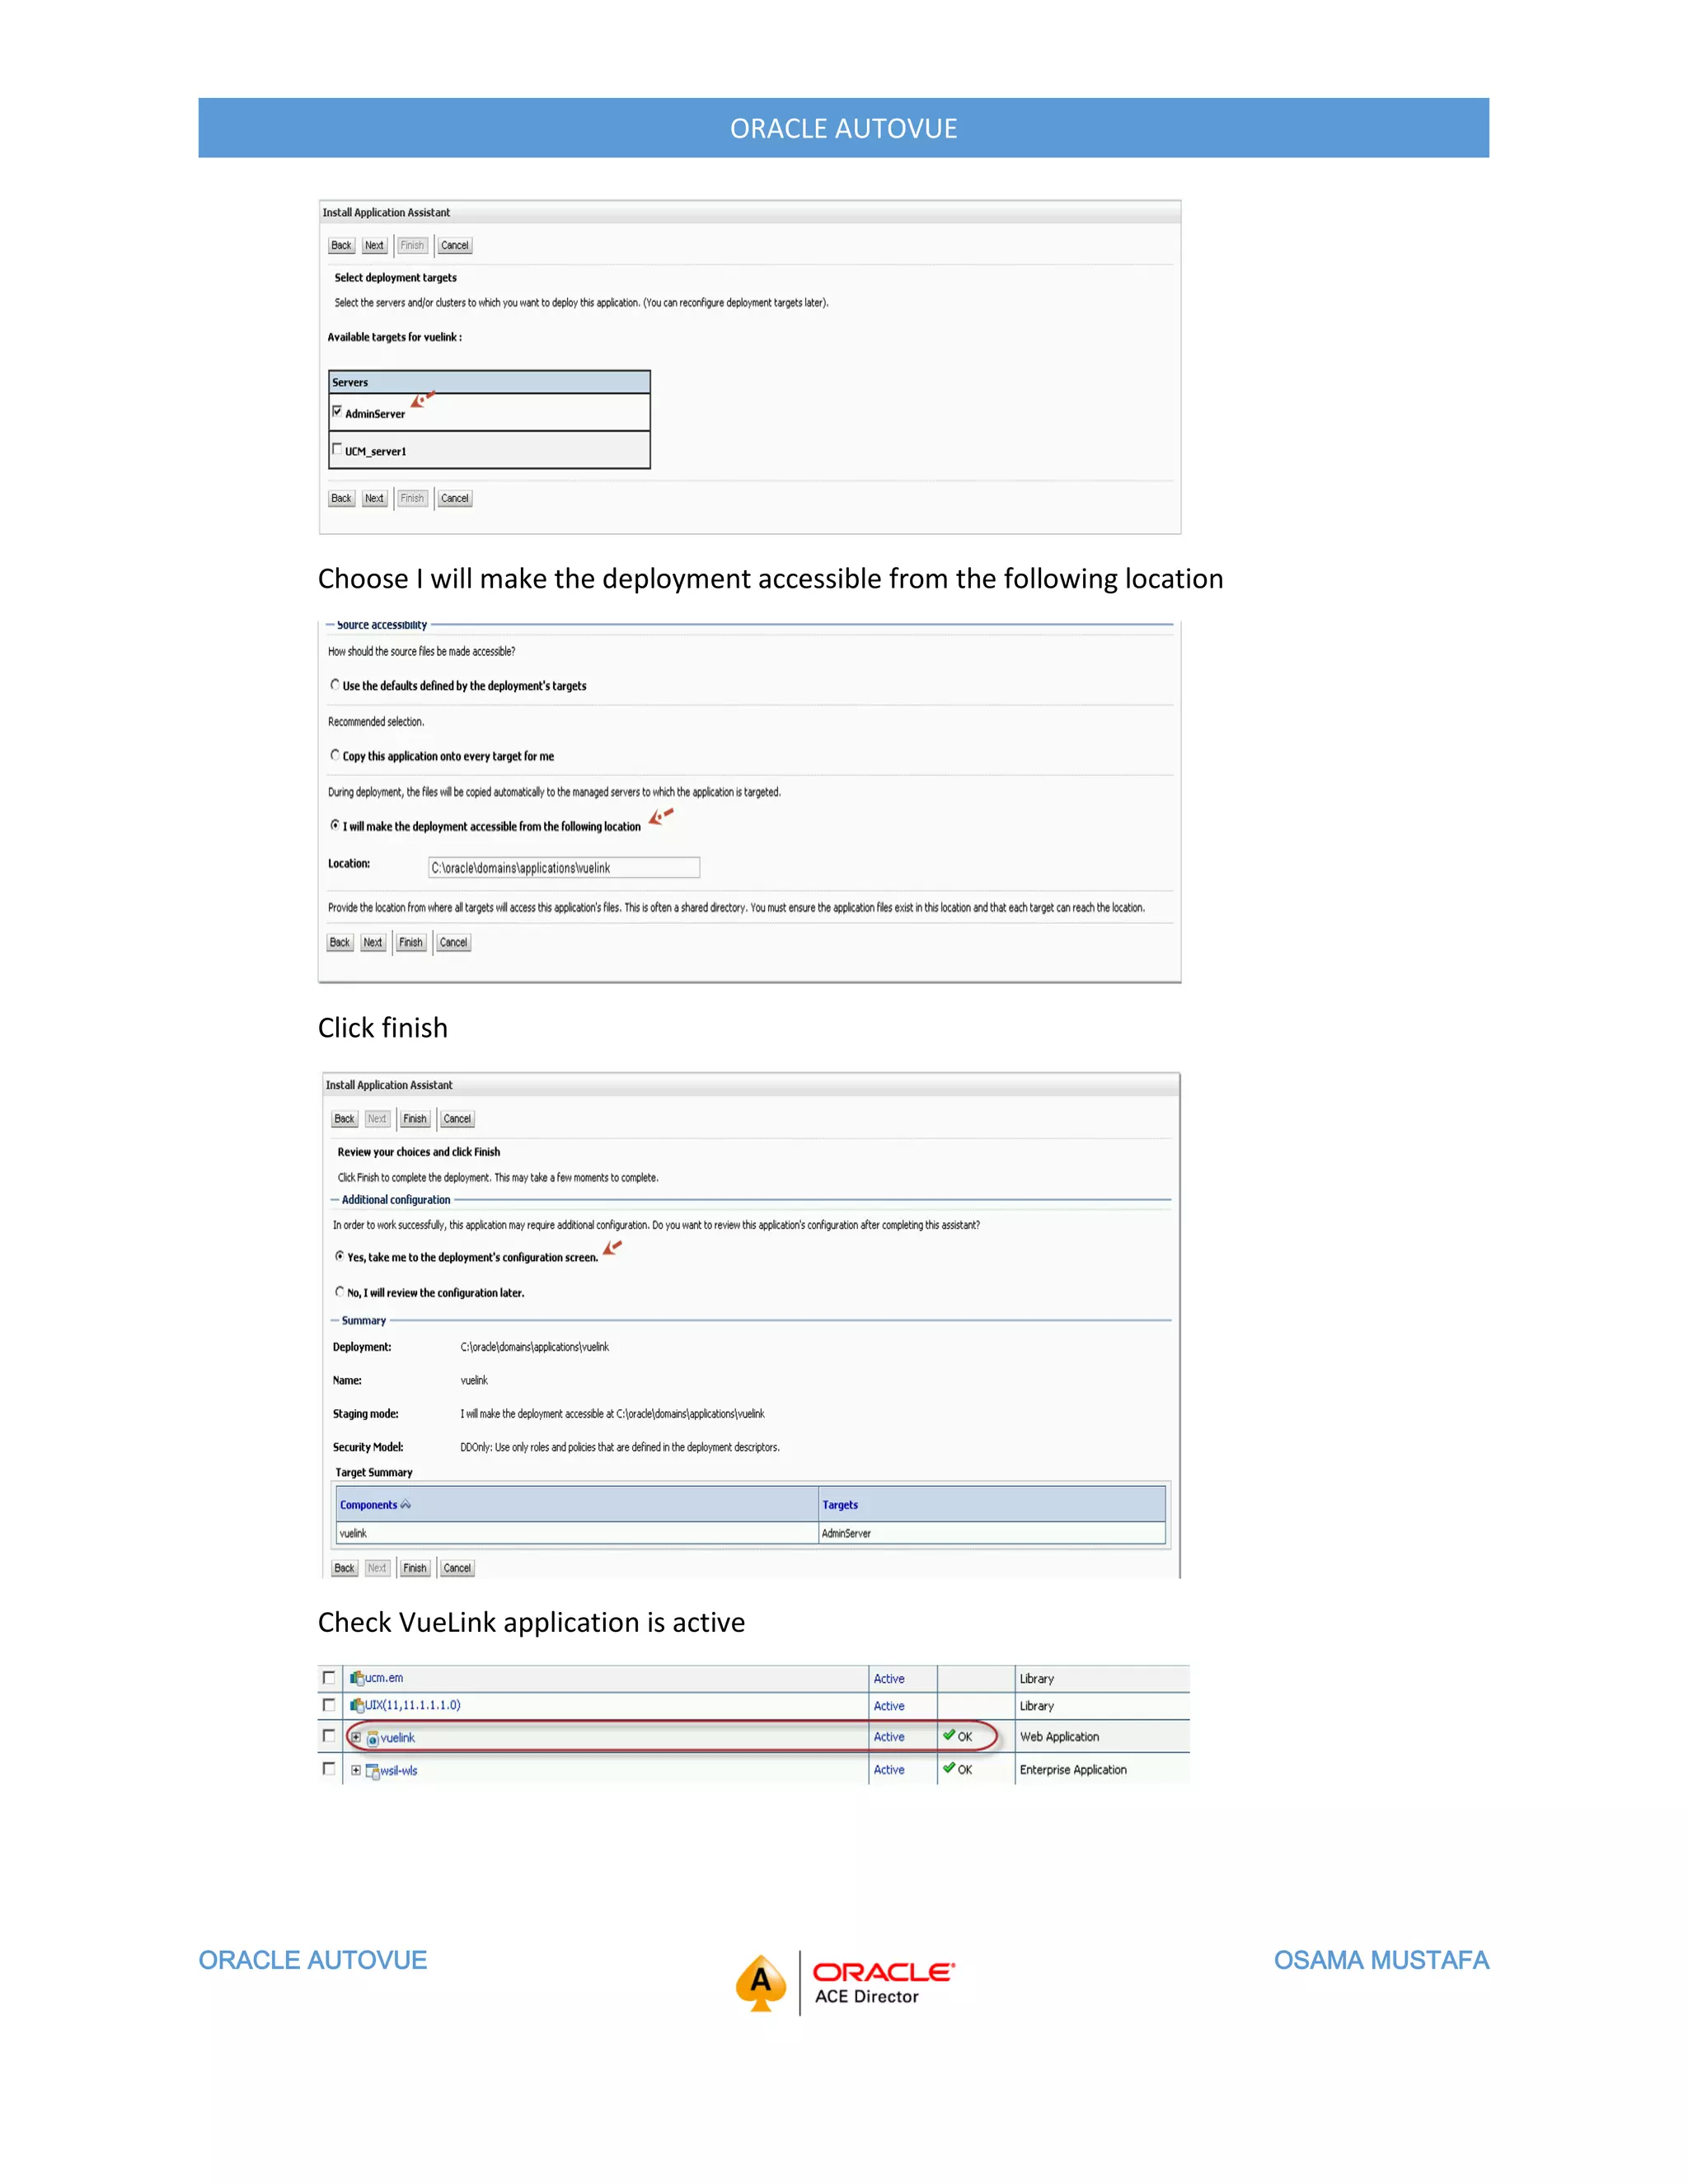
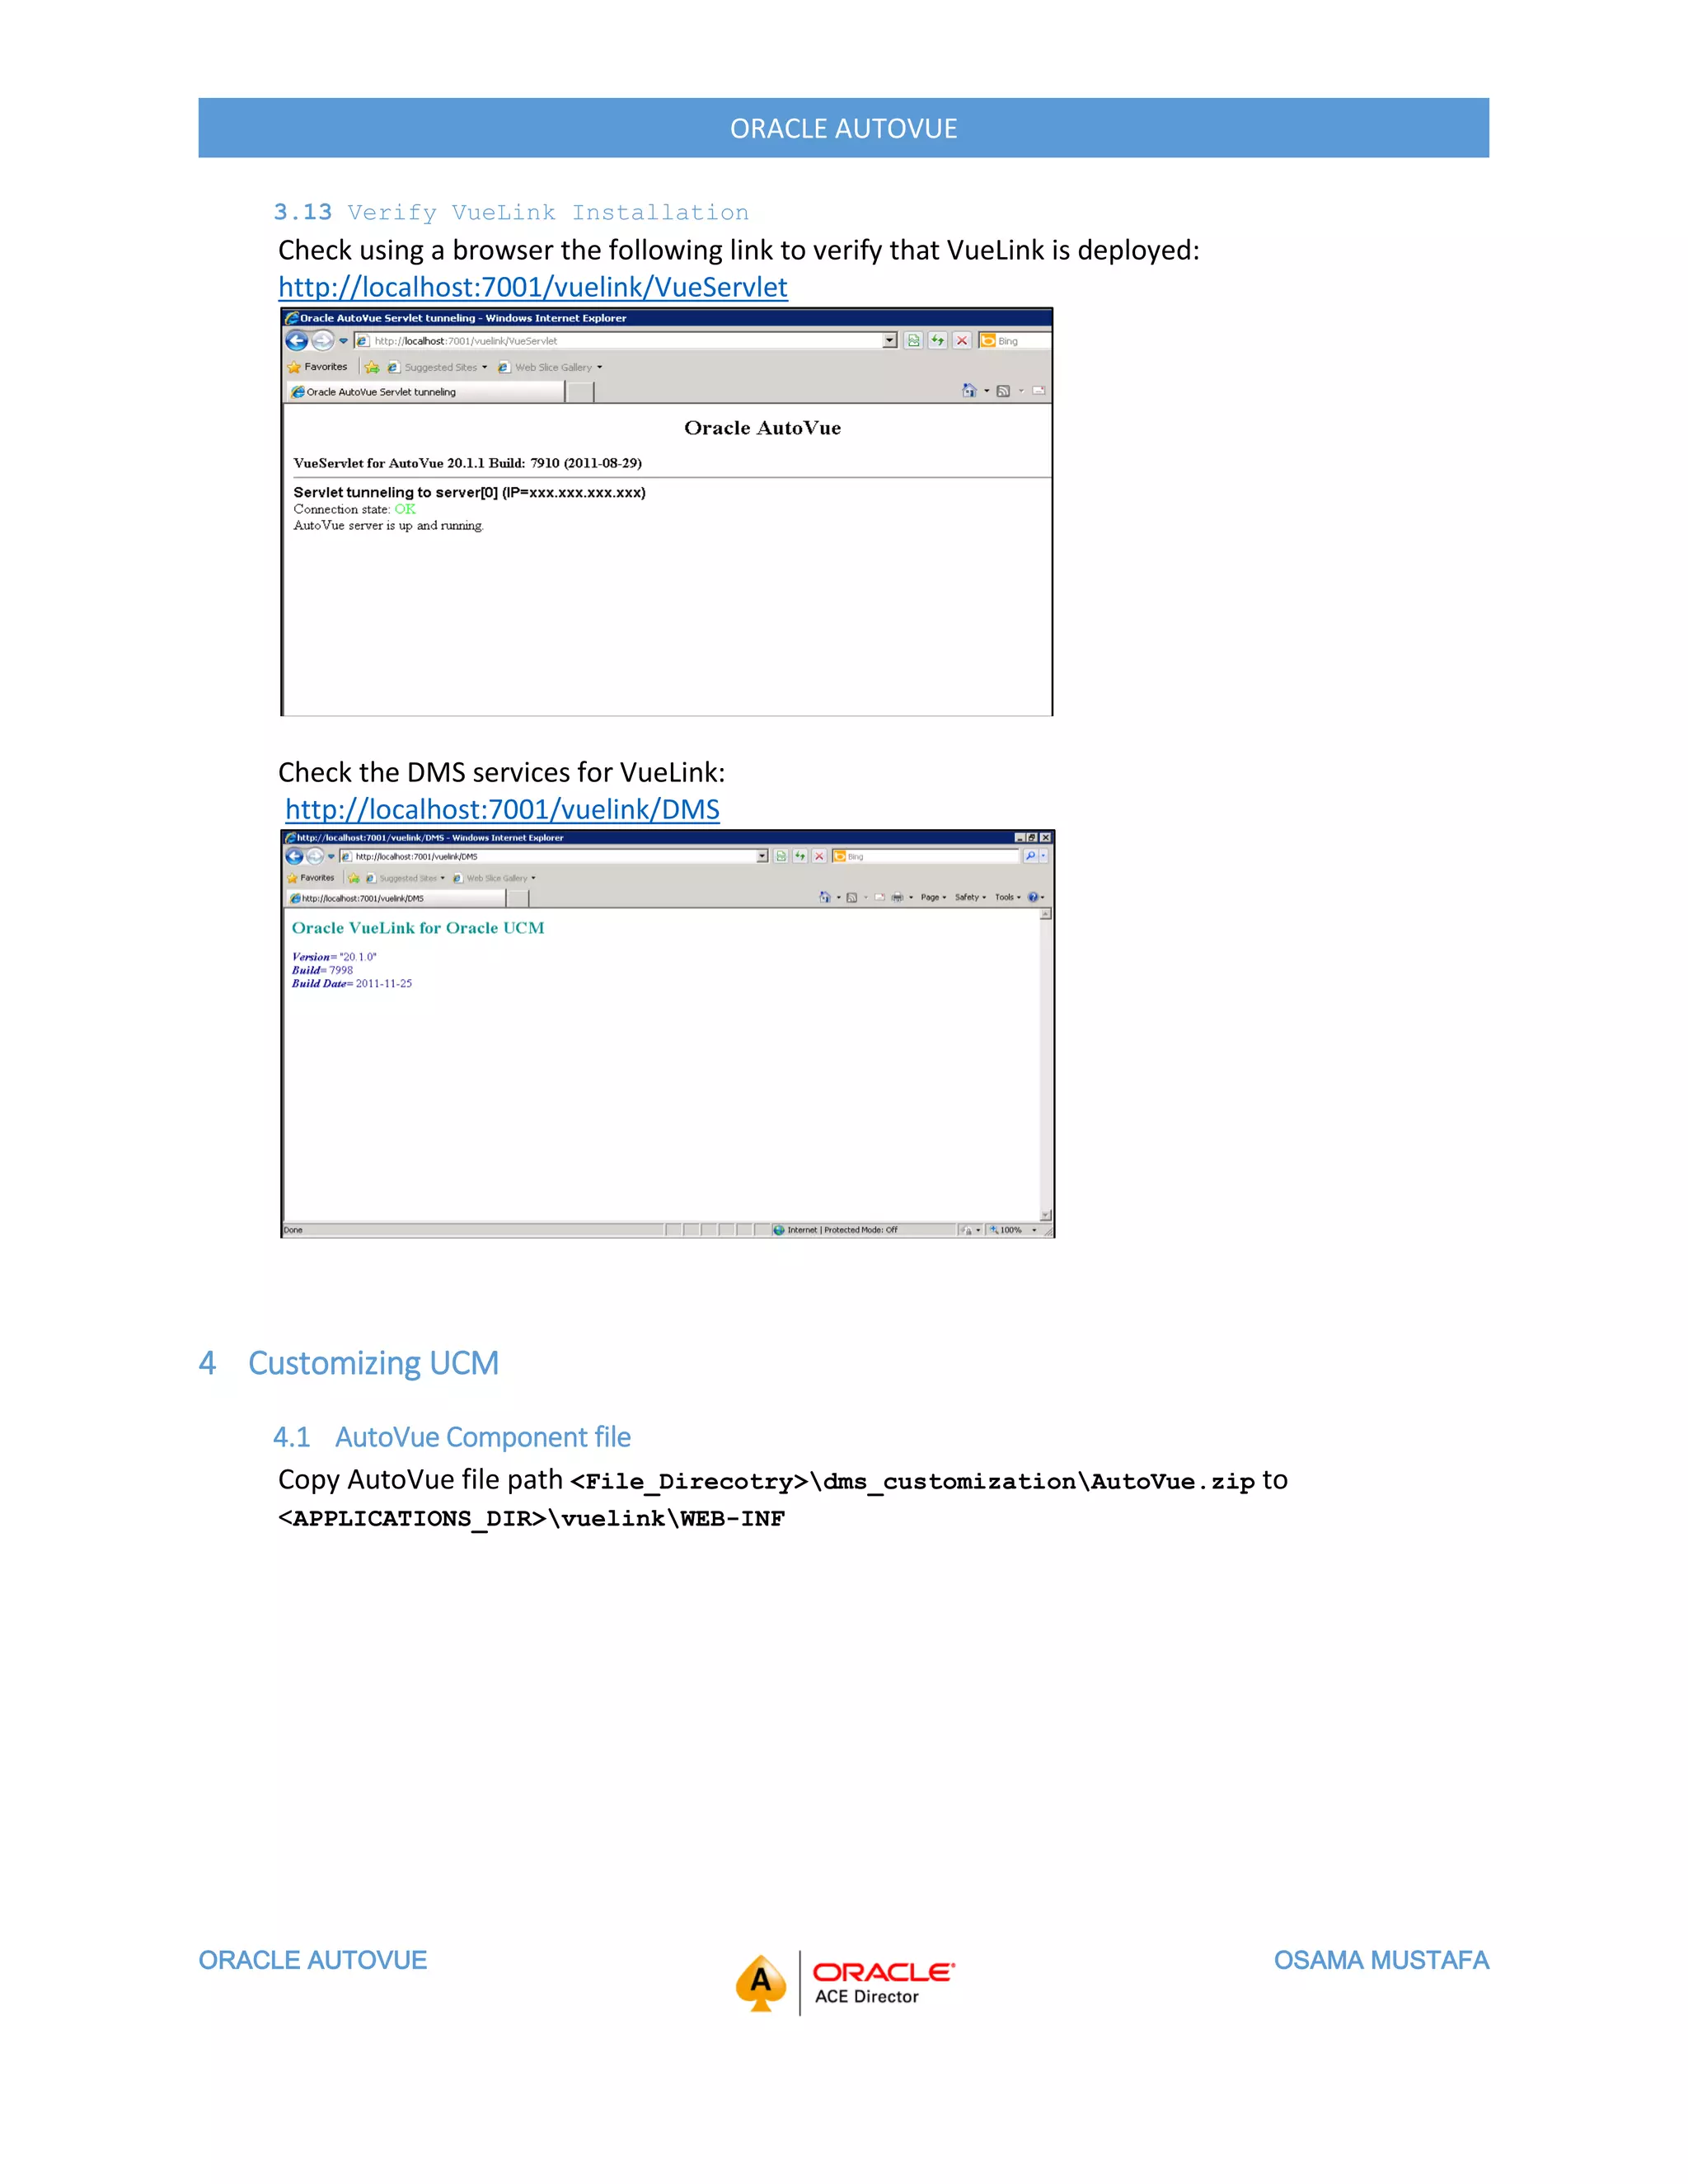
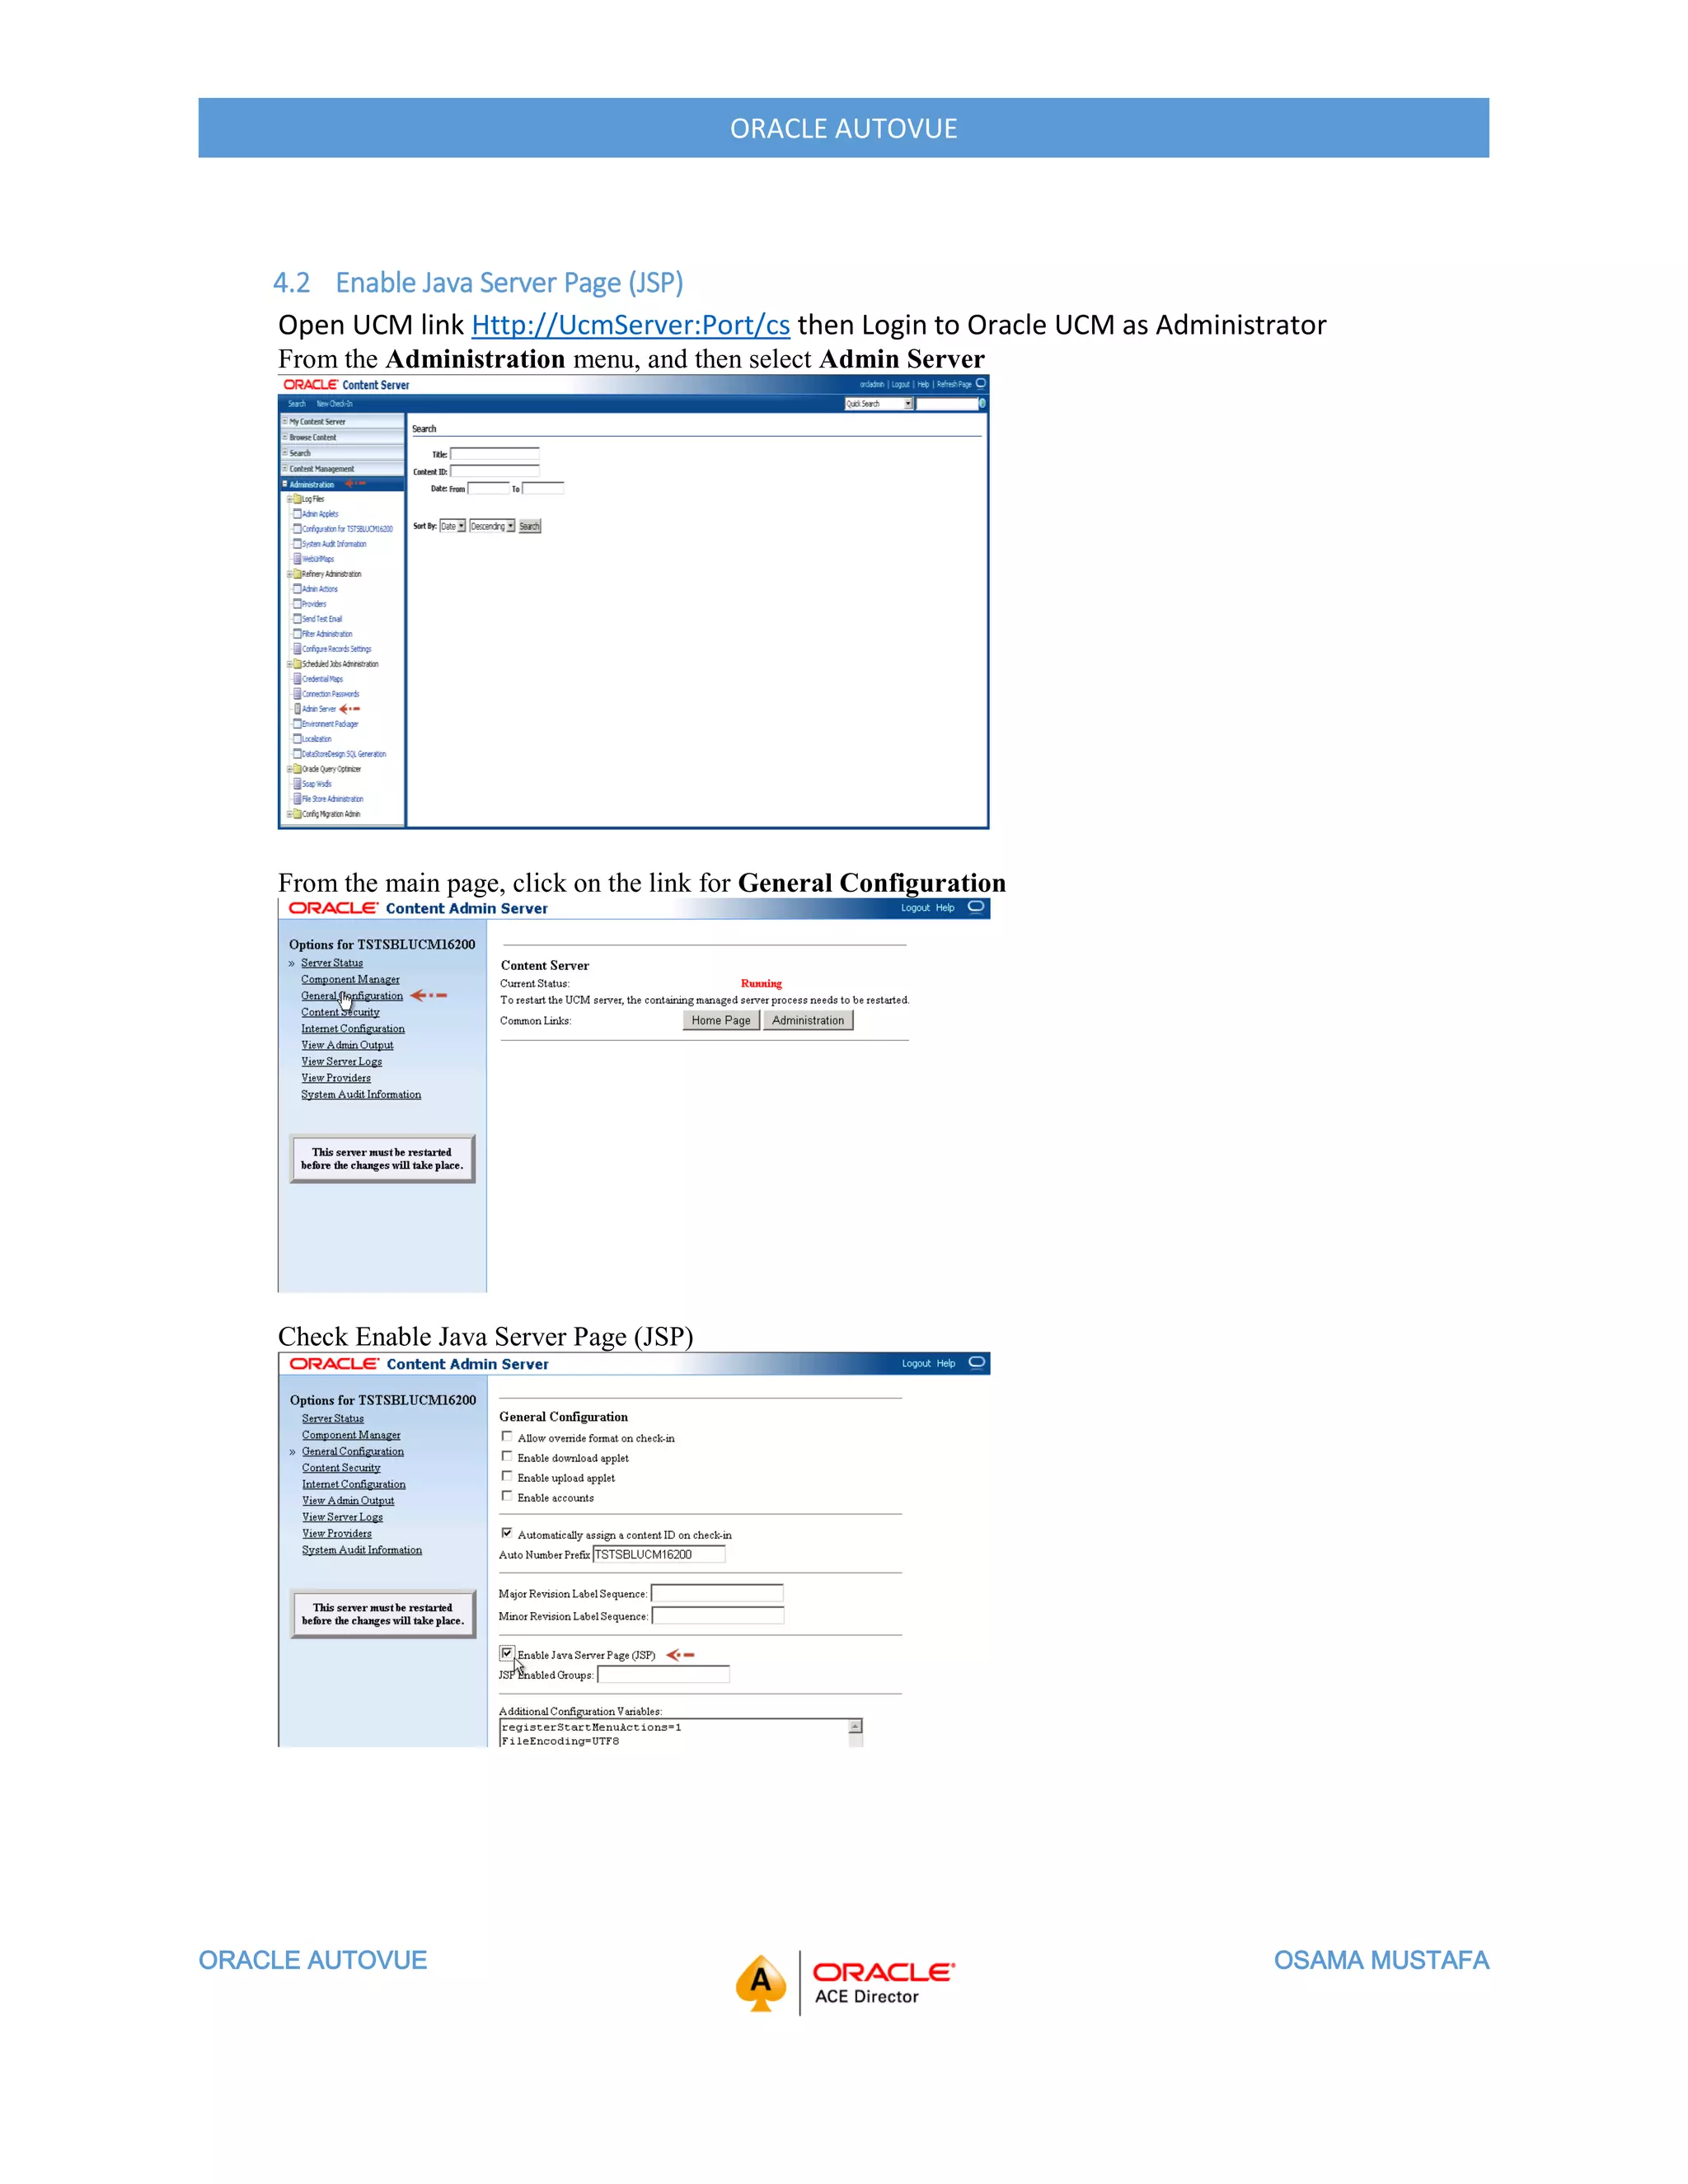
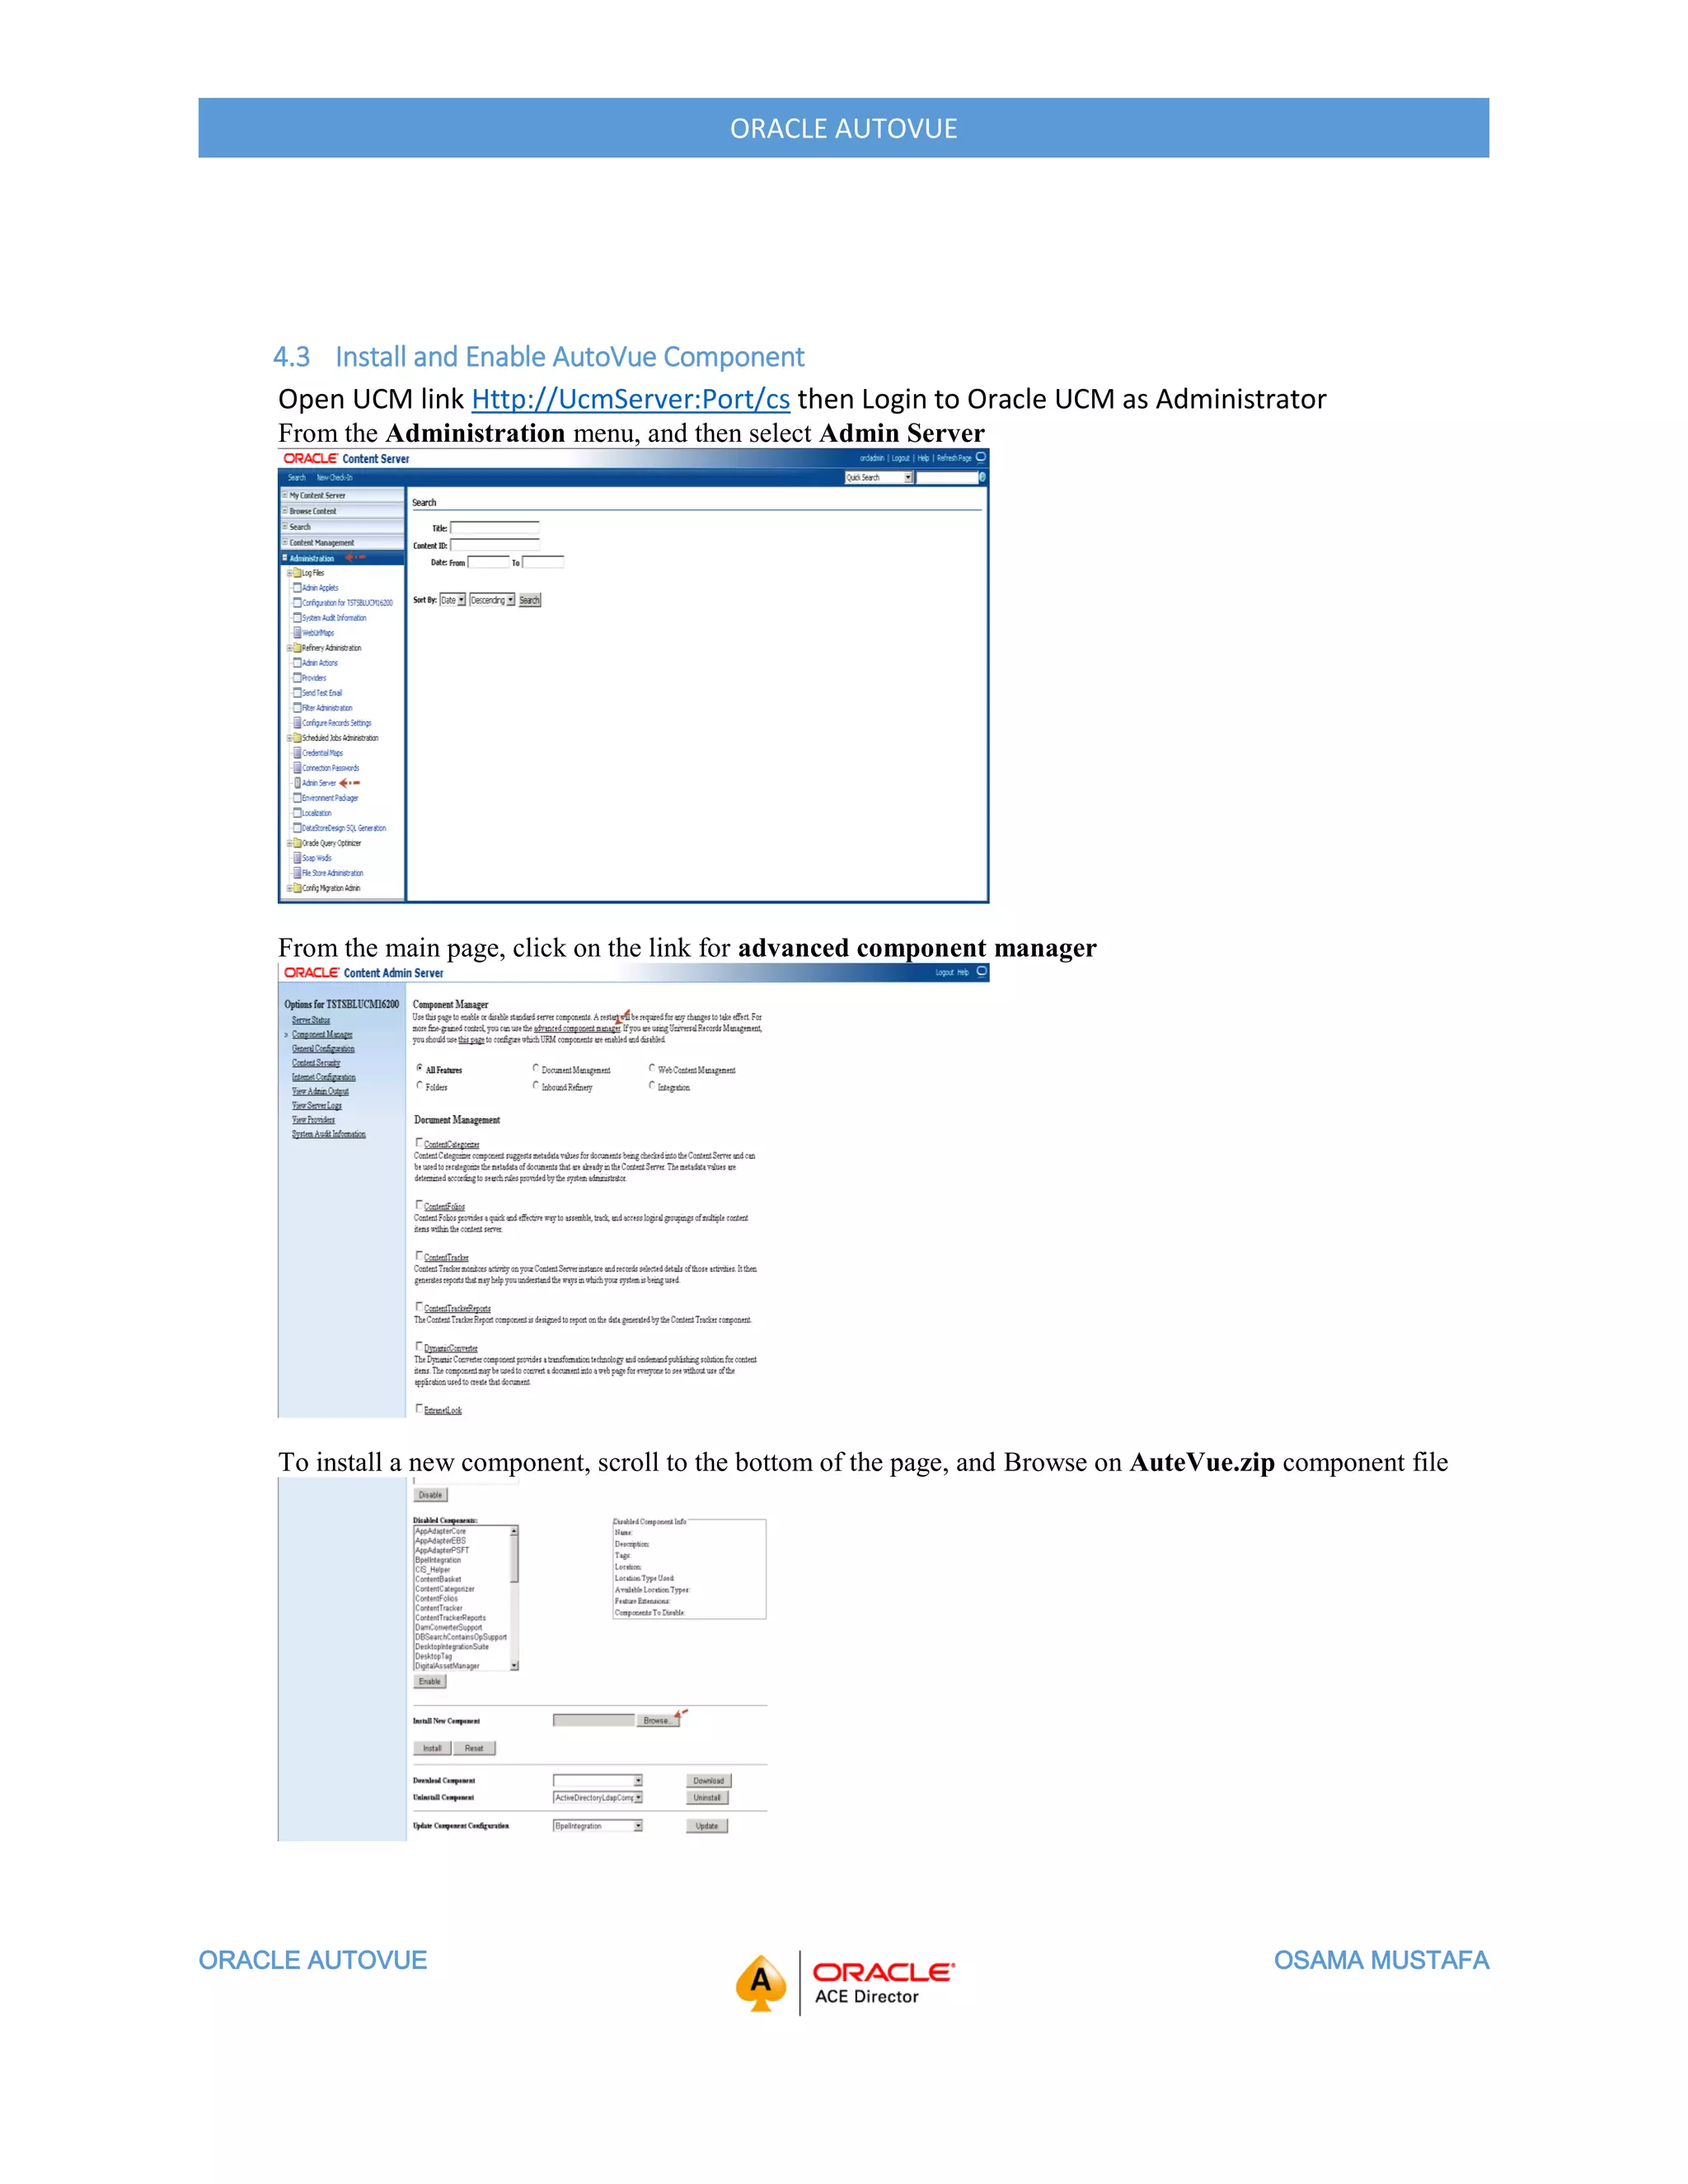
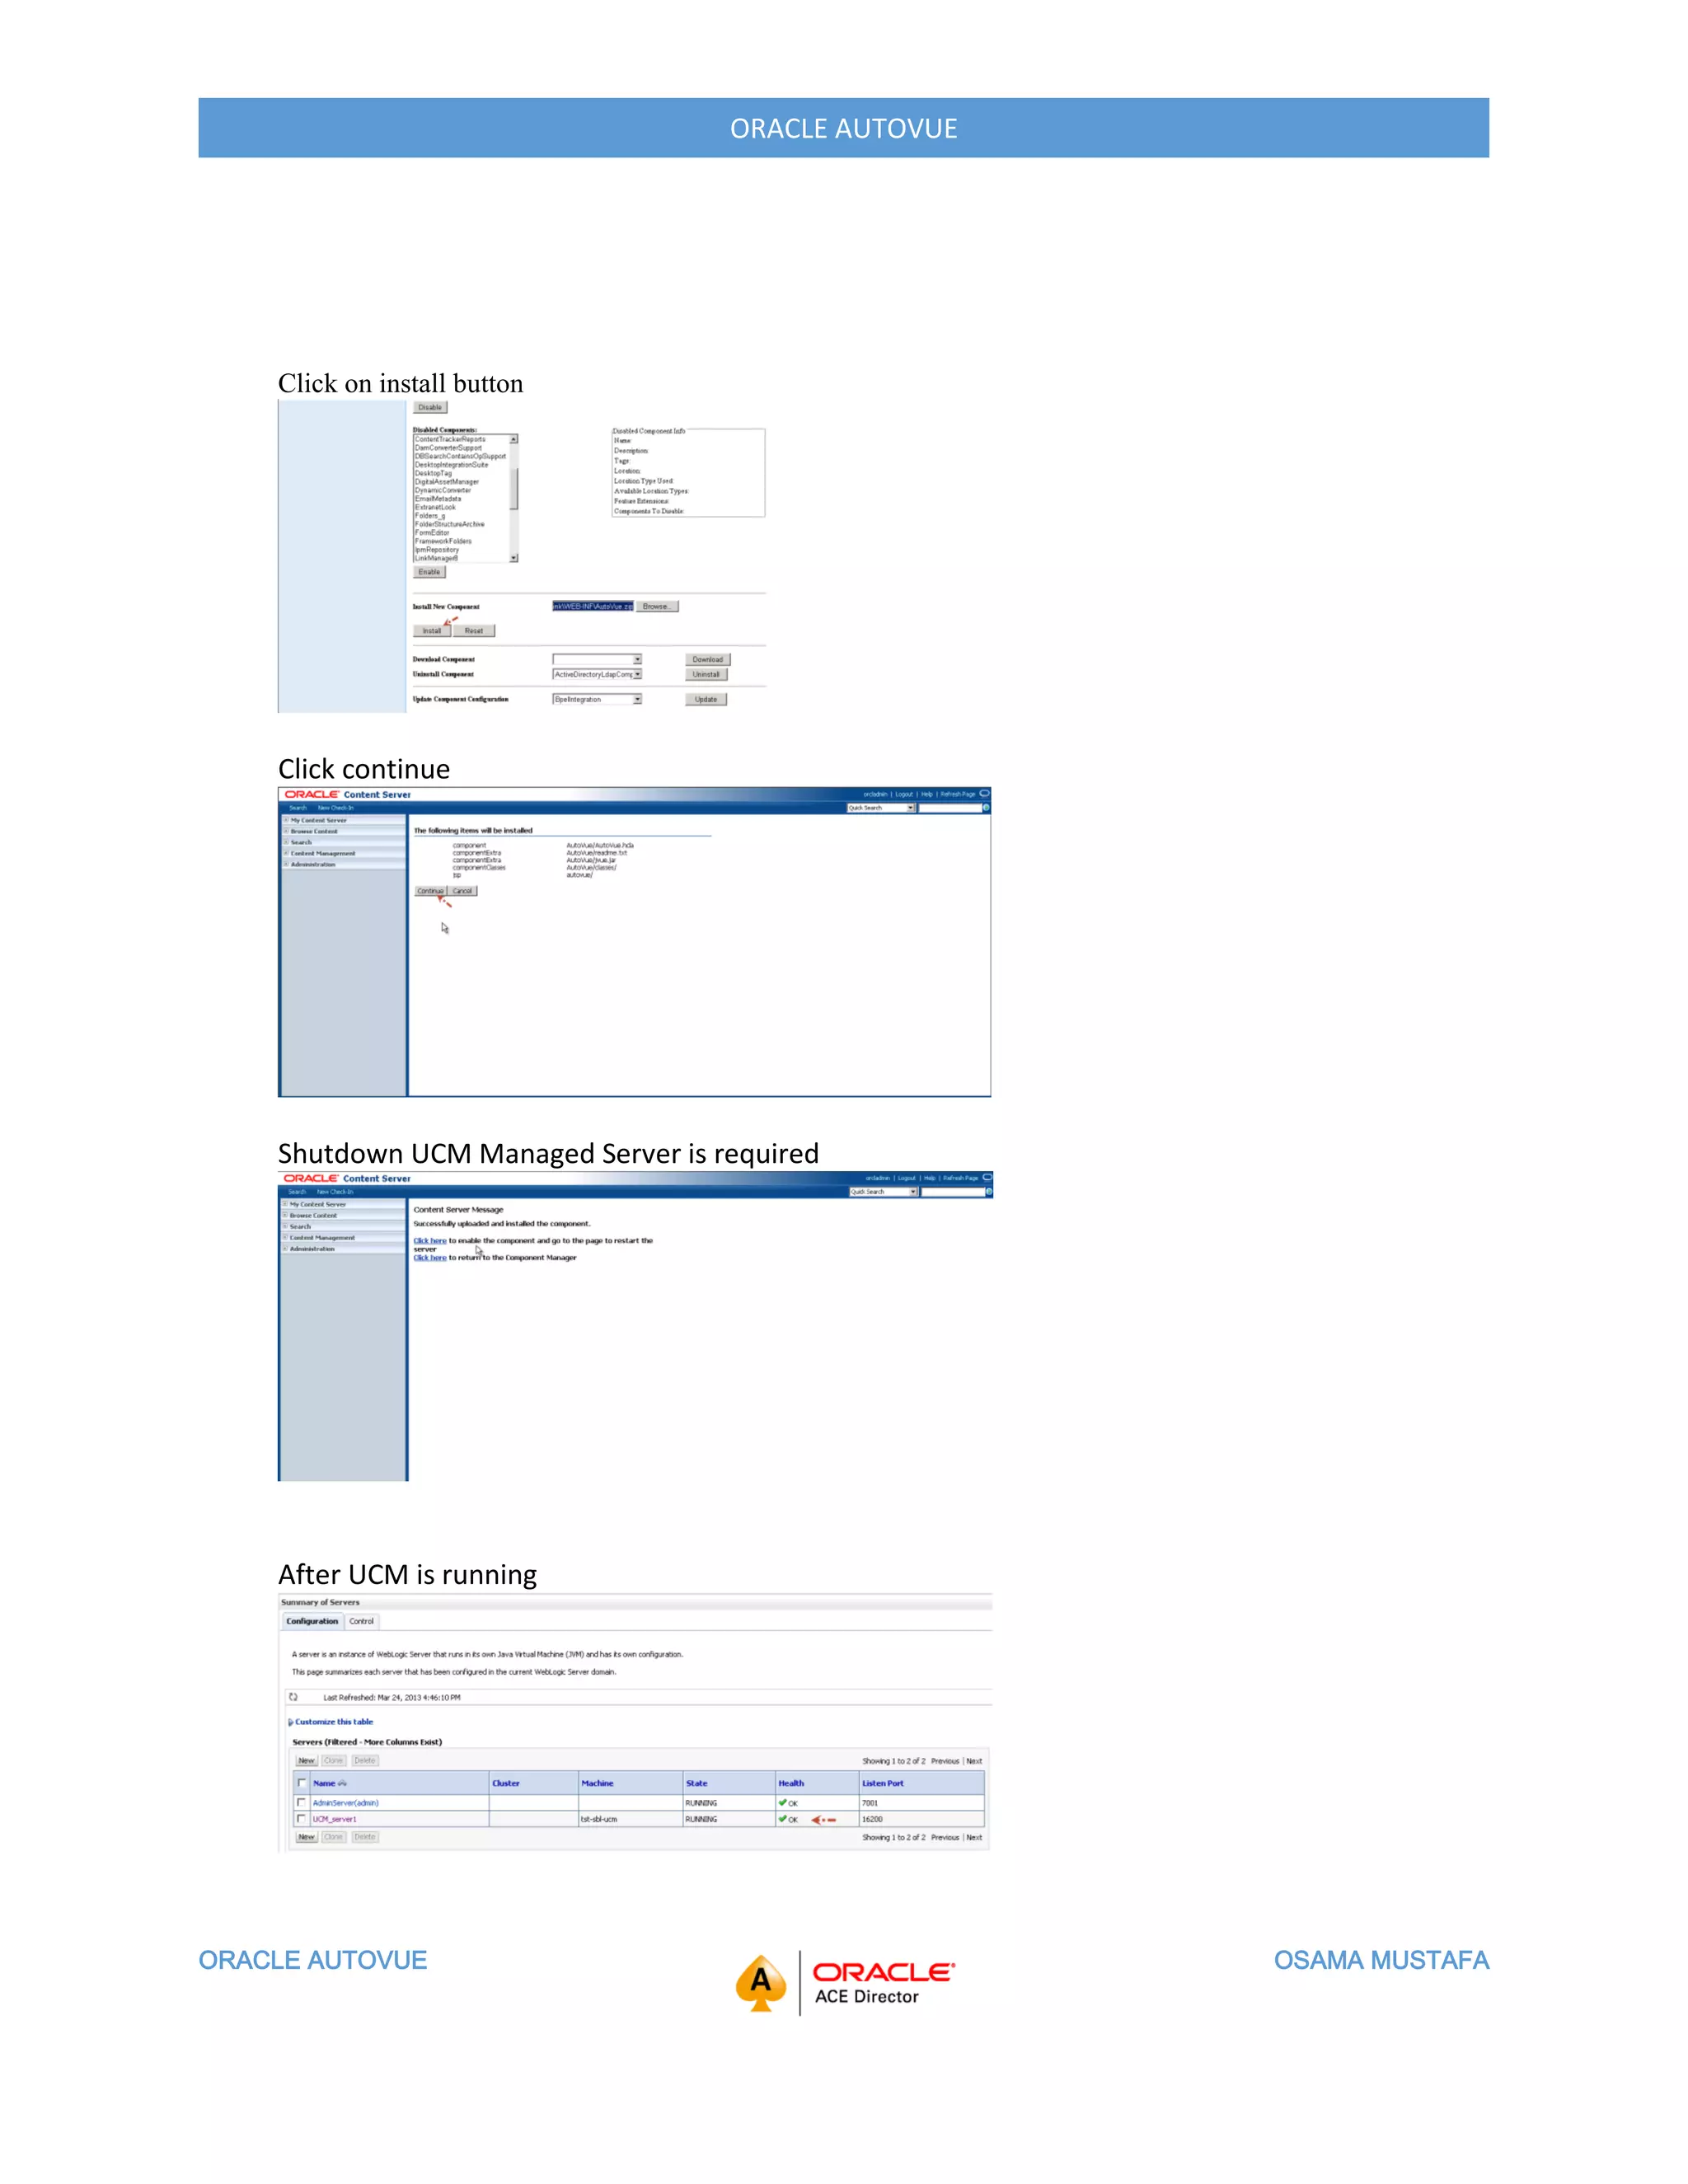
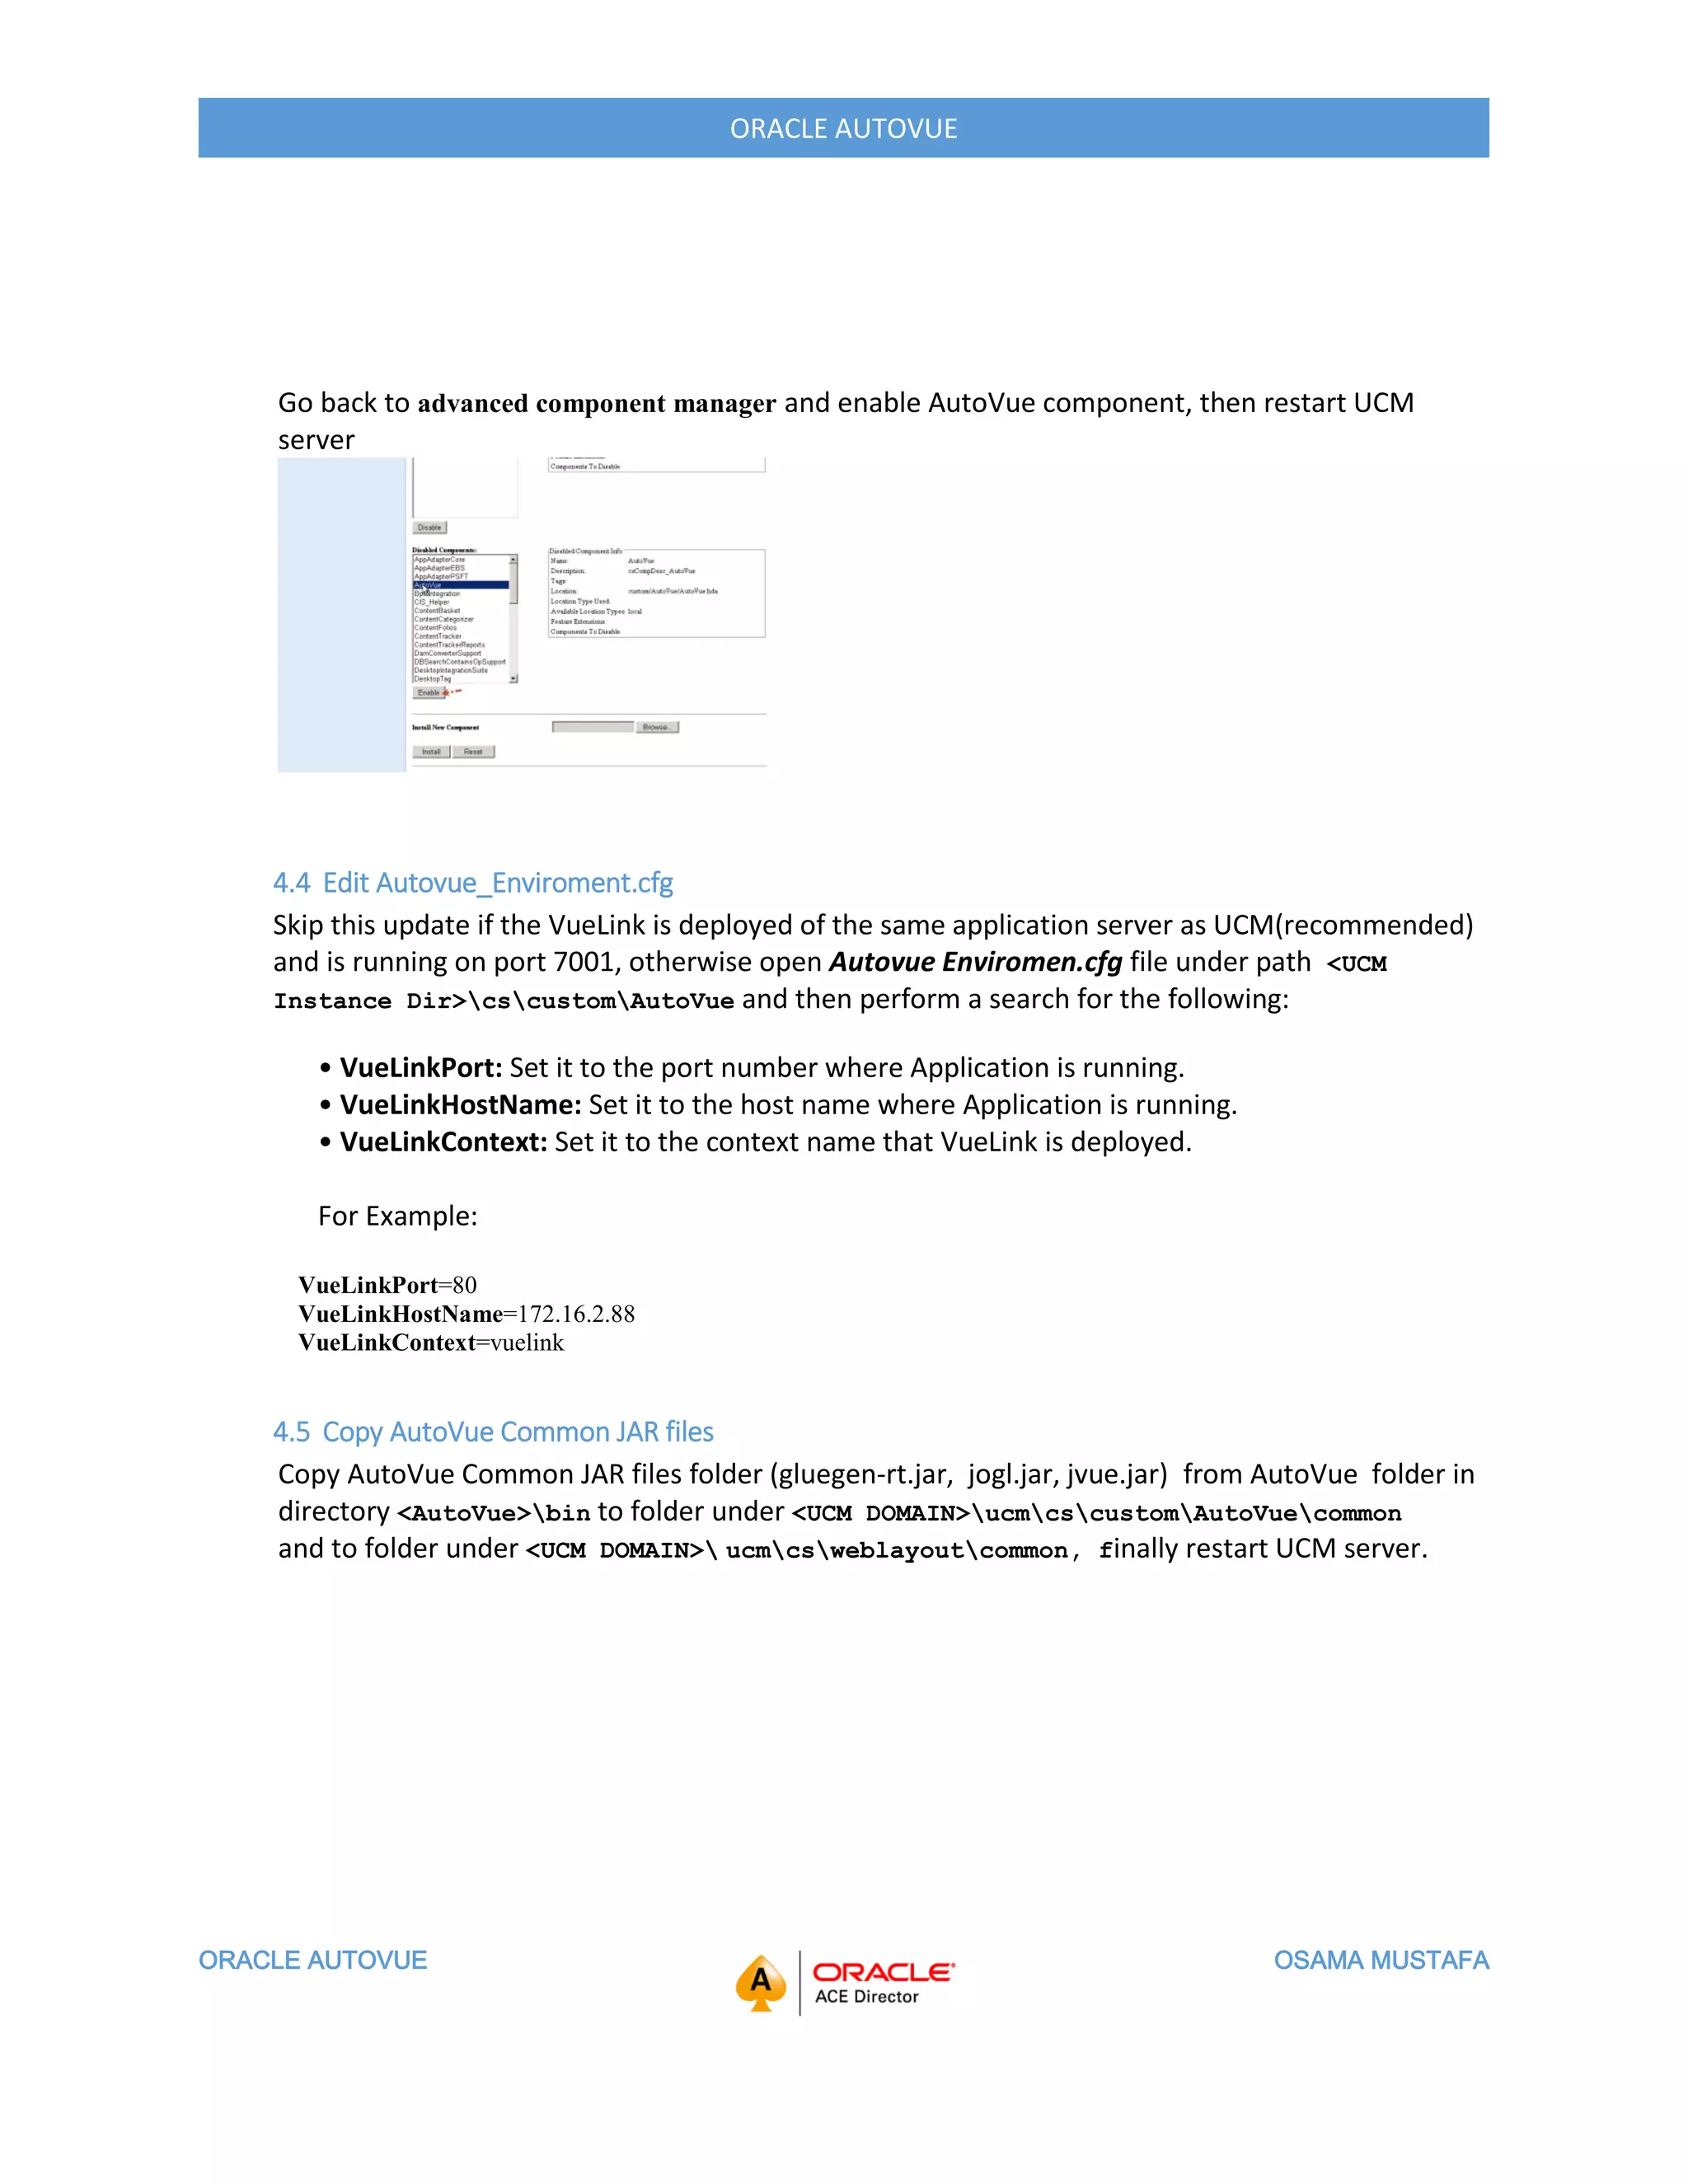
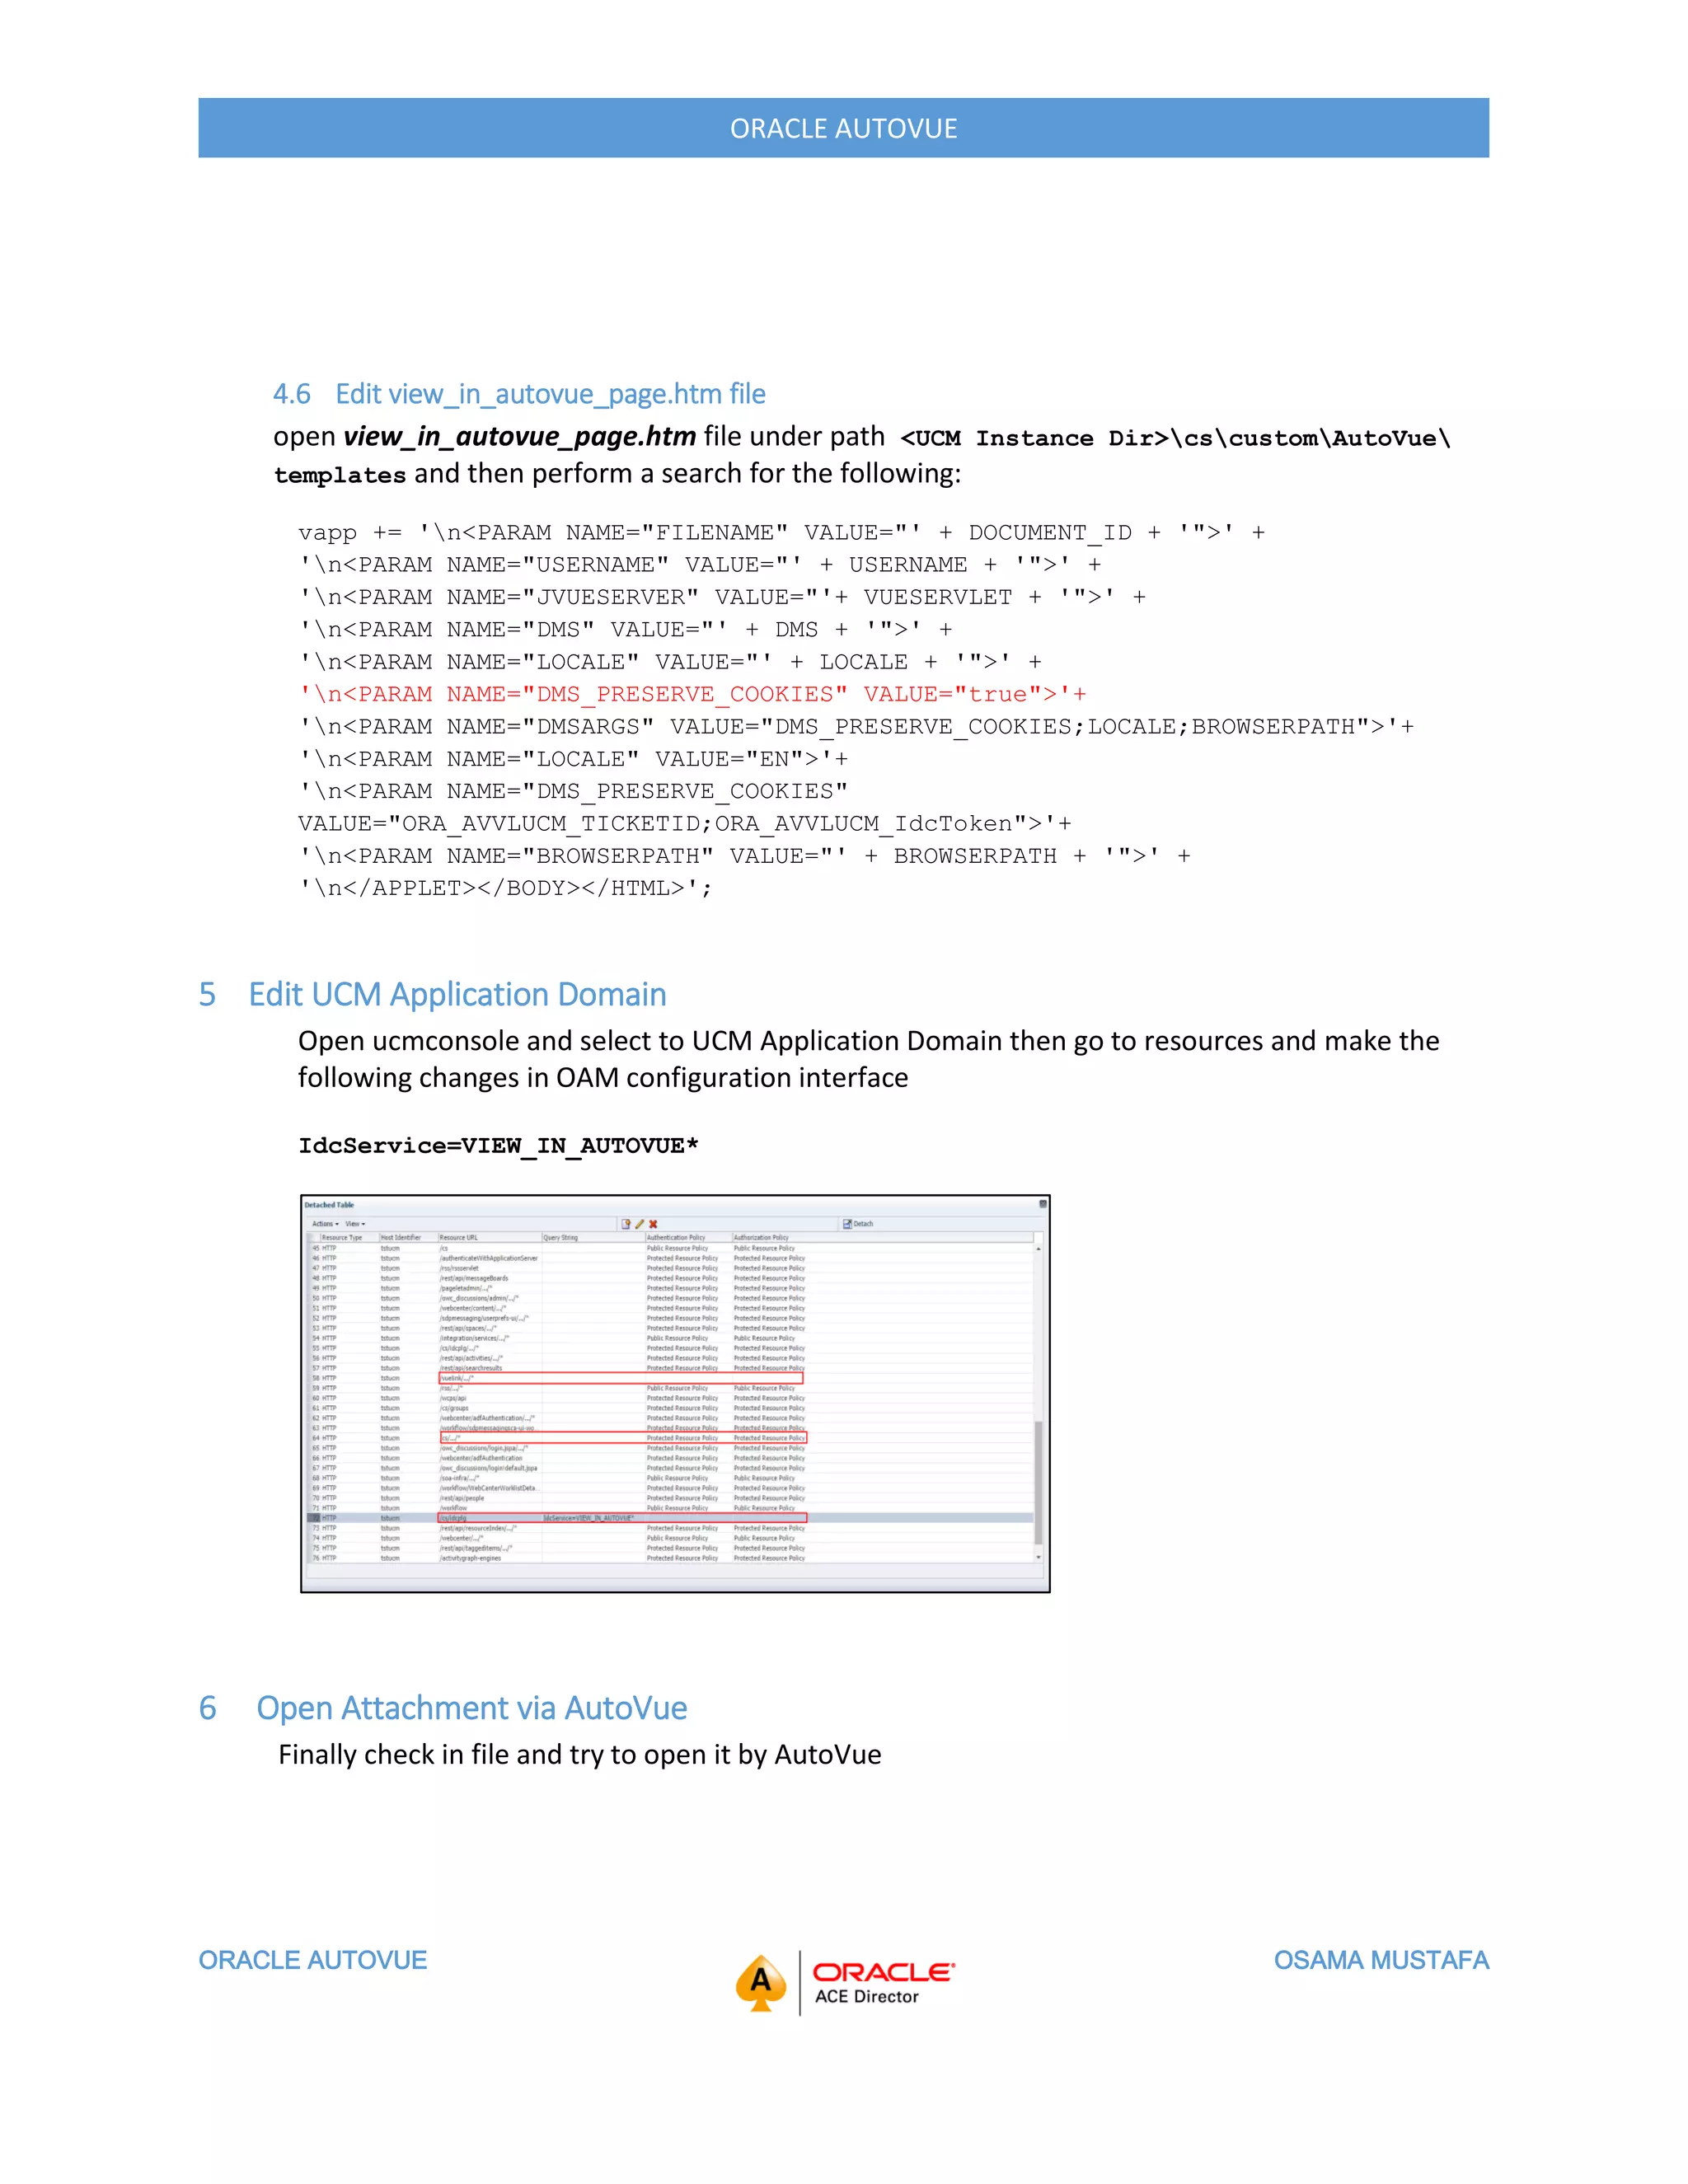
ORACLE AUTOVUE OSAMA MUSTAFA
ORACLE AUTOVUE
Introduction
This document describe steps to install Oracle Autovue and configure this application as SSO the
document provided with screenshots.
Environment:-
Operating System: Windows 2008
Database: - 11.2.0.4
Software Needed:-
1- AutoVue.
ORACLE AUTOVUE OSAMA MUSTAFA
ORACLE AUTOVUE
About the Author
Osama Mustafa has progressive experience in Oracle Products, community. He recently served as
Oracle Database Administrator.
Provide Database Implementation Solutions, High Availability Solution, Infrastructure and Storage
Planning, Install, Configure, Implement and manage Oracle E-Business Suite environments. Architect,
build and support highly-available Oracle EBS, Database and Fusion Middleware environments including
appropriate reporting, Installs, configures, upgrades, tunes, and maintains production, development and
test databases.
He entered Oracle ACE Program in 2013, he is author for the book Oracle Penetration Testing, Osama
Mustafa Certified OCP 10g,11g, Linux Implementations , Certified Ethical hacker and LPT , and Solaris
Administrator.
Include to all this Osama Mustafa is international Speaker in Oracle User Group and Oracle OTN Tour,
Published Online Articles in His blog about Oracle Technology, Volunteer in Oracle User Group such as
IOUG, ODTUG and UKOUG , Volunteer Board member in RACSIG and Organizer for RACATTACK
Event around the world. Recently his article has been published on OTECH magazine about Real
Application Cluster Here.
Twitter: @OsamaOracle
G+: Osama Mustafa
SlidShare: Osama Mustafa
LinkedIn: http://www.linkedin.com/in/osamamustafa
Blog: https://osamamustafa.blogpsot.com.
ORACLE AUTOVUE OSAMA MUSTAFA
ORACLE AUTOVUE
Oracle AutoVue
1. Installation AutoVue
Run the InstallClientServer.exe file from the installation folder.
1.1 Step 1: Welcome
ORACLE AUTOVUE OSAMA MUSTAFA
ORACLE AUTOVUE
2.2 Step 2: Specify Installation Directory
2.3 Step 3: Select Install Set
ORACLE AUTOVUE OSAMA MUSTAFA
ORACLE AUTOVUE
2.4 Step 4: Select Install Set: Custom
2.5 Step 5: Select Shortcut Folder
2.6 Step 6: Specify Hostname
ORACLE AUTOVUE OSAMA MUSTAFA
ORACLE AUTOVUE
2.7 Step 7: Specify Authentication
ORACLE AUTOVUE OSAMA MUSTAFA
ORACLE AUTOVUE
2.8 Step 8: Specify how SSL
ORACLE AUTOVUE OSAMA MUSTAFA
ORACLE AUTOVUE
2.9 Step 9: Pre-Installation Summary
2.10 Step 10: Installation Complete
3 Deploying VueLink on WebLogic Server
3.1 Updating config.cfg
Edit config.cfg so that UCM can receive requests from the VueLink machine, so browse to
<UCM Instance Dir>ucmcsconfig, search for SocketHostAddressSecurityFilter then add to this list the
IP address of the machine where VueLink is installed, as example:
#Server System Properties
SocketHostAddressSecurityFilter=127.0.0.1|10.26.1.171|172.16.2.88
Add new parameter with default port under #Additional Variables, as example:
#Additional Variables
IntradocServerPort=4444
ORACLE AUTOVUE OSAMA MUSTAFA
ORACLE AUTOVUE
3.2 Copy VueLink Application
Copy VueLink folder from <AutoVue_Installation_DIR>Vuelink_war to WebLogic Server
applications directory, the <APPLICATIONS_DIR> usually resides at <UCM_DOAMIN>
applicationsDOMAIN_NAME
3.3 Edit web.xml
Web.xml file is configure settings in the VueLink, so browse under
<APPLICATIONS_DIR>vuelinkWEB-INF and specify the host name of the machine that the
AutoVue server is running on and the port that AutoVue is listening to for connection for the
JVueServer, as example:
<init-param>
<param-name>JVueServer</param-name>
<param-value>localhost:5099</param-value>
</init-param>
The default value for the AutoVue port is 5099. It must be the same as the
jvueserver.socket.port parameter inside jvueserver.properties file under directory
>AutoVue_Home<bin
3.4 Edit adapterconfig.xml
adapterconfig.xml file is describe how VueLink able to connect to UCM, file directory under
the path <APPLICATIONS_DIR>vuelinkWEB-INFlib
Set value to the host name where UCM is installed, as example:
<property name="port">4444</property>
<property name="host">localhost</property>
<init-param>
<param-name>EnableSSL</param-name>
<param-value>false</param-value>
</init-param>
Verify that the port specified matches the one specified on the UCM server in the config.cfg file
on the server.
3.5 Edit jvueserver.properties
jvueserver.properties file is configure settings in the AutoVue, open jvueserver.properties
file under path < AutoVue Instance Dir>bin and then perform a add for the following
under #jvueserver.collaboration.group=group_name :
jvueserver.ssl.enable=FALSE
ORACLE AUTOVUE OSAMA MUSTAFA
ORACLE AUTOVUE
3.6 Copy cis-client-11g.jar
Copy cis-client-11g.jar from Oracle UCM Home in directory
<ORACLE_UCM_HOME>ucmDistributionCIS to lib folder under
<APPLICATIONS_DIR>vuelinkWEB-INFlib
3.7 Copy ESAPI_resources folder
Copy ESAPI_resources folder from Vuelink_war folder in directory
<AutoVue_Installation_DIR>Vuelink_war to folder under <UCM DOMAIN>
3.8 Edit setDomainEnv.cmd
setDomainEnv.cmd file is configure settings in the UCM DOMAIN, this modification require
restart AdminServer
open setDomainEnv.cmd file under path < UCM DOMAIN >bin and then perform a add for
the following under for %%i in ("%UCM_ORACLE_HOME%") do set
UCM_ORACLE_HOME=%%~fsi:
set JAVA_OPTIONS=%JAVA_OPTIONS% -
Dorg.owasp.esapi.resources=C:Oracleucm_domainESAPI_resources
3.9 Deploy VueLink from WebLogic Console
Logon to WebLogic web console and deploy the VueLink folder as an application.
Click on Deployments then install
ORACLE AUTOVUE OSAMA MUSTAFA
ORACLE AUTOVUE
Go to VueLink directory then click next
Choose install this deployment as an application
AdminServer will be as target
ORACLE AUTOVUE OSAMA MUSTAFA
ORACLE AUTOVUE
Choose I will make the deployment accessible from the following location
Click finish
Check VueLink application is active
ORACLE AUTOVUE OSAMA MUSTAFA
ORACLE AUTOVUE
3.10 Update mod_wl_ohs.conf file on Webtier Server
Add Vuelink part to mod_wl_ohs.conf file, this modification require restart OHS service
<Location /vuelink>
SetHandler weblogic-handler
WebLogicHost UCMServer
WebLogicPort 7001
</Location>
3.11 Deploy AutoVue Server as Windows Service
Run the following command with administrator privilege to register the AutoVue as Windows
Service from <AutoVue_HOME> which AutoVue binaries were installed:
<AutoVue_HOME>binjVueServerX.exe -standalone -install
Check for the Windows Service created named Oracle AutoVue Server
3.12 Verify AutoVue Server Installation
After starting up the AutoVue Server from Windows Service run the jVueServerX.exe from
< AutoVue _HOME>binjVueServerX.exe, it will show that the server is running as below:
ORACLE AUTOVUE OSAMA MUSTAFA
ORACLE AUTOVUE
3.13 Verify VueLink Installation
Check using a browser the following link to verify that VueLink is deployed:
http://localhost:7001/vuelink/VueServlet
Check the DMS services for VueLink:
http://localhost:7001/vuelink/DMS
4 Customizing UCM
4.1 AutoVue Component file
Copy AutoVue file path <File_Direcotry>dms_customizationAutoVue.zip to
<APPLICATIONS_DIR>vuelinkWEB-INF
ORACLE AUTOVUE OSAMA MUSTAFA
ORACLE AUTOVUE
4.2 Enable Java Server Page (JSP)
Open UCM link Http://UcmServer:Port/cs then Login to Oracle UCM as Administrator
From the Administration menu, and then select Admin Server
From the main page, click on the link for General Configuration
Check Enable Java Server Page (JSP)
ORACLE AUTOVUE OSAMA MUSTAFA
ORACLE AUTOVUE
4.3 Install and Enable AutoVue Component
Open UCM link Http://UcmServer:Port/cs then Login to Oracle UCM as Administrator
From the Administration menu, and then select Admin Server
From the main page, click on the link for advanced component manager
To install a new component, scroll to the bottom of the page, and Browse on AuteVue.zip component file
ORACLE AUTOVUE OSAMA MUSTAFA
ORACLE AUTOVUE
Click on install button
Click continue
Shutdown UCM Managed Server is required
After UCM is running
ORACLE AUTOVUE OSAMA MUSTAFA
ORACLE AUTOVUE
Go back to advanced component manager and enable AutoVue component, then restart UCM
server
4.4 Edit Autovue_Enviroment.cfg
Skip this update if the VueLink is deployed of the same application server as UCM(recommended)
and is running on port 7001, otherwise open Autovue Enviromen.cfg file under path <UCM
Instance Dir>cscustomAutoVue and then perform a search for the following:
• VueLinkPort: Set it to the port number where Application is running.
• VueLinkHostName: Set it to the host name where Application is running.
• VueLinkContext: Set it to the context name that VueLink is deployed.
For Example:
VueLinkPort=80
VueLinkHostName=172.16.2.88
VueLinkContext=vuelink
4.5 Copy AutoVue Common JAR files
Copy AutoVue Common JAR files folder (gluegen-rt.jar, jogl.jar, jvue.jar) from AutoVue folder in
directory <AutoVue>bin to folder under <UCM DOMAIN>ucmcscustomAutoVuecommon
and to folder under <UCM DOMAIN> ucmcsweblayoutcommon, finally restart UCM server.
ORACLE AUTOVUE OSAMA MUSTAFA
ORACLE AUTOVUE
4.6 Edit view_in_autovue_page.htm file
open view_in_autovue_page.htm file under path <UCM Instance Dir>cscustomAutoVue
templates and then perform a search for the following:
vapp += 'n<PARAM NAME="FILENAME" VALUE="' + DOCUMENT_ID + '">' +
'n<PARAM NAME="USERNAME" VALUE="' + USERNAME + '">' +
'n<PARAM NAME="JVUESERVER" VALUE="'+ VUESERVLET + '">' +
'n<PARAM NAME="DMS" VALUE="' + DMS + '">' +
'n<PARAM NAME="LOCALE" VALUE="' + LOCALE + '">' +
'n<PARAM NAME="DMS_PRESERVE_COOKIES" VALUE="true">'+
'n<PARAM NAME="DMSARGS" VALUE="DMS_PRESERVE_COOKIES;LOCALE;BROWSERPATH">'+
'n<PARAM NAME="LOCALE" VALUE="EN">'+
'n<PARAM NAME="DMS_PRESERVE_COOKIES"
VALUE="ORA_AVVLUCM_TICKETID;ORA_AVVLUCM_IdcToken">'+
'n<PARAM NAME="BROWSERPATH" VALUE="' + BROWSERPATH + '">' +
'n</APPLET></BODY></HTML>';
5 Edit UCM Application Domain
Open ucmconsole and select to UCM Application Domain then go to resources and make the
following changes in OAM configuration interface
IdcService=VIEW_IN_AUTOVUE*
6 Open Attachment via AutoVue
Finally check in file and try to open it by AutoVue
ORACLE AUTOVUE OSAMA MUSTAFA
ORACLE AUTOVUE

Oracle autovue

  • 1.
    ORACLE AUTOVUE OSAMAMUSTAFA ORACLE AUTOVUE Introduction This document describe steps to install Oracle Autovue and configure this application as SSO the document provided with screenshots. Environment:- Operating System: Windows 2008 Database: - 11.2.0.4 Software Needed:- 1- AutoVue.
  • 2.
    ORACLE AUTOVUE OSAMAMUSTAFA ORACLE AUTOVUE About the Author Osama Mustafa has progressive experience in Oracle Products, community. He recently served as Oracle Database Administrator. Provide Database Implementation Solutions, High Availability Solution, Infrastructure and Storage Planning, Install, Configure, Implement and manage Oracle E-Business Suite environments. Architect, build and support highly-available Oracle EBS, Database and Fusion Middleware environments including appropriate reporting, Installs, configures, upgrades, tunes, and maintains production, development and test databases. He entered Oracle ACE Program in 2013, he is author for the book Oracle Penetration Testing, Osama Mustafa Certified OCP 10g,11g, Linux Implementations , Certified Ethical hacker and LPT , and Solaris Administrator. Include to all this Osama Mustafa is international Speaker in Oracle User Group and Oracle OTN Tour, Published Online Articles in His blog about Oracle Technology, Volunteer in Oracle User Group such as IOUG, ODTUG and UKOUG , Volunteer Board member in RACSIG and Organizer for RACATTACK Event around the world. Recently his article has been published on OTECH magazine about Real Application Cluster Here. Twitter: @OsamaOracle G+: Osama Mustafa SlidShare: Osama Mustafa LinkedIn: http://www.linkedin.com/in/osamamustafa Blog: https://osamamustafa.blogpsot.com.
  • 3.
    ORACLE AUTOVUE OSAMAMUSTAFA ORACLE AUTOVUE Oracle AutoVue 1. Installation AutoVue Run the InstallClientServer.exe file from the installation folder. 1.1 Step 1: Welcome
  • 4.
    ORACLE AUTOVUE OSAMAMUSTAFA ORACLE AUTOVUE 2.2 Step 2: Specify Installation Directory 2.3 Step 3: Select Install Set
  • 5.
    ORACLE AUTOVUE OSAMAMUSTAFA ORACLE AUTOVUE 2.4 Step 4: Select Install Set: Custom 2.5 Step 5: Select Shortcut Folder 2.6 Step 6: Specify Hostname
  • 6.
    ORACLE AUTOVUE OSAMAMUSTAFA ORACLE AUTOVUE 2.7 Step 7: Specify Authentication
  • 7.
    ORACLE AUTOVUE OSAMAMUSTAFA ORACLE AUTOVUE 2.8 Step 8: Specify how SSL
  • 8.
    ORACLE AUTOVUE OSAMAMUSTAFA ORACLE AUTOVUE 2.9 Step 9: Pre-Installation Summary 2.10 Step 10: Installation Complete 3 Deploying VueLink on WebLogic Server 3.1 Updating config.cfg Edit config.cfg so that UCM can receive requests from the VueLink machine, so browse to <UCM Instance Dir>ucmcsconfig, search for SocketHostAddressSecurityFilter then add to this list the IP address of the machine where VueLink is installed, as example: #Server System Properties SocketHostAddressSecurityFilter=127.0.0.1|10.26.1.171|172.16.2.88 Add new parameter with default port under #Additional Variables, as example: #Additional Variables IntradocServerPort=4444
  • 9.
    ORACLE AUTOVUE OSAMAMUSTAFA ORACLE AUTOVUE 3.2 Copy VueLink Application Copy VueLink folder from <AutoVue_Installation_DIR>Vuelink_war to WebLogic Server applications directory, the <APPLICATIONS_DIR> usually resides at <UCM_DOAMIN> applicationsDOMAIN_NAME 3.3 Edit web.xml Web.xml file is configure settings in the VueLink, so browse under <APPLICATIONS_DIR>vuelinkWEB-INF and specify the host name of the machine that the AutoVue server is running on and the port that AutoVue is listening to for connection for the JVueServer, as example: <init-param> <param-name>JVueServer</param-name> <param-value>localhost:5099</param-value> </init-param> The default value for the AutoVue port is 5099. It must be the same as the jvueserver.socket.port parameter inside jvueserver.properties file under directory >AutoVue_Home<bin 3.4 Edit adapterconfig.xml adapterconfig.xml file is describe how VueLink able to connect to UCM, file directory under the path <APPLICATIONS_DIR>vuelinkWEB-INFlib Set value to the host name where UCM is installed, as example: <property name="port">4444</property> <property name="host">localhost</property> <init-param> <param-name>EnableSSL</param-name> <param-value>false</param-value> </init-param> Verify that the port specified matches the one specified on the UCM server in the config.cfg file on the server. 3.5 Edit jvueserver.properties jvueserver.properties file is configure settings in the AutoVue, open jvueserver.properties file under path < AutoVue Instance Dir>bin and then perform a add for the following under #jvueserver.collaboration.group=group_name : jvueserver.ssl.enable=FALSE
  • 10.
    ORACLE AUTOVUE OSAMAMUSTAFA ORACLE AUTOVUE 3.6 Copy cis-client-11g.jar Copy cis-client-11g.jar from Oracle UCM Home in directory <ORACLE_UCM_HOME>ucmDistributionCIS to lib folder under <APPLICATIONS_DIR>vuelinkWEB-INFlib 3.7 Copy ESAPI_resources folder Copy ESAPI_resources folder from Vuelink_war folder in directory <AutoVue_Installation_DIR>Vuelink_war to folder under <UCM DOMAIN> 3.8 Edit setDomainEnv.cmd setDomainEnv.cmd file is configure settings in the UCM DOMAIN, this modification require restart AdminServer open setDomainEnv.cmd file under path < UCM DOMAIN >bin and then perform a add for the following under for %%i in ("%UCM_ORACLE_HOME%") do set UCM_ORACLE_HOME=%%~fsi: set JAVA_OPTIONS=%JAVA_OPTIONS% - Dorg.owasp.esapi.resources=C:Oracleucm_domainESAPI_resources 3.9 Deploy VueLink from WebLogic Console Logon to WebLogic web console and deploy the VueLink folder as an application. Click on Deployments then install
  • 11.
    ORACLE AUTOVUE OSAMAMUSTAFA ORACLE AUTOVUE Go to VueLink directory then click next Choose install this deployment as an application AdminServer will be as target
  • 12.
    ORACLE AUTOVUE OSAMAMUSTAFA ORACLE AUTOVUE Choose I will make the deployment accessible from the following location Click finish Check VueLink application is active
  • 13.
    ORACLE AUTOVUE OSAMAMUSTAFA ORACLE AUTOVUE 3.10 Update mod_wl_ohs.conf file on Webtier Server Add Vuelink part to mod_wl_ohs.conf file, this modification require restart OHS service <Location /vuelink> SetHandler weblogic-handler WebLogicHost UCMServer WebLogicPort 7001 </Location> 3.11 Deploy AutoVue Server as Windows Service Run the following command with administrator privilege to register the AutoVue as Windows Service from <AutoVue_HOME> which AutoVue binaries were installed: <AutoVue_HOME>binjVueServerX.exe -standalone -install Check for the Windows Service created named Oracle AutoVue Server 3.12 Verify AutoVue Server Installation After starting up the AutoVue Server from Windows Service run the jVueServerX.exe from < AutoVue _HOME>binjVueServerX.exe, it will show that the server is running as below:
  • 14.
    ORACLE AUTOVUE OSAMAMUSTAFA ORACLE AUTOVUE 3.13 Verify VueLink Installation Check using a browser the following link to verify that VueLink is deployed: http://localhost:7001/vuelink/VueServlet Check the DMS services for VueLink: http://localhost:7001/vuelink/DMS 4 Customizing UCM 4.1 AutoVue Component file Copy AutoVue file path <File_Direcotry>dms_customizationAutoVue.zip to <APPLICATIONS_DIR>vuelinkWEB-INF
  • 15.
    ORACLE AUTOVUE OSAMAMUSTAFA ORACLE AUTOVUE 4.2 Enable Java Server Page (JSP) Open UCM link Http://UcmServer:Port/cs then Login to Oracle UCM as Administrator From the Administration menu, and then select Admin Server From the main page, click on the link for General Configuration Check Enable Java Server Page (JSP)
  • 16.
    ORACLE AUTOVUE OSAMAMUSTAFA ORACLE AUTOVUE 4.3 Install and Enable AutoVue Component Open UCM link Http://UcmServer:Port/cs then Login to Oracle UCM as Administrator From the Administration menu, and then select Admin Server From the main page, click on the link for advanced component manager To install a new component, scroll to the bottom of the page, and Browse on AuteVue.zip component file
  • 17.
    ORACLE AUTOVUE OSAMAMUSTAFA ORACLE AUTOVUE Click on install button Click continue Shutdown UCM Managed Server is required After UCM is running
  • 18.
    ORACLE AUTOVUE OSAMAMUSTAFA ORACLE AUTOVUE Go back to advanced component manager and enable AutoVue component, then restart UCM server 4.4 Edit Autovue_Enviroment.cfg Skip this update if the VueLink is deployed of the same application server as UCM(recommended) and is running on port 7001, otherwise open Autovue Enviromen.cfg file under path <UCM Instance Dir>cscustomAutoVue and then perform a search for the following: • VueLinkPort: Set it to the port number where Application is running. • VueLinkHostName: Set it to the host name where Application is running. • VueLinkContext: Set it to the context name that VueLink is deployed. For Example: VueLinkPort=80 VueLinkHostName=172.16.2.88 VueLinkContext=vuelink 4.5 Copy AutoVue Common JAR files Copy AutoVue Common JAR files folder (gluegen-rt.jar, jogl.jar, jvue.jar) from AutoVue folder in directory <AutoVue>bin to folder under <UCM DOMAIN>ucmcscustomAutoVuecommon and to folder under <UCM DOMAIN> ucmcsweblayoutcommon, finally restart UCM server.
  • 19.
    ORACLE AUTOVUE OSAMAMUSTAFA ORACLE AUTOVUE 4.6 Edit view_in_autovue_page.htm file open view_in_autovue_page.htm file under path <UCM Instance Dir>cscustomAutoVue templates and then perform a search for the following: vapp += 'n<PARAM NAME="FILENAME" VALUE="' + DOCUMENT_ID + '">' + 'n<PARAM NAME="USERNAME" VALUE="' + USERNAME + '">' + 'n<PARAM NAME="JVUESERVER" VALUE="'+ VUESERVLET + '">' + 'n<PARAM NAME="DMS" VALUE="' + DMS + '">' + 'n<PARAM NAME="LOCALE" VALUE="' + LOCALE + '">' + 'n<PARAM NAME="DMS_PRESERVE_COOKIES" VALUE="true">'+ 'n<PARAM NAME="DMSARGS" VALUE="DMS_PRESERVE_COOKIES;LOCALE;BROWSERPATH">'+ 'n<PARAM NAME="LOCALE" VALUE="EN">'+ 'n<PARAM NAME="DMS_PRESERVE_COOKIES" VALUE="ORA_AVVLUCM_TICKETID;ORA_AVVLUCM_IdcToken">'+ 'n<PARAM NAME="BROWSERPATH" VALUE="' + BROWSERPATH + '">' + 'n</APPLET></BODY></HTML>'; 5 Edit UCM Application Domain Open ucmconsole and select to UCM Application Domain then go to resources and make the following changes in OAM configuration interface IdcService=VIEW_IN_AUTOVUE* 6 Open Attachment via AutoVue Finally check in file and try to open it by AutoVue
  • 20.
    ORACLE AUTOVUE OSAMAMUSTAFA ORACLE AUTOVUE