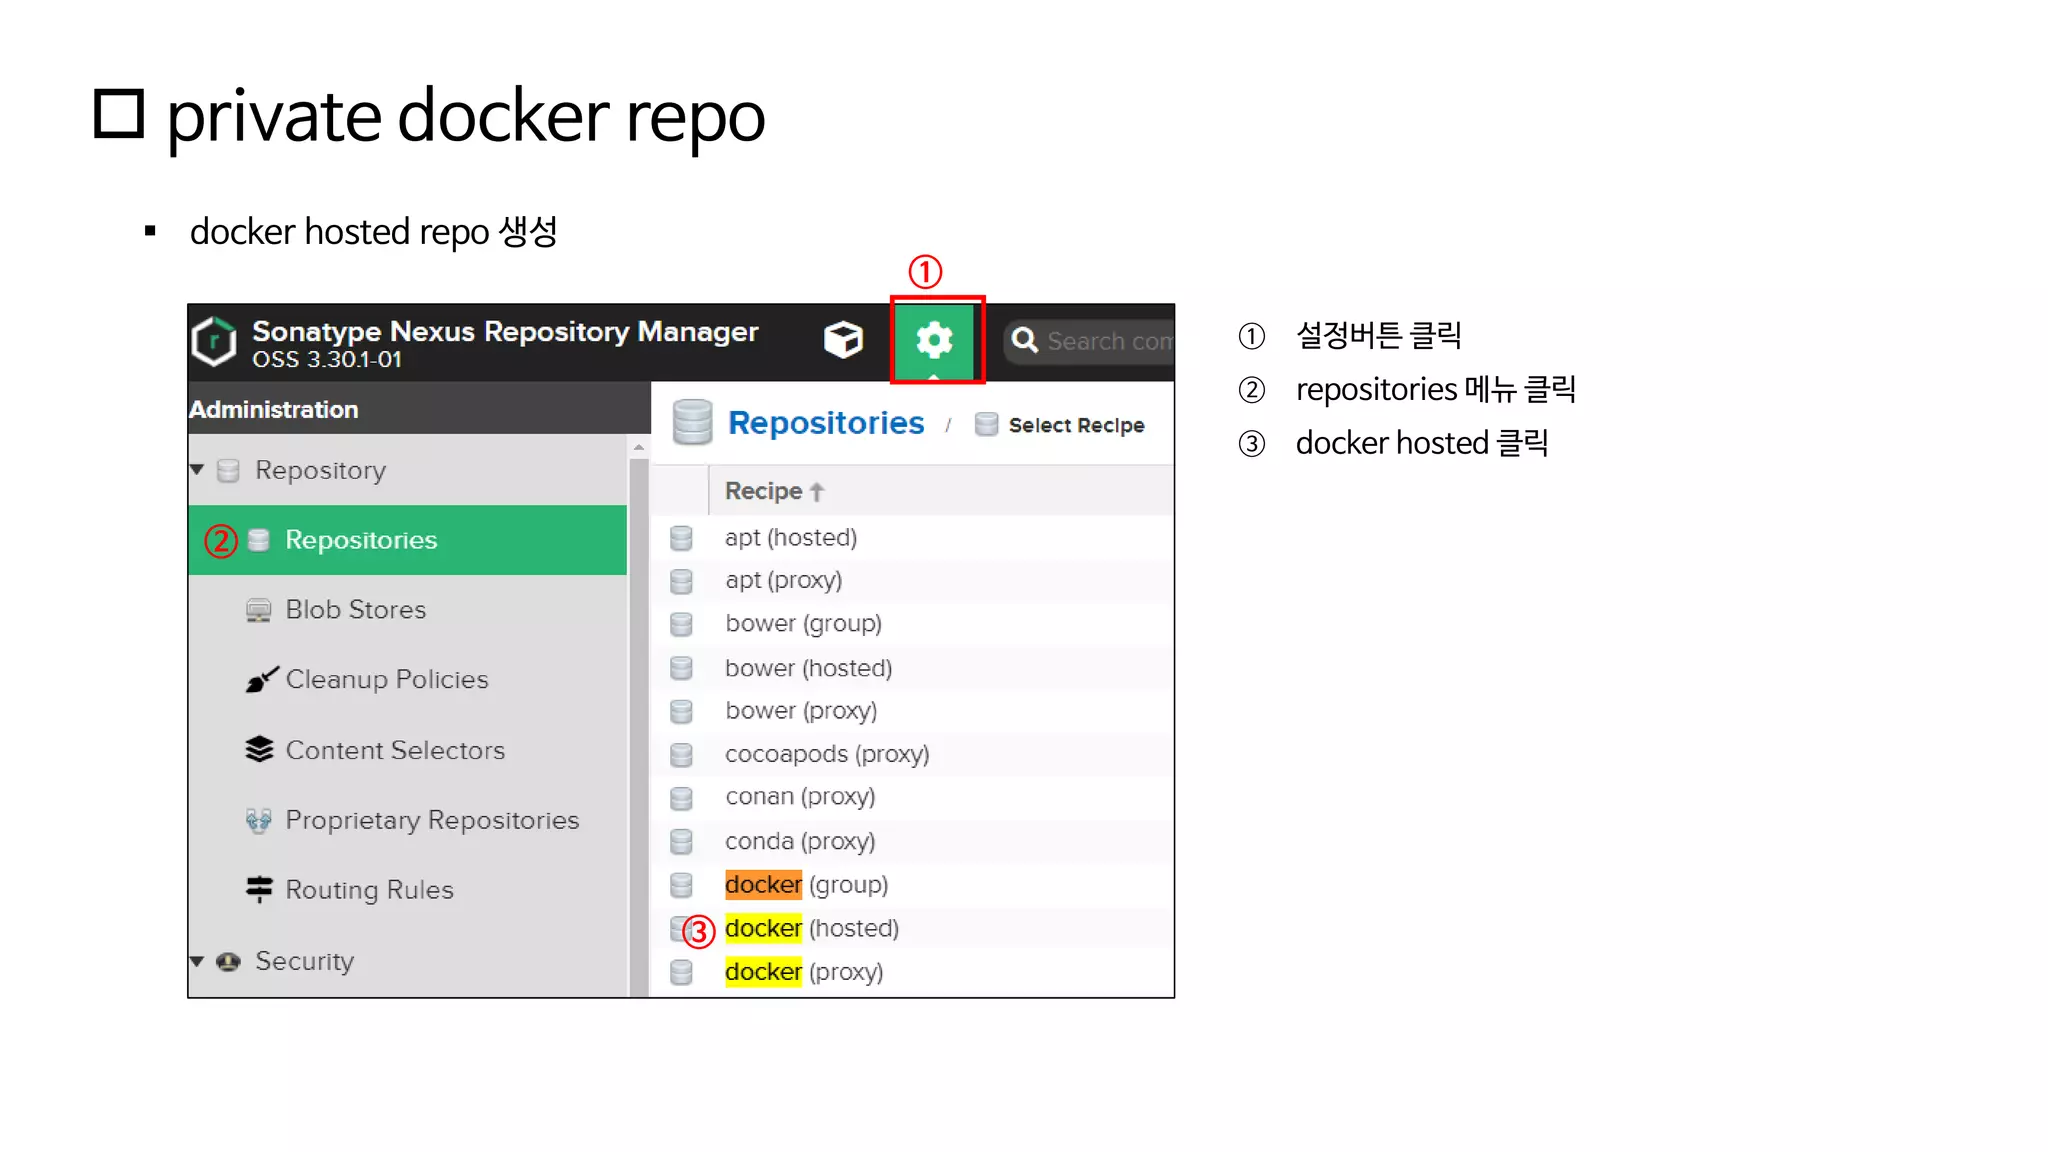
Nexus Helm 설치
+cert-manager로 https 적용
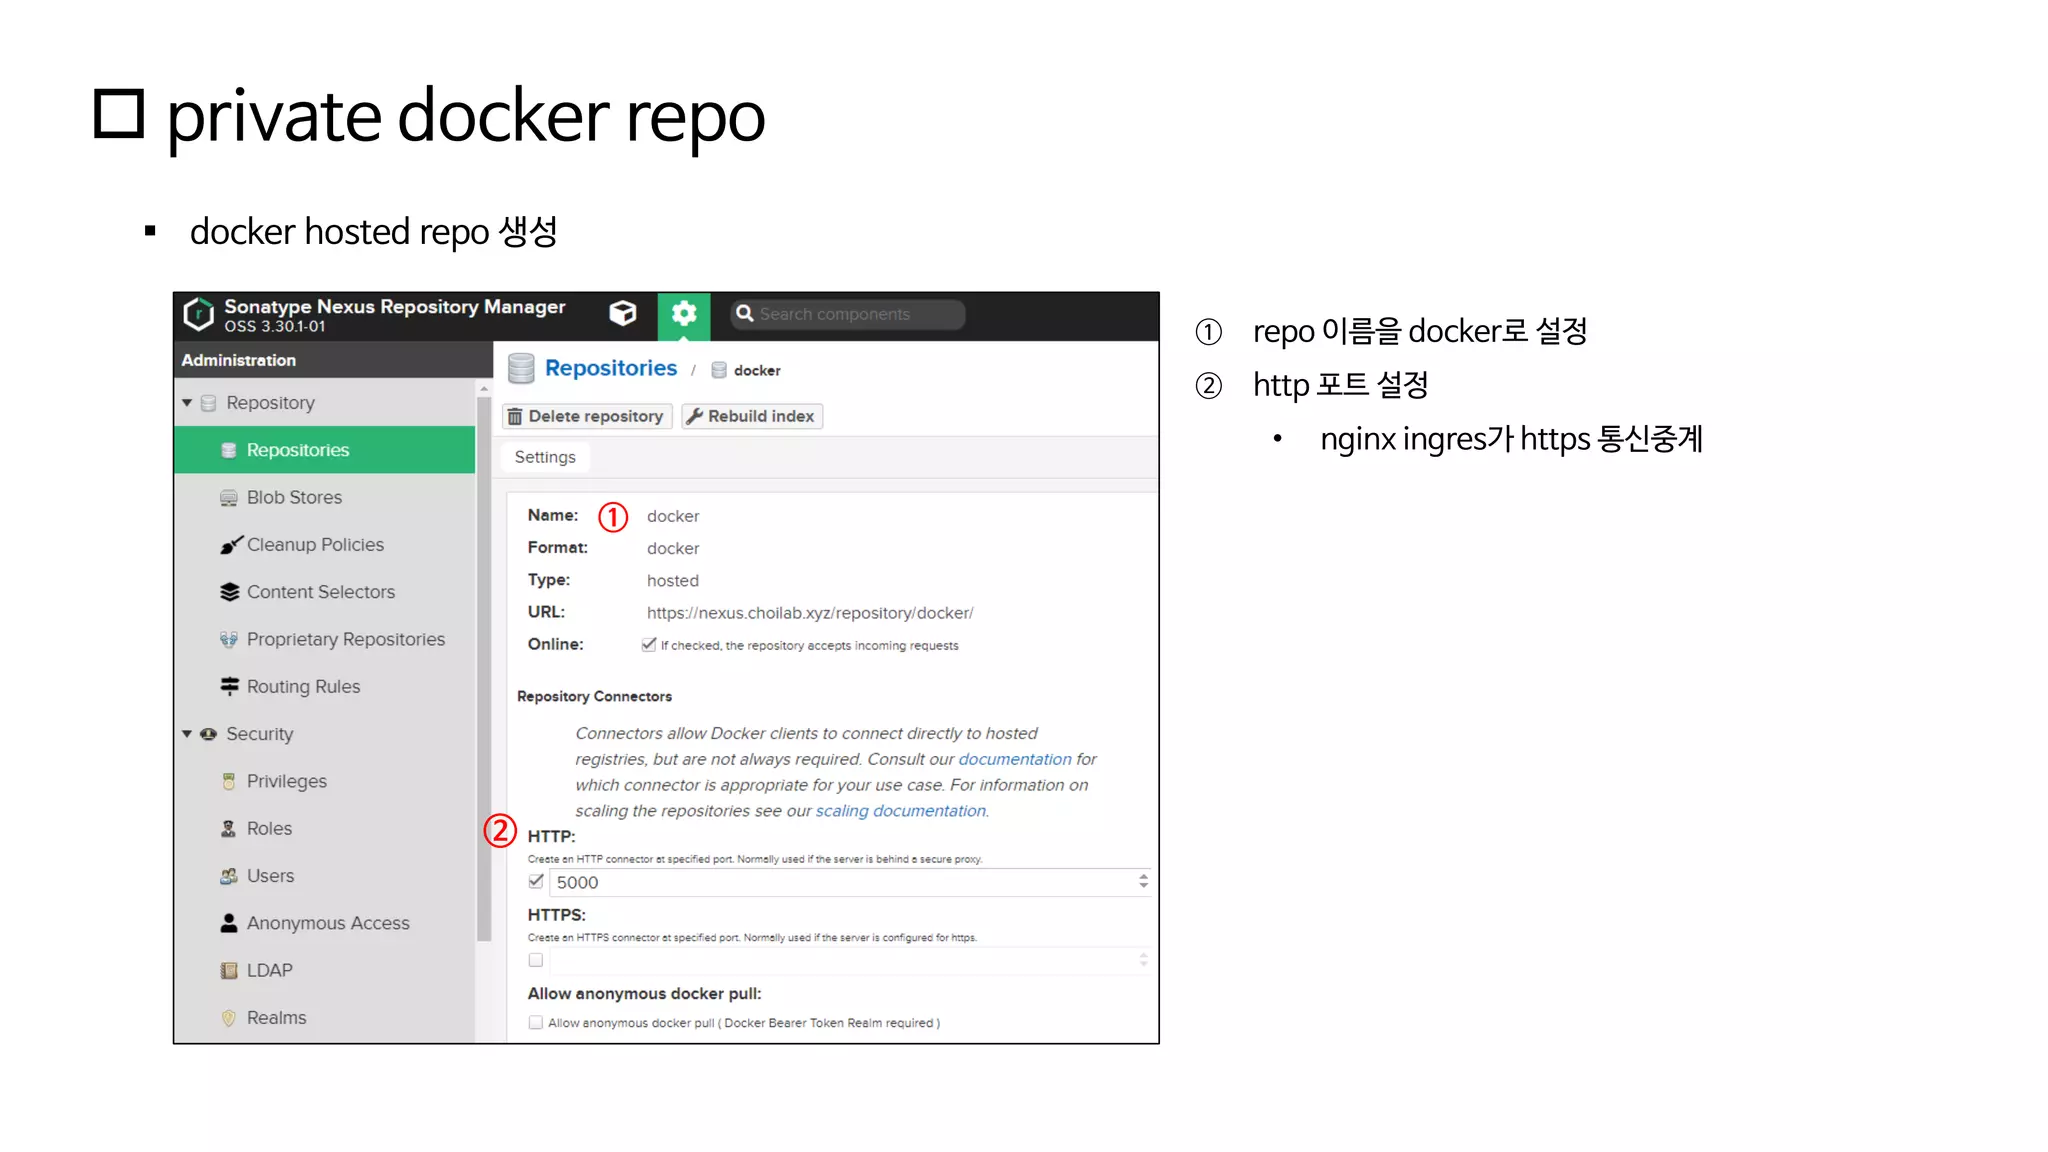
+ private docker repo 생성
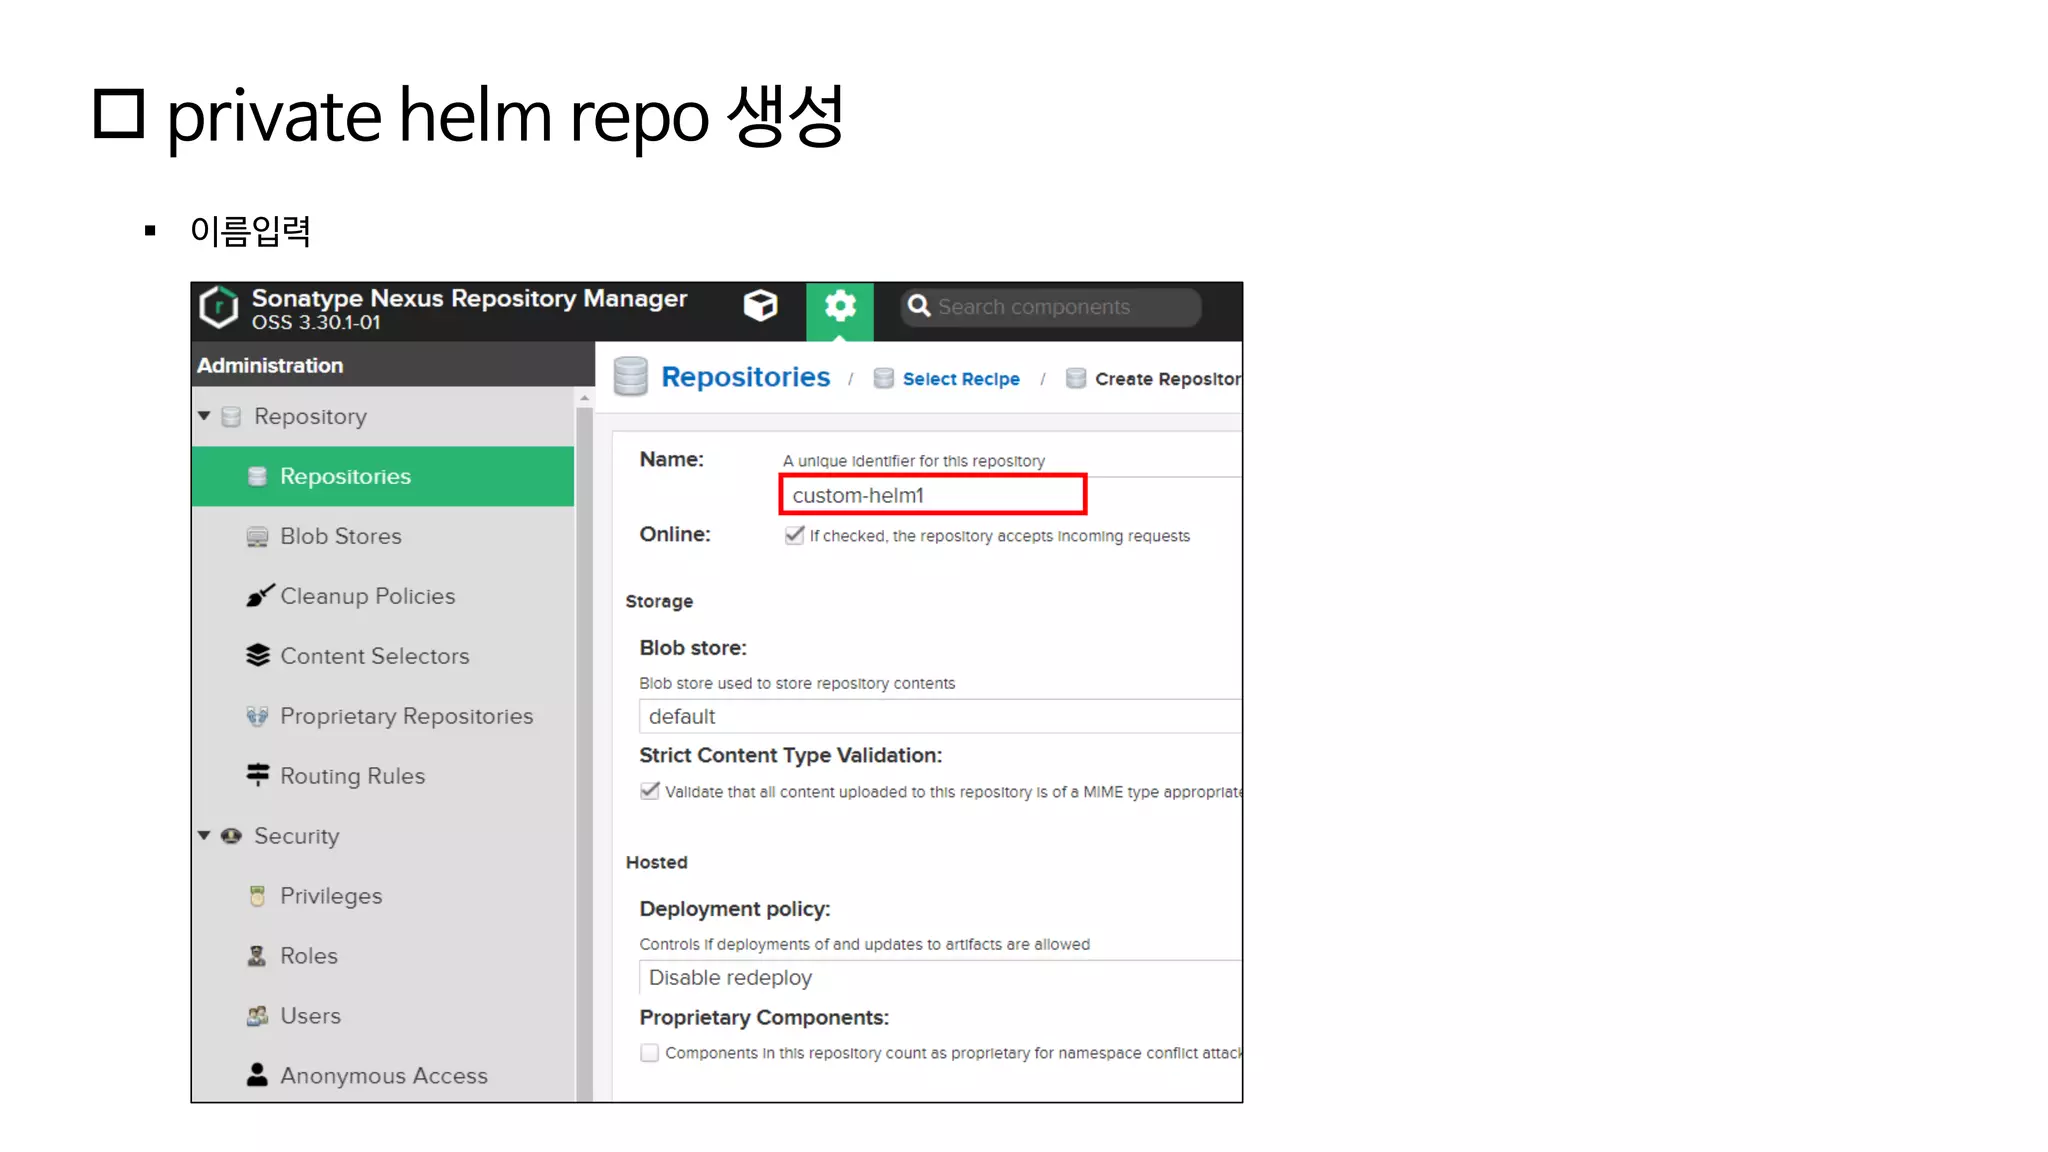
+ private helm repo 생성
※ yaml파일 등의 소스코드는 https://github.com/choisungwook/portfolio/wiki/nexus에서 볼 수 있습니다.
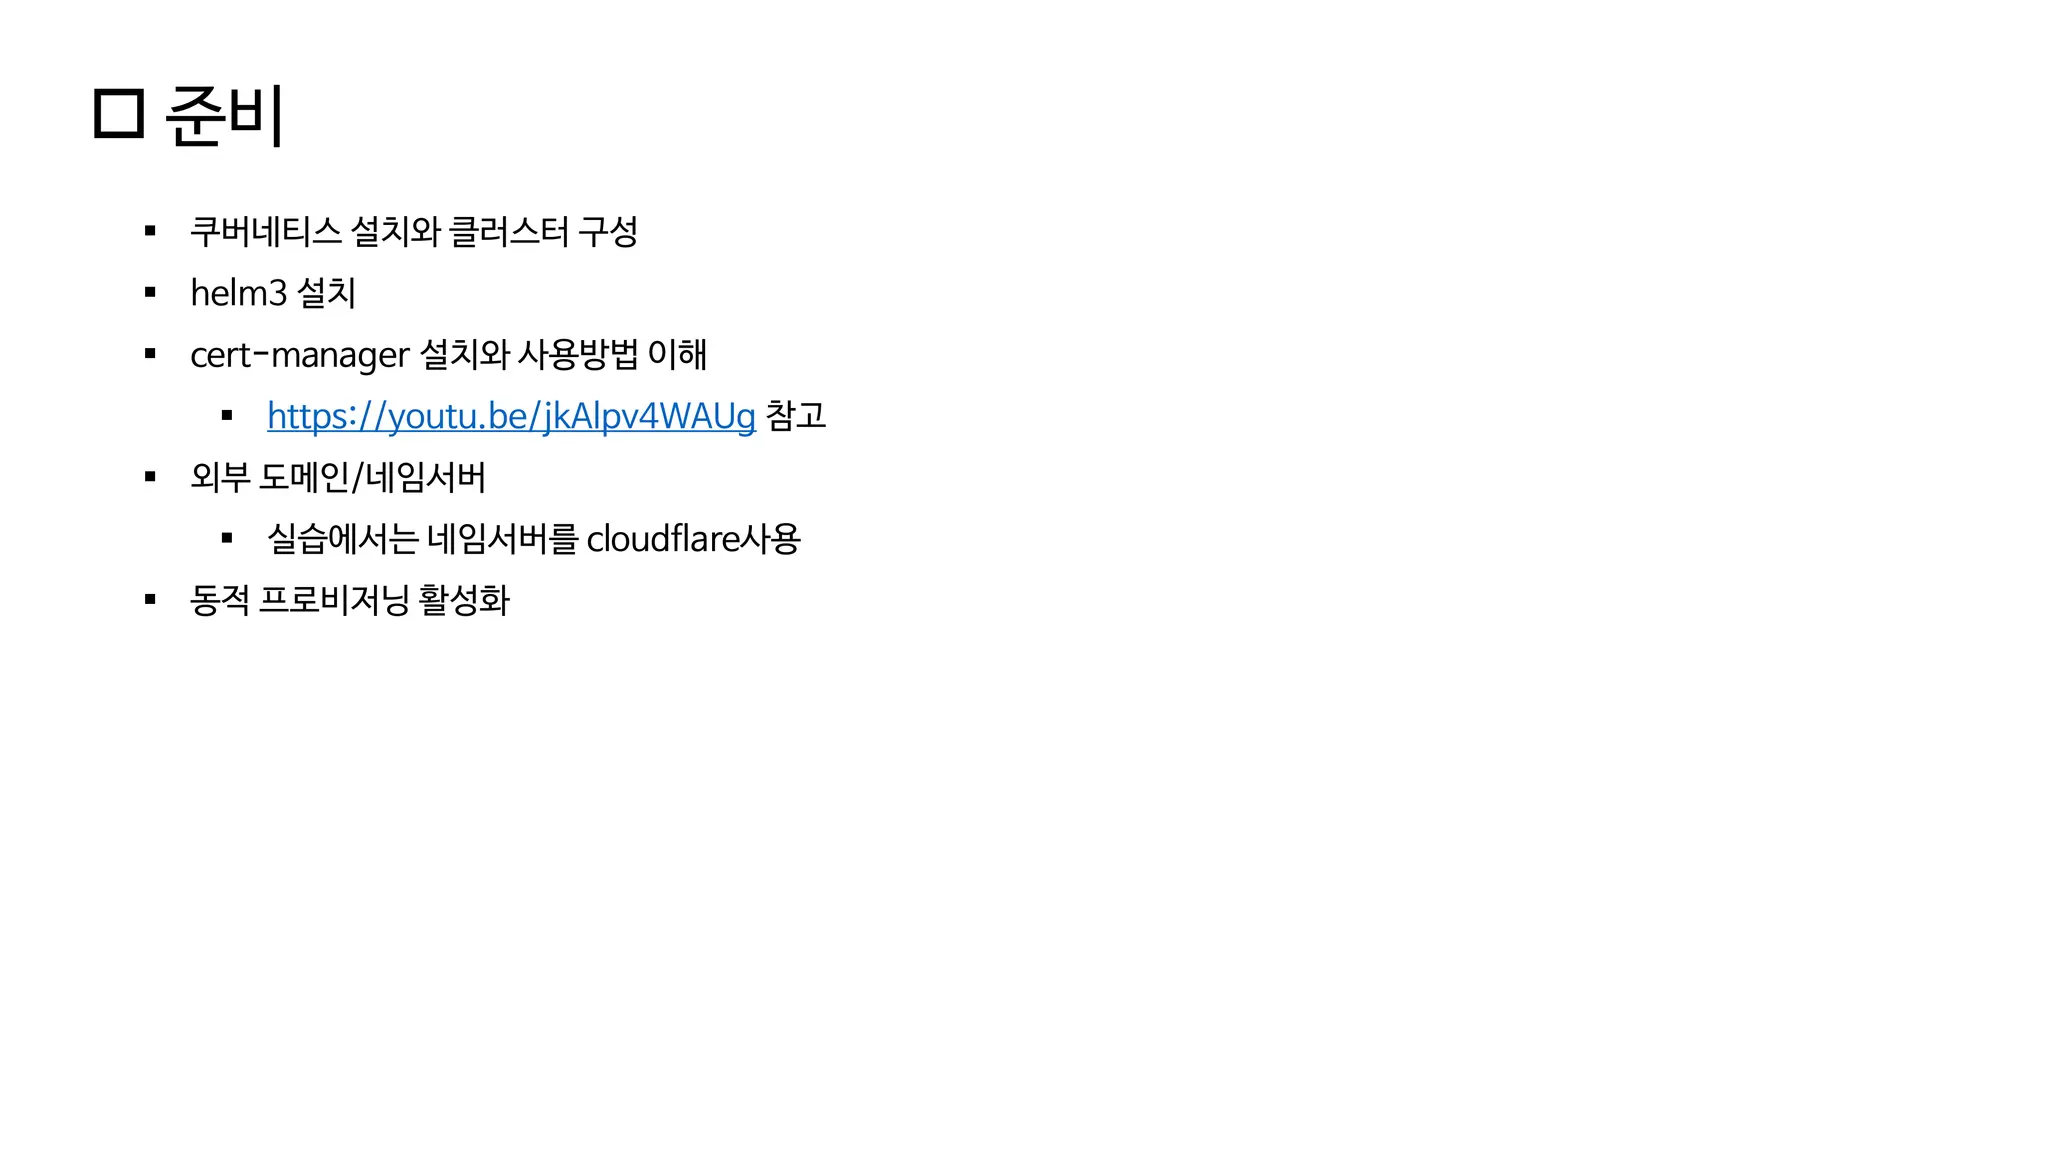
준비
▪ 쿠버네티스설치와 클러스터 구성
▪ helm3 설치
▪ cert-manager 설치와 사용방법 이해
▪ https://youtu.be/jkAlpv4WAUg 참고
▪ 외부 도메인/네임서버
▪ 실습에서는 네임서버를 cloudflare사용
▪ 동적 프로비저닝 활성화
4.
설치 -cert manager 설정
▪ namespace 생성
apiVersion: v1
kind: Secret
metadata:
name: cloudflare-api-token-secret
namespace: nexus
type: Opaque
stringData:
api-token: <your-token>
▪ cert-manager 네임서버 access-token 생성
kubectl create ns nexus
kubectl apply -f token.yaml
5.
설치 -cert manager 설정
▪ cert-manager issuer생성
apiVersion: cert-manager.io/v1
kind: Issuer
metadata:
name: nexus-prodissuser
namespace: nexus
spec:
acme:
# The ACME server URL
server: https://acme-v02.api.letsencrypt.org/directory
# Email address used for ACME registration
email: <your email>
# Name of a secret used to store the ACME account private key
privateKeySecretRef:
name: nexus-prodissuser
# Enable the challenge provider
solvers:
- dns01:
cloudflare:
email: <your email>
apiTokenSecretRef:
name: cloudflare-api-token-secret #cloudflare api token
key: api-token
kubectl apply -f issuer.yaml
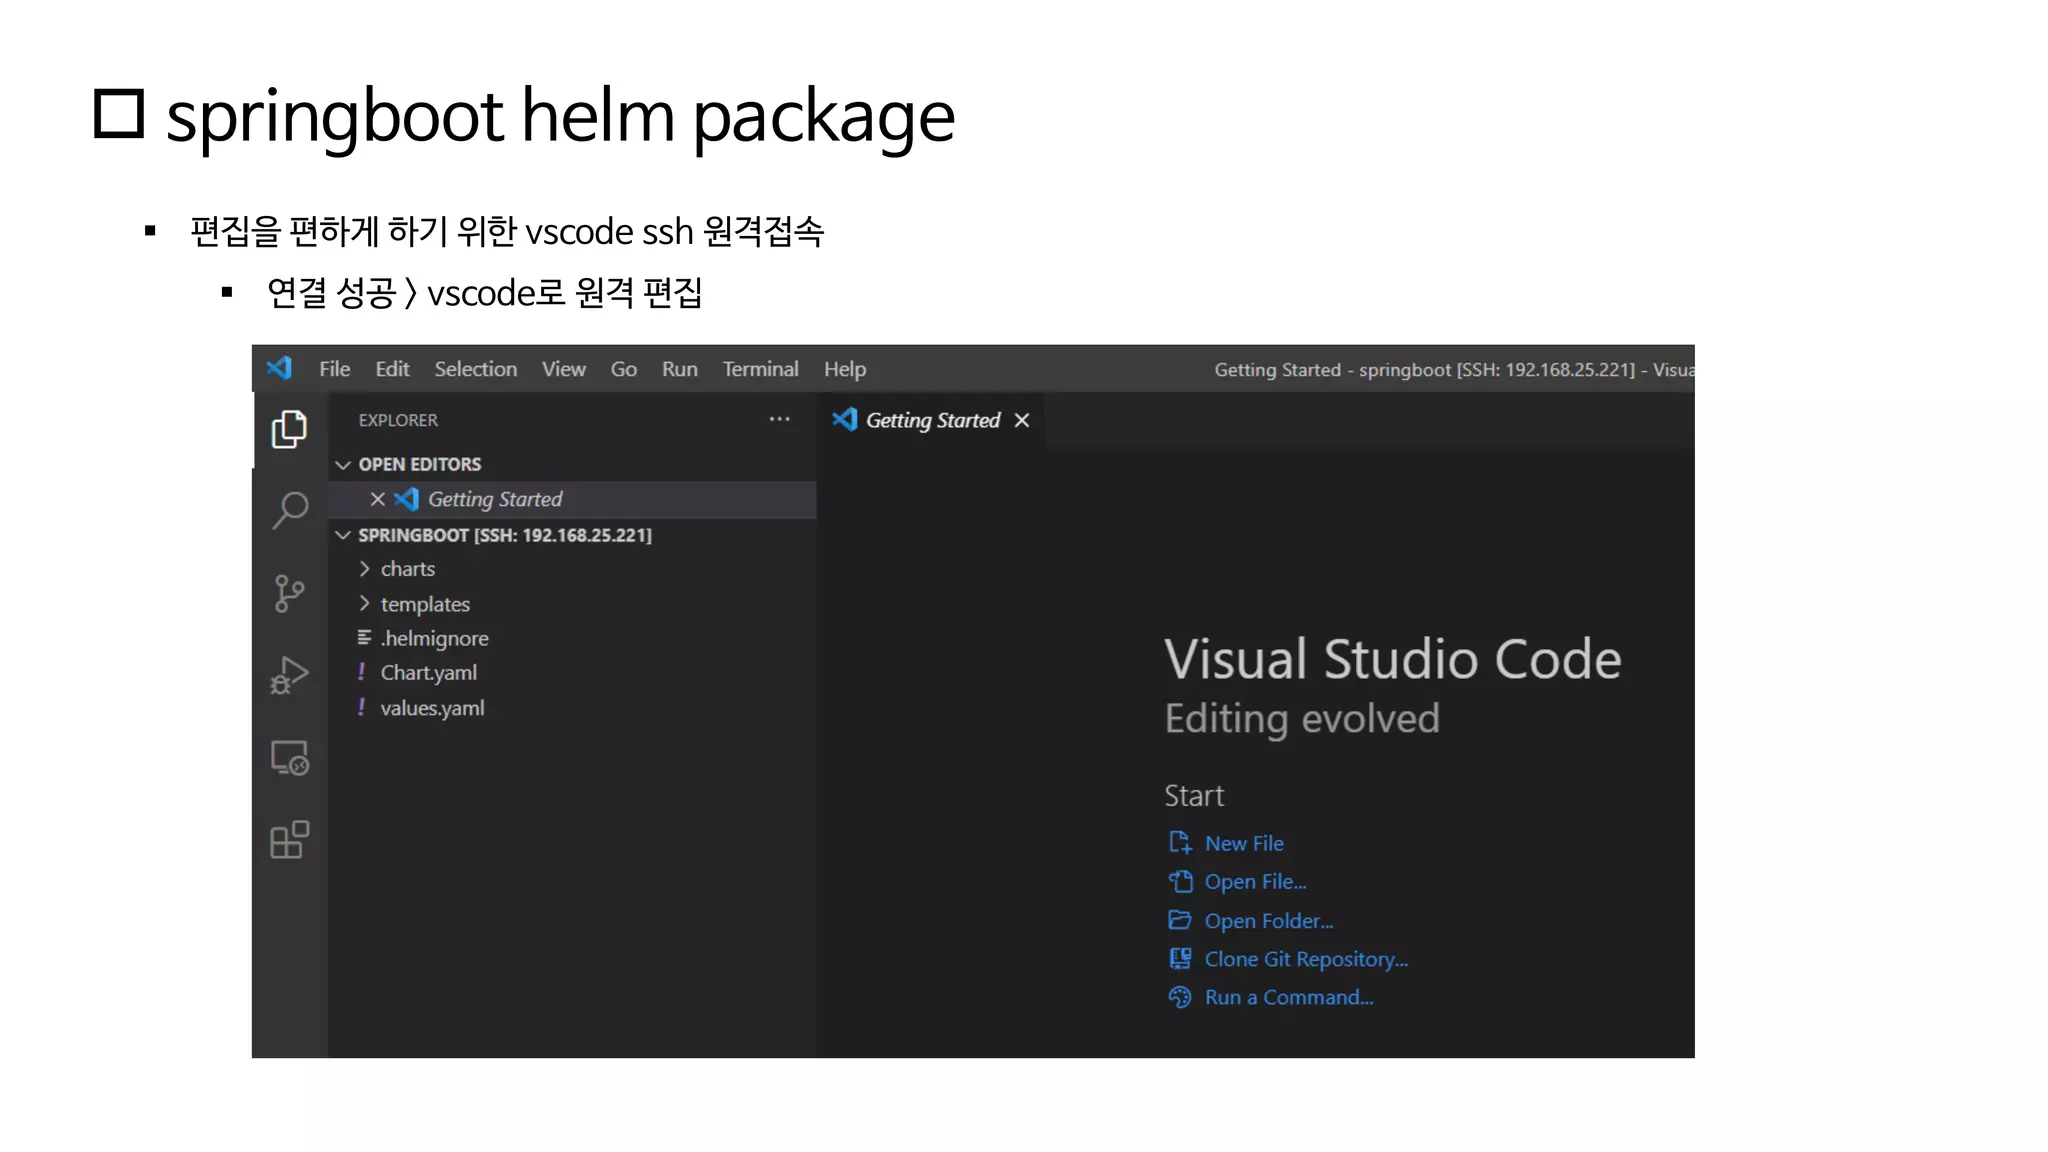
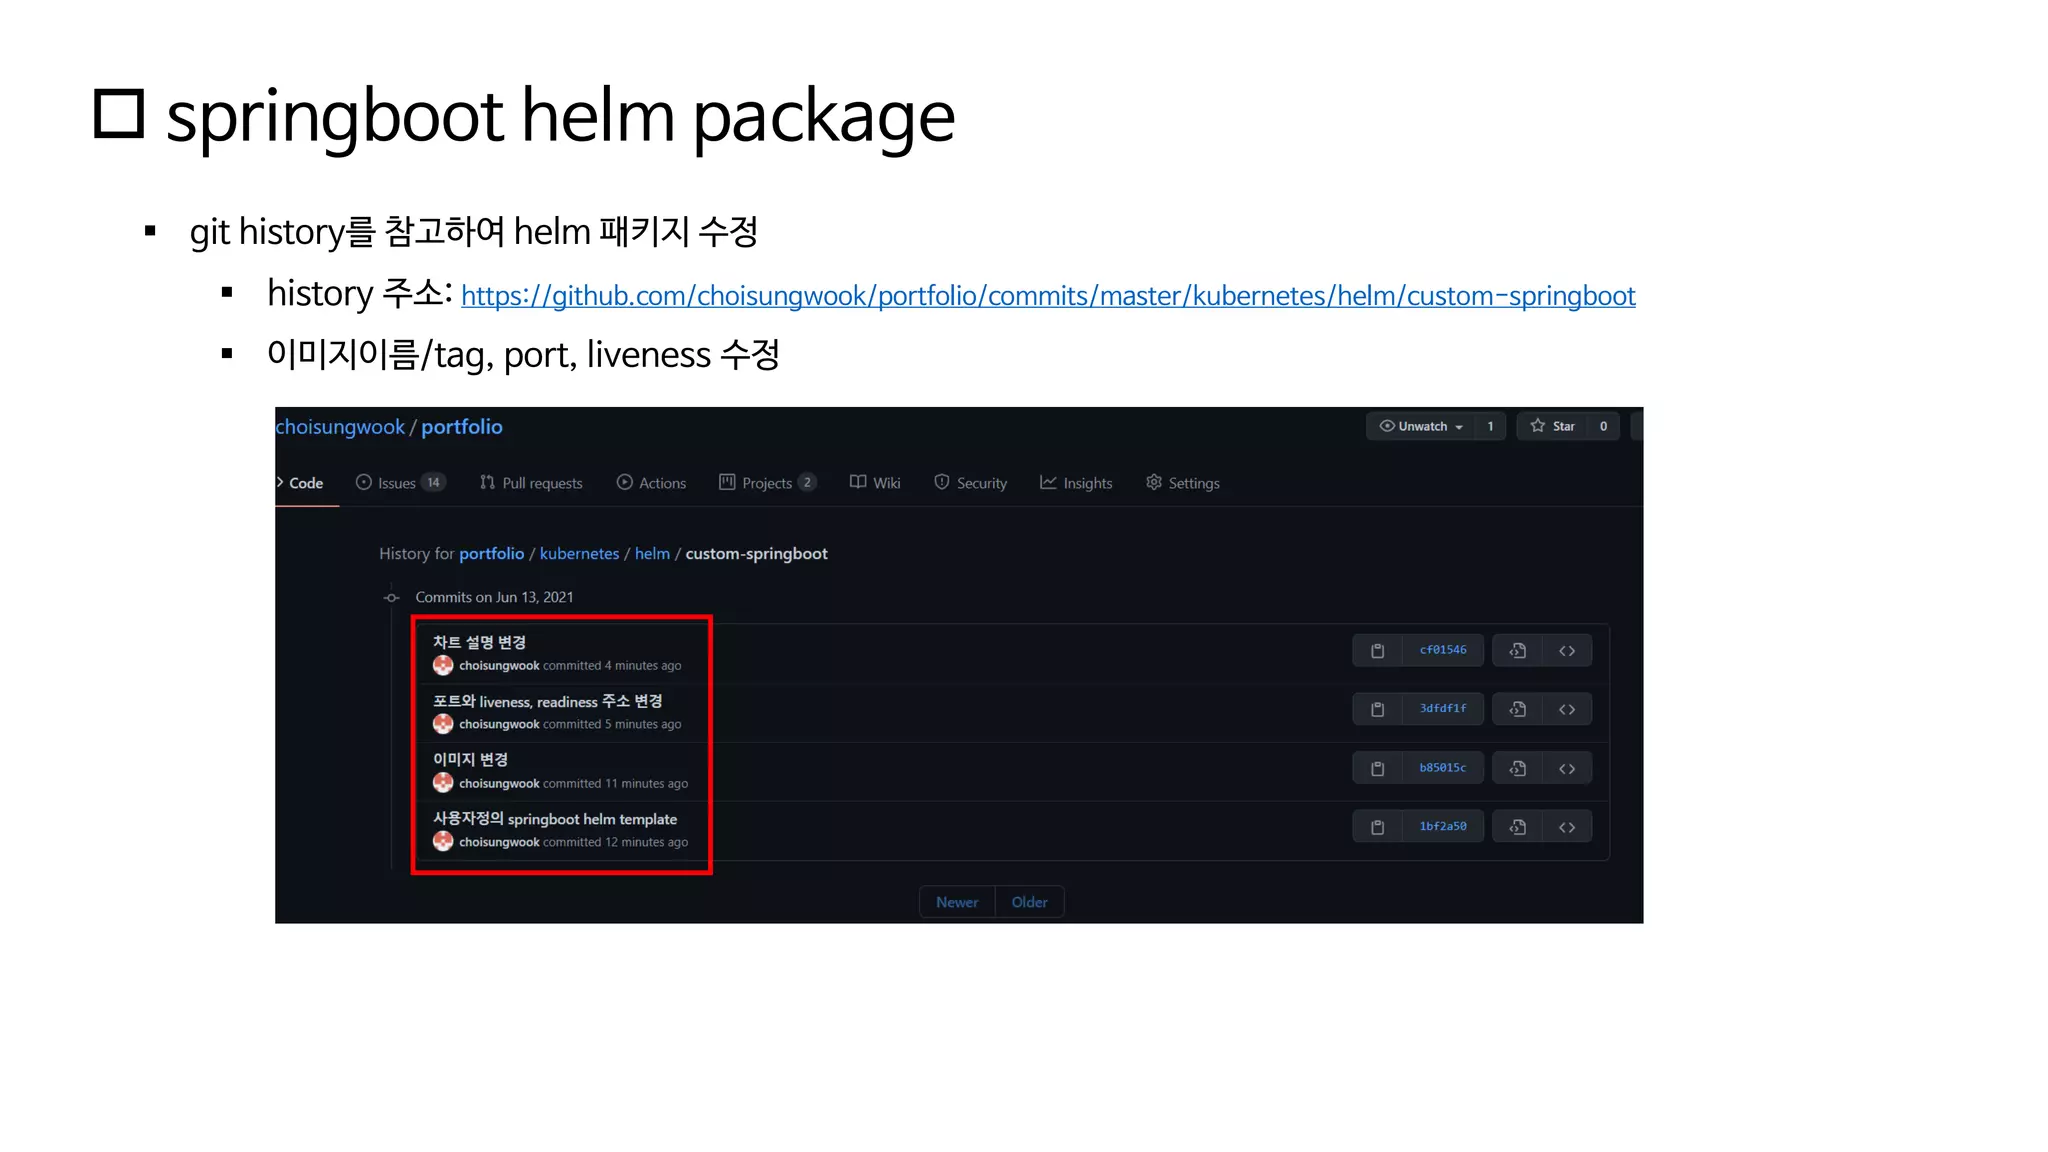
helm 패키지를이용한 서비스 배포
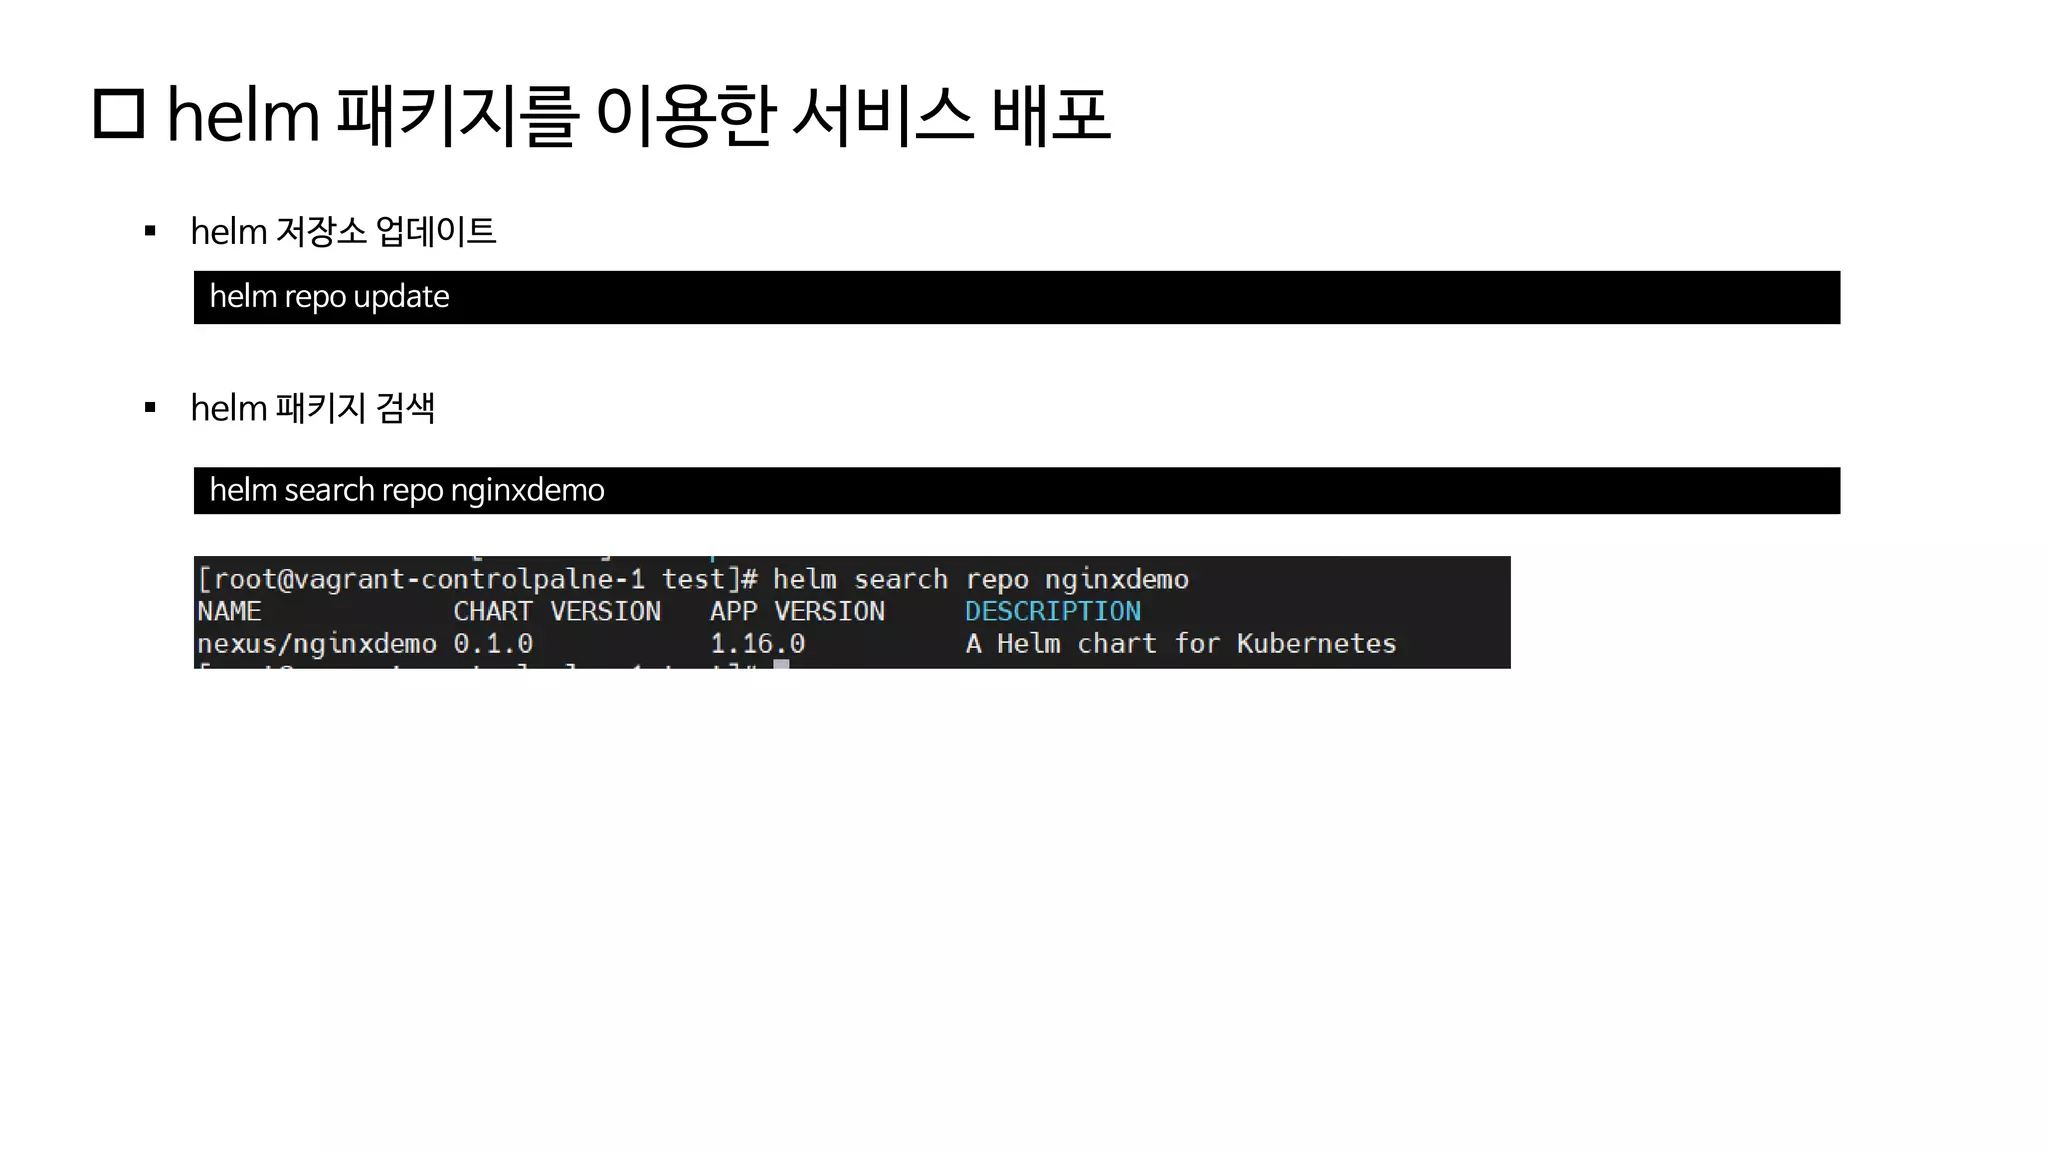
▪ helm 저장소 업데이트
helm search repo nginxdemo
helm repo update
▪ helm 패키지 검색
32.
helm 패키지를이용한 서비스 배포
▪ 업로드한 helm package를 이용하여 nginx 설치
helm install -n test --create-namespace nginx nexus/nginxdemo
33.
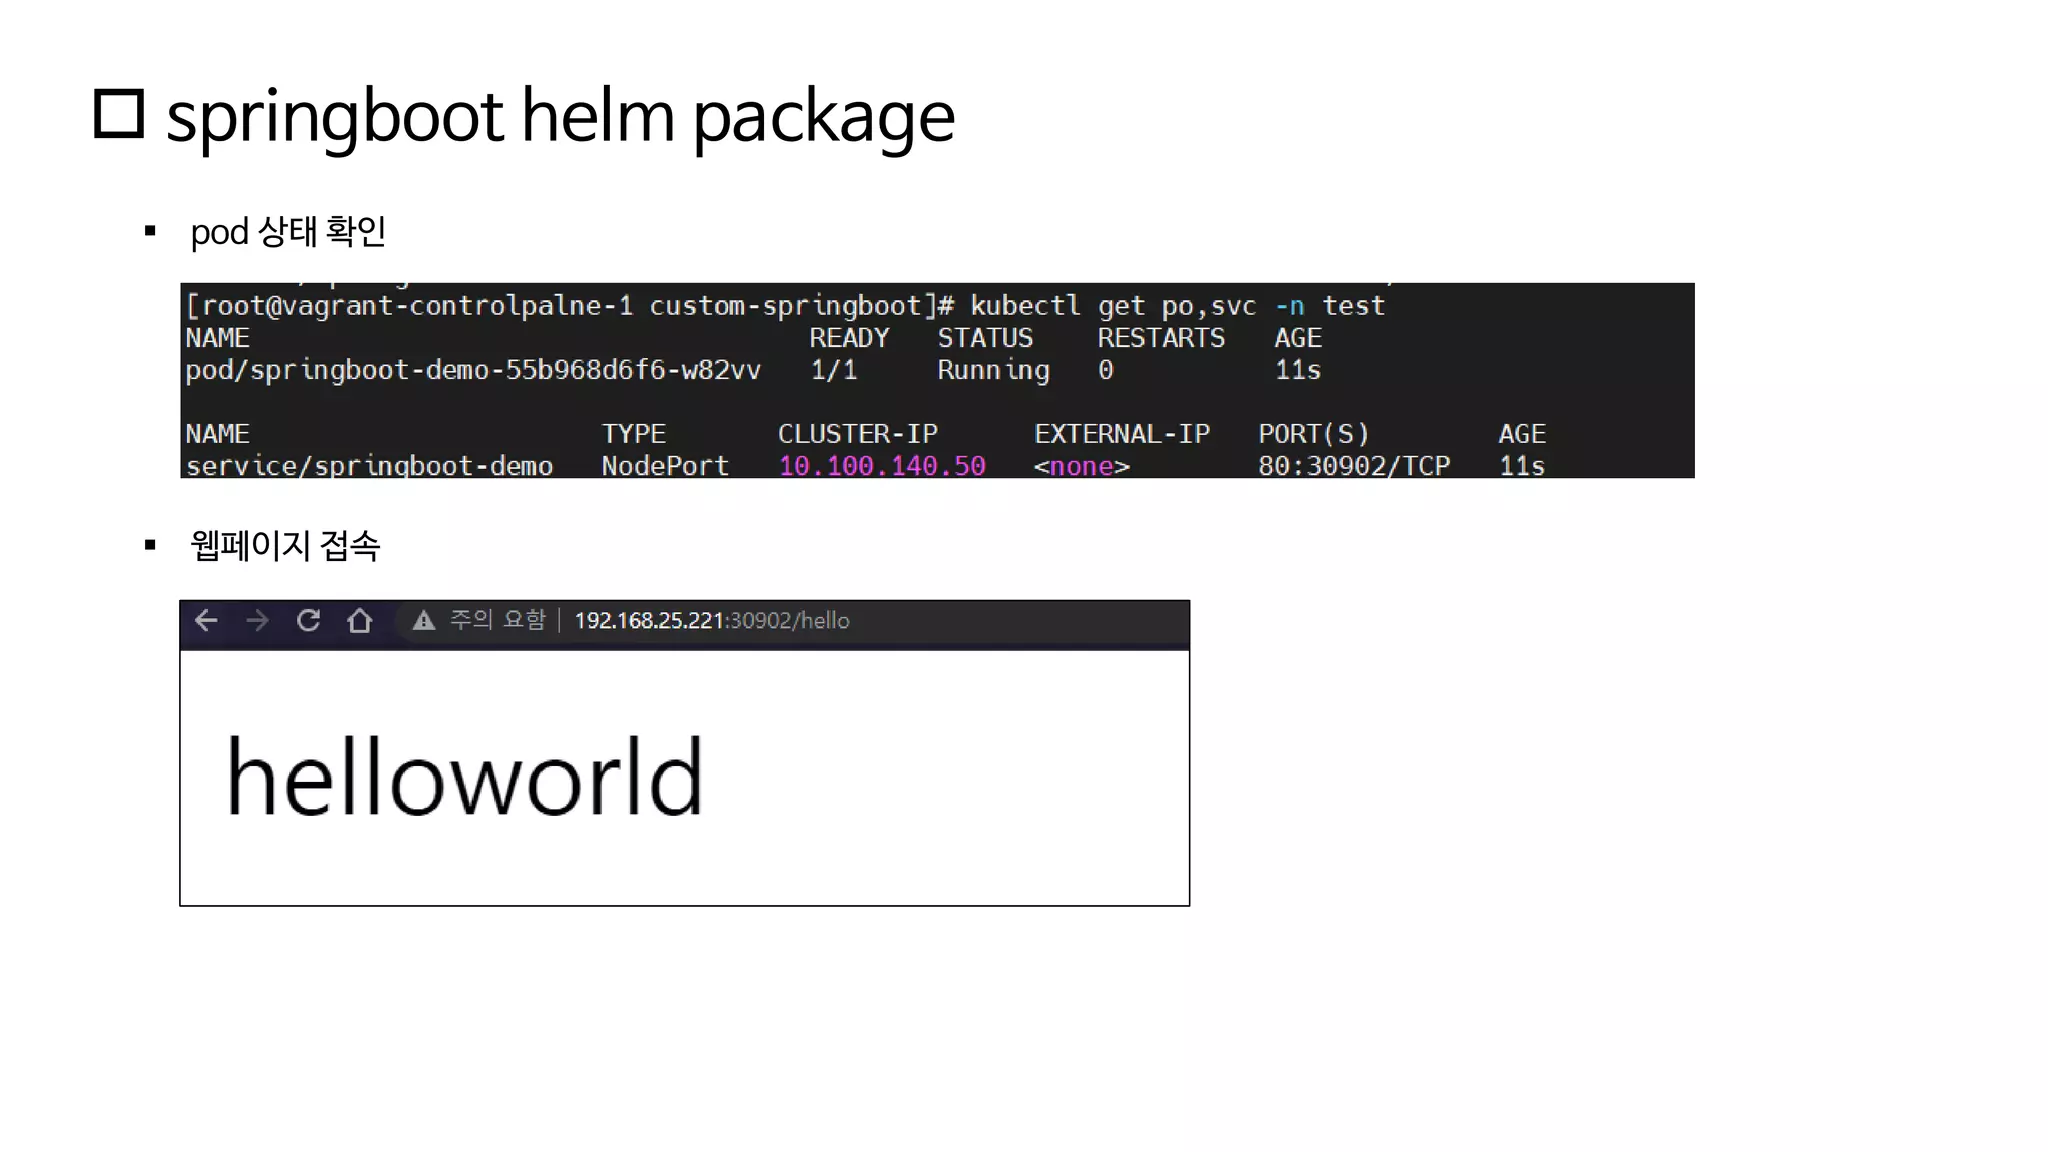
helm 패키지를이용한 서비스 배포
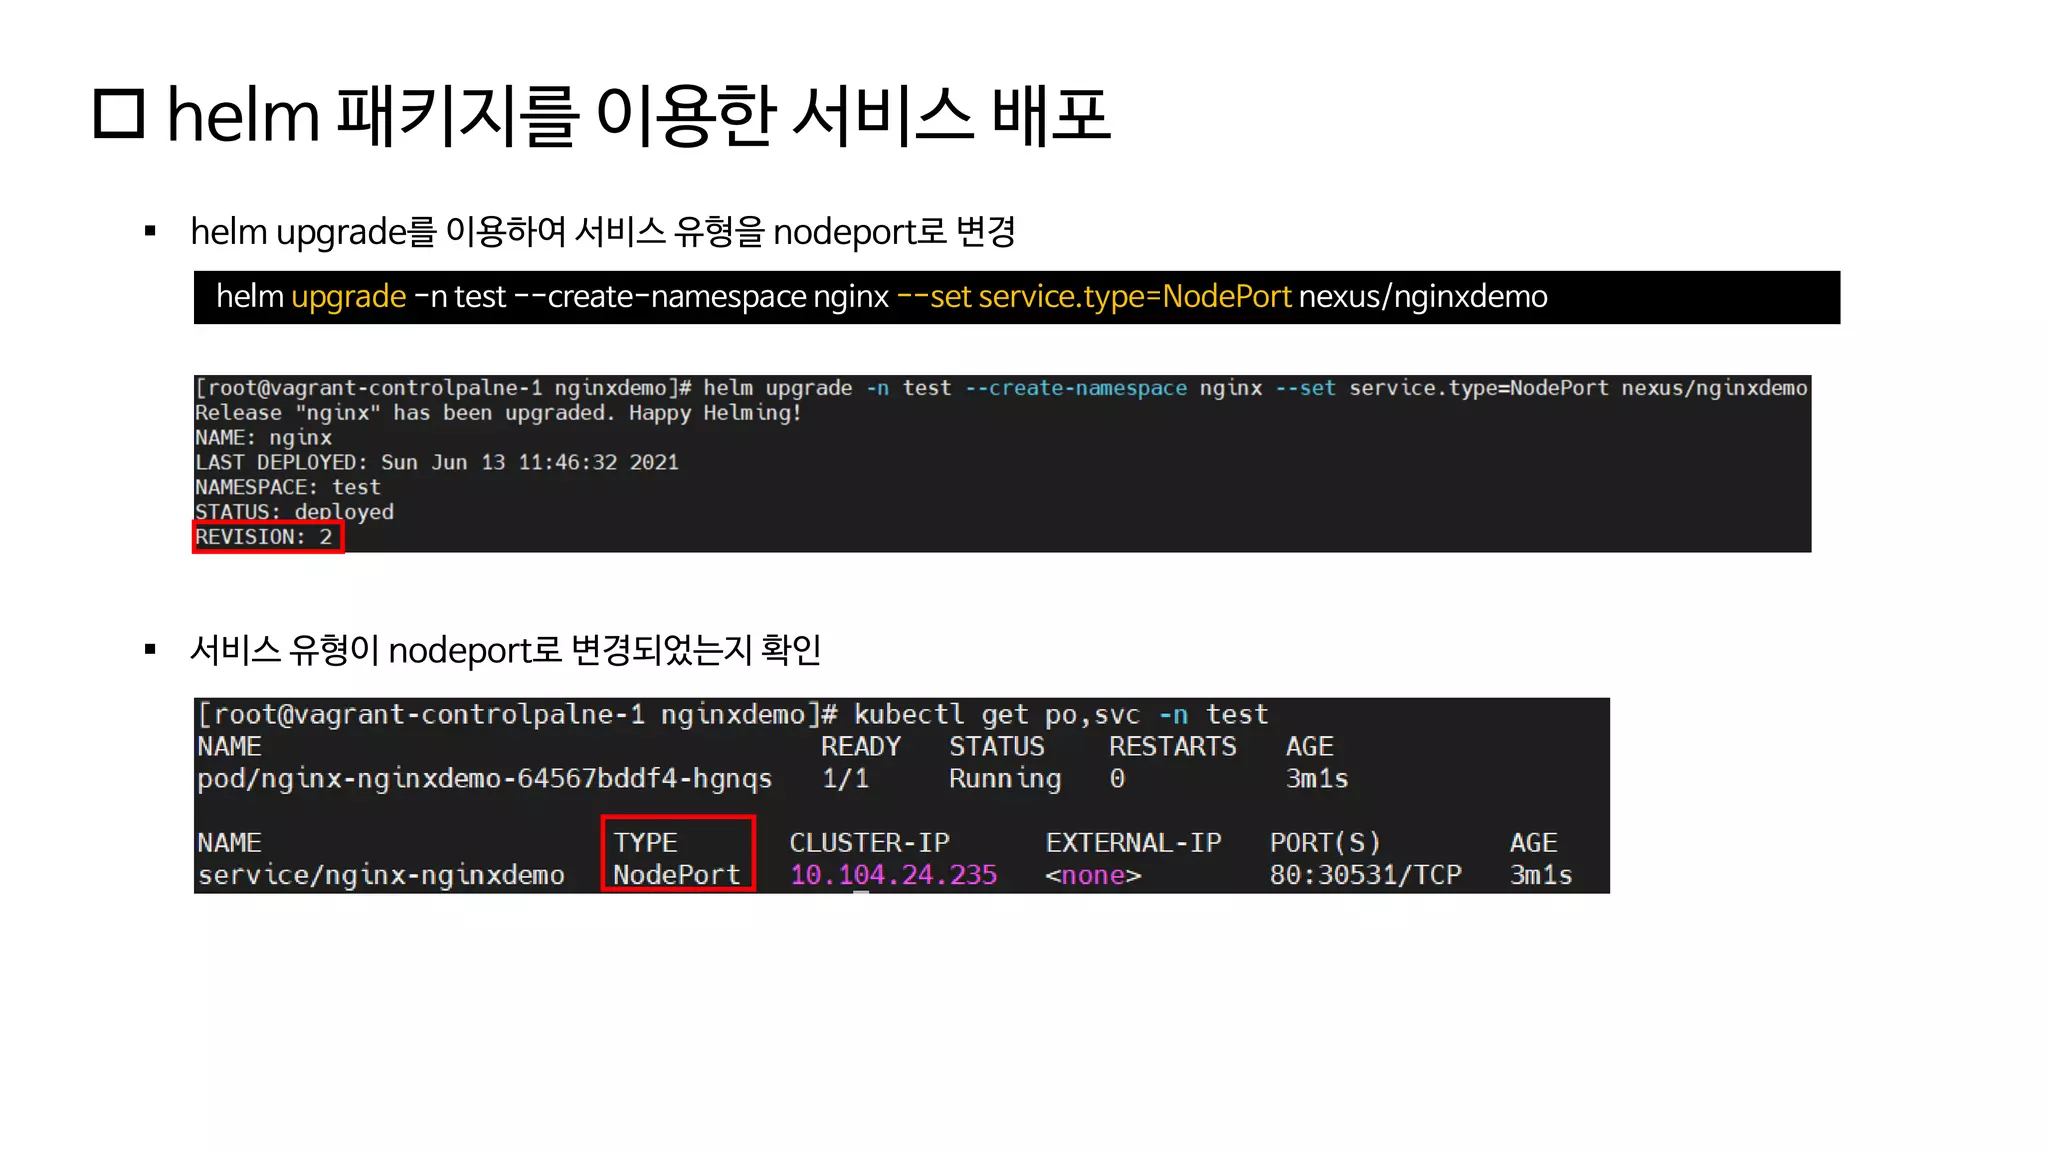
▪ helm upgrade를 이용하여 서비스 유형을 nodeport로 변경
helm upgrade -n test --create-namespace nginx --set service.type=NodePort nexus/nginxdemo
▪ 서비스 유형이 nodeport로 변경되었는지 확인
34.
helm 패키지를이용한 서비스 배포
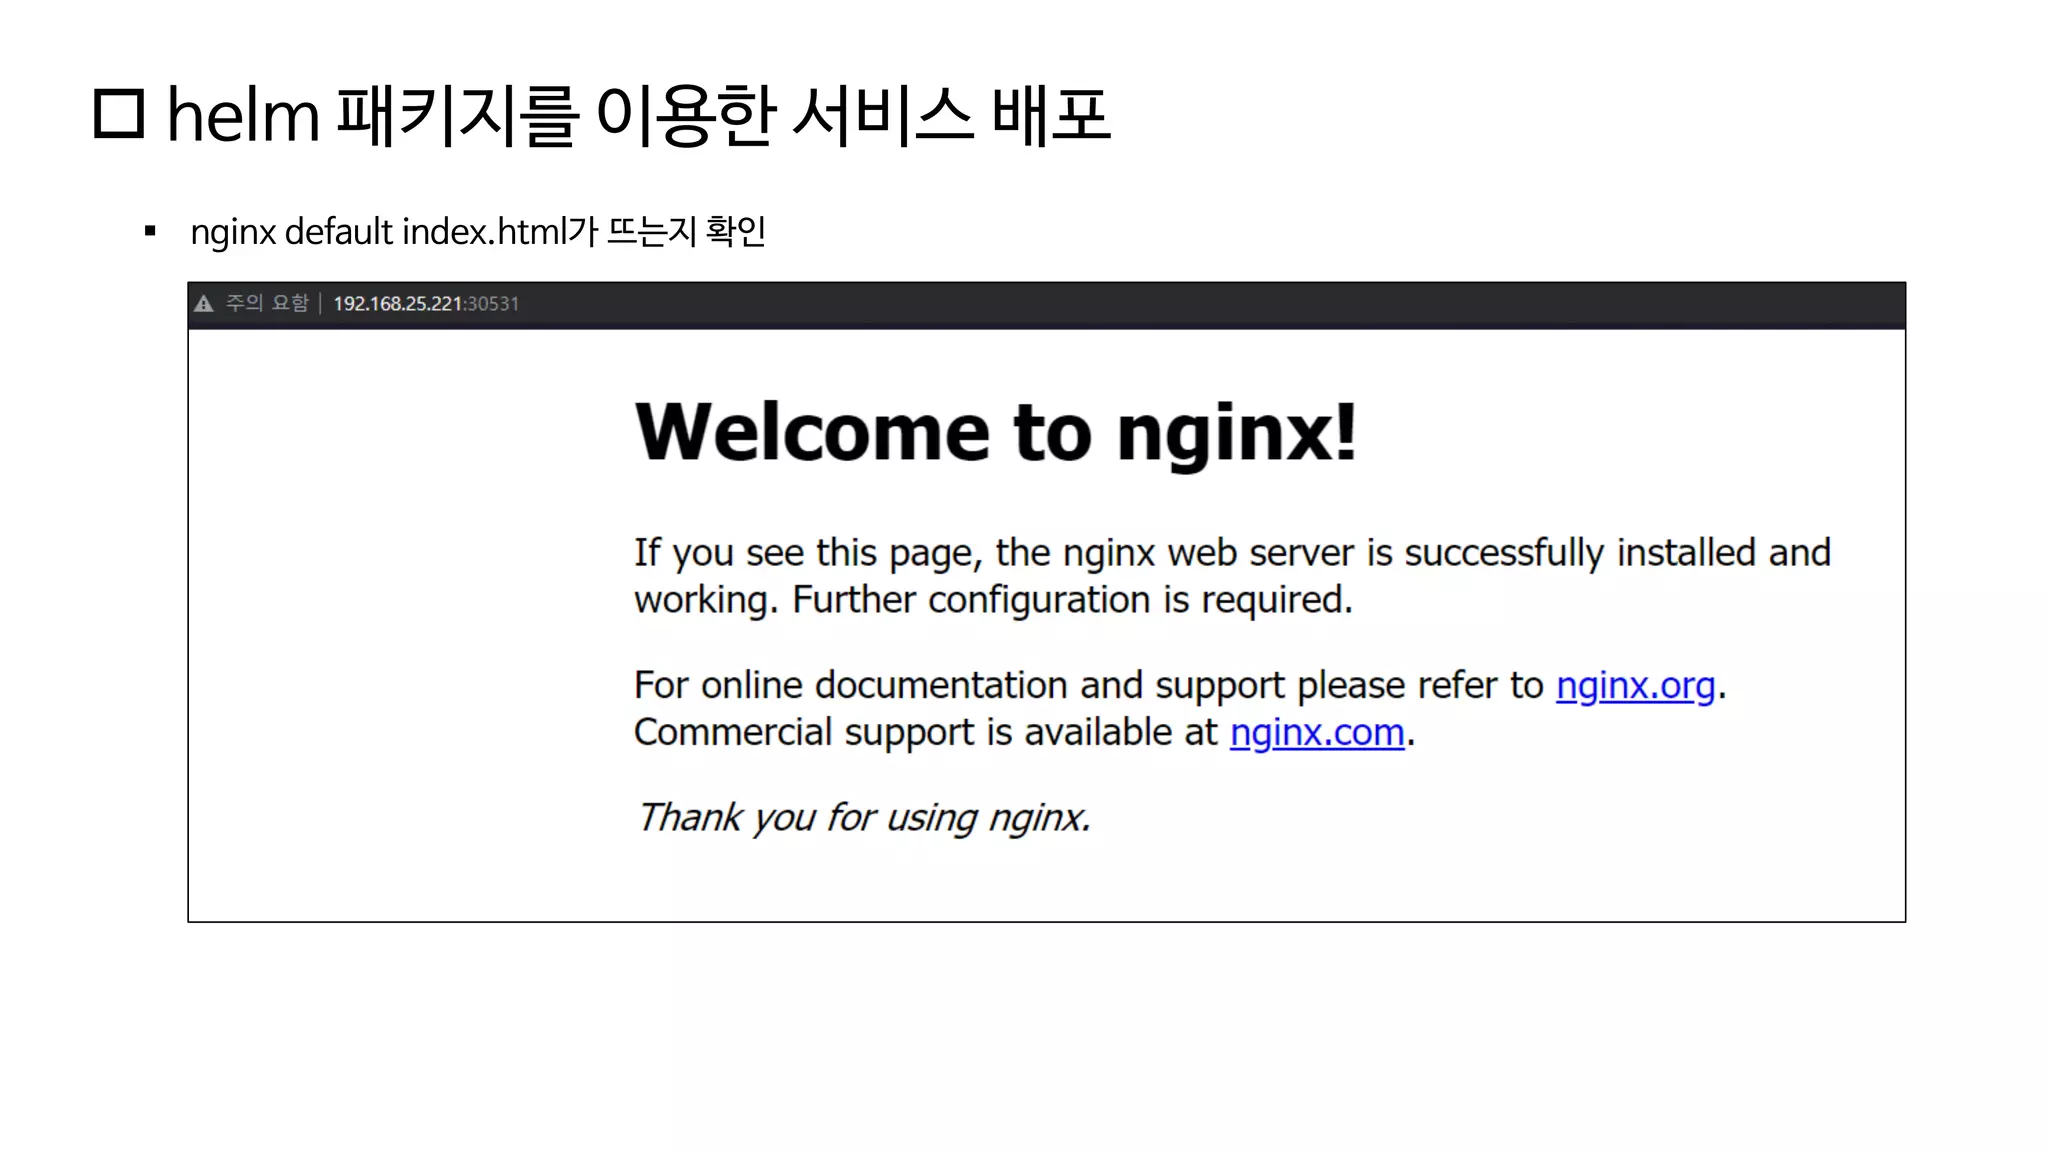
▪ nginx default index.html가 뜨는지 확인
35.
helm 패키지를이용한 서비스 배포
▪ helm 삭제
helm uninstall -n test nginx
kubectl create delete ns test


![[오픈소스컨설팅]RHEL7/CentOS7 Pacemaker기반-HA시스템구성-v1.0](https://cdn.slidesharecdn.com/ss_thumbnails/rhel-centos7-pacemaker-based-ha-admin-guidev1-151215000535-thumbnail.jpg?width=640&height=640&fit=bounds)
![Naver속도의, 속도에 의한, 속도를 위한 몽고DB (네이버 컨텐츠검색과 몽고DB) [Naver]](https://cdn.slidesharecdn.com/ss_thumbnails/naver-190916181334-thumbnail.jpg?width=640&height=640&fit=bounds)
![[2018] 오픈스택 5년 운영의 경험](https://cdn.slidesharecdn.com/ss_thumbnails/cloudinfra05-190131073350-thumbnail.jpg?width=640&height=640&fit=bounds)

![[오픈소스컨설팅] EFK Stack 소개와 설치 방법](https://cdn.slidesharecdn.com/ss_thumbnails/elasticstack-210712042246-thumbnail.jpg?width=640&height=640&fit=bounds)


![[115]쿠팡 서비스 클라우드 마이그레이션 통해 배운것들](https://cdn.slidesharecdn.com/ss_thumbnails/115coupang-181011031522-thumbnail.jpg?width=640&height=640&fit=bounds)


![XECon2015 :: [1-5] 김훈민 - 서버 운영자가 꼭 알아야 할 Docker](https://cdn.slidesharecdn.com/ss_thumbnails/xecon2015-1-5docker-160316043822-thumbnail.jpg?width=640&height=640&fit=bounds)

![[NDC17] Kubernetes로 개발서버 간단히 찍어내기](https://cdn.slidesharecdn.com/ss_thumbnails/ndc-170529041601-thumbnail.jpg?width=640&height=640&fit=bounds)


![[네이버클라우드플랫폼 온라인 교육 시리즈] 네이버클라우드플랫폼 쿠버네티스 소개(정낙수 클라우드 솔루션 아키텍트)](https://cdn.slidesharecdn.com/ss_thumbnails/ncpwebinartemplate20190221-190510081206-thumbnail.jpg?width=640&height=640&fit=bounds)
![[오픈소스컨설팅]쿠버네티스를 활용한 개발환경 구축](https://cdn.slidesharecdn.com/ss_thumbnails/opensourceconsutingkubernetesv0-191010000815-thumbnail.jpg?width=640&height=640&fit=bounds)
![[오픈소스컨설팅]Docker on Kubernetes v1](https://cdn.slidesharecdn.com/ss_thumbnails/dockeronkubernetesv1-160830033537-thumbnail.jpg?width=640&height=640&fit=bounds)


![[개인 프로젝트] 쿠버네티스를 이용한 개발환경 자동화 구축시스템 - 프로토타입](https://cdn.slidesharecdn.com/ss_thumbnails/srmproject-210620120212-thumbnail.jpg?width=640&height=640&fit=bounds)