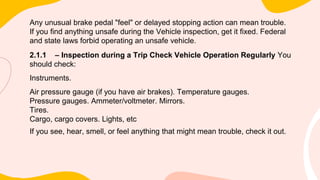
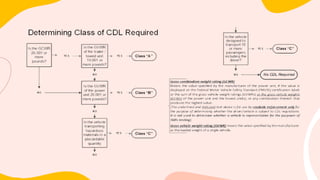
Step 4: Turn Off Engine and Check Lights
Make sure the parking brake is set, turn off the engine, and take the key with you.
Turn on headlights (low beams) and four-way emergency flashers, and get out of
the vehicle.
Step 5: Do Walk-around Inspection
Go to front of vehicle and check that low beams are on and both of the four-way
flashers are working.
Push dimmer switch and check that high beams work.
Turn off headlights and four-way emergency flashers.
Turn on parking, clearance, side-marker, and identification lights.
Turn on right turn signal, and start walk-around inspection.
General
Walk around and inspect.
Clean all lights, reflectors, and glass as you go along.
Left Front Side
Driver's door glass should be clean.
Door latches or locks should work properly. Left front wheel.
Condition of wheel and rim--missing, bent, broken studs, clamps, lugs, or any
signs of misalignment.
Condition of tires--properly inflated, valve stem and cap OK, no serious cuts,
bulges, or tread wear.
Use wrench to test rust-streaked lug nuts, indicating looseness.
Hub oil level OK, no leaks.
Left front suspension.
Condition of spring, spring hangers, shackles, u-bolts.
Shock absorber condition. Left front brake.
Condition of brake drum or disc.
Condition of hoses.
Front
Condition of front axle. Condition of steering system.
No loose, worn, bent, damaged or missing parts.
Must grab steering mechanism to test for looseness.
Condition of windshield.
Check for damage and clean if dirty.
Check windshield wiper arms for proper spring tension.
Check wiper blades for damage, "stiff" rubber, and securement.
Lights and reflectors.
Parking, clearance, and identification lights clean, operating, and proper color
(amber at front).
Reflectors clean and proper color (amber at front).
Right front turn signal light clean, operating, and proper color (amber or white on
signals facing forward).
Right Side
Right front: check all items as done on left front.
Primary and secondary safety cab locks engaged (if cab-over-engine design).
Right fuel tank(s).
Securely mounted, not damaged, or leaking. Fuel crossover line secure.
Tank(s) contain enough fuel. Cap(s) on and secure.
Condition of visible parts. Rear of engine--not leaking. Transmission--not leaking.
Exhaust system--secure, not leaking, not touching wires, fuel, or air-lines.
Frame and cross members--no bends or cracks.
Air-lines and electrical wiring--secured against snagging, rubbing, wearing.
Spare tire carrier or rack not damaged (if so equipped).
Spare tire and/or wheel securely mounted in rack.
Spare tire and wheel adequate (proper size, properly inflated).
Cargo securement (trucks).
Cargo properly blocked, braced, tied, chained, etc. Header board adequate,
secure (if required).
Side boards, stakes strong enough, free of damage, properly set in place (if so
equipped).
Canvas or tarp (if required) properly secured to prevent tearing, billowing, or
blocking of mirrors.
If oversize, all required signs (flags, lamps, and reflectors) safely and properly
mounted and all required permits in driver's possession.
Curbside cargo compartment doors in good condition, securely closed,
latched/locked and required security seals in place.
Right Rear
Condition of wheels and rims--no missing, bent, or broken spacers, studs,
clamps, or lugs.
Condition of tires--properly inflated, valve stems and caps OK, no serious cuts,
bulges, tread wear, tires not rubbing each other, and nothing stuck between
them.
Tires same type, e.g., not mixed radial and bias types.
Tires evenly matched (same sizes). Wheel bearing/seals not leaking.
Suspension.
Condition of spring(s), spring hangers, shackles, and u-bolts.
Axle secure.
Powered axle(s) not leaking lube (gear oil). Condition of torque rod arms,
bushings.
Condition of shock absorber(s).
If retractable axle equipped, check condition of lift mechanism. If air powered,
check for leaks.
Condition of air ride components. Brakes.
Brake adjustment.
Condition of brake drum(s) or discs.
Condition of hoses--look for any wear due to rubbing.
Lights and reflectors.
Side-marker lights clean, operating, and proper color (red at rear, others
amber).
Side-marker reflectors clean and proper color (red at rear, others amber).
Rear
Lights and reflectors.
Rear clearance and identification lights clean, operating, and proper color (red
at rear).
Reflectors clean and proper color (red at rear).
Taillights clean, operating, and proper color (red at rear).
Right rear turn signal operating, and proper color (red, yellow, or amber at
rear).
License plate(s) present, clean, and secured.
Splash guards present, not damaged, properly fastened, not dragging on
ground, or rubbing tires.
Cargo secure (trucks).
Cargo properly blocked, braced, tied, chained, etc. Tailboards up and properly
secured.
End gates free of damage, properly secured in stake sockets.
Canvas or tarp (if required) properly secured to prevent tearing, billowing, or
blocking of either the rearview mirrors or rear lights.
If over-length, or over-width, make sure all signs and/or additional lights/flags
are safely and properly mounted and all required permits are in driver's
possession.
Rear doors securely closed, latched/locked.
Left Side
Check all items as done on right side, plus:
Battery(ies) (if not mounted in engine compartment).
Battery box(es) securely mounted to vehicle. Box has secure cover.
Battery(ies) secured against movement. Battery(ies) not broken or leaking.
Fluid in battery(ies) at proper level (except maintenance-free type).
Cell caps present and securely tightened (except maintenance-free type).
Vents in cell caps free of foreign material (except maintenance-free type).
Step 6: Check Signal Lights Get In and Turn Off Lights Turn off all lights.
Turn on stop lights (apply trailer hand brake or have a helper put on the brake
pedal).
Turn on left turn signal lights. Get Out and Check Lights
Left front turn signal light clean, operating and proper color (amber or white on
signals facing the front).
Left rear turn signal light and both stop lights clean, operating, and proper color
(red, yellow, or amber).
Get In Vehicle
Turn off lights not needed for driving.
Check for all required papers, trip manifests, permits, etc.
Secure all loose articles in cab (they might interfere with operation of the
controls or hit you in a crash).
Start the engine.
Step 7: Start the Engine and Check
Test for Hydraulic Leaks. If the vehicle has hydraulic brakes, pump the brake
pedal three times. Then apply firm pressure to the pedal and hold for five
seconds. The pedal should not move. If it does, there may be a leak or other
problem. Get it fixed before driving. If the vehicle has air brakes, do the checks
described in Sections 5 and 6 of this manual.
Brake System
Test Parking Brake(s)
Fasten safety belt
Set parking brake (power unit only). Release trailer parking brake (if
applicable). Place vehicle into a low gear.
Gently pull forward against parking brake to make sure the parking brake holds.
Repeat the same steps for the trailer with trailer parking brake set and power
unit parking brakes released (if applicable).
If it doesn't hold vehicle, it is faulty; get it fixed.
Test Service Brake Stopping Action
Go about five miles per hour.
Push brake pedal firmly
"Pulling" to one side or the other can mean brake trouble.
Any unusual brake pedal "feel" or delayed stopping action can mean trouble.
If you find anything unsafe during the Vehicle inspection, get it fixed. Federal
and state laws forbid operating an unsafe vehicle.
2.1.1 – Inspection during a Trip Check Vehicle Operation Regularly You
should check:
Instruments.
Air pressure gauge (if you have air brakes). Temperature gauges.
Pressure gauges. Ammeter/voltmeter. Mirrors.
Tires.
Cargo, cargo covers. Lights, etc
If you see, hear, smell, or feel anything that might mean trouble, check it out.
Safety Inspection. Drivers of trucks and truck tractors when transporting cargo
must inspect the securement of the cargo within the first 50 miles of a trip and
every 150 miles or every three hours (whichever comes first) after.
2.1.1– After-trip Inspection and Report
You may have to make a written report each day on the condition of the
vehicle(s) you drove. Report anything affecting safety or possibly leading to
mechanical breakdown.
1.1. Commercial Driver License Tests
1.1.1 – Knowledge Tests
You will have to take one or more knowledge tests, depending on what class of
license and what endorsements you need. The CDL knowledge tests include:
The general knowledge test, taken by all applicants.
The passenger transport test, taken by all bus driver applicants.
The air brakes test, which you must take if your vehicle has air brakes,
including air over hydraulic brakes.
The combination vehicles test, which is required if you want to drive
combination vehicles.
The hazardous materials test, required if you want to haul hazardous materials as defined in 49
CFR 383.5. In order to obtain this endorsement you are also required to pass a Transportation
Security Administration (TSA) background check.
The tank vehicle test, required if you want to haul any liquid or gaseous materials in a tank or
tanks having an individual rated capacity of more than 119 gallons and an aggregate rated
capacity of 1,000 gallons or more that is either permanently or temporarily attached to the vehicle
or chassis
The doubles/triples test, required if you want to pull double or triple trailers.
The School Bus test, required if you want to drive a school bus.
1.1.2 – Skills Tests
If you pass the required knowledge test(s), you can take the CDL skills testwhen you are eligible.
The CDL Skills Test consists of three segments: Vehicle inspection, basic vehicle control, and
on- road driving. You must take the segments in the order listed and must pass each one before
moving to the next. You must take these tests in the type of vehicle for which you wish to be
licensed. Any vehicle that has components marked or labeled cannot be used for the CDL Skills
Test.
Vehicle Inspection. You will be tested to see if you know whether your vehicle is safe to drive.
You will be asked to do a Vehicle inspection of your vehicle. You must point to/touch and name
the item you are inspecting and explain to the examiner what you would inspect and why.
Basic Vehicle Control. You will be tested on your skill to control the vehicle. You will be asked
to move your vehicle forward, backward, and turn it within a defined area. These areas may be
marked with traffic lanes, cones, barriers, or something similar. The examiner will tell you how
each control test is to be done.
On-road Test. You will be tested on your skill to safely drive your vehicle in a variety of traffic
situations. The situations may include left and right turns, intersections, railroad crossings,
curves, up and down grades, single or multi-lane roads, streets, or highways. The examiner will
tell you where to drive.
Figure 1.2 details which sections of this manual you should study for each particular class of
license and for each endorsement
1.1 Medical Documentation Requirements
Starting January 30, 2012 and no later than January 30, 2014, if you are applying for a CDL
Permit; or are renewing, upgrading, adding endorsements to a CDL; or transferring a CDL from
another state, you are required to provide information to your State Driver’s License Agency
(SDLA) regarding the type of commercial motor vehicle operation you drive in or expect to drive
in with your CDL. Drivers operating in certain types of commerce will be required to submit a
current medical examiner’s certificate and/or any medical variance documents that you have
been issued (i.e. Vision, Skills Performance or Diabetic waivers, or other exemptions) to your
SDLA to obtain a “certified” medical status as part of your driving record. You must contact your
State Driver Licensing Agency (SDLA) to obtain information regarding the requirement for
submitting these documents.

New 6 - Driving Safely.pptx

  • 1.
    Step 4: TurnOff Engine and Check Lights Make sure the parking brake is set, turn off the engine, and take the key with you. Turn on headlights (low beams) and four-way emergency flashers, and get out of the vehicle. Step 5: Do Walk-around Inspection Go to front of vehicle and check that low beams are on and both of the four-way flashers are working. Push dimmer switch and check that high beams work. Turn off headlights and four-way emergency flashers. Turn on parking, clearance, side-marker, and identification lights. Turn on right turn signal, and start walk-around inspection. General Walk around and inspect. Clean all lights, reflectors, and glass as you go along.
  • 2.
    Left Front Side Driver'sdoor glass should be clean. Door latches or locks should work properly. Left front wheel. Condition of wheel and rim--missing, bent, broken studs, clamps, lugs, or any signs of misalignment. Condition of tires--properly inflated, valve stem and cap OK, no serious cuts, bulges, or tread wear. Use wrench to test rust-streaked lug nuts, indicating looseness. Hub oil level OK, no leaks. Left front suspension. Condition of spring, spring hangers, shackles, u-bolts. Shock absorber condition. Left front brake. Condition of brake drum or disc. Condition of hoses.
  • 3.
    Front Condition of frontaxle. Condition of steering system. No loose, worn, bent, damaged or missing parts. Must grab steering mechanism to test for looseness. Condition of windshield. Check for damage and clean if dirty. Check windshield wiper arms for proper spring tension. Check wiper blades for damage, "stiff" rubber, and securement. Lights and reflectors. Parking, clearance, and identification lights clean, operating, and proper color (amber at front). Reflectors clean and proper color (amber at front). Right front turn signal light clean, operating, and proper color (amber or white on signals facing forward).
  • 4.
    Right Side Right front:check all items as done on left front. Primary and secondary safety cab locks engaged (if cab-over-engine design). Right fuel tank(s). Securely mounted, not damaged, or leaking. Fuel crossover line secure. Tank(s) contain enough fuel. Cap(s) on and secure. Condition of visible parts. Rear of engine--not leaking. Transmission--not leaking. Exhaust system--secure, not leaking, not touching wires, fuel, or air-lines. Frame and cross members--no bends or cracks. Air-lines and electrical wiring--secured against snagging, rubbing, wearing.
  • 5.
    Spare tire carrieror rack not damaged (if so equipped). Spare tire and/or wheel securely mounted in rack. Spare tire and wheel adequate (proper size, properly inflated). Cargo securement (trucks). Cargo properly blocked, braced, tied, chained, etc. Header board adequate, secure (if required). Side boards, stakes strong enough, free of damage, properly set in place (if so equipped). Canvas or tarp (if required) properly secured to prevent tearing, billowing, or blocking of mirrors. If oversize, all required signs (flags, lamps, and reflectors) safely and properly mounted and all required permits in driver's possession. Curbside cargo compartment doors in good condition, securely closed, latched/locked and required security seals in place.
  • 6.
    Right Rear Condition ofwheels and rims--no missing, bent, or broken spacers, studs, clamps, or lugs. Condition of tires--properly inflated, valve stems and caps OK, no serious cuts, bulges, tread wear, tires not rubbing each other, and nothing stuck between them. Tires same type, e.g., not mixed radial and bias types. Tires evenly matched (same sizes). Wheel bearing/seals not leaking. Suspension. Condition of spring(s), spring hangers, shackles, and u-bolts. Axle secure. Powered axle(s) not leaking lube (gear oil). Condition of torque rod arms, bushings. Condition of shock absorber(s).
  • 7.
    If retractable axleequipped, check condition of lift mechanism. If air powered, check for leaks. Condition of air ride components. Brakes. Brake adjustment. Condition of brake drum(s) or discs. Condition of hoses--look for any wear due to rubbing. Lights and reflectors. Side-marker lights clean, operating, and proper color (red at rear, others amber). Side-marker reflectors clean and proper color (red at rear, others amber).
  • 8.
    Rear Lights and reflectors. Rearclearance and identification lights clean, operating, and proper color (red at rear). Reflectors clean and proper color (red at rear). Taillights clean, operating, and proper color (red at rear). Right rear turn signal operating, and proper color (red, yellow, or amber at rear). License plate(s) present, clean, and secured. Splash guards present, not damaged, properly fastened, not dragging on ground, or rubbing tires. Cargo secure (trucks).
  • 9.
    Cargo properly blocked,braced, tied, chained, etc. Tailboards up and properly secured. End gates free of damage, properly secured in stake sockets. Canvas or tarp (if required) properly secured to prevent tearing, billowing, or blocking of either the rearview mirrors or rear lights. If over-length, or over-width, make sure all signs and/or additional lights/flags are safely and properly mounted and all required permits are in driver's possession. Rear doors securely closed, latched/locked. Left Side Check all items as done on right side, plus: Battery(ies) (if not mounted in engine compartment). Battery box(es) securely mounted to vehicle. Box has secure cover. Battery(ies) secured against movement. Battery(ies) not broken or leaking.
  • 10.
    Fluid in battery(ies)at proper level (except maintenance-free type). Cell caps present and securely tightened (except maintenance-free type). Vents in cell caps free of foreign material (except maintenance-free type). Step 6: Check Signal Lights Get In and Turn Off Lights Turn off all lights. Turn on stop lights (apply trailer hand brake or have a helper put on the brake pedal). Turn on left turn signal lights. Get Out and Check Lights Left front turn signal light clean, operating and proper color (amber or white on signals facing the front). Left rear turn signal light and both stop lights clean, operating, and proper color (red, yellow, or amber).
  • 11.
    Get In Vehicle Turnoff lights not needed for driving. Check for all required papers, trip manifests, permits, etc. Secure all loose articles in cab (they might interfere with operation of the controls or hit you in a crash). Start the engine. Step 7: Start the Engine and Check Test for Hydraulic Leaks. If the vehicle has hydraulic brakes, pump the brake pedal three times. Then apply firm pressure to the pedal and hold for five seconds. The pedal should not move. If it does, there may be a leak or other problem. Get it fixed before driving. If the vehicle has air brakes, do the checks described in Sections 5 and 6 of this manual.
  • 12.
    Brake System Test ParkingBrake(s) Fasten safety belt Set parking brake (power unit only). Release trailer parking brake (if applicable). Place vehicle into a low gear. Gently pull forward against parking brake to make sure the parking brake holds. Repeat the same steps for the trailer with trailer parking brake set and power unit parking brakes released (if applicable). If it doesn't hold vehicle, it is faulty; get it fixed. Test Service Brake Stopping Action Go about five miles per hour. Push brake pedal firmly "Pulling" to one side or the other can mean brake trouble.
  • 13.
    Any unusual brakepedal "feel" or delayed stopping action can mean trouble. If you find anything unsafe during the Vehicle inspection, get it fixed. Federal and state laws forbid operating an unsafe vehicle. 2.1.1 – Inspection during a Trip Check Vehicle Operation Regularly You should check: Instruments. Air pressure gauge (if you have air brakes). Temperature gauges. Pressure gauges. Ammeter/voltmeter. Mirrors. Tires. Cargo, cargo covers. Lights, etc If you see, hear, smell, or feel anything that might mean trouble, check it out.
  • 14.
    Safety Inspection. Driversof trucks and truck tractors when transporting cargo must inspect the securement of the cargo within the first 50 miles of a trip and every 150 miles or every three hours (whichever comes first) after. 2.1.1– After-trip Inspection and Report You may have to make a written report each day on the condition of the vehicle(s) you drove. Report anything affecting safety or possibly leading to mechanical breakdown.
  • 16.
    1.1. Commercial DriverLicense Tests 1.1.1 – Knowledge Tests You will have to take one or more knowledge tests, depending on what class of license and what endorsements you need. The CDL knowledge tests include: The general knowledge test, taken by all applicants. The passenger transport test, taken by all bus driver applicants. The air brakes test, which you must take if your vehicle has air brakes, including air over hydraulic brakes. The combination vehicles test, which is required if you want to drive combination vehicles.
  • 17.
    The hazardous materialstest, required if you want to haul hazardous materials as defined in 49 CFR 383.5. In order to obtain this endorsement you are also required to pass a Transportation Security Administration (TSA) background check. The tank vehicle test, required if you want to haul any liquid or gaseous materials in a tank or tanks having an individual rated capacity of more than 119 gallons and an aggregate rated capacity of 1,000 gallons or more that is either permanently or temporarily attached to the vehicle or chassis The doubles/triples test, required if you want to pull double or triple trailers. The School Bus test, required if you want to drive a school bus.
  • 18.
    1.1.2 – SkillsTests If you pass the required knowledge test(s), you can take the CDL skills testwhen you are eligible. The CDL Skills Test consists of three segments: Vehicle inspection, basic vehicle control, and on- road driving. You must take the segments in the order listed and must pass each one before moving to the next. You must take these tests in the type of vehicle for which you wish to be licensed. Any vehicle that has components marked or labeled cannot be used for the CDL Skills Test. Vehicle Inspection. You will be tested to see if you know whether your vehicle is safe to drive. You will be asked to do a Vehicle inspection of your vehicle. You must point to/touch and name the item you are inspecting and explain to the examiner what you would inspect and why.
  • 19.
    Basic Vehicle Control.You will be tested on your skill to control the vehicle. You will be asked to move your vehicle forward, backward, and turn it within a defined area. These areas may be marked with traffic lanes, cones, barriers, or something similar. The examiner will tell you how each control test is to be done. On-road Test. You will be tested on your skill to safely drive your vehicle in a variety of traffic situations. The situations may include left and right turns, intersections, railroad crossings, curves, up and down grades, single or multi-lane roads, streets, or highways. The examiner will tell you where to drive. Figure 1.2 details which sections of this manual you should study for each particular class of license and for each endorsement
  • 20.
    1.1 Medical DocumentationRequirements Starting January 30, 2012 and no later than January 30, 2014, if you are applying for a CDL Permit; or are renewing, upgrading, adding endorsements to a CDL; or transferring a CDL from another state, you are required to provide information to your State Driver’s License Agency (SDLA) regarding the type of commercial motor vehicle operation you drive in or expect to drive in with your CDL. Drivers operating in certain types of commerce will be required to submit a current medical examiner’s certificate and/or any medical variance documents that you have been issued (i.e. Vision, Skills Performance or Diabetic waivers, or other exemptions) to your SDLA to obtain a “certified” medical status as part of your driving record. You must contact your State Driver Licensing Agency (SDLA) to obtain information regarding the requirement for submitting these documents.