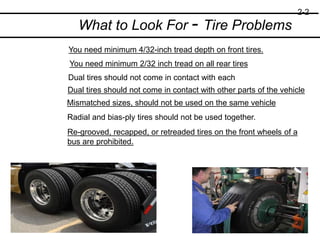
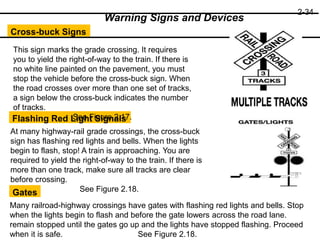
CDL Prep Training
Section 2 Driving Safely
• Section 2
• Driving Safely
– Knowledge
– Safe Driving Information
– Basic Information
• on Hazardous Materials
All commercial drivers must know
this information to pass the
General Knowledge Test
CDL Prep Course
2
Why Inspect?
• Safety is the most important reason you
inspect your vehicle
• Your safety and the safety of other road
users
Vehicle Inspection
3
• A vehicle defect found during an inspection could save
you problems later. You could have a breakdown on the
road that will cost time and money, or even worse, a
crash caused by the defect.
• Federal and state laws require that drivers inspect their
vehicles. Federal and state inspectors also may inspect
your vehicles. If they judge the vehicle to be unsafe, they
will put it "out of service" until it is fixed.
Vehicle Inspection
4
Cargo Inspection (Trucks)
• You must make sure the truck is not overloaded and the
cargo is balanced and secured before each trip. If the
cargo contains hazardous materials, you must inspect
for proper papers and placard on side of vehicle.
Vehilce Inspection
5
• There are three types of vehicle inspections
1. Pre-trip Inspection
– Find problems that could cause
– Break downs
– Crashes
Types of Inspections
6
2. En-route – Inspection
During a trip you should use your senses to check for
problems. (Looking Listening, Smelling and Feeling)
– Gauges
– Tires, Wheels and Rims
– Brakes
– Lights and Reflectors
– Brake and electrical connections to trailer
– Trailer coupling
– Cargo Securement Devices
3. Post Trip Inspection
At the end of the trip Fill out vehicle condition report,
listing any problems or repairs needed
Types of Insepctions
7
What to Look For - Tire Problems
You need minimum 4/32-inch tread depth on front tires.
You need minimum 2/32 inch tread on all rear tires
Dual tires should not come in contact with each
Dual tires should not come in contact with other parts of the vehicle
Mismatched sizes, should not be used on the same vehicle
Radial and bias-ply tires should not be used together.
Re-grooved, recapped, or retreaded tires on the front wheels of a
bus are prohibited.
2-2
What to Look For Wheel and Rims
Damaged rims
Rust around wheel nuts may mean the nuts are loose - check tightness
Wheels or rims that have had welding repairs are not safe
Mismatched, bent or cracked lock rings are dangerous
Missing clamps, spacers, studs or lugs means danger
Bad Brake Drums or Shoes
Cracked drums
Shoes or pads with oil, grease or brake fluid on them
Shoes worn dangerously thin, missing or broken
2-2
What to Look For – Steering System
• Missing nuts, bolts, cotter keys or other parts
• Bent, loose or broken parts, such as
steering column, steering gear box or tie rods
• If power steering equipped, check
hoses, pumps, and fluid level; check
for leaks
• Steering wheel play of more than 10
degrees
• Approximately two (2) inches
movement at the rim of a 20-inch
steering wheel can make it hard to
steer
2-3
What to Look For Suspension Systems
Spring hangers that allow movement of axle from proper position
Cracked or broken spring
hangers
Leaking shock absorbers
Any loose, cracked,
broken or missing frame
members
Torque rod or arm, u-bolts,
spring hangers or other
axle positioning parts that
are cracked, damaged
or missing
2-3
What to Look For Suspension Systems
Air suspension systems that are damaged and/or leaking
Missing or broken leaves in any leaf spring
2-4
What to Look For
Loose, broken, or missing exhaust pipes, mufflers, tailpipes or
vertical stacks
Exhaust system parts rubbing against fuel system parts, tires or
other moving parts of vehicle
Exhaust system parts that are leaking
Emergency Equipment
Fire extinguisher
Spare electrical fuses
Unless equipped
with circuit breakers
Warning devices for parked vehicles
three (3) reflective warning triangles
2-4
CDL Pre-Trip Inspection Test
In order to obtain a C..D.L., you will be required to pass a Pre-Trip
Inspection Test. You will be asked to do a pre-trip inspection of your
vehicle and explain to the examiner what you would inspect and why.
Seven-Step Inspection Method
Method of Inspection
You should do a pre-trip inspection the same way each time so
you will learn all the steps and be less likely to forget something.
2-5
• Review the last inspection report
• Approaching the vehicle
15
As you walk towards the Bus look under the vehicle to see if there is
any hanging wires, hoses, if there is any abnormal leaning and there
are no wet spots on ground
Step 1 Vehicle Overview
Drivers must make a vehicle inspection report in writing
each day. The motor carrier must repair any items in the
report that affect safety and certify on the report that repairs
were made or were unnecessary. You must sign the report
only if defects were noted and certified to be repaired or not
needed to be repaired.
Step 2 “Pre” Engine Start Checks
16
• Check that the Parking Brakes are on and/or Wheels Chocked.
• You may have to raise the hood, tilt the cab or open the engine
compartment door.
• Anti freeze levels- thru site glass or over flow compartment
• Windshield wiper fluid level- in wiper fluid container
• Power steering fluid- Container should have no more than full no
less than add
(These items can be found inside or outside under the hood
depending on whether you have a conventional or transit style
vehicle)
• Oil Level- dip stick should be no more than full no less than add
(The best time to check is before you start the engine)
• Transmission Fluid level- dip stick should be no more than full no
less than add (The best time to check is while the engine is on)
• The engine- should have no wet spots on it (signs of anything
leaking)
• All hoses and electric wires should look good
• All belts should be in good looking condition no more than ½ inch
play
Step 2 “Pre” Engine Start Checks
17
When Done make sure engine compartment is closed and secured.
Step 3: Start Engine and Inspect Inside the Cab
• Make sure parking brake is on and gear shifter is in neutral
or park if the vehicle is an automatic
Start Engine ----listen for unusual noises
• If equipped, check the Anti-lock Braking System (ABS)
indicator lights. Light on dash should come on and then turn off
• If ABS indicator stays on, the ABS is not working properly
2-5
Step 3: Start Engine and Inspect Inside the Cab
Look at the Gauges
• Oil pressure should come up to normal within seconds
after engine is started
• Ammeter and/or voltmeter should be in normal
range
• Coolant temperature should begin gradual rise to normal
operating range
• Engine oil temperature should begin gradual rise to
normal operating range
• Air pressure should build from 50 to 90 psi within three (3)
minutes
• Build air pressure to governor cut-out (usually around 120
– 140 psi)
2-5
Check Condition of Controls
•Steering wheel
•Clutch.
•Accelerator ("gas pedal").
•Brake controls:
Check all of the following for looseness, sticking, damage, or
improper setting
2-6
Step 3: Start Engine and Inspect Inside the Cab
21
• Transmission controls.
• Inter-axle differential lock (if vehicle has one).
• Horn(s).
• Windshield wiper/washer.
• Lights:
• Check Mirrors and Windshield.
• Cracks
• Dirt
• Illegal Stickers
• Clean and adjust as necessary
Step 3: Start Engine and Inspect Inside the Cab
Check Emergency Equipment
• Properly charged and rated fire extinguisher.
• three (3) red reflective triangles.
• Spare electrical fuses (unless vehicle has circuit
breakers).
2-7
Step 3: Start Engine and Inspect Inside the Cab
23
Optional Emergency Equipment
The following items are not required to be carried on
vehicle, However you should check to see if they are on
the vehicle
•Tire Chains (where winter conditions required
•Tire Channing equipment
•List of emergency phone numbers
•Crash reporting kit
Step 3: Start Engine and Inspect Inside the Cab
Step 4: Turn Off Engine and Check Lights
Make sure the parking brake is set, turn off the engine, and take
the key with you. turn on headlights (low beams) and four-way
emergency flashers, and get out of the vehicle.
•Go to front of vehicle and check that low beams are on and both of the
four-way flashers are working.
•Push dimmer switch and check that high beams work.
•Turn off headlights and four-way emergency flashers.
•Turn on parking, clearance, side-marker and identification lights.
•Turn on right turn signal, and start walk around inspection
Left Front Side
Driver’s door glass should be clean.
Door latches or locks should work
properly.
2-7
Step 4: Turn Off Engine and Check Lights
General
Clean all lights, reflectors and
glass as you go along
Check for cracked, chipped or
missing windows
Step 5: Do Walk-around Inspection
• Go to front of vehicle and check that low beams are on and both of the
four- way flashers are working.
• Push dimmer switch and check that high beams work.
• Turn off headlights and four-way emergency flashers.
• Turn on parking, clearance, side-marker and identification lights.
• Turn on right turn signal, and start walk around inspection
2-7
Left Front Wheel
• Condition of wheel and rim - missing, bent, broken studs, clamps,
lugs, or any signs of misalignment.
• Condition of tires - properly inflated, valve stem and cap okay, no
serious cuts, bulges, or tread wear.
• Use wrench to test rust-streaked lug nuts, indicating looseness.
• Hub oil level okay, no leaks.
2-7
Step 5: Do Walk-around Inspection
Left front suspension:
• Condition of spring, spring hangers, shackles, u-bolts.
• Shock absorber condition.
2-7
Step 5: Do Walk-around Inspection
Left front brake:
• Condition of brake drum or disc.
• Condition of hoses.
Condition of front axle:
• Condition of steering system.
• No loose, worn, bent, damaged or
missing parts.
• Must grab steering mechanism to
test for looseness.
2-7
Condition of windshield:
• Check for damage and clean, if dirty.
• Check for Illegal stickers
• Check windshield wiper arms for proper spring tension.
• Check wiper blades for damage, "stiff" rubber and
securement.
2-8
Step 5: Do Walk-around Inspection
Front Lights and reflectors:
• Parking, clearance and identification lights clean, operating and
proper color (amber at front)
• Reflectors clean and proper color
(amber at front).
• Right front turn signal light clean, operating and proper color
(amber or white on signals facing forward).
2-8
Step 5: Do Walk-around Inspection
32
• Right front: check all items
as done on left front.
• Primary and secondary safety
cab locks engaged (if cab-
over-engine design).
Right Side
Step 5: Do Walk-around Inspection
• Securely mounted, not damaged or
leaking.
• Fuel crossover line secure.
• Tank(s) contain enough fuel.
• Cap(s) on and secure.
Right fuel tank(s):
2-8
Condition of visible parts:
• Rear of engine - not leaking.
• Transmission - not leaking.
• Exhaust system - secure, not leaking, not touching wires, fuel
or air lines.
• Frame and cross members - no bends or cracks.
• Air lines and electrical wiring - secured against snagging, rubbing,
wearing.
• Spare tire carrier or rack not damaged (if so equipped).
• Spare tire and/or wheel securely mounted in rack.
• Spare tire and wheel adequate (proper size, properly inflated).
Step 5: Do Walk-around Inspection
Right Side
2-8
Cargo securement (trucks):
• Cargo properly blocked, braced, tied, chained, etc.
• Header board adequate, secure (if required).
• Side boards, stakes strong enough, free of damage, properly set
in place (if so equipped).
• Canvas or tarp (if required) properly secured to prevent tearing,
billowing or blocking of mirrors.
• If oversize, all required signs (flags, lamps, and reflectors) safely
and properly mounted and all required permits in driver’s possession.
• Curbside cargo compartment doors in good condition, securely closed,
latched/locked and required security seals in place.
Step 5: Do Walk-around Inspection
Right Rear
Condition of wheels and rims--no missing, bent, or broken spacers, studs,
clamps, or lugs.
Condition of tires--properly inflated, valve stems and caps okay, no serious
cuts, bulges, tread wear, tires not rubbing each other, and nothing stuck between
them.
Tires same type, e.g., not mixed radial and bias types.
Tires evenly matched (same sizes).
Wheel bearing/seals not leaking.
2-8
Step 5: Do Walk-around Inspection
Suspension:
• Condition of spring(s), spring hangers, shackles, and u-bolts.
• Axle secure.
• Powered axle(s) not leaking lube (gear oil).
• Condition of torque rod arms, bushings.
• Condition of shock absorber(s).
• If retractable axle equipped, check condition of lift mechanism. If
air powered, check for leaks.
• Condition of air ride components.
2-9
Brakes:
• Brake adjustment.
• condition of brake drum(s) or discs.
• condition of hoses--look for any wear due to
rubbing.
Step 5: Do Walk-around Inspection
Lights and reflectors:
• Side-marker lights clean,
operating, and proper color
(red at rear, others amber).
• Side-marker reflectors clean
and proper color (red at rear,
others amber).
Step 5: Do Walk-around Inspection
2-9
Rear
Lights and reflectors:
• Rear clearance and identification lights
clean, operating, and proper color
(red at rear).
• reflectors clean and proper color
(red at rear).
• taillights clean, operating, and proper color
(red at rear).
• right rear turn signal operating, and proper
color (red, yellow, or amber at rear).
License plate(s) present, clean, and secured.
Splash guards present, not damaged, properly
fastened, not dragging on ground, or rubbing tires.
Step 5: Do Walk-around Inspection
2-9
•Tailboards up and properly secured.
•Cargo properly blocked, braced, tied, chained, etc.
•If over-length, or over-width, make sure all signs and/or additional
lights/flags are safely and properly mounted and all
•Required permits are in driver’s possession.
•Rear doors securely closed, latched/locked.
Cargo securement (trucks)
Step 5: Do Walk-around Inspection
40
Left side
Check all items as done on right side, plus:
• Battery(s)
(if not mounted in engine compartment).
• Battery box is securely mounted to vehicle.
• Box has secure cover.
• Battery(s) secured against movement.
• Battery(s) not broken or leaking.
• Fluid in battery(s) at proper level (except maintenance-free type).
• Cell caps present and securely tightened (except maintenance-free type).
• Vents in cell caps free of foreign material (except maintenance-free type).
Step 5: Do Walk-around Inspection
2-10
Step 6: check signal lights
Get In and turn off lights
•Turn on stop lights
(apply trailer hand brake or have a helper put on the brake
pedal)
•Turn on left and right turn signal lights.
(four way flashers)
Get out and check lights
• Left and right front turn signal lights clean, operating and
proper color
(amber or white on signals facing the front)
• Left and right rear turn signal light and both stop lights clean,
operating, and proper color (red, yellow, or amber).
Turn off lights not needed for driving
Check for all required papers, trip manifests, permits, etc.
Secure all loose articles in cab
(They might interfere with operation of the controls or hit you in a crash).
2-10
Step 6: check signal lights
Test for Hydraulic leaks
• Get in the Vehicle
• Check the safety belt
• Pump the brake pedal three times
• Then apply firm pressure to the pedal and hold for five seconds
• The pedal should not move
• If it does, there may be a leak or other problem
– Get it fixed before driving
• If the vehicle has Air Brakes do the checks described in Sections
5 and 6
–
Step 7: Start the engine and check Brake System
43
Step 7: Start the engine and check Brake System
44
Test the parking brakes
• Set parking brake, (Power unit only)
• Release the trailer parking brake (if applicable)
• Place the vehicle into low gear
• Gently pull forward against the parking brake to ensure it holds
• Repeat the same steps for trailer with parking brake set and power
unit brake released (if applicable)
If the parking brake doesn’t hold, it is faulty – get it fixed!
2-10
Test Service Brake Stopping Action
• Go about five miles per hours
• Push the brake pedal firmly
• “Pulling” to one side or the other can mean brake trouble
• Any unusual brake pedal “feel” or delayed stopping action can mean
trouble
• If you find anything unsafe during the test, pre trip inspection
Get it fixed!
Federal and state laws forbid operating an unsafe vehicle
• Instruments.
• Cargo,
• Tires.
• Mirrors.
• Ammeter/voltmeter.
• Pressure gauges.
• Temperature gauges.
• Air pressure gauge (if you have air brakes).
• Lights.
•Cargo covers
If you:
See
Hear
Smell,
Feel anything that might mean trouble
CHECK IT OUT
During the Vehicle Operation You Should check regularly
• SAFETY INSPECTION:
• Drivers of trucks and truck tractors when transporting cargo must
inspect the securement of the cargo within the First 50 Miles of a
trip and Every 150 Miles or Every Three Hours After
• (whichever comes first)
During the Vehicle Operations You Should Check
47
You may have to make a written report each day on the condition of
the vehicle(s) you drove. Report anything affecting safety or
possibly leading to mechanical breakdown.
The vehicle inspection report tells the motor carrier about problems that
may need fixing. Keep a copy of your report in the vehicle for one
day. that way, The next driver can learn about any problems you have
found.
Remember
DOCUMENT
REPORT
&
If YOU DON’T REPORT IT IT CAN’T GET FIXED
Report all defects, no matter how minor
BASIC CONTROL OF YOUR VEHICLE
To drive a vehicle safely, you must be able to control its
speed and direction. Safe operation of a commercial vehicle
requires skill in:
• Accelerating.
• Steering.
• Stopping.
• Backing safely.
Fasten your seatbelt whenever on the road.
Apply the parking brake whenever you leave your
vehicle.
2-12
50
Accelerating
• Do not roll back when you start – you may hit someone behind you
• Use the parking brake whenever necessary to keep from rolling backing
• On a tractor-trailer equipped with a trailer brake hand valve, the hand
valve can be applied to keep from rolling back.
BASIC CONTROL OF YOUR VEHICLE
Speed up smoothly and gradually so the vehicle does not jerk. rough
acceleration can cause mechanical damage. When pulling a trailer,
rough acceleration can damage the coupling.
2-12
Accelerating
BASIC CONTROL OF YOUR VEHICLE
Accelerating
• Speed up very gradually when traction is poor, as in rain or
snow. If you use too much power, the drive wheels may spin. You
could lose control. If the drive wheels begin to spin, take your foot
off the accelerator
BASIC CONTROL OF YOUR VEHICLE
Steering
Hold the steering wheel firmly with both hands. Your hands should be on
opposite sides of the wheel. If you hit a curb or a pothole (chuckhole), the wheel
could pull away from your hands unless you have a firm hold.
Stopping
Push the brake pedal down gradually. Control the pressure so the vehicle
comes to a smooth, safe stop. If you have a manual transmission, push the
clutch in when the engine is close to idle.
Backing Safely
Because you cannot see everything behind your vehicle, backing is always
dangerous. Avoid backing whenever you can.
When you park try to park so you will be able to pull forward when you leave.
2-12
BASIC CONTROL OF YOUR VEHICLE
Backing Safely RULES
Start in the Proper Position
Put the vehicle in the best position to allow you to back safely
Look at Your Path
Before you begin get out and walk around the vehicle. Check your
clearance to the sides and overhead, in and near the path your
vehicle will take.
Use mirrors on both sides
Check mirrors on both sides frequently. Get out of the vehicle and
check your path if you are unsure.
Back Slowly
Use the lowest reverse gear. So you can more easily correct any
steering errors. You also can stop quickly if necessary.
2-12
Back and turn toward the driver’s side
Back to the driver’s side so you can see better. You can watch the
rear of your vehicle by looking out the side window.
Use a Helper When You can
There are blind spots you cannot see. Before you begin backing,
work out a set of hand signals that you both understand. Agree on a
signal for “STOP."
Backing without a trailer
.
Backing with a trailer.
When backing a car, straight truck, or bus, you turn the top of the
steering wheel toward the direction you want to go.
When backing a trailer, you turn the steering wheel in the opposite
direction. once the trailer starts to turn, you must turn the wheel the
other way to follow the trailer.
2-12
Try to position your vehicle so you can back in a straight line. If you
must back on a curved path, back to the driver’s side so you can see.
WHENEVER YOU BACK
When backing a trailer, make pull-ups to re-position your vehicle
as needed.
Back Slowly
This will let you make corrections before you get too far off course.
Use The Mirrors
The mirrors will help you see whether the trailer is drifting to one side
or the other.
Correct Drift Immediately
As soon as you see the trailer getting off the proper path, correct it
by turning the top of the steering wheel in the direction of the drift.
Pull Forward
2-13
SHIFTING GEARS
If you cannot get your vehicle into the right gear while driving,
you will have less control.
Manual Transmissions
Most heavy vehicles with manual transmissions require double
clutching to change gears
Basic Method For Shifting Up
•Release accelerator,
•Push in clutch and shift to neutral at the same time.
•Release clutch.
•Let engine and gears slow down to the rpm required for the next gear
(this takes practice).
•Push in clutch and shift to the higher gear at the same time.
•Release clutch and press accelerator at the same time.
2-13
• Using double clutching requires practice. If you remain in neutral
too long you may have difficulty putting the vehicle into the next
gear. If so, don’t try to force it. Return to neutral, release clutch,
increase engine speed to match road speed, and try again.
58
SHIFTING GEARS
Knowing when to shift up.
There are two ways of knowing when to shift:
1. Use Engine Speed (rpm).
Watch your tachometer, and shift up when
your engine reaches the top of the range.
Know your vehicle manual to learn the
operating RPM range.
Some newer vehicles use progressive
shifting: the rpm at which you shift
becomes higher as you move up in the
gears
2-13
SHIFTING GEARS
Shifting Gears
2. Use Road Speed (mph).
Learning what speeds each gear is good for. then, by using
the speedometer you will know when to shift up
Knowing when to shift up
Basic Procedures for Shifting Down
•Release accelerator, push in clutch, and shift to neutral at the
same time.
•Release clutch.
•Press accelerator, increase engine and gear speed to the rpm
required in the lower gear.
•Push in clutch and shift to lower gear at the same time.
•Release clutch and press accelerator at the same time.
2-14
Shifting Gears
62
• Downshifting, like up-shifting, requires knowing when to shift. Use
either the tachometer or the speedometer and downshift at the right
rpm or road speed.
Shifting Gears
Before Starting Down a Hill.
Special Conditions Where You Should Downshift
Slow down and shift down to a speed that you can
control without using the brakes hard. otherwise
the brakes can overheat and lose their braking
power.
Downshift before starting down the hill. make sure you
are in a low enough gear, usually lower than the gear
required to climb the same hill.
Before Entering a Curve
Slow down to a safe speed, and downshift to the
right gear before entering the curve. This lets you
use some power through the curve to help the
vehicle be more stable while turning. It also
allows you to speed up as soon as you are out of
the curve.
2-14
Multi-speed Rear Axles and Auxiliary Transmissions
Multi-speed rear axles and auxiliary transmissions are used on many
vehicles to provide extra gears. You usually control them by a selector
knob or switch on the gearshift lever of the main transmission. there are
many different shift patterns.
Learn the right way to shift gears in the vehicle you will drive.
Automatic Transmissions
Some vehicles have automatic transmissions. Automatic
transmissions may not provide extra gears on some trucks. You can
select a low range to get greater engine braking when going down
grades. the lower ranges prevent the transmission from shifting up
beyond the selected gear (unless the governor rpm is exceeded). It is
very important to use this braking effect when going down grades.
2-14
CAUTION
2-14
When your drive wheels have poor traction, the retarder may cause them to
skid. therefore, you should turn the retarder off whenever the road is wet,
icy, or snow covered.
Retarders
Retarders help slow a vehicle, reducing the need for using your brakes. they
reduce brake wear and give you another way to slow down. there are four
basic types of retarders (exhaust, engine, hydraulic, and electric). All
retarders can be turned on or off by the driver. on some vehicles the
retarding power can be adjusted. When turned "on," retarders apply their
braking power (to the drive wheels only) whenever you let up on the
accelerator pedal all the way.
These devices can be noisy, be sure you know
where their use is permitted.
2-15
SEEING
To be a safe driver you need to know what is going on all
around your vehicle. not looking properly is a major cause of
accidents.
All drivers look ahead; but many do not look far enough ahead.
The importance of looking far enough ahead
• Because stopping or changing lanes can take a lot of distance, knowing what
the traffic is doing on all sides of you is very important. You need to look well
ahead to make sure you have room to make these moves safely
Seeing
67
• Look for vehicles coming onto the highway, into your lane, or
turning. Watch for brake lights from slowing vehicles. By seeing
these things far enough ahead, you can change your speed, or
change lanes if necessary to avoid a problem. If a traffic light
has been green for a long time it will probably change before
there. Start slowing down and be ready to stop.
Look for Traffic.
Look for Road Conditions
• Look for hills and curves – anything that you will have to slow or change
lanes for. Pay attention to traffic signals and signs. If a light has been green
for a long time, it will probably change before you get there. Start slowing
down and be ready to stop. traffic signs may alert you to road conditions
where you may have to change speed.
2-15
Most good drivers look at least 12 to 15 seconds ahead. that means looking ahead the
distance you will travel in 12 to 15 seconds. At lower speeds, that is about one block. At
highway speeds it is about a quarter of a mile. If you are not looking that far ahead, you
may have to stop too quickly or make quick lane changes. Looking 12 to 15 seconds
ahead does not mean not paying attention to things that are closer.
How Far Ahead To Look
Good drivers shift their attention back and forth, near and far.
2-16
Seeing to the Sides and Rear
It is important to know what is going on behind and to the sides. check your mirrors
regularly. check more often in special situations.
Mirror Adjustment.
Mirror adjustment should be checked prior to the start of any trip and can only be
checked accurately when the trailer(s) are straight. You should check and adjust each
mirror to show some part of the vehicle. this will give you a reference point for judging
the position of the other images.
Regular Checks.
You need to make regular checks of your mirrors to be aware of traffic and to check your
vehicle.
Traffic
Check your mirrors for vehicles on either side and in back of you. In an emergency, you
may need to know whether you can make a quick lane change. use your mirrors to spot
overtaking vehicles. there are "blind spots" that your mirrors cannot show you. check
your mirrors regularly to know where other vehicles are around you, and to see if they
move into your blind spots.
2-16
Check Your Vehicle.
Seeing to the Sides and Rear
Use the mirrors to keep an eye on your tires. It is one way to spot a tire fire. If you are
carrying open cargo, you can use the mirrors to check it. Look for loose straps, ropes, or
chains. Watch for a flapping or ballooning tarp.
Special Situations
Special situations require more than regular mirror checks. these are lane changes,
turns, merges, and tight maneuvers.
Lane Changes
You need to check your mirrors to make sure no one is alongside you or about to
pass you.
2-16
Turns
Check Your Mirrors:
Check your mirrors to make sure the rear of your vehicle will not hit
anything.
Merges Use your mirrors to make sure the gap in traffic is large enough for you
to enter safely
Tight
Maneuvers
Any time you are driving in close quarters, check your mirrors often.
make sure you have enough clearance.
Check Your Mirrors:
• Before you change lanes to make sure there is enough room.
• After you have signaled, to check that no one has moved into your blind spot.
• right after you start the lane change, to double-check that your path is clear.
• After you complete the lane change.
2-16
How to Use Mirrors
Use mirrors correctly by checking them quickly and understanding what you see
When you use your mirrors while driving on
the road, check quickly. Look back and
forth between the mirrors and the road
ahead. do not focus on the mirrors for too
long. otherwise, you will travel quite a
distance without knowing what is
happening ahead. many large vehicles
have curved (convex, "fisheye," "spot,"
"bug-eye") mirrors that show a wider area
than flat mirrors. this is often helpful. But
everything appears smaller in a convex
mirror than it would if you were looking at it
directly. things also seem farther away than
they really are. It is important to realize this
and to allow for it. Figure 2.7 shows the
field of vision using a convex mirror
2-17
Communicating
Signal Your Intentions
Other drivers cannot know what you are going to do until you
tell them. Signaling what you intend to do is important for safety.
Here are some general rules for signaling.
Turns
• Signal early. Signal well before you turn. It is the best way to keep
others from trying to pass you.
• Signal continuously. You need both hands on the wheel to turn
safely. do not cancel the signal until you have completed the turn.
• Cancel your signal. do not forget to turn off your turn signal after
you have turned (if you do not have self-canceling signals).
Lane Changes Change lanes slowly and smoothly. That way a driver you did not
see may have a chance to honk his/her horn, or avoid your vehicle.
2-17
Slowing Down.
Communicating
Warn drivers behind you when you see you will need to slow
down. A few light taps on the brake pedal -- enough to flash the brake
lights -- should warn following drivers. use the four-way emergency
flashers for times when you are driving very slowly or are stopped.
Warn other drivers in any of the following situations:
•Trouble Ahead. The size of your vehicle may make it hard for drivers behind you
to see hazards ahead. If you see a hazard that will require slowing down, warn
the drivers behind by flashing your brake lights.
If you must drive slowly, alert following drivers by turning on your emergency
flashers if it is legal. (Laws regarding the use of flashers differ from one state to
another. check the laws of the states where you will drive.)
• Tight turns. Most car drivers do not know how slowly you have to
go to make a tight turn in a large vehicle. Give drivers behind you
warning by braking early and slowing gradually.
• Stopping on the road. Truck and bus drivers sometimes stop in
the roadway to unload cargo or passengers, or to stop at a railroad
crossing. Warn following drivers by flashing your brake lights. Do not
stop suddenly.
• Driving Slowly. Drivers often do not realize how fast they are
catching up to a slow vehicle until they are very close.
Communicating
75
Do not direct traffic
Communicating
76
Some drivers try to help out others by signaling when it is safe to pass.
You should not do this. You could cause an accident. You could be
blamed and it could cost you many thousands of dollars.
2-17
Communicating Your Presence
When Passing
Whenever you are about to pass a vehicle, pedestrian, or bicyclist, assume they do
not see you. They could suddenly move in front of you. When it is legal, tap the
horn lightly or, at night, flash your lights from low to high beam and back. And,
drive carefully enough to avoid a crash even if they do not see or hear you.
When It Is Hard To See.
At dawn, dusk, in rain, or snow, you need to make yourself easier to see. If you are
having trouble seeing other vehicles, other drivers will have trouble seeing you. turn
on your lights. Use the headlights, not just the identification or clearance lights.
Use the low beams; high beams can bother people in the daytime as well as at
night. If you need to use your windshield wipers your headlights must be on.
Use Your Horn When Needed
Your horn can let others know you are there. It can help to avoid a crash. use
your horn when needed. However, it can startle others and could be dangerous
when used unnecessarily.
When Parked at the side of the Road.
Communicating Your Presence
Be sure to turn on the four-way emergency flashers. this is important at night. do not
trust the taillights to give warning. drivers have crashed into the rear of a parked
vehicle because they thought it was moving normally. If you must stop on a road or
the shoulder of any road, you must put out your emergency warning devices within
ten minutes. Place your warning devices at the following locations:
One-way or Divided Highway
If you must stop on or by a one-way or divided highway, place
warning devices 10 feet, 100 feet, and 200 feet toward the
approaching traffic.
2-18
Two-way or Undivided Highway
If you stop on a two-lane road carrying traffic in both directions or on an undivided
highway, place warning devices within 10 feet of the front or rear corners to mark
the location of the vehicle and 100 feet behind and ahead of the vehicle, on the
shoulder or in the lane you stopped in.
Communicating Your Presence
2-18
Hill or Curve
Communicating Your Presence
Back beyond any hill, curve, or other obstruction that prevents other drivers
from seeing the vehicle within 500 feet. If line of sight view is obstructed due
to hill or curve, move the rear-most triangle to a point back down the road so
warning is provided.
When putting out the triangles, hold them between yourself and the oncoming
traffic for your own safety.
(So other drivers can see you.)
2-18
Communicating Your Presence
Use your horn when needed.
• Your horn can let others know you’re there. It
can help to avoid a crash. Use your horn when
needed. However, it can startle others and
could be dangerous when used unnecessarily.
Controlling Speed
Driving too fast is a major cause of fatal crashes. You must adjust your speed
depending on driving conditions. These include traction, curves, visibility, traffic
and hills.
Stopping Distance =
Perception distance
+ Reaction distance
_____+ Braking distance_____
= Total Stopping Distance
For an alert driver is about 3/4 second
Average driver has a reaction time of 3/4 second.
figure 2.11
2-19
Distance to a stop using the brake.
The effect of speed on stopping distance
Whenever you double your speed, it takes about four times as much distance to
stop and your vehicle will have four times the destructive power if it crashes. High
speeds increase stopping distances greatly. By slowing down a little, you can gain
a lot in reduced braking distance
The effect of vehicle weight on stopping distance
The heavier the vehicle, the more work the brakes must do to stop it, and the more
heat they absorb. But the brakes, tires, springs, and shock absorbers on heavy
vehicles are designed to work best when the vehicle is fully loaded. Empty trucks
require greater stopping distances because an empty vehicle has less traction. It
can bounce and lock up its wheels, giving much poorer braking.
(This is not usually the case with buses.)
Matching Speed to the Road Surface
You cannot steer or brake a vehicle unless you have traction. Traction is
friction between the tires and the road. there are some road conditions that
reduce traction and call for lower speeds.
2-20
Slippery Surfaces
It will take longer to stop, and it will be harder to turn without skidding, when the
road is slippery. Wet roads can double stopping distance. You must drive slower
to be able to stop in the same distance as on a dry road. Reduce speed by about
one-third (e.g., slow from 55 to about 35 mph) on a wet road. On packed
snow, reduce speed by a half, or more. If the surface is icy, reduce speed to a
crawl and stop driving as soon as you can safely do so.
Identifying Slippery Surfaces
2-20
Sometimes it is hard to know if the road is slippery. Here are some signs of
slippery roads
Shaded Areas
Bridges
Shady parts of the road will remain icy and slippery long after open areas
have melted
When the temperature drops, bridges will freeze before the road will. Be
especially careful when the temperature is close to 32 degrees Fahrenheit.
Melting Ice
Black Ice
Vehicle Icing.
Just After Rain begins.
Slight melting will make ice wet. Wet ice is much more slippery than ice that is
not wet
Black ice is a thin layer that is clear enough that you can see the road underneath
it. It makes the road look wet. Any time the temperature is below freezing and the
road looks wet, watch out for black ice.
An easy way to check for ice is to open the window and feel the front of the mirror,
mirror support, or antenna. If there is ice on these, the road surface is probably
starting to ice up.
Right after it starts to rain, the water mixes with oil left on the road by vehicles. this
makes the road very slippery. If the rain continues, it will wash the oil away.
2-20
Slippery Surfaces
Hydroplaning
In some weather, water or slush collects on the road. When this happens, your
vehicle can hydroplane. It is like water skiing--the tires lose their contact with the
road and have little or no traction. You may not be able to steer or brake. You can
regain control by releasing the accelerator and pushing in the clutch. This
will slow your vehicle and let the wheels turn freely. If the vehicle is hydroplaning,
DO NOT USE THE BRAKES TO SLOW DOWN. If the drive
wheels start to skid, push in the clutch to let them turn freely.
It does not take a lot of water to cause hydroplaning. Hydroplaning can occur at
speeds as low as 30 mph if there is a lot of water. Hydroplaning is more likely if tire
pressure is low, or the tread is worn. (The grooves in a tire carry away the water; if
they are not deep, they do not work well.)
Road surfaces where water can collect can create conditions that cause a vehicle
to hydroplane. Watch for clear reflections, tire splashes, and raindrops on the
road. these are indications of standing water. Be especially careful driving through
puddles. the water is often deep enough to cause hydroplaning.
2-20
Speed and Curves
If you take a curve too fast, two things can happen. The tires can lose their traction
and continue straight ahead, so you skid off the road, or, the tires may keep
their traction and the vehicle rolls over. tests have shown that trucks with a high
center of gravity can roll over at the posted speed limit for a curve.
Drivers must adjust their speed for curves in the road.
Slow to a safe speed before you enter a curve. Braking in a curve is dangerous
because it is easier to lock the wheels and cause a skid. Slow down as needed. do
not ever exceed the posted speed limit for the curve. Be in a gear that will let you
accelerate slightly in the curve, this will help you keep control.
2-20
Speed and Distance Ahead
You should always be able to stop within the distance you can see ahead.
Fog, rain, or other conditions may require that you slow down to be able to stop in
the distance you can see. At night, you cannot see as far with low beams as you
can with high beams. When you must use low beams, slow down.
2-20
Speed and Traffic Flow
When you are driving in heavy traffic, the safest speed is the speed of other
vehicles. vehicles going the same direction at the same speed are not likely to
run into one another. In many states, speed limits are lower for trucks and buses
than for cars. It can vary as much as 15 mph. use extra caution when you change
lanes or pass on these roadways. Drive at the speed of the traffic, if
you can without going at an illegal or unsafe speed. Keep a safe following distance.
The main reason drivers exceed speed limits is to save time. But, anyone trying
to drive faster than the speed of traffic will not be able to save much time. the risks
involved are not worth it. If you go faster than the speed of other traffic, you will
have to keep passing other vehicles. this increases the chance of a crash, and
it is more tiring. Fatigue increases the chance of a crash. Going with the flow of
traffic is safer and easier
89
Roadway Work Zones
• Speeding traffic is the number one cause of injury and death in
roadway work zones. observe the posted speed limits at all times
when approaching and driving through a work zone. Watch your
speedometer, and do not allow your speed to creep up as you drive
through long sections of road construction. decrease your speed for
adverse weather or road conditions. decrease your speed even
further when a worker is close to the roadway.
2-21
Managing Space
To be a safe driver, you need space all around your vehicle. When things go wrong,
space gives you time to think and to take action. to have space available when
something goes wrong, you need to manage space. While this is true for all drivers, it
is very important for large vehicles. they take up more space and they require more
space for stopping and turning.
Space Ahead
of all the space around your vehicle, it is the area ahead of the vehicle--the space
you are driving into --that is most important.
The need for space ahead
You need space ahead in case you must suddenly stop. According to accident
reports, the vehicle that trucks and buses most often run into is the one in front of
them. the most frequent cause is following too closely. remember, if the vehicle
ahead of you is smaller than yours, it can probably stop faster than you can. You
may crash if you are following too closely.
2-20
Speed on Downgrades
Your vehicle’s speed will increase on downgrades because of gravity.
Your most important objective is to select and maintain a speed that is not
too fast for the:
• Total weight of the vehicle and cargo. • Length of the grade.
• Steepness of the grade.
• Road conditions. • Weather.
Speed on Downgrades
92
• If a speed limit is posted, or there is a sign indicating "maximum Safe
Speed," never exceed the speed shown. Also, look for and heed warning
signs indicating the length and steepness of the grade. You must use the
braking effect of the engine as the principal way of controlling your
speed on downgrades. the braking effect of the engine is greatest when it
is near the governed R.P.M.’s and the transmission is in the lower gears.
Save your brakes so you will be able to slow or stop as required by road
and traffic conditions. Shift your transmission to a low gear before
starting down the grade and use the proper braking techniques.
Please read carefully the section on going down long, steep downgrades
safely in "mountain driving".
How much space should you keep in front of you? One good rule says you need
at least one second for each 10 feet of vehicle length at speeds below 40 mph.
At greater speeds, you must add 1 second for safety. For example, if you are driving
a 40-foot vehicle, you should leave 4 seconds between you and the vehicle ahead.
In a 60-foot rig, you will need 6 seconds. Over 40 mph, you would need 5 seconds
for a 40-foot vehicle and 7 seconds for a 60-foot vehicle. See Figure 2.12.
To know how much space you have, wait until the vehicle ahead passes a
shadow on the road, a pavement marking, or some other clear landmark.
then count off the seconds like this: "one thousand-and-one, one
thousand-and-two“ and so on, until you reach the same spot. compare your
count with the rule of one second for every ten feet of length.
2-22
Cross-reference pg35 Pub 95
How much space ahead?
How much space ahead
94
If you are driving a 40-foot truck
and only counted up to 2
seconds, you are too close.
drop back a little and count
again until you have 4 seconds
of following distance (or 5
seconds, if you are going
over 40 mph). After a little
practice, you will know how far
back you should be.
Remember to add 1 second
for speeds above 40 mph.
Also remember that when the
road is slippery, you need
much more space to stop.
Space Behind
You cannot stop others from following you too closely. But there are things
you can do to make it safer.
Stay to the Right
Heavy vehicles are often tailgated when they cannot keep up with the
speed of traffic. This often happens when you are going uphill. If a heavy
load is slowing you down, stay in the right lane if you can. Going uphill, you
should not pass another slow vehicle unless you can get around quickly and
safely.
Dealing with
Tailgaters Safely
In a large vehicle, it is often hard to see whether a
vehicle is close behind you. You may be tailgated:
When you are traveling
slowly
In bad weather.
Drivers trapped behind slow vehicles often follow closely.
Many car drivers follow large vehicles closely during bad
weather, especially when it is hard to see the road ahead
2-22
2-22
If you find yourself being tailgated, here are some things you can do to
reduce the chances of a crash:
Dealing with Tailgaters
Avoid quick
changes
Increase your
following
distance.
Do not speed up.
Avoid tricks
If you have to slow down or turn, signal early, and reduce
speed very gradually. (Take your foot off the accelerator)
Opening up room in front of you will help you to avoid
having to make sudden speed or direction changes. It also
makes it easier for the tailgater to get around you.
It is safer to be tailgated at a low speed than a high speed.
Do not turn on your taillights or flash your brake lights.
Follow the suggestions above.
2-23
Space to the Sides
Commercial vehicles are often wide and take up most of a lane. Safe
drivers will manage what little space they have. You can do this by keeping
your vehicle centered in your lane, and avoid driving alongside others
Staying centered in a lane.
You need to keep your vehicle centered in the lane to keep safe clearance
on either side. If your vehicle is wide, you have little room to spare.
Traveling next to others
There are two dangers in traveling alongside other vehicles:
• Another driver may change lanes suddenly and turn into you.
• You may be trapped when you need to change lanes.
Space to the Sides
98
Strong winds make it difficult to stay in your lane. The problem is
usually worse for lighter vehicles. This problem can be especially bad
coming out of tunnels. If you can avoid it do not drive along side of
others when crosswinds can affect you
Find an open spot where you are not near other traffic. When traffic is
heavy, it may be hard to find an open spot. If you must travel near
other vehicles, try to keep as much space as possible between you
and them. Also, drop back or pull forward so that you are sure the
other driver can see you.
Strong Winds
Traveling Next to Others
2-23
Space Overhead
Hitting overhead objects is a danger. make sure you always have overhead
clearance.
Do not assume that the heights posted at bridges and overpasses are
correct. Re-paving or packed snow may have reduced the clearances since
the heights were posted. the weight of a cargo van changes its height. An
empty van is higher than a loaded one. What you got under a bridge when
you were loaded may not be what you can do when you are empty
If you doubt you have safe space to pass under an object, go slowly. If you
are not sure you can make it, take another route.
LOW OVER HEAD CLEARANCE 12’ 6”
100
Warnings are often posted on low bridges or
underpasses, but sometimes they are not.
Some roads can cause a vehicle to tilt. there can be a problem
clearing objects along the edge of the road, such as signs,
trees, or bridge supports. Where this is a problem, drive a little
closer to the center of the road.
Before you back into an area, get out and check for overhanging
objects such as trees, branches, or electric wires.
It is easy to miss seeing them while you are backing. (Also check
for other hazards at the same time.)
2-23
Space Overhead
2-23
Space Below
Many drivers forget about the space under their vehicles. That space can
be very small when a vehicle is heavily loaded. This is often a problem on
dirt roads and in unpaved yards. drainage channels across roads can
cause the ends of some vehicles to drag cross such depressions carefully
Railroad tracks can stick up several inches, and can cause problems. This
is a problem particularly when pulling trailers with a low underneath
clearance and where the surface around the tracks are worn away. Do not
take a chance on getting hung up halfway across.
2-23
Space for Turns
The space around a truck or bus is important in turns. Because of wide
turning and off tracking, large vehicles can hit other vehicles or objects
during turns.
Right Turns Here are some rules to help prevent right-turn crashes:
• Turn slowly----to give yourself and others more time to avoid
problems.
• If you are driving a truck or bus that cannot make the right turn without
swinging into another lane, turn wide as you complete the turn. Keep the
rear of your vehicle close to the curb. This will stop other drivers from
passing you on the right.
• Do not turn wide to the left as you start the turn. A following driver
may think you are turning left and try to pass you on the right. You may
crash into the other vehicle as you complete your turn.
Space for Turns – Right Turns
103
• If you must cross into the
oncoming lane to make a
turn, watch out for vehicles
coming toward you. Give
them room to go by or to stop.
However, do not back up for
them, because you might hit
someone behind you.
See Figure 2.13
2-23
Figure 2.13
2-24
Space for Turns - Left Turns
On a left turn, make sure you are halfway through the intersection before
you start the left turn. If you turn too soon, the left side of your vehicle may
hit another vehicle because of off tracking.
If there are two turning lanes,
always take the right turn
lane. Do not start in the inside
lane because you may have to
swing right to make the turn.
Drivers on your left can be more
readily seen. See Figure 2.14.
Figure 2.14
2-24
Space Needed to Cross or Enter Traffic
Be aware of the size and weight of your vehicle when you cross or enter
traffic. Here are some important things to keep in mind.
Because of slow acceleration and the space large vehicles require, you
may need a much larger gap to enter traffic than you would in a car. Wait for
a large enough gap in traffic to enter the road. Do not assume other
motorist will let you in!!!
Acceleration varies with the load. Allow more room if your vehicle is heavily
loaded. Before you start across a road, make sure you can get all the way
across before traffic reaches you.
106
Seeing Hazards
What Is a Hazard?
A hazard is any condition which causes our trip to be unsafe. A road
condition or other road user (driver, bicyclist, pedestrian) that is a
possible danger can be a hazard.
For example, a car in front of you is headed toward the freeway exit, but his
brake lights come on and he begins braking hard. this could mean that the
driver is uncertain about taking the off ramp. He might suddenly return to
the highway. this car is a hazard. If the driver of the car cuts in front of you, it
is no longer just a hazard; it is an emergency.
2-24
Seeing Hazards Lets You Be Prepared.
You will have more time to act if you see hazards before they become
emergencies. In the example on the page before, you might make a lane
change or slow down to prevent a crash if the car suddenly cuts in front of
you. Seeing this hazard gives you time to check your mirrors and signal a
lane change. Being prepared reduces the danger. A driver who did not see
the hazard until the slow car pulled back on the highway in front of him
would have to do something very suddenly. Sudden braking or a quick
lane change is much more likely to lead to a crash.
Learning To See Hazards.
There are often clues that will help you see hazards. the more you drive, the
better you can learn to see hazards. This section will talk about hazards that
you should be aware of.
108
Hazardous Roads
Slow down and be very careful if you see any of the following road hazards:
• Work zones
When people are working on the road, it is a hazard. there may be narrower
lanes, sharp turns, or uneven surfaces. Other drivers are often distracted
and drive unsafely. Workers and construction vehicles may get in the way.
Drive slowly and carefully near work zones. Use your four-way flashers
or brake lights to warn drivers behind you. By law, you must turn on
your headlights. Penalties are increased for violations in work zones!
Seeing Hazards Lets You Be Prepared.
2-25
• Drop Off
• Foreign Objects
Sometimes the pavement drops off sharply near the edge of the road. Driving too
near the edge can tilt your vehicle toward the side of the road. This can
cause the top of your vehicle to hit roadside objects (signs, tree limbs). Also,
it can be hard to steer as you cross the drop off, going off the road, or coming
back on.
Things that have fallen on the road can be hazards. They can be a
danger to your tires and wheel rims. they can damage electrical and brake
lines. They can be caught between dual tires and cause severe damage.
Some obstacles that appear to be harmless can be very dangerous. For
example, cardboard boxes may be empty, but they may also contain some
solid or heavy material capable of causing damage. the same is true of
paper and cloth sacks. It is important to remain alert for objects of all sorts,
so you can see them early enough to avoid them without making sudden,
unsafe moves.
ROAD HAZARDS
110
Freeway and turnpike exits can be particularly dangerous for
commercial vehicles. Off ramps and on ramps often have speed
limit signs posted. Remember, these speeds may be safe for
automobiles, but may not be safe for larger vehicles or heavily
loaded vehicles. Exits that go downhill and turn at the same time
can be especially dangerous. the downgrade makes it difficult to
reduce speed. Braking and turning at the same time can be a
dangerous practice. make sure you are going slowly enough before
you get on the curved part of an off ramp or on ramp.
• Off Ramps/On Ramps.
ROAD HAZARDS
2-26
Drivers Who Are Hazards
In order to protect yourself and others, you must know when other drivers
may do something hazardous. Some clues to this type of hazard are
discussed below:
• Blocked Vision
People who cannot see others are a very dangerous hazard. Be alert for
drivers whose vision is blocked. Vans, loaded station wagons, and cars with
the rear window blocked are examples, rental trucks should be watched
carefully. Their drivers are often not used to the limited vision they have to the
sides and rear of the truck. In winter, vehicles with frosted, ice-covered, or
snow-covered windows are hazards. Vehicles may be partly hidden by blind
intersections or alleys. If you only can see the rear or front end of a
vehicle but not the driver, then he or she cannot see you. Be alert
because he/she may back out or enter into your lane. Always be prepared to
stop.
112
• Delivery Trucks can Present a Hazard.
Packages or vehicle doors often block the driver’s vision. Drivers of step
vans, postal vehicles, and local delivery vehicles often are in a hurry
and may suddenly step out of their vehicle or drive their vehicle into
the traffic lane.
Drivers Who Are Hazards
• Parked Vehicles can be Hazards
Especially when people start to get out of them. or, they may
suddenly start up and drive into your way. Watch for movement inside
the vehicle or movement of the vehicle itself that shows people are inside.
Watch for brake lights or backup lights, exhaust, and other clues that
a driver is about to move.
2-26
Drivers Who Are Hazards
• Be Careful of a Stopped Bus.
Passengers may cross in front of or behind the bus, and they often cannot
see you.
• Motorcyclists and Mopeds can be Potential Hazards
They can be hard to see or easy to look over. Be prepared for motorcyclists.
• Pedestrians and Bicyclists can also be Hazards
Walkers, joggers, and bicyclists may be on the road with their back to
the traffic, so they cannot see you. Sometimes they wear portable
stereos with headsets, so they cannot hear you either. This can be
dangerous. on rainy days, pedestrians may not see you because of hats or
umbrellas. they may be hurrying to get out of the rain and may not pay
attention to the traffic.
2-26
1. When approaching or passing a bicycle, slow down to a safe speed.
Before passing, you must first decide whether you can maneuver around the
bicyclist. Be sure to check for oncoming traffic. When passing, you must allow
at least four feet between your vehicle and a bicycle in order to pass
safely. If necessary and if you can do it safely, you are permitted to cross the
center double yellow line so you can maintain the four feet of clearance between
your vehicle and the bicycle.
3.
2.
Unless making a left turn, bicyclists traveling more slowly than passing vehicles
must keep to the right side of the roadway and must travel in the same direction
as the rest of traffic. However, this requirement is waived on roads with a single
lane in each direction.
Here are some points to remember about bicyclists you may encounter on the road:
BICYCLISTS
When there is only one travel lane, bicyclists may use any portion of the lane to
avoid hazards on the roadway, including keeping a safe distance from stopped
and parked cars.
4.
BICYCLISTS
115
5. Drivers cannot turn into the path of a bicyclist who is riding straight ahead on a
roadway or shoulder.
After you have passed a bicyclist, do not slow down or stop quickly. A quick stop
could lead to the bicyclist crashing into your vehicle
6.
You cannot force a bicyclist off the road. If you do this, you may face criminal
charges.
7.
Bicyclists are considered to be vehicle operators and are expected to obey
all traffic laws; however, they may travel at less than the posted minimum
speed and may not be cited for impeding traffic. Bicyclists may operate on a
shoulder or berm, but are not required to do so.
8.
Do not sound your horn close to bicyclists, unless you must do so to avoid a
crash.
9.
2-26
• Distractions
People who are distracted are hazards. Watch for where they are looking. If they are
looking elsewhere, they cannot see you. Be alert even when they are looking at
you, they may believe that they have the right of way.
• Children.
Children tend to act quickly without checking traffic. Children playing with one
another may not look for traffic and are a serious hazard.
• Talkers.
People Who Are Hazards
Drivers or pedestrians talking to one another may not be paying close
attention to the traffic
• Workers.
People working on or near the roadway are a hazard clue. the work creates a
distraction for other drivers and the workers themselves may not see you.
2-26
• Ice Cream Trucks.
• Disabled Vehicles.
• Accidents.
People Who Are Hazards
Someone selling ice cream is a hazard clue. children may be nearby and may not
see you.
Drivers changing a tire or fixing an engine often do not pay attention to the danger
that roadway traffic is to them. they are often careless. Jacked up wheels or raised
hoods are hazard clues.
Accidents are particularly hazardous. People involved in the accident may not look for
traffic. Passing drivers tend to look at the accident. People often run across the
road without looking. vehicles may slow or stop suddenly.
• Shoppers.
People in and around shopping areas are often not watching traffic because they are
looking for stores or looking into store windows.
2-26
• Confused Drivers.
• Slow Drivers.
Drivers Who Are Hazards
Confused drivers often change direction suddenly or stop without warning.
Confusion is common near freeway or turnpike interchanges and major
intersections. Tourists unfamiliar with the area can be very hazardous. Clues to
tourists include car-top luggage and out-of-state license plates. Unexpected actions
(stopping in the middle of a block, changing lanes for no apparent reason, backup
lights suddenly going on) are clues to confusion. Hesitation is another clue, including
driving very slowly, using brakes often, or stopping in the middle of an intersection.
You may also see drivers who are looking at street signs, maps, and house
numbers. These drivers may not be paying attention to you.
Motorists who fail to maintain normal speed are hazards. Seeing slow moving
vehicles early can prevent a crash. Some vehicles, by their nature, are slow and seeing
them is a hazard clue (mopeds, farm machinery, construction machinery, tractors, horse
drawn vehicles etc.). Some of these will have the "slow moving vehicle" symbol to
warn you. this is a red triangle with an orange center. Watch for it.
2-26
• Drivers in a Hurry.
Drivers Who Are Hazards
• Drivers Signaling a Turn May be a Hazard.
Drivers signaling a turn may slow more than expected or stop. If they are
making a tight turn into an alley or driveway, they may go very slowly. If pedestrians
or other vehicles block them, they may have to stop on the roadway. Vehicles
turning left may have to stop for oncoming vehicles.
Drivers may feel your commercial vehicle is preventing them from getting
where they want to go on time. Such drivers may pass you without a safe gap
in the oncoming traffic, cutting too close in front of you. Drivers entering the
road may pull in front of you in order to avoid being stuck behind you,
causing you to brake. Be aware of this and watch for drivers who are in a hurry.
2-27
Drivers Who Are Hazards
Some clues to these drivers are
➢ Weaving across the road or drifting from one side to another.
➢ Leaving the road (dropping right wheels onto the shoulder, or bumping
across a curb in a turn).
➢ Stopping at the wrong time (stopping at a green light, or waiting for too
long at a stop).
➢ Open window in cold weather.
➢ Speeding up or slowing down suddenly, driving too fast or too slow.
Be alert for drunk drivers and sleepy drivers late at night.
• Impaired Drivers.
Drivers who are sleepy, have had too much to drink, are on drugs, or who are ill are
hazards
Drivers Who Are Hazards
121
Drivers look in the direction they are going to turn. You may sometimes get a
clue from a driver’s head and body movements that a driver may be going to make
a turn, even though the turn signals are not on. Drivers making over-the-shoulder
checks may be going to change lanes. These clues are most easily seen in
motorcyclists and bicyclists. Watch other road users and try to tell whether they
might do something hazardous.
• Driver Body Movement as a Clue.
• Conflicts.
You are in conflict when you have to change speed and/or direction to avoid
hitting someone. Conflicts occur at intersections where vehicles meet, at merges
(such as turnpike on ramps) and where there are needed lane changes (such as the
end of a lane, forcing a move to another lane of traffic). Other situations include
slow moving or stalled traffic in a traffic lane, and accident scenes. Watch for other
drivers who are in conflict because they are a hazard to you. When they react to this
conflict, they may do something that will put them in conflict with you.
2-27
Hazards – Conflicts
Always Have a Plan
You should always be looking for hazards. Continue to learn to see hazards on
the road. However, do not forget why you are looking for the hazards--they may
turn into emergencies. You look for the hazards in order to have time to plan a
way out of any emergency. When you see a hazard, think about the
emergencies that could develop and figure out what you would do. Always
be prepared to take action based on your plans. In this way, you will be a
prepared, defensive driver who will improve your own safety as well as the safety
of all road users.
2-27
Distracted Driving
Whenever you are driving a vehicle and your attention is not on the road,
you are putting yourself, your passengers, other vehicles, and pedestrians in
danger. distracted driving can result when you perform any activity that may shift
your full attention from the driving task. Taking your eyes off the road or hands off
the steering wheel presents obvious driving risks. Mental activities that take your
mind away from driving are just as dangerous. Your eyes can gaze at objects in
the driving scene but fail to see them because your attention is distracted
elsewhere
Activities that can distract your attention include: talking to passengers;
adjusting the radio, cd player or climate controls; eating, drinking or smoking;
reading maps or other literature; picking up something that fell; reading billboards
and other road advertisements; Watching other people and vehicles including
aggressive drivers; talking on a cell phone or CB radio; using telematic devices
(such as navigation systems, pagers, cell phones etc.); daydreaming or being
occupied with other mental distractions.
2-28
Do Not Drive Distracted
If drivers react a half-second slower because of distractions, crashes double.
Some tips to follow so you will not become distracted:
• Review and be totally familiar with all safety and usage features on any in-
vehicle electronics, including your wireless or cell phone, before you drive.
• Pre-program radio stations.
• Pre-load you favorite cds or cassette tapes.
• Clear the vehicle of any unnecessary objects.
• Review maps and plan your route before you begin driving.
• Adjust all mirrors for best all-round visibility before you start your trip.
• Do not attempt to read or write while you drive.
• Avoid smoking, eating and drinking while you drive.
• Do not engage in complex or emotionally intense conversations with other
occupants.
Do Not Drive Distracted
125
• If possible, turn the cell phone off until your destination is reached.
• Position the cell phone within easy reach.
• Pre-program cell phones with commonly called numbers.
• If you have to place a call, find a safe place to pull off the road.
• Do Not Place Calls While Driving.
When possible, pull off the road in a safe, legal place when making/receiving a
call on communication equipment.
Use In-vehicle Communication Equipment Cautiously
2-28
•Some jurisdictions require that only hands-free devices can be used
while driving. Even these devices are unsafe to use when you are
moving down the road.
•If you must use your cell phone, keep conversations short. develop ways
to get free of long-winded friends and associates while on the road.
•Never use the cell phone for social visiting.
•Hang up in tricky traffic situations.
•Do not use the equipment when approaching locations with heavy traffic,
road construction, heavy pedestrian traffic, or severe weather
conditions.
•Do not attempt to type or read messages on your satellite system while d
riving.
Do Not Drive Distracted
2-28
Watch Out for Other Distracted Drivers
You need to be able to recognize other drivers who are engaged in any form
of driving distraction. Not recognizing other distracted drivers can prevent you
from perceiving or reacting correctly in time to prevent a crash. Watch for:
• Vehicles that may drift over the lane divider lines or within their own lane.
• Vehicles traveling at inconsistent speeds.
• Drivers who are preoccupied with maps, food, cigarettes, cell phones, or other
objects.
• Drivers who appear to be involved in conversations with their passengers.
Give a distracted driver plenty of room and maintain your safe following distance.
Be very careful when passing a driver who seems to be distracted. The other
driver may not be aware of your presence, and they may drift in front of you.
2-28
Aggressive Drivers/Road Rage
What Is It?
Aggressive driving and road rage is not a new problem. However, in
today’s world, where heavy and slow-moving traffic and tight schedules are
the norm, more and more drivers are taking out their anger and frustration
in their vehicles. Crowded roads leave little room for error, leading to
suspicion and hostility among drivers and encouraging them to take
personally the mistakes of other drivers.
Aggressive driving is the act of operating a motor vehicle in a selfish,
bold, or pushy manner, without regard for the rights or safety of others.
Road rage is operating a motor vehicle with the intent of doing harm to
others or physically assaulting a driver or their vehicle
2-29
How you feel before you even start your vehicle has a lot to do with how
stress will affect you while driving. Reduce your stress before and while you
drive.
• Listen to “easy listening” music.
• Give the drive your full attention.
• Do not allow yourself to become distracted by talking on your cell
phone, eating, etc.
• Be realistic about your travel time.
• Expect delays because of traffic, construction, or bad weather and make
allowances.
• If you are going to be later than you expected – Deal with it. Take a
deep breath and accept the delay.
Do Not Be an Aggressive Driver
130
Give other drivers the benefit of the doubt. Try to imagine why he or she is
driving that way. Whatever their reason, it has nothing to do with you.
Slow down and keep your following distance reasonable.
Do not drive slowly in the left lane of traffic.
Avoid gestures. Keep your hands on the wheel. Avoid making any gestures that
might anger another driver, even seemingly harmless expressions of irritation like
shaking your head.
Be a cautious and courteous driver. If another driver seems eager to get in
front of you, say, “Be my guest.” this response will soon become a habit and you will
not be as offended by other drivers’ actions.
2-29
What You Should Do When Confronted by an Aggressive Driver
• First and foremost, make every attempt to get out of their way.
• Put your pride in the back seat. Do not challenge them by speeding up or
attempting to hold-your-own in your travel lane.
• Avoid eye contact.
• Ignore gestures and refuse to react to them.
• Report aggressive drivers to the appropriate authorities by providing a
vehicle description, license plate number, location and, direction of travel, and if
possible description of driver.
• If you have a cell phone, and can do it safely, call the police.
• If an aggressive driver is involved in a crash farther down the road, stop
a safe distance from the crash scene, wait for the police to arrive, and
report the driving behavior that you witnessed.
2-30
DRIVING at NIGHT
It Is More Dangerous
You are at greater risk when you drive at night. drivers cannot see hazards
as quickly as in daylight, so they have less time to respond. Drivers caught
by surprise are less able to avoid a crash.
The problems of night driving involve the driver,
the roadway, and the vehicle.
The
Driver
The
Roadway
The
vehicle
2-30
Driver Factors
Vision
People cannot see as sharply at night or in dim light. Also, their eyes need time to
adjust to seeing in dim light. most people have noticed this when walking into a dark
movie theater.
Glare
Drivers can be blinded for a short time by bright light. It takes time to recover from
this blindness. Older drivers are especially bothered by glare. Most people have
been temporarily blinded by camera flash units or by the high beams of an
oncoming vehicle. It can take several seconds to recover from glare. Even two
seconds of glare blindness can be dangerous. A vehicle going 55 mph will travel
more than half the distance of a football field during that time. do not look directly at
bright lights when driving. Look at the right side of the road. Watch the sidelines
when someone coming toward you has very bright lights on.
DRIVING at NIGHT
2-30
Driver Factors DRIVING at NIGHT
Vision
People cannot see as sharply at night or in dim light. Also, their eyes need time
to adjust to seeing in dim light. Most people have noticed this when walking into a
dark movie theater.
Glare
Drivers can be blinded for a short time by bright light. It takes time to recover from
this blindness. Older drivers are especially bothered by glare. Most people have
been temporarily blinded by camera flash units or by the high beams of an
oncoming vehicle. It can take several seconds to recover from glare. Even two
seconds of glare blindness can be dangerous. A vehicle going 55 mph will travel
more than half the distance of a football field during that time. do not look directly at
bright lights when driving. Look at the right side of the road. Watch the sidelines
when someone coming toward you has very bright lights on.
135
Fatigue and Lack of Alertness
Fatigue (being tired) and lack of alertness are bigger problems at night. the body’s
need for sleep is beyond a person’s control. most people are less alert at night,
especially after midnight. This is particularly true if you have been driving for a long
time. Drivers may not see hazards as soon, or react as quickly, so the chance of a
crash is greater.
If you are sleepy, the only safe cure is to get off the road and get some sleep. If
you do not, you risk your life and the lives of others.
DRIVING at NIGHT
Driver Factors
In the daytime there is usually enough light to see well. This is not true at night.
Some areas may have bright street lights, but many areas will have poor
lighting. On most roads you will probably have to depend entirely on your
headlights.
2-30
DRIVING at NIGHT Roadway Factors
Poor Lighting
Less light means you will not be able to see hazards as well as in the daytime. Road
users who do not have lights are hard to see. There are many accidents at night
involving pedestrians, joggers, bicyclists, and animals.
Even when there are lights, the road scene can be confusing. Traffic signals and
hazards can be hard to see against a background of signs, shop windows, and
other lights.
Drive slower when lighting is poor or confusing.
Drive slowly enough to be sure you can stop in the distance you can see
ahead.
Drunk Drivers
Drunk drivers and drivers under the influence of drugs are a hazard to themselves
and to you. Be especially alert around the closing times for bars and taverns.
Watch for drivers who have trouble staying in their lane or maintaining speed, who
stop without reason, or show other signs of being under the influence of alcohol or
drugs.
2-30
DRIVING at NIGHT
Vehicle Factors
Headlights
At night your headlights will usually be the main source of light for you to see by and
for others to see you. You cannot see nearly as much with your headlights as you
see in the daytime. With low beams you can see ahead about 250 feet and with
high beams about 350-500 feet. You must adjust your speed to keep your
stopping distance within your sight distance. This means going slowly enough
to be able to stop within the range of your headlights. otherwise, by the time you see
a hazard, you will not have time to stop
Other Lights
In order for you to be seen easily, the following must be clean and working properly:
• Marker lights
• Reflectors.
• Taillights
. • Identification lights.
• Clearance lights
138
Night driving can be more dangerous if you have problems with your headlights.
dirty headlights may give only half the light they should. this cuts down your ability
to see, and makes it harder for others to see you. Make sure your lights are clean
and working. Headlights can be out of adjustment. If they do not point in the
right direction, they will not give you a good view and they can blind other
drivers. Have a qualified person make sure they are adjusted properly.
DRIVING at NIGHT
Vehicle Factors
Turn Signals and Brake Lights
At night your turn signals and brake lights are even more important for telling other
drivers what you intend to do. Make sure you have clean, working turn signals
and stop lights.
2-31
Windshield and Mirrors.
DRIVING at NIGHT
Vehicle Factors
It is more important at night than in the daytime to have a clean windshield and
clean mirrors. Bright lights at night can cause dirt on your windshield or
mirrors to create a glare of its own, blocking your view. Most people have
experienced driving toward the sun just as it has risen or is about to set, and found
that they can barely see through a windshield that seemed to look okay in the
middle of the day. Clean your windshield on the inside and outside for safe driving at
night.
Night Driving Procedures
Pre-trip Procedures
Make sure you are rested and alert. If you are drowsy, sleep before you drive! Even
a nap can save your life or the lives of others. If you wear eyeglasses, make sure
they are clean and unscratched. Do not wear sunglasses at night. Do a complete
pre-trip inspection of your vehicle and yourself. Pay attention to checking all
lights and reflectors, and cleaning those you can reach.
2-31
Avoid Blinding Others
Glare from your headlights can cause problems for drivers coming toward
you. They can also bother drivers going in the same direction you are, when your
lights shine in their rearview mirrors. Dim your lights before they cause glare for
other drivers. Dim your lights within 500 feet of an oncoming vehicle and when
following another vehicle within 500 feet.
Avoid Glare from Oncoming Vehicles
Do not look directly at lights of oncoming vehicles. Look slightly to the right at a
right lane or edge markings of the road, if available. If other drivers do not put
their low beams on, do not try to "get back at them" by putting your own high beams
on. this increases glare for oncoming drivers and increases the chance of a crash
Night Driving Procedures
2-31
Use High beams When You Can.
Some drivers make the mistake of always using low beams. This seriously cuts
down on their ability to see ahead. Use high beams when it is safe and legal to
do so. Use them when you are not within 500 feet of an approaching vehicle. Also,
do not let the inside of your cab get too bright. This makes it harder to see outside.
Keep the interior light off, and adjust your instrument lights as low as you can
to still be able to read the gauges.
If You Get Sleepy, Stop At The Nearest Safe Place
People often do not realize how close they are to falling asleep even when their
eyelids are falling shut. If you can safely do so, look at yourself in a mirror. If you
look sleepy, or you just feel sleepy, stop driving! You are in a very dangerous
condition. The only safe cure is to sleep.
Night Driving Procedures
2-31
DRIVING IN FOG
Fog can occur at any time. Fog on highways can be extremely dangerous. Fog is
often unexpected, and visibility can deteriorate rapidly. You should watch for foggy
conditions and be ready to reduce your speed. Do not assume that the fog will
thin out after you enter it. The best advice for driving in fog is do not. It is
preferable that you pull off the road into a rest area or truck stop until
visibility is better.
If you must drive, be sure to consider the following:
•Obey all fog-related warning signs.
• Slow down before you enter fog.
•Turn on all your lights. Use low-beam headlights and fog lights for best
visibility even in daytime, and be alert for other drivers who may have forgotten to
turn on their lights.
•
Driving in Fog
143
Turn on your 4-way flashers. This will give vehicles approaching you
from behind a quicker opportunity to notice your vehicle.
• Watch for vehicles on the side of the roadway. Seeing taillights or
headlights in front of you may not be a true indication of where the road is
ahead of you. The vehicle may not be on the road at all.
• Use roadside highway reflectors as guides to determine how the road
may curve ahead of you.
• Listen for traffic you cannot see.
• Avoid passing other vehicles.
• Do not stop along the side of the road, unless absolutely
necessary.
• Be prepared for emergency stops.
2-32
DRIVING IN WINTER
Vehicle Checks
Make sure your vehicle is ready before driving in winter weather. You should make a
regular pre-trip inspection, paying extra attention to the following items.
Coolant Level and Antifreeze Amount.
Make sure the cooling system is full and there is enough antifreeze in the system to
protect against freezing. this can be checked with a special coolant tester
Defrosting and Heating Equipment
Make sure the defrosters work. They are needed for safe driving. Make sure the
heater is working, and that you know how to operate it. If you use other heaters and
expect to need them (e.g., mirror heaters, battery box heaters, fuel tank heaters),
check their operation before starting your trip.
145
• Use windshield washer antifreeze to prevent freezing of the washer liquid. If you
cannot see well enough while driving (for example, if your wipers fail), stop safely
and fix the problem.
• Make sure the windshield wiper blades are in good condition. Make sure the
wiper blades press against the window hard enough to wipe the windshield clean,
otherwise they may not sweep off snow properly. Make sure the windshield
washer works and there is washing fluid in the washer reservoir.
Wipers and Washers.
DRIVING IN WINTER
Tires
Make sure you have enough tread on your tires. The drive tires must provide
traction to push the rig over wet pavement and through snow. the steering tires
must have traction to steer the vehicle. Enough tread is especially important in
winter conditions. You must have at least 4/32 inch tread depth in every major
groove on front tires and at least 2/32 inch on other tires. More would be better.
use a gauge to determine if you have enough tread for safe driving.
2-32
Vehicle Checks
146
Make sure the lights and reflectors are clean. Lights and reflectors are especially
important during bad weather. Check from time to time during bad weather to make
sure they are clean and working properly.
Lights and Reflectors
You may find yourself in conditions where you cannot drive without chains, even to
get to a place of safety. Carry the right number of chains and extra cross-links.
make sure they will fit your drive tires. Check the chains for broken hooks, worn or
broken cross-links, and bent or broken side chains. Learn how to put the chains on
before you need to do it in snow and ice. tire chains should be carried when driving
in winter weather.
Tire Chains
DRIVING IN WINTER
Windows and Mirrors
Remove any ice, snow, etc., from the windshield, windows, and mirrors before
starting. Use a windshield scraper, snow brush, and windshield defroster as
necessary.
Vehicle Checks
2-32
DRIVING IN WINTER
Exhaust System.
Radiator shutters and Winter-fronts
Hand Holds, Steps, and Deck Plates.
Remove all ice and snow from hand holds, steps, and deck plates which you must
use to enter the cab or to move about the vehicle. This will reduce the danger of
slipping
Remove ice from the radiator shutters. Make sure the winter-front is not closed too
tightly. If the shutters freeze shut or the winter-front is closed too much, the
engine may overheat and stop.
Exhaust system leaks are especially dangerous when cab ventilation may be poor
(windows rolled up, etc.). Loose connections could permit poisonous carbon
monoxide to leak into your vehicle. Carbon monoxide gas will cause you to be
sleepy. In large enough amounts it can kill you. Check the exhaust system for
loose parts and for sounds and signs of leaks.
Vehicle Checks
2-32
DRIVING IN WINTER
Driving
Slippery Surfaces
Start Gently and Slowly
Drive slowly and smoothly on slippery roads. If it is very slippery, you should not
drive at all. Stop at the first safe place.
When first starting, get the feel of the road. Do not hurry
Check for Ice.
Check for ice on the road, especially bridges and overpasses. A lack of spray
from other vehicles indicates ice has formed on the road. Also, check your mirrors
and wiper blades for ice. If they have ice, the road most likely will be icy as well.
2-32
DRIVING IN WINTER
Driving
Adjust Turning and Braking to Conditions.
Make turns as gently as possible. Do not brake any harder than necessary, and do
not use the engine brake or speed retarder. (they can cause the driving wheels
to skid on slippery surfaces.)
Do not pass slower vehicles unless necessary. Go slowly and watch far enough
ahead to keep a steady speed. Avoid having to slow down and speed up. Take
curves at slower speeds and do not brake while in curves. Be aware that as the
temperature rises to the point where ice begins to melt, the road becomes
even more slippery. Slow down more.
Adjust Speed to Conditions.
Do not drive alongside other vehicles. Keep a longer following distance.
When you see a traffic jam ahead, slow down or stop to wait for it to clear. Try hard
to anticipate stops early and slow down gradually. Watch for snowplows, as
well as salt and sand trucks, and give them plenty of room.
Adjust Space to Conditions.
150
DRIVING IN WINTER
Driving
2-32
Wet Brakes.
When driving in heavy rain or deep standing water, your brakes will get wet. Water
in the brakes can cause the brakes to be weak, to apply unevenly, or to grab.
This can cause lack of braking power, wheel lockups, pulling to one side or
the other, and jackknife if you pull a trailer
Avoid driving through deep puddles or flowing water if possible.
If not, you should:
• Slow down and place transmission in a low gear.
2-32
DRIVING IN WINTER
Driving
Wet Brakes.
• When out of the water, maintain light pressure on the brakes for a short
distance to heat them up and dry them out.
• Gently put on the brakes. This presses linings against brake drums or discs and
keeps mud, silt, sand, and water from getting in while driving through water.
• Increase engine rpm and cross the water while keeping light pressure on the
brakes.
• Make a test stop when safe to do so. Check behind to make sure no one is
following, then apply the brakes to be sure they work well. If not, dry them out
further as described above. (caution: do not apply too much brake pressure and
accelerator at the same time, or you can overheat brake drums and linings.)
2-34
DRIVING IN VERY HOT WEATHER
Vehicle Checks
Do a normal pre-trip inspection, but pay special attention to the following items:
Tires
Engine Oil.
Before driving check the tire mounting and air pressure. Inspect the tires
every two hours or every 100 miles when driving in very
hot weather. Air pressure increases with temperature. Do not let air out or the
pressure will be too low when the tires cool off. If a tire is too hot to touch, remain
stopped until the tire cools off. Otherwise the tire may blow out or catch fire.
The engine oil helps keep the engine cool, as well as
lubricating it. Make sure there is enough engine oil. If you have an oil
temperature gauge, make sure the temperature is within the proper range while you
are driving.
2-34
• Engine Coolant.
Before starting out, make sure the engine cooling system has enough water and
antifreeze according to the engine manufacturer’s directions. (Antifreeze helps
the engine under hot conditions as well as cold conditions.) When
driving, check the water temperature or coolant temperature gauge from time to
time. Make sure that it remains in the normal range. If the gauge goes above the
highest safe temperature, there may be something wrong that could lead to engine
failure and possibly fire. Stop driving as soon as safely possible and try to find out
what is wrong.
DRIVING IN VERY HOT WEATHER
Vehicle Checks
Some vehicles have sight glasses, see-through coolant overflow
containers, or coolant recovery containers. These permit you to check the
coolant level while the engine is hot. If the container is not part of the pressurized
system, the cap can be safely removed and coolant added even when the engine is
at operating temperature.
154
Never remove the radiator cap or any part of the pressurized system
until the system has cooled.
• Steam and boiling water can spray under pressure and cause severe
burns. If you can touch the radiator cap with your bare hand, it is probably
cool enough to open.
Vehicle Checks DRIVING IN VERY HOT WEATHER
2-34
• Engine Coolant.
2-33
DRIVING IN VERY HOT WEATHER
Vehicle Checks
• Engine Coolant.
If coolant has to be added to a system without a recovery tank or overflow
tank, follow these steps:
• Shut engine off
• Wait until engine has cooled
• Protect hands (use gloves or a thick cloth)
• Turn radiator cap slowly to the first stop, which releases the pressure seal
• Step back while pressure is released from cooling system
• When all pressure has been released, press down on the cap and turn it
further to remove the cap
• Visually check level of coolant and add more coolant if necessary
• Replace cap and turn all the way to the closed position
2-33
• Engine Belts.
• Hoses
DRIVING IN VERY HOT WEATHER
Vehicle Checks
Learn how to check v-belt tightness on your vehicle by pressing on the belts. Loose
belts will not turn the water pump and/or fan properly. This will result in
overheating. Also, check belts for cracking or other signs of wear. this is especially
true in hot weather. cracked belts are a safety hazard.
Make sure coolant hoses are in good condition. A broken hose while driving can lead
to engine failure and even fire.
157
High speeds create more heat for tires and the engine. In desert conditions
the heat may build up to the point where it is dangerous. the heat will
increase chances of tire failure or even fire, and engine failure.
• Go Slowly Enough to Prevent Overheating.
Tar in the road pavement frequently rises to the surface in very hot weather.
Spots where tar "bleeds" to the surface are very slippery.
• Watch for Bleeding Tar.
DRIVING IN VERY HOT WEATHER
2-33
Vehicle Checks
2-34
RAILROAD-HIGHWAY CROSSINGS
Railroad-highway grade crossings are a special kind of
intersection where the roadway crosses train tracks. these
crossings are always dangerous. Every such crossing must be
approached with the expectation that a train is coming.
159
This type of crossing has a traffic control device installed at the crossing to
regulate traffic at the crossing. These active devices include flashing red lights,
with or without bells and flashing red lights with bells and gates.
Active Crossings.
This type of crossing does not have any type of traffic control device. The
decision to stop or proceed rests entirely in your hands. Passive crossings
require you to recognize the crossing, search for any train using the tracks and
decide if there is sufficient clear space to cross safely. Passive crossings have
yellow circular advance warning signs, pavement markings and cross-bucks
to assist you in recognizing a crossing.
Passive Crossings.
RAILROAD-HIGHWAY CROSSINGS
2-34
Types of Crossings
2-34
Warning Signs and Devices
Advance Warning Signs
Pavement Markings
The round, black-on-yellow warning sign is placed
ahead of a public railroad-highway crossing. The
advance warning sign tells you to slow down, look and
listen for the train, and be prepared to stop at the
tracks if a train is coming.
See Figure 2.15.
Pavement markings mean the same as the
advance warning sign. they consist of an “x” with
the letters “RR” and a no-passing marking on two-
lane roads. See
Figure 2.16.
2-34
Cross-buck Signs
Flashing Red Light Signals
Gates
Warning Signs and Devices
This sign marks the grade crossing. It requires
you to yield the right-of-way to the train. If there is
no white line painted on the pavement, you must
stop the vehicle before the cross-buck sign. When
the road crosses over more than one set of tracks,
a sign below the cross-buck indicates the number
of tracks.
See Figure 2.17.
At many highway-rail grade crossings, the cross-buck
sign has flashing red lights and bells. When the lights
begin to flash, stop! A train is approaching. You are
required to yield the right-of-way to the train. If there is
more than one track, make sure all tracks are clear
before crossing.
See Figure 2.18.
Many railroad-highway crossings have gates with flashing red lights and bells. Stop
when the lights begin to flash and before the gate lowers across the road lane.
remain stopped until the gates go up and the lights have stopped flashing. Proceed
when it is safe. See Figure 2.18.
2-35
Driving Procedures
Never Race a Train to a Crossing
Reduce Speed.
Never attempt to race a train to a crossing. It is extremely difficult to
judge the speed of an approaching train.
Speed must be reduced in accordance with your ability to see approaching
trains in any direction, and speed must be held to a point which will permit
you to stop short of the tracks in case a stop is necessary.
163
You should not rely solely upon the presence of warning signals, gates, or
flagmen to warn of the approach of trains. Be especially alert at crossings
that do not have gates or flashing red light signals.
Do Not Rely on Signals.
Because of noise inside your vehicle, you cannot expect to hear the train
horn until the train is dangerously close to the crossing.
Do Not Expect to Hear a Train.
Driving Procedures
2-35
Double Tracks Require a Double Check.
Yard Areas and Grade Crossings in Cities and Towns.
2-35
Driving Procedures
Remember that a train on one track may hide a train on the other track.
Look both ways before crossing.
After one train has cleared a crossing, be sure no other trains are
near before starting across the tracks.
Yard areas and grade crossings in cities and towns are just as dangerous
as rural grade crossings. Approach them with as much caution.
165
• Turn on your four-way emergency flashers.
• Check for traffic behind you while stopping gradually. use a pullout lane, if
available.
When Stopping Be Sure To:
• Such a stop is otherwise required by law.
• The nature of the cargo makes a stop mandatory under state or federal
regulations.
A full stop is required at grade crossings whenever:
Stopping Safely at Railroad Highway Crossings
Driving Procedures
2-35
2-36
Crossing the Tracks
Railroad crossings with steep approaches can cause your unit to hang up
on the tracks.
Never permit traffic conditions to trap you in a position where you
have to stop on the tracks.
Be sure you can get all the way across the tracks before you start across. It
takes a typical tractor-trailer unit at least 14 seconds to clear a single
track and more than 15 seconds to clear a double track.
Do not shift gears while crossing railroad tracks.
167
If for any reason you get stuck on the tracks, get out of the vehicle
and away from the tracks. Check signposts or signal housing at the
crossing for emergency notification information. call 911 or other
emergency number. Give the location of the crossing using all
identifiable landmarks, especially the dot number, if posted.
• Single-axle tractor pulling a long trailer with its landing gear set to
accommodate a tandem-axle tractor.
• Low slung units (lowboy, car carrier, moving van, possum-belly
livestock trailer).
Be Aware! these trailers can get stuck on raised crossings:
Special Situations
Crossing the Tracks
2-36
2-36
MOUNTAIN DRIVING
In mountain driving, gravity plays a major role. on any upgrade,
gravity slows you down. The steeper the grade, the longer the grade,
and/or the heavier the load--the more you will have to use lower gears to
climb hills or mountains. In coming down long, steep downgrades, gravity
causes the speed of your vehicle to increase. You must select an
appropriate safe speed, then use a low gear, and proper braking
techniques. You should plan ahead and obtain information about any long,
steep grades along your planned route of travel. If possible, talk to other
drivers who are familiar with the grades to find out what speeds are safe.
You must go slowly enough so your brakes can hold you back without getting
too hot. If the brakes become too hot, they may start to "fade." this means you
have to apply them harder and harder to get the same stopping power. If you
continue to use the brakes hard, they can keep fading until you cannot slow
down or stop at all.
169
• Weather.
• road conditions.
• Steepness of the grade.
• Length of the grade.
• total weight of the vehicle and cargo.
Your most important consideration is to select a speed that is not too fast
for the:
Select a "Safe" Speed
MOUNTAIN DRIVING
2-36
If a speed limit is posted, or there is a sign indicating "maximum Safe
Speed," never exceed the speed shown. Also, look for and heed warning
signs indicating the length and steepness of the grade.
2-36
MOUNTAIN DRIVING
You must use the braking effect of the engine as the principal way of
controlling your speed. The braking effect of the engine is greatest when it is near
the governed RPMs and the transmission is in the lower gears. Save your brakes so
you will be able to slow or stop as required by road and traffic conditions.
Select the Right Gear Before Starting Down the Grade
Shift the transmission to a low gear before starting down the grade. Do not try
to downshift after your speed has already built up. You will not be able to shift into a
lower gear. You may not even be able to get back into any gear and all engine
braking effect will be lost. Forcing an automatic transmission into a lower gear at
high speed could damage the transmission and also lead to loss of all engine
braking effect.
171
MOUNTAIN DRIVING
2-36
With older trucks, a rule for choosing gears is to use the same gear
going down a hill that you would need to climb the hill.
However, new trucks have low friction parts and streamlined shapes
for fuel economy. they may also have more powerful engines. this
means they can go up hills in higher gears and have less friction and
air drag to hold them back going down hills. For that reason, drivers
of modern trucks may have to use lower gears going down a hill than
would be required to go up the hill. You should know what is right for
your vehicle.
2-37
Brake Fading or Failure
MOUNTAIN DRIVING
Brakes are designed so brake shoes or pads rub against the brake drum or
disks to slow the vehicle. Braking creates heat, but brakes are designed to
take a lot of heat. However, brakes can fade or fail from excessive heat
caused by using them too much and not relying on the engine braking
effect.
Brake fade is also affected by adjustment. To safely control a vehicle, every
brake must do its share of the work. Brakes out of adjustment will stop
doing their share before those that are in adjustment. the other brakes can
then overheat and fade, and there will not be enough braking available to
control the vehicle. Brakes can get out of adjustment quickly, especially
when they are used a lot; also, brake linings wear faster when they are hot.
therefore, brake adjustment must be checked frequently.
2-37
Proper Braking Technique
MOUNTAIN DRIVING
Remember
The use of brakes on a long and/or steep downgrade is only a supplement
to the braking effect of the engine. Once the vehicle is in the proper low
gear, the following are the proper braking techniques:
• Apply the brakes just hard enough to feel a definite slowdown.
• When your speed has increased to your "safe" speed, repeat steps 1 and
2.
• When your speed has been reduced to approximately five mph below
your "safe" speed, release the brakes.
(This brake application should last for about three seconds.)
174
Know escape ramp locations on your route. Signs show drivers where
ramp are located. Escape ramps save lives, equipment and cargo. use
them if you lose your brakes.
For example, if your "safe" speed is 40 mph, you would not apply the
brakes until your speed reaches 40 mph. You now apply the brakes hard
enough to gradually reduce your speed to 35 mph and then release the
brakes. Repeat this as often as necessary until you have reached the end
of the downgrade.
Escape ramps have been built on many steep mountain downgrades.
Escape ramps are made to stop runaway vehicles safely without
injuring drivers and passengers. Escape ramps use a long bed of
loose, soft material to slow a runaway vehicle, sometimes in
combination with an upgrade.
MOUNTAIN DRIVING
2-37
Proper Braking Technique
2-38
DRIVING EMERGENCIES
Traffic emergencies occur when two vehicles are about to collide. Vehicle
emergencies occur when tires, brakes, or other critical parts fail. Following
the safety practices in this manual can help prevent emergencies. But if an
emergency does happen, your chances of avoiding a crash depend upon
how well you take action. Actions you can take are discussed below
Steering to Avoid a Crash
Stopping is not always the safest thing to do in an emergency. When you
do not have enough room to stop, you may have to steer away from what is
ahead. remember, you can almost always turn to miss an obstacle more
quickly than you can stop. (However, top-heavy vehicles and tractors with
multiple trailers may flip over.)
176
A quick turn can be made safely, if it is done the right way. Here are some
points that safe drivers use:
How to turn quickly and safely.
In order to turn quickly, you must have a firm grip on the steering wheel with
both hands. the best way to have both hands on the wheel, if there is an
emergency, is to keep them there all the time.
Keep both Hands on the steering Wheel.
DRIVING EMERGENCIES
2-38
Be prepared to "counter-steer," that is, to turn the wheel back in the
other direction, once you have passed whatever was in your path.
Unless you are prepared to counter-steer, you will not be able to do it
quickly enough. You should think of emergency steering and counter-
steering as two parts of one driving action.
2-38
• Do not apply the brake while you are turning. It is very easy to lock your
wheels while turning. If that happens, you may skid out of control.
• Do not turn any more than needed to clear whatever is in your way. The more
sharply you turn, the greater the chances of a skid or rollover.
Where to steer
If an oncoming driver has drifted into your lane, a move to your right is best. If
that driver realizes what has happened, the natural response will be to return to his
or her own lane. If something is blocking your path, the best direction to steer
will depend on the situation.
If you have been using your mirrors, you will know which lane is empty and
can be safely used. If the shoulder is clear, going right may be best. No one is
likely to be driving on the shoulder but someone may be passing you on the left.
You will know if you have been using your mirrors. If you are blocked on both sides,
a move to the right may be best. At least you will not force anyone into an opposing
traffic lane and a possible head-on collision.
DRIVING EMERGENCIES
2-38
Leaving the Road.
DRIVING EMERGENCIES
Avoid Braking.
Keep one set of Wheels on the Pavement, if Possible
In some emergencies, you may have to drive off the road. It may be less
risky than facing a collision with another vehicle. Most shoulders are strong
enough to support the weight of a large vehicle and, therefore, offer an
available escape route.
Here are some guidelines, if you do leave the road.
If possible, avoid using the brakes until your speed has dropped to about
20 mph. then brake very gently to avoid skidding on a loose surface.
This helps to maintain control.
2-38
Stay on the Shoulder.
Returning to the Road.
If the shoulder is clear, stay on it until your vehicle has come to a stop.
When its safe, signal and check your mirrors before pulling back onto the
road.
• When both front tires are on the paved surface, counter-steer
immediately. the two turns should be made as a single "steer-counter-
steer" move.
If you are forced to return to the road before you can stop, use the following
procedure:
• Hold the wheel tightly and turn sharply enough to get right back on the
road safely. do not try to edge gradually back on the road. If you do, your
tires might grab unexpectedly and you could lose control.
DRIVING EMERGENCIES
2-39
How to Stop Quickly and Safely
DRIVING EMERGENCIES
If somebody suddenly pulls out in front of you, your natural response is to
hit the brakes. this is a good response if there is enough distance to stop,
and you use the brakes correctly.
You should brake in a way that will keep your vehicle in a straight line
and allow you to turn if it becomes necessary. You can use the
"controlled braking" method or the "stab braking" method.
Controlled Braking.
With this method, you apply the brakes as hard as you can without
locking the wheels. Keep steering wheel movements very small while
doing this. If you need to make a larger steering adjustment or if the
wheels lock, release the brakes. re-apply the brakes as soon as you
can.
181
Emergency braking does not mean pushing down on the brake pedal
as hard as you can. That will only keep the wheels locked up and
cause a skid. If the wheels are skidding, you cannot control the
vehicle.
DO NOT JAM ON THE BRAKES
Apply your brakes all the way. Release brakes when wheels lock up.
As soon as the wheels start rolling, apply the brakes fully again. (It
can take up to one second for the wheels to start rolling after you release
the brakes. If you re-apply the brakes before the wheels start rolling, the
vehicle will not straighten out.)
Stab Braking
DRIVING EMERGENCIES
2-39
2-39
DRIVING EMERGENCIES
Brake Failure
Loss of Hydraulic Pressure
Brakes kept in good condition rarely fail. Most hydraulic brake failures occur for one
of two reasons: (Air brakes are discussed in Section 5.)
• Loss of hydraulic pressure. • Brake fade on long hills.
When the system will not build up pressure, the brake pedal will feel spongy
or go to the floor. Here are some things you can do:
Downshift.
Putting the vehicle into a lower gear will help to slow the vehicle.
Sometimes pumping the brake pedal will generate enough hydraulic
pressure to stop the vehicle.
Pump the Brakes.
2-39
Find an Escape Route.
Use the Parking Brake.
The parking or emergency brake is separate from the hydraulic brake
system. Therefore, it can be used to slow the vehicle. However, be sure to
press the release button or pull the release lever at the same time you use the
emergency brake so you can adjust the brake pressure and keep the wheels
from locking up.
While slowing the vehicle, look for an escape route--an open field, side street, or
escape ramp. Turning uphill is a good way to slow and stop the vehicle. Make sure
the vehicle does not start rolling backward after you stop. Put it in low gear, apply
the parking brake, and, if necessary, roll back into some obstacle that will stop the
vehicle.
DRIVING EMERGENCIES
2-39
DRIVING EMERGENCIES
Brake Failure on Downgrades.
Going slow enough and braking properly will almost always prevent brake failure on
long downgrades. Once the brakes have failed, however, you are going to have
to look outside your vehicle for something to stop it.
Your best hope is an escape ramp. If there is one, there will be signs telling you
about it. Use it. Ramps are usually located a few miles from the top of the
downgrade. Every year, hundreds of drivers avoid injury to themselves or
damage to their vehicles by using escape ramps. Some escape ramps use soft
gravel that resists the motion of the vehicle and brings it to a stop. Others turn
uphill, using the hill to stop the vehicle and soft gravel to hold it in place. Before
driving in the mountains, you should know the escape ramps located on your route.
185
DRIVING EMERGENCIES
2-39
If no escape ramp is available, take the least hazardous escape route
you can--such as an open field or a side road that flattens out or turns
uphill. Make the move as soon as you know your brakes do not work. the
longer you wait, the faster the vehicle will go, and the harder it will be to
stop.
Any driver who loses brakes going downhill should use an escape ramp if it
is available. If you do not use it, your chances of having a serious crash
may be much greater.
Brake Failure on Downgrades.
2-40
Recognize Tire Failure.
• Sound
• Feel
Tire Failure DRIVING EMERGENCIES
• Vibration
Quickly knowing you have a tire failure will let you have more time to react. Having
just a few extra seconds to remember what it is you are supposed to do can help
you. the major signs of tire failure are:
The loud "bang" of a blowout is an easily recognized sign. Because it can take a
few seconds for your vehicle to react, you might think it was some other vehicle. But
any time you hear a tire blow, you would be safest to assume it is yours.
If the vehicle thumps or vibrates heavily, it may be a sign that one of the tires has
gone flat. With a rear tire, that may be the only sign you get.
If the steering feels "heavy," it is probably a sign that one of the front tires has
failed. Sometimes, failure of a rear tire will cause the vehicle to slide back and
forth or "fishtail." However, dual rear tires usually prevent this.
2-40
Respond to Tire Failure.
• Hold the Steering Wheel firmly
• Stay Off the Brake.
• Check the tires.
Tire Failure DRIVING EMERGENCIES
When a tire fails, your vehicle is in danger. You must immediately:
If a front tire fails, it can twist the steering wheel out of your hand. The only
way to prevent this is to keep a firm grip on the steering wheel with both hands at all
times.
It is natural to want to brake in an emergency. However, braking when a tire has
failed could cause loss of control. Unless you are about to run into something,
stay off the brake until the vehicle has slowed down. Then brake very gently,
pull off the road, and stop.
After you have come to a stop, get out and check all the tires. Do this even if the
vehicle seems to be handling all right. If one of your dual tires goes, the only way
you may know it is by getting out and looking at it.
2-40
ANTILOCK BRAKING SYSTEMS (ABS)
ABS is an addition to your normal brakes. It does not decrease or increase your
normal braking capability. ABS only activates when wheels are about to lock up.
ABS is a computerized system that keeps your wheels from locking up during
hard brake applications.
ABS does not necessarily shorten your stopping distance, but it does help you
keep the vehicle under control during hard braking.
How Antilock Braking Systems Work
Sensors detect potential wheel lock up. An electronic control unit (ECU) will then
decrease brake pressure to avoid wheel lockup.
Brake pressure is adjusted to provide the maximum braking without danger of
lockup.
ABS works far faster than the driver can respond to potential wheel lockup. At
all other times the brake system will operate normally.
2-40
ANTILOCK BRAKING SYSTEMS (ABS)
• Hydraulically braked trucks and buses with a gross vehicle weight rating of
10,000 lbs or more built on or after march 1, 1999. many commercial
vehicles built before these dates have been voluntarily equipped with ABS.
Vehicles Required to Have Antilock Braking Systems
The department of transportation requires that ABS be on:
• Truck tractors with air brakes built on or after march 1, 1997.
• Other air brake vehicles, (trucks, buses, trailers, and converter dollies) built
on or after march 1, 1998.
Many commercial vehicles built before these dates have been voluntarily
Equipped with ABS
2-40
ANTILOCK BRAKING SYSTEMS (ABS)
• Tractors, trucks, and buses will have yellow ABS malfunction lamps on the
instrument panel.
• Trailers will have yellow ABS malfunction lamps on the left side, either on
the front or rear corner.
• Dollies manufactured on or after march 1, 1998, are required to have a
lamp on the left side.
• As a system check on newer vehicles, the malfunction lamp comes on at
start-up for a bulb check, and then goes out quickly. on older systems, the
lamp could stay on until you are driving over five mph.
• If the lamp stays on after the bulb check, or goes on once you are under
way, you may have lost ABS control.
• In the case of towed units manufactured before it was required by the
department of transportation, it may be difficult to tell if the unit is equipped
with ABS. Look under the vehicle for the ECU and wheel speed sensor
wires coming from the back of the brakes.
How to Know If Your Vehicle Is Equipped with ABS
2-41
ANTILOCK BRAKING SYSTEMS (ABS)
How ABS Helps You
ABS on the Tractor Only or Only on the Trailer
When you brake hard on slippery surfaces in a vehicle without ABS, your
wheels may lock up. When your steering wheels lock up, you lose steering
control. When your other wheels lock up, you may skid, jackknife, or even
spin the vehicle.
ABS helps you avoid wheel lock up and maintain control. You may or may not
be able to stop faster with ABS, but you should be able to steer around an
obstacle while braking, and avoid skids caused by over braking.
• Having ABS on only the tractor, only the trailer, or even on only one axle, still gives
you more control over the vehicle during braking. Brake normally.
• When only the tractor has ABS, you should be able to maintain steering control,
and there is less chance of jackknifing.
• But keep your eye on the trailer and let up on the brakes (if you can safely do
so) if it begins to swing out.
• When only the trailer has ABS, the trailer is less likely to swing out, but if
you lose steering control or start a tractor jackknife, let up on the brakes (if
you can safely do so) until you regain control.
2-41
ANTILOCK BRAKING SYSTEMS (ABS)
Braking with ABS
When you drive a vehicle with ABS, you should brake as you always have.
In other words:
There is only one exception to this procedure. If you drive a straight
truck or combination with working ABS on all axles, in an emergency stop,
you can fully apply the brakes.
If your ABS is working properly, “stab” braking should not be used.
• Use only the braking force necessary to stop safely and stay in control.
• Brake the same way, regardless of whether you have ABS on the bus,
tractor, the trailer, or both.
• As you slow down, monitor your tractor and trailer and back off the brakes
to stay in control. (If it is safe to do so)
2-41
Without ABS you still have normal brake functions. Drive and brake
as you always have. Vehicles with ABS have yellow malfunction lamps to
tell you if something is not working.
As a system check on newer vehicles, the malfunction lamp comes on at
start-up for a bulb check and then goes out quickly. On older systems, the
lamp could stay on until you are driving over five mph.
If the lamp stays on after the bulb check, or goes on once you are
under way, you may have lost ABS control on one or more wheels.
Remember, if your ABS malfunctions, you still have regular brakes.
Drive normally, but get the system serviced soon.
Braking If ABS Is Not Working
ANTILOCK BRAKING SYSTEMS (ABS)
2-41
Safety Reminders
ANTILOCK BRAKING SYSTEMS (ABS)
• ABS will not allow you to drive
faster, follow more closely, or drive
less carefully.
• ABS will not prevent power or turning skids.
• ABS should prevent brake-induced
skids or jackknifes, but not those
caused by spinning the drive
wheels or going too fast in a turn.
• ABS will not necessarily shorten stopping
distance.
• ABS will not compensate for bad brakes
or poor brake maintenance.
• ABS will help maintain vehicle control, but
not always shorten stopping distance.
• ABS will not increase or decrease ultimate
stopping power–ABS is an “add-on” to your
normal brakes, not a replacement for them.
• ABS will not change the way you
normally brake. under normal brake
conditions, your vehicle will stop as
it always stopped.
• ABS only comes into play when a
wheel would normally have locked
up because of over braking.
Remember: The best vehicle safety feature is still a safe driver.
Remember: Drive so you never need to use your ABS.
Remember: If you need it, ABS could help to prevent a serious crash.
2-42
SKID CONTROL AND RECOVERY
A skid happens whenever the tires lose their grip on the road. this is caused in one
of four ways:
• Over-Braking.
• Over-Steering
• Over-Acceleration
• Driving Too Fast
Braking too hard and locking up the wheels.
Skids also can occur when using the speed
retarder when the road is slippery.
Turning the wheels more sharply than the
vehicle can turn.
Supplying too much power to the
drive wheels, causing them to spin.
Most serious skids result from driving too
fast for road conditions. Drivers who adjust
their driving to conditions do not over-
accelerate and do not have to over-brake or
over-steer from too much speed.
2-42
Drive-wheel Skids
SKID CONTROL AND RECOVERY
By far the most common skid is one in which the rear wheels lose traction
through excessive braking or acceleration. Skids caused by
acceleration usually happen on ice or snow. taking your foot off the
accelerator can easily stop them. (If it is very slippery, push the clutch in.
otherwise, the engine can keep the wheels from rolling freely and regaining
traction.)
Rear wheel braking skids occur when the
rear drive wheels lock. Because locked
wheels have less traction than rolling
wheels, the rear wheels usually slide
sideways in an attempt to "catch up" with
the front wheels. In a bus or straight truck,
the vehicle will slide sideways in a "spin out."
With vehicles towing trailers, a drive-wheel
skid can let the trailer push the towing vehicle
sideways, causing a sudden jackknife. See
Figure 2.19.
2-42
SKID CONTROL AND RECOVERY
Correcting a Drive-wheel Braking Skid
• Stop Braking.
• Turn Quickly.
• Counter-steer.
Do the following to correct a drive-wheel braking skid:
This will let the rear wheels roll again, and keep the rear wheels from sliding any
further. If on ice, push in the clutch to let the wheels turn freely.
When a vehicle begins to slide sideways, quickly steer in the direction you want
the vehicle to go-down the road. You must turn the wheel quickly.
As a vehicle turns back on course, it has a tendency to keep on turning. Unless you
turn the steering wheel quickly the other way, you may find yourself skidding in the
opposite direction.
Learning to stay off the brake, turn the steering wheel quickly, push in the
clutch, and counter-steer in a skid takes a lot of practice. The best place to get
this practice is on a large driving range or "skid” pad."
2-42
Front-wheel Skids
Driving too fast for conditions causes most front-wheel skids. Other
causes include lack of tread on the front tires and cargo loaded so
not enough weight is on the front axle. In a front-wheel skid, the front
end tends to go in a straight line regardless of how much you turn the
steering wheel. On a very slippery surface, you may not be able to steer
around a curve or turn.
SKID CONTROL AND RECOVERY
When a front-wheel skid occurs, the only way to stop the skid is to let
the vehicle slow down. Stop turning and/or braking so hard. Slow
down as quickly as possible without skidding.
2-43
ACCIDENT PROCEDURES
When you are in an accident and not seriously hurt, you need to act to prevent
further damage or injury. the basic steps to be taken at any accident are to:
• Notify Authorities.
• Protect the Area. • Care for the Injured.
Protect the Area
The first thing to do at an accident scene is to keep another accident from
happening in the same spot. to protect the accident are:
• If your vehicle is involved in the accident, try to get it to the
side of the road. This will help prevent another accident and
allow traffic to move.
• Set out reflective triangles to warn other traffic. Make
sure other drivers can see them in time to avoid the accident.
• Put on your flashers.
• If you are stopping to help, park away from the accident. The
area immediately around the accident will be needed for
emergency vehicles.
2-44
Notify Authorities
Care for the Injured
If you have a cell phone or C.B., call for assistance before you get out of
your vehicle. If not, wait until after the accident scene has been properly
protected, then phone or send someone to phone the police. try to
determine where you are so you can give the exact location.
If a qualified person is at the accident and helping the injured, stay out of
the way unless asked to assist. Otherwise, do the best you can to help any
injured parties. Here are some simple steps to follow in giving assistance:
• Keep the injured person warm.
• Do not move a severely injured person unless the danger of fire or
passing traffic makes it necessary.
• Stop heavy bleeding by applying direct pressure to the wound.
ACCIDENT PROCEDURES
2-44
FIRES
Truck fires can cause damage and injury. Learn the causes of fires and how
to prevent them. Know what to do to extinguish fires.
Causes of Fire
The following are some causes of vehicle fires:
• Cargo. Flammable cargo, improperly sealed or loaded cargo, poor ventilation.
• After accidents. Spilled fuel, improper use of flares.
• Tires. under-inflated tires and duals that touch.
• Electrical system. Short circuits due to damaged insulation, loose connections.
• Fuel. driver smoking, improper fueling, loose fuel connections.
Fires
2-44
Fire Prevention
Pay attention to the following:
• Caution. Use normal caution in handling anything flammable.
• Pre-trip Inspection. Make a complete inspection of the electrical, fuel, and
exhaust systems, tires, and cargo. Be sure to check that the fire extinguisher is
charged.
• En Route Inspection. Check the tires, wheels, and truck body for signs of heat
whenever you stop during a trip.
• Follow safe Procedures. Follow correct safety procedures for fueling the
vehicle, using brakes, handling flares, and other activities that can cause a fire.
• Monitoring. Check the instruments and gauges often for signs of overheating
and use the mirrors to look for signs of smoke from tires or the vehicle.
2-44
Pull off the Road.
The first step is to get the vehicle off the road and stop. In doing so:
• Notify emergency services of your problem and your location.
• Park in an open area, away from buildings, trees, brush, other vehicles, or
anything that might catch fire.
• Do not pull into a service station!
Keep the fire from spreading
Fire Fighting
With an engine fire, turn off the engine as soon as you can. Do not
open the hood if you can avoid it. Shoot foam through louvers, radiator,
or from the vehicle’s underside.
204
• Aim at the source or base of the fire, not up in the flames.
• When using the extinguisher, stay as far away from the fire as
possible.
Extinguish the Fire.
For a cargo fire in a van or box trailer, keep the doors shut, especially if
your cargo contains hazardous materials. Opening the van doors will
supply the fire with oxygen and can cause it to burn very fast.
Knowing how to fight fires is important. Drivers who did not know what to do have
made fires worse. Know how the fire extinguisher works. Study the instructions
printed on the extinguisher before you need it. Here are some procedures to follow
in case of fire.
Fire Fighting
2-44
2-45
Use the Right fire extinguisher
Water can be used on wood, paper, or cloth, but do not use water on an
electrical fire (can cause shock) or a gasoline fire (it will spread the flames).
The B:C type fire extinguisher is designed to work on electrical fires
and burning liquids.
The A:B:C type is designed to work on burning wood, paper, and cloth
as well.
A burning tire should be cooled with water. Lots of water may be
needed.
If you are not sure what to use, especially on a hazardous materials fire,
wait for firefighters. Position yourself upwind. Let the wind carry the
extinguisher to the fire rather than carrying the flames to you. Continue until
whatever was burning has been cooled. Absence of smoke or flame does
not mean the fire cannot restart.
206
Use the Right fire extinguisher
2-45
2460
ALCOHOL, OTHER DRUGS, AND DRIVING
Alcohol and Driving
Drinking alcohol and then driving is very dangerous and a serious problem.
People who drink alcohol are involved in traffic accidents resulting in over
20,000 deaths every year. Alcohol impairs muscle coordination,
reaction time, depth perception, and night vision. It also
affects the parts of the brain that control judgment and
inhibition. Impairment begins with the first drink.
208
There are many dangerous ideas about the use of alcohol.
The driver who believes in these wrong ideas will be more likely to get into
trouble. Here are some examples:
The Truth About Alcohol
• How alcohol works in the human body.
• How it affects driving.
• Laws regarding drinking and driving.
• Legal, financial, and safety risks of drinking and driving.
You should know:
ALCOHOL, OTHER DRUGS, AND DRIVING
2460
2-20
Alcohol goes directly from the stomach into the blood stream and is
carried to the brain. After passing through the brain, a small percentage
is removed in urine, perspiration, and by breathing, while the rest is
carried to the liver.
The liver can only process one-third an ounce of alcohol per hour, which is
considerably less than the alcohol in a standard drink. This is a fixed rate,
so only time, not black coffee or a cold shower, will sober you up.
If you have drinks faster than your body can get rid of them, you will have
more alcohol in your body, and your driving will be more affected. The
Blood Alcohol Concentration (BAC) commonly measures the amount of
alcohol in your body.
How Alcohol Works
210
It is the alcohol in drinks that affects human performance. It does not
make any difference whether that alcohol comes from “a couple of
beers” or from two glasses of wine or two shots of hard liquor.
All of the following drinks contain the same amount of alcohol:
➢ A 12-ounce glass of 5% beer.
➢ A 5-ounce glass of 12% wine.
➢ A 1 1/2-ounce shot of 80 proof liquor.
What Is a Drink?
How Alcohol Works
2-20
2-46
What determines blood alcohol concentration?
Alcohol and the Brain.
BAC is determined by the amount of alcohol you drink (more alcohol
means higher BAC), how fast you drink (faster drinking means higher
BAC), and your weight (a small person does not have to drink as much to
reach the same BAC).
Alcohol affects more and more of the brain as BAC builds up. The first
part of the brain affected controls judgment and self-control. One of
the bad things about this is it can keep drinkers from knowing they are
getting drunk. :
212
These effects mean increased chances of a crash and chances of losing
your driver’s license. Accident statistics show that the chance of a crash is
much greater for drivers who have been drinking than for drivers who have
not.
• Straddling lanes.
• Quick, jerky starts.
• Not signaling, failure to use lights.
• Running stop signs and red lights.
• Improper passing.
What determines blood alcohol concentration?
2-46
And, of course, good judgment and self-control are absolutely necessary
for safe driving. As BAC continues to build up, muscle control, vision,
and coordination are affected more and more. Effects on driving may
include:
2-47
How Alcohol Affects Driving.
All drivers are affected by drinking alcohol. Alcohol affects
judgment, vision, coordination, and reaction time. It causes
serious driving errors, such as:
• Weaving.
• Increased reaction time to hazards.
• Driving too fast or too slow
• Driving in the wrong lane.
• Running over the curb.
214
The Truth About Alcohol and Driving
2-20
2-48
Other Drugs
Besides alcohol, other legal and illegal drugs are being used more often
Laws prohibit possession or use of many drugs while on duty. They
prohibit being under the influence of any "controlled substance,"
amphetamines (including "pep pills,“ “uppers,” and "bennies"),
narcotics, or any other substance, which can make the driver unsafe.
this could include a variety of prescription and over-the-counter
drugs (cold medicines), which may make the driver drowsy or
otherwise affect safe driving ability
However, possession and use of a drug given to a driver by a doctor is
permitted if the doctor informs the driver that it will not affect safe driving
ability. Be sure your doctor is aware of all drugs that you are taking
because of possible interactions between the drugs that may affect your
driving.
217
Pay attention to warning labels for legitimate drugs and medicines, and
to doctor’s orders regarding possible effects.
Stay away from illegal drugs. Do not use any drug that hides
fatigue--the only cure for fatigue is rest. Alcohol can make the
effects of other drugs much worse. the safest rule is do not mix drugs
with driving at all.
Use of drugs can lead to traffic accidents resulting in death, injury,
and property damage. Furthermore, it can lead to arrest, fines, and
jail sentences.
It can also mean the end of a person’s driving career.
Other Drugs
2-48
STAYING ALERT AND FIT TO DRIVE
Driving a vehicle for long hours is tiring. Even the best of drivers will
become less alert. However, there are things that good drivers do to help
stay alert and safe. Be Ready to Drive
Get Enough Sleep
Sleep is not like money. You cannot save it up ahead of time and you
cannot borrow it. But, just as with money, you can go into debt with it. If you
do not sleep enough, you “owe” more sleep to yourself. this debt can only
be paid off by sleeping. You cannot overcome it with willpower, and it will
not go away by itself. The average person needs seven or eight hours
of sleep every 24 hours. Leaving on a long trip when you are already tired
is dangerous. If you have a long trip scheduled, make sure that you get
enough sleep before you go.
219
Try to arrange your schedule so you are not in “sleep debt” before a long
trip. Your body gets used to sleeping during certain hours. If you are driving
during those hours, you will be less alert. If possible, try to schedule
trips for the hours you are normally awake. Many heavy motor vehicle
accidents occur between midnight and 6 a.m. Tired drivers can easily
fall asleep at these times, especially if they do not regularly drive at those
hours. Trying to push on and finish a long trip at these times can be very
dangerous.
Schedule Trips Safely
STAYING ALERT AND FIT TO DRIVE
Resistance to fatigue and improved sleep are among the benefits of regular
exercise. try to incorporate exercise into your daily life. Instead of sitting and
watching TV. in your sleeper, walk or jog a few laps around the parking lot. A
little bit of daily exercise will give you energy throughout the day.
Try to arrange your schedule so you are not in “sleep debt” before a long
trip. Your body gets used to sleeping during certain hours. If you are driving
during those hours, you will be less alert. If possible, try to schedule
trips for the hours you are normally awake. Many heavy motor vehicle
accidents occur between midnight and 6 a.m. Tired drivers can easily
fall asleep at these times, especially if they do not regularly drive at those
hours. Trying to push on and finish a long trip at these times can be very
dangerous.
Exercise Regularly
2-48
Eat Healthy.
Avoid Medication.
It is often hard for drivers to find healthy food. But with a little extra effort, you can
eat healthy, even on the road. Try to find restaurants with healthy, balanced meals. If
you must eat at fast-food restaurants, pick low-fat items. Another simple way to
reduce your caloric intake is to eliminate fattening snacks. Instead, try fruit or
vegetables.
Many medicines can make you sleepy. Those that do have a label warning
against operating vehicles or machinery. The most common medicine of this type is
an ordinary cold pill. If you have to drive with a cold, you are better off
suffering from the cold than from the effects of the medicine.
STAYING ALERT AND FIT TO DRIVE
2-49
Visit Your Doctor.
Regular checkups literally can be lifesavers. Illnesses such as diabetes,
heart disease, and skin and colon cancer can be detected easily and treated if
found in time. You should consult your physician or a local sleep disorder center if
you suffer from frequent daytime sleepiness, have difficulty sleeping at night, take
frequent naps, fall asleep at strange times, snore loudly, gasp and choke in your
sleep, and/or wake up feeling as though you have not had enough sleep.
While You Are Driving
Keep Cool
Take Breaks
A hot, poorly ventilated vehicle can make you sleepy. Keep the window or vent
cracked open or use the air conditioner, if you have one.
Short breaks can keep you alert. But the time to take them is before
you feel really drowsy or tired. Stop often. Walk around and inspect your
vehicle. It may help to do some physical exercises.
Be sure to take a mid-afternoon break and plan to sleep between midnight
and 6 a.m.
STAYING ALERT AND FIT TO DRIVE
2-49
Recognize The Danger Signals Of Drowsy Driving.
Sleep is not voluntary. If you are drowsy, you can fall asleep and never
even know it. If you are drowsy, you are likely to have “micro sleeps”-
brief naps that last around four or five seconds. At 55 miles an hour,
that is more than 100 yards, and plenty of time for a crash. Even if you are
not aware of being drowsy, if you have a sleep debt you are still at risk.
Here are a few ways to tell if you are about to fall asleep. If you experience
any of these danger signs, take them as a warning that you could fall
asleep without meaning to:
223
Recognize The Danger Signals Of Drowsy Driving.
• Your eyes close or go out of focus by themselves.
If you have even one of these symptoms, you are in danger of
falling asleep. Pull off the road in a safe place and take a nap.
• You have drifted off the road and narrowly missed crashing.
• You keep jerking the truck back into the lane.
• You drift between lanes, tailgate, or miss traffic signs.
• You do not remember driving the last few miles.
• You have wandering, disconnected thoughts.
• You cannot stop yawning.
• You have trouble keeping your head up.
2-49
When You Do Become Sleepy
Stop To Sleep
Take A Nap
Avoid Drugs
When you are sleepy, trying to "push on" is far more dangerous than most drivers
think. It is a major cause of fatal accidents. Here are some important rules to follow.
When your body needs sleep, sleep is the only thing that will work. If
you have to make a stop anyway, make it whenever you feel the first signs of
sleepiness, even if it is earlier than you planned. By getting up a little earlier the
next day, you can keep on schedule without the danger of driving while you are not
alert.
If you cannot stop for the night, at least pull off at a safe place, such as a rest area
or truck stop, and take a nap. A nap as short as a half-hour will do more to
overcome fatigue than a half-hour coffee stop.
There are no drugs that can overcome being tired. While they may keep you
awake for a while, they will not make you alert. And eventually, you will be even
more tired than if you had not taken them at all. Sleep is the only thing that can
overcome fatigue.
When You Become Sleepy
Do Not
• Do not rely on coffee or another source of
caffeine to keep you awake. Do not count on
the radio, an open window, or other tricks to
keep you awake
• Once in a while, you may become so ill that you cannot
operate a motor vehicle safely. If this happens to you, you
must not drive. However, in case of an emergency, you may
drive to the nearest place where you can safely stop.
2-50
HAZARDOUS MATERIALS RULES FOR ALL COMERRCIAL DRIVERS
All drivers should know something about hazardous materials. You must be able to
recognize hazardous cargo, and you must know whether or not you can haul it
without having a hazardous materials endorsement on your CDL license.
What Are Hazardous Materials?
Why Are There Rules?
Hazardous materials are products that pose a risk to health, safety,
and property during transportation. See Figure 2.24.
You must follow the many rules about transporting hazardous materials.
The intent of the rules is to:
• Ensure Safe Drivers And Equipment.
• Communicate The Risk.
• Contain The Product.
2-51
228
Many hazardous products can injure or kill on contact. to protect drivers and others
from contact, the rules tell shippers how to package safely. Similar rules tell
drivers how to load, transport, and unload bulk tanks. These are containment
rules.
To Contain The Product.
To Communicate The Risk.
The shipper uses a shipping paper and diamond shaped hazard labels to warn
dockworkers and drivers of the risk. The shipping paper describes the
hazardous materials being transported. Shipping orders, bills of lading and
manifests are all shipping papers. Shippers put four-inch diamond shaped hazard
warning labels on most hazardous materials packages. These labels inform others
of the hazard. If the diamond label will not fit on the container, shippers put the label
on the tag. For example, compressed gas cylinders that will not hold a label will have
tags or decals. Labels look like the examples shown in figure
Hazardous Materials
2-51
After an accident or hazardous material spill or leak, you may be injured and
unable to communicate the hazards of the materials you are transporting.
Firefighters and police can prevent or reduce the amount of damage or injury at the
scene if they know what hazardous materials are being carried. Your life, and the
lives of others, may depend on quickly locating the hazardous materials shipping
papers. For that reason, you must tab shipping papers related to hazardous
materials or keep them on top of other shipping papers.
You must also keep shipping papers:
• On the driver’s seat when out of the vehicle.
• In a pouch on the driver’s door, or
• In clear view within reach while driving
2-51
Hazardous Materials
Lists of Regulated Products
Placards
Are used to warn others of hazardous materials. Placards are signs
put on the outside of a vehicle that identify the hazard class of the
cargo. A placarded vehicle must have at least four identical placards.
They are put on the front, rear, and both sides. Placards must be
readable from all four directions. They must be at least 10 3/4 inches
square, turned upright on a point, in a diamond shape. Cargo tanks
and other bulk packaging display the identification number of their
contents on placards or orange panels
2-51
231
Not all vehicles carrying hazardous materials need to have placards. The
rules about placards are given in Section 9 of this manual. You can drive a
vehicle that carries hazardous materials if it does not require
placards. If it requires placards, you cannot drive it unless your driver
license has the hazardous materials endorsement. See Figure 2.26.
Are a four digit code used by first responders to identify hazardous
materials. An identification number may be used to identify more than
one chemical on shipping papers. The identification number will be
preceded by the letters “NA” or “UN”. the US DOT Emergency response
Guide (ERG) lists the chemicals and the identification numbers assigned to
them..
Identification numbers
Lists of Regulated Products
The rules require all drivers of placarded vehicles to learn how to safely
load and transport hazardous products. They must have a commercial
driver license with the hazardous materials endorsement. To get the
required endorsement, you must pass a written test on material found in
Section 9 of this manual. You also will need a tank endorsement if you
transport Hazardous products in a cargo tank on a truck larger than 26,000
pounds, gross vehicle weight rating or certain vehicles that transport liquids
or gases. The liquid or gas does not have to be a hazardous material. A
tank endorsement is only required if your vehicle needs a class A or B CDL
and your vehicle has a permanently mounted cargo tank of any capacity; or
your vehicle is carrying a portable tank with a capacity of 1,000 gallons or
more
2-51
Hazardous Materials
233
Hazardous materials drivers must also know which products they can load
together, and which they cannot. these rules are also in Section 9. Before
loading a truck with more than one type of product, you must know if it is
safe to load them together. If you do not know, ask your employer and
consult the regulations.
Drivers who need the hazardous materials endorsement must learn the
placard rules. If you do not know if your vehicle needs placards, ask your
employer. Never drive a vehicle needing placards unless you have the
hazardous materials endorsement. To do so is a crime. When stopped,
you will be cited and you will not be allowed to drive your truck further. It
will cost you time and money. A failure to placard when needed may risk
your life and others if you have an accident. Emergency help will not know
of your hazardous cargo.
Hazardous Materials
2-51
Figure 2.25
Figure 2.26 Placards
2-51
1. What is the most important reason for doing a vehicle
inspection? PG. 2-1
A. To make sure the vehicle is safe
D. For you to get to know your vehicle
B. For you
C. For other road users
2. What things should you check during a trip?
(ENROUTE INSPECTION) PG. 2-2
Everything
• Instruments.
• Cargo,
• Tires.
• Mirrors.
• Ammeter/voltmeter.
• Pressure gauges. • Temperature gauges.
• Air pressure gauge (if you have air brakes).
• Lights.
•Cargo covers
Test Your Knowledge
2-11
3. Name some key steering system parts. PG. 2-3
Test Your Knowledge
4. Name some suspension system defects. PG. 2-3
Tie Rods
Steering Wheel
Steering
Knuckle
Spindle
Drag Link Steering
shaft
Gear box
Pitman Arm
Cracked or broken spring hangers
Torque rod or arm, u-bolts, spring
hangers that are cracked or broken
Leaking shock absorbers
Missing or broken leaves
in any leaf spring
Air suspension systems that are damaged and/or leaking
Steering
Arm
Hydraulic Fluid
Reservoir
Power Steering
Cylinder
2-11
5. What three kinds of emergency equipment must you have?
PG. 2-4 & 2-7
Spare
Fuses
Warning Devices
3 Reflective triangles
Fire
Extinguisher
Test Your Knowledge
6. What is the minimum tread depth for front tires? PG. 2-2
7. For other tires? PG. 2-2
8. What should wheel bearing seals be checked for? PG. 2-8
4/32 or 1/16
2/32 or 1/8
Wheel bearing/ seals should not be leaking
2-11
9. Name some things you should check on the front of
your vehicle during the walk-around inspection.
PG. 2-5, 2-6,
10. How do you test hydraulic brakes for leaks? PG. 2-7
All lights not cracked, missing, or broken
Test Your Knowledge
All reflectors not cracked, missing, or broken Condition of axel
Vehicle leaning to one side Fresh fluid leaks under the vehicle
Condition of suspension system Condition of windshield
The pedal should not move.
Pump the brake pedal three times.
Then apply firm pressure to the pedal and hold for five seconds
If it does, there may be a leak or other problem.
Get it fixed before driving.
2-11
2-15
Test Your Knowledge
11. Why should you back toward the driver’s side? PG 2-8
Back to the driver’s side so you can see better. You can watch the rear of your
vehicle by looking out the side window.
12. If stopped on a hill, how can you start moving without rolling
back? PG 2-12 Accelerating
If you have a manual transmission vehicle, partly engage the clutch before you
take your right foot off the brake. Put on the parking brake whenever necessary
to keep from rolling back. release the parking brake only when you have applied
enough engine power to keep from rolling back. On a tractor-trailer equipped
with a trailer brake hand valve, the hand valve can be applied to keep from
rolling back.
13. When backing, why is it important to use a helper? 2-12
There are blind spots you cannot see. Before you begin backing,
work out a set of hand signals that you both understand. Agree on a
signal for “STOP."
Test Your Knowledge
14. What is the most important hand signal that you and the
helper should agree on?
15. What are the two special conditions where you should
downshift?
Before starting down a Hill. Before entering a curve.
16. When should you downshift automatic transmissions? PG.
Before starting down a Hill.
Test Your Knowledge
17. Retarders keep you from skidding when the road is slippery.
PG 2-14 or ?
18. What are the two ways to know when to shift? PG 2-13
Use Engine Speed (rpm). Use Road Speed (mph).
When your drive wheels have poor traction, the retarder may
cause them to skid. Therefore, you should turn the retarder off
whenever the road is wet, icy, or snow covered.
True False
These questions may be
on the test. If you cannot
answer them all, re-read
subsections 2.4, 2.5, and
2.6.
2-21
Test Your Knowledge
19. How far ahead does the manual say you should look? PG. 2-15
20. What are two main things to look for ahead? PG. 2-15
21. What is your most important way to see the sides and rear of your
vehicle? PG 2-16
22. What does "communicating" mean in safe driving? PG 2-17
Most good drivers look at least 12 to 15 seconds ahead
Look for traffic Watch for brake lights from slowing vehicles-
Look for Road conditions
Pay attention to traffic signals and signs. If a light has been green
for a long time, it will probably change before you get there
Check your mirrors regularly
Signaling Your Intentions
2-21
Test Your Knowledge
23. Where should your reflectors be placed when stopped on a divided
highway? PG2-18
24. What three things add up to total stopping distance?
Perception Distance Reaction Distance. Braking Distance
2-21
Test Your Knowledge
25. If you go twice as fast, will your stopping distance increase by two or
four times? PG19
26. Empty trucks have the best braking. PG 2-19
27. What is hydroplaning? PG 2-20
28. What is “Black Ice”? PG 2-20
Whenever you double your speed, it takes about four times as much distance to
stop and your vehicle will have four times the destructive power if it crashes.
True or False
?
Brakes, tires, springs, and shock absorbers on heavy vehicles are designed to work
best when the vehicle is fully loaded.
It is like water skiing--the tires lose their contact with the road and have little or
no traction.
A thin layer of ice that is clear enough that you can see the road underneath. It
makes the road look wet
2-27
Test Your Knowledge
29. How do you find out how many seconds of following distance space you
have? Pg 2-22
30. If you are driving a 30-foot vehicle at 55 mph, how many seconds of
following distance should you allow?
PG.2-22 PG 35 Pub 95 PG F-31 Pub 117
31. You should decrease your following distance if somebody is following
you too closely. Or ?
To know how much space you have, wait until the vehicle ahead passes a
shadow on the road, a pavement marking, or some other clear landmark. then
count off the seconds like this: "one thousand-and-one, one thousand-and-two“
and so on, until you reach the same spot
A 4-second following distance, will allow you to steer or brake to avoid a hazard
safely on the highway, if the pavement is dry
At speeds greater than 40 mph, you must add 1 second for safety
Opening up room in front of you will help you to avoid having to make sudden
speed or direction changes. It also makes it easier for the tailgater to get around
you.
True False
2-27
32. If you swing wide to the left before turning right, another driver may try to
pass you on the right. Or ? PG. 2-23
33. What is a hazard? PG. 2-24
34. Why make emergency plans when you see a hazard? PG 2-27
Test Your Knowledge
False
True
• Do not turn wide to the left as you start the turn. A following driver may think
you are turning left and try to pass you on the right. You may crash into the other
vehicle as you complete your turn.
A hazard is any condition which causes our trip to be unsafe. A road condition or
other road user (driver, bicyclist, pedestrian) that is a possible danger can be a
hazard.
Always be prepared to take action based on your plans. In this way, you will be a
prepared, defensive driver who will improve your own safety as well as the safety of
all road user
2-29
35. What are some tips to follow so you will not become a
distracted driver? PG. 28
36. How do you use in-vehicle communications equipment
cautiously? PG. 28
Test Your Knowledge
Be totally familiar with all safety and usage features on any in-vehicle you use
(Pre-trip)
Do not engage in complex or emotionally intense conversations with other
Do not use hand held cell phones
No texting and driving
When possible, pull off the road in a safe, legal place when making/receiving a
call on communication equipment.
2-29
38. What is the difference between aggressive driving and road rage?
PG. 29
37. How do you recognize a distracted driver? PG. 28
Test Your Knowledge
Road rage is operating a motor vehicle with the intent of doing harm to
others or physically assaulting a driver or their vehicle
Aggressive driving is the act of operating a motor vehicle in a selfish,
bold, or pushy manner, without regard for the rights or safety of others.
• Vehicles that may drift over the lane divider lines or within their own lane.
• Vehicles traveling at inconsistent speeds.
• Drivers who are preoccupied with maps, food, cigarettes, cell phones, or other
objects.
• Drivers who appear to be involved in conversations with their passengers.
2-29
40. What are some things you can do to reduce your stress before and
while you drive? PG. 2-29
39. What should you do when confronted with an aggressive
driver? PG. 2-29
Test Your Knowledge
Report aggressive drivers Call the police.
Get out of their way.
Put your pride in the back seat.
Avoid eye contact. Ignore gestures and refuse to react to them.
Be a cautious and courteous driver.
“Be my guest.”
Avoid gestures
Do not drive slowly in the left lane
of traffic.
Listen to “easy listening” music.
Do not allow yourself to become
distracted by talking on your cell phone
Be realistic about your travel time.
41. You should use low beams whenever you can. PG.2-31
or ?
42. What should you do before you drive if you are drowsy? PG. 2-31
True False
Use High beams When You Can.
Some drivers make the mistake of always using low beams. This seriously
cuts down on their ability to see ahead. Use high beams when it is safe and
legal to do so. Use them when you are not within 500 feet of an approaching
vehicle. Also, do not let the inside of your cab get too bright. This makes it harder to
see outside. Keep the interior light off, and adjust your instrument lights as low as
you can to still be able to read the gauges.
Pre-trip Procedures
Make sure you are rested and alert. If you are drowsy, sleep before you drive!
Even a nap can save your life or the lives of others. If you wear eyeglasses,
make sure they are clean and unscratched. Do not wear sunglasses at night. Do a
complete pre-trip inspection of your vehicle and yourself. Pay attention to
checking all lights and reflectors, and cleaning those you can reach.
2-34
Test Your Knowledge
43. What effects can wet brakes cause? PG. 2-32
44. How can you avoid these problems? PG. 2-32
Wet Brakes.
When driving in heavy rain or deep standing water, your brakes will get wet. Water
in the brakes can cause the brakes to be weak, to apply unevenly, or to grab.
This can cause lack of braking power, wheel lockups, pulling to one side or
the other, and jackknife if you pull a trailer
Avoid driving through deep puddles or flowing water if possible!
2-34
Test Your Knowledge
46. You can safely remove the radiator cap as long as the engine is not
overheated. or ?
45. You should let air out of hot tires so the pressure goes back to
normal. PG.2-34 or ?
True
True False
False
2-34
Test Your Knowledge
• Tires
Before driving check the tire mounting and air pressure. Inspect the tires
every two hours or every 100 miles when driving in very
hot weather. Air pressure increases with temperature. Do not let air out or the
pressure will be too low when the tires cool off. If a tire is too hot to touch,
remain stopped until the tire cools off. Otherwise the tire may blow out or
catch fire.
Never remove the radiator cap or any part of the pressurized system
until the system has cooled. Steam and boiling water can spray under pressure
and cause severe burns. If you can touch the radiator cap with your bare hand, it is
probably cool enough to open.
2-37
Test Your Knowledge
47. What factors determine your selection of a "safe" speed when
going down a long, steep downgrade? PG. 2-36
48. Why should you be in the proper gear before starting down a
hill? PG. 2-36
• total weight of the vehicle and cargo. • Length of the grade.
• Steepness of the grade. • road conditions. • Weather.
Shift the transmission to a low gear before starting down the grade. Do not
try to downshift after your speed has already built up. You will not be
able to shift into a lower gear. You may not even be able to get back
into any gear and all engine braking effect will be lost. Forcing an
automatic transmission into a lower gear at high speed could damage the
transmission and also lead to loss of all engine braking effect.
2-37
Test Your Knowledge
51. How long does it take for a typical tractor-trailer unit to clear a
double track? PG
49. Describe the proper braking technique when going down a long,
steep downgrade. PG 2-37
50. What type of vehicles can get stuck on a railroad-highway
crossing? PG
• Apply the brakes just hard enough to feel a definite slowdown.
• When your speed has increased to your "safe" speed, repeat steps 1 and 2.
• When your speed has been reduced to approximately five mph below your "safe"
speed, release the brakes.
(This brake application should last for about three seconds.)
Special Situations
Be Aware! these trailers can get stuck on raised crossings:
• Low slung units (lowboy, car carrier, moving van, possum-belly livestock trailer).
• Single-axle tractor pulling a long trailer with its landing gear set to accommodate
a tandem-axle tractor.
2-43
Test Your Knowledge
52. Stopping is not always the safest thing to do in an emergency.
PG 2-38
53. What are some advantages of going right instead of left around an
obstacle? PG 2-38
or ?
True False
Steering to Avoid a Crash
Stopping is not always the safest thing to do in an emergency. When you do not have
enough room to stop, you may have to steer away from what is ahead. remember,
you can almost always turn to miss an obstacle more quickly than you can stop.
(However, top-heavy vehicles and tractors with multiple trailers may flip over.)
Where to steer
If an oncoming driver has drifted into your lane, a move to your right is best. If
that driver realizes what has happened, the natural response will be to return to his
or her own lane. If something is blocking your path, the best direction to steer
will depend on the situation.
If you have been using your mirrors, you will know which lane is empty and
can be safely used. If the shoulder is clear, going right may be best. No one is
likely to be driving on the shoulder but someone may be passing you on the
left. You will know if you have been using your mirrors. If you are blocked on both
sides, a move to the right may be best. At least you will not force anyone into an
opposing traffic lane and a possible head-on collision.
2-43
Test Your Knowledge
55. If a tire blows out, you should put the brakes on hard to stop
quickly. PG.2-40
54. What is an "escape ramp?“ PG 2-39
Your best hope is an escape ramp. If there is one, there will be signs telling you
about it. Use it. Ramps are usually located a few miles from the top of the
downgrade. Every year, hundreds of drivers avoid injury to themselves or
damage to their vehicles by using escape ramps. Some escape ramps use soft
gravel that resists the motion of the vehicle and brings it to a stop. Others turn
uphill, using the hill to stop the vehicle and soft gravel to hold it in place. Before
driving in the mountains, you should know the escape ramps located on your route.
or ?
True False
• Stay Off the Brake.
It is natural to want to brake in an emergency. However, braking when a tire has
failed could cause loss of control. Unless you are about to run into something,
stay off the brake until the vehicle has slowed down. Then brake very gently,
pull off the road, and stop.
2-43
Test Your Knowledge
56. How do you know if your vehicle has antilock brakes? PG 2-40
Tractors, trucks, and buses will have yellow ABS malfunction lamps on the
instrument panel.
Trailers will have yellow ABS malfunction lamps on the left side, either on the
front or rear corner.
Dollies manufactured on or after march 1, 1998, are required to have a lamp on the
left side.
As a system check on newer vehicles, the malfunction lamp comes on at
start-up for a bulb check, and then goes out quickly. on older systems, the lamp
could stay on until you are driving over five mph.
If the lamp stays on after the bulb check, or goes on once you are under way, you
may have lost ABS control.
In the case of towed units manufactured before it was required by the department of
transportation, it may be difficult to tell if the unit is equipped with ABS. Look under
the vehicle for the ECU and wheel speed sensor wires coming from the back of the
brakes.
How to Know If Your Vehicle Is Equipped with ABS
2-43
57. What is the proper braking technique when driving a vehicle with
antilock brakes? PG. 2-40
Test Your Knowledge
Braking with ABS
When you drive a vehicle with ABS, you should brake as you always have.
In other words:
• Use only the braking force necessary to stop safely and stay in control.
• Brake the same way, regardless of whether you have ABS on the bus,
tractor, the trailer, or both.
• As you slow down, monitor your tractor and trailer and back off the brakes
to stay in control.
(if it is safe to do so)
2-43
58. How do antilock brakes help you? PG. 2-41
Test Your Knowledge
How ABS Helps You
When you brake hard on slippery surfaces in a vehicle without ABS, your
wheels may lock up. When your steering wheels lock up, you lose steering
control. When your other wheels lock up, you may skid, jackknife, or even
spin the vehicle.
ABS helps you avoid wheel lock up and maintain control. You may or may not
be able to stop faster with ABS, but you should be able to steer around an
obstacle while braking, and avoid skids caused by over braking.
2-45
59. What are some things to do at an accident scene to prevent
another accident? PG. 2-43
60. Name two causes of tire fires. PG 2-44
Test Your Knowledge
Protect the Area
Try to get it to the side of the road
If you are stopping to help, park away from the accident
Put on your flashers.
Set out reflective triangles to warn other traffic.
• Tires. under-inflated tires and duals that touch.
61. What kinds of fires is A:B:C extinguisher not good for? PG 2-45
A burning tire should be cooled with water
A hazardous materials fire, wait for firefighters.
2-45
63. Name some causes of vehicle fires. PG 2-44
62. When using your extinguisher, should you get as close as
possible to the fire? PG 2-44
Test Your Knowledge
• When using the extinguisher, stay as far away from the fire as possible.
The following are some causes of vehicle fires:
• Cargo. Flammable cargo, improperly sealed or loaded cargo, poor ventilation.
• After accidents. Spilled fuel, improper use of flares.
• Tires. under-inflated tires and duals that touch.
• Electrical system. Short circuits due to damaged insulation, loose connections.
• Fuel. driver smoking, improper fueling, loose fuel connections.
64. Common medicines for colds can make you sleepy. PG 2-48
or ?
65. What should you do if you become sleepy while driving? PG 2-49
True False
2-52
Test Your Knowledge
Avoid Medication.
Many medicines can make you sleepy. Those that do have a label warning
against operating vehicles or machinery. The most common medicine
of this type is an ordinary cold pill. If you have to drive
with a cold, you are better off suffering from the cold than
from the effects of the medicine.
If you have even one of these symptoms, you are in danger of falling asleep. Pull off
the road in a safe place and take a nap.
2-52
Test Your Knowledge
66. Coffee and a little fresh air will help a drinker sober up. PG
or ?
True False
How Alcohol Works
Alcohol goes directly from the stomach into the blood
stream and is carried to the brain. After passing through the brain, a
small percentage is removed in urine, perspiration, and by breathing, while
the rest is carried to the liver. The liver can only process one-third an ounce of
alcohol per hour, which is considerably less than the alcohol in a standard drink.
This is a fixed rate, so only time, not black coffee or a cold shower, will
sober you up. If you have drinks faster than your body can get rid of them,
you will have more alcohol in your body, and your driving will be more affected.
The Blood Alcohol Concentration (BAC) commonly measures the amount
of alcohol in your body.
264
Are used to warn others of hazardous materials. Placards are signs put on the
outside of a vehicle that identify the hazard class of the cargo. A placarded
vehicle must have at least four identical placards. They are put on the front, rear,
and both sides. Placards must be readable from all four directions. They must
be at least 10 3/4 inches square, turned upright on a point, in a diamond
shape. Cargo tanks and other bulk packaging display the identification
number of their contents on placards or orange panels
67. What is a hazardous materials placard? PG 2-51
Test Your Knowledge
68. Why are placards used? PG 2-51
Are used to warn others of hazardous materials. Placards are signs put on the
outside of a vehicle that identify the hazard class of the cargo. A placarded
vehicle must have at least four identical placards. They are put on the front, rear,
and both sides. Placards must be readable from all four directions. They must
be at least 10 3/4 inches square, turned upright on a point, in a diamond
shape. Cargo tanks and other bulk packaging display the identification
number of their contents on placards or orange panels
69. What is “sleep debt”? PG
2-52
Test Your Knowledge
Get Enough Sleep
Sleep is not like money. You cannot save it up ahead of time and you cannot borrow
it. But, just as with money, you can go into debt with it. If you do not sleep enough,
you “owe” more sleep to yourself. this debt can only be paid off by sleeping. You
cannot overcome it with willpower, and it will not go away by itself. The average
person needs seven or eight hours of sleep every 24 hours. Leaving on
a long trip when you are already tired is dangerous. If you have
a long trip scheduled, make sure that you get enough sleep before you go.
Sleep is not voluntary. If you are drowsy, you can fall asleep and never
even know it. If you are drowsy, you are likely to have “micro sleeps”-brief
naps that last around four or five seconds. At 55 miles an hour, that is more than
100 yards, and plenty of time for a crash. Even if you are not aware of being drowsy,
if you have a sleep debt you are still at risk. Here are a few ways to tell if you are
about to fall asleep. If you experience any of these danger signs, take them as a
warning that you could fall asleep without meaning to:
• Your eyes close or go out of focus by themselves.
If you have even one of these symptoms, you are in danger of falling asleep. Pull
off the road in a safe place and take a nap.
• You have drifted off the road and narrowly missed crashing.
• You keep jerking the truck back into the lane.
• You drift between lanes, tailgate, or miss traffic signs.
• You do not remember driving the last few miles.
• You have wandering, disconnected thoughts.
• You cannot stop yawning.
• You have trouble keeping your head up.
70. What are the danger signals of drowsy driving? PG 2-49
Questions or Comments
Section 2 – Driving Safely
267

CDL 223 Part 2.ppt

  • 1.
    CDL Prep Training Section2 Driving Safely
  • 2.
    • Section 2 •Driving Safely – Knowledge – Safe Driving Information – Basic Information • on Hazardous Materials All commercial drivers must know this information to pass the General Knowledge Test CDL Prep Course 2
  • 3.
    Why Inspect? • Safetyis the most important reason you inspect your vehicle • Your safety and the safety of other road users Vehicle Inspection 3
  • 4.
    • A vehicledefect found during an inspection could save you problems later. You could have a breakdown on the road that will cost time and money, or even worse, a crash caused by the defect. • Federal and state laws require that drivers inspect their vehicles. Federal and state inspectors also may inspect your vehicles. If they judge the vehicle to be unsafe, they will put it "out of service" until it is fixed. Vehicle Inspection 4
  • 5.
    Cargo Inspection (Trucks) •You must make sure the truck is not overloaded and the cargo is balanced and secured before each trip. If the cargo contains hazardous materials, you must inspect for proper papers and placard on side of vehicle. Vehilce Inspection 5
  • 6.
    • There arethree types of vehicle inspections 1. Pre-trip Inspection – Find problems that could cause – Break downs – Crashes Types of Inspections 6
  • 7.
    2. En-route –Inspection During a trip you should use your senses to check for problems. (Looking Listening, Smelling and Feeling) – Gauges – Tires, Wheels and Rims – Brakes – Lights and Reflectors – Brake and electrical connections to trailer – Trailer coupling – Cargo Securement Devices 3. Post Trip Inspection At the end of the trip Fill out vehicle condition report, listing any problems or repairs needed Types of Insepctions 7
  • 8.
    What to LookFor - Tire Problems You need minimum 4/32-inch tread depth on front tires. You need minimum 2/32 inch tread on all rear tires Dual tires should not come in contact with each Dual tires should not come in contact with other parts of the vehicle Mismatched sizes, should not be used on the same vehicle Radial and bias-ply tires should not be used together. Re-grooved, recapped, or retreaded tires on the front wheels of a bus are prohibited. 2-2
  • 9.
    What to LookFor Wheel and Rims Damaged rims Rust around wheel nuts may mean the nuts are loose - check tightness Wheels or rims that have had welding repairs are not safe Mismatched, bent or cracked lock rings are dangerous Missing clamps, spacers, studs or lugs means danger Bad Brake Drums or Shoes Cracked drums Shoes or pads with oil, grease or brake fluid on them Shoes worn dangerously thin, missing or broken 2-2
  • 10.
    What to LookFor – Steering System • Missing nuts, bolts, cotter keys or other parts • Bent, loose or broken parts, such as steering column, steering gear box or tie rods • If power steering equipped, check hoses, pumps, and fluid level; check for leaks • Steering wheel play of more than 10 degrees • Approximately two (2) inches movement at the rim of a 20-inch steering wheel can make it hard to steer 2-3
  • 11.
    What to LookFor Suspension Systems Spring hangers that allow movement of axle from proper position Cracked or broken spring hangers Leaking shock absorbers Any loose, cracked, broken or missing frame members Torque rod or arm, u-bolts, spring hangers or other axle positioning parts that are cracked, damaged or missing 2-3
  • 12.
    What to LookFor Suspension Systems Air suspension systems that are damaged and/or leaking Missing or broken leaves in any leaf spring 2-4
  • 13.
    What to LookFor Loose, broken, or missing exhaust pipes, mufflers, tailpipes or vertical stacks Exhaust system parts rubbing against fuel system parts, tires or other moving parts of vehicle Exhaust system parts that are leaking Emergency Equipment Fire extinguisher Spare electrical fuses Unless equipped with circuit breakers Warning devices for parked vehicles three (3) reflective warning triangles 2-4
  • 14.
    CDL Pre-Trip InspectionTest In order to obtain a C..D.L., you will be required to pass a Pre-Trip Inspection Test. You will be asked to do a pre-trip inspection of your vehicle and explain to the examiner what you would inspect and why. Seven-Step Inspection Method Method of Inspection You should do a pre-trip inspection the same way each time so you will learn all the steps and be less likely to forget something. 2-5
  • 15.
    • Review thelast inspection report • Approaching the vehicle 15 As you walk towards the Bus look under the vehicle to see if there is any hanging wires, hoses, if there is any abnormal leaning and there are no wet spots on ground Step 1 Vehicle Overview Drivers must make a vehicle inspection report in writing each day. The motor carrier must repair any items in the report that affect safety and certify on the report that repairs were made or were unnecessary. You must sign the report only if defects were noted and certified to be repaired or not needed to be repaired.
  • 16.
    Step 2 “Pre”Engine Start Checks 16 • Check that the Parking Brakes are on and/or Wheels Chocked. • You may have to raise the hood, tilt the cab or open the engine compartment door. • Anti freeze levels- thru site glass or over flow compartment • Windshield wiper fluid level- in wiper fluid container • Power steering fluid- Container should have no more than full no less than add (These items can be found inside or outside under the hood depending on whether you have a conventional or transit style vehicle)
  • 17.
    • Oil Level-dip stick should be no more than full no less than add (The best time to check is before you start the engine) • Transmission Fluid level- dip stick should be no more than full no less than add (The best time to check is while the engine is on) • The engine- should have no wet spots on it (signs of anything leaking) • All hoses and electric wires should look good • All belts should be in good looking condition no more than ½ inch play Step 2 “Pre” Engine Start Checks 17 When Done make sure engine compartment is closed and secured.
  • 18.
    Step 3: StartEngine and Inspect Inside the Cab • Make sure parking brake is on and gear shifter is in neutral or park if the vehicle is an automatic Start Engine ----listen for unusual noises • If equipped, check the Anti-lock Braking System (ABS) indicator lights. Light on dash should come on and then turn off • If ABS indicator stays on, the ABS is not working properly 2-5
  • 19.
    Step 3: StartEngine and Inspect Inside the Cab Look at the Gauges • Oil pressure should come up to normal within seconds after engine is started • Ammeter and/or voltmeter should be in normal range • Coolant temperature should begin gradual rise to normal operating range • Engine oil temperature should begin gradual rise to normal operating range • Air pressure should build from 50 to 90 psi within three (3) minutes • Build air pressure to governor cut-out (usually around 120 – 140 psi) 2-5
  • 20.
    Check Condition ofControls •Steering wheel •Clutch. •Accelerator ("gas pedal"). •Brake controls: Check all of the following for looseness, sticking, damage, or improper setting 2-6 Step 3: Start Engine and Inspect Inside the Cab
  • 21.
    21 • Transmission controls. •Inter-axle differential lock (if vehicle has one). • Horn(s). • Windshield wiper/washer. • Lights: • Check Mirrors and Windshield. • Cracks • Dirt • Illegal Stickers • Clean and adjust as necessary Step 3: Start Engine and Inspect Inside the Cab
  • 22.
    Check Emergency Equipment •Properly charged and rated fire extinguisher. • three (3) red reflective triangles. • Spare electrical fuses (unless vehicle has circuit breakers). 2-7 Step 3: Start Engine and Inspect Inside the Cab
  • 23.
    23 Optional Emergency Equipment Thefollowing items are not required to be carried on vehicle, However you should check to see if they are on the vehicle •Tire Chains (where winter conditions required •Tire Channing equipment •List of emergency phone numbers •Crash reporting kit Step 3: Start Engine and Inspect Inside the Cab
  • 24.
    Step 4: TurnOff Engine and Check Lights Make sure the parking brake is set, turn off the engine, and take the key with you. turn on headlights (low beams) and four-way emergency flashers, and get out of the vehicle. •Go to front of vehicle and check that low beams are on and both of the four-way flashers are working. •Push dimmer switch and check that high beams work. •Turn off headlights and four-way emergency flashers. •Turn on parking, clearance, side-marker and identification lights. •Turn on right turn signal, and start walk around inspection
  • 25.
    Left Front Side Driver’sdoor glass should be clean. Door latches or locks should work properly. 2-7 Step 4: Turn Off Engine and Check Lights
  • 26.
    General Clean all lights,reflectors and glass as you go along Check for cracked, chipped or missing windows Step 5: Do Walk-around Inspection • Go to front of vehicle and check that low beams are on and both of the four- way flashers are working. • Push dimmer switch and check that high beams work. • Turn off headlights and four-way emergency flashers. • Turn on parking, clearance, side-marker and identification lights. • Turn on right turn signal, and start walk around inspection 2-7
  • 27.
    Left Front Wheel •Condition of wheel and rim - missing, bent, broken studs, clamps, lugs, or any signs of misalignment. • Condition of tires - properly inflated, valve stem and cap okay, no serious cuts, bulges, or tread wear. • Use wrench to test rust-streaked lug nuts, indicating looseness. • Hub oil level okay, no leaks. 2-7 Step 5: Do Walk-around Inspection
  • 28.
    Left front suspension: •Condition of spring, spring hangers, shackles, u-bolts. • Shock absorber condition. 2-7 Step 5: Do Walk-around Inspection
  • 29.
    Left front brake: •Condition of brake drum or disc. • Condition of hoses. Condition of front axle: • Condition of steering system. • No loose, worn, bent, damaged or missing parts. • Must grab steering mechanism to test for looseness. 2-7
  • 30.
    Condition of windshield: •Check for damage and clean, if dirty. • Check for Illegal stickers • Check windshield wiper arms for proper spring tension. • Check wiper blades for damage, "stiff" rubber and securement. 2-8 Step 5: Do Walk-around Inspection
  • 31.
    Front Lights andreflectors: • Parking, clearance and identification lights clean, operating and proper color (amber at front) • Reflectors clean and proper color (amber at front). • Right front turn signal light clean, operating and proper color (amber or white on signals facing forward). 2-8 Step 5: Do Walk-around Inspection
  • 32.
    32 • Right front:check all items as done on left front. • Primary and secondary safety cab locks engaged (if cab- over-engine design). Right Side Step 5: Do Walk-around Inspection • Securely mounted, not damaged or leaking. • Fuel crossover line secure. • Tank(s) contain enough fuel. • Cap(s) on and secure. Right fuel tank(s):
  • 33.
    2-8 Condition of visibleparts: • Rear of engine - not leaking. • Transmission - not leaking. • Exhaust system - secure, not leaking, not touching wires, fuel or air lines. • Frame and cross members - no bends or cracks. • Air lines and electrical wiring - secured against snagging, rubbing, wearing. • Spare tire carrier or rack not damaged (if so equipped). • Spare tire and/or wheel securely mounted in rack. • Spare tire and wheel adequate (proper size, properly inflated). Step 5: Do Walk-around Inspection Right Side
  • 34.
    2-8 Cargo securement (trucks): •Cargo properly blocked, braced, tied, chained, etc. • Header board adequate, secure (if required). • Side boards, stakes strong enough, free of damage, properly set in place (if so equipped). • Canvas or tarp (if required) properly secured to prevent tearing, billowing or blocking of mirrors. • If oversize, all required signs (flags, lamps, and reflectors) safely and properly mounted and all required permits in driver’s possession. • Curbside cargo compartment doors in good condition, securely closed, latched/locked and required security seals in place. Step 5: Do Walk-around Inspection
  • 35.
    Right Rear Condition ofwheels and rims--no missing, bent, or broken spacers, studs, clamps, or lugs. Condition of tires--properly inflated, valve stems and caps okay, no serious cuts, bulges, tread wear, tires not rubbing each other, and nothing stuck between them. Tires same type, e.g., not mixed radial and bias types. Tires evenly matched (same sizes). Wheel bearing/seals not leaking. 2-8 Step 5: Do Walk-around Inspection
  • 36.
    Suspension: • Condition ofspring(s), spring hangers, shackles, and u-bolts. • Axle secure. • Powered axle(s) not leaking lube (gear oil). • Condition of torque rod arms, bushings. • Condition of shock absorber(s). • If retractable axle equipped, check condition of lift mechanism. If air powered, check for leaks. • Condition of air ride components. 2-9 Brakes: • Brake adjustment. • condition of brake drum(s) or discs. • condition of hoses--look for any wear due to rubbing. Step 5: Do Walk-around Inspection
  • 37.
    Lights and reflectors: •Side-marker lights clean, operating, and proper color (red at rear, others amber). • Side-marker reflectors clean and proper color (red at rear, others amber). Step 5: Do Walk-around Inspection
  • 38.
    2-9 Rear Lights and reflectors: •Rear clearance and identification lights clean, operating, and proper color (red at rear). • reflectors clean and proper color (red at rear). • taillights clean, operating, and proper color (red at rear). • right rear turn signal operating, and proper color (red, yellow, or amber at rear). License plate(s) present, clean, and secured. Splash guards present, not damaged, properly fastened, not dragging on ground, or rubbing tires. Step 5: Do Walk-around Inspection
  • 39.
    2-9 •Tailboards up andproperly secured. •Cargo properly blocked, braced, tied, chained, etc. •If over-length, or over-width, make sure all signs and/or additional lights/flags are safely and properly mounted and all •Required permits are in driver’s possession. •Rear doors securely closed, latched/locked. Cargo securement (trucks) Step 5: Do Walk-around Inspection
  • 40.
    40 Left side Check allitems as done on right side, plus: • Battery(s) (if not mounted in engine compartment). • Battery box is securely mounted to vehicle. • Box has secure cover. • Battery(s) secured against movement. • Battery(s) not broken or leaking. • Fluid in battery(s) at proper level (except maintenance-free type). • Cell caps present and securely tightened (except maintenance-free type). • Vents in cell caps free of foreign material (except maintenance-free type). Step 5: Do Walk-around Inspection
  • 41.
    2-10 Step 6: checksignal lights Get In and turn off lights •Turn on stop lights (apply trailer hand brake or have a helper put on the brake pedal) •Turn on left and right turn signal lights. (four way flashers) Get out and check lights • Left and right front turn signal lights clean, operating and proper color (amber or white on signals facing the front) • Left and right rear turn signal light and both stop lights clean, operating, and proper color (red, yellow, or amber).
  • 42.
    Turn off lightsnot needed for driving Check for all required papers, trip manifests, permits, etc. Secure all loose articles in cab (They might interfere with operation of the controls or hit you in a crash). 2-10 Step 6: check signal lights
  • 43.
    Test for Hydraulicleaks • Get in the Vehicle • Check the safety belt • Pump the brake pedal three times • Then apply firm pressure to the pedal and hold for five seconds • The pedal should not move • If it does, there may be a leak or other problem – Get it fixed before driving • If the vehicle has Air Brakes do the checks described in Sections 5 and 6 – Step 7: Start the engine and check Brake System 43
  • 44.
    Step 7: Startthe engine and check Brake System 44 Test the parking brakes • Set parking brake, (Power unit only) • Release the trailer parking brake (if applicable) • Place the vehicle into low gear • Gently pull forward against the parking brake to ensure it holds • Repeat the same steps for trailer with parking brake set and power unit brake released (if applicable) If the parking brake doesn’t hold, it is faulty – get it fixed! 2-10
  • 45.
    Test Service BrakeStopping Action Test Service Brake Stopping Action • Go about five miles per hours • Push the brake pedal firmly • “Pulling” to one side or the other can mean brake trouble • Any unusual brake pedal “feel” or delayed stopping action can mean trouble • If you find anything unsafe during the test, pre trip inspection Get it fixed! Federal and state laws forbid operating an unsafe vehicle
  • 46.
    • Instruments. • Cargo, •Tires. • Mirrors. • Ammeter/voltmeter. • Pressure gauges. • Temperature gauges. • Air pressure gauge (if you have air brakes). • Lights. •Cargo covers If you: See Hear Smell, Feel anything that might mean trouble CHECK IT OUT During the Vehicle Operation You Should check regularly
  • 47.
    • SAFETY INSPECTION: •Drivers of trucks and truck tractors when transporting cargo must inspect the securement of the cargo within the First 50 Miles of a trip and Every 150 Miles or Every Three Hours After • (whichever comes first) During the Vehicle Operations You Should Check 47
  • 48.
    You may haveto make a written report each day on the condition of the vehicle(s) you drove. Report anything affecting safety or possibly leading to mechanical breakdown. The vehicle inspection report tells the motor carrier about problems that may need fixing. Keep a copy of your report in the vehicle for one day. that way, The next driver can learn about any problems you have found. Remember DOCUMENT REPORT & If YOU DON’T REPORT IT IT CAN’T GET FIXED Report all defects, no matter how minor
  • 49.
    BASIC CONTROL OFYOUR VEHICLE To drive a vehicle safely, you must be able to control its speed and direction. Safe operation of a commercial vehicle requires skill in: • Accelerating. • Steering. • Stopping. • Backing safely. Fasten your seatbelt whenever on the road. Apply the parking brake whenever you leave your vehicle. 2-12
  • 50.
    50 Accelerating • Do notroll back when you start – you may hit someone behind you • Use the parking brake whenever necessary to keep from rolling backing • On a tractor-trailer equipped with a trailer brake hand valve, the hand valve can be applied to keep from rolling back. BASIC CONTROL OF YOUR VEHICLE
  • 51.
    Speed up smoothlyand gradually so the vehicle does not jerk. rough acceleration can cause mechanical damage. When pulling a trailer, rough acceleration can damage the coupling. 2-12 Accelerating BASIC CONTROL OF YOUR VEHICLE
  • 52.
    Accelerating • Speed upvery gradually when traction is poor, as in rain or snow. If you use too much power, the drive wheels may spin. You could lose control. If the drive wheels begin to spin, take your foot off the accelerator BASIC CONTROL OF YOUR VEHICLE
  • 53.
    Steering Hold the steeringwheel firmly with both hands. Your hands should be on opposite sides of the wheel. If you hit a curb or a pothole (chuckhole), the wheel could pull away from your hands unless you have a firm hold. Stopping Push the brake pedal down gradually. Control the pressure so the vehicle comes to a smooth, safe stop. If you have a manual transmission, push the clutch in when the engine is close to idle. Backing Safely Because you cannot see everything behind your vehicle, backing is always dangerous. Avoid backing whenever you can. When you park try to park so you will be able to pull forward when you leave. 2-12 BASIC CONTROL OF YOUR VEHICLE
  • 54.
    Backing Safely RULES Startin the Proper Position Put the vehicle in the best position to allow you to back safely Look at Your Path Before you begin get out and walk around the vehicle. Check your clearance to the sides and overhead, in and near the path your vehicle will take. Use mirrors on both sides Check mirrors on both sides frequently. Get out of the vehicle and check your path if you are unsure. Back Slowly Use the lowest reverse gear. So you can more easily correct any steering errors. You also can stop quickly if necessary. 2-12
  • 55.
    Back and turntoward the driver’s side Back to the driver’s side so you can see better. You can watch the rear of your vehicle by looking out the side window. Use a Helper When You can There are blind spots you cannot see. Before you begin backing, work out a set of hand signals that you both understand. Agree on a signal for “STOP." Backing without a trailer . Backing with a trailer. When backing a car, straight truck, or bus, you turn the top of the steering wheel toward the direction you want to go. When backing a trailer, you turn the steering wheel in the opposite direction. once the trailer starts to turn, you must turn the wheel the other way to follow the trailer. 2-12
  • 56.
    Try to positionyour vehicle so you can back in a straight line. If you must back on a curved path, back to the driver’s side so you can see. WHENEVER YOU BACK When backing a trailer, make pull-ups to re-position your vehicle as needed. Back Slowly This will let you make corrections before you get too far off course. Use The Mirrors The mirrors will help you see whether the trailer is drifting to one side or the other. Correct Drift Immediately As soon as you see the trailer getting off the proper path, correct it by turning the top of the steering wheel in the direction of the drift. Pull Forward 2-13
  • 57.
    SHIFTING GEARS If youcannot get your vehicle into the right gear while driving, you will have less control. Manual Transmissions Most heavy vehicles with manual transmissions require double clutching to change gears Basic Method For Shifting Up •Release accelerator, •Push in clutch and shift to neutral at the same time. •Release clutch. •Let engine and gears slow down to the rpm required for the next gear (this takes practice). •Push in clutch and shift to the higher gear at the same time. •Release clutch and press accelerator at the same time. 2-13
  • 58.
    • Using doubleclutching requires practice. If you remain in neutral too long you may have difficulty putting the vehicle into the next gear. If so, don’t try to force it. Return to neutral, release clutch, increase engine speed to match road speed, and try again. 58 SHIFTING GEARS
  • 59.
    Knowing when toshift up. There are two ways of knowing when to shift: 1. Use Engine Speed (rpm). Watch your tachometer, and shift up when your engine reaches the top of the range. Know your vehicle manual to learn the operating RPM range. Some newer vehicles use progressive shifting: the rpm at which you shift becomes higher as you move up in the gears 2-13 SHIFTING GEARS
  • 60.
    Shifting Gears 2. UseRoad Speed (mph). Learning what speeds each gear is good for. then, by using the speedometer you will know when to shift up Knowing when to shift up
  • 61.
    Basic Procedures forShifting Down •Release accelerator, push in clutch, and shift to neutral at the same time. •Release clutch. •Press accelerator, increase engine and gear speed to the rpm required in the lower gear. •Push in clutch and shift to lower gear at the same time. •Release clutch and press accelerator at the same time. 2-14 Shifting Gears
  • 62.
    62 • Downshifting, likeup-shifting, requires knowing when to shift. Use either the tachometer or the speedometer and downshift at the right rpm or road speed. Shifting Gears
  • 63.
    Before Starting Downa Hill. Special Conditions Where You Should Downshift Slow down and shift down to a speed that you can control without using the brakes hard. otherwise the brakes can overheat and lose their braking power. Downshift before starting down the hill. make sure you are in a low enough gear, usually lower than the gear required to climb the same hill. Before Entering a Curve Slow down to a safe speed, and downshift to the right gear before entering the curve. This lets you use some power through the curve to help the vehicle be more stable while turning. It also allows you to speed up as soon as you are out of the curve. 2-14
  • 64.
    Multi-speed Rear Axlesand Auxiliary Transmissions Multi-speed rear axles and auxiliary transmissions are used on many vehicles to provide extra gears. You usually control them by a selector knob or switch on the gearshift lever of the main transmission. there are many different shift patterns. Learn the right way to shift gears in the vehicle you will drive. Automatic Transmissions Some vehicles have automatic transmissions. Automatic transmissions may not provide extra gears on some trucks. You can select a low range to get greater engine braking when going down grades. the lower ranges prevent the transmission from shifting up beyond the selected gear (unless the governor rpm is exceeded). It is very important to use this braking effect when going down grades. 2-14
  • 65.
    CAUTION 2-14 When your drivewheels have poor traction, the retarder may cause them to skid. therefore, you should turn the retarder off whenever the road is wet, icy, or snow covered. Retarders Retarders help slow a vehicle, reducing the need for using your brakes. they reduce brake wear and give you another way to slow down. there are four basic types of retarders (exhaust, engine, hydraulic, and electric). All retarders can be turned on or off by the driver. on some vehicles the retarding power can be adjusted. When turned "on," retarders apply their braking power (to the drive wheels only) whenever you let up on the accelerator pedal all the way. These devices can be noisy, be sure you know where their use is permitted.
  • 66.
    2-15 SEEING To be asafe driver you need to know what is going on all around your vehicle. not looking properly is a major cause of accidents. All drivers look ahead; but many do not look far enough ahead. The importance of looking far enough ahead • Because stopping or changing lanes can take a lot of distance, knowing what the traffic is doing on all sides of you is very important. You need to look well ahead to make sure you have room to make these moves safely
  • 67.
    Seeing 67 • Look forvehicles coming onto the highway, into your lane, or turning. Watch for brake lights from slowing vehicles. By seeing these things far enough ahead, you can change your speed, or change lanes if necessary to avoid a problem. If a traffic light has been green for a long time it will probably change before there. Start slowing down and be ready to stop. Look for Traffic. Look for Road Conditions • Look for hills and curves – anything that you will have to slow or change lanes for. Pay attention to traffic signals and signs. If a light has been green for a long time, it will probably change before you get there. Start slowing down and be ready to stop. traffic signs may alert you to road conditions where you may have to change speed.
  • 68.
    2-15 Most good driverslook at least 12 to 15 seconds ahead. that means looking ahead the distance you will travel in 12 to 15 seconds. At lower speeds, that is about one block. At highway speeds it is about a quarter of a mile. If you are not looking that far ahead, you may have to stop too quickly or make quick lane changes. Looking 12 to 15 seconds ahead does not mean not paying attention to things that are closer. How Far Ahead To Look Good drivers shift their attention back and forth, near and far.
  • 69.
    2-16 Seeing to theSides and Rear It is important to know what is going on behind and to the sides. check your mirrors regularly. check more often in special situations. Mirror Adjustment. Mirror adjustment should be checked prior to the start of any trip and can only be checked accurately when the trailer(s) are straight. You should check and adjust each mirror to show some part of the vehicle. this will give you a reference point for judging the position of the other images. Regular Checks. You need to make regular checks of your mirrors to be aware of traffic and to check your vehicle. Traffic Check your mirrors for vehicles on either side and in back of you. In an emergency, you may need to know whether you can make a quick lane change. use your mirrors to spot overtaking vehicles. there are "blind spots" that your mirrors cannot show you. check your mirrors regularly to know where other vehicles are around you, and to see if they move into your blind spots.
  • 70.
    2-16 Check Your Vehicle. Seeingto the Sides and Rear Use the mirrors to keep an eye on your tires. It is one way to spot a tire fire. If you are carrying open cargo, you can use the mirrors to check it. Look for loose straps, ropes, or chains. Watch for a flapping or ballooning tarp. Special Situations Special situations require more than regular mirror checks. these are lane changes, turns, merges, and tight maneuvers. Lane Changes You need to check your mirrors to make sure no one is alongside you or about to pass you.
  • 71.
    2-16 Turns Check Your Mirrors: Checkyour mirrors to make sure the rear of your vehicle will not hit anything. Merges Use your mirrors to make sure the gap in traffic is large enough for you to enter safely Tight Maneuvers Any time you are driving in close quarters, check your mirrors often. make sure you have enough clearance. Check Your Mirrors: • Before you change lanes to make sure there is enough room. • After you have signaled, to check that no one has moved into your blind spot. • right after you start the lane change, to double-check that your path is clear. • After you complete the lane change.
  • 72.
    2-16 How to UseMirrors Use mirrors correctly by checking them quickly and understanding what you see When you use your mirrors while driving on the road, check quickly. Look back and forth between the mirrors and the road ahead. do not focus on the mirrors for too long. otherwise, you will travel quite a distance without knowing what is happening ahead. many large vehicles have curved (convex, "fisheye," "spot," "bug-eye") mirrors that show a wider area than flat mirrors. this is often helpful. But everything appears smaller in a convex mirror than it would if you were looking at it directly. things also seem farther away than they really are. It is important to realize this and to allow for it. Figure 2.7 shows the field of vision using a convex mirror
  • 73.
    2-17 Communicating Signal Your Intentions Otherdrivers cannot know what you are going to do until you tell them. Signaling what you intend to do is important for safety. Here are some general rules for signaling. Turns • Signal early. Signal well before you turn. It is the best way to keep others from trying to pass you. • Signal continuously. You need both hands on the wheel to turn safely. do not cancel the signal until you have completed the turn. • Cancel your signal. do not forget to turn off your turn signal after you have turned (if you do not have self-canceling signals). Lane Changes Change lanes slowly and smoothly. That way a driver you did not see may have a chance to honk his/her horn, or avoid your vehicle.
  • 74.
    2-17 Slowing Down. Communicating Warn driversbehind you when you see you will need to slow down. A few light taps on the brake pedal -- enough to flash the brake lights -- should warn following drivers. use the four-way emergency flashers for times when you are driving very slowly or are stopped. Warn other drivers in any of the following situations: •Trouble Ahead. The size of your vehicle may make it hard for drivers behind you to see hazards ahead. If you see a hazard that will require slowing down, warn the drivers behind by flashing your brake lights. If you must drive slowly, alert following drivers by turning on your emergency flashers if it is legal. (Laws regarding the use of flashers differ from one state to another. check the laws of the states where you will drive.)
  • 75.
    • Tight turns.Most car drivers do not know how slowly you have to go to make a tight turn in a large vehicle. Give drivers behind you warning by braking early and slowing gradually. • Stopping on the road. Truck and bus drivers sometimes stop in the roadway to unload cargo or passengers, or to stop at a railroad crossing. Warn following drivers by flashing your brake lights. Do not stop suddenly. • Driving Slowly. Drivers often do not realize how fast they are catching up to a slow vehicle until they are very close. Communicating 75
  • 76.
    Do not directtraffic Communicating 76 Some drivers try to help out others by signaling when it is safe to pass. You should not do this. You could cause an accident. You could be blamed and it could cost you many thousands of dollars.
  • 77.
    2-17 Communicating Your Presence WhenPassing Whenever you are about to pass a vehicle, pedestrian, or bicyclist, assume they do not see you. They could suddenly move in front of you. When it is legal, tap the horn lightly or, at night, flash your lights from low to high beam and back. And, drive carefully enough to avoid a crash even if they do not see or hear you. When It Is Hard To See. At dawn, dusk, in rain, or snow, you need to make yourself easier to see. If you are having trouble seeing other vehicles, other drivers will have trouble seeing you. turn on your lights. Use the headlights, not just the identification or clearance lights. Use the low beams; high beams can bother people in the daytime as well as at night. If you need to use your windshield wipers your headlights must be on. Use Your Horn When Needed Your horn can let others know you are there. It can help to avoid a crash. use your horn when needed. However, it can startle others and could be dangerous when used unnecessarily.
  • 78.
    When Parked atthe side of the Road. Communicating Your Presence Be sure to turn on the four-way emergency flashers. this is important at night. do not trust the taillights to give warning. drivers have crashed into the rear of a parked vehicle because they thought it was moving normally. If you must stop on a road or the shoulder of any road, you must put out your emergency warning devices within ten minutes. Place your warning devices at the following locations: One-way or Divided Highway If you must stop on or by a one-way or divided highway, place warning devices 10 feet, 100 feet, and 200 feet toward the approaching traffic. 2-18
  • 79.
    Two-way or UndividedHighway If you stop on a two-lane road carrying traffic in both directions or on an undivided highway, place warning devices within 10 feet of the front or rear corners to mark the location of the vehicle and 100 feet behind and ahead of the vehicle, on the shoulder or in the lane you stopped in. Communicating Your Presence 2-18
  • 80.
    Hill or Curve CommunicatingYour Presence Back beyond any hill, curve, or other obstruction that prevents other drivers from seeing the vehicle within 500 feet. If line of sight view is obstructed due to hill or curve, move the rear-most triangle to a point back down the road so warning is provided. When putting out the triangles, hold them between yourself and the oncoming traffic for your own safety. (So other drivers can see you.) 2-18
  • 81.
    Communicating Your Presence Useyour horn when needed. • Your horn can let others know you’re there. It can help to avoid a crash. Use your horn when needed. However, it can startle others and could be dangerous when used unnecessarily.
  • 82.
    Controlling Speed Driving toofast is a major cause of fatal crashes. You must adjust your speed depending on driving conditions. These include traction, curves, visibility, traffic and hills. Stopping Distance = Perception distance + Reaction distance _____+ Braking distance_____ = Total Stopping Distance For an alert driver is about 3/4 second Average driver has a reaction time of 3/4 second. figure 2.11 2-19 Distance to a stop using the brake.
  • 83.
    The effect ofspeed on stopping distance Whenever you double your speed, it takes about four times as much distance to stop and your vehicle will have four times the destructive power if it crashes. High speeds increase stopping distances greatly. By slowing down a little, you can gain a lot in reduced braking distance The effect of vehicle weight on stopping distance The heavier the vehicle, the more work the brakes must do to stop it, and the more heat they absorb. But the brakes, tires, springs, and shock absorbers on heavy vehicles are designed to work best when the vehicle is fully loaded. Empty trucks require greater stopping distances because an empty vehicle has less traction. It can bounce and lock up its wheels, giving much poorer braking. (This is not usually the case with buses.) Matching Speed to the Road Surface You cannot steer or brake a vehicle unless you have traction. Traction is friction between the tires and the road. there are some road conditions that reduce traction and call for lower speeds. 2-20
  • 84.
    Slippery Surfaces It willtake longer to stop, and it will be harder to turn without skidding, when the road is slippery. Wet roads can double stopping distance. You must drive slower to be able to stop in the same distance as on a dry road. Reduce speed by about one-third (e.g., slow from 55 to about 35 mph) on a wet road. On packed snow, reduce speed by a half, or more. If the surface is icy, reduce speed to a crawl and stop driving as soon as you can safely do so. Identifying Slippery Surfaces 2-20 Sometimes it is hard to know if the road is slippery. Here are some signs of slippery roads Shaded Areas Bridges Shady parts of the road will remain icy and slippery long after open areas have melted When the temperature drops, bridges will freeze before the road will. Be especially careful when the temperature is close to 32 degrees Fahrenheit.
  • 85.
    Melting Ice Black Ice VehicleIcing. Just After Rain begins. Slight melting will make ice wet. Wet ice is much more slippery than ice that is not wet Black ice is a thin layer that is clear enough that you can see the road underneath it. It makes the road look wet. Any time the temperature is below freezing and the road looks wet, watch out for black ice. An easy way to check for ice is to open the window and feel the front of the mirror, mirror support, or antenna. If there is ice on these, the road surface is probably starting to ice up. Right after it starts to rain, the water mixes with oil left on the road by vehicles. this makes the road very slippery. If the rain continues, it will wash the oil away. 2-20 Slippery Surfaces
  • 86.
    Hydroplaning In some weather,water or slush collects on the road. When this happens, your vehicle can hydroplane. It is like water skiing--the tires lose their contact with the road and have little or no traction. You may not be able to steer or brake. You can regain control by releasing the accelerator and pushing in the clutch. This will slow your vehicle and let the wheels turn freely. If the vehicle is hydroplaning, DO NOT USE THE BRAKES TO SLOW DOWN. If the drive wheels start to skid, push in the clutch to let them turn freely. It does not take a lot of water to cause hydroplaning. Hydroplaning can occur at speeds as low as 30 mph if there is a lot of water. Hydroplaning is more likely if tire pressure is low, or the tread is worn. (The grooves in a tire carry away the water; if they are not deep, they do not work well.) Road surfaces where water can collect can create conditions that cause a vehicle to hydroplane. Watch for clear reflections, tire splashes, and raindrops on the road. these are indications of standing water. Be especially careful driving through puddles. the water is often deep enough to cause hydroplaning. 2-20
  • 87.
    Speed and Curves Ifyou take a curve too fast, two things can happen. The tires can lose their traction and continue straight ahead, so you skid off the road, or, the tires may keep their traction and the vehicle rolls over. tests have shown that trucks with a high center of gravity can roll over at the posted speed limit for a curve. Drivers must adjust their speed for curves in the road. Slow to a safe speed before you enter a curve. Braking in a curve is dangerous because it is easier to lock the wheels and cause a skid. Slow down as needed. do not ever exceed the posted speed limit for the curve. Be in a gear that will let you accelerate slightly in the curve, this will help you keep control. 2-20 Speed and Distance Ahead You should always be able to stop within the distance you can see ahead. Fog, rain, or other conditions may require that you slow down to be able to stop in the distance you can see. At night, you cannot see as far with low beams as you can with high beams. When you must use low beams, slow down.
  • 88.
    2-20 Speed and TrafficFlow When you are driving in heavy traffic, the safest speed is the speed of other vehicles. vehicles going the same direction at the same speed are not likely to run into one another. In many states, speed limits are lower for trucks and buses than for cars. It can vary as much as 15 mph. use extra caution when you change lanes or pass on these roadways. Drive at the speed of the traffic, if you can without going at an illegal or unsafe speed. Keep a safe following distance. The main reason drivers exceed speed limits is to save time. But, anyone trying to drive faster than the speed of traffic will not be able to save much time. the risks involved are not worth it. If you go faster than the speed of other traffic, you will have to keep passing other vehicles. this increases the chance of a crash, and it is more tiring. Fatigue increases the chance of a crash. Going with the flow of traffic is safer and easier
  • 89.
    89 Roadway Work Zones •Speeding traffic is the number one cause of injury and death in roadway work zones. observe the posted speed limits at all times when approaching and driving through a work zone. Watch your speedometer, and do not allow your speed to creep up as you drive through long sections of road construction. decrease your speed for adverse weather or road conditions. decrease your speed even further when a worker is close to the roadway.
  • 90.
    2-21 Managing Space To bea safe driver, you need space all around your vehicle. When things go wrong, space gives you time to think and to take action. to have space available when something goes wrong, you need to manage space. While this is true for all drivers, it is very important for large vehicles. they take up more space and they require more space for stopping and turning. Space Ahead of all the space around your vehicle, it is the area ahead of the vehicle--the space you are driving into --that is most important. The need for space ahead You need space ahead in case you must suddenly stop. According to accident reports, the vehicle that trucks and buses most often run into is the one in front of them. the most frequent cause is following too closely. remember, if the vehicle ahead of you is smaller than yours, it can probably stop faster than you can. You may crash if you are following too closely.
  • 91.
    2-20 Speed on Downgrades Yourvehicle’s speed will increase on downgrades because of gravity. Your most important objective is to select and maintain a speed that is not too fast for the: • Total weight of the vehicle and cargo. • Length of the grade. • Steepness of the grade. • Road conditions. • Weather.
  • 92.
    Speed on Downgrades 92 •If a speed limit is posted, or there is a sign indicating "maximum Safe Speed," never exceed the speed shown. Also, look for and heed warning signs indicating the length and steepness of the grade. You must use the braking effect of the engine as the principal way of controlling your speed on downgrades. the braking effect of the engine is greatest when it is near the governed R.P.M.’s and the transmission is in the lower gears. Save your brakes so you will be able to slow or stop as required by road and traffic conditions. Shift your transmission to a low gear before starting down the grade and use the proper braking techniques. Please read carefully the section on going down long, steep downgrades safely in "mountain driving".
  • 93.
    How much spaceshould you keep in front of you? One good rule says you need at least one second for each 10 feet of vehicle length at speeds below 40 mph. At greater speeds, you must add 1 second for safety. For example, if you are driving a 40-foot vehicle, you should leave 4 seconds between you and the vehicle ahead. In a 60-foot rig, you will need 6 seconds. Over 40 mph, you would need 5 seconds for a 40-foot vehicle and 7 seconds for a 60-foot vehicle. See Figure 2.12. To know how much space you have, wait until the vehicle ahead passes a shadow on the road, a pavement marking, or some other clear landmark. then count off the seconds like this: "one thousand-and-one, one thousand-and-two“ and so on, until you reach the same spot. compare your count with the rule of one second for every ten feet of length. 2-22 Cross-reference pg35 Pub 95 How much space ahead?
  • 94.
    How much spaceahead 94 If you are driving a 40-foot truck and only counted up to 2 seconds, you are too close. drop back a little and count again until you have 4 seconds of following distance (or 5 seconds, if you are going over 40 mph). After a little practice, you will know how far back you should be. Remember to add 1 second for speeds above 40 mph. Also remember that when the road is slippery, you need much more space to stop.
  • 95.
    Space Behind You cannotstop others from following you too closely. But there are things you can do to make it safer. Stay to the Right Heavy vehicles are often tailgated when they cannot keep up with the speed of traffic. This often happens when you are going uphill. If a heavy load is slowing you down, stay in the right lane if you can. Going uphill, you should not pass another slow vehicle unless you can get around quickly and safely. Dealing with Tailgaters Safely In a large vehicle, it is often hard to see whether a vehicle is close behind you. You may be tailgated: When you are traveling slowly In bad weather. Drivers trapped behind slow vehicles often follow closely. Many car drivers follow large vehicles closely during bad weather, especially when it is hard to see the road ahead 2-22
  • 96.
    2-22 If you findyourself being tailgated, here are some things you can do to reduce the chances of a crash: Dealing with Tailgaters Avoid quick changes Increase your following distance. Do not speed up. Avoid tricks If you have to slow down or turn, signal early, and reduce speed very gradually. (Take your foot off the accelerator) Opening up room in front of you will help you to avoid having to make sudden speed or direction changes. It also makes it easier for the tailgater to get around you. It is safer to be tailgated at a low speed than a high speed. Do not turn on your taillights or flash your brake lights. Follow the suggestions above.
  • 97.
    2-23 Space to theSides Commercial vehicles are often wide and take up most of a lane. Safe drivers will manage what little space they have. You can do this by keeping your vehicle centered in your lane, and avoid driving alongside others Staying centered in a lane. You need to keep your vehicle centered in the lane to keep safe clearance on either side. If your vehicle is wide, you have little room to spare. Traveling next to others There are two dangers in traveling alongside other vehicles: • Another driver may change lanes suddenly and turn into you. • You may be trapped when you need to change lanes.
  • 98.
    Space to theSides 98 Strong winds make it difficult to stay in your lane. The problem is usually worse for lighter vehicles. This problem can be especially bad coming out of tunnels. If you can avoid it do not drive along side of others when crosswinds can affect you Find an open spot where you are not near other traffic. When traffic is heavy, it may be hard to find an open spot. If you must travel near other vehicles, try to keep as much space as possible between you and them. Also, drop back or pull forward so that you are sure the other driver can see you. Strong Winds Traveling Next to Others
  • 99.
    2-23 Space Overhead Hitting overheadobjects is a danger. make sure you always have overhead clearance. Do not assume that the heights posted at bridges and overpasses are correct. Re-paving or packed snow may have reduced the clearances since the heights were posted. the weight of a cargo van changes its height. An empty van is higher than a loaded one. What you got under a bridge when you were loaded may not be what you can do when you are empty If you doubt you have safe space to pass under an object, go slowly. If you are not sure you can make it, take another route. LOW OVER HEAD CLEARANCE 12’ 6”
  • 100.
    100 Warnings are oftenposted on low bridges or underpasses, but sometimes they are not. Some roads can cause a vehicle to tilt. there can be a problem clearing objects along the edge of the road, such as signs, trees, or bridge supports. Where this is a problem, drive a little closer to the center of the road. Before you back into an area, get out and check for overhanging objects such as trees, branches, or electric wires. It is easy to miss seeing them while you are backing. (Also check for other hazards at the same time.) 2-23 Space Overhead
  • 101.
    2-23 Space Below Many driversforget about the space under their vehicles. That space can be very small when a vehicle is heavily loaded. This is often a problem on dirt roads and in unpaved yards. drainage channels across roads can cause the ends of some vehicles to drag cross such depressions carefully Railroad tracks can stick up several inches, and can cause problems. This is a problem particularly when pulling trailers with a low underneath clearance and where the surface around the tracks are worn away. Do not take a chance on getting hung up halfway across.
  • 102.
    2-23 Space for Turns Thespace around a truck or bus is important in turns. Because of wide turning and off tracking, large vehicles can hit other vehicles or objects during turns. Right Turns Here are some rules to help prevent right-turn crashes: • Turn slowly----to give yourself and others more time to avoid problems. • If you are driving a truck or bus that cannot make the right turn without swinging into another lane, turn wide as you complete the turn. Keep the rear of your vehicle close to the curb. This will stop other drivers from passing you on the right. • Do not turn wide to the left as you start the turn. A following driver may think you are turning left and try to pass you on the right. You may crash into the other vehicle as you complete your turn.
  • 103.
    Space for Turns– Right Turns 103 • If you must cross into the oncoming lane to make a turn, watch out for vehicles coming toward you. Give them room to go by or to stop. However, do not back up for them, because you might hit someone behind you. See Figure 2.13 2-23 Figure 2.13
  • 104.
    2-24 Space for Turns- Left Turns On a left turn, make sure you are halfway through the intersection before you start the left turn. If you turn too soon, the left side of your vehicle may hit another vehicle because of off tracking. If there are two turning lanes, always take the right turn lane. Do not start in the inside lane because you may have to swing right to make the turn. Drivers on your left can be more readily seen. See Figure 2.14. Figure 2.14
  • 105.
    2-24 Space Needed toCross or Enter Traffic Be aware of the size and weight of your vehicle when you cross or enter traffic. Here are some important things to keep in mind. Because of slow acceleration and the space large vehicles require, you may need a much larger gap to enter traffic than you would in a car. Wait for a large enough gap in traffic to enter the road. Do not assume other motorist will let you in!!! Acceleration varies with the load. Allow more room if your vehicle is heavily loaded. Before you start across a road, make sure you can get all the way across before traffic reaches you.
  • 106.
    106 Seeing Hazards What Isa Hazard? A hazard is any condition which causes our trip to be unsafe. A road condition or other road user (driver, bicyclist, pedestrian) that is a possible danger can be a hazard. For example, a car in front of you is headed toward the freeway exit, but his brake lights come on and he begins braking hard. this could mean that the driver is uncertain about taking the off ramp. He might suddenly return to the highway. this car is a hazard. If the driver of the car cuts in front of you, it is no longer just a hazard; it is an emergency.
  • 107.
    2-24 Seeing Hazards LetsYou Be Prepared. You will have more time to act if you see hazards before they become emergencies. In the example on the page before, you might make a lane change or slow down to prevent a crash if the car suddenly cuts in front of you. Seeing this hazard gives you time to check your mirrors and signal a lane change. Being prepared reduces the danger. A driver who did not see the hazard until the slow car pulled back on the highway in front of him would have to do something very suddenly. Sudden braking or a quick lane change is much more likely to lead to a crash. Learning To See Hazards. There are often clues that will help you see hazards. the more you drive, the better you can learn to see hazards. This section will talk about hazards that you should be aware of.
  • 108.
    108 Hazardous Roads Slow downand be very careful if you see any of the following road hazards: • Work zones When people are working on the road, it is a hazard. there may be narrower lanes, sharp turns, or uneven surfaces. Other drivers are often distracted and drive unsafely. Workers and construction vehicles may get in the way. Drive slowly and carefully near work zones. Use your four-way flashers or brake lights to warn drivers behind you. By law, you must turn on your headlights. Penalties are increased for violations in work zones! Seeing Hazards Lets You Be Prepared.
  • 109.
    2-25 • Drop Off •Foreign Objects Sometimes the pavement drops off sharply near the edge of the road. Driving too near the edge can tilt your vehicle toward the side of the road. This can cause the top of your vehicle to hit roadside objects (signs, tree limbs). Also, it can be hard to steer as you cross the drop off, going off the road, or coming back on. Things that have fallen on the road can be hazards. They can be a danger to your tires and wheel rims. they can damage electrical and brake lines. They can be caught between dual tires and cause severe damage. Some obstacles that appear to be harmless can be very dangerous. For example, cardboard boxes may be empty, but they may also contain some solid or heavy material capable of causing damage. the same is true of paper and cloth sacks. It is important to remain alert for objects of all sorts, so you can see them early enough to avoid them without making sudden, unsafe moves. ROAD HAZARDS
  • 110.
    110 Freeway and turnpikeexits can be particularly dangerous for commercial vehicles. Off ramps and on ramps often have speed limit signs posted. Remember, these speeds may be safe for automobiles, but may not be safe for larger vehicles or heavily loaded vehicles. Exits that go downhill and turn at the same time can be especially dangerous. the downgrade makes it difficult to reduce speed. Braking and turning at the same time can be a dangerous practice. make sure you are going slowly enough before you get on the curved part of an off ramp or on ramp. • Off Ramps/On Ramps. ROAD HAZARDS
  • 111.
    2-26 Drivers Who AreHazards In order to protect yourself and others, you must know when other drivers may do something hazardous. Some clues to this type of hazard are discussed below: • Blocked Vision People who cannot see others are a very dangerous hazard. Be alert for drivers whose vision is blocked. Vans, loaded station wagons, and cars with the rear window blocked are examples, rental trucks should be watched carefully. Their drivers are often not used to the limited vision they have to the sides and rear of the truck. In winter, vehicles with frosted, ice-covered, or snow-covered windows are hazards. Vehicles may be partly hidden by blind intersections or alleys. If you only can see the rear or front end of a vehicle but not the driver, then he or she cannot see you. Be alert because he/she may back out or enter into your lane. Always be prepared to stop.
  • 112.
    112 • Delivery Truckscan Present a Hazard. Packages or vehicle doors often block the driver’s vision. Drivers of step vans, postal vehicles, and local delivery vehicles often are in a hurry and may suddenly step out of their vehicle or drive their vehicle into the traffic lane. Drivers Who Are Hazards • Parked Vehicles can be Hazards Especially when people start to get out of them. or, they may suddenly start up and drive into your way. Watch for movement inside the vehicle or movement of the vehicle itself that shows people are inside. Watch for brake lights or backup lights, exhaust, and other clues that a driver is about to move.
  • 113.
    2-26 Drivers Who AreHazards • Be Careful of a Stopped Bus. Passengers may cross in front of or behind the bus, and they often cannot see you. • Motorcyclists and Mopeds can be Potential Hazards They can be hard to see or easy to look over. Be prepared for motorcyclists. • Pedestrians and Bicyclists can also be Hazards Walkers, joggers, and bicyclists may be on the road with their back to the traffic, so they cannot see you. Sometimes they wear portable stereos with headsets, so they cannot hear you either. This can be dangerous. on rainy days, pedestrians may not see you because of hats or umbrellas. they may be hurrying to get out of the rain and may not pay attention to the traffic.
  • 114.
    2-26 1. When approachingor passing a bicycle, slow down to a safe speed. Before passing, you must first decide whether you can maneuver around the bicyclist. Be sure to check for oncoming traffic. When passing, you must allow at least four feet between your vehicle and a bicycle in order to pass safely. If necessary and if you can do it safely, you are permitted to cross the center double yellow line so you can maintain the four feet of clearance between your vehicle and the bicycle. 3. 2. Unless making a left turn, bicyclists traveling more slowly than passing vehicles must keep to the right side of the roadway and must travel in the same direction as the rest of traffic. However, this requirement is waived on roads with a single lane in each direction. Here are some points to remember about bicyclists you may encounter on the road: BICYCLISTS When there is only one travel lane, bicyclists may use any portion of the lane to avoid hazards on the roadway, including keeping a safe distance from stopped and parked cars. 4.
  • 115.
    BICYCLISTS 115 5. Drivers cannotturn into the path of a bicyclist who is riding straight ahead on a roadway or shoulder. After you have passed a bicyclist, do not slow down or stop quickly. A quick stop could lead to the bicyclist crashing into your vehicle 6. You cannot force a bicyclist off the road. If you do this, you may face criminal charges. 7. Bicyclists are considered to be vehicle operators and are expected to obey all traffic laws; however, they may travel at less than the posted minimum speed and may not be cited for impeding traffic. Bicyclists may operate on a shoulder or berm, but are not required to do so. 8. Do not sound your horn close to bicyclists, unless you must do so to avoid a crash. 9.
  • 116.
    2-26 • Distractions People whoare distracted are hazards. Watch for where they are looking. If they are looking elsewhere, they cannot see you. Be alert even when they are looking at you, they may believe that they have the right of way. • Children. Children tend to act quickly without checking traffic. Children playing with one another may not look for traffic and are a serious hazard. • Talkers. People Who Are Hazards Drivers or pedestrians talking to one another may not be paying close attention to the traffic • Workers. People working on or near the roadway are a hazard clue. the work creates a distraction for other drivers and the workers themselves may not see you.
  • 117.
    2-26 • Ice CreamTrucks. • Disabled Vehicles. • Accidents. People Who Are Hazards Someone selling ice cream is a hazard clue. children may be nearby and may not see you. Drivers changing a tire or fixing an engine often do not pay attention to the danger that roadway traffic is to them. they are often careless. Jacked up wheels or raised hoods are hazard clues. Accidents are particularly hazardous. People involved in the accident may not look for traffic. Passing drivers tend to look at the accident. People often run across the road without looking. vehicles may slow or stop suddenly. • Shoppers. People in and around shopping areas are often not watching traffic because they are looking for stores or looking into store windows.
  • 118.
    2-26 • Confused Drivers. •Slow Drivers. Drivers Who Are Hazards Confused drivers often change direction suddenly or stop without warning. Confusion is common near freeway or turnpike interchanges and major intersections. Tourists unfamiliar with the area can be very hazardous. Clues to tourists include car-top luggage and out-of-state license plates. Unexpected actions (stopping in the middle of a block, changing lanes for no apparent reason, backup lights suddenly going on) are clues to confusion. Hesitation is another clue, including driving very slowly, using brakes often, or stopping in the middle of an intersection. You may also see drivers who are looking at street signs, maps, and house numbers. These drivers may not be paying attention to you. Motorists who fail to maintain normal speed are hazards. Seeing slow moving vehicles early can prevent a crash. Some vehicles, by their nature, are slow and seeing them is a hazard clue (mopeds, farm machinery, construction machinery, tractors, horse drawn vehicles etc.). Some of these will have the "slow moving vehicle" symbol to warn you. this is a red triangle with an orange center. Watch for it.
  • 119.
    2-26 • Drivers ina Hurry. Drivers Who Are Hazards • Drivers Signaling a Turn May be a Hazard. Drivers signaling a turn may slow more than expected or stop. If they are making a tight turn into an alley or driveway, they may go very slowly. If pedestrians or other vehicles block them, they may have to stop on the roadway. Vehicles turning left may have to stop for oncoming vehicles. Drivers may feel your commercial vehicle is preventing them from getting where they want to go on time. Such drivers may pass you without a safe gap in the oncoming traffic, cutting too close in front of you. Drivers entering the road may pull in front of you in order to avoid being stuck behind you, causing you to brake. Be aware of this and watch for drivers who are in a hurry.
  • 120.
    2-27 Drivers Who AreHazards Some clues to these drivers are ➢ Weaving across the road or drifting from one side to another. ➢ Leaving the road (dropping right wheels onto the shoulder, or bumping across a curb in a turn). ➢ Stopping at the wrong time (stopping at a green light, or waiting for too long at a stop). ➢ Open window in cold weather. ➢ Speeding up or slowing down suddenly, driving too fast or too slow. Be alert for drunk drivers and sleepy drivers late at night. • Impaired Drivers. Drivers who are sleepy, have had too much to drink, are on drugs, or who are ill are hazards
  • 121.
    Drivers Who AreHazards 121 Drivers look in the direction they are going to turn. You may sometimes get a clue from a driver’s head and body movements that a driver may be going to make a turn, even though the turn signals are not on. Drivers making over-the-shoulder checks may be going to change lanes. These clues are most easily seen in motorcyclists and bicyclists. Watch other road users and try to tell whether they might do something hazardous. • Driver Body Movement as a Clue. • Conflicts. You are in conflict when you have to change speed and/or direction to avoid hitting someone. Conflicts occur at intersections where vehicles meet, at merges (such as turnpike on ramps) and where there are needed lane changes (such as the end of a lane, forcing a move to another lane of traffic). Other situations include slow moving or stalled traffic in a traffic lane, and accident scenes. Watch for other drivers who are in conflict because they are a hazard to you. When they react to this conflict, they may do something that will put them in conflict with you.
  • 122.
    2-27 Hazards – Conflicts AlwaysHave a Plan You should always be looking for hazards. Continue to learn to see hazards on the road. However, do not forget why you are looking for the hazards--they may turn into emergencies. You look for the hazards in order to have time to plan a way out of any emergency. When you see a hazard, think about the emergencies that could develop and figure out what you would do. Always be prepared to take action based on your plans. In this way, you will be a prepared, defensive driver who will improve your own safety as well as the safety of all road users.
  • 123.
    2-27 Distracted Driving Whenever youare driving a vehicle and your attention is not on the road, you are putting yourself, your passengers, other vehicles, and pedestrians in danger. distracted driving can result when you perform any activity that may shift your full attention from the driving task. Taking your eyes off the road or hands off the steering wheel presents obvious driving risks. Mental activities that take your mind away from driving are just as dangerous. Your eyes can gaze at objects in the driving scene but fail to see them because your attention is distracted elsewhere Activities that can distract your attention include: talking to passengers; adjusting the radio, cd player or climate controls; eating, drinking or smoking; reading maps or other literature; picking up something that fell; reading billboards and other road advertisements; Watching other people and vehicles including aggressive drivers; talking on a cell phone or CB radio; using telematic devices (such as navigation systems, pagers, cell phones etc.); daydreaming or being occupied with other mental distractions.
  • 124.
    2-28 Do Not DriveDistracted If drivers react a half-second slower because of distractions, crashes double. Some tips to follow so you will not become distracted: • Review and be totally familiar with all safety and usage features on any in- vehicle electronics, including your wireless or cell phone, before you drive. • Pre-program radio stations. • Pre-load you favorite cds or cassette tapes. • Clear the vehicle of any unnecessary objects. • Review maps and plan your route before you begin driving. • Adjust all mirrors for best all-round visibility before you start your trip. • Do not attempt to read or write while you drive. • Avoid smoking, eating and drinking while you drive. • Do not engage in complex or emotionally intense conversations with other occupants.
  • 125.
    Do Not DriveDistracted 125 • If possible, turn the cell phone off until your destination is reached. • Position the cell phone within easy reach. • Pre-program cell phones with commonly called numbers. • If you have to place a call, find a safe place to pull off the road. • Do Not Place Calls While Driving. When possible, pull off the road in a safe, legal place when making/receiving a call on communication equipment. Use In-vehicle Communication Equipment Cautiously
  • 126.
    2-28 •Some jurisdictions requirethat only hands-free devices can be used while driving. Even these devices are unsafe to use when you are moving down the road. •If you must use your cell phone, keep conversations short. develop ways to get free of long-winded friends and associates while on the road. •Never use the cell phone for social visiting. •Hang up in tricky traffic situations. •Do not use the equipment when approaching locations with heavy traffic, road construction, heavy pedestrian traffic, or severe weather conditions. •Do not attempt to type or read messages on your satellite system while d riving. Do Not Drive Distracted
  • 127.
    2-28 Watch Out forOther Distracted Drivers You need to be able to recognize other drivers who are engaged in any form of driving distraction. Not recognizing other distracted drivers can prevent you from perceiving or reacting correctly in time to prevent a crash. Watch for: • Vehicles that may drift over the lane divider lines or within their own lane. • Vehicles traveling at inconsistent speeds. • Drivers who are preoccupied with maps, food, cigarettes, cell phones, or other objects. • Drivers who appear to be involved in conversations with their passengers. Give a distracted driver plenty of room and maintain your safe following distance. Be very careful when passing a driver who seems to be distracted. The other driver may not be aware of your presence, and they may drift in front of you.
  • 128.
    2-28 Aggressive Drivers/Road Rage WhatIs It? Aggressive driving and road rage is not a new problem. However, in today’s world, where heavy and slow-moving traffic and tight schedules are the norm, more and more drivers are taking out their anger and frustration in their vehicles. Crowded roads leave little room for error, leading to suspicion and hostility among drivers and encouraging them to take personally the mistakes of other drivers. Aggressive driving is the act of operating a motor vehicle in a selfish, bold, or pushy manner, without regard for the rights or safety of others. Road rage is operating a motor vehicle with the intent of doing harm to others or physically assaulting a driver or their vehicle
  • 129.
    2-29 How you feelbefore you even start your vehicle has a lot to do with how stress will affect you while driving. Reduce your stress before and while you drive. • Listen to “easy listening” music. • Give the drive your full attention. • Do not allow yourself to become distracted by talking on your cell phone, eating, etc. • Be realistic about your travel time. • Expect delays because of traffic, construction, or bad weather and make allowances. • If you are going to be later than you expected – Deal with it. Take a deep breath and accept the delay. Do Not Be an Aggressive Driver
  • 130.
    Do Not Bean Aggressive Driver 130 Give other drivers the benefit of the doubt. Try to imagine why he or she is driving that way. Whatever their reason, it has nothing to do with you. Slow down and keep your following distance reasonable. Do not drive slowly in the left lane of traffic. Avoid gestures. Keep your hands on the wheel. Avoid making any gestures that might anger another driver, even seemingly harmless expressions of irritation like shaking your head. Be a cautious and courteous driver. If another driver seems eager to get in front of you, say, “Be my guest.” this response will soon become a habit and you will not be as offended by other drivers’ actions.
  • 131.
    2-29 What You ShouldDo When Confronted by an Aggressive Driver • First and foremost, make every attempt to get out of their way. • Put your pride in the back seat. Do not challenge them by speeding up or attempting to hold-your-own in your travel lane. • Avoid eye contact. • Ignore gestures and refuse to react to them. • Report aggressive drivers to the appropriate authorities by providing a vehicle description, license plate number, location and, direction of travel, and if possible description of driver. • If you have a cell phone, and can do it safely, call the police. • If an aggressive driver is involved in a crash farther down the road, stop a safe distance from the crash scene, wait for the police to arrive, and report the driving behavior that you witnessed.
  • 132.
    2-30 DRIVING at NIGHT ItIs More Dangerous You are at greater risk when you drive at night. drivers cannot see hazards as quickly as in daylight, so they have less time to respond. Drivers caught by surprise are less able to avoid a crash. The problems of night driving involve the driver, the roadway, and the vehicle. The Driver The Roadway The vehicle
  • 133.
    2-30 Driver Factors Vision People cannotsee as sharply at night or in dim light. Also, their eyes need time to adjust to seeing in dim light. most people have noticed this when walking into a dark movie theater. Glare Drivers can be blinded for a short time by bright light. It takes time to recover from this blindness. Older drivers are especially bothered by glare. Most people have been temporarily blinded by camera flash units or by the high beams of an oncoming vehicle. It can take several seconds to recover from glare. Even two seconds of glare blindness can be dangerous. A vehicle going 55 mph will travel more than half the distance of a football field during that time. do not look directly at bright lights when driving. Look at the right side of the road. Watch the sidelines when someone coming toward you has very bright lights on. DRIVING at NIGHT
  • 134.
    2-30 Driver Factors DRIVINGat NIGHT Vision People cannot see as sharply at night or in dim light. Also, their eyes need time to adjust to seeing in dim light. Most people have noticed this when walking into a dark movie theater. Glare Drivers can be blinded for a short time by bright light. It takes time to recover from this blindness. Older drivers are especially bothered by glare. Most people have been temporarily blinded by camera flash units or by the high beams of an oncoming vehicle. It can take several seconds to recover from glare. Even two seconds of glare blindness can be dangerous. A vehicle going 55 mph will travel more than half the distance of a football field during that time. do not look directly at bright lights when driving. Look at the right side of the road. Watch the sidelines when someone coming toward you has very bright lights on.
  • 135.
    135 Fatigue and Lackof Alertness Fatigue (being tired) and lack of alertness are bigger problems at night. the body’s need for sleep is beyond a person’s control. most people are less alert at night, especially after midnight. This is particularly true if you have been driving for a long time. Drivers may not see hazards as soon, or react as quickly, so the chance of a crash is greater. If you are sleepy, the only safe cure is to get off the road and get some sleep. If you do not, you risk your life and the lives of others. DRIVING at NIGHT Driver Factors In the daytime there is usually enough light to see well. This is not true at night. Some areas may have bright street lights, but many areas will have poor lighting. On most roads you will probably have to depend entirely on your headlights.
  • 136.
    2-30 DRIVING at NIGHTRoadway Factors Poor Lighting Less light means you will not be able to see hazards as well as in the daytime. Road users who do not have lights are hard to see. There are many accidents at night involving pedestrians, joggers, bicyclists, and animals. Even when there are lights, the road scene can be confusing. Traffic signals and hazards can be hard to see against a background of signs, shop windows, and other lights. Drive slower when lighting is poor or confusing. Drive slowly enough to be sure you can stop in the distance you can see ahead. Drunk Drivers Drunk drivers and drivers under the influence of drugs are a hazard to themselves and to you. Be especially alert around the closing times for bars and taverns. Watch for drivers who have trouble staying in their lane or maintaining speed, who stop without reason, or show other signs of being under the influence of alcohol or drugs.
  • 137.
    2-30 DRIVING at NIGHT VehicleFactors Headlights At night your headlights will usually be the main source of light for you to see by and for others to see you. You cannot see nearly as much with your headlights as you see in the daytime. With low beams you can see ahead about 250 feet and with high beams about 350-500 feet. You must adjust your speed to keep your stopping distance within your sight distance. This means going slowly enough to be able to stop within the range of your headlights. otherwise, by the time you see a hazard, you will not have time to stop Other Lights In order for you to be seen easily, the following must be clean and working properly: • Marker lights • Reflectors. • Taillights . • Identification lights. • Clearance lights
  • 138.
    138 Night driving canbe more dangerous if you have problems with your headlights. dirty headlights may give only half the light they should. this cuts down your ability to see, and makes it harder for others to see you. Make sure your lights are clean and working. Headlights can be out of adjustment. If they do not point in the right direction, they will not give you a good view and they can blind other drivers. Have a qualified person make sure they are adjusted properly. DRIVING at NIGHT Vehicle Factors Turn Signals and Brake Lights At night your turn signals and brake lights are even more important for telling other drivers what you intend to do. Make sure you have clean, working turn signals and stop lights.
  • 139.
    2-31 Windshield and Mirrors. DRIVINGat NIGHT Vehicle Factors It is more important at night than in the daytime to have a clean windshield and clean mirrors. Bright lights at night can cause dirt on your windshield or mirrors to create a glare of its own, blocking your view. Most people have experienced driving toward the sun just as it has risen or is about to set, and found that they can barely see through a windshield that seemed to look okay in the middle of the day. Clean your windshield on the inside and outside for safe driving at night. Night Driving Procedures Pre-trip Procedures Make sure you are rested and alert. If you are drowsy, sleep before you drive! Even a nap can save your life or the lives of others. If you wear eyeglasses, make sure they are clean and unscratched. Do not wear sunglasses at night. Do a complete pre-trip inspection of your vehicle and yourself. Pay attention to checking all lights and reflectors, and cleaning those you can reach.
  • 140.
    2-31 Avoid Blinding Others Glarefrom your headlights can cause problems for drivers coming toward you. They can also bother drivers going in the same direction you are, when your lights shine in their rearview mirrors. Dim your lights before they cause glare for other drivers. Dim your lights within 500 feet of an oncoming vehicle and when following another vehicle within 500 feet. Avoid Glare from Oncoming Vehicles Do not look directly at lights of oncoming vehicles. Look slightly to the right at a right lane or edge markings of the road, if available. If other drivers do not put their low beams on, do not try to "get back at them" by putting your own high beams on. this increases glare for oncoming drivers and increases the chance of a crash Night Driving Procedures
  • 141.
    2-31 Use High beamsWhen You Can. Some drivers make the mistake of always using low beams. This seriously cuts down on their ability to see ahead. Use high beams when it is safe and legal to do so. Use them when you are not within 500 feet of an approaching vehicle. Also, do not let the inside of your cab get too bright. This makes it harder to see outside. Keep the interior light off, and adjust your instrument lights as low as you can to still be able to read the gauges. If You Get Sleepy, Stop At The Nearest Safe Place People often do not realize how close they are to falling asleep even when their eyelids are falling shut. If you can safely do so, look at yourself in a mirror. If you look sleepy, or you just feel sleepy, stop driving! You are in a very dangerous condition. The only safe cure is to sleep. Night Driving Procedures
  • 142.
    2-31 DRIVING IN FOG Fogcan occur at any time. Fog on highways can be extremely dangerous. Fog is often unexpected, and visibility can deteriorate rapidly. You should watch for foggy conditions and be ready to reduce your speed. Do not assume that the fog will thin out after you enter it. The best advice for driving in fog is do not. It is preferable that you pull off the road into a rest area or truck stop until visibility is better. If you must drive, be sure to consider the following: •Obey all fog-related warning signs. • Slow down before you enter fog. •Turn on all your lights. Use low-beam headlights and fog lights for best visibility even in daytime, and be alert for other drivers who may have forgotten to turn on their lights. •
  • 143.
    Driving in Fog 143 Turnon your 4-way flashers. This will give vehicles approaching you from behind a quicker opportunity to notice your vehicle. • Watch for vehicles on the side of the roadway. Seeing taillights or headlights in front of you may not be a true indication of where the road is ahead of you. The vehicle may not be on the road at all. • Use roadside highway reflectors as guides to determine how the road may curve ahead of you. • Listen for traffic you cannot see. • Avoid passing other vehicles. • Do not stop along the side of the road, unless absolutely necessary. • Be prepared for emergency stops.
  • 144.
    2-32 DRIVING IN WINTER VehicleChecks Make sure your vehicle is ready before driving in winter weather. You should make a regular pre-trip inspection, paying extra attention to the following items. Coolant Level and Antifreeze Amount. Make sure the cooling system is full and there is enough antifreeze in the system to protect against freezing. this can be checked with a special coolant tester Defrosting and Heating Equipment Make sure the defrosters work. They are needed for safe driving. Make sure the heater is working, and that you know how to operate it. If you use other heaters and expect to need them (e.g., mirror heaters, battery box heaters, fuel tank heaters), check their operation before starting your trip.
  • 145.
    145 • Use windshieldwasher antifreeze to prevent freezing of the washer liquid. If you cannot see well enough while driving (for example, if your wipers fail), stop safely and fix the problem. • Make sure the windshield wiper blades are in good condition. Make sure the wiper blades press against the window hard enough to wipe the windshield clean, otherwise they may not sweep off snow properly. Make sure the windshield washer works and there is washing fluid in the washer reservoir. Wipers and Washers. DRIVING IN WINTER Tires Make sure you have enough tread on your tires. The drive tires must provide traction to push the rig over wet pavement and through snow. the steering tires must have traction to steer the vehicle. Enough tread is especially important in winter conditions. You must have at least 4/32 inch tread depth in every major groove on front tires and at least 2/32 inch on other tires. More would be better. use a gauge to determine if you have enough tread for safe driving. 2-32 Vehicle Checks
  • 146.
    146 Make sure thelights and reflectors are clean. Lights and reflectors are especially important during bad weather. Check from time to time during bad weather to make sure they are clean and working properly. Lights and Reflectors You may find yourself in conditions where you cannot drive without chains, even to get to a place of safety. Carry the right number of chains and extra cross-links. make sure they will fit your drive tires. Check the chains for broken hooks, worn or broken cross-links, and bent or broken side chains. Learn how to put the chains on before you need to do it in snow and ice. tire chains should be carried when driving in winter weather. Tire Chains DRIVING IN WINTER Windows and Mirrors Remove any ice, snow, etc., from the windshield, windows, and mirrors before starting. Use a windshield scraper, snow brush, and windshield defroster as necessary. Vehicle Checks
  • 147.
    2-32 DRIVING IN WINTER ExhaustSystem. Radiator shutters and Winter-fronts Hand Holds, Steps, and Deck Plates. Remove all ice and snow from hand holds, steps, and deck plates which you must use to enter the cab or to move about the vehicle. This will reduce the danger of slipping Remove ice from the radiator shutters. Make sure the winter-front is not closed too tightly. If the shutters freeze shut or the winter-front is closed too much, the engine may overheat and stop. Exhaust system leaks are especially dangerous when cab ventilation may be poor (windows rolled up, etc.). Loose connections could permit poisonous carbon monoxide to leak into your vehicle. Carbon monoxide gas will cause you to be sleepy. In large enough amounts it can kill you. Check the exhaust system for loose parts and for sounds and signs of leaks. Vehicle Checks
  • 148.
    2-32 DRIVING IN WINTER Driving SlipperySurfaces Start Gently and Slowly Drive slowly and smoothly on slippery roads. If it is very slippery, you should not drive at all. Stop at the first safe place. When first starting, get the feel of the road. Do not hurry Check for Ice. Check for ice on the road, especially bridges and overpasses. A lack of spray from other vehicles indicates ice has formed on the road. Also, check your mirrors and wiper blades for ice. If they have ice, the road most likely will be icy as well.
  • 149.
    2-32 DRIVING IN WINTER Driving AdjustTurning and Braking to Conditions. Make turns as gently as possible. Do not brake any harder than necessary, and do not use the engine brake or speed retarder. (they can cause the driving wheels to skid on slippery surfaces.) Do not pass slower vehicles unless necessary. Go slowly and watch far enough ahead to keep a steady speed. Avoid having to slow down and speed up. Take curves at slower speeds and do not brake while in curves. Be aware that as the temperature rises to the point where ice begins to melt, the road becomes even more slippery. Slow down more. Adjust Speed to Conditions. Do not drive alongside other vehicles. Keep a longer following distance. When you see a traffic jam ahead, slow down or stop to wait for it to clear. Try hard to anticipate stops early and slow down gradually. Watch for snowplows, as well as salt and sand trucks, and give them plenty of room. Adjust Space to Conditions.
  • 150.
    150 DRIVING IN WINTER Driving 2-32 WetBrakes. When driving in heavy rain or deep standing water, your brakes will get wet. Water in the brakes can cause the brakes to be weak, to apply unevenly, or to grab. This can cause lack of braking power, wheel lockups, pulling to one side or the other, and jackknife if you pull a trailer Avoid driving through deep puddles or flowing water if possible. If not, you should: • Slow down and place transmission in a low gear.
  • 151.
    2-32 DRIVING IN WINTER Driving WetBrakes. • When out of the water, maintain light pressure on the brakes for a short distance to heat them up and dry them out. • Gently put on the brakes. This presses linings against brake drums or discs and keeps mud, silt, sand, and water from getting in while driving through water. • Increase engine rpm and cross the water while keeping light pressure on the brakes. • Make a test stop when safe to do so. Check behind to make sure no one is following, then apply the brakes to be sure they work well. If not, dry them out further as described above. (caution: do not apply too much brake pressure and accelerator at the same time, or you can overheat brake drums and linings.)
  • 152.
    2-34 DRIVING IN VERYHOT WEATHER Vehicle Checks Do a normal pre-trip inspection, but pay special attention to the following items: Tires Engine Oil. Before driving check the tire mounting and air pressure. Inspect the tires every two hours or every 100 miles when driving in very hot weather. Air pressure increases with temperature. Do not let air out or the pressure will be too low when the tires cool off. If a tire is too hot to touch, remain stopped until the tire cools off. Otherwise the tire may blow out or catch fire. The engine oil helps keep the engine cool, as well as lubricating it. Make sure there is enough engine oil. If you have an oil temperature gauge, make sure the temperature is within the proper range while you are driving.
  • 153.
    2-34 • Engine Coolant. Beforestarting out, make sure the engine cooling system has enough water and antifreeze according to the engine manufacturer’s directions. (Antifreeze helps the engine under hot conditions as well as cold conditions.) When driving, check the water temperature or coolant temperature gauge from time to time. Make sure that it remains in the normal range. If the gauge goes above the highest safe temperature, there may be something wrong that could lead to engine failure and possibly fire. Stop driving as soon as safely possible and try to find out what is wrong. DRIVING IN VERY HOT WEATHER Vehicle Checks Some vehicles have sight glasses, see-through coolant overflow containers, or coolant recovery containers. These permit you to check the coolant level while the engine is hot. If the container is not part of the pressurized system, the cap can be safely removed and coolant added even when the engine is at operating temperature.
  • 154.
    154 Never remove theradiator cap or any part of the pressurized system until the system has cooled. • Steam and boiling water can spray under pressure and cause severe burns. If you can touch the radiator cap with your bare hand, it is probably cool enough to open. Vehicle Checks DRIVING IN VERY HOT WEATHER 2-34 • Engine Coolant.
  • 155.
    2-33 DRIVING IN VERYHOT WEATHER Vehicle Checks • Engine Coolant. If coolant has to be added to a system without a recovery tank or overflow tank, follow these steps: • Shut engine off • Wait until engine has cooled • Protect hands (use gloves or a thick cloth) • Turn radiator cap slowly to the first stop, which releases the pressure seal • Step back while pressure is released from cooling system • When all pressure has been released, press down on the cap and turn it further to remove the cap • Visually check level of coolant and add more coolant if necessary • Replace cap and turn all the way to the closed position
  • 156.
    2-33 • Engine Belts. •Hoses DRIVING IN VERY HOT WEATHER Vehicle Checks Learn how to check v-belt tightness on your vehicle by pressing on the belts. Loose belts will not turn the water pump and/or fan properly. This will result in overheating. Also, check belts for cracking or other signs of wear. this is especially true in hot weather. cracked belts are a safety hazard. Make sure coolant hoses are in good condition. A broken hose while driving can lead to engine failure and even fire.
  • 157.
    157 High speeds createmore heat for tires and the engine. In desert conditions the heat may build up to the point where it is dangerous. the heat will increase chances of tire failure or even fire, and engine failure. • Go Slowly Enough to Prevent Overheating. Tar in the road pavement frequently rises to the surface in very hot weather. Spots where tar "bleeds" to the surface are very slippery. • Watch for Bleeding Tar. DRIVING IN VERY HOT WEATHER 2-33 Vehicle Checks
  • 158.
    2-34 RAILROAD-HIGHWAY CROSSINGS Railroad-highway gradecrossings are a special kind of intersection where the roadway crosses train tracks. these crossings are always dangerous. Every such crossing must be approached with the expectation that a train is coming.
  • 159.
    159 This type ofcrossing has a traffic control device installed at the crossing to regulate traffic at the crossing. These active devices include flashing red lights, with or without bells and flashing red lights with bells and gates. Active Crossings. This type of crossing does not have any type of traffic control device. The decision to stop or proceed rests entirely in your hands. Passive crossings require you to recognize the crossing, search for any train using the tracks and decide if there is sufficient clear space to cross safely. Passive crossings have yellow circular advance warning signs, pavement markings and cross-bucks to assist you in recognizing a crossing. Passive Crossings. RAILROAD-HIGHWAY CROSSINGS 2-34 Types of Crossings
  • 160.
    2-34 Warning Signs andDevices Advance Warning Signs Pavement Markings The round, black-on-yellow warning sign is placed ahead of a public railroad-highway crossing. The advance warning sign tells you to slow down, look and listen for the train, and be prepared to stop at the tracks if a train is coming. See Figure 2.15. Pavement markings mean the same as the advance warning sign. they consist of an “x” with the letters “RR” and a no-passing marking on two- lane roads. See Figure 2.16.
  • 161.
    2-34 Cross-buck Signs Flashing RedLight Signals Gates Warning Signs and Devices This sign marks the grade crossing. It requires you to yield the right-of-way to the train. If there is no white line painted on the pavement, you must stop the vehicle before the cross-buck sign. When the road crosses over more than one set of tracks, a sign below the cross-buck indicates the number of tracks. See Figure 2.17. At many highway-rail grade crossings, the cross-buck sign has flashing red lights and bells. When the lights begin to flash, stop! A train is approaching. You are required to yield the right-of-way to the train. If there is more than one track, make sure all tracks are clear before crossing. See Figure 2.18. Many railroad-highway crossings have gates with flashing red lights and bells. Stop when the lights begin to flash and before the gate lowers across the road lane. remain stopped until the gates go up and the lights have stopped flashing. Proceed when it is safe. See Figure 2.18.
  • 162.
    2-35 Driving Procedures Never Racea Train to a Crossing Reduce Speed. Never attempt to race a train to a crossing. It is extremely difficult to judge the speed of an approaching train. Speed must be reduced in accordance with your ability to see approaching trains in any direction, and speed must be held to a point which will permit you to stop short of the tracks in case a stop is necessary.
  • 163.
    163 You should notrely solely upon the presence of warning signals, gates, or flagmen to warn of the approach of trains. Be especially alert at crossings that do not have gates or flashing red light signals. Do Not Rely on Signals. Because of noise inside your vehicle, you cannot expect to hear the train horn until the train is dangerously close to the crossing. Do Not Expect to Hear a Train. Driving Procedures 2-35
  • 164.
    Double Tracks Requirea Double Check. Yard Areas and Grade Crossings in Cities and Towns. 2-35 Driving Procedures Remember that a train on one track may hide a train on the other track. Look both ways before crossing. After one train has cleared a crossing, be sure no other trains are near before starting across the tracks. Yard areas and grade crossings in cities and towns are just as dangerous as rural grade crossings. Approach them with as much caution.
  • 165.
    165 • Turn onyour four-way emergency flashers. • Check for traffic behind you while stopping gradually. use a pullout lane, if available. When Stopping Be Sure To: • Such a stop is otherwise required by law. • The nature of the cargo makes a stop mandatory under state or federal regulations. A full stop is required at grade crossings whenever: Stopping Safely at Railroad Highway Crossings Driving Procedures 2-35
  • 166.
    2-36 Crossing the Tracks Railroadcrossings with steep approaches can cause your unit to hang up on the tracks. Never permit traffic conditions to trap you in a position where you have to stop on the tracks. Be sure you can get all the way across the tracks before you start across. It takes a typical tractor-trailer unit at least 14 seconds to clear a single track and more than 15 seconds to clear a double track. Do not shift gears while crossing railroad tracks.
  • 167.
    167 If for anyreason you get stuck on the tracks, get out of the vehicle and away from the tracks. Check signposts or signal housing at the crossing for emergency notification information. call 911 or other emergency number. Give the location of the crossing using all identifiable landmarks, especially the dot number, if posted. • Single-axle tractor pulling a long trailer with its landing gear set to accommodate a tandem-axle tractor. • Low slung units (lowboy, car carrier, moving van, possum-belly livestock trailer). Be Aware! these trailers can get stuck on raised crossings: Special Situations Crossing the Tracks 2-36
  • 168.
    2-36 MOUNTAIN DRIVING In mountaindriving, gravity plays a major role. on any upgrade, gravity slows you down. The steeper the grade, the longer the grade, and/or the heavier the load--the more you will have to use lower gears to climb hills or mountains. In coming down long, steep downgrades, gravity causes the speed of your vehicle to increase. You must select an appropriate safe speed, then use a low gear, and proper braking techniques. You should plan ahead and obtain information about any long, steep grades along your planned route of travel. If possible, talk to other drivers who are familiar with the grades to find out what speeds are safe. You must go slowly enough so your brakes can hold you back without getting too hot. If the brakes become too hot, they may start to "fade." this means you have to apply them harder and harder to get the same stopping power. If you continue to use the brakes hard, they can keep fading until you cannot slow down or stop at all.
  • 169.
    169 • Weather. • roadconditions. • Steepness of the grade. • Length of the grade. • total weight of the vehicle and cargo. Your most important consideration is to select a speed that is not too fast for the: Select a "Safe" Speed MOUNTAIN DRIVING 2-36 If a speed limit is posted, or there is a sign indicating "maximum Safe Speed," never exceed the speed shown. Also, look for and heed warning signs indicating the length and steepness of the grade.
  • 170.
    2-36 MOUNTAIN DRIVING You mustuse the braking effect of the engine as the principal way of controlling your speed. The braking effect of the engine is greatest when it is near the governed RPMs and the transmission is in the lower gears. Save your brakes so you will be able to slow or stop as required by road and traffic conditions. Select the Right Gear Before Starting Down the Grade Shift the transmission to a low gear before starting down the grade. Do not try to downshift after your speed has already built up. You will not be able to shift into a lower gear. You may not even be able to get back into any gear and all engine braking effect will be lost. Forcing an automatic transmission into a lower gear at high speed could damage the transmission and also lead to loss of all engine braking effect.
  • 171.
    171 MOUNTAIN DRIVING 2-36 With oldertrucks, a rule for choosing gears is to use the same gear going down a hill that you would need to climb the hill. However, new trucks have low friction parts and streamlined shapes for fuel economy. they may also have more powerful engines. this means they can go up hills in higher gears and have less friction and air drag to hold them back going down hills. For that reason, drivers of modern trucks may have to use lower gears going down a hill than would be required to go up the hill. You should know what is right for your vehicle.
  • 172.
    2-37 Brake Fading orFailure MOUNTAIN DRIVING Brakes are designed so brake shoes or pads rub against the brake drum or disks to slow the vehicle. Braking creates heat, but brakes are designed to take a lot of heat. However, brakes can fade or fail from excessive heat caused by using them too much and not relying on the engine braking effect. Brake fade is also affected by adjustment. To safely control a vehicle, every brake must do its share of the work. Brakes out of adjustment will stop doing their share before those that are in adjustment. the other brakes can then overheat and fade, and there will not be enough braking available to control the vehicle. Brakes can get out of adjustment quickly, especially when they are used a lot; also, brake linings wear faster when they are hot. therefore, brake adjustment must be checked frequently.
  • 173.
    2-37 Proper Braking Technique MOUNTAINDRIVING Remember The use of brakes on a long and/or steep downgrade is only a supplement to the braking effect of the engine. Once the vehicle is in the proper low gear, the following are the proper braking techniques: • Apply the brakes just hard enough to feel a definite slowdown. • When your speed has increased to your "safe" speed, repeat steps 1 and 2. • When your speed has been reduced to approximately five mph below your "safe" speed, release the brakes. (This brake application should last for about three seconds.)
  • 174.
    174 Know escape ramplocations on your route. Signs show drivers where ramp are located. Escape ramps save lives, equipment and cargo. use them if you lose your brakes. For example, if your "safe" speed is 40 mph, you would not apply the brakes until your speed reaches 40 mph. You now apply the brakes hard enough to gradually reduce your speed to 35 mph and then release the brakes. Repeat this as often as necessary until you have reached the end of the downgrade. Escape ramps have been built on many steep mountain downgrades. Escape ramps are made to stop runaway vehicles safely without injuring drivers and passengers. Escape ramps use a long bed of loose, soft material to slow a runaway vehicle, sometimes in combination with an upgrade. MOUNTAIN DRIVING 2-37 Proper Braking Technique
  • 175.
    2-38 DRIVING EMERGENCIES Traffic emergenciesoccur when two vehicles are about to collide. Vehicle emergencies occur when tires, brakes, or other critical parts fail. Following the safety practices in this manual can help prevent emergencies. But if an emergency does happen, your chances of avoiding a crash depend upon how well you take action. Actions you can take are discussed below Steering to Avoid a Crash Stopping is not always the safest thing to do in an emergency. When you do not have enough room to stop, you may have to steer away from what is ahead. remember, you can almost always turn to miss an obstacle more quickly than you can stop. (However, top-heavy vehicles and tractors with multiple trailers may flip over.)
  • 176.
    176 A quick turncan be made safely, if it is done the right way. Here are some points that safe drivers use: How to turn quickly and safely. In order to turn quickly, you must have a firm grip on the steering wheel with both hands. the best way to have both hands on the wheel, if there is an emergency, is to keep them there all the time. Keep both Hands on the steering Wheel. DRIVING EMERGENCIES 2-38 Be prepared to "counter-steer," that is, to turn the wheel back in the other direction, once you have passed whatever was in your path. Unless you are prepared to counter-steer, you will not be able to do it quickly enough. You should think of emergency steering and counter- steering as two parts of one driving action.
  • 177.
    2-38 • Do notapply the brake while you are turning. It is very easy to lock your wheels while turning. If that happens, you may skid out of control. • Do not turn any more than needed to clear whatever is in your way. The more sharply you turn, the greater the chances of a skid or rollover. Where to steer If an oncoming driver has drifted into your lane, a move to your right is best. If that driver realizes what has happened, the natural response will be to return to his or her own lane. If something is blocking your path, the best direction to steer will depend on the situation. If you have been using your mirrors, you will know which lane is empty and can be safely used. If the shoulder is clear, going right may be best. No one is likely to be driving on the shoulder but someone may be passing you on the left. You will know if you have been using your mirrors. If you are blocked on both sides, a move to the right may be best. At least you will not force anyone into an opposing traffic lane and a possible head-on collision. DRIVING EMERGENCIES
  • 178.
    2-38 Leaving the Road. DRIVINGEMERGENCIES Avoid Braking. Keep one set of Wheels on the Pavement, if Possible In some emergencies, you may have to drive off the road. It may be less risky than facing a collision with another vehicle. Most shoulders are strong enough to support the weight of a large vehicle and, therefore, offer an available escape route. Here are some guidelines, if you do leave the road. If possible, avoid using the brakes until your speed has dropped to about 20 mph. then brake very gently to avoid skidding on a loose surface. This helps to maintain control.
  • 179.
    2-38 Stay on theShoulder. Returning to the Road. If the shoulder is clear, stay on it until your vehicle has come to a stop. When its safe, signal and check your mirrors before pulling back onto the road. • When both front tires are on the paved surface, counter-steer immediately. the two turns should be made as a single "steer-counter- steer" move. If you are forced to return to the road before you can stop, use the following procedure: • Hold the wheel tightly and turn sharply enough to get right back on the road safely. do not try to edge gradually back on the road. If you do, your tires might grab unexpectedly and you could lose control. DRIVING EMERGENCIES
  • 180.
    2-39 How to StopQuickly and Safely DRIVING EMERGENCIES If somebody suddenly pulls out in front of you, your natural response is to hit the brakes. this is a good response if there is enough distance to stop, and you use the brakes correctly. You should brake in a way that will keep your vehicle in a straight line and allow you to turn if it becomes necessary. You can use the "controlled braking" method or the "stab braking" method. Controlled Braking. With this method, you apply the brakes as hard as you can without locking the wheels. Keep steering wheel movements very small while doing this. If you need to make a larger steering adjustment or if the wheels lock, release the brakes. re-apply the brakes as soon as you can.
  • 181.
    181 Emergency braking doesnot mean pushing down on the brake pedal as hard as you can. That will only keep the wheels locked up and cause a skid. If the wheels are skidding, you cannot control the vehicle. DO NOT JAM ON THE BRAKES Apply your brakes all the way. Release brakes when wheels lock up. As soon as the wheels start rolling, apply the brakes fully again. (It can take up to one second for the wheels to start rolling after you release the brakes. If you re-apply the brakes before the wheels start rolling, the vehicle will not straighten out.) Stab Braking DRIVING EMERGENCIES 2-39
  • 182.
    2-39 DRIVING EMERGENCIES Brake Failure Lossof Hydraulic Pressure Brakes kept in good condition rarely fail. Most hydraulic brake failures occur for one of two reasons: (Air brakes are discussed in Section 5.) • Loss of hydraulic pressure. • Brake fade on long hills. When the system will not build up pressure, the brake pedal will feel spongy or go to the floor. Here are some things you can do: Downshift. Putting the vehicle into a lower gear will help to slow the vehicle. Sometimes pumping the brake pedal will generate enough hydraulic pressure to stop the vehicle. Pump the Brakes.
  • 183.
    2-39 Find an EscapeRoute. Use the Parking Brake. The parking or emergency brake is separate from the hydraulic brake system. Therefore, it can be used to slow the vehicle. However, be sure to press the release button or pull the release lever at the same time you use the emergency brake so you can adjust the brake pressure and keep the wheels from locking up. While slowing the vehicle, look for an escape route--an open field, side street, or escape ramp. Turning uphill is a good way to slow and stop the vehicle. Make sure the vehicle does not start rolling backward after you stop. Put it in low gear, apply the parking brake, and, if necessary, roll back into some obstacle that will stop the vehicle. DRIVING EMERGENCIES
  • 184.
    2-39 DRIVING EMERGENCIES Brake Failureon Downgrades. Going slow enough and braking properly will almost always prevent brake failure on long downgrades. Once the brakes have failed, however, you are going to have to look outside your vehicle for something to stop it. Your best hope is an escape ramp. If there is one, there will be signs telling you about it. Use it. Ramps are usually located a few miles from the top of the downgrade. Every year, hundreds of drivers avoid injury to themselves or damage to their vehicles by using escape ramps. Some escape ramps use soft gravel that resists the motion of the vehicle and brings it to a stop. Others turn uphill, using the hill to stop the vehicle and soft gravel to hold it in place. Before driving in the mountains, you should know the escape ramps located on your route.
  • 185.
    185 DRIVING EMERGENCIES 2-39 If noescape ramp is available, take the least hazardous escape route you can--such as an open field or a side road that flattens out or turns uphill. Make the move as soon as you know your brakes do not work. the longer you wait, the faster the vehicle will go, and the harder it will be to stop. Any driver who loses brakes going downhill should use an escape ramp if it is available. If you do not use it, your chances of having a serious crash may be much greater. Brake Failure on Downgrades.
  • 186.
    2-40 Recognize Tire Failure. •Sound • Feel Tire Failure DRIVING EMERGENCIES • Vibration Quickly knowing you have a tire failure will let you have more time to react. Having just a few extra seconds to remember what it is you are supposed to do can help you. the major signs of tire failure are: The loud "bang" of a blowout is an easily recognized sign. Because it can take a few seconds for your vehicle to react, you might think it was some other vehicle. But any time you hear a tire blow, you would be safest to assume it is yours. If the vehicle thumps or vibrates heavily, it may be a sign that one of the tires has gone flat. With a rear tire, that may be the only sign you get. If the steering feels "heavy," it is probably a sign that one of the front tires has failed. Sometimes, failure of a rear tire will cause the vehicle to slide back and forth or "fishtail." However, dual rear tires usually prevent this.
  • 187.
    2-40 Respond to TireFailure. • Hold the Steering Wheel firmly • Stay Off the Brake. • Check the tires. Tire Failure DRIVING EMERGENCIES When a tire fails, your vehicle is in danger. You must immediately: If a front tire fails, it can twist the steering wheel out of your hand. The only way to prevent this is to keep a firm grip on the steering wheel with both hands at all times. It is natural to want to brake in an emergency. However, braking when a tire has failed could cause loss of control. Unless you are about to run into something, stay off the brake until the vehicle has slowed down. Then brake very gently, pull off the road, and stop. After you have come to a stop, get out and check all the tires. Do this even if the vehicle seems to be handling all right. If one of your dual tires goes, the only way you may know it is by getting out and looking at it.
  • 188.
    2-40 ANTILOCK BRAKING SYSTEMS(ABS) ABS is an addition to your normal brakes. It does not decrease or increase your normal braking capability. ABS only activates when wheels are about to lock up. ABS is a computerized system that keeps your wheels from locking up during hard brake applications. ABS does not necessarily shorten your stopping distance, but it does help you keep the vehicle under control during hard braking. How Antilock Braking Systems Work Sensors detect potential wheel lock up. An electronic control unit (ECU) will then decrease brake pressure to avoid wheel lockup. Brake pressure is adjusted to provide the maximum braking without danger of lockup. ABS works far faster than the driver can respond to potential wheel lockup. At all other times the brake system will operate normally.
  • 189.
    2-40 ANTILOCK BRAKING SYSTEMS(ABS) • Hydraulically braked trucks and buses with a gross vehicle weight rating of 10,000 lbs or more built on or after march 1, 1999. many commercial vehicles built before these dates have been voluntarily equipped with ABS. Vehicles Required to Have Antilock Braking Systems The department of transportation requires that ABS be on: • Truck tractors with air brakes built on or after march 1, 1997. • Other air brake vehicles, (trucks, buses, trailers, and converter dollies) built on or after march 1, 1998. Many commercial vehicles built before these dates have been voluntarily Equipped with ABS
  • 190.
    2-40 ANTILOCK BRAKING SYSTEMS(ABS) • Tractors, trucks, and buses will have yellow ABS malfunction lamps on the instrument panel. • Trailers will have yellow ABS malfunction lamps on the left side, either on the front or rear corner. • Dollies manufactured on or after march 1, 1998, are required to have a lamp on the left side. • As a system check on newer vehicles, the malfunction lamp comes on at start-up for a bulb check, and then goes out quickly. on older systems, the lamp could stay on until you are driving over five mph. • If the lamp stays on after the bulb check, or goes on once you are under way, you may have lost ABS control. • In the case of towed units manufactured before it was required by the department of transportation, it may be difficult to tell if the unit is equipped with ABS. Look under the vehicle for the ECU and wheel speed sensor wires coming from the back of the brakes. How to Know If Your Vehicle Is Equipped with ABS
  • 191.
    2-41 ANTILOCK BRAKING SYSTEMS(ABS) How ABS Helps You ABS on the Tractor Only or Only on the Trailer When you brake hard on slippery surfaces in a vehicle without ABS, your wheels may lock up. When your steering wheels lock up, you lose steering control. When your other wheels lock up, you may skid, jackknife, or even spin the vehicle. ABS helps you avoid wheel lock up and maintain control. You may or may not be able to stop faster with ABS, but you should be able to steer around an obstacle while braking, and avoid skids caused by over braking. • Having ABS on only the tractor, only the trailer, or even on only one axle, still gives you more control over the vehicle during braking. Brake normally. • When only the tractor has ABS, you should be able to maintain steering control, and there is less chance of jackknifing. • But keep your eye on the trailer and let up on the brakes (if you can safely do so) if it begins to swing out. • When only the trailer has ABS, the trailer is less likely to swing out, but if you lose steering control or start a tractor jackknife, let up on the brakes (if you can safely do so) until you regain control.
  • 192.
    2-41 ANTILOCK BRAKING SYSTEMS(ABS) Braking with ABS When you drive a vehicle with ABS, you should brake as you always have. In other words: There is only one exception to this procedure. If you drive a straight truck or combination with working ABS on all axles, in an emergency stop, you can fully apply the brakes. If your ABS is working properly, “stab” braking should not be used. • Use only the braking force necessary to stop safely and stay in control. • Brake the same way, regardless of whether you have ABS on the bus, tractor, the trailer, or both. • As you slow down, monitor your tractor and trailer and back off the brakes to stay in control. (If it is safe to do so)
  • 193.
    2-41 Without ABS youstill have normal brake functions. Drive and brake as you always have. Vehicles with ABS have yellow malfunction lamps to tell you if something is not working. As a system check on newer vehicles, the malfunction lamp comes on at start-up for a bulb check and then goes out quickly. On older systems, the lamp could stay on until you are driving over five mph. If the lamp stays on after the bulb check, or goes on once you are under way, you may have lost ABS control on one or more wheels. Remember, if your ABS malfunctions, you still have regular brakes. Drive normally, but get the system serviced soon. Braking If ABS Is Not Working ANTILOCK BRAKING SYSTEMS (ABS)
  • 194.
    2-41 Safety Reminders ANTILOCK BRAKINGSYSTEMS (ABS) • ABS will not allow you to drive faster, follow more closely, or drive less carefully. • ABS will not prevent power or turning skids. • ABS should prevent brake-induced skids or jackknifes, but not those caused by spinning the drive wheels or going too fast in a turn. • ABS will not necessarily shorten stopping distance. • ABS will not compensate for bad brakes or poor brake maintenance. • ABS will help maintain vehicle control, but not always shorten stopping distance. • ABS will not increase or decrease ultimate stopping power–ABS is an “add-on” to your normal brakes, not a replacement for them. • ABS will not change the way you normally brake. under normal brake conditions, your vehicle will stop as it always stopped. • ABS only comes into play when a wheel would normally have locked up because of over braking. Remember: The best vehicle safety feature is still a safe driver. Remember: Drive so you never need to use your ABS. Remember: If you need it, ABS could help to prevent a serious crash.
  • 195.
    2-42 SKID CONTROL ANDRECOVERY A skid happens whenever the tires lose their grip on the road. this is caused in one of four ways: • Over-Braking. • Over-Steering • Over-Acceleration • Driving Too Fast Braking too hard and locking up the wheels. Skids also can occur when using the speed retarder when the road is slippery. Turning the wheels more sharply than the vehicle can turn. Supplying too much power to the drive wheels, causing them to spin. Most serious skids result from driving too fast for road conditions. Drivers who adjust their driving to conditions do not over- accelerate and do not have to over-brake or over-steer from too much speed.
  • 196.
    2-42 Drive-wheel Skids SKID CONTROLAND RECOVERY By far the most common skid is one in which the rear wheels lose traction through excessive braking or acceleration. Skids caused by acceleration usually happen on ice or snow. taking your foot off the accelerator can easily stop them. (If it is very slippery, push the clutch in. otherwise, the engine can keep the wheels from rolling freely and regaining traction.) Rear wheel braking skids occur when the rear drive wheels lock. Because locked wheels have less traction than rolling wheels, the rear wheels usually slide sideways in an attempt to "catch up" with the front wheels. In a bus or straight truck, the vehicle will slide sideways in a "spin out." With vehicles towing trailers, a drive-wheel skid can let the trailer push the towing vehicle sideways, causing a sudden jackknife. See Figure 2.19.
  • 197.
    2-42 SKID CONTROL ANDRECOVERY Correcting a Drive-wheel Braking Skid • Stop Braking. • Turn Quickly. • Counter-steer. Do the following to correct a drive-wheel braking skid: This will let the rear wheels roll again, and keep the rear wheels from sliding any further. If on ice, push in the clutch to let the wheels turn freely. When a vehicle begins to slide sideways, quickly steer in the direction you want the vehicle to go-down the road. You must turn the wheel quickly. As a vehicle turns back on course, it has a tendency to keep on turning. Unless you turn the steering wheel quickly the other way, you may find yourself skidding in the opposite direction. Learning to stay off the brake, turn the steering wheel quickly, push in the clutch, and counter-steer in a skid takes a lot of practice. The best place to get this practice is on a large driving range or "skid” pad."
  • 198.
    2-42 Front-wheel Skids Driving toofast for conditions causes most front-wheel skids. Other causes include lack of tread on the front tires and cargo loaded so not enough weight is on the front axle. In a front-wheel skid, the front end tends to go in a straight line regardless of how much you turn the steering wheel. On a very slippery surface, you may not be able to steer around a curve or turn. SKID CONTROL AND RECOVERY When a front-wheel skid occurs, the only way to stop the skid is to let the vehicle slow down. Stop turning and/or braking so hard. Slow down as quickly as possible without skidding.
  • 199.
    2-43 ACCIDENT PROCEDURES When youare in an accident and not seriously hurt, you need to act to prevent further damage or injury. the basic steps to be taken at any accident are to: • Notify Authorities. • Protect the Area. • Care for the Injured. Protect the Area The first thing to do at an accident scene is to keep another accident from happening in the same spot. to protect the accident are: • If your vehicle is involved in the accident, try to get it to the side of the road. This will help prevent another accident and allow traffic to move. • Set out reflective triangles to warn other traffic. Make sure other drivers can see them in time to avoid the accident. • Put on your flashers. • If you are stopping to help, park away from the accident. The area immediately around the accident will be needed for emergency vehicles.
  • 200.
    2-44 Notify Authorities Care forthe Injured If you have a cell phone or C.B., call for assistance before you get out of your vehicle. If not, wait until after the accident scene has been properly protected, then phone or send someone to phone the police. try to determine where you are so you can give the exact location. If a qualified person is at the accident and helping the injured, stay out of the way unless asked to assist. Otherwise, do the best you can to help any injured parties. Here are some simple steps to follow in giving assistance: • Keep the injured person warm. • Do not move a severely injured person unless the danger of fire or passing traffic makes it necessary. • Stop heavy bleeding by applying direct pressure to the wound. ACCIDENT PROCEDURES
  • 201.
    2-44 FIRES Truck fires cancause damage and injury. Learn the causes of fires and how to prevent them. Know what to do to extinguish fires. Causes of Fire The following are some causes of vehicle fires: • Cargo. Flammable cargo, improperly sealed or loaded cargo, poor ventilation. • After accidents. Spilled fuel, improper use of flares. • Tires. under-inflated tires and duals that touch. • Electrical system. Short circuits due to damaged insulation, loose connections. • Fuel. driver smoking, improper fueling, loose fuel connections. Fires
  • 202.
    2-44 Fire Prevention Pay attentionto the following: • Caution. Use normal caution in handling anything flammable. • Pre-trip Inspection. Make a complete inspection of the electrical, fuel, and exhaust systems, tires, and cargo. Be sure to check that the fire extinguisher is charged. • En Route Inspection. Check the tires, wheels, and truck body for signs of heat whenever you stop during a trip. • Follow safe Procedures. Follow correct safety procedures for fueling the vehicle, using brakes, handling flares, and other activities that can cause a fire. • Monitoring. Check the instruments and gauges often for signs of overheating and use the mirrors to look for signs of smoke from tires or the vehicle.
  • 203.
    2-44 Pull off theRoad. The first step is to get the vehicle off the road and stop. In doing so: • Notify emergency services of your problem and your location. • Park in an open area, away from buildings, trees, brush, other vehicles, or anything that might catch fire. • Do not pull into a service station! Keep the fire from spreading Fire Fighting With an engine fire, turn off the engine as soon as you can. Do not open the hood if you can avoid it. Shoot foam through louvers, radiator, or from the vehicle’s underside.
  • 204.
    204 • Aim atthe source or base of the fire, not up in the flames. • When using the extinguisher, stay as far away from the fire as possible. Extinguish the Fire. For a cargo fire in a van or box trailer, keep the doors shut, especially if your cargo contains hazardous materials. Opening the van doors will supply the fire with oxygen and can cause it to burn very fast. Knowing how to fight fires is important. Drivers who did not know what to do have made fires worse. Know how the fire extinguisher works. Study the instructions printed on the extinguisher before you need it. Here are some procedures to follow in case of fire. Fire Fighting 2-44
  • 205.
    2-45 Use the Rightfire extinguisher Water can be used on wood, paper, or cloth, but do not use water on an electrical fire (can cause shock) or a gasoline fire (it will spread the flames). The B:C type fire extinguisher is designed to work on electrical fires and burning liquids. The A:B:C type is designed to work on burning wood, paper, and cloth as well. A burning tire should be cooled with water. Lots of water may be needed. If you are not sure what to use, especially on a hazardous materials fire, wait for firefighters. Position yourself upwind. Let the wind carry the extinguisher to the fire rather than carrying the flames to you. Continue until whatever was burning has been cooled. Absence of smoke or flame does not mean the fire cannot restart.
  • 206.
    206 Use the Rightfire extinguisher 2-45
  • 207.
    2460 ALCOHOL, OTHER DRUGS,AND DRIVING Alcohol and Driving Drinking alcohol and then driving is very dangerous and a serious problem. People who drink alcohol are involved in traffic accidents resulting in over 20,000 deaths every year. Alcohol impairs muscle coordination, reaction time, depth perception, and night vision. It also affects the parts of the brain that control judgment and inhibition. Impairment begins with the first drink.
  • 208.
    208 There are manydangerous ideas about the use of alcohol. The driver who believes in these wrong ideas will be more likely to get into trouble. Here are some examples: The Truth About Alcohol • How alcohol works in the human body. • How it affects driving. • Laws regarding drinking and driving. • Legal, financial, and safety risks of drinking and driving. You should know: ALCOHOL, OTHER DRUGS, AND DRIVING 2460
  • 209.
    2-20 Alcohol goes directlyfrom the stomach into the blood stream and is carried to the brain. After passing through the brain, a small percentage is removed in urine, perspiration, and by breathing, while the rest is carried to the liver. The liver can only process one-third an ounce of alcohol per hour, which is considerably less than the alcohol in a standard drink. This is a fixed rate, so only time, not black coffee or a cold shower, will sober you up. If you have drinks faster than your body can get rid of them, you will have more alcohol in your body, and your driving will be more affected. The Blood Alcohol Concentration (BAC) commonly measures the amount of alcohol in your body. How Alcohol Works
  • 210.
    210 It is thealcohol in drinks that affects human performance. It does not make any difference whether that alcohol comes from “a couple of beers” or from two glasses of wine or two shots of hard liquor. All of the following drinks contain the same amount of alcohol: ➢ A 12-ounce glass of 5% beer. ➢ A 5-ounce glass of 12% wine. ➢ A 1 1/2-ounce shot of 80 proof liquor. What Is a Drink? How Alcohol Works 2-20
  • 211.
    2-46 What determines bloodalcohol concentration? Alcohol and the Brain. BAC is determined by the amount of alcohol you drink (more alcohol means higher BAC), how fast you drink (faster drinking means higher BAC), and your weight (a small person does not have to drink as much to reach the same BAC). Alcohol affects more and more of the brain as BAC builds up. The first part of the brain affected controls judgment and self-control. One of the bad things about this is it can keep drinkers from knowing they are getting drunk. :
  • 212.
    212 These effects meanincreased chances of a crash and chances of losing your driver’s license. Accident statistics show that the chance of a crash is much greater for drivers who have been drinking than for drivers who have not. • Straddling lanes. • Quick, jerky starts. • Not signaling, failure to use lights. • Running stop signs and red lights. • Improper passing. What determines blood alcohol concentration? 2-46 And, of course, good judgment and self-control are absolutely necessary for safe driving. As BAC continues to build up, muscle control, vision, and coordination are affected more and more. Effects on driving may include:
  • 213.
    2-47 How Alcohol AffectsDriving. All drivers are affected by drinking alcohol. Alcohol affects judgment, vision, coordination, and reaction time. It causes serious driving errors, such as: • Weaving. • Increased reaction time to hazards. • Driving too fast or too slow • Driving in the wrong lane. • Running over the curb.
  • 214.
    214 The Truth AboutAlcohol and Driving
  • 215.
  • 216.
    2-48 Other Drugs Besides alcohol,other legal and illegal drugs are being used more often Laws prohibit possession or use of many drugs while on duty. They prohibit being under the influence of any "controlled substance," amphetamines (including "pep pills,“ “uppers,” and "bennies"), narcotics, or any other substance, which can make the driver unsafe. this could include a variety of prescription and over-the-counter drugs (cold medicines), which may make the driver drowsy or otherwise affect safe driving ability However, possession and use of a drug given to a driver by a doctor is permitted if the doctor informs the driver that it will not affect safe driving ability. Be sure your doctor is aware of all drugs that you are taking because of possible interactions between the drugs that may affect your driving.
  • 217.
    217 Pay attention towarning labels for legitimate drugs and medicines, and to doctor’s orders regarding possible effects. Stay away from illegal drugs. Do not use any drug that hides fatigue--the only cure for fatigue is rest. Alcohol can make the effects of other drugs much worse. the safest rule is do not mix drugs with driving at all. Use of drugs can lead to traffic accidents resulting in death, injury, and property damage. Furthermore, it can lead to arrest, fines, and jail sentences. It can also mean the end of a person’s driving career. Other Drugs
  • 218.
    2-48 STAYING ALERT ANDFIT TO DRIVE Driving a vehicle for long hours is tiring. Even the best of drivers will become less alert. However, there are things that good drivers do to help stay alert and safe. Be Ready to Drive Get Enough Sleep Sleep is not like money. You cannot save it up ahead of time and you cannot borrow it. But, just as with money, you can go into debt with it. If you do not sleep enough, you “owe” more sleep to yourself. this debt can only be paid off by sleeping. You cannot overcome it with willpower, and it will not go away by itself. The average person needs seven or eight hours of sleep every 24 hours. Leaving on a long trip when you are already tired is dangerous. If you have a long trip scheduled, make sure that you get enough sleep before you go.
  • 219.
    219 Try to arrangeyour schedule so you are not in “sleep debt” before a long trip. Your body gets used to sleeping during certain hours. If you are driving during those hours, you will be less alert. If possible, try to schedule trips for the hours you are normally awake. Many heavy motor vehicle accidents occur between midnight and 6 a.m. Tired drivers can easily fall asleep at these times, especially if they do not regularly drive at those hours. Trying to push on and finish a long trip at these times can be very dangerous. Schedule Trips Safely STAYING ALERT AND FIT TO DRIVE Resistance to fatigue and improved sleep are among the benefits of regular exercise. try to incorporate exercise into your daily life. Instead of sitting and watching TV. in your sleeper, walk or jog a few laps around the parking lot. A little bit of daily exercise will give you energy throughout the day. Try to arrange your schedule so you are not in “sleep debt” before a long trip. Your body gets used to sleeping during certain hours. If you are driving during those hours, you will be less alert. If possible, try to schedule trips for the hours you are normally awake. Many heavy motor vehicle accidents occur between midnight and 6 a.m. Tired drivers can easily fall asleep at these times, especially if they do not regularly drive at those hours. Trying to push on and finish a long trip at these times can be very dangerous. Exercise Regularly
  • 220.
    2-48 Eat Healthy. Avoid Medication. Itis often hard for drivers to find healthy food. But with a little extra effort, you can eat healthy, even on the road. Try to find restaurants with healthy, balanced meals. If you must eat at fast-food restaurants, pick low-fat items. Another simple way to reduce your caloric intake is to eliminate fattening snacks. Instead, try fruit or vegetables. Many medicines can make you sleepy. Those that do have a label warning against operating vehicles or machinery. The most common medicine of this type is an ordinary cold pill. If you have to drive with a cold, you are better off suffering from the cold than from the effects of the medicine. STAYING ALERT AND FIT TO DRIVE
  • 221.
    2-49 Visit Your Doctor. Regularcheckups literally can be lifesavers. Illnesses such as diabetes, heart disease, and skin and colon cancer can be detected easily and treated if found in time. You should consult your physician or a local sleep disorder center if you suffer from frequent daytime sleepiness, have difficulty sleeping at night, take frequent naps, fall asleep at strange times, snore loudly, gasp and choke in your sleep, and/or wake up feeling as though you have not had enough sleep. While You Are Driving Keep Cool Take Breaks A hot, poorly ventilated vehicle can make you sleepy. Keep the window or vent cracked open or use the air conditioner, if you have one. Short breaks can keep you alert. But the time to take them is before you feel really drowsy or tired. Stop often. Walk around and inspect your vehicle. It may help to do some physical exercises. Be sure to take a mid-afternoon break and plan to sleep between midnight and 6 a.m. STAYING ALERT AND FIT TO DRIVE
  • 222.
    2-49 Recognize The DangerSignals Of Drowsy Driving. Sleep is not voluntary. If you are drowsy, you can fall asleep and never even know it. If you are drowsy, you are likely to have “micro sleeps”- brief naps that last around four or five seconds. At 55 miles an hour, that is more than 100 yards, and plenty of time for a crash. Even if you are not aware of being drowsy, if you have a sleep debt you are still at risk. Here are a few ways to tell if you are about to fall asleep. If you experience any of these danger signs, take them as a warning that you could fall asleep without meaning to:
  • 223.
    223 Recognize The DangerSignals Of Drowsy Driving. • Your eyes close or go out of focus by themselves. If you have even one of these symptoms, you are in danger of falling asleep. Pull off the road in a safe place and take a nap. • You have drifted off the road and narrowly missed crashing. • You keep jerking the truck back into the lane. • You drift between lanes, tailgate, or miss traffic signs. • You do not remember driving the last few miles. • You have wandering, disconnected thoughts. • You cannot stop yawning. • You have trouble keeping your head up.
  • 224.
    2-49 When You DoBecome Sleepy Stop To Sleep Take A Nap Avoid Drugs When you are sleepy, trying to "push on" is far more dangerous than most drivers think. It is a major cause of fatal accidents. Here are some important rules to follow. When your body needs sleep, sleep is the only thing that will work. If you have to make a stop anyway, make it whenever you feel the first signs of sleepiness, even if it is earlier than you planned. By getting up a little earlier the next day, you can keep on schedule without the danger of driving while you are not alert. If you cannot stop for the night, at least pull off at a safe place, such as a rest area or truck stop, and take a nap. A nap as short as a half-hour will do more to overcome fatigue than a half-hour coffee stop. There are no drugs that can overcome being tired. While they may keep you awake for a while, they will not make you alert. And eventually, you will be even more tired than if you had not taken them at all. Sleep is the only thing that can overcome fatigue.
  • 225.
    When You BecomeSleepy Do Not • Do not rely on coffee or another source of caffeine to keep you awake. Do not count on the radio, an open window, or other tricks to keep you awake • Once in a while, you may become so ill that you cannot operate a motor vehicle safely. If this happens to you, you must not drive. However, in case of an emergency, you may drive to the nearest place where you can safely stop.
  • 226.
    2-50 HAZARDOUS MATERIALS RULESFOR ALL COMERRCIAL DRIVERS All drivers should know something about hazardous materials. You must be able to recognize hazardous cargo, and you must know whether or not you can haul it without having a hazardous materials endorsement on your CDL license.
  • 227.
    What Are HazardousMaterials? Why Are There Rules? Hazardous materials are products that pose a risk to health, safety, and property during transportation. See Figure 2.24. You must follow the many rules about transporting hazardous materials. The intent of the rules is to: • Ensure Safe Drivers And Equipment. • Communicate The Risk. • Contain The Product. 2-51
  • 228.
    228 Many hazardous productscan injure or kill on contact. to protect drivers and others from contact, the rules tell shippers how to package safely. Similar rules tell drivers how to load, transport, and unload bulk tanks. These are containment rules. To Contain The Product. To Communicate The Risk. The shipper uses a shipping paper and diamond shaped hazard labels to warn dockworkers and drivers of the risk. The shipping paper describes the hazardous materials being transported. Shipping orders, bills of lading and manifests are all shipping papers. Shippers put four-inch diamond shaped hazard warning labels on most hazardous materials packages. These labels inform others of the hazard. If the diamond label will not fit on the container, shippers put the label on the tag. For example, compressed gas cylinders that will not hold a label will have tags or decals. Labels look like the examples shown in figure Hazardous Materials 2-51
  • 229.
    After an accidentor hazardous material spill or leak, you may be injured and unable to communicate the hazards of the materials you are transporting. Firefighters and police can prevent or reduce the amount of damage or injury at the scene if they know what hazardous materials are being carried. Your life, and the lives of others, may depend on quickly locating the hazardous materials shipping papers. For that reason, you must tab shipping papers related to hazardous materials or keep them on top of other shipping papers. You must also keep shipping papers: • On the driver’s seat when out of the vehicle. • In a pouch on the driver’s door, or • In clear view within reach while driving 2-51 Hazardous Materials
  • 230.
    Lists of RegulatedProducts Placards Are used to warn others of hazardous materials. Placards are signs put on the outside of a vehicle that identify the hazard class of the cargo. A placarded vehicle must have at least four identical placards. They are put on the front, rear, and both sides. Placards must be readable from all four directions. They must be at least 10 3/4 inches square, turned upright on a point, in a diamond shape. Cargo tanks and other bulk packaging display the identification number of their contents on placards or orange panels 2-51
  • 231.
    231 Not all vehiclescarrying hazardous materials need to have placards. The rules about placards are given in Section 9 of this manual. You can drive a vehicle that carries hazardous materials if it does not require placards. If it requires placards, you cannot drive it unless your driver license has the hazardous materials endorsement. See Figure 2.26. Are a four digit code used by first responders to identify hazardous materials. An identification number may be used to identify more than one chemical on shipping papers. The identification number will be preceded by the letters “NA” or “UN”. the US DOT Emergency response Guide (ERG) lists the chemicals and the identification numbers assigned to them.. Identification numbers Lists of Regulated Products
  • 232.
    The rules requireall drivers of placarded vehicles to learn how to safely load and transport hazardous products. They must have a commercial driver license with the hazardous materials endorsement. To get the required endorsement, you must pass a written test on material found in Section 9 of this manual. You also will need a tank endorsement if you transport Hazardous products in a cargo tank on a truck larger than 26,000 pounds, gross vehicle weight rating or certain vehicles that transport liquids or gases. The liquid or gas does not have to be a hazardous material. A tank endorsement is only required if your vehicle needs a class A or B CDL and your vehicle has a permanently mounted cargo tank of any capacity; or your vehicle is carrying a portable tank with a capacity of 1,000 gallons or more 2-51 Hazardous Materials
  • 233.
    233 Hazardous materials driversmust also know which products they can load together, and which they cannot. these rules are also in Section 9. Before loading a truck with more than one type of product, you must know if it is safe to load them together. If you do not know, ask your employer and consult the regulations. Drivers who need the hazardous materials endorsement must learn the placard rules. If you do not know if your vehicle needs placards, ask your employer. Never drive a vehicle needing placards unless you have the hazardous materials endorsement. To do so is a crime. When stopped, you will be cited and you will not be allowed to drive your truck further. It will cost you time and money. A failure to placard when needed may risk your life and others if you have an accident. Emergency help will not know of your hazardous cargo. Hazardous Materials 2-51
  • 234.
  • 235.
    1. What isthe most important reason for doing a vehicle inspection? PG. 2-1 A. To make sure the vehicle is safe D. For you to get to know your vehicle B. For you C. For other road users 2. What things should you check during a trip? (ENROUTE INSPECTION) PG. 2-2 Everything • Instruments. • Cargo, • Tires. • Mirrors. • Ammeter/voltmeter. • Pressure gauges. • Temperature gauges. • Air pressure gauge (if you have air brakes). • Lights. •Cargo covers Test Your Knowledge 2-11
  • 236.
    3. Name somekey steering system parts. PG. 2-3 Test Your Knowledge 4. Name some suspension system defects. PG. 2-3 Tie Rods Steering Wheel Steering Knuckle Spindle Drag Link Steering shaft Gear box Pitman Arm Cracked or broken spring hangers Torque rod or arm, u-bolts, spring hangers that are cracked or broken Leaking shock absorbers Missing or broken leaves in any leaf spring Air suspension systems that are damaged and/or leaking Steering Arm Hydraulic Fluid Reservoir Power Steering Cylinder 2-11
  • 237.
    5. What threekinds of emergency equipment must you have? PG. 2-4 & 2-7 Spare Fuses Warning Devices 3 Reflective triangles Fire Extinguisher Test Your Knowledge 6. What is the minimum tread depth for front tires? PG. 2-2 7. For other tires? PG. 2-2 8. What should wheel bearing seals be checked for? PG. 2-8 4/32 or 1/16 2/32 or 1/8 Wheel bearing/ seals should not be leaking 2-11
  • 238.
    9. Name somethings you should check on the front of your vehicle during the walk-around inspection. PG. 2-5, 2-6, 10. How do you test hydraulic brakes for leaks? PG. 2-7 All lights not cracked, missing, or broken Test Your Knowledge All reflectors not cracked, missing, or broken Condition of axel Vehicle leaning to one side Fresh fluid leaks under the vehicle Condition of suspension system Condition of windshield The pedal should not move. Pump the brake pedal three times. Then apply firm pressure to the pedal and hold for five seconds If it does, there may be a leak or other problem. Get it fixed before driving. 2-11
  • 239.
    2-15 Test Your Knowledge 11.Why should you back toward the driver’s side? PG 2-8 Back to the driver’s side so you can see better. You can watch the rear of your vehicle by looking out the side window. 12. If stopped on a hill, how can you start moving without rolling back? PG 2-12 Accelerating If you have a manual transmission vehicle, partly engage the clutch before you take your right foot off the brake. Put on the parking brake whenever necessary to keep from rolling back. release the parking brake only when you have applied enough engine power to keep from rolling back. On a tractor-trailer equipped with a trailer brake hand valve, the hand valve can be applied to keep from rolling back. 13. When backing, why is it important to use a helper? 2-12 There are blind spots you cannot see. Before you begin backing, work out a set of hand signals that you both understand. Agree on a signal for “STOP."
  • 240.
    Test Your Knowledge 14.What is the most important hand signal that you and the helper should agree on? 15. What are the two special conditions where you should downshift? Before starting down a Hill. Before entering a curve. 16. When should you downshift automatic transmissions? PG. Before starting down a Hill.
  • 241.
    Test Your Knowledge 17.Retarders keep you from skidding when the road is slippery. PG 2-14 or ? 18. What are the two ways to know when to shift? PG 2-13 Use Engine Speed (rpm). Use Road Speed (mph). When your drive wheels have poor traction, the retarder may cause them to skid. Therefore, you should turn the retarder off whenever the road is wet, icy, or snow covered. True False These questions may be on the test. If you cannot answer them all, re-read subsections 2.4, 2.5, and 2.6.
  • 242.
    2-21 Test Your Knowledge 19.How far ahead does the manual say you should look? PG. 2-15 20. What are two main things to look for ahead? PG. 2-15 21. What is your most important way to see the sides and rear of your vehicle? PG 2-16 22. What does "communicating" mean in safe driving? PG 2-17 Most good drivers look at least 12 to 15 seconds ahead Look for traffic Watch for brake lights from slowing vehicles- Look for Road conditions Pay attention to traffic signals and signs. If a light has been green for a long time, it will probably change before you get there Check your mirrors regularly Signaling Your Intentions
  • 243.
    2-21 Test Your Knowledge 23.Where should your reflectors be placed when stopped on a divided highway? PG2-18 24. What three things add up to total stopping distance? Perception Distance Reaction Distance. Braking Distance
  • 244.
    2-21 Test Your Knowledge 25.If you go twice as fast, will your stopping distance increase by two or four times? PG19 26. Empty trucks have the best braking. PG 2-19 27. What is hydroplaning? PG 2-20 28. What is “Black Ice”? PG 2-20 Whenever you double your speed, it takes about four times as much distance to stop and your vehicle will have four times the destructive power if it crashes. True or False ? Brakes, tires, springs, and shock absorbers on heavy vehicles are designed to work best when the vehicle is fully loaded. It is like water skiing--the tires lose their contact with the road and have little or no traction. A thin layer of ice that is clear enough that you can see the road underneath. It makes the road look wet
  • 245.
    2-27 Test Your Knowledge 29.How do you find out how many seconds of following distance space you have? Pg 2-22 30. If you are driving a 30-foot vehicle at 55 mph, how many seconds of following distance should you allow? PG.2-22 PG 35 Pub 95 PG F-31 Pub 117 31. You should decrease your following distance if somebody is following you too closely. Or ? To know how much space you have, wait until the vehicle ahead passes a shadow on the road, a pavement marking, or some other clear landmark. then count off the seconds like this: "one thousand-and-one, one thousand-and-two“ and so on, until you reach the same spot A 4-second following distance, will allow you to steer or brake to avoid a hazard safely on the highway, if the pavement is dry At speeds greater than 40 mph, you must add 1 second for safety Opening up room in front of you will help you to avoid having to make sudden speed or direction changes. It also makes it easier for the tailgater to get around you. True False
  • 246.
    2-27 32. If youswing wide to the left before turning right, another driver may try to pass you on the right. Or ? PG. 2-23 33. What is a hazard? PG. 2-24 34. Why make emergency plans when you see a hazard? PG 2-27 Test Your Knowledge False True • Do not turn wide to the left as you start the turn. A following driver may think you are turning left and try to pass you on the right. You may crash into the other vehicle as you complete your turn. A hazard is any condition which causes our trip to be unsafe. A road condition or other road user (driver, bicyclist, pedestrian) that is a possible danger can be a hazard. Always be prepared to take action based on your plans. In this way, you will be a prepared, defensive driver who will improve your own safety as well as the safety of all road user
  • 247.
    2-29 35. What aresome tips to follow so you will not become a distracted driver? PG. 28 36. How do you use in-vehicle communications equipment cautiously? PG. 28 Test Your Knowledge Be totally familiar with all safety and usage features on any in-vehicle you use (Pre-trip) Do not engage in complex or emotionally intense conversations with other Do not use hand held cell phones No texting and driving When possible, pull off the road in a safe, legal place when making/receiving a call on communication equipment.
  • 248.
    2-29 38. What isthe difference between aggressive driving and road rage? PG. 29 37. How do you recognize a distracted driver? PG. 28 Test Your Knowledge Road rage is operating a motor vehicle with the intent of doing harm to others or physically assaulting a driver or their vehicle Aggressive driving is the act of operating a motor vehicle in a selfish, bold, or pushy manner, without regard for the rights or safety of others. • Vehicles that may drift over the lane divider lines or within their own lane. • Vehicles traveling at inconsistent speeds. • Drivers who are preoccupied with maps, food, cigarettes, cell phones, or other objects. • Drivers who appear to be involved in conversations with their passengers.
  • 249.
    2-29 40. What aresome things you can do to reduce your stress before and while you drive? PG. 2-29 39. What should you do when confronted with an aggressive driver? PG. 2-29 Test Your Knowledge Report aggressive drivers Call the police. Get out of their way. Put your pride in the back seat. Avoid eye contact. Ignore gestures and refuse to react to them. Be a cautious and courteous driver. “Be my guest.” Avoid gestures Do not drive slowly in the left lane of traffic. Listen to “easy listening” music. Do not allow yourself to become distracted by talking on your cell phone Be realistic about your travel time.
  • 250.
    41. You shoulduse low beams whenever you can. PG.2-31 or ? 42. What should you do before you drive if you are drowsy? PG. 2-31 True False Use High beams When You Can. Some drivers make the mistake of always using low beams. This seriously cuts down on their ability to see ahead. Use high beams when it is safe and legal to do so. Use them when you are not within 500 feet of an approaching vehicle. Also, do not let the inside of your cab get too bright. This makes it harder to see outside. Keep the interior light off, and adjust your instrument lights as low as you can to still be able to read the gauges. Pre-trip Procedures Make sure you are rested and alert. If you are drowsy, sleep before you drive! Even a nap can save your life or the lives of others. If you wear eyeglasses, make sure they are clean and unscratched. Do not wear sunglasses at night. Do a complete pre-trip inspection of your vehicle and yourself. Pay attention to checking all lights and reflectors, and cleaning those you can reach. 2-34 Test Your Knowledge
  • 251.
    43. What effectscan wet brakes cause? PG. 2-32 44. How can you avoid these problems? PG. 2-32 Wet Brakes. When driving in heavy rain or deep standing water, your brakes will get wet. Water in the brakes can cause the brakes to be weak, to apply unevenly, or to grab. This can cause lack of braking power, wheel lockups, pulling to one side or the other, and jackknife if you pull a trailer Avoid driving through deep puddles or flowing water if possible! 2-34 Test Your Knowledge
  • 252.
    46. You cansafely remove the radiator cap as long as the engine is not overheated. or ? 45. You should let air out of hot tires so the pressure goes back to normal. PG.2-34 or ? True True False False 2-34 Test Your Knowledge • Tires Before driving check the tire mounting and air pressure. Inspect the tires every two hours or every 100 miles when driving in very hot weather. Air pressure increases with temperature. Do not let air out or the pressure will be too low when the tires cool off. If a tire is too hot to touch, remain stopped until the tire cools off. Otherwise the tire may blow out or catch fire. Never remove the radiator cap or any part of the pressurized system until the system has cooled. Steam and boiling water can spray under pressure and cause severe burns. If you can touch the radiator cap with your bare hand, it is probably cool enough to open.
  • 253.
    2-37 Test Your Knowledge 47.What factors determine your selection of a "safe" speed when going down a long, steep downgrade? PG. 2-36 48. Why should you be in the proper gear before starting down a hill? PG. 2-36 • total weight of the vehicle and cargo. • Length of the grade. • Steepness of the grade. • road conditions. • Weather. Shift the transmission to a low gear before starting down the grade. Do not try to downshift after your speed has already built up. You will not be able to shift into a lower gear. You may not even be able to get back into any gear and all engine braking effect will be lost. Forcing an automatic transmission into a lower gear at high speed could damage the transmission and also lead to loss of all engine braking effect.
  • 254.
    2-37 Test Your Knowledge 51.How long does it take for a typical tractor-trailer unit to clear a double track? PG 49. Describe the proper braking technique when going down a long, steep downgrade. PG 2-37 50. What type of vehicles can get stuck on a railroad-highway crossing? PG • Apply the brakes just hard enough to feel a definite slowdown. • When your speed has increased to your "safe" speed, repeat steps 1 and 2. • When your speed has been reduced to approximately five mph below your "safe" speed, release the brakes. (This brake application should last for about three seconds.) Special Situations Be Aware! these trailers can get stuck on raised crossings: • Low slung units (lowboy, car carrier, moving van, possum-belly livestock trailer). • Single-axle tractor pulling a long trailer with its landing gear set to accommodate a tandem-axle tractor.
  • 255.
    2-43 Test Your Knowledge 52.Stopping is not always the safest thing to do in an emergency. PG 2-38 53. What are some advantages of going right instead of left around an obstacle? PG 2-38 or ? True False Steering to Avoid a Crash Stopping is not always the safest thing to do in an emergency. When you do not have enough room to stop, you may have to steer away from what is ahead. remember, you can almost always turn to miss an obstacle more quickly than you can stop. (However, top-heavy vehicles and tractors with multiple trailers may flip over.) Where to steer If an oncoming driver has drifted into your lane, a move to your right is best. If that driver realizes what has happened, the natural response will be to return to his or her own lane. If something is blocking your path, the best direction to steer will depend on the situation. If you have been using your mirrors, you will know which lane is empty and can be safely used. If the shoulder is clear, going right may be best. No one is likely to be driving on the shoulder but someone may be passing you on the left. You will know if you have been using your mirrors. If you are blocked on both sides, a move to the right may be best. At least you will not force anyone into an opposing traffic lane and a possible head-on collision.
  • 256.
    2-43 Test Your Knowledge 55.If a tire blows out, you should put the brakes on hard to stop quickly. PG.2-40 54. What is an "escape ramp?“ PG 2-39 Your best hope is an escape ramp. If there is one, there will be signs telling you about it. Use it. Ramps are usually located a few miles from the top of the downgrade. Every year, hundreds of drivers avoid injury to themselves or damage to their vehicles by using escape ramps. Some escape ramps use soft gravel that resists the motion of the vehicle and brings it to a stop. Others turn uphill, using the hill to stop the vehicle and soft gravel to hold it in place. Before driving in the mountains, you should know the escape ramps located on your route. or ? True False • Stay Off the Brake. It is natural to want to brake in an emergency. However, braking when a tire has failed could cause loss of control. Unless you are about to run into something, stay off the brake until the vehicle has slowed down. Then brake very gently, pull off the road, and stop.
  • 257.
    2-43 Test Your Knowledge 56.How do you know if your vehicle has antilock brakes? PG 2-40 Tractors, trucks, and buses will have yellow ABS malfunction lamps on the instrument panel. Trailers will have yellow ABS malfunction lamps on the left side, either on the front or rear corner. Dollies manufactured on or after march 1, 1998, are required to have a lamp on the left side. As a system check on newer vehicles, the malfunction lamp comes on at start-up for a bulb check, and then goes out quickly. on older systems, the lamp could stay on until you are driving over five mph. If the lamp stays on after the bulb check, or goes on once you are under way, you may have lost ABS control. In the case of towed units manufactured before it was required by the department of transportation, it may be difficult to tell if the unit is equipped with ABS. Look under the vehicle for the ECU and wheel speed sensor wires coming from the back of the brakes. How to Know If Your Vehicle Is Equipped with ABS
  • 258.
    2-43 57. What isthe proper braking technique when driving a vehicle with antilock brakes? PG. 2-40 Test Your Knowledge Braking with ABS When you drive a vehicle with ABS, you should brake as you always have. In other words: • Use only the braking force necessary to stop safely and stay in control. • Brake the same way, regardless of whether you have ABS on the bus, tractor, the trailer, or both. • As you slow down, monitor your tractor and trailer and back off the brakes to stay in control. (if it is safe to do so)
  • 259.
    2-43 58. How doantilock brakes help you? PG. 2-41 Test Your Knowledge How ABS Helps You When you brake hard on slippery surfaces in a vehicle without ABS, your wheels may lock up. When your steering wheels lock up, you lose steering control. When your other wheels lock up, you may skid, jackknife, or even spin the vehicle. ABS helps you avoid wheel lock up and maintain control. You may or may not be able to stop faster with ABS, but you should be able to steer around an obstacle while braking, and avoid skids caused by over braking.
  • 260.
    2-45 59. What aresome things to do at an accident scene to prevent another accident? PG. 2-43 60. Name two causes of tire fires. PG 2-44 Test Your Knowledge Protect the Area Try to get it to the side of the road If you are stopping to help, park away from the accident Put on your flashers. Set out reflective triangles to warn other traffic. • Tires. under-inflated tires and duals that touch. 61. What kinds of fires is A:B:C extinguisher not good for? PG 2-45 A burning tire should be cooled with water A hazardous materials fire, wait for firefighters.
  • 261.
    2-45 63. Name somecauses of vehicle fires. PG 2-44 62. When using your extinguisher, should you get as close as possible to the fire? PG 2-44 Test Your Knowledge • When using the extinguisher, stay as far away from the fire as possible. The following are some causes of vehicle fires: • Cargo. Flammable cargo, improperly sealed or loaded cargo, poor ventilation. • After accidents. Spilled fuel, improper use of flares. • Tires. under-inflated tires and duals that touch. • Electrical system. Short circuits due to damaged insulation, loose connections. • Fuel. driver smoking, improper fueling, loose fuel connections.
  • 262.
    64. Common medicinesfor colds can make you sleepy. PG 2-48 or ? 65. What should you do if you become sleepy while driving? PG 2-49 True False 2-52 Test Your Knowledge Avoid Medication. Many medicines can make you sleepy. Those that do have a label warning against operating vehicles or machinery. The most common medicine of this type is an ordinary cold pill. If you have to drive with a cold, you are better off suffering from the cold than from the effects of the medicine. If you have even one of these symptoms, you are in danger of falling asleep. Pull off the road in a safe place and take a nap.
  • 263.
    2-52 Test Your Knowledge 66.Coffee and a little fresh air will help a drinker sober up. PG or ? True False How Alcohol Works Alcohol goes directly from the stomach into the blood stream and is carried to the brain. After passing through the brain, a small percentage is removed in urine, perspiration, and by breathing, while the rest is carried to the liver. The liver can only process one-third an ounce of alcohol per hour, which is considerably less than the alcohol in a standard drink. This is a fixed rate, so only time, not black coffee or a cold shower, will sober you up. If you have drinks faster than your body can get rid of them, you will have more alcohol in your body, and your driving will be more affected. The Blood Alcohol Concentration (BAC) commonly measures the amount of alcohol in your body.
  • 264.
    264 Are used towarn others of hazardous materials. Placards are signs put on the outside of a vehicle that identify the hazard class of the cargo. A placarded vehicle must have at least four identical placards. They are put on the front, rear, and both sides. Placards must be readable from all four directions. They must be at least 10 3/4 inches square, turned upright on a point, in a diamond shape. Cargo tanks and other bulk packaging display the identification number of their contents on placards or orange panels 67. What is a hazardous materials placard? PG 2-51 Test Your Knowledge 68. Why are placards used? PG 2-51 Are used to warn others of hazardous materials. Placards are signs put on the outside of a vehicle that identify the hazard class of the cargo. A placarded vehicle must have at least four identical placards. They are put on the front, rear, and both sides. Placards must be readable from all four directions. They must be at least 10 3/4 inches square, turned upright on a point, in a diamond shape. Cargo tanks and other bulk packaging display the identification number of their contents on placards or orange panels
  • 265.
    69. What is“sleep debt”? PG 2-52 Test Your Knowledge Get Enough Sleep Sleep is not like money. You cannot save it up ahead of time and you cannot borrow it. But, just as with money, you can go into debt with it. If you do not sleep enough, you “owe” more sleep to yourself. this debt can only be paid off by sleeping. You cannot overcome it with willpower, and it will not go away by itself. The average person needs seven or eight hours of sleep every 24 hours. Leaving on a long trip when you are already tired is dangerous. If you have a long trip scheduled, make sure that you get enough sleep before you go. Sleep is not voluntary. If you are drowsy, you can fall asleep and never even know it. If you are drowsy, you are likely to have “micro sleeps”-brief naps that last around four or five seconds. At 55 miles an hour, that is more than 100 yards, and plenty of time for a crash. Even if you are not aware of being drowsy, if you have a sleep debt you are still at risk. Here are a few ways to tell if you are about to fall asleep. If you experience any of these danger signs, take them as a warning that you could fall asleep without meaning to:
  • 266.
    • Your eyesclose or go out of focus by themselves. If you have even one of these symptoms, you are in danger of falling asleep. Pull off the road in a safe place and take a nap. • You have drifted off the road and narrowly missed crashing. • You keep jerking the truck back into the lane. • You drift between lanes, tailgate, or miss traffic signs. • You do not remember driving the last few miles. • You have wandering, disconnected thoughts. • You cannot stop yawning. • You have trouble keeping your head up. 70. What are the danger signals of drowsy driving? PG 2-49
  • 267.
    Questions or Comments Section2 – Driving Safely 267