Despite the reported average reply time, the conversation with COSJJ can take days or weeks. But one of our experts can stay on it and take care of it for you:
While we try to find every shortcut we can for reaching COSJJ customer service by email, we also recommend looking up the tips we have for your specific issue. Whether you're about to email info@cosjj.com or already have, it's worth checking for precise instructions.
Intro: How to turn a wooden pen on a lathe
Have you ever wondered how to make those awesome wooden pens? Well here is how you do it. At first the making of a American pen (that is this kind) will take you
about a hour and a half but once you have made a bunch you can make them in 15 minutes.
Image Notes
1. American style pen with Yellow Heart wood
Step 1: Supplies
For this Instructable you need these supplies. Most of these tools you can substitute for something else cheaper.
Lathe
Skew (the tool that you turn the wood with)
Wood ( i'm using yellow heart one of my favorites)
CA glue or Super Glue (thick and thin if possible)
Mandrel to hold the pen on with 3 bushings
Sand paper
Pen Kit or you could use pieces from a old pen that you don't use anymore
Paper towels
BLO (boiled linseed oil)
Drill press or equivalent
Clamp
Optional:
Micromesh to get the super shine
Beall buffing system to put on an awesome finish
Pen press
Majoras' mask accurate replica tutorial cosjj.comkingdayone
Here, at cosjj.com, we have several talented designers and tailors and years costume production experience. The lowest price is not we are chasing. It’s the result due to the hard works we put in this business. We know how much you care about cosplay and how important a quality cosplay costume can be! Go visit at http://www.cosjj.com/ and find a perfect cosplay costume for your upcoming cosplay show!! Any question please feel free to contact us via info@cosjj.com .
A documentation for a hair cap that prevents frizz while sleeping. Perfect for curly-haired people who love their hair but also love their sleepy times!
Mousetrap car that performs well, is cheap to build, and easy to build. There is much to be learned from this presentation even if this car is not built.
What are the main advantages of using HR recruiter services.pdfHumanResourceDimensi1
HR recruiter services offer top talents to companies according to their specific needs. They handle all recruitment tasks from job posting to onboarding and help companies concentrate on their business growth. With their expertise and years of experience, they streamline the hiring process and save time and resources for the company.
Business Valuation Principles for EntrepreneursBen Wann
This insightful presentation is designed to equip entrepreneurs with the essential knowledge and tools needed to accurately value their businesses. Understanding business valuation is crucial for making informed decisions, whether you're seeking investment, planning to sell, or simply want to gauge your company's worth.
RMD24 | Retail media: hoe zet je dit in als je geen AH of Unilever bent? Heid...BBPMedia1
Grote partijen zijn al een tijdje onderweg met retail media. Ondertussen worden in dit domein ook de kansen zichtbaar voor andere spelers in de markt. Maar met die kansen ontstaan ook vragen: Zelf retail media worden of erop adverteren? In welke fase van de funnel past het en hoe integreer je het in een mediaplan? Wat is nu precies het verschil met marketplaces en Programmatic ads? In dit half uur beslechten we de dilemma's en krijg je antwoorden op wanneer het voor jou tijd is om de volgende stap te zetten.
Digital Transformation and IT Strategy Toolkit and TemplatesAurelien Domont, MBA
This Digital Transformation and IT Strategy Toolkit was created by ex-McKinsey, Deloitte and BCG Management Consultants, after more than 5,000 hours of work. It is considered the world's best & most comprehensive Digital Transformation and IT Strategy Toolkit. It includes all the Frameworks, Best Practices & Templates required to successfully undertake the Digital Transformation of your organization and define a robust IT Strategy.
Editable Toolkit to help you reuse our content: 700 Powerpoint slides | 35 Excel sheets | 84 minutes of Video training
This PowerPoint presentation is only a small preview of our Toolkits. For more details, visit www.domontconsulting.com
Tata Group Dials Taiwan for Its Chipmaking Ambition in Gujarat’s DholeraAvirahi City Dholera
The Tata Group, a titan of Indian industry, is making waves with its advanced talks with Taiwanese chipmakers Powerchip Semiconductor Manufacturing Corporation (PSMC) and UMC Group. The goal? Establishing a cutting-edge semiconductor fabrication unit (fab) in Dholera, Gujarat. This isn’t just any project; it’s a potential game changer for India’s chipmaking aspirations and a boon for investors seeking promising residential projects in dholera sir.
Visit : https://www.avirahi.com/blog/tata-group-dials-taiwan-for-its-chipmaking-ambition-in-gujarats-dholera/
Unveiling the Secrets How Does Generative AI Work.pdfSam H
At its core, generative artificial intelligence relies on the concept of generative models, which serve as engines that churn out entirely new data resembling their training data. It is like a sculptor who has studied so many forms found in nature and then uses this knowledge to create sculptures from his imagination that have never been seen before anywhere else. If taken to cyberspace, gans work almost the same way.
"𝑩𝑬𝑮𝑼𝑵 𝑾𝑰𝑻𝑯 𝑻𝑱 𝑰𝑺 𝑯𝑨𝑳𝑭 𝑫𝑶𝑵𝑬"
𝐓𝐉 𝐂𝐨𝐦𝐬 (𝐓𝐉 𝐂𝐨𝐦𝐦𝐮𝐧𝐢𝐜𝐚𝐭𝐢𝐨𝐧𝐬) is a professional event agency that includes experts in the event-organizing market in Vietnam, Korea, and ASEAN countries. We provide unlimited types of events from Music concerts, Fan meetings, and Culture festivals to Corporate events, Internal company events, Golf tournaments, MICE events, and Exhibitions.
𝐓𝐉 𝐂𝐨𝐦𝐬 provides unlimited package services including such as Event organizing, Event planning, Event production, Manpower, PR marketing, Design 2D/3D, VIP protocols, Interpreter agency, etc.
Sports events - Golf competitions/billiards competitions/company sports events: dynamic and challenging
⭐ 𝐅𝐞𝐚𝐭𝐮𝐫𝐞𝐝 𝐩𝐫𝐨𝐣𝐞𝐜𝐭𝐬:
➢ 2024 BAEKHYUN [Lonsdaleite] IN HO CHI MINH
➢ SUPER JUNIOR-L.S.S. THE SHOW : Th3ee Guys in HO CHI MINH
➢FreenBecky 1st Fan Meeting in Vietnam
➢CHILDREN ART EXHIBITION 2024: BEYOND BARRIERS
➢ WOW K-Music Festival 2023
➢ Winner [CROSS] Tour in HCM
➢ Super Show 9 in HCM with Super Junior
➢ HCMC - Gyeongsangbuk-do Culture and Tourism Festival
➢ Korean Vietnam Partnership - Fair with LG
➢ Korean President visits Samsung Electronics R&D Center
➢ Vietnam Food Expo with Lotte Wellfood
"𝐄𝐯𝐞𝐫𝐲 𝐞𝐯𝐞𝐧𝐭 𝐢𝐬 𝐚 𝐬𝐭𝐨𝐫𝐲, 𝐚 𝐬𝐩𝐞𝐜𝐢𝐚𝐥 𝐣𝐨𝐮𝐫𝐧𝐞𝐲. 𝐖𝐞 𝐚𝐥𝐰𝐚𝐲𝐬 𝐛𝐞𝐥𝐢𝐞𝐯𝐞 𝐭𝐡𝐚𝐭 𝐬𝐡𝐨𝐫𝐭𝐥𝐲 𝐲𝐨𝐮 𝐰𝐢𝐥𝐥 𝐛𝐞 𝐚 𝐩𝐚𝐫𝐭 𝐨𝐟 𝐨𝐮𝐫 𝐬𝐭𝐨𝐫𝐢𝐞𝐬."
Falcon stands out as a top-tier P2P Invoice Discounting platform in India, bridging esteemed blue-chip companies and eager investors. Our goal is to transform the investment landscape in India by establishing a comprehensive destination for borrowers and investors with diverse profiles and needs, all while minimizing risk. What sets Falcon apart is the elimination of intermediaries such as commercial banks and depository institutions, allowing investors to enjoy higher yields.
Cracking the Workplace Discipline Code Main.pptxWorkforce Group
Cultivating and maintaining discipline within teams is a critical differentiator for successful organisations.
Forward-thinking leaders and business managers understand the impact that discipline has on organisational success. A disciplined workforce operates with clarity, focus, and a shared understanding of expectations, ultimately driving better results, optimising productivity, and facilitating seamless collaboration.
Although discipline is not a one-size-fits-all approach, it can help create a work environment that encourages personal growth and accountability rather than solely relying on punitive measures.
In this deck, you will learn the significance of workplace discipline for organisational success. You’ll also learn
• Four (4) workplace discipline methods you should consider
• The best and most practical approach to implementing workplace discipline.
• Three (3) key tips to maintain a disciplined workplace.
[Note: This is a partial preview. To download this presentation, visit:
https://www.oeconsulting.com.sg/training-presentations]
Sustainability has become an increasingly critical topic as the world recognizes the need to protect our planet and its resources for future generations. Sustainability means meeting our current needs without compromising the ability of future generations to meet theirs. It involves long-term planning and consideration of the consequences of our actions. The goal is to create strategies that ensure the long-term viability of People, Planet, and Profit.
Leading companies such as Nike, Toyota, and Siemens are prioritizing sustainable innovation in their business models, setting an example for others to follow. In this Sustainability training presentation, you will learn key concepts, principles, and practices of sustainability applicable across industries. This training aims to create awareness and educate employees, senior executives, consultants, and other key stakeholders, including investors, policymakers, and supply chain partners, on the importance and implementation of sustainability.
LEARNING OBJECTIVES
1. Develop a comprehensive understanding of the fundamental principles and concepts that form the foundation of sustainability within corporate environments.
2. Explore the sustainability implementation model, focusing on effective measures and reporting strategies to track and communicate sustainability efforts.
3. Identify and define best practices and critical success factors essential for achieving sustainability goals within organizations.
CONTENTS
1. Introduction and Key Concepts of Sustainability
2. Principles and Practices of Sustainability
3. Measures and Reporting in Sustainability
4. Sustainability Implementation & Best Practices
To download the complete presentation, visit: https://www.oeconsulting.com.sg/training-presentations
Improving profitability for small businessBen Wann
In this comprehensive presentation, we will explore strategies and practical tips for enhancing profitability in small businesses. Tailored to meet the unique challenges faced by small enterprises, this session covers various aspects that directly impact the bottom line. Attendees will learn how to optimize operational efficiency, manage expenses, and increase revenue through innovative marketing and customer engagement techniques.
Premium MEAN Stack Development Solutions for Modern BusinessesSynapseIndia
Stay ahead of the curve with our premium MEAN Stack Development Solutions. Our expert developers utilize MongoDB, Express.js, AngularJS, and Node.js to create modern and responsive web applications. Trust us for cutting-edge solutions that drive your business growth and success.
Know more: https://www.synapseindia.com/technology/mean-stack-development-company.html
1. Once upon a time, I joined the many procrastinators who storm the
stores on October 30th or 31st to buy something to wear to costume
parties. At some point, I realized two things: 1) "one size fits all"
does not indeed fit me at all and 2) holy cow! for that price, I can
make it myself. And so, I decided to pursue this latter point in
2010, the year I made my first costume as an adult (ended up being a
faun - a costume that was very well received). Since then, Halloween
has become my Christmas and I get excited about it the moment an idea
crosses my mind.
In the last few years, my source of inspiration has been movies that
hold a special place in my heart. I recall as a child watching
Indiana Jones & The Temple of Doom and feeling both scared and
thrilled at the same time. So, as the nostalgia set in while I
watched this movie sometime in Spring 2016, I knew that I had to be
Mola Ram for Halloween. Several online tutorials have helped me along
the years to create my costumes. To pay it forward, I'm writing this
Instructable in the hopes that it helps somebody else. Hope you enjoy
it!
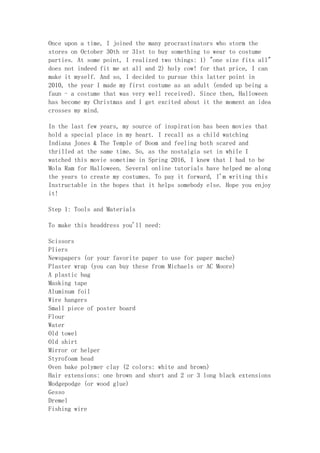
Step 1: Tools and Materials
To make this headdress you'll need:
Scissors
Pliers
Newspapers (or your favorite paper to use for paper mache)
Plaster wrap (you can buy these from Michaels or AC Moore)
A plastic bag
Masking tape
Aluminum foil
Wire hangers
Small piece of poster board
Flour
Water
Old towel
Old shirt
Mirror or helper
Styrofoam head
Oven bake polymer clay (2 colors: white and brown)
Hair extensions: one brown and short and 2 or 3 long black extensions
Modgepodge (or wood glue)
Gesso
Dremel
Fishing wire
3. I wanted to create a helmet-like support with a snug fit on my
head. I decided I would make a light-weight mold of my head using the
plaster wrap that can be found in art supply stores (ex. Michaels, AC
Moore, etc.) and then use such mold to add on the other details of
the headdress. While I wanted a snug fit, I also wanted to make sure
that it would be easy to put the headdress on and then take it off. I
found out that making the mold of the top of my head (down until the
ear line) achieved this balance. Creating the helmet-like support is
a 2-part process: 1) molding the top of the head and 2) adding the
jaw structure. We'll start with the former.
Working with the plaster wrap can be messy so I recommend putting an
old shirt on before proceeding. I also didn't want to apply the
strips directly on my hair (how would I explain my new look at
work?). I started by taking a grocery store bag and putting it over
my head to cover my hair (from approximately the top of my eyebrows
to the back of my neck). To keep it from sliding around, I tied the
handles on the back of my neck making sure the knot was at the base
of my skull. The bag was a bit lumpy in some areas due to trapped
air. I was able to remove this by rolling extra bag material under
the knot I just made.
Once the bag was secured, I grabbed the scissors and cut strips of
plaster of various widths (0.5" to 2"). At this point, I moved to the
bathroom so I would have access to a mirror (you can skip this step
if you have a helper who will be applying the plaster strips for you)
and made sure to have a bowl of water and an old towel nearby to
clean my hands. For each plaster strip, I put it in the water, took
4. it out and gently ran my fingers down the strip to remove excess
water (you want it wet but not dripping) before placing it on the top
of my head. After placing each strip on my head, I pressed on it to
ensure it was tight and flush against the bag that covered my hair.
This process was repeated until the top of my head was covered with
enough layers to keep the shape once dry (didn't actually keep track
of the number of layers and thinking 2 to 3 will be OK). At this
point, I waited until the plaster was rigid enough to remove from my
head without losing the shape (note: the plaster will still feel
damp/cold and will take a few hours to completely dry). Once removed
from my head, I put the top of the helmet on a Styrofoam head so that
it would continue drying.
The next part of the helmet-like support is to add the jaws. To do
this, I drew the outline of a jaw on a piece of poster board and cut
it using the scissors. For this part, I recommend: 1) looking at
pictures from the movie or internet to guide your jaw design and
determine the length and angle of the jaw according to your face and
2) place the helmet (once dry) on your head so you can determine the
placement of each jaw. It took some trial and error to get the jaw
design to the point that I was happy with it. Once happy with the
shape, I traced this on another piece of poster board and cut it to
create two identical jaw outlines. One thing to keep in mind is that
the jaws have a slight curvature and frame the sides of the face
towards the mouth. To do this, I taped wire (I used cut segments from
wire hangers but you can use any wire sturdy enough to keep a shape)
to the part of each poster board jaw cut-out that would touch the
side of my face and added a slight bend to each jaw. When the jaws
had the curved shape I was looking for, I taped the top part of each
jaw to each side of the helmet. I ended up placing them slightly in
front of my ears as I did not want my ears to be covered or squeezed
when wearing the headdress. At this point, I recommend you take the
helmet on and off a few times to ensure that you can put it on and
off easily before adding the plaster strips to the jaws.
The next part is adding plaster strips to the jaws. I did not want to
wrap the wire with the plaster strips, so I made sure that the strips
only covered the poster board jaw cut-out. After adding several
layers, and ensuring the jaws were rigid and retained the curved
shape, I carefully removed the wires from the inside of each jaw
before adding more plaster strips to fully cover each jaw. As
previously mentioned, I recommend taking the helmet on and off to
ensure that it comes off easily. The frame of the headdress is now
5. finished. You can set it back on the Styrofoam head and let it dry
completely.
Step 3: Creating the Horns
6. To create the horns:
1) I used 2 wire hangers and stretched them out pulling from the
hanger hook and middle of the bottom of the wire hanger.
2) widened the base (close to the hook) to the width of the base of
the horn (this will be attached to the helmet armature). I pinched
the other end of the wire hanger (this will be the point of the
horns).
3) using newspaper, I tore pages and bunched them up to add volume
between the 2 wires for each hanger. I used masking tape to secure
the newspaper stuffing to the horn structure. I kept adding newspaper
& tape until achieving a relatively smooth long cone.
4) I bent the long cone to match the shape of the horns (I recommend
looking at pictures from the movie for reference). The bending of the
wire hanger armature created creases in some areas of the cone. I
taped bunched up newspaper to these areas to make it smooth again.
Note: Since you'll need to create 2 horns, it's important that the
shape of the armature (steps 2 & 3 above) is the same for each wire
hanger. Step 4 may be a little tricky as the 2 horns need to be
mirror images of each other. It may take some trial & error to
achieve this.
Once happy with the shape of the 2 horns, I prepared to apply the
paper mache. There are many home made recipes online for paper mache.
Feel free to follow the one that works best for you. To achieve my
paste, I used my hands to mix water and flour (approximately 1:1
ratio) until obtaining a pancake batter consistency. After cleaning
my hands, I manually tore paper strips (down the length of the
7. newspaper) of various widths. Before adding the paper strips to the
horn armatures, I recommend covering your working area with newspaper
(paper mache can get messy). I then used one hand to apply the paste
to each paper strip and squeezed out excess paste before applying it
to the horn armature. At this point, you keep adding paper strips
until you've covered each horn and then add layers once the previous
one has dried. I lost track of the number of layers I applied (it was
probably 4-5). The cool thing about using wire hangers during this
process is that you have a hook, so feel free to use that to hang the
horns up to dry in between each layer of paper mache.
Once all of the layers were dry, I cut each horn at the middle using
a serrated knife so I could remove the horn armature (this will
reduce the weight of the horn, which you will appreciate once the
headdress is on your head). I recommend being careful in this step
and taking your time to remove the paper mache from the wire/taped
newspaper armature. You may need to use pliers to help remove bits
and pieces of the newspaper you previously bunched up to create the
armature. After removing all of the stuffing, I lined up the 2 pieces
I cut for each horn, taped them together and reinforced the seam by
applying layers of newspaper strips using the paper mache paste.
Step 4: Adding the Skull Details and Smoothing
8. During this step you'll need reference pictures of the headdress,
aluminum foil and plenty of masking tape. This part can take time and
I recommend playing your favorite music during the process. Using the
reference pictures, I started making the bone structure of what would
be the nose of the skull. I tore a strip of aluminum foil and pinched
it into the shape I was after. Since this was to be placed in the
middle of the skull, it also helped me determine the placement of the
eye sockets. I added foil to add volume behind the nose bone and
around the eye sockets and covered it with masking tape. Then I
continued adding foil and covering it with tape to augment certain
features of the skull. I was not after obtaining an exact replica of
the headdress of the movie. Rather, I wanted to give it enough
structural detail to make it recognizable with the rest of the
costume.
9. After finishing the nose and eye sockets, I tackled the area where
the voo-doo head will sit. To accomplish this, I made 2 pyramid-like
shapes and united them in the middle. It's important at this point to
determine how the horns will be attached to the helmet. I decided
that the horns would attach on the back of the helmet. I cut part of
each horn and positioned it on the back of the helmet, ensuring that
the horns were approximate mirror images of each other. I recommend
cutting the horns little by little (although you can always add foil
and masking tape if you end up cutting too much). I secured each horn
in place using hot glue and added foil and masking tape around the
base of each horn. I then put the headdress on and looked in the
mirror to ensure the horns looked right. Then it was back to adding
foil and masking tape to continue building up the details around the
skull structure. Feel free to be creative during this process. Once
happy with the structure, I made another batch of paper mache paste
and applied 2-3 coats of paper strips to the whole headdress.
While the paper mache was drying, I took pieces of oven bake polymer
clay (I used white Sculpey) and sculpted several teeth for each side
of the jaw. As I sculpted each tooth, I placed it on the side of the
jaw to ensure it was the right shape and size. I recommend making a
few more teeth than what you think you'll need. Then it's just a
matter of baking the teeth in the oven by following the directions in
the package. Once the paper mache had dried, I attached the teeth to
each side of the jaw using a hot glue gun.
To finish this step I applied:
1) a couple of coats of modgepodge to the paper mache to seal it
(letting each layer dry before applying the next one) and
2) several layers of gesso to make the headpiece as smooth as
possible, particularly the horns. When adding the gesso, it's
important to add one layer at a time and to sand the gesso in between
layers to achieve a smooth finish.
The headdress actually has a long string of hair that falls down the
back. Having worked with long hair extensions in the past, I know
they can add a bit of weight. After evaluating different methods to
attach this hair, I decided to drill 2 holes with my dremel on the
top of the headdress, right behind the area where the voo-doo head
will sit. The idea here is that I'll use fishing wire to tie the hair
extensions together and then loop the fishing wire through the 2
holes and tie it in place.
10. Step 5: The Voodoo Head
I used brown Sculpey and sculpted the voo-doo head. As with the
structure of the skull headdress, I added enough features to achieve
a similar look to that from the original movie. Once happy with the
sculpting, I baked the head in the oven following the instructions in
the packet.
For the hair of the voo-doo head, I went to a local beauty supply
store and bought a hair extension they had for sale. I unwrapped the
hair extension, folded it in half and then sewed along the folded
seam. I repeated this again, folding it in half and sewing along the
seam. Then I started sewing the seam in a circular manner, making
sure I kept it as tight as possible as I was sewing it together. I
ended up using all of the hair that came in the packet; however, I
recommend you keep your voo-doo head nearby to determine how much
hair you will need. Once done, I secured the fair on the voo-doo head
using a hot glue gun.
Step 6: Final Touches: Painting and Attaching
Voo-Doo Head and Hair
11. I worked in layers to add color and shading to the headpiece. Using
ivory paint as the base coat, I mixed shades of brown to highlight
certain areas (and dark brown/black for the eye sockets). I think one
can spend hours working on highlights and/or lowlights so I recommend
painting it according to any method you're comfortable with. Once
happy with the paint job, I sealed everything with a couple of layers
of clear varnish. I then secured the voo-doo head to the top of the
headdress using contact cement (I found out the hard way that hot
glue did not work well in securing the voo-doo head due to its
weight). To finish the headdress, I used 2 packs of fake black hair
extensions, tied them together using fishing wire and then looped the
fishing wire through the 2 holes I previously drilled with the
dremel. It's important to keep the fishing wire as tight as possible
as you are tying the wire through the holes on top of the headdress.
Once done, you can put the headdress on the Styrofoam head to admire
your work or do as I did... which is to put it on your head and go
around the house chanting "kalima, kalima, kalima..." :)
This is really a nice blog. Now our website cosjj.com is also looking
for the excellent cosplayer, contact us via
info@cosjj.com if you have have any insterests, we would offer free
costumes to you as long as you meet our sponsoring terms. Best
Cosplay Costumes online.