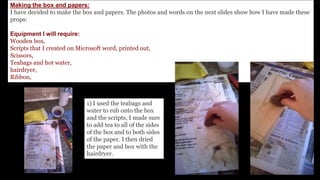
(writing and images individually created/produced by myself
(Jemma Green) )
As we had now decided as a group what props we would need
I decided to take control of this section and make it my own
task to gather and make all the props we would need. I
decided to make a brainstorm/mindmap of what is required of
each prop as a starting point. (next slide)
Props
Now that I have a better understanding on what each prop needs to look like/do I
decided to create a list of where I could get each prop, below:
Box:
I have a suitable wooden box which I can paint to make it look older. It is the ideal size and is seal-able as it has a
metal clasp/lever which secures the lid.
Papers:
I can source various lines from Shakespeare plays online. I will then place them in a word document and change
the font to a handwritten font style. I will then source images of ink blots on Google images and place these into
the word document to make the scripts look more convincing. I will then use a teabag to stain the pages making
them look old. I may also rip the edges of the paper to make them look even older and fragile.
Dagger/sword:
The theatre has a collection of props in which there is a dagger. We shall hopefully be able to use this.
Candle/lighter:
These items can be easily sourced and purchased from supermarkets. They will be very easy to obtain if required.
From doing the above planning I can now start to obtain and make the props.
Making the box and papers:
I have decided to make the box and papers. The photos and words on the next slides show how I have made these
props:
Equipment I will require:
Wooden box,
Scripts that I created on Microsoft word, printed out,
Scissors,
Teabags and hot water,
hairdryer,
Ribbon,
1) I used the teabags and
water to rub onto the box
and the scripts, I made sure
to add tea to all of the sides
of the box and to both sides
of the paper. I then dried
the paper and box with the
hairdryer.
2) I then ripped and
scrunched up the
paper to make them
look old and fragile.
I also used the
scissors to slice out
chunks of the wood
and create a dented
and splintered effect
on the wooden box.
3) Finally I folded them up,
tied them with ribbon,
and placed them into the
box and closed the lid.
Evaluation:
I am very pleased with the results and so are
the other group members. We have agreed
that the box and scripts look very convincing.

Props

  • 1.
    (writing and imagesindividually created/produced by myself (Jemma Green) ) As we had now decided as a group what props we would need I decided to take control of this section and make it my own task to gather and make all the props we would need. I decided to make a brainstorm/mindmap of what is required of each prop as a starting point. (next slide) Props
  • 3.
    Now that Ihave a better understanding on what each prop needs to look like/do I decided to create a list of where I could get each prop, below: Box: I have a suitable wooden box which I can paint to make it look older. It is the ideal size and is seal-able as it has a metal clasp/lever which secures the lid. Papers: I can source various lines from Shakespeare plays online. I will then place them in a word document and change the font to a handwritten font style. I will then source images of ink blots on Google images and place these into the word document to make the scripts look more convincing. I will then use a teabag to stain the pages making them look old. I may also rip the edges of the paper to make them look even older and fragile. Dagger/sword: The theatre has a collection of props in which there is a dagger. We shall hopefully be able to use this. Candle/lighter: These items can be easily sourced and purchased from supermarkets. They will be very easy to obtain if required. From doing the above planning I can now start to obtain and make the props.
  • 4.
    Making the boxand papers: I have decided to make the box and papers. The photos and words on the next slides show how I have made these props: Equipment I will require: Wooden box, Scripts that I created on Microsoft word, printed out, Scissors, Teabags and hot water, hairdryer, Ribbon, 1) I used the teabags and water to rub onto the box and the scripts, I made sure to add tea to all of the sides of the box and to both sides of the paper. I then dried the paper and box with the hairdryer.
  • 5.
    2) I thenripped and scrunched up the paper to make them look old and fragile. I also used the scissors to slice out chunks of the wood and create a dented and splintered effect on the wooden box. 3) Finally I folded them up, tied them with ribbon, and placed them into the box and closed the lid. Evaluation: I am very pleased with the results and so are the other group members. We have agreed that the box and scripts look very convincing.