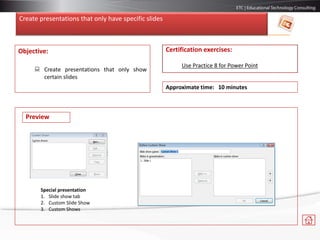
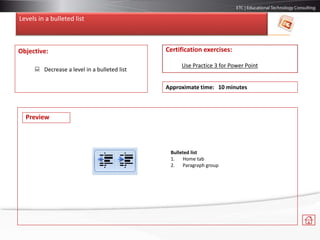
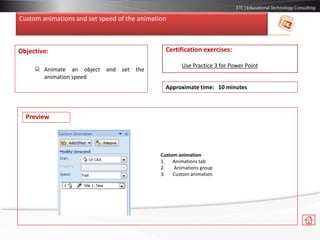
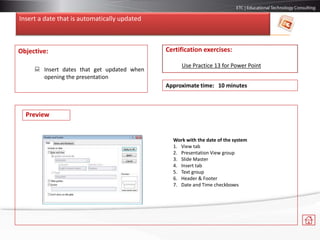
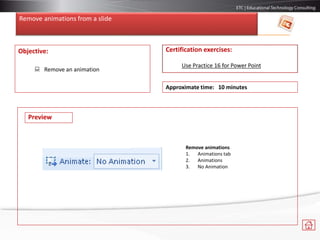
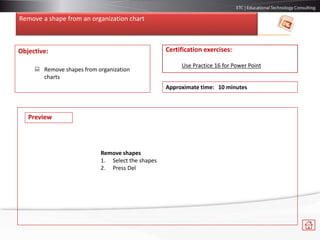
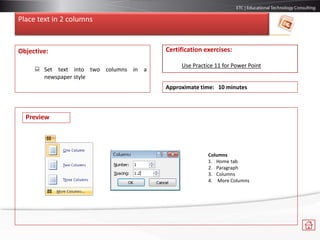
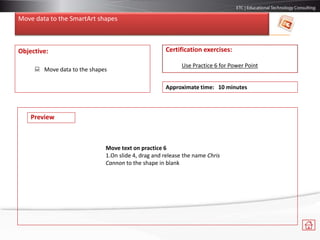
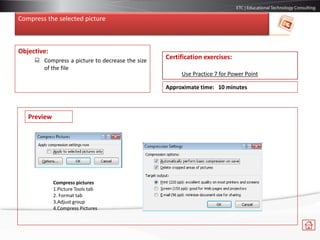
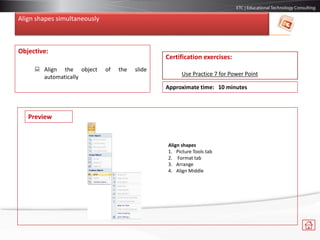
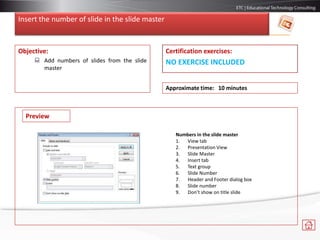
2. Content
Methodology
Resize a SmartArt graphic
Apply different textures to a shape
Insert text withy WordArt
Work with hyperlinks
Change to different types of SmartArt shapes
Work with default shape styles
Create presentations with specific slides
Levels in a bulleted list
Custom animations and set speed of the animation
Apply default formats to a table
Insert a footer in some slides
Insert a date that is automatically updated
Resize a slide
Insert SmartArt diagrams
Print a presentation in Outline view
Add new slides using existing designs
Hide comments in a presentation
Inspect a document searching for hidden metadata
Change the location of the slides within a presentation
Move text
Add a background to the slide master
Number slides excepting the title slide
Format a text box
Change a bulleted list for a numbered list
3. Content
Change the text format to Bold
Apply fill color to an organization chart
Import an Outline file from Word
Apply a theme to a presentation
Change the format of a shape
Package a presentation for CD
Rotate text
Sort the way the animation will be executed
Change the character of the bullet
Add comments to a bullet
Remove animations from a slide
Remove a shape from an organization chart
Place text in 2 columns
Insert a picture
Change the color of a SmartArt
Move data to the shapes of a SmartArt
Compress the selected picture
Align shapes simultaneously
Add a SmartArt graphic
Change the orientation of the slides to portrait
Insert the number of slide in the slide master
Change bullets to an SmartArt graphic element
4. Methodology
•Each slide has a color box that corresponds to a topic to develop, focused on a particular
objective.
•Topics are developed with specific exercises in each slide. They are included in a .zip folder with
this presentation.
•Finally, there is a set of steps to graphically follow the use of the tool.
Color box:
It mentions the certification
topics that are covered in that
slide.
Objective box:
It explains the required objective and
emphasizes the learning of the
certification topics.
Preview box:
You will find a quick visual guide
about the topic to easily locate the
exercise to be done.
Certification exercises box:
Sometimes you will find a link to a
practical exercise with the data you
need for reviewing what you know.
Home button:
Press this button to return to the
topic index.
5. Resize a SmartArt graphic
Objective:
Apply different properties to SmartArt
graphics
Certification exercises:
Use Practice 12 for Power Point
Approximate time: 10 minutes
Resize a SmartArt
1. SmartArt Tools tab
2. Format tab
3. Size group
4. Change Height and Width of the SmartArt
graphic
Preview
6. Apply different textures to a shape
Objective:
Apply different textures and fills to
change the look of a shape
Certification exercises:
Use Practice 4 for Power Point
Approximate time: 10 minutes
Preview
Apply textures
1. Drawing tools tab, Format tab
2. Shape Styles group
3. Shape fill
4. Texture
5. Green marble
7. Insert text with WordArt
Objective:
Improve the visual aspect of the text in
a presentation
Certification exercises:
Use Practice 4 for Power Point
Approximate time: 10 minutes
Word Art
1. Insert tab
2. Text group
3. Word Art
Preview
8. Work with hyperlinks
Objective:
Use hyperlinks to relate the
presentation to a different place in the
same presentation, or to another
program, file, web site, etc.
Certification exercises:
Use Practice 10 for Power Point
Approximate time: 10 minutes
Hyperlinks
1. Insert tab
2. Links group
3. Hyperlink
Preview
9. Change to the different types of SmartArt shapes
Objective:
Use SmartArt graphics to create
organization charts
Certification exercises:
Use Practice 10 for Power Point
Approximate time: 10 minutes
Organization charts
1. SmartArt Tools tab, Design tab
2. Layout group
3. More Layouts
4. Hierarch category
5. Organization chart
Preview
10. Work with shape default styles
Objective:
Use default styles to format objects
quickly
Certification exercises:
Use Practice 8 for Power Point
Approximate time: 10 minutes
Shape styles
1. Drawing Tools tab
2. Format tab
3. Shape Styles
Preview
11. Create presentations that only have specific slides
Objective:
Create presentations that only show
certain slides
Certification exercises:
Use Practice 8 for Power Point
Approximate time: 10 minutes
Special presentation
1. Slide show tab
2. Custom Slide Show
3. Custom Shows
Preview
12. Levels in a bulleted list
Objective:
Decrease a level in a bulleted list
Certification exercises:
Use Practice 3 for Power Point
Approximate time: 10 minutes
Bulleted list
1. Home tab
2. Paragraph group
Preview
13. Custom animations and set speed of the animation
Objective:
Animate an object and set the
animation speed
Certification exercises:
Use Practice 3 for Power Point
Approximate time: 10 minutes
Preview
Custom animation
1. Animations tab
2. Animations group
3. Custom animation
14. Apply default formats in a table
Objective:
Change the look of the tables with a
default format
Certification exercises:
Use Practice 18 for Power Point
Approximate time: 10 minutes
Table styles
1. Table Tools tab
2. Design tab
3. Table Styles
Preview
15. Insert a footer in some slides
Objective:
Work with footers in specific pages
Certification exercises:
Use Practice 18 for Power Point
Approximate time: 10 minutes
Preview
Insert header/ footer
1. View tab
2. Presentation Views
3. Slide Master
16. Insert a date that is automatically updated
Objective:
Insert dates that get updated when
opening the presentation
Certification exercises:
Use Practice 13 for Power Point
Approximate time: 10 minutes
Work with the date of the system
1. View tab
2. Presentation View group
3. Slide Master
4. Insert tab
5. Text group
6. Header & Footer
7. Date and Time checkboxes
Preview
17. Resize the slide of the presentation to presentation on screen.
Objective:
Set the size of the page
Certification exercises:
Use Practice 13 for Power Point
Approximate time: 10 minutes
Size of the slide
1. Design tab
2. Page Setup group
Preview
18. Insert SmartArt diagram
Objective:
Illustrate the content of the slides
Certification exercises:
Use Practice 22 for Power Point
Approximate time: 10 minutes
SmartArt graphic
1. Insert tab
2. Illustrations group
3. SmartArt
Preview
19. Print a presentation in Outline view
Objective:
To see only the written text of the
presentation
Certification exercises:
Use Practice 17 for Power Point
Approximate time: 10 minutes
Preview
Print in Outline view
1. Office Button
2. Print
3. Print
4. Print dialog box, select Outline View,
20. Add new slides using existing designs
Objective:
Insert a new slide using existing designs
Certification exercises:
Use Practice 20 for Power Point
Approximate time: 10 minutes
Add slide
1. Home tab
2. Slides group
3. New Slide
Preview
21. Hide comments in a presentation
Objective:
Hide the comments in a presentation
Certification exercises:
Use Practice 21 for Power Point
Approximate time: 10 minutes
Preview
Comments
1. Review tab
2. Comments
22. Inspect a document searching for hidden metadata
Objective:
Inspect documents searching for hidden
metadata
Certification exercises:
Use Practice 21 for Power Point
Approximate time: 10 minutes
Preview
Inspect documents
1. Office button
2. Prepare
3. Inspect Document
23. Change the location of the slides in a presentation
Objective:
Move the slides to another location
Certification exercises:
Use Practice 26 for Power Point
Approximate time: 10 minutes
Move slides
1. Select the slides you will move
2. Drag the slide to a new location
Preview
24. Move text
Objective:
Change the text to another place
Certification exercises:
Use Practice 26 for Power Point
Approximate time: 10 minutes
Move text with bullets
1. Select the text you will move.
2. Hold and drag, release on the
new location.
Preview
25. Add a background in the slide master
Objective:
Insert a background to the slide master
to apply it in all the presentation
Certification exercises:
Use Practice 5 for Power Point
Approximate time: 10 minutes
Background in the slide master
1. View tab
2. Presentation Views
3. Slide Master
4. Slide Master tab
5. Background
6. Background Styles
7. Format Background
Preview
26. Number the slides excepting the title slide
Objective:
Number the slides without including the
first slides
Certification exercises:
Use Practice 5 for Power Point
Approximate time: 10 minutes
Numbering
1. Insert tab
2. Text group
3. Slide Number
Preview
27. Format a text box
Objective:
Change the visual aspect of the text
boxes
Certification exercises:
Use Practice 27 for Power Point
Approximate time: 10 minutes
Text boxes
1. Drawing Tools tab
2. Format tab
3. Shape Styles
Preview
28. Change a bulleted list into a numbered list
Objective:
Change the format of the lists
Certification exercises:
Use Practice 27 for Power Point
Approximate time: 10 minutes
Preview
Change bulleted lists
1. Home tab
2. Paragraph group
3. Numbering
29. Change the text format to Bold
Objective:
Highlight text with bold style
Certification exercises:
Use Practice 25 for Power Point
Approximate time: 10 minutes
Bold
1. Home tab
2. Font group
3. Bold
Preview
30. Apply fill color to a organization chart
Objective:
Apply a visual format to an organization
chart
Certification exercises
Use Practice 25 for Power Point
Approximate time: 10 minutes
Preview
Fill color to an organization chart
1. SmartArt Tools tab
2. Format tab
3. Shape Styles
31. Import an outline file from Word
Objective:
Import Word files in outline format to
create slides
Certification exercises:
Use Practice 2 for Power Point
Approximate time: 10 minutes
Import Outline
1. Home tab
2. Slides
3. New Slide, Slides from Outline
Preview
32. Apply a theme to a presentation
Objective:
Apply a theme to the presentation to
apply a quick format
Certification exercises:
Use Practice 2 for Power Point
Approximate time: 10 minutes
Preview
Theme
1. View tab
2. Presentation View
3. Slides Master
4. Edit Theme
5. Themes
33. Change the format of a shape
Objective:
Change the properties of an object
through the Format Shape dialog box
Certification exercises:
Use Practice 9 for Power Point
Approximate time: 10 minutes
Change the format of a shape
1. Drawing Tools tab
2. Format tab
3. Shape Styles
Preview
34. Package a presentation for CD
Objective:
Package the presentation to distribute it
in CD
Certification exercises:
Use Practice 9 for Power Point
Approximate time: 10 minutes
Package for CD
1. Office Button
2. Publish
3. Package for CD
Preview
35. Objective:
Rotate the text for a better presentation
Certification exercises:
Use Practice 1 for Power Point
Approximate time: 10 minutes
Preview
Rotate the text
1. Drawing Tools tab
2. Format tab
3. Arrange tab
Rotate the text
36. Objective:
Order the way objects appear in the
presentation
Certification exercises:
Use Practice 1 for Power Point
Approximate time: 10 minutes
Sort the animations
1. Animations tab
2. Custom animation
Preview
Order the way the animation will be executed
37. Change the character of the bullet
Objective:
Replace the classic bullets by more
representative ones
Certification exercises:
Use Practice 24 for Power Point
Approximate time: 10 minutes
Change bullets
1.Home tab, Paragraph
group
2.Bullets
3.Bullets and Numbering
4.Picture
Preview
38. Add comments to a bullet
Objective:
Add comments
Certification exercises:
Use Practice 24 for Power Point
Approximate time: 10 minutes
Preview
Add comments
1. Review tab
2. New comment
39. Remove animations from a slide
Objective:
Remove an animation
Certification exercises:
Use Practice 16 for Power Point
Approximate time: 10 minutes
Remove animations
1. Animations tab
2. Animations
3. No Animation
Preview
40. Remove a shape from an organization chart
Objective:
Remove shapes from organization
charts
Certification exercises:
Use Practice 16 for Power Point
Approximate time: 10 minutes
Preview
Remove shapes
1. Select the shapes
2. Press Del
41. Place text in 2 columns
Objective:
Set text into two columns in a
newspaper style
Certification exercises:
Use Practice 11 for Power Point
Approximate time: 10 minutes
Preview
Columns
1. Home tab
2. Paragraph
3. Columns
4. More Columns
42. Insert a picture
Objective:
Insert pictures in a slide
Certification exercises:
Use Practice 11 for Power Point
Approximate time: 10 minutes
Preview
Picture
1. Insert tab
2. Illustration
3. Picture
43. Change the color of a SmartArt
Objective:
Apply design color to the SmartArt
shapes
Certification exercises:
Use Practice 6 for Power Point
Approximate time: 10 minutes
Preview
SmartArt color
1.SmartArt Tools tab
2.Design tab
3.SmartArt Styles
4.Change colors
44. Move data to the SmartArt shapes
Objective:
Move data to the shapes
Certification exercises:
Use Practice 6 for Power Point
Approximate time: 10 minutes
Preview
Move text on practice 6
1.On slide 4, drag and release the name Chris
Cannon to the shape in blank
45. Compress the selected picture
Objective:
Compress a picture to decrease the size
of the file
Certification exercises:
Use Practice 7 for Power Point
Approximate time: 10 minutes
Preview
Compress pictures
1.Picture Tools tab
2. Format tab
3.Adjust group
4.Compress Pictures
46. Align shapes simultaneously
Objective:
Align the object of the slide
automatically
Certification exercises:
Use Practice 7 for Power Point
Approximate time: 10 minutes
Preview
Align shapes
1. Picture Tools tab
2. Format tab
3. Arrange
4. Align Middle
47. Add a SmartArt graphic
Objective:
Use SmartArt graphic
Certification exercises:
Use Practice 15 for Power Point
Approximate time: 10 minutes
SmartArt graphic
1. Insert tab
2. Illustrations group
3. SmartArt
Preview
48. Change the orientation of the slides to portrait
Objective:
Change the orientation of the slides
Certification exercises:
Use Practice 15 for Power Point
Approximate time: 10 minutes
Preview
Orientation of the slides
1. Design tab
2. Page Setup group
3. Slide Orientation
4. Portrait
49. Insert the number of slide in the slide master
Objective:
Add numbers of slides from the slide
master
Certification exercises:
NO EXERCISE INCLUDED
Approximate time: 10 minutes
Preview
Numbers in the slide master
1. View tab
2. Presentation View
3. Slide Master
4. Insert tab
5. Text group
6. Slide Number
7. Header and Footer dialog box
8. Slide number
9. Don’t show on title slide
50. Change bullets to SmartArt graphic elements
Objective:
Change bullets to SmartArt graphic
elements
Certification exercises:
NO EXERCISE INCLUDED
Approximate time: 10 minutes
Preview
Change bullets to SmartArt
1. Select the bullets
2. Home tab
3. Paragraph group
4. Convert to SmartArt