The article discusses a new Astro Pi competition launched by the European Space Agency (ESA) that will allow students across Europe to develop code that will be run on two Raspberry Pi computers named Ed and Izzy, which are currently aboard the International Space Station. ESA astronaut Thomas Pesquet, who is set to launch to the ISS in November 2016, will run the students' code on Ed and Izzy. The competition aims to inspire more young people to get involved in coding and space through developing experiments that could potentially help with scientific research performed on the ISS.


![9November 2016raspberrypi.org/magpi
NewsALEXA / HMI
9November 2016
he Alexa Voice Service
(AVS) API for Raspberry
Pi now includes
hands-free functionality.
“Any digital maker using the free
API from the Amazon Developer
team had to add a button to their
build, putting a slight dampener
on the futuristic vibe of the
disembodied Alexa,” writes Alex
Bate, Raspberry Pi’s social media
editor. “We know about this
because a bunch of you [makers]
complained about it.”
This update removes the press-
a-button limitation. Makers can
now use Alexa by issuing a wake
word, calling out to “Alexa”,
“Echo”, or “Amazon”.
HANDS-FREE
WITH ALEXA
Above The update to Amazon's Alexa
API now enables Raspberry Pi makers to
create hands-free devices similar to the
Amazon Echo Dot
If you’re looking for ideas
for builds, check out the
Internet of Voice Challenge that
Raspberry Pi and Hackster hosted
(magpi.cc/2baErdf). Winning
builds included a voice-activated
Baseball Pitching Machine, a voice-
controlled K’nex Car, and a Smart
Cap for the visually impaired.
NOW TRENDING
The stories that made waves on
our social media sites this month
PIPER REVIEW magpi.cc/2dT46qz
Rob's review of the crowdfunded laptop that gamifies
the hardware building process piqued the interest of
our lively Google Plus community.
ZERO 360 magpi.cc/2dT2Qnk
This project generated
lots of love on Twitter.
James Mitchell’s
ingenious device
can take 360-degree
panoramas and
even time-lapses. It
features eight Pi Zeros
equipped with Camera
Modules, placed
around a laser-cut
wooden housing.
BUILDING A
HUMAN MACHINE
INTERFACE
roy Miller, applications
engineer at Galil Motion
Control, has developed
a human machine interface
(HMI) using Galil software
and a Raspberry Pi
The result is a cheap, powerful
HMI perfect for industrial
environments, without having
to use a full-sized PC.
“There are many sources
for HMIs, and many can cost
thousands of dollars,” says
Troy. The Raspberry Pi is a much
cheaper option, but it also comes
with a 7-inch touch display, and
now it can run Galil’s motion-
control software.
“This powerful trio forms the
foundation for an inexpensive but
fully capable HMI, customised for
any motion-control application,”
says Troy.
“There are free software tools
that can allow a person to create
just about any interface to run on
the Raspberry Pi,” he adds. “The
software acts as the glue to take in
the input from the user in the touch
interface, and the Galil gclib API
translates those simple instructions
into the commands to send to the
machine motion controller.”
Troy has made an excellent video
demonstration of a Raspberry
Pi running Galil software to
control a stepper motor linear
stage (magpi.cc/2dSXGYu).
TOP 50 magpi.cc/2dT4FAM
We were taken aback by the sheer weight of
community love for the Top 50 feature (from The MagPi
issue 50). Our Top 50 photo album got a huge amount of
attention on Facebook.
T
T](https://image.slidesharecdn.com/33294462-0498-4b86-bdf5-4e5348496d58-161028122254/85/MagPi51-9-320.jpg)


![raspberrypi.org/magpi 35November 2016
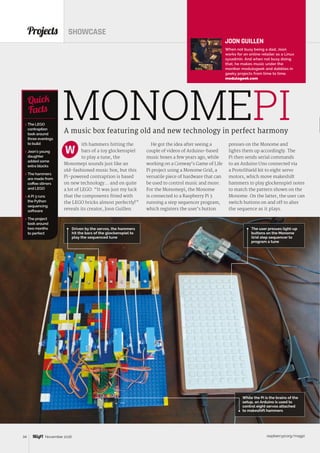
ProjectsMONOMEPI
STEP-01
Glockenspiel hammers
To play the notes on a toy glockenspiel, the hammers
are made from coffee stirrers, sticky tape, and LEGO
blocks borrowed from Joon’s young daughter.
STEP-02
Arduino servos
Eight servo motors are connected to an Arduino Uno
R3 and ProtoShield kit with a mini-breadboard. This
is controlled by the Raspberry Pi and Monome Grid.
STEP-03
LEGO construction
With the wiring complete, it’s time to connect the
hammers and add more LEGO blocks around the
servos to keep everything firmly in place.
BUILDING A
MODERN-DAY
MUSIC BOX
“The contraption itself took
only two or three evenings to
build,” Joon tells us. “I focused
most of my energy on the software
side, so the physical construction
was almost an afterthought.”
To build it, he borrowed a bunch
of LEGO blocks from his young
daughter. “They were the first
things I thought of using. I
haven’t the talent for crafts,
and so LEGO was the quickest
way to build the contraption. My
daughter even added some blocks
of her own in there!”
While the construction was quick,
the project as a whole took around
two months, with Joon working
casually over the course of several
evenings and weekends. “Most of it
was figuring out the step sequencer
logic, Arduino code, and optimising
performance.” The main Python
program running on the Pi is
based on a Monome library Joon
had created for his previous project.
“That took a very long time, as I
had zero Python knowledge when
I started out. The library has since
undergone several improvements
through the years.”
While Joon opted to control his
servos via an Arduino, he says
there’s no reason why anyone
creating a similar project couldn’t
trigger them from the Pi itself,
using a suitable motor driver board.
And if you’re lacking a Monome
(quite an expensive piece of kit), a
touchscreen could be used instead:
“A web-based UI should work, too.
Or, if one isn’t necessarily trying
to make a step sequencer, push
buttons or [a computer] keyboard
are viable control alternatives.”
As a part-time musician, Joon
plans to sample the Monomepi to
use in at least one of his tracks.
He’s also looking to improve the
project by “adding features to the
step sequencer program, such
as having more than 16 steps,
and the ability to use multiple
velocities. Other than that, I am
trying to think of more ways to
use my servos with the Pi!”
Joon admits he was lucky that the servos
fitted easily between the LEGO blocks,
albeit with a bit of paper padding
The note-playing hammers are made from coffee stirrers
stuck to LEGO blocks snaffled from Joon’s toddler!](https://image.slidesharecdn.com/33294462-0498-4b86-bdf5-4e5348496d58-161028122254/85/MagPi51-35-320.jpg)


![raspberrypi.org/magpi42 xxxx 2016
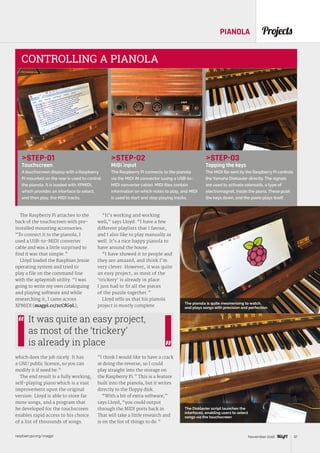
Tutorial RASPBERRY PI 101: BEGINNER’S GUIDE TO NOOBS
ne of the things we love about the Raspberry
Pi is just how easy it is to get started. A lot
of this is down to a custom, simple-to-use
installer called NOOBS.
NOOBS (or ‘New Out Of Box Software’, to give
it its full name) is a unique installation image
and an essential tool for newcomers. With
NOOBS loaded on a micro SD card, you can install
a wonderful range of operating systems for
your Raspberry Pi.
More importantly, you can speedily set up a new
Raspberry Pi with Raspbian, the official operating
system. When you start up a Raspberry Pi with
NOOBS for the first time, you’re given the option to
install the Raspbian operating system. Connect the
Raspberry Pi to a network and you’ll also get a bunch
of other operating systems to choose from.
From there it’s just a matter of picking the
operating system you want and letting NOOBS do
its thing. The NOOBS installer wipes the micro
SD card and sets up the operating system
for you. When the Raspberry Pi restarts,
you’ll no longer see NOOBS, just your
operating system.
In this tutorial, we’re going to help
absolute newcomers install Raspbian
Jessie with PIXEL (the official
operating system). But don’t forget:
you can use NOOBS to experiment
with other operating systems.
NOOBS isn’t just great for
beginners; it’s also ideal for
exploring what other operating
systems have to offer.
raspberrypi.org/magpi42 November 2016
micro SD card
(8GB or larger)
NOOBS
installation files
Mac, PC or
Linux machine
You’ll
Need
BEGINNER’S GUIDE TO
NOOBS
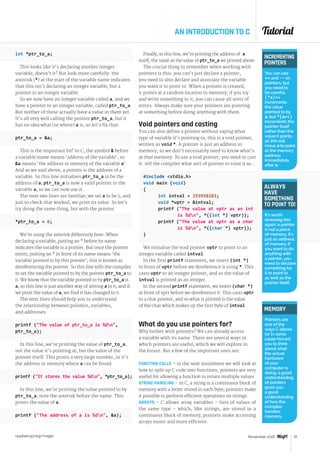
O
The ‘Raspbian [RECOMMENDED]’ option is the
official operating system and is available offline. The ‘x’
next to it indicates that this OS is going to be installed
The easiest way to set up a Raspberry Pi with Raspbian,
and other operating systems, is to use the NOOBS installer
Click the Install button
to format your micro SD
card and install the selected
operating system
Connect to a wireless
network (or attach an Ethernet
cable) to access a wider range
of operating systems](https://image.slidesharecdn.com/33294462-0498-4b86-bdf5-4e5348496d58-161028122254/85/MagPi51-42-320.jpg)
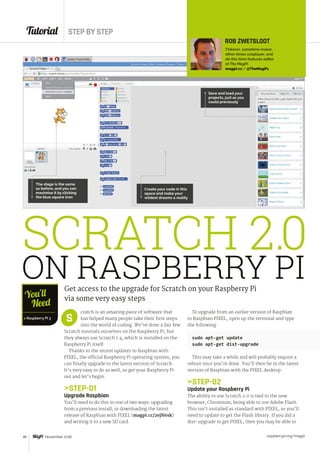
![raspberrypi.org/magpi 43xxxxx 2016
Tutorial
raspberrypi.org/magpi
01
RASPBERRY PI 101
STEP-01
Download NOOBS
Open your web browser and visit raspberrypi.org/
downloads/noobs/. Click on Download ZIP under
‘NOOBS Offline and network install’. Save the ZIP file
to your Downloads folder and extract its contents.
STEP-02
SD card
Download SD Card Formatter from sdcard.org and
open the program (click Yes in the User Account
Control alert on Windows). Attach your micro SD card
to the computer, and the card will appear in Drive.
Enter ‘SD CARD’ in the Volume Label so you can
identify it in the next step. Click Format (enter your
password on a Mac). Answer OK to the alerts.
STEP-03
Copy the files
Return to your Downloads and open the folder
containing the NOOBS files. Make sure you’re looking
at the files inside the folder, and not the folder itself.
Select all the files in the NOOBS folder and drag them
to the SD CARD folder (in the sidebar).
02
03
STEP-04
Power up
Eject the micro SD card from your computer. Place
it into your Raspberry Pi and power it up. You’ll be
greeted by the NOOBS v1.9 screen. If you haven’t
connected to the internet, you’ll only see a single
option: ‘Raspbian [RECOMMENDED]’.
STEP-05
Connect to network
To access more operating system options, connect the
Raspberry Pi to a network. Attach an Ethernet cable or
click ‘WiFi networks’. Choose your wireless network
and enter the password. Click OK. You’ll now see a wider
range of options (as shown in the main image opposite).
STEP-06
Install Raspbian
We’re going to go with Raspbian, so click to put an X
in the box next to ‘Raspbian [RECOMMENDED]’ and
click Install. Click Yes in the alert window. The NOOBS
software is copied to the micro SD card. NOOBS
displays ‘OS(es) Installed Successfully’ when the
software is installed. Click OK and the Raspberry Pi
will restart and boot into the operating system.
05
06
04
43November 2016](https://image.slidesharecdn.com/33294462-0498-4b86-bdf5-4e5348496d58-161028122254/85/MagPi51-43-320.jpg)


![Tutorial
raspberrypi.org/magpi 53November 2016
SENSOR-FREE PRESENCE DETECTOR
arp-scan list of devices if the following command
returns an address:
sudo arp-scan -l | grep DEVICEMACADDRESS
If your phone was found, the command will output
its address. If it wasn’t found, make sure that it’s
connected to the same WiFi network as the Pi (or vice
versa). You may also need to wake up your device, as
many devices disappear when they ‘sleep’.
Initial State
We’re going to use Initial State to create a real-time
dashboard showing who’s at the office and who isn’t.
Go to app.initialstate.com/#/register/ and create a
new account. Install the Initial State Python module
on your Pi:
curl -sSL https://get.initialstate.com/
python -o - | sudo bash
You will be prompted to create an example script;
this isn’t essential to installing the module, but can
help test your ability to stream to Initial State.
The code
You can clone the GitHub repo to get the
presence.py script:
git clone https://github.com/initialstate/
pi-sensor-free-presence-detector.git
We use threading to create separate pieces of code
that run at the same time as each other. This allows us
to look for more than one device on the network more
reliably. The subprocess module lets us call arp-scan
within our Python script.
To customise the script, change the arrays of names
and addresses to match your own. In this use case, we’re
tracking who’s at the office, so we have an array with our
Language
PYTHON 3
DOWNLOAD:
magpi.cc/2dDyuoV
TRIGGERING
AN ACTION
Easily set up
SMS or email
alerts within
Initial State or
customise the
code to make
the Pi trigger
something.
EMOJIS
You can
change
the emoji
icon in your
dashboard
to represent
your personal
use case, such
as a house or
hospital.
names. The address array contains the corresponding
MAC addresses for our phones. If you want to add more
devices, simply add more values to both arrays.
You’ll also need to replace YOUR_ACCESS_KEY
with your Initial State access key, which can be found
on your Initial State Account page.
Run the script with:
sudo python presence.py
Watch what prints to the terminal to make sure
your devices are being detected, and that streaming
is working. Head over to Initial State to check out
your dashboard!
Run from boot
To make this truly useful and reliable, we need to
handle any network issues. We found the easiest
solution to be rebooting the Pi whenever the network
connection drops. First, we need to create a script to
check the WiFi and then trigger shutdown:
sudo nano /usr/local/bin/checkwifi.sh
Place the following inside the file, making sure to
replace the IP address with the IP address of your router:
ping -c4 IP_ADDRESS /dev/null
if [ $? != 0 ]
then
sudo /sbin/shutdown -r now
fi
The ping checks for a connection. If it returns
with a non-zero exit code, the script sends the
shutdown command.
Save and exit the script. Now make sure its
permissions are in order:
sudo chmod 775 /usr/local/bin/checkwifi.sh
Running a script from boot on the Pi is pretty
straightforward with the service crontab:
sudo crontab -e
Pick your favourite text editor (such as nano) and at
the bottom of the file, under all of the comments, add
@reboot nohup sudo /usr/bin/python /home/
pi/presence.py to run the presence.py script. If
you named your script something else or put it in a
different directory, replace /home/pi/presence.py
with the correct path. Then, under that, add */5
* * * * /usr/bin/sudo -H /usr/local/bin/
checkwifi.sh /dev/null 21 to run the
checkwifi.sh script. Exit crontab and reboot the Pi to
run your new presence detector!
This small setup would fit perfectly in a 3D-printed enclosure](https://image.slidesharecdn.com/33294462-0498-4b86-bdf5-4e5348496d58-161028122254/85/MagPi51-53-320.jpg)

![Tutorial WALKTHROUGH
raspberrypi.org/magpi56 November 2016
#!/usr/bin/env python
# Statues
import time, pygame
import os, sys, random
import wiringpi2 as io
pygame.init() # initialise pygame
os.environ['SDL_VIDEO_WINDOW_POS'] = 'center'
pygame.display.set_caption(Statues)
screen = pygame.display.set_
mode([300,100],0,32)
pygame.mixer.quit()
pygame.mixer.init(frequency=22050, size=-16,
channels=2, buffer=512)
pygame.event.set_allowed(None)
pygame.event.set_allowed([pygame.
KEYDOWN,pygame.QUIT])
moveSound = pygame.mixer.Sound(sounds/s0.ogg)
pygame.mixer.music.load(sounds/tune.wav)
pygame.mixer.music.set_volume(1.0)
pygame.mixer.music.play()
pygame.mixer.music.pause()
imageNames = [ready,still,dance,freeze,
leftWin,rightWin,play]
messages = [ pygame.image.
load(images/+imageNames[m]+.png)
for m in range(0,7) ]
setup = 0 ; running =1; winner = 2; rstart = 3
# state machine constants
status = rstart # state machine status
stillTime = 0.0
startDelay = 2.0 # period to hold before game starts
stopDelay = 3.0 # period to wait after music
# stops before looking at sensors
playDuration = 4.0 # time the music plays
restart = False
def main():
global leftMovement,rightMovement, status
initGPIO()
printStatues game
print Esc to quit
leftMovement = False
rightMovement = False
while True:
checkForEvent()
if status == setup:
settingUp()
if status == running :
gameRun()
if status == winner :
gameWinner()
if status == rstart :
gameRstart()
def settingUp():
global stillTime, status, playTime
checkSensors()
showLEDs()
if stillTime == 0:
stillTime = time.time()
elif time.time() - stillTime startDelay :
status = running
statues.pySTEP-02
Make the PIR mounts
Make four brackets 11mm wide
from 2mm thick asymmetric
aluminium channel 12mm by
24mm by 24mm. Drill 2mm holes
in the short side to fix the PIR
sensor to the bracket with an M2
nut and bolt. Cut the long side
of two brackets down to 18mm
so they do not overlap when
attached to the sensor. Drill a
3mm hole in each long side so you
can fix it to the stick with M3 nuts
and bolts. Make sure the brackets
do not foul any of the PCB tracks;
assembly can be fiddly and a
miniature spanner helps.
STEP-03
Add the electronics
The few electronic parts fit on a
piece of 6 by 24 hole stripboard,
the copper strips running along the
short side. Drill three 1mm holes
through the stick to allow the LED to
be mounted on the other side. Wire
the power and signal connectors of
the PIR sensors through a three-pin
header socket to the board. Then
wire it all back to the Raspberry Pi
through a length of 9-way ribbon
cable. Attach the ribbon cable to the
stick with double-sided sticky foam
pads, and make a 30mm bracket
from 25mm by 15mm asymmetric
aluminium angle and fix it to an MDF
board about 100mm by 200mm.
The software
The statues.py program is written as a state machine
following the game phases. The stages of the game
are displayed in a small window and simply display
an image consisting of the words/instructions for
the current phase of the game. It uses the Pygame
framework and the streaming music function to make
sure that the music continues at the same point for the
next round when the game resumes.
Taking it further
We recommend the game is played as a ‘best of three
and you are out’ mode, but there is no software to
enforce that, so you might like to add some, or even
keep a score of the rounds won by each player. It is
best played at one end of a room, but you might have
to put some sort of a screen in front of the sensors
to stop any movement from the audience interfering
with them. You can replace the tune played with your
own; the tune in the GitHub repository is one we wrote
here at the Bakery – it might be a bit techno for some.
01.
02.
03.
04.
05.
06.
07.
08.
09.
10.
11.
12.
13.
14.
15.
16.
17.
18.
19.
20.
21.
22.
23.
24.
25.
26.
27.
28.
29.
30.
31.
32.
33.
34.
35.
36.
37.
38.
39.
40.
41.
42.
43.
44.
45.
46.
47.
48.
49.
50.
51.
52.
53.
54.
55.
56.
57.
58.
59.](https://image.slidesharecdn.com/33294462-0498-4b86-bdf5-4e5348496d58-161028122254/85/MagPi51-56-320.jpg)
![Tutorial
raspberrypi.org/magpi 57November 2016
STATUES PI
playTime = time.time()
pygame.mixer.music.unpause()
#play music - game running
displayMessage(2,128)
if leftMovement or rightMovement:
stillTime = 0
# reset the still time before the music
moveSound.play()
displayMessage(1,random.randint(40,220))
def gameRun():
global leftMovement,rightMovement, status, playTime
checkSensors()
showLEDs()
if time.time()-playTime playDuration :
#music stops
displayMessage(3,128)
pygame.mixer.music.pause()
status = winner
playTime = time.time()
else :
if not pygame.mixer.music.get_busy() :
# check end of music file
pygame.mixer.music.rewind()
pygame.mixer.music.play()
def gameWinner():
global leftMovement,rightMovement, status
if time.time() - playTime stopDelay :
checkSensors()
showLEDs()
if leftMovement or rightMovement :
moveSound.play()
if leftMovement :
printright player wins
winLED(1)
displayMessage(5,128)
else :
printleft player wins
winLED(0)
displayMessage(4,128)
status = rstart
time.sleep(3.5)
def gameRstart():
global restart, status, stillTime, playDuration
if restart :
restart = False
status = setup
checkSensors()
showLEDs()
displayMessage(0,128)
printready
stillTime = 0.0
playDuration = random.randint(6,20)+6
# time till next stop
else :
displayMessage(6,128)
def winLED(player):
for i in range(0,4): # all LEDs off
io.digitalWrite(ledPins[i],1)
if player == 0: # winner's LEDs yellow
io.digitalWrite(ledPins[0],0)
io.digitalWrite(ledPins[1],0)
else :
io.digitalWrite(ledPins[2],0)
io.digitalWrite(ledPins[3],0)
def displayMessage(m,b):
pygame.draw.rect(screen,(
b,b,b),(0,0,300,100),0)
screen.blit(messages[m],(0,0))
pygame.display.update()
def checkSensors():
global
leftMovement,rightMovement
if io.digitalRead(pirPins[0])
== 1 and not(leftMovement):
leftMovement = True
elif io.digitalRead(
pirPins[0]) == 0 and leftMovement:
leftMovement = False
if io.digitalRead(
pirPins[1]) == 1 and not(rightMovement):
rightMovement = True
elif io.digitalRead(pirPins[1]) == 0 and rightMovement:
rightMovement = False
def showLEDs():
if leftMovement :
io.digitalWrite(ledPins[0],0) # turn Red on
io.digitalWrite(ledPins[1],1) # turn Green off
else :
io.digitalWrite(ledPins[0],1) # turn Red off
io.digitalWrite(ledPins[1],0) # turn Green on
if rightMovement :
io.digitalWrite(ledPins[2],0) # turn Red on
io.digitalWrite(ledPins[3],1) # turn Green off
else :
io.digitalWrite(ledPins[2],1) # turn Red off
io.digitalWrite(ledPins[3],0) # turn Green on
def initGPIO():
global ledPins,pirPins
ledPins = [ 4,17,27,22] # left R, left G, right R, right G
pirPins = [18,23] # left / right
try :
io.wiringPiSetupGpio()
except :
printstart IDLE with 'gksudo idle' from command line
os._exit(1)
for pin in range (0,4):
io.pinMode(ledPins[pin],1) # led pin to output
io.digitalWrite(ledPins[pin],1) # turn off
io.pinMode(pirPins[0],0) # input left PIR sensor
io.pinMode(pirPins[1],0) # input right PIR sensor
io.pullUpDnControl(pirPins[0],2) # input enable pull up
io.pullUpDnControl(pirPins[1],2) # input enable pull up
def terminate(): # close down the program
printclosing down
pygame.mixer.quit()
pygame.quit() # close pygame
os._exit(1)
def checkForEvent(): # see if we need to quit
global restart
event = pygame.event.poll()
if event.type == pygame.QUIT :
terminate()
if event.type == pygame.KEYDOWN :
if event.key == pygame.K_ESCAPE :
terminate()
if event.key == pygame.K_SPACE :
restart = True
if __name__ == '__main__':
main()
Language
PYTHON
DOWNLOAD:
magpi.cc/1NqJjmV
PROJECT
VIDEOS
Check out Mike’s
Bakery videos at:
magpi.cc/1NqJnTz
60.
61.
62.
63.
64.
65.
66.
67.
68.
69.
70.
71.
72.
73.
74.
75.
76.
77.
78.
79.
80.
81.
82.
83.
84.
85.
86.
87.
88.
89.
90.
91.
92.
93.
94.
95.
96.
97.
98.
99.
100.
101.
102.
103.
104.
105.
106.
107.
108.
109.
110.
111.
112.
113.
114.
115.
116.
117.
118.
119.
120.
121.
122.
123.
124.
125.
126.
127.
128.
129.
130.
131.
132.
133.
134.
135.
136.
137.
138.
139.
140.
141.
142.
143.
144.
145.
146.
147.
148.
149.
150.
151.
152.
153.
154.
155.
156.
157.
158.
159.
160.
161.
162.
163.
164.
165.
166.
167.
168.
169.
170.
171.
172.
173.
174.
175.
176.
177.
178.
179.
180.
181.
182.
183.
184.
185.
186.
187.
188.
189.
190.
191.](https://image.slidesharecdn.com/33294462-0498-4b86-bdf5-4e5348496d58-161028122254/85/MagPi51-57-320.jpg)


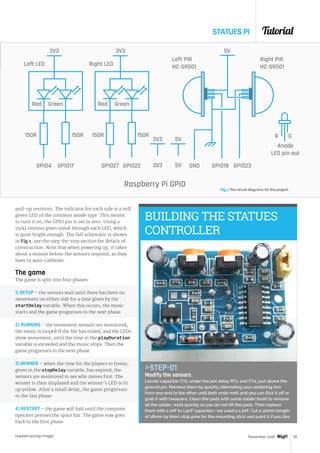
![Tutorial WALKTHROUGH
raspberrypi.org/magpi60 November 2016
Pi Cap and
Electric Paint
magpi.cc/
2e8kmGK
micro-USB cable
Pi power supply
Crocodile clips
Acrylic
Glue
Cardboard
Aluminium foil
You’ll
Need
apong breaks Pong out of the screen and
into your hands. Map the Pong paddles to
the position of your hands, using a Pi Cap
and Raspberry Pi, to create a simple and addictive
game. Capong is a physical reinterpretation of the
original video game. Instead of mouse or arrow keys,
it uses sensors arranged on a laser-cut stand so
that each player moves her hand between a pair of
sensors. The game is based on SimplePong, available
on openprocessing.org and released under Creative
Commons. It was modified to use input from the Pi Cap
sensors and converted to two-player operation.
First steps
First, we need to set up the Pi Cap. Run through the
‘Setting up your Pi Cap on the Raspberry Pi Zero’
tutorial found at magpi.cc/2emLB1K, and don’t miss
any steps. (You need to know the IP of the Pi to log
into it.) Run through the Pi Cap intro to see the code
examples, particularly the one that streams the sensor
data via OSC to your laptop terminal window. Notice
the DIFF data; that’s what we’ll be using.
Once you’ve done this, download and install
Processing if that’s not already on your laptop. Unzip
and install the code mpr121_pong in Processing’s
sketch folder, usually /Documents/Processing. Open
the sketch in Processing and start it running. To run
the OSC demo standalone, go to your PiCapExamples
folder on the Pi and cd to cpp/picap-datastream-
osc-cpp. Use ./run to see the Pi Cap datastream. Find
out the IP of your laptop then use ./run –host [IP
address of laptop] to stream it to Processing. Pong
should now be running. Click the laptop mouse to
start a game; it finishes when a player misses the ball.
Click the laptop mouse to start another game.
If you want to build the acrylic stand, as seen in our
version, you can download the Illustrator files online
(here: magpi.cc/2enaB7V and here: magpi.cc/2enc6Tn)
and follow the tutorial instructions, courtesy of
@rossatkin. You will need a laser cutter to cut these out,
or you can make it out of foam board.
To assemble your stand, glue one of the I-shaped
pieces of acrylic to the white rectangular piece with
no holes in it.
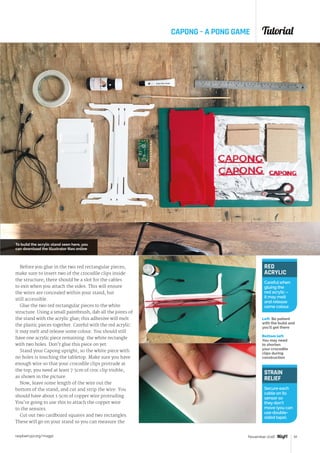
CAPONG
Make a physical version of Pong! Use capacitive sensing and Electric Paint
to make a fun and addictive two-player game to play with your friends
PAUL TANNER,
ROSS ATKIN
TINA ASPIALA
Paul, Ross, and Tina are IoT developers,
engineers, and designers. They enjoy
testing the limits of the latest tech with
Bare Conductive.
magpi.cc/2dDDdXP / @BareConductive
C
A PONG GAME
Four of the Pi Cap’s 12
capacitive electrodes
are being used as
proximity sensors
The game runs on a Pi Zero
with a Pi Cap add-on and
Ethernet cable
Players move their hands
between the Electric Paint
sensors to control the
paddles on screen
CROCODILE
CLIPS
Make sure you
leave enough
length for each
crocodile clip
to reach its
designated
electrode.](https://image.slidesharecdn.com/33294462-0498-4b86-bdf5-4e5348496d58-161028122254/85/MagPi51-60-320.jpg)
![Tutorial WALKTHROUGH
raspberrypi.org/magpi62 November 2016
import oscP5.*;
import netP5.*;
final int numElectrodes = 12;
boolean serialSelected = false;
boolean oscSelected = false;
boolean firstRead = true;
boolean soloMode = false;
boolean gameStart = false; //true;
float x = 150;
float y = 150;
float speedX = random(3, 5);
float speedY = random(3, 5);
int leftColor = 128;
int rightColor = 128;
int diam;
int rectSize = 150;
float diamHit;
int vpos1 = 0;
int vpos2 = 0;
OscP5 oscP5;
int[] diffs;
int globalGraphPtr = 0;
int electrodeNumber = 0;
int serialNumber = 4;
int lastMillis = 0;
void setup() {
size(500, 500);
noStroke();
smooth();
// setup OSC receiver on port 3000
oscP5 = new OscP5(this, 3000);
// other setup
diffs = new int[numElectrodes];
}
void oscEvent(OscMessage oscMessage) {
println(oscevent);
if (firstRead oscMessage.
checkAddrPattern(/diff)) {
firstRead = false;
}
else {
mpr121_pong.pde
01.
02.
03.
04.
05.
06.
07.
08.
09.
10.
11.
12.
13.
14.
15.
16.
17.
18.
19.
20.
21.
22.
23.
24.
25.
26.
27.
28.
29.
30.
31.
32.
33.
34.
35.
36.
37.
38.
39.
40.
41.
42.
43.
44.
45.
46.
47.
48.
49.
50.
51.
52.
53.
TROUBLE-
SHOOTING
Make sure
you’ve
mapped
the correct
crocodile clip
to each sensor
and electrode
combination.
size of the interior surfaces. If you’re using Electric
Paint, you can paint directly onto these squares.
Once dry, apply some double-sided tape; you’re
going to glue the sensors face down against the
acrylic. But first, you must cold-solder the paint!
Using your Electric Paint tube, squeeze out
a generous amount of paint onto the exposed
copper. You should make sure the wire is held
in place so that it doesn’t move around; you can
use double-sided tape. When you’re finished,
you should have four sensors – two square, two
rectangular – connected to each of the sides of the
Capong stand.
If you don’t have Electric Paint, you can
make your sensors using aluminium foil. Just
follow the same steps as above, but sandwich
the exposed wire between the aluminium foil
and the cardboard.
You can now firmly attach your sensors to the
stand and get out your Pi Cap and Pi Zero. Take the
crocodile clips that are protruding from the top of
the Capong stand and attach them to your Pi Cap’s
electrodes. Make sure you’re connecting to the
correct electrodes, the ones you’ve programmed
for functionality.
Now you can connect your Pi Zero, upload the
code, and get playing!
Above top Paint
Electric Paint to
make your sensor,
and to cold-
solder to your
crocodile clip
Above Attach
each of the
four crocodile
clips from each
sensor to the
correct electrode](https://image.slidesharecdn.com/33294462-0498-4b86-bdf5-4e5348496d58-161028122254/85/MagPi51-62-320.jpg)
![Tutorial
raspberrypi.org/magpi 63November 2016
if (oscMessage.checkAddrPattern(/diff)) {
// simulate mouse in original game
updateArrayOSC(diffs, oscMessage.
arguments());
vpos1=diffs[10]-diffs[1]+100; // guesswork
vpos1*=2.5;
if (vpos1 450) vpos1=450; // limits
if (vpos1 80) vpos1=80;
vpos2=diffs[0]-diffs[11]+100; // guesswork
vpos2*=2.0;
if (vpos2 450) vpos2=450; // limits
if (vpos2 80) vpos2=80;
print(vpos1, vpos2);
println();
}
}
}
void draw() {
background(255);
fill(200,0,0);
diam = 20;
ellipse(x, y, diam, diam);
fill(200,0,0);
rect(width-30, vpos1-rectSize/2, 10, rectSize);
rect(30, vpos2-rectSize/2, 10, rectSize);
if (gameStart) {
x = x + speedX;
y = y + speedY;
// if ball hits movable bar, invert X
direction and apply effects
if ( x width-30 x width-20 y
vpos1-rectSize/2 y
vpos1+rectSize/2 ) {
speedX = speedX * -1;
x = x + speedX;
rightColor = 0;
fill(200,0,0);
diamHit = random(75,150);
ellipse(x,y,diamHit,diamHit);
rectSize = rectSize-10;
rectSize = constrain(rectSize, 10,150);
}
// similar if ball hits the other movable bar
(2 players)
else if ( x 20 x 30 y vpos2-
rectSize/2 y vpos2+rectSize/2 ) {
speedX = speedX * -1;
x = x + speedX;
rightColor = 0;
fill(200,0,0);
diamHit = random(75,150);
ellipse(x,y,diamHit
,diamHit);
rectSize = rectSize-10;
rectSize =
constrain(rectSize, 10,150);
}
// if ball hits wall, change direction of X
(single-player only)
else if (false x 25) {
speedX = speedX * -1.1;
x = x + speedX;
leftColor = 0;
}
else {
leftColor = 128;
rightColor = 128;
}
// resets things if ball hits either wall - you lose
if (x width || x 0) {
gameStart = false;
//delay(5000); // auto-restart
//gameStart = true;
x = 150;
y = 150;
speedX = random(3, 5);
speedY = random(3, 5);
rectSize = 150;
}
// if ball hits up or down, change direction of Y
if ( y height || y 0 ) {
speedY = speedY * -1;
y = y + speedY;
}
}
}
void mousePressed() {
gameStart = !gameStart;
}
void updateArrayOSC(int[] array, Object[] data) {
if (array == null || data == null) {
return;
}
for (int i = 0; i min(array.length,
data.length); i++) {
array[i] = (int)data[i];
}
}
Language
PROCESSING
DOWNLOAD:
magpi.cc/2dDE4b0
54.
55.
56.
57.
58.
59.
60.
61.
62.
63.
64.
65.
66.
67.
68.
69.
70.
71.
72.
73.
74.
75.
76.
77.
78.
79.
80.
81.
82.
83.
84.
85.
86.
87.
88.
89.
90.
91.
92.
93.
94.
95.
96.
97.
98.
99.
100.
101.
102.
103.
104.
105.
106.
107.
108.
109.
110.
111.
112.
113.
114.
115.
116.
117.
118.
119.
120.
121.
122.
123.
124.
125.
126.
127.
128.
129.
130.
131.
132.
133.
134.
135.
136.
137.
138.
139.
140.
141.
142.
143.
144.
145.
146.
147.
148.
149.
150.
151.
152.
153.
154.
155.
156.
157.
CAPONG – A PONG GAME](https://image.slidesharecdn.com/33294462-0498-4b86-bdf5-4e5348496d58-161028122254/85/MagPi51-63-320.jpg)


![Review
raspberrypi.org/magpi 95May 2015
22 23
ESSENTIALS
[ Chapter One ]
[ LEARN TO CODE WITH C ]
23
[ CHAPTER FOUR]
stdio.h
a is equal to %d and I've finishedn
T
ESSENTIALS
22 [ Chapter Four ] [ More Advanced Flow Control ]
FLOW CONTROLFor loops and case statements – more advanced
ways of controlling the flow of a program
MORE ADVANCED
A for loop allows you to initialise,
test, and increment the variables
associated with a loop from
within the loop definition itself
A switch statement allows
you to choose different
actions depending on multiple
different values of a variable
CLEARN
CODE
WITH
TO
magpi.cc/learn-c-book
Get started today for
just £2.99 / $3.99 ON
YOUR
PROGRAM WITH THE WORLD’S
MOST POPULAR LANGUAGE
Raspberry Pi
ESSENTIALS
From the makers of the
official Raspberry Pi magazine
Find it on
digital app
raspberrypi.org/magpi 95November 2016](https://image.slidesharecdn.com/33294462-0498-4b86-bdf5-4e5348496d58-161028122254/85/MagPi51-95-320.jpg)