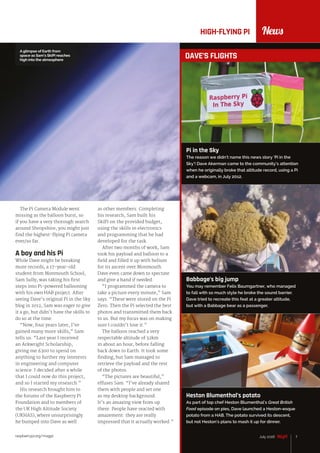
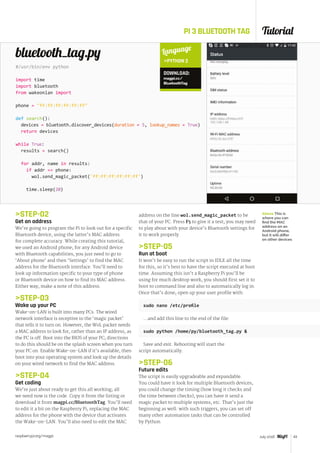
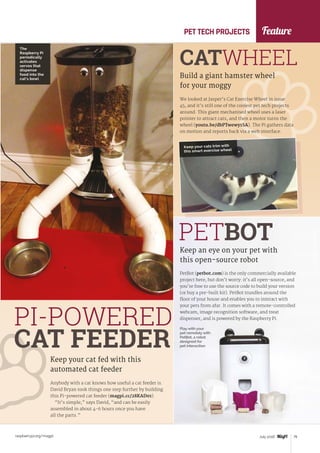
The Raspberry Pi 3 sold almost 500,000 units in March 2016, making it the best selling month in the history of the Raspberry Pi. This surpassed the previous record set in March 2015 with the release of the Raspberry Pi 2. The Raspberry Pi has now sold over 8 million units total, making it the best selling British computer ever produced. With continued growth, its next milestone may be surpassing the 12-17 million units sold of the Commodore 64.


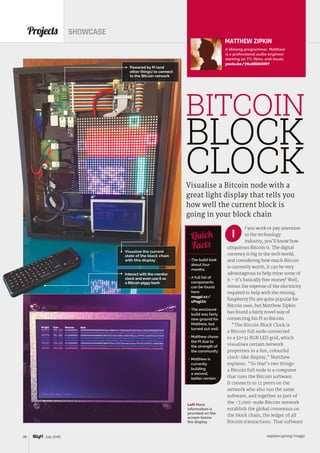
![raspberrypi.org/magpi6 July 2016
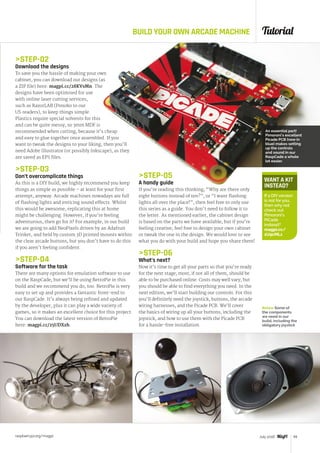
News
f you’ve paid attention to
high-altitude ballooning
(HAB) within the Raspberry
Pi community, you’ll have no doubt
heard of Dave Akerman. He’s
broken records thanks to Pis in
HABs, specifically ones involving
the highest altitude amateur live-
transmitted pictures. It’s very
specialised, but still spectacular.
It probably comes as no surprise,
then, to learn that he’s broken the
record once again, this time thanks
to the recently released upgrade
to the Raspberry Pi Zero. The new
camera port is a big deal when
you’re doing something like this.
“I’d been pleading with
Eben [Upton] since I first saw a
prototype of the original Pi Zero.
Its low weight would be ideal for
live-imaging HAB applications,
if only it had a camera port,”
Dave writes on the Raspberry Pi
blog. “The camera is the entire
reason for using a Pi for HAB; if
Everyone has been talking about high-altitude
ballooning this month; here’s why…
you don’t want pictures, then a
smaller/lighter/simpler AVR or
PIC microcontroller will easily
do the job, and with less battery
power. I felt that the CSI-less Pi
Zero was a missed opportunity.
Eben agreed, and said he would
try to make it happen.”
New records
On launch day, Dave had to wait
for the weather to clear before
filling up the balloon, contending
with some unexpected gusts of
wind in the process. The predicted
altitude for the payload before the
balloon burst was 42km (26 miles),
which is about double the altitude
of the U-2 spy plane. Predictions
weren’t far off; the last photo
sent from the camera before the
balloon burst records an altitude
of 41,837m. Dave believes this
breaks any previous record he’s
made, and any others that have
been made since.
FEATURE
HIGH-
FLYING PI
I
Last year, Skycademy helped
teachers around the UK to
learn about performing HAB
experiments in their schools.
It was a huge success, so the
Raspberry Pi Foundation is
launching a new Skycademy
course. The course will take place
over three days, with the second
day dedicated to launching and
tracking a HAB. You can find out
more information, and apply,
online: magpi.cc/28J5Vma
SKYCADEMY 2016
The balloon reached almost halfway
to the edge of space, and only a few
metres short of the 42km prediction
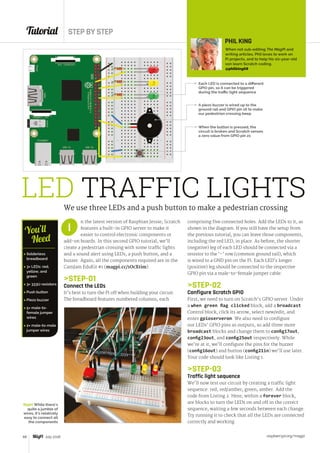
A basic case with the bare essentials needed to make things
work, which is important when you’re trying to save weight](https://image.slidesharecdn.com/fc37cea6-234e-4dec-82d7-3b63b4ecdd27-160909073919/85/MagPi47-6-320.jpg)

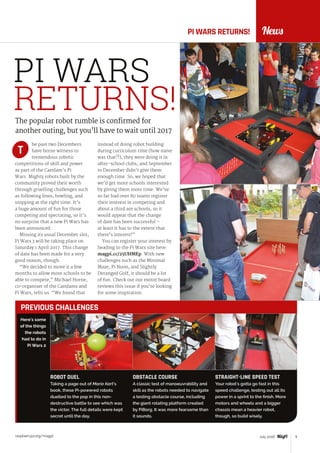


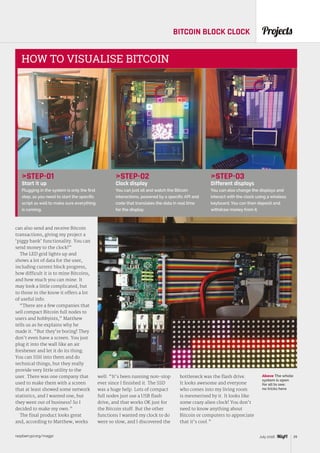
![raspberrypi.org/magpi 25July 2016
Feature
Expected results
Oliver had done his homework:
he took off in a light aircraft to
test the experiment, holding the
camera out of the window. He
was able to process the resulting
images and get an idea of what it
would be like with the benefit of
more altitude. Oliver expected to
see a negative correlation between
NDVI levels (or plant health) in
different areas and the amount
of CO2
emissions and average
fluctuations of temperature in
those areas.
“We also hoped to get some
strong definition between
different areas of land (for
example, very dense forest,
rainforest, agricultural land,
forested land) to demonstrate the
ability of the Raspberry Pi as an
ecological monitoring device,”
Oliver adds. “In my tests, we
managed to get some really strong
definition between different areas
of land.”
The experiment sought to investigate the plant health level of
vegetation across as much of the world’s surface as possible, by
examining the present levels of chlorophyll and comparing it against
several environmental factors for each area. Chlorophyll strongly
absorbs light in the 400-700nm band (visible light), but reflects
strongly in the near infrared band. The photosynthetic capacity (that is,
the chlorophyll levels) of a plant can then be worked out by comparing
the ratio of near infrared radiation reflected to visible radiation
reflected. A special index called NDVI gives a value from +1 (most
photosynthetic) to -1 (not photosynthetic). Forests will have a very
high value for NDVI, while areas such as oceans or deserts will have a
negative value.
THE SCIENCE
Results
Trees didn’t run as smoothy
as expected. In order for the
experiment to work, a blue filter
needed to be applied to the
camera, but it didn’t form part of
the payload to the ISS. It was an
essential component, and it looked
like the project would be doomed
(the astronauts even tried to find
a blue filter on board). In the end,
the Astro Pi was deployed onto the
hatch window and ran without it.
Hopefully this will help to inspire others to take
environmental monitoring into their own hands.
It’s pretty amazing to think that [Raspberry Pi] can
perform the job of something worth hundreds of
thousands of pounds
Oliver says
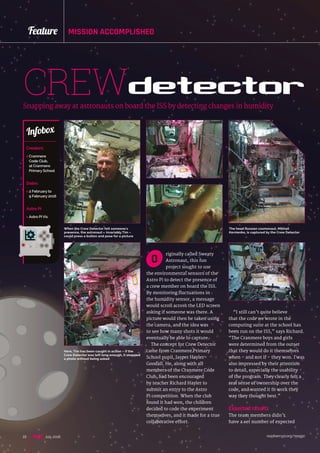
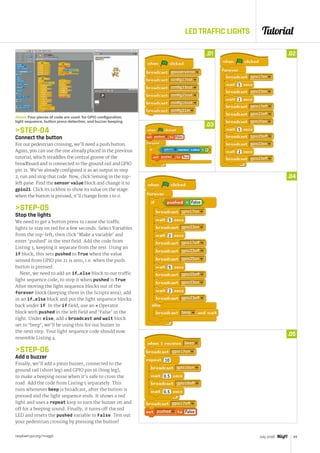
Credit: ESA
In order to get a good
image of Earth, Tim
Peake stuck the Astro
Pi IR device onto
the hatch window of
the ISS
But it meant the red and
infrared data would be saved
to the same channel, making it
impossible to distinguish the
latter. “We had to improvise
by using an alternative index
(GLI), which compares the green
channel to the red channel (G-R)/
(G+R),” Oliver reveals.
Despite the setback, more than
4,000 photos were sent back. And
they were stunning. “Although
there’s less definition than with
the NDVI method, it still shows
some definition. I am still playing
around to try and optimise the
images and to improve the
definition, such as taking into
account atmospheric corrections,
but hopefully there will be some
nice data in the end.”](https://image.slidesharecdn.com/fc37cea6-234e-4dec-82d7-3b63b4ecdd27-160909073919/85/MagPi47-25-320.jpg)
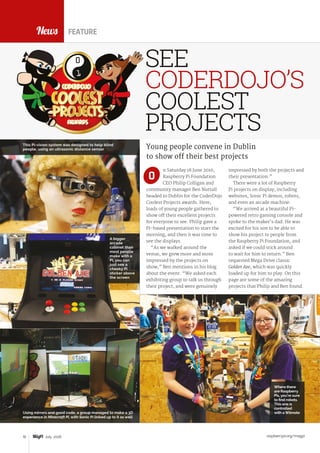
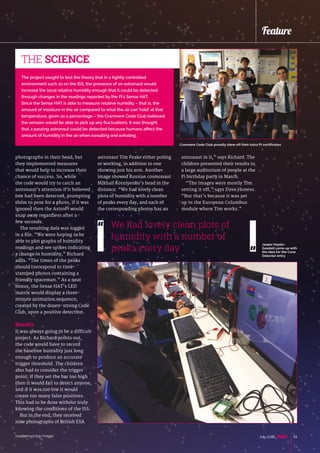
![raspberrypi.org/magpi26 July 2016
Feature MISSION ACCOMPLISHED
and beyond
TO INFINITY
im has returned to
Earth and been
reunited
with his family.
His legacy will
carry on, though,
thanks to the kids
he’s inspired over
the past six months,
and there’s a very real
possibility he’ll be able
to go up to the ISS again. As
for the Astro Pis, their legacy
is just beginning as they’ll be
up on the space station for a very
long time.
“The Astro Pis are staying on
board the ISS until 2022,” Dave
Honess tells us. “That’s when their
RTC batteries technically expire,
although they’ll probably hold
charge for another ten years. At
that point, we’ll get them down
from space and retire them to a
comfy museum somewhere so
everyone can go visit them!”
While the Astro Pis were created
with the aid of the UK Space
Agency with Tim’s stay in mind,
their ability to stay operational
for another 6-16 years on the ISS
means that other plans sprang up
for them. In March 2016, the ESA
got in contact with the Foundation
T
The future of Astro Pi is very bright
about the Astro Pis being involved
with French astronaut Thomas
Pesquet’s mission on the ISS.
“The ESA has Astro Pi
educational plans for the next two
astronauts that are going up,”
Dave reveals. “Thomas Pesquet is
launching in November this year,
The ESA has Astro Pi educational plans
for the next two astronauts that are
going up to the ISS
Want
to get
your
hands on
an Astro Pi?
You can start
3D-printing
your own flight
cases to do some
experiments with
and veteran [Italian]
astronaut Paolo Nespoli
launches in May 2017.”
It’s not just France and Italy
who will get involved with Astro
Pi, though. Thanks to the success
of Astro Pi, the ESA is rolling
out Astro Pi-related education
resources to all ESA member
states, which is currently 22
countries, exponentially expanding
the educational reach of the Astro
Pi project.
“Each ESA member state has
something called an ESERO office;
these provide free resources,
support and information for
teachers to enhance STEM subjects
using space as a context,” says](https://image.slidesharecdn.com/fc37cea6-234e-4dec-82d7-3b63b4ecdd27-160909073919/85/MagPi47-26-320.jpg)


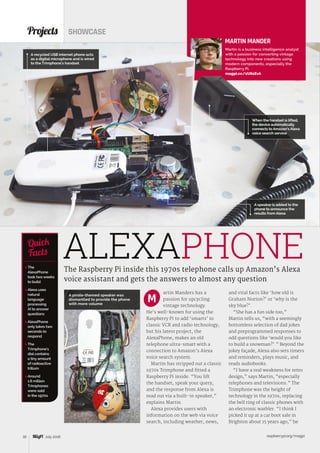
![raspberrypi.org/magpi34 July 2016
ertain members of The
MagPi team like a good
bit of karaoke. Africa by
Toto, Disney music, the theme
to Mazinger Z – it’s all a bit of fun
with the right people. Karaoke
machines can be expensive,
though, and the cheaper ones lack
great functionality as well. Harry
Gonzalez-Rivera came across this
Projects SHOWCASE
Unimpressed with a consumer karaoke product,
one Pi user made something far better with a Pi Zero
The project
uses bare-
bones Raspbian
It took about a
month’s work
at weekends
Harry’s
planning a
second version
powered by Pi 3
Karaoke is
a Japanese
portmanteau of
kara okesutra,
or empty
orchestra
This is Harry’s
first project
Quick
Facts
All the system fits inside this
small, older karaoke mixer
PI ZERO
KARAOKE BOX
Plug in a mic and
you’re ready to go
C
The system hooks up over
RCA cables and can be routed
through a home theatre setup
HARRY GONZALEZ-RIVERA
A system analyst living in
Texas, Harry likes to take tech
apart to figure out how it works
in his spare time.
magpi.cc/1tvSTTr
problem when trying to buy a
commercial karaoke machine.
“About a year ago, I bought a
consumer karaoke box that had
USB and HDMI for about $140,”
Harry tells us. “It looked awesome
until I actually tried to use it: at
first, the HDMI output created
an audio delay and the output
of the HDMI wasn’t even 1080p.
It turned out to be a conversion
from composite to HDMI. Also,
the USB implementation of the
device [for loading files] was
poorly programmed.”
After getting a smart hub for
home automation, Harry spent
some time trying to get it to
control his TV, and one of his
friends joked that he should try](https://image.slidesharecdn.com/fc37cea6-234e-4dec-82d7-3b63b4ecdd27-160909073919/85/MagPi47-34-320.jpg)
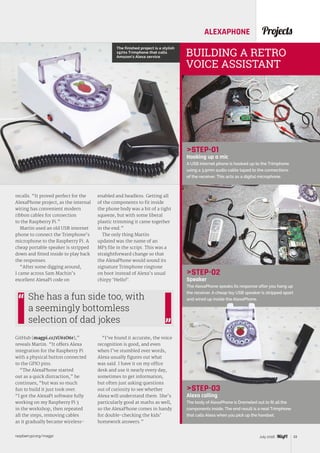
![raspberrypi.org/magpi 37July 2016
ProjectsBEEKEEPING SERVER
STEP-01
Arduino and DHT sensor
A DHT (digital humidity and
temperature) sensor is connected to the
Arduino on port 10. An LCD is hooked to
the Arduino, so Valentin can check the
readings locally at the beehive.
STEP-02
Box and buttons
A plastic tub is used as an enclosure
to protect the parts from the bees.
A button is connected to pin 12. Pressing
it activates the backlight so the LCD can
be read in low light conditions.
STEP-03
Bee safe
The Raspberry Pi and Arduino devices are
placed inside the sealed box, with a switch
used to turn it on and off. This unit is then
connected to a weight scale, mounted
at the bottom of the beehive.
INSIDE THE HIVE
pollen and produce honey.
If the flowers don’t have enough
pollen, the bees start eating the
honey from the hive. Therefore,
you have to move the hives to a
better area. So I thought, “What
a great idea to have a weight scale
under a hive.”
The Beekeeping Server merges
different devices and sensors.
The project contains a Raspberry
Pi, Arduino board, DHT23 sensor,
HX-711 scale amplifier board,
load scale (rated at 300kg), small
LCD, WiFi dongle, and lithium
polymer battery.
“The Arduino board is the core
of the project,” explains Valentin.
“It reads the temperature,
humidity and weight, and prints
it in a human-friendly format.
The HX711 amplifier sensor reads
raw data from the load scale and
sends it to Arduino in kilograms.
The DHT sensor reads outdoor
temperature and humidity,
and the LCD [displays] weight,
temperature, and humidity.
“The Raspberry Pi has the
role of the server for wireless
communication,” he continues.
An Apache server and SQL
database are set up in Raspbian.
The Raspberry Pi accesses the
data from the Arduino and
hosts a webpage displaying the
results. Alternatively, the small
LCD on the beehive provides
data on-site.
“It took about a month to
build,” says Valentin, “and of
course there were problems.”
From library issues all the
way to frying a board, Valentin
has had his work cut out.
“At first, I had problems
with getting a reading from
the HX711 sensor. My scale had
different colour codes for the
four wires it has, and the HX711
was getting no data. Currently,
I have problems with the weight
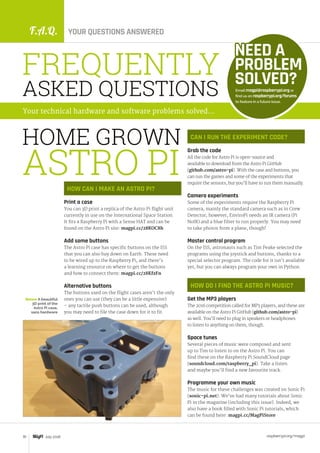
Above The
temperature and
weight of the hive
are accessed
remotely, letting
the owner
know when the
honey is ready
to be collected
I get. The scale is very sensitive
to temperature variation. I’m
currently trying to resolve that
problem by creating a thermal
barrier between the sensor and
outside temperature.”
Despite the gremlins,
the Beekeeping Server is in
constant use. Valentin is ironing
out the issues and looking
to add a solar panel soon (the
battery needs changing every
three days).
“It’s fun building one,” he
tells us. “The process of creating
something, and the information
you learn during the build process,
it’s all very rewarding.”](https://image.slidesharecdn.com/fc37cea6-234e-4dec-82d7-3b63b4ecdd27-160909073919/85/MagPi47-37-320.jpg)


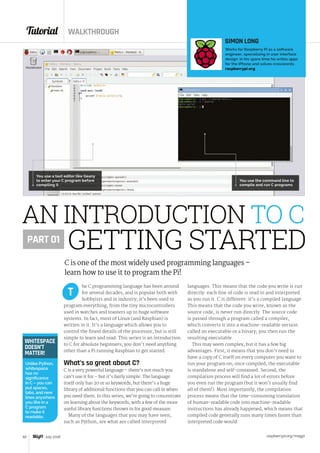
![Tutorial WALKTHROUGH
raspberrypi.org/magpi48 July 2016
The positions
of the LEDs are
numbered and
use an x and y
axis. However,
this starts from
the top-left of
the matrix
The egg, a yellow
LED, falls from a
random starting
point at the top
of the Sense HAT
Tilt the Sense HAT
left or right to
move the basket
to where you think
the egg will land –
can you catch it?
Raspberry Pi
Sense HAT
magpi.cc/
1TGGUt5
You’ll
Need ome of the most basic and repetitive games
can be the most fun. Consider Flappy Bird,
noughts and crosses, or even catch. With
this in mind, a simple drop-and-catch game makes
excellent use of the Sense HAT. Code a yellow LED to
drop each second, and a basket on the bottom row of
LEDs. Use code to record the accelerometer reading
and utilise this so that when you tilt your Sense HAT
left or right, you can move the basket to catch the
egg. Catch it and you play again, but if you miss one,
then it breaks and it’s game over.
Getting set up
Ensuring that your Raspberry Pi is turned off, attach
your Sense HAT to the GPIO pins. Use the supports
and screws to secure the HAT into position. Plug in
the power and boot up your Pi. The Sense HAT Python
library is included with the current OS image and
requires no installation. Either load your preferred
Python editor and type up the code, or download it to
your Raspberry Pi, saving it into your home folder.
To run the code, press F5; after a short introduction
screen and a countdown, the game will begin. If you
open the code in a text editor, you can customise some
features of the program such as the messages, the
colours used, and the splash screen.
To edit or use your own message, find the code line
which begins sense.show_message – for example,
on line 32. Change the text within the speech marks
and add your own message. Editing the colour of the
message is possible and achieved by changing the red,
green, and blue (RGB) values. The maximum value for
each is 255, which is the full amount of colour. These
can be combined to create a wide range of colours.
For example, the colour blue is [0, 0, 255].
Like the text, you can also change the colour of the
egg or basket by editing the RGB values within the
square brackets. These are set using the code
sense.set_pixel, found on line 46. You could change
the values to [0, 255, 0] to create a pea drop game!
S
MAKE A MOTION-CONTROLLED
EGG DROP GAMECan you catch the eggs as they drop from the top of the Sense HAT?
DAN ALDRED
A Raspberry Pi Certified Educator and
a lead schoolteacher for CAS. He's
passionate about creating projects and
uses projects like this to engage the
students that he teaches.
tecoed.co.uk / @dan_aldred](https://image.slidesharecdn.com/fc37cea6-234e-4dec-82d7-3b63b4ecdd27-160909073919/85/MagPi47-48-320.jpg)
![Tutorial
raspberrypi.org/magpi 49July 2016
Editing and using images
When the game begins, an image of a chicken is
displayed. This is loaded from a file called chick.png,
which is stored in the same folder as your egg drop
program file. You can create your own images to
display throughout the game and use the code
sense.load_image(chick.png) on line 34,
replacing the file name ‘chick.png’ with the
name of your file. An effective tool to create an
image is RPi 8x8 Grid Draw, a superb on-screen
program that enables you to manipulate the
LEDs in real time. You can change the colours,
rotate them, and then export the image as code
or as an 8×8 PNG file. First, we need to install the
‘Python PNG library’ – open a terminal window and
type: sudo pip3 install pypng. After this has
finished installing, type:
git clone https://github.com/jrobinson-uk/
RPi_8x8GridDraw
Once the installation has completed, move to its
folder by typing cd RPi_8x8GridDraw, then type
python3 sense_grid.py to run the application.
The Grid Editor enables you to select from a range
of colours displayed down the right-hand side of
the window. Simply choose a colour, then click the
location of the LED on the grid and select ‘Play on
LEDs’ to display the colour on the Sense HAT LED
matrix. Clear the LEDs using the ‘Clear Grid’ button
then start over. Finally, when exporting the image,
you can either save as a PNG file or you can export
the layout as code and import that into your program.
Remember that the image size is limited to 8×8
pixels. If you’re looking for inspiration, check out
Johan Viet who has some excellent examples of
8×8-pixel art (magpi.cc/1SrqGDm).
Dropping the egg
Both the basket and egg mechanics are similar, except
that the basket only moves left and right along the x
axis. This means that the y axis value stays static.
To simulate the egg
dropping, the first LED is set
in position and coloured yellow (line 46).
The egg_x is the value the LED’s horizontal position
at the top of the matrix; remember, this is selected
at random at the start of each drop. The egg_y value
refers to the LED’s vertical position. The LED is then
coloured black, giving the impression that it’s no longer
there (line 63). The egg_y value is increased by one,
which moves to the LED down one place (line 64). Then
that LED is coloured yellow, giving the appearance that
the egg has dropped down one space (line 65).
The basket is set by turning on one LED (line 47);
this creates a nice brownish colour. Since the basket
doesn’t move up, the y value position is set to 7. The
orientation of the Sense HAT is taken using pitch =
sense.get_orientation()['pitch'] on line 55. This
value is fed into a function called basket_move (line
18), which calculates the new position of the LED in
relation to the amount of tilt. Again, the LED is set to
black so it appears that the basket has left its current
position (line 62). Lastly, the new position is set using
sense.set_pixel(basket_x, 7, [139, 69, 19]),
where basket_x is the new value of the position of
the LED along the bottom of the matrix.
Below To make
the game more
interesting, the
egg is dropped
from a random
position each time
a new egg falls
Language
PYTHON
DOWNLOAD:
magpi.cc/1teCX7Y
EGG DROP GAME
Above Once the
egg is on the
bottom line of
LEDs, its position
is compared with
the position of
the basket
Figure out the positions of the LEDs
using the graphical interface](https://image.slidesharecdn.com/fc37cea6-234e-4dec-82d7-3b63b4ecdd27-160909073919/85/MagPi47-49-320.jpg)
![Tutorial
raspberrypi.org/magpi 53July 2016
MIXED UP
mixUp.py
#!/usr/bin/env python
# All Mixed Up by Mike Cook June 2016
import RPi.GPIO as GPIO
import MFRC522
import time, pygame, os, sys
pygame.init() # initialise graphics interface
os.environ['SDL_VIDEO_WINDOW_POS'] = 'center'
pygame.display.set_caption(All Mixed Up)
pygame.event.set_allowed(None)
pygame.event.set_allowed([pygame.KEYDOWN,pygame.QUIT])
screenWidth = 406
screenHeight = 615
screen = pygame.display.set_mode([screenWidth,screenHeight],0,32)
numberOfCards = 10 # picture cards
numberOfBacks = 3 # background cards
card = [ pygame.image.load(Cards/R+str(cardNumber)+.png).convert_alpha()
for cardNumber in range(0,numberOfCards+1)]
# three background images for each card
backImage = [ pygame.image.load(Cards/B+str(backNumber)+.jpg)
for backNumber in range(0,numberOfBacks*3)]
# number of entries to match numberOfCards variable + 1
tokens = [
0,0x96e2acd5,0xaa01a910,0xbd51192b,0xccb419de, 0xec9f19de,
0x5c6ccadd, 0x1c0201de, 0xcc0101de,0x1c88fadd, 0xccba19de]
# number of entries to match numberOfBacks variable
backToken = [0x9c3131de,0xbcc8eedd,0xdc54e6dd]
headRect = pygame.Rect(0,0,screenWidth,164)
bodyRect = pygame.Rect(0,165,screenWidth,224)
feetRect = pygame.Rect(0,384,screenWidth,231)
headReader = 0; bodyReader = 1; feetReader = 2
GPIO.setmode(GPIO.BOARD)
GPIO.setwarnings(False)
muxPins = [16,18,7]
cardPresent = [False,False,False]
cardID = [0,0,0]
needRedraw = True
background = 0
def main():
print All mixed up
init()
while 1:
checkForEvent()
if needRedraw :
drawScreen()
scanReaders()
def scanReaders():
global cardPresent, cardID, needRedraw, background
Gathering resources
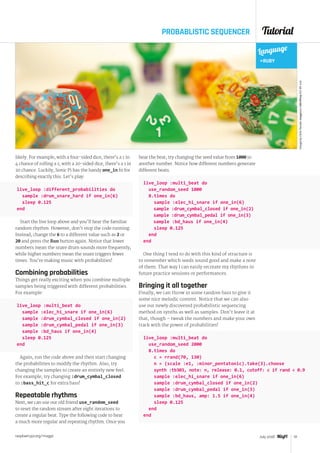
The first thing you need is the artwork for the cards.
This can be drawn as a class project, copied from a
book or the internet, or you can use our artwork. We
say ours, but we commissioned the robot drawings
from an artist friend, Adam Farra; you can see them
all in Fig 2 (page 57) and download them from the
GitHub repository for the project. If you’re drawing
your own artwork, it should end up as a PNG image
406 pixels wide by 615 pixels high. It’s important that
the height is divisible by three. They should also have
a transparent background, so we can add our own
in with other cards. There can be three background
images for each background card.
You will also need to install an RFID library; we
used the one at magpi.cc/28LleQN. The sample code
is useful for testing your readers individually. When
you’re ready, move the MFRC522.pyc file into the
folder that contains the mixUp.py code listing; this
folder should also contain a directory called Cards,
which contains the artwork files.
The software
The software runs under the Pygame framework
and starts off by initialising that system. Each card
causes its associated picture to be drawn, but through
a different mask depending on the reader the card
was seen on. In this way, only the head, body, or feet
are drawn, depending on the reader used. The line
Make your own
robot mash-up
Language
PYTHON 2.7
DOWNLOAD:
magpi.cc/1NqJjmV
PROJECT
VIDEOS
Check out Mike’s
Bakery videos at:
magpi.cc/1NqJnTz](https://image.slidesharecdn.com/fc37cea6-234e-4dec-82d7-3b63b4ecdd27-160909073919/85/MagPi47-53-320.jpg)
![Tutorial
raspberrypi.org/magpi 55July 2016
MIXED UP
that sets the tokens list will need changing to
match the cards that you have. Run the code and
present the cards to any reader to get a printout
of the card’s ID number. Next, copy and paste
these numbers into the tokens list. Do the same
for the background cards with the backToken
list. Now run the program again and see what card
generates what picture, then stick a printout of
that picture on the card.
You can swap the reader associated with the
head and feet by changing the headReader and
feetReader variables. This needs to be done to
make the display match the reader positions of the
reader box if you have it the inverse way up. If the
images you have drawn are not quite aligned, we
have written a program to nudge them into place,
which you can also find in the GitHub repo.
for reader in range(0,3):
setMux(reader)
(status,TagType) = mfRaeder[reader].MFRC522_Request(mfRaeder[reader].PICC_REQIDL)
if status == mfRaeder[reader].MI_OK:
(status,uid) = mfRaeder[reader].MFRC522_Anticoll()
if status == mfRaeder[reader].MI_OK and cardPresent[reader] == False :
cardPresent[reader] = True
needRedraw = True
token = (uid[0] 24) | (uid[1] 16) | (uid[2] 8) | uid[3]
if getImageNumber(token) != 0 :
cardID[reader] = getImageNumber(token)
else:
setBackground(token,reader)
print Card reader,reader,hex(token).rstrip(L)
else :
cardPresent[reader] = False # no card present
def drawScreen():
global needRedraw
screen.blit(backImage[background],(0,0))
screen.set_clip(headRect)
screen.blit(card[cardID[headReader]],(0,0)) # change 0 to 2 for inverse
screen.set_clip(bodyRect)
screen.blit(card[cardID[bodyReader]],(0,0))
screen.set_clip(feetRect)
screen.blit(card[cardID[feetReader]],(0,0)) # change 2 to 0 for inverse
screen.set_clip(None)
pygame.display.update()
needRedraw = False
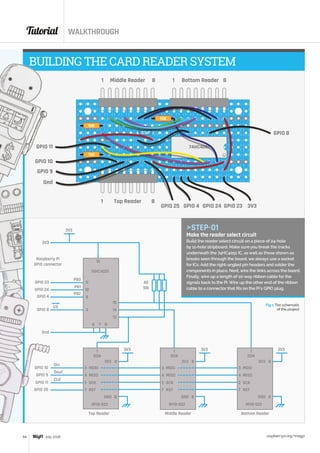
STEP-02
Attaching the readers
First, solder the right-angled pin headers on the
reader PCB. Now, make up lengths of 8-way ribbon
cable connectors to connect to the reader switch.
Mark each end of the cable with a small white dot
so you don’t get it the wrong way round. At this
stage, it’s worth testing that all three readers work.
As the readers are affected by metal, it’s important
to use as little metal as possible in constructing
the box. Also, the readers interfere with each
other, reducing the range, so mount them at least
70mm apart.](https://image.slidesharecdn.com/fc37cea6-234e-4dec-82d7-3b63b4ecdd27-160909073919/85/MagPi47-55-320.jpg)
![Tutorial
raspberrypi.org/magpi 57July 2016
MIXED UP
def getImageNumber(number):
image = 0
for i in range(0,numberOfCards+1) :
if tokens[i] == number:
image = i
return image
def setBackground(token, reader):
global background
background = 0
for i in range(0,numberOfBacks):
if token == backToken[i]:
background = reader + (i*3)
def init():
global mfRaeder
for pin in range (0,3):
GPIO.setup(muxPins[pin],GPIO.OUT) # mux pin to output
setMux(0)
reader1 = MFRC522.MFRC522()
setMux(1)
reader2 = MFRC522.MFRC522()
setMux(2)
reader3 = MFRC522.MFRC522()
mfRaeder = [reader1,reader2,reader3]
def setMux(n):
mask = 1;
for pin in range(0,3):
if (mask n) != 0 :
GPIO.output(muxPins[pin], True)
else :
GPIO.output(muxPins[pin], False)
mask = mask 1
def terminate(): # close down the program
print (Closing down)
GPIO.cleanup()
pygame.quit() # close pygame
os._exit(1)
def checkForEvent(): # see if we need to quit
global nextF, background, needRedraw, cardID
event = pygame.event.poll()
if event.type == pygame.QUIT :
terminate()
if event.type == pygame.KEYDOWN :
if event.key == pygame.K_ESCAPE :
terminate()
if event.key == pygame.K_SPACE : # reset display
background = 0
needRedraw = True
for i in range(0,3):
cardID[i] = 0
# Main program logic:
if __name__ == '__main__':
main()
Fig 2 The cast of crazy robots](https://image.slidesharecdn.com/fc37cea6-234e-4dec-82d7-3b63b4ecdd27-160909073919/85/MagPi47-57-320.jpg)

![Tutorial
raspberrypi.org/magpi 65July 2016
RASPBERRY BERET
First, check the version of Java (it should be 1.8):
java –version
If needed, install/upgrade via:
sudo apt-get install oracle-java8-jdk
The latest JAR package of our Raspberry Beret
version of Pisoundo can be downloaded and copied
to the Pi from magpi.cc/28IqaUQ.
If you’ve already hooked up the piezo as in the
schematic, you can launch the application via :
sudo java -jar pisoundo-0.0.1-Raspberry-
Beret.jar
From the network, we then point a browser at
http://[IP_address_of_Pi]:2111/ui/index.html
and choose a tune from the list. Alternatively, it’s
possible to inject your own musical code by clicking
on the On‑the-Fly link on the page.
STEP-04
Add some lights
Having hooked up our individual NeoPixels, as per
the diagram, we need to carry out the following
commands to get our lights on and flashing.
sudo apt-get install build-essential
python-dev git scons swig
https://github.com/jgarff/rpi_ws281x.git
cd python
sudo python setup.py install
In the example given, we see three NeoPixels, but
you can choose to add as few or as many as you want
(individual, rings, or strands). To configure this, type:
cd examples/
sudo nano strandtest.py
Then adjust the following line to suit your setup:
LED_COUNT = 3 # Number of LED pixels
Finally, to launch our program, use:
sudo python ./strandtest.py
Our LEDs should start to flicker, dance, and
change colour.
STEP-05
Cameras, action…
A final step is to hook up our Camera Module to take
photos or even broadcast a live video stream. One of
the easiest ways is with the RPi Cam Web Interface
(magpi.cc/28InKFJ). Don’t forget to activate the
camera via the Configuration menu on the Interfaces
tab. Here’s a simple installation method:
git clone https://github.com/
silvanmelchior/RPi_Cam_Web_Interface.git
cd RPi_Cam_Web_Interface
chmod u+x *.sh
./install.sh
Once we’ve set this up, all we need to do is point a
web browser at the IP address of our Pi to access the
RPi Cam Control.
STEP-06
Explore the possibilities
If you tested out this project on a breadboard to get
it working, it’s now time to install all the electronics
inside our hat. Use your imagination to modify and
make it better. Hack the hat. What else could we add
to our chapeau?
So now we have a Raspberry Beret – the kind you
wouldn’t find in a second-hand store. Enjoy!
LE BERET
BASQUE
The beret is
often thought
of as French,
but for us it’s
usually more
associated
specifically
with Basque
regional
tradition.
THE MELON
HAT
In France, they
think of the
bowler hat as
being British. A
fruit connection
– it’s called
a ‘melon hat’
in French!
Language
PYTHON
DOWNLOAD:
magpi.cc/28IqenE
Left Placing the
piezo on the top,
NeoPixels around
the edge, and
camera on the
front, we add our
3D ‘symbols’ for a
final Princely touch
Left Printing off
3D decorative
symbols adds
colour to our
headwear
and hides our
electronic
connections.
Hot glue is our
friend when
attaching them](https://image.slidesharecdn.com/fc37cea6-234e-4dec-82d7-3b63b4ecdd27-160909073919/85/MagPi47-65-320.jpg)
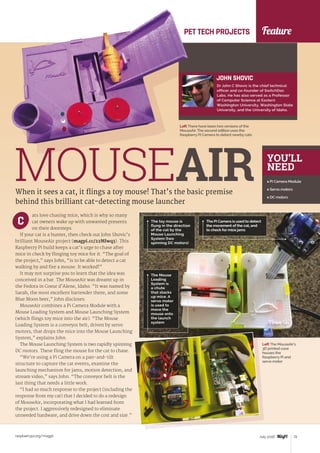

![Feature
raspberrypi.org/magpi76 July 2016
avid Hunt’s dog Lexi has her very own door.
The Raspberry Pi inside Pi-Rex listens for
Lexi’s bark and opens the door for her.
“Sleep deprivation has been driving me mad,” says
David. “It’s all down to a new member of the family,
our new dog. She [Lexi] barks at night when she’s
left out. She barks early in the morning when she’s
left in.”
One dog’s bark is enough to open doors on command
PI-REXDavid decided to build a bark-activated automatic
door opener. A noise detector circuit is wired to the
input of the Raspberry Pi to detect barks. A motor
driver circuit drives the actuator that unlocks the
door, and a weight and pulley system swings the door
open when it’s unlocked.
“I picked up the audio detection circuit in Maplin as
a DIY kit,” David tells us. “I probed the audio
sensor with a voltmeter; when the volume
into the microphone was at a decent level, I
saw about 3-3.5 volts at one point, so I hooked
that directly up to the GPIO on the Raspberry
Pi, and it worked beautifully.
“I had a few pieces of metal lying around,
and an angle bracket which got around the
concrete blocks nicely to meet the door lock.
I added a couple of bearings to reduce the
friction on the mechanism; I didn’t want to
burn out the actuator. When it was built it
was still a little stiff, so I greased it up and it
was then moving nice and smoothly.”
Now whenever Lexi barks, the door
opens automatically to let her into the
house (magpi.cc/28KAM3z).
TOP TEN
D
YOU’LL
NEED
Central door
lock actuator
Angle bracket
Motor driver PCB
DAVID HUNT
David is a senior embedded Linux
software engineer. In his spare time,
he takes pictures and plays with
gadgets and technology.
Left The door is connected to a weight via a pulley
system. When the actuator moves back, the door
automatically swings open
An audio detector circuit kit from Maplin is
hacked into the Raspberry Pi. This detects
Lexi’s barks and sends a signal to a GPIO pin
When a bark is detected,
the Raspberry Pi gets the
motor driver circuit to
drive the actuator
The central door lock
actuator is used as a
locking mechanism. This
pulls the door lock open
when a bark is detected
The door is connected to a weight via a
pulley system. When the actuator is pulled
back, the door automatically swings open](https://image.slidesharecdn.com/fc37cea6-234e-4dec-82d7-3b63b4ecdd27-160909073919/85/MagPi47-76-320.jpg)
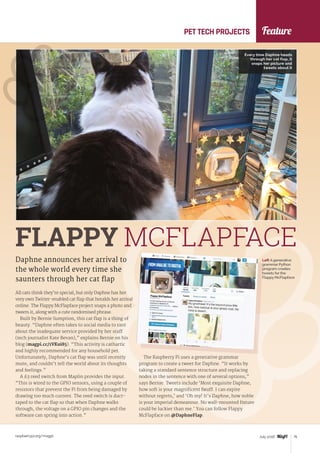
![Feature
raspberrypi.org/magpi78 July 2016
TOP TEN
Elephant beetles may not be the most strokeable pets,
but Will McGugan is a freelance software developer
in Edinburgh who loves them all the same. “These
insects are mostly nocturnal,” he tells us. “During
the day, they tend to burrow under their bedding
material or hang out on a branch. But during the
night, they can be quite active. I know this because
Monitoring nocturnal insects with a Raspberry Pi Camera
BEETLECAM
in the morning they have rearranged the branches
in their tank.”
Will wanted to make use of the Pi’s Camera Module
to create a webcam. “I also wanted to be able to create
time-lapse movies, because I didn’t want to watch 12
hours of video to see what they get up to at night.”
The result was Beetlecam (magpi.cc/22MLURG).
We looked at Matt Reed’s Sniffur project back in
issue 42, and it’s still an impressive piece of kit.
Sniffur uses a Bluetooth beacon and Raspberry Pis
to triangulate the position of Bean, the dog at Matt’s
office. But all dogs like to get out and play. “When
[greyhounds] do, they’re very hard to catch because
they’re so fast,” says Matt. “The need to know where
she is at any moment and see if she’s close to the
front doors is the reason Sniffur was built.”
Three Raspberry Pis are used to monitor the beacon
device attached to Bean’s collar (magpi.cc/28L5NIe).
Keep track of your pet, using beacons
to triangulate their position
SNIFFUR
Left A beacon is attached to Bean’s collar,
and three Raspberry Pi devices are used
to triangulate the dog’s position
The Beetlecam is mounted on the roof of
the elephant beetles’ tank using Velcro tabs](https://image.slidesharecdn.com/fc37cea6-234e-4dec-82d7-3b63b4ecdd27-160909073919/85/MagPi47-78-320.jpg)


![raspberrypi.org/magpi92 July 2016
Community YOUR LETTERS
YOUR LETTERS
All the merch
I saw a tweet on the Raspberry Pi account where
someone was wearing a Raspberry Pi T-shirt and a
MagPi hat, while drinking from a Raspberry Pi mug.
I knew there was Raspberry Pi merchandise, but I
didn’t know there was MagPi merchandise. Can I
get both of them from the same store, or are they
in different stores online?
Thanks,
Lisa Allyn
That was actually our Features Editor, Rob
Zwetsloot. The T-shirt is available from the
Raspberry Pi Swag shop (swag.raspberrypi.org)
along with other shirts and merch. That specific
cup isn’t for sale yet, but probably will be soon
(if it’s not already when this mag goes on sale);
there’s also another type of mug you can buy on
the store. As for the hat, unfortunately it’s a one of
a kind that was custom-made. We don’t currently
have any other merchandise, unfortunately; we
have been thinking about making some, however,
so watch this space.
For the cosplayers
I really liked the tutorial on doing Sans’ LED light-up
eye in the magazine [issue 45]. I’ve been trying to
think of a way to do cosplay electronics for a while
now and it was great to see some inspiration from
one of my favourite magazines. Will you do more
tutorials on how to incorporate the Raspberry Pi into
costumes or clothing in general? I’ve got some ideas
for costumes (and Christmas jumpers!) that I’d like
to use them for.
Yu Kimura
It was a lot of fun to make, even if there was some
emergency soldering that had to be done at the
convention. Finishing costumes at the hotel is
fairly normal for cosplayers, though. We’ve been
thinking about doing more to do with costuming
and wearables here at The MagPi; our Features Ed
and resident cosplayer has been planning a big build
that we’ll probably cover in here if he ever does it.
So hopefully, we can do more cosplay electronics
tutorials. Actuators, buttons, sounds, displays,
and a mic maybe? We’ll see what we can do.
The trick with cosplay electronics is making them portable and robust –
can’t really have breadboard knocking about inside a head!](https://image.slidesharecdn.com/fc37cea6-234e-4dec-82d7-3b63b4ecdd27-160909073919/85/MagPi47-92-320.jpg)


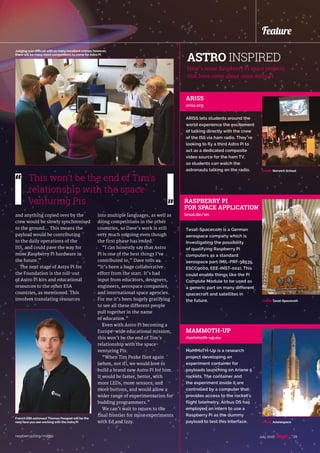
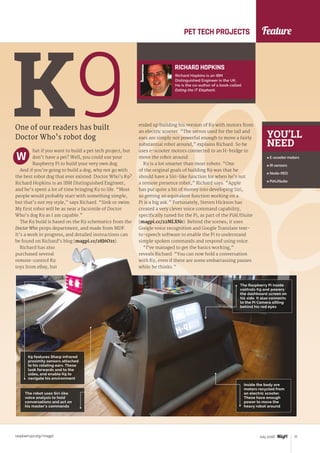
![ESSENTIALS
LEARN TO
CODE
SCRATCH
WITH
MAKE SIMPLE GAMES AND APPLICATIONS
ON
YOUR Raspberry Pi
Written by The MagPi Team
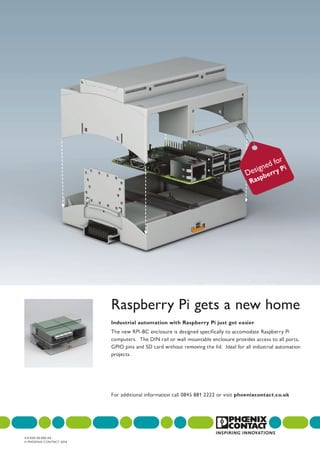
4 5
ESSENTIALS
[ Chapter One ]
[ LEARN TO CODE WITH SCRATCH ]
5
[ CHAPTER ONE]
GET STARTED
WITH SCRATCHFancy yourself as Disney or Miyamoto? Whether your
inspiration is Mickey Mouse or Mario, Scratch helps
you to bring your creations to life…
G
ESSENTIALS
4 [ Chapter One ] [ Get Started with Scratch ]
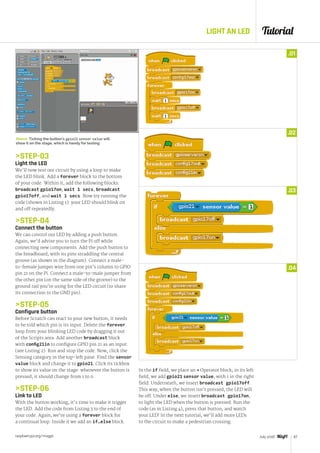
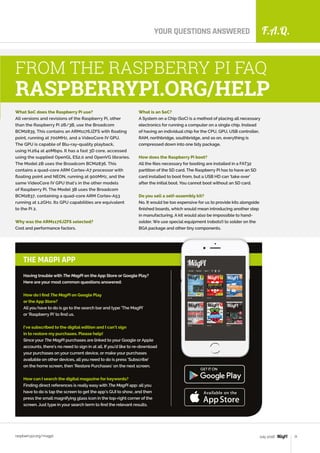
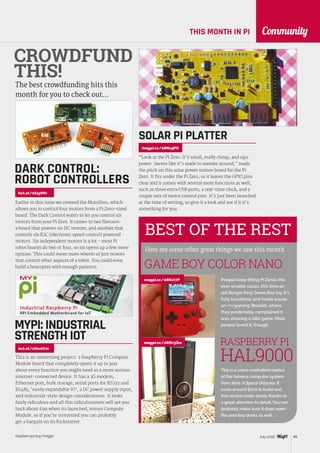
The Sprite List: Select your sprites
here, so you can change their scripts or
costumes. Click the Stage in the Sprite
List to add scripts to it or change its
background
The Blocks Palette:
This is where you
find the commands
to control your
sprites. Click the
rounded buttons
at the top to
switch between
the different types
of blocks
Scripts Area: Assemble
your programs here by
dragging blocks in from
the Blocks Palette and
joining them together
Tabs: Click the tabs
to choose between
changing a sprite’s
scripts, costumes,
or sounds
The Stage: Watch
your sprites move
and interact here
Get the latest
version of
Scratch by
updating your
operating system
using: sudo apt-
get update
sudo apt-get
upgrade
[ KEEP UP
TO DATE ]
4 5
ESSENTIALS
[ Chapter One ]
[ LEARN TO CODE WITH SCRATCH ]
5
[ CHAPTER ONE]
GET STARTED
WITH SCRATCHFancy yourself as Disney or Miyamoto? Whether your
inspiration is Mickey Mouse or Mario, Scratch helps
you to bring your creations to life…
G
ESSENTIALS
4 [ Chapter One ] [ Get Started with Scratch ]
The Sprite List: Select your sprites
here, so you can change their scripts or
costumes. Click the Stage in the Sprite
List to add scripts to it or change its
background
The Blocks Palette:
This is where you
find the commands
to control your
sprites. Click the
rounded buttons
at the top to
switch between
the different types
of blocks
Scripts Area: Assemble
your programs here by
dragging blocks in from
the Blocks Palette and
joining them together
Tabs: Click the tabs
to choose between
changing a sprite’s
scripts, costumes,
or sounds
The Stage: Watch
your sprites move
and interact here
Get the latest
version of
Scratch by
updating your
operating system
using: sudo apt-
get update
sudo apt-get
upgrade
[ KEEP UP
TO DATE ]
WITH SCRATCH
MAKE GAMES AND APPLICATIONS
raspberrypi.org/magpi98 July 2016
Get started today for
just £2.99 / $3.99
ESSENTIALS
From the makers of the
official Raspberry Pi magazine
magpi.cc/Scratch-book
Find it on
digital app
WITH
YOUR Raspberry Pi
LEARN TO CODE](https://image.slidesharecdn.com/fc37cea6-234e-4dec-82d7-3b63b4ecdd27-160909073919/85/MagPi47-98-320.jpg)