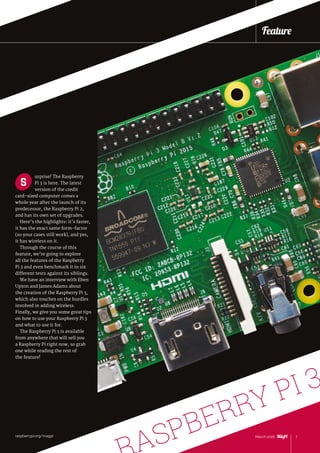
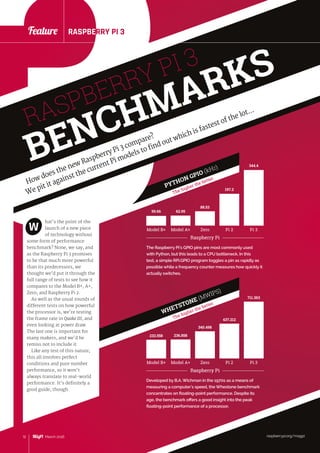
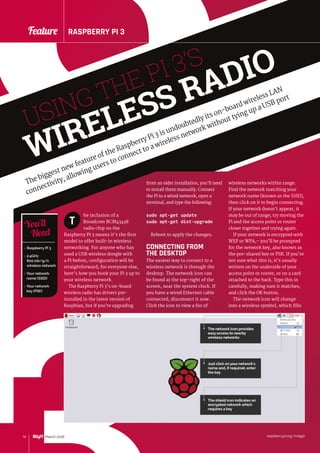
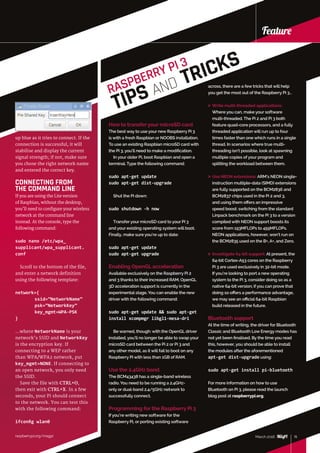
The Raspberry Pi 3 is the newest version of the Raspberry Pi. It features wireless LAN and Bluetooth connectivity built directly into the board for the first time. It also has a new 64-bit capable 1.2GHz processor. Interviews with Eben Upton and James Adams provide details on the challenges of adding wireless connectivity and developing a custom system-on-chip. Benchmark tests and usage ideas are also discussed to highlight the improvements of the new Raspberry Pi 3.


![raspberrypi.org/magpi10 March 2016
Feature RASPBERRY PI 3
3
raspberrypi.org/magpi10 March 2016
Feature RASPBERRY PI 3
INTRODUCING THE
RASPBERRY PI 3
We speak to Eben Upton and James Adams to find out
what makes the latest member of the Raspberry Pi family tick…
wireless and Bluetooth is the big
step change on this device. It’s
something people have asked us
for for a long time. It’s been this
missing element of the platform.
“It wasn’t on the original device
because it was a million miles
beyond us at the kind of scale we
were at back then,” Eben admits,
thinking back to the early days of
the Foundation. “We sold 800,000
Raspberry Pis before we hired our
first employee. There’s no way you
could do this sort of stuff with no
employees. It’s eaten a couple of
man-years, probably, getting radio
onto the device.”
TESTING
Conformance testing, too, would
have been difficult. “You can do
all the testing for an unintentional
radiator in a couple of days. Pete
[Lomas] and I did the original
one; Pete, James [Adams], Gordon
[Hollingworth], and I did the
subsequent products,” Eben
recalls. “The radio stuff, you give
it to a guy and he takes six weeks
and just rams through all of these
tests. The test campaign for Pi 3
has cost us, basically, £100,000,”
some ten times that of its radio-
free predecessors.
The radio chip isn’t the only
new feature, of course. The new
BCM2837 system-on-chip has
been developed specifically for the
t’s been four years
since the launch of the
original Raspberry Pi,
and project co-founder Eben
Upton has but one word to
describe that period: “Packed!”
he laughs from his home in a
small Cambridgeshire village.
“Just sort of non-stop.”
“There’s just this sense of
not really having stopped,” he
tells us on behalf of the growing
Raspberry Pi team. “Of just having
worked continuously.”
The culmination of the team’s
ambitions, the Raspberry Pi 3
excites Eben for one main reason:
“Connectivity. The other stuff is
just quantitative change, it’s just
faster, more,” he explains. “The
project by Broadcom. “It’s kind of
a mixture of being able to make a
business case for it, and then all
those people at Broadcom who
believed in the mission and were
prepared to do the work to get it
over the line,” Eben explains of
how the Foundation was able to
convince the multinational chip
giant to build custom chips for the
project. “That’s people from fresh
graduate engineers all the way up
to people in the C-suite at the top.
Tricky, though!”
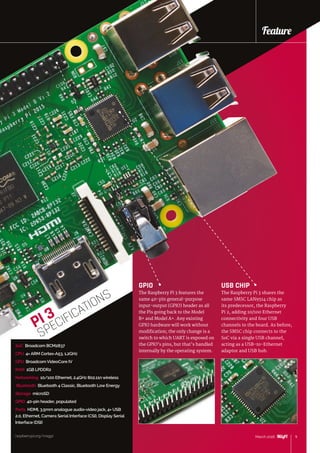
USB AND PXE
NETWORK BOOT
Even with the chip designed and
taped out in March of last year, the
Foundation had some final input
for Broadcom in order to add two
new features: direct USB mass-
storage and PXE network boot
capabilities. “Gordon rewrote the
boot ROM for the chip and then
provided an updated boot ROM to
Broadcom, saying ‘shove this in
the chip, it’ll work’,” Eben laughs.
“And it does!
“The other interesting thing
about the chip is for all other ones
the implementation work was done
entirely in Cambridge; this one was a
collaboration with Broadcom’s set-
top box engineering group in Aztec
West [business park] in Bristol.”
Eben readily admits that not all
the capabilities of the new parts
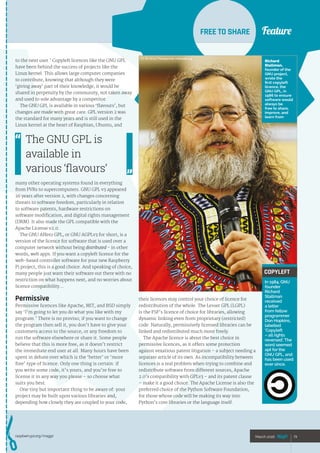
I
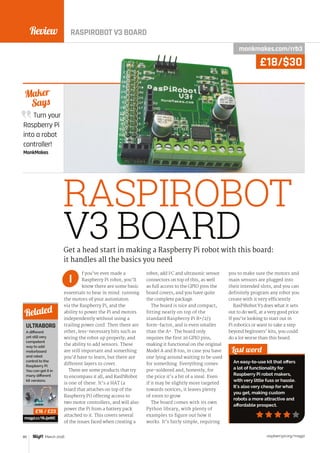
The tiny BCM43438
chip provides built-in
wireless and Bluetooth](https://image.slidesharecdn.com/5e54ee1a-bd14-477f-b936-547e418d2eaf-160909074336/85/MagPi43-12-320.jpg)
![raspberrypi.org/magpi 11March 2016
Feature
raspberrypi.org/magpi
Feature
are going to be used at launch,
however. “Although it is a 64‑bit
core, we’re using it as just a faster
32-bit core,” he reveals about
the Pi 3’s central processing unit.
“I can imagine there’d be some
real benefits [to 64-bit code].
The downside is that you do
really create a separate world. To
access that benefit, you’d have to
have two operating systems. I’m
hoping that someone will come
and demonstrate to me that this
is a good idea. But there are some
really compelling advantages to
still being basically ARMv6, and
because it’s [Cortex-]A53 it’s a
really good 32‑bit processor.”
Aware of the high demand
that a Raspberry Pi launch
typically encounters, talk turns to
production. “We’ve already made
30,000 of it,” Eben discloses, still
some weeks ahead of the release.
“I’d like to do at least three million
units, and that requires you to
build, say, 60,000 a week. We’ll
probably build around 100,000
a week in the UK, plus whatever
Embest builds in China, for a
month or two, then you back off to
maybe 60,000 a week.”
“I’D LIKE TO DO AT LEAST THREE MILLION UNITS, AND
THAT REQUIRES YOU TO BUILD, SAY, 60,000 A WEEK”
What were the
biggest challenges in
adding a radio?
Firstly, we had to find a
solution that would fit into the current Pi form factor
with minimal change and that would also be affordable.
Secondly was how to connect it to the 2837 processor.
Eben managed to secure a good solution from
Broadcom, the BCM43438, and I then set about
squeezing it onto the Pi. The layout for the BCM43438 was
a real challenge – as, for radio, layout really matters.
Connectivity-wise, 2837 actually has two SD card
controllers and two UARTs. We decided to look at
swapping to the Broadcom SD card controller as the
main [one], and using the standard SD controller to talk to
the wireless. For Bluetooth, we use the existing UART and
swap the UART on the GPIO pins to the second UART.
What is your circuit design workflow?
You need to have a completed schematic and then
iterate on the layout: place parts and shuffle them around
until you can see roughly how the connections will work
out before committing to routing the tracks out. It really
is part art and part science, and takes a bit of practice
before you get a good feel for how to do it well. I also like
to make sure all my designs look good, too, but that bit’s
not strictly necessary!
Is there anyone you’d like to thank?
Roger Thornton for managing most of the test-script
writing and conformance paperwork as well as plenty
of work on the RF side, closely followed by Phil Elwell
for sterling work on the Bluetooth and wireless stack,
and Kalevi Ratschunas and the team at Broadcom for
their hard work on the firmware side. I’d also like to thank
Alistair May, who gave us some invaluable help and
advice when we were initially getting to grips with the RF
engineering challenges.
Ifyou could add one feature to a
hypothetical Pi 4, what would it be?
That’s an easy one: I’d like to see USB 3.0 added, as it
really is the universal solution for adding peripherals
– especially higher bandwidth ones like disk drives,
network interfaces – and removes the requirement for
things like SATA.
11March 2016
JAMES ADAMS
DIRECTOR OF HARDWARE ENGINEERING](https://image.slidesharecdn.com/5e54ee1a-bd14-477f-b936-547e418d2eaf-160909074336/85/MagPi43-13-320.jpg)


![News
raspberrypi.org/magpi26 March 2016
News
he launch of the Raspberry
Pi Zero, the world’s
first fully functional
microcomputer to cost just £4/$5,
caused quite a stir. Unsurprisingly,
given the precedent of the
Foundation’s other launches, initial
stock sold out within minutes.
What has been more surprising is
that stock continues to be elusive,
with small batches appearing in
the official sales channel only to
immediately disappear again under
a flood of demand.
The scarcity of the Pi Zero has
led to a ‘black market’ of sorts
appearing. When we gave away a
cover-mounted Zero with issue 40,
we were disappointed to see auction
sites filled with opportunists trying
to profit from purchases from
supermarket shelves.
Even now, there are unscrupulous
outlets looking to profit from the
high demand for the device. Some
retailers have taken to buying up
stock from the official outlets in
order to resell at a substantial
mark-up; one seller was recently
found to be adding a pair of cheap
adaptor cables to the Pi Zero in
order to attempt to justify a £36
selling price.
Buyers are disappointed
that they can’t easily get their
hands on one or more Pi Zeros
for their planned projects, and
doubly so when they see rampant
profiteering. Fortunately, there’s
light at the end of the tunnel:
production is being ramped up to
meet demand.
“I placed another 150,000 POs
[production orders] – well, a pair
of POs, a 50K and a 100K – in the
last couple of days,” Raspberry Pi
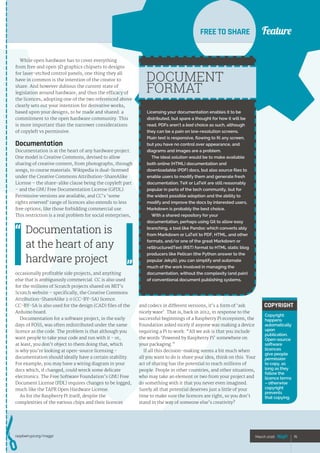
First-party hardware production leads to scaling challenges
RASPBERRY PI ZERO
T
Foundation co-founder Eben Upton
explained during an interview in
early February. “It’d be good to get
to a point where we’re doing at least
50,000 a month for Zero. I think we
could do 50,000 a month on Zero
pretty comfortably.”
But, given the tradition for new
Pi models to sell out at launch,
why is it taking so long to ramp
up production on the Zero? The
answer lies in the board’s unique
position, Eben reveals. “This isn’t
quite the same as the other Pis,
because the other Pis are made by
RS and Farnell. We make these Pis,
so you’re actually looking at a small
company trying to scale.”
“We’ve got good resources and
good engineers, but you’re looking
at a small company trying to scale
production,” Eben continues. “It’s
not quite realistic to compare the [Pi
Zero] throughput to the throughput
of the big Pis, because the big Pis
are being made by billion-dollar,
billion-pound companies; the Zero’s
being made by us.”
The launch of the Pi 3 won’t see
the Zero put on the back-burner,
though. “If we can get it stable at
50,000 a month,” Eben promises,
“then we can look at how we can
scale up from that.”
There’s light at the end of the
tunnel: production is being
ramped up to meet demand
RASPBERRY PI
ZERO PRODUCTION
GETTING ON TRACK
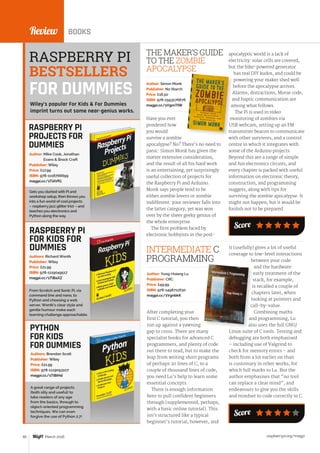
Below Production
scaling has proven
a challenge for
the Raspberry Pi
Foundation’s first
in-house board,
the Pi Zero](https://image.slidesharecdn.com/5e54ee1a-bd14-477f-b936-547e418d2eaf-160909074336/85/MagPi43-28-320.jpg)
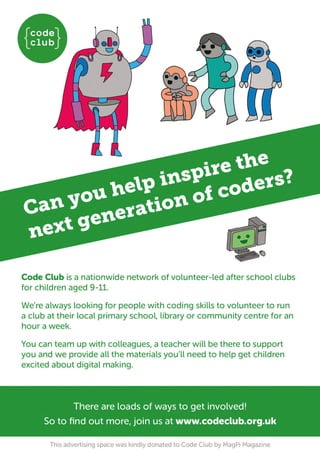
![raspberrypi.org/magpi 29March 2016
NewsRASPBERRY PI RIDES A WHALE
container tracking device. Compared
with previous efforts, he says it
was “extremely quick and simple
development work with Raspberry
Pi.” It also offered a greater range
of possibilities: “It was much more
than we had imagined, and at very
low cost.”
While there are numerous devices
available for monitoring wildlife
behaviour, using technology such as
VHF telemetry or the Argos system,
the Raspiwhale is the first to feature
a fully functional computer with
an operating system. According
to Daniel, there are three key
advantages of having a Raspberry Pi
on board: low cost, ease of use, and
the ability to use multiple sensors
simultaneously. “The huge amount
of information online, forums,
and the Raspberry Pi community
makes [for] easy implementation of
complex sensors, storage, analysis
and downloading of data, and so
on.” In addition, the Pi’s GPIO
connection and large number of
protocols make it easy to implement
“ideas for measuring environmental
aspects, whether [about an] animal
or its environment.”
While the RW1’s IMU (inertial
motion unit) tracks a whale’s
movements (including speed,
rotation, and compass bearing) with
great accuracy, the inclusion of the Pi
enables the collection of a wide range
of key data, such as temperature
(whale and sea), darkness,
photosynthesis activity, whale heart
rate, muscle activity, swimming
patterns, and indicators of stress. An
attached HD camera captures often
dramatic video footage and stills.
Testing times
So far, two RW1 models have been
built and field-tested: they are
required to work at depths of up
to 100m and survive collisions
with animals weighing 40 tons.
Each device is placed on a whale
– attached with non-invasive
suction cups, so as not to harm the
animal – using a long carbon-fibre
pole extended from a boat. As well
as transmitting its position, the
RW1’s XBee radio module enables
two-way communication with
a remote human operator who
can set each of the sensors and
download data, videos, photos,
and sound recordings.
Daniel tells us the system is
already producing some positive
results. “In tests, we could
record dives of a mother with
her cubs, [monitor] behaviour
of reproduction and feeding,
[and record] vocalisation with
the hydrophone and video
simultaneously.” In 2016, the team
plan to use Raspiwhale to record
at least 30 sessions of diving and
situations involving interaction
between whales and boats.
Much to Daniel’s surprise, the
project has already attracted the
interest of other wildlife research
teams around the world: due to its
use of low-cost hardware and open-
source software, other researchers
could easily adapt the device for
their own purposes. Meanwhile,
Daniel is planning to develop a
smaller version of Raspiwhale to use
on dolphins, and reckons the tiny
Pi Zero opens up some interesting
new possibilities.
In October 2015, Raspiwhale
won first prize in the category
‘New technologies in scientific
research’ at Argentina’s
prestigious Innovar event –
a government-backed annual
innovation competition that
featured entries from over 1,300
projects in 2015. The award was
presented to a delighted Daniel
Pérez Martinez (left), Dr Marcelo
Bertellotti, and Belen Arguelles.
INNOVATION AWARD
Daniel’s Ideas Pi website (ideaspi.com) lists
numerous planned projects using the Raspberry
Pi, ranging from a weather station to a metal
detector. He tells us that his next goal is
the development of a water level/quality
measurement station for the mining industry.
“The idea is that both mining companies and
partner communities can develop their projects to
have low-cost workstations, networked to monitor
the quantity and quality of water, as it changes
over time, in regions where mining takes place.”
IDEAS PI
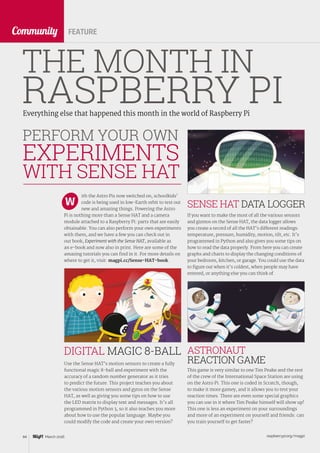
The orange RW1 is clearly
visible on the back of this whale
in the bay of Puerto Madryn](https://image.slidesharecdn.com/5e54ee1a-bd14-477f-b936-547e418d2eaf-160909074336/85/MagPi43-31-320.jpg)
![raspberrypi.org/magpi30 March 2016
News
hen you’re a kid, you
have to make the difficult
choice of what kind of
career you want to go into without
really having the life experience
necessary to properly choose what
you’d like to do. For Yasmin Bey,
a Year 10 student doing her GCSEs,
the decision is not that tough.
“Probably an AI specialist. It’s
definitely a field I would like to
go into,” Yasmin confidently
tells us. That’s her second choice
after starting her own business
as well – one in the tech and
computing sector. Even at 15,
pertaining to them and their
interests in tech and computing.
There was also a practical element,
according to Yasmin:
“For instance, I showed the
skills I learned from my interests
in technology… an incomplete
Traffic HAT (magpi.cc/1Mma7oD)
and then a complete one, with
the soldering, etc. I then did some
footage of the robot I made for Pi
Wars as well.”
By her own admission, she feels
the video was cringeworthy (don’t
we all when we make videos of
ourselves?). It did, however, win
her the prestigious award.
Yasmin’s interest in computing
started incredibly early, around
the age of four or five, when she
decided to make a website:
“I kind of liked that on a
website you have the power to put
whatever you want on it, so I just
decided to make my own. It had
really ugly marquee tags and Comic
Sans. From there, though, I learnt
that there are more languages than
just HTML and CSS, and then began
making JavaScript sites.”
At that age, she was unable to
learn more from school – “I don’t
think school knew what HTML
was!” – so the next best place
was learning on YouTube. A prime
How a young computer hobbyist discovered the Raspberry Pi and
won a European award for computing in the same year…
she’s already experienced enough
with computing to know it is what
she loves, and her efforts have
been rewarded by winning the
prestigious Digital Girl of the Year
award for 2015.
“It was really, really cool. So
cool,” Yasmin says of winning the
award. “When I heard how many
people applied for it – I think it
was in the 30,000s – I was amazed.
If you do the maths and figure out
your chance of actually winning,
[the odds] are rather substantial.”
Entry was via video where
applicants had to answer questions
W
INTERVIEW
DIGITAL GIRL OF
THE YEAR 2015
YASMIN BEY
AWARD
MISSION:
Recognising
outstanding
girls in digital
sectors around
the world
REGION:
Europe
PART OF:
The Ada
Awards, a
global award
network
named after
computing
pioneer Ada
Lovelace
WEBSITE:
digital
girlaward.com
DIGITAL
GIRL
OF THE
YEAR
Yasmin meets Carrie-Anne Philbin, with a cameo from Astro Pi](https://image.slidesharecdn.com/5e54ee1a-bd14-477f-b936-547e418d2eaf-160909074336/85/MagPi43-32-320.jpg)


![raspberrypi.org/magpi34 March 2016
hen the Raspberry Pi Zero
was being made, Eben
Upton mentioned to us
how one box of Pi Zeros holds
hundreds of them. Hundreds of
cores and hundreds of gigabytes
of RAM – a crate of power, if used
correctly. We never managed to
work out the FLOPS one box could
theoretically process, even if that
might not be feasible. However,
a Japanese company also saw the
power of the Pi Zero in numbers
and has created the PiZero Cluster
Board, which allows up to 16 Pi
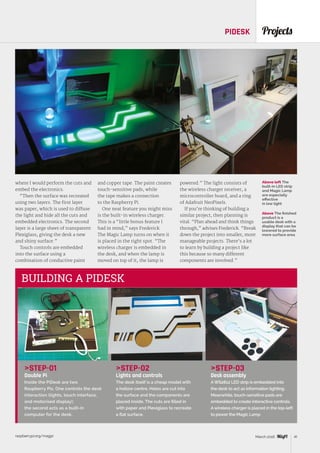
Projects SHOWCASE
Turn your Raspberry Pi Zeros into a number-crunching cluster
of computers with this custom-made board
The board
works with
any number of
Pi Zeros
From idea to
completion, the
cluster took six
weeks to build
A Compute
Module is used
in the Actbulb
The team have
been studying
the VideoCore
GPU for future
projects
The board is
20cm × 20cm ×
5cm, even with
Pis attached
Quick
Facts
The board is powered by one
supply on the rear that can
activate all 16 Pi Zeros
PIZEROCLUSTER BOARD
A full-size USB port
is wired up to each
Pi Zero
W
16 Pi Zeros working in
parallel means 16 1GHz
cores and 8GB of RAM
are available
IDEIN, INC
Yasuyuki Yamada , Koichi
Nakamura and Yukimasa
Sugizaki make up the team
at Idein, Inc, which works on
AI technology.
idein.jp
Zeros to do parallel computing.
We spoke to Koichi Nakamura,
representative director of Idein,
Inc, about the cluster board:
“When I was playing with
Raspberry Pi Zero, I realised that
costs of cables and adapters are
relatively expensive, and found
a solution that used micro USB
plugs for cradles. I used this idea
to create our computer cluster…
I think it’s useful for many other
projects, [but it was] originally
designed and developed for our
internal purposes.”
Idein is currently developing the
Actbulb, a Pi-powered sensor suite
that fits into standard lightbulb
sockets to use in any way you see fit.
Sensors include a microphone and
cameras; it’s also internet-enabled
and has an audio speaker.
“Since we are developing products
using Raspberry Pi, we need a
cluster of many Pis for software
development and tests,” Koichi
explains to us. “It’s also useful to set
up many other devices... We plan to
create a cluster to enable setup of
hundreds of our devices a day.”](https://image.slidesharecdn.com/5e54ee1a-bd14-477f-b936-547e418d2eaf-160909074336/85/MagPi43-36-320.jpg)
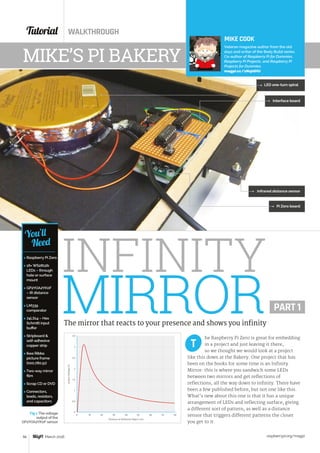
![raspberrypi.org/magpi 35March 2016
STEP-01
Set yourself up
To start with, all you need to do is slot in your
Raspberry Pi Zeros. It works with as few as one
and as many as 16 at a time.
STEP-02
Hook it up
The next step is to connect it all up. The Ethernet
switch and cables should go in first, followed by the
AC adapter to power it.
STEP-03
Work in parallel
That’s it! Turn it on and you can program it using
MPI or any other methods that utilise multiple Pi
Zeros at the same time.
ProjectsPI ZERO CLUSTER BOARD
CREATE A CLUSTER
It’s had a huge reaction online,
with many people excited by the
idea of the board. However, Koichi
believes it’s quite a simple project:
“PiZero Cluster Board is just a
collection of 16 identical circuits.
Each circuit draws one Ethernet
port and one USB port from [each]
Raspberry Pi Zero’s micro USB
port, using an SMSC LAN9512 chip.
There are also 16 power supply
circuits to generate 5V and 3.3V
from a 12V single power source for
Raspberry Pi Zero and LAN9512. All
16 circuits are the same.”
With Pi Zeros in short supply,
the team were unable to secure
enough to complete the cluster
at first. Fortunately, we at The
MagPi managed to call in every
favour, pull every string, and beg,
plead and borrow to get them the
remaining 15 Pi Zeros they needed
for tests.
Due to the popularity of the
board and its many uses, Koichi
plans to put it on Kickstarter once
they’re ready to crowdfund it. It
will be an improved version of the
prototype we’ve seen online.
“In our current plan, the number
of Raspberry Pi Zeros and USB
ports is reduced to 14,” Koichi tells
us. “We’ll also add an on-board
Ethernet switch to the board, and
the number of ports is reduced
to two.” This improvement will
reduce the number of Ethernet
ports and cables required, and so
lower the board’s overall cost.
We plan to create a cluster to
enable setup of hundreds of
our devices a day
Above The Pi Zero is plugged in via its
micro USB power and data ports. Each
unit also requires an SD card with an
operating system installed
Below The Pi-powered sensor that
necessitated the creation of the Pi
Zero cluster board. It attaches to
standard light fittings
The insides of Actbulb are a lot more
complex than a normal light bulb](https://image.slidesharecdn.com/5e54ee1a-bd14-477f-b936-547e418d2eaf-160909074336/85/MagPi43-37-320.jpg)
![raspberrypi.org/magpi36 March 2016
ave you ever wondered
what it might have been
like if the Victorians had
owned Raspberry Pis? Wonder
no more, as French maker Jean
Gaillat has built this marvellous
steampunked Pi that brought his
future-retro dream to life.
“The Steampunk Pi is my Jules
Verne-like mechanism,” says
Jean. “I can see my loved
one’s pictures or videos
[through] a big magnifying
glass and listen to very
old songs or records
through an old ear
trumpet. This is the kind
of stuff I would have been
so happy to find in the attic
of my grandparents’ house
when I was a young boy.
“Steampunk looks good,” he
continues. “I don’t know exactly
why, but I suspect it has something
to do with all the machines I saw in
my grandfather’s storeroom - he
was a wheelwright.”
The Raspberry Pi is housed inside
a wooden box, complete with stand,
magnifying glass, and a glorious
ear trumpet. “I bought the box for
two euros in the Cultura shop near
my town,” Jean tells us. (Cultura
is a chain of creative workshops in
France; cultura.com). Jean covered
the wooden box in Bomb varnish
and placed a Raspberry Pi inside.
Once the Pi was inside the
wooden box, it was time for some
accoutrements. “The ear trumpet
comes from a very old bike horn,”
reveals Jean. “It’s supposed to
amplify the sounds coming from
a tiny loudspeaker in the box. The
Projects SHOWCASE
This Raspberry Pi reimagined for the 19th century is a wonderful thing.
Lucy Hattersley talks to its maker, Jean Gaillat
STEAMPUNK PI
H
JEAN GAILLAT
Jean is a 60-year-old maker from France.
He works at Orange Group and is fond
of prog rock, electronics, photography,
mountain biking, and skiing.
jeangaillat.wordpress.com
With Kodi
Remote, it can
be controlled
from a phone
All the parts
cost less
than €20
The ear
trumpet comes
from an old
bike horn
The screen has
a resolution of
640×480
Jean also
uses it as an
internet radio
Quick
Facts
The magnifying glass
expands the tiny screen
The stand is hand-made
from an old curtain rod
The trumpet makes the
audio sound just like an
old record player](https://image.slidesharecdn.com/5e54ee1a-bd14-477f-b936-547e418d2eaf-160909074336/85/MagPi43-38-320.jpg)
![raspberrypi.org/magpi 37March 2016
ProjectsSTEAMPUNK PI
STEP-01
Wooden box
The Raspberry Pi is placed inside a wooden box
along with a 5V regulator, WiFi dongle, and a small
speaker. The Raspberry Pi is running OpenELEC 4.0,
and a USB key contains all the media.
STEP-02
Trumpet and stand
An ear trumpet is placed on the speaker to
amplify the sound, and a golden curtain rod fixed
to an old oil lamp support. On the back of the
wooden box is a USB hub.
STEP-03
Magnified screen
A magnifying glass is fixed to the front of the
box, in front of a 4DPI-24-HAT screen from 4D
Systems (4dsystems.com.au). The result is a
quirky player that can be used to view media
from an imaginary past.
STEAMPUNKING A PI
sound is exactly what I wanted - just
like from an old telephone.”
Jean bought the magnifying glass
for 12 euros in a store in Lyon that
specialises in devices for camping.
“I had seen this glass and said to
myself, ‘Oh yeah, that’s just what I
want for my Steampunk Pi.’ There
were LEDs in it. I pulled out the
LEDs and battery and kept the glass.
It’s fair to say that this isn’t the
kind of screen that’s comfortable
for long shows, but it’s interesting
to scrutinise and see my children’s
smiling faces through it.”
Obviously, the sound and
vision aren’t as good as a high-
definition monitor, but it works
surprisingly well. “I stare into
the glass on the front to watch
movies – at one or two metres
it’s acceptable,” says Jean.
With the sound and vision up and
running, it was time for Jean to turn
the Steampunk Pi into an artistic
object. We particularly like the
Victorian stand. “I made it by myself
using part of a golden curtain rod,”
says Jean. The rod is fixed with screws
to an old rusty iron oil lamp support.
“This is a recurring dream,”
explains Jean, “to retrieve the very
soul of our past, bypassing centuries
using a kind of time machine. I
have built this thing only to put it
somewhere, where it can be found
by a child in the future. But I have to
solve the issue of an empty battery
power unit.”
Jean is planning to add speech
to the machine next, in his native
French of course. “Like [Iron Man’s]
J.A.R.V.I.S,” he says, “talk to the
thing and the thing answers: ‘Oui
maître. Que puis-je faire pour
vous?’ I want to build the internet of
talking things: steampunked talking
things… waouh!”
ThesoundisexactlywhatIwanted
-justlikefromanoldtelephone
The Steampunked Pi
is a retro device with
modern capabilities
The result looks right at
home as a piece of art](https://image.slidesharecdn.com/5e54ee1a-bd14-477f-b936-547e418d2eaf-160909074336/85/MagPi43-39-320.jpg)
![raspberrypi.org/magpi38 March 2016
nfrared (IR) cameras are
traditionally used in low-
light situations. Typically,
IR is used in security cameras at
night, and you can also implant
an IR camera into your birdhouse
for a live view of some hatchlings.
Using it in daytime for ‘normal’
photos, though, is something
quite unusual. However, it’s what
Krzystof Jankowski decided he
wanted to do using a Raspberry Pi
and the Pi NoIR Camera Module.
“I’ve been a photographer for
many years and I’ve always wanted
to take surreal (at least to our eye)
infrared photos,” Krzystof tells
us, “but there was no commercial
camera that can do that easily. Also,
those cameras for astronomers
Projects SHOWCASE
Never mind a portable Raspberry Pi camera – how about a portable
Pi IR camera for taking stunning and unique shots?
It was tested
and completed
in a morning
Krzystof likes to
make different
portable
projects using
Raspberry Pi
Krzystof plans
to make a
smart wall
with RSS feeds
and stats
He plans to
work with
Arch next
The project
uses a B+ and
not a Pi 2 or 3
Quick
Facts
Take surreal, IR photos during
the daytime for a slightly
different look at the world
EYE-PI CAMERA
It works roughly like a normal
camera – just point and shoot
to take a photo!
I
As the IR range is mostly heat,
the sky will be darker than
usual, while other objects are
highlighted unusually
KRZYSTOF JANKOWSKI
A pixel artist and indie game
developer, Krzystof likes to hack
around with Raspberry Pis and
Arduino gear in his spare time.
krzysztofjankowski.com / p1x.in
were always pricey. Using filters
was too time-consuming and
requires using high ISO.
“When I was ready to buy the
[Pi] Camera Module, I chose the
NoIR to test how it works. After
the few first tests, it turned out it
works perfectly fine, but using it
with wires, monitor, keyboard, and
making photos by command line
was absolutely not fun. A camera
needs to be small and have a
physical button to make photos.”
Krzystof made a prototype “using
a lot of duct tape” and went for
a walk with it. It worked as he’d
hoped, so he began work on a more
robust and easier-to-use version.
“For me it was very easy as I
know Linux, programming, and
soldering,” he explains. “I think
that even for newbies it will still
be easy. The whole thing is fairly
basic to make yourself: connect
camera, solder button and LED on,
put wires to proper GPIO ports, and
download my script and install a
few required packages.”
His custom script is what makes
it possible, and is downloadable
from GitHub (magpi.cc/1K2PRgi).
It’s only 23 lines long, but it has
some tweaks to the way photos are
taken to get them to look the way
they do, and to optimise the speed
as well, according to Krzystof:
“There’s a small lag like in early
digital cameras. For landscape
photography it’s absolutely
acceptable, though. The only](https://image.slidesharecdn.com/5e54ee1a-bd14-477f-b936-547e418d2eaf-160909074336/85/MagPi43-40-320.jpg)


![Tutorial
raspberrypi.org/magpi 53March 2016
CLEF HERO
Below Use Audacity
to split your Sonic Pi
recording into notes
STEP-03
Fix your hyphens
Audacity exports your files with names like
note-01.wav, note-02.wav, and so on, but Pygame
Zero requires underscores, not hyphens. To do
the bulk rename, we recommend you install
mmv with sudo apt-get install mmv. Then
cd to the sounds directory where you have the
files Audacity exported, and enter the command
mmv note-*.wav note_#1.wav. Copy
thud.wav into sounds too, from pi/Pimoroni/
pianohat/sounds/drums. It’s used when the player
presses the wrong key.
STEP-04
Prepare your art
You’ll need a treble clef and a background image.
We’re using a treble clef from magpi.cc/1XdhNA3
(download the small version) and a background by
Gerd Altmann (magpi.cc/1XdhOnK) – again, use the
small one. Rename your clef to treble_clef.png
and your background to clef_background.jpg.
clef.py
# Clef Hero by Sean McManus
import pianohat, random, time
WIDTH, HEIGHT = 600, 440
RED = (255,0,0)
GREEN = (0,255,0)
BLUE = (0,0,255)
notes_to_play = list()
note_colours = list()
level = 1
notes_data = [
[0, sounds.note_01, 1, ], [2, sounds.note_03, 2, ],
[4, sounds.note_05, 3, ], [5, sounds.note_06, 4, ],
[7, sounds.note_08, 5, ], [9, sounds.note_10, 6, ],
[11, sounds.note_12, 7,], [0, sounds.note_13, 8, ],
[2, sounds.note_15, 9, ], [4, sounds.note_17, 10, ],
[5, sounds.note_18, 11, ],[7, sounds.note_20, 12, ],
[9, sounds.note_22, 13, ],
[1, sounds.note_02, 1, #],[3, sounds.note_04, 2, #],
[6, sounds.note_07, 4, #],[8, sounds.note_09, 5, #],
[10, sounds.note_11, 6, #], [1, sounds.note_14, 8, #],
[3, sounds.note_16, 9, #], [6, sounds.note_19, 11, #],
[8, sounds.note_21, 12, #], [10, sounds.note_23, 13, #],
[1, sounds.note_02, 2, b], [3, sounds.note_04, 3, b],
[6, sounds.note_07, 5, b], [8, sounds.note_09, 6, b],
[10, sounds.note_11, 7, b], [1, sounds.note_14, 9, b],
[3, sounds.note_16, 10, b],[6, sounds.note_19, 12, b],
[8, sounds.note_21, 13, b]
]
def round_setup():
global note_position, note_number, notes_to_play
del notes_to_play[:]
del note_colours[:]
level_data = notes_data[0 : level * 4]
for i in range(8):
notes_to_play.append(random.choice(level_data))
note_colours.append(BLUE)
note_position = 0
note_number = 0
clock.schedule_unique(hint_on, 5)
def draw():
screen.blit(images.clef_background,(0,0))
screen.draw.text(Clef, (310,90), color=blue, fontsize=120)
screen.draw.text(Clef, (315,85), color=white, fontsize=120)
screen.draw.text(Hero, (310,180), color=blue, fontsize=120)
screen.draw.text(Hero, (315,175), color=white, fontsize=120)
BOX = Rect((100,290), (400,120))
SHADOW = Rect((105,295), (400,120))
screen.draw.filled_rect(SHADOW, (0,0,0))
screen.draw.filled_rect(BOX, (255,255,255))
screen.blit(images.treble_clef,(105,305))
for y in range(5):
screen.draw.line((110, 380 - y*16), (490, 380 - y*16), (0,0,0))
show_notes()
def show_notes():
for i in range(8):
draw_note(i)
def draw_note(note_number):
screen.draw.filled_circle((180 + note_number * 35, 404 - notes_to_play[
note_number][2]*8), 7, note_colours[note_number])
if notes_to_play[note_number][2] == 1 or notes_to_play[note_number][2] == 13:
screen.draw.line((170 + note_number * 35, 404 - notes_to_play[
note_number][2]*8), (190 + note_number * 35, 404 - notes_to_play[note_number]
Language
PYTHON](https://image.slidesharecdn.com/5e54ee1a-bd14-477f-b936-547e418d2eaf-160909074336/85/MagPi43-55-320.jpg)
![Tutorial STEP BY STEP
raspberrypi.org/magpi54 March 2016
[2]*8), note_colours[note_number])
screen.draw.text(notes_to_play[note_number][3], (
162 + note_number * 35, 395 - notes_to_play[note_number][2]*8),
color = note_colours[note_number], fontsize=24)
def update():
draw_note(note_position)
def handle_note(piano_key, pressed):
global note_position, note_colours, level
if pressed == False: # key was released, not pressed
return
if piano_key == 12: # if top C pressed
piano_key = 0 # treat it the same as bottom C
clock.unschedule(hint_on)
if piano_key == notes_to_play[note_position][0]:
note_colours[note_position] = GREEN
notes_to_play[note_position][1].play()
lights_out()
if note_position 7:
note_position += 1
else:
lights_on()
if level 8:
level += 1
round_setup()
clock.schedule_unique(hint_on, 5)
else:
note_colours[note_position] = RED
sounds.thud.play()
def hint_on():
pianohat.set_led(notes_to_play[note_position][0], True)
def lights_out():
for light in range(16):
pianohat.set_led(light, False)
def lights_on():
for light in range(13):
pianohat.set_led(light, True)
clock.schedule_unique(lights_out, 1)
lights_on()
round_setup()
pianohat.auto_leds(False)
pianohat.on_note(handle_note)
Listing 1
note = 60
with_synth :tb303 do
22.times do
play note
note = note + 1
sleep 1.25
end
end
Language
SONIC PI
Resize your clef to 62×110 pixels. You can use
sudo apt-get install imagemagick and then
convert treble_clef.png -resize 62x100
treble_clef.png to resize the image from the
command line. Create a directory called images
inside the clef directory and put your pictures there.
This is where Pygame Zero looks for all its images.
STEP-05
Build the Clef Hero game
The main code listing shown contains the Python
code for the Clef Hero game. Call it clef.py and put it
into your clef directory, so it sits immediately above
the sounds and images directories, as Pygame Zero
will expect. You run it with sudo pgzrun clef.py
from LXTerminal in the desktop environment. Each
level has eight notes. When you play a note correctly,
it goes green. When you complete the level, another
eight notes are chosen randomly. The range of notes
starts small, but increases with each screen you
finish until all notes are in play. Tap the black notes
carefully: it’s easy to also hit a white key by mistake.
STEP-06
It’s time for your solo!
There’s lots you can do to customise Clef Hero. The
list notes_data describes the notes - the data is Piano
HAT key, sound file, the stave line or space numbered
from C=1 at the bottom, and the sharp or flat symbol.
To have notes arrive in a different order, change their
place in this list. To play with all the notes from the
start, add random.shuffle(notes_data) immediately
after notes_data is defined. Why not add a score
or a time limit? Or adapt the game for the bass clef?
Jam with it!
Below Use Sonic
Pi to make (and
customise) the
sounds for
this game](https://image.slidesharecdn.com/5e54ee1a-bd14-477f-b936-547e418d2eaf-160909074336/85/MagPi43-56-320.jpg)

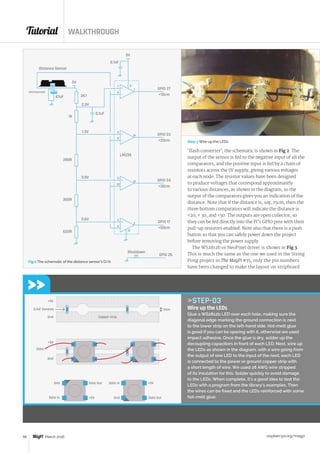
![Tutorial WALKTHROUGH
raspberrypi.org/magpi60 March 2016
# Magic mirror display
# By Mike Cook - January 2016
import time, os, random
import wiringpi2 as io
from neopixel import *
random.seed()
DATA_PIN = 18 # pin connected to the NeoPixels
NUM_PIXELS = 16 # number of LEDs in the spiral
try :
io.wiringPiSetupGpio()
except :
printstart IDLE with 'gksudo idle' from CLI
os._exit(1)
pixels = Adafruit_NeoPixel(
NUM_PIXELS,DATA_PIN,800000,5,False)
sensorPins = [17,24,23,27]
shutDownPin = 26
pattern = 0
patternTimeSteps = [0.5, 0.08, 0.05, 0.2, 0.01]
# time spent in each step
patternStep = 0 ; patternTemp = 0 ;
patternTemp2 = 0
col = [ (255,0,0),(0,255,0),(0,0,255),(255,255,255),
mirror1.py
We used a Pi B+ to develop the code using the
Pimoroni Black HAT Hack3R. When finished, we
changed the /etc/rc.local file to add this line to the end:
python path name/mirror1.py
This makes the Pi boot up automatically into this
program. Of course, the ‘path name’ was replaced by
the path where this program is to be found. This needs
to be in quotes if there are any spaces in the path.
Then we just swapped the SD card over to the Pi Zero
and mounted it in the mirror.
Taking it further
You can experiment and write your own LED display
patterns that are triggered for each of the four
distances the mirror can detect. You can even make
the patterns multi-step – that is, the sequence of light
could be extended, and change the longer the viewer is
at a fixed distance.
In part 2 next issue, we will show you how to add
a time display to the mirror, but all is not quite as
straightforward as you might think. Tune in next
month for a bit of a surprise.
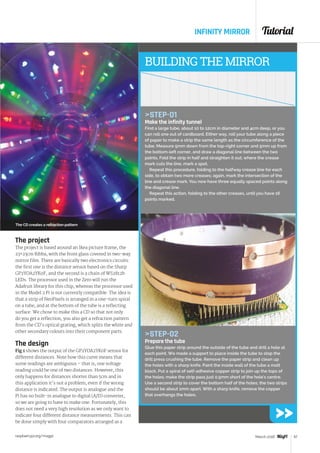
STEP-05
Make the brackets
Cover the picture frame glass with the mirror film. There are plenty of
online examples of how to do this using a squeegee, water spray, and
baby shampoo. Any specks of dust will show up, so make sure it’s well
cleaned. Note that it will take about a week for the film’s glue to cure
and bond with the glass. Fit the tube and mount flush with the mirror
in the frame, and use a fillet of hot-melt glue to fix the light tube to the
mount. Make a bracket to hold the distance sensor with a small piece
of asymmetric angle aluminium and paint it black. Fix it on the bottom
of the frame with two M3 bolts. Use these same bolts to fix the bracket
that holds the Pi Zero and electronic interface. Fix the Pi Zero to the
bracket using nylon nuts – we used drilled-out nylon nuts to make
the stand-off pillars for the Zero to ensure there was no chance of the
GPIO plug shorting out on the bracket.
STEP-06
Finishing off
Finally, build the electronics – that is Fig 2 3 – on a small piece of
stripboard. We used pin headers soldered horizontally to make the
connections with the LEDs and the distance sensor. Cut holes in the back
mounting board to fix the LED disc in place.
The mirror’s light patterns react to your proximity
01.
02.
03.
04.
05.
06.
07.
08.
09.
10.
11.
12.
13.
14.
15.
16.
17.
18.
19.
20.
21.
22.
23.
24.
25.](https://image.slidesharecdn.com/5e54ee1a-bd14-477f-b936-547e418d2eaf-160909074336/85/MagPi43-62-320.jpg)
![Tutorial
raspberrypi.org/magpi 61March 2016
26.
27.
28.
29.
30.
31.
32.
33.
34.
35.
36.
37.
38.
39.
40.
41.
42.
43.
44.
45.
46.
47.
48.
49.
50.
51.
52.
53.
54.
55.
56.
57.
58.
59.
60.
61.
62.
63.
64.
65.
66.
67.
68.
69.
70.
71.
72.
73.
74.
75.
76.
77.
78.
79.
80.
81.
82.
83.
84.
85.
86.
87.
88.
89.
90.
91.
92.
93.
94.
95.
96.
97.
98.
99.
100.
101.
102.
103.
104.
105.
106.
107.
108.
109.
110.
111.
112.
113.
114.
115.
116.
117.
118.
119.
120.
121.
122.
123.
124.
125.
126.
127.
(255,0,0),(0,255,0),(0,0,255),(255,255,255) ]
def main():
initGPIO()
while True:
if io.digitalRead(shutDownPin) == 0 :
os.system(sudo shutdown -h now)
# to prepare for power down
checkForDistance()
advancePattern()
time.sleep(patternTimeSteps[pattern])
def advancePattern(): # next step in LED pattern
global patternStep, patternTemp, patternTemp2
if pattern == 0:
return # nothing to do
if pattern == 1 : # Radar scan
if patternStep == 0:
patternTemp +=1
if patternTemp 3 :
patternTemp = 0
wipe()
pixels.setPixelColor(patternStep,Color(col[
patternTemp][0],col[patternTemp][1],col[patternTemp][2]))
updateStep()
return
if pattern == 2 : # Colour wipe
if patternStep == 0:
patternTemp +=1
if patternTemp 3 :
patternTemp = 0
pixels.setPixelColor(patternStep,Color(
col[patternTemp][0],col[patternTemp][1],col[
patternTemp][2] ))
updateStep()
return
if pattern == 3 : # Multicolour riot
wipe()
off = patternStep 0x03
for L in range(0,NUM_PIXELS,4):
pixels.setPixelColor(L, Color(
col[off][0],col[off][1] ,col[off][2] ))
pixels.setPixelColor(L+1, Color(
col[off+1][0],col[off+1][1],col[off+1][2]))
pixels.setPixelColor(L+2, Color(
col[off+2][0],col[off+2][1],col[off+2][2]))
pixels.setPixelColor(L+3, Color(
col[off+3][0],col[off+3][1],col[off+3][2]))
updateStep()
return
if pattern == 4 : # Slow colour cycle
if patternStep == 0:
patternTemp += 5
if patternTemp 255:
patternTemp = 0
pixels.setPixelColor(patternStep, Hcol(((
patternStep * 256 / NUM_PIXELS) + patternTemp) 255))
updateStep()
return
def initGPIO():
for pin in range (0,4):
io.pinMode(sensorPins[pin],0)
io.pullUpDnControl(
sensorPins[pin],2)
io.pinMode(shutDownPin,0)#input
io.pullUpDnControl(
shutDownPin,2)
pixels.begin()
# This initialises the NeoPixel library
def updateStep():
global patternStep
patternStep +=1
if patternStep = NUM_PIXELS :
patternStep =0
pixels.show()
def wipe():
for i in range(0,pixels.numPixels()):
pixels.setPixelColor(i, Color(0,0,0))
def Hcol(h): # HSV colour space with S = V = 1
if h 85:
return Color(h * 3, 255 - h * 3, 0)
elif h 170:
h -= 85
return Color(255 - h * 3, 0, h * 3)
else:
h -= 170
return Color(0, h * 3, 255 - h * 3)
def checkForDistance(): # select pattern based on distance
global pattern, patternStep
if io.digitalRead(sensorPins[0]) == 1 :
if pattern != 0: # if something showing
wipe()
pixels.show()
pattern = 0 # stop any display
patternStep = 0 # put to start of a pattern
else :
close = 0
for n in range(1,4):
if io.digitalRead(sensorPins[n]) == 0 :
close = n
if pattern != close+1 : # has pattern changed?
pattern = close+1
patternStep = 0 # stage in pattern
#printnow showing pattern,pattern
# Main program logic
if __name__ == '__main__':
main()
Language
PYTHON 2.7
DOWNLOAD:
magpi.cc/1NqJjmV
PROJECT
VIDEOS
Check out Mike’s
Bakery videos at:
magpi.cc/1NqJnTz
INFINITY MIRROR](https://image.slidesharecdn.com/5e54ee1a-bd14-477f-b936-547e418d2eaf-160909074336/85/MagPi43-63-320.jpg)
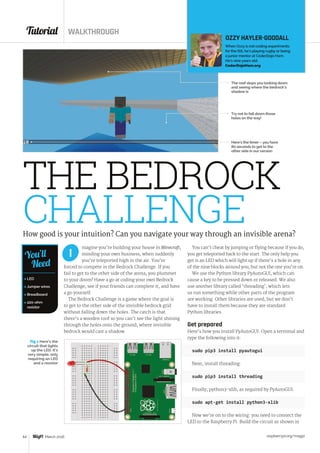
![Tutorial
raspberrypi.org/magpi 65March 2016
THE BEDROCK CHALLENGE
from gpiozero import LED
from mcpi.minecraft import Minecraft
import time, sys, random, threading
import pyautogui as pag
led = LED(13)
mc = Minecraft.create()
running = True
def make_holes(num, x, y, z): # make the holes
for I in range(num):
rx = random.randint(2,49)
rz = random.randint(2,49)
mc.setBlocks(x+rx, y+20, z+rz, x+rx, y+22, z+rz, 0)
def monitor(starting_pos):
global running
LED = [(-1, -1, 1), (-1, -1, 0), (-1, -1, -1), (
0, -1, -1), (1, -1, -1), (1, -1, 0), (1, -1, 1), (0, -1, 1)]
y_start = starting_pos.y
while running:
pag.keyUp('shift')
pos = mc.player.getTilePos()
for p in LED:
boss = mc.getBlock(pos.x+p[0], pos.y+p[1], pos.z+p[2])
if boss==0:
led.on() # LED on
else:
led.off() # LED off
if pos.y y_start:
mc.postToChat ('cheat')
mc.player.setPos(
starting_pos.x, pos.y, starting_pos.z) # teleport after cheating
time.sleep(1)
if pos.y y_start:
mc.postToChat ('Uh-oh')
time.sleep(3)
mc.player.setPos(
starting_pos.x, starting_pos.y, starting_pos.z)
# move after cheating
if pos.z==starting_pos.z+51:
mc.postToChat('Well Done')
running = False
try:
pos = mc.player.getTilePos()
mc.postToChat(
'get ready for the bedrock challenge')
time.sleep(1)
mc.postToChat(
'get to the other side without falling
down the holes!')
time.sleep(3)
mc.setBlocks(
pos.x+1, pos.y+20, pos.z, pos.x+53, pos.y+22, pos.z+53, 35) #wool
mc.setBlocks(
pos.x+2, pos.y+20, pos.z+1, pos.x+52, pos.y+20, pos.z+52, 95)#bedrock
mc.setBlocks(
pos.x+1, pos.y+30, pos.z, pos.x+53, pos.y+30, pos.z+53, 17) #roof
mc.setBlocks(
pos.x+2, pos.y+21, pos.z+1, pos.x+52, pos.y+22, pos.z+52, 0)
# air for Steve starting position
mc.setBlocks(
pos.x+25, pos.y+21, pos.z+1, pos.x+25, pos.y+22, pos.z+1, 0)
mc.player.setPos(
pos.x+25, pos.y+21, pos.z+1) # teleport to start
newpos = mc.player.getTilePos() # get new position
t1 = threading.Thread(target = monitor, args = (newpos, ))
t1.start()
make_holes(250, pos.x, pos.y, pos.z)
time_start = time.time()
counter = 80 # setting the timer
while time.time()time_start+80: # starting the timer
time.sleep(1)
counter-=1
if counter%10==0:
mc.postToChat(str(counter))
mc.setBlocks(
pos.x+2, pos.y+20, pos.z+1, pos.x+52, pos.y+20, pos.z+52, 0)
mc.postToChat('GAME OVER')
running = False
except KeyboardInterrupt: # type Ctrl+C
print('bye')
running = False
sys.exit()
bedrockchallenge.py Language
PYTHON 3
DOWNLOAD:
magpi.cc/1QbdoYO
Fig 1 . To test it, open a terminal and type python3,
then enter the following lines:
from gpiozero import LED
led = LED(13)
led.on()
This should turn on the LED assigned to GPIO pin 13.
Modding Minecraft
Now we’ve done all our preparations, let’s get coding!
In this code, we have two functions: one stops you
cheating while the other creates the holes. There
are two main ways of cheating, and we block both of
these. One way is to hold down the SHIFT key (‘enable
sneak’), which normally stops you falling. We use
PyAutoGUI to hold the SHIFT key up to prevent you
from using sneak. The other way is to fly to the finish.
We stop this by finding your Y position at the start,
then checking if it has changed - in other words, if
you’ve gone higher. It also won’t allow you to run
around the perimeter walls. The function that stops
you cheating has another purpose: it turns the LED
on if there’s air around you. We do this by finding the
positions of all nine blocks, then we see if one of them
is air. If one or more is air, we turn the LED on. If you
do sadly fall down a hole, ‘Uh-Oh’ gets displayed and
you’ll be teleported back to the start.
Here’s how we create the arena. We first build
the invisible bedrock plane, then we pick random
positions to place the holes. After that, we build the
roof, and then finally we create the wool walls. To
give you a time limit to reach the other end we have
a counter, which gets displayed on the Minecraft
screen when it reaches a multiple of ten. When it
reaches zero, we turn all the invisible bedrock into air.
Game over!
You could make it easier by giving the player more
time, or make it harder and have more holes. If you
have an annoying older brother, they might find some
other sneaky ways to cheat. Can you think of any? If
you can, try to write code to prevent them!](https://image.slidesharecdn.com/5e54ee1a-bd14-477f-b936-547e418d2eaf-160909074336/85/MagPi43-67-320.jpg)


![raspberrypi.org/magpi 71March 2016
Feature
Free to share
Enforcing sharing through licences is known as
copyleft, and the best-known copyleft licence is the
GNU GPL – used for much of Raspbian and all of its
other GNU/Linux relatives. The GNU General Public
License (GPL) is one of the oldest FOSS licences, and
was the first designed to ensure both the freedom of
the end user and that of users further down the chain,
after software had been modified and passed on.
The Free Software Foundation (FSF) and the GNU
project were both started in the 1980s by Richard
Stallman, who wrote GNU Emacs and the GNU
toolchain, including the GNU Compiler Collection’s
(GCC) C compiler, which is the first piece of
software that chip manufacturers port to any new
hardware platform. While the GNU project – at
least with the addition of the Linux kernel – has
grown to dominate every area of serious computing,
the copyleft ideas behind the GPL have had an
effect in several fields beyond computing – from
farming (opensourceecology.org) to medicine
(opensource.com/tags/medicine). The key to copyleft
is protecting ‘four essential freedoms’:
FREE TO SHARE
The freedom to run the program as you wish,
for any purpose (freedom 0).
The freedom to study how the program works,
and change it so it does your computing as you
wish (freedom 1). Access to the source code
is a precondition for this.
The freedom to redistribute copies so you can
help your neighbour (freedom 2).
The freedom to distribute copies of your
modified versions to others (freedom 3). By
doing this, you can give the whole community
a chance to benefit from your changes. Access
to the source code is a precondition for this.
All of this can be summarised as ‘I’m going to let
you do what you like with my program – providing
that when you pass it along (with or without your
own modifications), you pass on these same freedoms
English, despite its monstrously large vocabulary,
is one of the only languages to conflate the
meanings of free-of-charge and free-as-in-
speech into the same word. Consequently, free
software in the early days was often lumped
with freeware, shareware, and other proprietary
but often amateur small projects. The approach
of the Free Software Foundation (FSF) to this
problem (for the English-speaking world) is to talk
continuously about freedom until the message
gets through.
A different approach was taken by some
members of the GNU/Linux community at the
end of the 1990s, coining the term ‘open source’
in an effort to find a business-friendly alternative
to ‘free’. Their early rhetoric tended to emphasise
the benefits of access to the source code, which
led to some muddying of the waters when some
proprietary companies allowed limited access to
their source code, but under very restrictive terms.
The term FOSS (free and open-source software)
nowadays means we can all talk about the same
thing, without bickering about words. The Open
Source Initiative’s ‘Open Source Definition’ [1]
(based on Bruce Perens’s Debian Free Software
Guidelines of 1997) emphasises freedom to
modify and redistribute every bit as much as the
Free Software Definition [2] written for the FSF by
Richard Stallman 30 years ago.
gnu.org/philosophy/free-sw.html
opensource.org/osd
FREE OR OPEN?
71March 2016
GET A
LAWYER
For small
projects
needing a bit
of thought
before
redistribution,
we hope this
will set you
on the right
road. If you’re
scaling up,
however,
please seek
professional
advice.
Enforcing sharing
through licences is
known as copyleft
opensource.com CC-BY-SA](https://image.slidesharecdn.com/5e54ee1a-bd14-477f-b936-547e418d2eaf-160909074336/85/MagPi43-73-320.jpg)
![Feature
raspberrypi.org/magpi72 March 201672 March 2016
FREE TO SHARE
Licence choice is in part governed by what you want end users to
do with your project – and if you want them to be able to do just
about anything, we have mentioned permissive licences in the main
text already. To get the best take-up of your project, however, lots of
great documentation is important.
FarmBot (farmbot.io) is an “open-source CNC farming machine
and software package built for small scale, hyper-local, DIY food
production,” controlled by an internet-connected Raspberry Pi
2 and Arduino/RAMPS (RepRap Arduino Mega Pololu Shield –
popular for controlling 3D printers). As well as being a great project
– using a CNC’s XYZ motion, combined with specialist tools, to
automatically manage the growing of plants over a 1 to 20 square
metre area – the FarmBot project aims to be “not just open source
[but] useful source.”
Useful source
The plans are not just freely licensed, but include detailed assembly
instructions, bills of low-cost and easily available materials,
troubleshooting tips, past iterations, and exhaustive information on
what FarmBot is all about.
The intention is to spread FarmBot and its benefits far and wide:
“we’re even committed to operating our companywith transparency
and open companyvalues at the forefront,” its creators say. As well
as publishing all of the designs and software under free and open
licences, FarmBot maintains a busy user forum with very good
guidelines to help keep things civil.
Contributing beer
BrewPi (brewpi.com), another Raspberry Pi/Arduino hybrid, controls
temperature in the brewing of beer (or fermentation of wine). A
popular project, it’s used by many suppliers of homebrew equipment,
and to avoid potential problems, BrewPi has adopted a Contributor
License Agreement (CLA) – similar to that used in the Django project
– to ensure that all code contributed to the project can continue to be
used and distributed with free and open licences.
BrewPi’s documents are available in reStructuredText format in
the repository, as well as online.
BARLEY AND BEER –FARMBOT BREWPI
Manage the growing
of plants over a one to
20 square metre area
Feature
CASE STUDY
FarmBot takes tender care of your
plants – and great docs mean
almost anyone can build one.
CC BY 4.0 farmbot.io](https://image.slidesharecdn.com/5e54ee1a-bd14-477f-b936-547e418d2eaf-160909074336/85/MagPi43-74-320.jpg)


![raspberrypi.org/magpi 87March 2016
Community
Above The
office espresso
machine was
‘Houndified’,
and can
now hold a
conversation
as it brews
your coffee
HOUND: OUT NOW
Hound, the first-party app that uses Houndify on
iOS and Android, has been in private beta since it
was announced last year. By the time you read this
magazine, the full version will be out for everyone
to use. It makes use of all the excellent features
if Houndify for a better voice-control experience
on your device. It’s not on the Raspberry Pi, but it’s
definitely worth a look!
HOUNDIFY
understand the meaning in real-
time as we are understanding the
text, we can do a better job with the
accuracy also. That turned out to be
true: with our benchmarks, we saw
a huge improvement in accuracy.”
The second key difference
is the ability for Houndify to
understand complex queries,
and this is the aspect that really
impresses people. Users go from
asking a serious of short questions
to asking long strings which
would not be usable anywhere
else. For example, the following
sentence works with Houndify:
‘Show me hotels in San
Francisco for tomorrow that are
less than $300 but not less than
$200, are pet friendly, have a
gym and a pool, with three or
four stars, staying for two nights,
and don’t include anything that
doesn’t have air conditioning.’
Master of your domain
Last but not least, Houndify’s
‘domains’ are a key differentiator.
“It’s important to understand
that this is not like magic,”
Keyvan explains. “You can’t just
make it all work with everything.
If you want it to understand
weather, you have to integrate
it with the weather provider
and understand the type of
interactions that people will do
with that domain. Same for if you
want to understand stock markets
or local business search or hotel
search. These are all domains. We
call them domains because they
are big but they’re very specific,
so they need to be added one by
one. We thought that to make this
really useful, we need to be able
to understand a lot of things, so
we need to be able to add these
domains very fast.”
Google and Apple also use such
domains, but they only have a few
and have not added many new
ones in the past few years.
“We built a platform that
allows us to add these domains
faster and more efficiently than
[rival services],” Keyvan tells us.
“The key was that you don’t have
to be a scientist in that space
to be able to use the platform.
You don’t need to have a PhD
in linguistics or speech; we
employ fresh computer science
graduates, and they are able to
understand our platform and add
new domains within days. When
we announced our platform in
June of last year, we had about
50 domains; today we have more
than 110 domains… Eventually
we will open the domain level
part of this platform to outside
developers, and that’s when we go
from hundreds internally to 1,000
to 10,000… 100,000… you know.
1,000,000 domains.”
Houndify is available for use
in projects now for free and on
Raspberry Pi. Check houndify.com
for more information.
HOUNDIFY
WITH PI
Houndify works well on the
Raspberry Pi, with enough
resources to run it just fine.
Keyvan tells us how it has
been used:
“We sponsored a huge
hackathon at the University
of Pennsylvania and they had
1,300 students working over
two or three days. We had a big
presence there and I believe
Houndify was the most used API
in the whole hackathon. There’s
a lot of interest by the developer
community and a lot of them use
the Raspberry Pi.”
In the Houndify office itself,
an engineer hacked their
espresso machine to talk to
users – after it takes your order
first, of course.
The various domains that can be
used with Houndify, from hotel
and weather to more abstract
domains like blackjack](https://image.slidesharecdn.com/5e54ee1a-bd14-477f-b936-547e418d2eaf-160909074336/85/MagPi43-89-320.jpg)


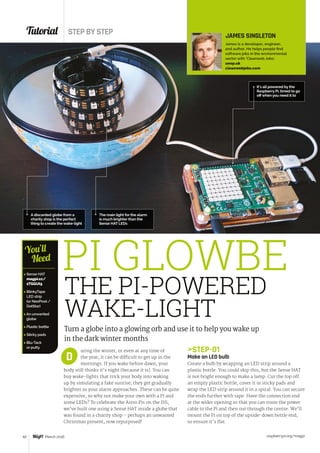
![ESSENTIALS
MUSICWITH
LIVECODECREATEAMAZINGSOUNDS
ON
YOUR Raspberry Pi
Written by Sam Aaron
MAKE
10 11
ESSENTIALS
[ ]
[ MAKE MUSIC WITH SONIC PI ]
11
[ CHAPTER TWO]
CODED BEATSSonic Pi creator Sam Aaron continues his essential new series
with one of the most influential drum breaks in music history…
O
ESSENTIALS
10 [ Chapter Two ] [ Coded Beats ]
Below The Akai MPC 2000, a classic early sampler
raspberrypi.org/magpi98 March 2016
magpi.cc/sonic-pi-book
Find it on
digital app
CODE MUSIC
SONIC PIWITH
Get started today for
just £2.99 / $3.99
ESSENTIALS
From the makers of the
official Raspberry Pi magazine
LIVE CODE CREATE AMAZING SOUNDS
ON
YOUR Raspberry Pi](https://image.slidesharecdn.com/5e54ee1a-bd14-477f-b936-547e418d2eaf-160909074336/85/MagPi43-100-320.jpg)


