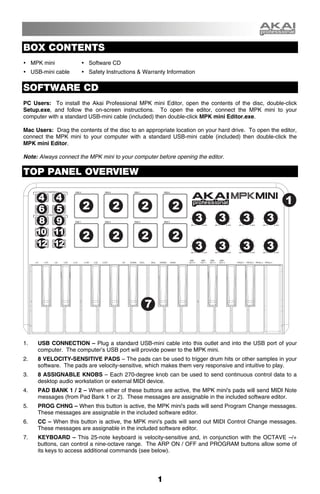
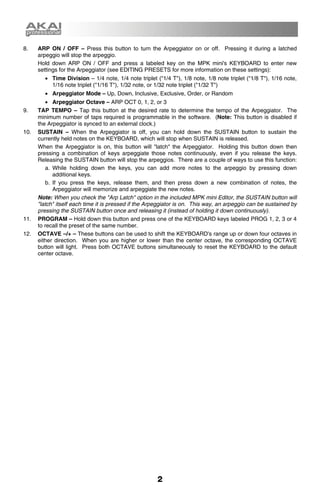
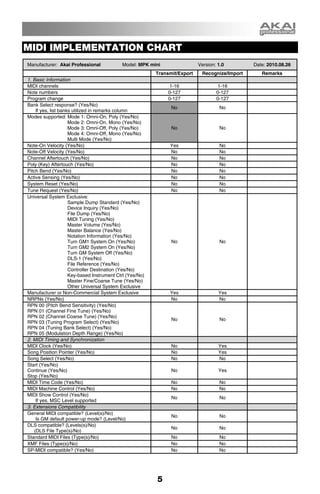
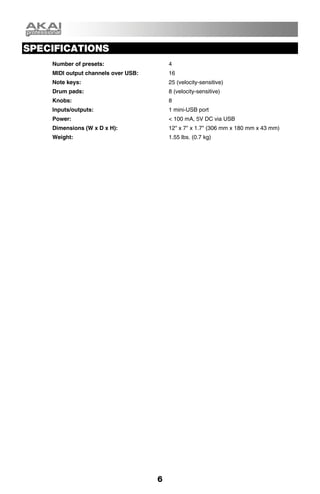
The Akai Pro MPK mini keyboard controller has an impressive array of buttons, knobs and pads to provide "hands-on" performance and production control no matter your location. Use the MPK mini keyboard quickstart guide for an overview of the mini keyboard and all it's functions.
This user manual provides instructions for setting up and using a community computer called K-Yan. K-Yan is an all-in-one device that includes a projector, computer, and speakers. It can be used to project presentations, videos, and access the internet for community members. The manual covers unpacking K-Yan, setting up the projection area, starting up and shutting down the computer and projector, and basic projector controls. Contact information is also provided for technical support.
This document discusses 9 different types of POS keyboards: compact size, full size, 78-key, LCD, Qwerty, mini Qwerty, 28-key, compact, and keyboards with 112, 66, or 51 keys. For each type, the document provides details on features such as the number of programmable keys, key materials, programming capabilities, and interfaces. It also briefly explains the basic functioning of keyboards, with the keyboard controller sending scan codes to the keyboard buffer and system software.
This document summarizes and compares several keyboards and a keyboard/mouse combo. It describes the Logitech Wireless Touch Keyboard which has a built-in touchpad, 12 month battery life, and wireless range. It also outlines the Corsair Strafe Mechanical Gaming Keyboard which uses Cherry MX switches and has red backlighting and programmable keys. Finally, it provides details on the Logitech MK550 Wireless Wave Keyboard and Mouse Combo, noting its ergonomic wave design, included mouse and receiver, and 3 year warranty.
This document outlines exercises for implementing a two-button user interface using an Arduino. It includes instructions for differentiating between long and short button clicks, moving a servo during a button interrupt, and creating a two-button UI with two menus - one for controlling a fan and another for displaying temperature and humidity readings. The material needed includes a Wemos D1 R32 board with an Arduino sensor shield, servo motor, relay, and LCD screen.
The document provides an overview guide for setting up and using the Novation Impulse USB MIDI keyboard. It includes sections on connecting the Impulse, its basic operation including the keyboard, controls and ports, installing bundled software and setting up HUI control in various DAWs like Pro Tools, Cubase, Reaper and Studio One. It also covers using the Impulse to control mixer tracks and plugins in a DAW and additional Ableton Live clip launch functionality.
This document provides instructions for using RCCreator software to copy remote controls. It includes:
1) An introduction to the software and its ability to copy 98% of remote controls.
2) System requirements to run the software on Windows XP/Vista/7/8/10.
3) Steps to install the software, add a new remote control profile, read codes from an original remote, and export the codes to program a USB remote.
The quick start guide provides instructions for installing the tablet driver and connecting the tablet to a computer. It explains the system requirements, how to install the driver software by inserting the driver CD, and how to connect the tablet to the computer via USB cable or dongle. It also provides an overview of the tablet hardware components and their functions.
Leadleds Brand Remote led sign board manualleadleds AW
Learn how to easy to program your message by PC or by remote, by remote is fast way to program your messages, which support text, number and etc., multi-language supported, learn more click https://untsmart.com/products/remote-led-sign
This document provides instructions for using RCCreator software to program remote controls. It discusses downloading and installing the software, connecting a programmable remote control to the computer, adding a new remote to the software database, reading codes from an original remote control, assigning those codes to buttons on the programmable remote, and then programming the remote control. The summary highlights the key steps in programming a remote control using the RCCreator software.
The document describes the Steinberg layout and functionality for the Mackie Control hardware controller when used with Nuendo. Key points include:
1. The Steinberg overlay provides custom key bindings for Mackie Control functions in Nuendo. It can be placed over the top right of Mackie Control.
2. Mackie Control operates in Selected Channel, Fader Set, or Global mode depending on the parameter group selected. Selected Channel mode controls a single channel, Fader Set mode controls a parameter across multiple channels, and Global mode controls global settings.
3. Parameter pages can be navigated with Page Up/Down buttons to access different EQ, FX, and insert parameters for the selected channel or global settings.
The document provides instructions for creating a digital dice game using a Microbit device. It explains that the objectives are for students to 1) reproduce a simple program, 2) extend the code to display dice patterns instead of numbers, and 3) develop the code to generate a new random number when the device is shaken. It then gives step-by-step instructions for coding a basic dice rolling program using the Microbit emulator, downloading the code, and flashing it onto the physical device. Finally, it lists challenges for students to modify the code to display valid dice numbers only, show dot patterns instead of numbers, and update the random number on each shake.
This document provides frequently asked questions and answers about smcFanControl software. The main differences between Version 1.2x and 2.x are that 2.x has been completely rewritten, sits in the menu bar for quicker access, supports all Intel Macs, allows saving of fan settings as favorites, and automatically applies different settings when power sources change. smcFanControl is installed by dragging the application to the desired folder and uninstalled by dragging it to the trash. It does not install any background processes.
This document provides frequently asked questions and answers about smcFanControl, a fan control application for Mac computers. Key points include:
- smcFanControl is easy to install by dragging the application to the desired folder, and uninstall by dragging to trash. It does not install background processes.
- smcFanControl only sets the minimum fan speed. The fans will still increase speed based on CPU load set by Apple. Higher minimum speeds mean longer to increase further.
- smcFanControl needs administrative credentials to change fan speeds, but these are not saved or stored by the application.
This document provides instructions for operating a Tandberg video conferencing system including making and receiving calls, adjusting cameras and audio, displaying video sources, using features like snapshots and picture-in-picture, conducting multi-point video conferences, and powering down the system. The remote control and on-screen menus are used to control call functions, cameras, audio levels, and select between video sources like the document camera, PC presenter, or VCR.
The document summarizes the key features and functions of the TANDBERG Video Conferencing System. It describes the built-in camera, codec, remote control, microphone, and provides step-by-step instructions on starting up the system, making and ending calls, controlling cameras and video sources, using presets, and adjusting volume.
Latency refers to the delay between producing a sound and hearing it played back. This delay can be distracting and annoying when trying to record audio. The Multimix USB mixer allows for zero-latency monitoring, meaning you can hear yourself in real-time while recording without any delay. To set this up, you connect the mixer to your computer via USB, set the mixer controls appropriately, and configure your DAW (Digital Audio Workstation) software to route audio through the mixer for both input and output. This allows you to monitor yourself in real-time during recording.
The document provides a user guide for the Extech 407860 Vibration Meter. It describes the meter's features for measuring vibration levels in industrial machinery. The guide covers how to connect the supplied vibration probe, select measurement units and functions, use data logging features, view stored readings, and transfer data to a PC. The meter measures vibration displacement, velocity and acceleration within ISO standards.
Set up Google Assistant
20
VIII. Battery
The battery is not removable. Please fully charge the battery before first
use. When the battery is low, please recharge in time.
IX .Firmware Upgrading Procedures
1. Download the latest firmware package from the manufacturer's
website. Make sure the firmware is compatible with your tablet model.
2. Copy the firmware package to the root directory of the tablet's
internal storage or external SD card.
3. Power off the tablet and then power it on while pressing and holding
the "Reset" button located at the bottom of the tablet.
4. When the upgrade mode menu appears, use the volume buttons
This document provides a quick start user manual for the MIC 1462 1/4 DIN setpoint programmer. It describes the power up procedure, keypad operation, indicators, displays, and how to program profiles into the controller. Profiles can be programmed with global parameters, program parameters, and segment parameters. Segment programming allows setting the final setpoint, time/ramp rate, and events for each segment. A sample profile is provided as an example.
1. This chapter provides instructions on using the computer's software features, including Lenovo Dynamic Brightness System, Lenovo Eye Distance System, and BackOn Track.
2. Lenovo Dynamic Brightness System automatically detects ambient brightness and adjusts display brightness accordingly for comfort in different lighting conditions.
3. Lenovo Eye Distance System uses infrared sensors to detect how far away the user's eyes are from the screen and adjusts screen properties to reduce eye strain.
4. BackOn Track helps protect privacy by securely deleting files and preventing data leakage from damaged, lost or stolen computers.
Network Management Card User Manual-en.pdfLuongVanLoi1
The document provides instructions for configuring and managing a Network Management Card (NMC) and connected UPS device via a web browser or SNMP. It describes connecting the NMC to the UPS and a computer, and outlines the steps to configure NMC and UPS settings like IP address, date/time, email alerts, and firmware upgrades through the web interface or serial port connection. Key functions of the NMC include monitoring UPS status, controlling the UPS, and triggering safe OS shutdown on UPS events.
This document provides instructions for configuring a tablet and digital pen device. It describes installing the driver software, connecting both wired and wireless tablets, and verifying that the hardware and drivers are functioning properly. It also provides details on customizing the pen tip and button functions, setting the pressure sensitivity and working area, and programming hot cells and express keys. Usage tips are provided for waking the pen from standby, double tapping, scrolling, and storing the pen properly.
As we navigate through the ebbs and flows of life, it is natural to experience moments of low motivation and dwindling passion for our goals.
However, it is important to remember that this is a common hurdle that can be overcome with the right strategies in place.
In this guide, we will explore ways to rekindle the fire within you and stay motivated towards your aspirations.
More Related Content
Similar to MPK Mini Keyboard Controller Quickstart Guide
The quick start guide provides instructions for installing the tablet driver and connecting the tablet to a computer. It explains the system requirements, how to install the driver software by inserting the driver CD, and how to connect the tablet to the computer via USB cable or dongle. It also provides an overview of the tablet hardware components and their functions.
Leadleds Brand Remote led sign board manualleadleds AW
Learn how to easy to program your message by PC or by remote, by remote is fast way to program your messages, which support text, number and etc., multi-language supported, learn more click https://untsmart.com/products/remote-led-sign
This document provides instructions for using RCCreator software to program remote controls. It discusses downloading and installing the software, connecting a programmable remote control to the computer, adding a new remote to the software database, reading codes from an original remote control, assigning those codes to buttons on the programmable remote, and then programming the remote control. The summary highlights the key steps in programming a remote control using the RCCreator software.
The document describes the Steinberg layout and functionality for the Mackie Control hardware controller when used with Nuendo. Key points include:
1. The Steinberg overlay provides custom key bindings for Mackie Control functions in Nuendo. It can be placed over the top right of Mackie Control.
2. Mackie Control operates in Selected Channel, Fader Set, or Global mode depending on the parameter group selected. Selected Channel mode controls a single channel, Fader Set mode controls a parameter across multiple channels, and Global mode controls global settings.
3. Parameter pages can be navigated with Page Up/Down buttons to access different EQ, FX, and insert parameters for the selected channel or global settings.
The document provides instructions for creating a digital dice game using a Microbit device. It explains that the objectives are for students to 1) reproduce a simple program, 2) extend the code to display dice patterns instead of numbers, and 3) develop the code to generate a new random number when the device is shaken. It then gives step-by-step instructions for coding a basic dice rolling program using the Microbit emulator, downloading the code, and flashing it onto the physical device. Finally, it lists challenges for students to modify the code to display valid dice numbers only, show dot patterns instead of numbers, and update the random number on each shake.
This document provides frequently asked questions and answers about smcFanControl software. The main differences between Version 1.2x and 2.x are that 2.x has been completely rewritten, sits in the menu bar for quicker access, supports all Intel Macs, allows saving of fan settings as favorites, and automatically applies different settings when power sources change. smcFanControl is installed by dragging the application to the desired folder and uninstalled by dragging it to the trash. It does not install any background processes.
This document provides frequently asked questions and answers about smcFanControl, a fan control application for Mac computers. Key points include:
- smcFanControl is easy to install by dragging the application to the desired folder, and uninstall by dragging to trash. It does not install background processes.
- smcFanControl only sets the minimum fan speed. The fans will still increase speed based on CPU load set by Apple. Higher minimum speeds mean longer to increase further.
- smcFanControl needs administrative credentials to change fan speeds, but these are not saved or stored by the application.
This document provides instructions for operating a Tandberg video conferencing system including making and receiving calls, adjusting cameras and audio, displaying video sources, using features like snapshots and picture-in-picture, conducting multi-point video conferences, and powering down the system. The remote control and on-screen menus are used to control call functions, cameras, audio levels, and select between video sources like the document camera, PC presenter, or VCR.
The document summarizes the key features and functions of the TANDBERG Video Conferencing System. It describes the built-in camera, codec, remote control, microphone, and provides step-by-step instructions on starting up the system, making and ending calls, controlling cameras and video sources, using presets, and adjusting volume.
Latency refers to the delay between producing a sound and hearing it played back. This delay can be distracting and annoying when trying to record audio. The Multimix USB mixer allows for zero-latency monitoring, meaning you can hear yourself in real-time while recording without any delay. To set this up, you connect the mixer to your computer via USB, set the mixer controls appropriately, and configure your DAW (Digital Audio Workstation) software to route audio through the mixer for both input and output. This allows you to monitor yourself in real-time during recording.
The document provides a user guide for the Extech 407860 Vibration Meter. It describes the meter's features for measuring vibration levels in industrial machinery. The guide covers how to connect the supplied vibration probe, select measurement units and functions, use data logging features, view stored readings, and transfer data to a PC. The meter measures vibration displacement, velocity and acceleration within ISO standards.
Set up Google Assistant
20
VIII. Battery
The battery is not removable. Please fully charge the battery before first
use. When the battery is low, please recharge in time.
IX .Firmware Upgrading Procedures
1. Download the latest firmware package from the manufacturer's
website. Make sure the firmware is compatible with your tablet model.
2. Copy the firmware package to the root directory of the tablet's
internal storage or external SD card.
3. Power off the tablet and then power it on while pressing and holding
the "Reset" button located at the bottom of the tablet.
4. When the upgrade mode menu appears, use the volume buttons
This document provides a quick start user manual for the MIC 1462 1/4 DIN setpoint programmer. It describes the power up procedure, keypad operation, indicators, displays, and how to program profiles into the controller. Profiles can be programmed with global parameters, program parameters, and segment parameters. Segment programming allows setting the final setpoint, time/ramp rate, and events for each segment. A sample profile is provided as an example.
1. This chapter provides instructions on using the computer's software features, including Lenovo Dynamic Brightness System, Lenovo Eye Distance System, and BackOn Track.
2. Lenovo Dynamic Brightness System automatically detects ambient brightness and adjusts display brightness accordingly for comfort in different lighting conditions.
3. Lenovo Eye Distance System uses infrared sensors to detect how far away the user's eyes are from the screen and adjusts screen properties to reduce eye strain.
4. BackOn Track helps protect privacy by securely deleting files and preventing data leakage from damaged, lost or stolen computers.
Network Management Card User Manual-en.pdfLuongVanLoi1
The document provides instructions for configuring and managing a Network Management Card (NMC) and connected UPS device via a web browser or SNMP. It describes connecting the NMC to the UPS and a computer, and outlines the steps to configure NMC and UPS settings like IP address, date/time, email alerts, and firmware upgrades through the web interface or serial port connection. Key functions of the NMC include monitoring UPS status, controlling the UPS, and triggering safe OS shutdown on UPS events.
This document provides instructions for configuring a tablet and digital pen device. It describes installing the driver software, connecting both wired and wireless tablets, and verifying that the hardware and drivers are functioning properly. It also provides details on customizing the pen tip and button functions, setting the pressure sensitivity and working area, and programming hot cells and express keys. Usage tips are provided for waking the pen from standby, double tapping, scrolling, and storing the pen properly.
Similar to MPK Mini Keyboard Controller Quickstart Guide (20)
As we navigate through the ebbs and flows of life, it is natural to experience moments of low motivation and dwindling passion for our goals.
However, it is important to remember that this is a common hurdle that can be overcome with the right strategies in place.
In this guide, we will explore ways to rekindle the fire within you and stay motivated towards your aspirations.
Understanding of Self - Applied Social Psychology - Psychology SuperNotesPsychoTech Services
A proprietary approach developed by bringing together the best of learning theories from Psychology, design principles from the world of visualization, and pedagogical methods from over a decade of training experience, that enables you to: Learn better, faster!
You may be stressed about revealing your cancer diagnosis to your child or children.
Children love stories and these often provide parents with a means of broaching tricky subjects and so the ‘The Secret Warrior’ book was especially written for CANSA TLC, by creative writer and social worker, Sally Ann Carter.
Find out more:
https://cansa.org.za/resources-to-help-share-a-parent-or-loved-ones-cancer-diagnosis-with-a-child/
Procrastination is a common challenge that many individuals face when it comes to completing tasks and achieving goals. It can hinder productivity and lead to feelings of stress and frustration.
However, with the right strategies and mindset, it is possible to overcome procrastination and increase productivity.
In this article, we will explore the causes of procrastination, how to recognize the signs of procrastination in oneself, and effective strategies for overcoming procrastination and boosting productivity.
ProSocial Behaviour - Applied Social Psychology - Psychology SuperNotesPsychoTech Services
A proprietary approach developed by bringing together the best of learning theories from Psychology, design principles from the world of visualization, and pedagogical methods from over a decade of training experience, that enables you to: Learn better, faster!
Aggression - Applied Social Psychology - Psychology SuperNotesPsychoTech Services
A proprietary approach developed by bringing together the best of learning theories from Psychology, design principles from the world of visualization, and pedagogical methods from over a decade of training experience, that enables you to: Learn better, faster!
3. BOX CONTENTS
MPK mini Software CD
USB-mini cable Safety Instructions & Warranty Information
SOFTWARE CD
PC Users: To install the Akai Professional MPK mini Editor, open the contents of the disc, double-click
Setup.exe, and follow the on-screen instructions. To open the editor, connect the MPK mini to your
computer with a standard USB-mini cable (included) then double-click MPK mini Editor.exe.
Mac Users: Drag the contents of the disc to an appropriate location on your hard drive. To open the editor,
connect the MPK mini to your computer with a standard USB-mini cable (included) then double-click the
MPK mini Editor.
Note: Always connect the MPK mini to your computer before opening the editor.
TOP PANEL OVERVIEW
4 4 1
6 5 2 2 2 2
8 9 3 3 3 3
10 11
2 2 2 2
12 12 3 3 3 3
7
1. USB CONNECTION – Plug a standard USB-mini cable into this outlet and into the USB port of your
computer. The computer’s USB port will provide power to the MPK mini.
2. 8 VELOCITY-SENSITIVE PADS – The pads can be used to trigger drum hits or other samples in your
software. The pads are velocity-sensitive, which makes them very responsive and intuitive to play.
3. 8 ASSIGNABLE KNOBS – Each 270-degree knob can be used to send continuous control data to a
desktop audio workstation or external MIDI device.
4. PAD BANK 1 / 2 – When either of these buttons are active, the MPK mini's pads will send MIDI Note
messages (from Pad Bank 1 or 2). These messages are assignable in the included software editor.
5. PROG CHNG – When this button is active, the MPK mini's pads will send Program Change messages.
These messages are assignable in the included software editor.
6. CC – When this button is active, the MPK mini's pads will send out MIDI Control Change messages.
These messages are assignable in the included software editor.
7. KEYBOARD – This 25-note keyboard is velocity-sensitive and, in conjunction with the OCTAVE –/+
buttons, can control a nine-octave range. The ARP ON / OFF and PROGRAM buttons allow some of
its keys to access additional commands (see below).
1
4. 8. ARP ON / OFF – Press this button to turn the Arpeggiator on or off. Pressing it during a latched
arpeggio will stop the arpeggio.
Hold down ARP ON / OFF and press a labeled key on the MPK mini's KEYBOARD to enter new
settings for the Arpeggiator (see EDITING PRESETS for more information on these settings):
• Time Division – 1/4 note, 1/4 note triplet ("1/4 T"), 1/8 note, 1/8 note triplet ("1/8 T"), 1/16 note,
1/16 note triplet ("1/16 T"), 1/32 note, or 1/32 note triplet ("1/32 T")
• Arpeggiator Mode – Up, Down, Inclusive, Exclusive, Order, or Random
• Arpeggiator Octave – ARP OCT 0, 1, 2, or 3
9. TAP TEMPO – Tap this button at the desired rate to determine the tempo of the Arpeggiator. The
minimum number of taps required is programmable in the software. (Note: This button is disabled if
the Arpeggiator is synced to an external clock.)
10. SUSTAIN – When the Arpeggiator is off, you can hold down the SUSTAIN button to sustain the
currently held notes on the KEYBOARD, which will stop when SUSTAIN is released.
When the Arpeggiator is on, this button will "latch" the Arpeggiator. Holding this button down then
pressing a combination of keys arpeggiate those notes continuously, even if you release the keys.
Releasing the SUSTAIN button will stop the arpeggios. There are a couple of ways to use this function:
a. While holding down the keys, you can add more notes to the arpeggio by pressing down
additional keys.
b. If you press the keys, release them, and then press down a new combination of notes, the
Arpeggiator will memorize and arpeggiate the new notes.
Note: When you check the "Arp Latch" option in the included MPK mini Editor, the SUSTAIN button will
"latch" itself each time it is pressed if the Arpeggiator is on. This way, an arpeggio can be sustained by
pressing the SUSTAIN button once and releasing it (instead of holding it down continuously).
11. PROGRAM – Hold down this button and press one of the KEYBOARD keys labeled PROG 1, 2, 3 or 4
to recall the preset of the same number.
12. OCTAVE –/+ – These buttons can be used to shift the KEYBOARD's range up or down four octaves in
either direction. When you are higher or lower than the center octave, the corresponding OCTAVE
button will light. Press both OCTAVE buttons simultaneously to reset the KEYBOARD to the default
center octave.
2
5. SOFTWARE EDITOR
OPENING THE EDITOR
Always connect the MPK mini to your computer before opening the software editor.
After opening the software editor, you will need to select the MPK mini from the drop-down menu on the opening screen and
click "Done."
For Mac or Windows Vista users, it will be listed as Akai MPK mini.
For Windows XP users, it will be listed as USB Audio Device. (If you have other USB audio devices connected to your
computer, which may have identical names, you may need to try selecting each one until the MPK mini is recognized.)
IMPORTANT!: The first time you use the software editor, even if the correct device is already shown in the drop-down
menu, you still need to click on the menu and select the device. (You will also need to do this if you move your files to a
new location.) In future sessions, though, you can simply click "Done" if the correct device is shown in this window.
PRESETS
LOADING & SAVING PRESETS
The editor lets you edit, save, or load presets for the MPK mini on your computer.
1. GET PRESET – Click a button to select the
number of a preset currently on the MPK Note: When you save a preset, the current PRESET # will be saved
mini (1-4). When you select it, its settings with it. When you load that preset later, the PRESET # field will be
will be shown on the software interface. updated with that number. If you want to change the preset number
2. PRESET # – Click on this field to select the before uploading it to the MPK mini, simply select a new PRESET #
number that the currently shown preset will before clicking UPLOAD.
use if you upload it to the MPK mini (by
clicking UPLOAD).
3. UPLOAD – Click this button to send the TO COPY A PRESET:
currently shown preset to the MPK mini. 1. Load the preset you want to copy from the MPK mini by clicking
The number of this preset is determined by the GET PRESET button.
the PRESET # field. 2. Set the preset you want to copy it to on the MPK mini by clicking
4. SAVE PRESET – Click this button to save PRESET # field and selecting it.
the currently shown preset to your 3. Click UPLOAD to send the copied preset to the MPK mini.
computer.
5. LOAD PRESET – Click this button to load a
saved preset from your computer. Once it loads, you will see its settings in the software interface.
3
6. EDITING PRESETS
This section outlines the editable items for each preset. Items #7-10 are editable for every pad. Items #11-13 are editable for
every knob.
6. NOTE DISPLAY TYPE – Click this to change how the MIDI Note Numbers are displayed in the editor.
7. NOTE # – Click on this field and drag up or down with the mouse (or use your computer keyboard's or keys) to
change the MIDI Note Number the pad will send.
8. PC # – Click on this field and drag up or down with the mouse (or use your computer keyboard's or keys) to change
the MIDI Program Change number the pad will send.
9. CC # (PAD) – Click on this field and drag up or down with the mouse (or use your computer keyboard's or keys) to
change the MIDI Control Change number the pad will send.
10. PAD BEHAVIOR – Click this button to select whether the MPK mini's pads will function as a "Momentary" or "Toggle"
switch.
11. CC # (KNOB) – Click on this field and drag up or down with the mouse (or use your computer keyboard's or keys)
to change the MIDI Control Change number the knob will send.
12. LOW VALUE – Click on this field and drag up or down with the mouse (or use your computer keyboard's or keys) to
change the lowest possible value the knob will send.
13. HI VALUE – Click on this field and drag up or down with the mouse (or use your computer keyboard's or keys) to
change the highest possible value the knob will send.
14. PAD MIDI CHANNEL – Click this field to select the number of the MIDI channel which the pads will use to transmit MIDI
messages while using this preset.
15. KEY + KNOBS MIDI CHANNEL – Click this field to select the number of the MIDI channel which the keyboard and
knobs will use to transmit MIDI messages while using this preset.
16. TRANSPOSITION – Click on this field and drag up or down with the mouse (or use your computer keyboard's or
keys) to change the transposition of the MPK mini's KEYBOARD. You can transpose it up to 12 semitones in either
direction.
17. OCTAVE – Click this field to select the default octave for the preset.
18. ARP OCTAVE – Click this field to select the number of octaves (0-3) that an arpeggio will span. If this number is larger
than zero, after the first arpeggio in its original octave, subsequent arpeggios will sound in increasingly higher octaves.
After sounding at the highest octave (assigned here), the process will repeat from the original octave.
19. ARP ENABLE – Click this button to enable or disable the Arpeggiator. The button is red when the Arpeggiator is
enabled.
20. ARP MODE – Click this field to select the mode for the Arpeggiator.
• Up – Notes arpeggiate from the lowest note up to the highest note.
• Down – Notes arpeggiate from the highest note down to the lowest note.
• Inclusive – Notes arpeggiate from the lowest to the highest note and back down. Lowest and highest
notes are retriggered when the arpeggio changes direction.
• Exclusive – Notes arpeggiate from the lowest to the highest note and back down. Lowest and highest
notes are not retriggered when the arpeggio changes direction.
• Random – Plays the held notes in random selection.
• Order – Notes will be repeated in the same order in which their keys were pressed.
21. ARP TIME DIVISION – Click this field to select the time division, which determines how often the Arpeggiator will play a
note. The smaller the value, the faster the arpeggio.
22. ARP CLOCK – Click this field to select whether the Arpeggiator will follow the MPK mini's internal clock or an external
clock. (Note: When synced to an external clock, the MPK mini's TAP TEMPO button will be disabled.)
23. ARP LATCH – Click this button to enable or disable latching for the Arpeggiator. When this button is red, latching is
enabled, which means notes will continue to arpeggiate even after the key is no longer being pressed. (Press the ARP
ON / OFF button to stop the arpeggio.) When latching is disabled, notes will only arpeggiate when their keys are held
down.
24. TAP TEMPO TAPS – Click this field to select the minimum number of taps (of the TAP TEMPO button) required to
detect and enter a new tempo for the Arpeggiator.
25. TEMPO – Click on this field and drag up or down with the mouse (or use your computer keyboard's or keys) to
change the current tempo for the Arpeggiator.
4
7. MIDI IMPLEMENTATION CHART
Manufacturer: Akai Professional Model: MPK mini Version: 1.0 Date: 2010.08.26
Transmit/Export Recognize/Import Remarks
1. Basic Information
MIDI channels 1-16 1-16
Note numbers 0-127 0-127
Program change 0-127 0-127
Bank Select response? (Yes/No)
No No
If yes, list banks utilized in remarks column
Modes supported: Mode 1: Omni-On, Poly (Yes/No)
Mode 2: Omni-On, Mono (Yes/No)
Mode 3: Omni-Off, Poly (Yes/No) No No
Mode 4: Omni-Off, Mono (Yes/No)
Multi Mode (Yes/No)
Note-On Velocity (Yes/No) Yes No
Note-Off Velocity (Yes/No) No No
Channel Aftertouch (Yes/No) No No
Poly (Key) Aftertouch (Yes/No) No No
Pitch Bend (Yes/No) No No
Active Sensing (Yes/No) No No
System Reset (Yes/No) No No
Tune Request (Yes/No) No No
Universal System Exclusive:
Sample Dump Standard (Yes/No)
Device Inquiry (Yes/No)
File Dump (Yes/No)
MIDI Tuning (Yes/No)
Master Volume (Yes/No)
Master Balance (Yes/No)
Notation Information (Yes/No)
Turn GM1 System On (Yes/No) No No
Turn GM2 System On (Yes/No)
Turn GM System Off (Yes/No)
DLS-1 (Yes/No)
File Reference (Yes/No)
Controller Destination (Yes/No)
Key-based Instrument Ctrl (Yes/No)
Master Fine/Coarse Tune (Yes/No)
Other Universal System Exclusive
Manufacturer or Non-Commercial System Exclusive Yes Yes
NRPNs (Yes/No) No No
RPN 00 (Pitch Bend Sensitivity) (Yes/No)
RPN 01 (Channel Fine Tune) (Yes/No)
RPN 02 (Channel Coarse Tune) (Yes/No)
No No
RPN 03 (Tuning Program Select) (Yes/No)
RPN 04 (Tuning Bank Select) (Yes/No)
RPN 05 (Modulation Depth Range) (Yes/No)
2. MIDI Timing and Synchronization
MIDI Clock (Yes/No) No Yes
Song Position Pointer (Yes/No) No Yes
Song Select (Yes/No) No No
Start (Yes/No)
Continue (Yes/No) No Yes
Stop (Yes/No)
MIDI Time Code (Yes/No) No No
MIDI Machine Control (Yes/No) No No
MIDI Show Control (Yes/No)
No No
If yes, MSC Level supported
3. Extensions Compatibility
General MIDI compatible? (Level(s)/No)
No No
Is GM default power-up mode? (Level/No)
DLS compatible? (Levels(s)/No)
No No
(DLS File Type(s)/No)
Standard MIDI Files (Type(s)/No) No No
XMF Files (Type(s)/No) No No
SP-MIDI compatible? (Yes/No) No No
5
8. SPECIFICATIONS
Number of presets: 4
MIDI output channels over USB: 16
Note keys: 25 (velocity-sensitive)
Drum pads: 8 (velocity-sensitive)
Knobs: 8
Inputs/outputs: 1 mini-USB port
Power: < 100 mA, 5V DC via USB
Dimensions (W x D x H): 12" x 7" x 1.7" (306 mm x 180 mm x 43 mm)
Weight: 1.55 lbs. (0.7 kg)
6