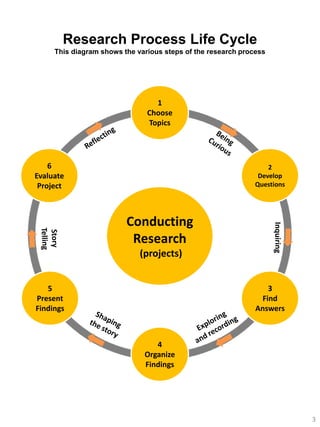
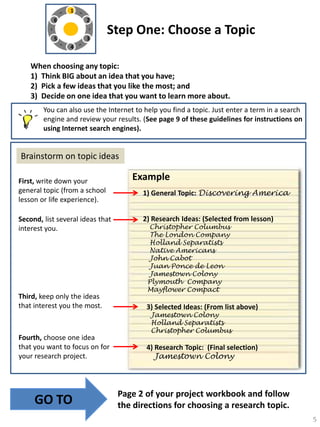
Kids’ Research Partners

Student
Research
Project Guidelines
To do research is to inquire or question something and learn
more about it. A research project is a plan to do research and
get results. A researcher is a person who conducts research
and tells their story about it.
These guidelines will help you learn about the various parts
of the research process. They will also lead you along the
path and completion of your research project.

Copyright © 2013 by Kids’Research Partners (KRP)
Why do people conduct research?

For hundreds of years, people have been
doing research to learn something new and
expand their view of the world.

Some people do research because
they like to focus on their interests.

Other people want to hone their problemsolving and communication skills.

And still other people want to gain experience
that will benefit them in school and in their
careers.

Why do you think you’d like to conduct your own research?
Whether it’s for one of these reasons, all of them, or for some other
reason altogether, people who conduct research are always learning and
growing, and that can make them happy and feel satisfied inside.
2
Research Process Life Cycle
This diagram shows the various steps of the research process

1
Choose
Topics

6
Evaluate
Project

2
Develop
Questions

(projects)
5
Present
Findings

Inquiring

Conducting
Research

3
Find
Answers

4
Organize
Findings

3
Your Research Project

To complete your research project, you will:
Step 1: Choose a research topic.
Step 2: Develop guiding questions about your topic.
Step 3: Find answers to your questions.
Step 4: Organize your findings.
Step 5: Create your presentation and communicate your findings.

Step 6: Your audience will evaluate your presentation.
Step 7: Reflect on what you learned and what your audience thought of
your research project and presentation.

While you are working on your
project, you will be the researcher.

4
1
6

2

5

3

Step One: Choose a Topic

4

When choosing any topic:
1) Think BIG about an idea that you have;
2) Pick a few ideas that you like the most; and
3) Decide on one idea that you want to learn more about.
You can also use the Internet to help you find a topic. Just enter a term in a search
engine and review your results. (See page 9 of these guidelines for instructions on
using Internet search engines).

Brainstorm on topic ideas
First, write down your
general topic (from a school
lesson or life experience).
Second, list several ideas that
interest you.

Third, keep only the ideas
that interest you the most.

Fourth, choose one idea
that you want to focus on for
your research project.

GO TO

Example
1) General Topic: Discovering America

2) Research Ideas: (Selected from lesson)
Christopher Columbus
The London Company
Holland Separatists
Native Americans
John Cabot
Juan Ponce de Leon
Jamestown Colony
Plymouth Company
Mayflower Compact

3) Selected Ideas: (From list above)
Jamestown Colony
Holland Separatists
Christopher Columbus

4) Research Topic: (Final selection)
Jamestown Colony

Page 2 of your project workbook and follow
the directions for choosing a research topic.
5
1

6

2

5

3

Step Two: Develop Guiding Questions

4

Research is based on inquiry and discovery. Researchers ask
questions that help them discover how their world works.
There are three main types of questions:
Factual (literal) questions are those that require the researcher to retrieve facts about
a given topic. These types of questions usually start with who, what, when, where,
why and how. They usually have just one correct answer. Although, the answer is not
always simple, factual questions usually make the best for inquiry-based projects, as
long as they are answerable and lead to exploring the topic further.
Example: Where was the first British settlement in North America located?
The answers to factual questions form the foundation for higher-level (interpretive
and evaluative) questions. If we don't know the "facts" about something, our
interpretation of and evaluation of something will probably be flawed.
Interpretive questions are those that ask for answers based on what people think
about evidence that they find while answering factual questions or reading assigned
texts. Interpretive questions ask for a researcher’s interpretation of facts that they
have learned about a topic. These questions ask what can be inferred by the facts (see
page 16 to learn about inferences).
Example: Why did the British settlers decide to build the Jamestown Colony at the end
of a peninsula surrounded by the James River, York River, and Chesapeake Bay?
Evaluative questions ask for some kind of opinion, belief, or point of view. Answers to
this type of question depend on a person’s knowledge and experience.
Example: Where is the best Chinese food found?
Evaluative questions rarely make good questions for inquiry-based projects, because
they are focused on the researcher’s opinion.

6
Questions help direct research
To help you develop questions, you might ask yourself:
 What do I know about my topic already?
 What do I not know yet?
 What do I want to know?
Start by asking some who, what, when, where, why, and how questions.
Your first question should help clarify what your topic is. Simply asking for the
definition of the topic is enough to get the ideas rolling and deeper questions will
come.
Then you can ask deeper questions.

Example
Topic: Jamestown Colony

General, defining question: What was the Jamestown Colony?
Deeper questions: Who started it
Where was it?
Why did they settle there?
Why did they start it
What did they do there?
Why was it important to American History?

GO TO

Page 3 of your project workbook and follow the
directions for developing guiding questions.
7
1
6

2

5

Step Three: Do Your Research

3

Learning about information sources and searching methods

4

What is information?
Information is a set of facts or ideas that are given by one person or thing and
meant to be received and understood by another person or thing.

Information…
•

Consider these •
facts while
doing
your research. •

is not always complete. It may be only one part of the whole view of
a subject.
is influenced by a giver’s point of view. Information providers help
form the receiver’s understanding of an idea. Information givers are
telling their version of a story.

differs in value and uniqueness. Some information is a duplicate of
other information, so it doesn’t add new ideas on a topic.

Sources of Information
Where can you go to answer the questions that you have about a subject?
 Internet websites
 Public libraries
 Experts
To be sure that you have the whole picture, you should look all the sources of information
(resources) that are available to you before you select the information that answers your
questions.
The following pages will help you learn more about these sources of information.
8
Internet (World Wide Web)
The Internet is like a big library that
computers (and other devices) can access
from anywhere in the world. Just as anyone
can access information sources such as
books, magazines, newspapers and videos in
a library, they can also access these sources in
an electronic form on the Internet.

Documents
From
Libraries

Images

Company Sites
Commerce Sites
(Amazon, etc.)

Internet
(World Wide Web)

Videos

Government
information

Other Stuff
Social media
Personal opinions
Blogs

Looking for answers on the Internet
To find information on the Internet:
1st Use a search engine such as Google (www.google.com) or Bing
(www.bing.com).

2nd Enter (type in) your search term (words that describe questions about your
topic).
3rd Scroll down or use the direction keys on your keyboard to review the results
of your search.
4th Click on the highlighted links on the page to review each site and look for
information that you can use for your research.
5th Repeat your search. If you are not satisfied with your original search results,
then you can try new words or combinations of words and search again. You can
do this again and again until you think you’ve got the complete answer to your
questions.
9
Steps to Searching the Internet

1

Go to a
search
engine

2

3

Enter
your search
term here

Scroll down
results page
using the
direction keys
on your keyboard

4

Click
on the
highlighted
text to review
the web page
10
Libraries
The library is a great place to find sources of information that you can use to answer your
guiding questions. The library holds both print and electronic information, videos, and
music. The library catalog helps you locate sources of information that are found in the
library.

Using the library catalog
1) Find the library catalog.
Libraries have catalog terminals
throughout the building. Electronic
catalogs are also available on library
websites.
2) Enter your search term.
These are the same terms that
you used to search the Internet.
Library systems also allow you
to search by subject, source
title, author, or key word.
3) Review your search results.
Scroll down the results page or
use the direction keys on your
keyboard to review your library
source results.
4) Select your resources.
Click on the links and find
the source location (library
locator/call number).

Having trouble using the catalog or finding
a location? Librarians love to help their
customers. Please ask the librarian for help if
you need it!
11
Experts

Examples

An expert is a person that knows a lot about a topic. They
might work in an area that involves your topic, or maybe
they are in school and researched your topic too.

•

Experts may live close to you or across the world.

•

They may be able to answer your questions. If they
cannot, maybe they will know where to go to answer
them.

The Internet is a great source of locating experts. They
can be found on:

•
•
•
•
•

Authors

University professor
and researcher

Personal or company websites
Social media sites (such as Linked-in and Facebook)
Schools (educational institutions)
News articles
Conference agendas
News reporters

Local experts
If you look around your community, you
might find people that can help answer your
questions.

Museums staff

Local officials

GO TO

Page 4 of your project workbook and follow the
directions there to search for information.
12
Writing a Bibliography
Good research requires a record of the information that was used
to explore the topic. That record is called a bibliography.
• A bibliography lists all of the sources that are used to conduct research such as books,
movies, websites, interviews, or magazine articles.

Information for bibliographies can be found directly at the source!
Example: Bibliographic entry for a book
The title page will provide the name of the author, the publisher, and where the
book was published.

Bibliography

Owl, Grey, Tales Of An Empty Cabin,
Dodd, Mead & Company,
New York, 1936

INSIDE: Title, Author,
City of publication,
Publisher’s name &
Year of publication
QuickTime™ and a
TIFF (Uncompressed) decompressor
are needed to see this picture.

GO TO

Page 5 of your project workbook and follow the
directions for creating a bibliography.
13
Bibliography Style Sheet
Using the following examples while you create your bibliography

Article in a newspaper (on the Internet)
Stolberg, Sheryl, “Centrists Pose Challenges,” New York Times, February 27, 2010, Accessed February 28, 2010,
www.nytimes.com/2010/02/28/us/28health.html.
Last name, First name, Article title, title of publication (news service), Article date, Article access date, Internet address.

Book (one author)
Goldman, Daniel. The Life of Michael Jordan. New York: Bantam, 1996.
Last name, First name. Name of book. City of publication: Publisher’s Name, Year Published.

Expert Interview/correspondence
Goodman, Mary, Personal interview, September 3, 2012.
Last name, First name, Personal interview/correspondence, Date.

Internet fact sheet/website (articles, reports, and facts on topics).
* If an author is indicated, then add it in the front of the entry*
*Smith, Paul,* “Platypus,” Animal Facts Guide, September 7, 2013, www.animalfactguide.com/animal-facts/platypus

Last name, First name, Title of factsheet/article/blog/Title of Internet website, Access date, Internet address.

Internet site
“Google Privacy Policy,” Accessed March 11, 2009, www.google.com/intl/en/privacypolicy.html.
Title of Internet website, Access date, Internet address.

Magazine article (Found on the Internet. If not from the Internet, list the same, but without the address)
“Price, Sean, “Hunting Spiders,” Kids Discover Spider, February 2003: 13, 8-9, www.kidspider.comkspidersFeb03.html.
Last Name, First name, “Title of article,” Name of magazine, Date, Volume, Pages, Internet address.

14
1
6

2

5

3

Step Four: Organize Your Findings

4

Organizing your findings (answers to questions, interesting facts, and any conclusions) is
the first step to presenting your research to others. Remember that presentations are
stories about your research. You will introduce your topic to your audience, tell them
what you did, and tell them what you found out. Organize your findings in the same way.

When organizing your findings:

Example

First, write the title of your research topic.

Jamestown Colony
Its importance to American History

Second create headlines and bullet points. Use key words from your guiding questions.
Below the headlines add bullet points with facts next to them. Facts do not have to be
complete sentences, but they need to be complete thoughts.

Example
Question: What did the settlers do at Jamestown?
Headline:

Jamestown Work and Life
• Settlers grew tobacco crops
• The first slaves in America were traded in Jamestown

Third, add in any new and interesting facts that you found while doing your research.
Example
• 1614 - John Rolfe married Pocahontas
• Their marriage brought peace between the settlers and indigenous
people
• 1619 – The first African slaves were brought to America through Jamestown

Fourth, add concluding thoughts or impressions that you have about the topic after
doing your research. Consider your observations and the facts that you found, then make
inferences about your topic.

Example
• Settlers came to America to grow crops and make money
• Discovering America was not easy
• Settlers helped to form the United States
15
Observations and Inferences
The main reason for doing research is to learn about a topic and come up with conclusions
about what is learned.
Observations are anything that can be detected directly with the use of people’s five
senses: sight, hearing, touch, taste, smell.
Observations can be clues—things that a researcher sees—either literally (looking at
something) or figuratively (reading about it). From these observations, researchers make
inferences.
Inferences are personal and contain opinion. They are based on personal observations or
on the observations of other people. An inference is the interpretation of facts. Inferences
express probability, not certainty.
By observing your topic, asking questions about it, and finding answers to your questions
you learn new facts about it. In research you make observations then infer (make
conclusions about the facts that you observed).
Remember that the same observations can lead to different conclusions, depending on the
researchers’ perspectives. This should be considered when coming up with your own
conclusions.

Example
Observations
- There are lots of birds near the surface of the bay
- Many fishing boats are out and they are using their trolling nets
Inferences/Conclusions
- There must be a lot of fish in the bay
- There might be sharks or other predators close by too

16
GO TO

Page 7 of your project workbook and follow the
directions for organizing your findings.

17
1
6

2

5

3

Step Five: Present Your Research

4

When creating a presentation:
1) Design your story
2) Decide on your presentation Type/Format and create your
presentation
3) Practice your presentation skills

Design your story
Like a good story, every presentation has a beginning, middle, and end.

Beginning

Middle

End

Introduction

Main body

Conclusion

You’ve already organized your information (Step 4). Now it’s just a matter of designing
it. Your presentation will include an:
Introduction
• A title/headline introducing your research (your research topic)
• Introduction or description of your topic (define what your topic is)
• Details about your project (definition of your topic; steps that you took to find the
answers to your guiding questions; sources of information that you used to answer
your questions).
Main body (Details about what you learned about your topic)
• Headlines – formed using key words from your guiding questions
• Bullets under your headlines from your answers
• Interesting facts as bullet points
Conclusions (Lasting thoughts about your topic)
• Inferences that you make about what you observed during your research

18
Decide on Your Presentation Type/Format
Create Your Presentation

An important part of doing your research is presenting your results to your friends,
families, and classmates.
There are a number of formats that you can use to share your findings with others. Factors
that help a researcher decide on the format that they will use include:
•
•
•

The purpose of the report (Examples: to share an accomplishment or to motivate
others to do something)
The ideas that are to be shared
The time and place that a researcher is using to report their findings

Presentation Types/Formats
The three main formats are written papers, oral presentations (PowerPoint or Prezi), or a
combined approach – display board with an oral presentation.

Written Paper
A research paper is a written explanation of the research done and the method that was
used to do it. Papers are usually written using an expository style, a type of writing that is
designed to convey information or explain ideas. In this type of writing, the author begins
with a topic sentence or paragraph, adds details, and ends with a concluding section. A
research paper should include a bibliography.

• This guidebook will NOT detail research paper writing.
Other guides do that well. You may want to go onto the
Internet to find more information on writing a research
paper.

Wait

• For your research you will focus on oral presentations.

19
PowerPoint Presentations
PowerPoint presentations include pictures, and
clip art (animations), designs, tables, and simple
texts. Presentations may include video and
sound too.

Each presentation will have:
•
•
•

1 title slide; then
6-8 main body slides; and
1 conclusion (or Summary) slide.

Some important steps to follow when
designing your presentation:
•
•
•
•

Less is more. Use simple designs.
Standardize heading positions, colors and
styles throughout the presentation.
Colors should contrast the background.
Follow the same format with effects,
transitions and animation.

Text guidelines
•

Use bullet points (phrases not complete
sentences).

•
•
•
•
•
•
•
•

No more than 6 words a line.
No more than 6 lines to a slide.
Font size between 18 to 36 point.
Try to use bold font for most text on a slide.
Text should contrast with background.
Information should be simple and clear to
understand (just what’s needed).
Avoid abbreviations and acronyms.
Limit punctuation marks.

Clip art and graphics
•
•

Graphics should help the audience
understand the text, not overwhelm it.
No more than two graphics per slide.

20
Prezi
With Prezi zooming presentation
software, you create an engaging
experience that leads your audience
down a path of discovery.

21
Display Board
Single and Tri-Fold
Display boards are simple, artistic and mobile
ways to help tell the story of your research.
A display board is used at a competition, a
showroom, in a classroom, at a conference,
or in any situation where the researcher
wants to have a self explanatory display and
provide details through an oral presentation.

When using a display board, think
about the following:
Organization your presentation
Ensure that your presentation goes from…
• Top to bottom
• Left to right
…so your audience can quickly and easily
follow it.
Font size
Adjust your text fonts…
• Headlines – 24 to 36 points
• Text 18 - 20 points
…to make the presentation easy to read from
a few feet away.
Visual aids
Add visual aids such as…
• Photos, drawings, diagrams
• Models
• Tables (for numbers)
• Experiment results
…to make the presentation interesting
and easy to understand.
22
Tell Your story: Practice your presentation skills
Once you have completed your research and created a presentation, it is time
to share it with your audience. A presentation should be no more than 10
minutes long (if you are doing a Power Point presentation there will be about
10-12 slides). While preparing for your presentation make sure that you:
•

Know your audience. Consider what your audience may already know about
your topic. It will help you connect with them better.

•

Plan carefully. Review your presentation to make sure that you aren’t missing
anything. Your audience should not wonder what your presentation was about
when you have completed it.

•

Time your presentation. Plan to speak about one minute for each section.
Practice your presentation and time it to make sure that you do not go over or
under your allotted time.

•

Speak slowly and clearly. Speak clearly, not too fast, naturally, and loud enough
that everyone can hear what you are saying.

•

Follow the text and pictures on your presentation. You want your audience to
follow you as you tell your story. If you follow what’s on your presentation, the
audience will be able to follow you.

•

Speak about, but DO NOT READ the information on your presentation. The
presentation helps you know what to say and it helps the audience follow your
story. But don’t read from the presentation, because it will get boring to the
audience. Instead, while speaking, add more details and provide more
examples.

•

Good presentations take practice. Practicing will help you feel more
comfortable and natural when you get up in front of people and share your
work. Practice will help your body and your mind naturally remember the pace
and rhythm of your presentation. If you have problems remembering
something, don’t worry. It happens to everyone! The presentation will be your
cheat sheet and help you remember what you are talking about.

•

Have fun with your presentation. While you are up there, you are the expert.
Just enjoy your experience of presenting and be OK with it. It only lasts for a
short time and then you will feel that sense of “WEW, I did it!”
23
GO TO

Page 9 of your project workbook and follow the
directions for presenting your research.

24
1
6

2

5

3

Step Six: Evaluate the Project

4

Your audience and will evaluate your and your presentation.
Evaluations help researchers develop their research skills. They are
food for thought and help a researcher see where they can expand or change
their research and presentation. Try to find gratitude for the evaluator’s marks
and comments that they give. Their evaluations will help you grow as a researcher
and person.

Your audience will be asked to measure various factors about
your presentation and research. Some factors that your audience
will consider include:
•

Project completeness
•
•

•

Questions asked and answered
•

•

Are there any questions missing that could have helped the research?

Grammar and spelling errors
•
•

•

Did the researcher follow and complete each step of the research
process?
Do they have a complete bibliography?

Did the researcher check their work?
Did they revise and check for grammar and spelling errors?

Amount of thought put into project and presentation
•
•
•

Did the researcher describe the topic well?
Did they add details to help the audience understand how the topic
relates to its environment?
Did the researcher find new facts, and come up with new conclusions
about the topic?

25
GO TO

Page 11 of your project workbook and follow
the directions for reflecting on your completed
research project.

26
Congratulations!
You did it!
You completed your
research, created your
presentation, and
presented it to your
audience.

NOW
Remember
This is a part of your
growing and learning
You should take every opportunity to wonder about
ideas that pop into your mind. Question your ideas, go
find answers, then tell someone what you’ve learned. The
process of inquiring, learning, and sharing is life long.

ENJOY!
27

Krp research guidelines october 7, 2013

  • 1.
    Kids’ Research Partners Student Research ProjectGuidelines To do research is to inquire or question something and learn more about it. A research project is a plan to do research and get results. A researcher is a person who conducts research and tells their story about it. These guidelines will help you learn about the various parts of the research process. They will also lead you along the path and completion of your research project. Copyright © 2013 by Kids’Research Partners (KRP)
  • 2.
    Why do peopleconduct research? For hundreds of years, people have been doing research to learn something new and expand their view of the world. Some people do research because they like to focus on their interests. Other people want to hone their problemsolving and communication skills. And still other people want to gain experience that will benefit them in school and in their careers. Why do you think you’d like to conduct your own research? Whether it’s for one of these reasons, all of them, or for some other reason altogether, people who conduct research are always learning and growing, and that can make them happy and feel satisfied inside. 2
  • 3.
    Research Process LifeCycle This diagram shows the various steps of the research process 1 Choose Topics 6 Evaluate Project 2 Develop Questions (projects) 5 Present Findings Inquiring Conducting Research 3 Find Answers 4 Organize Findings 3
  • 4.
    Your Research Project Tocomplete your research project, you will: Step 1: Choose a research topic. Step 2: Develop guiding questions about your topic. Step 3: Find answers to your questions. Step 4: Organize your findings. Step 5: Create your presentation and communicate your findings. Step 6: Your audience will evaluate your presentation. Step 7: Reflect on what you learned and what your audience thought of your research project and presentation. While you are working on your project, you will be the researcher. 4
  • 5.
    1 6 2 5 3 Step One: Choosea Topic 4 When choosing any topic: 1) Think BIG about an idea that you have; 2) Pick a few ideas that you like the most; and 3) Decide on one idea that you want to learn more about. You can also use the Internet to help you find a topic. Just enter a term in a search engine and review your results. (See page 9 of these guidelines for instructions on using Internet search engines). Brainstorm on topic ideas First, write down your general topic (from a school lesson or life experience). Second, list several ideas that interest you. Third, keep only the ideas that interest you the most. Fourth, choose one idea that you want to focus on for your research project. GO TO Example 1) General Topic: Discovering America 2) Research Ideas: (Selected from lesson) Christopher Columbus The London Company Holland Separatists Native Americans John Cabot Juan Ponce de Leon Jamestown Colony Plymouth Company Mayflower Compact 3) Selected Ideas: (From list above) Jamestown Colony Holland Separatists Christopher Columbus 4) Research Topic: (Final selection) Jamestown Colony Page 2 of your project workbook and follow the directions for choosing a research topic. 5
  • 6.
    1 6 2 5 3 Step Two: DevelopGuiding Questions 4 Research is based on inquiry and discovery. Researchers ask questions that help them discover how their world works. There are three main types of questions: Factual (literal) questions are those that require the researcher to retrieve facts about a given topic. These types of questions usually start with who, what, when, where, why and how. They usually have just one correct answer. Although, the answer is not always simple, factual questions usually make the best for inquiry-based projects, as long as they are answerable and lead to exploring the topic further. Example: Where was the first British settlement in North America located? The answers to factual questions form the foundation for higher-level (interpretive and evaluative) questions. If we don't know the "facts" about something, our interpretation of and evaluation of something will probably be flawed. Interpretive questions are those that ask for answers based on what people think about evidence that they find while answering factual questions or reading assigned texts. Interpretive questions ask for a researcher’s interpretation of facts that they have learned about a topic. These questions ask what can be inferred by the facts (see page 16 to learn about inferences). Example: Why did the British settlers decide to build the Jamestown Colony at the end of a peninsula surrounded by the James River, York River, and Chesapeake Bay? Evaluative questions ask for some kind of opinion, belief, or point of view. Answers to this type of question depend on a person’s knowledge and experience. Example: Where is the best Chinese food found? Evaluative questions rarely make good questions for inquiry-based projects, because they are focused on the researcher’s opinion. 6
  • 7.
    Questions help directresearch To help you develop questions, you might ask yourself:  What do I know about my topic already?  What do I not know yet?  What do I want to know? Start by asking some who, what, when, where, why, and how questions. Your first question should help clarify what your topic is. Simply asking for the definition of the topic is enough to get the ideas rolling and deeper questions will come. Then you can ask deeper questions. Example Topic: Jamestown Colony General, defining question: What was the Jamestown Colony? Deeper questions: Who started it Where was it? Why did they settle there? Why did they start it What did they do there? Why was it important to American History? GO TO Page 3 of your project workbook and follow the directions for developing guiding questions. 7
  • 8.
    1 6 2 5 Step Three: DoYour Research 3 Learning about information sources and searching methods 4 What is information? Information is a set of facts or ideas that are given by one person or thing and meant to be received and understood by another person or thing. Information… • Consider these • facts while doing your research. • is not always complete. It may be only one part of the whole view of a subject. is influenced by a giver’s point of view. Information providers help form the receiver’s understanding of an idea. Information givers are telling their version of a story. differs in value and uniqueness. Some information is a duplicate of other information, so it doesn’t add new ideas on a topic. Sources of Information Where can you go to answer the questions that you have about a subject?  Internet websites  Public libraries  Experts To be sure that you have the whole picture, you should look all the sources of information (resources) that are available to you before you select the information that answers your questions. The following pages will help you learn more about these sources of information. 8
  • 9.
    Internet (World WideWeb) The Internet is like a big library that computers (and other devices) can access from anywhere in the world. Just as anyone can access information sources such as books, magazines, newspapers and videos in a library, they can also access these sources in an electronic form on the Internet. Documents From Libraries Images Company Sites Commerce Sites (Amazon, etc.) Internet (World Wide Web) Videos Government information Other Stuff Social media Personal opinions Blogs Looking for answers on the Internet To find information on the Internet: 1st Use a search engine such as Google (www.google.com) or Bing (www.bing.com). 2nd Enter (type in) your search term (words that describe questions about your topic). 3rd Scroll down or use the direction keys on your keyboard to review the results of your search. 4th Click on the highlighted links on the page to review each site and look for information that you can use for your research. 5th Repeat your search. If you are not satisfied with your original search results, then you can try new words or combinations of words and search again. You can do this again and again until you think you’ve got the complete answer to your questions. 9
  • 10.
    Steps to Searchingthe Internet 1 Go to a search engine 2 3 Enter your search term here Scroll down results page using the direction keys on your keyboard 4 Click on the highlighted text to review the web page 10
  • 11.
    Libraries The library isa great place to find sources of information that you can use to answer your guiding questions. The library holds both print and electronic information, videos, and music. The library catalog helps you locate sources of information that are found in the library. Using the library catalog 1) Find the library catalog. Libraries have catalog terminals throughout the building. Electronic catalogs are also available on library websites. 2) Enter your search term. These are the same terms that you used to search the Internet. Library systems also allow you to search by subject, source title, author, or key word. 3) Review your search results. Scroll down the results page or use the direction keys on your keyboard to review your library source results. 4) Select your resources. Click on the links and find the source location (library locator/call number). Having trouble using the catalog or finding a location? Librarians love to help their customers. Please ask the librarian for help if you need it! 11
  • 12.
    Experts Examples An expert isa person that knows a lot about a topic. They might work in an area that involves your topic, or maybe they are in school and researched your topic too. • Experts may live close to you or across the world. • They may be able to answer your questions. If they cannot, maybe they will know where to go to answer them. The Internet is a great source of locating experts. They can be found on: • • • • • Authors University professor and researcher Personal or company websites Social media sites (such as Linked-in and Facebook) Schools (educational institutions) News articles Conference agendas News reporters Local experts If you look around your community, you might find people that can help answer your questions. Museums staff Local officials GO TO Page 4 of your project workbook and follow the directions there to search for information. 12
  • 13.
    Writing a Bibliography Goodresearch requires a record of the information that was used to explore the topic. That record is called a bibliography. • A bibliography lists all of the sources that are used to conduct research such as books, movies, websites, interviews, or magazine articles. Information for bibliographies can be found directly at the source! Example: Bibliographic entry for a book The title page will provide the name of the author, the publisher, and where the book was published. Bibliography Owl, Grey, Tales Of An Empty Cabin, Dodd, Mead & Company, New York, 1936 INSIDE: Title, Author, City of publication, Publisher’s name & Year of publication QuickTime™ and a TIFF (Uncompressed) decompressor are needed to see this picture. GO TO Page 5 of your project workbook and follow the directions for creating a bibliography. 13
  • 14.
    Bibliography Style Sheet Usingthe following examples while you create your bibliography Article in a newspaper (on the Internet) Stolberg, Sheryl, “Centrists Pose Challenges,” New York Times, February 27, 2010, Accessed February 28, 2010, www.nytimes.com/2010/02/28/us/28health.html. Last name, First name, Article title, title of publication (news service), Article date, Article access date, Internet address. Book (one author) Goldman, Daniel. The Life of Michael Jordan. New York: Bantam, 1996. Last name, First name. Name of book. City of publication: Publisher’s Name, Year Published. Expert Interview/correspondence Goodman, Mary, Personal interview, September 3, 2012. Last name, First name, Personal interview/correspondence, Date. Internet fact sheet/website (articles, reports, and facts on topics). * If an author is indicated, then add it in the front of the entry* *Smith, Paul,* “Platypus,” Animal Facts Guide, September 7, 2013, www.animalfactguide.com/animal-facts/platypus Last name, First name, Title of factsheet/article/blog/Title of Internet website, Access date, Internet address. Internet site “Google Privacy Policy,” Accessed March 11, 2009, www.google.com/intl/en/privacypolicy.html. Title of Internet website, Access date, Internet address. Magazine article (Found on the Internet. If not from the Internet, list the same, but without the address) “Price, Sean, “Hunting Spiders,” Kids Discover Spider, February 2003: 13, 8-9, www.kidspider.comkspidersFeb03.html. Last Name, First name, “Title of article,” Name of magazine, Date, Volume, Pages, Internet address. 14
  • 15.
    1 6 2 5 3 Step Four: OrganizeYour Findings 4 Organizing your findings (answers to questions, interesting facts, and any conclusions) is the first step to presenting your research to others. Remember that presentations are stories about your research. You will introduce your topic to your audience, tell them what you did, and tell them what you found out. Organize your findings in the same way. When organizing your findings: Example First, write the title of your research topic. Jamestown Colony Its importance to American History Second create headlines and bullet points. Use key words from your guiding questions. Below the headlines add bullet points with facts next to them. Facts do not have to be complete sentences, but they need to be complete thoughts. Example Question: What did the settlers do at Jamestown? Headline: Jamestown Work and Life • Settlers grew tobacco crops • The first slaves in America were traded in Jamestown Third, add in any new and interesting facts that you found while doing your research. Example • 1614 - John Rolfe married Pocahontas • Their marriage brought peace between the settlers and indigenous people • 1619 – The first African slaves were brought to America through Jamestown Fourth, add concluding thoughts or impressions that you have about the topic after doing your research. Consider your observations and the facts that you found, then make inferences about your topic. Example • Settlers came to America to grow crops and make money • Discovering America was not easy • Settlers helped to form the United States 15
  • 16.
    Observations and Inferences Themain reason for doing research is to learn about a topic and come up with conclusions about what is learned. Observations are anything that can be detected directly with the use of people’s five senses: sight, hearing, touch, taste, smell. Observations can be clues—things that a researcher sees—either literally (looking at something) or figuratively (reading about it). From these observations, researchers make inferences. Inferences are personal and contain opinion. They are based on personal observations or on the observations of other people. An inference is the interpretation of facts. Inferences express probability, not certainty. By observing your topic, asking questions about it, and finding answers to your questions you learn new facts about it. In research you make observations then infer (make conclusions about the facts that you observed). Remember that the same observations can lead to different conclusions, depending on the researchers’ perspectives. This should be considered when coming up with your own conclusions. Example Observations - There are lots of birds near the surface of the bay - Many fishing boats are out and they are using their trolling nets Inferences/Conclusions - There must be a lot of fish in the bay - There might be sharks or other predators close by too 16
  • 17.
    GO TO Page 7of your project workbook and follow the directions for organizing your findings. 17
  • 18.
    1 6 2 5 3 Step Five: PresentYour Research 4 When creating a presentation: 1) Design your story 2) Decide on your presentation Type/Format and create your presentation 3) Practice your presentation skills Design your story Like a good story, every presentation has a beginning, middle, and end. Beginning Middle End Introduction Main body Conclusion You’ve already organized your information (Step 4). Now it’s just a matter of designing it. Your presentation will include an: Introduction • A title/headline introducing your research (your research topic) • Introduction or description of your topic (define what your topic is) • Details about your project (definition of your topic; steps that you took to find the answers to your guiding questions; sources of information that you used to answer your questions). Main body (Details about what you learned about your topic) • Headlines – formed using key words from your guiding questions • Bullets under your headlines from your answers • Interesting facts as bullet points Conclusions (Lasting thoughts about your topic) • Inferences that you make about what you observed during your research 18
  • 19.
    Decide on YourPresentation Type/Format Create Your Presentation An important part of doing your research is presenting your results to your friends, families, and classmates. There are a number of formats that you can use to share your findings with others. Factors that help a researcher decide on the format that they will use include: • • • The purpose of the report (Examples: to share an accomplishment or to motivate others to do something) The ideas that are to be shared The time and place that a researcher is using to report their findings Presentation Types/Formats The three main formats are written papers, oral presentations (PowerPoint or Prezi), or a combined approach – display board with an oral presentation. Written Paper A research paper is a written explanation of the research done and the method that was used to do it. Papers are usually written using an expository style, a type of writing that is designed to convey information or explain ideas. In this type of writing, the author begins with a topic sentence or paragraph, adds details, and ends with a concluding section. A research paper should include a bibliography. • This guidebook will NOT detail research paper writing. Other guides do that well. You may want to go onto the Internet to find more information on writing a research paper. Wait • For your research you will focus on oral presentations. 19
  • 20.
    PowerPoint Presentations PowerPoint presentationsinclude pictures, and clip art (animations), designs, tables, and simple texts. Presentations may include video and sound too. Each presentation will have: • • • 1 title slide; then 6-8 main body slides; and 1 conclusion (or Summary) slide. Some important steps to follow when designing your presentation: • • • • Less is more. Use simple designs. Standardize heading positions, colors and styles throughout the presentation. Colors should contrast the background. Follow the same format with effects, transitions and animation. Text guidelines • Use bullet points (phrases not complete sentences). • • • • • • • • No more than 6 words a line. No more than 6 lines to a slide. Font size between 18 to 36 point. Try to use bold font for most text on a slide. Text should contrast with background. Information should be simple and clear to understand (just what’s needed). Avoid abbreviations and acronyms. Limit punctuation marks. Clip art and graphics • • Graphics should help the audience understand the text, not overwhelm it. No more than two graphics per slide. 20
  • 21.
    Prezi With Prezi zoomingpresentation software, you create an engaging experience that leads your audience down a path of discovery. 21
  • 22.
    Display Board Single andTri-Fold Display boards are simple, artistic and mobile ways to help tell the story of your research. A display board is used at a competition, a showroom, in a classroom, at a conference, or in any situation where the researcher wants to have a self explanatory display and provide details through an oral presentation. When using a display board, think about the following: Organization your presentation Ensure that your presentation goes from… • Top to bottom • Left to right …so your audience can quickly and easily follow it. Font size Adjust your text fonts… • Headlines – 24 to 36 points • Text 18 - 20 points …to make the presentation easy to read from a few feet away. Visual aids Add visual aids such as… • Photos, drawings, diagrams • Models • Tables (for numbers) • Experiment results …to make the presentation interesting and easy to understand. 22
  • 23.
    Tell Your story:Practice your presentation skills Once you have completed your research and created a presentation, it is time to share it with your audience. A presentation should be no more than 10 minutes long (if you are doing a Power Point presentation there will be about 10-12 slides). While preparing for your presentation make sure that you: • Know your audience. Consider what your audience may already know about your topic. It will help you connect with them better. • Plan carefully. Review your presentation to make sure that you aren’t missing anything. Your audience should not wonder what your presentation was about when you have completed it. • Time your presentation. Plan to speak about one minute for each section. Practice your presentation and time it to make sure that you do not go over or under your allotted time. • Speak slowly and clearly. Speak clearly, not too fast, naturally, and loud enough that everyone can hear what you are saying. • Follow the text and pictures on your presentation. You want your audience to follow you as you tell your story. If you follow what’s on your presentation, the audience will be able to follow you. • Speak about, but DO NOT READ the information on your presentation. The presentation helps you know what to say and it helps the audience follow your story. But don’t read from the presentation, because it will get boring to the audience. Instead, while speaking, add more details and provide more examples. • Good presentations take practice. Practicing will help you feel more comfortable and natural when you get up in front of people and share your work. Practice will help your body and your mind naturally remember the pace and rhythm of your presentation. If you have problems remembering something, don’t worry. It happens to everyone! The presentation will be your cheat sheet and help you remember what you are talking about. • Have fun with your presentation. While you are up there, you are the expert. Just enjoy your experience of presenting and be OK with it. It only lasts for a short time and then you will feel that sense of “WEW, I did it!” 23
  • 24.
    GO TO Page 9of your project workbook and follow the directions for presenting your research. 24
  • 25.
    1 6 2 5 3 Step Six: Evaluatethe Project 4 Your audience and will evaluate your and your presentation. Evaluations help researchers develop their research skills. They are food for thought and help a researcher see where they can expand or change their research and presentation. Try to find gratitude for the evaluator’s marks and comments that they give. Their evaluations will help you grow as a researcher and person. Your audience will be asked to measure various factors about your presentation and research. Some factors that your audience will consider include: • Project completeness • • • Questions asked and answered • • Are there any questions missing that could have helped the research? Grammar and spelling errors • • • Did the researcher follow and complete each step of the research process? Do they have a complete bibliography? Did the researcher check their work? Did they revise and check for grammar and spelling errors? Amount of thought put into project and presentation • • • Did the researcher describe the topic well? Did they add details to help the audience understand how the topic relates to its environment? Did the researcher find new facts, and come up with new conclusions about the topic? 25
  • 26.
    GO TO Page 11of your project workbook and follow the directions for reflecting on your completed research project. 26
  • 27.
    Congratulations! You did it! Youcompleted your research, created your presentation, and presented it to your audience. NOW Remember This is a part of your growing and learning You should take every opportunity to wonder about ideas that pop into your mind. Question your ideas, go find answers, then tell someone what you’ve learned. The process of inquiring, learning, and sharing is life long. ENJOY! 27