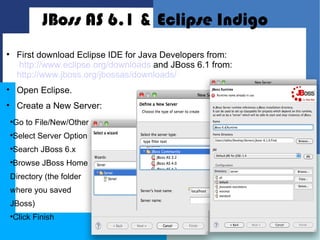
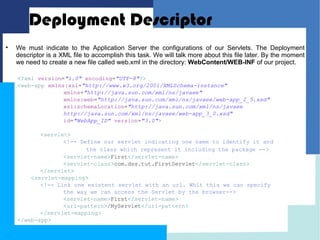
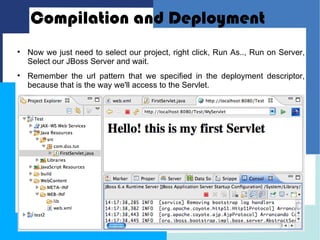
Introduction to
     Java Enterprise
         Edition

    Configuring JBoss within Eclipse
        
            Write your first Servlet

                       Fernando Gil
                   lobho.gil@gmail.com
                       Marzo 2012
Agenda


    How to configure JBoss AS within Eclipse in
    order to start the develop of JavaEE
    applications.

    We'll write our first Servlet class.

    We'll discuss the deployment descriptor.
JBoss AS 6.1 & Eclipse Indigo

        First download Eclipse IDE for Java Developers from:
        http://www.eclipse.org/downloads and JBoss 6.1 from:
        http://www.jboss.org/jbossas/downloads/

        Open Eclipse.

        Create a New Server:
    Go to File/New/Other
    


    Select Server Option
    


    Search JBoss 6.x
    


    Browse JBoss Home
    


    Directory (the folder
    where you saved
    JBoss)
    Click Finish
    
Important

        If you can not find JBoss 6.x in the servers list,
        try to Download additional server adapters:

    
     Sometimes eclipse can
    not find the JBoss
    adapters, in that case
    check this video tutorial
    to solve the problem:
    Eclipse & JBoss AS 6
Dynamic Web
         Project


    Open Eclipse and select File/New/
    Dynamic Web Project

    Set the Project Name and the
    location

    In Target Runtime we must select
    the runtime of JBoss 6.x

    The Dynamic web module version
    will be set automatically

    We can Click Finish
Creating our
          Servlet

    In order to keep the
    example simple, we'll
    create     a    servlet
    selecting
    File/New/Class and set
    the values like in the
    picture:
The Code
package com.dss.tut;

import java.io.*;
import javax.servlet.*;
import javax.servlet.http.*;

public class FirstServlet extends HttpServlet {
      /* The service() method handles requests and creates responses.
       * The servlet container automatically calls this method when
       * it gets any request for this servlet.*/
      public void service(HttpServletRequest req, HttpServletResponse resp)
                   throws IOException, ServletException{
             PrintWriter pw = resp.getWriter();
           pw.println("<html>");
           pw.println(" <head></head>");
           pw.println(" <body>");
           pw.println(" <h1>Hello! this is my first
Servlet</h1>");
           pw.println(" </body>");
           pw.println("</html>");
      }
}
Deployment Descriptor

    We must indicate to the Application Server the configurations of our Servlets. The Deployment
    descriptor is a XML file to accomplish this task. We will talk more about this file later. By the moment
    we need to create a new file called web.xml in the directory: WebContent/WEB-INF of our project.

    <?xml version="1.0" encoding="UTF-8"?>
    <web-app xmlns:xsi="http://www.w3.org/2001/XMLSchema-instance"
                  xmlns="http://java.sun.com/xml/ns/javaee"
                  xmlns:web="http://java.sun.com/xml/ns/javaee/web-app_2_5.xsd"
                  xsi:schemaLocation="http://java.sun.com/xml/ns/javaee
                  http://java.sun.com/xml/ns/javaee/web-app_3_0.xsd"
                  id="WebApp_ID" version="3.0">

           <servlet>
                  <!-- Define our servlet indicating one name to identify it and
                         the class which represent it including the package -->
                  <servlet-name>First</servlet-name>
                  <servlet-class>com.dss.tut.FirstServlet</servlet-class>
           </servlet>
        <servlet-mapping>
           <!-- Link one existent servlet with an url. Whit this we can specify
                  the way we can access the Servlet by the browser-->
                  <servlet-name>First</servlet-name>
                  <url-pattern>/MyServlet</url-pattern>
           </servlet-mapping>
    </web-app>
Compilation and Deployment

    Now we just need to select our project, right click, Run As.., Run on Server,
    Select our JBoss Server and wait.

    Remember the url pattern that we specified in the deployment descriptor,
    because that is the way we'll access to the Servlet.
Next Lesson:
JPS Technology
         Fernando Gil
     lobho.gil@gmail.com
         Marzo 2012

Java EE 02-First Servlet

  • 1.
    Introduction to Java Enterprise Edition  Configuring JBoss within Eclipse  Write your first Servlet Fernando Gil lobho.gil@gmail.com Marzo 2012
  • 2.
    Agenda  How to configure JBoss AS within Eclipse in order to start the develop of JavaEE applications.  We'll write our first Servlet class.  We'll discuss the deployment descriptor.
  • 3.
    JBoss AS 6.1& Eclipse Indigo  First download Eclipse IDE for Java Developers from: http://www.eclipse.org/downloads and JBoss 6.1 from: http://www.jboss.org/jbossas/downloads/  Open Eclipse.  Create a New Server: Go to File/New/Other  Select Server Option  Search JBoss 6.x  Browse JBoss Home  Directory (the folder where you saved JBoss) Click Finish 
  • 4.
    Important  If you can not find JBoss 6.x in the servers list, try to Download additional server adapters:  Sometimes eclipse can not find the JBoss adapters, in that case check this video tutorial to solve the problem: Eclipse & JBoss AS 6
  • 5.
    Dynamic Web Project  Open Eclipse and select File/New/ Dynamic Web Project  Set the Project Name and the location  In Target Runtime we must select the runtime of JBoss 6.x  The Dynamic web module version will be set automatically  We can Click Finish
  • 6.
    Creating our Servlet  In order to keep the example simple, we'll create a servlet selecting File/New/Class and set the values like in the picture:
  • 7.
    The Code package com.dss.tut; importjava.io.*; import javax.servlet.*; import javax.servlet.http.*; public class FirstServlet extends HttpServlet { /* The service() method handles requests and creates responses. * The servlet container automatically calls this method when * it gets any request for this servlet.*/ public void service(HttpServletRequest req, HttpServletResponse resp) throws IOException, ServletException{ PrintWriter pw = resp.getWriter(); pw.println("<html>"); pw.println(" <head></head>"); pw.println(" <body>"); pw.println(" <h1>Hello! this is my first Servlet</h1>"); pw.println(" </body>"); pw.println("</html>"); } }
  • 8.
    Deployment Descriptor  We must indicate to the Application Server the configurations of our Servlets. The Deployment descriptor is a XML file to accomplish this task. We will talk more about this file later. By the moment we need to create a new file called web.xml in the directory: WebContent/WEB-INF of our project. <?xml version="1.0" encoding="UTF-8"?> <web-app xmlns:xsi="http://www.w3.org/2001/XMLSchema-instance" xmlns="http://java.sun.com/xml/ns/javaee" xmlns:web="http://java.sun.com/xml/ns/javaee/web-app_2_5.xsd" xsi:schemaLocation="http://java.sun.com/xml/ns/javaee http://java.sun.com/xml/ns/javaee/web-app_3_0.xsd" id="WebApp_ID" version="3.0"> <servlet> <!-- Define our servlet indicating one name to identify it and the class which represent it including the package --> <servlet-name>First</servlet-name> <servlet-class>com.dss.tut.FirstServlet</servlet-class> </servlet> <servlet-mapping> <!-- Link one existent servlet with an url. Whit this we can specify the way we can access the Servlet by the browser--> <servlet-name>First</servlet-name> <url-pattern>/MyServlet</url-pattern> </servlet-mapping> </web-app>
  • 9.
    Compilation and Deployment  Now we just need to select our project, right click, Run As.., Run on Server, Select our JBoss Server and wait.  Remember the url pattern that we specified in the deployment descriptor, because that is the way we'll access to the Servlet.
  • 10.
    Next Lesson: JPS Technology Fernando Gil lobho.gil@gmail.com Marzo 2012