Download to read offline
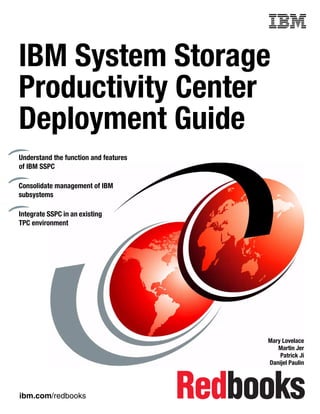
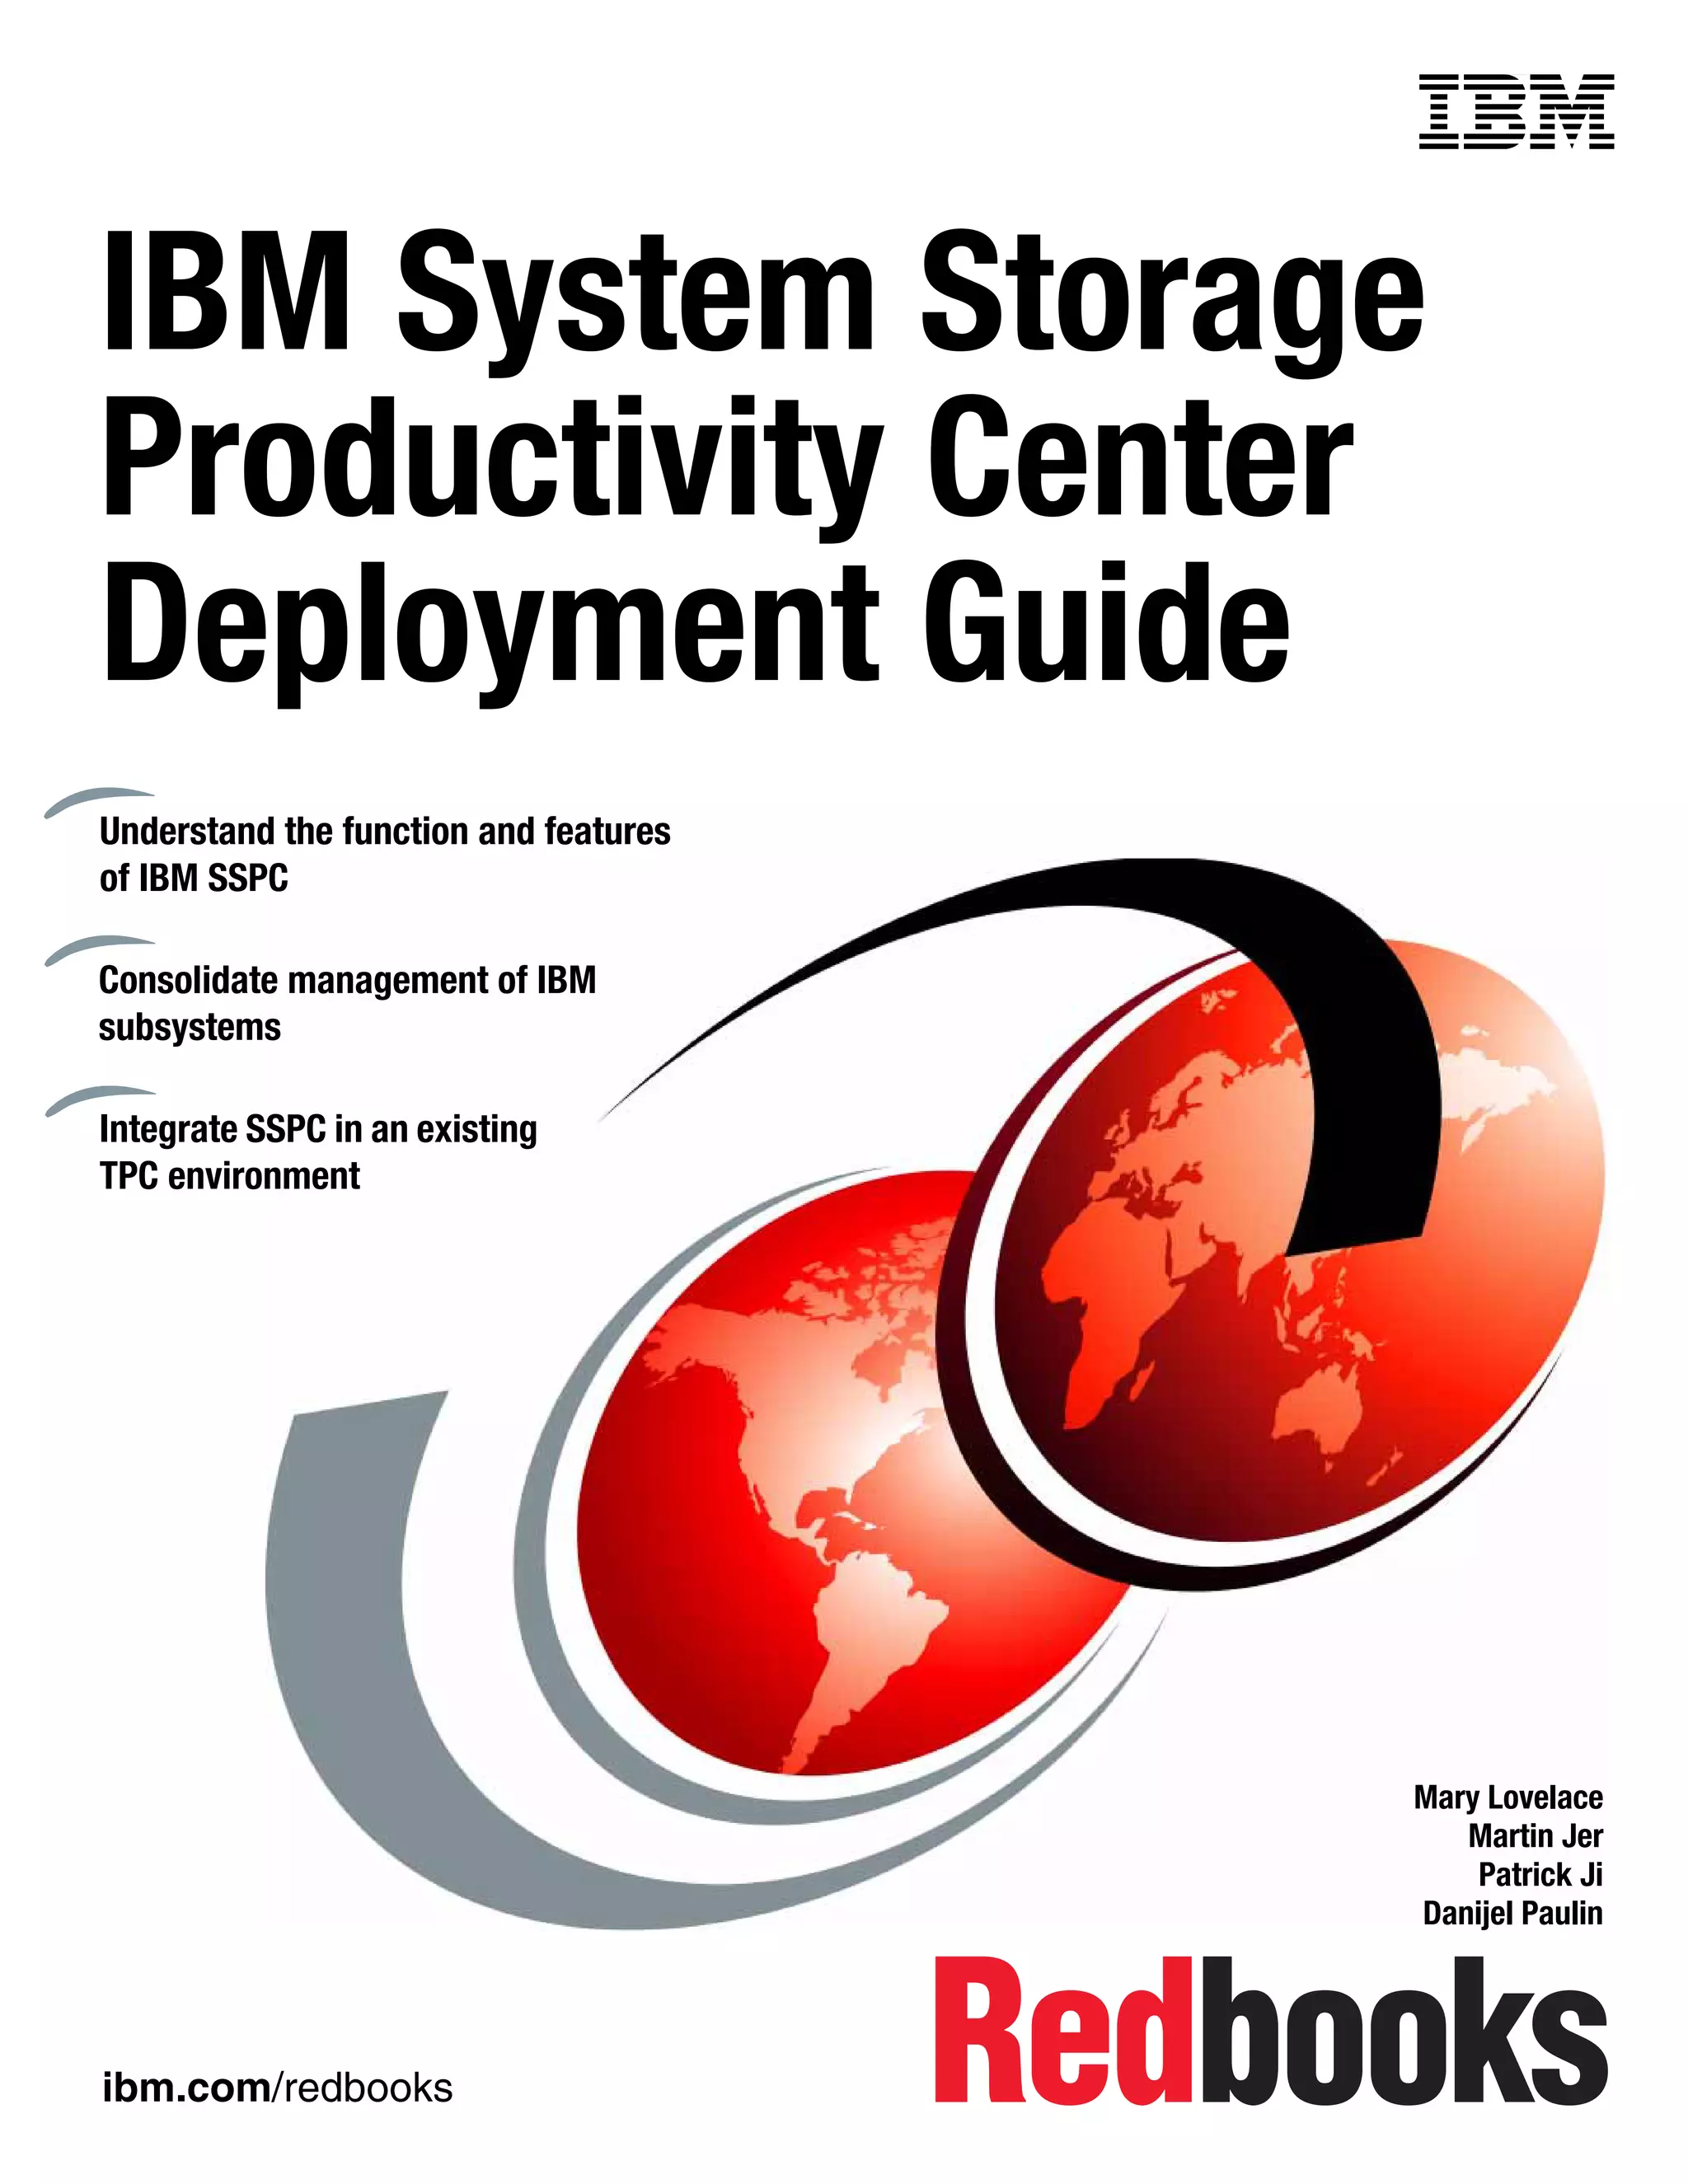

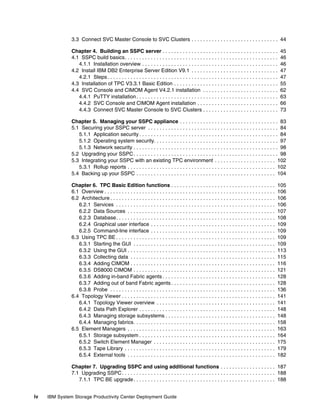


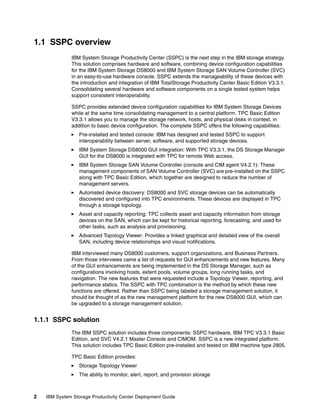
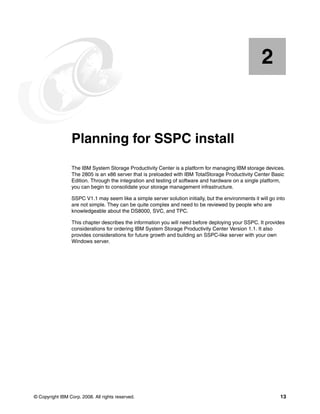
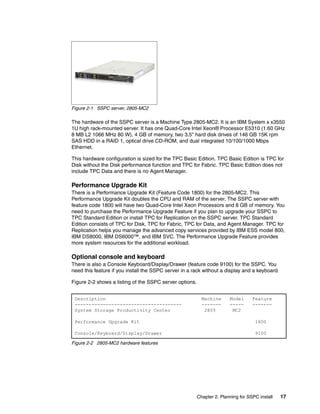
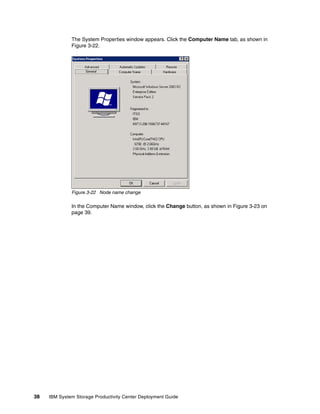
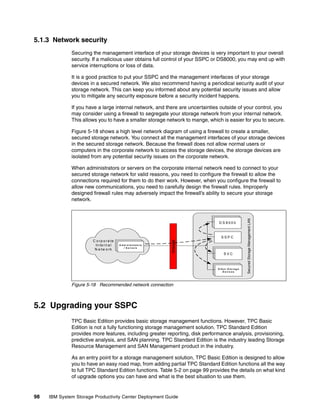
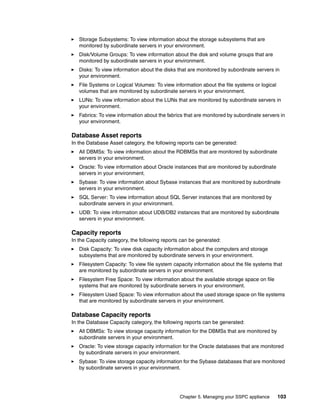
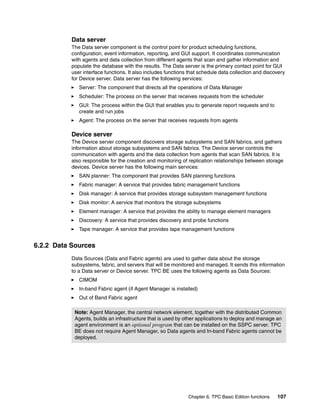
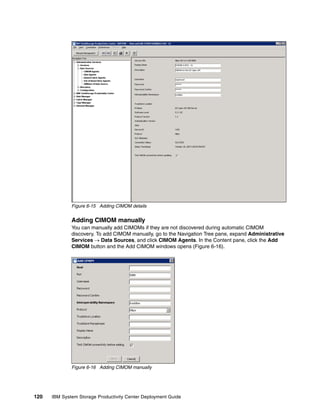
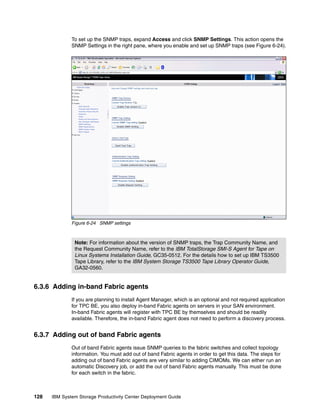
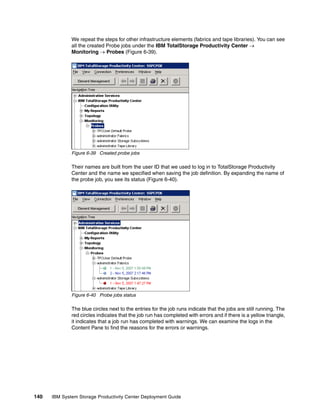
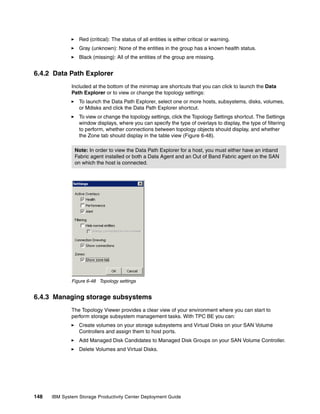
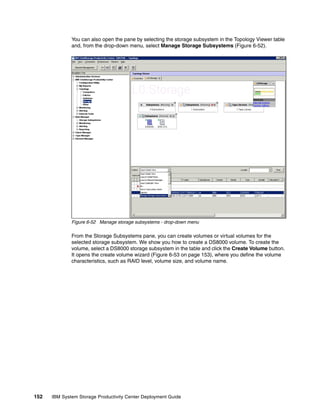
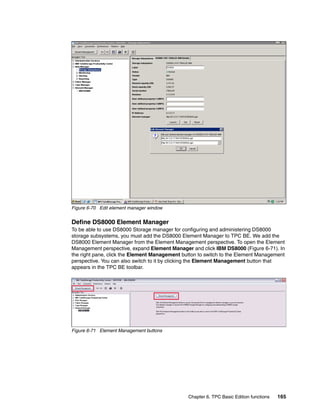
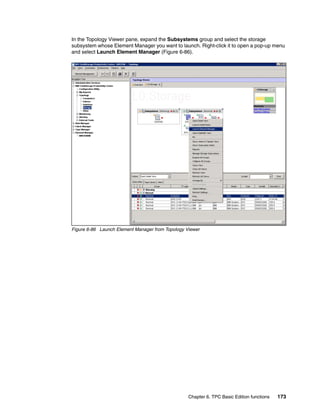
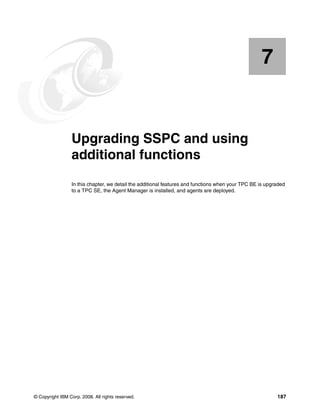
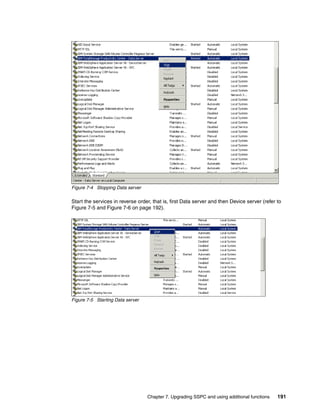
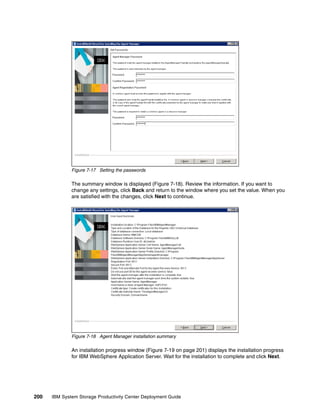
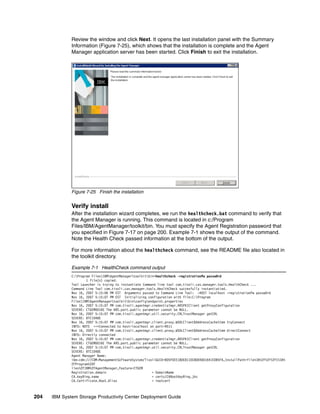
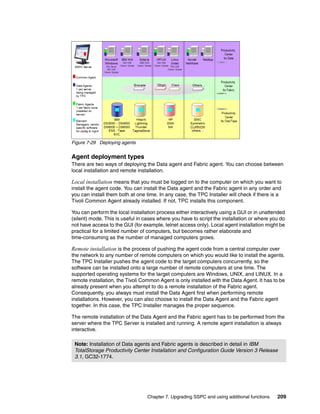
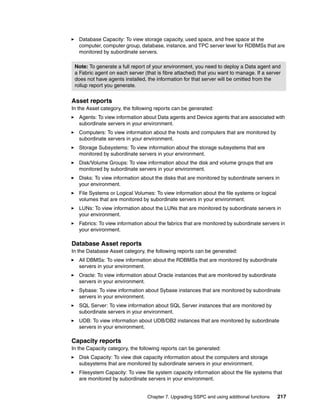
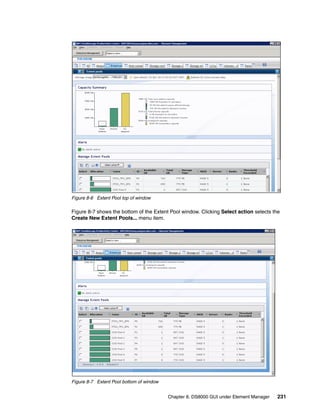
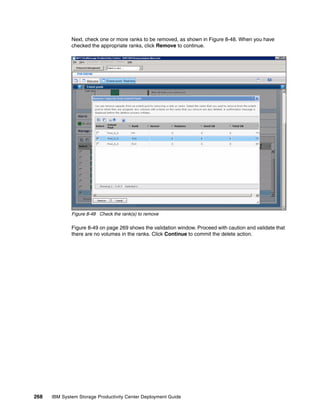
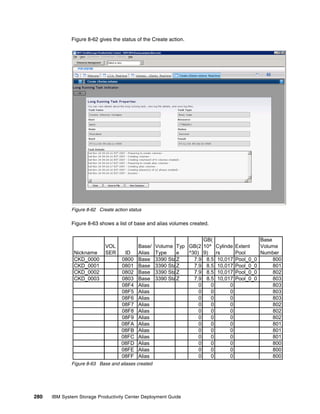
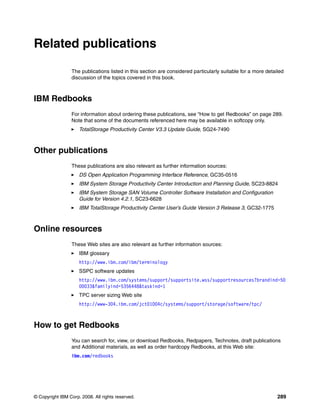
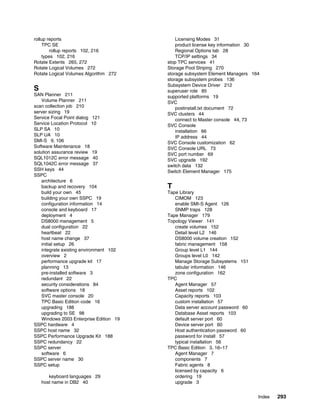
![DS Storage SVC Admin TPC Basic TPC Standard
Function Manager Console Edition Edition
Storage Infrastructure Configuration/Status Reporting
Device Discovery/Configuration
Manage multiple DS8000s / SVCs from 1 User Interface
Topology Viewer and Storage Health Management
Provisioning, including Fabric zoning and Disk LUN
assignment
Configuration Management – Highlight configuration changes
over time periods, Best Practice recommendations, Storage
configuration planning and recommendations, Security
planner
Storage Reporting
Basic Asset & Capacity Reporting
Storage reporting on the relationships of computers, file
systems and DS8000 LUNs/volumes
Capacity Analysis/Predictive Growth
Customized and Detailed Capacity Reporting – including
Chargeback and Database Reporting
Performance Management
Performance Reporting/Thresholds
Volume Performance Advisor – Recommend DS8000
configuration based on performance workloads
Fabric performance reporting and monitor
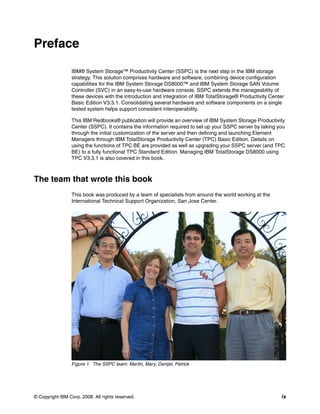
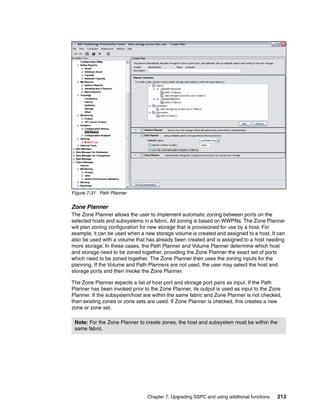
Figure 1-1 Comparison between TPC Standard Edition and Basic Edition
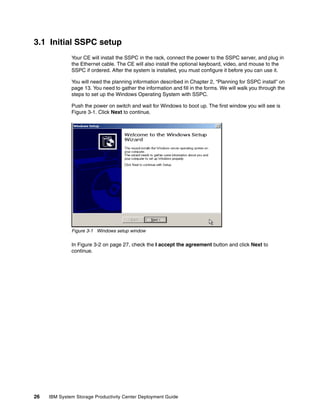
1.3 When do you need SSPC
In this section, we discuss the options for deploying SSPC in your environment, when SSPC
is optional, and when it is required based on your configuration.
1.3.1 DS8000 management
New DS8000 series systems purchased after October 23, 2007 will need TPC V3.3.1 in order
to access the DS8000 GUI from any system other than the HMC. Existing DS8000
subsystems upgrading to R3 (DS8000 Licensed Machine Code [LMC] 5.3.0xx.xx, or later) do
not require SSPC. Customers will still see the enhancement made to the DS Storage
Manager but will not have the new features/GUI offered with SSPC.
Any TPC product at the V3.3.1 level (excluding TPC for Replication) will integrate the DS8000
Storage Manager GUI with TPC. With this new release of DS8000, several configuration
operations have been greatly improved. Additionally, TPC will provide tools requested by
many in the DS8000 community, such as Topology Viewer and asset and capacity reporting.
TPC Basic Edition V3.3.1 comes pre-installed on the new SSPC offering. SSPC was
specifically designed and tested with DS8000 and SVC customers in mind. In order to avoid
possible installation delays and potential technical issues, we recommend that if you do not
have TPC that you order SSPC.
If you already have TPC installed and configured in your environment (excluding TPC Limited
Edition users), you can use your existing TPC server and TPC software license to perform the
remote configuration of new DS8000s using the GUI. Of course, your TPC installation must
have IP connectivity to the new DS8000 in question. To do so, you need to upgrade your TPC
to V3.3.1. TPC V3.3.1 is the first release able to access the integrated DS8000 GUI remotely.
Without TPC V3.3.1, the new DS8000 GUI can only be accessed directly from the HMC.
Chapter 1. System Storage Productivity Center introduction 5](https://image.slidesharecdn.com/ibmsystemstorageproductivitycenterdeploymentguidesg247560-120524013920-phpapp01/85/Ibm-system-storage-productivity-center-deployment-guide-sg247560-19-320.jpg)


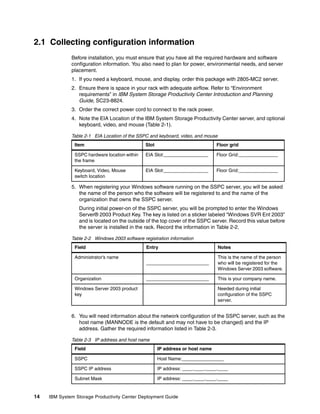
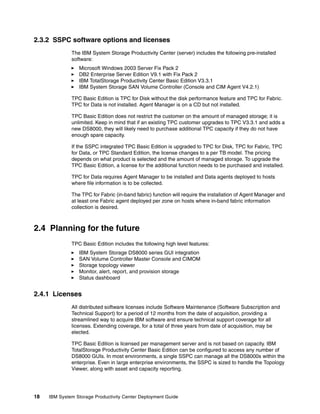

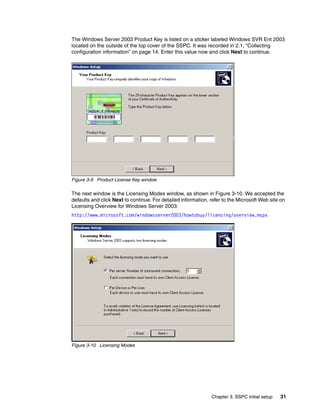
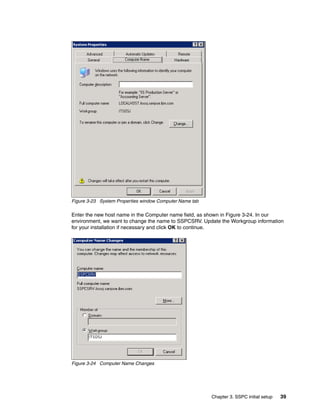
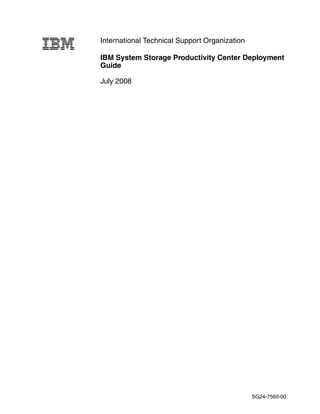
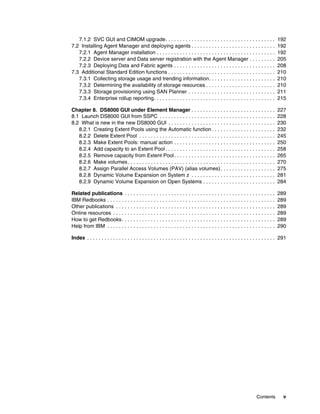
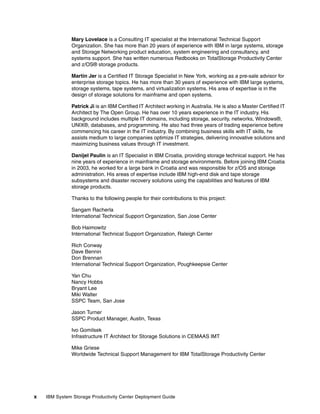
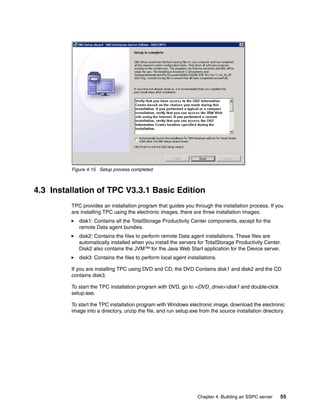
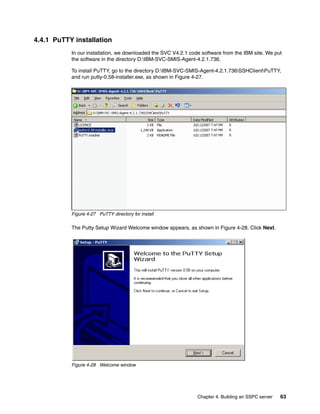
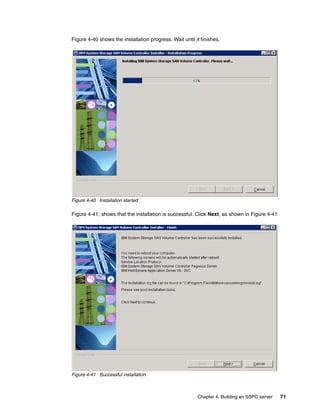
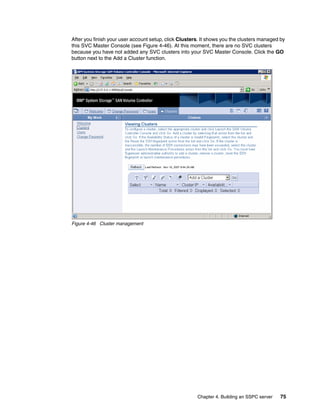
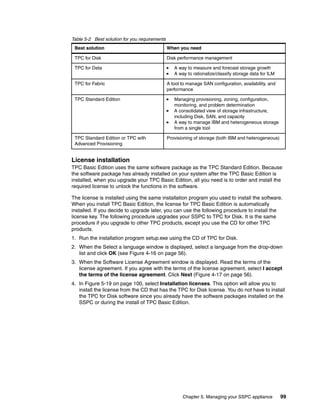
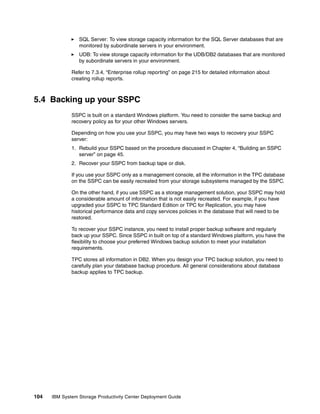
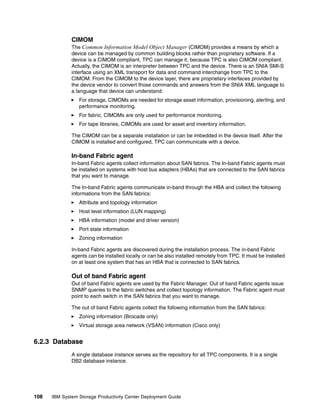
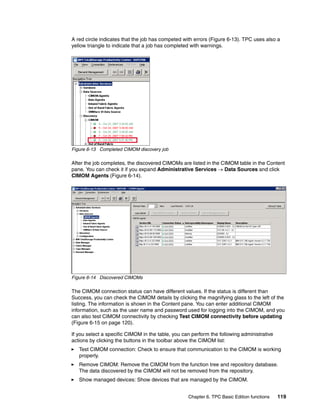
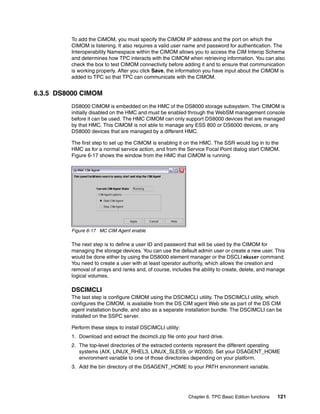
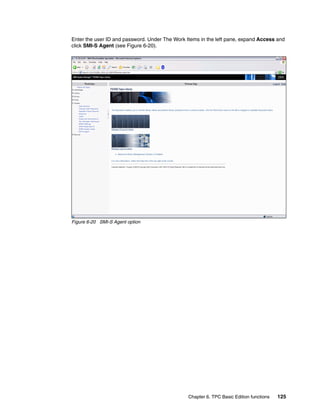
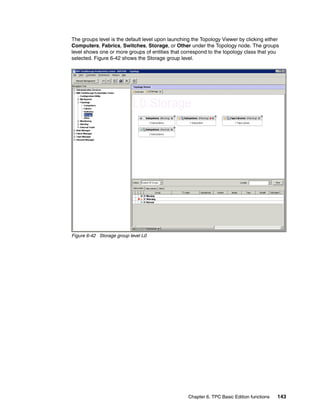
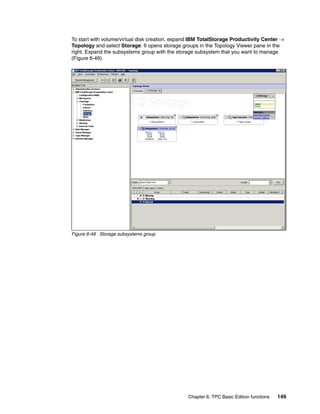
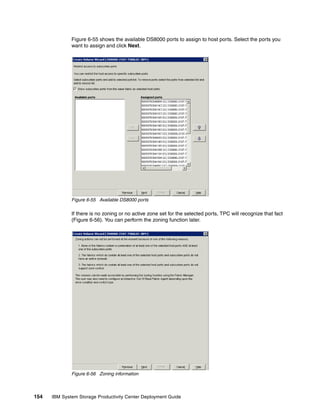
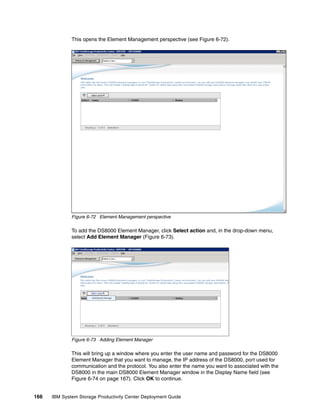
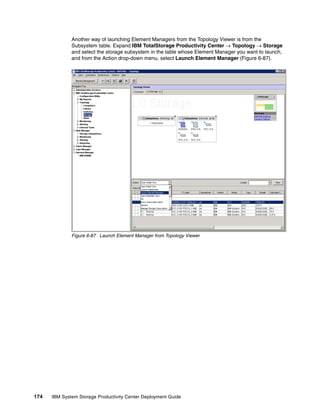
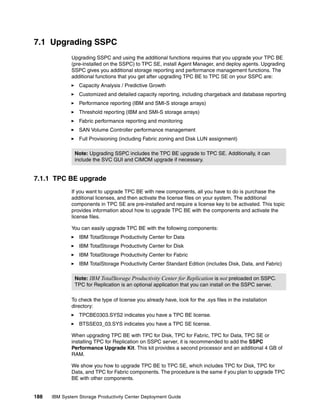
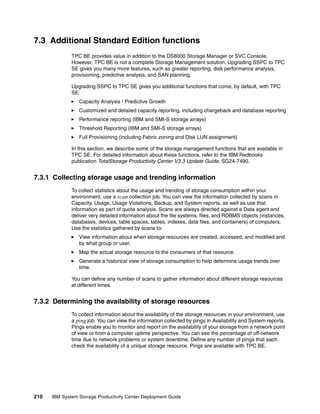
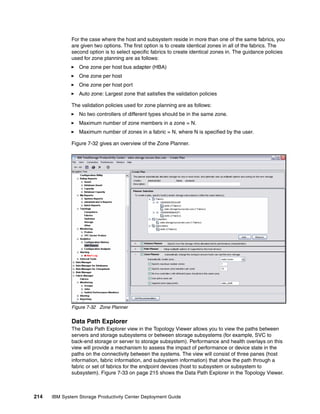
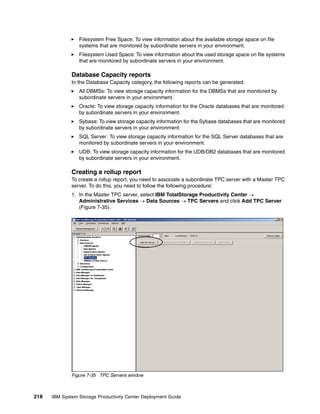
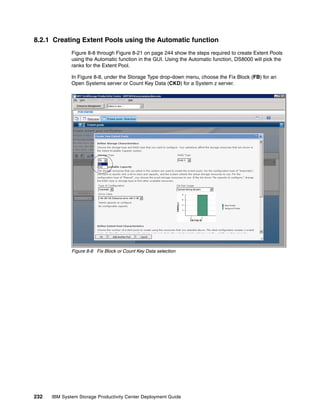
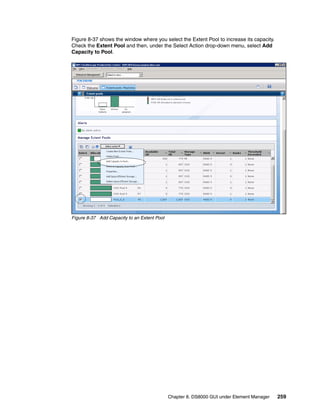
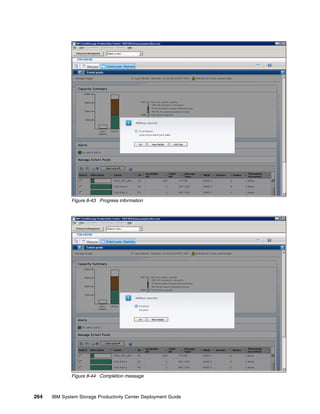
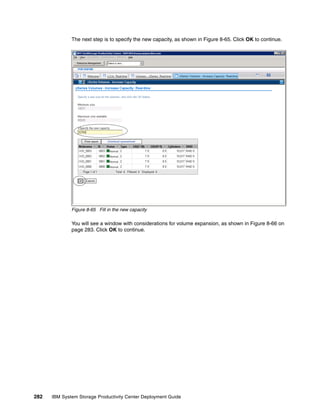
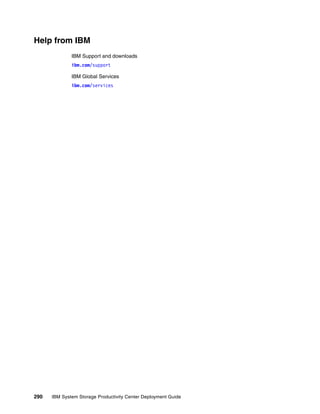
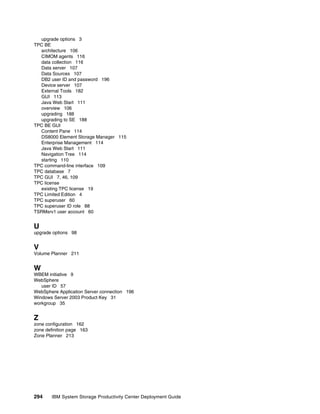
![Figure 3-28 Command prompt window
Change to the directory where your DB2 is installed. By default this is C:Program
FilesIBMSQLLIB. Enter the following commands, as shown in Figure 3-29:
db2extsec /u db2users /a db2admns
db2start
Microsoft Windows XP [Version 5.1.2600]
(C) Copyright 1985-2001 Microsoft Corp.
C:Documents and SettingsAdministrator>cd Program FilesIBMSQLLIB
C:Program FilesIBMSQLLIB>db2extsec /u db2users /a db2admns
DB2EXTSEC: processing completed successfully.
C:Documents and SettingsAdministrator>db2start
SQL1063N DB2START processing was successful.
Figure 3-29 Issue DOS commands and response
3.2.3 Stop and start services
You have to stop and then restart two Windows services for the DB2 host name change to
take effect. First, we have to stop the IBM WebSphere Application Server V6 - Device server
and IBM TotalStorage Productivity Center - Data server.
Select Start → Settings → Control Panel → Administrative Tools → Services to locate
the Services window.
Chapter 3. SSPC initial setup 41](https://image.slidesharecdn.com/ibmsystemstorageproductivitycenterdeploymentguidesg247560-120524013920-phpapp01/85/Ibm-system-storage-productivity-center-deployment-guide-sg247560-55-320.jpg)


This document provides a deployment guide for IBM System Storage Productivity Center (SSPC). It discusses SSPC and TotalStorage Productivity Center (TPC) Basic Edition, including their components, architecture and key concepts. It also covers planning considerations for an SSPC installation such as hardware and software requirements, licensing, and server sizing. The document then describes setting up an SSPC server, including installing required software like DB2 and TPC. It concludes with sections on managing the SSPC appliance after deployment through security, upgrades and integrating it with an existing TPC environment.