Downloaded 88 times


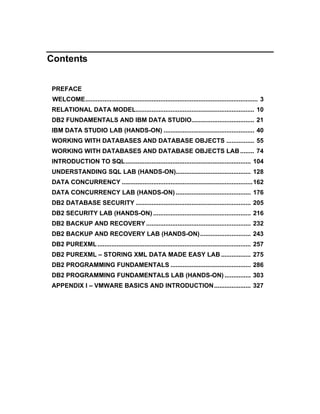


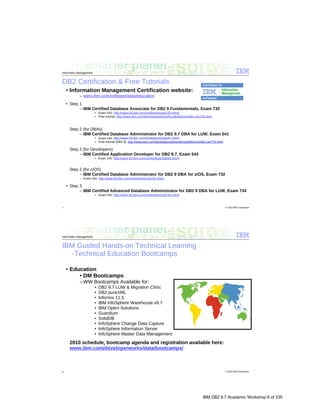


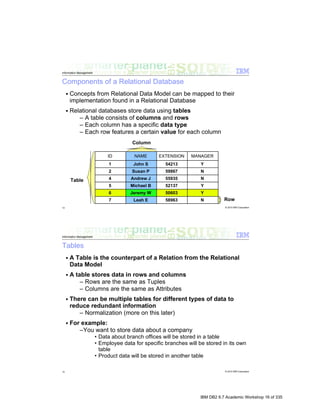

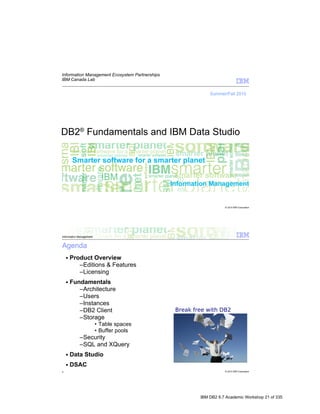
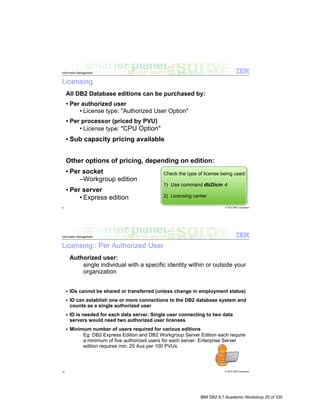
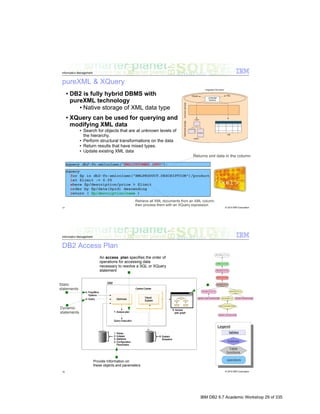

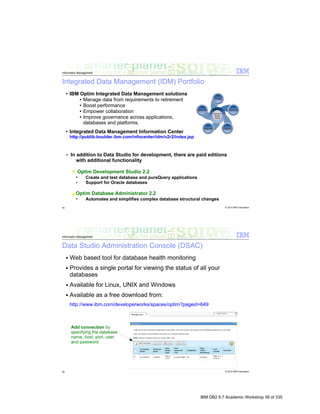
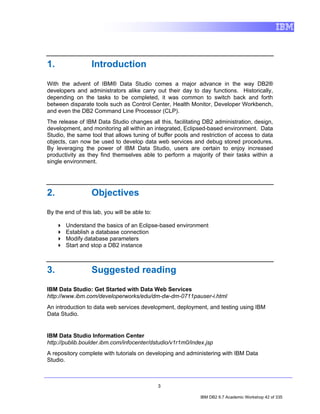


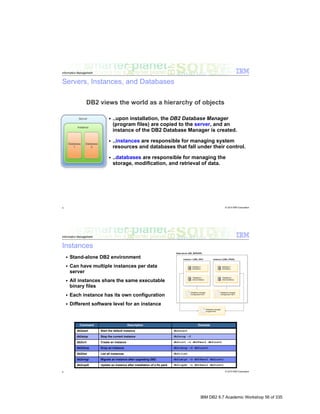
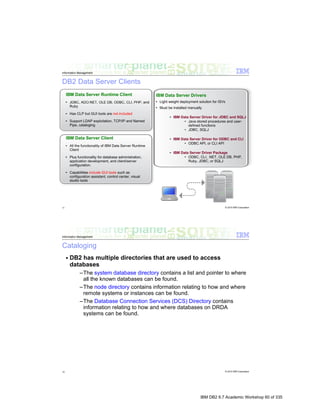
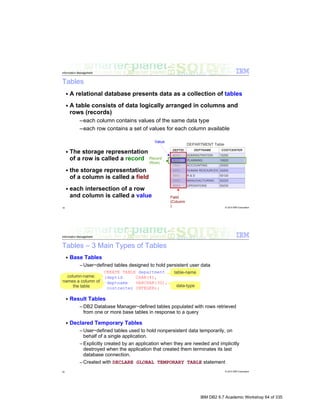

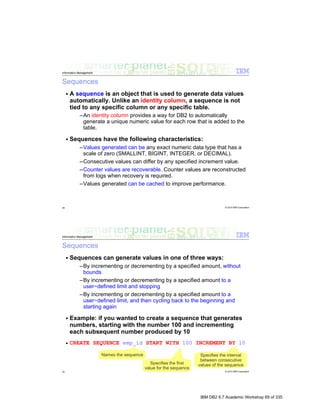


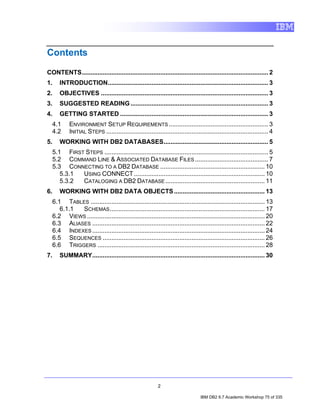
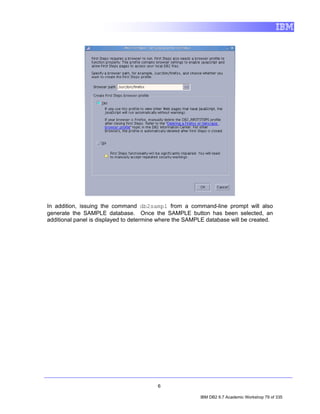
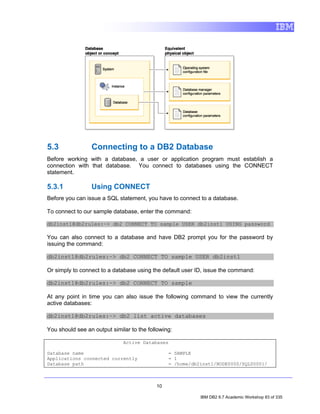


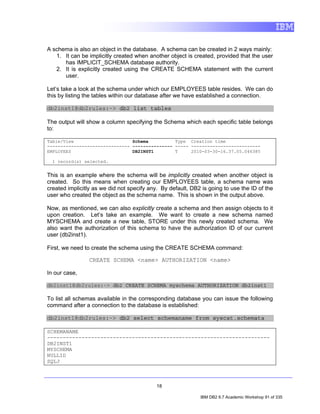
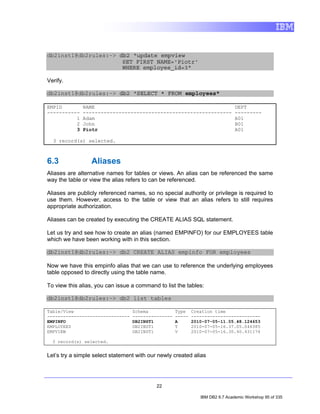
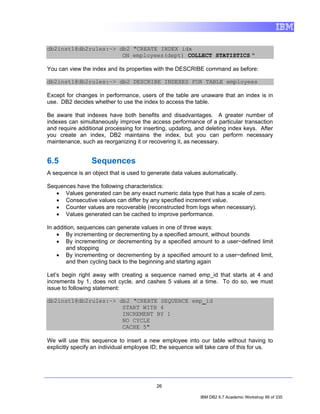
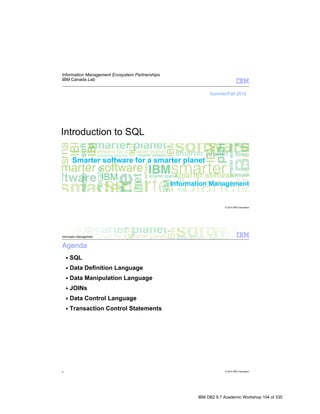
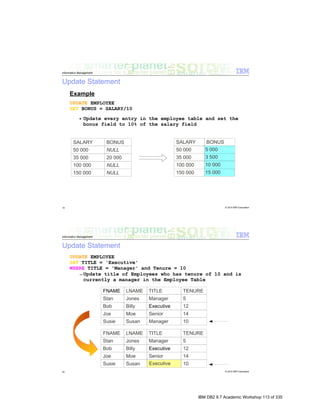
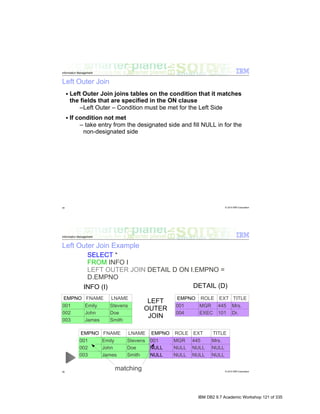
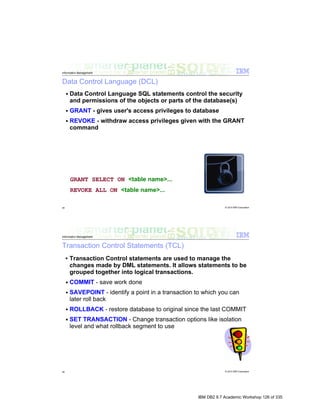
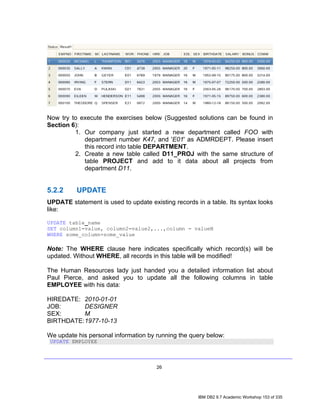
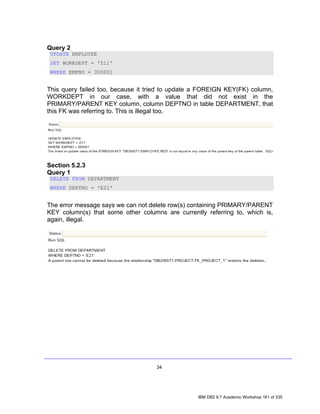
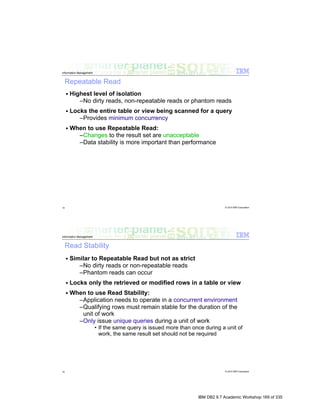
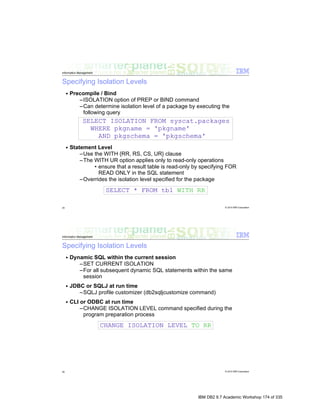
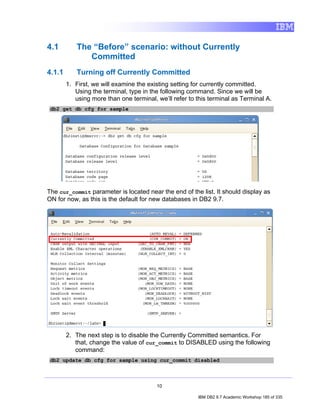
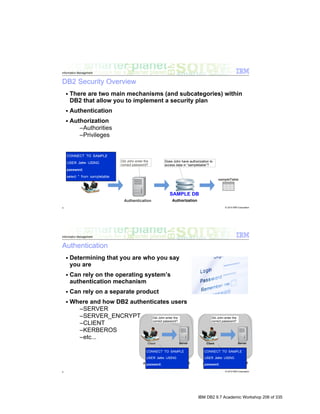
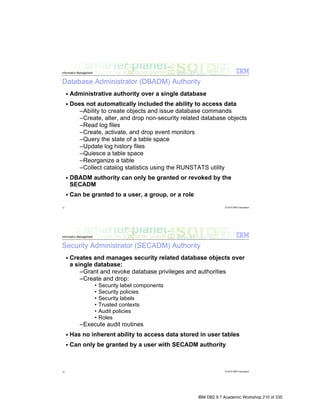
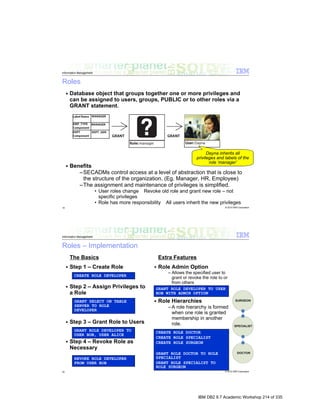
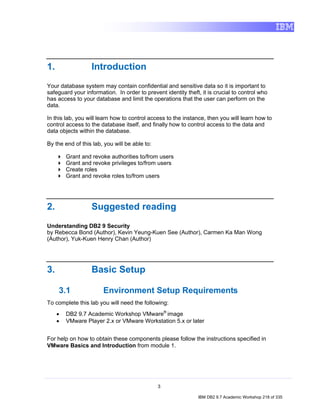
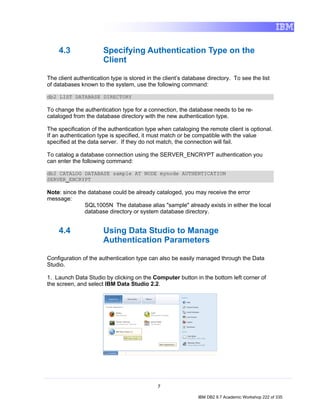
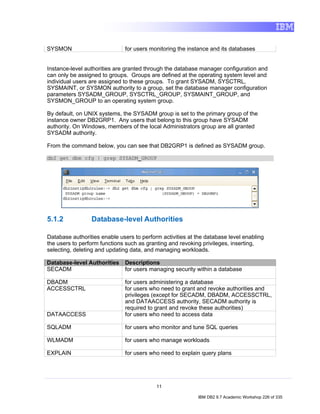
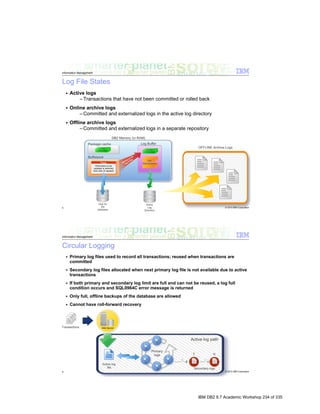
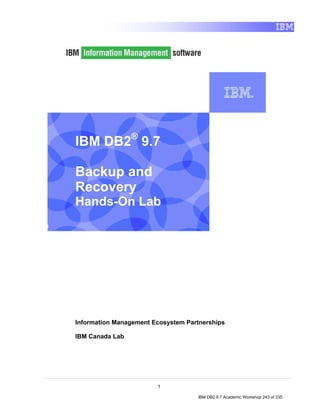
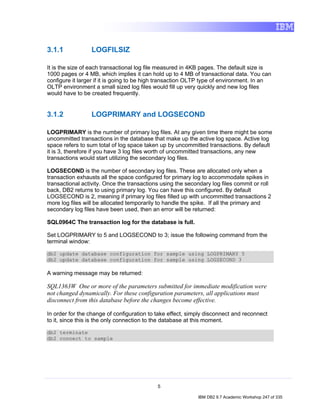
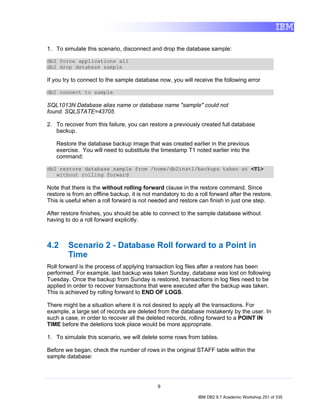
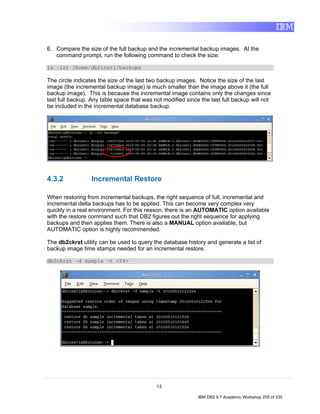
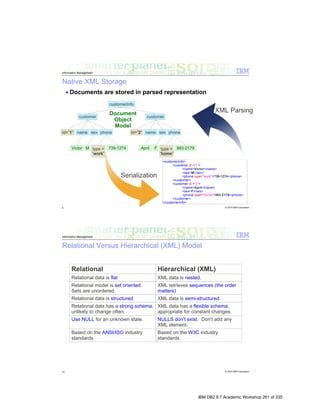
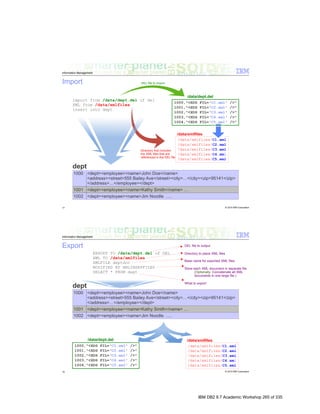
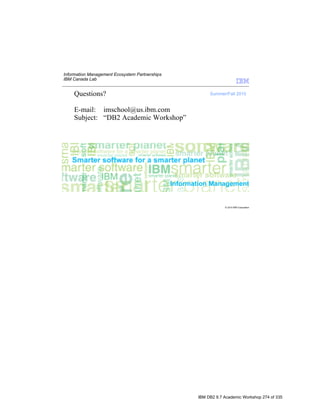
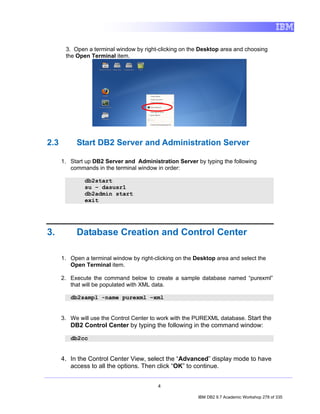
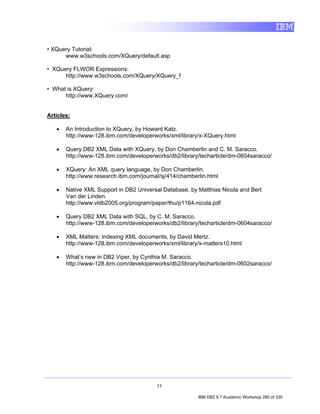
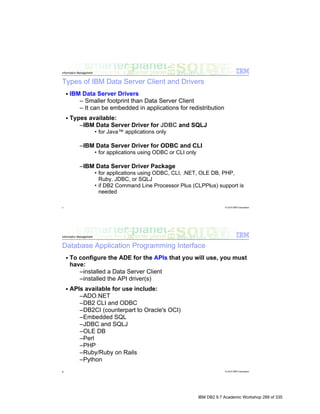
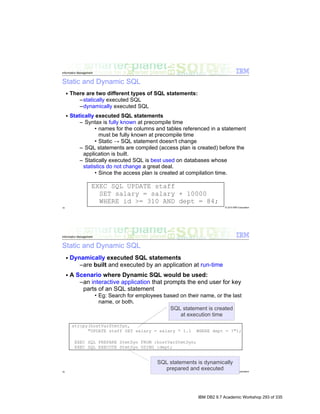
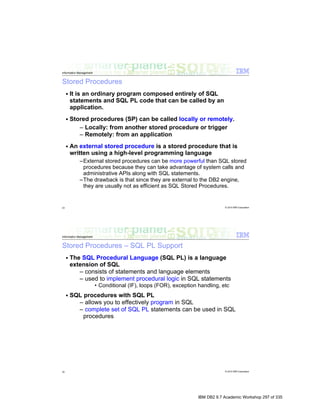
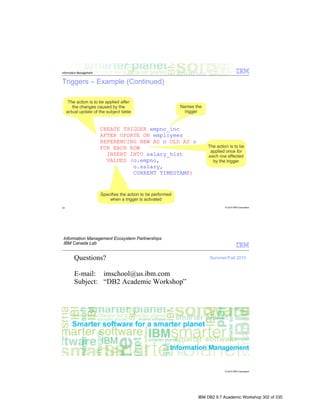
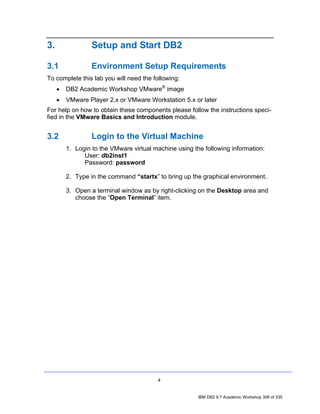
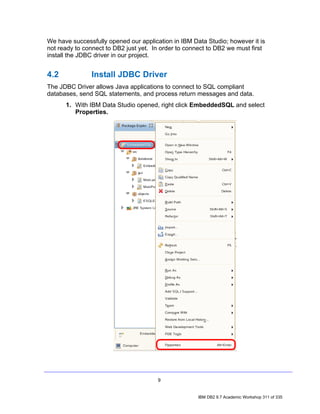
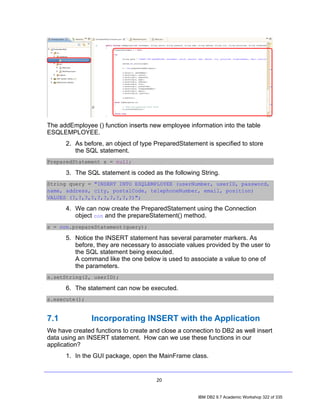
![Tables are created by executing the CREATE TABLE SQL statement. In its simplest
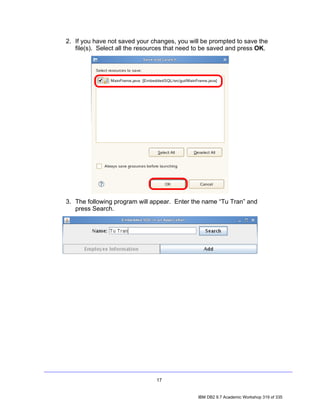
form, the syntax for this statement is:
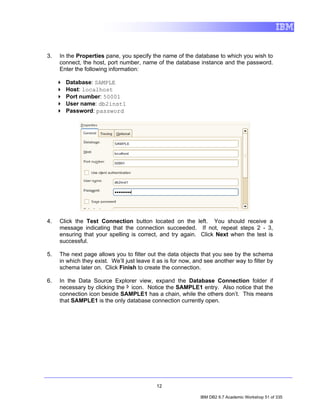
CREATE TABLE [TableName]
([ColumnName] [DataType], ...)
where:
• TableName identifies the name that is to be assigned to the table to be created.
• ColumnName identifies the unique name that is to be assigned to the column that
is to be created.
• DataType identifies the data type to be assigned to the column to be created;
the data type specified determines the kind of data values that can be stored in
the column.
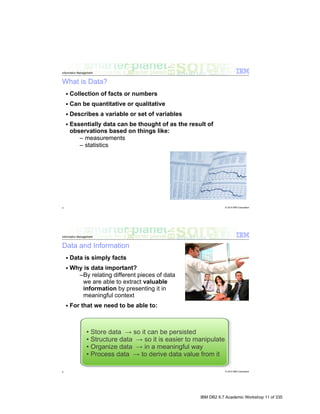
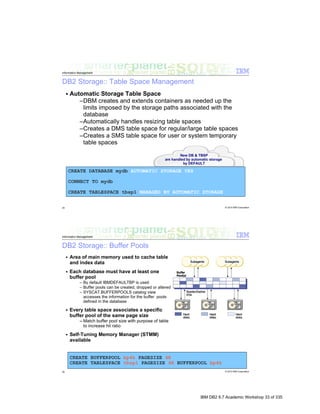
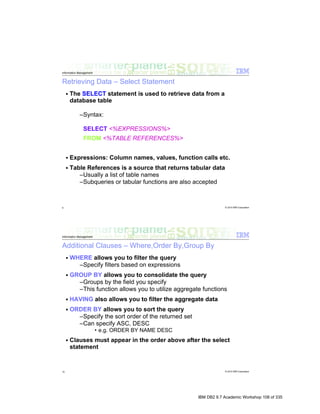
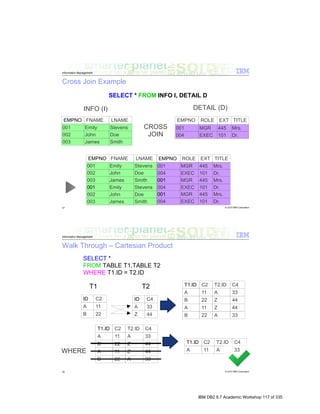
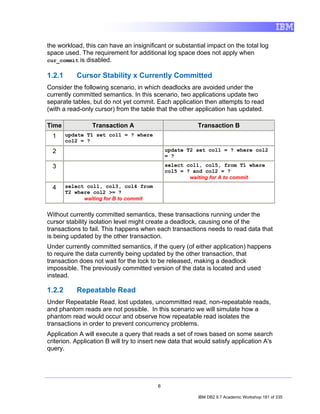
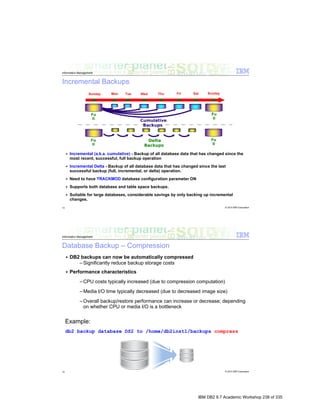
Thus, if you wanted to create a table named EMPLOYEES that has three columns, one
of which is used to store numeric values and two that are used to store character string
values, as shown below,
Column Type
empid INTEGER
name CHAR(50)
Dept CHAR(9)
you could do so by executing a CREATE TABLE SQL statement that looks something
like this:
db2inst1@db2rules:~> db2 "CREATE TABLE employees
(empid INTEGER,
name CHAR(50),
dept INTEGER)"
You can execute a DESCRIBE command to view the basic properties of the table:
db2inst1@db2rules:~> db2 describe table employees
Data type Column
Column name schema Data type name Length Scale Nulls
------------------------------- --------- ------------------- ---------- ----- -----
EMPID SYSIBM INTEGER 4 0 Yes
NAME SYSIBM CHARACTER 50 0 Yes
DEPT SYSIBM INTEGER 4 0 Yes
3 record(s) selected.
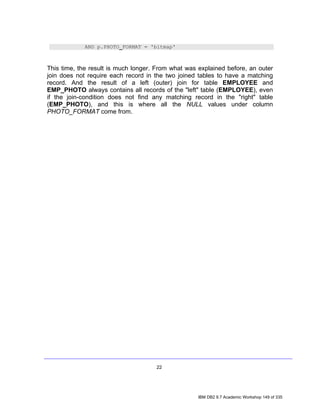
But, now we notice that the department data type was specified as INTEGER not CHAR
as originally intended. Therefore we need a way to change this data type from
INTEGER to CHARACTER. We can do this using the alter statement.
14
IBM DB2 9.7 Academic Workshop 87 of 335](https://image.slidesharecdn.com/r9tdzce302coursebook-111014003815-phpapp02/85/IBM-COE-course-book-93-320.jpg)

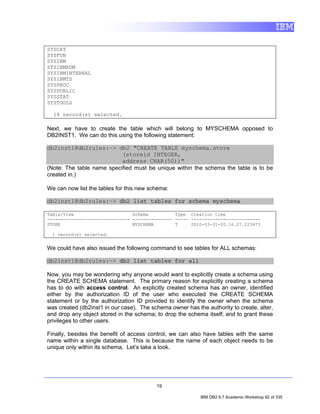
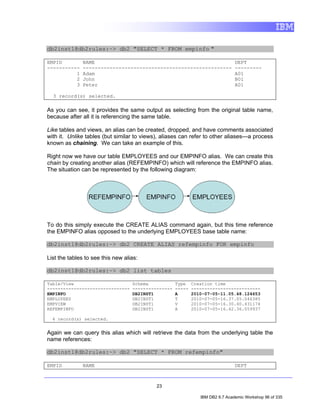
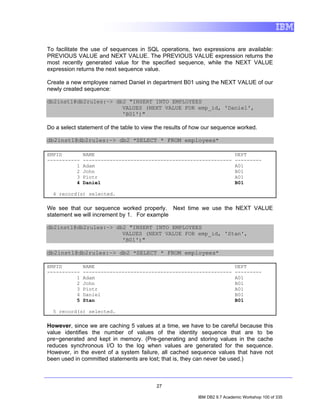

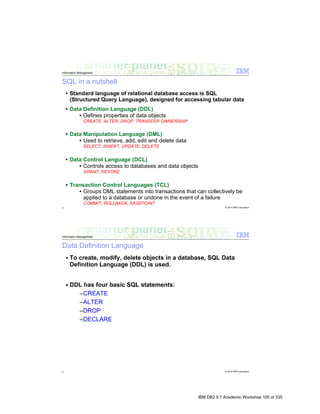
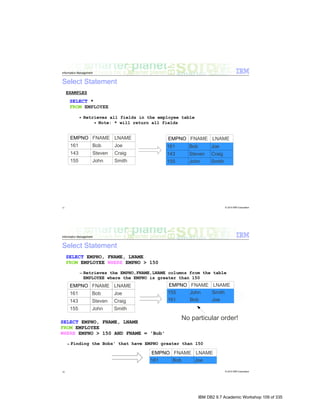

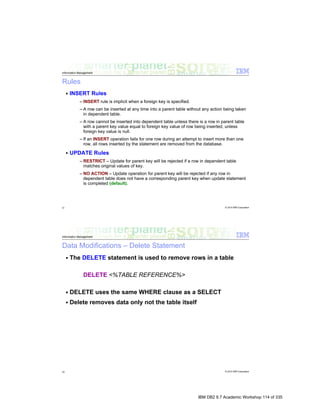
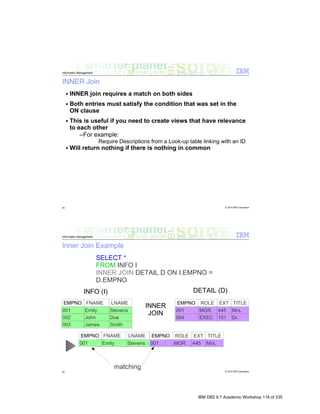
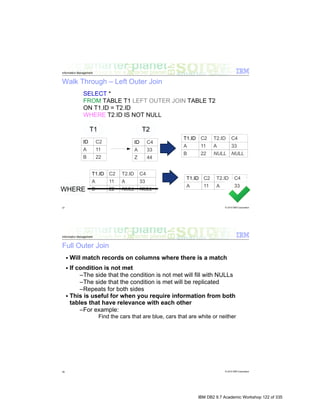


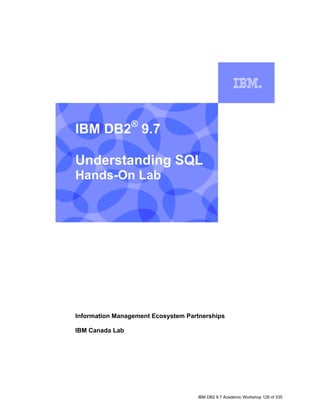
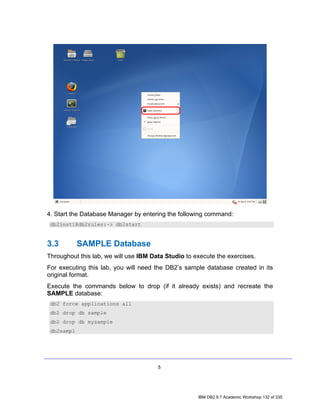
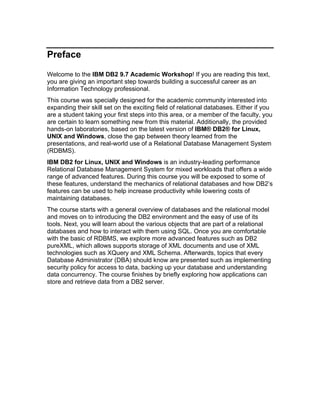
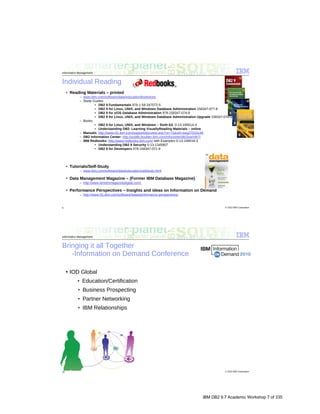
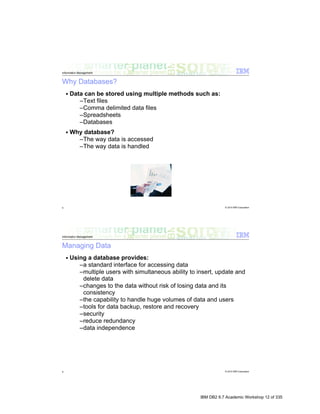
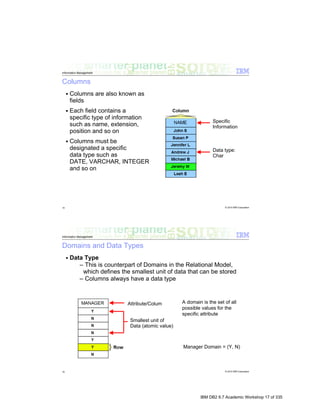
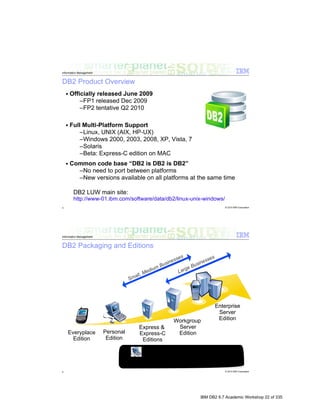
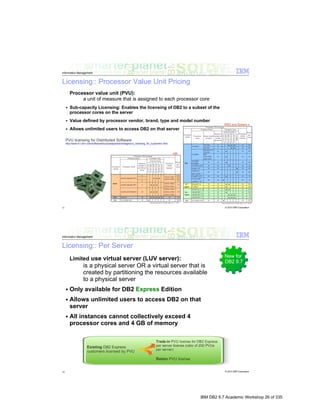
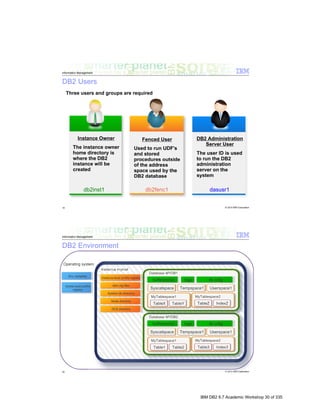
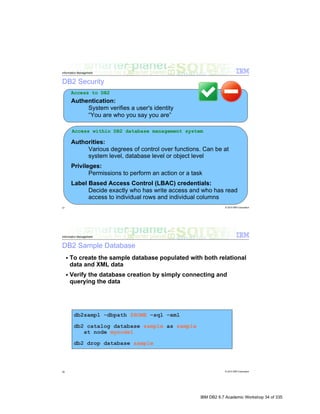
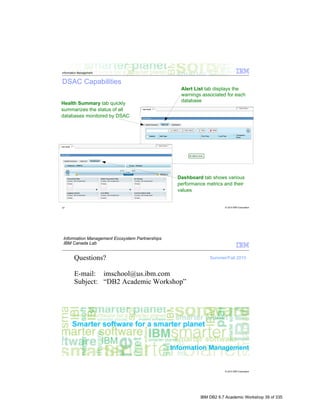
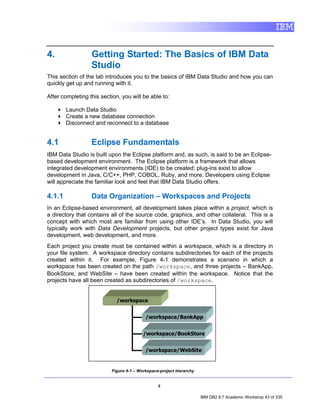
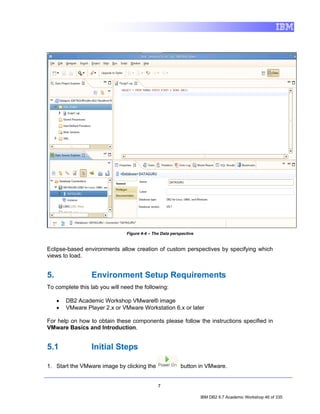
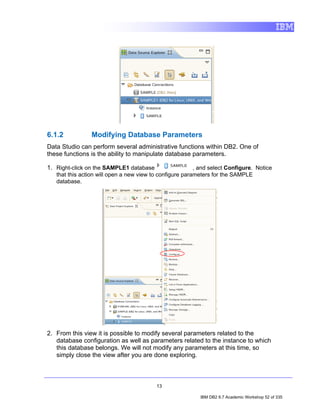
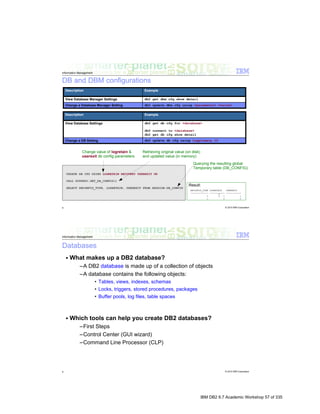
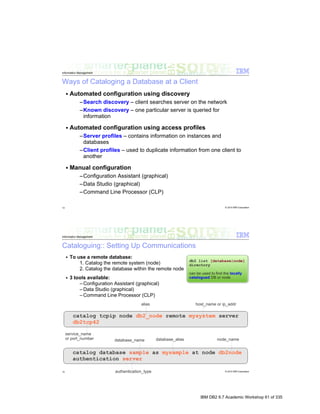
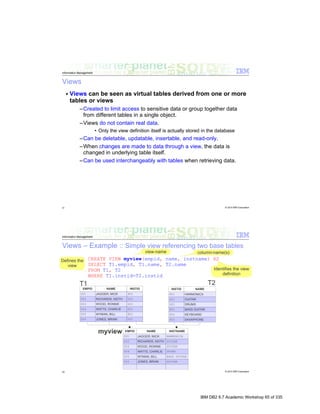
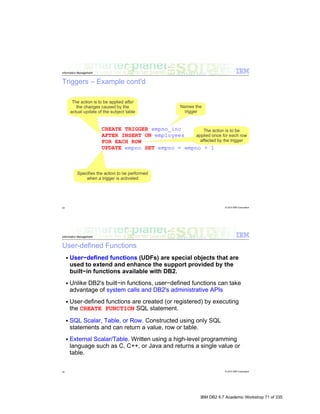
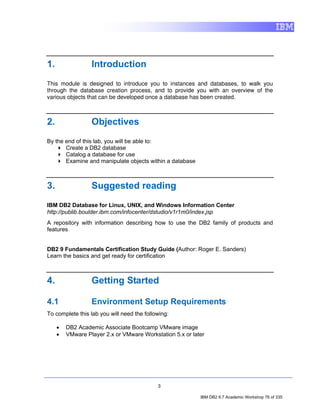
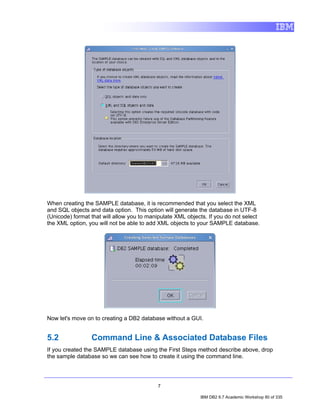
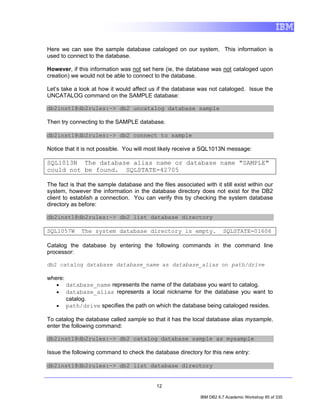
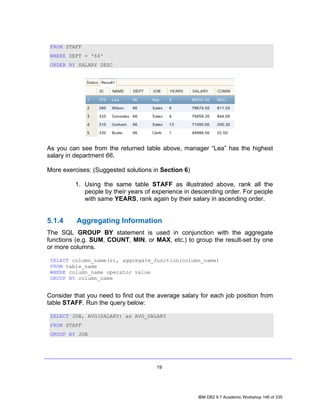
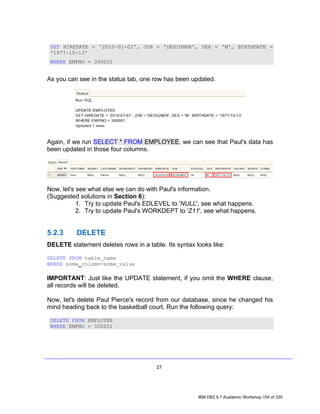
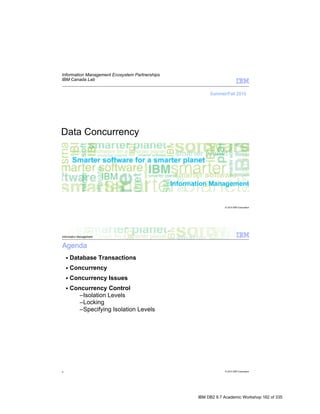
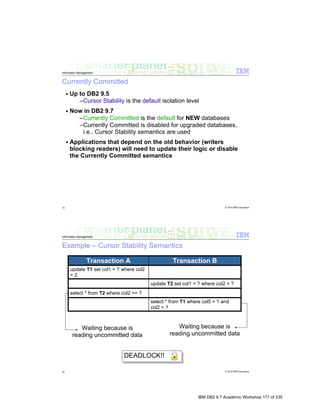
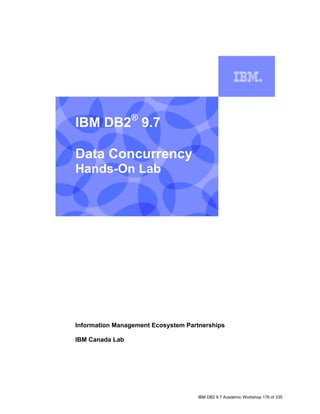
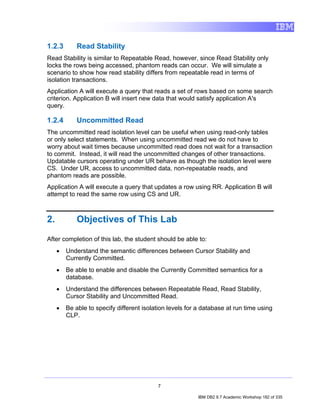
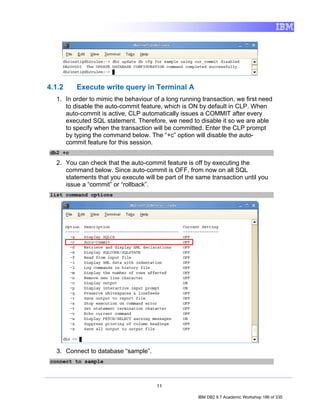
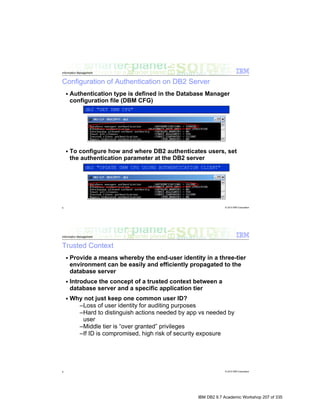
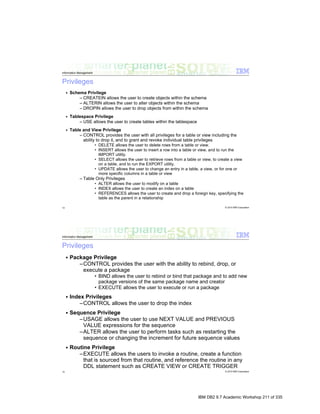
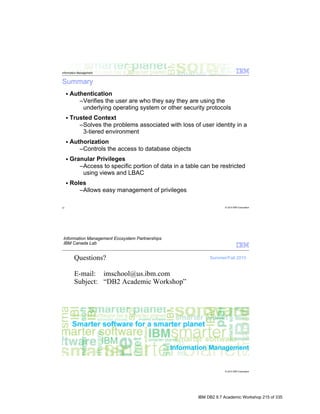
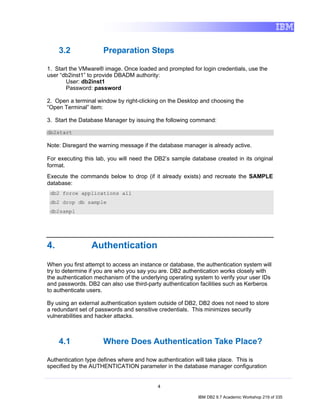
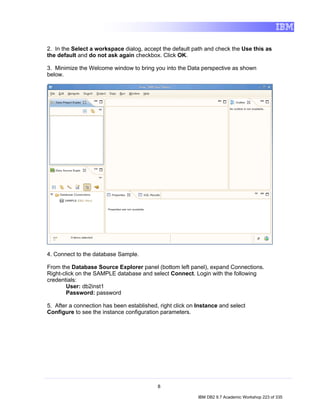
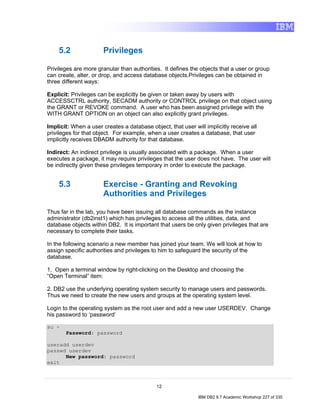
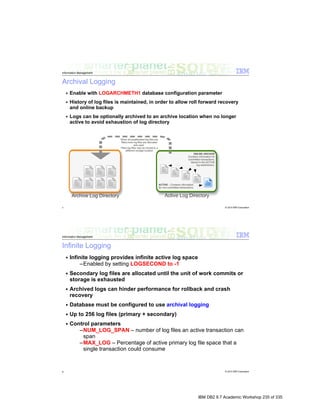
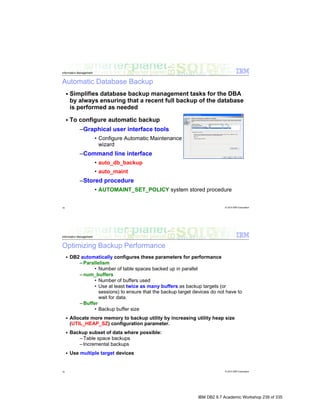
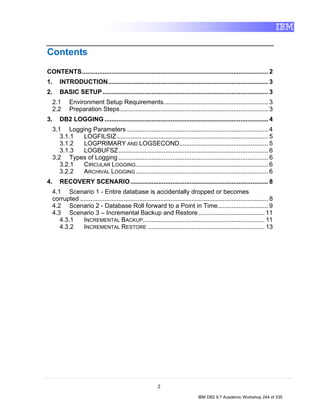
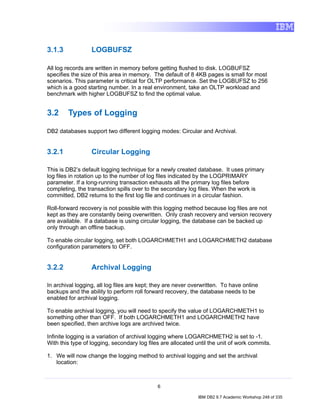
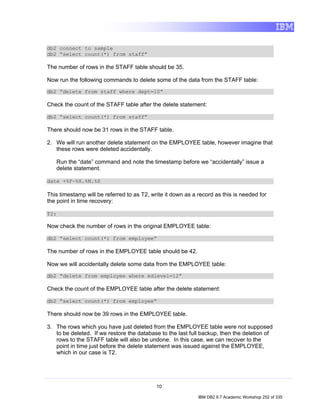
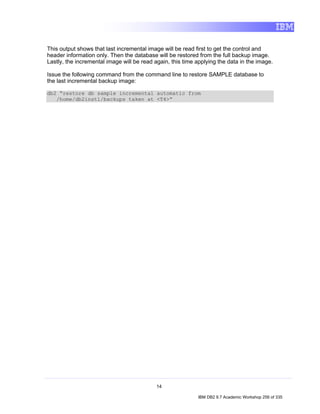
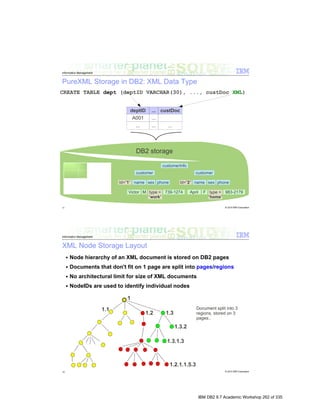
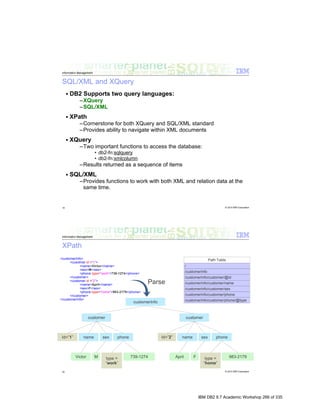
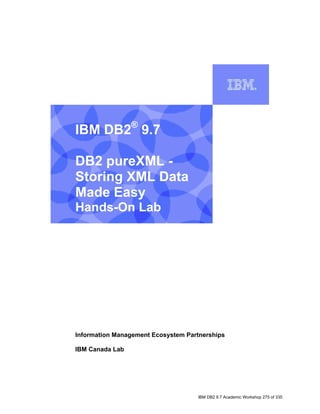
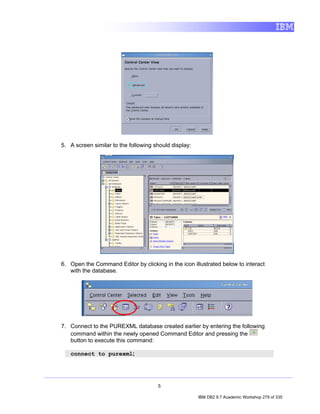
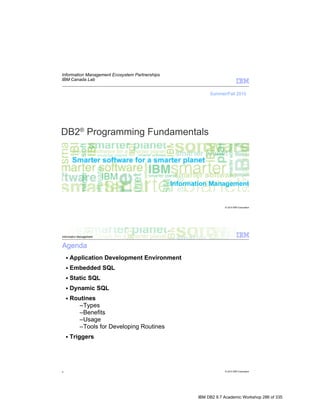
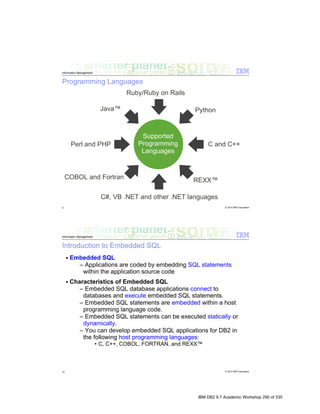
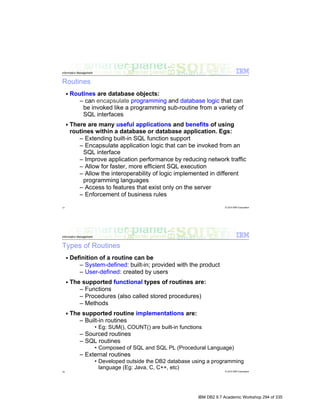
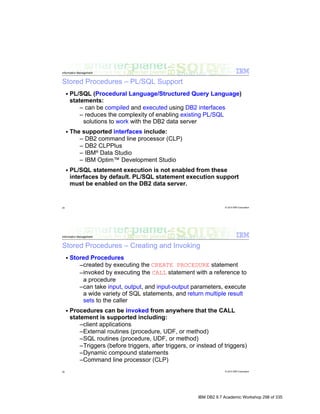
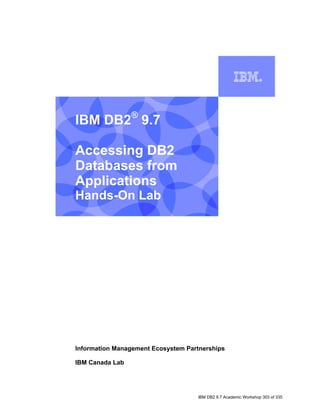
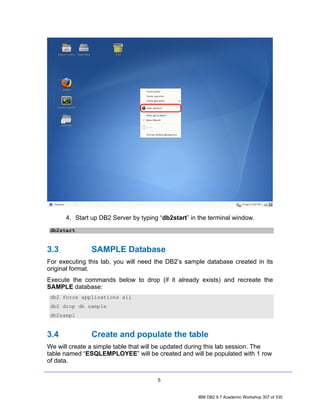
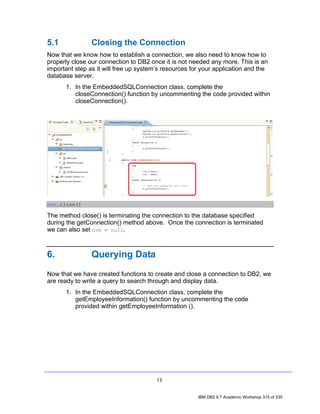
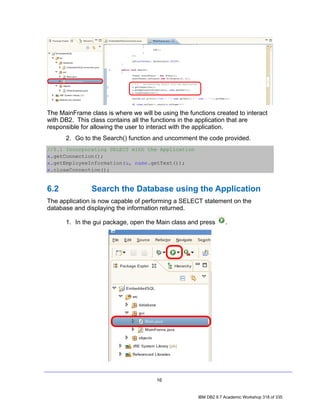
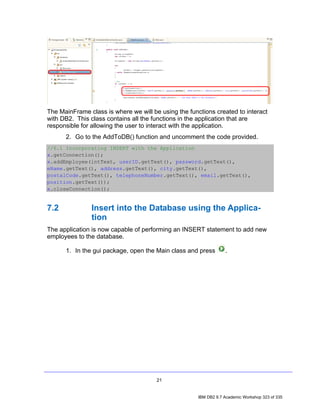
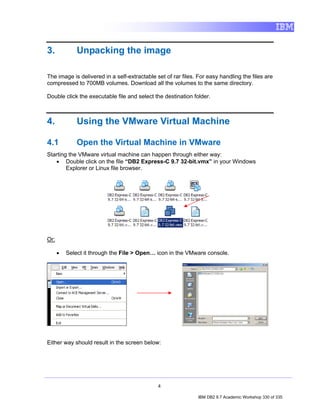
![4. Exploring a Database with IBM Data Studio
Before you can do anything productive with IBM Data Studio, a connection must
be established to a database. The Data Source Explorer view in Data Studio
allows you to do this. From this view it is possible to interact with and manipulate
database artifacts. Now let's connect to SAMPLE database.
Note: In the Data Source Explorer make sure the Show the Data Source
Explorer Contents in flat view icon is selected (this icon should change to
this: ), otherwise you may have problem directing to the right tables.
1. In the Data Source Explorer, right-click on the SAMPLE [DB2 Alias] node,
and select Connect.
2. If the Database Authorization window appears, enter the following
credentials:
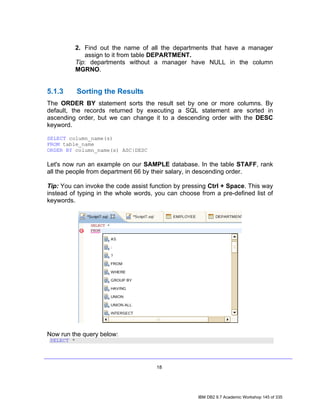
• Username: db2inst1
• Password: password
7
IBM DB2 9.7 Academic Workshop 134 of 335](https://image.slidesharecdn.com/r9tdzce302coursebook-111014003815-phpapp02/85/IBM-COE-course-book-140-320.jpg)
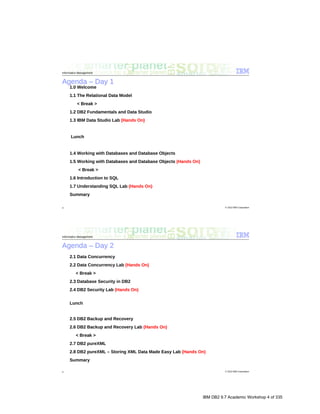
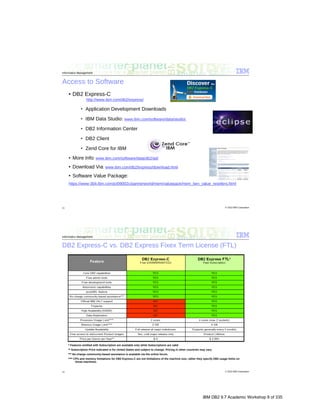
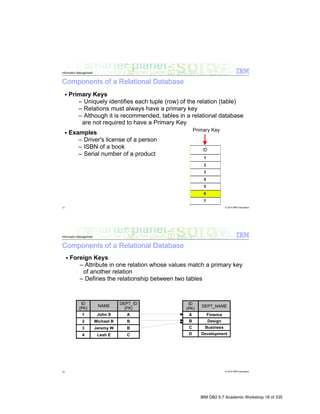
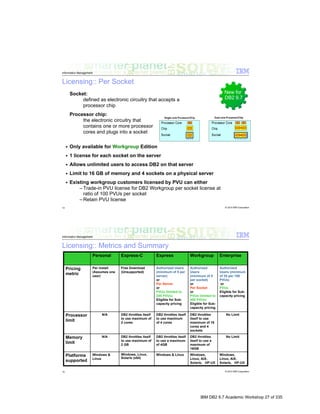
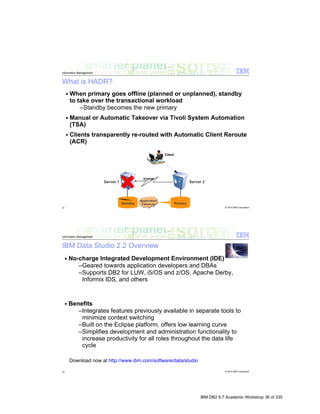
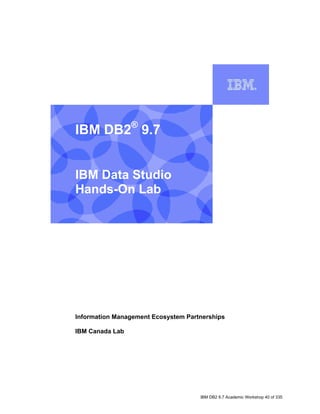
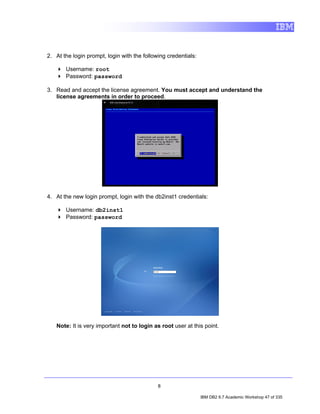
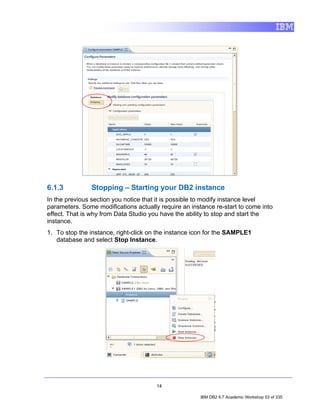
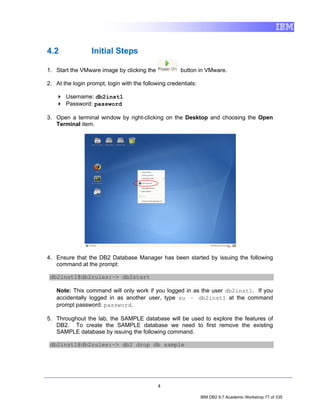
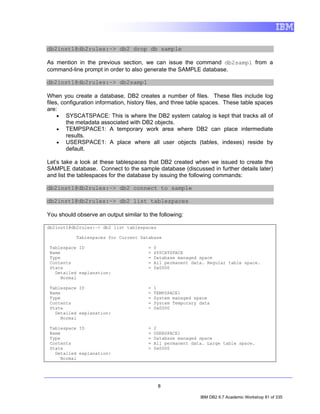
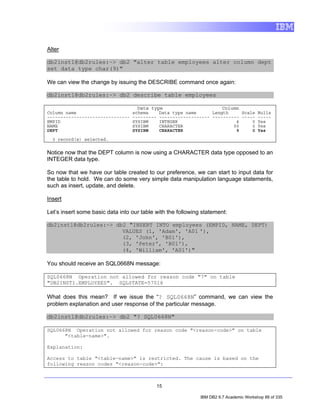
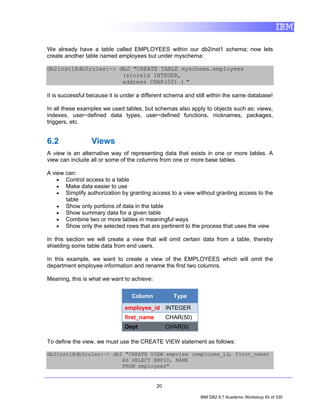
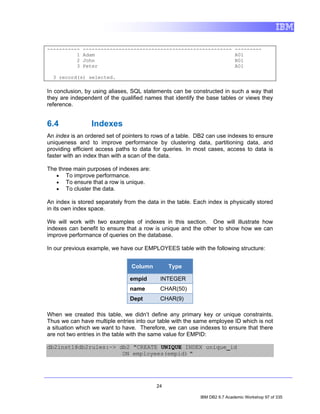
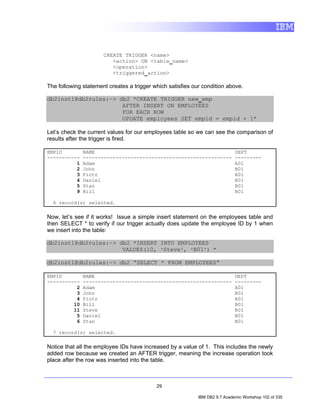
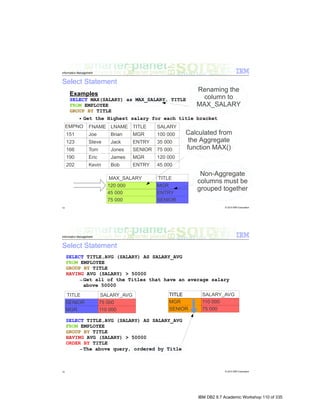
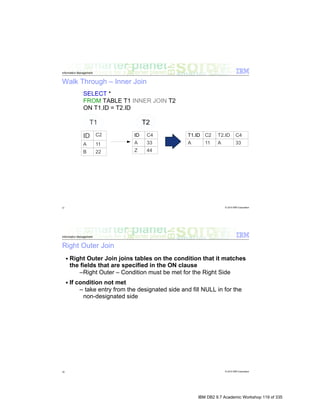
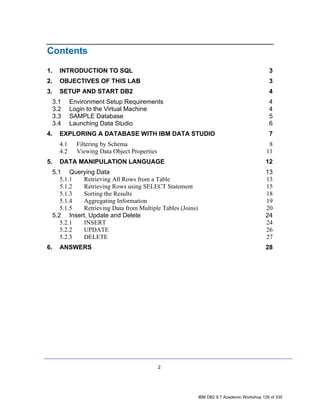
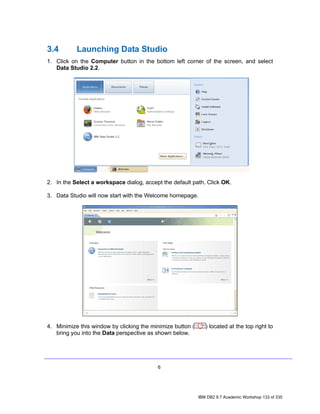
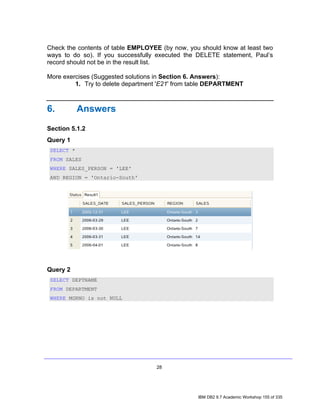
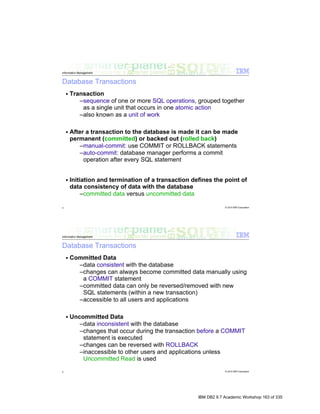
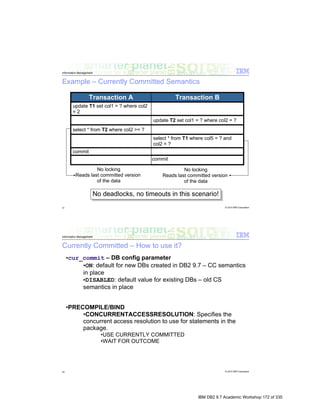
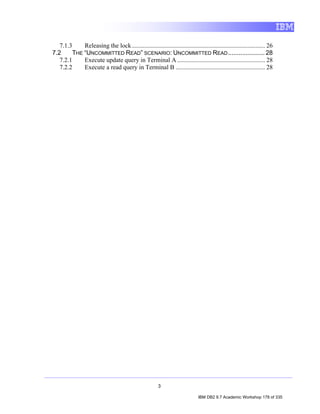
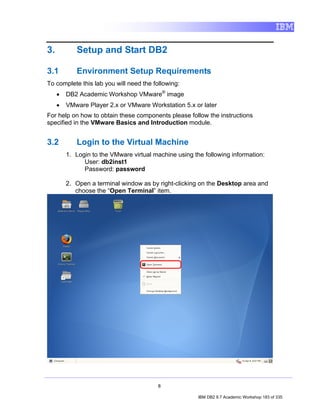
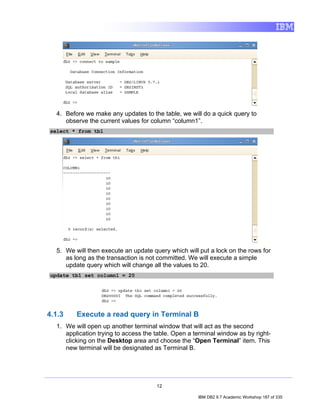
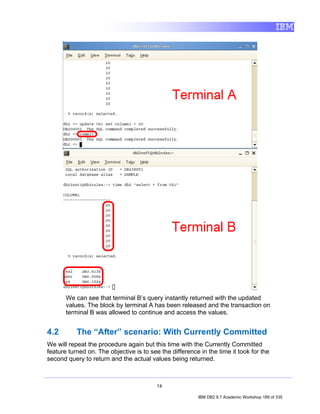
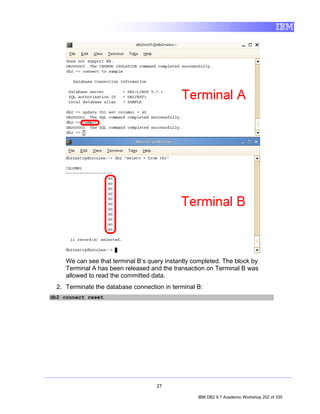
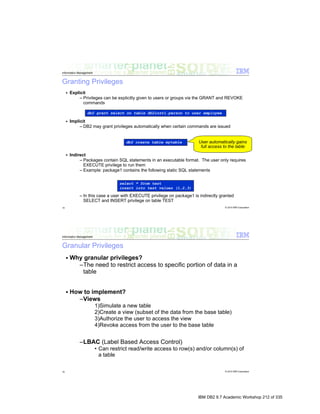
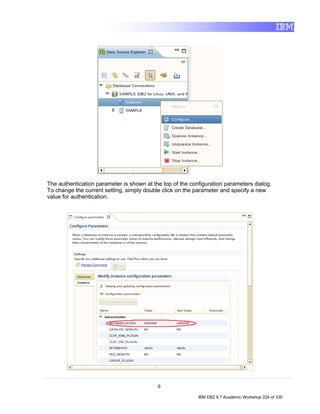
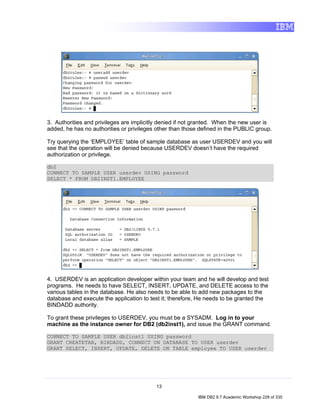
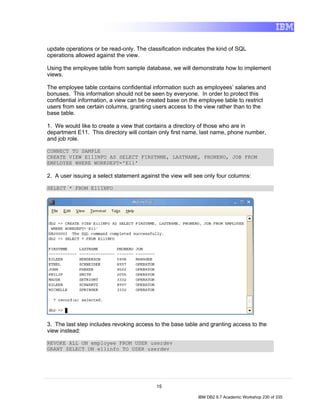
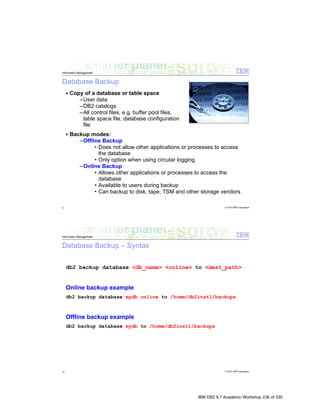
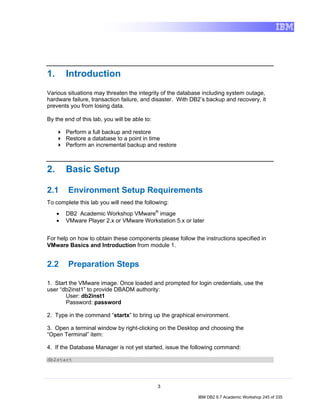
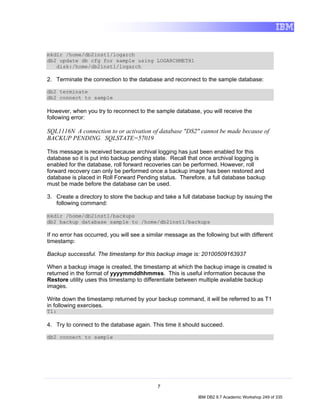
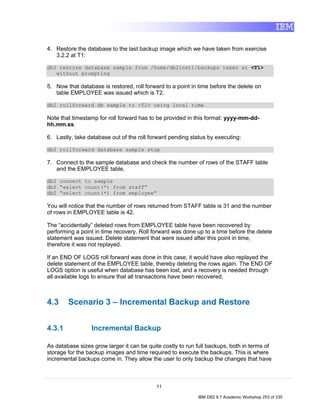
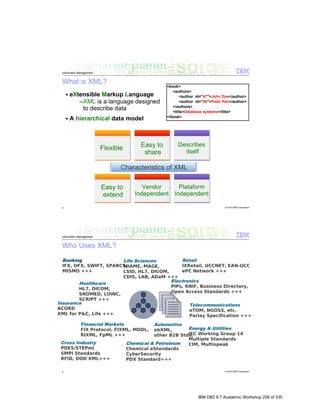
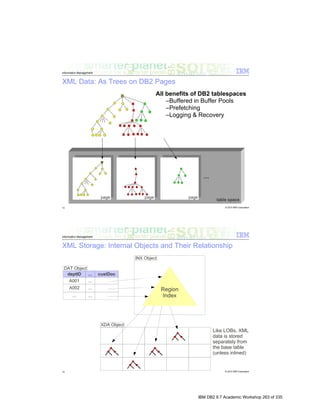
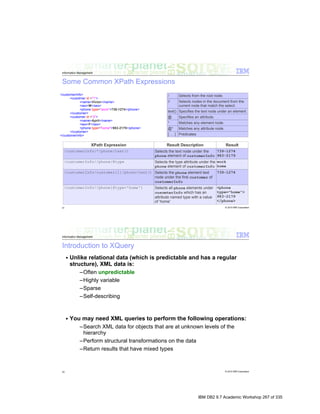
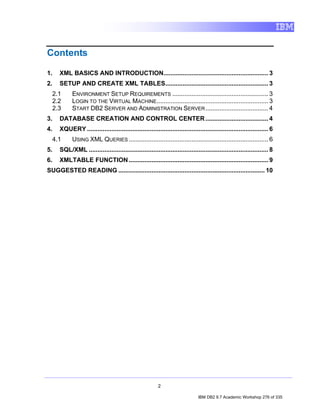
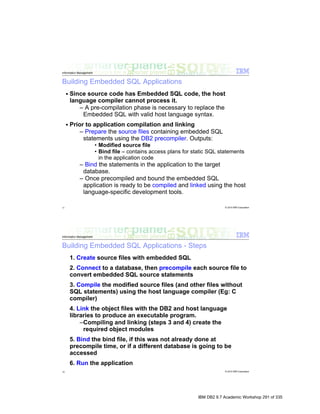
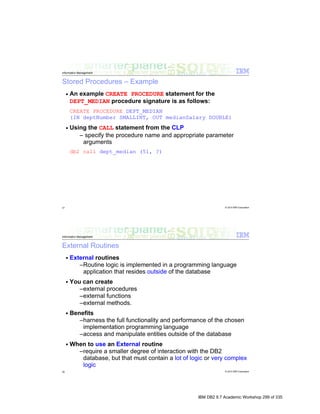
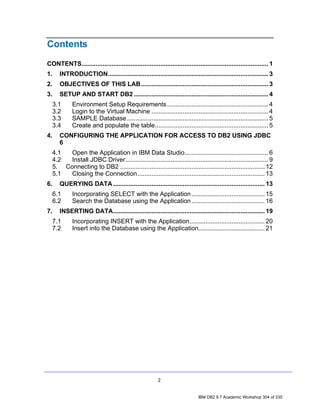
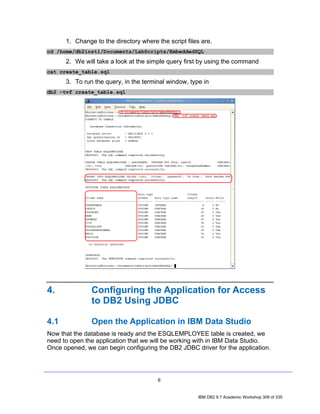
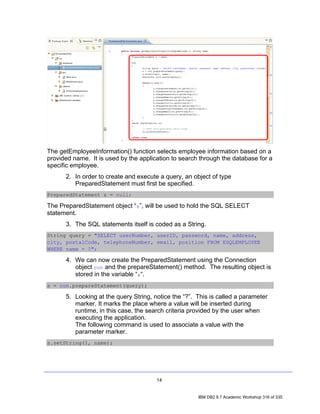
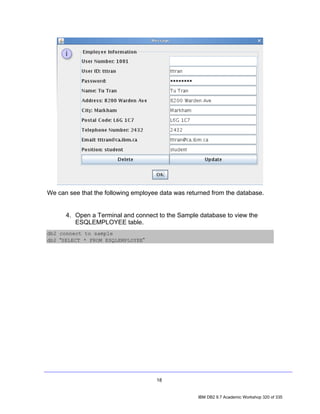
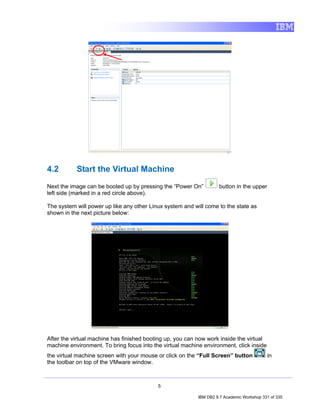
![3. Click OK. Notice that the SAMPLE [DB2 Alias] connection icon now has a
little yellow chain, signifying that the connection has been established.
4.1 Filtering by Schema
1. In the Data Source Explorer, expand the following nodes by clicking the
icons beside them: SAMPLE [DB2 for Linux...] > SAMPLE > Schemas.
8
IBM DB2 9.7 Academic Workshop 135 of 335](https://image.slidesharecdn.com/r9tdzce302coursebook-111014003815-phpapp02/85/IBM-COE-course-book-141-320.jpg)
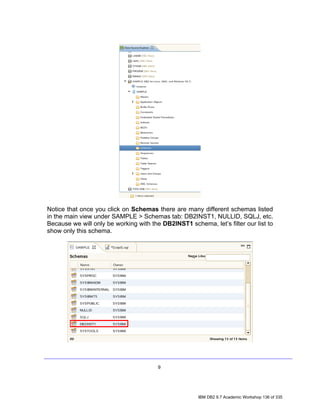
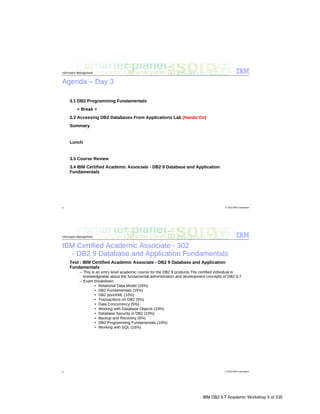
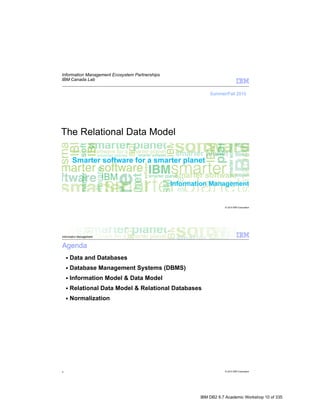
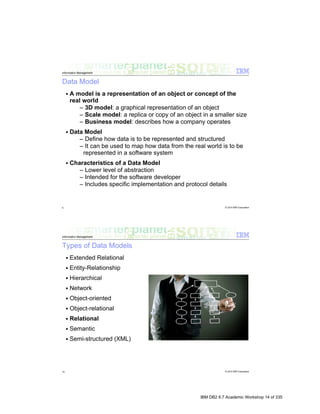
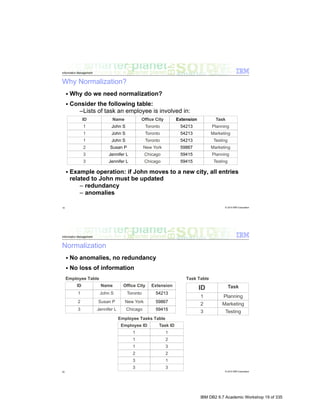
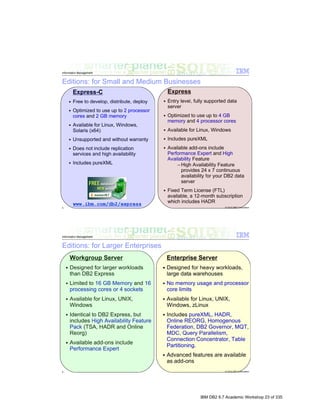
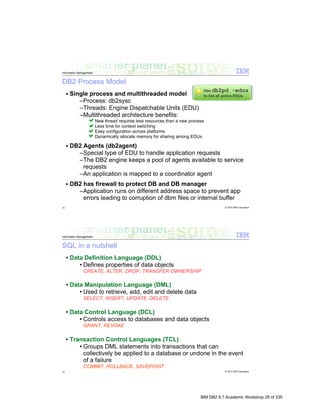
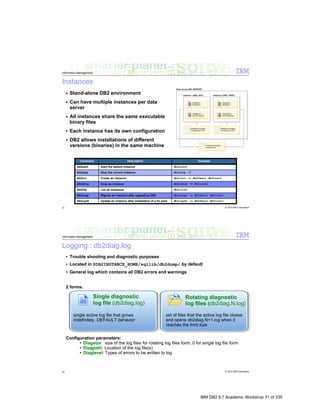
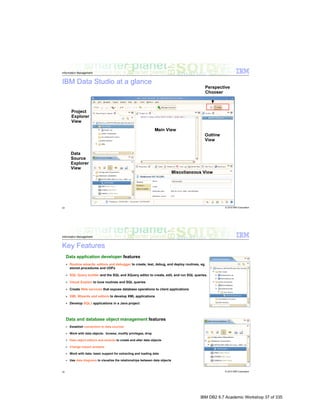
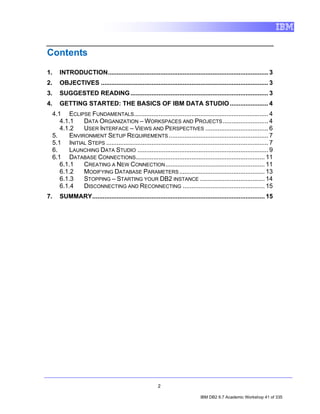
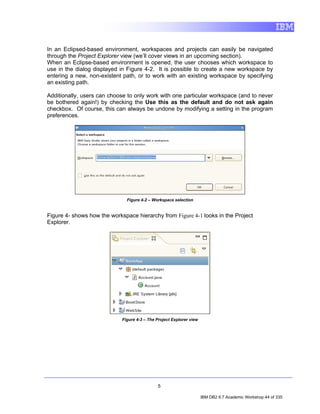
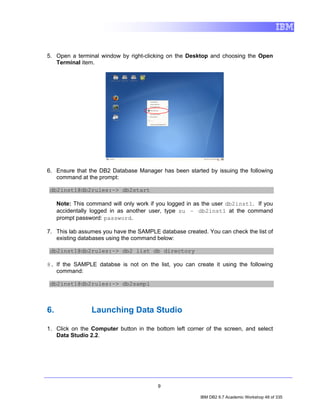
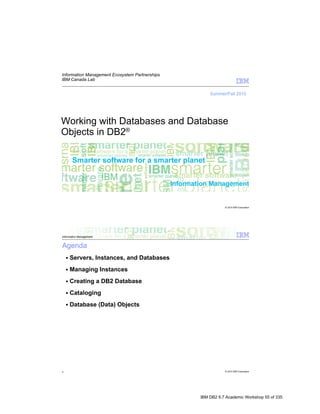
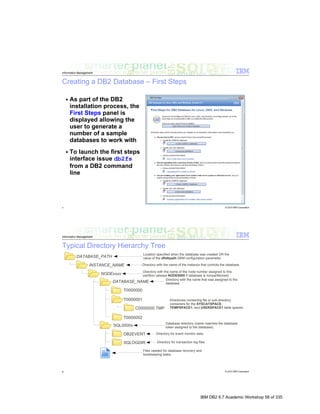
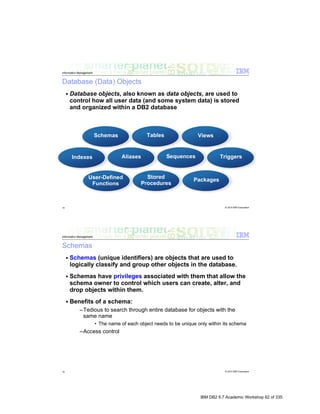
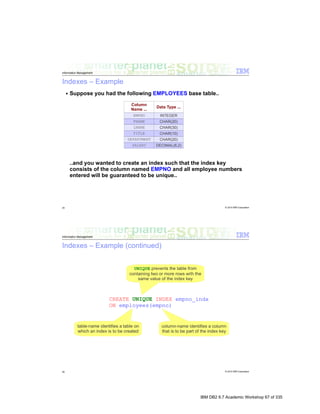
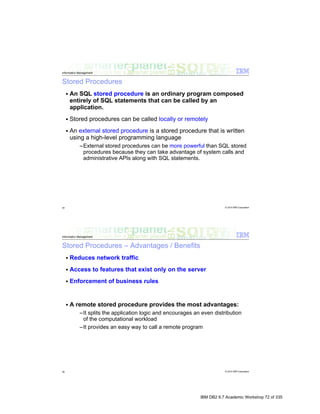
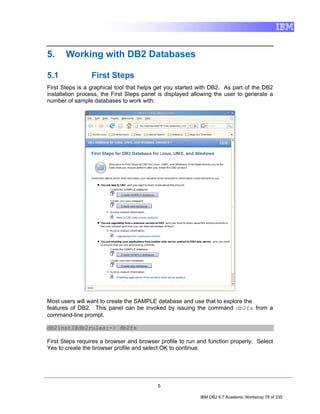
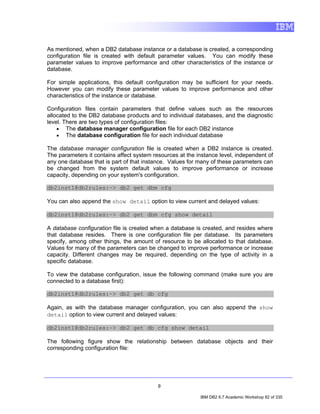
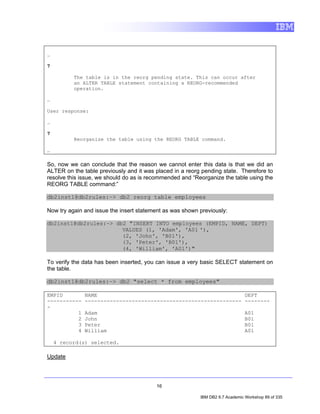
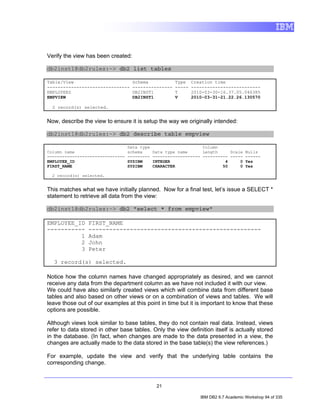
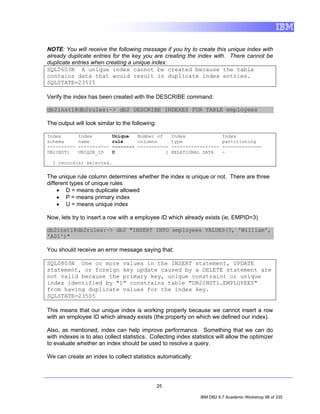
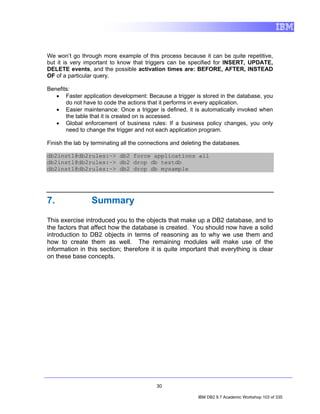
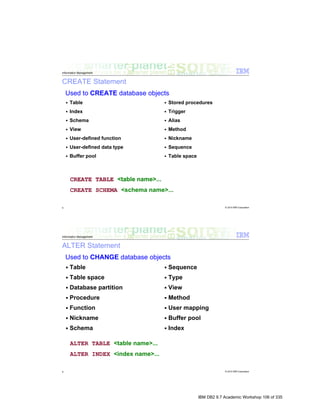
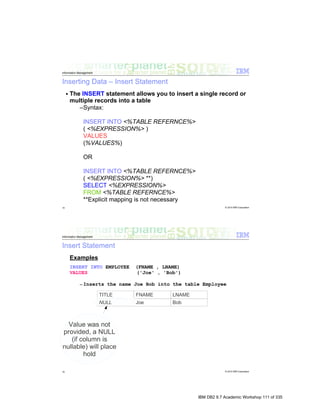
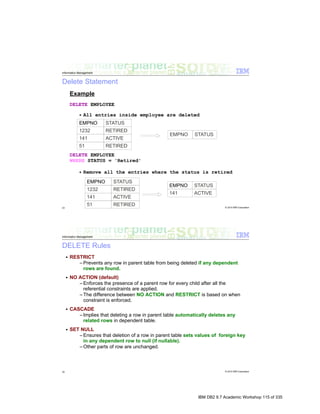
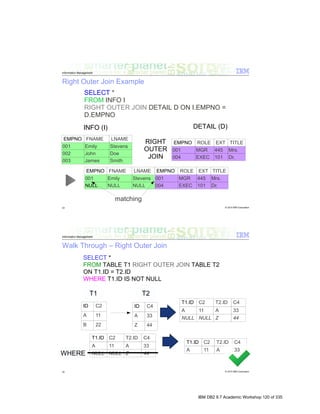
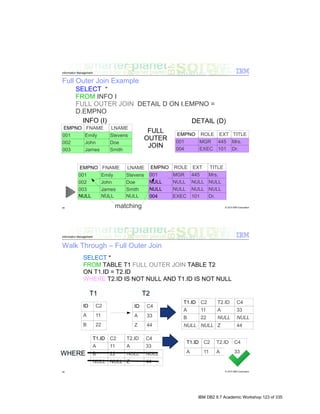
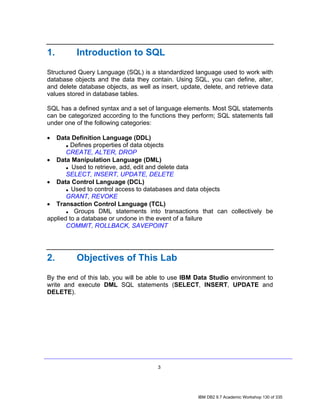
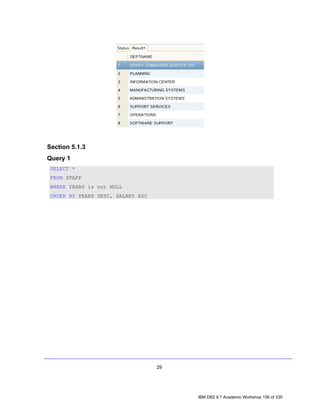
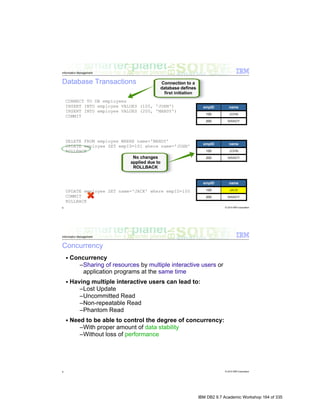
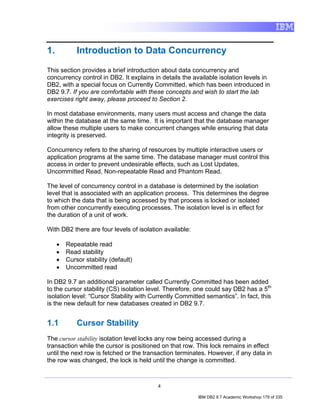
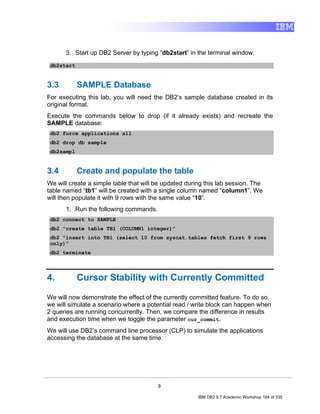
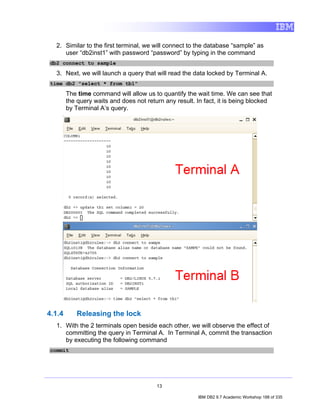
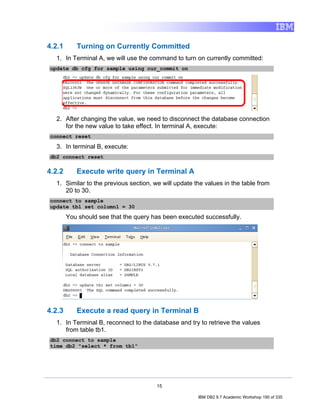
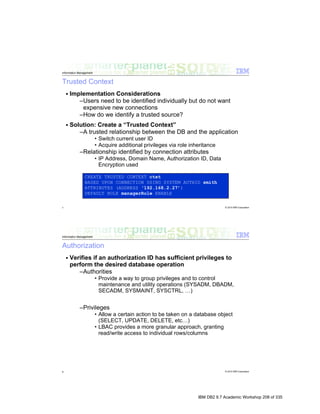
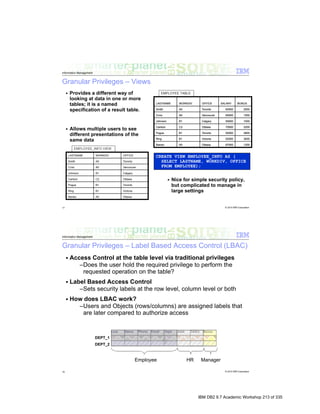
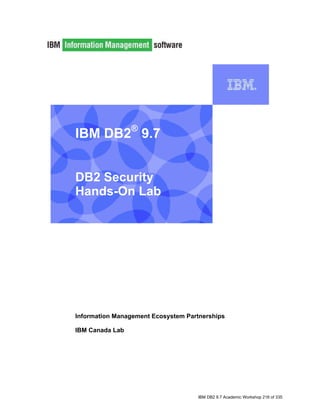
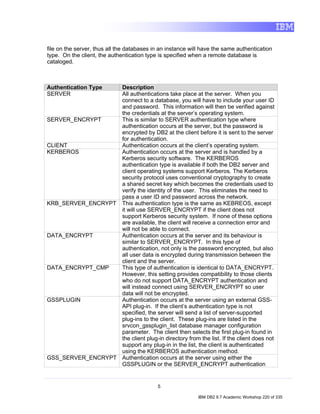
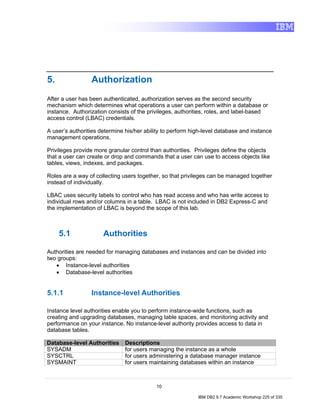
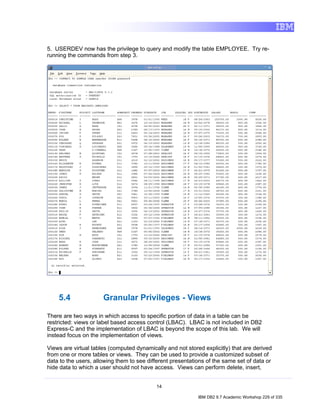
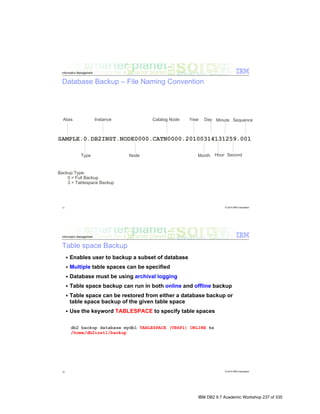
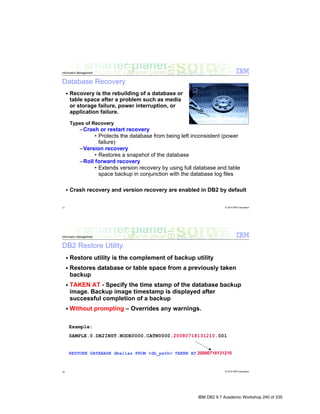
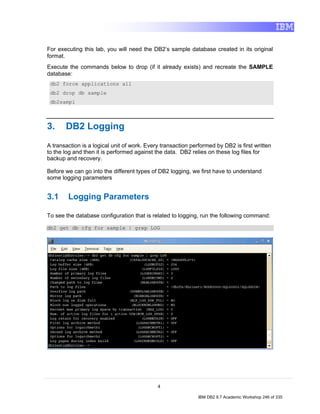
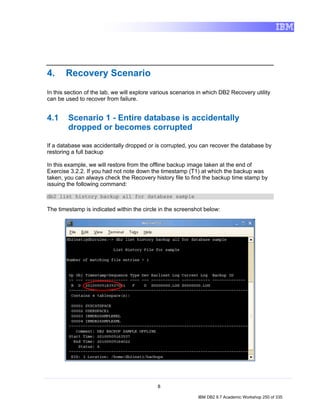
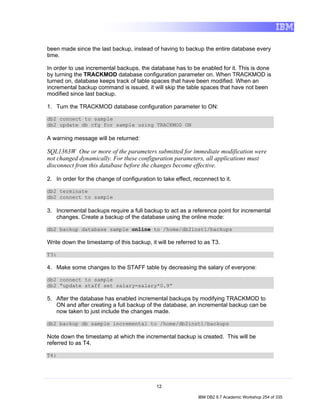
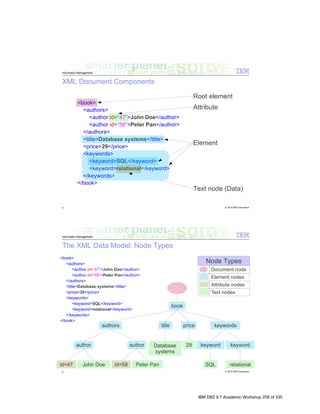
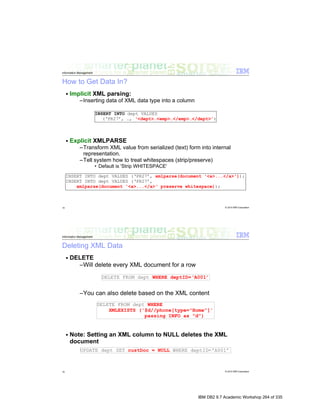
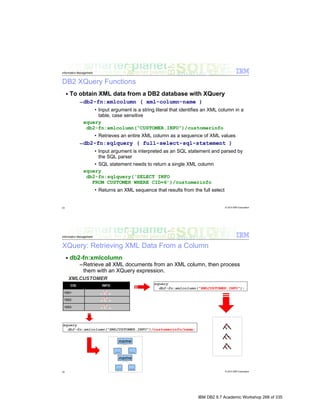
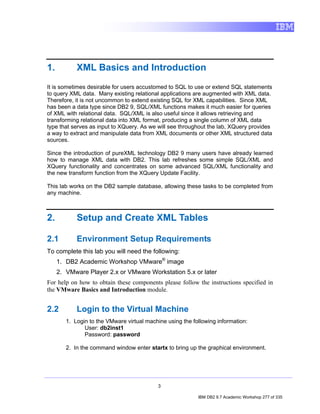
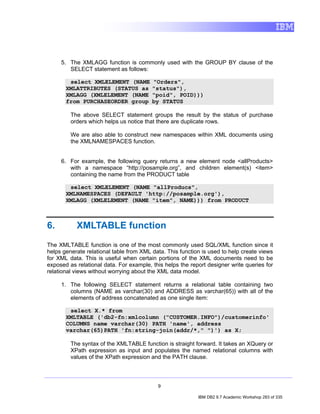
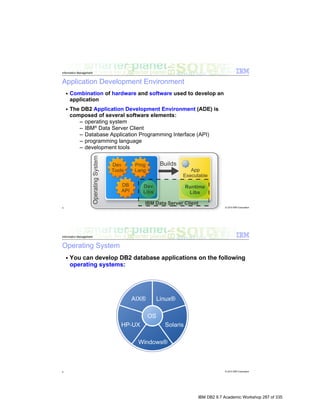
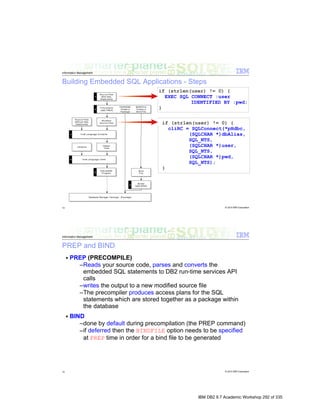
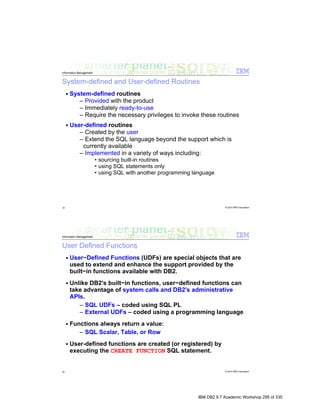
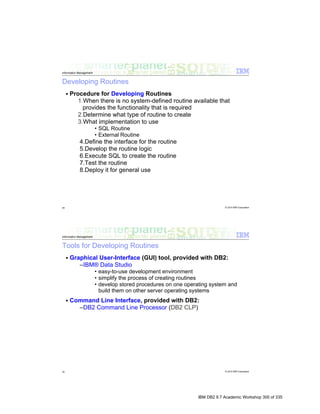
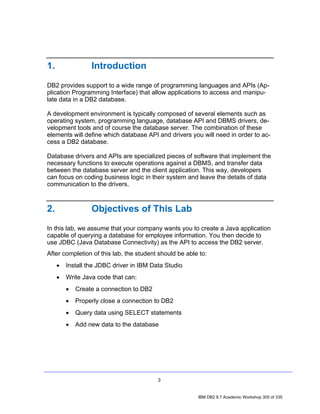
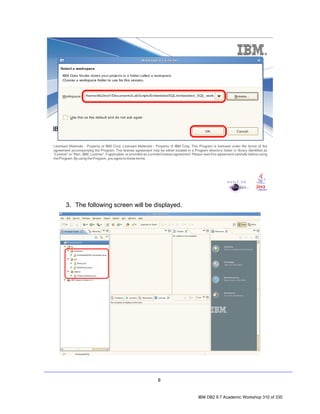
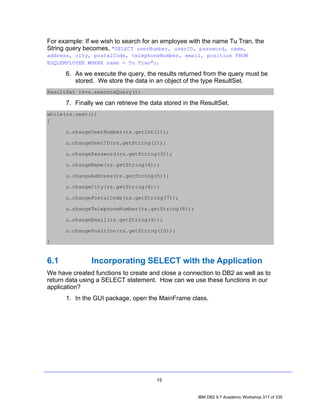
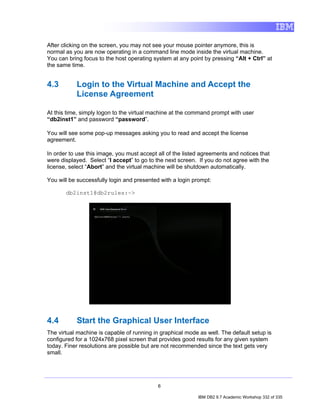
![2. In the Data Source Explorer, right-click on the Schemas node and select
Filter. The Filter dialog will appear, allowing you to filter either by typing in the
name of a schema (or a portion thereof), or by selecting from a list of schemas.
For this lab, we will filter by selection.
• Uncheck the Disable filter checkbox.
• Select the Selection radio button.
• Select Include selected items in the drop down list.
• Check the DB2INST1 checkbox.
• Click OK.
Repeat step 1 and notice that the previous Schemas node now reads Schemas
[Filtered]. Note as well that DB2INST1 is the only schema that appears in the
list.
10
IBM DB2 9.7 Academic Workshop 137 of 335](https://image.slidesharecdn.com/r9tdzce302coursebook-111014003815-phpapp02/85/IBM-COE-course-book-143-320.jpg)
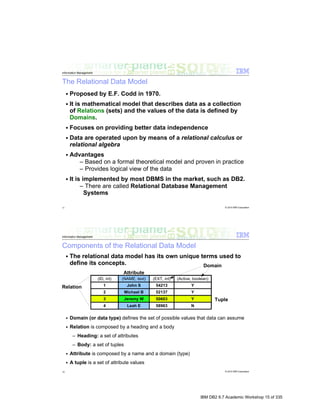
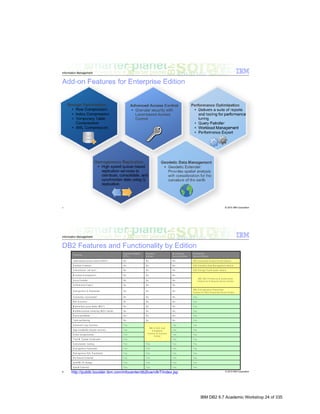
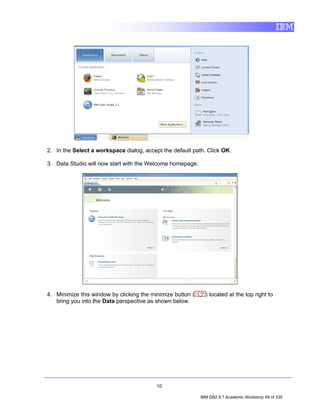
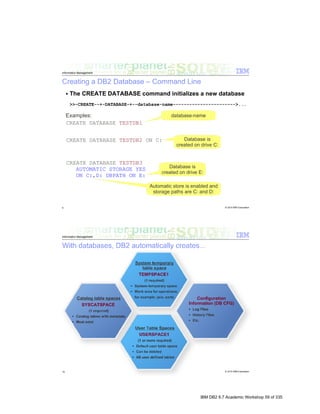
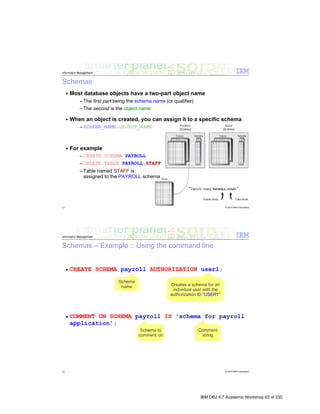
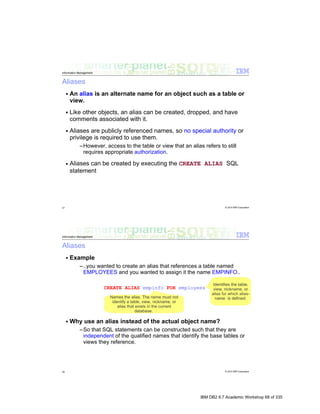
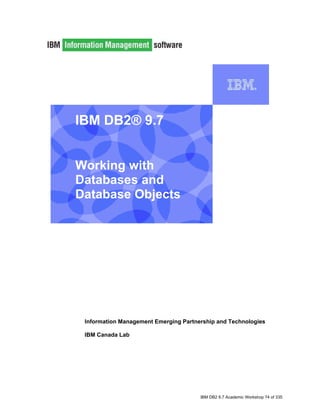
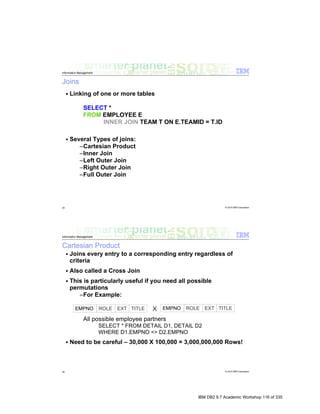
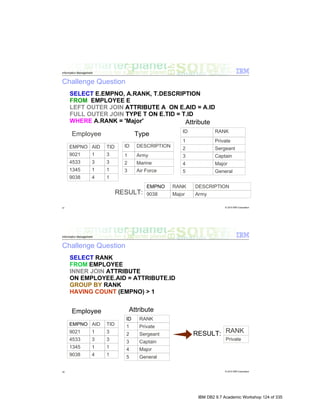
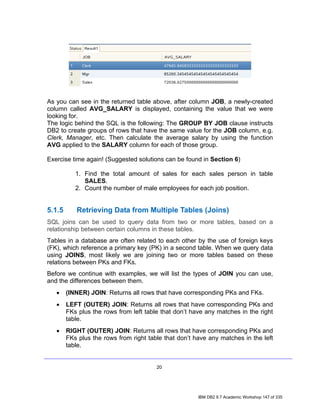
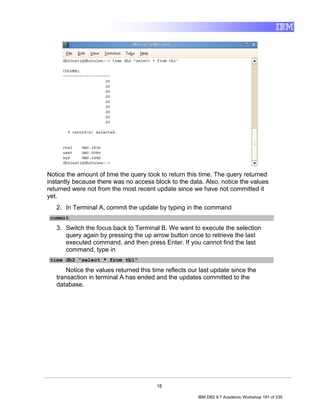
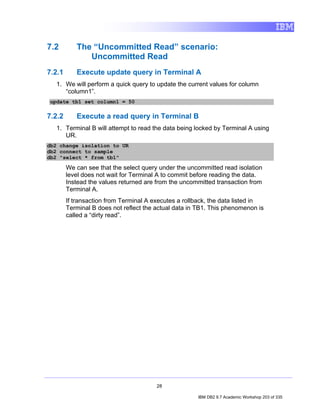
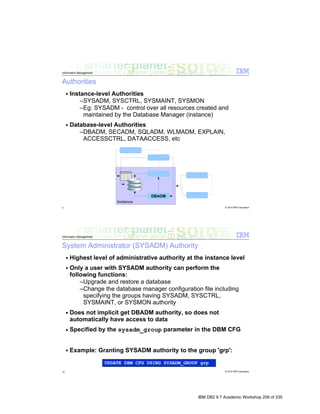
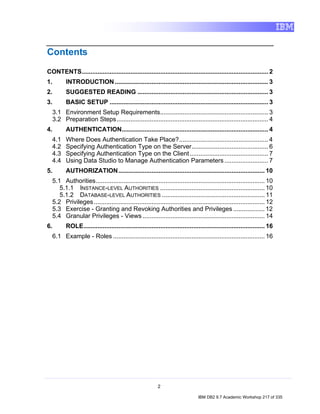
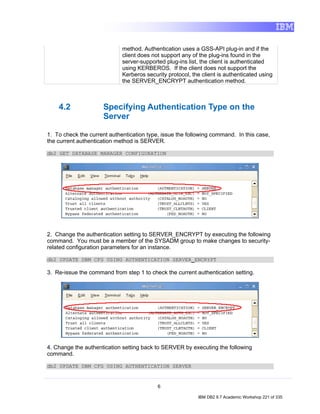
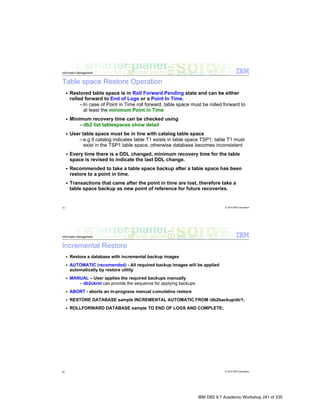
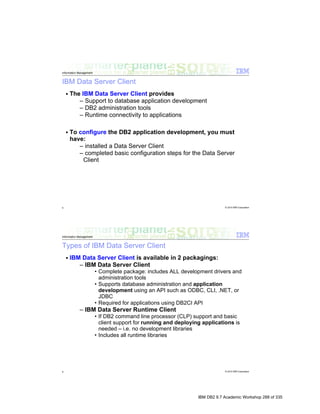
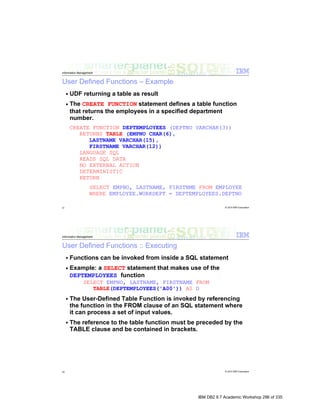
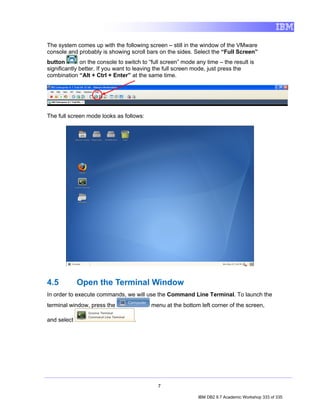
![4.2 Viewing Data Object Properties
Data Source Explorer allows users to view most properties of nearly every
single data object available such as tables, views, packages, sequences, and so
on. Let’s spend a moment viewing the properties of some table to see how the
Properties view works.
1. In the Data Source Explorer, go to: SAMPLE > Schemas [Filtered] >
DB2INST1 > Tables.
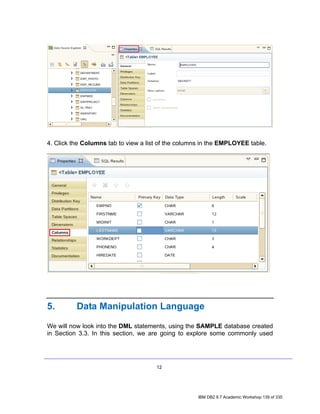
2. Select one of the listed tables, say, EMPLOYEE by clicking on it.
3. Select the Properties tab to the right of the Data Source Explorer.
11
IBM DB2 9.7 Academic Workshop 138 of 335](https://image.slidesharecdn.com/r9tdzce302coursebook-111014003815-phpapp02/85/IBM-COE-course-book-144-320.jpg)
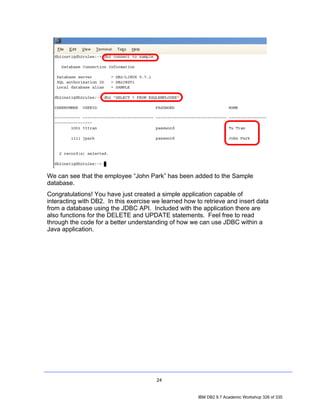
![DML statements by walking through examples, and then followed by some
exercises to test your understanding.
Before we move on to executing the SQL statements, make sure you are
connected to the SAMPLE database.
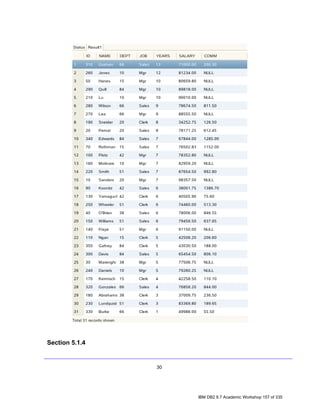
5.1 Querying Data
Because no database is worth much unless data can be obtained from it, it’s
important to understand how to use a SELECT SQL statement to retrieve data
from your tables.
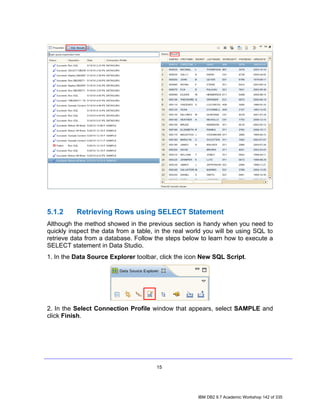
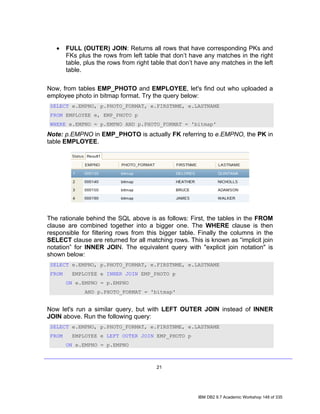
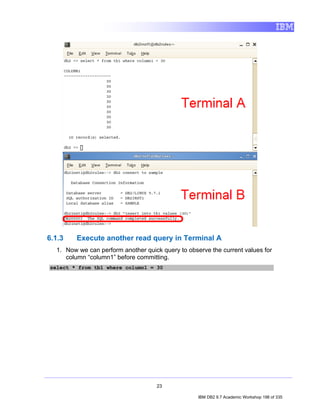
5.1.1 Retrieving All Rows from a Table
Before using SQL, we’ll quickly show you how to retrieve rows from a table just
using the Data Studio options, without the need to write SQL code.
1. In the Data Source Explorer view, direct to the table you want to return all the
rows. For example, SAMPLE [DB2 for Linux...] > SAMPLE > Schemas
[Filtered] > DB2INST1 > Tables > EMPLOYEE.
2. Right Click on the table EMPLOYEE, choose Data item, and then click on
Return All Rows.
13
IBM DB2 9.7 Academic Workshop 140 of 335](https://image.slidesharecdn.com/r9tdzce302coursebook-111014003815-phpapp02/85/IBM-COE-course-book-146-320.jpg)
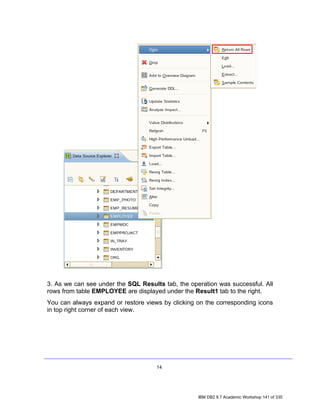


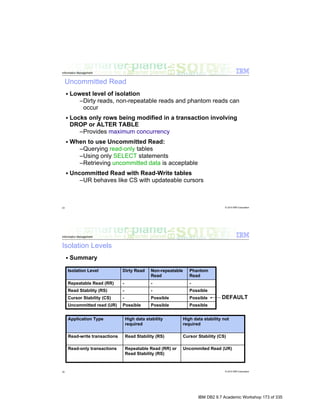


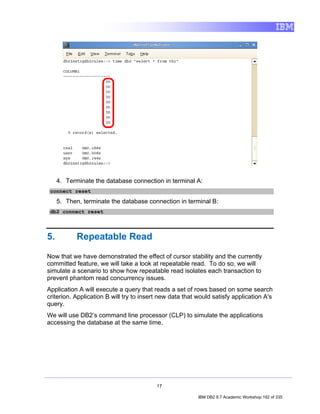

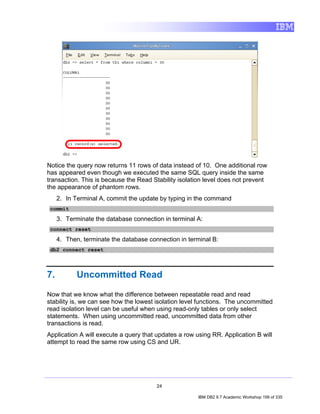
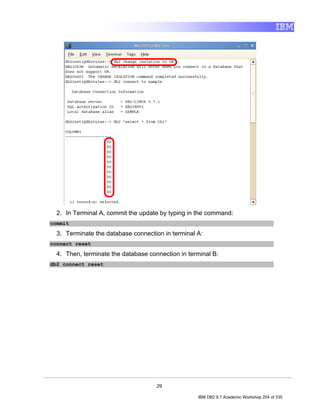


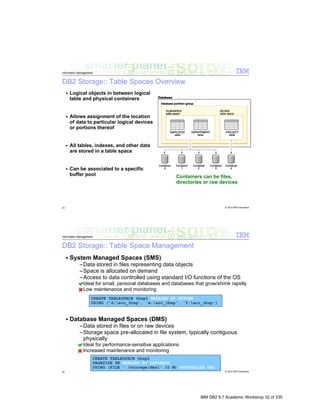
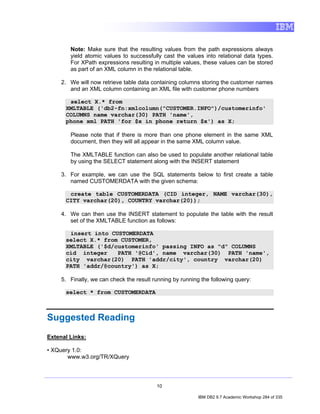
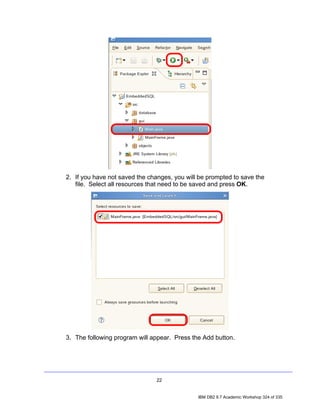
![8. Clear the results output by this command by right-clicking on the bottom panel
and selecting the “Clear Results” option.
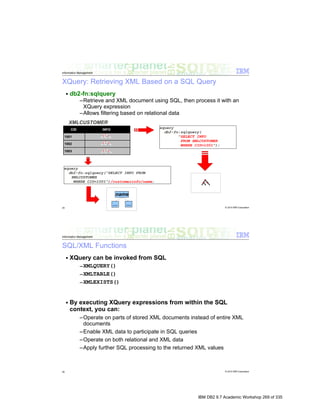
4. XQuery
XQuery is used for querying XML data in the same manner as SQL is used for querying
traditional relational data within databases. As we will see in the steps below, this is
achieved by allowing XQuery to use XPath expression syntax to address specific parts
of an XML document.
4.1 Using XML Queries
We are going to start by querying an XML document that contains a list of
customers with information; such as name, address, phone number, etc.
Note: All of the commands below should be placed on a single line as one query.
1. Enter the following query within the Command Editor window and click to
execute it and retrieve the results:
XQuery db2-fn:xmlcolumn("CUSTOMER.INFO");
You probably noticed that the function xmlcolumn returns the complete XML
document. If we want to retrieve specific information within the XML documents
we can use an XPath expression. Additionally, XPath allows us to specify
predicates within square brackets, in order to filter the results of your query.
2. In XPath, there is a special predicate called the positional predicate that returns
the node from a specified position for a given XML document. For example, the
XQuery below has an XPath expression containing the positional predicate
([1]) and always returns the first phone number from every XML document
(i.e. the first phone number of every customer). You may enter the query below
in the Command Editor window and execute the query to see the results.
xquery db2-fn:xmlcolumn("CUSTOMER.INFO")
/*:customerinfo/*:phone[1]
3. We can query for the details of customers who live in Toronto by entering the
following XQuery into the Command Editor window and executing the query to
see the results:
xquery db2-fn:xmlcolumn('CUSTOMER.INFO')/customerinfo[addr
/city ='Toronto']
6
IBM DB2 9.7 Academic Workshop 280 of 335](https://image.slidesharecdn.com/r9tdzce302coursebook-111014003815-phpapp02/85/IBM-COE-course-book-286-320.jpg)
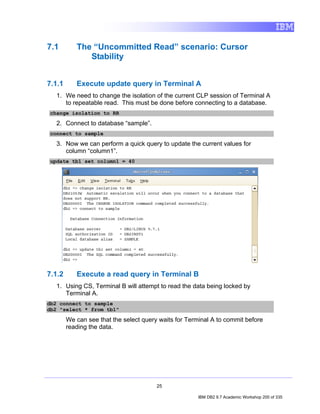
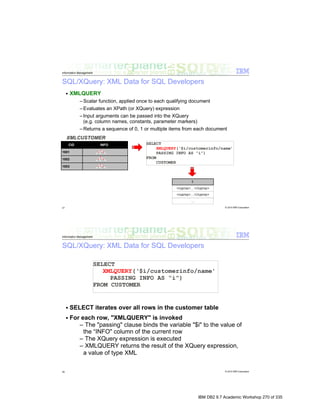
![4. We can write an XPath expression that fetchs the assistant name (without tags)
of the customer whose Cid is greater than 1003 and belongs to Canada with
the following:
xquery db2-fn:xmlcolumn("CUSTOMER.INFO")/*:customerinfo
[@Cid > 1003]/*:addr[@country="Canada"]/../*:assistant
/*:name/text()
5. Now retrieve the names of customers that have a “work” phone number of
“905-555-7258” as follows:
xquery db2-fn:xmlcolumn('CUSTOMER.INFO')/
customerinfo/phone[@type='work' and text()='905-555-
7258']/../name
6. Then we can retrieve the cities where the country is “Canada” using the
following query:
xquery db2-
fn:xmlcolumn('CUSTOMER.INFO')//addr[@country="Canada"]/city
7. So far we have seen how to fetch individual element/attribute values from an
XML document. XQuery further allows construction of XML documents during
querying. Now, we will write an XQuery that returns a single element
<ShippedItems> containing the names of all items from orders that have been
shipped;
xquery <ShippedItems>
{db2-fn:xmlcolumn("PURCHASEORDER.PORDER")
/*:PurchaseOrder[@Status="Shipped"]/*:item/*:name}
</ShippedItems>
8. Apart from constructing XML fragments on the fly, XQuery also allows nested
loop operations. The XQuery expression shown below returns the name and
quantity of all items from the purchase orders whose status is shipped (You
may use a second “for” clause to iterate over the quantity of items):
xquery for $po in
db2-fn:xmlcolumn("PURCHASEORDER.PORDER")/*:PurchaseOrder
for $quantity in $po/*:item/*:quantity
where $po/@Status="Shipped"
return ($po/*:item/*:name, $quantity)
7
IBM DB2 9.7 Academic Workshop 281 of 335](https://image.slidesharecdn.com/r9tdzce302coursebook-111014003815-phpapp02/85/IBM-COE-course-book-287-320.jpg)
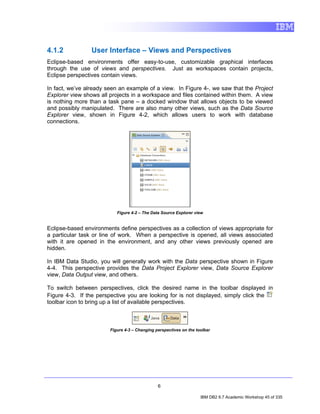
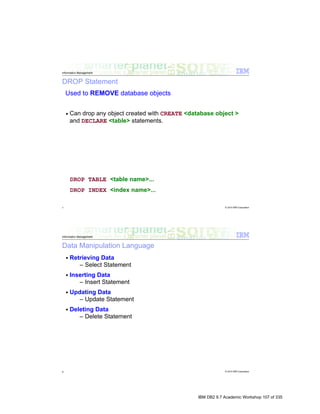
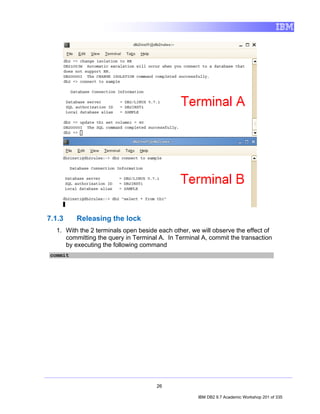
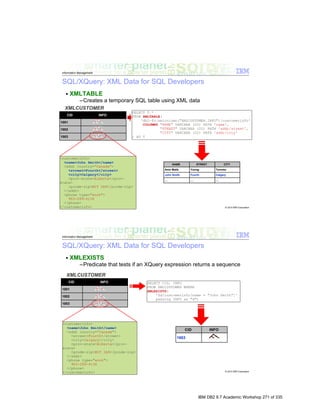
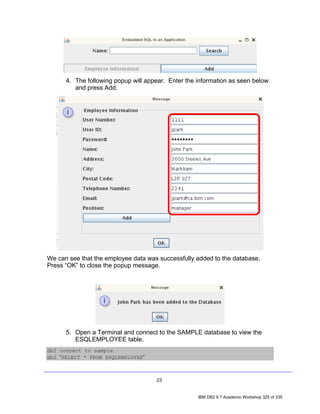
![5. SQL/XML
Apart from supporting XQuery, DB2 also provides a number of built in SQL/XML
functions that can transform XML data into relational and vice versa. Some of the
SQL/XML functions can also be used for parsing, serializing and casting XML data type
into relational types.
We can now look at a couple of SQL/XML functions such as XMLQUERY, XMLEXISTS
that are used to fetch XML nodes that satisfy a given predicate.
1. The following SELECT statement returns the customer IDs (CID) of only those
customers who have an assistant:
select CID from CUSTOMER where XMLEXISTS
('$d/customerinfo/assistant' passing INFO as "d")
Here, only the CID is returned for the documents containing an assistant
element
2. The following SELECT statement returns all the customers whose address
country is “Canada” and whose city is “Toronto”:
select XMLQUERY( '$d/*:customerinfo/*:name' passing INFO
as "d") from CUSTOMER where XMLEXISTS
('$x/*:customerinfo/*:addr[@country ="Canada" and
*:city="Toronto"]' passing INFO as "x");
3. We will now construct an XML document with a <PurchaseOrder> element tag
and 4 children element tags (poid, status, custid and orderdate). The values for
the document can be obtained from the PURCHASEORDER table where the
POID is 5001.
select XMLELEMENT (NAME "PurchaseOrder",
XMLELEMENT (NAME "poid", POID),
XMLELEMENT (NAME "status", STATUS),
XMLELEMENT (NAME "custid", CUSTID),
XMLELEMENT (NAME "orderdate", ORDERDATE))
from PURCHASEORDER where POID = 5001
4. The SQL/XML function XMLAGG aggregates certain values together into one
group. The following SELECT statement returns an XML fragment with parent
element <Orders> containing all the POIDs from table PURCHASEORDER as
children:
select XMLELEMENT (NAME "Orders",
XMLAGG (XMLELEMENT (NAME "poid", POID))) from PURCHASEORDER
8
IBM DB2 9.7 Academic Workshop 282 of 335](https://image.slidesharecdn.com/r9tdzce302coursebook-111014003815-phpapp02/85/IBM-COE-course-book-288-320.jpg)


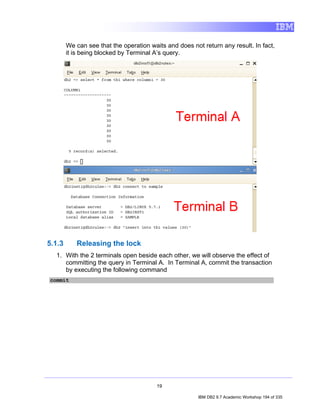
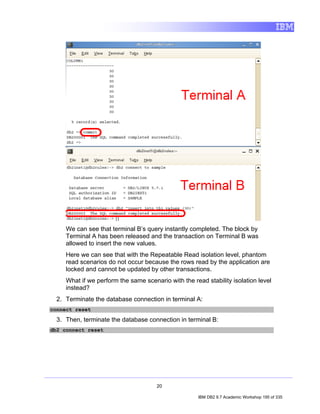
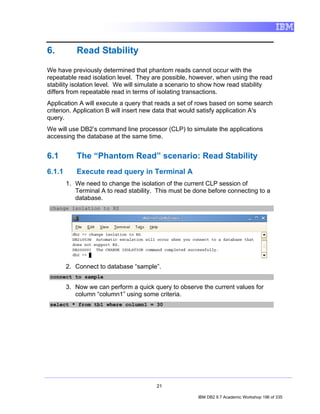
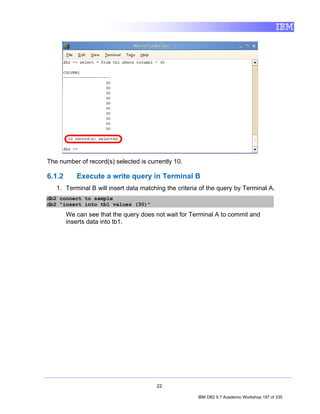
This document provides an introduction to IBM Data Studio, an Eclipse-based environment for developing and administering DB2 databases. The document outlines the objectives of the lab, which are to understand the basics of an Eclipse environment, establish a database connection, modify database parameters, and start and stop a DB2 instance. It also provides instructions on launching Data Studio, creating and modifying database connections, and disconnecting and reconnecting to databases. The lab introduces users to the key features and functionality of IBM Data Studio.


![[Uruguay] DB2 Web Query for i - Hernando Bedoya](https://cdn.slidesharecdn.com/ss_thumbnails/db2webquery-111121131455-phpapp01-thumbnail.jpg?width=640&height=640&fit=bounds)


