SlideShare a Scribd company logo
1 of 43
Download to read offline
Core Data Tutorial for
iOS
Contents
Introduction 5
Organization of This Document 6
Starting Out 7
Create the Project 8
Understanding a Core Data–Based Project 9
The Core Data Stack 9
Managed Objects and the Managed Object Context 10
The Managed Object Model 11
Persistent Store Coordinator 12
The Table View Controller 14
Creating and Defining the RootViewController Class 14
Implementing the RootViewController Class 15
Synthesize the Properties 16
Write the Accessor Method for the Core Location Manager 16
Implementing viewDidLoad 17
Implement Methods for Memory Management 18
Configuring the Application Delegate 18
Add the Navigation Controller Property 18
Implement the Application Delegate 19
Build and Test 20
Managed Object and Model 22
Modeling Your Data 22
Add the Entity 22
Add the Attributes 23
Custom Managed Object Class 25
Core Data Recap 26
Adding Events 27
Implementing the addEvent Method 27
Get the Current Location 27
Create and Configure the Event object 28
2012-12-13 | © 2012 Apple Inc. All Rights Reserved.
2
Save the New Event 28
Handling Errors 29
Update the Events Array and the Table View 29
Displaying Events in the Table View 30
Build and Test 32
Core Data Recap 32
Fetching Events 33
Fetching Managed Objects 33
Creating and Executing the Request 34
Create the Request 34
Set the Sort Descriptor 35
Execute the Request 35
Finish Up 36
Build and Test 36
Core Data Recap 36
Deleting Events 37
Deleting Managed Objects 37
Deleting an Event 37
Build and Test 38
Core Data Recap 38
Next Steps 40
The Core Data Utility Tutorial 40
Use a Fetched Results Controller 40
Creating a Managed Object Model with Xcode 40
A Drill-Down Interface 41
Add an Add Sheet 41
Document Revision History 42
2012-12-13 | © 2012 Apple Inc. All Rights Reserved.
3
Contents
Figures
Starting Out 7
Figure 1-1 A simple Core Data stack 10
Figure 1-2 Managed objects in a context, and a table in the persistent store 11
Figure 1-3 An entity description, a table in the database, and a managed object. 11
Figure 1-4 A complex Core Data stack 13
2012-12-13 | © 2012 Apple Inc. All Rights Reserved.
4
Core Data is a schema-driven object graph management and persistence framework. Fundamentally, Core
Data helps you to save model objects (in the sense of the model-view-controller design pattern) to a file and
get them back again. This is similar to archiving (see Archives and Serializations Programming Guide), but Core
Data offers much more than that. Amongst other things, it:
● Provides an infrastructure for managing all the changes to your model objects. This gives you automatic
support for undo and redo, and for maintaining reciprocal relationships between objects.
● Allows you to keep just a subset of your model objects in memory at any given time. This is especially
important on iOS where conserving memory is critical.
● Uses a schema to describe the model objects. You define the principal features of your model
classes—including the relationships between them—in a GUI-based editor. This provides a wealth of basic
functionality “for free,” including setting of default values and attribute value validation.
● Allows you to maintain disjoint sets of edits of your objects. This is useful if you want to, for example, allow
the user to make edits in one view that may be discarded without affecting data displayed in another
view.
● Has an infrastructure for data store versioning and migration. This lets you easily upgrade an old version
of the user’s file to the current version.
Core Data is available on iOS 3.0 and later.
You should read this document to learn how to use Core Data on iOS, including:
● The fundamental design patterns and techniques that underlie Core Data
● The basics of using the Xcode data modeling tool
● How to create, update, and delete objects managed by Core Data, and how to commit changes to a data
store
2012-12-13 | © 2012 Apple Inc. All Rights Reserved.
5
Introduction
Important: Core Data is not an entry-level technology. Before starting to use Core Data, you must understand
the basics of iOS application development, including:
● How to use Xcode and Interface Builder
● Fundamental design patterns such as model-view-controller and delegation
● How to use view controllers, navigation controllers, and table views
None of these tools and techniques are explained in this tutorial, so that the content can focus on Core
Data itself.
Documents you should read to gain adequate experience include:
● Your First iOS App
● Xcode Workspace Guide
● Cocoa Fundamentals Guide
● View Controller Programming Guide for iOS
● Table View Programming Guide for iOS
Organization of This Document
This tutorial comprises the following chapters:
● “Starting Out” (page 7)
● “The Table View Controller” (page 14)
● “Managed Object and Model” (page 22)
● “Adding Events” (page 27)
● “Fetching Events” (page 33)
● “Deleting Events” (page 37)
● “Next Steps” (page 40)
The source code for the tutorial is provided in the Locations sample code.
Introduction
Organization of This Document
2012-12-13 | © 2012 Apple Inc. All Rights Reserved.
6
The goals of this chapter are to describe the application that you will build, then to create the Xcode project
and to understand the basics of what the Xcode project template gives you.
The goal of this tutorial is to provide a practical introduction to the Core Data framework and how you use it.
The aim here is not to create a polished application, but rather to illustrate the fundamental classes, tools, and
techniques you’ll use in any Core Data–based program. It doesn’t provide in-depth explanations of all the
features the framework offers, but it does give references to other documents you can read to gain a deeper
understanding.
To add a bit more interest, the tutorial also makes use of the Core Location framework. The Core Location
manager is a straightforward object, and for the purposes of this project you don’t need to understand it in
any detail.
The application you create is conceptually simple—it lets you record your location at any time as an “event,”
and uses a table view to show the time, latitude, and longitude of all the events you’ve recorded. It has an Add
button to add a new event, and an Edit button that allows you to delete events from the list.
2012-12-13 | © 2012 Apple Inc. All Rights Reserved.
7
Starting Out
In this tutorial, you use Core Data primarily to represent the Event objects and store them in an external file
so that they can be displayed when the application launches.
Note: As a convention, >> denotes the beginning of a paragraph (sometimes including the following
bulleted list) that contains steps that you must perform in the tutorial.
In code listings, comments included in Xcode template files are not shown.
Create the Project
The only steps in this chapter are to create the project itself and link against the Core Location framework.
>> In Xcode, create a Project using the Window-Based Application template in the iOS section. In the Options
section, select the switch to use Core Data for storage. Call the project “Locations”.
It’s important that you call the project “Locations” if you want to copy and paste code required later in the
tutorial.
>> link the project against the Core Location framework.
Starting Out
Create the Project
2012-12-13 | © 2012 Apple Inc. All Rights Reserved.
8
Understanding a Core Data–Based Project
Together with various other supporting files, the template provides you with:
● An application delegate class
● A MainWindow interface (.xib) file
● A Core Data model (.xcdatamodeld) file—typically referred to as the managed object model
The application also links against the Core Data framework.
Of the resources, the first two should be familiar, although the details of the delegate class will be new. The
model file is described later in “Managed Object and Model” (page 22). For now, examine the header file of
the application delegate class. In addition to the standard window and view controller, it provides (amongst
other features) three properties and two methods:
@property (nonatomic, retain, readonly) NSManagedObjectContext *managedObjectContext;
@property (nonatomic, retain, readonly) NSManagedObjectModel *managedObjectModel;
@property (nonatomic, retain, readonly) NSPersistentStoreCoordinator
*persistentStoreCoordinator;
- (NSURL *)applicationDocumentsDirectory;
- (void)saveContext;
As its name implies, the applicationDocumentsDirectory method simply returns the URL identifying the
application’s documents directory, which is where the file containing the application’s data will be located.
The properties provide access to what’s called the Core Data stack, and saveContext saves changes you make
to model objects to the data file.
The Core Data Stack
Stack is the term used to describe a collection of Core Data framework objects that work together to get
modeled objects from and save data to a persistent store—the file where your data is stored. Conceptually,
a persistent store is like a database, with tables and records. (One of the store types you can use with Core
Data is SQLite, but the store doesn’t have to be an actual database.)
Starting Out
Understanding a Core Data–Based Project
2012-12-13 | © 2012 Apple Inc. All Rights Reserved.
9
Figure 1-1 (page 10) shows the simplest—and most common—configuration of the stack.
Figure 1-1 A simple Core Data stack
Store
File
Persistent Object Store
A collection of object data
Managed Object Model
A collection of entity descriptions
Managed Object Context
A collection of managed objects
Persistent Store Coordinator
A collection of stores
The objects you usually work directly with are at the top of the stack—the managed object context and the
managed objects it contains.
Managed Objects and the Managed Object Context
A managed object is an instance of NSManagedObject or of a subclass of NSManagedObject. Conceptually,
it’s an object representation of a record in a table in a database, so it’s a model (in the sense of the
model-view-controller design pattern) object that is managed by Core Data. Managed objects represent the data
you operate on in your application—for example departments and employees in a human resources application;
shapes, text areas, and groups in a drawing application; albums, artists, and tracks in a music management
application. A managed object is always associated with a managed object context.
The managed object context is an instance of NSManagedObjectContext. A context represents a single
object space, or scratch pad, in an application. Its primary responsibility is to manage a collection of managed
objects. These objects form a group of related model objects that represent an internally consistent view of
one or more persistent stores. The context is a powerful object with a central role in your application, with
responsibilities from life-cycle management to validation, relationship maintenance, and undo/redo.
When you create a new managed object, you insert it into a context. You fetch existing records in the database
into the context as managed objects. (Fetching is discussed in greater detail in “Fetching Events” (page 33).)
Any changes you make (whether insertion or deletion of complete objects, or manipulation of property values)
are kept in memory until you actually commit them to the store by saving the context.
Starting Out
The Core Data Stack
2012-12-13 | © 2012 Apple Inc. All Rights Reserved.
10
Figure 1-2 (page 11) illustrates a managed object context that contains two managed objects corresponding
to two records in an external database. In one of the objects, a property value has been changed in memory,
but the change has not been committed to the database. Notice that there are two additional records in the
database for which there are no corresponding managed objects.
Figure 1-2 Managed objects in a context, and a table in the persistent store
Managed Object Context
Employee
name
salary
Fred
90000
Employee
name
salary
Nigel
60000 Unsaved data
name
Fred
salary
90000
97000
Nigel 50000
Tanya 56000
Employee
Juli
Current data
The Managed Object Model
A managed object model is an instance of NSManagedObjectModel. It’s an object representation of a schema
that describes your database, and so the managed objects you use in your application. A model is a collection
of entity description objects (instances of NSEntityDescription). An entity description describes an entity
(a table in a database) in terms of its name, the name of the class used to represent the entity in your application,
and what properties (attributes and relationships) it has.
Figure 1-3 (page 11) illustrates the relationship between an entity description in a model, a table in the database,
and a managed object corresponding to a single record in the table.
Figure 1-3 An entity description, a table in the database, and a managed object.
Managed Object
name
salary
Fred
97000
entityDescription
Entity Description
Name
Managed Object Class
Attribute
Attribute
“Employee”
NSManagedObject
name
salary
Starting Out
The Core Data Stack
2012-12-13 | © 2012 Apple Inc. All Rights Reserved.
11
Every managed object has a reference to the entity of which it is an instance.
Core Data uses the model to map between managed objects in your application and records in the database.
It’s important to be aware that if you change the schema in your application, Core Data won’t be able to read
stores you created using the previous model. (This is something common to many persistence mechanisms.
Core Data, though, does also provide an infrastructure for managing such changes—see the Core Data Model
Versioning and Data Migration Programming Guide.)
Persistent Store Coordinator
The persistent store coordinator plays a central role in how Core Data manages data; however, you don’t
often interact with the coordinator directly when you use the framework. This section describes the persistent
store coordinator in detail, so if you prefer you can skip it and refer to it later as necessary. (The persistent store
coordinator is also described in “Core Data Basics” in the Core Data Programming Guide.)
A persistent store coordinator is an instance of NSPersistentStoreCoordinator. It manages a collection
of persistent object stores. A persistent object store represents an external store (file) of persisted data. It’s
the object that actually maps between objects in your application and records in the database. There are
different classes of persistent object store for the different file types that Core Data supports. You can also
implement your own if you want to support a custom file type—see Atomic Store Programming Topics. To
learn more about persistent stores and the different types, see “Persistent Store Features” in Core Data Programming
Guide.
In an iOS application, you generally just have a single store, but in complex applications (particularly for
Mac OS X) there may be several, each potentially containing different entities. The persistent store coordinator’s
role is to manage these stores and present to its managed object contexts the façade of a single unified store.
When you fetch records, Core Data retrieves results from all of them (unless you specify which store you’re
interested in).
In any application, you might have multiple managed object contexts. You might want to maintain discrete
sets of managed objects and edits to those objects; or you might want to perform a background operation
using one context while allowing the user to interact with objects in another. Each of these would be connected
to the same coordinator.
Starting Out
The Core Data Stack
2012-12-13 | © 2012 Apple Inc. All Rights Reserved.
12
Figure 1-4 (page 13) illustrates the role the coordinator plays. Stacks aren’t usually this complicated.
Figure 1-4 A complex Core Data stack
Managed Object Context Managed Object Context
Persistent Object Store Persistent Object Store Persistent Object Store
Managed Object ModelPersistent Store Coordinator
A collection of
entity descriptions
DepartmentEmployee
Customer Contractor
DepartmentEmployee
Customer
Starting Out
The Core Data Stack
2012-12-13 | © 2012 Apple Inc. All Rights Reserved.
13
The goal of this chapter is to create an initial implementation of the table view controller, and to update the
application delegate to create and configure an instance of the table view controller.
This chapter sets up the table view, creating an instance of a navigation controller and a table view controller,
and configuring the Core Location manager. This provides the architecture for the application. In the next
chapter, you’ll use Core Data to manage the actual data.
It’s assumed that you’re already familiar with view controllers and table views; this chapter does not provide
significant detail or explanation beyond that you need to understand the role of each of the components in
the application. If any of this is too challenging, you should stop here and practice writing some more
applications before continuing.
The application delegate is responsible for creating, configuring, and displaying a navigation controller and a
table view controller.
The table view controller displays the array of event objects. To support this, the controller adds four properties
to the basic table view controller:
● A mutable array, which contains the collection of event objects that the table view controller displays.
It’s populated from the application’s persistent store when the application starts up, and updated as the
user adds and removes events.
● A managed object context, which serves as your gateway to the Core Data stack.
● A Core Location manager, which provides location information to the application. The user can add new
events only when this is active (the Simulator simulates activity so you don’t need to install the application
on a device to test it).
● A bar button item, which the user needs to add events. You need a reference to the button so you can
conditionally enable and disable it in response to changes in the Core Location manager’s state.
Creating and Defining the RootViewController Class
First, create files for the new class.
>> In Xcode, create a new UITableViewController subclass; call it RootViewController. (Do not create
a nib file.)
2012-12-13 | © 2012 Apple Inc. All Rights Reserved.
14
The Table View Controller
Next, add four properties, for the events array, the managed object context, the Core Location manager, and
an Add button. The root view controller serves as the Core Location manager’s delegate, so it must adopt the
CLLocationManagerDelegate protocol.
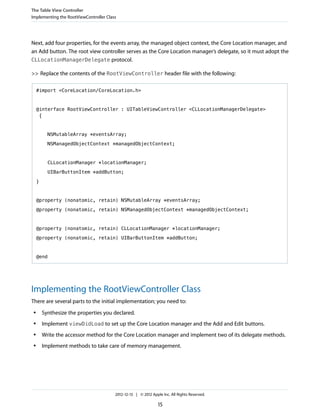
>> Replace the contents of the RootViewController header file with the following:
#import <CoreLocation/CoreLocation.h>
@interface RootViewController : UITableViewController <CLLocationManagerDelegate>
{
NSMutableArray *eventsArray;
NSManagedObjectContext *managedObjectContext;
CLLocationManager *locationManager;
UIBarButtonItem *addButton;
}
@property (nonatomic, retain) NSMutableArray *eventsArray;
@property (nonatomic, retain) NSManagedObjectContext *managedObjectContext;
@property (nonatomic, retain) CLLocationManager *locationManager;
@property (nonatomic, retain) UIBarButtonItem *addButton;
@end
Implementing the RootViewController Class
There are several parts to the initial implementation; you need to:
● Synthesize the properties you declared.
● Implement viewDidLoad to set up the Core Location manager and the Add and Edit buttons.
● Write the accessor method for the Core Location manager and implement two of its delegate methods.
● Implement methods to take care of memory management.
The Table View Controller
Implementing the RootViewController Class
2012-12-13 | © 2012 Apple Inc. All Rights Reserved.
15
All the code described in the following sections goes into the @implementation block of the
RootViewController class, replacing implementations provided by the template as appropriate.
(Implementations for the table view data source methods are described later.)
Synthesize the Properties
>> Add these lines:
@synthesize eventsArray;
@synthesize managedObjectContext;
@synthesize addButton;
@synthesize locationManager;
Write the Accessor Method for the Core Location Manager
>> Create an accessor method to dynamically create the Core Location manager on demand:
- (CLLocationManager *)locationManager {
if (locationManager != nil) {
return locationManager;
}
locationManager = [[CLLocationManager alloc] init];
locationManager.desiredAccuracy = kCLLocationAccuracyNearestTenMeters;
locationManager.delegate = self;
return locationManager;
}
Next, implement two delegate methods to enable and disable the Add button as appropriate. If the Core
Location manager is generating updates, then enable the button; if the Core Location manager is failing, then
disable the button.
>> Add the following two Core Location manager delegate methods:
- (void)locationManager:(CLLocationManager *)manager
The Table View Controller
Implementing the RootViewController Class
2012-12-13 | © 2012 Apple Inc. All Rights Reserved.
16
didUpdateToLocation:(CLLocation *)newLocation
fromLocation:(CLLocation *)oldLocation {
addButton.enabled = YES;
}
- (void)locationManager:(CLLocationManager *)manager
didFailWithError:(NSError *)error {
addButton.enabled = NO;
}
Implementing viewDidLoad
The viewDidLoad method needs to set up the Core Location manager and the Add and Edit buttons.
>> Replace the implementation of viewDidLoad with the following:
- (void)viewDidLoad {
[super viewDidLoad];
// Set the title.
self.title = @"Locations";
// Set up the buttons.
self.navigationItem.leftBarButtonItem = self.editButtonItem;
addButton = [[UIBarButtonItem alloc]
initWithBarButtonSystemItem:UIBarButtonSystemItemAdd
target:self action:@selector(addEvent)];
addButton.enabled = NO;
self.navigationItem.rightBarButtonItem = addButton;
// Start the location manager.
[[self locationManager] startUpdatingLocation];
}
The Table View Controller
Implementing the RootViewController Class
2012-12-13 | © 2012 Apple Inc. All Rights Reserved.
17
Implement Methods for Memory Management
>> Replace the existing implementations of viewDidUnload and dealloc. The implementation of
viewDidUnload should relinquish ownership of anything created in viewDidLoad that can be recreated.
- (void)viewDidUnload {
self.eventsArray = nil;
self.locationManager = nil;
self.addButton = nil;
}
- (void)dealloc {
[managedObjectContext release];
[eventsArray release];
[locationManager release];
[addButton release];
[super dealloc];
}
Configuring the Application Delegate
The application delegate is responsible for creating and configuring the root view controller and a navigation
controller to contain it.
Add the Navigation Controller Property
You need to add a property for the navigation controller.
>> In the application delegate’s header file (LocationsAppDelegate.h), add an instance variable:
UINavigationController *navigationController;
>> Add the property declaration:
@property (nonatomic, retain) UINavigationController *navigationController;
The Table View Controller
Configuring the Application Delegate
2012-12-13 | © 2012 Apple Inc. All Rights Reserved.
18
Implement the Application Delegate
In the application delegate’s implementation file (LocationsAppDelegate.m), you need to:
● Import the RootViewController’s header file.
● Synthesize the navigationController property.
● In the applicationDidFinishLaunching: method, create an instance of RootViewController and
a navigation controller to contain it.
You also need to pass the application’s managed object context to the new root view controller.
>> Before the @implementation block of the application delegate class, import the RootViewController
class’s header file:
#import "RootViewController.h"
>> In the @implementation block of the application delegate class, synthesize the navigation controller
property:
@synthesize navigationController;
>> Replace your application delegate’s application:didFinishLaunchingWithOptions: method with
the following implementation:
- (BOOL)application:(UIApplication *)application
didFinishLaunchingWithOptions:(NSDictionary *)launchOptions {
RootViewController *rootViewController = [[RootViewController alloc]
initWithStyle:UITableViewStylePlain];
NSManagedObjectContext *context = [self managedObjectContext];
if (!context) {
// Handle the error.
}
// Pass the managed object context to the view controller.
rootViewController.managedObjectContext = context;
UINavigationController *aNavigationController = [[UINavigationController alloc]
The Table View Controller
Configuring the Application Delegate
2012-12-13 | © 2012 Apple Inc. All Rights Reserved.
19
initWithRootViewController:rootViewController];
self.navigationController = aNavigationController;
[window addSubview:[navigationController view]];
[window makeKeyAndVisible];
[rootViewController release];
[aNavigationController release];
return YES;
}
Build and Test
At this stage you should build and run the project to make sure that it all works.
The Table View Controller
Build and Test
2012-12-13 | © 2012 Apple Inc. All Rights Reserved.
20
Note: For the application to work correctly, you must not disable your computer’s location services
(see Security > General in System Preferences). When it launches, you must also allow the application
to use your location.
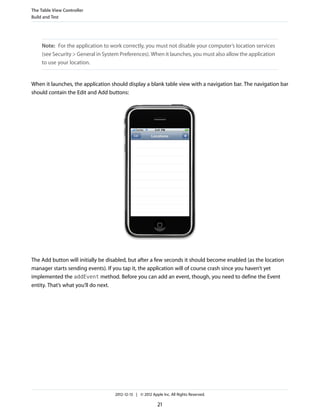
When it launches, the application should display a blank table view with a navigation bar. The navigation bar
should contain the Edit and Add buttons:
The Add button will initially be disabled, but after a few seconds it should become enabled (as the location
manager starts sending events). If you tap it, the application will of course crash since you haven’t yet
implemented the addEvent method. Before you can add an event, though, you need to define the Event
entity. That’s what you’ll do next.
The Table View Controller
Build and Test
2012-12-13 | © 2012 Apple Inc. All Rights Reserved.
21
The goal of this chapter is to allow users to create a new event when they tap the Add button. To do this, you
need to define the Event entity in the managed object model, implement the corresponding class, and create
an instance of the class in the add method.
Modeling Your Data
As noted in “The Managed Object Model” (page 11), the model is a collection of entity and property description
objects that tell Core Data about the managed objects in your application. You can create the model
programmatically, or use the Xcode modeling tool to create the model graphically, in a similar way to that in
which you create a user interface using Interface Builder.
There are actually several ways to edit the constituent parts of the model; these steps typically describe just
one. To learn more about the modeling tool, and other ways to edit the model, see Xcode Tools for Core Data.
This application has just a single entity, an Event, with three attributes—creation date, latitude, and longitude.
Add the Entity
First, add an Event entity.
>> In Xcode, in the Resources group select the model file (Locations.xcdatamodel) to display the model
editor.
>> Choose Design > Data Model > Add Entity to add a new entity to the model.
You can also use the Add button (+) at the lower left of the entity pane, or use the shortcut menu within the
diagram view in the model editor.
You should see a new entry for the entity (called “Entity”) appear in the entity pane at the top left of the
document editor, and a graphical representation of the entity (a rounded rectangle) appear in the diagram
view. Now you can set the name for the new entity.
>> Make sure you have the new entity selected in the entity pane so that you see information about the entity
in the detail pane at the right. Change the name of the entity to Event. (Don’t change the class name.)
2012-12-13 | © 2012 Apple Inc. All Rights Reserved.
22
Managed Object and Model
Your model should look similar to this:
There’s an important difference between the name of the entity and the name of the Objective-C class used
to represent instances of the entity. Core Data uses the entity description to find out about the data objects
it manages, so the class name doesn’t have to be the same as the entity name. Indeed, in some cases several
entities may be represented by the same class—NSManagedObject. Core Data is able to differentiate the
instances on the basis of their associated entity description.
Add the Attributes
First, add the attribute for the creation date.
>> Make sure you have selected Event in the entity pane, then choose Design > Data Model > Add Attribute.
You should see a new attribute (called newAttribute) appear in the property pane. You need to set its name
and type.
>> Make sure you have selected the new attribute in the property pane, then in the detail pane change the
name of the attribute to creationDate, and select Date from the Type pop-up menu.
Managed Object and Model
Modeling Your Data
2012-12-13 | © 2012 Apple Inc. All Rights Reserved.
23
You don’t need to set any of the other values.
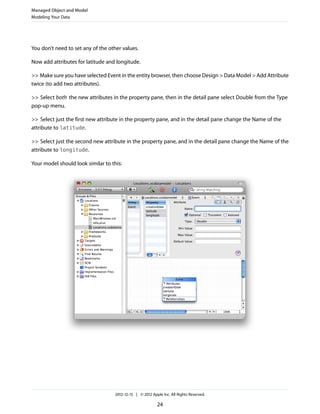
Now add attributes for latitude and longitude.
>> Make sure you have selected Event in the entity browser, then choose Design > Data Model > Add Attribute
twice (to add two attributes).
>> Select both the new attributes in the property pane, then in the detail pane select Double from the Type
pop-up menu.
>> Select just the first new attribute in the property pane, and in the detail pane change the Name of the
attribute to latitude.
>> Select just the second new attribute in the property pane, and in the detail pane change the Name of the
attribute to longitude.
Your model should look similar to this:
Managed Object and Model
Modeling Your Data
2012-12-13 | © 2012 Apple Inc. All Rights Reserved.
24
Custom Managed Object Class
Although in principle you can represent an entity using NSManagedObject, in practice it is common to use
a custom class. This yields several benefits, including:
● Better support from the development tools.
You get code completion for property accessor methods, and compile-time type- and symbol-checking.
● Support for custom methods for the entity.
In many situations, you want to provide special logic for the entity, such as validation methods or derived
properties. For example, in a Person entity you might implement validation method to ensure that a
hasDriversLicense property cannot be true if the age property is less than 17, or a fullName method
that returns a suitable concatenation of firstName and lastName.
Now use Xcode to generate the files for a custom class to represent the Event entity.
>>In Xcode, in the model, select the Event entity. (You must select the entity; the selection is used to indicate
which items to create subclasses for.)
>>Choose File > New File. In the New File dialog, select Managed Object Class.
Depending on the version of Xcode you’re using, the Managed Object Class may be available in the iOS section
under Cocoa Touch Classes, or you may need to choose the template in the Mac OS X section, under
Cocoa—either will work correctly.
>>Click Next. The correct location and targets should have been selected for you. Click Next to accept them.
You should see the Entity selection pane, with the Event entity selected. The “Generate accessors” and “Generate
Objective-C 2.0 properties” options should also be selected.
>>Click Finish to generate the files.
The Event class interface and implementation files are created and added to your project. There are a few
things to notice:
● In the interface file (Event.h), all the attributes are represented by object values.
Although you specified the latitude and longitude attribute types as Double, the property values at
runtime are instances of NSNumber. Core Data uses objects to represent values.
● In the implementation file (Event.m), the properties are implemented as dynamic.
Normally you might expect to see synthesized, however Core Data generates the accessor methods at
runtime.
● In the implementation file (Event.m), there is no dealloc method.
Managed Object and Model
Custom Managed Object Class
2012-12-13 | © 2012 Apple Inc. All Rights Reserved.
25
Normally you might expect to see a dealloc method to release instance variables, however Core Data
is responsible for the life-cycle of all modeled properties of a managed object. (If you add your own instance
variables that do not have corresponding properties in the managed object model, then you need to
manage those yourself as normal.)
● The model is also updated—the Event entity is now represented by the Event class.
Because the model was changed, you need to save it.
>>Save the model file.
Finally, because the table view controller is going to make use of the new class, import its header file in the
table view controller’s implementation file.
>>In the table view controller’s implementation file (RootViewController.m), after the initial import
statement, add:
#import "Event.h"
Core Data Recap
You used the Xcode data modeling tool to create a new entity. You then created a custom class to represent
that entity. In the next chapter, you’ll create instances of the entity.
If you want to learn more about the modeling tools, see Xcode Tools for Core Data.
Managed Object and Model
Core Data Recap
2012-12-13 | © 2012 Apple Inc. All Rights Reserved.
26
The goal of this chapter is to create the application logic to allow the user to create new event objects and
display them in the user interface.
Implementing the addEvent Method
You create new Event objects in the addEvent method. Recall that it’s invoked when the user taps the Add
button (see “Implementing viewDidLoad” (page 17)). There are several parts to the method. It has to:
● Get the current location
● Create an Event object and configure it using the current location information
● Save the Event object
● Update the events array and the user interface
First, though, declare the addEvent method.
>> Add a declaration of the addEvent method to the RootViewController header file:
- (void)addEvent;
Get the Current Location
When you create a new Event object, you need to set its location. You get the location from the location
manager. If it’s not able to provide a location, then don’t continue.
>> Add the following to RootViewController implementation file:
- (void)addEvent {
CLLocation *location = [locationManager location];
if (!location) {
return;
}
2012-12-13 | © 2012 Apple Inc. All Rights Reserved.
27
Adding Events
}
Create and Configure the Event object
You typically create a managed object using a convenience
method—insertNewObjectForEntityForName:inManagedObjectContext:—of
NSEntityDescription, which returns a properly initialized instance of the correct class for the entity you
specify, inserted into the managed object context. (For more about the initialization process, see “Managed Objects”
in Core Data Programming Guide). After you’ve created the object, you can set its property values.
You get the latitude and longitude from the location as scalar values, so you need to convert these to NSNumber
objects for the Event object. You could get the time stamp from the location as well, but this is a constant
value in Simulator. Instead, here you can use date method of NSDate to get a date object representing the
current date and time.
>> Add the following code at the end of the current implementation of addEvent:
// Create and configure a new instance of the Event entity.
Event *event = (Event *)[NSEntityDescription insertNewObjectForEntityForName:@"Event"
inManagedObjectContext:managedObjectContext];
CLLocationCoordinate2D coordinate = [location coordinate];
[event setLatitude:[NSNumber numberWithDouble:coordinate.latitude]];
[event setLongitude:[NSNumber numberWithDouble:coordinate.longitude]];
[event setCreationDate:[NSDate date]];
This illustrates the general technique you use to update a managed object, whether it’s a new managed object
you created, or one you fetch from the store. You simply use accessor methods, just as you would any other
Cocoa object. Importantly, though, changes are not pushed to the persistent store until you explicitly save the
context.
Save the New Event
Remember that the managed object context acts like a scratch pad (see “Managed Objects and the Managed
Object Context” (page 10)). Whatever changes you make—whether editing property values or adding or
deleting whole objects—aren’t actually committed to the persistent store (file) until you save the context.
Typically, in an iOS application, you save changes as soon as the user has made them.
>> Add the following code at the end of the current implementation of addEvent:
Adding Events
Implementing the addEvent Method
2012-12-13 | © 2012 Apple Inc. All Rights Reserved.
28
NSError *error = nil;
if (![managedObjectContext save:&error]) {
// Handle the error.
}
In common with several Core Data methods, the NSManagedObjectContext save: method takes an error
parameter and returns a Boolean value to indicate success or failure. The situation is really no different from
that in any other application; it’s just that the return value from the save: method and the error parameter
tend to bring into sharper focus the possibility of a problem occurring.
Handling Errors
It’s up to you to decide how you handle a Core Data error.
In a scenario as simple as that described in “Save the New Event” (page 28)—where the only change you
expect is the addition of a single object—if the data can’t be saved it’s likely to be indicative of some sort of
catastrophic failure from which recovery might be difficult or impossible. In this situation you might just present
an alert sheet telling the user to restart the application.
In a more complex scenario, the user might have changed property values, or added or deleted managed
objects in such a way that either an individual object is in an inconsistent state (validation fails) or the object
graph as a whole is inconsistent. If you have more than one managed object context, it’s also possible that the
persistent store was updated when changes made in a different context were committed and so the objects
in the current context are inconsistent with the corresponding records in the store.
In general, you can interrogate the error object to find out what went wrong.
You should think carefully about what the user experience should be in the event of an error occurring. What
information should you present to the user? What options might you give them for recovering from the
problem? These are not questions that Core Data is able to answer.
Update the Events Array and the Table View
Finally, you need to add the new Event object to the events array, then update the table view. Since this is a
new Event, and Events are displayed with most recent events at the top of the list, add the new object to the
beginning of the events array, add a corresponding row to the top of the table view, then scroll the table view
to show the new row.
>> Add the following code at the end of the current implementation of addEvent:
[eventsArray insertObject:event atIndex:0];
Adding Events
Implementing the addEvent Method
2012-12-13 | © 2012 Apple Inc. All Rights Reserved.
29
NSIndexPath *indexPath = [NSIndexPath indexPathForRow:0 inSection:0];
[self.tableView insertRowsAtIndexPaths:[NSArray arrayWithObject:indexPath]
withRowAnimation:UITableViewRowAnimationFade];
[self.tableView scrollToRowAtIndexPath:[NSIndexPath indexPathForRow:0 inSection:0]
atScrollPosition:UITableViewScrollPositionTop animated:YES];
The next task is to complete the implementation of the table view data-source methods to display the events.
Displaying Events in the Table View
You need to update two table view data-source methods to display the events.
First simply tell the table view how many events to display.
>> Update the implementation of tableView:numberOfRowsInSection: to return the number of objects
in the events array (there’s only one section, so you don’t need to test the section number):
- (NSInteger)tableView:(UITableView *)tableView
numberOfRowsInSection:(NSInteger)section {
return [eventsArray count];
}
Next, you need to configure the table view cells to display information about each event. You’ll see there is a
nontrivial amount of code, but most of it is related to user interface and display rather than data management.
>> Replace the implementation of tableView:(UITableView *)tableView cellForRowAtIndexPath:
with the following:
- (UITableViewCell *)tableView:(UITableView *)tableView
cellForRowAtIndexPath:(NSIndexPath *)indexPath {
// A date formatter for the time stamp.
static NSDateFormatter *dateFormatter = nil;
if (dateFormatter == nil) {
dateFormatter = [[NSDateFormatter alloc] init];
[dateFormatter setTimeStyle:NSDateFormatterMediumStyle];
[dateFormatter setDateStyle:NSDateFormatterMediumStyle];
Adding Events
Displaying Events in the Table View
2012-12-13 | © 2012 Apple Inc. All Rights Reserved.
30
}
// A number formatter for the latitude and longitude.
static NSNumberFormatter *numberFormatter = nil;
if (numberFormatter == nil) {
numberFormatter = [[NSNumberFormatter alloc] init];
[numberFormatter setNumberStyle:NSNumberFormatterDecimalStyle];
[numberFormatter setMaximumFractionDigits:3];
}
static NSString *CellIdentifier = @"Cell";
// Dequeue or create a new cell.
UITableViewCell *cell = [tableView
dequeueReusableCellWithIdentifier:CellIdentifier];
if (cell == nil) {
cell = [[[UITableViewCell alloc] initWithStyle:UITableViewCellStyleSubtitle
reuseIdentifier:CellIdentifier] autorelease];
}
Event *event = (Event *)[eventsArray objectAtIndex:indexPath.row];
cell.textLabel.text = [dateFormatter stringFromDate:[event creationDate]];
NSString *string = [NSString stringWithFormat:@"%@, %@",
[numberFormatter stringFromNumber:[event latitude]],
[numberFormatter stringFromNumber:[event longitude]]];
cell.detailTextLabel.text = string;
return cell;
}
Adding Events
Displaying Events in the Table View
2012-12-13 | © 2012 Apple Inc. All Rights Reserved.
31
Build and Test
If you build the project, it should compile without errors. The application should also launch and run correctly,
until you tap the Add button—at which point it will crash. This is because the events array hasn’t been created
yet.
>> Solely for testing purposes, add the following line to the end of the RootViewController object’s
implementation of viewDidLoad:
eventsArray = [[NSMutableArray alloc] init];
If you build and run now, you should find that if you tap the Add button new events are displayed in the table
view. If you quit and relaunch the application, though, you won’t see the list of Events when it starts up. To
remedy this, you need to populate the events array on launch with the existing Event objects. This is your
task in the next chapter. Before doing that, restore the project to its pre-testing state.
>> Delete the line you added for testing.
Core Data Recap
There was a lot of code in this chapter, and not much related directly to Core Data. The important points are
that:
● You typically create a new managed object using the convenience method
insertNewObjectForEntityForName:inManagedObjectContext: of NSEntityDescription.
This method ensures that you get a properly initialized instance of the class that represents the entity you
specify.
● To commit changes to the persistent store, you need to save the managed object context.
The context acts as a scratch pad; if you add or modify objects, the changes are held in memory until you
invoke save:. It’s up to you to decide how to deal with any error that might occur during a save operation.
● You get and set a managed object’s property values using accessor methods, just as you would any other
object.
You can also use key-value coding, just as you would any other object, but using accessor methods is
much more efficient (see “Using Managed Objects” in Core Data Programming Guide).
Adding Events
Build and Test
2012-12-13 | © 2012 Apple Inc. All Rights Reserved.
32
The goal of this chapter is to fetch existing Event objects when the application launches.
Fetching Managed Objects
To fetch objects from a persistent store, you need a managed object context and a fetch request. A fetch
request is an instance of NSFetchRequest. As a minimum, it specifies the entity you’re interested in. It may
also specify any constraints on the values that the objects should have and what order you want them back
in. For example, in a corporate information application, you might create a fetch request to retrieve Employee
objects, ordered by name, whose salary is greater than a certain amount. The constraints are represented by
a predicate—an instance of NSPredicate. (For more about predicates see Predicate Programming Guide.)
The sort order is represented by an array of NSSortOrdering objects.
Managed Object Context
Execute fetch request
Response
Query
Returns
Persistent Store Coordinator
Array
Persistent Object Store
Entity (table name)
Predicate (optional)
Sort orderings (optional)
Employee
salary > 60000
name: ascending alphabetical
Fetch Request
Managed Object
name
salary
Fred
97000
Managed Object
name
salary
Juli
90000
2012-12-13 | © 2012 Apple Inc. All Rights Reserved.
33
Fetching Events
Unless you really need all the objects of a particular entity, you should use a predicate to limit the number of
objects returned to those you’re actually interested in. (If you’re displaying objects in a table view, you can
also use a fetched results controller—NSFetchedResultsController—to manage a result set for you. It
works hard to ensure that as little data as possible is held in memory.)
Note that you don’t always need to execute a fetch to retrieve objects. Core Data, if necessary, automatically
retrieves objects that are at the destination of a relationship. For example, if you execute a fetch to retrieve an
Employee object, then ask it for its related Department, then Core Data fetches the Department for you if
it hadn’t already been fetched.
Creating and Executing the Request
When the table view controller loads its view, it should fetch the Event objects and keep them in the events
array so that they can be displayed later. The events array needs to be mutable since the user can add and
remove events.
Create the Request
Create a fetch request and set the entity.
>> Add the following code at the end of the current implementation of viewDidLoad:
NSFetchRequest *request = [[NSFetchRequest alloc] init];
NSEntityDescription *entity = [NSEntityDescription entityForName:@"Event"
inManagedObjectContext:managedObjectContext];
[request setEntity:entity];
The method of interest here is NSEntityDescription’s entityForName:inManagedObjectContext:.
You provide the name of the entity you want and the managed object context you’re dealing with; the method
then asks for the (managed object) context’s (persistent store) coordinator’s (managed object) model and
retrieves from that the entity with the name you specified (you can refer back to “The Core Data Stack” (page
9) to see a pictorial representation). Conceptually it’s not very difficult (you just navigate down the stack),
and you could do it yourself easily enough, but it’s much more convenient to use the class method.
Fetching Events
Creating and Executing the Request
2012-12-13 | © 2012 Apple Inc. All Rights Reserved.
34
Set the Sort Descriptor
If you don’t specify a sort descriptor, the order in which objects are returned from a fetch is undefined. To
retrieve the Events in chronological order, you therefore need to specify a sort descriptor for the fetch. Because
you might want to specify multiple sort orderings (for example, you might want to sort employees by
department, last name, and first name), you need to put the sort descriptor in an array.
>> At the end of the current implementation of viewDidLoad, create a sort descriptor to order Event objects
by creation date—most recent first—and a mutable array. Add the sort descriptor to the array, and set the
array as the fetch request’s sortDescriptors array:
NSSortDescriptor *sortDescriptor = [[NSSortDescriptor alloc]
initWithKey:@"creationDate" ascending:NO];
NSArray *sortDescriptors = [[NSArray alloc] initWithObjects:sortDescriptor, nil];
[request setSortDescriptors:sortDescriptors];
[sortDescriptors release];
[sortDescriptor release];
(It’s often useful to use the initWithObjects: method of NSArray in case you want to add more sort
descriptors later.)
Execute the Request
Having created a fetch request, you now execute it. The events array needs to be mutable, so make a mutable
copy of the result.
>> Add the following code at the end of the current implementation of viewDidLoad:
NSError *error = nil;
NSMutableArray *mutableFetchResults = [[managedObjectContext
executeFetchRequest:request error:&error] mutableCopy];
if (mutableFetchResults == nil) {
// Handle the error.
}
As previously, this example leaves it up to you to decide how to handle any error (see “Handling Errors” (page
29)).
Fetching Events
Creating and Executing the Request
2012-12-13 | © 2012 Apple Inc. All Rights Reserved.
35
Finish Up
The final steps are to set the view controller’s events array instance variable and to release objects that were
allocated.
>> Add the following code at the end of the current implementation of viewDidLoad:
[self setEventsArray:mutableFetchResults];
[mutableFetchResults release];
[request release];
Build and Test
If you build and run the application, you should find that it compiles correctly and that existing Event objects
are displayed when the application launches.
Core Data Recap
The important points from this chapter are that:
● You fetch managed objects by creating a fetch request.
As a minimum, you need to specify an entity. You get the entity using the convenience method
entityForName:inManagedObjectContext: of NSEntityDescription. You might also specify a
predicate and an array of sort orderings.
To ensure that you retrieve no more objects than necessary (and so keep memory usage down), you should
typically try to constrain your request as narrowly as possible using a predicate.
● You don’t always need to explicitly fetch managed objects.
This wasn’t addressed directly in code, since there are no relationships in this tutorial. To repeat the point
made earlier, though: Core Data, if necessary, automatically retrieves objects that are at the destination
of a relationship. For example, if you execute a fetch to retrieve an Employee object, then ask it for its
related Department, Core Data fetches the Department for you if it hasn’t already been fetched.
Fetching Events
Build and Test
2012-12-13 | © 2012 Apple Inc. All Rights Reserved.
36
The goal of this chapter is to allow the user to delete events from the list.
Deleting Managed Objects
As you saw when you created a new managed object, the lifetime of a record in the database is not tied to
the lifetime of a given managed object. If you create a managed object, it doesn’t mean a record automatically
is created for that object in the database—you need to save the context. Similarly, simply because an object
is deallocated does not mean that the corresponding record itself is destroyed.
To delete a record, you tell the managed object context to mark an object as deleted, using the deleteObject:
method of NSManagedObjectContext. Then to actually destroy the record, you commit the action using
save:.
Deleting an Event
To handle deletion, you implement the table view data source method
tableView:commitEditingStyle:forRowAtIndexPath:. It needs to do three things:
1. Delete the selected object.
2. Update the table view.
3. Save the changes.
It should do this only if the action is a delete.
>> In the RootViewController implementation file, implement the
tableView:commitEditingStyle:forRowAtIndexPath: method as follows:
- (void)tableView:(UITableView *)tableView
commitEditingStyle:(UITableViewCellEditingStyle)editingStyle
forRowAtIndexPath:(NSIndexPath *)indexPath {
if (editingStyle == UITableViewCellEditingStyleDelete) {
2012-12-13 | © 2012 Apple Inc. All Rights Reserved.
37
Deleting Events
// Delete the managed object at the given index path.
NSManagedObject *eventToDelete = [eventsArray objectAtIndex:indexPath.row];
[managedObjectContext deleteObject:eventToDelete];
// Update the array and table view.
[eventsArray removeObjectAtIndex:indexPath.row];
[tableView deleteRowsAtIndexPaths:[NSArray arrayWithObject:indexPath]
withRowAnimation:YES];
// Commit the change.
NSError *error = nil;
if (![managedObjectContext save:&error]) {
// Handle the error.
}
}
}
Build and Test
Build and test the application. You should find that it compiles and runs without error. If you tap Edit, the table
view should enter edit mode. If you delete a row, it should be properly deleted from the table view. If you quit
and relaunch the application, the row you deleted should no longer be visible.
You’ve now completed the tutorial. You can start investigating ways to enhance your knowledge and
understanding of Core Data. Some suggestions are given in the next chapter.
Core Data Recap
You’ve now performed the basic tasks you need to be familiar with to use Core Data—you:
● Created an entity in a managed object model. You also created a custom class to represent the entity.
● Created an instance of a managed object. You also changed some of its property values.
● Fetched managed objects.
● Deleted a managed object.
Deleting Events
Build and Test
2012-12-13 | © 2012 Apple Inc. All Rights Reserved.
38
You may have noticed that, in performing these tasks, the only object in the Core Data stack (see “The Core
Data Stack” (page 9)) with which you interacted directly was the managed object context. Although you
have access to the other objects in the stack, you often don’t need to use them directly. Either the Xcode
template takes care of setting them up, or you use a convenience class method to accomplish a particular task
that would otherwise require you to access them.
Deleting Events
Core Data Recap
2012-12-13 | © 2012 Apple Inc. All Rights Reserved.
39
Here are some suggestions for ways in which you can enhance your understanding of Core Data and how you
can integrate it in your applications. As you explore, you can turn to the Core Data Programming Guide for
help.
Changing the Model Means you Cannot Open Existing Stores: If you change the schema in your
managed object model, your application typically won’t be able to open files you created with an
earlier version. This is an issue that you might address as your experience grows (see Core Data Model
Versioning and Data Migration Programming Guide). First, though, there are some easier steps to
take.
The Core Data Utility Tutorial
It’s worth turning away from iOS for a short while and working through Core Data Utility Tutorial. It’s similar
in many respects to this tutorial, but it’s freed from the distraction of a user interface. It introduces a couple of
new concepts regarding the lifecycle of a managed object, and reinforces the idea of the managed object
model being just a collection of objects—by having you create one programatically.
Use a Fetched Results Controller
Turning back to iOS, try to update the Locations application to use an NSFetchedResultsController object.
A fetched results controller is intended primarily to make fetching large numbers of objects much more efficient,
but it’s worth practicing using one with a smaller data set. For comparison, look at the CoreDataBooks example.
Creating a Managed Object Model with Xcode
Read Xcode Mapping Tool for Core Data. You will learn more about the Xcode tools for Core Data, and in
particular how to establish relationships between entities. This will be essential if you want to create applications
that contain entities that are related to each other, as suggested in “A Drill-Down Interface” (page 41).
2012-12-13 | © 2012 Apple Inc. All Rights Reserved.
40
Next Steps
A Drill-Down Interface
Extend the Locations application to provide a drill-down interface to allow users to inspect an event—perhaps
to edit comments or a add photograph. You need to add more properties to the Event entity, and perhaps a
second entity. The TaggedLocations sample provides an example of using a second entity with a to-many
relationship.
If you add a photograph, consider the memory management implications of fetching a photograph with every
Event you retrieve from the store. Core Data has a feature called faulting (see “Managed Objects” in Core Data
Programming Guide) which means that it doesn’t have to complete the object graph. You would typically
model the photograph as a separate entity, with a relationship from the Event entity to the Photo entity (and
a reciprocal relationship from the photo to the event). When you retrieve just a single Event object, the photo
relationship may be represented by a fault. If you ask an event for its photo, Core Data automatically fulfills
the fault and retrieves the corresponding data for you. See PhotoLocations for an example.
Add an Add Sheet
An Add sheet allows you to enter more information about an event when you create it. Think about what
information you might pass to the Add sheet controller. Think also about how you might keep the edits made
to the Event object in the Add sheet discrete from edits made in the rest of the application. (Hint: you might
consider using two managed object contexts—see the CoreDataBooks example.)
Next Steps
A Drill-Down Interface
2012-12-13 | © 2012 Apple Inc. All Rights Reserved.
41
This table describes the changes to Core Data Tutorial for iOS.
NotesDate
Made minor editorial corrections thoughout. Fixed broken links.2012-12-13
Updated for iOS 4.0 and later.2010-11-15
Changed the title from "Core Data Tutorial for iPhone OS."2010-07-08
Corrected links to sample applications.2009-09-09
Corrected typographical errors.2009-06-04
Added a missing line of code to the implementation of
applicationDidFinishLaunching:.
2009-03-19
First version of a tutorial that introduces application development for
iPhone using Core Data.
2009-03-15
2012-12-13 | © 2012 Apple Inc. All Rights Reserved.
42
Document Revision History
Apple Inc.
© 2012 Apple Inc.
All rights reserved.
No part of this publication may be reproduced,
stored in a retrieval system, or transmitted, in any
form or by any means, mechanical, electronic,
photocopying, recording, or otherwise, without
prior written permission of Apple Inc., with the
following exceptions: Any person is hereby
authorized to store documentation on a single
computer for personal use only and to print
copies of documentation for personal use
provided that the documentation contains
Apple’s copyright notice.
No licenses, express or implied, are granted with
respect to any of the technology described in this
document. Apple retains all intellectual property
rights associated with the technology described
in this document. This document is intended to
assist application developers to develop
applications only for Apple-labeled computers.
Apple Inc.
1 Infinite Loop
Cupertino, CA 95014
408-996-1010
Apple, the Apple logo, Cocoa, Cocoa Touch,
iPhone, Mac, Objective-C, and Xcode are
trademarks of Apple Inc., registered in the U.S.
and other countries.
iOS is a trademark or registered trademark of
Cisco in the U.S. and other countries and is used
under license.
Even though Apple has reviewed this document,
APPLE MAKES NO WARRANTY OR REPRESENTATION,
EITHER EXPRESS OR IMPLIED, WITH RESPECT TO THIS
DOCUMENT, ITS QUALITY, ACCURACY,
MERCHANTABILITY, OR FITNESS FOR A PARTICULAR
PURPOSE. AS A RESULT, THIS DOCUMENT IS PROVIDED
“AS IS,” AND YOU, THE READER, ARE ASSUMING THE
ENTIRE RISK AS TO ITS QUALITY AND ACCURACY.
IN NO EVENT WILL APPLE BE LIABLE FOR DIRECT,
INDIRECT, SPECIAL, INCIDENTAL, OR CONSEQUENTIAL
DAMAGES RESULTING FROM ANY DEFECT OR
INACCURACY IN THIS DOCUMENT, even if advised of
the possibility of such damages.
THE WARRANTY AND REMEDIES SET FORTH ABOVE
ARE EXCLUSIVE AND IN LIEU OF ALL OTHERS, ORAL
OR WRITTEN, EXPRESS OR IMPLIED. No Apple dealer,
agent, or employee is authorized to make any
modification, extension, or addition to this warranty.
Some states do not allow the exclusion or limitation
of implied warranties or liability for incidental or
consequential damages, so the above limitation or
exclusion may not apply to you. This warranty gives
you specific legal rights, and you may also have other
rights which vary from state to state.

More Related Content

Similar to Iphone programming: Core Data Tutorial for iOS

iOS Course day 2
iOS Course day 2iOS Course day 2
iOS Course day 2Rich Allen
 
Oracle EBS 12.1.3 : Integrate OA Framework BC4J components within java concur...
Oracle EBS 12.1.3 : Integrate OA Framework BC4J components within java concur...Oracle EBS 12.1.3 : Integrate OA Framework BC4J components within java concur...
Oracle EBS 12.1.3 : Integrate OA Framework BC4J components within java concur...Amit Singh
 
Pune-Cocoa: Core data - I
Pune-Cocoa: Core data - IPune-Cocoa: Core data - I
Pune-Cocoa: Core data - IPrashant Rane
 
Getting Started with React, When You’re an Angular Developer
Getting Started with React, When You’re an Angular DeveloperGetting Started with React, When You’re an Angular Developer
Getting Started with React, When You’re an Angular DeveloperFabrit Global
 
Learn Entity Framework in a day with Code First, Model First and Database First
Learn Entity Framework in a day with Code First, Model First and Database FirstLearn Entity Framework in a day with Code First, Model First and Database First
Learn Entity Framework in a day with Code First, Model First and Database FirstJibran Rasheed Khan
 
How Android Architecture Components can Help You Improve Your App’s Design?
How Android Architecture Components can Help You Improve Your App’s Design?How Android Architecture Components can Help You Improve Your App’s Design?
How Android Architecture Components can Help You Improve Your App’s Design?Paul Cook
 
Asp.net c# MVC-5 Training-Day-2 of Day-9
Asp.net c# MVC-5 Training-Day-2 of Day-9Asp.net c# MVC-5 Training-Day-2 of Day-9
Asp.net c# MVC-5 Training-Day-2 of Day-9AHM Pervej Kabir
 
Oracle to vb 6.0 connectivity
Oracle to vb 6.0 connectivityOracle to vb 6.0 connectivity
Oracle to vb 6.0 connectivityrohit vishwakarma
 
Microsoft Entity Framework
Microsoft Entity FrameworkMicrosoft Entity Framework
Microsoft Entity FrameworkMahmoud Tolba
 
Oracle Application Developmenr Framework
Oracle Application Developmenr FrameworkOracle Application Developmenr Framework
Oracle Application Developmenr FrameworkGurpreet singh
 
Mobile Programming - 2 Jetpack Compose
Mobile Programming - 2 Jetpack ComposeMobile Programming - 2 Jetpack Compose
Mobile Programming - 2 Jetpack ComposeAndiNurkholis1
 
Introduction to sails.js
Introduction to sails.jsIntroduction to sails.js
Introduction to sails.jsAmit Bidwai
 

Similar to Iphone programming: Core Data Tutorial for iOS (20)

iOS Course day 2
iOS Course day 2iOS Course day 2
iOS Course day 2
 
Notepad tutorial
Notepad tutorialNotepad tutorial
Notepad tutorial
 
Oracle EBS 12.1.3 : Integrate OA Framework BC4J components within java concur...
Oracle EBS 12.1.3 : Integrate OA Framework BC4J components within java concur...Oracle EBS 12.1.3 : Integrate OA Framework BC4J components within java concur...
Oracle EBS 12.1.3 : Integrate OA Framework BC4J components within java concur...
 
Pune-Cocoa: Core data - I
Pune-Cocoa: Core data - IPune-Cocoa: Core data - I
Pune-Cocoa: Core data - I
 
Getting Started with React, When You’re an Angular Developer
Getting Started with React, When You’re an Angular DeveloperGetting Started with React, When You’re an Angular Developer
Getting Started with React, When You’re an Angular Developer
 
SSDT unleashed
SSDT unleashedSSDT unleashed
SSDT unleashed
 
Learn Entity Framework in a day with Code First, Model First and Database First
Learn Entity Framework in a day with Code First, Model First and Database FirstLearn Entity Framework in a day with Code First, Model First and Database First
Learn Entity Framework in a day with Code First, Model First and Database First
 
How Android Architecture Components can Help You Improve Your App’s Design?
How Android Architecture Components can Help You Improve Your App’s Design?How Android Architecture Components can Help You Improve Your App’s Design?
How Android Architecture Components can Help You Improve Your App’s Design?
 
Asp.net c# MVC-5 Training-Day-2 of Day-9
Asp.net c# MVC-5 Training-Day-2 of Day-9Asp.net c# MVC-5 Training-Day-2 of Day-9
Asp.net c# MVC-5 Training-Day-2 of Day-9
 
Oracle to vb 6.0 connectivity
Oracle to vb 6.0 connectivityOracle to vb 6.0 connectivity
Oracle to vb 6.0 connectivity
 
Microsoft Entity Framework
Microsoft Entity FrameworkMicrosoft Entity Framework
Microsoft Entity Framework
 
Entity Framework
Entity FrameworkEntity Framework
Entity Framework
 
Codeigniter
CodeigniterCodeigniter
Codeigniter
 
Oracle Application Developmenr Framework
Oracle Application Developmenr FrameworkOracle Application Developmenr Framework
Oracle Application Developmenr Framework
 
Mobile Programming - 2 Jetpack Compose
Mobile Programming - 2 Jetpack ComposeMobile Programming - 2 Jetpack Compose
Mobile Programming - 2 Jetpack Compose
 
Odi training
Odi trainingOdi training
Odi training
 
ios basics
ios basicsios basics
ios basics
 
Entity framework1
Entity framework1Entity framework1
Entity framework1
 
Ado.net
Ado.netAdo.net
Ado.net
 
Introduction to sails.js
Introduction to sails.jsIntroduction to sails.js
Introduction to sails.js
 

More from Kenny Nguyen

Introduction to foreign exchange trading
Introduction to foreign exchange tradingIntroduction to foreign exchange trading
Introduction to foreign exchange tradingKenny Nguyen
 
Nghệ thuật lãnh đạo và động viên: Leadership and Motivation
Nghệ thuật lãnh đạo và động viên: Leadership and MotivationNghệ thuật lãnh đạo và động viên: Leadership and Motivation
Nghệ thuật lãnh đạo và động viên: Leadership and MotivationKenny Nguyen
 
The concept of strategy: five Ps for strategy
The concept of strategy: five Ps for strategyThe concept of strategy: five Ps for strategy
The concept of strategy: five Ps for strategyKenny Nguyen
 
Business negotiation
Business negotiationBusiness negotiation
Business negotiationKenny Nguyen
 
The global financial crisis
The global financial crisisThe global financial crisis
The global financial crisisKenny Nguyen
 
Iphone programming: Objective c
Iphone programming: Objective cIphone programming: Objective c
Iphone programming: Objective cKenny Nguyen
 
Digital killed the book?
Digital killed the book?Digital killed the book?
Digital killed the book?Kenny Nguyen
 
Fighting counterfeit motion pictures
Fighting counterfeit motion picturesFighting counterfeit motion pictures
Fighting counterfeit motion picturesKenny Nguyen
 
Interaction design beyond human computer interaction
Interaction design beyond human computer interactionInteraction design beyond human computer interaction
Interaction design beyond human computer interactionKenny Nguyen
 
Giáo trình Flash CS5 và Action Script 3.0
Giáo trình Flash CS5 và Action Script 3.0Giáo trình Flash CS5 và Action Script 3.0
Giáo trình Flash CS5 và Action Script 3.0Kenny Nguyen
 
Stages of team development
Stages of team developmentStages of team development
Stages of team developmentKenny Nguyen
 
Step by step guide to sustainability planning
Step by step guide to sustainability planningStep by step guide to sustainability planning
Step by step guide to sustainability planningKenny Nguyen
 
Strategic management
Strategic managementStrategic management
Strategic managementKenny Nguyen
 
Comparison of eBay.com and Alibaba.com
Comparison of eBay.com and Alibaba.comComparison of eBay.com and Alibaba.com
Comparison of eBay.com and Alibaba.comKenny Nguyen
 
The Jack who would be king
The Jack who would be kingThe Jack who would be king
The Jack who would be kingKenny Nguyen
 
Agile Methodologies
Agile MethodologiesAgile Methodologies
Agile MethodologiesKenny Nguyen
 
Exchange rates effect
Exchange rates effectExchange rates effect
Exchange rates effectKenny Nguyen
 
Economics for managers
Economics for managersEconomics for managers
Economics for managersKenny Nguyen
 
Dealing with unethical behaviors in organizations
Dealing with unethical behaviors in organizationsDealing with unethical behaviors in organizations
Dealing with unethical behaviors in organizationsKenny Nguyen
 
Cost and Sale concepts
Cost and Sale conceptsCost and Sale concepts
Cost and Sale conceptsKenny Nguyen
 

More from Kenny Nguyen (20)

Introduction to foreign exchange trading
Introduction to foreign exchange tradingIntroduction to foreign exchange trading
Introduction to foreign exchange trading
 
Nghệ thuật lãnh đạo và động viên: Leadership and Motivation
Nghệ thuật lãnh đạo và động viên: Leadership and MotivationNghệ thuật lãnh đạo và động viên: Leadership and Motivation
Nghệ thuật lãnh đạo và động viên: Leadership and Motivation
 
The concept of strategy: five Ps for strategy
The concept of strategy: five Ps for strategyThe concept of strategy: five Ps for strategy
The concept of strategy: five Ps for strategy
 
Business negotiation
Business negotiationBusiness negotiation
Business negotiation
 
The global financial crisis
The global financial crisisThe global financial crisis
The global financial crisis
 
Iphone programming: Objective c
Iphone programming: Objective cIphone programming: Objective c
Iphone programming: Objective c
 
Digital killed the book?
Digital killed the book?Digital killed the book?
Digital killed the book?
 
Fighting counterfeit motion pictures
Fighting counterfeit motion picturesFighting counterfeit motion pictures
Fighting counterfeit motion pictures
 
Interaction design beyond human computer interaction
Interaction design beyond human computer interactionInteraction design beyond human computer interaction
Interaction design beyond human computer interaction
 
Giáo trình Flash CS5 và Action Script 3.0
Giáo trình Flash CS5 và Action Script 3.0Giáo trình Flash CS5 và Action Script 3.0
Giáo trình Flash CS5 và Action Script 3.0
 
Stages of team development
Stages of team developmentStages of team development
Stages of team development
 
Step by step guide to sustainability planning
Step by step guide to sustainability planningStep by step guide to sustainability planning
Step by step guide to sustainability planning
 
Strategic management
Strategic managementStrategic management
Strategic management
 
Comparison of eBay.com and Alibaba.com
Comparison of eBay.com and Alibaba.comComparison of eBay.com and Alibaba.com
Comparison of eBay.com and Alibaba.com
 
The Jack who would be king
The Jack who would be kingThe Jack who would be king
The Jack who would be king
 
Agile Methodologies
Agile MethodologiesAgile Methodologies
Agile Methodologies
 
Exchange rates effect
Exchange rates effectExchange rates effect
Exchange rates effect
 
Economics for managers
Economics for managersEconomics for managers
Economics for managers
 
Dealing with unethical behaviors in organizations
Dealing with unethical behaviors in organizationsDealing with unethical behaviors in organizations
Dealing with unethical behaviors in organizations
 
Cost and Sale concepts
Cost and Sale conceptsCost and Sale concepts
Cost and Sale concepts
 

Recently uploaded

Understanding the Laravel MVC Architecture
Understanding the Laravel MVC ArchitectureUnderstanding the Laravel MVC Architecture
Understanding the Laravel MVC ArchitecturePixlogix Infotech
 
GenCyber Cyber Security Day Presentation
GenCyber Cyber Security Day PresentationGenCyber Cyber Security Day Presentation
GenCyber Cyber Security Day PresentationMichael W. Hawkins
 
Injustice - Developers Among Us (SciFiDevCon 2024)
Injustice - Developers Among Us (SciFiDevCon 2024)Injustice - Developers Among Us (SciFiDevCon 2024)
Injustice - Developers Among Us (SciFiDevCon 2024)Allon Mureinik
 
WhatsApp 9892124323 ✓Call Girls In Kalyan ( Mumbai ) secure service
WhatsApp 9892124323 ✓Call Girls In Kalyan ( Mumbai ) secure serviceWhatsApp 9892124323 ✓Call Girls In Kalyan ( Mumbai ) secure service
WhatsApp 9892124323 ✓Call Girls In Kalyan ( Mumbai ) secure servicePooja Nehwal
 
Pigging Solutions Piggable Sweeping Elbows
Pigging Solutions Piggable Sweeping ElbowsPigging Solutions Piggable Sweeping Elbows
Pigging Solutions Piggable Sweeping ElbowsPigging Solutions
 
Benefits Of Flutter Compared To Other Frameworks
Benefits Of Flutter Compared To Other FrameworksBenefits Of Flutter Compared To Other Frameworks
Benefits Of Flutter Compared To Other FrameworksSoftradix Technologies
 
Unblocking The Main Thread Solving ANRs and Frozen Frames
Unblocking The Main Thread Solving ANRs and Frozen FramesUnblocking The Main Thread Solving ANRs and Frozen Frames
Unblocking The Main Thread Solving ANRs and Frozen FramesSinan KOZAK
 
Advanced Test Driven-Development @ php[tek] 2024
Advanced Test Driven-Development @ php[tek] 2024Advanced Test Driven-Development @ php[tek] 2024
Advanced Test Driven-Development @ php[tek] 2024Scott Keck-Warren
 
Next-generation AAM aircraft unveiled by Supernal, S-A2
Next-generation AAM aircraft unveiled by Supernal, S-A2Next-generation AAM aircraft unveiled by Supernal, S-A2
Next-generation AAM aircraft unveiled by Supernal, S-A2Hyundai Motor Group
 
Hyderabad Call Girls Khairatabad ✨ 7001305949 ✨ Cheap Price Your Budget
Hyderabad Call Girls Khairatabad ✨ 7001305949 ✨ Cheap Price Your BudgetHyderabad Call Girls Khairatabad ✨ 7001305949 ✨ Cheap Price Your Budget
Hyderabad Call Girls Khairatabad ✨ 7001305949 ✨ Cheap Price Your BudgetEnjoy Anytime
 
FULL ENJOY 🔝 8264348440 🔝 Call Girls in Diplomatic Enclave | Delhi
FULL ENJOY 🔝 8264348440 🔝 Call Girls in Diplomatic Enclave | DelhiFULL ENJOY 🔝 8264348440 🔝 Call Girls in Diplomatic Enclave | Delhi
FULL ENJOY 🔝 8264348440 🔝 Call Girls in Diplomatic Enclave | Delhisoniya singh
 
Snow Chain-Integrated Tire for a Safe Drive on Winter Roads
Snow Chain-Integrated Tire for a Safe Drive on Winter RoadsSnow Chain-Integrated Tire for a Safe Drive on Winter Roads
Snow Chain-Integrated Tire for a Safe Drive on Winter RoadsHyundai Motor Group
 
Tech-Forward - Achieving Business Readiness For Copilot in Microsoft 365
Tech-Forward - Achieving Business Readiness For Copilot in Microsoft 365Tech-Forward - Achieving Business Readiness For Copilot in Microsoft 365
Tech-Forward - Achieving Business Readiness For Copilot in Microsoft 3652toLead Limited
 
Transforming Data Streams with Kafka Connect: An Introduction to Single Messa...
Transforming Data Streams with Kafka Connect: An Introduction to Single Messa...Transforming Data Streams with Kafka Connect: An Introduction to Single Messa...
Transforming Data Streams with Kafka Connect: An Introduction to Single Messa...HostedbyConfluent
 
08448380779 Call Girls In Greater Kailash - I Women Seeking Men
08448380779 Call Girls In Greater Kailash - I Women Seeking Men08448380779 Call Girls In Greater Kailash - I Women Seeking Men
08448380779 Call Girls In Greater Kailash - I Women Seeking MenDelhi Call girls
 
Integration and Automation in Practice: CI/CD in Mule Integration and Automat...
Integration and Automation in Practice: CI/CD in Mule Integration and Automat...Integration and Automation in Practice: CI/CD in Mule Integration and Automat...
Integration and Automation in Practice: CI/CD in Mule Integration and Automat...Patryk Bandurski
 
#StandardsGoals for 2024: What’s new for BISAC - Tech Forum 2024
#StandardsGoals for 2024: What’s new for BISAC - Tech Forum 2024#StandardsGoals for 2024: What’s new for BISAC - Tech Forum 2024
#StandardsGoals for 2024: What’s new for BISAC - Tech Forum 2024BookNet Canada
 
Beyond Boundaries: Leveraging No-Code Solutions for Industry Innovation
Beyond Boundaries: Leveraging No-Code Solutions for Industry InnovationBeyond Boundaries: Leveraging No-Code Solutions for Industry Innovation
Beyond Boundaries: Leveraging No-Code Solutions for Industry InnovationSafe Software
 
IAC 2024 - IA Fast Track to Search Focused AI Solutions
IAC 2024 - IA Fast Track to Search Focused AI SolutionsIAC 2024 - IA Fast Track to Search Focused AI Solutions
IAC 2024 - IA Fast Track to Search Focused AI SolutionsEnterprise Knowledge
 

Recently uploaded (20)

Understanding the Laravel MVC Architecture
Understanding the Laravel MVC ArchitectureUnderstanding the Laravel MVC Architecture
Understanding the Laravel MVC Architecture
 
GenCyber Cyber Security Day Presentation
GenCyber Cyber Security Day PresentationGenCyber Cyber Security Day Presentation
GenCyber Cyber Security Day Presentation
 
Injustice - Developers Among Us (SciFiDevCon 2024)
Injustice - Developers Among Us (SciFiDevCon 2024)Injustice - Developers Among Us (SciFiDevCon 2024)
Injustice - Developers Among Us (SciFiDevCon 2024)
 
WhatsApp 9892124323 ✓Call Girls In Kalyan ( Mumbai ) secure service
WhatsApp 9892124323 ✓Call Girls In Kalyan ( Mumbai ) secure serviceWhatsApp 9892124323 ✓Call Girls In Kalyan ( Mumbai ) secure service
WhatsApp 9892124323 ✓Call Girls In Kalyan ( Mumbai ) secure service
 
Pigging Solutions Piggable Sweeping Elbows
Pigging Solutions Piggable Sweeping ElbowsPigging Solutions Piggable Sweeping Elbows
Pigging Solutions Piggable Sweeping Elbows
 
Benefits Of Flutter Compared To Other Frameworks
Benefits Of Flutter Compared To Other FrameworksBenefits Of Flutter Compared To Other Frameworks
Benefits Of Flutter Compared To Other Frameworks
 
Unblocking The Main Thread Solving ANRs and Frozen Frames
Unblocking The Main Thread Solving ANRs and Frozen FramesUnblocking The Main Thread Solving ANRs and Frozen Frames
Unblocking The Main Thread Solving ANRs and Frozen Frames
 
Advanced Test Driven-Development @ php[tek] 2024
Advanced Test Driven-Development @ php[tek] 2024Advanced Test Driven-Development @ php[tek] 2024
Advanced Test Driven-Development @ php[tek] 2024
 
Next-generation AAM aircraft unveiled by Supernal, S-A2
Next-generation AAM aircraft unveiled by Supernal, S-A2Next-generation AAM aircraft unveiled by Supernal, S-A2
Next-generation AAM aircraft unveiled by Supernal, S-A2
 
Vulnerability_Management_GRC_by Sohang Sengupta.pptx
Vulnerability_Management_GRC_by Sohang Sengupta.pptxVulnerability_Management_GRC_by Sohang Sengupta.pptx
Vulnerability_Management_GRC_by Sohang Sengupta.pptx
 
Hyderabad Call Girls Khairatabad ✨ 7001305949 ✨ Cheap Price Your Budget
Hyderabad Call Girls Khairatabad ✨ 7001305949 ✨ Cheap Price Your BudgetHyderabad Call Girls Khairatabad ✨ 7001305949 ✨ Cheap Price Your Budget
Hyderabad Call Girls Khairatabad ✨ 7001305949 ✨ Cheap Price Your Budget
 
FULL ENJOY 🔝 8264348440 🔝 Call Girls in Diplomatic Enclave | Delhi
FULL ENJOY 🔝 8264348440 🔝 Call Girls in Diplomatic Enclave | DelhiFULL ENJOY 🔝 8264348440 🔝 Call Girls in Diplomatic Enclave | Delhi
FULL ENJOY 🔝 8264348440 🔝 Call Girls in Diplomatic Enclave | Delhi
 
Snow Chain-Integrated Tire for a Safe Drive on Winter Roads
Snow Chain-Integrated Tire for a Safe Drive on Winter RoadsSnow Chain-Integrated Tire for a Safe Drive on Winter Roads
Snow Chain-Integrated Tire for a Safe Drive on Winter Roads
 
Tech-Forward - Achieving Business Readiness For Copilot in Microsoft 365
Tech-Forward - Achieving Business Readiness For Copilot in Microsoft 365Tech-Forward - Achieving Business Readiness For Copilot in Microsoft 365
Tech-Forward - Achieving Business Readiness For Copilot in Microsoft 365
 
Transforming Data Streams with Kafka Connect: An Introduction to Single Messa...
Transforming Data Streams with Kafka Connect: An Introduction to Single Messa...Transforming Data Streams with Kafka Connect: An Introduction to Single Messa...
Transforming Data Streams with Kafka Connect: An Introduction to Single Messa...
 
08448380779 Call Girls In Greater Kailash - I Women Seeking Men
08448380779 Call Girls In Greater Kailash - I Women Seeking Men08448380779 Call Girls In Greater Kailash - I Women Seeking Men
08448380779 Call Girls In Greater Kailash - I Women Seeking Men
 
Integration and Automation in Practice: CI/CD in Mule Integration and Automat...
Integration and Automation in Practice: CI/CD in Mule Integration and Automat...Integration and Automation in Practice: CI/CD in Mule Integration and Automat...
Integration and Automation in Practice: CI/CD in Mule Integration and Automat...
 
#StandardsGoals for 2024: What’s new for BISAC - Tech Forum 2024
#StandardsGoals for 2024: What’s new for BISAC - Tech Forum 2024#StandardsGoals for 2024: What’s new for BISAC - Tech Forum 2024
#StandardsGoals for 2024: What’s new for BISAC - Tech Forum 2024
 
Beyond Boundaries: Leveraging No-Code Solutions for Industry Innovation
Beyond Boundaries: Leveraging No-Code Solutions for Industry InnovationBeyond Boundaries: Leveraging No-Code Solutions for Industry Innovation
Beyond Boundaries: Leveraging No-Code Solutions for Industry Innovation
 
IAC 2024 - IA Fast Track to Search Focused AI Solutions
IAC 2024 - IA Fast Track to Search Focused AI SolutionsIAC 2024 - IA Fast Track to Search Focused AI Solutions
IAC 2024 - IA Fast Track to Search Focused AI Solutions
 

Iphone programming: Core Data Tutorial for iOS

  • 2. Contents Introduction 5 Organization of This Document 6 Starting Out 7 Create the Project 8 Understanding a Core Data–Based Project 9 The Core Data Stack 9 Managed Objects and the Managed Object Context 10 The Managed Object Model 11 Persistent Store Coordinator 12 The Table View Controller 14 Creating and Defining the RootViewController Class 14 Implementing the RootViewController Class 15 Synthesize the Properties 16 Write the Accessor Method for the Core Location Manager 16 Implementing viewDidLoad 17 Implement Methods for Memory Management 18 Configuring the Application Delegate 18 Add the Navigation Controller Property 18 Implement the Application Delegate 19 Build and Test 20 Managed Object and Model 22 Modeling Your Data 22 Add the Entity 22 Add the Attributes 23 Custom Managed Object Class 25 Core Data Recap 26 Adding Events 27 Implementing the addEvent Method 27 Get the Current Location 27 Create and Configure the Event object 28 2012-12-13 | © 2012 Apple Inc. All Rights Reserved. 2
  • 3. Save the New Event 28 Handling Errors 29 Update the Events Array and the Table View 29 Displaying Events in the Table View 30 Build and Test 32 Core Data Recap 32 Fetching Events 33 Fetching Managed Objects 33 Creating and Executing the Request 34 Create the Request 34 Set the Sort Descriptor 35 Execute the Request 35 Finish Up 36 Build and Test 36 Core Data Recap 36 Deleting Events 37 Deleting Managed Objects 37 Deleting an Event 37 Build and Test 38 Core Data Recap 38 Next Steps 40 The Core Data Utility Tutorial 40 Use a Fetched Results Controller 40 Creating a Managed Object Model with Xcode 40 A Drill-Down Interface 41 Add an Add Sheet 41 Document Revision History 42 2012-12-13 | © 2012 Apple Inc. All Rights Reserved. 3 Contents
  • 4. Figures Starting Out 7 Figure 1-1 A simple Core Data stack 10 Figure 1-2 Managed objects in a context, and a table in the persistent store 11 Figure 1-3 An entity description, a table in the database, and a managed object. 11 Figure 1-4 A complex Core Data stack 13 2012-12-13 | © 2012 Apple Inc. All Rights Reserved. 4
  • 5. Core Data is a schema-driven object graph management and persistence framework. Fundamentally, Core Data helps you to save model objects (in the sense of the model-view-controller design pattern) to a file and get them back again. This is similar to archiving (see Archives and Serializations Programming Guide), but Core Data offers much more than that. Amongst other things, it: ● Provides an infrastructure for managing all the changes to your model objects. This gives you automatic support for undo and redo, and for maintaining reciprocal relationships between objects. ● Allows you to keep just a subset of your model objects in memory at any given time. This is especially important on iOS where conserving memory is critical. ● Uses a schema to describe the model objects. You define the principal features of your model classes—including the relationships between them—in a GUI-based editor. This provides a wealth of basic functionality “for free,” including setting of default values and attribute value validation. ● Allows you to maintain disjoint sets of edits of your objects. This is useful if you want to, for example, allow the user to make edits in one view that may be discarded without affecting data displayed in another view. ● Has an infrastructure for data store versioning and migration. This lets you easily upgrade an old version of the user’s file to the current version. Core Data is available on iOS 3.0 and later. You should read this document to learn how to use Core Data on iOS, including: ● The fundamental design patterns and techniques that underlie Core Data ● The basics of using the Xcode data modeling tool ● How to create, update, and delete objects managed by Core Data, and how to commit changes to a data store 2012-12-13 | © 2012 Apple Inc. All Rights Reserved. 5 Introduction
  • 6. Important: Core Data is not an entry-level technology. Before starting to use Core Data, you must understand the basics of iOS application development, including: ● How to use Xcode and Interface Builder ● Fundamental design patterns such as model-view-controller and delegation ● How to use view controllers, navigation controllers, and table views None of these tools and techniques are explained in this tutorial, so that the content can focus on Core Data itself. Documents you should read to gain adequate experience include: ● Your First iOS App ● Xcode Workspace Guide ● Cocoa Fundamentals Guide ● View Controller Programming Guide for iOS ● Table View Programming Guide for iOS Organization of This Document This tutorial comprises the following chapters: ● “Starting Out” (page 7) ● “The Table View Controller” (page 14) ● “Managed Object and Model” (page 22) ● “Adding Events” (page 27) ● “Fetching Events” (page 33) ● “Deleting Events” (page 37) ● “Next Steps” (page 40) The source code for the tutorial is provided in the Locations sample code. Introduction Organization of This Document 2012-12-13 | © 2012 Apple Inc. All Rights Reserved. 6
  • 7. The goals of this chapter are to describe the application that you will build, then to create the Xcode project and to understand the basics of what the Xcode project template gives you. The goal of this tutorial is to provide a practical introduction to the Core Data framework and how you use it. The aim here is not to create a polished application, but rather to illustrate the fundamental classes, tools, and techniques you’ll use in any Core Data–based program. It doesn’t provide in-depth explanations of all the features the framework offers, but it does give references to other documents you can read to gain a deeper understanding. To add a bit more interest, the tutorial also makes use of the Core Location framework. The Core Location manager is a straightforward object, and for the purposes of this project you don’t need to understand it in any detail. The application you create is conceptually simple—it lets you record your location at any time as an “event,” and uses a table view to show the time, latitude, and longitude of all the events you’ve recorded. It has an Add button to add a new event, and an Edit button that allows you to delete events from the list. 2012-12-13 | © 2012 Apple Inc. All Rights Reserved. 7 Starting Out
  • 8. In this tutorial, you use Core Data primarily to represent the Event objects and store them in an external file so that they can be displayed when the application launches. Note: As a convention, >> denotes the beginning of a paragraph (sometimes including the following bulleted list) that contains steps that you must perform in the tutorial. In code listings, comments included in Xcode template files are not shown. Create the Project The only steps in this chapter are to create the project itself and link against the Core Location framework. >> In Xcode, create a Project using the Window-Based Application template in the iOS section. In the Options section, select the switch to use Core Data for storage. Call the project “Locations”. It’s important that you call the project “Locations” if you want to copy and paste code required later in the tutorial. >> link the project against the Core Location framework. Starting Out Create the Project 2012-12-13 | © 2012 Apple Inc. All Rights Reserved. 8
  • 9. Understanding a Core Data–Based Project Together with various other supporting files, the template provides you with: ● An application delegate class ● A MainWindow interface (.xib) file ● A Core Data model (.xcdatamodeld) file—typically referred to as the managed object model The application also links against the Core Data framework. Of the resources, the first two should be familiar, although the details of the delegate class will be new. The model file is described later in “Managed Object and Model” (page 22). For now, examine the header file of the application delegate class. In addition to the standard window and view controller, it provides (amongst other features) three properties and two methods: @property (nonatomic, retain, readonly) NSManagedObjectContext *managedObjectContext; @property (nonatomic, retain, readonly) NSManagedObjectModel *managedObjectModel; @property (nonatomic, retain, readonly) NSPersistentStoreCoordinator *persistentStoreCoordinator; - (NSURL *)applicationDocumentsDirectory; - (void)saveContext; As its name implies, the applicationDocumentsDirectory method simply returns the URL identifying the application’s documents directory, which is where the file containing the application’s data will be located. The properties provide access to what’s called the Core Data stack, and saveContext saves changes you make to model objects to the data file. The Core Data Stack Stack is the term used to describe a collection of Core Data framework objects that work together to get modeled objects from and save data to a persistent store—the file where your data is stored. Conceptually, a persistent store is like a database, with tables and records. (One of the store types you can use with Core Data is SQLite, but the store doesn’t have to be an actual database.) Starting Out Understanding a Core Data–Based Project 2012-12-13 | © 2012 Apple Inc. All Rights Reserved. 9
  • 10. Figure 1-1 (page 10) shows the simplest—and most common—configuration of the stack. Figure 1-1 A simple Core Data stack Store File Persistent Object Store A collection of object data Managed Object Model A collection of entity descriptions Managed Object Context A collection of managed objects Persistent Store Coordinator A collection of stores The objects you usually work directly with are at the top of the stack—the managed object context and the managed objects it contains. Managed Objects and the Managed Object Context A managed object is an instance of NSManagedObject or of a subclass of NSManagedObject. Conceptually, it’s an object representation of a record in a table in a database, so it’s a model (in the sense of the model-view-controller design pattern) object that is managed by Core Data. Managed objects represent the data you operate on in your application—for example departments and employees in a human resources application; shapes, text areas, and groups in a drawing application; albums, artists, and tracks in a music management application. A managed object is always associated with a managed object context. The managed object context is an instance of NSManagedObjectContext. A context represents a single object space, or scratch pad, in an application. Its primary responsibility is to manage a collection of managed objects. These objects form a group of related model objects that represent an internally consistent view of one or more persistent stores. The context is a powerful object with a central role in your application, with responsibilities from life-cycle management to validation, relationship maintenance, and undo/redo. When you create a new managed object, you insert it into a context. You fetch existing records in the database into the context as managed objects. (Fetching is discussed in greater detail in “Fetching Events” (page 33).) Any changes you make (whether insertion or deletion of complete objects, or manipulation of property values) are kept in memory until you actually commit them to the store by saving the context. Starting Out The Core Data Stack 2012-12-13 | © 2012 Apple Inc. All Rights Reserved. 10
  • 11. Figure 1-2 (page 11) illustrates a managed object context that contains two managed objects corresponding to two records in an external database. In one of the objects, a property value has been changed in memory, but the change has not been committed to the database. Notice that there are two additional records in the database for which there are no corresponding managed objects. Figure 1-2 Managed objects in a context, and a table in the persistent store Managed Object Context Employee name salary Fred 90000 Employee name salary Nigel 60000 Unsaved data name Fred salary 90000 97000 Nigel 50000 Tanya 56000 Employee Juli Current data The Managed Object Model A managed object model is an instance of NSManagedObjectModel. It’s an object representation of a schema that describes your database, and so the managed objects you use in your application. A model is a collection of entity description objects (instances of NSEntityDescription). An entity description describes an entity (a table in a database) in terms of its name, the name of the class used to represent the entity in your application, and what properties (attributes and relationships) it has. Figure 1-3 (page 11) illustrates the relationship between an entity description in a model, a table in the database, and a managed object corresponding to a single record in the table. Figure 1-3 An entity description, a table in the database, and a managed object. Managed Object name salary Fred 97000 entityDescription Entity Description Name Managed Object Class Attribute Attribute “Employee” NSManagedObject name salary Starting Out The Core Data Stack 2012-12-13 | © 2012 Apple Inc. All Rights Reserved. 11
  • 12. Every managed object has a reference to the entity of which it is an instance. Core Data uses the model to map between managed objects in your application and records in the database. It’s important to be aware that if you change the schema in your application, Core Data won’t be able to read stores you created using the previous model. (This is something common to many persistence mechanisms. Core Data, though, does also provide an infrastructure for managing such changes—see the Core Data Model Versioning and Data Migration Programming Guide.) Persistent Store Coordinator The persistent store coordinator plays a central role in how Core Data manages data; however, you don’t often interact with the coordinator directly when you use the framework. This section describes the persistent store coordinator in detail, so if you prefer you can skip it and refer to it later as necessary. (The persistent store coordinator is also described in “Core Data Basics” in the Core Data Programming Guide.) A persistent store coordinator is an instance of NSPersistentStoreCoordinator. It manages a collection of persistent object stores. A persistent object store represents an external store (file) of persisted data. It’s the object that actually maps between objects in your application and records in the database. There are different classes of persistent object store for the different file types that Core Data supports. You can also implement your own if you want to support a custom file type—see Atomic Store Programming Topics. To learn more about persistent stores and the different types, see “Persistent Store Features” in Core Data Programming Guide. In an iOS application, you generally just have a single store, but in complex applications (particularly for Mac OS X) there may be several, each potentially containing different entities. The persistent store coordinator’s role is to manage these stores and present to its managed object contexts the façade of a single unified store. When you fetch records, Core Data retrieves results from all of them (unless you specify which store you’re interested in). In any application, you might have multiple managed object contexts. You might want to maintain discrete sets of managed objects and edits to those objects; or you might want to perform a background operation using one context while allowing the user to interact with objects in another. Each of these would be connected to the same coordinator. Starting Out The Core Data Stack 2012-12-13 | © 2012 Apple Inc. All Rights Reserved. 12
  • 13. Figure 1-4 (page 13) illustrates the role the coordinator plays. Stacks aren’t usually this complicated. Figure 1-4 A complex Core Data stack Managed Object Context Managed Object Context Persistent Object Store Persistent Object Store Persistent Object Store Managed Object ModelPersistent Store Coordinator A collection of entity descriptions DepartmentEmployee Customer Contractor DepartmentEmployee Customer Starting Out The Core Data Stack 2012-12-13 | © 2012 Apple Inc. All Rights Reserved. 13
  • 14. The goal of this chapter is to create an initial implementation of the table view controller, and to update the application delegate to create and configure an instance of the table view controller. This chapter sets up the table view, creating an instance of a navigation controller and a table view controller, and configuring the Core Location manager. This provides the architecture for the application. In the next chapter, you’ll use Core Data to manage the actual data. It’s assumed that you’re already familiar with view controllers and table views; this chapter does not provide significant detail or explanation beyond that you need to understand the role of each of the components in the application. If any of this is too challenging, you should stop here and practice writing some more applications before continuing. The application delegate is responsible for creating, configuring, and displaying a navigation controller and a table view controller. The table view controller displays the array of event objects. To support this, the controller adds four properties to the basic table view controller: ● A mutable array, which contains the collection of event objects that the table view controller displays. It’s populated from the application’s persistent store when the application starts up, and updated as the user adds and removes events. ● A managed object context, which serves as your gateway to the Core Data stack. ● A Core Location manager, which provides location information to the application. The user can add new events only when this is active (the Simulator simulates activity so you don’t need to install the application on a device to test it). ● A bar button item, which the user needs to add events. You need a reference to the button so you can conditionally enable and disable it in response to changes in the Core Location manager’s state. Creating and Defining the RootViewController Class First, create files for the new class. >> In Xcode, create a new UITableViewController subclass; call it RootViewController. (Do not create a nib file.) 2012-12-13 | © 2012 Apple Inc. All Rights Reserved. 14 The Table View Controller
  • 15. Next, add four properties, for the events array, the managed object context, the Core Location manager, and an Add button. The root view controller serves as the Core Location manager’s delegate, so it must adopt the CLLocationManagerDelegate protocol. >> Replace the contents of the RootViewController header file with the following: #import <CoreLocation/CoreLocation.h> @interface RootViewController : UITableViewController <CLLocationManagerDelegate> { NSMutableArray *eventsArray; NSManagedObjectContext *managedObjectContext; CLLocationManager *locationManager; UIBarButtonItem *addButton; } @property (nonatomic, retain) NSMutableArray *eventsArray; @property (nonatomic, retain) NSManagedObjectContext *managedObjectContext; @property (nonatomic, retain) CLLocationManager *locationManager; @property (nonatomic, retain) UIBarButtonItem *addButton; @end Implementing the RootViewController Class There are several parts to the initial implementation; you need to: ● Synthesize the properties you declared. ● Implement viewDidLoad to set up the Core Location manager and the Add and Edit buttons. ● Write the accessor method for the Core Location manager and implement two of its delegate methods. ● Implement methods to take care of memory management. The Table View Controller Implementing the RootViewController Class 2012-12-13 | © 2012 Apple Inc. All Rights Reserved. 15
  • 16. All the code described in the following sections goes into the @implementation block of the RootViewController class, replacing implementations provided by the template as appropriate. (Implementations for the table view data source methods are described later.) Synthesize the Properties >> Add these lines: @synthesize eventsArray; @synthesize managedObjectContext; @synthesize addButton; @synthesize locationManager; Write the Accessor Method for the Core Location Manager >> Create an accessor method to dynamically create the Core Location manager on demand: - (CLLocationManager *)locationManager { if (locationManager != nil) { return locationManager; } locationManager = [[CLLocationManager alloc] init]; locationManager.desiredAccuracy = kCLLocationAccuracyNearestTenMeters; locationManager.delegate = self; return locationManager; } Next, implement two delegate methods to enable and disable the Add button as appropriate. If the Core Location manager is generating updates, then enable the button; if the Core Location manager is failing, then disable the button. >> Add the following two Core Location manager delegate methods: - (void)locationManager:(CLLocationManager *)manager The Table View Controller Implementing the RootViewController Class 2012-12-13 | © 2012 Apple Inc. All Rights Reserved. 16
  • 17. didUpdateToLocation:(CLLocation *)newLocation fromLocation:(CLLocation *)oldLocation { addButton.enabled = YES; } - (void)locationManager:(CLLocationManager *)manager didFailWithError:(NSError *)error { addButton.enabled = NO; } Implementing viewDidLoad The viewDidLoad method needs to set up the Core Location manager and the Add and Edit buttons. >> Replace the implementation of viewDidLoad with the following: - (void)viewDidLoad { [super viewDidLoad]; // Set the title. self.title = @"Locations"; // Set up the buttons. self.navigationItem.leftBarButtonItem = self.editButtonItem; addButton = [[UIBarButtonItem alloc] initWithBarButtonSystemItem:UIBarButtonSystemItemAdd target:self action:@selector(addEvent)]; addButton.enabled = NO; self.navigationItem.rightBarButtonItem = addButton; // Start the location manager. [[self locationManager] startUpdatingLocation]; } The Table View Controller Implementing the RootViewController Class 2012-12-13 | © 2012 Apple Inc. All Rights Reserved. 17
  • 18. Implement Methods for Memory Management >> Replace the existing implementations of viewDidUnload and dealloc. The implementation of viewDidUnload should relinquish ownership of anything created in viewDidLoad that can be recreated. - (void)viewDidUnload { self.eventsArray = nil; self.locationManager = nil; self.addButton = nil; } - (void)dealloc { [managedObjectContext release]; [eventsArray release]; [locationManager release]; [addButton release]; [super dealloc]; } Configuring the Application Delegate The application delegate is responsible for creating and configuring the root view controller and a navigation controller to contain it. Add the Navigation Controller Property You need to add a property for the navigation controller. >> In the application delegate’s header file (LocationsAppDelegate.h), add an instance variable: UINavigationController *navigationController; >> Add the property declaration: @property (nonatomic, retain) UINavigationController *navigationController; The Table View Controller Configuring the Application Delegate 2012-12-13 | © 2012 Apple Inc. All Rights Reserved. 18
  • 19. Implement the Application Delegate In the application delegate’s implementation file (LocationsAppDelegate.m), you need to: ● Import the RootViewController’s header file. ● Synthesize the navigationController property. ● In the applicationDidFinishLaunching: method, create an instance of RootViewController and a navigation controller to contain it. You also need to pass the application’s managed object context to the new root view controller. >> Before the @implementation block of the application delegate class, import the RootViewController class’s header file: #import "RootViewController.h" >> In the @implementation block of the application delegate class, synthesize the navigation controller property: @synthesize navigationController; >> Replace your application delegate’s application:didFinishLaunchingWithOptions: method with the following implementation: - (BOOL)application:(UIApplication *)application didFinishLaunchingWithOptions:(NSDictionary *)launchOptions { RootViewController *rootViewController = [[RootViewController alloc] initWithStyle:UITableViewStylePlain]; NSManagedObjectContext *context = [self managedObjectContext]; if (!context) { // Handle the error. } // Pass the managed object context to the view controller. rootViewController.managedObjectContext = context; UINavigationController *aNavigationController = [[UINavigationController alloc] The Table View Controller Configuring the Application Delegate 2012-12-13 | © 2012 Apple Inc. All Rights Reserved. 19
  • 20. initWithRootViewController:rootViewController]; self.navigationController = aNavigationController; [window addSubview:[navigationController view]]; [window makeKeyAndVisible]; [rootViewController release]; [aNavigationController release]; return YES; } Build and Test At this stage you should build and run the project to make sure that it all works. The Table View Controller Build and Test 2012-12-13 | © 2012 Apple Inc. All Rights Reserved. 20
  • 21. Note: For the application to work correctly, you must not disable your computer’s location services (see Security > General in System Preferences). When it launches, you must also allow the application to use your location. When it launches, the application should display a blank table view with a navigation bar. The navigation bar should contain the Edit and Add buttons: The Add button will initially be disabled, but after a few seconds it should become enabled (as the location manager starts sending events). If you tap it, the application will of course crash since you haven’t yet implemented the addEvent method. Before you can add an event, though, you need to define the Event entity. That’s what you’ll do next. The Table View Controller Build and Test 2012-12-13 | © 2012 Apple Inc. All Rights Reserved. 21
  • 22. The goal of this chapter is to allow users to create a new event when they tap the Add button. To do this, you need to define the Event entity in the managed object model, implement the corresponding class, and create an instance of the class in the add method. Modeling Your Data As noted in “The Managed Object Model” (page 11), the model is a collection of entity and property description objects that tell Core Data about the managed objects in your application. You can create the model programmatically, or use the Xcode modeling tool to create the model graphically, in a similar way to that in which you create a user interface using Interface Builder. There are actually several ways to edit the constituent parts of the model; these steps typically describe just one. To learn more about the modeling tool, and other ways to edit the model, see Xcode Tools for Core Data. This application has just a single entity, an Event, with three attributes—creation date, latitude, and longitude. Add the Entity First, add an Event entity. >> In Xcode, in the Resources group select the model file (Locations.xcdatamodel) to display the model editor. >> Choose Design > Data Model > Add Entity to add a new entity to the model. You can also use the Add button (+) at the lower left of the entity pane, or use the shortcut menu within the diagram view in the model editor. You should see a new entry for the entity (called “Entity”) appear in the entity pane at the top left of the document editor, and a graphical representation of the entity (a rounded rectangle) appear in the diagram view. Now you can set the name for the new entity. >> Make sure you have the new entity selected in the entity pane so that you see information about the entity in the detail pane at the right. Change the name of the entity to Event. (Don’t change the class name.) 2012-12-13 | © 2012 Apple Inc. All Rights Reserved. 22 Managed Object and Model
  • 23. Your model should look similar to this: There’s an important difference between the name of the entity and the name of the Objective-C class used to represent instances of the entity. Core Data uses the entity description to find out about the data objects it manages, so the class name doesn’t have to be the same as the entity name. Indeed, in some cases several entities may be represented by the same class—NSManagedObject. Core Data is able to differentiate the instances on the basis of their associated entity description. Add the Attributes First, add the attribute for the creation date. >> Make sure you have selected Event in the entity pane, then choose Design > Data Model > Add Attribute. You should see a new attribute (called newAttribute) appear in the property pane. You need to set its name and type. >> Make sure you have selected the new attribute in the property pane, then in the detail pane change the name of the attribute to creationDate, and select Date from the Type pop-up menu. Managed Object and Model Modeling Your Data 2012-12-13 | © 2012 Apple Inc. All Rights Reserved. 23
  • 24. You don’t need to set any of the other values. Now add attributes for latitude and longitude. >> Make sure you have selected Event in the entity browser, then choose Design > Data Model > Add Attribute twice (to add two attributes). >> Select both the new attributes in the property pane, then in the detail pane select Double from the Type pop-up menu. >> Select just the first new attribute in the property pane, and in the detail pane change the Name of the attribute to latitude. >> Select just the second new attribute in the property pane, and in the detail pane change the Name of the attribute to longitude. Your model should look similar to this: Managed Object and Model Modeling Your Data 2012-12-13 | © 2012 Apple Inc. All Rights Reserved. 24
  • 25. Custom Managed Object Class Although in principle you can represent an entity using NSManagedObject, in practice it is common to use a custom class. This yields several benefits, including: ● Better support from the development tools. You get code completion for property accessor methods, and compile-time type- and symbol-checking. ● Support for custom methods for the entity. In many situations, you want to provide special logic for the entity, such as validation methods or derived properties. For example, in a Person entity you might implement validation method to ensure that a hasDriversLicense property cannot be true if the age property is less than 17, or a fullName method that returns a suitable concatenation of firstName and lastName. Now use Xcode to generate the files for a custom class to represent the Event entity. >>In Xcode, in the model, select the Event entity. (You must select the entity; the selection is used to indicate which items to create subclasses for.) >>Choose File > New File. In the New File dialog, select Managed Object Class. Depending on the version of Xcode you’re using, the Managed Object Class may be available in the iOS section under Cocoa Touch Classes, or you may need to choose the template in the Mac OS X section, under Cocoa—either will work correctly. >>Click Next. The correct location and targets should have been selected for you. Click Next to accept them. You should see the Entity selection pane, with the Event entity selected. The “Generate accessors” and “Generate Objective-C 2.0 properties” options should also be selected. >>Click Finish to generate the files. The Event class interface and implementation files are created and added to your project. There are a few things to notice: ● In the interface file (Event.h), all the attributes are represented by object values. Although you specified the latitude and longitude attribute types as Double, the property values at runtime are instances of NSNumber. Core Data uses objects to represent values. ● In the implementation file (Event.m), the properties are implemented as dynamic. Normally you might expect to see synthesized, however Core Data generates the accessor methods at runtime. ● In the implementation file (Event.m), there is no dealloc method. Managed Object and Model Custom Managed Object Class 2012-12-13 | © 2012 Apple Inc. All Rights Reserved. 25
  • 26. Normally you might expect to see a dealloc method to release instance variables, however Core Data is responsible for the life-cycle of all modeled properties of a managed object. (If you add your own instance variables that do not have corresponding properties in the managed object model, then you need to manage those yourself as normal.) ● The model is also updated—the Event entity is now represented by the Event class. Because the model was changed, you need to save it. >>Save the model file. Finally, because the table view controller is going to make use of the new class, import its header file in the table view controller’s implementation file. >>In the table view controller’s implementation file (RootViewController.m), after the initial import statement, add: #import "Event.h" Core Data Recap You used the Xcode data modeling tool to create a new entity. You then created a custom class to represent that entity. In the next chapter, you’ll create instances of the entity. If you want to learn more about the modeling tools, see Xcode Tools for Core Data. Managed Object and Model Core Data Recap 2012-12-13 | © 2012 Apple Inc. All Rights Reserved. 26
  • 27. The goal of this chapter is to create the application logic to allow the user to create new event objects and display them in the user interface. Implementing the addEvent Method You create new Event objects in the addEvent method. Recall that it’s invoked when the user taps the Add button (see “Implementing viewDidLoad” (page 17)). There are several parts to the method. It has to: ● Get the current location ● Create an Event object and configure it using the current location information ● Save the Event object ● Update the events array and the user interface First, though, declare the addEvent method. >> Add a declaration of the addEvent method to the RootViewController header file: - (void)addEvent; Get the Current Location When you create a new Event object, you need to set its location. You get the location from the location manager. If it’s not able to provide a location, then don’t continue. >> Add the following to RootViewController implementation file: - (void)addEvent { CLLocation *location = [locationManager location]; if (!location) { return; } 2012-12-13 | © 2012 Apple Inc. All Rights Reserved. 27 Adding Events
  • 28. } Create and Configure the Event object You typically create a managed object using a convenience method—insertNewObjectForEntityForName:inManagedObjectContext:—of NSEntityDescription, which returns a properly initialized instance of the correct class for the entity you specify, inserted into the managed object context. (For more about the initialization process, see “Managed Objects” in Core Data Programming Guide). After you’ve created the object, you can set its property values. You get the latitude and longitude from the location as scalar values, so you need to convert these to NSNumber objects for the Event object. You could get the time stamp from the location as well, but this is a constant value in Simulator. Instead, here you can use date method of NSDate to get a date object representing the current date and time. >> Add the following code at the end of the current implementation of addEvent: // Create and configure a new instance of the Event entity. Event *event = (Event *)[NSEntityDescription insertNewObjectForEntityForName:@"Event" inManagedObjectContext:managedObjectContext]; CLLocationCoordinate2D coordinate = [location coordinate]; [event setLatitude:[NSNumber numberWithDouble:coordinate.latitude]]; [event setLongitude:[NSNumber numberWithDouble:coordinate.longitude]]; [event setCreationDate:[NSDate date]]; This illustrates the general technique you use to update a managed object, whether it’s a new managed object you created, or one you fetch from the store. You simply use accessor methods, just as you would any other Cocoa object. Importantly, though, changes are not pushed to the persistent store until you explicitly save the context. Save the New Event Remember that the managed object context acts like a scratch pad (see “Managed Objects and the Managed Object Context” (page 10)). Whatever changes you make—whether editing property values or adding or deleting whole objects—aren’t actually committed to the persistent store (file) until you save the context. Typically, in an iOS application, you save changes as soon as the user has made them. >> Add the following code at the end of the current implementation of addEvent: Adding Events Implementing the addEvent Method 2012-12-13 | © 2012 Apple Inc. All Rights Reserved. 28
  • 29. NSError *error = nil; if (![managedObjectContext save:&error]) { // Handle the error. } In common with several Core Data methods, the NSManagedObjectContext save: method takes an error parameter and returns a Boolean value to indicate success or failure. The situation is really no different from that in any other application; it’s just that the return value from the save: method and the error parameter tend to bring into sharper focus the possibility of a problem occurring. Handling Errors It’s up to you to decide how you handle a Core Data error. In a scenario as simple as that described in “Save the New Event” (page 28)—where the only change you expect is the addition of a single object—if the data can’t be saved it’s likely to be indicative of some sort of catastrophic failure from which recovery might be difficult or impossible. In this situation you might just present an alert sheet telling the user to restart the application. In a more complex scenario, the user might have changed property values, or added or deleted managed objects in such a way that either an individual object is in an inconsistent state (validation fails) or the object graph as a whole is inconsistent. If you have more than one managed object context, it’s also possible that the persistent store was updated when changes made in a different context were committed and so the objects in the current context are inconsistent with the corresponding records in the store. In general, you can interrogate the error object to find out what went wrong. You should think carefully about what the user experience should be in the event of an error occurring. What information should you present to the user? What options might you give them for recovering from the problem? These are not questions that Core Data is able to answer. Update the Events Array and the Table View Finally, you need to add the new Event object to the events array, then update the table view. Since this is a new Event, and Events are displayed with most recent events at the top of the list, add the new object to the beginning of the events array, add a corresponding row to the top of the table view, then scroll the table view to show the new row. >> Add the following code at the end of the current implementation of addEvent: [eventsArray insertObject:event atIndex:0]; Adding Events Implementing the addEvent Method 2012-12-13 | © 2012 Apple Inc. All Rights Reserved. 29
  • 30. NSIndexPath *indexPath = [NSIndexPath indexPathForRow:0 inSection:0]; [self.tableView insertRowsAtIndexPaths:[NSArray arrayWithObject:indexPath] withRowAnimation:UITableViewRowAnimationFade]; [self.tableView scrollToRowAtIndexPath:[NSIndexPath indexPathForRow:0 inSection:0] atScrollPosition:UITableViewScrollPositionTop animated:YES]; The next task is to complete the implementation of the table view data-source methods to display the events. Displaying Events in the Table View You need to update two table view data-source methods to display the events. First simply tell the table view how many events to display. >> Update the implementation of tableView:numberOfRowsInSection: to return the number of objects in the events array (there’s only one section, so you don’t need to test the section number): - (NSInteger)tableView:(UITableView *)tableView numberOfRowsInSection:(NSInteger)section { return [eventsArray count]; } Next, you need to configure the table view cells to display information about each event. You’ll see there is a nontrivial amount of code, but most of it is related to user interface and display rather than data management. >> Replace the implementation of tableView:(UITableView *)tableView cellForRowAtIndexPath: with the following: - (UITableViewCell *)tableView:(UITableView *)tableView cellForRowAtIndexPath:(NSIndexPath *)indexPath { // A date formatter for the time stamp. static NSDateFormatter *dateFormatter = nil; if (dateFormatter == nil) { dateFormatter = [[NSDateFormatter alloc] init]; [dateFormatter setTimeStyle:NSDateFormatterMediumStyle]; [dateFormatter setDateStyle:NSDateFormatterMediumStyle]; Adding Events Displaying Events in the Table View 2012-12-13 | © 2012 Apple Inc. All Rights Reserved. 30
  • 31. } // A number formatter for the latitude and longitude. static NSNumberFormatter *numberFormatter = nil; if (numberFormatter == nil) { numberFormatter = [[NSNumberFormatter alloc] init]; [numberFormatter setNumberStyle:NSNumberFormatterDecimalStyle]; [numberFormatter setMaximumFractionDigits:3]; } static NSString *CellIdentifier = @"Cell"; // Dequeue or create a new cell. UITableViewCell *cell = [tableView dequeueReusableCellWithIdentifier:CellIdentifier]; if (cell == nil) { cell = [[[UITableViewCell alloc] initWithStyle:UITableViewCellStyleSubtitle reuseIdentifier:CellIdentifier] autorelease]; } Event *event = (Event *)[eventsArray objectAtIndex:indexPath.row]; cell.textLabel.text = [dateFormatter stringFromDate:[event creationDate]]; NSString *string = [NSString stringWithFormat:@"%@, %@", [numberFormatter stringFromNumber:[event latitude]], [numberFormatter stringFromNumber:[event longitude]]]; cell.detailTextLabel.text = string; return cell; } Adding Events Displaying Events in the Table View 2012-12-13 | © 2012 Apple Inc. All Rights Reserved. 31
  • 32. Build and Test If you build the project, it should compile without errors. The application should also launch and run correctly, until you tap the Add button—at which point it will crash. This is because the events array hasn’t been created yet. >> Solely for testing purposes, add the following line to the end of the RootViewController object’s implementation of viewDidLoad: eventsArray = [[NSMutableArray alloc] init]; If you build and run now, you should find that if you tap the Add button new events are displayed in the table view. If you quit and relaunch the application, though, you won’t see the list of Events when it starts up. To remedy this, you need to populate the events array on launch with the existing Event objects. This is your task in the next chapter. Before doing that, restore the project to its pre-testing state. >> Delete the line you added for testing. Core Data Recap There was a lot of code in this chapter, and not much related directly to Core Data. The important points are that: ● You typically create a new managed object using the convenience method insertNewObjectForEntityForName:inManagedObjectContext: of NSEntityDescription. This method ensures that you get a properly initialized instance of the class that represents the entity you specify. ● To commit changes to the persistent store, you need to save the managed object context. The context acts as a scratch pad; if you add or modify objects, the changes are held in memory until you invoke save:. It’s up to you to decide how to deal with any error that might occur during a save operation. ● You get and set a managed object’s property values using accessor methods, just as you would any other object. You can also use key-value coding, just as you would any other object, but using accessor methods is much more efficient (see “Using Managed Objects” in Core Data Programming Guide). Adding Events Build and Test 2012-12-13 | © 2012 Apple Inc. All Rights Reserved. 32
  • 33. The goal of this chapter is to fetch existing Event objects when the application launches. Fetching Managed Objects To fetch objects from a persistent store, you need a managed object context and a fetch request. A fetch request is an instance of NSFetchRequest. As a minimum, it specifies the entity you’re interested in. It may also specify any constraints on the values that the objects should have and what order you want them back in. For example, in a corporate information application, you might create a fetch request to retrieve Employee objects, ordered by name, whose salary is greater than a certain amount. The constraints are represented by a predicate—an instance of NSPredicate. (For more about predicates see Predicate Programming Guide.) The sort order is represented by an array of NSSortOrdering objects. Managed Object Context Execute fetch request Response Query Returns Persistent Store Coordinator Array Persistent Object Store Entity (table name) Predicate (optional) Sort orderings (optional) Employee salary > 60000 name: ascending alphabetical Fetch Request Managed Object name salary Fred 97000 Managed Object name salary Juli 90000 2012-12-13 | © 2012 Apple Inc. All Rights Reserved. 33 Fetching Events
  • 34. Unless you really need all the objects of a particular entity, you should use a predicate to limit the number of objects returned to those you’re actually interested in. (If you’re displaying objects in a table view, you can also use a fetched results controller—NSFetchedResultsController—to manage a result set for you. It works hard to ensure that as little data as possible is held in memory.) Note that you don’t always need to execute a fetch to retrieve objects. Core Data, if necessary, automatically retrieves objects that are at the destination of a relationship. For example, if you execute a fetch to retrieve an Employee object, then ask it for its related Department, then Core Data fetches the Department for you if it hadn’t already been fetched. Creating and Executing the Request When the table view controller loads its view, it should fetch the Event objects and keep them in the events array so that they can be displayed later. The events array needs to be mutable since the user can add and remove events. Create the Request Create a fetch request and set the entity. >> Add the following code at the end of the current implementation of viewDidLoad: NSFetchRequest *request = [[NSFetchRequest alloc] init]; NSEntityDescription *entity = [NSEntityDescription entityForName:@"Event" inManagedObjectContext:managedObjectContext]; [request setEntity:entity]; The method of interest here is NSEntityDescription’s entityForName:inManagedObjectContext:. You provide the name of the entity you want and the managed object context you’re dealing with; the method then asks for the (managed object) context’s (persistent store) coordinator’s (managed object) model and retrieves from that the entity with the name you specified (you can refer back to “The Core Data Stack” (page 9) to see a pictorial representation). Conceptually it’s not very difficult (you just navigate down the stack), and you could do it yourself easily enough, but it’s much more convenient to use the class method. Fetching Events Creating and Executing the Request 2012-12-13 | © 2012 Apple Inc. All Rights Reserved. 34
  • 35. Set the Sort Descriptor If you don’t specify a sort descriptor, the order in which objects are returned from a fetch is undefined. To retrieve the Events in chronological order, you therefore need to specify a sort descriptor for the fetch. Because you might want to specify multiple sort orderings (for example, you might want to sort employees by department, last name, and first name), you need to put the sort descriptor in an array. >> At the end of the current implementation of viewDidLoad, create a sort descriptor to order Event objects by creation date—most recent first—and a mutable array. Add the sort descriptor to the array, and set the array as the fetch request’s sortDescriptors array: NSSortDescriptor *sortDescriptor = [[NSSortDescriptor alloc] initWithKey:@"creationDate" ascending:NO]; NSArray *sortDescriptors = [[NSArray alloc] initWithObjects:sortDescriptor, nil]; [request setSortDescriptors:sortDescriptors]; [sortDescriptors release]; [sortDescriptor release]; (It’s often useful to use the initWithObjects: method of NSArray in case you want to add more sort descriptors later.) Execute the Request Having created a fetch request, you now execute it. The events array needs to be mutable, so make a mutable copy of the result. >> Add the following code at the end of the current implementation of viewDidLoad: NSError *error = nil; NSMutableArray *mutableFetchResults = [[managedObjectContext executeFetchRequest:request error:&error] mutableCopy]; if (mutableFetchResults == nil) { // Handle the error. } As previously, this example leaves it up to you to decide how to handle any error (see “Handling Errors” (page 29)). Fetching Events Creating and Executing the Request 2012-12-13 | © 2012 Apple Inc. All Rights Reserved. 35
  • 36. Finish Up The final steps are to set the view controller’s events array instance variable and to release objects that were allocated. >> Add the following code at the end of the current implementation of viewDidLoad: [self setEventsArray:mutableFetchResults]; [mutableFetchResults release]; [request release]; Build and Test If you build and run the application, you should find that it compiles correctly and that existing Event objects are displayed when the application launches. Core Data Recap The important points from this chapter are that: ● You fetch managed objects by creating a fetch request. As a minimum, you need to specify an entity. You get the entity using the convenience method entityForName:inManagedObjectContext: of NSEntityDescription. You might also specify a predicate and an array of sort orderings. To ensure that you retrieve no more objects than necessary (and so keep memory usage down), you should typically try to constrain your request as narrowly as possible using a predicate. ● You don’t always need to explicitly fetch managed objects. This wasn’t addressed directly in code, since there are no relationships in this tutorial. To repeat the point made earlier, though: Core Data, if necessary, automatically retrieves objects that are at the destination of a relationship. For example, if you execute a fetch to retrieve an Employee object, then ask it for its related Department, Core Data fetches the Department for you if it hasn’t already been fetched. Fetching Events Build and Test 2012-12-13 | © 2012 Apple Inc. All Rights Reserved. 36
  • 37. The goal of this chapter is to allow the user to delete events from the list. Deleting Managed Objects As you saw when you created a new managed object, the lifetime of a record in the database is not tied to the lifetime of a given managed object. If you create a managed object, it doesn’t mean a record automatically is created for that object in the database—you need to save the context. Similarly, simply because an object is deallocated does not mean that the corresponding record itself is destroyed. To delete a record, you tell the managed object context to mark an object as deleted, using the deleteObject: method of NSManagedObjectContext. Then to actually destroy the record, you commit the action using save:. Deleting an Event To handle deletion, you implement the table view data source method tableView:commitEditingStyle:forRowAtIndexPath:. It needs to do three things: 1. Delete the selected object. 2. Update the table view. 3. Save the changes. It should do this only if the action is a delete. >> In the RootViewController implementation file, implement the tableView:commitEditingStyle:forRowAtIndexPath: method as follows: - (void)tableView:(UITableView *)tableView commitEditingStyle:(UITableViewCellEditingStyle)editingStyle forRowAtIndexPath:(NSIndexPath *)indexPath { if (editingStyle == UITableViewCellEditingStyleDelete) { 2012-12-13 | © 2012 Apple Inc. All Rights Reserved. 37 Deleting Events
  • 38. // Delete the managed object at the given index path. NSManagedObject *eventToDelete = [eventsArray objectAtIndex:indexPath.row]; [managedObjectContext deleteObject:eventToDelete]; // Update the array and table view. [eventsArray removeObjectAtIndex:indexPath.row]; [tableView deleteRowsAtIndexPaths:[NSArray arrayWithObject:indexPath] withRowAnimation:YES]; // Commit the change. NSError *error = nil; if (![managedObjectContext save:&error]) { // Handle the error. } } } Build and Test Build and test the application. You should find that it compiles and runs without error. If you tap Edit, the table view should enter edit mode. If you delete a row, it should be properly deleted from the table view. If you quit and relaunch the application, the row you deleted should no longer be visible. You’ve now completed the tutorial. You can start investigating ways to enhance your knowledge and understanding of Core Data. Some suggestions are given in the next chapter. Core Data Recap You’ve now performed the basic tasks you need to be familiar with to use Core Data—you: ● Created an entity in a managed object model. You also created a custom class to represent the entity. ● Created an instance of a managed object. You also changed some of its property values. ● Fetched managed objects. ● Deleted a managed object. Deleting Events Build and Test 2012-12-13 | © 2012 Apple Inc. All Rights Reserved. 38
  • 39. You may have noticed that, in performing these tasks, the only object in the Core Data stack (see “The Core Data Stack” (page 9)) with which you interacted directly was the managed object context. Although you have access to the other objects in the stack, you often don’t need to use them directly. Either the Xcode template takes care of setting them up, or you use a convenience class method to accomplish a particular task that would otherwise require you to access them. Deleting Events Core Data Recap 2012-12-13 | © 2012 Apple Inc. All Rights Reserved. 39
  • 40. Here are some suggestions for ways in which you can enhance your understanding of Core Data and how you can integrate it in your applications. As you explore, you can turn to the Core Data Programming Guide for help. Changing the Model Means you Cannot Open Existing Stores: If you change the schema in your managed object model, your application typically won’t be able to open files you created with an earlier version. This is an issue that you might address as your experience grows (see Core Data Model Versioning and Data Migration Programming Guide). First, though, there are some easier steps to take. The Core Data Utility Tutorial It’s worth turning away from iOS for a short while and working through Core Data Utility Tutorial. It’s similar in many respects to this tutorial, but it’s freed from the distraction of a user interface. It introduces a couple of new concepts regarding the lifecycle of a managed object, and reinforces the idea of the managed object model being just a collection of objects—by having you create one programatically. Use a Fetched Results Controller Turning back to iOS, try to update the Locations application to use an NSFetchedResultsController object. A fetched results controller is intended primarily to make fetching large numbers of objects much more efficient, but it’s worth practicing using one with a smaller data set. For comparison, look at the CoreDataBooks example. Creating a Managed Object Model with Xcode Read Xcode Mapping Tool for Core Data. You will learn more about the Xcode tools for Core Data, and in particular how to establish relationships between entities. This will be essential if you want to create applications that contain entities that are related to each other, as suggested in “A Drill-Down Interface” (page 41). 2012-12-13 | © 2012 Apple Inc. All Rights Reserved. 40 Next Steps
  • 41. A Drill-Down Interface Extend the Locations application to provide a drill-down interface to allow users to inspect an event—perhaps to edit comments or a add photograph. You need to add more properties to the Event entity, and perhaps a second entity. The TaggedLocations sample provides an example of using a second entity with a to-many relationship. If you add a photograph, consider the memory management implications of fetching a photograph with every Event you retrieve from the store. Core Data has a feature called faulting (see “Managed Objects” in Core Data Programming Guide) which means that it doesn’t have to complete the object graph. You would typically model the photograph as a separate entity, with a relationship from the Event entity to the Photo entity (and a reciprocal relationship from the photo to the event). When you retrieve just a single Event object, the photo relationship may be represented by a fault. If you ask an event for its photo, Core Data automatically fulfills the fault and retrieves the corresponding data for you. See PhotoLocations for an example. Add an Add Sheet An Add sheet allows you to enter more information about an event when you create it. Think about what information you might pass to the Add sheet controller. Think also about how you might keep the edits made to the Event object in the Add sheet discrete from edits made in the rest of the application. (Hint: you might consider using two managed object contexts—see the CoreDataBooks example.) Next Steps A Drill-Down Interface 2012-12-13 | © 2012 Apple Inc. All Rights Reserved. 41
  • 42. This table describes the changes to Core Data Tutorial for iOS. NotesDate Made minor editorial corrections thoughout. Fixed broken links.2012-12-13 Updated for iOS 4.0 and later.2010-11-15 Changed the title from "Core Data Tutorial for iPhone OS."2010-07-08 Corrected links to sample applications.2009-09-09 Corrected typographical errors.2009-06-04 Added a missing line of code to the implementation of applicationDidFinishLaunching:. 2009-03-19 First version of a tutorial that introduces application development for iPhone using Core Data. 2009-03-15 2012-12-13 | © 2012 Apple Inc. All Rights Reserved. 42 Document Revision History
  • 43. Apple Inc. © 2012 Apple Inc. All rights reserved. No part of this publication may be reproduced, stored in a retrieval system, or transmitted, in any form or by any means, mechanical, electronic, photocopying, recording, or otherwise, without prior written permission of Apple Inc., with the following exceptions: Any person is hereby authorized to store documentation on a single computer for personal use only and to print copies of documentation for personal use provided that the documentation contains Apple’s copyright notice. No licenses, express or implied, are granted with respect to any of the technology described in this document. Apple retains all intellectual property rights associated with the technology described in this document. This document is intended to assist application developers to develop applications only for Apple-labeled computers. Apple Inc. 1 Infinite Loop Cupertino, CA 95014 408-996-1010 Apple, the Apple logo, Cocoa, Cocoa Touch, iPhone, Mac, Objective-C, and Xcode are trademarks of Apple Inc., registered in the U.S. and other countries. iOS is a trademark or registered trademark of Cisco in the U.S. and other countries and is used under license. Even though Apple has reviewed this document, APPLE MAKES NO WARRANTY OR REPRESENTATION, EITHER EXPRESS OR IMPLIED, WITH RESPECT TO THIS DOCUMENT, ITS QUALITY, ACCURACY, MERCHANTABILITY, OR FITNESS FOR A PARTICULAR PURPOSE. AS A RESULT, THIS DOCUMENT IS PROVIDED “AS IS,” AND YOU, THE READER, ARE ASSUMING THE ENTIRE RISK AS TO ITS QUALITY AND ACCURACY. IN NO EVENT WILL APPLE BE LIABLE FOR DIRECT, INDIRECT, SPECIAL, INCIDENTAL, OR CONSEQUENTIAL DAMAGES RESULTING FROM ANY DEFECT OR INACCURACY IN THIS DOCUMENT, even if advised of the possibility of such damages. THE WARRANTY AND REMEDIES SET FORTH ABOVE ARE EXCLUSIVE AND IN LIEU OF ALL OTHERS, ORAL OR WRITTEN, EXPRESS OR IMPLIED. No Apple dealer, agent, or employee is authorized to make any modification, extension, or addition to this warranty. Some states do not allow the exclusion or limitation of implied warranties or liability for incidental or consequential damages, so the above limitation or exclusion may not apply to you. This warranty gives you specific legal rights, and you may also have other rights which vary from state to state.