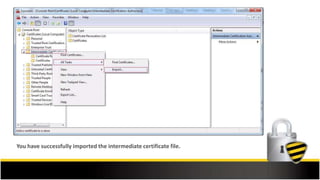
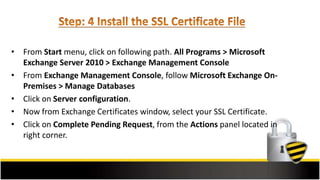
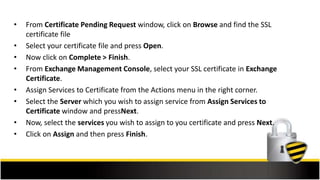
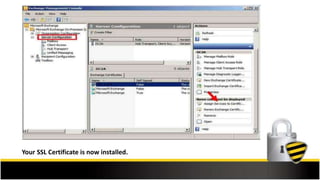
How to install SSL Certificate on
Microsoft Exchange Server 2010
Microsoft Exchange Server 2010 SSL Installation Steps
Pre-Installation Steps:
• Buy an SSL Certificate
• Generate a CSR
• A Certificate Authority Verifies Your Details
• CA issues an SSL Certificate & sends SSL Certificate in a .zip file
After finish Pre-Installation steps, follow our Step by Step Guidelines about
SSL Certificate Installation on Microsoft Exchange Server 2010.
After completing the SSL Certificate purchase process, you can
download your SSL certificate or a Certificate Authority (CA) will email
your certificate, which will contain Primary, Intermediate and Root
certificate in a zip folder. Now, you can download that zip file and extract
it on a particular root directory, where you wish to store your certificate
files.
• In Start menu, Type MMC & click on it or else write
Windows+ R, then type MMC and press Enter.
• Console1 screen will appear
• from File Menu click on Add/Remove Snap-ins or else
type Ctrl + M
• Select Certificates from Available snap-ins: console and click
on Add
• Select a specific computer account and click Finish
• After reaching on Add or Remove Snap-ins dialogue, click
on OK
• Expand Certificate under the Console Root folder
• Now right click on Intermediate Certificate, hover mouse on All
Tasks and click on Import.
• Press Next button, click on Browse, search for your intermediate
Certificate file
• Then press Next, select ‘Place all certificates in the following
store’ & press Browse button, now from the list of Certificate stores
select Intermediate Certificate Authorities & click
• Certificate Import Wizard will appear, verify your certificate and
press Finish.
• The Import was Successful alert message will appear, press OK
• Save the Console and Close MMC.
You have successfully imported the intermediate certificate file.
• From Start menu, click on following path. All Programs > Microsoft
Exchange Server 2010 > Exchange Management Console
• From Exchange Management Console, follow Microsoft Exchange On-
Premises > Manage Databases
• Click on Server configuration.
• Now from Exchange Certificates window, select your SSL Certificate.
• Click on Complete Pending Request, from the Actions panel located in
right corner.
• From Certificate Pending Request window, click on Browse and find the SSL
certificate file
• Select your certificate file and press Open.
• Now click on Complete > Finish.
• From Exchange Management Console, select your SSL certificate in Exchange
Certificate.
• Assign Services to Certificate from the Actions menu in the right corner.
• Select the Server which you wish to assign service from Assign Services to
Certificate window and pressNext.
• Now, select the services you wish to assign to you certificate and press Next.
• Click on Assign and then press Finish.
Your SSL Certificate is now installed.
• Microsoft Exchange Server Support Center : https://support.microsoft.com/en-
us/ph/13965?wa=wsignin1.0
• SSL Installation Checker : https://cheapsslsecurity.com/ssltools/ssl-checker.php
• Generate CSR : https://cheapsslsecurity.com/ssltools/csr-generator.php
Blog: cheapsslsecurity.com/blog
Facebook: CheapSSLSecurities
Twitter: SSLSecurity
Google Plus: +Cheapsslsecurity
For More Information on SSL Certificate Errors

How to install SSL Certificate on Microsoft Exchange Server 2010

  • 1.
    How to installSSL Certificate on Microsoft Exchange Server 2010
  • 2.
    Microsoft Exchange Server2010 SSL Installation Steps Pre-Installation Steps: • Buy an SSL Certificate • Generate a CSR • A Certificate Authority Verifies Your Details • CA issues an SSL Certificate & sends SSL Certificate in a .zip file After finish Pre-Installation steps, follow our Step by Step Guidelines about SSL Certificate Installation on Microsoft Exchange Server 2010.
  • 3.
    After completing theSSL Certificate purchase process, you can download your SSL certificate or a Certificate Authority (CA) will email your certificate, which will contain Primary, Intermediate and Root certificate in a zip folder. Now, you can download that zip file and extract it on a particular root directory, where you wish to store your certificate files.
  • 4.
    • In Startmenu, Type MMC & click on it or else write Windows+ R, then type MMC and press Enter. • Console1 screen will appear • from File Menu click on Add/Remove Snap-ins or else type Ctrl + M • Select Certificates from Available snap-ins: console and click on Add • Select a specific computer account and click Finish • After reaching on Add or Remove Snap-ins dialogue, click on OK
  • 5.
    • Expand Certificateunder the Console Root folder • Now right click on Intermediate Certificate, hover mouse on All Tasks and click on Import. • Press Next button, click on Browse, search for your intermediate Certificate file • Then press Next, select ‘Place all certificates in the following store’ & press Browse button, now from the list of Certificate stores select Intermediate Certificate Authorities & click • Certificate Import Wizard will appear, verify your certificate and press Finish. • The Import was Successful alert message will appear, press OK • Save the Console and Close MMC.
  • 6.
    You have successfullyimported the intermediate certificate file.
  • 7.
    • From Startmenu, click on following path. All Programs > Microsoft Exchange Server 2010 > Exchange Management Console • From Exchange Management Console, follow Microsoft Exchange On- Premises > Manage Databases • Click on Server configuration. • Now from Exchange Certificates window, select your SSL Certificate. • Click on Complete Pending Request, from the Actions panel located in right corner.
  • 8.
    • From CertificatePending Request window, click on Browse and find the SSL certificate file • Select your certificate file and press Open. • Now click on Complete > Finish. • From Exchange Management Console, select your SSL certificate in Exchange Certificate. • Assign Services to Certificate from the Actions menu in the right corner. • Select the Server which you wish to assign service from Assign Services to Certificate window and pressNext. • Now, select the services you wish to assign to you certificate and press Next. • Click on Assign and then press Finish.
  • 9.
    Your SSL Certificateis now installed.
  • 10.
    • Microsoft ExchangeServer Support Center : https://support.microsoft.com/en- us/ph/13965?wa=wsignin1.0 • SSL Installation Checker : https://cheapsslsecurity.com/ssltools/ssl-checker.php • Generate CSR : https://cheapsslsecurity.com/ssltools/csr-generator.php
  • 11.
    Blog: cheapsslsecurity.com/blog Facebook: CheapSSLSecurities Twitter:SSLSecurity Google Plus: +Cheapsslsecurity For More Information on SSL Certificate Errors