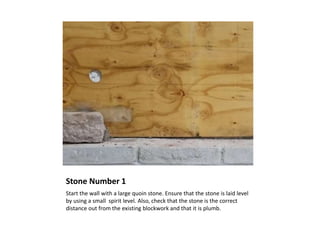
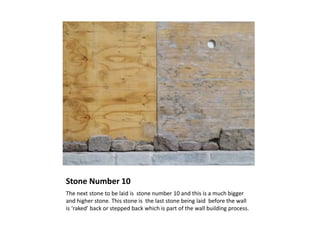
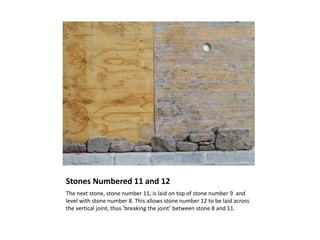
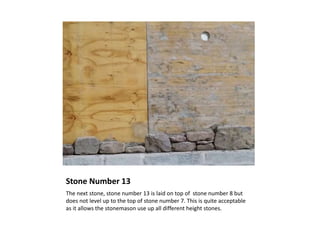
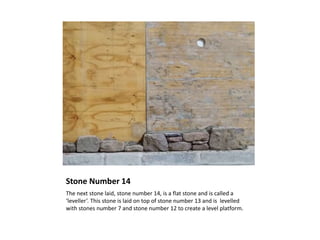
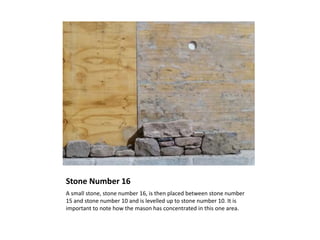
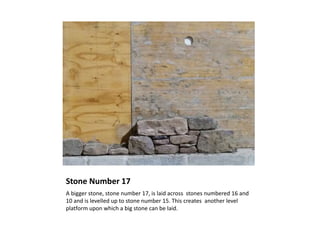
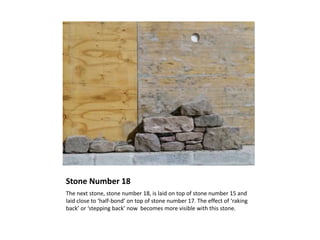
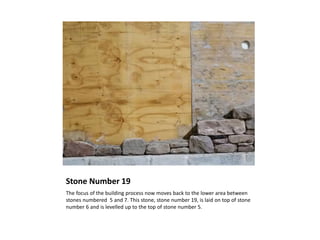
Building a Natural Stone Wall
Cladding Panel
By
Donal Corcoran
29-11-2018
Introduction
• In this presentation I will show how to build a
natural stone wall cladding panel in dry stone
wall style
• I will begin by outlining a number of relevant
building rules which ensure consistency in the
building of the panel
• These rules are also relevant to both the
strength and aesthetics of the finished panel
Introduction
• After stating the relevant building rules I will
begin building the panel
• The laying of each stone in the panel will be
accompanied by an explanation of why a
stone of that size is being laid in that position
• This will be done by constant reference back
to the relevant building rules and will result in
a very pleasing piece of stonework
Rules of Building
• Rule 1: The first course of stonework should
follow the rule: Big, Small, Smaller, Different
Height, Different Height, Different Height,
Diff………
• Rule 2: Following the first course, the main
rule is to “Level up and Break the Joint
(Vertical)”
• Rule 3: Build with big stones and fill in with
smaller stones
Rules of Building
• Rule 4: No stone should be higher than longer
when laid
• Rule 5: No 2 stones of equal height should be
laid beside each other unless they are thin
levellers
• Rule 6: Avoid stacking more than 2 stones on
top of each other unless they are very small
stones and are used to fill a small area
between bigger stones
Rules of Building
• Rule 7: Stones should be laid half-bond
wherever possible
• Rule 8: No cross joints should be visible in the
built wall
• Rule 9: Vertical and horizontal joints should be
as tight as possible
• Rule 10: Horizontal bed joints should be level
• Rule 11: Quoins should run in alternate
direction
Rules of Building
• Rule 12: All quoins should have a sharp arris
next to the vertical line
• Rule 13: Adjoining stones should be levelled
up to where the arris of the main stone
changes direction
• Rule 14: Continuous horizontal joints should
not be longer than 1m
• Rule 15: Continuous vertical joints should not
be longer than 300mm
Rules of Building
• Rule 16: All finishing stones up to the line
should reach the line exactly
• Rule 17: Individual stones need not be fully
rectangular but must be laid with the longest
part as the base
• Rule 18: Always, keep the horizontal building
line above the stone being built
Stone Number 1
Start the wall with a large quoin stone. Ensure that the stone is laid level
by using a small spirit level. Also, check that the stone is the correct
distance out from the existing blockwork and that it is plumb.
Stone Number 2
Place a smaller stone next to the big quoin stone ensuring that the
vertical joint is tight. Also check that the stone is laid with the base level
and that it is in line with the first stone.
Stone Number 3
Place another smaller stone next to stone number 2 ensuring that it is
level, plumb and in line with the stones already laid by using the small
level and timber gauge which are partly visible in the picture.
Stone Number 4
Place a bigger stone, number 4, next to stone number 3 to satisfy the
setting out rule which reads, ‘Big, Small, Smaller, Different Height,
Different Height, Different Height……..’.
Stone Number 5
The next stone to be placed, stone number 5, should be a different
height to stone number 4 and the difference in height should be at least
30mm to allow ‘levelling up’ later in the process.
Stone Number 6
The sixth stone to be placed will again be a different height to the one
that preceded it. This will ensure that a variety of different height stone s
will be used which in turn adds to the beauty of the wall.
Stone Number 7
The next stone to be placed is stone number 7. This stone is different in
height and in this case is a bigger stone. Note how all the stones are laid tight
to the stones beside them with the mortar being filled in behind them.
Stone Number 8
Stone number 8 is a different height again and is laid tight to stone
number 7. A wide variety of stone sizes are already evident and this will
continue throughout the project.
Stone Number 9
Stone number 9 is laid next. Note however, how this stone is smaller than
stone number 8. This is done to ensure that a pattern of ‘Big, Small, Big,
Small….’ is not followed and thus ensures random sized stone are used.
Stone Number 10
The next stone to be laid is stone number 10 and this is a much bigger
and higher stone. This stone is the last stone being laid before the wall
is ‘raked’ back or stepped back which is part of the wall building process.
Stones Numbered 11 and 12
The next stone, stone number 11, is laid on top of stone number 9 and
level with stone number 8. This allows stone number 12 to be laid across
the vertical joint, thus ‘breaking the joint’ between stone 8 and 11.
Stone Number 13
The next stone, stone number 13 is laid on top of stone number 8 but
does not level up to the top of stone number 7. This is quite acceptable
as it allows the stonemason use up all different height stones.
Stone Number 14
The next stone laid, stone number 14, is a flat stone and is called a
‘leveller’. This stone is laid on top of stone number 13 and is levelled
with stones number 7 and stone number 12 to create a level platform.
Stone Number 15
The next stone, stone number 15, is laid on top of stones 7, 14 and 12.
This breaks the vertical joints between stones 7 and 14 and 14 and 12.
This is in line with rule 2 which states ‘level up and break the joint’.
Stone Number 16
A small stone, stone number 16, is then placed between stone number
15 and stone number 10 and is levelled up to stone number 10. It is
important to note how the mason has concentrated in this one area.
Stone Number 17
A bigger stone, stone number 17, is laid across stones numbered 16 and
10 and is levelled up to stone number 15. This creates another level
platform upon which a big stone can be laid.
Stone Number 18
The next stone, stone number 18, is laid on top of stone number 15 and
laid close to ‘half-bond’ on top of stone number 17. The effect of ‘raking
back’ or ‘stepping back’ now becomes more visible with this stone.
Stone Number 19
The focus of the building process now moves back to the lower area between
stones numbered 5 and 7. This stone, stone number 19, is laid on top of stone
number 6 and is levelled up to the top of stone number 5.
Stone Number 20
Stone number 20 is then laid across stones numbered 5 and 19 breaking
the vertical joint between them. This is in line with the practice of
breaking the joints with big stone and levelling up with smaller ones.
Stone Number 21
The next stone to be laid, stone number 21, is a small stone and is laid
on top of stone number 19 and levelled with the top of stone number 7.
This demonstrates the use of smaller stones in ‘levelling up’.
Stone Numbered 22 and 23
These two flat stone, stone numbered 22 and 23, are referred to as
levellers and are used to level up with stone number 20. They also break
the vertical joint between stones numbered 21 and 7.
Stone Number 24
The next stone laid, stone number 24 is laid on top of stone number 5
and level with the top of stone number 4. This is the first part of the rule
‘level up and break the joint’.
Stone Number 25
The next stone to be laid, stone number 25, is a thin stone which is laid
across stones 4 and 24 thus breaking the vertical joint. A long spirit level
is used to level stone 25 with stones numbered 20 and 23.
Stones Numbered 26 and 27
Stones numbered 26 and 27 are very small stones used to fill up the
space between stone 25 and stone 20.These stone s would have been
shaped to fit tight in this space.
Stone Number 28
Stone number 28 is a large stone and is laid on top of stones 25, 27 and
20 breaking two vertical joints. Note how stone number 28 is laid with
the left hand side directly plumb with the edge of stone number 25.
Stone Number 29
Stone numbered 29 is a thin stone and is laid between stones 28 and 15. This
stone does not level up to stone 15 and may be used by the mason to avoid a
block pattern and use up as many different height stones as possible.
Stone Number 30
The next stone, stone number 30, is laid on top of stone 29 and is
levelled up to stone 15. Note the way in which the mortar used is kept at
the back of the stones and levelled up to the top of the stones.
Stone Number 31
Stone number 31 is laid half-bond across stones 30 and 15. Note how the
small spirit level is placed on the outside edge of the stone to ensure that the
stone is laid level which looks much better than one laid unevenly.
Stone Number 32
Stone number 32 follows the rule of ‘build with big stones and fill in with
the small ones’. This stone is laid between stones 28 and 31. This shows
the importance of shaping both big and small stones before building.
Stones Numbered 33, 34 and 35
Two pieces of thin ‘slatish’ stone, numbers 33 and 34 are laid on top of
each other in order to level up to stones 28 and 31. The vertical joints are
then broken by laying a new stone, stone 35 across stones 28, 34 and 31.
Stone Number 36
The stonemason now moves to the right to begin the process of ‘levelling
up and breaking the joint’ by laying the next stone, stone 36, between
stones 31 and 18 all the while maintaining tight joints.
Stone Number 37
This next stone, stone 37 satisfies the ‘levelling up’ part of the rule by
levelling up to the top of stones 31 and 18. This process requires the
stonemason to have shaped a big quantity of different sized stones.
Stone Number 38
Stone number 38 satisfies the second part of the rule by ‘breaking ‘ the
vertical joint between stones 31 and 37. Note how stone 38 is level with stone
35 but does not break the rule that ‘no stones of equal height should be laid
beside each other unless they are levellers’.
Stones Number 39 and 40
The area between stones numbered 35 and 38 is now filled in with
stones numbered 39 and 40. Note how the stonemason is concentrating
on a specific area of the wall which is being built up to an apex.
Stone Number 41
The next stone, stone number 41, is laid half-bond across stones 35 and
40 and follows the practice of building to an apex. This process also
allows the stones that are ‘raked’ back to be half-bonded later.
Stone Number 42
The stonemason now moves to the right and places the next stone, stone
numbered 42, half-bond across stones numbered 37 and 18. This stone
fits tightly into the tapered shape of stone number 18.
Stones Numbered 43 and 44
The next stone to be laid, stone number 43, is a piece of flat slate and is
shaped to fit level with the top of stone numbered 18. This is followed by
laying stone number 44 which is laid level with stone number 38.
Stone Number 45
Stone numbered 45 is then laid close to half-bond across stones 38 and
44. This stone is laid level with stone 41 as this is the finished height of
the panel in this project.
Stones Numbered 46 and 47
Stones numbered 46 and 47 are now laid in the space between stones 41
and 45. These are the last stones to be laid in this area and the
stonemason will now move to the left to build another apex to the left.
Stone Number 48
Stone number 48 is a quoin stone and is laid in an alternate direction to
the first quoin as per rule 11 and is laid with the edge as close as
possible to the vertical building line which is being used as a guide.
Stone Number 49
Stone number 49 is a long thin stone and is laid on top of stone number
3. This stone is laid level by using the small spirit level but is not big
enough to be levelled up to stone 4 which is quite acceptable.
Stones Numbered 50 and 51
These stones, numbered 50 and 51, are laid level with stones 2 and 4.
Although both stones are the same size they do not break Rule 5 as
these stones are levellers.
Stone Number 52
The next stone, stone 52, is a big stone as is laid half-bond across stone 4.
The stone must be high enough to avoid a cross joint. Note how the
stone is shaped to fit tight against stones 25 and 28.
Stone Number 53
Stone number 53 is laid next to stone 52 and is laid level with stone 1.
Note how the stones are laid up along the angle on stone 2 with tight
joints and resulting in a vertical joint half way on stone 2.
Stones Number 54 and 55
Two leveller stones, stones numbered 54 and 55, are now laid between
stone 1 and stone 53 and are levelled to the top of each to create a level
section upon which a larger stone can laid upon.
Stone Number 56
This stone, stone 56 is a long stone and is laid across stones 1, 55 and 53
breaking the vertical joint between stones 1 and 55. This also creates a
space either side of stone 56 which can be filled with smaller stones.
Stones Numbered 57, 58 and 59
The space between stones 48 and 56 is filled with leveller stones 57 and
58 which level up with stone 56. A small stone, stone 59, is laid in the
space between stones 56 and 52 and laid level with stone 52.
Stone Number 60
The next stone to be laid is stone 60 which is laid close to half-bond
across stones 58 and 56. It is important stone 60 is laid level with stone
48 as it allows another long quoin to be laid on top of both stones.
Stone Number 61 and 62
Stones numbered 61 and 62 are small stones and are laid in the space
between stones 48 and 60 and are levelled up to create a level base for
the next quoin stone.
Stone Number 63
Stone number 63 is a quoin stone which is laid across stones 48, 62 and
60. Note how close the quoin stone is laid to the vertical building line and
how the quoin stones are laid in alternate directions in line with Rule 11.
Stone Number 64
Stone number 64 is another quoin stone and is laid running in to the wall
which is in line with Rule 11. Note how the wall is now divided into 2
apexes and a valley which is common practise in building stone walls.
Stone Number 65
The stonemason now goes to the lowest section of the valley and lays
stone 65 which breaks the vertical joint between stones 59 and 52. This
stone is also laid level with the top of stone 56.
Stones Number 66 and 67
These two stones are flat levelling stones and are laid in the space
between stones 65 and 28. It is argued that the use of two flat stones is
much more attractive than simply using one thicker stone to level up.
Stone Number 68
This is another decent sized stone which breaks the vertical joint
between stones 56 and 65. This is also another example of the Rule 3
which states ‘build with the big stones and fill in with the smaller stones’.
Stones Numbered 69 and 70
The stonemason now continues following the rule previously stated and
fills in the area between stones 68 and 28 with two smaller rectangular
stones, stones numbered 69 and 70 resulting in another level section.
Stones Numbered 71, 72, 73 and 74
The area between stones 60 and 68 is now filled in with two small stones
numbered 71 and 72. This is followed by filling in the area between
stones 63 and 68 with stone s 73 and 74, a rectangular and flat stone.
Stone Number 75
The long level section of wall now allows the stone mason to lay a long
medium height stone, stone number 75, across stones 68, 70 and 28
breaking two vertical joints and levelling up to the finish height.
Stone Number 76
Stone number 76 is a flat levelling stone laid in the space between stones
63 and 75. Note how the levelling stone, stone 76is laid level to the
change in angle of stone number 63 which is in line with Rule 13.
Stones Numbered 77 and 78
Stone number 77 is a small piece of slate used to level up with the top of
stone 63. Stone number 78 is then placed across stones 63 and 77
breaking the vertical joint and levelling up to the finish height.
Stones Numbered 79 and 80
Stones numbered 79 and 80 are small stones and are laid in the area
between stones 64 and 78. Note how this system of building ensures that
the widest variety of stone sizes are used resulting in less waste.
Stone Number 81
The next stone, stone number 81, is a small square shaped stone and is
placed in the space between stones 78 and 75. These ‘filling in stones’
are normally dressed specifically for these spaces unlike larger stones.
Stones Numbered 82, 83 and 84
Stone 82 is laid on top of stone 81 and is levelled up to the top of stones
78 and 75. The area between stones 745and 35 is then filled in with
stones numbered 83 and 84 which is levelled up to the top of stone 35.
Stones Numbered 85 and 86
Stone numbered 85 is now laid to break the vertical joint between stones
84 and 35. This is a rectangular shaped stone with a taper to the right
and stone 86 is laid on top of this taper to reach the finish height.
Finished Stone Panel
The finished stone panel shows how a wide variety of semi-dressed
rubble stone can be built following a number of building rules to
produce a strong and attractive piece of work.

How to build a stone wall cladding panel

  • 1.
    Building a NaturalStone Wall Cladding Panel By Donal Corcoran 29-11-2018
  • 2.
    Introduction • In thispresentation I will show how to build a natural stone wall cladding panel in dry stone wall style • I will begin by outlining a number of relevant building rules which ensure consistency in the building of the panel • These rules are also relevant to both the strength and aesthetics of the finished panel
  • 3.
    Introduction • After statingthe relevant building rules I will begin building the panel • The laying of each stone in the panel will be accompanied by an explanation of why a stone of that size is being laid in that position • This will be done by constant reference back to the relevant building rules and will result in a very pleasing piece of stonework
  • 4.
    Rules of Building •Rule 1: The first course of stonework should follow the rule: Big, Small, Smaller, Different Height, Different Height, Different Height, Diff……… • Rule 2: Following the first course, the main rule is to “Level up and Break the Joint (Vertical)” • Rule 3: Build with big stones and fill in with smaller stones
  • 5.
    Rules of Building •Rule 4: No stone should be higher than longer when laid • Rule 5: No 2 stones of equal height should be laid beside each other unless they are thin levellers • Rule 6: Avoid stacking more than 2 stones on top of each other unless they are very small stones and are used to fill a small area between bigger stones
  • 6.
    Rules of Building •Rule 7: Stones should be laid half-bond wherever possible • Rule 8: No cross joints should be visible in the built wall • Rule 9: Vertical and horizontal joints should be as tight as possible • Rule 10: Horizontal bed joints should be level • Rule 11: Quoins should run in alternate direction
  • 7.
    Rules of Building •Rule 12: All quoins should have a sharp arris next to the vertical line • Rule 13: Adjoining stones should be levelled up to where the arris of the main stone changes direction • Rule 14: Continuous horizontal joints should not be longer than 1m • Rule 15: Continuous vertical joints should not be longer than 300mm
  • 8.
    Rules of Building •Rule 16: All finishing stones up to the line should reach the line exactly • Rule 17: Individual stones need not be fully rectangular but must be laid with the longest part as the base • Rule 18: Always, keep the horizontal building line above the stone being built
  • 9.
    Stone Number 1 Startthe wall with a large quoin stone. Ensure that the stone is laid level by using a small spirit level. Also, check that the stone is the correct distance out from the existing blockwork and that it is plumb.
  • 10.
    Stone Number 2 Placea smaller stone next to the big quoin stone ensuring that the vertical joint is tight. Also check that the stone is laid with the base level and that it is in line with the first stone.
  • 11.
    Stone Number 3 Placeanother smaller stone next to stone number 2 ensuring that it is level, plumb and in line with the stones already laid by using the small level and timber gauge which are partly visible in the picture.
  • 12.
    Stone Number 4 Placea bigger stone, number 4, next to stone number 3 to satisfy the setting out rule which reads, ‘Big, Small, Smaller, Different Height, Different Height, Different Height……..’.
  • 13.
    Stone Number 5 Thenext stone to be placed, stone number 5, should be a different height to stone number 4 and the difference in height should be at least 30mm to allow ‘levelling up’ later in the process.
  • 14.
    Stone Number 6 Thesixth stone to be placed will again be a different height to the one that preceded it. This will ensure that a variety of different height stone s will be used which in turn adds to the beauty of the wall.
  • 15.
    Stone Number 7 Thenext stone to be placed is stone number 7. This stone is different in height and in this case is a bigger stone. Note how all the stones are laid tight to the stones beside them with the mortar being filled in behind them.
  • 16.
    Stone Number 8 Stonenumber 8 is a different height again and is laid tight to stone number 7. A wide variety of stone sizes are already evident and this will continue throughout the project.
  • 17.
    Stone Number 9 Stonenumber 9 is laid next. Note however, how this stone is smaller than stone number 8. This is done to ensure that a pattern of ‘Big, Small, Big, Small….’ is not followed and thus ensures random sized stone are used.
  • 18.
    Stone Number 10 Thenext stone to be laid is stone number 10 and this is a much bigger and higher stone. This stone is the last stone being laid before the wall is ‘raked’ back or stepped back which is part of the wall building process.
  • 19.
    Stones Numbered 11and 12 The next stone, stone number 11, is laid on top of stone number 9 and level with stone number 8. This allows stone number 12 to be laid across the vertical joint, thus ‘breaking the joint’ between stone 8 and 11.
  • 20.
    Stone Number 13 Thenext stone, stone number 13 is laid on top of stone number 8 but does not level up to the top of stone number 7. This is quite acceptable as it allows the stonemason use up all different height stones.
  • 21.
    Stone Number 14 Thenext stone laid, stone number 14, is a flat stone and is called a ‘leveller’. This stone is laid on top of stone number 13 and is levelled with stones number 7 and stone number 12 to create a level platform.
  • 22.
    Stone Number 15 Thenext stone, stone number 15, is laid on top of stones 7, 14 and 12. This breaks the vertical joints between stones 7 and 14 and 14 and 12. This is in line with rule 2 which states ‘level up and break the joint’.
  • 23.
    Stone Number 16 Asmall stone, stone number 16, is then placed between stone number 15 and stone number 10 and is levelled up to stone number 10. It is important to note how the mason has concentrated in this one area.
  • 24.
    Stone Number 17 Abigger stone, stone number 17, is laid across stones numbered 16 and 10 and is levelled up to stone number 15. This creates another level platform upon which a big stone can be laid.
  • 25.
    Stone Number 18 Thenext stone, stone number 18, is laid on top of stone number 15 and laid close to ‘half-bond’ on top of stone number 17. The effect of ‘raking back’ or ‘stepping back’ now becomes more visible with this stone.
  • 26.
    Stone Number 19 Thefocus of the building process now moves back to the lower area between stones numbered 5 and 7. This stone, stone number 19, is laid on top of stone number 6 and is levelled up to the top of stone number 5.
  • 27.
    Stone Number 20 Stonenumber 20 is then laid across stones numbered 5 and 19 breaking the vertical joint between them. This is in line with the practice of breaking the joints with big stone and levelling up with smaller ones.
  • 28.
    Stone Number 21 Thenext stone to be laid, stone number 21, is a small stone and is laid on top of stone number 19 and levelled with the top of stone number 7. This demonstrates the use of smaller stones in ‘levelling up’.
  • 29.
    Stone Numbered 22and 23 These two flat stone, stone numbered 22 and 23, are referred to as levellers and are used to level up with stone number 20. They also break the vertical joint between stones numbered 21 and 7.
  • 30.
    Stone Number 24 Thenext stone laid, stone number 24 is laid on top of stone number 5 and level with the top of stone number 4. This is the first part of the rule ‘level up and break the joint’.
  • 31.
    Stone Number 25 Thenext stone to be laid, stone number 25, is a thin stone which is laid across stones 4 and 24 thus breaking the vertical joint. A long spirit level is used to level stone 25 with stones numbered 20 and 23.
  • 32.
    Stones Numbered 26and 27 Stones numbered 26 and 27 are very small stones used to fill up the space between stone 25 and stone 20.These stone s would have been shaped to fit tight in this space.
  • 33.
    Stone Number 28 Stonenumber 28 is a large stone and is laid on top of stones 25, 27 and 20 breaking two vertical joints. Note how stone number 28 is laid with the left hand side directly plumb with the edge of stone number 25.
  • 34.
    Stone Number 29 Stonenumbered 29 is a thin stone and is laid between stones 28 and 15. This stone does not level up to stone 15 and may be used by the mason to avoid a block pattern and use up as many different height stones as possible.
  • 35.
    Stone Number 30 Thenext stone, stone number 30, is laid on top of stone 29 and is levelled up to stone 15. Note the way in which the mortar used is kept at the back of the stones and levelled up to the top of the stones.
  • 36.
    Stone Number 31 Stonenumber 31 is laid half-bond across stones 30 and 15. Note how the small spirit level is placed on the outside edge of the stone to ensure that the stone is laid level which looks much better than one laid unevenly.
  • 37.
    Stone Number 32 Stonenumber 32 follows the rule of ‘build with big stones and fill in with the small ones’. This stone is laid between stones 28 and 31. This shows the importance of shaping both big and small stones before building.
  • 38.
    Stones Numbered 33,34 and 35 Two pieces of thin ‘slatish’ stone, numbers 33 and 34 are laid on top of each other in order to level up to stones 28 and 31. The vertical joints are then broken by laying a new stone, stone 35 across stones 28, 34 and 31.
  • 39.
    Stone Number 36 Thestonemason now moves to the right to begin the process of ‘levelling up and breaking the joint’ by laying the next stone, stone 36, between stones 31 and 18 all the while maintaining tight joints.
  • 40.
    Stone Number 37 Thisnext stone, stone 37 satisfies the ‘levelling up’ part of the rule by levelling up to the top of stones 31 and 18. This process requires the stonemason to have shaped a big quantity of different sized stones.
  • 41.
    Stone Number 38 Stonenumber 38 satisfies the second part of the rule by ‘breaking ‘ the vertical joint between stones 31 and 37. Note how stone 38 is level with stone 35 but does not break the rule that ‘no stones of equal height should be laid beside each other unless they are levellers’.
  • 42.
    Stones Number 39and 40 The area between stones numbered 35 and 38 is now filled in with stones numbered 39 and 40. Note how the stonemason is concentrating on a specific area of the wall which is being built up to an apex.
  • 43.
    Stone Number 41 Thenext stone, stone number 41, is laid half-bond across stones 35 and 40 and follows the practice of building to an apex. This process also allows the stones that are ‘raked’ back to be half-bonded later.
  • 44.
    Stone Number 42 Thestonemason now moves to the right and places the next stone, stone numbered 42, half-bond across stones numbered 37 and 18. This stone fits tightly into the tapered shape of stone number 18.
  • 45.
    Stones Numbered 43and 44 The next stone to be laid, stone number 43, is a piece of flat slate and is shaped to fit level with the top of stone numbered 18. This is followed by laying stone number 44 which is laid level with stone number 38.
  • 46.
    Stone Number 45 Stonenumbered 45 is then laid close to half-bond across stones 38 and 44. This stone is laid level with stone 41 as this is the finished height of the panel in this project.
  • 47.
    Stones Numbered 46and 47 Stones numbered 46 and 47 are now laid in the space between stones 41 and 45. These are the last stones to be laid in this area and the stonemason will now move to the left to build another apex to the left.
  • 48.
    Stone Number 48 Stonenumber 48 is a quoin stone and is laid in an alternate direction to the first quoin as per rule 11 and is laid with the edge as close as possible to the vertical building line which is being used as a guide.
  • 49.
    Stone Number 49 Stonenumber 49 is a long thin stone and is laid on top of stone number 3. This stone is laid level by using the small spirit level but is not big enough to be levelled up to stone 4 which is quite acceptable.
  • 50.
    Stones Numbered 50and 51 These stones, numbered 50 and 51, are laid level with stones 2 and 4. Although both stones are the same size they do not break Rule 5 as these stones are levellers.
  • 51.
    Stone Number 52 Thenext stone, stone 52, is a big stone as is laid half-bond across stone 4. The stone must be high enough to avoid a cross joint. Note how the stone is shaped to fit tight against stones 25 and 28.
  • 52.
    Stone Number 53 Stonenumber 53 is laid next to stone 52 and is laid level with stone 1. Note how the stones are laid up along the angle on stone 2 with tight joints and resulting in a vertical joint half way on stone 2.
  • 53.
    Stones Number 54and 55 Two leveller stones, stones numbered 54 and 55, are now laid between stone 1 and stone 53 and are levelled to the top of each to create a level section upon which a larger stone can laid upon.
  • 54.
    Stone Number 56 Thisstone, stone 56 is a long stone and is laid across stones 1, 55 and 53 breaking the vertical joint between stones 1 and 55. This also creates a space either side of stone 56 which can be filled with smaller stones.
  • 55.
    Stones Numbered 57,58 and 59 The space between stones 48 and 56 is filled with leveller stones 57 and 58 which level up with stone 56. A small stone, stone 59, is laid in the space between stones 56 and 52 and laid level with stone 52.
  • 56.
    Stone Number 60 Thenext stone to be laid is stone 60 which is laid close to half-bond across stones 58 and 56. It is important stone 60 is laid level with stone 48 as it allows another long quoin to be laid on top of both stones.
  • 57.
    Stone Number 61and 62 Stones numbered 61 and 62 are small stones and are laid in the space between stones 48 and 60 and are levelled up to create a level base for the next quoin stone.
  • 58.
    Stone Number 63 Stonenumber 63 is a quoin stone which is laid across stones 48, 62 and 60. Note how close the quoin stone is laid to the vertical building line and how the quoin stones are laid in alternate directions in line with Rule 11.
  • 59.
    Stone Number 64 Stonenumber 64 is another quoin stone and is laid running in to the wall which is in line with Rule 11. Note how the wall is now divided into 2 apexes and a valley which is common practise in building stone walls.
  • 60.
    Stone Number 65 Thestonemason now goes to the lowest section of the valley and lays stone 65 which breaks the vertical joint between stones 59 and 52. This stone is also laid level with the top of stone 56.
  • 61.
    Stones Number 66and 67 These two stones are flat levelling stones and are laid in the space between stones 65 and 28. It is argued that the use of two flat stones is much more attractive than simply using one thicker stone to level up.
  • 62.
    Stone Number 68 Thisis another decent sized stone which breaks the vertical joint between stones 56 and 65. This is also another example of the Rule 3 which states ‘build with the big stones and fill in with the smaller stones’.
  • 63.
    Stones Numbered 69and 70 The stonemason now continues following the rule previously stated and fills in the area between stones 68 and 28 with two smaller rectangular stones, stones numbered 69 and 70 resulting in another level section.
  • 64.
    Stones Numbered 71,72, 73 and 74 The area between stones 60 and 68 is now filled in with two small stones numbered 71 and 72. This is followed by filling in the area between stones 63 and 68 with stone s 73 and 74, a rectangular and flat stone.
  • 65.
    Stone Number 75 Thelong level section of wall now allows the stone mason to lay a long medium height stone, stone number 75, across stones 68, 70 and 28 breaking two vertical joints and levelling up to the finish height.
  • 66.
    Stone Number 76 Stonenumber 76 is a flat levelling stone laid in the space between stones 63 and 75. Note how the levelling stone, stone 76is laid level to the change in angle of stone number 63 which is in line with Rule 13.
  • 67.
    Stones Numbered 77and 78 Stone number 77 is a small piece of slate used to level up with the top of stone 63. Stone number 78 is then placed across stones 63 and 77 breaking the vertical joint and levelling up to the finish height.
  • 68.
    Stones Numbered 79and 80 Stones numbered 79 and 80 are small stones and are laid in the area between stones 64 and 78. Note how this system of building ensures that the widest variety of stone sizes are used resulting in less waste.
  • 69.
    Stone Number 81 Thenext stone, stone number 81, is a small square shaped stone and is placed in the space between stones 78 and 75. These ‘filling in stones’ are normally dressed specifically for these spaces unlike larger stones.
  • 70.
    Stones Numbered 82,83 and 84 Stone 82 is laid on top of stone 81 and is levelled up to the top of stones 78 and 75. The area between stones 745and 35 is then filled in with stones numbered 83 and 84 which is levelled up to the top of stone 35.
  • 71.
    Stones Numbered 85and 86 Stone numbered 85 is now laid to break the vertical joint between stones 84 and 35. This is a rectangular shaped stone with a taper to the right and stone 86 is laid on top of this taper to reach the finish height.
  • 72.
    Finished Stone Panel Thefinished stone panel shows how a wide variety of semi-dressed rubble stone can be built following a number of building rules to produce a strong and attractive piece of work.