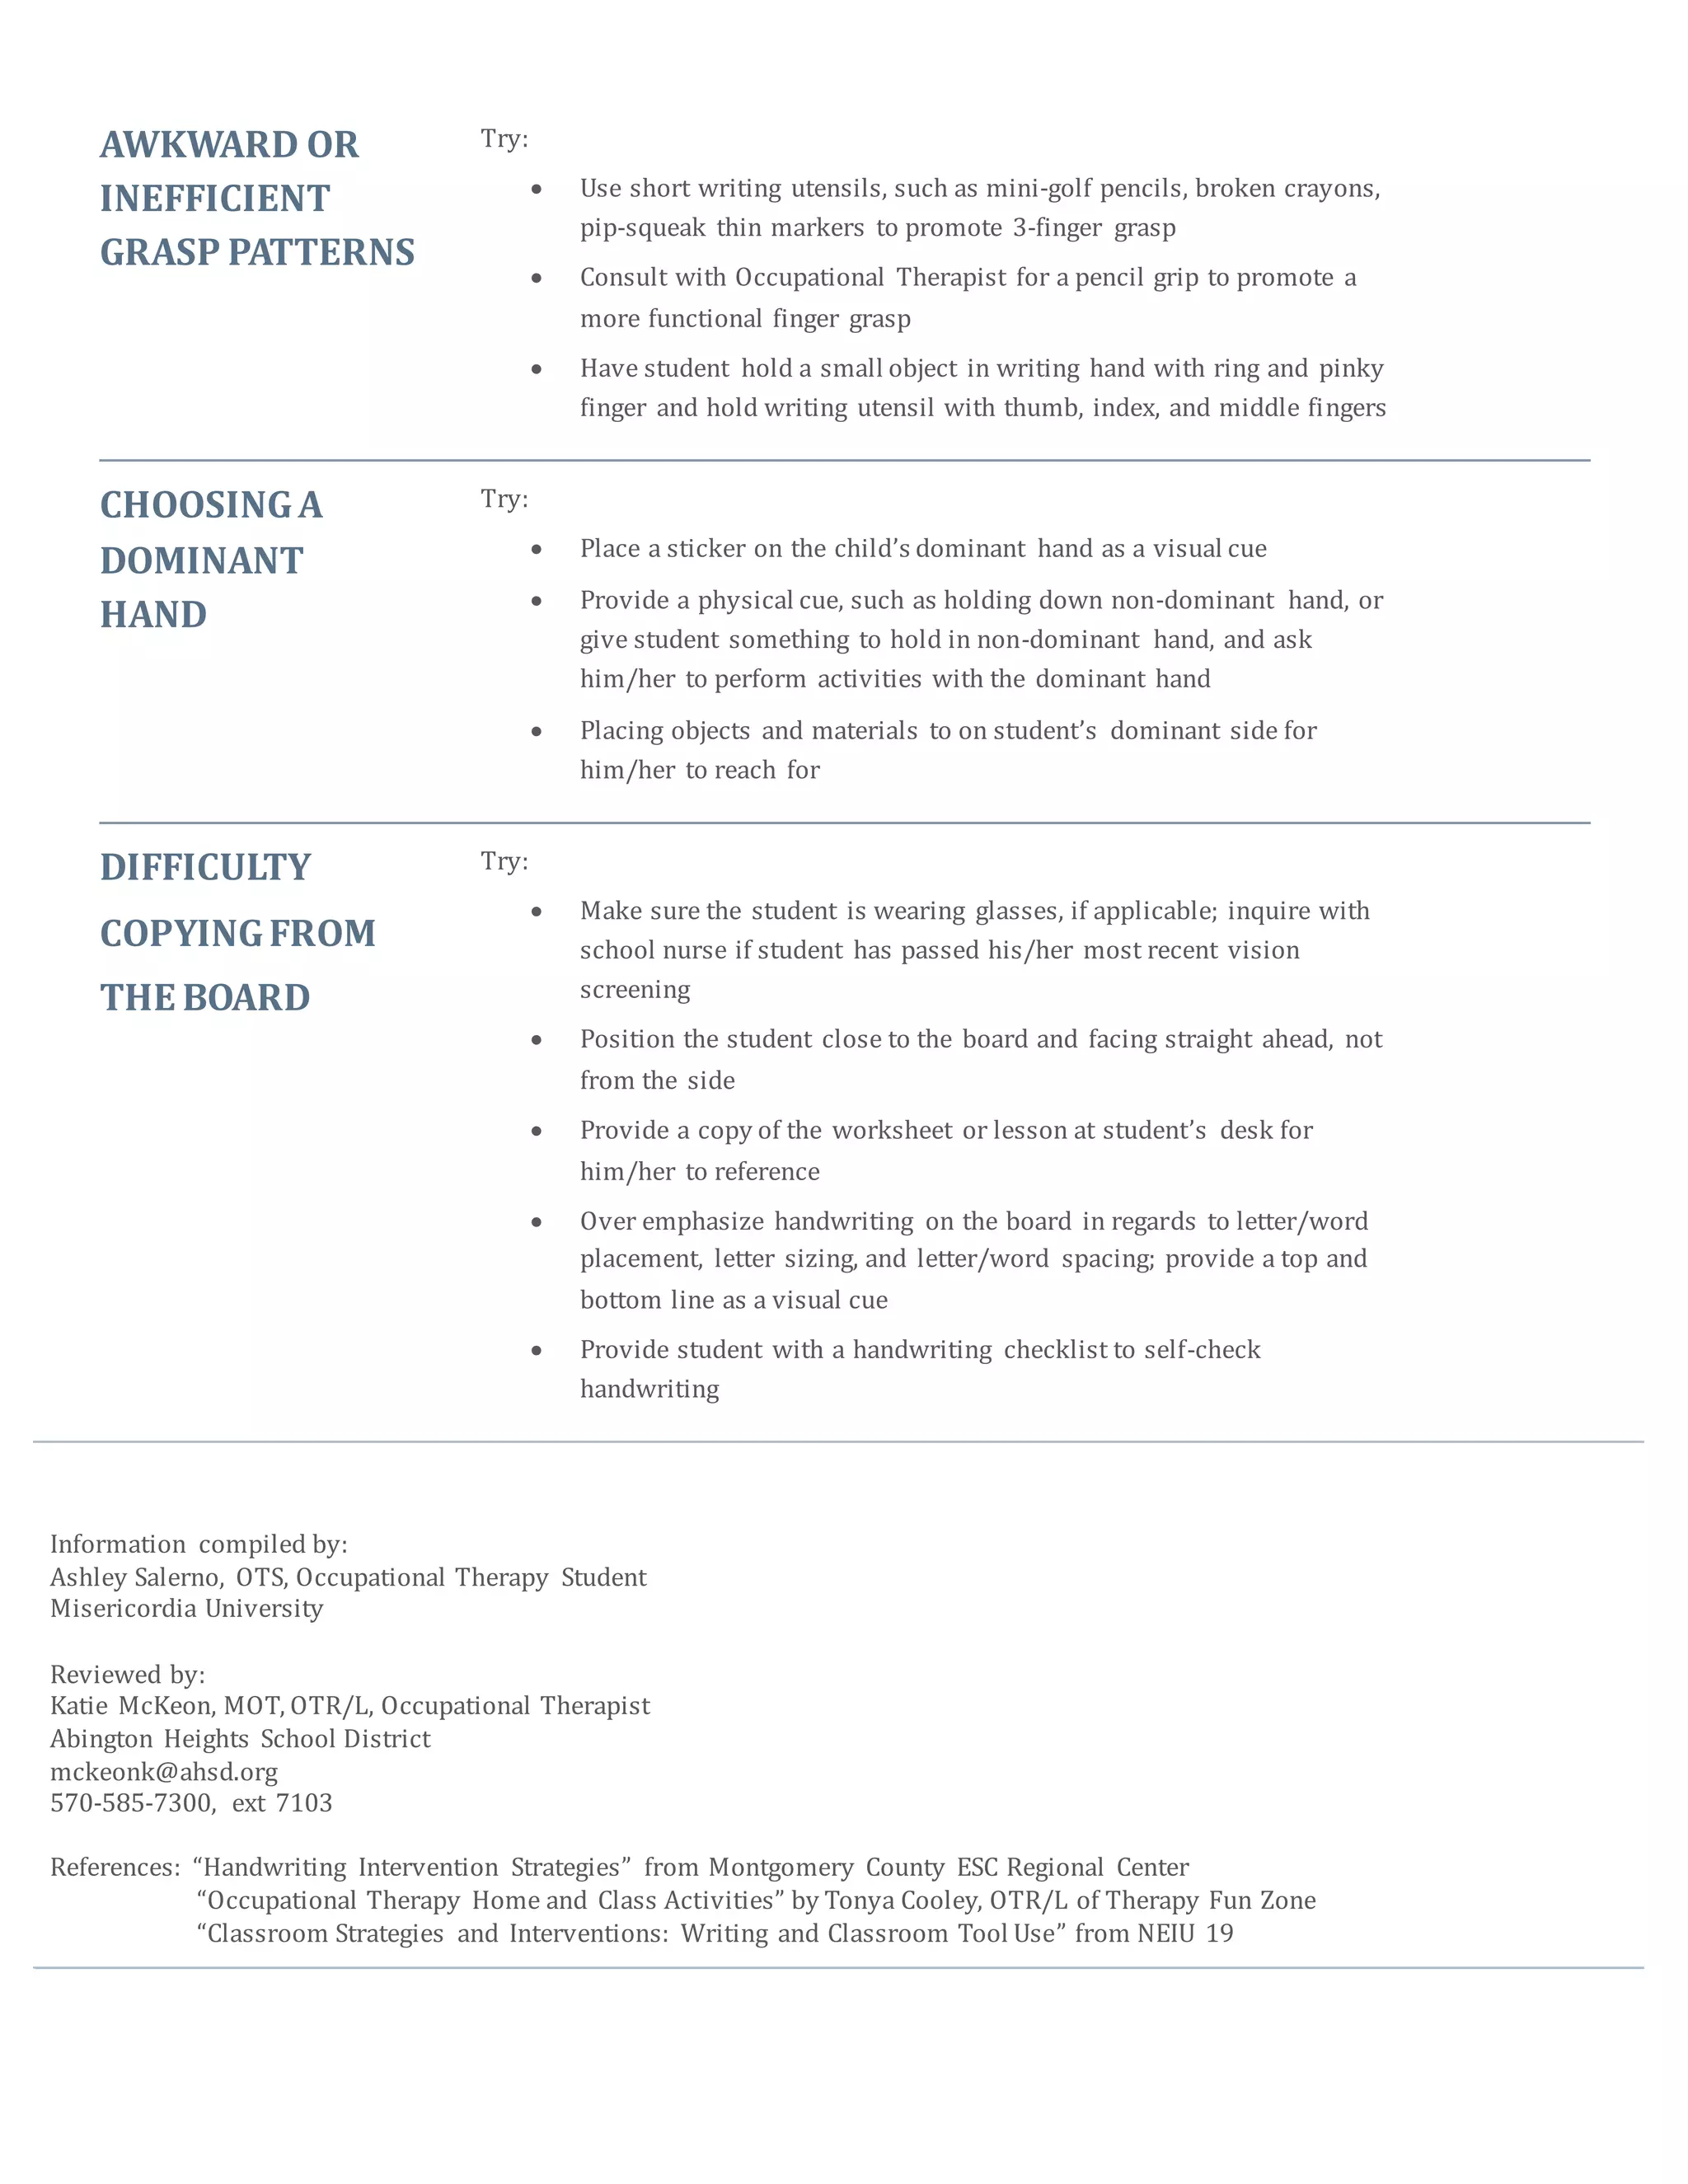
HANDWRITING TIPS & TRICKS: IF YOU SEE…
POOR LETTER
FORMATIONS
Try:
 Teach similar letters in groups (straight line letters, diagonal line
letters, curved line letters)
 Use consistent verbal cues for each letter formation
 Provide student with alphabet model at desk
 Multi-sensory writing activities such as: rainbow writing, air writing,
build letters with wax Wikki Sticks, write letters in sand or shaving
cream
 Provide a worksheet with the correct letter model and have student
trace and then copy the letter; complete one worksheet per day to
promote motor memory
REVERSALS Try:
 Use consistent verbal cues for each letter formation
 Use different colors to visualize changes in stroke direction when
teaching the letter
 Provide starting dots for corner starting and center starting letters
 Use cognitive cues to distinguish letters: “c comes before d, make
letter ‘c’ and slide up to make ‘d’”; “make letter ‘h’ and curve to make
‘b’ for “honey bee”
 Provide student with alphabet model at desk; cue student to check
letters prior to submission; circle letters which are reversed
 Multi-sensory writing activities such as: rainbow writing, air writing,
build letters with wax Wikki Sticks, write letters in sand or shaving
cream
 The best way to remediate reversals is to practice proper formation
each day (i.e. morning worksheet, right before lunch or recess,
during (5) minutes of classroom snack time (“working snack”). You
want the child to see the correct formation and then trace/copy to
develop motor memory for that letter.
“FLOATING” OR
“SINKING”
LETTERS FROM
THE BASELINE
Try:
 Colored 3-lined paper and pre-teaching for placement (i.e. “tall”
letters, letters which “fall” below baseline)
 Place a barrier at top and bottom lines, such as a wax Wikki Stick
 Provide visual cues such as highlighting the top and bottom lines two
different colors (i.e. “Start at the green line, pull down to the red line
and stop!”)
WRITINGWHICH
IS TOO LIGHT
Try:
 Use of a thin marker or a mechanical pencil with thick lead (1.3mm)
 Trial a weighted pencil
 Use a vibrating pen as a warm up prior to writing to provide proprioceptive feedback
(i.e. Squiggle Pen)
 Place writing on vertical surface (i.e. 3-inch binder) for increased wrist support
WRITINGWITH
TOO MUCH
FORCE
Try:
 Using a lead pencil (.07 lead or larger); if pencil lead breaks this will
provide proprioceptive feedback and encourage student to
understand the feeling of when the pencil lead breaks/pressing too
hard
 Place a textured or soft surface underneath writing (i.e. sandpaper or
foam); if pencil breaks through this will encourage proprioceptive
feedback
 Place writing on a vertical surface to decrease force (i.e. 3-inch
binder, tape worksheet to wall)
POOR SPACING
OF
LETTERS/WORDS
Try:
 Exaggerate word spaces when providing a visual model on board to
copy or on paper
 Use various size graph paper and instruct the student to write one
letter per box
 Use of manipulatives such as a Space Man, popsicle stick with
favorite character attached, small post-it note, plastic or wooden
finger spacers, and/or student’s own finger; for left handed students,
use objects to assist with spacing versus student’s finger
 To promote reading and writing from left to right: Mark the left side
of desk and paper with a green piece of tape or green marker; mark
the right side of the desk and paper with a red piece of tape or red
marker
 Teach “Spaghetti and Meatball” spaces (i.e. use a thin object, like a
wax Wikki Stick, to teach small spaces between letters inside words;
use a larger object, likea fuzzy pom-pom, to teach large spacing
between words)
AWKWARD OR
INEFFICIENT
GRASP PATTERNS
Try:
 Use short writing utensils, such as mini-golf pencils, broken crayons,
pip-squeak thin markers to promote 3-finger grasp
 Consult with Occupational Therapist for a pencil grip to promote a
more functional finger grasp
 Have student hold a small object in writing hand with ring and pinky
finger and hold writing utensil with thumb, index, and middle fingers
CHOOSINGA
DOMINANT
HAND
Try:
 Place a sticker on the child’s dominant hand as a visual cue
 Provide a physical cue, such as holding down non-dominant hand, or
give student something to hold in non-dominant hand, and ask
him/her to perform activities with the dominant hand
 Placing objects and materials to on student’s dominant side for
him/her to reach for
DIFFICULTY
COPYINGFROM
THE BOARD
Try:
 Make sure the student is wearing glasses, if applicable; inquire with
school nurse if student has passed his/her most recent vision
screening
 Position the student close to the board and facing straight ahead, not
from the side
 Provide a copy of the worksheet or lesson at student’s desk for
him/her to reference
 Over emphasize handwriting on the board in regards to letter/word
placement, letter sizing, and letter/word spacing; provide a top and
bottom line as a visual cue
 Provide student with a handwriting checklist to self-check
handwriting
Information compiled by:
Ashley Salerno, OTS, Occupational Therapy Student
Misericordia University
Reviewed by:
Katie McKeon, MOT, OTR/L, Occupational Therapist
Abington Heights School District
mckeonk@ahsd.org
570-585-7300, ext 7103
References: “Handwriting Intervention Strategies” from Montgomery County ESC Regional Center
“Occupational Therapy Home and Class Activities” by Tonya Cooley, OTR/L of Therapy Fun Zone
“Classroom Strategies and Interventions: Writing and Classroom Tool Use” from NEIU 19
Handwriting Tip Sheet

Handwriting Tip Sheet

  • 1.
    HANDWRITING TIPS &TRICKS: IF YOU SEE… POOR LETTER FORMATIONS Try:  Teach similar letters in groups (straight line letters, diagonal line letters, curved line letters)  Use consistent verbal cues for each letter formation  Provide student with alphabet model at desk  Multi-sensory writing activities such as: rainbow writing, air writing, build letters with wax Wikki Sticks, write letters in sand or shaving cream  Provide a worksheet with the correct letter model and have student trace and then copy the letter; complete one worksheet per day to promote motor memory REVERSALS Try:  Use consistent verbal cues for each letter formation  Use different colors to visualize changes in stroke direction when teaching the letter  Provide starting dots for corner starting and center starting letters  Use cognitive cues to distinguish letters: “c comes before d, make letter ‘c’ and slide up to make ‘d’”; “make letter ‘h’ and curve to make ‘b’ for “honey bee”  Provide student with alphabet model at desk; cue student to check letters prior to submission; circle letters which are reversed  Multi-sensory writing activities such as: rainbow writing, air writing, build letters with wax Wikki Sticks, write letters in sand or shaving cream  The best way to remediate reversals is to practice proper formation each day (i.e. morning worksheet, right before lunch or recess, during (5) minutes of classroom snack time (“working snack”). You want the child to see the correct formation and then trace/copy to develop motor memory for that letter. “FLOATING” OR “SINKING” LETTERS FROM THE BASELINE Try:  Colored 3-lined paper and pre-teaching for placement (i.e. “tall” letters, letters which “fall” below baseline)  Place a barrier at top and bottom lines, such as a wax Wikki Stick  Provide visual cues such as highlighting the top and bottom lines two different colors (i.e. “Start at the green line, pull down to the red line and stop!”)
  • 2.
    WRITINGWHICH IS TOO LIGHT Try: Use of a thin marker or a mechanical pencil with thick lead (1.3mm)  Trial a weighted pencil  Use a vibrating pen as a warm up prior to writing to provide proprioceptive feedback (i.e. Squiggle Pen)  Place writing on vertical surface (i.e. 3-inch binder) for increased wrist support WRITINGWITH TOO MUCH FORCE Try:  Using a lead pencil (.07 lead or larger); if pencil lead breaks this will provide proprioceptive feedback and encourage student to understand the feeling of when the pencil lead breaks/pressing too hard  Place a textured or soft surface underneath writing (i.e. sandpaper or foam); if pencil breaks through this will encourage proprioceptive feedback  Place writing on a vertical surface to decrease force (i.e. 3-inch binder, tape worksheet to wall) POOR SPACING OF LETTERS/WORDS Try:  Exaggerate word spaces when providing a visual model on board to copy or on paper  Use various size graph paper and instruct the student to write one letter per box  Use of manipulatives such as a Space Man, popsicle stick with favorite character attached, small post-it note, plastic or wooden finger spacers, and/or student’s own finger; for left handed students, use objects to assist with spacing versus student’s finger  To promote reading and writing from left to right: Mark the left side of desk and paper with a green piece of tape or green marker; mark the right side of the desk and paper with a red piece of tape or red marker  Teach “Spaghetti and Meatball” spaces (i.e. use a thin object, like a wax Wikki Stick, to teach small spaces between letters inside words; use a larger object, likea fuzzy pom-pom, to teach large spacing between words)
  • 3.
    AWKWARD OR INEFFICIENT GRASP PATTERNS Try: Use short writing utensils, such as mini-golf pencils, broken crayons, pip-squeak thin markers to promote 3-finger grasp  Consult with Occupational Therapist for a pencil grip to promote a more functional finger grasp  Have student hold a small object in writing hand with ring and pinky finger and hold writing utensil with thumb, index, and middle fingers CHOOSINGA DOMINANT HAND Try:  Place a sticker on the child’s dominant hand as a visual cue  Provide a physical cue, such as holding down non-dominant hand, or give student something to hold in non-dominant hand, and ask him/her to perform activities with the dominant hand  Placing objects and materials to on student’s dominant side for him/her to reach for DIFFICULTY COPYINGFROM THE BOARD Try:  Make sure the student is wearing glasses, if applicable; inquire with school nurse if student has passed his/her most recent vision screening  Position the student close to the board and facing straight ahead, not from the side  Provide a copy of the worksheet or lesson at student’s desk for him/her to reference  Over emphasize handwriting on the board in regards to letter/word placement, letter sizing, and letter/word spacing; provide a top and bottom line as a visual cue  Provide student with a handwriting checklist to self-check handwriting Information compiled by: Ashley Salerno, OTS, Occupational Therapy Student Misericordia University Reviewed by: Katie McKeon, MOT, OTR/L, Occupational Therapist Abington Heights School District mckeonk@ahsd.org 570-585-7300, ext 7103 References: “Handwriting Intervention Strategies” from Montgomery County ESC Regional Center “Occupational Therapy Home and Class Activities” by Tonya Cooley, OTR/L of Therapy Fun Zone “Classroom Strategies and Interventions: Writing and Classroom Tool Use” from NEIU 19