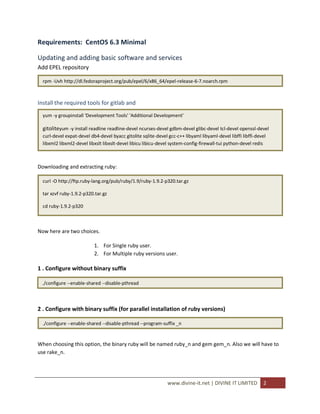
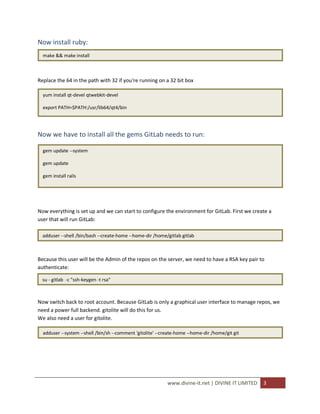
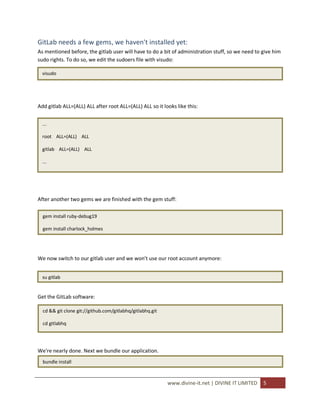
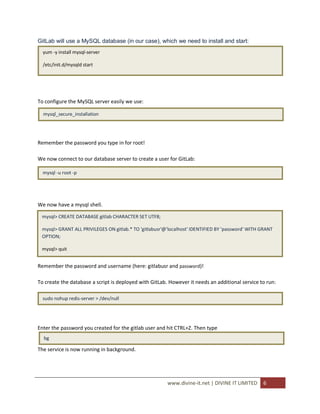
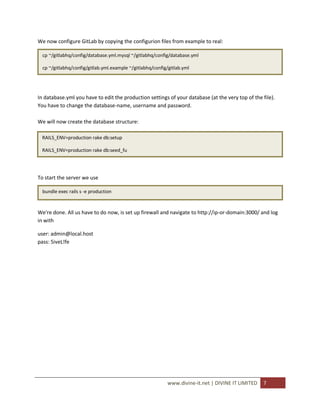
Installing Gitlab with Gitolite and Git on CentOS


                   Md. Raiful Hasan

                   DIVINE IT LIMITED


                             www.divine-it.net | DIVINE IT LIMITED   1
Requirements: CentOS 6.3 Minimal

Updating and adding basic software and services
Add EPEL repository

  rpm -Uvh http://dl.fedoraproject.org/pub/epel/6/x86_64/epel-release-6-7.noarch.rpm


Install the required tools for gitlab and
  yum -y groupinstall 'Development Tools' 'Additional Development'

  gitoliteyum -y install readline readline-devel ncurses-devel gdbm-devel glibc-devel tcl-devel openssl-devel
  curl-devel expat-devel db4-devel byacc gitolite sqlite-devel gcc-c++ libyaml libyaml-devel libffi libffi-devel
  libxml2 libxml2-devel libxslt libxslt-devel libicu libicu-devel system-config-firewall-tui python-devel redis


Downloading and extracting ruby:

  curl -O http://ftp.ruby-lang.org/pub/ruby/1.9/ruby-1.9.2-p320.tar.gz

  tar xzvf ruby-1.9.2-p320.tar.gz

  cd ruby-1.9.2-p320


Now here are two choices.

                           1. For Single ruby user.
                           2. For Multiple ruby versions user.

1 . Configure without binary suffix

 ./configure --enable-shared --disable-pthread


2 . Configure with binary suffix (for parallel installation of ruby versions)

  ./configure --enable-shared --disable-pthread --program-suffix _n


When choosing this option, the binary ruby will be named ruby_n and gem gem_n. Also we will have to
use rake_n.


                                                               www.divine-it.net | DIVINE IT LIMITED          2
Now install ruby:
  make && make install


Replace the 64 in the path with 32 if you're running on a 32 bit box

  yum install qt-devel qtwebkit-devel

  export PATH=$PATH:/usr/lib64/qt4/bin


Now we have to install all the gems GitLab needs to run:

  gem update --system

  gem update

  gem install rails


Now everything is set up and we can start to configure the environment for GitLab. First we create a
user that will run GitLab:

  adduser --shell /bin/bash --create-home --home-dir /home/gitlab gitlab


Because this user will be the Admin of the repos on the server, we need to have a RSA key pair to
authenticate:

  su - gitlab -c "ssh-keygen -t rsa"


Now switch back to root account. Because GitLab is only a graphical user interface to manage repos, we
need a power full backend. gitolite will do this for us.
We also need a user for gitolite.

  adduser --system --shell /bin/sh --comment 'gitolite' --create-home --home-dir /home/git git


                                                            www.divine-it.net | DIVINE IT LIMITED   3
Gitolite needs to know one key that it knows as admin. We will pass the key of GitLab to gitolite. To do
so we first copy the private key of our gitlab user to the home
directory of our gitolite user:

 # make sure do this as root


  cp /home/gitlab/.ssh/id_rsa.pub /home/git/gitlab.pub


Now we need to initialize gitolite:

  su git

  gl-setup ~/gitlab.pub # this passes the admin key to gitolite


Switch back to root user now.

We now need to give our management software (GitLab) access to the repos:

  usermod -a -G git gitlab

  chmod -R g+rwX /home/git/repositories/

  chmod 770 /home/git


Because the gitlab user will need a password later on, we configure it right now, so we are finished with
all the user stuff.

  passwd gitlab # please choose a good password :)


As next step we need to introduce GitLab to gitolite (that is, we let them change their SSH-keys)

  su gitlab

  ssh root@localhost


... And back to the root user.


                                                              www.divine-it.net | DIVINE IT LIMITED   4
GitLab needs a few gems, we haven't installed yet:
As mentioned before, the gitlab user will have to do a bit of administration stuff, so we need to give him
sudo rights. To do so, we edit the sudoers file with visudo:

  visudo


Add gitlab ALL=(ALL) ALL after root ALL=(ALL) ALL so it looks like this:


  ...

  root ALL=(ALL) ALL

  gitlab ALL=(ALL) ALL

  ...


After another two gems we are finished with the gem stuff:

  gem install ruby-debug19

  gem install charlock_holmes


We now switch to our gitlab user and we won't use our root account anymore:


  su gitlab


Get the GitLab software:

  cd && git clone git://github.com/gitlabhq/gitlabhq.git

  cd gitlabhq


We're nearly done. Next we bundle our application.
  bundle install


                                                           www.divine-it.net | DIVINE IT LIMITED   5
GitLab will use a MySQL database (in our case), which we need to install and start:
  yum -y install mysql-server

  /etc/init.d/mysqld start


To configure the MySQL server easily we use:

  mysql_secure_installation


Remember the password you type in for root!

We now connect to our database server to create a user for GitLab:

  mysql -u root -p


We now have a mysql shell.

 mysql> CREATE DATABASE gitlab CHARACTER SET UTF8;

 mysql> GRANT ALL PRIVILEGES ON gitlab.* TO 'gitlabusr'@'localhost' IDENTIFIED BY 'password' WITH GRANT
 OPTION;

 mysql> quit


Remember the password and username (here: gitlabusr and password)!

To create the database a script is deployed with GitLab. However it needs an additional service to run:

  sudo nohup redis-server > /dev/null


Enter the password you created for the gitlab user and hit CTRL+Z. Then type
  bg

The service is now running in background.


                                                        www.divine-it.net | DIVINE IT LIMITED     6
We now configure GitLab by copying the configurion files from example to real:

  cp ~/gitlabhq/config/database.yml.mysql ~/gitlabhq/config/database.yml

  cp ~/gitlabhq/config/gitlab.yml.example ~/gitlabhq/config/gitlab.yml


In database.yml you have to edit the production settings of your database (at the very top of the file).
You have to change the database-name, username and password.

We will now create the database structure:

 RAILS_ENV=production rake db:setup

 RAILS_ENV=production rake db:seed_fu


To start the server we use

  bundle exec rails s -e production


We're done. All us have to do now, is set up firewall and navigate to http://ip-or-domain:3000/ and log
in with

user: admin@local.host
pass: 5iveL!fe


                                                           www.divine-it.net | DIVINE IT LIMITED   7

Git lab installation guide

  • 1.
    Installing Gitlab withGitolite and Git on CentOS Md. Raiful Hasan DIVINE IT LIMITED www.divine-it.net | DIVINE IT LIMITED 1
  • 2.
    Requirements: CentOS 6.3Minimal Updating and adding basic software and services Add EPEL repository rpm -Uvh http://dl.fedoraproject.org/pub/epel/6/x86_64/epel-release-6-7.noarch.rpm Install the required tools for gitlab and yum -y groupinstall 'Development Tools' 'Additional Development' gitoliteyum -y install readline readline-devel ncurses-devel gdbm-devel glibc-devel tcl-devel openssl-devel curl-devel expat-devel db4-devel byacc gitolite sqlite-devel gcc-c++ libyaml libyaml-devel libffi libffi-devel libxml2 libxml2-devel libxslt libxslt-devel libicu libicu-devel system-config-firewall-tui python-devel redis Downloading and extracting ruby: curl -O http://ftp.ruby-lang.org/pub/ruby/1.9/ruby-1.9.2-p320.tar.gz tar xzvf ruby-1.9.2-p320.tar.gz cd ruby-1.9.2-p320 Now here are two choices. 1. For Single ruby user. 2. For Multiple ruby versions user. 1 . Configure without binary suffix ./configure --enable-shared --disable-pthread 2 . Configure with binary suffix (for parallel installation of ruby versions) ./configure --enable-shared --disable-pthread --program-suffix _n When choosing this option, the binary ruby will be named ruby_n and gem gem_n. Also we will have to use rake_n. www.divine-it.net | DIVINE IT LIMITED 2
  • 3.
    Now install ruby: make && make install Replace the 64 in the path with 32 if you're running on a 32 bit box yum install qt-devel qtwebkit-devel export PATH=$PATH:/usr/lib64/qt4/bin Now we have to install all the gems GitLab needs to run: gem update --system gem update gem install rails Now everything is set up and we can start to configure the environment for GitLab. First we create a user that will run GitLab: adduser --shell /bin/bash --create-home --home-dir /home/gitlab gitlab Because this user will be the Admin of the repos on the server, we need to have a RSA key pair to authenticate: su - gitlab -c "ssh-keygen -t rsa" Now switch back to root account. Because GitLab is only a graphical user interface to manage repos, we need a power full backend. gitolite will do this for us. We also need a user for gitolite. adduser --system --shell /bin/sh --comment 'gitolite' --create-home --home-dir /home/git git www.divine-it.net | DIVINE IT LIMITED 3
  • 4.
    Gitolite needs toknow one key that it knows as admin. We will pass the key of GitLab to gitolite. To do so we first copy the private key of our gitlab user to the home directory of our gitolite user: # make sure do this as root cp /home/gitlab/.ssh/id_rsa.pub /home/git/gitlab.pub Now we need to initialize gitolite: su git gl-setup ~/gitlab.pub # this passes the admin key to gitolite Switch back to root user now. We now need to give our management software (GitLab) access to the repos: usermod -a -G git gitlab chmod -R g+rwX /home/git/repositories/ chmod 770 /home/git Because the gitlab user will need a password later on, we configure it right now, so we are finished with all the user stuff. passwd gitlab # please choose a good password :) As next step we need to introduce GitLab to gitolite (that is, we let them change their SSH-keys) su gitlab ssh root@localhost ... And back to the root user. www.divine-it.net | DIVINE IT LIMITED 4
  • 5.
    GitLab needs afew gems, we haven't installed yet: As mentioned before, the gitlab user will have to do a bit of administration stuff, so we need to give him sudo rights. To do so, we edit the sudoers file with visudo: visudo Add gitlab ALL=(ALL) ALL after root ALL=(ALL) ALL so it looks like this: ... root ALL=(ALL) ALL gitlab ALL=(ALL) ALL ... After another two gems we are finished with the gem stuff: gem install ruby-debug19 gem install charlock_holmes We now switch to our gitlab user and we won't use our root account anymore: su gitlab Get the GitLab software: cd && git clone git://github.com/gitlabhq/gitlabhq.git cd gitlabhq We're nearly done. Next we bundle our application. bundle install www.divine-it.net | DIVINE IT LIMITED 5
  • 6.
    GitLab will usea MySQL database (in our case), which we need to install and start: yum -y install mysql-server /etc/init.d/mysqld start To configure the MySQL server easily we use: mysql_secure_installation Remember the password you type in for root! We now connect to our database server to create a user for GitLab: mysql -u root -p We now have a mysql shell. mysql> CREATE DATABASE gitlab CHARACTER SET UTF8; mysql> GRANT ALL PRIVILEGES ON gitlab.* TO 'gitlabusr'@'localhost' IDENTIFIED BY 'password' WITH GRANT OPTION; mysql> quit Remember the password and username (here: gitlabusr and password)! To create the database a script is deployed with GitLab. However it needs an additional service to run: sudo nohup redis-server > /dev/null Enter the password you created for the gitlab user and hit CTRL+Z. Then type bg The service is now running in background. www.divine-it.net | DIVINE IT LIMITED 6
  • 7.
    We now configureGitLab by copying the configurion files from example to real: cp ~/gitlabhq/config/database.yml.mysql ~/gitlabhq/config/database.yml cp ~/gitlabhq/config/gitlab.yml.example ~/gitlabhq/config/gitlab.yml In database.yml you have to edit the production settings of your database (at the very top of the file). You have to change the database-name, username and password. We will now create the database structure: RAILS_ENV=production rake db:setup RAILS_ENV=production rake db:seed_fu To start the server we use bundle exec rails s -e production We're done. All us have to do now, is set up firewall and navigate to http://ip-or-domain:3000/ and log in with user: admin@local.host pass: 5iveL!fe www.divine-it.net | DIVINE IT LIMITED 7