SlideShare a Scribd company logo
1 of 46
Download to read offline
P R E M I E R G I M P U S E R S M A G A Z I N E . I S S U E # 6 . N O V E M B E R 2 0 1 4
VISIT OUR WEBSITE HTTP://GIMPMAGAZINE.ORG
ISSN: 1929-6894
DIGITAL VERSION
NEXT GEN GIMP
MAGAZINE
AARON TYREE
INTERVIEW
AARON TYREE
MASTER CLASS
THE GIMP
GALLERY
ISSN: 1929-6894
DIGITAL VERSION
P R E M I E R G I M P U S E R S M A G A Z I N E . I S S U E # 6 . N O V E M B E R 2 0 1 4 . V I S I T O U R W E B S I T E H T T P : / / G I M P M A G A Z I N E . O R G . F U L L S C R E E N V I E W I N G
NEXT GEN GIMP
MAGAZINE
AARON TYREE
INTERVIEW
AARON TYREE
MASTER CLASS
THE GIMP
GALLERY
Welcome to the new and improved GIMP Magazine! The team has had some valued time off over the
summer, but we have also been working hard to make our magazine better. We have had some
challenges but we also have a vision and a clear direction set for this magazine based directly on your
feedback.
As the managing editor I have had some time to think about the future of GIMP Magazine. Some of
the challenges we have had have been around production. We have a very small team to produce this
magazine four times per year. The amount of work to edit and creatively lay out a 100 page magazine
for both print and digital has been a significant effort. We conducted a short survey some time ago, and
the vast majority of our readers felt that digital was all they needed. This is important information for
our team, and I have decided to discontinue the print version. While I loved the quality and feel of the
hard copy magazine, this move will save us considerable time and allow for a greater range of
submissions from our readers. This format change will also allow us to re-design the magazine entirely
around the screen viewing experience, not print. This new 16:9 layout gives us an array of new creative
possibilities for presenting articles and it looks great on widescreen monitors, tablets, and phones. I
view this more as a slide presentation as opposed to a printed document, even though this will print on
8.5"x14" legal size paper.
My vision has always been to eventually grow to a monthly magazine. In an effort to get closer to that
vision I have decided to try a pilot project. This means that we will be producing a monthly magazine for
six months or so starting with this issue. Ideally I would like to get to ten issues per year. Each issue will
be considerably smaller, consisting of one feature article, a related tutorial, and perhaps tips, along with
creative gallery submissions.
This new format will be much easier for our small team to produce, and it will provide more
opportunities for our GIMP artists and photographers to be featured on the cover of our magazine. We
would like to grow our team, and as we do so, grow the content within our magazine. Perhaps someday
we might grow to a 100 page magazine every month. We are presently looking for an editor and
illustrator to join our team. Simply contact us if you are interested (http://gimpmagazine.org/contact).
During this time off, I have kept close to free software as I created an educational book along with a
full video series on the subject of calligraphy and lettering (a re-emerging fine art). I have learned a great
deal from this ebook/video project, and I feel that it is important to use these open source tools regularly
while working for this magazine. I had huge success using these tools (GIMP, Inkscape, and Scribus) and
I also plan on writing about my experience so that others can also feel comfortable using open source
software on large creative projects.
We were hoping to have a GIMP 2.10 Special Edition of the magazine ready to go, but unfortunately
this has not happened. The core GIMP team has reached out to us in an effort to improve
communications, and we look forward to working with them in the future. The GIMP magazine team
would still love to do a special feature on GIMP 2.10 to share with the world all of the amazing new
features that will be available. From what limited material I have seen so far, version 2.10 looks
outstanding!
GIMP Magazine will continue to be absolutely free for everyone to enjoy. And we do appreciate your
donations as they help to pay for our operating costs such as web hosting, cloud storage, and so forth.
As we move to a monthly magazine we have also made efforts to accept more regular donations by
using the popular Patreon system where you can help with the ongoing support of GIMP Magazine.
The team at GIMP Magazine proudly presents Issue #6. If you are not already doing so, please follow
us on Twitter, Google+, Issue, or by email subscription. Also, tell a friend about GIMP and GIMP
Magazine and kindly tweet or blog about us to help spread the word.
Enjoy!
Cheers
Steve
http://twitter.com/steveczajka
http://flickr.com/steveczajka
L E T T E R F RO M T H E E D I T O R
g i m p m a g a z i n e . o r g | 4
ISSUU
HTTP://WWW.ISSUU.COM/GIMPMAGAZINE
EMAIL NEWSLETTER
HTTP://GIMPMAGAZINE.ORG (CLICK SUBSCRIBE)
TWITTER
HTTP://WWW.TWITTER.COM/GIMPMAGAZINE
GOOGLE+
FOLLOW +GIMP MAGAZINE
BIT TORRENT
PLEASE SHARE THIS PDF ON BIT TORRENT!
WEBSITE
HTTP://GIMPMAGAZINE.ORG
EDITORIAL TEAM:
Steve Czajka, Managing Editor
Design & Desktop Publishing
Dave Lepek, Contributing Writer / Editing Assistance
Rolf Steinort, All things Web
Debi Dalio, Contributing Writer / Editing / Submissions
Ian Muttoo, Contributing Writer / Photography
LEGAL:
GIMP Magazine does not take any responsibility, express or implied, for
the material and its nature or accuracy of the information which is
published in this magazine. All the materials presented in this magazine
have been produced with the express permission of their respective
authors/owners.
GIMP Magazine and the contributors disclaim all warranties, express or
implied, including but not limited to implied warranties of
merchantability or fitness for a particular purpose. All images and
materials presented in this document are printed/reprinted with express
permission from the authors and/or writers. The content responsibility
lies completely with the contributing writer or the author of the article,
and may not be representative of the views of the publisher.
This PDF magazine is free and available from the GIMP Magazine
website. GIMP Magazine is made available under Creative Commons
"Attribution-Share Alike 2.5" license.
GIMP Magazine trademark logo is copyright by the owner Steve Czajka.
All advertisements are copyright by the respective owners.
ADVERTISING:
Please visit our website to view our advertising rate card and policies at
http://gimpmagazine.org/about .
HOW TO CONTACT GIMP MAGAZINE:
Website: http://gimpmagazine.org/contact
Publication Origin: Mississauga, Ontario, Canada
PRODUCTION NOTES:
GIMP Magazine was created using Scribus 1.4.1, GIMP 2.6/2.8, Inkscape
0.47. Biondi was used for headlines, Open Sans and Open Sans
Condensed for house typography. And we can't forget "the coolest
mascot" ever, Wilber, adorning the front cover and various locations!
ISSN 1929-6894 (online), ISSN 1929-8498 (print).
YOUTUBE
HTTP://WWW.YOUTUBE.COM/STEVECZAJKA
F O L L O W US
g i m p m a g a z i n e . o r g | 5
PLACE YOUR AD HERE!
FULL PAGE FOR $99
VIA PAYPAL / CREDIT CARD
HTTP://GIMPMAGAZINE.ORG/ABOUT
g i m p m a g a z i n e . o r g | 8
g i m p m a g a z i n e . o r g | 9
g i m p m a g a z i n e . o r g | 1 0
g i m p m a g a z i n e . o r g | 1 1
g i m p m a g a z i n e . o r g | 1 2
AN INTERVIEW WITH AARON
TYREE
Edited by Debi Dalio
Aaron Tyree is a commercial fashion and portrait photographer from Washington State in the
U.S. He uses a variety of open source software and innovative low-cost hardware in his work.
He is most well known for his images of Devon Jade which were shot using an older Canon
20D with DIY reflectors and were post-processed in GIMP.
g i m p m a g a z i n e . o r g | 1 3
SO, AARON, HOW DO YOU GET THE IDEAS FOR YOUR WORK?
It really depends on what or who I am shooting. Also, for whom I am
shooting. A lot of it is intuitive. With people, I'll just listen and pay
attention to little things. When I feel that “click” of seeing who they are,
and how they want to be seen, I try to encourage that and capture it.
Trust and friendship produce the best images in my opinion. If it's for a
commercial client, it's kind of the same thing, but I listen for what their
vision is. Once I see it, I throw ideas and impressions out as I go until I
get there. It's a fun process.
WHO OR WHAT ARE THE BIGGEST INFLUENCES FOR YOU?
People and relationships. Those are the big ones. And just stopping
to actually look around and be thankful for it. I think when you believe
that everything is created and that intention and love underlie
everything around you, it changes how you see most things. A camera is
really just a copy machine. The art occurs in the intention and framing
of how things are seen by the person using it.
As far as photographers go, I'd say Zach Arias is a big influence for
how he approaches photography, and even life in general. I also like Sue
Bryce for her use of light and how she captures emotional connection.
Artistically, I am really inspired by Camilla Åkrans. Her composition and
color tones are unique. Another inspiration is Chase Jarvis for his total
commitment to doing what he does well, and his continual drive to
innovate.
ART OCCURS IN THE INTENTION
AND FRAMING OF HOW THINGS
ARE SEEN BY THE PERSON
USING THE CAMERA
g i m p m a g a z i n e . o r g | 1 4
HAVE YOU EVER TAKEN FORMAL LESSONS OR ARE YOU SELF-
TAUGHT?
If formal means sitting in a classroom with an instructor, no I've never
taken formal lessons.
But I have spent a ridiculous number of hours watching CreativeLIVE
workshops. I can't say enough about what they are doing there. I've
been able to learn from the best people in the world because of these
workshops. I practice a lot. I grew up in a very musical family where
practice was normal, so daily practice of whatever I am doing is pretty
ingrained in how I live. With photography, I'll do mental exercises even
when I'm not shooting, like, “If I had to take one photograph within a 50-
foot radius of where I'm sitting, what would it be, and how would I do it.”
Or, “What is one character trait of the person I'm talking to that I think is
beautiful, and how would I photograph it.” It may sound over the top to
some, but having spent some years doing things that I didn't love,
getting to do something that I do love is a great privilege, and I believe
it's worth investing all of yourself to be the best you can be. Gratitude is
powerful.
WHAT IS YOUR PROCESS FOR CREATING AN IMAGE?
Understanding what you want to say is always the starting point. Even
if it's just an emotion. If you don't have that, you are going to have a
hard time saying anything that will capture anyone's attention. Honestly,
I think the best images ask simple questions. “This person is beautiful.
Do you agree?” or “Do you see the integrity this person has?” Things like
that. Good photographs give the viewer an opportunity to form their
own conclusions.
Understanding the light and color that you want is second. When I'm
outside, I'll always start with light. I'll find a space where the light is doing
what I want it to do. Then I'll look for composition. I like simplicity and
negative space, so I look for that, or interesting geometry that frames
the subject in unexpected ways. Once I have all the technical stuff out of
the way, I'll just focus on an emotional connection with the person I'm
shooting. In the studio, the process is faster since it's a controlled space.
I can set everything up beforehand. I use a lot of reflection and
g i m p m a g a z i n e . o r g | 1 5
continuous light in the studio to minimize anything that could draw my
attention away from the person I am shooting.
After that, it's a matter of brewing some coffee, turning on SomaFM,
and setting up an editing environment.
GOOD PHOTOGRAPHS GIVE THE
VIEWER AN OPPORTUNITY TO
FORM THEIR OWN
CONCLUSIONS.
WHAT IS YOUR MOST MEMORABLE SHOOT?
There was a shoot that I did with my stepdaughter Devon in the
backyard one day while we were barbecuing as a family. The reason it
was so significant is partly because of the events leading up to it. Only
three months before, I had made an internal decision to seriously
pursue photography after hearing a radio interview. The interview was
about shots seen around the world, and had several well-known
photographers describing the amazing moments when their images
were captured. I had the thought as I was listening that something
divine was happening when those shots were taken, like they were
being given a gift. Then, as strange as it might sound, I just had this
conviction that if the gift that they were getting was not coming from
them, then I could receive the same gift. It's a simple thought, but it was
just one of those moments where you feel like the air is full of electricity
and you are peeking into something beyond yourself.
For the next three months I consumed everything I could find about
photography. I watched hours and hours of workshops, took notes, and
then refined the notes. I did not have a camera at that point, so what I
was doing would probably seem pretty silly to some. A photographer
without a camera. But my wife had the same sense I did and supported
me. I was cultivating a deep vision for what I wanted to say with a
g i m p m a g a z i n e . o r g | 1 6
camera when I did eventually get one. After three months I got to a
point where I thought, “OK. I can't go much further without a camera.”
And I couldn't really afford one at that point. I went into my room, sent
up a prayer, and then went outside to greet a friend that had come to
visit. Long story short, she had brought a camera with her that she felt
like she was supposed to give me. I was pretty silent and emotional for a
long time after that.
So, when I shot with Devon in the backyard, it was a pretty amazing
feeling. I made some reflectors from a silver emergency blanket and
used a $5 roll-down vinyl blind that I had gotten from a thrift store as a
background. Devon is a beautiful girl. And I kept getting goosebumps as
I was shooting her. It's hard to explain. I felt like the images I was seeing
in the viewfinder were significant somehow. When I tentatively posted
those images online a little while later, the response was beyond
anything that either one of us could have expected.. Four months later,
those images had been viewed over a million times, and we were both
being contacted by magazines and designers.
It has taken about a year of very hard work, sacrifice, and some
sleepless nights to start seeing those contacts become clients, but I
firmly believe those first days were a divine gift. It keeps you humble
when what you are doing was given as a gift in the first place.
Before getting into photography full time, I did some Linux
development. When I built my workflow, I wanted to incorporate what I
had learned. Linux is not really viewed as the optimum editing
environment by the artistic community, but that is changing. If you are
willing to rethink how you do things, and be creative with your workflow,
it is incredibly powerful. I use a Debian-based distribution called
CrunchBang as a starting template for all of the computers in my
workflow. It uses considerably fewer resources than most operating
systems, and allows all of the available resources to be used for editing
tasks. And because it is so modular, you can build machines to do
specific things fairly easily without all the bloat of unnecessary software
that comes prepackaged into other operating systems.
TOOLS IN TYREE'S WORKFLOW
CAMERAS AND EQUIPMENT:
• AN ASSORTMENT OF CANON
CAMERAS WITH MODIFIED MAGIC
LANTERN FIRMWARE
• 3500 WATTS OF 5500K CFL
LIGHTING AND A VARIETY OF
MODIFIERS
• 4 LED MINI-PANELS
• 2 CREE HIGH INTENSITY LED SPOTS
• 1 DIY 600 RGB LED PANEL WITH
REMOTE
• 1 MULTI-CHANNEL REMOTE
SHUTTER RELEASE
• NEXUS 7 WITH DSLR REMOTE
SOFTWARE:
• DEBIAN GNU/LINUX
• IMAGEMAGICK
• UFRAW-BATCH
• AFTERSHOT PRO
• GIMP
• DROPBOX
• OWNCLOUD
g i m p m a g a z i n e . o r g | 1 7
DO YOU SHOOT IN RAW MODE? IF SO, WHICH SOFTWARE DO
YOU USE TO PROCESS RAW FILES?
I always shoot in RAW. The editing options that RAW provides are
invaluable. I have done a lot of testing with the RAW editors that are
available for Linux. My current RAW editor of choice is AfterShot Pro. It
is the fastest and most stable RAW editor that I have come across that
runs on Linux. The plugin framework is also pretty good. I wish that it
were open source, but I don't think that is currently a priority for Corel.
WHY DID YOU CHOOSE TO USE GIMP AND WHICH FEATURES DO
YOU USE THE MOST?
I won't lie. I started using GIMP because I could not afford Photoshop.
But at this point, I prefer GIMP. GIMP is a world-class editing tool. If you
are willing to put in the time to learn how it works, it gives you a lot of
freedom, and it has very few limitations. It also gives my images a
different feel. Lots of people use Photoshop and buy the latest
Photoshop actions pack. They use similar methods and get similar
results. GIMP produces a different look that I like a lot.
As far as which features I use most, I'd have to say modes and masks.
Paint and layer modes are dreamy, and there is not much you can't do
with clever use of layer masks.
WHICH FEATURES WOULD YOU MOST WANT TO SEE IN
UPCOMING VERSIONS OF GIMP?
As far as I know, both of the features I most want to see will be in
version 2.10. These are higher bit capability and script recording. But if
we are dreaming big, I would go with an API to directly access a running
GIMP instance from a remote device, and the ability to easily choose the
location of configuration files. Like a Dropbox folder for instance.
g i m p m a g a z i n e . o r g | 1 8
g i m p m a g a z i n e . o r g | 1 9
IF YOU COULD GO BACK IN TIME, WHAT ADVICE WOULD YOU
GIVE YOURSELF?
You are loved. Failure is a perspective that you can change. Feel the
fear, do it anyway.
WHAT ARE YOUR FUTURE PLANS?
Keep learning. Keep dreaming. Keep shooting. Put my work out there.
I'm in this for the long haul.
FIND AARON TYREE IN THE FOLLOWING LOCATIONS:
Personal website: http://aarontyree.com/
Facebook: https://www.facebook.com/AaronTyreePhotography
Google+:
https://plus.google.com/u/0/104341314301144658678/posts
500px.com: http://500px.com/aarontyree
DeviantArt: http://aarontyree.deviantart.com/
Tumblr: http://aar0ntyree.tumblr.com/
ONLINE INSPIRATION AND RESOURCES
ZACH ARIAS: HTTP://ZACKARIAS.COM/
SUE BRYCE: HTTP://SUEBRYCE.COM/
CAMILLA ÅKRANS: HTTP://WWW.LUNDLUND.COM/PHOTOGRAPHERS/CAMILLA-AKRANS/
CHASE JARVIS: HTTP://WWW.CHASEJARVIS.COM/PHOTO/PORTFOLIOS-AI_1.HTML
CREATIVELIVE: HTTP://WWW.CREATIVELIVE.COM/
g i m p m a g a z i n e . o r g | 2 0
AARON’S UPDATE
[This article was written several months before publishing. Since the time of writing and the time of publishing
we at GIMP Magazine connected with Aaron and he provided the following update. -Ed]
A short time after writing this article, a competitive commercial software provider started offering an
online subscription. It took me a couple of months to finally give in, but I eventually did. What I have found
after using GIMP for years, and now using commercial software for a couple months, is this.
If you are interested only in creating art, you do not need commercial software. Yeah, I said it. In fact, in
some ways, I think you are better off using GIMP. Ninety per cent of the tools in commercial software can
be found in GIMP, and some tools in GIMP cannot be found in Photoshop. Also, the G'MIC project is
nothing to scoff at. There are entire industries built around software suites that do what G'MIC does, and
in some cases not as well. Between RawTherapee, GIMP, and G'MIC there is so much that you can do that
it will take you a long time to bump up against their limitations, if you ever do. And if and when you do, the
code is open, meaning you can create the tool you want or you can make a change yourself.
As far as why I made this choice, this is my full-time profession, and I won't lie. The way that commercial
products work together has saved me so much time its hard to believe. I'm talking about a full day per
client in some cases. This is invaluable to me. The commercial software provider has spent a lot of money
designing their software to interact well and they have succeeded. There is also the reality that ALL of my
peers use this commercial software. I don't mind being different, but some clients expect .psd files at the
completion of a shoot, with layers intact. You will get tired of explaining what an .xcf file is, and why it's
close to a .psd file, after the first client conversation. There are also a few areas of functionality in the
commercial software that allow you to refine images in ways that are just beyond GIMP's current
capabilities. I could elaborate on these, but I don't think it matters for the purpose of this article.
My point is this. For anyone who is wondering if they are missing out by not using commercial software,
consider this. Unless you are pursuing image production and editing as a full-time career, I wouldn't bother
with it. That's just my opinion. There is so much you can do with GIMP. Once you start wishing that you
could blend a 3dLUT into zone 5 with a smooth gradient to more accurately reflect the tones of a print film
pulled by two stops, you know what this means, and you are getting frustrated that you can't do that in
GIMP, you might think about switching to commercial software. Until then, enjoy the freedom. ■
FOLLOW DAVE LEPEK ON TWITTER @ACCORDING2DAVE
WE LOVE PIE AT GIMP MAGAZINE, SO MUCH SO THAT WE ARE
DEDICATING AN ENTIRE ISSUE (SPRING 2015) TO PIE. WE ARE
ASKING EVERYONE TO SUBMIT THEIR FAVORITE PIE PHOTOS
(MACRO, FOCUS BLUR, ANY PHOTOGRAPHIC TECHNIQUE YOU LIKE),
PIE GRAPHIC DESIGNS, AND EVEN PIE STORIES OF WHY YOU LOVE
PIE.
GIMPMAGAZINE.ORG/SUBMISSIONS
Meet The GIMP!
A Videopodcast
about
Free and Open Source Graphics
Software
http://meetthegimp.org
FOLLOW DEBI DALIO AT HTTP://PORTRAITS-NATURALLY.BLOGSPOT.COM/
"MASK OF THE COCKATOO"
g i m p m a g a z i n e . o r g | 2 5
GERALD SCHENK
Title: Toy Toronto Street
Description: I like photography as it is the hobby
where untalented nerds are able to pretend they can
be creative and produce art, while, in fact, it is only
sophisticated learning and imitating things learned
from the net or books. GIMP is a logical extension to
this. Still, the pretence of art is enough for me to be
happy about it.
This image was made with the Focus Blur plugin by
Kyoichiro Suda (http://registry.gimp.org/node/8236).
It applies out-of-focus blur based on the value in a
greyscale depth-map. Unlike regular blur filters, this
plugin also simulates actual lens effects – a point is
blurred to a disc with non-uniform density. Using a
manually drawn depth map, the shallow depth of
field of a close-up shot is simulated, while the object,
in fact, is large in real life and is, in its entirety,
beyond the hyperfocal distance.
Portfolio:
http://www.flickr.com/photos/60990146@N02/
g i m p m a g a z i n e . o r g | 2 6
JAN-HENDRIK CASPERS
Title: Treskowbrücke, Berlin, Germany
Description: I'm a software developer and
photography is my hobby. I have used "The Gimp"
since I started using Linux many years ago. This
picture was taken on a foggy night and post-
processed with UFRaw and GIMP.
Portfolio:
http://www.flickr.com/photos/96734916@N05/
g i m p m a g a z i n e . o r g | 2 7
SEAN MCLEAN
Title: Point Reyes Lighthouse
Description: I'm an amateur photographer and
technology dude from around Santa Cruz, California. I
feel a personal commitment to art and to open source
software, especially since Linux changed nearly
everything for me in 2000. I process all of my photos
with GIMP and usually RawTherapee on either Linux
Mint or Xubuntu.
This image is a favorite photo of the Point Reyes
Lighthouse at Point Reyes National Seashore just
before sunset. I shot it using a Canon 7D and a Sigma
17-50mm lens. Processing was done using GIMP 2.8
and RawTherapee on Xubuntu 13.10. The actual
workflow included luminance masks in the light, mid,
and dark ranges followed by just a little bit of unsharp
mask.
Portfolio:
http://www.flickr.com/photos/55255576@N07/
g i m p m a g a z i n e . o r g | 2 8
JEREMY GOOCH
Title: Zero-K Mech
Description: I work professionally as an interface
designer, and I do freelance illustration as well. I
enjoy working in a variety of mediums, but lately I
have been working primarily in the digital realm. I've
been using GIMP since 2008 and I've made it a
personal mission to switch to entirely free software to
create my artwork, so using GIMP was a natural
transition for me. This artwork was created using
GIMP 2.6 on Linux Mint 11.
Blog: http://jeremygooch.blogspot.com/
g i m p m a g a z i n e . o r g | 2 9
GUSTAVO DEVEZE
Title: Urban scene... (escena urbana...)
Description: I am a visual artist living in Buenos Aires,
Argentina. In my work the theme arises from the signs
I suggest as a reaction to some day-to-day
happenings, which can be an insistent idea or a
phrase heard when passing by. In this way I begin to
work, starting from the spots, looking for the forms
(from the abstract I go towards the formation), and
using the techniques of drawing and painting. My
images are also occasionally accompanied by a short
text.
For this image, I used GIMP 2.6 with a graphics tablet
(6x8 inches). This image is composed of one layer
with the black (lines, planes, and textures), another
layer containing the color in Multiply mode, and a
third layer with small retouches in Soft light mode.
Blog: http://jeneverito.blogspot.com
Bobolobo: http://bobolobo.blogspot.com
Website: http://www.deveze.com.ar
g i m p m a g a z i n e . o r g | 3 0
LUCIANO FREITAS
Title: Prometheu, free
Description: I'm an enthusiast of open source and
free graphic software. As a student of cinema and
audio/visual arts, I'm able to do drawings and take
photographs, which is very important and useful for
me. That's where GIMP, Inkscape, and Blender come
into the picture. I used MakeHuman to create and
model the human figure, then iluminated and
rendered it in Blender, where I made the additional
objects (chain and goggles). Afterwards I used GIMP
with G'MIC filters and effects.
g i m p m a g a z i n e . o r g | 3 1
STEVE CZAJKA
Title: Oktoberfest
Description: This was authentically hand lettered
using a Pilot Parallel calligraphy pen. It was scanned,
and post processed using both GIMP and Inkscape.
GIMP was used for cropping, curves, background
removal, while Inkscape was used for colourization,
and a ridges filter.
Website: http://flickr.com/steveczajka
g i m p m a g a z i n e . o r g | 3 2
STEVE CZAJKA
Title: Literary Connection Book Cover Proposal
Description: This was authentically hand lettered
using a Pilot Parallel calligraphy pen. The digital
typeface was completely processed using GIMP. The
book cover design options were created using
Inkscape, an amazing layout tool.
Website: http://flickr.com/steveczajka
g i m p m a g a z i n e . o r g | 3 5
USING GIMP FOR PORTRAIT AND
FASHION PHOTOGRAPHY
A Master Class by Aaron Tyree, Edited by Debi Dalio
In the process of learning effective photo editing techniques, I heard the following many times: “There are a
lot of ways to edit photos, but if you want to achieve professional-level results you really have to use 'such
and such' software.” Through trial and error I've come to the conclusion that while this can be true in some
cases, it is most often not true. It greatly depends on your goal. If you want to shoot and edit photos for
massive billboards, you will need very specific software. On the other hand, if your goal is to shoot and edit
great photographs for yourself or for clients, your software selection is considerably less limited. When I
started pursuing photography professionally, it was suggested to me by many photographers that GIMP
was somehow restrictive in its photo editing capability. This is simply not true. I believe their remarks were
a result of not having access to good information on how to interact with the incredibly powerful set of
tools that GIMP contains.
This tutorial is an attempt to provide a “base system”, so to speak, for developing a personal editing style. It
is a result of studying the editing techniques of many photographers and translating the tools that I saw
commonly used into my GIMP workflow. I use GIMP on the majority of the images I produce. I have chosen
not to go into great detail with each filter, tool, or technique by covering all of their capabilities. I will,
instead, be focusing more on what I seem to use most often.
This tutorial assumes two things:
1. That you know how to get a good exposure in camera.
2. That, if you shoot RAW, you can use the RAW editor of your choice to make adjustments, then export the
image to GIMP.
We will start at the point of having imported an image into GIMP.
I will be covering the following in GIMP 2.8:
• iWarp
• Wavelet Decompose
• Cloning and Healing
• Spotlighting
• Curves
• Unsharp MaskBEFORE AFTER
IWARP
iWarp is a transform tool that allows you to move,
shrink, grow, and otherwise bend the pixels within an
image to your will. There is no shortage of controversy
surrounding the use of this tool thanks to its overuse in
fashion magazines. For me, the purpose of iWarp is to
make subtle adjustments to perspective anomalies in
an image, not to make every woman look like Jessica
Rabbit. iWarp should be used sparingly, as it is quite
obvious when it's used too liberally.
You can find this filter through Filters > Distorts > IWarp.
Figure 1.
The filter settings I use most frequently are the Deform
Modes shown in box 1. They are Move, Grow, and
Shrink, which allow you to stretch, expand, and shrink
parts of the image by dragging the mouse on the
preview image.
The variable settings shown in box 2 adjust how the
Deform Mode affects the image. The Deform radius
defines the radius, in pixels, of the filter action circle
around the pixel pointed to by the mouse. The Deform
amount sets limits on how much the area can be
deformed in relation to surrounding pixels. The Bilinear
option improves the relationship between affected
pixels, resulting in a smoother appearance of the
affected area. For this particular adjustment, I have
selected a deform radius of 72, and have left all the
other settings at their defaults. The deform radius is the
primary adjustment that I find myself using, often
leaving all others in their default state.
Figure 2.
In this example image, iWarp has been used to remove
the bulging of the arm where it is pressed against the
leg and the bulging of the upper arm where it is
pressed against the rear wall. The adjustments are
subtle, which is the goal.
For a more in-depth description of iWarp's controls, visit
http://docs.gimp.org/en/plug-in-iwarp.html.
WAVELET DECOMPOSE
One of my very least liked things in fashion and portrait
images is over-edited skin where the result looks
something like polished latex. The Wavelet Decompose
filter in GIMP is a great way to avoid this. Wavelet
Decompose losslessly decomposes a layer of an image
into layers of wavelet scales. Or, more simply put, it
separates the detail of an image into multiple editable
layers with detail levels progressing from fine to coarse.
This allows you to remove coarse detail while leaving
fine detail undisturbed.
I use Wavelet Decompose primarily for skin retouching.
The benefit is that pores and other common skin
details are contained in the finer detail layers, whereas
larger blemishes are contained in the larger grain detail
layers. This means you can erase imperfections while
leaving pores and fine textures unchanged.
To use Wavelet Decompose, you must first download it
from the GIMP Plugin Registry at
http://registry.gimp.org/node/11742 and install it in
your GIMP 2/lib/gimp/2.0/plug-ins folder. If you are
using Windows and would prefer to use a tool that
helps you install plugins (plus provides a wide variety of
plugins), you can download the GIMP Extensions Pack
for Windows from http://registry.gimp.org/node/27656.
For Mac users, Simone Karin Lehmann does some great
builds for Mac with many extra filters and plugins
compiled in. You can find her work at
http://gimp.lisanet.de/Website/News/News.html. Once
the Wavelet Decompose plugin is installed, you can find
it through Filters > Generic > Wavelet decompose.
Figure 3.
Wavelet Decompose has a control dialog that pops up
when you select it. The default settings and number of
detail layers are usually sufficient. When you click OK,
the currently active layer is separated into five layers of
detail, with layer 1 being the most fine and layer 5 being
the most coarse, plus a residual layer of everything
that's left over.
The majority of skin imperfections that photographers
will desire to remove are now contained in Wavelet
scales 4 and 5. You can either use the Eraser tool to
remove unwanted details in each layer, using the
eraser's opacity to control the level of removal, or use
the method that I prefer.
I like to create a layer mask by right-clicking on “Wavelet
scale 5” and selecting Add Layer Mask.
g i m p m a g a z i n e . o r g | 3 6
g i m p m a g a z i n e . o r g | 3 7
Figure 4.
I initialize the Layer Mask to “White (full opacity)”.
Figure 5.
Painting on the layer mask with black will reduce detail
based on the opacity of the paintbrush.
A bonus of using Wavelet Decompose is that you can
also use it to sharpen areas of an image.
You will notice that under the Wavelet scale layers is a
layer called “Wavelet residual”. Since all of the detail of
the image is contained in the Wavelet scale layers, the
residual layer is essentially “not detail”. By erasing parts
of this layer, you are effectively removing “not detail”
and leaving only detail. This means you can easily
sharpen selected areas, such as eyes, or bring out line
details by tracing along them. You can control the
amount of sharpening by adjusting the opacity of the
eraser tool. More opacity equals more sharpening, less
opacity equals less sharpening.
Experimentation is the best way to learn how to use
this filter, and, with some familiarization, the end result
can look like the right-hand side of this before and after
image:
Figure 6.
CLONING AND HEALING
If you do portrait and/or fashion photography, you’ll
find that the Clone and Healing tools are your friends.
For removing little blemishes from skin, the Healing tool
is the way to go. And for lightening circles under the
eyes, the Clone tool is hard to beat. When using these
tools, I rarely use anything other than a circular 50%
hardness brush. You can get all intense about which
brush to use for which situation, but, in practice, I find
that it’s rare for me to change my brush selection. But,
of course, you should develop your own style.
THE CLONE TOOL
Figure 7.
The Clone tool uses a brush to copy from one area of
an image and paint over another area. This tool has a
multitude of uses. You can remove people from the
background of an image, remove stray hairs, and so
forth. This example demonstrates one method of using
the Clone tool to lighten dark circles under the eyes.
Figure 8.
g i m p m a g a z i n e . o r g | 3 8
You can see by the square in the first image the area
that I wish to lighten. In the next image, the first circle is
the selection area that I will be cloning from. The
second circle is the area where I will be cloning to. The
last image is the end result.
The Clone tool looks like a rubber stamp with a handle
(Shortcut: C). You mark the area you wish to clone from
by holding down the Ctrl key and left-clicking on the
image at a point that you want to copy. In this case, I
selected a skin area that is light compared to the dark
area I wanted to lighten. For a more subtle lightening
effect, I changed the Clone tool’s opacity to 10%. Once I
had selected an appropriate brush, all that remained
was to paint over the destination area.
THE HEALING TOOL
The Healing tool is similar to the Clone tool, but with
one significant difference. While the Clone tool copies
pixels from one area and replaces the pixels in another,
the Healing tool copies pixels from one area, then
blends them with the pixels in another. The result of
healing can be smoother in appearance than that of
cloning, and is usually the best way to remove
blemishes from skin.
Figure 9.
In the above image, box 1 is the Healing tool icon, which
looks like crossed bandages (Shortcut: H). Circle 2 is the
sample area and circle 3 is the area I want to heal. I set
the opacity much higher with the Healing tool that with
the Clone tool because of how it blends with the
surrounding pixels.
Before and after:
Figure 10.
SPOTLIGHTING
This is more of a technique than a tool, but I have found
myself using it more and more to enhance the feeling
and lighting in an image. Essentially it consists of
creating a transparent layer, creating a radial gradient
on the new transparent layer over a specific area of an
image that you want to lighten, then changing the layer
mode to Soft light. From there you can change the
layer’s opacity to adjust the intensity of the “light”. Using
this method, you can enhance existing lighting or even
simulate another light source in some cases. I’ll walk
through the steps.
1. Create a new layer and, when prompted, select
Transparency for the layer type.
2. Select the Blend tool. (Shortcut: L)
Figure 11.
3. In the Tool Options dialog for the Blend tool, set the
Blend Mode to Normal, set the Gradient to “FG to
Transparent“, and set the Shape to Radial.
Figure 12.
4. Make sure your foreground color is set to white, then,
on the newly created transparent layer, put the cursor
where you would like the light to be centered. Left-click
with your mouse and hold. Pull the cursor away in any
direction until you reach the edge of where you would
like the light to be, then release the mouse button. The
result should look similar to this:
g i m p m a g a z i n e . o r g | 3 9
Figure 13.
5. Now, using the drop-down Mode menu at the top of
the Layers dialog, change the mode of the layer from
Normal to Soft light. Use the layer Opacity slider to
adjust the amount and intensity of the light.
Before and after:
Figure 14.
Figure 15.
There is another way that I use this technique regularly.
Rather than using the Dodge tool to lighten eyes, I
create a transparent layer, select a round 50%
hardness brush, and reduce the size of the brush so
that I can paint with white directly over the whites of the
eyes.
Figure 16.
By changing the layer mode of this transparent layer to
Soft light, I can control the lightness of the eyes by
adjusting the layer's opacity. I prefer this to dodging
and burning since a soft light adjustment from the layer
above seems to leave the pixels of the image looking
more natural.
These are just two uses for the technique of painting or
laying color on a transparent layer and changing the
layer mode. By experimenting with gradient shapes and
various colors you can come up with interesting effects.
You can simulate light flares, change and augment
colors, darken and lighten specific areas, and so forth.
CURVES
In the photo world right now, filters are all the rage.
Instagram, the majority of online editors, and even most
Photoshop actions have contributed largely to this
trend. What you may not know is that many of these
filters are just a manipulation of Value and RGB curves.
Contrast, color toning, and white and black point
adjustments can all be accomplished with curves. This
topic could take up its own lengthy tutorial, but I’ll
attempt to offer a simple example to get you started.
Select Colors > Curves to open the Curves dialog.
Figure 17.
g i m p m a g a z i n e . o r g | 4 0
Click on the Channel drop-down menu and you will see
five options:
1. Value
2. Red
3. Green
4. Blue
5. Alpha
We will focus on Value, Red, Green, and Blue.
The Value curve is fairly straight forward. If you were to
convert your image to black and white, every pixel in the
image would be some value between black and white.
The Value curve adjusts the blacks and whites of your
image, plus all of the greys in between. By selecting any
point on the line, you can move that point up or down,
and make it more white or more black.
On the left, the point at the bottom represents black
and affects the darkest parts of your image. On the
right, the point at the top represents white and affects
the lightest parts of your image. By moving the black
point on the bottom left upward, you will be lightening
shadows. By moving the white point at the top
downward, you will be darkening the highlights. So
again, by selecting any point on the diagonal line, and
moving it up or down, you will lighten or darken that
Value in the image.
Color curves are similar, but operate slightly differently.
To understand how they work, think not only of red,
green, and blue, but also their opposites. When you
look at colors on a color wheel, red is opposite cyan,
green is opposite magenta, and yellow is opposite blue.
Figure 18.
With color curves, moving a point on a curve up will
increase that color. Moving a point on the curve down
will increase its opposite. For example, with the Red
curve selected, if you want more red in the image, drag
the curve up. If you want more cyan in the image, drag
the red curve down. For the green curve, up means
more green, down means more magenta. And for the
blue curve, up means more blue, and down means
more yellow.
That is reasonably simple. But you need to put both
concepts together to understand how to use curves
well. Simply put, when using a Red, Green, or Blue
curve, if you want to adjust a color in the shadows, then
move the curve up or down near the bottom left where
the curves affect the darkest part of the image. The
middle of the curve will adjust the midtones. If you want
to adjust a color in the highlights, move the curve up or
down on the top right, where the curve affects the
lightest part of the image.
Figure 19
In this image you can see that I lightened the shadows a
little using the Value curve, added some blue to the
shadows using the Blue curve, added magenta to the
midtones by pulling the Green curve down, and finished
by adding a little red to both the shadows and
midtones.
This will, of course, require experimentation, but as you
grasp how the various curves work, you will realize that
a whole lot of the editing that is commonly done to an
image can all be accomplished in the Curves dialog.
UNSHARP MASK
I often wait until the end of an editing session to
sharpen an image, and only sharpen when the image is
at its final resolution. There are differing opinions on
this, but it is what I find myself doing most often. The
sharpening method that is pretty much my go-to is
Unsharp Mask.
Unsharp Mask essentially uses layers, Gaussian blur,
and color inversion to enhance borders in an image. It
gives the image a sharper appearance without using
sharpening methods that increase image noise. As with
all editing techniques, preferred methods are
subjective, but I find that I prefer the look of Unsharp
Mask to most other sharpening methods.
The Unsharp Mask filter that comes with GIMP is very
functional. You can find it at:
Filters > Enhance > Unsharp Mask
You will be presented with this dialog box:
Figure 20.
g i m p m a g a z i n e . o r g | 4 1
There are three primary options for this filter: Radius,
Amount, and Threshold. Amount is fairly self-
explanatory. It indicates how much emphasis is to be
used on borders. I'll focus here on the Radius and
Threshold sliders.
The simplest way to understand Radius is to first
understand what is meant by a border. Borders are
noticeable color and value transitions in an image.
Simply put, the edge of a dress, or the transition from
iris to pupil in an eye, is a border. Since Unsharp Mask
emphasizes borders, Radius is essentially how many
pixels away from the border you want that emphasis to
be noticeable.
Figure 21.
As a visual example, you can see how the border of the
grey bars will be emphasized in white.
This is with a fairly low radius.
Figure 22.
You can see here that the grey bars now have a white
gradient around their borders that extends further than
in the first image because the Unsharp Mask filter
radius has been increased.
So, by adjusting the radius of the unsharp mask, you will
increase or decrease how far away from the border the
emphasis extends.
Threshold is a bit simpler. In practical terms, Threshold
controls the filter’s sensitivity to borders. So if you want
to emphasize the borders of the eyes or the lips, for
example, but don’t want to emphasize the borders of
subtle transitions in the skin, then raising the threshold
will decrease the filter's sensitivity to border transitions
in an image. If you want detail emphasized in every little
pixel, then lowering the Threshold will increase the
filter’s sensitivity to border transitions. There is
technically more to it, but this generalization will give
you a practical working understanding of how to use it.
If you would like to dig deeper, you can find a technical
description here: http://docs.gimp.org/en/plug-in-
unsharp-mask.html.
The default slider settings for Unsharp Mask are very
usable in most instances, but experimentation is always
recommended.
Here is one final recommendation when using Unsharp
Mask. Before using it, separate your image into HSV
layers (hue, saturation, and value), and apply the
Unsharp Mask to the Value layer. The value layer
simplifies all of the borders in an image by getting color
out of the way. The edges seem a little sharper, and
there seems to be less noise in the final image.
To separate an image into HSV layers, choose Colors >
Components > Decompose, change the Color model to
HSV, and click OK. A new window will open with your
image separated into Hue, Saturation, and Value layers.
Make sure the Value layer is selected, then apply the
Unsharp Mask filter to it. After sharpening, choose
Colors > Components > Recompose and GIMP will
recompose the three layers back onto the layer from
which you did the decompose.
So there it is. For better or for worse. I hope that with
some experimentation you will find using these image
adjustment steps helpful, and will be pleased with the
results you get.
Happy editing! ■
• YOUR BEST PHOTOGRAPHY POST
PROCESSED IN GIMP / UFRAW ETC.
• YOUR MOST AWESOME GRAPHIC ART
DESIGN CREATED IN GIMP
• YOUR GIMP TUTORIALS
• YOUR TIPS & TRICKS
• YOUR LIST OF FAVOURITE GIMP
RESOURCES (WEBSITE URLS)
• YOUR NEW COOLEST SCRIPTS AND
PLUGIN DESCRIPTIONS
• YOUR OTHER OPEN SOURCE SOFTWARE
REVIEWS
• YOUR FAVOURITE HARDWARE REVIEWS
• AND YOUR MOST REQUESTED FUTURE
GIMP UPGRADES / FEATURE REQUESTS
WANT TO MAKE THE COVER OF GIMP
MAGAZINE?
We need your help to contribute to this magazine!
Promote your amazing works with GIMP or related open source graphics software to the world.
SUBMIT AN IMAGE FOR OUR DESIGN /
PHOTOGRAPHY GALLERY
Visit http://gimpmagazine.org/submissions and fill out the
form at the bottom of the page.
SUBMIT A SUGGESTION
Email us at GIMPMagazine at hotmail dot ca with the
details. You can also follow us on Twitter at
www.twitter.com/GIMPMagazine or on Google+ name GIMP
Magazine.
WANT TO JOIN THE GIMP MAGAZINE TEAM?
Have you researched stories, interviewed people, and
written articles? Are you a digital artist or photographer? Do
you have a passion for GIMP or related open source
software? Let us know by sending us an email with your
credentials and interest to http://gimpmagazine.org/contact.
INTERESTED IN ADVERTISING WITH US?
We are considering publishing corporate advertising in
upcoming issues. We are looking for organizations from the
following areas who are interested in reaching potentially
millions of interested GIMP users:
• Specialty computer hardware, printers, monitors, pen
tablets, etc.
• Specialty cameras, lenses, filters, lighting, accessories, etc.
• Specialty print and imaging services
• Stock photography, textures, font collections, etc.
• Artists, photographers, models, creatives, etc.
• Software / photography / graphic design courses,
conferences, etc.
• Specialty software filters, plugins, apps etc.
• Instructional books, DVDs, videos, etc.
Our Advertising Rate Card can be found at
http://gimpmagazine.org/about
S U B M I S S I O N S
g i m p m a g a z i n e . o r g | 4 4
WANT MORE TIPS & TRICKS?
SUBSCRIBE TO OUR
YOUTUBE CHANNEL
HTTP://YOUTUBE.COM/STEVECZAJKA
Gimp magazine número 6.

More Related Content

Similar to Gimp magazine número 6.

Gimp magazine número 7
Gimp magazine número 7Gimp magazine número 7
Gimp magazine número 7Huehue 1
 
Gimp magazine número 10
Gimp magazine número 10Gimp magazine número 10
Gimp magazine número 10Huehue 1
 
Gimp magazine 9
Gimp magazine 9Gimp magazine 9
Gimp magazine 9Huehue 1
 
As media evaluation G321
As media evaluation G321As media evaluation G321
As media evaluation G321jaeplummer1
 
As media evaluation G321
As media evaluation G321As media evaluation G321
As media evaluation G321jaeplummer1
 
As media evaluation G321
As media evaluation G321As media evaluation G321
As media evaluation G321jaeplummer1
 
As media evaluation g321 finished
As media evaluation g321 finishedAs media evaluation g321 finished
As media evaluation g321 finishedlukebarnacle96
 
Evaluation questions
Evaluation questionsEvaluation questions
Evaluation questionsasmediac15
 
Evaluating my music magazine
Evaluating my music magazine Evaluating my music magazine
Evaluating my music magazine Akash Sharma
 
Its a gig-babygignewsletter
Its a gig-babygignewsletterIts a gig-babygignewsletter
Its a gig-babygignewsletterChirag Thumar
 

Similar to Gimp magazine número 6. (20)

Gimp magazine 4
Gimp magazine 4Gimp magazine 4
Gimp magazine 4
 
Gimp magazine 5
Gimp magazine 5Gimp magazine 5
Gimp magazine 5
 
Gimp magazine número 7
Gimp magazine número 7Gimp magazine número 7
Gimp magazine número 7
 
Gimp magazine número 10
Gimp magazine número 10Gimp magazine número 10
Gimp magazine número 10
 
Gimp magazine 9
Gimp magazine 9Gimp magazine 9
Gimp magazine 9
 
Gimp magazine 1
Gimp magazine 1Gimp magazine 1
Gimp magazine 1
 
Gimp magazine 3
Gimp magazine 3Gimp magazine 3
Gimp magazine 3
 
Gimp magazine 2
Gimp magazine 2Gimp magazine 2
Gimp magazine 2
 
As media evaluation G321
As media evaluation G321As media evaluation G321
As media evaluation G321
 
As media evaluation G321
As media evaluation G321As media evaluation G321
As media evaluation G321
 
As media evaluation G321
As media evaluation G321As media evaluation G321
As media evaluation G321
 
Unit 14 - LO4
Unit 14 - LO4Unit 14 - LO4
Unit 14 - LO4
 
As media evaluation g321 finished
As media evaluation g321 finishedAs media evaluation g321 finished
As media evaluation g321 finished
 
LO2
LO2LO2
LO2
 
Evaluation questions
Evaluation questionsEvaluation questions
Evaluation questions
 
Evaluating my music magazine
Evaluating my music magazine Evaluating my music magazine
Evaluating my music magazine
 
Its a gig-babygignewsletter
Its a gig-babygignewsletterIts a gig-babygignewsletter
Its a gig-babygignewsletter
 
Portfolio mou
Portfolio mouPortfolio mou
Portfolio mou
 
LO5
LO5LO5
LO5
 
LO4
LO4LO4
LO4
 

More from Huehue 1

The Original Hacker no. 12
The Original Hacker no. 12The Original Hacker no. 12
The Original Hacker no. 12Huehue 1
 
The Original Hacker no. 13.
The Original Hacker no. 13.The Original Hacker no. 13.
The Original Hacker no. 13.Huehue 1
 
Tuxinfo número 71.
Tuxinfo número 71.Tuxinfo número 71.
Tuxinfo número 71.Huehue 1
 
The Original Hacker número 11.
The Original Hacker número 11.The Original Hacker número 11.
The Original Hacker número 11.Huehue 1
 
TuxInfo número 70
TuxInfo número 70TuxInfo número 70
TuxInfo número 70Huehue 1
 
Tux Info número 69.
Tux Info número 69.Tux Info número 69.
Tux Info número 69.Huehue 1
 
Full Circle número 90
Full Circle número 90Full Circle número 90
Full Circle número 90Huehue 1
 
Full Circle 89
Full Circle 89Full Circle 89
Full Circle 89Huehue 1
 
The Original Hacker número 9.
The Original Hacker número 9.The Original Hacker número 9.
The Original Hacker número 9.Huehue 1
 
The Original Hacker número 8.
The Original Hacker número 8.The Original Hacker número 8.
The Original Hacker número 8.Huehue 1
 
Full Circle 88
Full Circle 88Full Circle 88
Full Circle 88Huehue 1
 
Curso linux
Curso linuxCurso linux
Curso linuxHuehue 1
 
TuxInfo número 68
TuxInfo número 68TuxInfo número 68
TuxInfo número 68Huehue 1
 
Full Circle 87
Full Circle 87Full Circle 87
Full Circle 87Huehue 1
 
Primeros pasos con Libre Office
Primeros pasos con Libre OfficePrimeros pasos con Libre Office
Primeros pasos con Libre OfficeHuehue 1
 
Full Circle 86
Full Circle 86Full Circle 86
Full Circle 86Huehue 1
 
Manual Inkscape
Manual InkscapeManual Inkscape
Manual InkscapeHuehue 1
 
Aprenda Gimp a los tropezones.
Aprenda Gimp a los tropezones.Aprenda Gimp a los tropezones.
Aprenda Gimp a los tropezones.Huehue 1
 
The Original Hacker número 6.
The Original Hacker número 6.The Original Hacker número 6.
The Original Hacker número 6.Huehue 1
 
Original Hacker 5
Original Hacker 5Original Hacker 5
Original Hacker 5Huehue 1
 

More from Huehue 1 (20)

The Original Hacker no. 12
The Original Hacker no. 12The Original Hacker no. 12
The Original Hacker no. 12
 
The Original Hacker no. 13.
The Original Hacker no. 13.The Original Hacker no. 13.
The Original Hacker no. 13.
 
Tuxinfo número 71.
Tuxinfo número 71.Tuxinfo número 71.
Tuxinfo número 71.
 
The Original Hacker número 11.
The Original Hacker número 11.The Original Hacker número 11.
The Original Hacker número 11.
 
TuxInfo número 70
TuxInfo número 70TuxInfo número 70
TuxInfo número 70
 
Tux Info número 69.
Tux Info número 69.Tux Info número 69.
Tux Info número 69.
 
Full Circle número 90
Full Circle número 90Full Circle número 90
Full Circle número 90
 
Full Circle 89
Full Circle 89Full Circle 89
Full Circle 89
 
The Original Hacker número 9.
The Original Hacker número 9.The Original Hacker número 9.
The Original Hacker número 9.
 
The Original Hacker número 8.
The Original Hacker número 8.The Original Hacker número 8.
The Original Hacker número 8.
 
Full Circle 88
Full Circle 88Full Circle 88
Full Circle 88
 
Curso linux
Curso linuxCurso linux
Curso linux
 
TuxInfo número 68
TuxInfo número 68TuxInfo número 68
TuxInfo número 68
 
Full Circle 87
Full Circle 87Full Circle 87
Full Circle 87
 
Primeros pasos con Libre Office
Primeros pasos con Libre OfficePrimeros pasos con Libre Office
Primeros pasos con Libre Office
 
Full Circle 86
Full Circle 86Full Circle 86
Full Circle 86
 
Manual Inkscape
Manual InkscapeManual Inkscape
Manual Inkscape
 
Aprenda Gimp a los tropezones.
Aprenda Gimp a los tropezones.Aprenda Gimp a los tropezones.
Aprenda Gimp a los tropezones.
 
The Original Hacker número 6.
The Original Hacker número 6.The Original Hacker número 6.
The Original Hacker número 6.
 
Original Hacker 5
Original Hacker 5Original Hacker 5
Original Hacker 5
 

Recently uploaded

Organic Name Reactions for the students and aspirants of Chemistry12th.pptx
Organic Name Reactions  for the students and aspirants of Chemistry12th.pptxOrganic Name Reactions  for the students and aspirants of Chemistry12th.pptx
Organic Name Reactions for the students and aspirants of Chemistry12th.pptxVS Mahajan Coaching Centre
 
CARE OF CHILD IN INCUBATOR..........pptx
CARE OF CHILD IN INCUBATOR..........pptxCARE OF CHILD IN INCUBATOR..........pptx
CARE OF CHILD IN INCUBATOR..........pptxGaneshChakor2
 
Contemporary philippine arts from the regions_PPT_Module_12 [Autosaved] (1).pptx
Contemporary philippine arts from the regions_PPT_Module_12 [Autosaved] (1).pptxContemporary philippine arts from the regions_PPT_Module_12 [Autosaved] (1).pptx
Contemporary philippine arts from the regions_PPT_Module_12 [Autosaved] (1).pptxRoyAbrique
 
18-04-UA_REPORT_MEDIALITERAСY_INDEX-DM_23-1-final-eng.pdf
18-04-UA_REPORT_MEDIALITERAСY_INDEX-DM_23-1-final-eng.pdf18-04-UA_REPORT_MEDIALITERAСY_INDEX-DM_23-1-final-eng.pdf
18-04-UA_REPORT_MEDIALITERAСY_INDEX-DM_23-1-final-eng.pdfssuser54595a
 
Paris 2024 Olympic Geographies - an activity
Paris 2024 Olympic Geographies - an activityParis 2024 Olympic Geographies - an activity
Paris 2024 Olympic Geographies - an activityGeoBlogs
 
How to Make a Pirate ship Primary Education.pptx
How to Make a Pirate ship Primary Education.pptxHow to Make a Pirate ship Primary Education.pptx
How to Make a Pirate ship Primary Education.pptxmanuelaromero2013
 
How to Configure Email Server in Odoo 17
How to Configure Email Server in Odoo 17How to Configure Email Server in Odoo 17
How to Configure Email Server in Odoo 17Celine George
 
Presentation by Andreas Schleicher Tackling the School Absenteeism Crisis 30 ...
Presentation by Andreas Schleicher Tackling the School Absenteeism Crisis 30 ...Presentation by Andreas Schleicher Tackling the School Absenteeism Crisis 30 ...
Presentation by Andreas Schleicher Tackling the School Absenteeism Crisis 30 ...EduSkills OECD
 
Sanyam Choudhary Chemistry practical.pdf
Sanyam Choudhary Chemistry practical.pdfSanyam Choudhary Chemistry practical.pdf
Sanyam Choudhary Chemistry practical.pdfsanyamsingh5019
 
Presiding Officer Training module 2024 lok sabha elections
Presiding Officer Training module 2024 lok sabha electionsPresiding Officer Training module 2024 lok sabha elections
Presiding Officer Training module 2024 lok sabha electionsanshu789521
 
Mastering the Unannounced Regulatory Inspection
Mastering the Unannounced Regulatory InspectionMastering the Unannounced Regulatory Inspection
Mastering the Unannounced Regulatory InspectionSafetyChain Software
 
The basics of sentences session 2pptx copy.pptx
The basics of sentences session 2pptx copy.pptxThe basics of sentences session 2pptx copy.pptx
The basics of sentences session 2pptx copy.pptxheathfieldcps1
 
Class 11 Legal Studies Ch-1 Concept of State .pdf
Class 11 Legal Studies Ch-1 Concept of State .pdfClass 11 Legal Studies Ch-1 Concept of State .pdf
Class 11 Legal Studies Ch-1 Concept of State .pdfakmcokerachita
 
Kisan Call Centre - To harness potential of ICT in Agriculture by answer farm...
Kisan Call Centre - To harness potential of ICT in Agriculture by answer farm...Kisan Call Centre - To harness potential of ICT in Agriculture by answer farm...
Kisan Call Centre - To harness potential of ICT in Agriculture by answer farm...Krashi Coaching
 
Incoming and Outgoing Shipments in 1 STEP Using Odoo 17
Incoming and Outgoing Shipments in 1 STEP Using Odoo 17Incoming and Outgoing Shipments in 1 STEP Using Odoo 17
Incoming and Outgoing Shipments in 1 STEP Using Odoo 17Celine George
 
“Oh GOSH! Reflecting on Hackteria's Collaborative Practices in a Global Do-It...
“Oh GOSH! Reflecting on Hackteria's Collaborative Practices in a Global Do-It...“Oh GOSH! Reflecting on Hackteria's Collaborative Practices in a Global Do-It...
“Oh GOSH! Reflecting on Hackteria's Collaborative Practices in a Global Do-It...Marc Dusseiller Dusjagr
 
BASLIQ CURRENT LOOKBOOK LOOKBOOK(1) (1).pdf
BASLIQ CURRENT LOOKBOOK  LOOKBOOK(1) (1).pdfBASLIQ CURRENT LOOKBOOK  LOOKBOOK(1) (1).pdf
BASLIQ CURRENT LOOKBOOK LOOKBOOK(1) (1).pdfSoniaTolstoy
 

Recently uploaded (20)

Organic Name Reactions for the students and aspirants of Chemistry12th.pptx
Organic Name Reactions  for the students and aspirants of Chemistry12th.pptxOrganic Name Reactions  for the students and aspirants of Chemistry12th.pptx
Organic Name Reactions for the students and aspirants of Chemistry12th.pptx
 
CARE OF CHILD IN INCUBATOR..........pptx
CARE OF CHILD IN INCUBATOR..........pptxCARE OF CHILD IN INCUBATOR..........pptx
CARE OF CHILD IN INCUBATOR..........pptx
 
Contemporary philippine arts from the regions_PPT_Module_12 [Autosaved] (1).pptx
Contemporary philippine arts from the regions_PPT_Module_12 [Autosaved] (1).pptxContemporary philippine arts from the regions_PPT_Module_12 [Autosaved] (1).pptx
Contemporary philippine arts from the regions_PPT_Module_12 [Autosaved] (1).pptx
 
18-04-UA_REPORT_MEDIALITERAСY_INDEX-DM_23-1-final-eng.pdf
18-04-UA_REPORT_MEDIALITERAСY_INDEX-DM_23-1-final-eng.pdf18-04-UA_REPORT_MEDIALITERAСY_INDEX-DM_23-1-final-eng.pdf
18-04-UA_REPORT_MEDIALITERAСY_INDEX-DM_23-1-final-eng.pdf
 
Paris 2024 Olympic Geographies - an activity
Paris 2024 Olympic Geographies - an activityParis 2024 Olympic Geographies - an activity
Paris 2024 Olympic Geographies - an activity
 
How to Make a Pirate ship Primary Education.pptx
How to Make a Pirate ship Primary Education.pptxHow to Make a Pirate ship Primary Education.pptx
How to Make a Pirate ship Primary Education.pptx
 
Model Call Girl in Bikash Puri Delhi reach out to us at 🔝9953056974🔝
Model Call Girl in Bikash Puri  Delhi reach out to us at 🔝9953056974🔝Model Call Girl in Bikash Puri  Delhi reach out to us at 🔝9953056974🔝
Model Call Girl in Bikash Puri Delhi reach out to us at 🔝9953056974🔝
 
How to Configure Email Server in Odoo 17
How to Configure Email Server in Odoo 17How to Configure Email Server in Odoo 17
How to Configure Email Server in Odoo 17
 
Código Creativo y Arte de Software | Unidad 1
Código Creativo y Arte de Software | Unidad 1Código Creativo y Arte de Software | Unidad 1
Código Creativo y Arte de Software | Unidad 1
 
Presentation by Andreas Schleicher Tackling the School Absenteeism Crisis 30 ...
Presentation by Andreas Schleicher Tackling the School Absenteeism Crisis 30 ...Presentation by Andreas Schleicher Tackling the School Absenteeism Crisis 30 ...
Presentation by Andreas Schleicher Tackling the School Absenteeism Crisis 30 ...
 
Sanyam Choudhary Chemistry practical.pdf
Sanyam Choudhary Chemistry practical.pdfSanyam Choudhary Chemistry practical.pdf
Sanyam Choudhary Chemistry practical.pdf
 
Presiding Officer Training module 2024 lok sabha elections
Presiding Officer Training module 2024 lok sabha electionsPresiding Officer Training module 2024 lok sabha elections
Presiding Officer Training module 2024 lok sabha elections
 
TataKelola dan KamSiber Kecerdasan Buatan v022.pdf
TataKelola dan KamSiber Kecerdasan Buatan v022.pdfTataKelola dan KamSiber Kecerdasan Buatan v022.pdf
TataKelola dan KamSiber Kecerdasan Buatan v022.pdf
 
Mastering the Unannounced Regulatory Inspection
Mastering the Unannounced Regulatory InspectionMastering the Unannounced Regulatory Inspection
Mastering the Unannounced Regulatory Inspection
 
The basics of sentences session 2pptx copy.pptx
The basics of sentences session 2pptx copy.pptxThe basics of sentences session 2pptx copy.pptx
The basics of sentences session 2pptx copy.pptx
 
Class 11 Legal Studies Ch-1 Concept of State .pdf
Class 11 Legal Studies Ch-1 Concept of State .pdfClass 11 Legal Studies Ch-1 Concept of State .pdf
Class 11 Legal Studies Ch-1 Concept of State .pdf
 
Kisan Call Centre - To harness potential of ICT in Agriculture by answer farm...
Kisan Call Centre - To harness potential of ICT in Agriculture by answer farm...Kisan Call Centre - To harness potential of ICT in Agriculture by answer farm...
Kisan Call Centre - To harness potential of ICT in Agriculture by answer farm...
 
Incoming and Outgoing Shipments in 1 STEP Using Odoo 17
Incoming and Outgoing Shipments in 1 STEP Using Odoo 17Incoming and Outgoing Shipments in 1 STEP Using Odoo 17
Incoming and Outgoing Shipments in 1 STEP Using Odoo 17
 
“Oh GOSH! Reflecting on Hackteria's Collaborative Practices in a Global Do-It...
“Oh GOSH! Reflecting on Hackteria's Collaborative Practices in a Global Do-It...“Oh GOSH! Reflecting on Hackteria's Collaborative Practices in a Global Do-It...
“Oh GOSH! Reflecting on Hackteria's Collaborative Practices in a Global Do-It...
 
BASLIQ CURRENT LOOKBOOK LOOKBOOK(1) (1).pdf
BASLIQ CURRENT LOOKBOOK  LOOKBOOK(1) (1).pdfBASLIQ CURRENT LOOKBOOK  LOOKBOOK(1) (1).pdf
BASLIQ CURRENT LOOKBOOK LOOKBOOK(1) (1).pdf
 

Gimp magazine número 6.

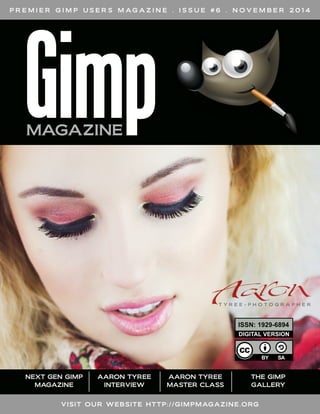
  • 1. P R E M I E R G I M P U S E R S M A G A Z I N E . I S S U E # 6 . N O V E M B E R 2 0 1 4 VISIT OUR WEBSITE HTTP://GIMPMAGAZINE.ORG ISSN: 1929-6894 DIGITAL VERSION NEXT GEN GIMP MAGAZINE AARON TYREE INTERVIEW AARON TYREE MASTER CLASS THE GIMP GALLERY
  • 2. ISSN: 1929-6894 DIGITAL VERSION P R E M I E R G I M P U S E R S M A G A Z I N E . I S S U E # 6 . N O V E M B E R 2 0 1 4 . V I S I T O U R W E B S I T E H T T P : / / G I M P M A G A Z I N E . O R G . F U L L S C R E E N V I E W I N G NEXT GEN GIMP MAGAZINE AARON TYREE INTERVIEW AARON TYREE MASTER CLASS THE GIMP GALLERY
  • 3.
  • 4. Welcome to the new and improved GIMP Magazine! The team has had some valued time off over the summer, but we have also been working hard to make our magazine better. We have had some challenges but we also have a vision and a clear direction set for this magazine based directly on your feedback. As the managing editor I have had some time to think about the future of GIMP Magazine. Some of the challenges we have had have been around production. We have a very small team to produce this magazine four times per year. The amount of work to edit and creatively lay out a 100 page magazine for both print and digital has been a significant effort. We conducted a short survey some time ago, and the vast majority of our readers felt that digital was all they needed. This is important information for our team, and I have decided to discontinue the print version. While I loved the quality and feel of the hard copy magazine, this move will save us considerable time and allow for a greater range of submissions from our readers. This format change will also allow us to re-design the magazine entirely around the screen viewing experience, not print. This new 16:9 layout gives us an array of new creative possibilities for presenting articles and it looks great on widescreen monitors, tablets, and phones. I view this more as a slide presentation as opposed to a printed document, even though this will print on 8.5"x14" legal size paper. My vision has always been to eventually grow to a monthly magazine. In an effort to get closer to that vision I have decided to try a pilot project. This means that we will be producing a monthly magazine for six months or so starting with this issue. Ideally I would like to get to ten issues per year. Each issue will be considerably smaller, consisting of one feature article, a related tutorial, and perhaps tips, along with creative gallery submissions. This new format will be much easier for our small team to produce, and it will provide more opportunities for our GIMP artists and photographers to be featured on the cover of our magazine. We would like to grow our team, and as we do so, grow the content within our magazine. Perhaps someday we might grow to a 100 page magazine every month. We are presently looking for an editor and illustrator to join our team. Simply contact us if you are interested (http://gimpmagazine.org/contact). During this time off, I have kept close to free software as I created an educational book along with a full video series on the subject of calligraphy and lettering (a re-emerging fine art). I have learned a great deal from this ebook/video project, and I feel that it is important to use these open source tools regularly while working for this magazine. I had huge success using these tools (GIMP, Inkscape, and Scribus) and I also plan on writing about my experience so that others can also feel comfortable using open source software on large creative projects. We were hoping to have a GIMP 2.10 Special Edition of the magazine ready to go, but unfortunately this has not happened. The core GIMP team has reached out to us in an effort to improve communications, and we look forward to working with them in the future. The GIMP magazine team would still love to do a special feature on GIMP 2.10 to share with the world all of the amazing new features that will be available. From what limited material I have seen so far, version 2.10 looks outstanding! GIMP Magazine will continue to be absolutely free for everyone to enjoy. And we do appreciate your donations as they help to pay for our operating costs such as web hosting, cloud storage, and so forth. As we move to a monthly magazine we have also made efforts to accept more regular donations by using the popular Patreon system where you can help with the ongoing support of GIMP Magazine. The team at GIMP Magazine proudly presents Issue #6. If you are not already doing so, please follow us on Twitter, Google+, Issue, or by email subscription. Also, tell a friend about GIMP and GIMP Magazine and kindly tweet or blog about us to help spread the word. Enjoy! Cheers Steve http://twitter.com/steveczajka http://flickr.com/steveczajka L E T T E R F RO M T H E E D I T O R g i m p m a g a z i n e . o r g | 4
  • 5. ISSUU HTTP://WWW.ISSUU.COM/GIMPMAGAZINE EMAIL NEWSLETTER HTTP://GIMPMAGAZINE.ORG (CLICK SUBSCRIBE) TWITTER HTTP://WWW.TWITTER.COM/GIMPMAGAZINE GOOGLE+ FOLLOW +GIMP MAGAZINE BIT TORRENT PLEASE SHARE THIS PDF ON BIT TORRENT! WEBSITE HTTP://GIMPMAGAZINE.ORG EDITORIAL TEAM: Steve Czajka, Managing Editor Design & Desktop Publishing Dave Lepek, Contributing Writer / Editing Assistance Rolf Steinort, All things Web Debi Dalio, Contributing Writer / Editing / Submissions Ian Muttoo, Contributing Writer / Photography LEGAL: GIMP Magazine does not take any responsibility, express or implied, for the material and its nature or accuracy of the information which is published in this magazine. All the materials presented in this magazine have been produced with the express permission of their respective authors/owners. GIMP Magazine and the contributors disclaim all warranties, express or implied, including but not limited to implied warranties of merchantability or fitness for a particular purpose. All images and materials presented in this document are printed/reprinted with express permission from the authors and/or writers. The content responsibility lies completely with the contributing writer or the author of the article, and may not be representative of the views of the publisher. This PDF magazine is free and available from the GIMP Magazine website. GIMP Magazine is made available under Creative Commons "Attribution-Share Alike 2.5" license. GIMP Magazine trademark logo is copyright by the owner Steve Czajka. All advertisements are copyright by the respective owners. ADVERTISING: Please visit our website to view our advertising rate card and policies at http://gimpmagazine.org/about . HOW TO CONTACT GIMP MAGAZINE: Website: http://gimpmagazine.org/contact Publication Origin: Mississauga, Ontario, Canada PRODUCTION NOTES: GIMP Magazine was created using Scribus 1.4.1, GIMP 2.6/2.8, Inkscape 0.47. Biondi was used for headlines, Open Sans and Open Sans Condensed for house typography. And we can't forget "the coolest mascot" ever, Wilber, adorning the front cover and various locations! ISSN 1929-6894 (online), ISSN 1929-8498 (print). YOUTUBE HTTP://WWW.YOUTUBE.COM/STEVECZAJKA F O L L O W US g i m p m a g a z i n e . o r g | 5
  • 6. PLACE YOUR AD HERE! FULL PAGE FOR $99 VIA PAYPAL / CREDIT CARD HTTP://GIMPMAGAZINE.ORG/ABOUT
  • 7.
  • 8. g i m p m a g a z i n e . o r g | 8
  • 9. g i m p m a g a z i n e . o r g | 9
  • 10. g i m p m a g a z i n e . o r g | 1 0
  • 11. g i m p m a g a z i n e . o r g | 1 1
  • 12. g i m p m a g a z i n e . o r g | 1 2 AN INTERVIEW WITH AARON TYREE Edited by Debi Dalio Aaron Tyree is a commercial fashion and portrait photographer from Washington State in the U.S. He uses a variety of open source software and innovative low-cost hardware in his work. He is most well known for his images of Devon Jade which were shot using an older Canon 20D with DIY reflectors and were post-processed in GIMP.
  • 13. g i m p m a g a z i n e . o r g | 1 3 SO, AARON, HOW DO YOU GET THE IDEAS FOR YOUR WORK? It really depends on what or who I am shooting. Also, for whom I am shooting. A lot of it is intuitive. With people, I'll just listen and pay attention to little things. When I feel that “click” of seeing who they are, and how they want to be seen, I try to encourage that and capture it. Trust and friendship produce the best images in my opinion. If it's for a commercial client, it's kind of the same thing, but I listen for what their vision is. Once I see it, I throw ideas and impressions out as I go until I get there. It's a fun process. WHO OR WHAT ARE THE BIGGEST INFLUENCES FOR YOU? People and relationships. Those are the big ones. And just stopping to actually look around and be thankful for it. I think when you believe that everything is created and that intention and love underlie everything around you, it changes how you see most things. A camera is really just a copy machine. The art occurs in the intention and framing of how things are seen by the person using it. As far as photographers go, I'd say Zach Arias is a big influence for how he approaches photography, and even life in general. I also like Sue Bryce for her use of light and how she captures emotional connection. Artistically, I am really inspired by Camilla Åkrans. Her composition and color tones are unique. Another inspiration is Chase Jarvis for his total commitment to doing what he does well, and his continual drive to innovate. ART OCCURS IN THE INTENTION AND FRAMING OF HOW THINGS ARE SEEN BY THE PERSON USING THE CAMERA
  • 14. g i m p m a g a z i n e . o r g | 1 4 HAVE YOU EVER TAKEN FORMAL LESSONS OR ARE YOU SELF- TAUGHT? If formal means sitting in a classroom with an instructor, no I've never taken formal lessons. But I have spent a ridiculous number of hours watching CreativeLIVE workshops. I can't say enough about what they are doing there. I've been able to learn from the best people in the world because of these workshops. I practice a lot. I grew up in a very musical family where practice was normal, so daily practice of whatever I am doing is pretty ingrained in how I live. With photography, I'll do mental exercises even when I'm not shooting, like, “If I had to take one photograph within a 50- foot radius of where I'm sitting, what would it be, and how would I do it.” Or, “What is one character trait of the person I'm talking to that I think is beautiful, and how would I photograph it.” It may sound over the top to some, but having spent some years doing things that I didn't love, getting to do something that I do love is a great privilege, and I believe it's worth investing all of yourself to be the best you can be. Gratitude is powerful. WHAT IS YOUR PROCESS FOR CREATING AN IMAGE? Understanding what you want to say is always the starting point. Even if it's just an emotion. If you don't have that, you are going to have a hard time saying anything that will capture anyone's attention. Honestly, I think the best images ask simple questions. “This person is beautiful. Do you agree?” or “Do you see the integrity this person has?” Things like that. Good photographs give the viewer an opportunity to form their own conclusions. Understanding the light and color that you want is second. When I'm outside, I'll always start with light. I'll find a space where the light is doing what I want it to do. Then I'll look for composition. I like simplicity and negative space, so I look for that, or interesting geometry that frames the subject in unexpected ways. Once I have all the technical stuff out of the way, I'll just focus on an emotional connection with the person I'm shooting. In the studio, the process is faster since it's a controlled space. I can set everything up beforehand. I use a lot of reflection and
  • 15. g i m p m a g a z i n e . o r g | 1 5 continuous light in the studio to minimize anything that could draw my attention away from the person I am shooting. After that, it's a matter of brewing some coffee, turning on SomaFM, and setting up an editing environment. GOOD PHOTOGRAPHS GIVE THE VIEWER AN OPPORTUNITY TO FORM THEIR OWN CONCLUSIONS. WHAT IS YOUR MOST MEMORABLE SHOOT? There was a shoot that I did with my stepdaughter Devon in the backyard one day while we were barbecuing as a family. The reason it was so significant is partly because of the events leading up to it. Only three months before, I had made an internal decision to seriously pursue photography after hearing a radio interview. The interview was about shots seen around the world, and had several well-known photographers describing the amazing moments when their images were captured. I had the thought as I was listening that something divine was happening when those shots were taken, like they were being given a gift. Then, as strange as it might sound, I just had this conviction that if the gift that they were getting was not coming from them, then I could receive the same gift. It's a simple thought, but it was just one of those moments where you feel like the air is full of electricity and you are peeking into something beyond yourself. For the next three months I consumed everything I could find about photography. I watched hours and hours of workshops, took notes, and then refined the notes. I did not have a camera at that point, so what I was doing would probably seem pretty silly to some. A photographer without a camera. But my wife had the same sense I did and supported me. I was cultivating a deep vision for what I wanted to say with a
  • 16. g i m p m a g a z i n e . o r g | 1 6 camera when I did eventually get one. After three months I got to a point where I thought, “OK. I can't go much further without a camera.” And I couldn't really afford one at that point. I went into my room, sent up a prayer, and then went outside to greet a friend that had come to visit. Long story short, she had brought a camera with her that she felt like she was supposed to give me. I was pretty silent and emotional for a long time after that. So, when I shot with Devon in the backyard, it was a pretty amazing feeling. I made some reflectors from a silver emergency blanket and used a $5 roll-down vinyl blind that I had gotten from a thrift store as a background. Devon is a beautiful girl. And I kept getting goosebumps as I was shooting her. It's hard to explain. I felt like the images I was seeing in the viewfinder were significant somehow. When I tentatively posted those images online a little while later, the response was beyond anything that either one of us could have expected.. Four months later, those images had been viewed over a million times, and we were both being contacted by magazines and designers. It has taken about a year of very hard work, sacrifice, and some sleepless nights to start seeing those contacts become clients, but I firmly believe those first days were a divine gift. It keeps you humble when what you are doing was given as a gift in the first place. Before getting into photography full time, I did some Linux development. When I built my workflow, I wanted to incorporate what I had learned. Linux is not really viewed as the optimum editing environment by the artistic community, but that is changing. If you are willing to rethink how you do things, and be creative with your workflow, it is incredibly powerful. I use a Debian-based distribution called CrunchBang as a starting template for all of the computers in my workflow. It uses considerably fewer resources than most operating systems, and allows all of the available resources to be used for editing tasks. And because it is so modular, you can build machines to do specific things fairly easily without all the bloat of unnecessary software that comes prepackaged into other operating systems. TOOLS IN TYREE'S WORKFLOW CAMERAS AND EQUIPMENT: • AN ASSORTMENT OF CANON CAMERAS WITH MODIFIED MAGIC LANTERN FIRMWARE • 3500 WATTS OF 5500K CFL LIGHTING AND A VARIETY OF MODIFIERS • 4 LED MINI-PANELS • 2 CREE HIGH INTENSITY LED SPOTS • 1 DIY 600 RGB LED PANEL WITH REMOTE • 1 MULTI-CHANNEL REMOTE SHUTTER RELEASE • NEXUS 7 WITH DSLR REMOTE SOFTWARE: • DEBIAN GNU/LINUX • IMAGEMAGICK • UFRAW-BATCH • AFTERSHOT PRO • GIMP • DROPBOX • OWNCLOUD
  • 17. g i m p m a g a z i n e . o r g | 1 7 DO YOU SHOOT IN RAW MODE? IF SO, WHICH SOFTWARE DO YOU USE TO PROCESS RAW FILES? I always shoot in RAW. The editing options that RAW provides are invaluable. I have done a lot of testing with the RAW editors that are available for Linux. My current RAW editor of choice is AfterShot Pro. It is the fastest and most stable RAW editor that I have come across that runs on Linux. The plugin framework is also pretty good. I wish that it were open source, but I don't think that is currently a priority for Corel. WHY DID YOU CHOOSE TO USE GIMP AND WHICH FEATURES DO YOU USE THE MOST? I won't lie. I started using GIMP because I could not afford Photoshop. But at this point, I prefer GIMP. GIMP is a world-class editing tool. If you are willing to put in the time to learn how it works, it gives you a lot of freedom, and it has very few limitations. It also gives my images a different feel. Lots of people use Photoshop and buy the latest Photoshop actions pack. They use similar methods and get similar results. GIMP produces a different look that I like a lot. As far as which features I use most, I'd have to say modes and masks. Paint and layer modes are dreamy, and there is not much you can't do with clever use of layer masks. WHICH FEATURES WOULD YOU MOST WANT TO SEE IN UPCOMING VERSIONS OF GIMP? As far as I know, both of the features I most want to see will be in version 2.10. These are higher bit capability and script recording. But if we are dreaming big, I would go with an API to directly access a running GIMP instance from a remote device, and the ability to easily choose the location of configuration files. Like a Dropbox folder for instance.
  • 18. g i m p m a g a z i n e . o r g | 1 8
  • 19. g i m p m a g a z i n e . o r g | 1 9 IF YOU COULD GO BACK IN TIME, WHAT ADVICE WOULD YOU GIVE YOURSELF? You are loved. Failure is a perspective that you can change. Feel the fear, do it anyway. WHAT ARE YOUR FUTURE PLANS? Keep learning. Keep dreaming. Keep shooting. Put my work out there. I'm in this for the long haul. FIND AARON TYREE IN THE FOLLOWING LOCATIONS: Personal website: http://aarontyree.com/ Facebook: https://www.facebook.com/AaronTyreePhotography Google+: https://plus.google.com/u/0/104341314301144658678/posts 500px.com: http://500px.com/aarontyree DeviantArt: http://aarontyree.deviantart.com/ Tumblr: http://aar0ntyree.tumblr.com/ ONLINE INSPIRATION AND RESOURCES ZACH ARIAS: HTTP://ZACKARIAS.COM/ SUE BRYCE: HTTP://SUEBRYCE.COM/ CAMILLA ÅKRANS: HTTP://WWW.LUNDLUND.COM/PHOTOGRAPHERS/CAMILLA-AKRANS/ CHASE JARVIS: HTTP://WWW.CHASEJARVIS.COM/PHOTO/PORTFOLIOS-AI_1.HTML CREATIVELIVE: HTTP://WWW.CREATIVELIVE.COM/
  • 20. g i m p m a g a z i n e . o r g | 2 0 AARON’S UPDATE [This article was written several months before publishing. Since the time of writing and the time of publishing we at GIMP Magazine connected with Aaron and he provided the following update. -Ed] A short time after writing this article, a competitive commercial software provider started offering an online subscription. It took me a couple of months to finally give in, but I eventually did. What I have found after using GIMP for years, and now using commercial software for a couple months, is this. If you are interested only in creating art, you do not need commercial software. Yeah, I said it. In fact, in some ways, I think you are better off using GIMP. Ninety per cent of the tools in commercial software can be found in GIMP, and some tools in GIMP cannot be found in Photoshop. Also, the G'MIC project is nothing to scoff at. There are entire industries built around software suites that do what G'MIC does, and in some cases not as well. Between RawTherapee, GIMP, and G'MIC there is so much that you can do that it will take you a long time to bump up against their limitations, if you ever do. And if and when you do, the code is open, meaning you can create the tool you want or you can make a change yourself. As far as why I made this choice, this is my full-time profession, and I won't lie. The way that commercial products work together has saved me so much time its hard to believe. I'm talking about a full day per client in some cases. This is invaluable to me. The commercial software provider has spent a lot of money designing their software to interact well and they have succeeded. There is also the reality that ALL of my peers use this commercial software. I don't mind being different, but some clients expect .psd files at the completion of a shoot, with layers intact. You will get tired of explaining what an .xcf file is, and why it's close to a .psd file, after the first client conversation. There are also a few areas of functionality in the commercial software that allow you to refine images in ways that are just beyond GIMP's current capabilities. I could elaborate on these, but I don't think it matters for the purpose of this article. My point is this. For anyone who is wondering if they are missing out by not using commercial software, consider this. Unless you are pursuing image production and editing as a full-time career, I wouldn't bother with it. That's just my opinion. There is so much you can do with GIMP. Once you start wishing that you could blend a 3dLUT into zone 5 with a smooth gradient to more accurately reflect the tones of a print film pulled by two stops, you know what this means, and you are getting frustrated that you can't do that in GIMP, you might think about switching to commercial software. Until then, enjoy the freedom. ■
  • 21. FOLLOW DAVE LEPEK ON TWITTER @ACCORDING2DAVE WE LOVE PIE AT GIMP MAGAZINE, SO MUCH SO THAT WE ARE DEDICATING AN ENTIRE ISSUE (SPRING 2015) TO PIE. WE ARE ASKING EVERYONE TO SUBMIT THEIR FAVORITE PIE PHOTOS (MACRO, FOCUS BLUR, ANY PHOTOGRAPHIC TECHNIQUE YOU LIKE), PIE GRAPHIC DESIGNS, AND EVEN PIE STORIES OF WHY YOU LOVE PIE. GIMPMAGAZINE.ORG/SUBMISSIONS
  • 22. Meet The GIMP! A Videopodcast about Free and Open Source Graphics Software http://meetthegimp.org
  • 23. FOLLOW DEBI DALIO AT HTTP://PORTRAITS-NATURALLY.BLOGSPOT.COM/ "MASK OF THE COCKATOO"
  • 24.
  • 25. g i m p m a g a z i n e . o r g | 2 5 GERALD SCHENK Title: Toy Toronto Street Description: I like photography as it is the hobby where untalented nerds are able to pretend they can be creative and produce art, while, in fact, it is only sophisticated learning and imitating things learned from the net or books. GIMP is a logical extension to this. Still, the pretence of art is enough for me to be happy about it. This image was made with the Focus Blur plugin by Kyoichiro Suda (http://registry.gimp.org/node/8236). It applies out-of-focus blur based on the value in a greyscale depth-map. Unlike regular blur filters, this plugin also simulates actual lens effects – a point is blurred to a disc with non-uniform density. Using a manually drawn depth map, the shallow depth of field of a close-up shot is simulated, while the object, in fact, is large in real life and is, in its entirety, beyond the hyperfocal distance. Portfolio: http://www.flickr.com/photos/60990146@N02/
  • 26. g i m p m a g a z i n e . o r g | 2 6 JAN-HENDRIK CASPERS Title: Treskowbrücke, Berlin, Germany Description: I'm a software developer and photography is my hobby. I have used "The Gimp" since I started using Linux many years ago. This picture was taken on a foggy night and post- processed with UFRaw and GIMP. Portfolio: http://www.flickr.com/photos/96734916@N05/
  • 27. g i m p m a g a z i n e . o r g | 2 7 SEAN MCLEAN Title: Point Reyes Lighthouse Description: I'm an amateur photographer and technology dude from around Santa Cruz, California. I feel a personal commitment to art and to open source software, especially since Linux changed nearly everything for me in 2000. I process all of my photos with GIMP and usually RawTherapee on either Linux Mint or Xubuntu. This image is a favorite photo of the Point Reyes Lighthouse at Point Reyes National Seashore just before sunset. I shot it using a Canon 7D and a Sigma 17-50mm lens. Processing was done using GIMP 2.8 and RawTherapee on Xubuntu 13.10. The actual workflow included luminance masks in the light, mid, and dark ranges followed by just a little bit of unsharp mask. Portfolio: http://www.flickr.com/photos/55255576@N07/
  • 28. g i m p m a g a z i n e . o r g | 2 8 JEREMY GOOCH Title: Zero-K Mech Description: I work professionally as an interface designer, and I do freelance illustration as well. I enjoy working in a variety of mediums, but lately I have been working primarily in the digital realm. I've been using GIMP since 2008 and I've made it a personal mission to switch to entirely free software to create my artwork, so using GIMP was a natural transition for me. This artwork was created using GIMP 2.6 on Linux Mint 11. Blog: http://jeremygooch.blogspot.com/
  • 29. g i m p m a g a z i n e . o r g | 2 9 GUSTAVO DEVEZE Title: Urban scene... (escena urbana...) Description: I am a visual artist living in Buenos Aires, Argentina. In my work the theme arises from the signs I suggest as a reaction to some day-to-day happenings, which can be an insistent idea or a phrase heard when passing by. In this way I begin to work, starting from the spots, looking for the forms (from the abstract I go towards the formation), and using the techniques of drawing and painting. My images are also occasionally accompanied by a short text. For this image, I used GIMP 2.6 with a graphics tablet (6x8 inches). This image is composed of one layer with the black (lines, planes, and textures), another layer containing the color in Multiply mode, and a third layer with small retouches in Soft light mode. Blog: http://jeneverito.blogspot.com Bobolobo: http://bobolobo.blogspot.com Website: http://www.deveze.com.ar
  • 30. g i m p m a g a z i n e . o r g | 3 0 LUCIANO FREITAS Title: Prometheu, free Description: I'm an enthusiast of open source and free graphic software. As a student of cinema and audio/visual arts, I'm able to do drawings and take photographs, which is very important and useful for me. That's where GIMP, Inkscape, and Blender come into the picture. I used MakeHuman to create and model the human figure, then iluminated and rendered it in Blender, where I made the additional objects (chain and goggles). Afterwards I used GIMP with G'MIC filters and effects.
  • 31. g i m p m a g a z i n e . o r g | 3 1 STEVE CZAJKA Title: Oktoberfest Description: This was authentically hand lettered using a Pilot Parallel calligraphy pen. It was scanned, and post processed using both GIMP and Inkscape. GIMP was used for cropping, curves, background removal, while Inkscape was used for colourization, and a ridges filter. Website: http://flickr.com/steveczajka
  • 32. g i m p m a g a z i n e . o r g | 3 2 STEVE CZAJKA Title: Literary Connection Book Cover Proposal Description: This was authentically hand lettered using a Pilot Parallel calligraphy pen. The digital typeface was completely processed using GIMP. The book cover design options were created using Inkscape, an amazing layout tool. Website: http://flickr.com/steveczajka
  • 33.
  • 34.
  • 35. g i m p m a g a z i n e . o r g | 3 5 USING GIMP FOR PORTRAIT AND FASHION PHOTOGRAPHY A Master Class by Aaron Tyree, Edited by Debi Dalio In the process of learning effective photo editing techniques, I heard the following many times: “There are a lot of ways to edit photos, but if you want to achieve professional-level results you really have to use 'such and such' software.” Through trial and error I've come to the conclusion that while this can be true in some cases, it is most often not true. It greatly depends on your goal. If you want to shoot and edit photos for massive billboards, you will need very specific software. On the other hand, if your goal is to shoot and edit great photographs for yourself or for clients, your software selection is considerably less limited. When I started pursuing photography professionally, it was suggested to me by many photographers that GIMP was somehow restrictive in its photo editing capability. This is simply not true. I believe their remarks were a result of not having access to good information on how to interact with the incredibly powerful set of tools that GIMP contains. This tutorial is an attempt to provide a “base system”, so to speak, for developing a personal editing style. It is a result of studying the editing techniques of many photographers and translating the tools that I saw commonly used into my GIMP workflow. I use GIMP on the majority of the images I produce. I have chosen not to go into great detail with each filter, tool, or technique by covering all of their capabilities. I will, instead, be focusing more on what I seem to use most often. This tutorial assumes two things: 1. That you know how to get a good exposure in camera. 2. That, if you shoot RAW, you can use the RAW editor of your choice to make adjustments, then export the image to GIMP. We will start at the point of having imported an image into GIMP. I will be covering the following in GIMP 2.8: • iWarp • Wavelet Decompose • Cloning and Healing • Spotlighting • Curves • Unsharp MaskBEFORE AFTER
  • 36. IWARP iWarp is a transform tool that allows you to move, shrink, grow, and otherwise bend the pixels within an image to your will. There is no shortage of controversy surrounding the use of this tool thanks to its overuse in fashion magazines. For me, the purpose of iWarp is to make subtle adjustments to perspective anomalies in an image, not to make every woman look like Jessica Rabbit. iWarp should be used sparingly, as it is quite obvious when it's used too liberally. You can find this filter through Filters > Distorts > IWarp. Figure 1. The filter settings I use most frequently are the Deform Modes shown in box 1. They are Move, Grow, and Shrink, which allow you to stretch, expand, and shrink parts of the image by dragging the mouse on the preview image. The variable settings shown in box 2 adjust how the Deform Mode affects the image. The Deform radius defines the radius, in pixels, of the filter action circle around the pixel pointed to by the mouse. The Deform amount sets limits on how much the area can be deformed in relation to surrounding pixels. The Bilinear option improves the relationship between affected pixels, resulting in a smoother appearance of the affected area. For this particular adjustment, I have selected a deform radius of 72, and have left all the other settings at their defaults. The deform radius is the primary adjustment that I find myself using, often leaving all others in their default state. Figure 2. In this example image, iWarp has been used to remove the bulging of the arm where it is pressed against the leg and the bulging of the upper arm where it is pressed against the rear wall. The adjustments are subtle, which is the goal. For a more in-depth description of iWarp's controls, visit http://docs.gimp.org/en/plug-in-iwarp.html. WAVELET DECOMPOSE One of my very least liked things in fashion and portrait images is over-edited skin where the result looks something like polished latex. The Wavelet Decompose filter in GIMP is a great way to avoid this. Wavelet Decompose losslessly decomposes a layer of an image into layers of wavelet scales. Or, more simply put, it separates the detail of an image into multiple editable layers with detail levels progressing from fine to coarse. This allows you to remove coarse detail while leaving fine detail undisturbed. I use Wavelet Decompose primarily for skin retouching. The benefit is that pores and other common skin details are contained in the finer detail layers, whereas larger blemishes are contained in the larger grain detail layers. This means you can erase imperfections while leaving pores and fine textures unchanged. To use Wavelet Decompose, you must first download it from the GIMP Plugin Registry at http://registry.gimp.org/node/11742 and install it in your GIMP 2/lib/gimp/2.0/plug-ins folder. If you are using Windows and would prefer to use a tool that helps you install plugins (plus provides a wide variety of plugins), you can download the GIMP Extensions Pack for Windows from http://registry.gimp.org/node/27656. For Mac users, Simone Karin Lehmann does some great builds for Mac with many extra filters and plugins compiled in. You can find her work at http://gimp.lisanet.de/Website/News/News.html. Once the Wavelet Decompose plugin is installed, you can find it through Filters > Generic > Wavelet decompose. Figure 3. Wavelet Decompose has a control dialog that pops up when you select it. The default settings and number of detail layers are usually sufficient. When you click OK, the currently active layer is separated into five layers of detail, with layer 1 being the most fine and layer 5 being the most coarse, plus a residual layer of everything that's left over. The majority of skin imperfections that photographers will desire to remove are now contained in Wavelet scales 4 and 5. You can either use the Eraser tool to remove unwanted details in each layer, using the eraser's opacity to control the level of removal, or use the method that I prefer. I like to create a layer mask by right-clicking on “Wavelet scale 5” and selecting Add Layer Mask. g i m p m a g a z i n e . o r g | 3 6
  • 37. g i m p m a g a z i n e . o r g | 3 7 Figure 4. I initialize the Layer Mask to “White (full opacity)”. Figure 5. Painting on the layer mask with black will reduce detail based on the opacity of the paintbrush. A bonus of using Wavelet Decompose is that you can also use it to sharpen areas of an image. You will notice that under the Wavelet scale layers is a layer called “Wavelet residual”. Since all of the detail of the image is contained in the Wavelet scale layers, the residual layer is essentially “not detail”. By erasing parts of this layer, you are effectively removing “not detail” and leaving only detail. This means you can easily sharpen selected areas, such as eyes, or bring out line details by tracing along them. You can control the amount of sharpening by adjusting the opacity of the eraser tool. More opacity equals more sharpening, less opacity equals less sharpening. Experimentation is the best way to learn how to use this filter, and, with some familiarization, the end result can look like the right-hand side of this before and after image: Figure 6. CLONING AND HEALING If you do portrait and/or fashion photography, you’ll find that the Clone and Healing tools are your friends. For removing little blemishes from skin, the Healing tool is the way to go. And for lightening circles under the eyes, the Clone tool is hard to beat. When using these tools, I rarely use anything other than a circular 50% hardness brush. You can get all intense about which brush to use for which situation, but, in practice, I find that it’s rare for me to change my brush selection. But, of course, you should develop your own style. THE CLONE TOOL Figure 7. The Clone tool uses a brush to copy from one area of an image and paint over another area. This tool has a multitude of uses. You can remove people from the background of an image, remove stray hairs, and so forth. This example demonstrates one method of using the Clone tool to lighten dark circles under the eyes. Figure 8.
  • 38. g i m p m a g a z i n e . o r g | 3 8 You can see by the square in the first image the area that I wish to lighten. In the next image, the first circle is the selection area that I will be cloning from. The second circle is the area where I will be cloning to. The last image is the end result. The Clone tool looks like a rubber stamp with a handle (Shortcut: C). You mark the area you wish to clone from by holding down the Ctrl key and left-clicking on the image at a point that you want to copy. In this case, I selected a skin area that is light compared to the dark area I wanted to lighten. For a more subtle lightening effect, I changed the Clone tool’s opacity to 10%. Once I had selected an appropriate brush, all that remained was to paint over the destination area. THE HEALING TOOL The Healing tool is similar to the Clone tool, but with one significant difference. While the Clone tool copies pixels from one area and replaces the pixels in another, the Healing tool copies pixels from one area, then blends them with the pixels in another. The result of healing can be smoother in appearance than that of cloning, and is usually the best way to remove blemishes from skin. Figure 9. In the above image, box 1 is the Healing tool icon, which looks like crossed bandages (Shortcut: H). Circle 2 is the sample area and circle 3 is the area I want to heal. I set the opacity much higher with the Healing tool that with the Clone tool because of how it blends with the surrounding pixels. Before and after: Figure 10. SPOTLIGHTING This is more of a technique than a tool, but I have found myself using it more and more to enhance the feeling and lighting in an image. Essentially it consists of creating a transparent layer, creating a radial gradient on the new transparent layer over a specific area of an image that you want to lighten, then changing the layer mode to Soft light. From there you can change the layer’s opacity to adjust the intensity of the “light”. Using this method, you can enhance existing lighting or even simulate another light source in some cases. I’ll walk through the steps. 1. Create a new layer and, when prompted, select Transparency for the layer type. 2. Select the Blend tool. (Shortcut: L) Figure 11. 3. In the Tool Options dialog for the Blend tool, set the Blend Mode to Normal, set the Gradient to “FG to Transparent“, and set the Shape to Radial. Figure 12. 4. Make sure your foreground color is set to white, then, on the newly created transparent layer, put the cursor where you would like the light to be centered. Left-click with your mouse and hold. Pull the cursor away in any direction until you reach the edge of where you would like the light to be, then release the mouse button. The result should look similar to this:
  • 39. g i m p m a g a z i n e . o r g | 3 9 Figure 13. 5. Now, using the drop-down Mode menu at the top of the Layers dialog, change the mode of the layer from Normal to Soft light. Use the layer Opacity slider to adjust the amount and intensity of the light. Before and after: Figure 14. Figure 15. There is another way that I use this technique regularly. Rather than using the Dodge tool to lighten eyes, I create a transparent layer, select a round 50% hardness brush, and reduce the size of the brush so that I can paint with white directly over the whites of the eyes. Figure 16. By changing the layer mode of this transparent layer to Soft light, I can control the lightness of the eyes by adjusting the layer's opacity. I prefer this to dodging and burning since a soft light adjustment from the layer above seems to leave the pixels of the image looking more natural. These are just two uses for the technique of painting or laying color on a transparent layer and changing the layer mode. By experimenting with gradient shapes and various colors you can come up with interesting effects. You can simulate light flares, change and augment colors, darken and lighten specific areas, and so forth. CURVES In the photo world right now, filters are all the rage. Instagram, the majority of online editors, and even most Photoshop actions have contributed largely to this trend. What you may not know is that many of these filters are just a manipulation of Value and RGB curves. Contrast, color toning, and white and black point adjustments can all be accomplished with curves. This topic could take up its own lengthy tutorial, but I’ll attempt to offer a simple example to get you started. Select Colors > Curves to open the Curves dialog. Figure 17.
  • 40. g i m p m a g a z i n e . o r g | 4 0 Click on the Channel drop-down menu and you will see five options: 1. Value 2. Red 3. Green 4. Blue 5. Alpha We will focus on Value, Red, Green, and Blue. The Value curve is fairly straight forward. If you were to convert your image to black and white, every pixel in the image would be some value between black and white. The Value curve adjusts the blacks and whites of your image, plus all of the greys in between. By selecting any point on the line, you can move that point up or down, and make it more white or more black. On the left, the point at the bottom represents black and affects the darkest parts of your image. On the right, the point at the top represents white and affects the lightest parts of your image. By moving the black point on the bottom left upward, you will be lightening shadows. By moving the white point at the top downward, you will be darkening the highlights. So again, by selecting any point on the diagonal line, and moving it up or down, you will lighten or darken that Value in the image. Color curves are similar, but operate slightly differently. To understand how they work, think not only of red, green, and blue, but also their opposites. When you look at colors on a color wheel, red is opposite cyan, green is opposite magenta, and yellow is opposite blue. Figure 18. With color curves, moving a point on a curve up will increase that color. Moving a point on the curve down will increase its opposite. For example, with the Red curve selected, if you want more red in the image, drag the curve up. If you want more cyan in the image, drag the red curve down. For the green curve, up means more green, down means more magenta. And for the blue curve, up means more blue, and down means more yellow. That is reasonably simple. But you need to put both concepts together to understand how to use curves well. Simply put, when using a Red, Green, or Blue curve, if you want to adjust a color in the shadows, then move the curve up or down near the bottom left where the curves affect the darkest part of the image. The middle of the curve will adjust the midtones. If you want to adjust a color in the highlights, move the curve up or down on the top right, where the curve affects the lightest part of the image. Figure 19 In this image you can see that I lightened the shadows a little using the Value curve, added some blue to the shadows using the Blue curve, added magenta to the midtones by pulling the Green curve down, and finished by adding a little red to both the shadows and midtones. This will, of course, require experimentation, but as you grasp how the various curves work, you will realize that a whole lot of the editing that is commonly done to an image can all be accomplished in the Curves dialog. UNSHARP MASK I often wait until the end of an editing session to sharpen an image, and only sharpen when the image is at its final resolution. There are differing opinions on this, but it is what I find myself doing most often. The sharpening method that is pretty much my go-to is Unsharp Mask. Unsharp Mask essentially uses layers, Gaussian blur, and color inversion to enhance borders in an image. It gives the image a sharper appearance without using sharpening methods that increase image noise. As with all editing techniques, preferred methods are subjective, but I find that I prefer the look of Unsharp Mask to most other sharpening methods. The Unsharp Mask filter that comes with GIMP is very functional. You can find it at: Filters > Enhance > Unsharp Mask You will be presented with this dialog box: Figure 20.
  • 41. g i m p m a g a z i n e . o r g | 4 1 There are three primary options for this filter: Radius, Amount, and Threshold. Amount is fairly self- explanatory. It indicates how much emphasis is to be used on borders. I'll focus here on the Radius and Threshold sliders. The simplest way to understand Radius is to first understand what is meant by a border. Borders are noticeable color and value transitions in an image. Simply put, the edge of a dress, or the transition from iris to pupil in an eye, is a border. Since Unsharp Mask emphasizes borders, Radius is essentially how many pixels away from the border you want that emphasis to be noticeable. Figure 21. As a visual example, you can see how the border of the grey bars will be emphasized in white. This is with a fairly low radius. Figure 22. You can see here that the grey bars now have a white gradient around their borders that extends further than in the first image because the Unsharp Mask filter radius has been increased. So, by adjusting the radius of the unsharp mask, you will increase or decrease how far away from the border the emphasis extends. Threshold is a bit simpler. In practical terms, Threshold controls the filter’s sensitivity to borders. So if you want to emphasize the borders of the eyes or the lips, for example, but don’t want to emphasize the borders of subtle transitions in the skin, then raising the threshold will decrease the filter's sensitivity to border transitions in an image. If you want detail emphasized in every little pixel, then lowering the Threshold will increase the filter’s sensitivity to border transitions. There is technically more to it, but this generalization will give you a practical working understanding of how to use it. If you would like to dig deeper, you can find a technical description here: http://docs.gimp.org/en/plug-in- unsharp-mask.html. The default slider settings for Unsharp Mask are very usable in most instances, but experimentation is always recommended. Here is one final recommendation when using Unsharp Mask. Before using it, separate your image into HSV layers (hue, saturation, and value), and apply the Unsharp Mask to the Value layer. The value layer simplifies all of the borders in an image by getting color out of the way. The edges seem a little sharper, and there seems to be less noise in the final image. To separate an image into HSV layers, choose Colors > Components > Decompose, change the Color model to HSV, and click OK. A new window will open with your image separated into Hue, Saturation, and Value layers. Make sure the Value layer is selected, then apply the Unsharp Mask filter to it. After sharpening, choose Colors > Components > Recompose and GIMP will recompose the three layers back onto the layer from which you did the decompose. So there it is. For better or for worse. I hope that with some experimentation you will find using these image adjustment steps helpful, and will be pleased with the results you get. Happy editing! ■
  • 42.
  • 43.
  • 44. • YOUR BEST PHOTOGRAPHY POST PROCESSED IN GIMP / UFRAW ETC. • YOUR MOST AWESOME GRAPHIC ART DESIGN CREATED IN GIMP • YOUR GIMP TUTORIALS • YOUR TIPS & TRICKS • YOUR LIST OF FAVOURITE GIMP RESOURCES (WEBSITE URLS) • YOUR NEW COOLEST SCRIPTS AND PLUGIN DESCRIPTIONS • YOUR OTHER OPEN SOURCE SOFTWARE REVIEWS • YOUR FAVOURITE HARDWARE REVIEWS • AND YOUR MOST REQUESTED FUTURE GIMP UPGRADES / FEATURE REQUESTS WANT TO MAKE THE COVER OF GIMP MAGAZINE? We need your help to contribute to this magazine! Promote your amazing works with GIMP or related open source graphics software to the world. SUBMIT AN IMAGE FOR OUR DESIGN / PHOTOGRAPHY GALLERY Visit http://gimpmagazine.org/submissions and fill out the form at the bottom of the page. SUBMIT A SUGGESTION Email us at GIMPMagazine at hotmail dot ca with the details. You can also follow us on Twitter at www.twitter.com/GIMPMagazine or on Google+ name GIMP Magazine. WANT TO JOIN THE GIMP MAGAZINE TEAM? Have you researched stories, interviewed people, and written articles? Are you a digital artist or photographer? Do you have a passion for GIMP or related open source software? Let us know by sending us an email with your credentials and interest to http://gimpmagazine.org/contact. INTERESTED IN ADVERTISING WITH US? We are considering publishing corporate advertising in upcoming issues. We are looking for organizations from the following areas who are interested in reaching potentially millions of interested GIMP users: • Specialty computer hardware, printers, monitors, pen tablets, etc. • Specialty cameras, lenses, filters, lighting, accessories, etc. • Specialty print and imaging services • Stock photography, textures, font collections, etc. • Artists, photographers, models, creatives, etc. • Software / photography / graphic design courses, conferences, etc. • Specialty software filters, plugins, apps etc. • Instructional books, DVDs, videos, etc. Our Advertising Rate Card can be found at http://gimpmagazine.org/about S U B M I S S I O N S g i m p m a g a z i n e . o r g | 4 4
  • 45. WANT MORE TIPS & TRICKS? SUBSCRIBE TO OUR YOUTUBE CHANNEL HTTP://YOUTUBE.COM/STEVECZAJKA