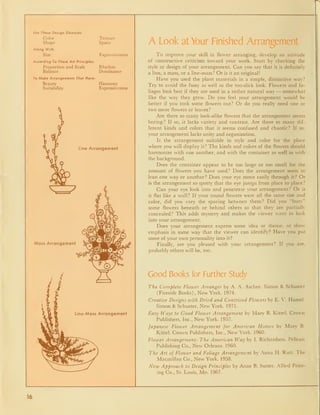
Q.630.7
It6c
no.1154
cop. 5
CORE Metadata, citation and similar papers at core.ac.uk
Provided by Illinois Digital Environment for Access to Learning and Scholarship Repository
Digitized by. the lr;iternet Archive
in 2611 Withfaffding from
University of Illinois Urbana-Champaign
http://www.archive.org/details/flowerarranging1154culb
Flower
Arranging
University of Illinois at Urbana-Champaign
College ofAgriculture
Cooperative Extension Service
Circular 1154
CONTENTS
Selecting Your Plant Materials .... 3
Cutting and Care of Plant
Materials 5
You Will Need Some Containers . . 6
Use the Right Kind of Holder 7
Line Arrangenients 8
Mass Arrangements 10
Line-Mass Arrangements 12
Now Let's Look at Art Principles. . 14
A Look at Your Finished
Arrangement 16
Good Books for Further Study . ... 1 6
This circular was prepared by
JOHN R. CULBERT,
Professor of Floriculture.
Issued in furtherance of Cooperative Ex-
tension Work, Acts of May 8 and June
30, 1914, in cooperation with the U.S.
Department of Agriculture. JOHN B.
CLAAR, Director, Cooperative Exten-
sion Service, University of Illinois at
Urbana-Champaign. The Illinois Cooper-
ative Extension Service provides equal
opportunities in programs and employ-
ment.
20M—1-78—39333—$s
A RRANGiNG FLOWERS glves you a chancc to participate in an art
_£. activity, to express yourself creatively, and to make your home
or room more livable and attractive.
You make a flower arrangement whenever you place selected
flowers and foliages into a container according to plan or design.
Roses casually placed in a vase are attractive because of their beau-
tiful color and shape. These same roses are even more appealing
when arranged in a stylish way.
Most flower arrangements are made for a certain purpose or
place. An arrangement for the dining table, for example, should be
of a size, color, and shape that will harmonize with the table setting.
Besides being beautiful and suitable for the occasion or place, a good
flower arrangement should be expressive of some theme or idea and
of your own personality.
As a flower arranger you are participating in an art form. The
chief diff"erence between flower arranging and the other arts is the
medium. Our medium is plant material. What paint is to the painter
and clay is to the potter, flowers and foliages are to us. Our medium
is alive and will die quickly unless given proper care (page 5).
In choosing plant materials you must consider their color, shape,
texture, size, space, and expressiveness (pages 3 and 4). These are
the visual characteristics or design elements of all objects. For exam-
ple, a rose could be described in this way: yellow with green leaves
and stem; round and halfway open with spaces between the petals;
3 inches wide and 2 inches deep; straight stem 12 inches long; vel-
vety texture; and expressive of your best wishes on your mother's
birthday.
Next you must decide on the style or design for arranging your
plant material. Three general styles — the line, the mass, and the
line-mass — are in use today. They are described and illustrated on
pages 8 to 13. In selecting a style, consider the place where the ar-
rangement will be used or the occasion for its use. The shape of the
container may give you ideas. Your greatest inspiration, however,
should come from the plant material itself. Let its shape, the way
it grows, or the combination you choose suggest the right way to
use it.
There is no end to the many possible variations of the three basic
styles of flower arranging. Look for ideas in books (some are sug-
gested on page 16), magazines, flower shows, florists' windows, and
arrangements made by your friends. Then use your own imagination
to create new arrangements that will express your ideas and per-
sonality.
As you finish your arrangement, take a critical look at it. Some
of the questions you may ask — and answer ^
— are on page 16. If
you are pleased with it, you will want to know why. If something
seems not quite right, you will want to know what is wrong and how
to correct it. To help answer the why, what, and how, study the
principles underlying the art of flower arranging on jiages 14 and
15. In your next arrangement begin to make these principles work
for you.
KCr)X
"C5^
Selecting Your Plant Materials
Success in flower arranging starts with your skill in selecting
plant materials that will be suitable for the particular arrangement
you want to make. Here are some of the things to think about —
the design elements — when choosing flowers and foliages:
Color. Consider the hue of the color — red, yellow, blue, for
example. The names around the color wheel at left are hues. Next.
check the value of the color: Is it light or dark? Then clieck the
intensity, which can vary from bright to dull. Some colors are wann
— yellows and oranges, for example: others, like blues and violets,
are cool.
For your first arrangement select all warm hues or all cool hues.
^'ou may want to use related hues — for example, yellow, yellow-
orange, and orange; or blue, blue-violet, and violet. In such a color
scheme, use most of one hue. least of another, and an in-between
amount of the third hue. Or you may choose a scheme with one
kind of color, such as all yellows or all greens. If you use only one
hue, make sure to select plant materials of different shapes, sizes,
or textures.
Later you may want to try a complementary color scheme. You
can obtain dramatic contrasts by combining red and green, violet
and yellow, or any other two hues that are opposite each other on
the color wheel. One of the comf^lcmentary hues should be lighter
in value than the other, and one should be brighter than the other.
U.se more of one hue than of the other.
Flower colors should harmonize with one another, with the con-
tainer, and with the background — such as a tablecloth — against
which the arrangement will be displayed.
Size. Select flowers and leaves of different sizes. Use the buds
and small flowers and leaves at the top and edges of the arrange-
ment; place the large leaves or fully opened flowers low in the
arrangement.
Shape. Study the many shapes of flowers, leaves, and stems.
Plant materials are put into three main groups according to their
shape
Spiky or linear shapes
(These are best for line and line-mass arrangements; they set directions
and cause a feeling of movement; they are often used to form the skeleton
of the arrangement.)
Leaves and stems
Twelve-Hue Color Wheel
Spiky or Linear Shapes
Sour Dock
Banana
Gladiolus
Flowers
Delphinium
Gladiolus
Larkspur
Mullein
Snapdragon
Sour dock
Cattails
Cornstalks
Gladiolus
Grasses
Iris
Pussy willow
Yucca
Twigs and branches
Fruits and vegetables
Banana
Green beans
Green onions
Okra pods
Rhubarb stalks
Mass or Rounded Shapes
Daisy
Rose
Apple
Tomato
Spray or Filler Shapes
Elderberry
Huckleberry
I
Mass or rounded shapes
(These are best for line-mass or mass arrangements; as focusing shapes,
they may be used to develop the focal point in line-mass arrangements;
or they may make up almost all of a mass arrangement.)
Flowers Leaves Fruits and vegetables
Chrysanthemum Geranium Apple
Daisy Hen and chickens Lemon
Iris Hosta (plantain lily) Onion
Marigold Magnolia Orange
Rose Salal (lemon) Tomato
Zinnia Violet Turnip
Spray or filler shapes
(These are best for mass and line-mass arrangements; use them as back-
ground materials and as space fillers in mass arrangements; prune and thin
them before using in line-mass arrangements.
)
Flowers Leaves Fruits and vegetables
Ageratum
Baby's breath
Corn tassels
Goldenrod
Mustard
Asparagus
Ferns
Huckleberry
Parsley
Pine
Bunch of grapes
Cluster of crab apples
Elderberry
Pompon chrys anthemum Juniper
Texture varies not only with the feel of the plant surface, but
also with the arrangement of the petals or florets. Here are some
examples of different textures in plant materials
:
Texture Plant material
Airy
Dense
Hairy
Prickly
Shiny
Velvety
Spray of baby's breath
Zinnia flower
Leaf of African violet
Seed head of sandbur or thistle
Lily petal
Rose petal
Space. As you select flowers and foliages, notice that they are
not like solid apples, but that there are spaces between the flowers
of a spray of baby's breath, for example, and between the petals of
a daisy. You can look inside a tulip or through an iris flower. A
leafy branch has odd-shaped spaces of different sizes. You may select
certain flowers or leaves just because of their spaces. As you place
the flowers and leaves in the container, you create spaces of various
sizes and shapes. Spaces are often as important as the flowers or
leaves.
Expressiveness. Through your selection of flowers and leaves
you may express a mood, idea, or sentiment. For example: daffodils
and pussy willows suggest spring; cattails make you think of a
swamp; white roses are elegant and fomial; sunflowers are casual
and suggest summer; red roses may say "I love you."
Try to name your finished arrangements, or perhaps name them
first. Some names are Morning Mist, Day Dream, Candid Camera,
Lost in a Swamp, Day at the Beach, By the Roadside, Joy, Peace,
Spring Song, A Friend.
Remove Leaves Marked "X'
Hot Water — 100-110° F
(or hot as your hand can stand)
Make Fresh Cut With Sharp
Knife Just Before Placing
in Holder
Cutting and Cnre of Plant Materials
When, what, and how to cut. 1 he best tinu- to cut flowers is
in late afternoon, when the plants contain the most stored foods.
The next best time is in early morning, when water content is at
its highest. Most flowers last longest if cut when almost fully open.
Many tight buds or young leaves wilt rapidly and will not take uj)
water. But some flowers keep best if cut in the bud stage or when
they are just beginning to open. These include daffodil, iris, lily.
peony, poppy, and tulip. Fully open or faded flowers are already
old and often do not keep well.
Before cutting any flowers or foliage, plan the arrangement in
your head, or sketch it on paper. Cut the stems with a sharp knife
or shears. The stems should be longer than you will need. Remove
all leaves from the lower part of the stems.
Care before arranging. After you bring the flowers into the
house, remove all leaves that would be under water in the container.
Also keep the flowers out of water. Leaves and flowers will rot in
water, and the plant cells will become clogged with bacteria, pre-
venting water from moving up the stems.
After removing the leaves, cut an inch ofT the stems, and imme-
diately put them in water almost as hot as your hand can stand. The
water should be about half as deep as the stems are long. Make
sure the water containers have been thoroughly washed.
Various floral preservatives are available from your florist. For
best results, cut the stems and place them at once into a hot preser-
vative solution. Properly used, preservatives will extend the life of
the flowers for one or more days.
Store flowers and foliages in a cool, humid place, out of the
sun, and away from drafts. Do not store with fruits, vegetables, or
decaying flowers or leaves; these give off ethylene which shortens
the life of many cut flowers. Wait until the plant materials feel stiff
before you arrange them.
Care when arranging. The container should have been thor-
oughly washed since its last use. Fill it with water before you start
to arrange the flowers. You may add a floral preservative if you
wish. Using a sharp knife or shears, make a fresh cut on each stem
just before you put it in the container. Leave stems in water until
you use them. Do not let the plant materials lie around on the table
to dry out. Handle the flowers by their stems. Your hands are hot!
Care of arrangement. Place the arrangement out of the sun and
away from drafts, hot air ducts, and radiators. At night, put it in
a cool place to prolong the life of the flowers. Keep the container
full of water; check this daily. Change the water occasionally. When
you do this, you may w-ant to rearrange the flowers. When rear-
ranging, be sure to remove at least 1 inch from each stem.
For Line Arrangements
For Mass Arrangements
For Line-Mass Arrangements
(also some line OR mass arrangements)
You Will Need Some Containers
Almost anything that will hold water may be used as a container.
The important thing is to select a size, shape, color, and material
that will harmonize with the plant materials and with your home
and furniture. Even skilled arrangers cannot make good arrange-
ments in unsuitable containers.
Size. The container should be in scale with the table on which
it is displayed. A vase 3 feet tall, for example, is too large for a 2-
by 4-foot coffee table. Remember, the larger the container, the more
flowers are required. Small or medium-sized containers are most
useful. Allow about two-fifths of the overall size of the arrangement
for the container.
Shape. Some good shapes for containers are illustrated at left.
Suit the shape to the design of the arrangement. Simple shapes with
clean lines are best. Avoid those in the form of animals, heads,
pianos, etc., except for special occasions.
Color. Tans, browns, grays, and greens are useful colors, har-
monizing easily with plant materials and with most backgrounds.
White containers call attention to themselves and are often difficult
to use effectively.
Materials. Pottery containers, ranging from rough bean pots
to delicate china vases, are the most frequently used. Many vege-
table dishes, cereal bowls, and sugar bowls make good flower con-
tainers.
Glass containers, like pottery ones, can be thin and dainty — or
thick and sturdy. They can be clear or colored ;
plain or cut and
fancy. In using clear glass, remember that stems and the holder
will be seen.
Metals suggest strength. Copper, bronze, and brass are the most
versatile. Aluminum and stainless steel are modern; iron suggests
weight.
Baskets with liners to hold water come in many shapes and are
excellent for mass or naturalistic arrangements. Most plastic con-
tainers are too light in weight.
Expressiveness and harmony. The spirit of the plant material
and container should go together. Pussy willows and daffodils are
happy in brown or green pottery but not in an elegant silver bowl.
Remember that the plant material and how you use it are more
important than the container. Art objects should be displayed and
admired for themselves and not used as containers for flowers.
I
Pinpoints
For Line Arrangements
Stick Stems on Pins
or
Wedge Between Pins
Clay
Chicken Wire
For Mass Arrangements
Wedge Stems in
Layers of Wire
Floral Foam
For Line-Mass and Mass
Arrangements
^y Add Water
Here
Insert Stem
to Bottom
of Container
Use the Right Kind of Holder
A good holder should give you freedom to place the stems where
you want them and then hold them there securely. Choose a holder
to suit the style of arrangement you plan, the plant materials, and
the container. These kinds are recommended :
Pinpoint holders are best for line or line-mass arrangements in
low bowls or shallow pedestal containers. Fasten the holder securely
to the clean, dry container with waterproof floral clay such as Posey
Klay or Cling. Stems are stuck directly onto the pins or are wedged
between them. To put thin stems on a pinpoint holder, bind several
to each other or to a larger stem with a rubber band, string, or floral
tape. Thick woody stems are easier to insert if you split the ends.
Chicken wire or floral netting of 1-inch mesh, preferably enam-
eled green, is excellent for mass arrangements in vases or deep bowls.
Fill the entire container with the chicken wire and extend it an inch
or so above the top. Crush, roll, and form the wire so that each stem
will pass through at least three layers of meshes or wires. Wedge the
wire securely into the container before you start arranging. A pin-
point may be used beneath the chicken wire to hold vertical stems
precisely in place. Crisscross wires beneath the pinpoint before it is
mounted. Then run these wires through the pre-formed chicken wire
and twist them together to hold the chicken wire in place.
Floral foams, such as Fill-Fast-Foam, Oasis, and Quickee, hold
stems in place and supply water to the flowers. They may be used
for some line arrangements but are best for line-mass or mass ar-
rangements. Soak the material in a pail of water until it barely
floats. Cut a piece to fill the container and force it into place. Then
cut a corner off the material so that you can fill the container with
water and can add water later as needed. Insert stems to the bottom
of the foam. Do not pull a stem part way out after inserting it, for
this may remove the stem end from contact with the water or foam
and the flower may wilt. When you use heavy flowers with large
stems, such as gladiolus, cut a piece of chicken wire slightly larger
than the container top and place it securely over the foam.
The new floral foams Sahara and Bar-Fast are excellent holders
for dried plant materials, but do not use them for fresh materials.
Pinpoints are also good for dried materials. Styrofoam should only
be used as a holder for artificial flowers and leaves which have stiff
 ire stems. Do not use for fresh flowers.
Conceal the holder by bringing some of the flowers or foliage
down over it. Sometimes pebbles or other natural materials have to
be used to conceal pinpoint holders. Place these materials in a natu-
ral way so they do not attract attention.
Line Arrangements
Line arrangements are adaptations of Japanese styles. The linear
quality of a few branches, leaves, or flowers is emphasized to produce
a clean-cut, sparse look. The spaces between the plant materials are
nearly as important as the materials themselves. Color is of less
concern than line, shape, space, and expressiveness.
Successful line arrangements develop a dynamic feeling of ac-
tion, movement, life. At the same time, the spaces stimulate con-
templation and imagination in the viewer. Line arrangements en-
courage creative experimentation and originality because they are
based on the natural lines and spaces of the plant material and do
not copy stiff geometric designs.
Many line arrangements have three lines or placements. Often
all three lines are of the same material, but you may select one kind
of material for two lines and another for the third. Although this
third placement may be fuller and more colorful, it must not detract
from the strong linear effect. To avoid the cluttered look, remove
leaves of flowers that interfere with the main lines, which are often
slender, thin, and flowing. Select thicker, fuller materials to develop
a strong, sturdy effect. Do not feel restricted to three lines or place-
ments. Try arrangements with two lines or five or seven. Study plant
materials and use them as they grow. As you make many line ar-
rangements, you will begin to develop your own free-style or free-
form designs.
Most linear arrangements have asymmetrical balance; that is,
one side is different from the other. They are to be viewed only
from the front. Allowing some materials to extend toward the front
and some toward the back usually develops considerable depth
(third dimension). Line arrangements may be tall in relatively
small containers and still have good balance since so little material
is used. Most have vertical movement, but tr>' diagonal, circular, or
horizontal rhythms.
Pinpoint holders are best. Low. flat bowls, compotes, or pedestal
bowls are good containers. Vases may be used if the pinpoint is
mounted near the top by filling the vase almost full of sand or fine
gravel.
To achieve the desired natural effect, place all the stems close
together on the pinpoint. Let the stems start out together and extend
in the same direction for several inches before branching out. Try
to select materials that have just the curves you want.
How to bend stems or branches. You can bend straight stems
if you have patience. Trim off unwanted side branches and leaves.
Then hold the branch with both hands, thumbs touching under-
neath the stem, and fingers grasping the stem above the thumbs.
Press down gently with your fingers and push up with your thumbs
at the same time. Move hands toward the ends of the stem slowly
to avoid breaking. Repeat many times to get the curve you want.
Soak stiff woody stems for several hours before bending, then fasten
them to a board in the desired position until they dry.
8
Branch Before and
After Trimming
Arrows
ndicate
Facing
Top View
Making a Line Arrangement
Plant materials needed. Two long branches and a few short
branches of a shrub, tree, or evergreen (such as burning bush, flo-
rist's huckleberry, honeysuckle, privet, yew, etc.). Three to seven
small round flowers of various sizes (such as chrysanthemum, mari-
gold, zinnia, etc.)
Container. A low bowl, which may be round, oval, square, rec-
tangular, or free form in shape.
Holder. A pinpoint is best. A small block of floral foam may be
used, but it may fall over unless wedged in place.
Procedure. Mount the pinpoint with floral clay in the center or
slightly back of the center of a round container. Mount the holder
back of center and toward the left back corner of containers of
other shapes.
Select branch one for its graceful upright curve; its length should
be approximately three times the width of the container. If there is
any doubt about the right length, choose a slightly longer branch.
Select branch two to somewhat repeat the curve of branch one.
Branch two should curve to the left and then point up. It should be
about two-thirds as long as branch one.
Trim branches as shown at left. Some bending may be necessary
to obtain the desired curve. Split bases of thicker branches to make
them easier to stick on pinpoint. If the base of the stem is thin, at-
tach one or two branches about 2 or 3 inches long to the base with
tape or a rubber band, making the stem easy to stick on the pin-
point. This method is also useful for anchoring thin-stemmed flowers.
Insert branch one on pinpoint so that it leans slightly backward
with its tip (head) arched directly over its base (foot).
Branch two may be placed either in front of or behind branch
one. Try both placements before deciding. The two branches should
be close together for several inches before branch two curv-es to the
left. Note positions of branches in top-view drawing (lower left)
The longest flower stem should be about half as long as branch
two; the flower should be a bud or only partly open. Stick this stem
on pinpoint so that stem and flower are immediately to the right of
branch one. Let the flower or bud face up.
Cut stems of other flowers so that no two are of the same length.
Place flowers so that the smallest face upward, with some of the
larger ones facing right and others forward. Let some flowers be
partly hidden by others.
Finish arrangement by placing a few short branches at the base.
These branches and the lower flowers should conceal the holder.
This is but one of the many, many ways of making line arrange-
ments. As you select plant material, you may choose branches with
straight, curved, diagonal, or zig-zag stems. Large arrangements re-
quire large flowers; miniature arrangements with dainty branches
require tiny flowers. Instead of flowers you may wish to use another
kind of branch or some leaves. During the winter use bare branches
or evergreens and some dried flowers or roadside materials. Line
arrangements give you a real chance to experiment.
Mass Arrangements
Traditional mass arrangements are adapted from European
floral designs. They have a thick, full look and require much plant
material. The whole colorful mass of flowers and foliages is empha-
sized, rather than the individual flowers, leaves, or branches.
Mass arrangements may be of many shapes, such as circles,
domes, crescents, ovals, and triangles. Ovals and triangles are good
shapes because the height and width are not the same. An arrange-
ment may be made to be seen from one side only, or completed all
around so that it becomes free-standing and may be viewed from
any angle. A center of interest containing a focal point which at-
tracts the eye is usually developed.
Color is the most important element in mass arrangements.
Three or more kinds or colors of flowers are often combined with
one or more kinds of foliage. Usually it is best to select more of one
kind and color and less of the others. The plant materials are
grouped together by kind and the groups are blended together.
Choose colors that harmonize with one another and with the place
where the arrangement is to be used.
A variety of flower sizes, textures, or shapes is necessary. Al-
though round or spray-shaped flowers usually dominate, spiky shapes
are good for triangular arrangements. When using round flowers,
let the ones at the top face up, those at the bottom face slightly
down, some face right, some left, and the ones in the center face
out. Even though the stems are not usually seen, all should radiate
or seem to radiate from the focal point.
Good development of depth is important. Allow some material
to extend over the edge of the container. "Bury" some flowers be-
hind others to lead the eye into the arrangement. Plan spaces around
the edges to give airiness. Avoid a flat, pressed look by opening up
spaces among the flowers. Foliage coming out between the flowers
leads the eye in and out of the arrangement.
Stylized mass arrangements differ from the traditional ones by
being more clean-cut, precise, and geometrical. Select three or more
kinds and colors of flowers and foliages; you will need at least sev-
eral flowers of each. Instead of blending each kind and color,
separate them to form well-defined placements. Often a center of
interest with focal point is carefully planned and developed.
Natural mass arrangements are inspired by the way plants
grow. Usually only one or two kinds and colors of flowers are used
together with the plants' own foliage. The arranger tries to capture
the spirit of the plant material and arrange it to suggest that it is
growing in the container.
Floral foams make excellent holders for mass arrangements.
Chicken wire is also good for vases or deep bowls and for hea7
flowers with large stems. Urns, compotes, goblets, vases, and me-
dium-to-deep bowls are the best containers for mass arrangements.
10
First Four
Foliage Placements
Light
Yellow
f
= Facing
(Foliage not Shown)
Dark
Yellow
Added
Orange
Added
Making a Mass Arrangement
Plant materials needed. Ten to twelve light yellow or cream
zinnias about IVi to 2 inches in diameter with stems 10 to 12 inches
long. Eight to ten dark yellow zinnias with 2- to 3-inch flowers and
8- to 10-inch stems. Five orange or red zinnias with 2- to 3-inch
flowers and 6- to 8-inch stems. Eight to ten stems about 12 inches
long of foliage such as yew (evergreen) or privet, florist's huckle-
berr)', or other small-leaved shrub, or small ferns. Other round
flowers such as chrysanthemum, cosmos, geranium, marigold, rose,
yarrow, etc., may be substituted, but the flower sizes and stem length
should be about the same as given. Flowers with different shapes such
as feverfew or goldenrod may be used instead of zinnias. Baby's breath
may be added for its fluffy efTect. Note that the color scheme is of
warm, related colors. A scheme of cool, related colors may be chosen
instead. This amount of material will make a full arrangement of
round, oval, or triangular shape. Plan the shape of the arrangement
before you start.
Container. An urn or compote about 3 inches tall with an open-
ing about 5 inches wide.
Holder. A block of wet floral foam.
Procedure. Cut the wet floral foam to fit tightly in the con-
tainer and to extend about 1 inch above the top. Insert a straight
stem of foliage vertically in the center and at the back of the con-
tainer to establish the height. Place two look-alike stems almost
horizontally, one on each side, to determine width. Insert a shorter
stem horizontally in front to establish depth. Other stems of foliage
are placed within these four stems to form the shape and size of the
arrangement. Too much foliage will leave little room for the flowers.
Additional foliage may be needed after the flowers are in place.
The ten to twelve light yellow zinnias are put in first and gener-
ally placed as the foliage was. Select the smallest flowers for the
height, width, and depth placements. Let the tallest flowers face up,
the width flowers face left and right, and the depth flowers face
front and slightly down. The other flowers are placed in between
to complete the size and shape of the arrangement. Let those in the
center extend out past the foliage to give depth and to allow space
for the other flowers.
The eight to ten dark yellow zinnias are put inside and under-
neath the light yellows. Their placement mostly repeats that of the
light yellow zinnias.
The five orange zinnias are positioned to form a loose group that
repeats the overall shape of the arrangement. These are mostly
underneath the other flowers and form the focal area. Let them face
front and slightly up.
Avoid overcrowding and a flat, pressed look. Often the addition
of some foliage between flowers separates the flowers and gives a
looser effect. Leave some spaces among the flowers. The spaces per-
mit the viewer to look into the arrangement. Reward the viewer by
"burying" some flowers so that they are partially concealed by
others. This technique develops depth and eye penetration and lends
a sense of mystery to your arrangement.
11
Line-Mass Arrangements
Line-mass arrangements combine the strong line of Japanese
styles with the massed effect of European floral designs. This style
of flower arranging, developed in the United States, is often called
Contemporary American. Line-mass arrangements generally have
a neat, uncluttered look with definite line, a well-defined mass, and
plenty of open spaces. Usually strong lines are established in the
upper part by spikes or spike-like flowers or leaves, or by leafy or
bare branches. Roundish flowers are placed where the lines meet
and between the lines to give a solid but clean-cut massed effect in
the lower part.
You will need to decide whether to emphasize the line or the
mass. They should not be equal in measurement, area, or weight.
Feature the line material if it is of special interest. Feature the mass
material if it is more interesting in color or texture. If mass is empha-
sized, the result is a massed-line arrangement.
Whichever portion dominates, the line and mass must usually
blend into one whole. Group the kinds and colors of materials, then
blend the groups. The line material penetrates and disappears into
the mass material. Some of the mass material is brought up to
mingle with the main line. The main line thus extends down into
and through the mass, emerges at the rim of the container, and
often extends beyond to partially cover it. The result is a strong
unifying rhythm that leads the eye easily through the arrangement.
But sometimes the arranger may purposely segregate two kinds of
quite different materials to produce an arrangement with striking
contrast.
Line-mass arrangements are often triangular in shape, mostly
asymmetrical in balance, and meant to be seen from the front only.
They are usually colorful and striking in design, and often have a
strong center of interest. At least two kinds of materials are needed
•
— one for line and one for mass. Sometimes more than two kinds
are used, but a large number of different kinds and colors should
be avoided as they give an overly massed and cluttered effect. A
second mass material may be chosen just to develop the focal point.
Foliage is often used to provide variety, continuity, and transition
between the different kinds of materials. When placed at the back,
foliage adds finish and depth to the arrangement.
Natural line-mass arrangements use the plant material in a de-
sign suggestive of the way it grows. Linear pussy willow stems and
roundish daffodils could be combined to make a typical natural line-
mass arrangement.
Stylized line-mass arrangements have a less natural design. The
arranger organizes the materials with little thought of suggesting
their natural growth habit to make a clean-cut, precise, tailored,
and rather streamlined geometric arrangement. The arrangements
shown on this page are stylized.
Floral foams or pinpoints are suggested for the line-mass styles.
Low bowls, compotes, pedestal bowls, goblets, and medium-tall
vases with simple shapes are suitable containers.
12
Remove All
Side Branches
Trimmed
Corn Tassel
Corn Tassels
and Dock
in Place
Fresh
Foliage
Size, Facing,
and Spacing
of Flowers
Making a Line-Mass Arrangement
Plant materials needed. Three dry corn tassels about 15 to 20
inches long, all the main stems either straight or curved in about the
same way. Five to seven round flowers such as small chrysanthemums
or zinnias, or wild flowers such as brown-eyed Susans. Best if brown,
yellow-brown, or reddish in color and of various sizes. Three to five
stems (depending on size) dry sour dock. A few leafy twigs of fresh
foliage such as yew, privet, or other evergreens or small-leaved
shrubs. (Omit fresh foliage if the rest of the materials are dried.)
Container. A shallow bowl of any shape about 6 to 8 inches in
the largest dimension.
Holder. A block of wet floral foam about 2 .x 3 x 2 inches.
Style and theme. A one-sided line-mass arrangement suggesting
late summer or early fall in Illinois.
Procedure. Place holder slightly to left and back of center of
container. Carefully break ofT and save all of the side branches of
the corn tassels. Pick one of the main stems of the tassels for the
tallest placement. Insert it securely in the holder to establish the
height and vertical line. The trimmed tassel gives a strong linear
effect.
The second tassel is cut somewhat shorter than the first. Insert
in holder close to first tassel and slightly to the left and back. Have
the lower 2 to 3 inches of the tassel stems touch.
Cut the third tassel somewhat shorter than the second. Insert
immediately in front of the first tassel. Let it slant slightly to the
left of the second tassel.
The three tassels should form a group with each somewhat sepa-
rated from the others at the top. The direction of all three should
be similar.
Place most of the sour dock to the left and in front of the tassels,
allowing it to become less vertical and more horizontal near the
container. The dock generally repeats the line of the tassels at the
top but then spreads out near the container to give a fuller effect.
Its darker brown color and different texture contrast with the corn
tassels.
Place the com tassel side branches horizontally to the right and
at the base of the three main tassels. Select either mostly straight or
mostly curved pieces to correspond to the curved or straight main
tassels. The number and placement of these will depend on your
taste and judgment.
Place a few short leafy twigs of the fresh foliage among the dock
at the base of the main tassels. Their purpose is to add variety in
green color, shape, size, and texture.
The flowers are now inserted among the dock, foliage, and tas-
sels to form roughly an upright triangular pattern. Use the smallest
flower for the tallest placement and have it face up. The stems of
the other flowers will be shorter and of different lengths. Face the
flowers in various directions. Allow some of the flowers to be partly
hidden by the other materials.
By using more or less of the materials, you may make the ar-
rangement full and more massive, or loose, open, and more linear.
13
Proportion
Good
(B
Poor
2
Scale
Good Poor
Flower Weight
Heavier Lighter
Large
Round
Dense
Solid
^ Small
^/^^ Spiky
Loose
Airy
' Position '
Color
Bright Dull
Dark Light
Warm Cool
Now Lets Look at Art Principles
Now that you have made several arrangements, let us look at the
art (design) principles underlying successful flower arrangements.
Neither rules nor fads, these principles are present in all man-made
things that have beauty.
On pages 3 and 4 you found that you should select plant ma-
terials because of their special colors, shapes, textures, and spaces.
These are the design elements of flowers and leaves. The flower
arranger uses these design elements, as well as flower size and ex-
pressiveness, according to the following art principles.
Proportion is the relationship in size and shape among things
or parts of things. After you select a container, how much of each
kind of plant material will you need to construct the size and shape
of arrangement you plan? Usually the plant material should be
about three-fifths and the container two-fifths of the finished ar-
rangement. The dimensions of height, width, and depth will depend
on your imagination and skill. Try making the arrangement taller
than you think it should be. (You can always shorten the stems.)
If you select three kinds and colors of material, have most of one
kind, least of another, and an in-between amount of the third.
Scale is the size relationship between flower and flower or be-
tween flower and container. Generally flower sizes should be some-
what the same, but you may wish to use larger leaves or flowers
for variety or contrast. No flower or leaf should be more than one-
third the size of the container. Scale requires special attention in
miniature arrangements.
Balance means that the finished arrangement does not fall over
or look as if it will fall over. Consider the balance from side to side,
top to bottom, and front to back. Symmetrical balance means that
one side of the arrangement is nearly a mirror image of the other.
(See page 10, A and B.) Such arrangements are apt to appear
formal, dignified, restful — but may be dull and lifeless. In arrange-
ments with asymmetrical balance the plant material and placement
are different on each side of the vertical axis which divides the
arrangement in half. (See page 3, A, B, C; and page 12, A, B, C.)
Asymmetrical arrangements are more informal, active, subtle, stimu-
lating, and dynamic. The spaces are important. As you handle each
flower or leaf, you can judge its actual weight. More important is
its-visual weight. A flower appears to be heavy if it is large: bright,
dark, or warm in color; round in shape; dense in texture; and solid
without spaces. The farther a flower is from the vertical axis, the
heavier it seems. Locate the tip of the tallest flower or branch over
its base or where it is inserted in the holder. To judge balance, imag-
ine the vertical axis as passing through the center of interest or the
point where the stems come together; squint your eyes as you com-
pare one side with the other for visual balance.
14
Radiation
Good Poor
Keep Stems Close
Together at Holder
Repetition of Line
Good Poor
Repetition of Shape
Good Poor
Color Gradation
Hue: Yellow — Yellow-Orange —
Orange
Value. Light Yellow (Tint) —
Yellow — Dark Yellow (Shade)
Intensify: Bright Yellow — Yellow —
Dull Yellow
Rhythm means related movement. As you look at an arrange-
ment with strong moement, your eye seems to be led along visual
paths. (See all arrangements on pages 8 and 10.) Each kind of
plant grows according to its own built-in rhythm. The cattail is
vertical, weeping willow branches curve and droop, the i'y grows
horizontally along the ground or climbs up along a wall. As you
select and gather your plant materials, study the way they grow.
Then you will know better how to arrange them to produce natural
rhythms.
Most plants grow so tliat the stems radiate from one place in the
ground. As they grow, they form branches that are related to one
another in a radiating way. In flower arrangements, the stems are
held together by the holder and radiate from the container.
Radiation, then, is used in most arrangements to develop basic
rhythm.
If you repeat a line, a shape, a color, a texture, or a space, you
will achieve strong rhythm by repetition. Avoid overdoing repeti-
tion for it may become boring.
The easy change from one thing to another is transition. To de-
velop rhythm by transition, allow some plant material to drape over
the edge of the container to bring the two together. (See all arrange-
ments on page 12.) Place the buds and smallest flowers at the edges
of the arrangement, the largest flowers near the center, and the in-
between sizes between the two to gain rhythm by size progression.
Arrange flower colors from light through intermediate to dark for
color gradation.
Dominance or Emphasis. Through the development of domi-
nance you tell the viewer what is most important in your arrange-
ment. DaflPodils, pussy willows, and some moss and stones say, "It's
spring!" Graceful, curving, leafless twigs with a few stones tell the
viewer that the curves of the twigs and the open spaces are what
this arrangement is all about. .s you plan your arrangement and
select the materials, you decide just what story you want to tell or
what kind of flower will be most important. You may emphasize a
dominant color, size, shape, line, or texture. For example, in plan-
ning a red and white arrangement, select a larger number or a larger
size of red flowers if you want the red to dominate.
A center of interest containing a focal point is often developed in
mass or line-mass arrangements. (See page 10, B, or page 12, B.)
The center of interest is usually slightly above the point where all
the stems appear to meet. You may concentrate flowers there; place
the largest, most colorful, or showiest flower there ; use round focus-
ing flowers; or place some large flat leaves nearby. But avoid over-
doing — don't make the center of interest too obvious. Figurines
may be emphasized ; if so, they should be large enough to dominate
the plant material. (However, it is best not to use figurines until you
have mastered the arrangement of plant materials.) Line arrange-
ments are best without a center of interest since their appeal is in
the lines of the branches and the spaces.
15
Use These Design Elements:
Color
Shape
Along With:
Size
According To These Art Principles:
Proportion and Scale
Balance
To Make Arrangements That Have:
Beauty
Suitability
Texture
Space
Expressiveness
Riiythm
Dominance
Harmony
Expressiveness
Line Arrangement
^^^
Mass Arrangement
Line-Mass Arrangement
A Look at Your Finished Arrangement
To improve your skill in flower arranging, develop an attitude
of constructive criticism toward your work. Start by checking the
style or design of your arrangement. Can you say that it is definitely
a line, a mass, or a line-mass? Or is it an original!
Have you used the plant materials in a simple, distinctive way?
Try to avoid the fussy as well as the too-slick look. Flowers and fo-
liages look best if they are used in a rather natural way — somewhat
like the way they grew. Do you feel your arrangement would be
better if you took some flowers out? Or do you really need one or
two more flowers or leaves?
Are there so many look-alike flowers that the arrangement seems
boring? If so, it lacks variety and contrast. Are there so many dif-
ferent kinds and colors that it seems confused and chaotic? If so,
your arrangement lacks unity and organization.
Is the arrangement suitable in style and color for the place
where you will display it? The kinds and colors of the flowers should
harmonize with one another, and with the container as well as with
the background.
Does the container appear to be too large or too small for the
amount of flowers you have used? Does the arrangement seem to
lean one way or another? Does your eye move easily through it? Or
is the arrangement so spotty that the eye jumps from place to place?
Can your eye look into and penetrate your arrangement? Or is
it flat like a wall? If your round flowers were all the same size and
color, did you vary the spacing between them? Did you "bury"
some flowers beneath or behind others so that they are partially
concealed? This adds mystery and makes the viewer want to look
into your arrangement.
Does your arrangement express some idea or theme, or show-
emphasis in some way that the viewer can identify? Have you put
some of your own personality into it?
Finally, are you pleased with your arrangement? If you are,
probably others will be, too.
Good Books for Further Study
The Complete Flower Arranger by A. A. Ascher. Simon & Schuster
(Fireside Books) , New York. 1974.
Creative Designs with Dried and Contrived Flowers by E. V. Hamel.
Simon & Schuster, New York. 1971.
Easy Ways to Good Flower Arrangement by Mary B. Kittel. Crown
Publishers, Inc., New York. 1957.
Japanese Flower Arrangement for American Homes by Mary B.
Kittel. Crown Publishers, Inc., New York. 1960.
Flower Arrangement: The American Way by I. Richardson. Pelican
Publishing Co., New Orleans. 1960.
The Art of Flower and Foliage Arrangement by Anna H. Rutt. The
Macmillan Co., New York. 1958.
New Approach to Design Principles by Anne B. Sutter. Allied Print-
ing Co., St. Louis, Mo. 1967.
16
UNIVERSITY OF ILLINOIS-URBANA
Q.630.7IL6C ,^,^ „,
C005
CIRCULAR URBANA. ILL.
1154 1978
3 0112 019533782

flower arrangementbasicsandtipsforbeginners.pdf

  • 1.
    Q.630.7 It6c no.1154 cop. 5 CORE Metadata,citation and similar papers at core.ac.uk Provided by Illinois Digital Environment for Access to Learning and Scholarship Repository
  • 3.
    Digitized by. thelr;iternet Archive in 2611 Withfaffding from University of Illinois Urbana-Champaign http://www.archive.org/details/flowerarranging1154culb
  • 5.
    Flower Arranging University of Illinoisat Urbana-Champaign College ofAgriculture Cooperative Extension Service Circular 1154
  • 6.
    CONTENTS Selecting Your PlantMaterials .... 3 Cutting and Care of Plant Materials 5 You Will Need Some Containers . . 6 Use the Right Kind of Holder 7 Line Arrangenients 8 Mass Arrangements 10 Line-Mass Arrangements 12 Now Let's Look at Art Principles. . 14 A Look at Your Finished Arrangement 16 Good Books for Further Study . ... 1 6 This circular was prepared by JOHN R. CULBERT, Professor of Floriculture. Issued in furtherance of Cooperative Ex- tension Work, Acts of May 8 and June 30, 1914, in cooperation with the U.S. Department of Agriculture. JOHN B. CLAAR, Director, Cooperative Exten- sion Service, University of Illinois at Urbana-Champaign. The Illinois Cooper- ative Extension Service provides equal opportunities in programs and employ- ment. 20M—1-78—39333—$s A RRANGiNG FLOWERS glves you a chancc to participate in an art _£. activity, to express yourself creatively, and to make your home or room more livable and attractive. You make a flower arrangement whenever you place selected flowers and foliages into a container according to plan or design. Roses casually placed in a vase are attractive because of their beau- tiful color and shape. These same roses are even more appealing when arranged in a stylish way. Most flower arrangements are made for a certain purpose or place. An arrangement for the dining table, for example, should be of a size, color, and shape that will harmonize with the table setting. Besides being beautiful and suitable for the occasion or place, a good flower arrangement should be expressive of some theme or idea and of your own personality. As a flower arranger you are participating in an art form. The chief diff"erence between flower arranging and the other arts is the medium. Our medium is plant material. What paint is to the painter and clay is to the potter, flowers and foliages are to us. Our medium is alive and will die quickly unless given proper care (page 5). In choosing plant materials you must consider their color, shape, texture, size, space, and expressiveness (pages 3 and 4). These are the visual characteristics or design elements of all objects. For exam- ple, a rose could be described in this way: yellow with green leaves and stem; round and halfway open with spaces between the petals; 3 inches wide and 2 inches deep; straight stem 12 inches long; vel- vety texture; and expressive of your best wishes on your mother's birthday. Next you must decide on the style or design for arranging your plant material. Three general styles — the line, the mass, and the line-mass — are in use today. They are described and illustrated on pages 8 to 13. In selecting a style, consider the place where the ar- rangement will be used or the occasion for its use. The shape of the container may give you ideas. Your greatest inspiration, however, should come from the plant material itself. Let its shape, the way it grows, or the combination you choose suggest the right way to use it. There is no end to the many possible variations of the three basic styles of flower arranging. Look for ideas in books (some are sug- gested on page 16), magazines, flower shows, florists' windows, and arrangements made by your friends. Then use your own imagination to create new arrangements that will express your ideas and per- sonality. As you finish your arrangement, take a critical look at it. Some of the questions you may ask — and answer ^ — are on page 16. If you are pleased with it, you will want to know why. If something seems not quite right, you will want to know what is wrong and how to correct it. To help answer the why, what, and how, study the principles underlying the art of flower arranging on jiages 14 and 15. In your next arrangement begin to make these principles work for you.
  • 7.
    KCr)X "C5^ Selecting Your PlantMaterials Success in flower arranging starts with your skill in selecting plant materials that will be suitable for the particular arrangement you want to make. Here are some of the things to think about — the design elements — when choosing flowers and foliages: Color. Consider the hue of the color — red, yellow, blue, for example. The names around the color wheel at left are hues. Next. check the value of the color: Is it light or dark? Then clieck the intensity, which can vary from bright to dull. Some colors are wann — yellows and oranges, for example: others, like blues and violets, are cool. For your first arrangement select all warm hues or all cool hues. ^'ou may want to use related hues — for example, yellow, yellow- orange, and orange; or blue, blue-violet, and violet. In such a color scheme, use most of one hue. least of another, and an in-between amount of the third hue. Or you may choose a scheme with one kind of color, such as all yellows or all greens. If you use only one hue, make sure to select plant materials of different shapes, sizes, or textures. Later you may want to try a complementary color scheme. You can obtain dramatic contrasts by combining red and green, violet and yellow, or any other two hues that are opposite each other on the color wheel. One of the comf^lcmentary hues should be lighter in value than the other, and one should be brighter than the other. U.se more of one hue than of the other. Flower colors should harmonize with one another, with the con- tainer, and with the background — such as a tablecloth — against which the arrangement will be displayed. Size. Select flowers and leaves of different sizes. Use the buds and small flowers and leaves at the top and edges of the arrange- ment; place the large leaves or fully opened flowers low in the arrangement. Shape. Study the many shapes of flowers, leaves, and stems. Plant materials are put into three main groups according to their shape Spiky or linear shapes (These are best for line and line-mass arrangements; they set directions and cause a feeling of movement; they are often used to form the skeleton of the arrangement.) Leaves and stems Twelve-Hue Color Wheel Spiky or Linear Shapes Sour Dock Banana Gladiolus Flowers Delphinium Gladiolus Larkspur Mullein Snapdragon Sour dock Cattails Cornstalks Gladiolus Grasses Iris Pussy willow Yucca Twigs and branches Fruits and vegetables Banana Green beans Green onions Okra pods Rhubarb stalks
  • 8.
    Mass or RoundedShapes Daisy Rose Apple Tomato Spray or Filler Shapes Elderberry Huckleberry I Mass or rounded shapes (These are best for line-mass or mass arrangements; as focusing shapes, they may be used to develop the focal point in line-mass arrangements; or they may make up almost all of a mass arrangement.) Flowers Leaves Fruits and vegetables Chrysanthemum Geranium Apple Daisy Hen and chickens Lemon Iris Hosta (plantain lily) Onion Marigold Magnolia Orange Rose Salal (lemon) Tomato Zinnia Violet Turnip Spray or filler shapes (These are best for mass and line-mass arrangements; use them as back- ground materials and as space fillers in mass arrangements; prune and thin them before using in line-mass arrangements. ) Flowers Leaves Fruits and vegetables Ageratum Baby's breath Corn tassels Goldenrod Mustard Asparagus Ferns Huckleberry Parsley Pine Bunch of grapes Cluster of crab apples Elderberry Pompon chrys anthemum Juniper Texture varies not only with the feel of the plant surface, but also with the arrangement of the petals or florets. Here are some examples of different textures in plant materials : Texture Plant material Airy Dense Hairy Prickly Shiny Velvety Spray of baby's breath Zinnia flower Leaf of African violet Seed head of sandbur or thistle Lily petal Rose petal Space. As you select flowers and foliages, notice that they are not like solid apples, but that there are spaces between the flowers of a spray of baby's breath, for example, and between the petals of a daisy. You can look inside a tulip or through an iris flower. A leafy branch has odd-shaped spaces of different sizes. You may select certain flowers or leaves just because of their spaces. As you place the flowers and leaves in the container, you create spaces of various sizes and shapes. Spaces are often as important as the flowers or leaves. Expressiveness. Through your selection of flowers and leaves you may express a mood, idea, or sentiment. For example: daffodils and pussy willows suggest spring; cattails make you think of a swamp; white roses are elegant and fomial; sunflowers are casual and suggest summer; red roses may say "I love you." Try to name your finished arrangements, or perhaps name them first. Some names are Morning Mist, Day Dream, Candid Camera, Lost in a Swamp, Day at the Beach, By the Roadside, Joy, Peace, Spring Song, A Friend.
  • 9.
    Remove Leaves Marked"X' Hot Water — 100-110° F (or hot as your hand can stand) Make Fresh Cut With Sharp Knife Just Before Placing in Holder Cutting and Cnre of Plant Materials When, what, and how to cut. 1 he best tinu- to cut flowers is in late afternoon, when the plants contain the most stored foods. The next best time is in early morning, when water content is at its highest. Most flowers last longest if cut when almost fully open. Many tight buds or young leaves wilt rapidly and will not take uj) water. But some flowers keep best if cut in the bud stage or when they are just beginning to open. These include daffodil, iris, lily. peony, poppy, and tulip. Fully open or faded flowers are already old and often do not keep well. Before cutting any flowers or foliage, plan the arrangement in your head, or sketch it on paper. Cut the stems with a sharp knife or shears. The stems should be longer than you will need. Remove all leaves from the lower part of the stems. Care before arranging. After you bring the flowers into the house, remove all leaves that would be under water in the container. Also keep the flowers out of water. Leaves and flowers will rot in water, and the plant cells will become clogged with bacteria, pre- venting water from moving up the stems. After removing the leaves, cut an inch ofT the stems, and imme- diately put them in water almost as hot as your hand can stand. The water should be about half as deep as the stems are long. Make sure the water containers have been thoroughly washed. Various floral preservatives are available from your florist. For best results, cut the stems and place them at once into a hot preser- vative solution. Properly used, preservatives will extend the life of the flowers for one or more days. Store flowers and foliages in a cool, humid place, out of the sun, and away from drafts. Do not store with fruits, vegetables, or decaying flowers or leaves; these give off ethylene which shortens the life of many cut flowers. Wait until the plant materials feel stiff before you arrange them. Care when arranging. The container should have been thor- oughly washed since its last use. Fill it with water before you start to arrange the flowers. You may add a floral preservative if you wish. Using a sharp knife or shears, make a fresh cut on each stem just before you put it in the container. Leave stems in water until you use them. Do not let the plant materials lie around on the table to dry out. Handle the flowers by their stems. Your hands are hot! Care of arrangement. Place the arrangement out of the sun and away from drafts, hot air ducts, and radiators. At night, put it in a cool place to prolong the life of the flowers. Keep the container full of water; check this daily. Change the water occasionally. When you do this, you may w-ant to rearrange the flowers. When rear- ranging, be sure to remove at least 1 inch from each stem.
  • 10.
    For Line Arrangements ForMass Arrangements For Line-Mass Arrangements (also some line OR mass arrangements) You Will Need Some Containers Almost anything that will hold water may be used as a container. The important thing is to select a size, shape, color, and material that will harmonize with the plant materials and with your home and furniture. Even skilled arrangers cannot make good arrange- ments in unsuitable containers. Size. The container should be in scale with the table on which it is displayed. A vase 3 feet tall, for example, is too large for a 2- by 4-foot coffee table. Remember, the larger the container, the more flowers are required. Small or medium-sized containers are most useful. Allow about two-fifths of the overall size of the arrangement for the container. Shape. Some good shapes for containers are illustrated at left. Suit the shape to the design of the arrangement. Simple shapes with clean lines are best. Avoid those in the form of animals, heads, pianos, etc., except for special occasions. Color. Tans, browns, grays, and greens are useful colors, har- monizing easily with plant materials and with most backgrounds. White containers call attention to themselves and are often difficult to use effectively. Materials. Pottery containers, ranging from rough bean pots to delicate china vases, are the most frequently used. Many vege- table dishes, cereal bowls, and sugar bowls make good flower con- tainers. Glass containers, like pottery ones, can be thin and dainty — or thick and sturdy. They can be clear or colored ; plain or cut and fancy. In using clear glass, remember that stems and the holder will be seen. Metals suggest strength. Copper, bronze, and brass are the most versatile. Aluminum and stainless steel are modern; iron suggests weight. Baskets with liners to hold water come in many shapes and are excellent for mass or naturalistic arrangements. Most plastic con- tainers are too light in weight. Expressiveness and harmony. The spirit of the plant material and container should go together. Pussy willows and daffodils are happy in brown or green pottery but not in an elegant silver bowl. Remember that the plant material and how you use it are more important than the container. Art objects should be displayed and admired for themselves and not used as containers for flowers. I
  • 11.
    Pinpoints For Line Arrangements StickStems on Pins or Wedge Between Pins Clay Chicken Wire For Mass Arrangements Wedge Stems in Layers of Wire Floral Foam For Line-Mass and Mass Arrangements ^y Add Water Here Insert Stem to Bottom of Container Use the Right Kind of Holder A good holder should give you freedom to place the stems where you want them and then hold them there securely. Choose a holder to suit the style of arrangement you plan, the plant materials, and the container. These kinds are recommended : Pinpoint holders are best for line or line-mass arrangements in low bowls or shallow pedestal containers. Fasten the holder securely to the clean, dry container with waterproof floral clay such as Posey Klay or Cling. Stems are stuck directly onto the pins or are wedged between them. To put thin stems on a pinpoint holder, bind several to each other or to a larger stem with a rubber band, string, or floral tape. Thick woody stems are easier to insert if you split the ends. Chicken wire or floral netting of 1-inch mesh, preferably enam- eled green, is excellent for mass arrangements in vases or deep bowls. Fill the entire container with the chicken wire and extend it an inch or so above the top. Crush, roll, and form the wire so that each stem will pass through at least three layers of meshes or wires. Wedge the wire securely into the container before you start arranging. A pin- point may be used beneath the chicken wire to hold vertical stems precisely in place. Crisscross wires beneath the pinpoint before it is mounted. Then run these wires through the pre-formed chicken wire and twist them together to hold the chicken wire in place. Floral foams, such as Fill-Fast-Foam, Oasis, and Quickee, hold stems in place and supply water to the flowers. They may be used for some line arrangements but are best for line-mass or mass ar- rangements. Soak the material in a pail of water until it barely floats. Cut a piece to fill the container and force it into place. Then cut a corner off the material so that you can fill the container with water and can add water later as needed. Insert stems to the bottom of the foam. Do not pull a stem part way out after inserting it, for this may remove the stem end from contact with the water or foam and the flower may wilt. When you use heavy flowers with large stems, such as gladiolus, cut a piece of chicken wire slightly larger than the container top and place it securely over the foam. The new floral foams Sahara and Bar-Fast are excellent holders for dried plant materials, but do not use them for fresh materials. Pinpoints are also good for dried materials. Styrofoam should only be used as a holder for artificial flowers and leaves which have stiff ire stems. Do not use for fresh flowers. Conceal the holder by bringing some of the flowers or foliage down over it. Sometimes pebbles or other natural materials have to be used to conceal pinpoint holders. Place these materials in a natu- ral way so they do not attract attention.
  • 12.
    Line Arrangements Line arrangementsare adaptations of Japanese styles. The linear quality of a few branches, leaves, or flowers is emphasized to produce a clean-cut, sparse look. The spaces between the plant materials are nearly as important as the materials themselves. Color is of less concern than line, shape, space, and expressiveness. Successful line arrangements develop a dynamic feeling of ac- tion, movement, life. At the same time, the spaces stimulate con- templation and imagination in the viewer. Line arrangements en- courage creative experimentation and originality because they are based on the natural lines and spaces of the plant material and do not copy stiff geometric designs. Many line arrangements have three lines or placements. Often all three lines are of the same material, but you may select one kind of material for two lines and another for the third. Although this third placement may be fuller and more colorful, it must not detract from the strong linear effect. To avoid the cluttered look, remove leaves of flowers that interfere with the main lines, which are often slender, thin, and flowing. Select thicker, fuller materials to develop a strong, sturdy effect. Do not feel restricted to three lines or place- ments. Try arrangements with two lines or five or seven. Study plant materials and use them as they grow. As you make many line ar- rangements, you will begin to develop your own free-style or free- form designs. Most linear arrangements have asymmetrical balance; that is, one side is different from the other. They are to be viewed only from the front. Allowing some materials to extend toward the front and some toward the back usually develops considerable depth (third dimension). Line arrangements may be tall in relatively small containers and still have good balance since so little material is used. Most have vertical movement, but tr>' diagonal, circular, or horizontal rhythms. Pinpoint holders are best. Low. flat bowls, compotes, or pedestal bowls are good containers. Vases may be used if the pinpoint is mounted near the top by filling the vase almost full of sand or fine gravel. To achieve the desired natural effect, place all the stems close together on the pinpoint. Let the stems start out together and extend in the same direction for several inches before branching out. Try to select materials that have just the curves you want. How to bend stems or branches. You can bend straight stems if you have patience. Trim off unwanted side branches and leaves. Then hold the branch with both hands, thumbs touching under- neath the stem, and fingers grasping the stem above the thumbs. Press down gently with your fingers and push up with your thumbs at the same time. Move hands toward the ends of the stem slowly to avoid breaking. Repeat many times to get the curve you want. Soak stiff woody stems for several hours before bending, then fasten them to a board in the desired position until they dry. 8
  • 13.
    Branch Before and AfterTrimming Arrows ndicate Facing Top View Making a Line Arrangement Plant materials needed. Two long branches and a few short branches of a shrub, tree, or evergreen (such as burning bush, flo- rist's huckleberry, honeysuckle, privet, yew, etc.). Three to seven small round flowers of various sizes (such as chrysanthemum, mari- gold, zinnia, etc.) Container. A low bowl, which may be round, oval, square, rec- tangular, or free form in shape. Holder. A pinpoint is best. A small block of floral foam may be used, but it may fall over unless wedged in place. Procedure. Mount the pinpoint with floral clay in the center or slightly back of the center of a round container. Mount the holder back of center and toward the left back corner of containers of other shapes. Select branch one for its graceful upright curve; its length should be approximately three times the width of the container. If there is any doubt about the right length, choose a slightly longer branch. Select branch two to somewhat repeat the curve of branch one. Branch two should curve to the left and then point up. It should be about two-thirds as long as branch one. Trim branches as shown at left. Some bending may be necessary to obtain the desired curve. Split bases of thicker branches to make them easier to stick on pinpoint. If the base of the stem is thin, at- tach one or two branches about 2 or 3 inches long to the base with tape or a rubber band, making the stem easy to stick on the pin- point. This method is also useful for anchoring thin-stemmed flowers. Insert branch one on pinpoint so that it leans slightly backward with its tip (head) arched directly over its base (foot). Branch two may be placed either in front of or behind branch one. Try both placements before deciding. The two branches should be close together for several inches before branch two curv-es to the left. Note positions of branches in top-view drawing (lower left) The longest flower stem should be about half as long as branch two; the flower should be a bud or only partly open. Stick this stem on pinpoint so that stem and flower are immediately to the right of branch one. Let the flower or bud face up. Cut stems of other flowers so that no two are of the same length. Place flowers so that the smallest face upward, with some of the larger ones facing right and others forward. Let some flowers be partly hidden by others. Finish arrangement by placing a few short branches at the base. These branches and the lower flowers should conceal the holder. This is but one of the many, many ways of making line arrange- ments. As you select plant material, you may choose branches with straight, curved, diagonal, or zig-zag stems. Large arrangements re- quire large flowers; miniature arrangements with dainty branches require tiny flowers. Instead of flowers you may wish to use another kind of branch or some leaves. During the winter use bare branches or evergreens and some dried flowers or roadside materials. Line arrangements give you a real chance to experiment.
  • 14.
    Mass Arrangements Traditional massarrangements are adapted from European floral designs. They have a thick, full look and require much plant material. The whole colorful mass of flowers and foliages is empha- sized, rather than the individual flowers, leaves, or branches. Mass arrangements may be of many shapes, such as circles, domes, crescents, ovals, and triangles. Ovals and triangles are good shapes because the height and width are not the same. An arrange- ment may be made to be seen from one side only, or completed all around so that it becomes free-standing and may be viewed from any angle. A center of interest containing a focal point which at- tracts the eye is usually developed. Color is the most important element in mass arrangements. Three or more kinds or colors of flowers are often combined with one or more kinds of foliage. Usually it is best to select more of one kind and color and less of the others. The plant materials are grouped together by kind and the groups are blended together. Choose colors that harmonize with one another and with the place where the arrangement is to be used. A variety of flower sizes, textures, or shapes is necessary. Al- though round or spray-shaped flowers usually dominate, spiky shapes are good for triangular arrangements. When using round flowers, let the ones at the top face up, those at the bottom face slightly down, some face right, some left, and the ones in the center face out. Even though the stems are not usually seen, all should radiate or seem to radiate from the focal point. Good development of depth is important. Allow some material to extend over the edge of the container. "Bury" some flowers be- hind others to lead the eye into the arrangement. Plan spaces around the edges to give airiness. Avoid a flat, pressed look by opening up spaces among the flowers. Foliage coming out between the flowers leads the eye in and out of the arrangement. Stylized mass arrangements differ from the traditional ones by being more clean-cut, precise, and geometrical. Select three or more kinds and colors of flowers and foliages; you will need at least sev- eral flowers of each. Instead of blending each kind and color, separate them to form well-defined placements. Often a center of interest with focal point is carefully planned and developed. Natural mass arrangements are inspired by the way plants grow. Usually only one or two kinds and colors of flowers are used together with the plants' own foliage. The arranger tries to capture the spirit of the plant material and arrange it to suggest that it is growing in the container. Floral foams make excellent holders for mass arrangements. Chicken wire is also good for vases or deep bowls and for hea7 flowers with large stems. Urns, compotes, goblets, vases, and me- dium-to-deep bowls are the best containers for mass arrangements. 10
  • 15.
    First Four Foliage Placements Light Yellow f =Facing (Foliage not Shown) Dark Yellow Added Orange Added Making a Mass Arrangement Plant materials needed. Ten to twelve light yellow or cream zinnias about IVi to 2 inches in diameter with stems 10 to 12 inches long. Eight to ten dark yellow zinnias with 2- to 3-inch flowers and 8- to 10-inch stems. Five orange or red zinnias with 2- to 3-inch flowers and 6- to 8-inch stems. Eight to ten stems about 12 inches long of foliage such as yew (evergreen) or privet, florist's huckle- berr)', or other small-leaved shrub, or small ferns. Other round flowers such as chrysanthemum, cosmos, geranium, marigold, rose, yarrow, etc., may be substituted, but the flower sizes and stem length should be about the same as given. Flowers with different shapes such as feverfew or goldenrod may be used instead of zinnias. Baby's breath may be added for its fluffy efTect. Note that the color scheme is of warm, related colors. A scheme of cool, related colors may be chosen instead. This amount of material will make a full arrangement of round, oval, or triangular shape. Plan the shape of the arrangement before you start. Container. An urn or compote about 3 inches tall with an open- ing about 5 inches wide. Holder. A block of wet floral foam. Procedure. Cut the wet floral foam to fit tightly in the con- tainer and to extend about 1 inch above the top. Insert a straight stem of foliage vertically in the center and at the back of the con- tainer to establish the height. Place two look-alike stems almost horizontally, one on each side, to determine width. Insert a shorter stem horizontally in front to establish depth. Other stems of foliage are placed within these four stems to form the shape and size of the arrangement. Too much foliage will leave little room for the flowers. Additional foliage may be needed after the flowers are in place. The ten to twelve light yellow zinnias are put in first and gener- ally placed as the foliage was. Select the smallest flowers for the height, width, and depth placements. Let the tallest flowers face up, the width flowers face left and right, and the depth flowers face front and slightly down. The other flowers are placed in between to complete the size and shape of the arrangement. Let those in the center extend out past the foliage to give depth and to allow space for the other flowers. The eight to ten dark yellow zinnias are put inside and under- neath the light yellows. Their placement mostly repeats that of the light yellow zinnias. The five orange zinnias are positioned to form a loose group that repeats the overall shape of the arrangement. These are mostly underneath the other flowers and form the focal area. Let them face front and slightly up. Avoid overcrowding and a flat, pressed look. Often the addition of some foliage between flowers separates the flowers and gives a looser effect. Leave some spaces among the flowers. The spaces per- mit the viewer to look into the arrangement. Reward the viewer by "burying" some flowers so that they are partially concealed by others. This technique develops depth and eye penetration and lends a sense of mystery to your arrangement. 11
  • 16.
    Line-Mass Arrangements Line-mass arrangementscombine the strong line of Japanese styles with the massed effect of European floral designs. This style of flower arranging, developed in the United States, is often called Contemporary American. Line-mass arrangements generally have a neat, uncluttered look with definite line, a well-defined mass, and plenty of open spaces. Usually strong lines are established in the upper part by spikes or spike-like flowers or leaves, or by leafy or bare branches. Roundish flowers are placed where the lines meet and between the lines to give a solid but clean-cut massed effect in the lower part. You will need to decide whether to emphasize the line or the mass. They should not be equal in measurement, area, or weight. Feature the line material if it is of special interest. Feature the mass material if it is more interesting in color or texture. If mass is empha- sized, the result is a massed-line arrangement. Whichever portion dominates, the line and mass must usually blend into one whole. Group the kinds and colors of materials, then blend the groups. The line material penetrates and disappears into the mass material. Some of the mass material is brought up to mingle with the main line. The main line thus extends down into and through the mass, emerges at the rim of the container, and often extends beyond to partially cover it. The result is a strong unifying rhythm that leads the eye easily through the arrangement. But sometimes the arranger may purposely segregate two kinds of quite different materials to produce an arrangement with striking contrast. Line-mass arrangements are often triangular in shape, mostly asymmetrical in balance, and meant to be seen from the front only. They are usually colorful and striking in design, and often have a strong center of interest. At least two kinds of materials are needed • — one for line and one for mass. Sometimes more than two kinds are used, but a large number of different kinds and colors should be avoided as they give an overly massed and cluttered effect. A second mass material may be chosen just to develop the focal point. Foliage is often used to provide variety, continuity, and transition between the different kinds of materials. When placed at the back, foliage adds finish and depth to the arrangement. Natural line-mass arrangements use the plant material in a de- sign suggestive of the way it grows. Linear pussy willow stems and roundish daffodils could be combined to make a typical natural line- mass arrangement. Stylized line-mass arrangements have a less natural design. The arranger organizes the materials with little thought of suggesting their natural growth habit to make a clean-cut, precise, tailored, and rather streamlined geometric arrangement. The arrangements shown on this page are stylized. Floral foams or pinpoints are suggested for the line-mass styles. Low bowls, compotes, pedestal bowls, goblets, and medium-tall vases with simple shapes are suitable containers. 12
  • 17.
    Remove All Side Branches Trimmed CornTassel Corn Tassels and Dock in Place Fresh Foliage Size, Facing, and Spacing of Flowers Making a Line-Mass Arrangement Plant materials needed. Three dry corn tassels about 15 to 20 inches long, all the main stems either straight or curved in about the same way. Five to seven round flowers such as small chrysanthemums or zinnias, or wild flowers such as brown-eyed Susans. Best if brown, yellow-brown, or reddish in color and of various sizes. Three to five stems (depending on size) dry sour dock. A few leafy twigs of fresh foliage such as yew, privet, or other evergreens or small-leaved shrubs. (Omit fresh foliage if the rest of the materials are dried.) Container. A shallow bowl of any shape about 6 to 8 inches in the largest dimension. Holder. A block of wet floral foam about 2 .x 3 x 2 inches. Style and theme. A one-sided line-mass arrangement suggesting late summer or early fall in Illinois. Procedure. Place holder slightly to left and back of center of container. Carefully break ofT and save all of the side branches of the corn tassels. Pick one of the main stems of the tassels for the tallest placement. Insert it securely in the holder to establish the height and vertical line. The trimmed tassel gives a strong linear effect. The second tassel is cut somewhat shorter than the first. Insert in holder close to first tassel and slightly to the left and back. Have the lower 2 to 3 inches of the tassel stems touch. Cut the third tassel somewhat shorter than the second. Insert immediately in front of the first tassel. Let it slant slightly to the left of the second tassel. The three tassels should form a group with each somewhat sepa- rated from the others at the top. The direction of all three should be similar. Place most of the sour dock to the left and in front of the tassels, allowing it to become less vertical and more horizontal near the container. The dock generally repeats the line of the tassels at the top but then spreads out near the container to give a fuller effect. Its darker brown color and different texture contrast with the corn tassels. Place the com tassel side branches horizontally to the right and at the base of the three main tassels. Select either mostly straight or mostly curved pieces to correspond to the curved or straight main tassels. The number and placement of these will depend on your taste and judgment. Place a few short leafy twigs of the fresh foliage among the dock at the base of the main tassels. Their purpose is to add variety in green color, shape, size, and texture. The flowers are now inserted among the dock, foliage, and tas- sels to form roughly an upright triangular pattern. Use the smallest flower for the tallest placement and have it face up. The stems of the other flowers will be shorter and of different lengths. Face the flowers in various directions. Allow some of the flowers to be partly hidden by the other materials. By using more or less of the materials, you may make the ar- rangement full and more massive, or loose, open, and more linear. 13
  • 18.
    Proportion Good (B Poor 2 Scale Good Poor Flower Weight HeavierLighter Large Round Dense Solid ^ Small ^/^^ Spiky Loose Airy ' Position ' Color Bright Dull Dark Light Warm Cool Now Lets Look at Art Principles Now that you have made several arrangements, let us look at the art (design) principles underlying successful flower arrangements. Neither rules nor fads, these principles are present in all man-made things that have beauty. On pages 3 and 4 you found that you should select plant ma- terials because of their special colors, shapes, textures, and spaces. These are the design elements of flowers and leaves. The flower arranger uses these design elements, as well as flower size and ex- pressiveness, according to the following art principles. Proportion is the relationship in size and shape among things or parts of things. After you select a container, how much of each kind of plant material will you need to construct the size and shape of arrangement you plan? Usually the plant material should be about three-fifths and the container two-fifths of the finished ar- rangement. The dimensions of height, width, and depth will depend on your imagination and skill. Try making the arrangement taller than you think it should be. (You can always shorten the stems.) If you select three kinds and colors of material, have most of one kind, least of another, and an in-between amount of the third. Scale is the size relationship between flower and flower or be- tween flower and container. Generally flower sizes should be some- what the same, but you may wish to use larger leaves or flowers for variety or contrast. No flower or leaf should be more than one- third the size of the container. Scale requires special attention in miniature arrangements. Balance means that the finished arrangement does not fall over or look as if it will fall over. Consider the balance from side to side, top to bottom, and front to back. Symmetrical balance means that one side of the arrangement is nearly a mirror image of the other. (See page 10, A and B.) Such arrangements are apt to appear formal, dignified, restful — but may be dull and lifeless. In arrange- ments with asymmetrical balance the plant material and placement are different on each side of the vertical axis which divides the arrangement in half. (See page 3, A, B, C; and page 12, A, B, C.) Asymmetrical arrangements are more informal, active, subtle, stimu- lating, and dynamic. The spaces are important. As you handle each flower or leaf, you can judge its actual weight. More important is its-visual weight. A flower appears to be heavy if it is large: bright, dark, or warm in color; round in shape; dense in texture; and solid without spaces. The farther a flower is from the vertical axis, the heavier it seems. Locate the tip of the tallest flower or branch over its base or where it is inserted in the holder. To judge balance, imag- ine the vertical axis as passing through the center of interest or the point where the stems come together; squint your eyes as you com- pare one side with the other for visual balance. 14
  • 19.
    Radiation Good Poor Keep StemsClose Together at Holder Repetition of Line Good Poor Repetition of Shape Good Poor Color Gradation Hue: Yellow — Yellow-Orange — Orange Value. Light Yellow (Tint) — Yellow — Dark Yellow (Shade) Intensify: Bright Yellow — Yellow — Dull Yellow Rhythm means related movement. As you look at an arrange- ment with strong moement, your eye seems to be led along visual paths. (See all arrangements on pages 8 and 10.) Each kind of plant grows according to its own built-in rhythm. The cattail is vertical, weeping willow branches curve and droop, the i'y grows horizontally along the ground or climbs up along a wall. As you select and gather your plant materials, study the way they grow. Then you will know better how to arrange them to produce natural rhythms. Most plants grow so tliat the stems radiate from one place in the ground. As they grow, they form branches that are related to one another in a radiating way. In flower arrangements, the stems are held together by the holder and radiate from the container. Radiation, then, is used in most arrangements to develop basic rhythm. If you repeat a line, a shape, a color, a texture, or a space, you will achieve strong rhythm by repetition. Avoid overdoing repeti- tion for it may become boring. The easy change from one thing to another is transition. To de- velop rhythm by transition, allow some plant material to drape over the edge of the container to bring the two together. (See all arrange- ments on page 12.) Place the buds and smallest flowers at the edges of the arrangement, the largest flowers near the center, and the in- between sizes between the two to gain rhythm by size progression. Arrange flower colors from light through intermediate to dark for color gradation. Dominance or Emphasis. Through the development of domi- nance you tell the viewer what is most important in your arrange- ment. DaflPodils, pussy willows, and some moss and stones say, "It's spring!" Graceful, curving, leafless twigs with a few stones tell the viewer that the curves of the twigs and the open spaces are what this arrangement is all about. .s you plan your arrangement and select the materials, you decide just what story you want to tell or what kind of flower will be most important. You may emphasize a dominant color, size, shape, line, or texture. For example, in plan- ning a red and white arrangement, select a larger number or a larger size of red flowers if you want the red to dominate. A center of interest containing a focal point is often developed in mass or line-mass arrangements. (See page 10, B, or page 12, B.) The center of interest is usually slightly above the point where all the stems appear to meet. You may concentrate flowers there; place the largest, most colorful, or showiest flower there ; use round focus- ing flowers; or place some large flat leaves nearby. But avoid over- doing — don't make the center of interest too obvious. Figurines may be emphasized ; if so, they should be large enough to dominate the plant material. (However, it is best not to use figurines until you have mastered the arrangement of plant materials.) Line arrange- ments are best without a center of interest since their appeal is in the lines of the branches and the spaces. 15
  • 20.
    Use These DesignElements: Color Shape Along With: Size According To These Art Principles: Proportion and Scale Balance To Make Arrangements That Have: Beauty Suitability Texture Space Expressiveness Riiythm Dominance Harmony Expressiveness Line Arrangement ^^^ Mass Arrangement Line-Mass Arrangement A Look at Your Finished Arrangement To improve your skill in flower arranging, develop an attitude of constructive criticism toward your work. Start by checking the style or design of your arrangement. Can you say that it is definitely a line, a mass, or a line-mass? Or is it an original! Have you used the plant materials in a simple, distinctive way? Try to avoid the fussy as well as the too-slick look. Flowers and fo- liages look best if they are used in a rather natural way — somewhat like the way they grew. Do you feel your arrangement would be better if you took some flowers out? Or do you really need one or two more flowers or leaves? Are there so many look-alike flowers that the arrangement seems boring? If so, it lacks variety and contrast. Are there so many dif- ferent kinds and colors that it seems confused and chaotic? If so, your arrangement lacks unity and organization. Is the arrangement suitable in style and color for the place where you will display it? The kinds and colors of the flowers should harmonize with one another, and with the container as well as with the background. Does the container appear to be too large or too small for the amount of flowers you have used? Does the arrangement seem to lean one way or another? Does your eye move easily through it? Or is the arrangement so spotty that the eye jumps from place to place? Can your eye look into and penetrate your arrangement? Or is it flat like a wall? If your round flowers were all the same size and color, did you vary the spacing between them? Did you "bury" some flowers beneath or behind others so that they are partially concealed? This adds mystery and makes the viewer want to look into your arrangement. Does your arrangement express some idea or theme, or show- emphasis in some way that the viewer can identify? Have you put some of your own personality into it? Finally, are you pleased with your arrangement? If you are, probably others will be, too. Good Books for Further Study The Complete Flower Arranger by A. A. Ascher. Simon & Schuster (Fireside Books) , New York. 1974. Creative Designs with Dried and Contrived Flowers by E. V. Hamel. Simon & Schuster, New York. 1971. Easy Ways to Good Flower Arrangement by Mary B. Kittel. Crown Publishers, Inc., New York. 1957. Japanese Flower Arrangement for American Homes by Mary B. Kittel. Crown Publishers, Inc., New York. 1960. Flower Arrangement: The American Way by I. Richardson. Pelican Publishing Co., New Orleans. 1960. The Art of Flower and Foliage Arrangement by Anna H. Rutt. The Macmillan Co., New York. 1958. New Approach to Design Principles by Anne B. Sutter. Allied Print- ing Co., St. Louis, Mo. 1967. 16
  • 24.
    UNIVERSITY OF ILLINOIS-URBANA Q.630.7IL6C,^,^ „, C005 CIRCULAR URBANA. ILL. 1154 1978 3 0112 019533782