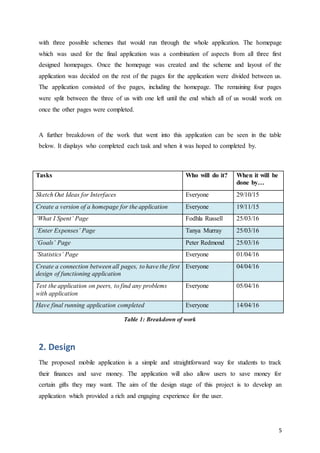
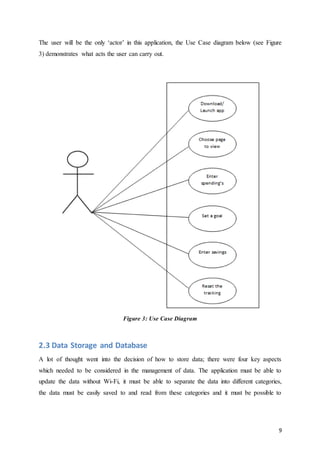
Personal Finance Tracker App
The design, development and implementation
of a finance tracking and saving application
Fodhla Russell - 12348171
Peter Redmond - 13745411
Tanya Murray – 12724775
Academic Supervisor: Josephine Griffith
1
Submitted to: The College of Engineering and Informatics at NUIG
Presented on: 8th April 2016
Course: Bachelor of Arts (BA)
Module Title: Final Year Project
Module Code: CT328
Statement of Originality: “I declare that this is my work and that all
contributions from other persons have been appropriately identified and
acknowledged.”
Acknowledgement: We would like to extend a special thanks to our supervisor
Josephine Griffith for her help, advice and patience throughout the development
of this project.
2
Contents
1. Introduction............................................................................................................................ 3
1.1 Proposal for Application ..................................................................................................3
1.2 Requirements....................................................................................................................3
1.2.1 Essential Features ......................................................................................................4
1.2.2 Desirable Features .....................................................................................................4
1.3 Breakdown of Work.........................................................................................................4
2. Design ....................................................................................................................................5
2.1 Early Design Stage...........................................................................................................6
2.2 Using the Application.......................................................................................................8
2.3 Data Storage and Database...............................................................................................9
2.4 Logo ...............................................................................................................................10
3. Technologies ........................................................................................................................ 11
4. Implementation .................................................................................................................... 12
4.1 Homepage.......................................................................................................................12
4.2 ‘What I Spent’ Page .......................................................................................................17
4.3 ‘Enter Expenses’ Page....................................................................................................23
4.4 ‘Statistics’ Page..............................................................................................................29
4.5 ‘Goals’ Page ...................................................................................................................31
5. Problems Encountered ......................................................................................................... 36
6. Evaluation ............................................................................................................................ 37
7. Conclusion ........................................................................................................................... 38
8. References............................................................................................................................ 40
3
1. Introduction
1.1 Proposal for Application
The original brief for this project was to design, develop and test an application on an android
platform, to allow the recording and tracking of money spending. The application should also
allow an easy way to enter data and provide mechanisms to set budget limits and targets.
Interviews with peers were conducted and existing financial tracking applications were
examined so that we could create a financial tracking application which was unique. From
this a set of requirements was developed for our application. Our personal financial tracking
application is orientated towards students and focuses more on a savings aspect rather than
just tracking how much money the user has spent. The application will allow users to track
and record their spending in a set of categories, such as rent, food or clothing and will also
allow users to track their savings. These savings can then be added up to reach a certain goal
or target which was chosen by the user. The main requirements for the application were to
allow users to navigate the application easily, to enter data and to set savings goals.
Our finished application was required to fulfil the following objectives:
 Create a coherent application which is easily navigated.
 The application should focus on students and their spending criteria.
 The application should focus on a savings aspect.
 Data must be easily entered.
 The application should allow the tracking and recording of data.
 The application should allow the users to set targets/goals.
1.2 Requirements
The requirements for this application were developed from interviews with our peers and the
examination of existing financial tracking applications. This development of requirements
was performed in order to create a personal financial tracking application which was different
and unique, but also to find what aspects in tracking applications worked effectively. A
variety of requirements were gathered for this application; which were subsequently divided
into essential and desirable features for the application.
4
1.2.1 Essential Features
These are the features which were determined as essential for the application:
 The application must be easy and coherent to use.
 The application must look good and have a catchy name to attract users.
 The application must be compatible with an android smartphone.
 The application must allow users to easily enter the money they have spent.
 The application must track the user’s spending.
 The application must allow the user to enter the money they have spent into different
categories.
 The application must connect to an internal file where data can be written to and read
from.
 The application must have a way for the user to enter their savings, which would then
be added up until they reach the goal (such as a gift) they have set. This is displayed
on a progression bar.
1.2.2 Desirable Features
These are the features which were determined as desirable (not essential):
 A page with a chart which displays how much money the user has spent in each
category over a certain period.
 A communications section where users can share their tips and ideas on how to save
money.
 A way to set daily/weekly/monthly allowances in each spending category, the user
can set an amount which they do not want to spend over. The application could also
give a warning if the user is about to go over the allowance.
1.3 Breakdown of Work
At the start of the development, of our application, we all took part in creating our own
design for the open screen (homepage). These three designs of the homepage provided us
5
with three possible schemes that would run through the whole application. The homepage
which was used for the final application was a combination of aspects from all three first
designed homepages. Once the homepage was created and the scheme and layout of the
application was decided on the rest of the pages for the application were divided between us.
The application consisted of five pages, including the homepage. The remaining four pages
were split between the three of us with one left until the end which all of us would work on
once the other pages were completed.
A further breakdown of the work that went into this application can be seen in the table
below. It displays who completed each task and when it was hoped to completed by.
Tasks Who will do it? When it will be
done by…
Sketch Out Ideas for Interfaces Everyone 29/10/15
Create a version of a homepage for the application Everyone 19/11/15
‘What I Spent’ Page Fodhla Russell 25/03/16
‘Enter Expenses’ Page Tanya Murray 25/03/16
‘Goals’ Page Peter Redmond 25/03/16
‘Statistics’ Page Everyone 01/04/16
Create a connection between all pages, to have the first
design of functioning application
Everyone 04/04/16
Test the application on peers, to find any problems
with application
Everyone 05/04/16
Have final running application completed Everyone 14/04/16
Table 1: Breakdown of work
2. Design
The proposed mobile application is a simple and straightforward way for students to track
their finances and save money. The application will also allow users to save money for
certain gifts they may want. The aim of the design stage of this project is to develop an
application which provided a rich and engaging experience for the user.
6
2.1 Early Design Stage
The proposed application was designed into five user interfaces (UI) (see Figure 1 and Figure
2), which allow the user to add the money they had spent or saved and see the amount of
money they had spent or saved. The images below are the early proposed design for what
each UI might look like. These prototypes of the UI’s gave us a clear idea of what we wanted
our end product to look like before coding began. They also helped in developing a consistent
layout between each UI, as the pages of the application were divided between the three
developers.
Figure 1: Early sketches of app design
7
8
Figure 2: Sample pages for application
2.2 Using the Application
The application will load onto the ‘Homepage’ which consists of images which graphically
represent the pages of the application. The user can click on any of the images and it will
bring them to the desired page. The ‘What I Spent’ page displays the different categories
(such as rent, food and clothing) the user has spent money in. This page is displayed in a list
view and show the name of the category along with the amount the user has spent in the
category. The ‘Enter Expenses’ page is where the user can enter their spending’s. This page
consists of edit text, which related to each category, where the user can enter the amount of
money they had spent in a certain category. The user can submit their spending by clicking
on the ADD button at the bottom of the page. The ‘Statistics’ page displays the statistics of
the user’s finances on a pie chart. The pie chart shows how much the user has spent in each
category, this page also displays a progression bar which shows how much the user has saved
and spent. Finally, the ‘Goals’ page allows the user to set themselves goals, the user can enter
their savings which will be appended to the goals progress bar. The progress bar displays how
much the user has saved for the goal and how much is left to save. This page must allow the
user to enter savings and set up a goal.
9
The user will be the only ‘actor’ in this application, the Use Case diagram below (see Figure
3) demonstrates what acts the user can carry out.
Figure 3: Use Case Diagram
2.3 Data Storage and Database
A lot of thought went into the decision of how to store data; there were four key aspects
which needed to be considered in the management of data. The application must be able to
update the data without Wi-Fi, it must be able to separate the data into different categories,
the data must be easily saved to and read from these categories and it must be possible to
10
reset the data. The database SQLite was chosen as it was seen as the best way to store data
and to fulfil the aspects we needed.
SQLite is an open source database that is free to use, it is also a relational database which
means that the database is structured to recognize relations between stored items of
information. The most important feature of SQLite is that it is a local database, so it does not
require any server or Open Database Connectivity or Java Database Connectivity queries for
its functionality. SQLite saves the data into a text file which is saved locally on the user's
Android device. Furthermore Android comes with built in SQLite database implementations,
so there is no need to install any extra libraries to use SQLite with Android. These are the
reasons why SQLite was the perfect data management system to store the data for our
financial application.
2.4 Logo
As the application will be downloadable from the app store and will be displayed on a user's
mobile the icon that represents the application is very important. The logo for the icon must
catch the user’s eye; for many people the applications logo can be the deciding factor on
whether to download the application or not. So our logo must be aesthetically pleasing and
should visually represent the application.
A catchy name for our financial tracking and saving application was also needed, in order to
better attract users. The name the application was given is ‘Save4Ewe’. The logo needed to
accurately represent this name, but at the same time be visually appealing. To create the logo
we combined two images together (Image A and Image B), using Adobe Fireworks. In this
logo we tried to create the look of money in a ‘piggy bank’. Image B was placed under Image
A, and then a ‘layer mask’ was placed on Image A so that the inside of the sheep could be
removed and Image B was visible from underneath. The blue background around the sheep
logo was then made transparent so that the background on the user’s device was seen around
the sheep, see Image C; this was our final logo.
11
Image A Image B Image C
Figure 4: Creating the logo in Adobe Fireworks
3. Technologies
Android Studio
Android Studio was the chosen system to create this
mobile application; it was the most logical option as
the application had to be developed for an Android
platform. Android Studio allows you to build
applications for Android phones. With its variety of features it makes it easier to manage
projects and resources and test your applications, with its pre-configured emulator. Although
Android Studio did cause a few issues when first downloading, the system was still used to
code our financial tracking application, as it was the easiest way to develop the application
without having to code in another system and importing the code into Android Studio.
12
Adobe Fireworks CS6
The popular graphics editing application Adobe
Fireworks was useful in completing one of the
essential features for the application. It was used
to create an interesting application logo and
catchy name to attract users. This application was
chosen for its ability to manipulate bitmaps to
create unique images. Two of the developers had
practice using this graphics editing tool so there
was no time taken to learn how to use the
application. Fireworks was used to create the logo for the mobile application, which would
attract users. Fireworks was also used to design and edit the images used within the
application, so that the images used within the application complemented its design and style.
SQLite
SQLite is a software library that implements a self-
contained, server-less, zero-configuration, transactional SQL
database engine. Also Android comes with the built in
SQLite database implementations. This made SQLite
perfectly suited for the applications needs. The database is embedded into the applications
software, so there was no need to access an external database; this made it a lot easier to
manage data. This database management system allowed us to fulfil all our applications
needs, which were mentioned above.
4. Implementation
4.1 Homepage
The homepage was developed through a combination of all developers’ ideas and styles. The
page was first planned to display four images which would navigate the user to the other
pages in the application, with each image representing the page which it related to (see Figure
13
1). But we re-designed the layout of the pages. As the user would now be accessing the
‘Enter Expenses’ page through the ‘What I Spent’ page, so now only three images would be
displayed on the homepage. This seemed to be a better way to layout the pages, as a user
would be able to look at what they have already spent and see if they can buy an item, they
can then add an item, if they decide to buy it, through the same page. Due to this change the
layout of the home screen had to be re-designed as three square images on a page would not
look appealing. We decided to display the images which represented the ‘What I Spent’,
‘Statistics’ and ‘Goals’ pages within circles which would be scattered across the page. The
user would be able to click on each of these circles which would navigate the user to the
relevant page.
An animation ‘Splash’ screen would initialise before the main ‘Home’ page was reached to
give the application a professional and appealing look and feel. The layout for this page was
created through the layout file, the circles also differed in sizes to look more aesthetically
pleasing. The images displayed in the circles were retrieved from the internet. The main Java
class was where the code which linked each of these buttons to their relevant page was
created.
public class Splash extends MainActivity {
@Override
protected void onCreate(Bundle savedInstanceState) {
super.onCreate(savedInstanceState);
setContentView(R.layout.splashh);
final ImageView iv = (ImageView) findViewById(R.id.image_view);
final Animation an =
AnimationUtils.loadAnimation(getBaseContext(),R.anim.rotate);
final Animation an2 =
AnimationUtils.loadAnimation(getBaseContext(),R.anim.abc_fade_out);
iv.startAnimation(an);
an.setAnimationListener(new Animation.AnimationListener() {
public void onAnimationStart(Animation animation) {
}
public void onAnimationEnd(Animation animation) {
iv.startAnimation(an2);
finish();
Intent i = new Intent(getBaseContext(),MainActivity.class);
startActivity(i);
}
public void onAnimationRepeat(Animation animation) {
14
}
});
}
}
Splash.java
<?xml version="1.0" encoding="utf-8"?>
<RelativeLayout xmlns:android="http://schemas.android.com/apk/res/android"
xmlns:tools="http://schemas.android.com/tools"
android:layout_width="match_parent"
android:layout_height="match_parent"
android:paddingBottom="@dimen/activity_vertical_margin"
android:paddingLeft="@dimen/activity_horizontal_margin"
android:paddingRight="@dimen/activity_horizontal_margin"
android:paddingTop="@dimen/activity_vertical_margin"
android:background="#FFFFFF"
tools:context=".Splash">
<TextView
android:layout_width="wrap_content"
android:layout_height="wrap_content"
android:text="The Finance Tracker"
android:textSize="30sp"
android:layout_alignParentBottom="true"
android:layout_centerHorizontal="true"
android:layout_marginBottom="94dp"
android:id="@+id/textView"
android:textColor="#1ce9ca" />
<ImageView android:id="@+id/image_view"
android:layout_width="wrap_content"
android:layout_height="wrap_content"
android:adjustViewBounds="true"
android:maxWidth="200dp"
android:maxHeight="200dp"
android:scaleType="fitCenter"
android:src="@drawable/loading4"
android:layout_above="@+id/textView"
android:layout_centerHorizontal="true"
android:layout_marginBottom="58dp" />
</RelativeLayout>
Splash.xml
package com.example.the_thunderdome.financetrackingapp;
import android.content.Intent;
import android.support.v7.app.AppCompatActivity;
import android.os.Bundle;
import android.view.View;
import android.widget.Button;
import android.widget.ImageButton;
public class MainActivity extends AppCompatActivity {
@Override
protected void onCreate(Bundle savedInstanceState) {
super.onCreate(savedInstanceState);
setContentView(R.layout.activity_main);
Button advance_to_gift = (Button)findViewById(R.id.imageButton4);
15
advance_to_gift.setOnClickListener(new View.OnClickListener() {
@Override
public void onClick(View view) {
Intent intent = new Intent(MainActivity.this, Giftscreen.class);
startActivity(intent);
}
});
Button advance_to_expenses = (Button)findViewById(R.id.imageButton1);
advance_to_gift.setOnClickListener(new View.OnClickListener() {
@Override
public void onClick(View view) {
Intent intent = new Intent(MainActivity.this, expenses.class);
startActivity(intent);
}
});
Button advance_to_statistics = (Button)findViewById(R.id.imageButton3);
advance_to_gift.setOnClickListener(new View.OnClickListener() {
@Override
public void onClick(View view) {
Intent intent = new Intent(MainActivity.this, statistics.class);
startActivity(intent);
}
});
}
}
Homepage.java
<?xml version="1.0" encoding="utf-8"?>
<RelativeLayout xmlns:android="http://schemas.android.com/apk/res/android"
xmlns:tools="http://schemas.android.com/tools"
android:layout_width="match_parent"
android:layout_height="match_parent"
android:paddingBottom="@dimen/activity_vertical_margin"
android:paddingLeft="@dimen/activity_horizontal_margin"
android:paddingRight="@dimen/activity_horizontal_margin"
android:paddingTop="@dimen/activity_vertical_margin"
android:background="#FFFFFF"
tools:context="com.example.the_thunderdome.financetrackingapp.MainActivity">
<TextView
android:layout_width="wrap_content"
android:layout_height="wrap_content"
android:text="The Finance Tracker"
android:textSize="35sp"
android:id="@+id/textView"
android:textColor="#1ce9ca"
android:layout_alignParentRight="true"
android:layout_alignParentEnd="true"
android:layout_above="@+id/imageButton3"
16
android:layout_alignParentTop="true"
android:layout_alignParentLeft="true"
android:layout_alignParentStart="true" />
<Button
android:layout_width="250dp"
android:layout_height="250dp"
android:background="@drawable/rounded_button"
android:gravity="center_vertical|center_horizontal"
android:text="Expenses"
android:textColor="#fff"
android:id="@+id/imageButton1"
android:layout_below="@+id/imageButton3"
android:layout_toRightOf="@+id/imageButton3"
android:layout_toEndOf="@+id/imageButton3" />
<Button
android:layout_width="170dp"
android:layout_height="170dp"
android:background="@drawable/rounded_button2"
android:gravity="center_vertical|center_horizontal"
android:text="Statistics"
android:textColor="#fff"
android:id="@+id/imageButton3"
android:layout_centerVertical="true"
android:layout_alignParentLeft="true"
android:layout_alignParentStart="true" />
<Button
android:layout_width="170dp"
android:layout_height="170dp"
android:background="@drawable/rounded_button3"
android:gravity="center_vertical|center_horizontal"
android:text="Savings"
android:textColor="#fff"
android:id="@+id/imageButton4"
android:layout_above="@+id/imageButton1"
android:layout_alignParentRight="true"
android:layout_alignParentEnd="true"
android:layout_marginBottom="83dp" />
</RelativeLayout>
Homepage.xml
17
4.2 ‘What I Spent’ Page
This page of the application needed to display the categories in which the user can split the
expenses into, the amount of money spent in each category (which is read from the database)
and an image which represents the category. The icons used to represent each category were
retrieved from online (AIGA, 2016; Iconsdb.com, 2016; Icons8, 2016; Skillswise, 2013;
Simpson, 2016; Tsao, 2016; United States Department of Transportation, 2016). A lot of
research and trial and error went into getting this page to look how we wanted it to. At first I
attempted to use a linear layout to create the list format we wanted. But this layout only
allowed you to append one item to each row; this would not work as there needed to be three
items in each row. This lead us to use a list view which allowed us to create the desired
layout. This page and its layout can be seen in Figure 6 below. This page was linked to the
‘Enter Expenses’ page; there is a button at the end of the page which allowed the used to go
to the page. At first all the pages where separate but we found it fit better if these two pages
were linked.
A list view is a layout that displays a list of scrollable items. To create this list view I created
an adapter (ListAdapter.java) which would automatically insert items to the list, these items
are pulled from an array and a database. The java class Category.java, generated getters and
setters for each of the items which would be appended to the list view. In the main java class
(MyListView.java) the array of category names was initialised, the corresponding images
were set and the amount spent in each category was read from the database. The code which
read from the database was placed into the main activity; this code populated the list view
with the amount of money the user spent in the certain categories. This method to populate
the list view was called in the onCreate() method and was also called after more data was
entered by the user so that it would refresh the amount spent. To create the layout for this list
view the layout file, content_my_list_view.xml, was edited and a new layout file was created
(list_row.xml). These two layout files created the layout of the list view which can be seen in
Figure 6. Finally this page was completed by creating the title (What I Spent...) for this page,
which is displayed in the menu bar. This title was created by editing the Android Manifest.
18
Figure 6: Screenshot of page running
import android.content.Intent;
import android.database.Cursor;
import android.os.Bundle;
import android.support.design.widget.FloatingActionButton;
import android.support.v7.app.AppCompatActivity;
import android.support.v7.widget.Toolbar;
import android.view.Menu;
import android.view.MenuItem;
import android.view.View;
import android.widget.ListView;
import android.widget.SimpleCursorAdapter;
import java.util.ArrayList;
import java.util.List;
public class MyListView extends AppCompatActivity
{
private List<Category> categoryList = new ArrayList<>();
private ListAdapter listAdapter;
private ListView listView;
DbHelper myDb = new DbHelper(this);
//setting the names for each category
String[] categoryTitle = new String[]{
"Rent","Food", "Clothing", "Travel", "Entertainment", "Nights Out",
"Other"
};
//adding an image to each category
int[] imagesId = new int[]{
R.drawable.ic_rent,
R.drawable.ic_food,
R.drawable.ic_clothing,
R.drawable.ic_travel,
R.drawable.ic_entertainment,
19
R.drawable.ic_drinks,
R.drawable.ic_other
};
String[] amountSpent = new String[]{
"€0","€0", "€0", "€0", "€0", "€0", "€0"
};
@Override
protected void onCreate(Bundle savedInstanceState) {
super.onCreate(savedInstanceState);
setContentView(R.layout.activity_my_list_view);
Toolbar toolbar = (Toolbar) findViewById(R.id.toolbar);
setSupportActionBar(toolbar);
//button which links to enter expenses page
FloatingActionButton fab = (FloatingActionButton)
findViewById(R.id.btnLink);
fab.setOnClickListener(new View.OnClickListener() {
@Override
public void onClick(View view) {
Intent intent = new Intent(MyListView.this, MyExpenses.class);
startActivity(intent);
}
});
//this creates the ListView and populates it will relevant items
listView = (ListView) findViewById(R.id.listView);
listAdapter = new ListAdapter(this, categoryList);
listView.setAdapter(listAdapter);
for (int i = 0; i < categoryTitle.length; i++) {
Category category = new Category();
category.setTitle(categoryTitle[i]);
category.setImages(imagesId[i]);
category.setAmountSpent(amountSpent[i]);
categoryList.add(category);
};
populateListView();
}
@Override
public boolean onCreateOptionsMenu(Menu menu)
{
// Inflate the menu; this adds items to the action bar if it is present.
getMenuInflater().inflate(R.menu.menu_my_list_view, menu);
return true;
}
@Override
public boolean onOptionsItemSelected(MenuItem item)
{
// Handle action bar item clicks here. The action bar will
// automatically handle clicks on the Home/Up button, so long
// as you specify a parent activity in AndroidManifest.xml.
int id = item.getItemId();
//noinspection SimplifiableIfStatement
if (id == R.id.action_settings)
{
return true;
}
return super.onOptionsItemSelected(item);
}
public void populateListView()
{
Cursor cursor = myDb.getAllData();
String[] fromFieldNames = new String[] {DbHelper.COL_1, DbHelper.COL_2,
DbHelper.COL_3,
20
DbHelper.COL_4, DbHelper.COL_5, DbHelper.COL_6, DbHelper.COL_7};
int[] toViewIDs = new int[] {R.id.tvAmountSpent};
SimpleCursorAdapter myCursorAdapter;
myCursorAdapter = new
SimpleCursorAdapter(getBaseContext(),R.layout.list_row, cursor,
fromFieldNames,toViewIDs, 0);
ListView myList = (ListView) findViewById(R.id.listView);
myList.setAdapter(myCursorAdapter);
}
}
MyListView.java
<?xml version="1.0" encoding="utf-8"?>
<RelativeLayout
xmlns:android="http://schemas.android.com/apk/res/android"
xmlns:app="http://schemas.android.com/apk/res-auto"
xmlns:tools="http://schemas.android.com/tools"
android:layout_width="wrap_content"
android:layout_height="match_parent"
android:orientation="vertical"
android:paddingBottom="@dimen/activity_vertical_margin"
android:paddingLeft="@dimen/activity_horizontal_margin"
android:paddingRight="@dimen/activity_horizontal_margin"
android:paddingTop="@dimen/activity_vertical_margin"
app:layout_behavior="@string/appbar_scrolling_view_behavior"
tools:context="com.example.alex.listview.MyListView"
tools:showIn="@layout/activity_my_list_view">
<ListView
android:layout_width="fill_parent"
android:layout_height="wrap_content"
android:id="@+id/listView"
android:divider="@color/list_divider"
android:dividerHeight="1dp"
android:layout_alignParentLeft="true"
android:layout_alignParentStart="true"
android:layout_alignParentBottom="true"
android:layout_alignParentTop="true"
android:layout_alignParentRight="true"
android:layout_alignParentEnd="true" />
</RelativeLayout>
content_my_list_view.xml
public class Category {
private String title;
private String amountSpent;
private int images;
public Category(){
}
public Category (String title, int images, String amountSpent){
this.title = title;
this.images = images;
this.amountSpent = amountSpent;
}
21
public String getTitle(){
return title;
}
public void setTitle (String title){
this.title = title;
}
public int getImages(){
return images;
}
public void setImages (int images) {
this.images = images;
}
public String getAmountSpent(){
return amountSpent;
}
public void setAmountSpent (String amountSpent){
this.amountSpent = amountSpent;
}
}
Category.java
import android.app.Activity;
import android.content.Context;
import android.view.LayoutInflater;
import android.view.View;
import android.view.ViewGroup;
import android.widget.BaseAdapter;
import android.widget.ImageView;
import android.widget.TextView;
import java.util.List;
/**
* Created by Alex on 02/03/2016.
*/
public class ListAdapter extends BaseAdapter {
private Activity activity;
private List<Category> categoryList;
private LayoutInflater inflater;
public ListAdapter(Activity activity, List<Category>categoryList) {
this.activity = activity;
this.categoryList = categoryList;
}
@Override
public int getCount(){
return categoryList.size();
}
@Override
public Object getItem(int position){
return categoryList.get(position);
}
@Override
public long getItemId(int position){
return position;
}
@Override
public View getView(int position, View convertView, ViewGroup parent){
if(inflater == null){
22
inflater =
(LayoutInflater)activity.getSystemService(Context.LAYOUT_INFLATER_SERVICE);
}
if(convertView == null){
convertView = inflater.inflate(R.layout.list_row, null);
}
ImageView images = (ImageView) convertView.findViewById(R.id.ivCategory);
TextView title = (TextView) convertView.findViewById(R.id.tvTitle);
TextView amountSpent = (TextView)
convertView.findViewById(R.id.tvAmountSpent);
Category category = categoryList.get(position);
images.setImageResource(category.getImages());
title.setText(category.getTitle());
amountSpent.setText(category.getAmountSpent());
return convertView;
}
}
ListAdapter.java
<?xml version="1.0" encoding="utf-8"?>
<RelativeLayout
xmlns:android="http://schemas.android.com/apk/res/android"
android:orientation="vertical"
android:layout_width="match_parent"
android:layout_height="match_parent"
android:padding="6dp"
android:paddingTop="6dp"
android:paddingBottom="6dp">
//Images which will be displayed
<ImageView
android:id="@+id/ivCategory"
android:layout_width="60dp"
android:layout_height="40dp"
android:src="@drawable/ic_rent"
android:layout_alignTop="@+id/linerLayout"
android:layout_alignParentLeft="true"
android:layout_alignParentStart="true"/>
//Names of each category
<TextView
android:id="@+id/tvTitle"
android:layout_width="wrap_content"
android:layout_height="wrap_content"
android:textAllCaps="true"
android:layout_centerHorizontal="true"
android:text="Rent"
android:textSize="15dp"
android:layout_centerInParent="true"
android:gravity="center"/>
<LinearLayout
android:layout_width="wrap_content"
android:layout_height="wrap_content"
android:orientation="horizontal"
android:layout_alignParentRight="true"
android:layout_alignParentTop="true"
android:id="@+id/linerLayout">
//The amount spent in each category
23
<TextView
android:id="@+id/tvAmountSpent"
android:layout_width="wrap_content"
android:layout_height="wrap_content"
android:textSize="15dp"
android:text="€"/>
</LinearLayout>
</RelativeLayout>
list_row.xml
4.3 ‘Enter Expenses’ Page
This page was originally going to consist of a calculator, a dropdown menu and a button
which allowed the user to add data to the database. This page would allow the user to select
which category they wanted to add money to from the dropdown menu. While the calculator
allowed the user to type the amount of money in they had spent, a calculator setup was
chosen so that the user could add multiple items in at the same time and add them together.
But due to the fact we had little knowledge on databases we were unable to create this page in
the desired way. We were unable to use the dropdown menu to relate to the categories in the
database, and we could not find any tutorials or code that would help in creating our desired
page. Due to this hurdle we re-designed the page so that it would be easier to enter data into
the database. The re-designed page consisted of edit texts for each category with two buttons.
The edit texts allowed the user to add the money they had spent in a certain category to the
database and one of the buttons allowed the user to reset the database back to zero (see Figure
7).
The layout of this page was created through the layout file, content_my_expenses.xml. Each
edit texts in the layout had a hint which displayed the category name. The main purpose of
this page was to add the data to the SQLite database, two java classes were used to add this
data to the database and also reset the database (MyExpenses.java and DbHelper.java). The
DbHelper.java class was used to create the database and database table, this was done
through a query. There were two methods used when creating the table in the database
onCreate() and onUpgrade(). The onCreate() method was used to create a table if one did not
exist, while the onUpgrade() method opened the table if it existed. Two other methods were
used within this java class, one to insert the data into the relevant columns and one that reset
all the database columns to zero. The method which inserted the data was specially coded so
24
that any time the user clicked the add button the data was appended onto the existing number
in the relevant column. The MyExpenses.java was the main class and called all the methods
to run, which create the table and add the data to the table. This class also provided toasts
(messages to the user) which would display once a button was clicked, telling the user
whether the data was added or not and if the database was reset. This is the database in
which the list view on the ‘What I Spent’ page reads from.
Figure 7: Screenshot of page running
import android.app.AlertDialog;
import android.os.Bundle;
import android.support.v7.app.AppCompatActivity;
import android.support.v7.widget.Toolbar;
import android.view.View;
import android.widget.Button;
import android.widget.EditText;
import android.widget.Toast;
public class MyExpenses extends AppCompatActivity
{
DbHelper myDb;
EditText editRent,editFood, editClothing, editTravel,
editEntertainment, editNightsOut, editOther;
Button btnAddData;
Button btnReset;
@Override
protected void onCreate(Bundle savedInstanceState)
{
25
super.onCreate(savedInstanceState);
setContentView(R.layout.activity_my_expenses);
Toolbar toolbar = (Toolbar) findViewById(R.id.toolbar);
setSupportActionBar(toolbar);
//calls the methods to create the database table
myDb = new DbHelper(this);
editRent = (EditText) findViewById(R.id.editText_rent);
editFood = (EditText) findViewById(R.id.editText_food);
editClothing = (EditText) findViewById(R.id.editText_clothing);
editTravel = (EditText) findViewById(R.id.editText_travel);
editEntertainment = (EditText) findViewById(R.id.editText_entertainment);
editNightsOut = (EditText) findViewById(R.id.editText_nightsOut);
editOther = (EditText) findViewById(R.id.editText_other);
btnAddData = (Button) findViewById(R.id.button_add);
btnReset = (Button) findViewById(R.id.button_reset);
//call all method
AddData();
ResetData();
}
public void ResetData()
{
btnReset.setOnClickListener(
new View.OnClickListener()
{
@Override
public void onClick(View v)
{
Integer deletedRows = myDb.resetData(null);
Toast.makeText(MyExpenses.this, "Reset",
Toast.LENGTH_LONG).show();
}
});
}
public void AddData()
{
btnAddData.setOnClickListener(
new View.OnClickListener() {
@Override
public void onClick(View v) {
boolean isInserted =
myDb.insertData(editRent.getText().toString(),
editFood.getText().toString(),
editClothing.getText().toString(),
editTravel.getText().toString(),
editEntertainment.getText().toString(),
editNightsOut.getText().toString(),
editOther.getText().toString());
if (isInserted) {
Toast.makeText(MyExpenses.this, "Added",
Toast.LENGTH_LONG).show();
} else {
Toast.makeText(MyExpenses.this, "Data not Inserted",
Toast.LENGTH_LONG).show();
}
editRent.setText("");
editFood.setText("");
editClothing.setText("");
editTravel.setText("");
editEntertainment.setText("");
editNightsOut.setText("");
editOther.setText("");
}
26
});
}
public void showMessage(String title, String Message)
{
AlertDialog.Builder builder = new AlertDialog.Builder(this);
builder.setCancelable(true);
builder.setTitle(title);
builder.setMessage(Message);
builder.show();
}
}
MyExpenses.java
import android.content.ContentValues;
import android.content.Context;
import android.database.Cursor;
import android.database.sqlite.SQLiteDatabase;
import android.database.sqlite.SQLiteOpenHelper;
/**
* Created by Alex on 08/04/2016.
*/
public class DbHelper extends SQLiteOpenHelper
{
//name of database, the table and columns
public static final String DATABASE_NAME = "expenses.db";
public static final String TABLE_NAME = "expenses_table";
public static final String COL_1 = "RENT";
public static final String COL_2 = "FOOD";
public static final String COL_3 = "CLOTHING";
public static final String COL_4 = "TRAVEL";
public static final String COL_5 = "ENTERTAINMENT";
public static final String COL_6 = "NIGHTS_OUT";
public static final String COL_7 = "OTHER";
//when this constructor is called the database will be created
public DbHelper(Context context) {super(context, DATABASE_NAME, null, 1);}
//when this method is called it will create a table
@Override
public void onCreate(SQLiteDatabase db)
{
//this will execute the query and create the table
db.execSQL("create table " + TABLE_NAME + " (RENT INTEGER, FOOD INTEGER, "
+
"CLOTHING INTEGER, TRAVEL INTEGER, ENTERTAINMENT INTEGER, " +
"NIGHTS_OUT INTEGER, OTHER INTEGER);");
}
@Override
public void onUpgrade(SQLiteDatabase db, int oldVersion, int newVersion)
{
db.execSQL("DROP TABLE IF EXISTS "+TABLE_NAME);
onCreate(db);
}
//this method will add the data to database
public boolean insertData(String rent, String food, String clothing, String
travel,
String entertainment, String nightsOut, String
other)
{
SQLiteDatabase db = this.getWritableDatabase();
ContentValues contentValues = new ContentValues();
27
//placing data into each column
contentValues.put(COL_1,rent);
contentValues.put(COL_2,food);
contentValues.put(COL_3,clothing);
contentValues.put(COL_4,travel);
contentValues.put(COL_5,entertainment);
contentValues.put(COL_6,nightsOut);
contentValues.put(COL_7,other);
long result;
result = db.insert(TABLE_NAME,null ,contentValues);
if(result == -1)
{
return false;
}
else
{
return true;
}
}
//this method will get the data from the database
public Cursor getAllData() {
SQLiteDatabase db = this.getWritableDatabase();
Cursor res = db.rawQuery("Select * from " + TABLE_NAME, null);
return res;
}
public Integer resetData (String _id)
{
SQLiteDatabase db = this.getWritableDatabase();
return db.delete(TABLE_NAME, null, null);
}
}
DbHelper.java
<?xml version="1.0" encoding="utf-8"?>
<RelativeLayout xmlns:android="http://schemas.android.com/apk/res/android"
xmlns:app="http://schemas.android.com/apk/res-auto"
xmlns:tools="http://schemas.android.com/tools"
android:layout_width="match_parent"
android:layout_height="match_parent"
android:paddingBottom="@dimen/activity_vertical_margin"
android:paddingLeft="@dimen/activity_horizontal_margin"
android:paddingRight="@dimen/activity_horizontal_margin"
android:paddingTop="@dimen/activity_vertical_margin"
app:layout_behavior="@string/appbar_scrolling_view_behavior"
tools:context="com.example.alex.listview.MyExpenses"
tools:showIn="@layout/activity_my_expenses">
<EditText
android:layout_width="match_parent"
android:layout_height="wrap_content"
android:id="@+id/editText_rent"
android:inputType="number"
android:hint="Rent"
android:textSize="20dp"/>
<EditText
android:layout_width="match_parent"
android:layout_height="wrap_content"
28
android:id="@+id/editText_food"
android:inputType="number"
android:layout_below="@+id/editText_rent"
android:layout_alignParentLeft="true"
android:layout_alignParentStart="true"
android:layout_marginTop="15dp"
android:hint="Food"
android:textSize="20dp"/>
<EditText
android:layout_width="match_parent"
android:layout_height="wrap_content"
android:id="@+id/editText_clothing"
android:inputType="number"
android:layout_below="@+id/editText_food"
android:layout_alignParentLeft="true"
android:layout_alignParentStart="true"
android:layout_marginTop="15dp"
android:hint="Clothing"
android:textSize="20dp"/>
<EditText
android:layout_width="match_parent"
android:layout_height="wrap_content"
android:id="@+id/editText_travel"
android:inputType="number"
android:layout_below="@+id/editText_clothing"
android:layout_alignParentLeft="true"
android:layout_alignParentStart="true"
android:layout_marginTop="15dp"
android:hint="Travel"
android:textSize="20dp"/>
<EditText
android:layout_width="match_parent"
android:layout_height="wrap_content"
android:id="@+id/editText_entertainment"
android:inputType="number"
android:layout_below="@+id/editText_travel"
android:layout_alignParentLeft="true"
android:layout_alignParentStart="true"
android:layout_marginTop="15dp"
android:hint="Entertainment"
android:textSize="20dp"/>
<EditText
android:layout_width="match_parent"
android:layout_height="wrap_content"
android:id="@+id/editText_nightsOut"
android:inputType="number"
android:layout_below="@+id/editText_entertainment"
android:layout_alignParentLeft="true"
android:layout_alignParentStart="true"
android:layout_marginTop="15dp"
android:hint="Nights Out"
android:textSize="20dp"/>
<EditText
android:layout_width="match_parent"
android:layout_height="wrap_content"
android:id="@+id/editText_other"
android:inputType="number"
android:hint="Other"
android:textSize="20dp"
android:layout_below="@+id/editText_nightsOut"
android:layout_alignParentLeft="true"
29
android:layout_alignParentStart="true"
android:layout_marginTop="15dp"/>
<Button
android:layout_width="wrap_content"
android:layout_height="wrap_content"
android:text="Add"
android:id="@+id/button_add"
android:layout_marginTop="18dp"
android:layout_below="@+id/editText_other"
android:layout_alignParentLeft="true"
android:layout_alignParentStart="true" />
<Button
android:layout_width="wrap_content"
android:layout_height="wrap_content"
android:text="Reset"
android:id="@+id/button_reset"
android:layout_alignTop="@+id/button_add"
android:layout_alignRight="@+id/editText_other"
android:layout_alignEnd="@+id/editText_other" />
</RelativeLayout>
content_my_expenses.xml
4.4 ‘Statistics’ Page
This is the page where the user can access from the Home Screen, to see exactly how much
they have spent, but also how much they have saved. It is and quick and efficient way for
users to grasp their financial situation, and more importantly puts into perspective, their
spend versus save capabilities. This page has two options as stated above; ‘Expenses’ and
‘Savings’, and when the user originally selects the ‘Statistics’ option, it displays the expenses
first. It shows a combined figure of all the expenses the user has spent such as ‘Rent’ and
‘Other’. The second option that the user can choose on this page is ‘Savings’, and it is in
exactly the same layout structure as the ‘Expenses’ statistic view, so as to keep in line with
design continuity. It is in exactly the same design format as the ‘Expenses’ with the
exception, in order to differentiate between the two statistics, the colour presentation of each
page.
The ‘Expenses’ option will have red overtones and the ‘Savings’ option will have green.
These colours were chosen as red is generally associated with alarm or alert which fits in well
with ‘Expenses’, as the user should be gently warned as to how much money they are
spending. The ‘Savings’ option will have green overtones, as the colour green is usually
associated with progress, success or quite simply the opposite of red. It is also associated in
modern day culture with money, and this is very apt as you essentially will have more money
30
as shown on the ‘Savings’ statistic page. The two statistics are calculated and shown from
two separate databases. When either option is chosen and clicked, it calls the database and
shows the cumulative contents of each, and presents it as a figure to the user. This is the
easiest and simplest way for a user to see their financial situation in an uncluttered,
straightforward and no nonsense way.
This page was not fully completed for the submission of this report; the only item so far
displayed on this page is a pie chart which displays how much the user has spent in each
category. This allows users to graphically see how much they have spent in each category and
see where they may be able to cut back and save. This pie chart will be created using the
MPAndroidChart from the Android library.
package com.example.alex.myapplication;
import android.graphics.Color;
import android.os.Bundle;
import android.support.v7.app.AppCompatActivity;
import android.support.v7.widget.Toolbar;
import android.view.Menu;
import android.view.MenuItem;
import android.widget.RelativeLayout;
public class MainActivity extends AppCompatActivity
{
private RelativeLayout mainLayout;
private PieChart mChart;
private float[] yData = {20, 10, 25, 5, 15, 25};
private String[] xData = {"item 1", "item 2", "item 3", "item 4", "item 5",
"item 6"};
@Override
protected void onCreate(Bundle savedInstanceState)
{
super.onCreate(savedInstanceState);
setContentView(R.layout.activity_main);
Toolbar toolbar = (Toolbar) findViewById(R.id.toolbar);
setSupportActionBar(toolbar);
mainLayout = (RelativeLayout) findViewById(R.id.mainLayout);
mChart = new PieChart (this);
mainLayout.addView(mChart);
mainLayout.setBackgroundColor(Color.LTGRAY);
mChart.setUsePercentValues(true);
mChart.setDescription("Pie Chart");
mChart.setDrawHoleEnabled(true);
mChart.setHoleColorTransparent(true);
mChart.setHoleRasius(7);
mChart.setTransparentCircleRadius(10);
mChart.setOnChartValueSelectedListener(new OnChartValueSelectedListener()
{
public void onValueSelected(Entry e, int dataSetIndex, Highlight h)
{
31
}
public void onNothingSelected()
{
}
});
}
@Override
public boolean onCreateOptionsMenu(Menu menu) {
// Inflate the menu; this adds items to the action bar if it is present.
getMenuInflater().inflate(R.menu.menu_main, menu);
return true;
}
@Override
public boolean onOptionsItemSelected(MenuItem item) {
// Handle action bar item clicks here. The action bar will
// automatically handle clicks on the Home/Up button, so long
// as you specify a parent activity in AndroidManifest.xml.
int id = item.getItemId();
//noinspection SimplifiableIfStatement
if (id == R.id.action_settings) {
return true;
}
return super.onOptionsItemSelected(item);
}
}
MainActivity.java
4.5 ‘Goals’ Page
The ‘Goals’ page is an option which allows a user the option to add a special item or goal to
save up for. The idea was that most of the finance tracking applications on the market were
orientated towards the negative aspects of finance tracking. Most of the applications that we
tested nearly always showed how much money they were spending, and how much money
they essentially did not have anymore, rather than any beneficial aspects. This option will
give the user a satisfying and gratifying feeling, and make them eager to use the application.
It will also help them to save money in general, especially for those users who cannot save or
are incapable of savings. As by proxy, if a user really wants an item they need money to pay
for it, and if they could use the desired item as a target, that they could see every day or week
how close they are getting to obtaining that target, they would use it, regardless of if they
were an enthusiastic saver or not. It also acts as an incentive to use the application, as users
who require a finance tracking application obviously need the application to help with their
finances, however, if it contained something positive that they could do with their finances,
such as saving for a target item, that would create a positive and appealing aspect associated
32
with the application. This will help increase the appeal and continuing operation of the
application by users. The ‘Goals’ page is essentially a savings page in disguise.
The ‘Goals’ section will use an SQLite database to set up a foundation for each goal that user
creates. The first page that user sees after they pick the ‘Goals’ option from the ‘Home’ page
will show three input boxes labelled ‘Goal Name’, ‘Price’ and ‘Saved’. Underneath it will
have four options in the format of buttons labelled ‘Add’, ‘Delete’, ‘Update’ and ‘View
Goals’. The user inputs an item that they would like to buy, along with its price, and how
much they want to save immediately, if any. This information is completed on the ‘Giftadd’
page and is sent to a database implementing SQLite labelled ‘DatabaseHelper’. From there it
is stored in the phones memory, so even when the application is exited form, the information
will still be available to the user when opened again. The format of the table in the database is
ordered into four columns: the unique Id of the item, the name of the item, the price of the
item, and the savings so far towards the item. This information can be accessed and viewed
once the user clicks on the ‘View Goals’ button. The ‘Delete’ button, basically deletes goals
from the database, either the user has hit them or they simply do not want them anymore. The
‘Update’ button is where the user can update their goal, either changing the cost of the item
or adding more savings to the item. This appends the information in the database so the user
can see ,once they click on the ‘View Goals’ button, how much progress they are making on
their targeted goals.
package com.example.the_thunderdome.financetrackingapp;
import android.app.AlertDialog;
import android.content.Context;
import android.database.Cursor;
import android.database.sqlite.SQLiteDatabase;
import android.support.v7.app.AppCompatActivity;
import android.os.Bundle;
import android.view.Menu;
import android.view.MenuItem;
import android.view.View;
import android.widget.Button;
import android.widget.EditText;
import android.widget.Toast;
public class Giftadd extends AppCompatActivity{
DatabaseHelper myDb;
EditText editName,editPrice,editSavings;
Button btnAddData, deleteButton, getAllData;
@Override
protected void onCreate(Bundle savedInstanceState) {
super.onCreate(savedInstanceState);
setContentView(R.layout.activity_giftadd);
33
myDb = new DatabaseHelper(this);
editName = (EditText)findViewById(R.id.editText_name);
editPrice = (EditText)findViewById(R.id.editText_price);
editSavings = (EditText)findViewById(R.id.editText_savings);
btnAddData = (Button)findViewById(R.id.button_add);
deleteButton = (Button)findViewById(R.id.deleteButton);
getAllData = (Button)findViewById(R.id.btnviewAll);
AddData();
dataReset();
viewAll();
}
public void dataReset(){
deleteButton.setOnClickListener(new View.OnClickListener() {
@Override
public void onClick(View v) {
Integer deleteRows = myDb.dataReset(null);
Toast.makeText(Giftadd.this, "Gifts Reset",
Toast.LENGTH_LONG).show();
}
});
}
public void AddData() {
btnAddData.setOnClickListener(
new View.OnClickListener() {
@Override
public void onClick(View v) {
boolean isInserted =
myDb.insertData(editName.getText().toString(),
editPrice.getText().toString(),
editSavings.getText().toString());
if(isInserted =true)
Toast.makeText(Giftadd.this,"Gift
Added",Toast.LENGTH_LONG).show();
else
Toast.makeText(Giftadd.this,"Gift Not
Added",Toast.LENGTH_LONG).show();
}
}
);
}
public void viewAll() {
getAllData.setOnClickListener(
new View.OnClickListener() {
public void onClick(View v) {
Cursor res = myDb.getAllData();
if (res.getCount() == 0) {
showmessage("Error", "Nothing Found");
return;
}
StringBuffer buffer = new StringBuffer();
while (res.moveToNext()) {
buffer.append("Gift Id : " + res.getString(0) + "n");
buffer.append("Name : " + res.getString(1) + "n");
buffer.append("Price : €" + res.getString(2) + "n");
buffer.append("Saved So Far : €" + res.getString(3) +
"nn");
}
showmessage("Gifts", buffer.toString());
}
}
);
34
}
public void showmessage(String title, String Message) {
AlertDialog.Builder builder = new AlertDialog.Builder(this);
builder.setCancelable(true);
builder.setTitle(title);
builder.setMessage(Message);
builder.show();
}
@Override
public boolean onCreateOptionsMenu(Menu menu) {
// Inflate the menu; this adds items to the action bar if it is present.
getMenuInflater().inflate(R.menu.menu_main, menu);
return true;
}
@Override
public boolean onOptionsItemSelected(MenuItem item) {
// Handle action bar item clicks here. The action bar will
// automatically handle clicks on the Home/Up button, so long
// as you specify a parent activity in AndroidManifest.xml.
int id = item.getItemId();
//noinspection SimplifiableIfStatement
if (id == R.id.action_settings) {
return true;
}
return super.onOptionsItemSelected(item);
}
}
GiftAdd.java
<?xml version="1.0" encoding="utf-8"?>
<RelativeLayout xmlns:android="http://schemas.android.com/apk/res/android"
xmlns:tools="http://schemas.android.com/tools"
android:layout_width="match_parent"
android:layout_height="match_parent"
android:paddingBottom="@dimen/activity_vertical_margin"
android:paddingLeft="@dimen/activity_horizontal_margin"
android:paddingRight="@dimen/activity_horizontal_margin"
android:paddingTop="@dimen/activity_vertical_margin"
tools:context="com.example.the_thunderdome.financetrackingapp.Giftadd">
<EditText
android:layout_width="wrap_content"
android:layout_height="wrap_content"
android:id="@+id/editText_name"
android:width="300dp"
android:hint="Enter Item Name"
android:layout_above="@+id/editText_price"
android:layout_centerHorizontal="true" />
<EditText
android:layout_width="wrap_content"
android:layout_height="wrap_content"
android:inputType="number"
android:ems="10"
android:id="@+id/editText_price"
android:width="300dp"
android:hint="Enter Item Price"
android:layout_above="@+id/editText_savings"
android:layout_centerHorizontal="true"
35
/>
<EditText
android:layout_width="wrap_content"
android:layout_height="wrap_content"
android:inputType="number"
android:ems="10"
android:id="@+id/editText_savings"
android:width="300dp"
android:hint="Money Saved"
android:layout_above="@+id/button_add"
android:layout_centerHorizontal="true"/>
<Button
android:text="Add"
android:id="@+id/button_add"
android:onClick="addGift"
android:layout_width="wrap_content"
android:layout_height="wrap_content"
android:layout_centerVertical="true"
android:layout_toLeftOf="@+id/deleteButton"
android:layout_toStartOf="@+id/deleteButton" />
<Button
android:layout_width="wrap_content"
android:layout_height="wrap_content"
android:text="Reset Gifts"
android:id="@+id/deleteButton"
android:layout_alignTop="@+id/button_add"
android:layout_centerHorizontal="true" />
<Button
android:layout_width="wrap_content"
android:layout_height="wrap_content"
android:text="View Gifts"
android:id="@+id/btnviewAll"
android:layout_alignTop="@+id/deleteButton"
android:layout_alignParentRight="true"
android:layout_alignParentEnd="true" />
</RelativeLayout>
GiftAdd.xml
package com.example.the_thunderdome.financetrackingapp;
/**
* Created by The_Thunderdome on 08/04/2016.
*/
import android.content.ContentValues;
import android.content.Context;
import android.database.Cursor;
import android.database.sqlite.SQLiteDatabase;
import android.database.sqlite.SQLiteOpenHelper;
public class DatabaseHelper extends SQLiteOpenHelper {
public static final String DATABASE_NAME = "Gift.db";
public static final String TABLE_NAME = "gift_table";
public static final String COL_1 = "ID";
public static final String COL_2 = "NAME";
public static final String COL_3 = "PRICE";
public static final String COL_4 = "SAVINGS";
public DatabaseHelper(Context context) {
super(context, DATABASE_NAME, null, 1);
36
}
@Override
public void onCreate(SQLiteDatabase db) {
db.execSQL("create table " + TABLE_NAME + " (ID INTEGER PRIMARY KEY
AUTOINCREMENT,NAME TEXT,PRICE INTEGER,SAVINGS INTEGER)");
}
@Override
public void onUpgrade(SQLiteDatabase db, int oldVersion, int newVersion) {
db.execSQL("DROP TABLE IF EXISTS "+TABLE_NAME);
onCreate(db);
}
public boolean insertData(String name,String price,String savings) {
SQLiteDatabase db = this.getWritableDatabase();
ContentValues contentValues = new ContentValues();
contentValues.put(COL_2,name);
contentValues.put(COL_3,price);
contentValues.put(COL_4, savings);
long result = db.insert(TABLE_NAME, null ,contentValues);
if(result == -1)
return false;
else
return true;
}
public Integer dataReset (String _id){
SQLiteDatabase db = this.getWritableDatabase();
return db.delete(TABLE_NAME,null,null);
}
public Cursor getAllData(){
SQLiteDatabase db = this.getWritableDatabase();
Cursor res = db.rawQuery("select * from " + TABLE_NAME, null);
return res;
}
}
DatabaseHelper.java
5. Problems Encountered
Two main obstacles were encountered which hindered the progress of our project. As java
was largely new to us, as a programming language, there was a learning curve, especially
using java within Android Studio. These problems were generally resolved by reading about
java programming, watching tutorials about the area and reading developer communities
online. But this caused a lot of time to be spent trying to figure out how to code certain
things. The second problem which we encountered was actually getting Android Studio to
work on our computers. Due to the fact Android Studio requires a lot of memory space and
needs a relatively new computer to run the program efficiently. This took a considerable
amount of time and we were unable to start coding until this problem was resolved. In many
of these cases were conceptual problems arose they were usually fixed by gaining help from
37
people who had experience with Android Studio. But for two of us a new computer had to be
acquired that would be compatible with Android Studio.
While creating the application the biggest learning curve we encountered, in relation to java
programming was finding a way to manage and save our data. As saving data using java was
a new topic for us, we spent a bit of time trying to find the best way to store the data we want
in the way that we wanted. At first we tried to use a simple file which would be saved within
the application, where we could save data to and read data from. But this was inadequate for
the way in which we needed the data to be stored; we needed the data to be stored in a table
format with columns relating to certain categories. In the end we used a SQLite database as it
fulfilled our data management requirement. Due to our lack of knowledge about databases
problems were often encountered, but these problems were usually solved by watching
tutorials or acquiring help from people with experience (Programming Knowledge, 2015).
A finally issue was combining the application pages together, as each page was created on a
different computer the code had to be slightly changed when combining the whole
application onto one computer. This was time consuming as the code had to be thoroughly
searched in order to ensure the page's code would work on the new computer. Furthermore
the images for some pages had to be re-uploaded to the new computer. Due to all these time
delays the application was not fully completed for the submission of this report.
6. Evaluation
As the application was not fully completed before the submission of this report, the
application was only handed out to close friends (students) for testing. They tested the
application on the emulator provided by Android Studio. They admired the layout of the
application, they found that the content of each page was easily seen and it was clear how the
page functioned. From a functionality point of view the application seemed to be user
friendly, the users were able to easily navigate the application and understood how it worked.
These users also admired the savings aspect of the application and found it to be a great way
to save money as they could track what they were actually saving. Although due to the fact
the application was not fully completed the users did raise some queries about the
38
application, for instance they mentioned a time keeping aspect so that they could see the date
that they had started to track their expenses and knew how long they had been tracking them
for. This is an aspect of the application which we were unable to complete before the
submission of the report. One of us based a paper for another module on our application and
got feedback from their peers about it and formed a review. Some of the questions that were
asked in the review were; ‘What was your first impressions on opening the app’? ’Did you
find the app easy to us’? ‘Would you use this app in the future’? ‘What would you add to this
to make it more student friendly’? ‘Would you recommend this to your friends’? This review
provided a valuable insight in how the application should run.
From this evaluation it is clear we were able to fulfil some of the objectives and requirements
we had set out for the application. The application was coherent and easily navigated, the
data was easily entered, the application tracked and recorded the users spending and the
students testing the application found it appealing, so the focus on students was
fulfilled. Another requirement that we managed to fulfil was to create a unique financial
tracking application. This was accomplished by focusing on a savings aspect rather than just
tracking expenses. The users which tested the application found this savings aspect to be an
appealing part of the application.
7. Conclusion
The overall experience of creating an application for this Final Year Project was rewarding,
being able to create a fully functioning application that would work on your mobile device
was very fulfilling. Although the difficulties that came during the development of the
application were frustrating at times, the learning curve was very steep and managing to get
Android Studio functional was very time consuming. But finding solutions to these problems
we encountered made the experience as rewarding as it was. Learning about Android Studio,
java programming and databases was challenging at times and very time consuming. But this
whole experience provided us with some valuable skills. In completing this project we
learned new programing skills, improved our problem solving abilities and worked together
as a group.
We are very pleased with how our application has developed so far, we have managed to
39
accomplish the objectives and requirements we had set out of the application. The hard work
which was placed into the application allowed us to create an application that could track and
record users spending and allow the user to save up for a certain gift/goal. The design of this
application was created with the help and valuable insights of our peers and our supervisor.
This was a rewarding experience and we will be able to further build and improve on the
skills which we have gained here.
40
8. References
AIGA (2016) Drink Icon. Retrieved from
https://www.iconfinder.com/icons/134140/bar_drink_icon
Delessio, C., Darcey, L. and Conder, S. (2012). Sams Teach Yourself Android Application
Development in 24 Hours. (2nd Ed.) Indianapolis Indiana: SAMS.
Iconsdb.com (2016) Euro Icon. Retrieved from http://www.iconsdb.com/black-icons/euro-
icon.html
Icons8 (2016) Food Icon. Retrieved from http://www.iconarchive.com/show/windows-8-
icons-by-icons8/Ecommerce-Food-icon.html
Programming Knowledge. (2015, April 6). Android SQLite Database Tutorial 3 # Insert
values to SQLite Database table using Android [Video File]. Retrieved from
https://www.youtube.com/watch?v=T0ClYrJukPA
Programming Knowledge. (2015, April 9). Android SQLite Database Tutorial 4 # Show
SQLite Database table Values using Android [Video File]. Retrieved from
https://www.youtube.com/watch?v=KUq5wf3Mh0c
Programming Knowledge. (2015, May 24). Android SQLite Database Tutorial 5 # Update
values in SQLite Database table using Android [Video File]. Retrieved from
https://www.youtube.com/watch?v=PA4A9IesyCg
Programming Knowledge. (2015, May 30). Android SQLite Database Tutorial 6 # Delete
values in SQLite Database table using Android [Video File]. Retrieved from
https://www.youtube.com/watch?v=neaCUaHa2Ek
Sierra, K. and Bates, B. (2005). Head First Java. (2nd Ed.). Sebastopol, CA: O’Reilly.
Skillswise (2013) Camera Icon. Retrieved from http://www.bbc.co.uk/skillswise/0/21741802
Simpson, P. (2016) Rent Icon. Retrieved from
https://www.iconfinder.com/icons/269990/building_construction_house_property_rea
l_estate_rent_home_rent_sign_icon
Tsao, J. (2016) Train Icon. Retrieved from
https://www.pinterest.com/pin/341358846730819648/
41
United States Department of Transportation (2016) Hanger Icon. Retrieved from
https://www.iconfinder.com/icons/41960/clothing_hanger_wardrobe_icon

FINAL REPORT

  • 1.
    Personal Finance TrackerApp The design, development and implementation of a finance tracking and saving application Fodhla Russell - 12348171 Peter Redmond - 13745411 Tanya Murray – 12724775 Academic Supervisor: Josephine Griffith
  • 2.
    1 Submitted to: TheCollege of Engineering and Informatics at NUIG Presented on: 8th April 2016 Course: Bachelor of Arts (BA) Module Title: Final Year Project Module Code: CT328 Statement of Originality: “I declare that this is my work and that all contributions from other persons have been appropriately identified and acknowledged.” Acknowledgement: We would like to extend a special thanks to our supervisor Josephine Griffith for her help, advice and patience throughout the development of this project.
  • 3.
    2 Contents 1. Introduction............................................................................................................................ 3 1.1Proposal for Application ..................................................................................................3 1.2 Requirements....................................................................................................................3 1.2.1 Essential Features ......................................................................................................4 1.2.2 Desirable Features .....................................................................................................4 1.3 Breakdown of Work.........................................................................................................4 2. Design ....................................................................................................................................5 2.1 Early Design Stage...........................................................................................................6 2.2 Using the Application.......................................................................................................8 2.3 Data Storage and Database...............................................................................................9 2.4 Logo ...............................................................................................................................10 3. Technologies ........................................................................................................................ 11 4. Implementation .................................................................................................................... 12 4.1 Homepage.......................................................................................................................12 4.2 ‘What I Spent’ Page .......................................................................................................17 4.3 ‘Enter Expenses’ Page....................................................................................................23 4.4 ‘Statistics’ Page..............................................................................................................29 4.5 ‘Goals’ Page ...................................................................................................................31 5. Problems Encountered ......................................................................................................... 36 6. Evaluation ............................................................................................................................ 37 7. Conclusion ........................................................................................................................... 38 8. References............................................................................................................................ 40
  • 4.
    3 1. Introduction 1.1 Proposalfor Application The original brief for this project was to design, develop and test an application on an android platform, to allow the recording and tracking of money spending. The application should also allow an easy way to enter data and provide mechanisms to set budget limits and targets. Interviews with peers were conducted and existing financial tracking applications were examined so that we could create a financial tracking application which was unique. From this a set of requirements was developed for our application. Our personal financial tracking application is orientated towards students and focuses more on a savings aspect rather than just tracking how much money the user has spent. The application will allow users to track and record their spending in a set of categories, such as rent, food or clothing and will also allow users to track their savings. These savings can then be added up to reach a certain goal or target which was chosen by the user. The main requirements for the application were to allow users to navigate the application easily, to enter data and to set savings goals. Our finished application was required to fulfil the following objectives:  Create a coherent application which is easily navigated.  The application should focus on students and their spending criteria.  The application should focus on a savings aspect.  Data must be easily entered.  The application should allow the tracking and recording of data.  The application should allow the users to set targets/goals. 1.2 Requirements The requirements for this application were developed from interviews with our peers and the examination of existing financial tracking applications. This development of requirements was performed in order to create a personal financial tracking application which was different and unique, but also to find what aspects in tracking applications worked effectively. A variety of requirements were gathered for this application; which were subsequently divided into essential and desirable features for the application.
  • 5.
    4 1.2.1 Essential Features Theseare the features which were determined as essential for the application:  The application must be easy and coherent to use.  The application must look good and have a catchy name to attract users.  The application must be compatible with an android smartphone.  The application must allow users to easily enter the money they have spent.  The application must track the user’s spending.  The application must allow the user to enter the money they have spent into different categories.  The application must connect to an internal file where data can be written to and read from.  The application must have a way for the user to enter their savings, which would then be added up until they reach the goal (such as a gift) they have set. This is displayed on a progression bar. 1.2.2 Desirable Features These are the features which were determined as desirable (not essential):  A page with a chart which displays how much money the user has spent in each category over a certain period.  A communications section where users can share their tips and ideas on how to save money.  A way to set daily/weekly/monthly allowances in each spending category, the user can set an amount which they do not want to spend over. The application could also give a warning if the user is about to go over the allowance. 1.3 Breakdown of Work At the start of the development, of our application, we all took part in creating our own design for the open screen (homepage). These three designs of the homepage provided us
  • 6.
    5 with three possibleschemes that would run through the whole application. The homepage which was used for the final application was a combination of aspects from all three first designed homepages. Once the homepage was created and the scheme and layout of the application was decided on the rest of the pages for the application were divided between us. The application consisted of five pages, including the homepage. The remaining four pages were split between the three of us with one left until the end which all of us would work on once the other pages were completed. A further breakdown of the work that went into this application can be seen in the table below. It displays who completed each task and when it was hoped to completed by. Tasks Who will do it? When it will be done by… Sketch Out Ideas for Interfaces Everyone 29/10/15 Create a version of a homepage for the application Everyone 19/11/15 ‘What I Spent’ Page Fodhla Russell 25/03/16 ‘Enter Expenses’ Page Tanya Murray 25/03/16 ‘Goals’ Page Peter Redmond 25/03/16 ‘Statistics’ Page Everyone 01/04/16 Create a connection between all pages, to have the first design of functioning application Everyone 04/04/16 Test the application on peers, to find any problems with application Everyone 05/04/16 Have final running application completed Everyone 14/04/16 Table 1: Breakdown of work 2. Design The proposed mobile application is a simple and straightforward way for students to track their finances and save money. The application will also allow users to save money for certain gifts they may want. The aim of the design stage of this project is to develop an application which provided a rich and engaging experience for the user.
  • 7.
    6 2.1 Early DesignStage The proposed application was designed into five user interfaces (UI) (see Figure 1 and Figure 2), which allow the user to add the money they had spent or saved and see the amount of money they had spent or saved. The images below are the early proposed design for what each UI might look like. These prototypes of the UI’s gave us a clear idea of what we wanted our end product to look like before coding began. They also helped in developing a consistent layout between each UI, as the pages of the application were divided between the three developers. Figure 1: Early sketches of app design
  • 8.
  • 9.
    8 Figure 2: Samplepages for application 2.2 Using the Application The application will load onto the ‘Homepage’ which consists of images which graphically represent the pages of the application. The user can click on any of the images and it will bring them to the desired page. The ‘What I Spent’ page displays the different categories (such as rent, food and clothing) the user has spent money in. This page is displayed in a list view and show the name of the category along with the amount the user has spent in the category. The ‘Enter Expenses’ page is where the user can enter their spending’s. This page consists of edit text, which related to each category, where the user can enter the amount of money they had spent in a certain category. The user can submit their spending by clicking on the ADD button at the bottom of the page. The ‘Statistics’ page displays the statistics of the user’s finances on a pie chart. The pie chart shows how much the user has spent in each category, this page also displays a progression bar which shows how much the user has saved and spent. Finally, the ‘Goals’ page allows the user to set themselves goals, the user can enter their savings which will be appended to the goals progress bar. The progress bar displays how much the user has saved for the goal and how much is left to save. This page must allow the user to enter savings and set up a goal.
  • 10.
    9 The user willbe the only ‘actor’ in this application, the Use Case diagram below (see Figure 3) demonstrates what acts the user can carry out. Figure 3: Use Case Diagram 2.3 Data Storage and Database A lot of thought went into the decision of how to store data; there were four key aspects which needed to be considered in the management of data. The application must be able to update the data without Wi-Fi, it must be able to separate the data into different categories, the data must be easily saved to and read from these categories and it must be possible to
  • 11.
    10 reset the data.The database SQLite was chosen as it was seen as the best way to store data and to fulfil the aspects we needed. SQLite is an open source database that is free to use, it is also a relational database which means that the database is structured to recognize relations between stored items of information. The most important feature of SQLite is that it is a local database, so it does not require any server or Open Database Connectivity or Java Database Connectivity queries for its functionality. SQLite saves the data into a text file which is saved locally on the user's Android device. Furthermore Android comes with built in SQLite database implementations, so there is no need to install any extra libraries to use SQLite with Android. These are the reasons why SQLite was the perfect data management system to store the data for our financial application. 2.4 Logo As the application will be downloadable from the app store and will be displayed on a user's mobile the icon that represents the application is very important. The logo for the icon must catch the user’s eye; for many people the applications logo can be the deciding factor on whether to download the application or not. So our logo must be aesthetically pleasing and should visually represent the application. A catchy name for our financial tracking and saving application was also needed, in order to better attract users. The name the application was given is ‘Save4Ewe’. The logo needed to accurately represent this name, but at the same time be visually appealing. To create the logo we combined two images together (Image A and Image B), using Adobe Fireworks. In this logo we tried to create the look of money in a ‘piggy bank’. Image B was placed under Image A, and then a ‘layer mask’ was placed on Image A so that the inside of the sheep could be removed and Image B was visible from underneath. The blue background around the sheep logo was then made transparent so that the background on the user’s device was seen around the sheep, see Image C; this was our final logo.
  • 12.
    11 Image A ImageB Image C Figure 4: Creating the logo in Adobe Fireworks 3. Technologies Android Studio Android Studio was the chosen system to create this mobile application; it was the most logical option as the application had to be developed for an Android platform. Android Studio allows you to build applications for Android phones. With its variety of features it makes it easier to manage projects and resources and test your applications, with its pre-configured emulator. Although Android Studio did cause a few issues when first downloading, the system was still used to code our financial tracking application, as it was the easiest way to develop the application without having to code in another system and importing the code into Android Studio.
  • 13.
    12 Adobe Fireworks CS6 Thepopular graphics editing application Adobe Fireworks was useful in completing one of the essential features for the application. It was used to create an interesting application logo and catchy name to attract users. This application was chosen for its ability to manipulate bitmaps to create unique images. Two of the developers had practice using this graphics editing tool so there was no time taken to learn how to use the application. Fireworks was used to create the logo for the mobile application, which would attract users. Fireworks was also used to design and edit the images used within the application, so that the images used within the application complemented its design and style. SQLite SQLite is a software library that implements a self- contained, server-less, zero-configuration, transactional SQL database engine. Also Android comes with the built in SQLite database implementations. This made SQLite perfectly suited for the applications needs. The database is embedded into the applications software, so there was no need to access an external database; this made it a lot easier to manage data. This database management system allowed us to fulfil all our applications needs, which were mentioned above. 4. Implementation 4.1 Homepage The homepage was developed through a combination of all developers’ ideas and styles. The page was first planned to display four images which would navigate the user to the other pages in the application, with each image representing the page which it related to (see Figure
  • 14.
    13 1). But were-designed the layout of the pages. As the user would now be accessing the ‘Enter Expenses’ page through the ‘What I Spent’ page, so now only three images would be displayed on the homepage. This seemed to be a better way to layout the pages, as a user would be able to look at what they have already spent and see if they can buy an item, they can then add an item, if they decide to buy it, through the same page. Due to this change the layout of the home screen had to be re-designed as three square images on a page would not look appealing. We decided to display the images which represented the ‘What I Spent’, ‘Statistics’ and ‘Goals’ pages within circles which would be scattered across the page. The user would be able to click on each of these circles which would navigate the user to the relevant page. An animation ‘Splash’ screen would initialise before the main ‘Home’ page was reached to give the application a professional and appealing look and feel. The layout for this page was created through the layout file, the circles also differed in sizes to look more aesthetically pleasing. The images displayed in the circles were retrieved from the internet. The main Java class was where the code which linked each of these buttons to their relevant page was created. public class Splash extends MainActivity { @Override protected void onCreate(Bundle savedInstanceState) { super.onCreate(savedInstanceState); setContentView(R.layout.splashh); final ImageView iv = (ImageView) findViewById(R.id.image_view); final Animation an = AnimationUtils.loadAnimation(getBaseContext(),R.anim.rotate); final Animation an2 = AnimationUtils.loadAnimation(getBaseContext(),R.anim.abc_fade_out); iv.startAnimation(an); an.setAnimationListener(new Animation.AnimationListener() { public void onAnimationStart(Animation animation) { } public void onAnimationEnd(Animation animation) { iv.startAnimation(an2); finish(); Intent i = new Intent(getBaseContext(),MainActivity.class); startActivity(i); } public void onAnimationRepeat(Animation animation) {
  • 15.
    14 } }); } } Splash.java <?xml version="1.0" encoding="utf-8"?> <RelativeLayoutxmlns:android="http://schemas.android.com/apk/res/android" xmlns:tools="http://schemas.android.com/tools" android:layout_width="match_parent" android:layout_height="match_parent" android:paddingBottom="@dimen/activity_vertical_margin" android:paddingLeft="@dimen/activity_horizontal_margin" android:paddingRight="@dimen/activity_horizontal_margin" android:paddingTop="@dimen/activity_vertical_margin" android:background="#FFFFFF" tools:context=".Splash"> <TextView android:layout_width="wrap_content" android:layout_height="wrap_content" android:text="The Finance Tracker" android:textSize="30sp" android:layout_alignParentBottom="true" android:layout_centerHorizontal="true" android:layout_marginBottom="94dp" android:id="@+id/textView" android:textColor="#1ce9ca" /> <ImageView android:id="@+id/image_view" android:layout_width="wrap_content" android:layout_height="wrap_content" android:adjustViewBounds="true" android:maxWidth="200dp" android:maxHeight="200dp" android:scaleType="fitCenter" android:src="@drawable/loading4" android:layout_above="@+id/textView" android:layout_centerHorizontal="true" android:layout_marginBottom="58dp" /> </RelativeLayout> Splash.xml package com.example.the_thunderdome.financetrackingapp; import android.content.Intent; import android.support.v7.app.AppCompatActivity; import android.os.Bundle; import android.view.View; import android.widget.Button; import android.widget.ImageButton; public class MainActivity extends AppCompatActivity { @Override protected void onCreate(Bundle savedInstanceState) { super.onCreate(savedInstanceState); setContentView(R.layout.activity_main); Button advance_to_gift = (Button)findViewById(R.id.imageButton4);
  • 16.
    15 advance_to_gift.setOnClickListener(new View.OnClickListener() { @Override publicvoid onClick(View view) { Intent intent = new Intent(MainActivity.this, Giftscreen.class); startActivity(intent); } }); Button advance_to_expenses = (Button)findViewById(R.id.imageButton1); advance_to_gift.setOnClickListener(new View.OnClickListener() { @Override public void onClick(View view) { Intent intent = new Intent(MainActivity.this, expenses.class); startActivity(intent); } }); Button advance_to_statistics = (Button)findViewById(R.id.imageButton3); advance_to_gift.setOnClickListener(new View.OnClickListener() { @Override public void onClick(View view) { Intent intent = new Intent(MainActivity.this, statistics.class); startActivity(intent); } }); } } Homepage.java <?xml version="1.0" encoding="utf-8"?> <RelativeLayout xmlns:android="http://schemas.android.com/apk/res/android" xmlns:tools="http://schemas.android.com/tools" android:layout_width="match_parent" android:layout_height="match_parent" android:paddingBottom="@dimen/activity_vertical_margin" android:paddingLeft="@dimen/activity_horizontal_margin" android:paddingRight="@dimen/activity_horizontal_margin" android:paddingTop="@dimen/activity_vertical_margin" android:background="#FFFFFF" tools:context="com.example.the_thunderdome.financetrackingapp.MainActivity"> <TextView android:layout_width="wrap_content" android:layout_height="wrap_content" android:text="The Finance Tracker" android:textSize="35sp" android:id="@+id/textView" android:textColor="#1ce9ca" android:layout_alignParentRight="true" android:layout_alignParentEnd="true" android:layout_above="@+id/imageButton3"
  • 17.
    16 android:layout_alignParentTop="true" android:layout_alignParentLeft="true" android:layout_alignParentStart="true" /> <Button android:layout_width="250dp" android:layout_height="250dp" android:background="@drawable/rounded_button" android:gravity="center_vertical|center_horizontal" android:text="Expenses" android:textColor="#fff" android:id="@+id/imageButton1" android:layout_below="@+id/imageButton3" android:layout_toRightOf="@+id/imageButton3" android:layout_toEndOf="@+id/imageButton3" /> <Button android:layout_width="170dp" android:layout_height="170dp" android:background="@drawable/rounded_button2" android:gravity="center_vertical|center_horizontal" android:text="Statistics" android:textColor="#fff" android:id="@+id/imageButton3" android:layout_centerVertical="true" android:layout_alignParentLeft="true" android:layout_alignParentStart="true"/> <Button android:layout_width="170dp" android:layout_height="170dp" android:background="@drawable/rounded_button3" android:gravity="center_vertical|center_horizontal" android:text="Savings" android:textColor="#fff" android:id="@+id/imageButton4" android:layout_above="@+id/imageButton1" android:layout_alignParentRight="true" android:layout_alignParentEnd="true" android:layout_marginBottom="83dp" /> </RelativeLayout> Homepage.xml
  • 18.
    17 4.2 ‘What ISpent’ Page This page of the application needed to display the categories in which the user can split the expenses into, the amount of money spent in each category (which is read from the database) and an image which represents the category. The icons used to represent each category were retrieved from online (AIGA, 2016; Iconsdb.com, 2016; Icons8, 2016; Skillswise, 2013; Simpson, 2016; Tsao, 2016; United States Department of Transportation, 2016). A lot of research and trial and error went into getting this page to look how we wanted it to. At first I attempted to use a linear layout to create the list format we wanted. But this layout only allowed you to append one item to each row; this would not work as there needed to be three items in each row. This lead us to use a list view which allowed us to create the desired layout. This page and its layout can be seen in Figure 6 below. This page was linked to the ‘Enter Expenses’ page; there is a button at the end of the page which allowed the used to go to the page. At first all the pages where separate but we found it fit better if these two pages were linked. A list view is a layout that displays a list of scrollable items. To create this list view I created an adapter (ListAdapter.java) which would automatically insert items to the list, these items are pulled from an array and a database. The java class Category.java, generated getters and setters for each of the items which would be appended to the list view. In the main java class (MyListView.java) the array of category names was initialised, the corresponding images were set and the amount spent in each category was read from the database. The code which read from the database was placed into the main activity; this code populated the list view with the amount of money the user spent in the certain categories. This method to populate the list view was called in the onCreate() method and was also called after more data was entered by the user so that it would refresh the amount spent. To create the layout for this list view the layout file, content_my_list_view.xml, was edited and a new layout file was created (list_row.xml). These two layout files created the layout of the list view which can be seen in Figure 6. Finally this page was completed by creating the title (What I Spent...) for this page, which is displayed in the menu bar. This title was created by editing the Android Manifest.
  • 19.
    18 Figure 6: Screenshotof page running import android.content.Intent; import android.database.Cursor; import android.os.Bundle; import android.support.design.widget.FloatingActionButton; import android.support.v7.app.AppCompatActivity; import android.support.v7.widget.Toolbar; import android.view.Menu; import android.view.MenuItem; import android.view.View; import android.widget.ListView; import android.widget.SimpleCursorAdapter; import java.util.ArrayList; import java.util.List; public class MyListView extends AppCompatActivity { private List<Category> categoryList = new ArrayList<>(); private ListAdapter listAdapter; private ListView listView; DbHelper myDb = new DbHelper(this); //setting the names for each category String[] categoryTitle = new String[]{ "Rent","Food", "Clothing", "Travel", "Entertainment", "Nights Out", "Other" }; //adding an image to each category int[] imagesId = new int[]{ R.drawable.ic_rent, R.drawable.ic_food, R.drawable.ic_clothing, R.drawable.ic_travel, R.drawable.ic_entertainment,
  • 20.
    19 R.drawable.ic_drinks, R.drawable.ic_other }; String[] amountSpent =new String[]{ "€0","€0", "€0", "€0", "€0", "€0", "€0" }; @Override protected void onCreate(Bundle savedInstanceState) { super.onCreate(savedInstanceState); setContentView(R.layout.activity_my_list_view); Toolbar toolbar = (Toolbar) findViewById(R.id.toolbar); setSupportActionBar(toolbar); //button which links to enter expenses page FloatingActionButton fab = (FloatingActionButton) findViewById(R.id.btnLink); fab.setOnClickListener(new View.OnClickListener() { @Override public void onClick(View view) { Intent intent = new Intent(MyListView.this, MyExpenses.class); startActivity(intent); } }); //this creates the ListView and populates it will relevant items listView = (ListView) findViewById(R.id.listView); listAdapter = new ListAdapter(this, categoryList); listView.setAdapter(listAdapter); for (int i = 0; i < categoryTitle.length; i++) { Category category = new Category(); category.setTitle(categoryTitle[i]); category.setImages(imagesId[i]); category.setAmountSpent(amountSpent[i]); categoryList.add(category); }; populateListView(); } @Override public boolean onCreateOptionsMenu(Menu menu) { // Inflate the menu; this adds items to the action bar if it is present. getMenuInflater().inflate(R.menu.menu_my_list_view, menu); return true; } @Override public boolean onOptionsItemSelected(MenuItem item) { // Handle action bar item clicks here. The action bar will // automatically handle clicks on the Home/Up button, so long // as you specify a parent activity in AndroidManifest.xml. int id = item.getItemId(); //noinspection SimplifiableIfStatement if (id == R.id.action_settings) { return true; } return super.onOptionsItemSelected(item); } public void populateListView() { Cursor cursor = myDb.getAllData(); String[] fromFieldNames = new String[] {DbHelper.COL_1, DbHelper.COL_2, DbHelper.COL_3,
  • 21.
    20 DbHelper.COL_4, DbHelper.COL_5, DbHelper.COL_6,DbHelper.COL_7}; int[] toViewIDs = new int[] {R.id.tvAmountSpent}; SimpleCursorAdapter myCursorAdapter; myCursorAdapter = new SimpleCursorAdapter(getBaseContext(),R.layout.list_row, cursor, fromFieldNames,toViewIDs, 0); ListView myList = (ListView) findViewById(R.id.listView); myList.setAdapter(myCursorAdapter); } } MyListView.java <?xml version="1.0" encoding="utf-8"?> <RelativeLayout xmlns:android="http://schemas.android.com/apk/res/android" xmlns:app="http://schemas.android.com/apk/res-auto" xmlns:tools="http://schemas.android.com/tools" android:layout_width="wrap_content" android:layout_height="match_parent" android:orientation="vertical" android:paddingBottom="@dimen/activity_vertical_margin" android:paddingLeft="@dimen/activity_horizontal_margin" android:paddingRight="@dimen/activity_horizontal_margin" android:paddingTop="@dimen/activity_vertical_margin" app:layout_behavior="@string/appbar_scrolling_view_behavior" tools:context="com.example.alex.listview.MyListView" tools:showIn="@layout/activity_my_list_view"> <ListView android:layout_width="fill_parent" android:layout_height="wrap_content" android:id="@+id/listView" android:divider="@color/list_divider" android:dividerHeight="1dp" android:layout_alignParentLeft="true" android:layout_alignParentStart="true" android:layout_alignParentBottom="true" android:layout_alignParentTop="true" android:layout_alignParentRight="true" android:layout_alignParentEnd="true" /> </RelativeLayout> content_my_list_view.xml public class Category { private String title; private String amountSpent; private int images; public Category(){ } public Category (String title, int images, String amountSpent){ this.title = title; this.images = images; this.amountSpent = amountSpent; }
  • 22.
    21 public String getTitle(){ returntitle; } public void setTitle (String title){ this.title = title; } public int getImages(){ return images; } public void setImages (int images) { this.images = images; } public String getAmountSpent(){ return amountSpent; } public void setAmountSpent (String amountSpent){ this.amountSpent = amountSpent; } } Category.java import android.app.Activity; import android.content.Context; import android.view.LayoutInflater; import android.view.View; import android.view.ViewGroup; import android.widget.BaseAdapter; import android.widget.ImageView; import android.widget.TextView; import java.util.List; /** * Created by Alex on 02/03/2016. */ public class ListAdapter extends BaseAdapter { private Activity activity; private List<Category> categoryList; private LayoutInflater inflater; public ListAdapter(Activity activity, List<Category>categoryList) { this.activity = activity; this.categoryList = categoryList; } @Override public int getCount(){ return categoryList.size(); } @Override public Object getItem(int position){ return categoryList.get(position); } @Override public long getItemId(int position){ return position; } @Override public View getView(int position, View convertView, ViewGroup parent){ if(inflater == null){
  • 23.
    22 inflater = (LayoutInflater)activity.getSystemService(Context.LAYOUT_INFLATER_SERVICE); } if(convertView ==null){ convertView = inflater.inflate(R.layout.list_row, null); } ImageView images = (ImageView) convertView.findViewById(R.id.ivCategory); TextView title = (TextView) convertView.findViewById(R.id.tvTitle); TextView amountSpent = (TextView) convertView.findViewById(R.id.tvAmountSpent); Category category = categoryList.get(position); images.setImageResource(category.getImages()); title.setText(category.getTitle()); amountSpent.setText(category.getAmountSpent()); return convertView; } } ListAdapter.java <?xml version="1.0" encoding="utf-8"?> <RelativeLayout xmlns:android="http://schemas.android.com/apk/res/android" android:orientation="vertical" android:layout_width="match_parent" android:layout_height="match_parent" android:padding="6dp" android:paddingTop="6dp" android:paddingBottom="6dp"> //Images which will be displayed <ImageView android:id="@+id/ivCategory" android:layout_width="60dp" android:layout_height="40dp" android:src="@drawable/ic_rent" android:layout_alignTop="@+id/linerLayout" android:layout_alignParentLeft="true" android:layout_alignParentStart="true"/> //Names of each category <TextView android:id="@+id/tvTitle" android:layout_width="wrap_content" android:layout_height="wrap_content" android:textAllCaps="true" android:layout_centerHorizontal="true" android:text="Rent" android:textSize="15dp" android:layout_centerInParent="true" android:gravity="center"/> <LinearLayout android:layout_width="wrap_content" android:layout_height="wrap_content" android:orientation="horizontal" android:layout_alignParentRight="true" android:layout_alignParentTop="true" android:id="@+id/linerLayout"> //The amount spent in each category
  • 24.
    23 <TextView android:id="@+id/tvAmountSpent" android:layout_width="wrap_content" android:layout_height="wrap_content" android:textSize="15dp" android:text="€"/> </LinearLayout> </RelativeLayout> list_row.xml 4.3 ‘Enter Expenses’Page This page was originally going to consist of a calculator, a dropdown menu and a button which allowed the user to add data to the database. This page would allow the user to select which category they wanted to add money to from the dropdown menu. While the calculator allowed the user to type the amount of money in they had spent, a calculator setup was chosen so that the user could add multiple items in at the same time and add them together. But due to the fact we had little knowledge on databases we were unable to create this page in the desired way. We were unable to use the dropdown menu to relate to the categories in the database, and we could not find any tutorials or code that would help in creating our desired page. Due to this hurdle we re-designed the page so that it would be easier to enter data into the database. The re-designed page consisted of edit texts for each category with two buttons. The edit texts allowed the user to add the money they had spent in a certain category to the database and one of the buttons allowed the user to reset the database back to zero (see Figure 7). The layout of this page was created through the layout file, content_my_expenses.xml. Each edit texts in the layout had a hint which displayed the category name. The main purpose of this page was to add the data to the SQLite database, two java classes were used to add this data to the database and also reset the database (MyExpenses.java and DbHelper.java). The DbHelper.java class was used to create the database and database table, this was done through a query. There were two methods used when creating the table in the database onCreate() and onUpgrade(). The onCreate() method was used to create a table if one did not exist, while the onUpgrade() method opened the table if it existed. Two other methods were used within this java class, one to insert the data into the relevant columns and one that reset all the database columns to zero. The method which inserted the data was specially coded so
  • 25.
    24 that any timethe user clicked the add button the data was appended onto the existing number in the relevant column. The MyExpenses.java was the main class and called all the methods to run, which create the table and add the data to the table. This class also provided toasts (messages to the user) which would display once a button was clicked, telling the user whether the data was added or not and if the database was reset. This is the database in which the list view on the ‘What I Spent’ page reads from. Figure 7: Screenshot of page running import android.app.AlertDialog; import android.os.Bundle; import android.support.v7.app.AppCompatActivity; import android.support.v7.widget.Toolbar; import android.view.View; import android.widget.Button; import android.widget.EditText; import android.widget.Toast; public class MyExpenses extends AppCompatActivity { DbHelper myDb; EditText editRent,editFood, editClothing, editTravel, editEntertainment, editNightsOut, editOther; Button btnAddData; Button btnReset; @Override protected void onCreate(Bundle savedInstanceState) {
  • 26.
    25 super.onCreate(savedInstanceState); setContentView(R.layout.activity_my_expenses); Toolbar toolbar =(Toolbar) findViewById(R.id.toolbar); setSupportActionBar(toolbar); //calls the methods to create the database table myDb = new DbHelper(this); editRent = (EditText) findViewById(R.id.editText_rent); editFood = (EditText) findViewById(R.id.editText_food); editClothing = (EditText) findViewById(R.id.editText_clothing); editTravel = (EditText) findViewById(R.id.editText_travel); editEntertainment = (EditText) findViewById(R.id.editText_entertainment); editNightsOut = (EditText) findViewById(R.id.editText_nightsOut); editOther = (EditText) findViewById(R.id.editText_other); btnAddData = (Button) findViewById(R.id.button_add); btnReset = (Button) findViewById(R.id.button_reset); //call all method AddData(); ResetData(); } public void ResetData() { btnReset.setOnClickListener( new View.OnClickListener() { @Override public void onClick(View v) { Integer deletedRows = myDb.resetData(null); Toast.makeText(MyExpenses.this, "Reset", Toast.LENGTH_LONG).show(); } }); } public void AddData() { btnAddData.setOnClickListener( new View.OnClickListener() { @Override public void onClick(View v) { boolean isInserted = myDb.insertData(editRent.getText().toString(), editFood.getText().toString(), editClothing.getText().toString(), editTravel.getText().toString(), editEntertainment.getText().toString(), editNightsOut.getText().toString(), editOther.getText().toString()); if (isInserted) { Toast.makeText(MyExpenses.this, "Added", Toast.LENGTH_LONG).show(); } else { Toast.makeText(MyExpenses.this, "Data not Inserted", Toast.LENGTH_LONG).show(); } editRent.setText(""); editFood.setText(""); editClothing.setText(""); editTravel.setText(""); editEntertainment.setText(""); editNightsOut.setText(""); editOther.setText(""); }
  • 27.
    26 }); } public void showMessage(Stringtitle, String Message) { AlertDialog.Builder builder = new AlertDialog.Builder(this); builder.setCancelable(true); builder.setTitle(title); builder.setMessage(Message); builder.show(); } } MyExpenses.java import android.content.ContentValues; import android.content.Context; import android.database.Cursor; import android.database.sqlite.SQLiteDatabase; import android.database.sqlite.SQLiteOpenHelper; /** * Created by Alex on 08/04/2016. */ public class DbHelper extends SQLiteOpenHelper { //name of database, the table and columns public static final String DATABASE_NAME = "expenses.db"; public static final String TABLE_NAME = "expenses_table"; public static final String COL_1 = "RENT"; public static final String COL_2 = "FOOD"; public static final String COL_3 = "CLOTHING"; public static final String COL_4 = "TRAVEL"; public static final String COL_5 = "ENTERTAINMENT"; public static final String COL_6 = "NIGHTS_OUT"; public static final String COL_7 = "OTHER"; //when this constructor is called the database will be created public DbHelper(Context context) {super(context, DATABASE_NAME, null, 1);} //when this method is called it will create a table @Override public void onCreate(SQLiteDatabase db) { //this will execute the query and create the table db.execSQL("create table " + TABLE_NAME + " (RENT INTEGER, FOOD INTEGER, " + "CLOTHING INTEGER, TRAVEL INTEGER, ENTERTAINMENT INTEGER, " + "NIGHTS_OUT INTEGER, OTHER INTEGER);"); } @Override public void onUpgrade(SQLiteDatabase db, int oldVersion, int newVersion) { db.execSQL("DROP TABLE IF EXISTS "+TABLE_NAME); onCreate(db); } //this method will add the data to database public boolean insertData(String rent, String food, String clothing, String travel, String entertainment, String nightsOut, String other) { SQLiteDatabase db = this.getWritableDatabase(); ContentValues contentValues = new ContentValues();
  • 28.
    27 //placing data intoeach column contentValues.put(COL_1,rent); contentValues.put(COL_2,food); contentValues.put(COL_3,clothing); contentValues.put(COL_4,travel); contentValues.put(COL_5,entertainment); contentValues.put(COL_6,nightsOut); contentValues.put(COL_7,other); long result; result = db.insert(TABLE_NAME,null ,contentValues); if(result == -1) { return false; } else { return true; } } //this method will get the data from the database public Cursor getAllData() { SQLiteDatabase db = this.getWritableDatabase(); Cursor res = db.rawQuery("Select * from " + TABLE_NAME, null); return res; } public Integer resetData (String _id) { SQLiteDatabase db = this.getWritableDatabase(); return db.delete(TABLE_NAME, null, null); } } DbHelper.java <?xml version="1.0" encoding="utf-8"?> <RelativeLayout xmlns:android="http://schemas.android.com/apk/res/android" xmlns:app="http://schemas.android.com/apk/res-auto" xmlns:tools="http://schemas.android.com/tools" android:layout_width="match_parent" android:layout_height="match_parent" android:paddingBottom="@dimen/activity_vertical_margin" android:paddingLeft="@dimen/activity_horizontal_margin" android:paddingRight="@dimen/activity_horizontal_margin" android:paddingTop="@dimen/activity_vertical_margin" app:layout_behavior="@string/appbar_scrolling_view_behavior" tools:context="com.example.alex.listview.MyExpenses" tools:showIn="@layout/activity_my_expenses"> <EditText android:layout_width="match_parent" android:layout_height="wrap_content" android:id="@+id/editText_rent" android:inputType="number" android:hint="Rent" android:textSize="20dp"/> <EditText android:layout_width="match_parent" android:layout_height="wrap_content"
  • 29.
    28 android:id="@+id/editText_food" android:inputType="number" android:layout_below="@+id/editText_rent" android:layout_alignParentLeft="true" android:layout_alignParentStart="true" android:layout_marginTop="15dp" android:hint="Food" android:textSize="20dp"/> <EditText android:layout_width="match_parent" android:layout_height="wrap_content" android:id="@+id/editText_clothing" android:inputType="number" android:layout_below="@+id/editText_food" android:layout_alignParentLeft="true" android:layout_alignParentStart="true" android:layout_marginTop="15dp" android:hint="Clothing" android:textSize="20dp"/> <EditText android:layout_width="match_parent" android:layout_height="wrap_content" android:id="@+id/editText_travel" android:inputType="number" android:layout_below="@+id/editText_clothing" android:layout_alignParentLeft="true" android:layout_alignParentStart="true" android:layout_marginTop="15dp" android:hint="Travel" android:textSize="20dp"/> <EditText android:layout_width="match_parent" android:layout_height="wrap_content" android:id="@+id/editText_entertainment" android:inputType="number" android:layout_below="@+id/editText_travel" android:layout_alignParentLeft="true" android:layout_alignParentStart="true" android:layout_marginTop="15dp" android:hint="Entertainment" android:textSize="20dp"/> <EditText android:layout_width="match_parent" android:layout_height="wrap_content" android:id="@+id/editText_nightsOut" android:inputType="number" android:layout_below="@+id/editText_entertainment" android:layout_alignParentLeft="true" android:layout_alignParentStart="true" android:layout_marginTop="15dp" android:hint="Nights Out" android:textSize="20dp"/> <EditText android:layout_width="match_parent" android:layout_height="wrap_content" android:id="@+id/editText_other" android:inputType="number" android:hint="Other" android:textSize="20dp" android:layout_below="@+id/editText_nightsOut" android:layout_alignParentLeft="true"
  • 30.
    29 android:layout_alignParentStart="true" android:layout_marginTop="15dp"/> <Button android:layout_width="wrap_content" android:layout_height="wrap_content" android:text="Add" android:id="@+id/button_add" android:layout_marginTop="18dp" android:layout_below="@+id/editText_other" android:layout_alignParentLeft="true" android:layout_alignParentStart="true" /> <Button android:layout_width="wrap_content" android:layout_height="wrap_content" android:text="Reset" android:id="@+id/button_reset" android:layout_alignTop="@+id/button_add" android:layout_alignRight="@+id/editText_other" android:layout_alignEnd="@+id/editText_other" /> </RelativeLayout> content_my_expenses.xml 4.4‘Statistics’ Page This is the page where the user can access from the Home Screen, to see exactly how much they have spent, but also how much they have saved. It is and quick and efficient way for users to grasp their financial situation, and more importantly puts into perspective, their spend versus save capabilities. This page has two options as stated above; ‘Expenses’ and ‘Savings’, and when the user originally selects the ‘Statistics’ option, it displays the expenses first. It shows a combined figure of all the expenses the user has spent such as ‘Rent’ and ‘Other’. The second option that the user can choose on this page is ‘Savings’, and it is in exactly the same layout structure as the ‘Expenses’ statistic view, so as to keep in line with design continuity. It is in exactly the same design format as the ‘Expenses’ with the exception, in order to differentiate between the two statistics, the colour presentation of each page. The ‘Expenses’ option will have red overtones and the ‘Savings’ option will have green. These colours were chosen as red is generally associated with alarm or alert which fits in well with ‘Expenses’, as the user should be gently warned as to how much money they are spending. The ‘Savings’ option will have green overtones, as the colour green is usually associated with progress, success or quite simply the opposite of red. It is also associated in modern day culture with money, and this is very apt as you essentially will have more money
  • 31.
    30 as shown onthe ‘Savings’ statistic page. The two statistics are calculated and shown from two separate databases. When either option is chosen and clicked, it calls the database and shows the cumulative contents of each, and presents it as a figure to the user. This is the easiest and simplest way for a user to see their financial situation in an uncluttered, straightforward and no nonsense way. This page was not fully completed for the submission of this report; the only item so far displayed on this page is a pie chart which displays how much the user has spent in each category. This allows users to graphically see how much they have spent in each category and see where they may be able to cut back and save. This pie chart will be created using the MPAndroidChart from the Android library. package com.example.alex.myapplication; import android.graphics.Color; import android.os.Bundle; import android.support.v7.app.AppCompatActivity; import android.support.v7.widget.Toolbar; import android.view.Menu; import android.view.MenuItem; import android.widget.RelativeLayout; public class MainActivity extends AppCompatActivity { private RelativeLayout mainLayout; private PieChart mChart; private float[] yData = {20, 10, 25, 5, 15, 25}; private String[] xData = {"item 1", "item 2", "item 3", "item 4", "item 5", "item 6"}; @Override protected void onCreate(Bundle savedInstanceState) { super.onCreate(savedInstanceState); setContentView(R.layout.activity_main); Toolbar toolbar = (Toolbar) findViewById(R.id.toolbar); setSupportActionBar(toolbar); mainLayout = (RelativeLayout) findViewById(R.id.mainLayout); mChart = new PieChart (this); mainLayout.addView(mChart); mainLayout.setBackgroundColor(Color.LTGRAY); mChart.setUsePercentValues(true); mChart.setDescription("Pie Chart"); mChart.setDrawHoleEnabled(true); mChart.setHoleColorTransparent(true); mChart.setHoleRasius(7); mChart.setTransparentCircleRadius(10); mChart.setOnChartValueSelectedListener(new OnChartValueSelectedListener() { public void onValueSelected(Entry e, int dataSetIndex, Highlight h) {
  • 32.
    31 } public void onNothingSelected() { } }); } @Override publicboolean onCreateOptionsMenu(Menu menu) { // Inflate the menu; this adds items to the action bar if it is present. getMenuInflater().inflate(R.menu.menu_main, menu); return true; } @Override public boolean onOptionsItemSelected(MenuItem item) { // Handle action bar item clicks here. The action bar will // automatically handle clicks on the Home/Up button, so long // as you specify a parent activity in AndroidManifest.xml. int id = item.getItemId(); //noinspection SimplifiableIfStatement if (id == R.id.action_settings) { return true; } return super.onOptionsItemSelected(item); } } MainActivity.java 4.5 ‘Goals’ Page The ‘Goals’ page is an option which allows a user the option to add a special item or goal to save up for. The idea was that most of the finance tracking applications on the market were orientated towards the negative aspects of finance tracking. Most of the applications that we tested nearly always showed how much money they were spending, and how much money they essentially did not have anymore, rather than any beneficial aspects. This option will give the user a satisfying and gratifying feeling, and make them eager to use the application. It will also help them to save money in general, especially for those users who cannot save or are incapable of savings. As by proxy, if a user really wants an item they need money to pay for it, and if they could use the desired item as a target, that they could see every day or week how close they are getting to obtaining that target, they would use it, regardless of if they were an enthusiastic saver or not. It also acts as an incentive to use the application, as users who require a finance tracking application obviously need the application to help with their finances, however, if it contained something positive that they could do with their finances, such as saving for a target item, that would create a positive and appealing aspect associated
  • 33.
    32 with the application.This will help increase the appeal and continuing operation of the application by users. The ‘Goals’ page is essentially a savings page in disguise. The ‘Goals’ section will use an SQLite database to set up a foundation for each goal that user creates. The first page that user sees after they pick the ‘Goals’ option from the ‘Home’ page will show three input boxes labelled ‘Goal Name’, ‘Price’ and ‘Saved’. Underneath it will have four options in the format of buttons labelled ‘Add’, ‘Delete’, ‘Update’ and ‘View Goals’. The user inputs an item that they would like to buy, along with its price, and how much they want to save immediately, if any. This information is completed on the ‘Giftadd’ page and is sent to a database implementing SQLite labelled ‘DatabaseHelper’. From there it is stored in the phones memory, so even when the application is exited form, the information will still be available to the user when opened again. The format of the table in the database is ordered into four columns: the unique Id of the item, the name of the item, the price of the item, and the savings so far towards the item. This information can be accessed and viewed once the user clicks on the ‘View Goals’ button. The ‘Delete’ button, basically deletes goals from the database, either the user has hit them or they simply do not want them anymore. The ‘Update’ button is where the user can update their goal, either changing the cost of the item or adding more savings to the item. This appends the information in the database so the user can see ,once they click on the ‘View Goals’ button, how much progress they are making on their targeted goals. package com.example.the_thunderdome.financetrackingapp; import android.app.AlertDialog; import android.content.Context; import android.database.Cursor; import android.database.sqlite.SQLiteDatabase; import android.support.v7.app.AppCompatActivity; import android.os.Bundle; import android.view.Menu; import android.view.MenuItem; import android.view.View; import android.widget.Button; import android.widget.EditText; import android.widget.Toast; public class Giftadd extends AppCompatActivity{ DatabaseHelper myDb; EditText editName,editPrice,editSavings; Button btnAddData, deleteButton, getAllData; @Override protected void onCreate(Bundle savedInstanceState) { super.onCreate(savedInstanceState); setContentView(R.layout.activity_giftadd);
  • 34.
    33 myDb = newDatabaseHelper(this); editName = (EditText)findViewById(R.id.editText_name); editPrice = (EditText)findViewById(R.id.editText_price); editSavings = (EditText)findViewById(R.id.editText_savings); btnAddData = (Button)findViewById(R.id.button_add); deleteButton = (Button)findViewById(R.id.deleteButton); getAllData = (Button)findViewById(R.id.btnviewAll); AddData(); dataReset(); viewAll(); } public void dataReset(){ deleteButton.setOnClickListener(new View.OnClickListener() { @Override public void onClick(View v) { Integer deleteRows = myDb.dataReset(null); Toast.makeText(Giftadd.this, "Gifts Reset", Toast.LENGTH_LONG).show(); } }); } public void AddData() { btnAddData.setOnClickListener( new View.OnClickListener() { @Override public void onClick(View v) { boolean isInserted = myDb.insertData(editName.getText().toString(), editPrice.getText().toString(), editSavings.getText().toString()); if(isInserted =true) Toast.makeText(Giftadd.this,"Gift Added",Toast.LENGTH_LONG).show(); else Toast.makeText(Giftadd.this,"Gift Not Added",Toast.LENGTH_LONG).show(); } } ); } public void viewAll() { getAllData.setOnClickListener( new View.OnClickListener() { public void onClick(View v) { Cursor res = myDb.getAllData(); if (res.getCount() == 0) { showmessage("Error", "Nothing Found"); return; } StringBuffer buffer = new StringBuffer(); while (res.moveToNext()) { buffer.append("Gift Id : " + res.getString(0) + "n"); buffer.append("Name : " + res.getString(1) + "n"); buffer.append("Price : €" + res.getString(2) + "n"); buffer.append("Saved So Far : €" + res.getString(3) + "nn"); } showmessage("Gifts", buffer.toString()); } } );
  • 35.
    34 } public void showmessage(Stringtitle, String Message) { AlertDialog.Builder builder = new AlertDialog.Builder(this); builder.setCancelable(true); builder.setTitle(title); builder.setMessage(Message); builder.show(); } @Override public boolean onCreateOptionsMenu(Menu menu) { // Inflate the menu; this adds items to the action bar if it is present. getMenuInflater().inflate(R.menu.menu_main, menu); return true; } @Override public boolean onOptionsItemSelected(MenuItem item) { // Handle action bar item clicks here. The action bar will // automatically handle clicks on the Home/Up button, so long // as you specify a parent activity in AndroidManifest.xml. int id = item.getItemId(); //noinspection SimplifiableIfStatement if (id == R.id.action_settings) { return true; } return super.onOptionsItemSelected(item); } } GiftAdd.java <?xml version="1.0" encoding="utf-8"?> <RelativeLayout xmlns:android="http://schemas.android.com/apk/res/android" xmlns:tools="http://schemas.android.com/tools" android:layout_width="match_parent" android:layout_height="match_parent" android:paddingBottom="@dimen/activity_vertical_margin" android:paddingLeft="@dimen/activity_horizontal_margin" android:paddingRight="@dimen/activity_horizontal_margin" android:paddingTop="@dimen/activity_vertical_margin" tools:context="com.example.the_thunderdome.financetrackingapp.Giftadd"> <EditText android:layout_width="wrap_content" android:layout_height="wrap_content" android:id="@+id/editText_name" android:width="300dp" android:hint="Enter Item Name" android:layout_above="@+id/editText_price" android:layout_centerHorizontal="true" /> <EditText android:layout_width="wrap_content" android:layout_height="wrap_content" android:inputType="number" android:ems="10" android:id="@+id/editText_price" android:width="300dp" android:hint="Enter Item Price" android:layout_above="@+id/editText_savings" android:layout_centerHorizontal="true"
  • 36.
    35 /> <EditText android:layout_width="wrap_content" android:layout_height="wrap_content" android:inputType="number" android:ems="10" android:id="@+id/editText_savings" android:width="300dp" android:hint="Money Saved" android:layout_above="@+id/button_add" android:layout_centerHorizontal="true"/> <Button android:text="Add" android:id="@+id/button_add" android:onClick="addGift" android:layout_width="wrap_content" android:layout_height="wrap_content" android:layout_centerVertical="true" android:layout_toLeftOf="@+id/deleteButton" android:layout_toStartOf="@+id/deleteButton" /> <Button android:layout_width="wrap_content" android:layout_height="wrap_content" android:text="ResetGifts" android:id="@+id/deleteButton" android:layout_alignTop="@+id/button_add" android:layout_centerHorizontal="true" /> <Button android:layout_width="wrap_content" android:layout_height="wrap_content" android:text="View Gifts" android:id="@+id/btnviewAll" android:layout_alignTop="@+id/deleteButton" android:layout_alignParentRight="true" android:layout_alignParentEnd="true" /> </RelativeLayout> GiftAdd.xml package com.example.the_thunderdome.financetrackingapp; /** * Created by The_Thunderdome on 08/04/2016. */ import android.content.ContentValues; import android.content.Context; import android.database.Cursor; import android.database.sqlite.SQLiteDatabase; import android.database.sqlite.SQLiteOpenHelper; public class DatabaseHelper extends SQLiteOpenHelper { public static final String DATABASE_NAME = "Gift.db"; public static final String TABLE_NAME = "gift_table"; public static final String COL_1 = "ID"; public static final String COL_2 = "NAME"; public static final String COL_3 = "PRICE"; public static final String COL_4 = "SAVINGS"; public DatabaseHelper(Context context) { super(context, DATABASE_NAME, null, 1);
  • 37.
    36 } @Override public void onCreate(SQLiteDatabasedb) { db.execSQL("create table " + TABLE_NAME + " (ID INTEGER PRIMARY KEY AUTOINCREMENT,NAME TEXT,PRICE INTEGER,SAVINGS INTEGER)"); } @Override public void onUpgrade(SQLiteDatabase db, int oldVersion, int newVersion) { db.execSQL("DROP TABLE IF EXISTS "+TABLE_NAME); onCreate(db); } public boolean insertData(String name,String price,String savings) { SQLiteDatabase db = this.getWritableDatabase(); ContentValues contentValues = new ContentValues(); contentValues.put(COL_2,name); contentValues.put(COL_3,price); contentValues.put(COL_4, savings); long result = db.insert(TABLE_NAME, null ,contentValues); if(result == -1) return false; else return true; } public Integer dataReset (String _id){ SQLiteDatabase db = this.getWritableDatabase(); return db.delete(TABLE_NAME,null,null); } public Cursor getAllData(){ SQLiteDatabase db = this.getWritableDatabase(); Cursor res = db.rawQuery("select * from " + TABLE_NAME, null); return res; } } DatabaseHelper.java 5. Problems Encountered Two main obstacles were encountered which hindered the progress of our project. As java was largely new to us, as a programming language, there was a learning curve, especially using java within Android Studio. These problems were generally resolved by reading about java programming, watching tutorials about the area and reading developer communities online. But this caused a lot of time to be spent trying to figure out how to code certain things. The second problem which we encountered was actually getting Android Studio to work on our computers. Due to the fact Android Studio requires a lot of memory space and needs a relatively new computer to run the program efficiently. This took a considerable amount of time and we were unable to start coding until this problem was resolved. In many of these cases were conceptual problems arose they were usually fixed by gaining help from
  • 38.
    37 people who hadexperience with Android Studio. But for two of us a new computer had to be acquired that would be compatible with Android Studio. While creating the application the biggest learning curve we encountered, in relation to java programming was finding a way to manage and save our data. As saving data using java was a new topic for us, we spent a bit of time trying to find the best way to store the data we want in the way that we wanted. At first we tried to use a simple file which would be saved within the application, where we could save data to and read data from. But this was inadequate for the way in which we needed the data to be stored; we needed the data to be stored in a table format with columns relating to certain categories. In the end we used a SQLite database as it fulfilled our data management requirement. Due to our lack of knowledge about databases problems were often encountered, but these problems were usually solved by watching tutorials or acquiring help from people with experience (Programming Knowledge, 2015). A finally issue was combining the application pages together, as each page was created on a different computer the code had to be slightly changed when combining the whole application onto one computer. This was time consuming as the code had to be thoroughly searched in order to ensure the page's code would work on the new computer. Furthermore the images for some pages had to be re-uploaded to the new computer. Due to all these time delays the application was not fully completed for the submission of this report. 6. Evaluation As the application was not fully completed before the submission of this report, the application was only handed out to close friends (students) for testing. They tested the application on the emulator provided by Android Studio. They admired the layout of the application, they found that the content of each page was easily seen and it was clear how the page functioned. From a functionality point of view the application seemed to be user friendly, the users were able to easily navigate the application and understood how it worked. These users also admired the savings aspect of the application and found it to be a great way to save money as they could track what they were actually saving. Although due to the fact the application was not fully completed the users did raise some queries about the
  • 39.
    38 application, for instancethey mentioned a time keeping aspect so that they could see the date that they had started to track their expenses and knew how long they had been tracking them for. This is an aspect of the application which we were unable to complete before the submission of the report. One of us based a paper for another module on our application and got feedback from their peers about it and formed a review. Some of the questions that were asked in the review were; ‘What was your first impressions on opening the app’? ’Did you find the app easy to us’? ‘Would you use this app in the future’? ‘What would you add to this to make it more student friendly’? ‘Would you recommend this to your friends’? This review provided a valuable insight in how the application should run. From this evaluation it is clear we were able to fulfil some of the objectives and requirements we had set out for the application. The application was coherent and easily navigated, the data was easily entered, the application tracked and recorded the users spending and the students testing the application found it appealing, so the focus on students was fulfilled. Another requirement that we managed to fulfil was to create a unique financial tracking application. This was accomplished by focusing on a savings aspect rather than just tracking expenses. The users which tested the application found this savings aspect to be an appealing part of the application. 7. Conclusion The overall experience of creating an application for this Final Year Project was rewarding, being able to create a fully functioning application that would work on your mobile device was very fulfilling. Although the difficulties that came during the development of the application were frustrating at times, the learning curve was very steep and managing to get Android Studio functional was very time consuming. But finding solutions to these problems we encountered made the experience as rewarding as it was. Learning about Android Studio, java programming and databases was challenging at times and very time consuming. But this whole experience provided us with some valuable skills. In completing this project we learned new programing skills, improved our problem solving abilities and worked together as a group. We are very pleased with how our application has developed so far, we have managed to
  • 40.
    39 accomplish the objectivesand requirements we had set out of the application. The hard work which was placed into the application allowed us to create an application that could track and record users spending and allow the user to save up for a certain gift/goal. The design of this application was created with the help and valuable insights of our peers and our supervisor. This was a rewarding experience and we will be able to further build and improve on the skills which we have gained here.
  • 41.
    40 8. References AIGA (2016)Drink Icon. Retrieved from https://www.iconfinder.com/icons/134140/bar_drink_icon Delessio, C., Darcey, L. and Conder, S. (2012). Sams Teach Yourself Android Application Development in 24 Hours. (2nd Ed.) Indianapolis Indiana: SAMS. Iconsdb.com (2016) Euro Icon. Retrieved from http://www.iconsdb.com/black-icons/euro- icon.html Icons8 (2016) Food Icon. Retrieved from http://www.iconarchive.com/show/windows-8- icons-by-icons8/Ecommerce-Food-icon.html Programming Knowledge. (2015, April 6). Android SQLite Database Tutorial 3 # Insert values to SQLite Database table using Android [Video File]. Retrieved from https://www.youtube.com/watch?v=T0ClYrJukPA Programming Knowledge. (2015, April 9). Android SQLite Database Tutorial 4 # Show SQLite Database table Values using Android [Video File]. Retrieved from https://www.youtube.com/watch?v=KUq5wf3Mh0c Programming Knowledge. (2015, May 24). Android SQLite Database Tutorial 5 # Update values in SQLite Database table using Android [Video File]. Retrieved from https://www.youtube.com/watch?v=PA4A9IesyCg Programming Knowledge. (2015, May 30). Android SQLite Database Tutorial 6 # Delete values in SQLite Database table using Android [Video File]. Retrieved from https://www.youtube.com/watch?v=neaCUaHa2Ek Sierra, K. and Bates, B. (2005). Head First Java. (2nd Ed.). Sebastopol, CA: O’Reilly. Skillswise (2013) Camera Icon. Retrieved from http://www.bbc.co.uk/skillswise/0/21741802 Simpson, P. (2016) Rent Icon. Retrieved from https://www.iconfinder.com/icons/269990/building_construction_house_property_rea l_estate_rent_home_rent_sign_icon Tsao, J. (2016) Train Icon. Retrieved from https://www.pinterest.com/pin/341358846730819648/
  • 42.
    41 United States Departmentof Transportation (2016) Hanger Icon. Retrieved from https://www.iconfinder.com/icons/41960/clothing_hanger_wardrobe_icon