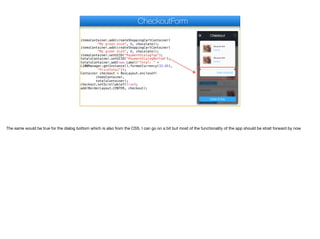
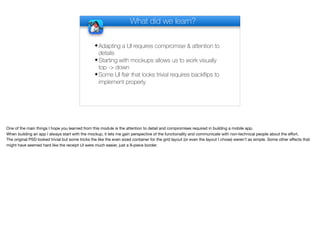
Extracting ui Design - part VI
In this final part we’ll discuss the checkout form, yes I said form
CheckoutForm
© Codename One 2017 all rights reserved
I know it looks like a dialog but I chose to implement it as a form and if you look at it closely you will see why
public static void showCheckOut() {
Form existingForm = Display.getInstance().getCurrent();
CheckoutForm f = new CheckoutForm(existingForm);
f.oldTransition = existingForm.getTransitionOutAnimator();;
Image background = Image.createImage(existingForm.getWidth(),
existingForm.getHeight());
Graphics g = background.getGraphics();
existingForm.paintComponent(g, true);
g.setAlpha(150);
g.setColor(0);
g.fillRect(0, 0, background.getWidth(), background.getHeight());
background = Display.getInstance().gaussianBlurImage(background, 10);
f.getUnselectedStyle().setBgImage(background);
f.getUnselectedStyle().setBackgroundType(
Style.BACKGROUND_IMAGE_SCALED_FILL);
f.setTransitionOutAnimator(CommonTransitions.createUncover(
CommonTransitions.SLIDE_VERTICAL, true, 200));
existingForm.setTransitionOutAnimator(CommonTransitions.createEmpty());
existingForm.setTransitionOutAnimator(CommonTransitions.createCover(
CommonTransitions.SLIDE_VERTICAL, false, 200));
f.show();
}
CheckoutForm
The functionality of the checkout UI is outside of the receipt section which we would normally think of as the “dialog” both the X button and the order button are outside
of that UI hence this should appear as a form. 

To get this appearance we grab a “screenshot” of the existing form by drawing it onto an image we then blur and tint the screenshot and set it as the background of our
form.

We also use cover transition which provides that cool iOS style transition for the checkout UI
private Transition oldTransition;
private CheckoutForm(Form previous) {
super(new BorderLayout());
Button x = new Button("", "Title");
FontImage.setMaterialIcon(x, FontImage.MATERIAL_CLOSE);
x.addActionListener(e -> {
previous.showBack();
previous.setTransitionOutAnimator(oldTransition);
});
add(BorderLayout.NORTH,
BorderLayout.centerAbsoluteEastWest(new Label("Checkout", "Title"), null, x)
);
add(BorderLayout.SOUTH, new Button("Order & Pay", "CheckoutButton"));
Container itemsContainer = new Container(BoxLayout.y());
Container totalsContainer = new Container(BoxLayout.y());
Image chocolate = null;
try {
chocolate = Image.createImage("/chocolate-cake.jpg");
} catch(IOException err) {
Log.e(err);
}
CheckoutForm
The close button is just a button placed in the north of the form. I considered using a Toolbar and eventually chose to just place components in the north area. Both
would have worked out to identical results so there was no real reason to use components.
private Transition oldTransition;
private CheckoutForm(Form previous) {
super(new BorderLayout());
Button x = new Button("", "Title");
FontImage.setMaterialIcon(x, FontImage.MATERIAL_CLOSE);
x.addActionListener(e -> {
previous.showBack();
previous.setTransitionOutAnimator(oldTransition);
});
add(BorderLayout.NORTH,
BorderLayout.centerAbsoluteEastWest(
new Label("Checkout", "Title"), null, x));
add(BorderLayout.SOUTH, new Button("Order & Pay", "CheckoutButton"));
Container itemsContainer = new Container(BoxLayout.y());
Container totalsContainer = new Container(BoxLayout.y());
Image chocolate = null;
try {
chocolate = Image.createImage("/chocolate-cake.jpg");
} catch(IOException err) {
Log.e(err);
}
CheckoutForm
Here I construct the title and close button. It’s mostly one long line of code if we ignore the code required to implement the X
private Transition oldTransition;
private CheckoutForm(Form previous) {
super(new BorderLayout());
Button x = new Button("", "Title");
FontImage.setMaterialIcon(x, FontImage.MATERIAL_CLOSE);
x.addActionListener(e -> {
previous.showBack();
previous.setTransitionOutAnimator(oldTransition);
});
add(BorderLayout.NORTH,
BorderLayout.centerAbsoluteEastWest(
new Label("Checkout", "Title"), null, x));
add(BorderLayout.SOUTH, new Button("Order & Pay", "CheckoutButton"));
Container itemsContainer = new Container(BoxLayout.y());
Container totalsContainer = new Container(BoxLayout.y());
Image chocolate = null;
try {
chocolate = Image.createImage("/chocolate-cake.jpg");
} catch(IOException err) {
Log.e(err);
}
CheckoutForm
The checkout button is placed in the south, again not a lot of functionality for that.
itemsContainer.add(createShoppingCartContainer(
"My great dish", 8, chocolate));
itemsContainer.add(createShoppingCartContainer(
"My great dish", 8, chocolate));
itemsContainer.setUIID("PaymentDialogTop");
totalsContainer.setUIID("PaymentDialogBottom");
totalsContainer.add(new Label("Total: " +
L10NManager.getInstance().formatCurrency(33.45),
"PriceTotal"));
Container checkout = BoxLayout.encloseY(
itemsContainer,
totalsContainer);
checkout.setScrollableY(true);
add(BorderLayout.CENTER, checkout);
CheckoutForm
The dish container code is a bit simplistic, I extracted it to a separate method that just constructs a border layout entry with the image, the title & the price
itemsContainer.add(createShoppingCartContainer(
"My great dish", 8, chocolate));
itemsContainer.add(createShoppingCartContainer(
"My great dish", 8, chocolate));
itemsContainer.setUIID("PaymentDialogTop");
totalsContainer.setUIID("PaymentDialogBottom");
totalsContainer.add(new Label("Total: " +
L10NManager.getInstance().formatCurrency(33.45),
"PriceTotal"));
Container checkout = BoxLayout.encloseY(
itemsContainer,
totalsContainer);
checkout.setScrollableY(true);
add(BorderLayout.CENTER, checkout);
CheckoutForm
You might recall the dialog top UIID from the CSS and cutting tutorial this is effectively the background of the receipt
itemsContainer.add(createShoppingCartContainer(
"My great dish", 8, chocolate));
itemsContainer.add(createShoppingCartContainer(
"My great dish", 8, chocolate));
itemsContainer.setUIID("PaymentDialogTop");
totalsContainer.setUIID("PaymentDialogBottom");
totalsContainer.add(new Label("Total: " +
L10NManager.getInstance().formatCurrency(33.45),
"PriceTotal"));
Container checkout = BoxLayout.encloseY(
itemsContainer,
totalsContainer);
checkout.setScrollableY(true);
add(BorderLayout.CENTER, checkout);
CheckoutForm
The same would be true for the dialog bottom which is also from the CSS. I can go on a bit but most of the functionality of the app should be strait forward by now
What did we learn?
✦Adapting a UI requires compromise & attention to
details
✦Starting with mockups allows us to work visually
top -> down
✦Some UI flair that looks trivial requires backflips to
implement properly
One of the main things I hope you learned from this module is the attention to detail and compromises required in building a mobile app. 

When building an app I always start with the mockup, it lets me gain perspective of the functionality and communicate with non-technical people about the effort.

The original PSD looked trivial but some tricks the like the even sized container for the grid layout (or even the layout I chose) weren’t as simple. Some other effects that
might have seemed hard like the receipt UI were much easier, just a 9-piece border.
Thank You!
Thanks for finishing this module, I hope everything was clear to you and please feel free to ask questions and make comments so we can improve

Extracting ui Design - part 6 - transcript.pdf

  • 1.
    Extracting ui Design- part VI In this final part we’ll discuss the checkout form, yes I said form
  • 2.
    CheckoutForm © Codename One2017 all rights reserved I know it looks like a dialog but I chose to implement it as a form and if you look at it closely you will see why
  • 3.
    public static voidshowCheckOut() { Form existingForm = Display.getInstance().getCurrent(); CheckoutForm f = new CheckoutForm(existingForm); f.oldTransition = existingForm.getTransitionOutAnimator();; Image background = Image.createImage(existingForm.getWidth(), existingForm.getHeight()); Graphics g = background.getGraphics(); existingForm.paintComponent(g, true); g.setAlpha(150); g.setColor(0); g.fillRect(0, 0, background.getWidth(), background.getHeight()); background = Display.getInstance().gaussianBlurImage(background, 10); f.getUnselectedStyle().setBgImage(background); f.getUnselectedStyle().setBackgroundType( Style.BACKGROUND_IMAGE_SCALED_FILL); f.setTransitionOutAnimator(CommonTransitions.createUncover( CommonTransitions.SLIDE_VERTICAL, true, 200)); existingForm.setTransitionOutAnimator(CommonTransitions.createEmpty()); existingForm.setTransitionOutAnimator(CommonTransitions.createCover( CommonTransitions.SLIDE_VERTICAL, false, 200)); f.show(); } CheckoutForm The functionality of the checkout UI is outside of the receipt section which we would normally think of as the “dialog” both the X button and the order button are outside of that UI hence this should appear as a form. To get this appearance we grab a “screenshot” of the existing form by drawing it onto an image we then blur and tint the screenshot and set it as the background of our form. We also use cover transition which provides that cool iOS style transition for the checkout UI
  • 4.
    private Transition oldTransition; privateCheckoutForm(Form previous) { super(new BorderLayout()); Button x = new Button("", "Title"); FontImage.setMaterialIcon(x, FontImage.MATERIAL_CLOSE); x.addActionListener(e -> { previous.showBack(); previous.setTransitionOutAnimator(oldTransition); }); add(BorderLayout.NORTH, BorderLayout.centerAbsoluteEastWest(new Label("Checkout", "Title"), null, x) ); add(BorderLayout.SOUTH, new Button("Order & Pay", "CheckoutButton")); Container itemsContainer = new Container(BoxLayout.y()); Container totalsContainer = new Container(BoxLayout.y()); Image chocolate = null; try { chocolate = Image.createImage("/chocolate-cake.jpg"); } catch(IOException err) { Log.e(err); } CheckoutForm The close button is just a button placed in the north of the form. I considered using a Toolbar and eventually chose to just place components in the north area. Both would have worked out to identical results so there was no real reason to use components.
  • 5.
    private Transition oldTransition; privateCheckoutForm(Form previous) { super(new BorderLayout()); Button x = new Button("", "Title"); FontImage.setMaterialIcon(x, FontImage.MATERIAL_CLOSE); x.addActionListener(e -> { previous.showBack(); previous.setTransitionOutAnimator(oldTransition); }); add(BorderLayout.NORTH, BorderLayout.centerAbsoluteEastWest( new Label("Checkout", "Title"), null, x)); add(BorderLayout.SOUTH, new Button("Order & Pay", "CheckoutButton")); Container itemsContainer = new Container(BoxLayout.y()); Container totalsContainer = new Container(BoxLayout.y()); Image chocolate = null; try { chocolate = Image.createImage("/chocolate-cake.jpg"); } catch(IOException err) { Log.e(err); } CheckoutForm Here I construct the title and close button. It’s mostly one long line of code if we ignore the code required to implement the X
  • 6.
    private Transition oldTransition; privateCheckoutForm(Form previous) { super(new BorderLayout()); Button x = new Button("", "Title"); FontImage.setMaterialIcon(x, FontImage.MATERIAL_CLOSE); x.addActionListener(e -> { previous.showBack(); previous.setTransitionOutAnimator(oldTransition); }); add(BorderLayout.NORTH, BorderLayout.centerAbsoluteEastWest( new Label("Checkout", "Title"), null, x)); add(BorderLayout.SOUTH, new Button("Order & Pay", "CheckoutButton")); Container itemsContainer = new Container(BoxLayout.y()); Container totalsContainer = new Container(BoxLayout.y()); Image chocolate = null; try { chocolate = Image.createImage("/chocolate-cake.jpg"); } catch(IOException err) { Log.e(err); } CheckoutForm The checkout button is placed in the south, again not a lot of functionality for that.
  • 7.
    itemsContainer.add(createShoppingCartContainer( "My great dish",8, chocolate)); itemsContainer.add(createShoppingCartContainer( "My great dish", 8, chocolate)); itemsContainer.setUIID("PaymentDialogTop"); totalsContainer.setUIID("PaymentDialogBottom"); totalsContainer.add(new Label("Total: " + L10NManager.getInstance().formatCurrency(33.45), "PriceTotal")); Container checkout = BoxLayout.encloseY( itemsContainer, totalsContainer); checkout.setScrollableY(true); add(BorderLayout.CENTER, checkout); CheckoutForm The dish container code is a bit simplistic, I extracted it to a separate method that just constructs a border layout entry with the image, the title & the price
  • 8.
    itemsContainer.add(createShoppingCartContainer( "My great dish",8, chocolate)); itemsContainer.add(createShoppingCartContainer( "My great dish", 8, chocolate)); itemsContainer.setUIID("PaymentDialogTop"); totalsContainer.setUIID("PaymentDialogBottom"); totalsContainer.add(new Label("Total: " + L10NManager.getInstance().formatCurrency(33.45), "PriceTotal")); Container checkout = BoxLayout.encloseY( itemsContainer, totalsContainer); checkout.setScrollableY(true); add(BorderLayout.CENTER, checkout); CheckoutForm You might recall the dialog top UIID from the CSS and cutting tutorial this is effectively the background of the receipt
  • 9.
    itemsContainer.add(createShoppingCartContainer( "My great dish",8, chocolate)); itemsContainer.add(createShoppingCartContainer( "My great dish", 8, chocolate)); itemsContainer.setUIID("PaymentDialogTop"); totalsContainer.setUIID("PaymentDialogBottom"); totalsContainer.add(new Label("Total: " + L10NManager.getInstance().formatCurrency(33.45), "PriceTotal")); Container checkout = BoxLayout.encloseY( itemsContainer, totalsContainer); checkout.setScrollableY(true); add(BorderLayout.CENTER, checkout); CheckoutForm The same would be true for the dialog bottom which is also from the CSS. I can go on a bit but most of the functionality of the app should be strait forward by now
  • 10.
    What did welearn? ✦Adapting a UI requires compromise & attention to details ✦Starting with mockups allows us to work visually top -> down ✦Some UI flair that looks trivial requires backflips to implement properly One of the main things I hope you learned from this module is the attention to detail and compromises required in building a mobile app. When building an app I always start with the mockup, it lets me gain perspective of the functionality and communicate with non-technical people about the effort. The original PSD looked trivial but some tricks the like the even sized container for the grid layout (or even the layout I chose) weren’t as simple. Some other effects that might have seemed hard like the receipt UI were much easier, just a 9-piece border.
  • 11.
    Thank You! Thanks forfinishing this module, I hope everything was clear to you and please feel free to ask questions and make comments so we can improve