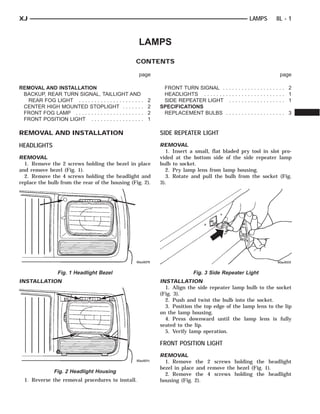
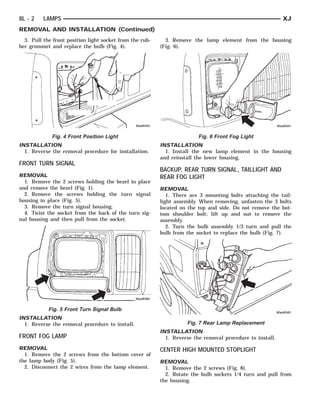
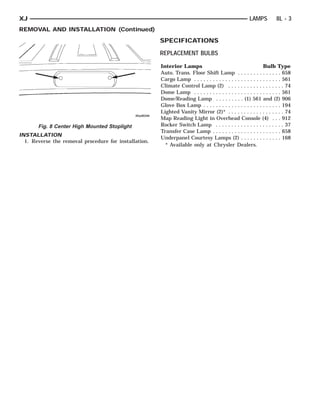
XJ                                                                                                    LAMPS      8L - 1


                                                        LAMPS
                                                       CONTENTS

                                                         page                                                      page

REMOVAL AND INSTALLATION                                           FRONT TURN SIGNAL .        ................... 2
 BACKUP, REAR TURN SIGNAL, TAILLIGHT AND                           HEADLIGHTS . . . . . . .   ................... 1
  REAR FOG LIGHT . . . . . . . . . . . . . . . . . . . . .    2    SIDE REPEATER LIGHT         .................. 1
 CENTER HIGH MOUNTED STOPLIGHT . . . . . . .                  2   SPECIFICATIONS
 FRONT FOG LAMP . . . . . . . . . . . . . . . . . . . . . .   2    REPLACEMENT BULBS          ................... 3
 FRONT POSITION LIGHT . . . . . . . . . . . . . . . . .       1

REMOVAL AND INSTALLATION                                          SIDE REPEATER LIGHT
HEADLIGHTS                                                        REMOVAL
                                                                    1. Insert a small, flat bladed pry tool in slot pro-
REMOVAL                                                           vided at the bottom side of the side repeater lamp
  1. Remove the 2 screws holding the bezel in place               bulb to socket.
and remove bezel (Fig. 1).                                          2. Pry lamp lens from lamp housing.
  2. Remove the 4 screws holding the headlight and                  3. Rotate and pull the bulb from the socket (Fig.
replace the bulb from the rear of the housing (Fig. 2).           3).


                  Fig. 1 Headlight Bezel                                       Fig. 3 Side Repeater Light
INSTALLATION                                                      INSTALLATION
                                                                    1. Align the side repeater lamp bulb to the socket
                                                                  (Fig. 3).
                                                                    2. Push and twist the bulb into the socket.
                                                                    3. Position the top edge of the lamp lens to the lip
                                                                  on the lamp housing.
                                                                    4. Press downward until the lamp lens is fully
                                                                  seated to the lip.
                                                                    5. Verify lamp operation.

                                                                  FRONT POSITION LIGHT
                                                                  REMOVAL
                                                                    1. Remove the 2 screws holding the headlight
                                                                  bezel in place and remove the bezel (Fig. 1).
                Fig. 2 Headlight Housing
                                                                    2. Remove the 4 screws holding the headlight
  1. Reverse the removal procedures to install.                   housing (Fig. 2).
8L - 2    LAMPS                                                                                            XJ
REMOVAL AND INSTALLATION (Continued)
  3. Pull the front position light socket from the rub-     3. Remove the lamp element from the housing
ber grommet and replace the bulb (Fig. 4).                (Fig. 6).


             Fig. 4 Front Position Light                                 Fig. 6 Front Fog Light
INSTALLATION                                              INSTALLATION
  1. Reverse the removal procedure for installation.        1. Install the new lamp element in the housing
                                                          and reinstall the lower housing.
FRONT TURN SIGNAL
                                                          BACKUP, REAR TURN SIGNAL, TAILLIGHT AND
REMOVAL                                                   REAR FOG LIGHT
  1. Remove the 2 screws holding the bezel in place
and remove the bezel (Fig. 1).                            REMOVAL
  2. Remove the screws holding the turn signal               1. There are 3 mounting bolts attaching the tail-
housing in place (Fig. 5).                                light assembly. When removing, unfasten the 3 bolts
  3. Remove the turn signal housing.                      located on the top and side. Do not remove the bot-
  4. Twist the socket from the back of the turn sig-      tom shoulder bolt; lift up and out to remove the
nal housing and then pull from the socket.                assembly.
                                                             2. Turn the bulb assembly 1/3 turn and pull the
                                                          bulb from the socket to replace the bulb (Fig. 7).


            Fig. 5 Front Turn Signal Bulb
INSTALLATION
  1. Reverse the removal procedure to install.                      Fig. 7 Rear Lamp Replacement
                                                          INSTALLATION
FRONT FOG LAMP                                              1. Reverse the removal procedure to install.
REMOVAL                                                   CENTER HIGH MOUNTED STOPLIGHT
  1. Remove the 2 screws from the bottom cover of
the lamp body (Fig. 5).                                   REMOVAL
  2. Disconnect the 2 wires from the lamp element.          1. Remove the 2 screws (Fig. 8).
                                                            2. Rotate the bulb sockets 1/4 turn and pull from
                                                          the housing.
XJ                                                                                                    LAMPS          8L - 3
REMOVAL AND INSTALLATION (Continued)
                                                       SPECIFICATIONS
                                                       REPLACEMENT BULBS

                                                       Interior Lamps                                         Bulb Type
                                                       Auto. Trans. Floor Shift Lamp . . . . . . . . . . . . . . 658
                                                       Cargo Lamp . . . . . . . . . . . . . . . . . . . . . . . . . . . . 561
                                                       Climate Control Lamp (2) . . . . . . . . . . . . . . . . . . 74
                                                       Dome Lamp . . . . . . . . . . . . . . . . . . . . . . . . . . . . 561
                                                       Dome/Reading Lamp . . . . . . . . . (1) 561 and (2) 906
                                                       Glove Box Lamp . . . . . . . . . . . . . . . . . . . . . . . . . 194
                                                       Lighted Vanity Mirror (2)* . . . . . . . . . . . . . . . . . . 74
                                                       Map Reading Light in Overhead Console (4) . . . 912
       Fig. 8 Center High Mounted Stoplight            Rocker Switch Lamp . . . . . . . . . . . . . . . . . . . . . . 37
                                                       Transfer Case Lamp . . . . . . . . . . . . . . . . . . . . . . 658
INSTALLATION
                                                       Underpanel Courtesy Lamps (2) . . . . . . . . . . . . . 168
  1. Reverse the removal procedure for installation.
                                                         * Available only at Chrysler Dealers.
Exj 8 la

Exj 8 la

  • 1.
    XJ LAMPS 8L - 1 LAMPS CONTENTS page page REMOVAL AND INSTALLATION FRONT TURN SIGNAL . ................... 2 BACKUP, REAR TURN SIGNAL, TAILLIGHT AND HEADLIGHTS . . . . . . . ................... 1 REAR FOG LIGHT . . . . . . . . . . . . . . . . . . . . . 2 SIDE REPEATER LIGHT .................. 1 CENTER HIGH MOUNTED STOPLIGHT . . . . . . . 2 SPECIFICATIONS FRONT FOG LAMP . . . . . . . . . . . . . . . . . . . . . . 2 REPLACEMENT BULBS ................... 3 FRONT POSITION LIGHT . . . . . . . . . . . . . . . . . 1 REMOVAL AND INSTALLATION SIDE REPEATER LIGHT HEADLIGHTS REMOVAL 1. Insert a small, flat bladed pry tool in slot pro- REMOVAL vided at the bottom side of the side repeater lamp 1. Remove the 2 screws holding the bezel in place bulb to socket. and remove bezel (Fig. 1). 2. Pry lamp lens from lamp housing. 2. Remove the 4 screws holding the headlight and 3. Rotate and pull the bulb from the socket (Fig. replace the bulb from the rear of the housing (Fig. 2). 3). Fig. 1 Headlight Bezel Fig. 3 Side Repeater Light INSTALLATION INSTALLATION 1. Align the side repeater lamp bulb to the socket (Fig. 3). 2. Push and twist the bulb into the socket. 3. Position the top edge of the lamp lens to the lip on the lamp housing. 4. Press downward until the lamp lens is fully seated to the lip. 5. Verify lamp operation. FRONT POSITION LIGHT REMOVAL 1. Remove the 2 screws holding the headlight bezel in place and remove the bezel (Fig. 1). Fig. 2 Headlight Housing 2. Remove the 4 screws holding the headlight 1. Reverse the removal procedures to install. housing (Fig. 2).
  • 2.
    8L - 2 LAMPS XJ REMOVAL AND INSTALLATION (Continued) 3. Pull the front position light socket from the rub- 3. Remove the lamp element from the housing ber grommet and replace the bulb (Fig. 4). (Fig. 6). Fig. 4 Front Position Light Fig. 6 Front Fog Light INSTALLATION INSTALLATION 1. Reverse the removal procedure for installation. 1. Install the new lamp element in the housing and reinstall the lower housing. FRONT TURN SIGNAL BACKUP, REAR TURN SIGNAL, TAILLIGHT AND REMOVAL REAR FOG LIGHT 1. Remove the 2 screws holding the bezel in place and remove the bezel (Fig. 1). REMOVAL 2. Remove the screws holding the turn signal 1. There are 3 mounting bolts attaching the tail- housing in place (Fig. 5). light assembly. When removing, unfasten the 3 bolts 3. Remove the turn signal housing. located on the top and side. Do not remove the bot- 4. Twist the socket from the back of the turn sig- tom shoulder bolt; lift up and out to remove the nal housing and then pull from the socket. assembly. 2. Turn the bulb assembly 1/3 turn and pull the bulb from the socket to replace the bulb (Fig. 7). Fig. 5 Front Turn Signal Bulb INSTALLATION 1. Reverse the removal procedure to install. Fig. 7 Rear Lamp Replacement INSTALLATION FRONT FOG LAMP 1. Reverse the removal procedure to install. REMOVAL CENTER HIGH MOUNTED STOPLIGHT 1. Remove the 2 screws from the bottom cover of the lamp body (Fig. 5). REMOVAL 2. Disconnect the 2 wires from the lamp element. 1. Remove the 2 screws (Fig. 8). 2. Rotate the bulb sockets 1/4 turn and pull from the housing.
  • 3.
    XJ LAMPS 8L - 3 REMOVAL AND INSTALLATION (Continued) SPECIFICATIONS REPLACEMENT BULBS Interior Lamps Bulb Type Auto. Trans. Floor Shift Lamp . . . . . . . . . . . . . . 658 Cargo Lamp . . . . . . . . . . . . . . . . . . . . . . . . . . . . 561 Climate Control Lamp (2) . . . . . . . . . . . . . . . . . . 74 Dome Lamp . . . . . . . . . . . . . . . . . . . . . . . . . . . . 561 Dome/Reading Lamp . . . . . . . . . (1) 561 and (2) 906 Glove Box Lamp . . . . . . . . . . . . . . . . . . . . . . . . . 194 Lighted Vanity Mirror (2)* . . . . . . . . . . . . . . . . . . 74 Map Reading Light in Overhead Console (4) . . . 912 Fig. 8 Center High Mounted Stoplight Rocker Switch Lamp . . . . . . . . . . . . . . . . . . . . . . 37 Transfer Case Lamp . . . . . . . . . . . . . . . . . . . . . . 658 INSTALLATION Underpanel Courtesy Lamps (2) . . . . . . . . . . . . . 168 1. Reverse the removal procedure for installation. * Available only at Chrysler Dealers.