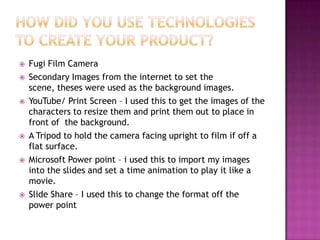
Evaluation Of Stop
Motion Project
Emily Challinor – The Cut
   Fugi Film Camera
   Secondary Images from the internet to set the
    scene, theses were used as the background images.
   YouTube/ Print Screen – I used this to get the images of the
    characters to resize them and print them out to place in
    front of the background.
   A Tripod to hold the camera facing upright to film if off a
    flat surface.
   Microsoft Power point – i used this to import my images
    into the slides and set a time animation to play it like a
    movie.
   Slide Share – I used this to change the format off the
    power point
• I was able to create my own version of the trailer of ‘the cut’
  and didn’t find this difficult to adapt to the genre.
• I watched the cut on YouTube first to see what I would need to
  create the animation, deciding on what backgrounds for the
  scene to use which I used Google images to do this, and printed
  them off, also to get a quality picture of the characters in the
  trailer to be able to get them printed off and create a narrative
  to the animation and what will happen in it.
• I have different ideas to how the animation could go but I
  decided to use the story line of the actual trailer, and in the
  making of the animation I had everything I needed to create it
  and the location/ the room lighting worked really well with the
  quality of camera used and time given was enough to create
  the animation
 In my animation and change the look of
  the character's and found the same
  characters in different contents wearing
  different clothes to twist the story of the
  animation (the two guys) in the scene.
 The scene of the setting was changed to
  in a bar with at plain background so the
  main character covered up most of the
  background in the animation.
Evauation Mini Movie

Evauation Mini Movie

  • 1.
    Evaluation Of Stop MotionProject Emily Challinor – The Cut
  • 2.
    Fugi Film Camera  Secondary Images from the internet to set the scene, theses were used as the background images.  YouTube/ Print Screen – I used this to get the images of the characters to resize them and print them out to place in front of the background.  A Tripod to hold the camera facing upright to film if off a flat surface.  Microsoft Power point – i used this to import my images into the slides and set a time animation to play it like a movie.  Slide Share – I used this to change the format off the power point
  • 3.
    • I wasable to create my own version of the trailer of ‘the cut’ and didn’t find this difficult to adapt to the genre. • I watched the cut on YouTube first to see what I would need to create the animation, deciding on what backgrounds for the scene to use which I used Google images to do this, and printed them off, also to get a quality picture of the characters in the trailer to be able to get them printed off and create a narrative to the animation and what will happen in it. • I have different ideas to how the animation could go but I decided to use the story line of the actual trailer, and in the making of the animation I had everything I needed to create it and the location/ the room lighting worked really well with the quality of camera used and time given was enough to create the animation
  • 4.
     In myanimation and change the look of the character's and found the same characters in different contents wearing different clothes to twist the story of the animation (the two guys) in the scene.  The scene of the setting was changed to in a bar with at plain background so the main character covered up most of the background in the animation.