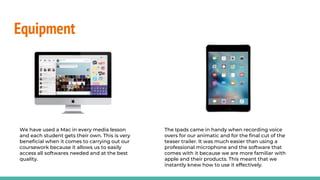
Evaluation Task 4
How did you use new media technologies in the construction and
research, planning and evaluation stages?
Equipment
Our main technological equipment consisted of a Mac computer, an Ipad
and a Canon 80D.
Equipment
We have used a Mac in every media lesson
and each student gets their own. This is very
beneficial when it comes to carrying out our
coursework because it allows us to easily
access all softwares needed and at the best
quality.
The Ipads came in handy when recording voice
overs for our animatic and for the final cut of the
teaser trailer. It was much easier than using a
professional microphone and the software that
comes with it because we are more familiar with
apple and their products. This meant that we
instantly knew how to use it effectively.
Equipment
For our filming and
photography we used a Canon
80D. This is a big step up from
the simple camcorder that we
used last year.
It had a significantly better camera
quality and zoom. It also had a number
of different settings that we could use.
It had manual focus (or auto) so
that we could choose what we
wanted the camera to be
focussed on. This was especially
helpful for us because using
focussing effectively is a key
aspect of horror films.
We had the option of using the
exposure lock so that the lighting
would be the same when the
camera moved around, creating
consistency.
Websites used
I used Mahara as a way to
present and store all of my
work from the research and
planning stages through to the
evaluations, in the form of
journal entries.
Mahara allowed me to present
each journal entry any way I
wanted. This meant that I could
use a variety of different
techniques when presenting my
work, each method being
specific to the piece of work I
was producing. This resulted in
my journal being as aesthetically
pleasing and as efficient as
possible.
I used SlideShare a number of times
throughout the research, planning and
evaluation stages of our work. It allowed me
to insert any work I had made which was in
the form of a powerpoint or a document. I
could then embed it straight from
SlideShare onto Mahara.
SlideShare was an essential website for my
coursework because I did a lot of my work on
google slides and docs, however I couldn’t insert my
work from those website onto Mahara whilst
making it look presentable (I could only attach a
link, which would make the journal entry appear
empty and incomplete). SlideShare allowed me to
embed my work and keep my blog looking
presentable.
Despite Maraha being
very useful, it also had its
downsides. For example
we each had a limited
amount of storage so this
prevented us from
uploading a number of
images and larger files, so
our presentation was
compromised.
Nonetheless, half way
through the research and
planning process, our
storage limit was
increased.
Websites
Along with SlideShare, Piktochart was a way
for me to present my work. I only used
Piktochart once and it was to present my
findings of the conventions of a magazine
front cover.
I had never used this
website before and it
was very rewarding
to learn to use
because it allowed
me to present my
work very
professionally.
It is a very visual way to
present your work so it
meant that I was very
restricted with how
much text I could use.
So I had to make sure I
used it for a piece of
work which wasn’t very
text dominated.
ZapSplat is a website which has thousands of free, and
copyright free, sound effects which you can download.
Having good sound in our teaser trailer was vital, so the
more layers of different sounds, the better. ZapSplat
allowed us to easily download as many sound effects as
we wanted, which we then layered over the soundtrack
to help create a dramatic, tension building piece of
audio.
We used Garageband to create our main soundtrack,
however it didn’t have all the sound we wanted. This left
us stuck with what we felt, wasn’t a very effective
soundtrack. We knew that we couldn’t have any
copyrighted audio, so ZapSplat was perfect.
Software
The main software that we used was Final Cut Pro. we used this during post-
production to edit and manipulate our footage for the teaser trailer and to create
the ident. Throughout this process I learnt about some new skills/tools available to
use on Final Cut such as, keyframing, colour correction and transformation.
Software
When creating the ident, I chose not to
use any of the preset titles, instead I
created my own from scratch. For the
image, I used a black background with
stars and two circles which acted as
text boxes. In order for the ident to be
engaging, it couldn’t be a still image.
This is when I learnt how to do
keyframing. It allowed me to make the
two circles grow in size alongside the
text layered on top of them. Without
learning how to use keyframing, our
ident would’ve been static and not very
interesting.
Software
During the editing process of our teaser, we noticed that a lot of our footage came out with different lighting
exposures even though each shot was in the same location. To overcome this issue, we used the colour correction
tool. This allowed us to match the colours on each shot so that they were near to perfectly similar, creating
consistency.
Software
Our trailer starts with a shot of a YouTube page with a
YouTube playing. In order to do this we had to open a
youtube page on google chrome and use inspect
element to change the text so that it matched what our
characters YouTube page would be.
In order to do this we had to layer the video and our
channel image above the screenshot. We then transform
the size of our video to a smaller size and then edit the z
and y axis so that it was positioned in the correct place.
We then took a screenshot of this page and inserted it
into our timeline on Final Cut. However we still
needed to somehow put our own video in the space
where the YouTube is played and add our our
characters own YouTube channel image.
Poster
We used Adobe Photoshop and
illustrator to create and edit the
poster. We mainly used Photoshop
to do the editing/manipulations
and then Illustrator for the actual
poster production.
When Holly photographed the
main image, she did well to make
sure it was focused on the
camcorder, resulting in the
background getting blurred.
However it wasn’t quite blurred
enough, so we used the blur tool in
photoshop to blur the trees a bit
more, to make it seem more
ominous.
We also made the lighting darker
by lowering the contrast and
exposure, as well as using the
burn tool to darken specific areas.
The finishing touch of our poster
was to add an image on the
reflection of the camcorder. This
was fairly simple - we layered it on
top and made sure the exposure
was high and then used the
eraser tool, but lowered the power
of it so that it would only really
lower the opacity of the image
when ‘erasing’
Magazine
For the magazine we had to cut out the
background from our image so that we
could create layers. In order to do this I used
the eraser and magic eraser tool in
photoshop. This allowed us to then save it as
a new image with no background and put it
onto the magazine cover and overlap the
masthead.
Other than that, the image itself didn’t need
any touching up so we kept that as it is. So all
we did then was add the text and extra
images such as the barcode and masthead.
Conclusion
In conclusion, I used a number of new media technologies throughout the whole
process of research, planning, production and evaluations. Each technology has its
own way of helping me to produce and display my work in the most effective way.
I felt that I learnt the most about Final Cut Pro and all the different tools that are
available to use, however I’ve found that learning how to use all of the different
websites to present my research and planning, are the most rewarding. Websites
such as Emaze, Piktochart and even Google Slides. There are websites like Prezi
which I have used, but never completely got to grips with them and preferred other
websites.
Nonetheless, if i had any difficulties using any websites or softwares then I would
watch tutorials on how to use them and learn step by step.

Evaluation task 4

  • 1.
    Evaluation Task 4 Howdid you use new media technologies in the construction and research, planning and evaluation stages?
  • 3.
    Equipment Our main technologicalequipment consisted of a Mac computer, an Ipad and a Canon 80D.
  • 4.
    Equipment We have useda Mac in every media lesson and each student gets their own. This is very beneficial when it comes to carrying out our coursework because it allows us to easily access all softwares needed and at the best quality. The Ipads came in handy when recording voice overs for our animatic and for the final cut of the teaser trailer. It was much easier than using a professional microphone and the software that comes with it because we are more familiar with apple and their products. This meant that we instantly knew how to use it effectively.
  • 5.
    Equipment For our filmingand photography we used a Canon 80D. This is a big step up from the simple camcorder that we used last year. It had a significantly better camera quality and zoom. It also had a number of different settings that we could use. It had manual focus (or auto) so that we could choose what we wanted the camera to be focussed on. This was especially helpful for us because using focussing effectively is a key aspect of horror films. We had the option of using the exposure lock so that the lighting would be the same when the camera moved around, creating consistency.
  • 6.
    Websites used I usedMahara as a way to present and store all of my work from the research and planning stages through to the evaluations, in the form of journal entries. Mahara allowed me to present each journal entry any way I wanted. This meant that I could use a variety of different techniques when presenting my work, each method being specific to the piece of work I was producing. This resulted in my journal being as aesthetically pleasing and as efficient as possible. I used SlideShare a number of times throughout the research, planning and evaluation stages of our work. It allowed me to insert any work I had made which was in the form of a powerpoint or a document. I could then embed it straight from SlideShare onto Mahara. SlideShare was an essential website for my coursework because I did a lot of my work on google slides and docs, however I couldn’t insert my work from those website onto Mahara whilst making it look presentable (I could only attach a link, which would make the journal entry appear empty and incomplete). SlideShare allowed me to embed my work and keep my blog looking presentable. Despite Maraha being very useful, it also had its downsides. For example we each had a limited amount of storage so this prevented us from uploading a number of images and larger files, so our presentation was compromised. Nonetheless, half way through the research and planning process, our storage limit was increased.
  • 7.
    Websites Along with SlideShare,Piktochart was a way for me to present my work. I only used Piktochart once and it was to present my findings of the conventions of a magazine front cover. I had never used this website before and it was very rewarding to learn to use because it allowed me to present my work very professionally. It is a very visual way to present your work so it meant that I was very restricted with how much text I could use. So I had to make sure I used it for a piece of work which wasn’t very text dominated. ZapSplat is a website which has thousands of free, and copyright free, sound effects which you can download. Having good sound in our teaser trailer was vital, so the more layers of different sounds, the better. ZapSplat allowed us to easily download as many sound effects as we wanted, which we then layered over the soundtrack to help create a dramatic, tension building piece of audio. We used Garageband to create our main soundtrack, however it didn’t have all the sound we wanted. This left us stuck with what we felt, wasn’t a very effective soundtrack. We knew that we couldn’t have any copyrighted audio, so ZapSplat was perfect.
  • 8.
    Software The main softwarethat we used was Final Cut Pro. we used this during post- production to edit and manipulate our footage for the teaser trailer and to create the ident. Throughout this process I learnt about some new skills/tools available to use on Final Cut such as, keyframing, colour correction and transformation.
  • 9.
    Software When creating theident, I chose not to use any of the preset titles, instead I created my own from scratch. For the image, I used a black background with stars and two circles which acted as text boxes. In order for the ident to be engaging, it couldn’t be a still image. This is when I learnt how to do keyframing. It allowed me to make the two circles grow in size alongside the text layered on top of them. Without learning how to use keyframing, our ident would’ve been static and not very interesting.
  • 10.
    Software During the editingprocess of our teaser, we noticed that a lot of our footage came out with different lighting exposures even though each shot was in the same location. To overcome this issue, we used the colour correction tool. This allowed us to match the colours on each shot so that they were near to perfectly similar, creating consistency.
  • 11.
    Software Our trailer startswith a shot of a YouTube page with a YouTube playing. In order to do this we had to open a youtube page on google chrome and use inspect element to change the text so that it matched what our characters YouTube page would be. In order to do this we had to layer the video and our channel image above the screenshot. We then transform the size of our video to a smaller size and then edit the z and y axis so that it was positioned in the correct place. We then took a screenshot of this page and inserted it into our timeline on Final Cut. However we still needed to somehow put our own video in the space where the YouTube is played and add our our characters own YouTube channel image.
  • 12.
    Poster We used AdobePhotoshop and illustrator to create and edit the poster. We mainly used Photoshop to do the editing/manipulations and then Illustrator for the actual poster production. When Holly photographed the main image, she did well to make sure it was focused on the camcorder, resulting in the background getting blurred. However it wasn’t quite blurred enough, so we used the blur tool in photoshop to blur the trees a bit more, to make it seem more ominous. We also made the lighting darker by lowering the contrast and exposure, as well as using the burn tool to darken specific areas. The finishing touch of our poster was to add an image on the reflection of the camcorder. This was fairly simple - we layered it on top and made sure the exposure was high and then used the eraser tool, but lowered the power of it so that it would only really lower the opacity of the image when ‘erasing’
  • 13.
    Magazine For the magazinewe had to cut out the background from our image so that we could create layers. In order to do this I used the eraser and magic eraser tool in photoshop. This allowed us to then save it as a new image with no background and put it onto the magazine cover and overlap the masthead. Other than that, the image itself didn’t need any touching up so we kept that as it is. So all we did then was add the text and extra images such as the barcode and masthead.
  • 14.
    Conclusion In conclusion, Iused a number of new media technologies throughout the whole process of research, planning, production and evaluations. Each technology has its own way of helping me to produce and display my work in the most effective way. I felt that I learnt the most about Final Cut Pro and all the different tools that are available to use, however I’ve found that learning how to use all of the different websites to present my research and planning, are the most rewarding. Websites such as Emaze, Piktochart and even Google Slides. There are websites like Prezi which I have used, but never completely got to grips with them and preferred other websites. Nonetheless, if i had any difficulties using any websites or softwares then I would watch tutorials on how to use them and learn step by step.