SlideShare a Scribd company logo
1 of 46
Download to read offline
brain computer interface technology


                                               Emotiv EPOC
                                                User Manual
                                                Includes headset
                                              and software setup
                                      information for your Emotiv
                                            EPOC neuroheadset.
Table of Contents


  Quick Start Guide .................................................................................................................4
  Introduction to Emotiv EPOC Neuro-technology Neuroheadset.........................................11
     NEUROHEADSET FEATURES ............................................................................................................ 11
     SAFETY .......................................................................................................................................... 12
     REGULATORY REQUIREMENTS......................................................................................................... 13
  1.0 Getting Started ............................................................................................................15
  2.0 Minimum Hardware and Software requirements .........................................................16
  2.1 Charging the EPOC Neuroheadset Battery .................................................................16
  2.2 Use of Saline Hydration Sensor Pack and Felt Inserts................................................17
  2.3 USB Transceiver Installation .......................................................................................19
  2.4 EPOC Control Panel™ ................................................................................................19
  2.5 Placement of Emotiv EPOC Neuroheadset on the Head ............................................20
  2.6 EmoEngine Status Panel.............................................................................................20
     ENGINE STATUS ............................................................................................................................. 21
  2.7 User Status ..................................................................................................................21
  2.8 Sensor Contact Quality Display ...................................................................................22
  2.9 Neuroheadset Set-Up ..................................................................................................23
  3.0 Achieving Good Signal Quality ....................................................................................24


EMOTIV EPOC USER MANUAL | BRAIN COMPUTER INTERFACE TECHNOLOGY                                                                                               2
3.1 Expressiv™ Suite ........................................................................................................26
     3.1.1 UNDERSTANDING THE EXPRESSIV SUITE PANEL DISPLAY ......................................................... 26
     3.1.2 SENSITIVITY ADJUSTMENT PANEL .......................................................................................... 27
     3.1.3 EMOKEY ............................................................................................................................... 28
  3.2 Affectiv™ Suite ............................................................................................................30
     3.2.1 AFFECTIV SUITE INTRODUCTION ............................................................................................. 30
     3.2.2 UNDERSTANDING THE AFFECTIV PANEL DISPLAY ..................................................................... 31
     3.2.3 AFFECTIV SUITE DETECTION DETAILS ..................................................................................... 31
  3.3 Cognitiv™ Suite ...........................................................................................................32
     3.3.1   COGNITIV SUITE INTRODUCTION ............................................................................................. 32
     3.3.2   UNDERSTANDING THE COGNITIV PANEL DISPLAY ..................................................................... 33
     3.3.3   COGNITIV TRAINING ............................................................................................................... 34
     3.3.4   TRAINING NEUTRAL ................................................................................................................ 36
     3.3.5   CLEAR TRAINING BUTTON ...................................................................................................... 37
     3.3.6   COGNITIV TIPS ...................................................................................................................... 37
     3.3.7   EMOKEY FOR COGNITIV ACTIONS ........................................................................................... 37
  3.4 Mouse Emulator...........................................................................................................39
     3.4.1 UNDERSTANDING THE MOUSE EMULATOR TAB ........................................................................ 39
     3.4.2 MOUSE EMULATOR CONTROLS ............................................................................................... 40
  4.0 Trouble Shooting and Help ..........................................................................................41


EMOTIV EPOC USER MANUAL | BRAIN COMPUTER INTERFACE TECHNOLOGY                                                                                          3
Quick Start Guide

  Items in the EPOC Headset Kit

  Make sure all items are present in your kit before starting.

     •   Headset Assembly with Rechargeable Lithium battery already installed
     •   USB Transceiver Dongle
     •   Hydration Sensor Pack with 16 Sensor Units
     •   Saline solution
     •   50/60Hz 100-250 VAC Battery Charger (US customers) or USB charger (non-US customers)
     •   CD Installation Disk for Windows XP or Vista (for EPOC consumer headset. SDKs are
         delivered electronically)


EMOTIV EPOC USER MANUAL | BRAIN COMPUTER INTERFACE TECHNOLOGY                                   4
Initial charging of headset

  Make sure the small switch on the rear underside of the headset is set to the “Off” position before
  starting.

  Plug the mini USB cable attached to the supplied battery charger into the slot at the top of the
  headset and to the USB port on your PC or the power cord into a 50 or 60 Hz 100-250 V electrical
  outlet.


  The Lithium battery can be recharged to 100% capacity in approximately 4 hours depending on the
  initial state of charge. Charging for 30 minutes usually yields about a 10% increase in charge.

  The EPOC Headset contains two status LEDs located at the rear and next to the power switch at
  the back of the headband. When the power switch is set to the “on” position, the rear LED will
  illuminate and appear blue if there is sufficient charge for correct operation, unless charging is in
  progress. The charging LED will appear red during battery charging; when the battery is fully-
  charged, the charging LED will display green.

  NOTE: The Headset should not be charged when still on the head.


  Software Installation

  Insert the supplied EPOC CD setup disk into your computer's CD/DVD drive and follow the step-by-
  step installation instructions.


  After software installation, start-up the EPOC Control Panel program, loading the Headset Setup
  screen.


EMOTIV EPOC USER MANUAL | BRAIN COMPUTER INTERFACE TECHNOLOGY                                             5
Hydrating the Sensors

  Open the Saline Hydration Sensor Pack with the white felt inserts inside. The inserts will eventually
  be mounted in the headset arms but must be properly wetted with saline solution first. Begin
  wetting each of the felt inserts with the supplied saline solution. The felts should be wet to the
  touch, but not soaking wet!

  Note: This is standard multipurpose contact lens saline solution and is available from any local drug
  store in case you run out of solution. However, the bottle supplied with the kit should be sufficient
  initially. See the User Manual on the EPOC CD setup disk for recommendations.

  Add a few drops of saline to saturate the large white hydrator pad attached to the top cover of the
  hydrator, then close the cover and gently shake the hydrator pack. This will maintain the moisture
  of the felt pads when they are not in use. Open the pack and check that each of the pads had been
  wetted. If not fully wetted, then add a drop or two of saline to any pads not sufficiently wet using the
  dropper bottle. Be careful not to over-wet the pads. If you have connection problems, add more
  saline to each felt pad.


EMOTIV EPOC USER MANUAL | BRAIN COMPUTER INTERFACE TECHNOLOGY                                                6
Sensor Assembly

  After the wetting process, remove the sensor units with their felt pads from the hydrator pack and
  insert each one into the black plastic headset arms, turning each one clockwise one-quarter turn
  until you feel a definite "click". The "click" indicates each sensor is correctly installed in a headset
  arm. If you have difficulty with this step, apply a little more force until you feel the "click" but be
  careful not to exert excessive force as damage might occur. Please see the Troubleshooting
  section if the sensors do not click in place easily.


  NOTE: When not in use, the sensor units should be removed from the headset arms and stored in
  the hydrator pack for subsequent use.


EMOTIV EPOC USER MANUAL | BRAIN COMPUTER INTERFACE TECHNOLOGY                                                7
Pairing the Neuroheadset

  Insert the supplied USB Transceiver Dongle into one of your computer's USB slots. Use a USB
  extension cable and position the Transceiver in a prominent location away from your monitor and
  PC to improve poor reception.


  Then turn-on the headset using the switch at the bottom end of the headset, holding it close to the
  Transceiver.


  Headset Placement

  You are now ready to put the EPOC headset on your head. Using both hands, slide the headset
  down from the top of your head. Place the arms approximately as depicted, being careful to place
  the sensors with the black rubber insert on the bone just behind each ear lobe. Correct placement
  of the rubber sensor is critical for correct operation.


EMOTIV EPOC USER MANUAL | BRAIN COMPUTER INTERFACE TECHNOLOGY                                           8
Notice the 2 front sensors should be approximately at the hairline or about the width of 3 fingers
  above your eyebrows.


  After the headset is in position, press and hold the 2 reference sensors (located just above and
  behind your ears) for about 5-10 seconds. Good contact of reference sensors is the key for a
  good signal. Check that the lights corresponding to these 2 reference sensors turn from red to
  green in the EPOC Control Panel Headset Setup screen.


  Gently press and hold each remaining sensor against your scalp until all the lights corresponding to
  those sensors turn to green in the EPOC Control Panel.


EMOTIV EPOC USER MANUAL | BRAIN COMPUTER INTERFACE TECHNOLOGY                                            9
If you are unable to get anything except 2 red sensors, add saline to the reference and other
  sensors, or try the alternate reference locations – swap the reference sensors with the rubber
  comfort pads located directly behind the ears, making sure the reference sensors contact directly
  onto the bare skin on the bony bump.

  Signal Quality Screen

  Your objective is to achieve as many green lights as possible using the EPOC Control Panel and
  adjusting the position of the various arms accordingly. (See full User Manual Document contained
  on the CD for detailed instructions) Note that the EPOC will still function with some sensor locations
  showing yellow or orange, and will even cope with a few red or black however the detections will be
  less reliable in this state. Often the contact quality will gradually improve after a few minutes use, so
  don’t be too discouraged if setup is not perfect at first.


  You are now ready to begin using the EPOC headset.

  If you experience difficulties with initial headset start-up, fine tuning or operation, you may contact
  Emotiv EPOC Customer Support by live chat or support tickets at www.emotiv.com


EMOTIV EPOC USER MANUAL | BRAIN COMPUTER INTERFACE TECHNOLOGY                                                 10
Introduction to Emotiv EPOC Neuro-technology Neuroheadset

  Fulfill the fantasy of having supernatural powers and controlling the world with
  your mind!
  For over a millennium, mankind has dreamed of the ability to control objects with the power of
  thought. Today that dream has become reality! Now you can experience the fantasy of having
  supernatural powers and controlling the world with your mind.

  Based on the latest developments in neuro-technology, Emotiv has developed a revolutionary new
  personal interface for human computer interaction. The Emotiv EPOC uses a set of sensors to tune
  into electric signals produced by the brain to detect player thoughts, feelings and expressions and
  connects wirelessly to most PCs.

  Neuroheadset Features:
  Limited edition design

  14 biopotential sensors with gold-plated connectors offer optimal positioning for accurate spatial
  resolution

  Gyroscope generates optimal positional information for cursor and camera controls

  Hi-performance wireless gives users total range of motion Dongle

  is USB compatible and requires no custom drivers Rechargeable

  Lithium battery provides 12 hours of continuous use


EMOTIV EPOC USER MANUAL | BRAIN COMPUTER INTERFACE TECHNOLOGY                                           11
Safety:
  Please note the following safety considerations:


  CHOKING HAZARD – detachable small parts. Keep away from small children.

  DO NOT attach the neuroheadset to the charger or USB connector while in use. AWAYS remove
  the neuroheadset during charging and avoid touching the sensors if fitted. Although unlikely, an
  insulation failure in the charger or USB source may cause the neuroheadset to become live. The
  neuroheadset will automatically enter sleep mode while attached to the charger, so it is not possible
  to extend use while charging.

  WARNING: Radio emissions may interfere with appliances and medical equipment including heart
  pacemakers and automated medical dosimetry systems. Use with caution.

  WARNING: Discontinue use if the system becomes uncomfortable to wear or if skin irritation
  occurs. Users are advised not to share sets of sensors to avoid cross-infection risks.


EMOTIV EPOC USER MANUAL | BRAIN COMPUTER INTERFACE TECHNOLOGY                                             12
Regulatory Requirements:
  FCC Requirements Part 15
  This device complies with Part 15 of the FCC Rules. Operation is subject to the following two
  conditions:

  1. This device may not cause harmful interference, and

  2. This device must accept any interference received, including interference that may cause
  undesired operation.

  This equipment has been tested and found to comply with the limits for a Class B digital device,
  pursuant to Part 15 of the FCC Rules. These limits are designed to provide reasonable protection
  against harmful interference in a residential installation. This equipment generates, uses, and can
  radiate radio frequency energy and, if not installed and used in accordance with the instructions,
  may cause harmful interference to radio communications. However, there is no guarantee that
  interference will not occur in a particular installation. If this equipment does cause harmful
  interference to radio or television reception which can be determined by turning the radio or
  television off and on, the user is encouraged to try to correct interference by one or more of the
  following measures:


  1. Reorient or relocate the receiving antenna.

  2. Increase the separation between the equipment and receiver.

  3. Connect the equipment into an outlet on another circuit.

  4. Consult the dealer or an experienced radio/TV technician for help.

  NOTE: Modifications not expressly approved by Emotiv could void the user’s authority to operate
  the equipment

  Canada
  This device complies with RSS-210 of Industry Canada (IC). Operation is subject to the following
  two conditions:

  1. This device may not cause interference, and

  2. This device must accept any interference received, including interference that may cause
  undesired operation of this device.

  This Class B digital apparatus complies with Canadian ICES-003. Cet appareil numérique de la
  Classe B est conforme à la norme NMB-003 du Canada.


EMOTIV EPOC USER MANUAL | BRAIN COMPUTER INTERFACE TECHNOLOGY                                           13
Europe, Australia, New Zealand


  Product Name and Model: Emotiv EPOC Model 1.0

  Product description: EPOC Neuroheadset, USB-01 Transceiver, Hydrator Pack + charger or
  charge cable

  conforms to the following Product Specifications and Regulations:

  EMC and Telecom: Class B

  ETSI EN 300 440-2 V1.4.1
  EN 301 489-1
  EN 301 489-3
  AS/NZS CISPR22 :2009
  AS/NZS 4268 :2008
  FCC CFR 47 Part 15C (identifiers XUE-EPOC01, XUE-USBD01)

  Safety:

  EN 60950-1:2006
  IEC 60950-1:2005 (2nd Edition)
  AS/NZS 60950.1:2003 including amendments 1, 2 & 3
  CB Certificate JPTUV-029914 (TUV Rheinland)

  The product herewith complies with the requirements of the Low Voltage Directive 2006/95/EC, the
  EMC Directive 2004/108/EC, the R&TTE Directive 1999/5/EC, and carries the CE and C-Tick
  marks accordingly.


EMOTIV EPOC USER MANUAL | BRAIN COMPUTER INTERFACE TECHNOLOGY                                        14
1.0     Getting Started

  EPOC Neuroheadset Kit Components:

  EPOC Neuroheadset Assembly with Rechargeable Lithium battery already installed

  USB Transceiver Dongle

  Hydration Sensor Pack with 16 Sensor Units

  Saline Solution

  For US customers, 50/60Hz 100-250 VAC Battery Charger. For non-US customers kit includes
  USB to USB-MiniB battery charging cable providing 5.0V at 0.1A from a standard USB socket on
  any computer.

  Quick Start Guide

  All of the components of the Emotiv EPOC Neuroheadset are delivered in our standard shipping
  box. Inside the box you will find all of the components neatly stored for shipping and storage.

  Note: Never put the Emotiv EPOC, or any of its components, back into the packaging until they
  have dried completely. Make sure the Hydrator sensor pack is sealed and is not leaking. If wet,
  wipe the seal clean before closing.


EMOTIV EPOC USER MANUAL | BRAIN COMPUTER INTERFACE TECHNOLOGY                                       15
2.0     Minimum Hardware and Software requirements

  2.4 GHz Intel Pentium 4 processor (or equivalent)

  Microsoft Windows XP with Service Pack 2, Microsoft Windows Vista or Microsoft Windows 7

  1GB RAM, minimum

  50 MB available disk space.

  One or two unused USB 2.0 ports (depending on the number of EPOC Neuroheadsets you wish to
  use simultaneously)

  Insert the Installation Disk into you PC disk drive and install the EPOC software and follow the
  instructions. For instructions on Windows 7, any other application issues, contact Emotiv Support
  at support@emotiv.com. Toll Free in USA: 1-800-538-EMOTIV (1800-538-3668). We recommend
  you download the latest versions of Emotiv software from http://www.emotiv.com/store/apps/ to
  obtain the latest features. Up to date versions of all software on the installation disk are available for
  free download. Many other applications are also available at the same location.


  2.1     Charging the EPOC Neuroheadset Battery

  The Emotiv EPOC Neuroheadset contains a built-in rechargeable lithium battery which is designed
  to run for approximately 12 hours when fully charged. To charge the EPOC battery, set the power
  switch to the “off” position, and plug the EPOC Neuroheadset into the Emotiv battery charger using
  the mini-USB cable provided with the EPOC Neuroheadset. Using the supplied battery charger, a
  fully drained battery can be recharged to 100% capacity in approximately 6 hours; charging for 30
  minutes usually yields about a 10% increase in charge.

  The EPOC Neuroheadset contains a status LED located next to the power switch at the back of the
  headband. When the power switch is set to the “on” position, the LED will illuminate and appear
  blue if there is sufficient charge for correct operation. The LED will appear red during battery
  charging; when the battery is fully-charged, the LED will display green.

  NOTE 1: The Neuroheadset should not be charged when still on the head.

  NOTE 2: Do not expose battery or neuroheadset to prolonged temperatures above 122°F (50°C).
  Damage to the battery or neuroheadset may occur.


EMOTIV EPOC USER MANUAL | BRAIN COMPUTER INTERFACE TECHNOLOGY                                                  16
2.2     Use of Saline Hydration Sensor Pack and Felt Inserts
  Open the Saline Hydration Sensor Pack with the white felt inserts inside. The inserts will be
  mounted in the neuroheadset arms but must be properly wetted with saline solution first. The
  saline solution is harmless but allows the felt pads to make good contact with the skull when
  properly positioned on the head. This is a very important step.

  Pour a small amount of saline onto each of the sensors (6 or 7 drops if completely dry). Once you
  have moistened the sensors, pour a small amount of saline onto the large white hydrator pad to
  evenly moisten the entire pad. Close the hydrator and allow the sensors to absorb some of the
  saline. You can shake or invert the hydrator unit so that the liquid is evenly distributed and
  absorbed into the felt pads. Note: For user comfort the sensor pads should be damp but not
  dripping wet. If the pads do not feel slightly wet, you may also place one or two more drops of the
  solution directly on the pads from the top to speed the process of absorption.

  Following the initial hydration step, each of the inserts must be removed from the pack and securely
  mounted in the EPOC neuroheadset arms by turning the inserts one quarter turn to the right and
  listen/feel for the click. If you do not hear or feel the click, try again until you do. A very firm force
  may be needed the first couple of times but be careful not to exert excessive force or you may
  damage the headset arms. Practice on the sockets in the hydrator a few times if you are unsure.

  Ensure that each sensor is locked in place. Note that the sensor location behind the ears is fitted
  with a soft rubber comfort pad. This should remain in place unless the normal Reference sensors
  do not contact properly (see below for alternative Reference Sensor location)

  The fully populated neuroheadset should look like this:


EMOTIV EPOC USER MANUAL | BRAIN COMPUTER INTERFACE TECHNOLOGY                                                  17
After first use, the pads should be rewet the next time EPOC is used by using a dropper to wet the
  sensors and hydrator pad again. The sensors should be removed from arms after use and stored
  in the hydrator unit to keep the sensors moist for subsequent use.

  Note on saline solution:       When the initially provided saline solution has been exhausted,
  additional saline should be purchased from a local drug store. We recommend the use of Multi-
  purpose Contact Lens Solution if possible, but do not use Contact Lens Cleaning or Sterilizing
  Solutions. Multi-purpose Solution contains non-allergenic anti-microbial agents which help to keep
  your sensors fresh and prevent transfer of microbes between users. Normal saline between 0.7%
  and 4% w-w sodium chloride may also be used, but we recommend adding a small quantity (no
  more than 4% by volume) of a household disinfectant such as 70% iso-propyl alcohol.


EMOTIV EPOC USER MANUAL | BRAIN COMPUTER INTERFACE TECHNOLOGY                                          18
2.3     USB Transceiver Installation

  Plug the provided Emotiv USB transceiver into an unused USB port on your computer. After one
  or two seconds you should see a single LED flashing slowly, or a single bright LED and another dim
  LED if the transceiver has already paired with a nearby neuroheadset. The transceiver should be
  recognized and installed automatically by your computer as a USB Human Interface Device. Please
  wait for a moment until Windows indicates that the new hardware is installed and ready to use.

  Hold the Emotiv EPOC close to the USB receiver, and turn it on using the switch at the rear of the
  headband.      You should see a new steady LED on the receiver, which indicates that the
  neuroheadset has properly paired with the USB receiver, and a more dim LED which flashes
  indicating successful data transfer.


  2.4     EPOC Control Panel™

  This section explains how to use EPOC Control Panel to explore the Emotiv detection suites.

  Launch EPOC Control Panel by selecting Windows Start → Programs → Emotiv→ EPOC Control
  Panel. When the Control Panel is launched for the first time, your firewall software (if installed on
  your computer) may notify you that the Control Panel is trying to accept connections from the
  network. For proper operation, you must allow EPOC Control Panel to use this port by selecting
  “Unblock” (or a similar option, depending on your firewall software).


  Figure 1 Windows Firewall warning about EPOC Control Panel – select Unblock
  EPOC Control Panel showcases the capabilities of the Emotiv EPOC Neuroheadset to decipher
  brain signals, facial expressions and even mouse control using the in-built motion sensors.


EMOTIV EPOC USER MANUAL | BRAIN COMPUTER INTERFACE TECHNOLOGY                                             19
2.5     Placement of Emotiv EPOC Neuroheadset on the Head
  Carefully expand the EPOC neuroheadset to place it on subject’s head. Using both hands, slide
  the neuroheadset down from the top of your head. Place the arms approximately as depicted, being
  careful to place the sensors with the black rubber insert on the bone just behind each ear lobe.
  Correct placement of the rubber sensor is critical for correct operation.

  If any sensors fall out, replace them and ensure they are locked in place. The EPOC Neuroheadset
  should be positioned on the head as indicated by the following illustrations.

  NOTE: Caution should be exercised never to bend the arms of the neuroheadset backwards out of
  their natural curvature. Damage may occur.

  A view of a properly located Emotiv EPOC. Note that the front sensors are 2 – 2.5 inches (50-
  60mm or about three finger widths) above the eyebrows.

  The “Reference Sensors” shown here must have good contact with the subject to assess the
  Contact Quality of the remaining sensors. You many need to press these against the subject’s
  scalp for a short period to establish a good conductive path.

  In the event that the Reference Sensors do not make proper contact (all or most sensors “black” on
  Control Panel screen), the behind ear locations can be used as alternative Reference locations.

  Swap the Comfort Pads with the Reference Sensors as shown. Also check that all of the sensor
  pads are damp. Use the Reference Sensors location which gives best overall performance.


  2.6     EmoEngine Status Panel

  The top pane of EPOC Control Panel is known as the EmoEngine Status Pane. This pane displays
  indicators that provide real-time information about EmoEngine status and EPOC Neuroheadset
  sensor contact quality. It also exposes user profile management controls.


  Figure 2 EmoEngine Status Pane


EMOTIV EPOC USER MANUAL | BRAIN COMPUTER INTERFACE TECHNOLOGY                                          20
Engine Status
  By default, the Control Panel will automatically connect to the EmoEngine when launched. In this
  mode, it will automatically discover attached USB transceivers and Emotiv EPOC Neuroheadsets.

  There are four status indicators:

  System Status: A summary of the general EmoEngine status.

  System Up Time: The timestamp (in seconds) attached to the most recently received EmoState
  event. Generally, this corresponds to the length of time that the EmoEngine has been running with
  an EPOC Neuroheadset connected to the USB receiver.

  Wireless Signal: This displays the quality of the connection between the EPOC Neuroheadset and
  the Emotiv wireless USB receiver connected to your machine. If you have not yet connected, the
  display will show “No Signal”. If the wireless signal strength drops too low (displayed as “Bad” or
  “No Signal”) then no detection results will be transmitted and the Control Panel will disable its
  detection suite UI controls.

  Battery Power: Displays an approximation of the remaining charge in an EPOC Neuroheadset’s
  built-in battery.


  2.7     User Status

  Use the controls in this section to manage user profiles and assign a specific user (via their profile)
  to a specific attached EPOC Neuroheadset. Although the EmoEngine supports up to two
  simultaneously connected EPOC Neuroheadsets, EPOC Control Panel only displays status
  information and detection results for a single EPOC Neuroheadset at a time. The Headset combo
  box allows you to specify the EPOC Neuroheadset that has the current “focus.” In Figure 3 the User
  Status controls tell us that the Control Panel is currently displaying information for the user with
  profile “Emotiv User”, wearing EPOC Neuroheadset “0.” If you wish to use multiple headsets you
  can switch between them using the “Headset” drop-down box, or you can launch a second instance
  of EPOC Control Panel and select a different headset for each instance.

  Note: neuroheadset numbering begins with 0 and not 1 as you might expect. Other operations that
  are supported include adding, saving, removing, and switching between user profiles. Note: EPOC
  Control Panel will automatically save user profile data to disk when it exits so it is generally not
  necessary to use the Save Profile button.


EMOTIV EPOC USER MANUAL | BRAIN COMPUTER INTERFACE TECHNOLOGY                                               21
Figure 3 Add New User Profile


  2.8    Sensor Contact Quality Display
  Accurate detection results depend on good sensor contact and signal quality. This display is a
  visual representation of the current contact quality of the individual EPOC Neuroheadset sensors.
  The display is a smaller copy of the contact quality visualization found on the Control Panel’s
  Neuroheadset Setup tab. Please see Section 3.0 for more information about fitting the EPOC
  Neuroheadset and achieving good signal quality.


EMOTIV EPOC USER MANUAL | BRAIN COMPUTER INTERFACE TECHNOLOGY                                         22
2.9      Neuroheadset Set-Up


  The Headset Setup panel is displayed by default when starting EPOC Control Panel. The main
  function of this panel is to display contact quality feedback for the EPOC Neuroheadset’s sensors
  and provide guidance to the user in fitting the EPOC Neuroheadset correctly. It is important for the
  user to achieve the best possible contact quality before proceeding to the other EPOC Control
  Panel tabs. Poor contact quality will result in poor Emotiv detection results, although the EPOC will
  continue to perform moderately well with a small number of missing or lower quality sensors.


  Figure 4 Neuroheadset Setup Panel
  The image on the left side of the panel is a representation of the sensor locations when looking
  down from above onto the user’s head. Each circle represents one sensor and its approximate
  location when wearing the neuroheadset. The color of the sensor circle is a representation of the
  contact quality. To achieve the best possible contact quality, all of the sensors should show as
  green.

  Other sensor colors indicate:

  Black:          No signal (Not Acceptable)

  Red:            Very poor signal (Not Acceptable)


EMOTIV EPOC USER MANUAL | BRAIN COMPUTER INTERFACE TECHNOLOGY                                             23
Orange:          Poor signal

  Yellow:          Fair signal

  All Green:       Ideal signal

  Green + Some Yellows: Acceptable

  Green + Black and/or Orange/Red: Not Acceptable (EPOC may continue to function with several
  black or red sensors however many detections will be disabled and others will be less reliable).

  The setup procedure used to achieve good contact quality is outlined below. Only after the EPOC
  Neuroheadset sensor contact quality has been maximised, should you move on to other EPOC
  Control Panel tabs.


  3.0       Achieving Good Signal Quality
  STEP 1: Before putting on the EPOC Neuroheadset, ensure that each of the 16 electrode sockets
  are fitted with a sensor unit with a moist felt pad. If the pads are not already moist, wet them with
  saline solution before inserting into the neuroheadset using the procedure outlined in Section 2.2,
  above.

  STEP 2: Switch on the EPOC Neuroheadset, and verify that the built-in battery is charged and is
  providing power by looking for the blue LED located near the power switch at the back of the
  neuroheadset. If the neuroheadset battery needs charging, set the power switch to the off position,
  and plug the neuroheadset into the Emotiv battery charger using the mini-USB cable provided with
  the EPOC Neuroheadset, or alternatively through a spare USB socket on your PC using a USB-
  MiniB cable. Allow the EPOC Neuroheadset battery to charge for at least 15 minutes before trying
  again. A fully discharged neuroheadset will take up to 6 hours to reach full charge.

  STEP 3: Verify that the Wireless Signal reception is reported as “Good” by looking at the Engine
  Status area in the EmoEngine Status Pane (described in Section 2.6). If the Wireless Signal status
  is reported as “Bad” or “No Signal”, then make sure that the Emotiv Wireless USB Receiver is
  inserted into a USB port on your computer and that the bright LED and dim flickering data transfer
  LED on the top half of the receiver are visible. If the LED is blinking slowly or is not illuminated, then
  remove the receiver from the computer, reinsert it, and try again. Remove any metallic or dense
  physical obstructions located near the receiver or the EPOC Neuroheadset, and move away from
  any powerful sources of electromagnetic interference, such as microwave ovens, large motors, or
  high-powered radio transmitters. You may also attach the USB Transceiver to the end of a USB
  extension cable in order to position the Transceiver prominently in the space, away from potential
  sources of interference such as monitors and wireless routers.

  STEP 4: Put on the EPOC Neuroheadset by gently pulling apart the headband and lowering the
  sensor arms onto your head from the top down, near the rear of the skull. Next, slide the
  neuroheadset forward until the sensors closest to the neuroheadset pivot points are located directly
  above your ears and as close to your hairline as possible. Adjust the fit so that the rectangular
  compartments at the front ends of the headband sit comfortably just above and behind your ears.
  Tilt the neuroheadset so that the two lowest, front-most sensors are symmetric on your forehead


EMOTIV EPOC USER MANUAL | BRAIN COMPUTER INTERFACE TECHNOLOGY                                                  24
and positioned about 2 to 2.5 inches above your eyebrows. Finally, check that all sensors are
  touching your head and, if not, then fine tune the neuroheadset fit by gently sliding the
  neuroheadset in small increments until an ideal fit has been achieved.

  STEP 5: Starting with the two sensors just above and about an inch (25mm) behind your ears
  (these are reference sensors for which good contact with your scalp is essential), adjust the
  sensors so they make proper contact with your scalp (i.e. show green on the contact quality
  display). If the indicators are:

  Black: Check that the sensor has a felt pad fitted. Check that the felt pad is pressing firmly against
  your scalp. Then try re-moistening the felt pad. If problems persist, this may indicate a problem with
  the EPOC Neuroheadset.

  Yellow, Orange, or Red: The sensor has not established a good conductive path with your scalp.
  Check that the felt pad is making comfortable, yet firm, contact with your scalp. Try shifting the
  neuroheadset slightly back and forth on your head, or press gently on the troublesome sensor to
  improve contact. If the contact is adequate, ensure that the felt pad is moist. If the sensor’s indicator
  color becomes lighter, the signal quality is improving. If the sensor’s indicator color is getting darker
  the signal quality is deteriorating. If problems still persist, try parting the hair in the vicinity of the
  electrode so the felt pad touches your scalp.

  See the TROUBLESHOOTING GUIDE at the end of this manual for more details on how to deal
  with poor contact.

  STEP 6: Repeat Step 5 for each of the remaining sensors until all of the sensors have adequate
  contact quality (i.e. are predominantly showing green).

  If at any time the reference sensors (located just above and behind your ears) no longer have a
  good connection (i.e. they show RED, and most or all of the other sensors turn BLACK),
  immediately restore these sensors to green before proceeding further. Try the alternative reference
  locations behind the ears if you continue to have difficulty with the primary locations (Section 2.5).


EMOTIV EPOC USER MANUAL | BRAIN COMPUTER INTERFACE TECHNOLOGY                                                   25
3.1     Expressiv™ Suite
  The Expressive Suite details the facial expressions and non-verbal communication capabilities of
  the EPOC Neuroheadset. No longer do you need to push a button or type in emoticons into a chat
  dialog box during game-play. Now, if you want to show facial expressions on your avatar, you need
  only perform them while wearing the EPOC neuroheadset and you can display these expressions
  on the face of your avatar.


  Figure 5 Expressiv Suite


  3.1.1 Understanding the Expressiv Suite Panel Display

  On the left-hand side of the Expressiv Suite panel is a simple avatar. The avatar will mimic your
  facial expressions, in camera view (i.e. not mirrored). The facial expressions which are displayed
  include horizontal eye movements to the left and right, normal eye blinks, left and right sided winks,
  clenching the teeth and smiling.,

  On the right-hand side of the panel is the Sensitivity panel. This panel is explained further in the
  following section.


EMOTIV EPOC USER MANUAL | BRAIN COMPUTER INTERFACE TECHNOLOGY                                              26
3.1.2 Sensitivity Adjustment Panel
  The Control Panel offers sensitivity adjustments for the Expressiv Suite detections. This is
  controlled through sliders to the right of avatar.

  For each facial expression, check the performance of the detection. If you feel that the Expressiv
  detection is not responding readily to a particular expression, then increase the sensitivity for that
  expression. If you feel that it is too easy to trigger a particular expression, or you are seeing “false
  positive” expressions, then decrease the sensitivity for that expression. Sensitivity can be increased
  or decreased by moving the sensitivity slider to the right or left, respectively.


  Figure 6 Expressiv Suite Sensitivity Adjustment Panel


EMOTIV EPOC USER MANUAL | BRAIN COMPUTER INTERFACE TECHNOLOGY                                                27
3.1.3 EmoKey
  EmoKey links the Emotiv technology to your applications by easily converting detected events into
  any combination of keystrokes. EmoKey is a nonintrusive, lightweight, background process that
  runs behind your existing games or applications. EmoKey lets you create mappings that define how
  detections are converted to keystroke combinations. Your mappings can then be saved and shared
  so you can use mappings that your friends have created for your favorite games and software.
  EmoKey mappings can be as simple as linking the Expressiv smile detection to text characters
  such as ":)", so that chat applications instantly know when you smile.

  Configuring EmoKey
  To configure a facial expression to EmoKey, select the expression you wish to link and click on the
  Key button next to the Facial Expression description. This will bring up a Configuration Dialogue
  box as shown in Figure 7. Type into the text box, the specific keystroke(s) you wish to send. You
  can also make the facial expression send a continuous string of keys by checking the Hold the key
  box.

  There are also options to further configure the Key hold time and Key trigger delay time. Once you
  are satisfied with the settings, click the Apply button.


  Figure 7 Emokey Configuration Dialogue Box


EMOTIV EPOC USER MANUAL | BRAIN COMPUTER INTERFACE TECHNOLOGY                                           28
Once EmoKey is activated, the keystroke(s) allocated to the facial expression will be marked in the
  corresponding box. An orange highlight will flash in the box to the right of the facial expression
  description that is being triggered. Only actions that have keystrokes allocated will be sent to an
  application window that is active. This is shown in Figure 8, where a smile triggers the keystroke
  “:)”. To make this happen, enter the desired keystrokes and carefully choose the trigger condition.
  Note the some Expressions have the option “occurs” while others have “is equal to”, “is greater
  than”, “is less than”. Select “is greater than” and type “0.2” into the condition box, which will trigger
  your smile keystrokes whenever a Smile greater than 20% of full scale is detected.


  Figure 8 EmoKey - Smile detection linked to “:)”
  You can manage and save Emokey mappings using the EmoKey menu at the top of the Control
  Panel Window. Mappings can be loaded or saved and you can also temporarily suspend EmoKey
  activity using the Activate tick selector in the EmoKey menu.


EMOTIV EPOC USER MANUAL | BRAIN COMPUTER INTERFACE TECHNOLOGY                                                 29
3.2    Affectiv™ Suite
  The Affectiv Suite of functions measures and displays a wide range of subjective emotional
  responses. Levels of interest, excitement, and engagement that you experience in a cyber
  environment are translated into graphical measurements on the control panel dials, and in some
  cases, into dynamically changing environments within games you are playing.


  Figure 9 Affectiv Suite Panel


  3.2.1 Affectiv Suite Introduction
  The Affectiv Suite reports real time changes in the subjective emotions experienced by the user.
  EPOC Control Panel currently displays three short-term and three long-term Affectiv detections:
  Meditation, Engagement and Excitement. Emotions related to Engagement are alertness,
  vigilance, concentration, stimulation, interest.


  Examples of engaging video game events that result in a peak in the detection are difficult tasks
  requiring concentration, discovering something new, and entering a new area. Deaths in a game


EMOTIV EPOC USER MANUAL | BRAIN COMPUTER INTERFACE TECHNOLOGY                                         30
often result in bell-shaped transient responses. Shooting or sniping targets also produce similar
  transient responses. Writing something on paper or typing typically increase the engagement score,
  while closing the eyes almost always rapidly decreases the score.

  3.2.2 Understanding the Affectiv Panel Display
  The Affectiv Suite panel contains two graph panes displaying the three Affectiv detections
  instantaneous and long-term average time scales. The top chart is configured to plot 30 seconds of
  data for the Engagement, Meditation and Instantaneous Excitement detections. The bottom chart
  defaults to display 5 minutes worth of data for the Long-Term Engagement, Meditation and
  Excitement detections. The values that are plotted on the graphs are the output scores returned by
  the Affectiv detections.

  3.2.3 Affectiv Suite Detection Details
  Scoring behavior: In general, the greater the increase in physiological arousal the greater the output
  score for the detection.

  Instantaneous Excitement is experienced as an awareness or feeling of physiological arousal with a
  positive value. Excitement is characterized by activation in the sympathetic nervous system which
  results in a range of physiological responses including pupil dilation, eye widening, sweat gland
  stimulation, heart rate and muscle tension increases, blood diversion, and digestive inhibition. The
  Instantaneous Excitement detection is tuned to provide output scores that more accurately reflect
  short-term changes in excitement over time periods as short as several seconds.

  Related emotions: titillation, nervousness, agitation

  Long-Term Excitement is experienced and defined in the same way as Instantaneous Excitement,
  but the detection is designed and tuned to be more accurate when measuring changes in
  excitement over longer time periods, typically measured in minutes.

  Engagement is experienced as alertness and the conscious direction of attention towards task-
  relevant stimuli. It is characterized by increased physiological arousal and beta waves (a well-
  known type of EEG waveform) along with attenuated alpha waves (another type of EEG waveform).
  The opposite pole of this detection is referred to as “Boredom” in EPOC Control Panel and the
  Emotiv API; however, please note that this does not always correspond to a subjective emotional
  experience that all users describe as boredom.

  Related emotions: alertness, vigilance, concentration, stimulation, interest Scoring behavior: The
  greater the attention, focus and cognitive workload, the greater the output score reported by the
  detection. Examples of engaging video game events that result in a peak in the detection are
  difficult tasks requiring concentration, discovering something new, and entering a new area. Deaths
  in a game often result in bell-shaped transient responses. Shooting or sniping targets also produce
  similar transient responses. Writing something on paper or typing typically increase the
  engagement score, while closing the eyes almost always rapidly decreases the score.


EMOTIV EPOC USER MANUAL | BRAIN COMPUTER INTERFACE TECHNOLOGY                                              31
3.3     Cognitiv™ Suite

  The Cognitiv Suite panel uses a virtual 3D model to display an animated representation of
  the Cognitiv detection output.

  3.3.1 Cognitiv Suite Introduction
  The Cognitiv detection suite evaluates a user’s real time brainwave activity to discern the user’s
  conscious intent to perform distinct physical actions on a real or virtual object. The detection is
  designed to work with up to 13 different actions: 6 directional movements (push, pull, left, right, up
  and down) and 6 rotations (clockwise, counter-clockwise, left, right, forward and backward) plus
  one additional action that exists only in the realm of the user’s imagination: disappear.

  Cognitiv allows the user to choose up to 4 actions that can be recognized at any given time. The
  detection reports a single action or neutral (i.e. no action) at a time, along with an action power
  which represents the detection’s certainty that the user has entered the cognitive state associated
  with that action.

  Increasing the number of concurrent actions increases the difficulty in maintaining conscious control
  over the Cognitiv detection results. Almost all new users readily gain control over a single action
  quite quickly. Learning to control multiple actions typically requires practice and becomes
  progressively harder as additional actions are added. Although EPOC Control Panel allows a user
  to select up to 4 actions at a time, it is important that each user masters the use of the Cognitiv
  detection one action at a time, only increasing the number of concurrent actions after he or she has
  first gained confidence and accuracy with a lower number of actions.


EMOTIV EPOC USER MANUAL | BRAIN COMPUTER INTERFACE TECHNOLOGY                                              32
Figure 10 Cognitiv Suite Panel


  3.3.2 Understanding the Cognitiv Panel Display

  The Cognitiv Suite panel uses a virtual 3D model to display an animated representation of
  the Cognitiv detection output. This 3D model is also used to assist the user in visualizing the
  intended action during the training process. The Power gauge to the left of the 3D display is an
  indicator of the “action power”, or relative certainty that the user is consciously visualizing the
  current action.

  This information to the right displays the current state of the Cognitiv detection and allows the user
  to define the current set of actions. In order to enable the Cognitiv detection, each chosen action,
  plus the Neutral action must first be trained. For more information about the training process please
  refer to Section 3.3.3 below.

  A green checkmark is used to indicate that the corresponding action has been trained; an orange X
  indicates a lack of training data. Remember, in order for the Cognitiv detection to be activated, all
  actions, plus Neutral (the user’s background mental state) must be trained.

  Use the drop down selection menu to modify the number and type of enabled actions.


EMOTIV EPOC USER MANUAL | BRAIN COMPUTER INTERFACE TECHNOLOGY                                              33
3.3.3 Cognitiv Training

  The Cognitiv training process enables the EmoEngine to analyze your brainwaves and develop a
  personalized signature which corresponds to each particular action, as well as the background
  state, or “neutral”. As the EmoEngine learns and refines the signatures for each of the actions, as
  well as neutral, detections become more precise and easier to perform.


  Figure 11 Cognitiv Neutral Training in action

  Pressing the TRAIN button next to the drop down menu activates the user interface controls that
  support the Cognitiv training process. The training process consists of three steps:

  First, train a neutral state. Neutral training must be completed first before any actions can be trained
  and activated. To train neutral, there is nothing in particular that you need to do. Simply relax, act
  natural and clear your mind. Press the TRAIN button to bring up the training screen and press GO
  when you are ready. A progress bar will appear as your brainwaves are observed. Once training is
  complete, you will be asked to accept or reject the training session by pressing YES or NO. Once
  you accept, you will be automatically returned to the Cognitiv Panel Display.


EMOTIV EPOC USER MANUAL | BRAIN COMPUTER INTERFACE TECHNOLOGY                                                34
Figure 12 Accepting a Training Session
  When you are ready to begin imagining or visualizing an action you wish to train, select the action
  from the dropdown list. Actions that have already been trained are paired with a green checkmark;
  actions with no training data are paired with an orange X.

  During the training process it is very important to maintain your mental focus for the duration of the
  training period (currently 8 seconds). Physical gestures, such as pushing an imaginary object with
  one hand, may be used to heighten your focus on the intended action, but are not required. You
  should also refrain from making substantial head movements or dramatic facial expressions during
  the training period, as these actions can interfere with the recorded EEG signal.

  Initially, the cube on screen will not move, as the system has not yet acquired the training data
  necessary to construct a personalized signature for the current set of actions. After Neutral and
  each enabled action have been trained at least once, the Cognitiv detection is activated and the
  cube will respond to the Cognitiv detection, and your mental control, in real time.

  Some users will find it easier to maintain the necessary mental focus if the cube is automatically
  animated to perform the intended action as a visualization aid during training. If you think you will
  benefit from this, then you may select the Animate cube according to training action checkbox.
  Otherwise, the cube will remain stationary or, if you have already supplied training data and the
  detection is active, will be animated by the current detection results for the action being trained,
  while you supply new training data.


EMOTIV EPOC USER MANUAL | BRAIN COMPUTER INTERFACE TECHNOLOGY                                              35
Figure 13 Cognitiv training of push with animate model according to training action
  selected
  Finally, you are prompted to accept or reject the training recording. Ideal Cognitiv detection
  performance is typically achieved by supplying consistent training data (i.e. a consistent mental
  visualization on the part of the user) across several training sessions for each enabled action. The
  ability to reject the last training recording allows you to decide whether you were able to remain
  mentally focused on the appropriate action during the last training session. Alternatively, you may
  press the Abort Training button to abort the training recording if you are interrupted, become
  distracted, or notice problems with the EPOC Neuroheadset contact quality indicators during the
  recording. A training session is automatically discarded if the wireless signal strength or EEG
  signal quality is poor for a significant portion of the training period. A notification will be displayed to
  the user if this has occurred.

  3.3.4 Training Neutral
  The Neutral “action” refers to the user’s passive mental state; one that isn’t associated with any of
  the selected Cognitiv actions. While training Neutral, you should enter a mental state that doesn’t
  involve the other Cognitiv actions. Typically this means engaging in passive mental activities such
  as reading or just relaxing. However, to minimize “false-positive” Cognitiv action results (i.e.
  incorrect reporting of unintended actions), it may also be helpful to emulate other mental states and
  facial expressions that are likely to be encountered in the application context and environment in
  which you’ll be using Cognitiv. For many users, providing more Neutral training data will result in
  better overall Cognitiv performance.


EMOTIV EPOC USER MANUAL | BRAIN COMPUTER INTERFACE TECHNOLOGY                                                    36
Neutral training must be completed first before any actions can be trained and activated.

  3.3.5 Clear Training Button
  Occasionally, you may find that a particular trained action doesn’t work as well as it once did. This
  may indicate that the training data used to construct your personalized Cognitiv signature was
  “contaminated” by a more recent, inconsistent training session or that some characteristics of your
  brainwaves have changed over time. It may also happen that you wish to change the mental
  imagery or technique that you associate with a particular action. In either situation, you can use the
  RESET button to delete the training data for the selected action. Keep in mind that doing so will
  disable the Cognitiv detection until new training data has been recorded for this action.

  3.3.6 Cognitiv Tips
  Mental dexterity with the Cognitiv Suite is a skill that will improve over time. As you learn to train
  distinct, reproducible mental states for each action, the detection becomes increasingly precise.
  Most users typically achieve their best results after training each action several times. Overtraining
  can sometimes produce a decrease in accuracy –although this may also indicate a lack of
  consistency and mental fatigue. Practice and experience will help determine the ideal amount of
  training required for each individual user.

  If it becomes hard for you to return to neutral (i.e. to stop the cube from moving) you should try
  refreshing your mental state by momentarily shifting your focus away from the screen and relaxing.
  It is easy to become immersed in the experience and to have the Cognitiv actions at the “front of
  your mind” while trying to be neutral.

  Successful training relies on consistency and focus. For best results, you must perform the
  intended action continuously for the full training period. It is common for novice users to become
  distracted at some point during the training period and then mentally restart an action, but this
  practice will result in poorer results than training with a mental focus that spans the entire training
  period.

  A common mistake is for users to attempt to “force” a particular action, usually by straining head,
  jaw, tongue or neck muscles or squinting. These actions will just disguise a poor signature and
  make the detection difficult to duplicate. Try to relax and use your imagination to visualize the
  intended action, especially during training. Keep your eyes open if possible so you can see the
  visual feedback on screen. Actions will occur most reliably if the user relaxes and lets the action
  happen, in a similar way to moving a limb or remembering a tune.

  A short latency, of up to two seconds, in the initiation and cessation of the cube’s animated action
  on screen is typical.

  3.3.7 EmoKey for Cognitiv Actions
  EmoKey links the Emotiv technology to your applications by easily converting detected events into
  any combination of keystrokes. EmoKey is a nonintrusive, lightweight, background process that
  runs behind your existing games or applications. EmoKey lets you create mappings that define how
  detections are converted to keystroke combinations. Your mappings can then be saved and shared


EMOTIV EPOC USER MANUAL | BRAIN COMPUTER INTERFACE TECHNOLOGY                                               37
so you can use mappings that your friends have created for your favorite games and software.
  EmoKey can be as complex as linking a "lift" command to a sequence of keystrokes that trigger a
  levitation spell in a game.

  To configure a Cognitiv action to EmoKey, select the action you wish to link and click on the KEY
  button to the far right of the Cognitiv Panel Display. This will bring up a Configuration Dialogue box
  as shown in Figure 7. Type into the text box, the specific keystroke(s) you wish to send. You can
  also make the facial expression send a continuous string of keys by checking the Hold the key box.

  There are also options to further configure the Key hold time and Key trigger delay time. Once you
  are satisfied with the settings, click the Apply button.


  Figure 14 EmoKey Configuration Dialogue box

  Once EmoKey is activated, the keystroke(s) allocated to the Cognitiv action will be marked in the
  corresponding box. An orange highlight will flash in the box to the right of the description of the
  action being triggered. Only actions that have keystrokes allocated will be sent to an application
  window that is active. This is shown in Figure 14, where a pull triggers the keystroke “Z”. Make
  sure you set the condition to “is greater than” and enter 0.2 into the condition box at the lower right
  to trigger the “Z” key whenever the action strength exceeds 20% of full scale.


EMOTIV EPOC USER MANUAL | BRAIN COMPUTER INTERFACE TECHNOLOGY                                               38
Figure 15 EmoKey in Action Linking Pull to keying in “Z”


EMOTIV EPOC USER MANUAL | BRAIN COMPUTER INTERFACE TECHNOLOGY   39
Figure 15 EmoKey in Action Linking Pull to keying in “Z”


EMOTIV EPOC USER MANUAL | BRAIN COMPUTER INTERFACE TECHNOLOGY   40
Figure 16 Option for select model

  To select models different you can press to the icon to display form select. If you want to choose any model
  you only double click that model.

  3.4             Mouse Emulator
  The EPOC neuroheadset comes with a built-in 2-axis gyroscope which enables a range of
  additional functions. One possible use is mouse cursor control.

  3.4.1           Understanding the Mouse Emulator Tab
  The Mouse Emulator Tab in the EPOC Control Panel allows you to activate the neuroheadset’s
  gyroscope and link it to the control of your computer’s mouse cursor.

  The left side of the Mouse Emulator Tab provides a visual representation of the gyroscope’s relative
  position. The right side of the Mouse Emulator Tab provides the controls to activate and deactivate
  this feature along with a slider bar to make sensitivity adjustments.


EMOTIV EPOC USER MANUAL | BRAIN COMPUTER INTERFACE TECHNOLOGY                                                    41
Figure 16 Mouse Emulator Tab

  3.4.2 Mouse Emulator Controls
  To enable this feature, click on the Activate button. Your mouse will immediately respond based
  on the movement of your head. Simply turn your head from left to right, up and down. You will also
  notice the orange indicator dot move in accordance with the movement of your head/gyroscope.
  The Mouse Sensitivity slider allows you to adjust the sensitivity of the gyroscope when controlling
  your mouse cursor. The Reset button allows you to re-centre your position.

  To deactivate this feature, use your head movement to move your cursor to the Deactivate button
  and left mouse click, or Press CTRL+SHIFT+M.


EMOTIV EPOC USER MANUAL | BRAIN COMPUTER INTERFACE TECHNOLOGY                                           42
4.0    Trouble Shooting and Help

  Transceiver Dongle lights don’t work (Should see either one slow flashing LED – if unpaired – or
  one bright and one dim LED – if paired).

     •   Try different USB port, different computer.

     •   Check other USB equipment works in same port

     •   Possible LED failure – carry on regardless


  Transceiver Dongle not recognized (USB “ding” on insertion, stream of Hardware Identifier strings
  observed on first installation)

     •   Use only on XP, Window Vista and Windows 7 and virtual Windows XP/Vista/7 machines in
         Mac OS X

     •   Check Device Manager list as Dongle is inserted and removed.

     •   Try different USB port, different computer.

     •   If Control Panel is running it will ask for User Profile selection when the Transceiver Dongle
         is recognized, whether the neuroheadset is paired or not


  Does not pair (Transceiver Dongle switches from single slow flashing LED to one bright & one dim
  LED if correctly paired)

     •   Check for blue LED on neuroheadset (recharge neuroheadset if absent).

     •   Hold neuroheadset very close to USB, switch off and on.

     •   Unplug and replace Transceiver Dongle in USB port, repeat pairing attempt

     •   Obtain a USB male - USB female extension cable and plug into the PC. Attach the
         Transceiver Dongle to the extension cable and position in a prominent location away from
         your PC, monitor, wireless router and other sources of radio-frequency interference.

     •   Turn off or disconnect other wireless and Bluetooth devices in the area to isolate possible
         causes


EMOTIV EPOC USER MANUAL | BRAIN COMPUTER INTERFACE TECHNOLOGY                                             43
Weak wireless connection or repeated drop-outs (expected range 3-5 metres within line of sight)

      •   Move closer to the Transceiver Dongle

      •   Obtain a USB male - USB female extension cable and plug into the PC. Attach the
          Transceiver Dongle to the extension cable and position in a prominent location away from
          your PC, monitor, wireless router and other sources of radio-frequency interference.

      •   Turn off or disconnect other wireless and Bluetooth devices in the area to isolate possible
          causes

      •   Turn off neuroheadset, unplug Transceiver Dongle and repeat the pairing exercise


  Sensors do not positively lock in place (sensors should click in place as they are rotated a quarter-
  turn clockwise after insertion into the socket)

      •   Sensors are made deliberately tight to start with and the locking tabs are slightly deformed
          to the correct shape during the first fitting. Soetimes the sensors are very tight and the user
          feels they will not turn further into the socket.

      •   Take each sensor in turn and use an empty socket in the Hydrator Pack. Forcibly rotate the
          sensor fully clockwise in the socket until a definite click is felt (use a cloth or tool to hold the
          sensor if your fingers are easily damaged). Click and unclick the sensor into the socket a
          few times to complete the process.

      •   The sensor can now be fitted to the headset, Make sure ou feel a distinct catch as ou rotate
          the sensor into the socket and the finger tabs are aligned along the axis of each arm.


  All sensors black except RED references (directly below ears on Contact Quality map)

      •   Start with RUBBER COMFORT PADS in locations directly behind the ears.

      •   The primary reference sensor locations are behind the head, elevated at about 30 degrees
          backwards behind the ears (see diagram in main section of this manual)

      •   Ensure reference sensors and at least one forehead sensor are sufficiently wet

      •   Ensure all sensors are properly located in the neuroheadset receptacles. They should not
          spin or fall out when gently moved.

      •   Try to minimize the amount of hair trapped underneath the reference sensors. The
          neuroheadset can be wriggled to allow the sensors to pass through the hair, or you can try
          to displace some of the hair with a pencil or similar.


EMOTIV EPOC USER MANUAL | BRAIN COMPUTER INTERFACE TECHNOLOGY                                                    44
•   Gently press reference sensors onto the head for at least 5 seconds, then release. It may
          take another 20 seconds or so for the sensors to respond.

      •   Gently press wet forehead sensor for 5 seconds then release. It may take another 20
          seconds or so for the sensors to respond.

      •   If still no signals, switch reference sensors to the alternate location as follows: remove the
          RUBBER COMFORT PADS (including the plastic holders) from their location behind the
          ears. They should twist out just like any of the sensors. Move the felt pads from the usual
          reference locations and place them in the sockets recently vacated by the RUBBER
          COMFORT PADS. You can put the COMFORT PADS into the original reference sockets,
          or leave them out if you prefer. Make sure you don’t lose them if you choose to leave them
          out.

      •   Make sure the sensors are sufficiently damp and repeat the above procedure, taking care
          to locate the new reference sensors onto a patch of bare skin on or near the bony lump
          located just behind the ear flap. Within a few seconds the sensors should come to life,
          especially if you press gently on some of the other sensors for a few seconds.


  One or both of the sensors immediately adjacent to the ears remains black.

      •   These sensors are located on the main body of the Arm assembly, closest to the arm pivot
          point. They detect activity in the temporal lobes and are known as T7 (left side) and T8
          (right side). A combination of the shape of the arm assembly and the user’s head shape
          (particularly long, narrow heads with relatively flat sides) can sometimes result in these
          sensors failing to touch the head, being held off by some of the other sensors.

      •   Check that the sensors are clean and attached properly as per the general comments in
          the next section

      •   Check that the sensors are clean and attached properly as per the general

      •   Remove the RUBBER COMFORT PAD including the plastic holder, from the side or sides
          where the contact cannot be achieved. The neuroheadset can be worn comfortably without
          these pads for people with this head shape, and no harm will come to the connector
          sockets because they are fully enclosed. The change in balance point is usually sufficient
          to ensure contact occurs.

      •   In the unlikely event that contact is still impossible to obtain, you can use a longer felt pad
          or use a cotton ball soaked in saline to fill the gap or replace the felt piece.


EMOTIV EPOC USER MANUAL | BRAIN COMPUTER INTERFACE TECHNOLOGY                                               45
One or more sensors remain black or red for every fitting and user

      •   Check that the sensor is properly located in the socket. It should click firmly in place, the
          finger tabs should be aligned along the axis of the arm and it should not freely rotate in the
          socket.

      •   Check that the sensor is sufficiently damp for operation

      •   Check that the sensor is applying gentle but positive pressure to your head in this location.
          When pressed, it should not move inwards. You may find that slightly relocating the
          neuroheadset settles the sensors into a better location

      •   Remove the neuroheadset and gently press the felt pad into the sensor. It should protrude
          by no more than 2mm. It should also feel damp and be free of obstructions.

      •   Remove the sensor and inspect it. The sensor should have a felt pad on the front side and
          a domed gold-plated metal plate which is visible from the rear side. The metal plate should
          be clean and free of obstructions at least across the central third of the domed section in
          order to make proper contact when inserted.

      •   Check the socket. Make sure the gold contact plate is clean and there is nothing trapped in
          the socket which could affect the contact. The gold contacts inside the socket consist of
          three spring tabs which bend slightly upwards towards the sensor. Make sure they are not
          bent away, damaged or dirty.

      •   Swap a different sensor into that location from somewhere that is known to be working.
          This will eliminate a faulty sensor

      •   Please contact Customer Service if you cannot resolve this problem and the location
          seems to be failing for each fitting and all users.

  If you have other problems or your problem is not rectified by the above procedures, please check
  the updated Troubleshooting information, visit our Live Chat Support, initiate a support ticket at
  www.emotiv.com or email support@emotiv.com for further assistance.

  .


EMOTIV EPOC USER MANUAL | BRAIN COMPUTER INTERFACE TECHNOLOGY                                              46

More Related Content

What's hot (20)

Brain port device
Brain port device Brain port device
Brain port device
 
AlterEgo Device PPT
AlterEgo Device PPTAlterEgo Device PPT
AlterEgo Device PPT
 
Alter ego - PPT
Alter ego - PPT Alter ego - PPT
Alter ego - PPT
 
Emotiv Analysis
Emotiv AnalysisEmotiv Analysis
Emotiv Analysis
 
BRAIN CHIPS
BRAIN CHIPSBRAIN CHIPS
BRAIN CHIPS
 
AlterEgo: A Personalized Wearable Silent Speech Interface
AlterEgo: A Personalized Wearable Silent Speech InterfaceAlterEgo: A Personalized Wearable Silent Speech Interface
AlterEgo: A Personalized Wearable Silent Speech Interface
 
BRAIN GATE
BRAIN GATEBRAIN GATE
BRAIN GATE
 
Presentation.ppt
Presentation.pptPresentation.ppt
Presentation.ppt
 
Blue Eyes ppt
Blue Eyes pptBlue Eyes ppt
Blue Eyes ppt
 
Brain Gate
Brain GateBrain Gate
Brain Gate
 
Brain gate ppt prem (5010)
Brain gate  ppt prem (5010)Brain gate  ppt prem (5010)
Brain gate ppt prem (5010)
 
Blue eyes
Blue eyesBlue eyes
Blue eyes
 
Applying Brain Computer Interface Technology for Playing Games
Applying Brain Computer Interface Technology for Playing GamesApplying Brain Computer Interface Technology for Playing Games
Applying Brain Computer Interface Technology for Playing Games
 
Braingatetechnology 141217072335-conversion-gate02
Braingatetechnology 141217072335-conversion-gate02Braingatetechnology 141217072335-conversion-gate02
Braingatetechnology 141217072335-conversion-gate02
 
Blue eyes technology semimsso
Blue eyes technology semimssoBlue eyes technology semimsso
Blue eyes technology semimsso
 
What is brain gate
What is brain gateWhat is brain gate
What is brain gate
 
Eye Ring ppt
Eye Ring pptEye Ring ppt
Eye Ring ppt
 
Eye ring
Eye ringEye ring
Eye ring
 
Blue eyes technology
Blue eyes technologyBlue eyes technology
Blue eyes technology
 
Blue eyes technology
Blue eyes technologyBlue eyes technology
Blue eyes technology
 

Viewers also liked

BIG,Emotiv Systems
BIG,Emotiv SystemsBIG,Emotiv Systems
BIG,Emotiv SystemsYogesh Garg
 
Emotiv System Team 8
Emotiv System  Team 8Emotiv System  Team 8
Emotiv System Team 8Ashish Tandon
 
Detecting biosignals with the Emotiv EPOC headset : a review
Detecting biosignals with the Emotiv EPOC headset : a reviewDetecting biosignals with the Emotiv EPOC headset : a review
Detecting biosignals with the Emotiv EPOC headset : a reviewiMALorg
 
Emotive presentation
Emotive presentationEmotive presentation
Emotive presentationethansm
 
miniMAL & other low-res media facades
miniMAL & other low-res media facadesminiMAL & other low-res media facades
miniMAL & other low-res media facadesiMALorg
 
Emotiv EPOC by Neneng
Emotiv EPOC by NenengEmotiv EPOC by Neneng
Emotiv EPOC by NenengAgate Studio
 
Neurobotix Final PowerPoint
Neurobotix Final PowerPointNeurobotix Final PowerPoint
Neurobotix Final PowerPointNick7658
 
ノンタッチUI時代とフロントエンドエンジニア (Using emotiv)
ノンタッチUI時代とフロントエンドエンジニア (Using emotiv)ノンタッチUI時代とフロントエンドエンジニア (Using emotiv)
ノンタッチUI時代とフロントエンドエンジニア (Using emotiv)hagino 3000
 
Brainsense -Introduction to brain computer interface
Brainsense -Introduction to brain computer interfaceBrainsense -Introduction to brain computer interface
Brainsense -Introduction to brain computer interfacePantech ProLabs India Pvt Ltd
 
Emotiv EPOC EEG Headset
Emotiv EPOC EEG HeadsetEmotiv EPOC EEG Headset
Emotiv EPOC EEG HeadsetAhmed Gad
 
20100531 Scrum Einfuehrung
20100531 Scrum Einfuehrung20100531 Scrum Einfuehrung
20100531 Scrum EinfuehrungMartin Fache
 
20101213 webmontag ignite
20101213 webmontag ignite20101213 webmontag ignite
20101213 webmontag igniteMartin Fache
 
Mobile-First SEO - The Marketers Edition #3XEDigital
Mobile-First SEO - The Marketers Edition #3XEDigitalMobile-First SEO - The Marketers Edition #3XEDigital
Mobile-First SEO - The Marketers Edition #3XEDigitalAleyda Solís
 
What Makes Great Infographics
What Makes Great InfographicsWhat Makes Great Infographics
What Makes Great InfographicsSlideShare
 
TEDx Manchester: AI & The Future of Work
TEDx Manchester: AI & The Future of WorkTEDx Manchester: AI & The Future of Work
TEDx Manchester: AI & The Future of WorkVolker Hirsch
 
Masters of SlideShare
Masters of SlideShareMasters of SlideShare
Masters of SlideShareKapost
 
STOP! VIEW THIS! 10-Step Checklist When Uploading to Slideshare
STOP! VIEW THIS! 10-Step Checklist When Uploading to SlideshareSTOP! VIEW THIS! 10-Step Checklist When Uploading to Slideshare
STOP! VIEW THIS! 10-Step Checklist When Uploading to SlideshareEmpowered Presentations
 

Viewers also liked (20)

BIG,Emotiv Systems
BIG,Emotiv SystemsBIG,Emotiv Systems
BIG,Emotiv Systems
 
Emotiv System Team 8
Emotiv System  Team 8Emotiv System  Team 8
Emotiv System Team 8
 
Detecting biosignals with the Emotiv EPOC headset : a review
Detecting biosignals with the Emotiv EPOC headset : a reviewDetecting biosignals with the Emotiv EPOC headset : a review
Detecting biosignals with the Emotiv EPOC headset : a review
 
Emotive presentation
Emotive presentationEmotive presentation
Emotive presentation
 
miniMAL & other low-res media facades
miniMAL & other low-res media facadesminiMAL & other low-res media facades
miniMAL & other low-res media facades
 
Emotiv EPOC by Neneng
Emotiv EPOC by NenengEmotiv EPOC by Neneng
Emotiv EPOC by Neneng
 
Neurobotix Final PowerPoint
Neurobotix Final PowerPointNeurobotix Final PowerPoint
Neurobotix Final PowerPoint
 
ノンタッチUI時代とフロントエンドエンジニア (Using emotiv)
ノンタッチUI時代とフロントエンドエンジニア (Using emotiv)ノンタッチUI時代とフロントエンドエンジニア (Using emotiv)
ノンタッチUI時代とフロントエンドエンジニア (Using emotiv)
 
Brainsense -Introduction to brain computer interface
Brainsense -Introduction to brain computer interfaceBrainsense -Introduction to brain computer interface
Brainsense -Introduction to brain computer interface
 
Emotiv EPOC EEG Headset
Emotiv EPOC EEG HeadsetEmotiv EPOC EEG Headset
Emotiv EPOC EEG Headset
 
3. pasos para diagnostico
3.  pasos para diagnostico3.  pasos para diagnostico
3. pasos para diagnostico
 
20100531 Scrum Einfuehrung
20100531 Scrum Einfuehrung20100531 Scrum Einfuehrung
20100531 Scrum Einfuehrung
 
20101213 webmontag ignite
20101213 webmontag ignite20101213 webmontag ignite
20101213 webmontag ignite
 
Mobile-First SEO - The Marketers Edition #3XEDigital
Mobile-First SEO - The Marketers Edition #3XEDigitalMobile-First SEO - The Marketers Edition #3XEDigital
Mobile-First SEO - The Marketers Edition #3XEDigital
 
What Makes Great Infographics
What Makes Great InfographicsWhat Makes Great Infographics
What Makes Great Infographics
 
TEDx Manchester: AI & The Future of Work
TEDx Manchester: AI & The Future of WorkTEDx Manchester: AI & The Future of Work
TEDx Manchester: AI & The Future of Work
 
Build Features, Not Apps
Build Features, Not AppsBuild Features, Not Apps
Build Features, Not Apps
 
Masters of SlideShare
Masters of SlideShareMasters of SlideShare
Masters of SlideShare
 
STOP! VIEW THIS! 10-Step Checklist When Uploading to Slideshare
STOP! VIEW THIS! 10-Step Checklist When Uploading to SlideshareSTOP! VIEW THIS! 10-Step Checklist When Uploading to Slideshare
STOP! VIEW THIS! 10-Step Checklist When Uploading to Slideshare
 
You Suck At PowerPoint!
You Suck At PowerPoint!You Suck At PowerPoint!
You Suck At PowerPoint!
 

Similar to Epoc user-manual-ce

Plantronics savi w440 user guide
Plantronics savi w440 user guidePlantronics savi w440 user guide
Plantronics savi w440 user guidebest4systems
 
Plantronics savi w440 m user guide
Plantronics savi w440 m user guidePlantronics savi w440 m user guide
Plantronics savi w440 m user guidebest4systems
 
Asus Eee Pad Transformer Prime Manual / User Guide
Asus Eee Pad Transformer Prime Manual / User GuideAsus Eee Pad Transformer Prime Manual / User Guide
Asus Eee Pad Transformer Prime Manual / User Guidemanualsheet
 
Olympus oev261 h_-_service_manual
Olympus oev261 h_-_service_manualOlympus oev261 h_-_service_manual
Olympus oev261 h_-_service_manualZaheer Ahmad
 
epson_perfection-610.pdf
epson_perfection-610.pdfepson_perfection-610.pdf
epson_perfection-610.pdfromica7
 
Advanced scopes-lab
Advanced scopes-labAdvanced scopes-lab
Advanced scopes-labcyberns_
 
Edit stor omni quick guide sm
Edit stor omni quick guide smEdit stor omni quick guide sm
Edit stor omni quick guide smOscar Mestanza
 
E5395 1001 px_win7
E5395 1001 px_win7E5395 1001 px_win7
E5395 1001 px_win7sam381
 
Asio4 all v2 instruction manual
Asio4 all v2 instruction manualAsio4 all v2 instruction manual
Asio4 all v2 instruction manualJeferson Costa
 
Asio4 all v2 instruction manual
Asio4 all v2 instruction manualAsio4 all v2 instruction manual
Asio4 all v2 instruction manualJudith Acha
 
Asio4 all v2 instruction manual
Asio4 all v2 instruction manualAsio4 all v2 instruction manual
Asio4 all v2 instruction manualOseasGaliego
 
CARA MENANG POKER ONLINE DI SITUS POKER DAPAT PULSA PALING JITU
CARA MENANG POKER ONLINE DI SITUS POKER DAPAT PULSA PALING JITUCARA MENANG POKER ONLINE DI SITUS POKER DAPAT PULSA PALING JITU
CARA MENANG POKER ONLINE DI SITUS POKER DAPAT PULSA PALING JITUwidwid123
 
Asio4 all v2 instruction manual
Asio4 all v2 instruction manualAsio4 all v2 instruction manual
Asio4 all v2 instruction manualssusercd9a14
 
Asio4 all v2 instruction manual
Asio4 all v2 instruction manualAsio4 all v2 instruction manual
Asio4 all v2 instruction manualDiogo Soares
 

Similar to Epoc user-manual-ce (20)

Plantronics savi w440 user guide
Plantronics savi w440 user guidePlantronics savi w440 user guide
Plantronics savi w440 user guide
 
Hantek6022 be manual english(v1.0.3)
Hantek6022 be manual english(v1.0.3)Hantek6022 be manual english(v1.0.3)
Hantek6022 be manual english(v1.0.3)
 
Plantronics savi w440 m user guide
Plantronics savi w440 m user guidePlantronics savi w440 m user guide
Plantronics savi w440 m user guide
 
Asus Eee Pad Transformer Prime Manual / User Guide
Asus Eee Pad Transformer Prime Manual / User GuideAsus Eee Pad Transformer Prime Manual / User Guide
Asus Eee Pad Transformer Prime Manual / User Guide
 
Olympus oev261 h_-_service_manual
Olympus oev261 h_-_service_manualOlympus oev261 h_-_service_manual
Olympus oev261 h_-_service_manual
 
epson_perfection-610.pdf
epson_perfection-610.pdfepson_perfection-610.pdf
epson_perfection-610.pdf
 
Advanced scopes-lab
Advanced scopes-labAdvanced scopes-lab
Advanced scopes-lab
 
User manual on laptop
User manual on laptopUser manual on laptop
User manual on laptop
 
Edit stor omni quick guide sm
Edit stor omni quick guide smEdit stor omni quick guide sm
Edit stor omni quick guide sm
 
E5395 1001 px_win7
E5395 1001 px_win7E5395 1001 px_win7
E5395 1001 px_win7
 
E manual
E manualE manual
E manual
 
Asio4 all v2 instruction manual
Asio4 all v2 instruction manualAsio4 all v2 instruction manual
Asio4 all v2 instruction manual
 
Asio4 all v2 instruction manual
Asio4 all v2 instruction manualAsio4 all v2 instruction manual
Asio4 all v2 instruction manual
 
Asio4 all v2 instruction manual
Asio4 all v2 instruction manualAsio4 all v2 instruction manual
Asio4 all v2 instruction manual
 
CARA MENANG POKER ONLINE DI SITUS POKER DAPAT PULSA PALING JITU
CARA MENANG POKER ONLINE DI SITUS POKER DAPAT PULSA PALING JITUCARA MENANG POKER ONLINE DI SITUS POKER DAPAT PULSA PALING JITU
CARA MENANG POKER ONLINE DI SITUS POKER DAPAT PULSA PALING JITU
 
Asio4 all v2 instruction manual
Asio4 all v2 instruction manualAsio4 all v2 instruction manual
Asio4 all v2 instruction manual
 
Asio4 all v2 instruction manual
Asio4 all v2 instruction manualAsio4 all v2 instruction manual
Asio4 all v2 instruction manual
 
Asio4 all v2 instruction manual
Asio4 all v2 instruction manualAsio4 all v2 instruction manual
Asio4 all v2 instruction manual
 
Asio4 all v2 instruction manual
Asio4 all v2 instruction manualAsio4 all v2 instruction manual
Asio4 all v2 instruction manual
 
Asio4 all v2 instruction manual
Asio4 all v2 instruction manualAsio4 all v2 instruction manual
Asio4 all v2 instruction manual
 

Epoc user-manual-ce

  • 1. brain computer interface technology
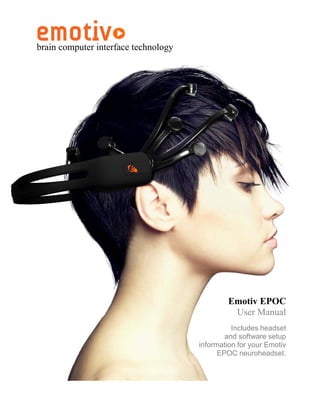
 Emotiv EPOC User Manual Includes headset and software setup information for your Emotiv EPOC neuroheadset.
  • 2. Table of Contents Quick Start Guide .................................................................................................................4 Introduction to Emotiv EPOC Neuro-technology Neuroheadset.........................................11 NEUROHEADSET FEATURES ............................................................................................................ 11 SAFETY .......................................................................................................................................... 12 REGULATORY REQUIREMENTS......................................................................................................... 13 1.0 Getting Started ............................................................................................................15 2.0 Minimum Hardware and Software requirements .........................................................16 2.1 Charging the EPOC Neuroheadset Battery .................................................................16 2.2 Use of Saline Hydration Sensor Pack and Felt Inserts................................................17 2.3 USB Transceiver Installation .......................................................................................19 2.4 EPOC Control Panel™ ................................................................................................19 2.5 Placement of Emotiv EPOC Neuroheadset on the Head ............................................20 2.6 EmoEngine Status Panel.............................................................................................20 ENGINE STATUS ............................................................................................................................. 21 2.7 User Status ..................................................................................................................21 2.8 Sensor Contact Quality Display ...................................................................................22 2.9 Neuroheadset Set-Up ..................................................................................................23 3.0 Achieving Good Signal Quality ....................................................................................24 EMOTIV EPOC USER MANUAL | BRAIN COMPUTER INTERFACE TECHNOLOGY 2
  • 3. 3.1 Expressiv™ Suite ........................................................................................................26 3.1.1 UNDERSTANDING THE EXPRESSIV SUITE PANEL DISPLAY ......................................................... 26 3.1.2 SENSITIVITY ADJUSTMENT PANEL .......................................................................................... 27 3.1.3 EMOKEY ............................................................................................................................... 28 3.2 Affectiv™ Suite ............................................................................................................30 3.2.1 AFFECTIV SUITE INTRODUCTION ............................................................................................. 30 3.2.2 UNDERSTANDING THE AFFECTIV PANEL DISPLAY ..................................................................... 31 3.2.3 AFFECTIV SUITE DETECTION DETAILS ..................................................................................... 31 3.3 Cognitiv™ Suite ...........................................................................................................32 3.3.1 COGNITIV SUITE INTRODUCTION ............................................................................................. 32 3.3.2 UNDERSTANDING THE COGNITIV PANEL DISPLAY ..................................................................... 33 3.3.3 COGNITIV TRAINING ............................................................................................................... 34 3.3.4 TRAINING NEUTRAL ................................................................................................................ 36 3.3.5 CLEAR TRAINING BUTTON ...................................................................................................... 37 3.3.6 COGNITIV TIPS ...................................................................................................................... 37 3.3.7 EMOKEY FOR COGNITIV ACTIONS ........................................................................................... 37 3.4 Mouse Emulator...........................................................................................................39 3.4.1 UNDERSTANDING THE MOUSE EMULATOR TAB ........................................................................ 39 3.4.2 MOUSE EMULATOR CONTROLS ............................................................................................... 40 4.0 Trouble Shooting and Help ..........................................................................................41 EMOTIV EPOC USER MANUAL | BRAIN COMPUTER INTERFACE TECHNOLOGY 3
  • 4. Quick Start Guide Items in the EPOC Headset Kit Make sure all items are present in your kit before starting. • Headset Assembly with Rechargeable Lithium battery already installed • USB Transceiver Dongle • Hydration Sensor Pack with 16 Sensor Units • Saline solution • 50/60Hz 100-250 VAC Battery Charger (US customers) or USB charger (non-US customers) • CD Installation Disk for Windows XP or Vista (for EPOC consumer headset. SDKs are delivered electronically) EMOTIV EPOC USER MANUAL | BRAIN COMPUTER INTERFACE TECHNOLOGY 4
  • 5. Initial charging of headset Make sure the small switch on the rear underside of the headset is set to the “Off” position before starting. Plug the mini USB cable attached to the supplied battery charger into the slot at the top of the headset and to the USB port on your PC or the power cord into a 50 or 60 Hz 100-250 V electrical outlet. The Lithium battery can be recharged to 100% capacity in approximately 4 hours depending on the initial state of charge. Charging for 30 minutes usually yields about a 10% increase in charge. The EPOC Headset contains two status LEDs located at the rear and next to the power switch at the back of the headband. When the power switch is set to the “on” position, the rear LED will illuminate and appear blue if there is sufficient charge for correct operation, unless charging is in progress. The charging LED will appear red during battery charging; when the battery is fully- charged, the charging LED will display green. NOTE: The Headset should not be charged when still on the head. Software Installation Insert the supplied EPOC CD setup disk into your computer's CD/DVD drive and follow the step-by- step installation instructions. After software installation, start-up the EPOC Control Panel program, loading the Headset Setup screen. EMOTIV EPOC USER MANUAL | BRAIN COMPUTER INTERFACE TECHNOLOGY 5
  • 6. Hydrating the Sensors Open the Saline Hydration Sensor Pack with the white felt inserts inside. The inserts will eventually be mounted in the headset arms but must be properly wetted with saline solution first. Begin wetting each of the felt inserts with the supplied saline solution. The felts should be wet to the touch, but not soaking wet! Note: This is standard multipurpose contact lens saline solution and is available from any local drug store in case you run out of solution. However, the bottle supplied with the kit should be sufficient initially. See the User Manual on the EPOC CD setup disk for recommendations. Add a few drops of saline to saturate the large white hydrator pad attached to the top cover of the hydrator, then close the cover and gently shake the hydrator pack. This will maintain the moisture of the felt pads when they are not in use. Open the pack and check that each of the pads had been wetted. If not fully wetted, then add a drop or two of saline to any pads not sufficiently wet using the dropper bottle. Be careful not to over-wet the pads. If you have connection problems, add more saline to each felt pad. EMOTIV EPOC USER MANUAL | BRAIN COMPUTER INTERFACE TECHNOLOGY 6
  • 7. Sensor Assembly After the wetting process, remove the sensor units with their felt pads from the hydrator pack and insert each one into the black plastic headset arms, turning each one clockwise one-quarter turn until you feel a definite "click". The "click" indicates each sensor is correctly installed in a headset arm. If you have difficulty with this step, apply a little more force until you feel the "click" but be careful not to exert excessive force as damage might occur. Please see the Troubleshooting section if the sensors do not click in place easily. NOTE: When not in use, the sensor units should be removed from the headset arms and stored in the hydrator pack for subsequent use. EMOTIV EPOC USER MANUAL | BRAIN COMPUTER INTERFACE TECHNOLOGY 7
  • 8. Pairing the Neuroheadset Insert the supplied USB Transceiver Dongle into one of your computer's USB slots. Use a USB extension cable and position the Transceiver in a prominent location away from your monitor and PC to improve poor reception. Then turn-on the headset using the switch at the bottom end of the headset, holding it close to the Transceiver. Headset Placement You are now ready to put the EPOC headset on your head. Using both hands, slide the headset down from the top of your head. Place the arms approximately as depicted, being careful to place the sensors with the black rubber insert on the bone just behind each ear lobe. Correct placement of the rubber sensor is critical for correct operation. EMOTIV EPOC USER MANUAL | BRAIN COMPUTER INTERFACE TECHNOLOGY 8
  • 9. Notice the 2 front sensors should be approximately at the hairline or about the width of 3 fingers above your eyebrows. After the headset is in position, press and hold the 2 reference sensors (located just above and behind your ears) for about 5-10 seconds. Good contact of reference sensors is the key for a good signal. Check that the lights corresponding to these 2 reference sensors turn from red to green in the EPOC Control Panel Headset Setup screen. Gently press and hold each remaining sensor against your scalp until all the lights corresponding to those sensors turn to green in the EPOC Control Panel. EMOTIV EPOC USER MANUAL | BRAIN COMPUTER INTERFACE TECHNOLOGY 9
  • 10. If you are unable to get anything except 2 red sensors, add saline to the reference and other sensors, or try the alternate reference locations – swap the reference sensors with the rubber comfort pads located directly behind the ears, making sure the reference sensors contact directly onto the bare skin on the bony bump. Signal Quality Screen Your objective is to achieve as many green lights as possible using the EPOC Control Panel and adjusting the position of the various arms accordingly. (See full User Manual Document contained on the CD for detailed instructions) Note that the EPOC will still function with some sensor locations showing yellow or orange, and will even cope with a few red or black however the detections will be less reliable in this state. Often the contact quality will gradually improve after a few minutes use, so don’t be too discouraged if setup is not perfect at first. You are now ready to begin using the EPOC headset. If you experience difficulties with initial headset start-up, fine tuning or operation, you may contact Emotiv EPOC Customer Support by live chat or support tickets at www.emotiv.com EMOTIV EPOC USER MANUAL | BRAIN COMPUTER INTERFACE TECHNOLOGY 10
  • 11. Introduction to Emotiv EPOC Neuro-technology Neuroheadset Fulfill the fantasy of having supernatural powers and controlling the world with your mind! For over a millennium, mankind has dreamed of the ability to control objects with the power of thought. Today that dream has become reality! Now you can experience the fantasy of having supernatural powers and controlling the world with your mind. Based on the latest developments in neuro-technology, Emotiv has developed a revolutionary new personal interface for human computer interaction. The Emotiv EPOC uses a set of sensors to tune into electric signals produced by the brain to detect player thoughts, feelings and expressions and connects wirelessly to most PCs. Neuroheadset Features: Limited edition design 14 biopotential sensors with gold-plated connectors offer optimal positioning for accurate spatial resolution Gyroscope generates optimal positional information for cursor and camera controls Hi-performance wireless gives users total range of motion Dongle is USB compatible and requires no custom drivers Rechargeable Lithium battery provides 12 hours of continuous use EMOTIV EPOC USER MANUAL | BRAIN COMPUTER INTERFACE TECHNOLOGY 11
  • 12. Safety: Please note the following safety considerations: CHOKING HAZARD – detachable small parts. Keep away from small children. DO NOT attach the neuroheadset to the charger or USB connector while in use. AWAYS remove the neuroheadset during charging and avoid touching the sensors if fitted. Although unlikely, an insulation failure in the charger or USB source may cause the neuroheadset to become live. The neuroheadset will automatically enter sleep mode while attached to the charger, so it is not possible to extend use while charging. WARNING: Radio emissions may interfere with appliances and medical equipment including heart pacemakers and automated medical dosimetry systems. Use with caution. WARNING: Discontinue use if the system becomes uncomfortable to wear or if skin irritation occurs. Users are advised not to share sets of sensors to avoid cross-infection risks. EMOTIV EPOC USER MANUAL | BRAIN COMPUTER INTERFACE TECHNOLOGY 12
  • 13. Regulatory Requirements: FCC Requirements Part 15 This device complies with Part 15 of the FCC Rules. Operation is subject to the following two conditions: 1. This device may not cause harmful interference, and 2. This device must accept any interference received, including interference that may cause undesired operation. This equipment has been tested and found to comply with the limits for a Class B digital device, pursuant to Part 15 of the FCC Rules. These limits are designed to provide reasonable protection against harmful interference in a residential installation. This equipment generates, uses, and can radiate radio frequency energy and, if not installed and used in accordance with the instructions, may cause harmful interference to radio communications. However, there is no guarantee that interference will not occur in a particular installation. If this equipment does cause harmful interference to radio or television reception which can be determined by turning the radio or television off and on, the user is encouraged to try to correct interference by one or more of the following measures: 1. Reorient or relocate the receiving antenna. 2. Increase the separation between the equipment and receiver. 3. Connect the equipment into an outlet on another circuit. 4. Consult the dealer or an experienced radio/TV technician for help. NOTE: Modifications not expressly approved by Emotiv could void the user’s authority to operate the equipment Canada This device complies with RSS-210 of Industry Canada (IC). Operation is subject to the following two conditions: 1. This device may not cause interference, and 2. This device must accept any interference received, including interference that may cause undesired operation of this device. This Class B digital apparatus complies with Canadian ICES-003. Cet appareil numérique de la Classe B est conforme à la norme NMB-003 du Canada. EMOTIV EPOC USER MANUAL | BRAIN COMPUTER INTERFACE TECHNOLOGY 13
  • 14. Europe, Australia, New Zealand Product Name and Model: Emotiv EPOC Model 1.0 Product description: EPOC Neuroheadset, USB-01 Transceiver, Hydrator Pack + charger or charge cable conforms to the following Product Specifications and Regulations: EMC and Telecom: Class B ETSI EN 300 440-2 V1.4.1 EN 301 489-1 EN 301 489-3 AS/NZS CISPR22 :2009 AS/NZS 4268 :2008 FCC CFR 47 Part 15C (identifiers XUE-EPOC01, XUE-USBD01) Safety: EN 60950-1:2006 IEC 60950-1:2005 (2nd Edition) AS/NZS 60950.1:2003 including amendments 1, 2 & 3 CB Certificate JPTUV-029914 (TUV Rheinland) The product herewith complies with the requirements of the Low Voltage Directive 2006/95/EC, the EMC Directive 2004/108/EC, the R&TTE Directive 1999/5/EC, and carries the CE and C-Tick marks accordingly. EMOTIV EPOC USER MANUAL | BRAIN COMPUTER INTERFACE TECHNOLOGY 14
  • 15. 1.0 Getting Started EPOC Neuroheadset Kit Components: EPOC Neuroheadset Assembly with Rechargeable Lithium battery already installed USB Transceiver Dongle Hydration Sensor Pack with 16 Sensor Units Saline Solution For US customers, 50/60Hz 100-250 VAC Battery Charger. For non-US customers kit includes USB to USB-MiniB battery charging cable providing 5.0V at 0.1A from a standard USB socket on any computer. Quick Start Guide All of the components of the Emotiv EPOC Neuroheadset are delivered in our standard shipping box. Inside the box you will find all of the components neatly stored for shipping and storage. Note: Never put the Emotiv EPOC, or any of its components, back into the packaging until they have dried completely. Make sure the Hydrator sensor pack is sealed and is not leaking. If wet, wipe the seal clean before closing. EMOTIV EPOC USER MANUAL | BRAIN COMPUTER INTERFACE TECHNOLOGY 15
  • 16. 2.0 Minimum Hardware and Software requirements 2.4 GHz Intel Pentium 4 processor (or equivalent) Microsoft Windows XP with Service Pack 2, Microsoft Windows Vista or Microsoft Windows 7 1GB RAM, minimum 50 MB available disk space. One or two unused USB 2.0 ports (depending on the number of EPOC Neuroheadsets you wish to use simultaneously) Insert the Installation Disk into you PC disk drive and install the EPOC software and follow the instructions. For instructions on Windows 7, any other application issues, contact Emotiv Support at support@emotiv.com. Toll Free in USA: 1-800-538-EMOTIV (1800-538-3668). We recommend you download the latest versions of Emotiv software from http://www.emotiv.com/store/apps/ to obtain the latest features. Up to date versions of all software on the installation disk are available for free download. Many other applications are also available at the same location. 2.1 Charging the EPOC Neuroheadset Battery The Emotiv EPOC Neuroheadset contains a built-in rechargeable lithium battery which is designed to run for approximately 12 hours when fully charged. To charge the EPOC battery, set the power switch to the “off” position, and plug the EPOC Neuroheadset into the Emotiv battery charger using the mini-USB cable provided with the EPOC Neuroheadset. Using the supplied battery charger, a fully drained battery can be recharged to 100% capacity in approximately 6 hours; charging for 30 minutes usually yields about a 10% increase in charge. The EPOC Neuroheadset contains a status LED located next to the power switch at the back of the headband. When the power switch is set to the “on” position, the LED will illuminate and appear blue if there is sufficient charge for correct operation. The LED will appear red during battery charging; when the battery is fully-charged, the LED will display green. NOTE 1: The Neuroheadset should not be charged when still on the head. NOTE 2: Do not expose battery or neuroheadset to prolonged temperatures above 122°F (50°C). Damage to the battery or neuroheadset may occur. EMOTIV EPOC USER MANUAL | BRAIN COMPUTER INTERFACE TECHNOLOGY 16
  • 17. 2.2 Use of Saline Hydration Sensor Pack and Felt Inserts Open the Saline Hydration Sensor Pack with the white felt inserts inside. The inserts will be mounted in the neuroheadset arms but must be properly wetted with saline solution first. The saline solution is harmless but allows the felt pads to make good contact with the skull when properly positioned on the head. This is a very important step. Pour a small amount of saline onto each of the sensors (6 or 7 drops if completely dry). Once you have moistened the sensors, pour a small amount of saline onto the large white hydrator pad to evenly moisten the entire pad. Close the hydrator and allow the sensors to absorb some of the saline. You can shake or invert the hydrator unit so that the liquid is evenly distributed and absorbed into the felt pads. Note: For user comfort the sensor pads should be damp but not dripping wet. If the pads do not feel slightly wet, you may also place one or two more drops of the solution directly on the pads from the top to speed the process of absorption. Following the initial hydration step, each of the inserts must be removed from the pack and securely mounted in the EPOC neuroheadset arms by turning the inserts one quarter turn to the right and listen/feel for the click. If you do not hear or feel the click, try again until you do. A very firm force may be needed the first couple of times but be careful not to exert excessive force or you may damage the headset arms. Practice on the sockets in the hydrator a few times if you are unsure. Ensure that each sensor is locked in place. Note that the sensor location behind the ears is fitted with a soft rubber comfort pad. This should remain in place unless the normal Reference sensors do not contact properly (see below for alternative Reference Sensor location) The fully populated neuroheadset should look like this: EMOTIV EPOC USER MANUAL | BRAIN COMPUTER INTERFACE TECHNOLOGY 17
  • 18. After first use, the pads should be rewet the next time EPOC is used by using a dropper to wet the sensors and hydrator pad again. The sensors should be removed from arms after use and stored in the hydrator unit to keep the sensors moist for subsequent use. Note on saline solution: When the initially provided saline solution has been exhausted, additional saline should be purchased from a local drug store. We recommend the use of Multi- purpose Contact Lens Solution if possible, but do not use Contact Lens Cleaning or Sterilizing Solutions. Multi-purpose Solution contains non-allergenic anti-microbial agents which help to keep your sensors fresh and prevent transfer of microbes between users. Normal saline between 0.7% and 4% w-w sodium chloride may also be used, but we recommend adding a small quantity (no more than 4% by volume) of a household disinfectant such as 70% iso-propyl alcohol. EMOTIV EPOC USER MANUAL | BRAIN COMPUTER INTERFACE TECHNOLOGY 18
  • 19. 2.3 USB Transceiver Installation Plug the provided Emotiv USB transceiver into an unused USB port on your computer. After one or two seconds you should see a single LED flashing slowly, or a single bright LED and another dim LED if the transceiver has already paired with a nearby neuroheadset. The transceiver should be recognized and installed automatically by your computer as a USB Human Interface Device. Please wait for a moment until Windows indicates that the new hardware is installed and ready to use. Hold the Emotiv EPOC close to the USB receiver, and turn it on using the switch at the rear of the headband. You should see a new steady LED on the receiver, which indicates that the neuroheadset has properly paired with the USB receiver, and a more dim LED which flashes indicating successful data transfer. 2.4 EPOC Control Panel™ This section explains how to use EPOC Control Panel to explore the Emotiv detection suites. Launch EPOC Control Panel by selecting Windows Start → Programs → Emotiv→ EPOC Control Panel. When the Control Panel is launched for the first time, your firewall software (if installed on your computer) may notify you that the Control Panel is trying to accept connections from the network. For proper operation, you must allow EPOC Control Panel to use this port by selecting “Unblock” (or a similar option, depending on your firewall software). Figure 1 Windows Firewall warning about EPOC Control Panel – select Unblock EPOC Control Panel showcases the capabilities of the Emotiv EPOC Neuroheadset to decipher brain signals, facial expressions and even mouse control using the in-built motion sensors. EMOTIV EPOC USER MANUAL | BRAIN COMPUTER INTERFACE TECHNOLOGY 19
  • 20. 2.5 Placement of Emotiv EPOC Neuroheadset on the Head Carefully expand the EPOC neuroheadset to place it on subject’s head. Using both hands, slide the neuroheadset down from the top of your head. Place the arms approximately as depicted, being careful to place the sensors with the black rubber insert on the bone just behind each ear lobe. Correct placement of the rubber sensor is critical for correct operation. If any sensors fall out, replace them and ensure they are locked in place. The EPOC Neuroheadset should be positioned on the head as indicated by the following illustrations. NOTE: Caution should be exercised never to bend the arms of the neuroheadset backwards out of their natural curvature. Damage may occur. A view of a properly located Emotiv EPOC. Note that the front sensors are 2 – 2.5 inches (50- 60mm or about three finger widths) above the eyebrows. The “Reference Sensors” shown here must have good contact with the subject to assess the Contact Quality of the remaining sensors. You many need to press these against the subject’s scalp for a short period to establish a good conductive path. In the event that the Reference Sensors do not make proper contact (all or most sensors “black” on Control Panel screen), the behind ear locations can be used as alternative Reference locations. Swap the Comfort Pads with the Reference Sensors as shown. Also check that all of the sensor pads are damp. Use the Reference Sensors location which gives best overall performance. 2.6 EmoEngine Status Panel The top pane of EPOC Control Panel is known as the EmoEngine Status Pane. This pane displays indicators that provide real-time information about EmoEngine status and EPOC Neuroheadset sensor contact quality. It also exposes user profile management controls. Figure 2 EmoEngine Status Pane EMOTIV EPOC USER MANUAL | BRAIN COMPUTER INTERFACE TECHNOLOGY 20
  • 21. Engine Status By default, the Control Panel will automatically connect to the EmoEngine when launched. In this mode, it will automatically discover attached USB transceivers and Emotiv EPOC Neuroheadsets. There are four status indicators: System Status: A summary of the general EmoEngine status. System Up Time: The timestamp (in seconds) attached to the most recently received EmoState event. Generally, this corresponds to the length of time that the EmoEngine has been running with an EPOC Neuroheadset connected to the USB receiver. Wireless Signal: This displays the quality of the connection between the EPOC Neuroheadset and the Emotiv wireless USB receiver connected to your machine. If you have not yet connected, the display will show “No Signal”. If the wireless signal strength drops too low (displayed as “Bad” or “No Signal”) then no detection results will be transmitted and the Control Panel will disable its detection suite UI controls. Battery Power: Displays an approximation of the remaining charge in an EPOC Neuroheadset’s built-in battery. 2.7 User Status Use the controls in this section to manage user profiles and assign a specific user (via their profile) to a specific attached EPOC Neuroheadset. Although the EmoEngine supports up to two simultaneously connected EPOC Neuroheadsets, EPOC Control Panel only displays status information and detection results for a single EPOC Neuroheadset at a time. The Headset combo box allows you to specify the EPOC Neuroheadset that has the current “focus.” In Figure 3 the User Status controls tell us that the Control Panel is currently displaying information for the user with profile “Emotiv User”, wearing EPOC Neuroheadset “0.” If you wish to use multiple headsets you can switch between them using the “Headset” drop-down box, or you can launch a second instance of EPOC Control Panel and select a different headset for each instance. Note: neuroheadset numbering begins with 0 and not 1 as you might expect. Other operations that are supported include adding, saving, removing, and switching between user profiles. Note: EPOC Control Panel will automatically save user profile data to disk when it exits so it is generally not necessary to use the Save Profile button. EMOTIV EPOC USER MANUAL | BRAIN COMPUTER INTERFACE TECHNOLOGY 21
  • 22. Figure 3 Add New User Profile 2.8 Sensor Contact Quality Display Accurate detection results depend on good sensor contact and signal quality. This display is a visual representation of the current contact quality of the individual EPOC Neuroheadset sensors. The display is a smaller copy of the contact quality visualization found on the Control Panel’s Neuroheadset Setup tab. Please see Section 3.0 for more information about fitting the EPOC Neuroheadset and achieving good signal quality. EMOTIV EPOC USER MANUAL | BRAIN COMPUTER INTERFACE TECHNOLOGY 22
  • 23. 2.9 Neuroheadset Set-Up The Headset Setup panel is displayed by default when starting EPOC Control Panel. The main function of this panel is to display contact quality feedback for the EPOC Neuroheadset’s sensors and provide guidance to the user in fitting the EPOC Neuroheadset correctly. It is important for the user to achieve the best possible contact quality before proceeding to the other EPOC Control Panel tabs. Poor contact quality will result in poor Emotiv detection results, although the EPOC will continue to perform moderately well with a small number of missing or lower quality sensors. Figure 4 Neuroheadset Setup Panel The image on the left side of the panel is a representation of the sensor locations when looking down from above onto the user’s head. Each circle represents one sensor and its approximate location when wearing the neuroheadset. The color of the sensor circle is a representation of the contact quality. To achieve the best possible contact quality, all of the sensors should show as green. Other sensor colors indicate: Black: No signal (Not Acceptable) Red: Very poor signal (Not Acceptable) EMOTIV EPOC USER MANUAL | BRAIN COMPUTER INTERFACE TECHNOLOGY 23
  • 24. Orange: Poor signal Yellow: Fair signal All Green: Ideal signal Green + Some Yellows: Acceptable Green + Black and/or Orange/Red: Not Acceptable (EPOC may continue to function with several black or red sensors however many detections will be disabled and others will be less reliable). The setup procedure used to achieve good contact quality is outlined below. Only after the EPOC Neuroheadset sensor contact quality has been maximised, should you move on to other EPOC Control Panel tabs. 3.0 Achieving Good Signal Quality STEP 1: Before putting on the EPOC Neuroheadset, ensure that each of the 16 electrode sockets are fitted with a sensor unit with a moist felt pad. If the pads are not already moist, wet them with saline solution before inserting into the neuroheadset using the procedure outlined in Section 2.2, above. STEP 2: Switch on the EPOC Neuroheadset, and verify that the built-in battery is charged and is providing power by looking for the blue LED located near the power switch at the back of the neuroheadset. If the neuroheadset battery needs charging, set the power switch to the off position, and plug the neuroheadset into the Emotiv battery charger using the mini-USB cable provided with the EPOC Neuroheadset, or alternatively through a spare USB socket on your PC using a USB- MiniB cable. Allow the EPOC Neuroheadset battery to charge for at least 15 minutes before trying again. A fully discharged neuroheadset will take up to 6 hours to reach full charge. STEP 3: Verify that the Wireless Signal reception is reported as “Good” by looking at the Engine Status area in the EmoEngine Status Pane (described in Section 2.6). If the Wireless Signal status is reported as “Bad” or “No Signal”, then make sure that the Emotiv Wireless USB Receiver is inserted into a USB port on your computer and that the bright LED and dim flickering data transfer LED on the top half of the receiver are visible. If the LED is blinking slowly or is not illuminated, then remove the receiver from the computer, reinsert it, and try again. Remove any metallic or dense physical obstructions located near the receiver or the EPOC Neuroheadset, and move away from any powerful sources of electromagnetic interference, such as microwave ovens, large motors, or high-powered radio transmitters. You may also attach the USB Transceiver to the end of a USB extension cable in order to position the Transceiver prominently in the space, away from potential sources of interference such as monitors and wireless routers. STEP 4: Put on the EPOC Neuroheadset by gently pulling apart the headband and lowering the sensor arms onto your head from the top down, near the rear of the skull. Next, slide the neuroheadset forward until the sensors closest to the neuroheadset pivot points are located directly above your ears and as close to your hairline as possible. Adjust the fit so that the rectangular compartments at the front ends of the headband sit comfortably just above and behind your ears. Tilt the neuroheadset so that the two lowest, front-most sensors are symmetric on your forehead EMOTIV EPOC USER MANUAL | BRAIN COMPUTER INTERFACE TECHNOLOGY 24
  • 25. and positioned about 2 to 2.5 inches above your eyebrows. Finally, check that all sensors are touching your head and, if not, then fine tune the neuroheadset fit by gently sliding the neuroheadset in small increments until an ideal fit has been achieved. STEP 5: Starting with the two sensors just above and about an inch (25mm) behind your ears (these are reference sensors for which good contact with your scalp is essential), adjust the sensors so they make proper contact with your scalp (i.e. show green on the contact quality display). If the indicators are: Black: Check that the sensor has a felt pad fitted. Check that the felt pad is pressing firmly against your scalp. Then try re-moistening the felt pad. If problems persist, this may indicate a problem with the EPOC Neuroheadset. Yellow, Orange, or Red: The sensor has not established a good conductive path with your scalp. Check that the felt pad is making comfortable, yet firm, contact with your scalp. Try shifting the neuroheadset slightly back and forth on your head, or press gently on the troublesome sensor to improve contact. If the contact is adequate, ensure that the felt pad is moist. If the sensor’s indicator color becomes lighter, the signal quality is improving. If the sensor’s indicator color is getting darker the signal quality is deteriorating. If problems still persist, try parting the hair in the vicinity of the electrode so the felt pad touches your scalp. See the TROUBLESHOOTING GUIDE at the end of this manual for more details on how to deal with poor contact. STEP 6: Repeat Step 5 for each of the remaining sensors until all of the sensors have adequate contact quality (i.e. are predominantly showing green). If at any time the reference sensors (located just above and behind your ears) no longer have a good connection (i.e. they show RED, and most or all of the other sensors turn BLACK), immediately restore these sensors to green before proceeding further. Try the alternative reference locations behind the ears if you continue to have difficulty with the primary locations (Section 2.5). EMOTIV EPOC USER MANUAL | BRAIN COMPUTER INTERFACE TECHNOLOGY 25
  • 26. 3.1 Expressiv™ Suite The Expressive Suite details the facial expressions and non-verbal communication capabilities of the EPOC Neuroheadset. No longer do you need to push a button or type in emoticons into a chat dialog box during game-play. Now, if you want to show facial expressions on your avatar, you need only perform them while wearing the EPOC neuroheadset and you can display these expressions on the face of your avatar. Figure 5 Expressiv Suite 3.1.1 Understanding the Expressiv Suite Panel Display On the left-hand side of the Expressiv Suite panel is a simple avatar. The avatar will mimic your facial expressions, in camera view (i.e. not mirrored). The facial expressions which are displayed include horizontal eye movements to the left and right, normal eye blinks, left and right sided winks, clenching the teeth and smiling., On the right-hand side of the panel is the Sensitivity panel. This panel is explained further in the following section. EMOTIV EPOC USER MANUAL | BRAIN COMPUTER INTERFACE TECHNOLOGY 26
  • 27. 3.1.2 Sensitivity Adjustment Panel The Control Panel offers sensitivity adjustments for the Expressiv Suite detections. This is controlled through sliders to the right of avatar. For each facial expression, check the performance of the detection. If you feel that the Expressiv detection is not responding readily to a particular expression, then increase the sensitivity for that expression. If you feel that it is too easy to trigger a particular expression, or you are seeing “false positive” expressions, then decrease the sensitivity for that expression. Sensitivity can be increased or decreased by moving the sensitivity slider to the right or left, respectively. Figure 6 Expressiv Suite Sensitivity Adjustment Panel EMOTIV EPOC USER MANUAL | BRAIN COMPUTER INTERFACE TECHNOLOGY 27
  • 28. 3.1.3 EmoKey EmoKey links the Emotiv technology to your applications by easily converting detected events into any combination of keystrokes. EmoKey is a nonintrusive, lightweight, background process that runs behind your existing games or applications. EmoKey lets you create mappings that define how detections are converted to keystroke combinations. Your mappings can then be saved and shared so you can use mappings that your friends have created for your favorite games and software. EmoKey mappings can be as simple as linking the Expressiv smile detection to text characters such as ":)", so that chat applications instantly know when you smile. Configuring EmoKey To configure a facial expression to EmoKey, select the expression you wish to link and click on the Key button next to the Facial Expression description. This will bring up a Configuration Dialogue box as shown in Figure 7. Type into the text box, the specific keystroke(s) you wish to send. You can also make the facial expression send a continuous string of keys by checking the Hold the key box. There are also options to further configure the Key hold time and Key trigger delay time. Once you are satisfied with the settings, click the Apply button. Figure 7 Emokey Configuration Dialogue Box EMOTIV EPOC USER MANUAL | BRAIN COMPUTER INTERFACE TECHNOLOGY 28
  • 29. Once EmoKey is activated, the keystroke(s) allocated to the facial expression will be marked in the corresponding box. An orange highlight will flash in the box to the right of the facial expression description that is being triggered. Only actions that have keystrokes allocated will be sent to an application window that is active. This is shown in Figure 8, where a smile triggers the keystroke “:)”. To make this happen, enter the desired keystrokes and carefully choose the trigger condition. Note the some Expressions have the option “occurs” while others have “is equal to”, “is greater than”, “is less than”. Select “is greater than” and type “0.2” into the condition box, which will trigger your smile keystrokes whenever a Smile greater than 20% of full scale is detected. Figure 8 EmoKey - Smile detection linked to “:)” You can manage and save Emokey mappings using the EmoKey menu at the top of the Control Panel Window. Mappings can be loaded or saved and you can also temporarily suspend EmoKey activity using the Activate tick selector in the EmoKey menu. EMOTIV EPOC USER MANUAL | BRAIN COMPUTER INTERFACE TECHNOLOGY 29
  • 30. 3.2 Affectiv™ Suite The Affectiv Suite of functions measures and displays a wide range of subjective emotional responses. Levels of interest, excitement, and engagement that you experience in a cyber environment are translated into graphical measurements on the control panel dials, and in some cases, into dynamically changing environments within games you are playing. Figure 9 Affectiv Suite Panel 3.2.1 Affectiv Suite Introduction The Affectiv Suite reports real time changes in the subjective emotions experienced by the user. EPOC Control Panel currently displays three short-term and three long-term Affectiv detections: Meditation, Engagement and Excitement. Emotions related to Engagement are alertness, vigilance, concentration, stimulation, interest. Examples of engaging video game events that result in a peak in the detection are difficult tasks requiring concentration, discovering something new, and entering a new area. Deaths in a game EMOTIV EPOC USER MANUAL | BRAIN COMPUTER INTERFACE TECHNOLOGY 30
  • 31. often result in bell-shaped transient responses. Shooting or sniping targets also produce similar transient responses. Writing something on paper or typing typically increase the engagement score, while closing the eyes almost always rapidly decreases the score. 3.2.2 Understanding the Affectiv Panel Display The Affectiv Suite panel contains two graph panes displaying the three Affectiv detections instantaneous and long-term average time scales. The top chart is configured to plot 30 seconds of data for the Engagement, Meditation and Instantaneous Excitement detections. The bottom chart defaults to display 5 minutes worth of data for the Long-Term Engagement, Meditation and Excitement detections. The values that are plotted on the graphs are the output scores returned by the Affectiv detections. 3.2.3 Affectiv Suite Detection Details Scoring behavior: In general, the greater the increase in physiological arousal the greater the output score for the detection. Instantaneous Excitement is experienced as an awareness or feeling of physiological arousal with a positive value. Excitement is characterized by activation in the sympathetic nervous system which results in a range of physiological responses including pupil dilation, eye widening, sweat gland stimulation, heart rate and muscle tension increases, blood diversion, and digestive inhibition. The Instantaneous Excitement detection is tuned to provide output scores that more accurately reflect short-term changes in excitement over time periods as short as several seconds. Related emotions: titillation, nervousness, agitation Long-Term Excitement is experienced and defined in the same way as Instantaneous Excitement, but the detection is designed and tuned to be more accurate when measuring changes in excitement over longer time periods, typically measured in minutes. Engagement is experienced as alertness and the conscious direction of attention towards task- relevant stimuli. It is characterized by increased physiological arousal and beta waves (a well- known type of EEG waveform) along with attenuated alpha waves (another type of EEG waveform). The opposite pole of this detection is referred to as “Boredom” in EPOC Control Panel and the Emotiv API; however, please note that this does not always correspond to a subjective emotional experience that all users describe as boredom. Related emotions: alertness, vigilance, concentration, stimulation, interest Scoring behavior: The greater the attention, focus and cognitive workload, the greater the output score reported by the detection. Examples of engaging video game events that result in a peak in the detection are difficult tasks requiring concentration, discovering something new, and entering a new area. Deaths in a game often result in bell-shaped transient responses. Shooting or sniping targets also produce similar transient responses. Writing something on paper or typing typically increase the engagement score, while closing the eyes almost always rapidly decreases the score. EMOTIV EPOC USER MANUAL | BRAIN COMPUTER INTERFACE TECHNOLOGY 31
  • 32. 3.3 Cognitiv™ Suite The Cognitiv Suite panel uses a virtual 3D model to display an animated representation of the Cognitiv detection output. 3.3.1 Cognitiv Suite Introduction The Cognitiv detection suite evaluates a user’s real time brainwave activity to discern the user’s conscious intent to perform distinct physical actions on a real or virtual object. The detection is designed to work with up to 13 different actions: 6 directional movements (push, pull, left, right, up and down) and 6 rotations (clockwise, counter-clockwise, left, right, forward and backward) plus one additional action that exists only in the realm of the user’s imagination: disappear. Cognitiv allows the user to choose up to 4 actions that can be recognized at any given time. The detection reports a single action or neutral (i.e. no action) at a time, along with an action power which represents the detection’s certainty that the user has entered the cognitive state associated with that action. Increasing the number of concurrent actions increases the difficulty in maintaining conscious control over the Cognitiv detection results. Almost all new users readily gain control over a single action quite quickly. Learning to control multiple actions typically requires practice and becomes progressively harder as additional actions are added. Although EPOC Control Panel allows a user to select up to 4 actions at a time, it is important that each user masters the use of the Cognitiv detection one action at a time, only increasing the number of concurrent actions after he or she has first gained confidence and accuracy with a lower number of actions. EMOTIV EPOC USER MANUAL | BRAIN COMPUTER INTERFACE TECHNOLOGY 32
  • 33. Figure 10 Cognitiv Suite Panel 3.3.2 Understanding the Cognitiv Panel Display The Cognitiv Suite panel uses a virtual 3D model to display an animated representation of the Cognitiv detection output. This 3D model is also used to assist the user in visualizing the intended action during the training process. The Power gauge to the left of the 3D display is an indicator of the “action power”, or relative certainty that the user is consciously visualizing the current action. This information to the right displays the current state of the Cognitiv detection and allows the user to define the current set of actions. In order to enable the Cognitiv detection, each chosen action, plus the Neutral action must first be trained. For more information about the training process please refer to Section 3.3.3 below. A green checkmark is used to indicate that the corresponding action has been trained; an orange X indicates a lack of training data. Remember, in order for the Cognitiv detection to be activated, all actions, plus Neutral (the user’s background mental state) must be trained. Use the drop down selection menu to modify the number and type of enabled actions. EMOTIV EPOC USER MANUAL | BRAIN COMPUTER INTERFACE TECHNOLOGY 33
  • 34. 3.3.3 Cognitiv Training The Cognitiv training process enables the EmoEngine to analyze your brainwaves and develop a personalized signature which corresponds to each particular action, as well as the background state, or “neutral”. As the EmoEngine learns and refines the signatures for each of the actions, as well as neutral, detections become more precise and easier to perform. Figure 11 Cognitiv Neutral Training in action Pressing the TRAIN button next to the drop down menu activates the user interface controls that support the Cognitiv training process. The training process consists of three steps: First, train a neutral state. Neutral training must be completed first before any actions can be trained and activated. To train neutral, there is nothing in particular that you need to do. Simply relax, act natural and clear your mind. Press the TRAIN button to bring up the training screen and press GO when you are ready. A progress bar will appear as your brainwaves are observed. Once training is complete, you will be asked to accept or reject the training session by pressing YES or NO. Once you accept, you will be automatically returned to the Cognitiv Panel Display. EMOTIV EPOC USER MANUAL | BRAIN COMPUTER INTERFACE TECHNOLOGY 34
  • 35. Figure 12 Accepting a Training Session When you are ready to begin imagining or visualizing an action you wish to train, select the action from the dropdown list. Actions that have already been trained are paired with a green checkmark; actions with no training data are paired with an orange X. During the training process it is very important to maintain your mental focus for the duration of the training period (currently 8 seconds). Physical gestures, such as pushing an imaginary object with one hand, may be used to heighten your focus on the intended action, but are not required. You should also refrain from making substantial head movements or dramatic facial expressions during the training period, as these actions can interfere with the recorded EEG signal. Initially, the cube on screen will not move, as the system has not yet acquired the training data necessary to construct a personalized signature for the current set of actions. After Neutral and each enabled action have been trained at least once, the Cognitiv detection is activated and the cube will respond to the Cognitiv detection, and your mental control, in real time. Some users will find it easier to maintain the necessary mental focus if the cube is automatically animated to perform the intended action as a visualization aid during training. If you think you will benefit from this, then you may select the Animate cube according to training action checkbox. Otherwise, the cube will remain stationary or, if you have already supplied training data and the detection is active, will be animated by the current detection results for the action being trained, while you supply new training data. EMOTIV EPOC USER MANUAL | BRAIN COMPUTER INTERFACE TECHNOLOGY 35
  • 36. Figure 13 Cognitiv training of push with animate model according to training action selected Finally, you are prompted to accept or reject the training recording. Ideal Cognitiv detection performance is typically achieved by supplying consistent training data (i.e. a consistent mental visualization on the part of the user) across several training sessions for each enabled action. The ability to reject the last training recording allows you to decide whether you were able to remain mentally focused on the appropriate action during the last training session. Alternatively, you may press the Abort Training button to abort the training recording if you are interrupted, become distracted, or notice problems with the EPOC Neuroheadset contact quality indicators during the recording. A training session is automatically discarded if the wireless signal strength or EEG signal quality is poor for a significant portion of the training period. A notification will be displayed to the user if this has occurred. 3.3.4 Training Neutral The Neutral “action” refers to the user’s passive mental state; one that isn’t associated with any of the selected Cognitiv actions. While training Neutral, you should enter a mental state that doesn’t involve the other Cognitiv actions. Typically this means engaging in passive mental activities such as reading or just relaxing. However, to minimize “false-positive” Cognitiv action results (i.e. incorrect reporting of unintended actions), it may also be helpful to emulate other mental states and facial expressions that are likely to be encountered in the application context and environment in which you’ll be using Cognitiv. For many users, providing more Neutral training data will result in better overall Cognitiv performance. EMOTIV EPOC USER MANUAL | BRAIN COMPUTER INTERFACE TECHNOLOGY 36
  • 37. Neutral training must be completed first before any actions can be trained and activated. 3.3.5 Clear Training Button Occasionally, you may find that a particular trained action doesn’t work as well as it once did. This may indicate that the training data used to construct your personalized Cognitiv signature was “contaminated” by a more recent, inconsistent training session or that some characteristics of your brainwaves have changed over time. It may also happen that you wish to change the mental imagery or technique that you associate with a particular action. In either situation, you can use the RESET button to delete the training data for the selected action. Keep in mind that doing so will disable the Cognitiv detection until new training data has been recorded for this action. 3.3.6 Cognitiv Tips Mental dexterity with the Cognitiv Suite is a skill that will improve over time. As you learn to train distinct, reproducible mental states for each action, the detection becomes increasingly precise. Most users typically achieve their best results after training each action several times. Overtraining can sometimes produce a decrease in accuracy –although this may also indicate a lack of consistency and mental fatigue. Practice and experience will help determine the ideal amount of training required for each individual user. If it becomes hard for you to return to neutral (i.e. to stop the cube from moving) you should try refreshing your mental state by momentarily shifting your focus away from the screen and relaxing. It is easy to become immersed in the experience and to have the Cognitiv actions at the “front of your mind” while trying to be neutral. Successful training relies on consistency and focus. For best results, you must perform the intended action continuously for the full training period. It is common for novice users to become distracted at some point during the training period and then mentally restart an action, but this practice will result in poorer results than training with a mental focus that spans the entire training period. A common mistake is for users to attempt to “force” a particular action, usually by straining head, jaw, tongue or neck muscles or squinting. These actions will just disguise a poor signature and make the detection difficult to duplicate. Try to relax and use your imagination to visualize the intended action, especially during training. Keep your eyes open if possible so you can see the visual feedback on screen. Actions will occur most reliably if the user relaxes and lets the action happen, in a similar way to moving a limb or remembering a tune. A short latency, of up to two seconds, in the initiation and cessation of the cube’s animated action on screen is typical. 3.3.7 EmoKey for Cognitiv Actions EmoKey links the Emotiv technology to your applications by easily converting detected events into any combination of keystrokes. EmoKey is a nonintrusive, lightweight, background process that runs behind your existing games or applications. EmoKey lets you create mappings that define how detections are converted to keystroke combinations. Your mappings can then be saved and shared EMOTIV EPOC USER MANUAL | BRAIN COMPUTER INTERFACE TECHNOLOGY 37
  • 38. so you can use mappings that your friends have created for your favorite games and software. EmoKey can be as complex as linking a "lift" command to a sequence of keystrokes that trigger a levitation spell in a game. To configure a Cognitiv action to EmoKey, select the action you wish to link and click on the KEY button to the far right of the Cognitiv Panel Display. This will bring up a Configuration Dialogue box as shown in Figure 7. Type into the text box, the specific keystroke(s) you wish to send. You can also make the facial expression send a continuous string of keys by checking the Hold the key box. There are also options to further configure the Key hold time and Key trigger delay time. Once you are satisfied with the settings, click the Apply button. Figure 14 EmoKey Configuration Dialogue box Once EmoKey is activated, the keystroke(s) allocated to the Cognitiv action will be marked in the corresponding box. An orange highlight will flash in the box to the right of the description of the action being triggered. Only actions that have keystrokes allocated will be sent to an application window that is active. This is shown in Figure 14, where a pull triggers the keystroke “Z”. Make sure you set the condition to “is greater than” and enter 0.2 into the condition box at the lower right to trigger the “Z” key whenever the action strength exceeds 20% of full scale. EMOTIV EPOC USER MANUAL | BRAIN COMPUTER INTERFACE TECHNOLOGY 38
  • 39. Figure 15 EmoKey in Action Linking Pull to keying in “Z” EMOTIV EPOC USER MANUAL | BRAIN COMPUTER INTERFACE TECHNOLOGY 39
  • 40. Figure 15 EmoKey in Action Linking Pull to keying in “Z” EMOTIV EPOC USER MANUAL | BRAIN COMPUTER INTERFACE TECHNOLOGY 40
  • 41. Figure 16 Option for select model To select models different you can press to the icon to display form select. If you want to choose any model you only double click that model. 3.4 Mouse Emulator The EPOC neuroheadset comes with a built-in 2-axis gyroscope which enables a range of additional functions. One possible use is mouse cursor control. 3.4.1 Understanding the Mouse Emulator Tab The Mouse Emulator Tab in the EPOC Control Panel allows you to activate the neuroheadset’s gyroscope and link it to the control of your computer’s mouse cursor. The left side of the Mouse Emulator Tab provides a visual representation of the gyroscope’s relative position. The right side of the Mouse Emulator Tab provides the controls to activate and deactivate this feature along with a slider bar to make sensitivity adjustments. EMOTIV EPOC USER MANUAL | BRAIN COMPUTER INTERFACE TECHNOLOGY 41
  • 42. Figure 16 Mouse Emulator Tab 3.4.2 Mouse Emulator Controls To enable this feature, click on the Activate button. Your mouse will immediately respond based on the movement of your head. Simply turn your head from left to right, up and down. You will also notice the orange indicator dot move in accordance with the movement of your head/gyroscope. The Mouse Sensitivity slider allows you to adjust the sensitivity of the gyroscope when controlling your mouse cursor. The Reset button allows you to re-centre your position. To deactivate this feature, use your head movement to move your cursor to the Deactivate button and left mouse click, or Press CTRL+SHIFT+M. EMOTIV EPOC USER MANUAL | BRAIN COMPUTER INTERFACE TECHNOLOGY 42
  • 43. 4.0 Trouble Shooting and Help Transceiver Dongle lights don’t work (Should see either one slow flashing LED – if unpaired – or one bright and one dim LED – if paired). • Try different USB port, different computer. • Check other USB equipment works in same port • Possible LED failure – carry on regardless Transceiver Dongle not recognized (USB “ding” on insertion, stream of Hardware Identifier strings observed on first installation) • Use only on XP, Window Vista and Windows 7 and virtual Windows XP/Vista/7 machines in Mac OS X • Check Device Manager list as Dongle is inserted and removed. • Try different USB port, different computer. • If Control Panel is running it will ask for User Profile selection when the Transceiver Dongle is recognized, whether the neuroheadset is paired or not Does not pair (Transceiver Dongle switches from single slow flashing LED to one bright & one dim LED if correctly paired) • Check for blue LED on neuroheadset (recharge neuroheadset if absent). • Hold neuroheadset very close to USB, switch off and on. • Unplug and replace Transceiver Dongle in USB port, repeat pairing attempt • Obtain a USB male - USB female extension cable and plug into the PC. Attach the Transceiver Dongle to the extension cable and position in a prominent location away from your PC, monitor, wireless router and other sources of radio-frequency interference. • Turn off or disconnect other wireless and Bluetooth devices in the area to isolate possible causes EMOTIV EPOC USER MANUAL | BRAIN COMPUTER INTERFACE TECHNOLOGY 43
  • 44. Weak wireless connection or repeated drop-outs (expected range 3-5 metres within line of sight) • Move closer to the Transceiver Dongle • Obtain a USB male - USB female extension cable and plug into the PC. Attach the Transceiver Dongle to the extension cable and position in a prominent location away from your PC, monitor, wireless router and other sources of radio-frequency interference. • Turn off or disconnect other wireless and Bluetooth devices in the area to isolate possible causes • Turn off neuroheadset, unplug Transceiver Dongle and repeat the pairing exercise Sensors do not positively lock in place (sensors should click in place as they are rotated a quarter- turn clockwise after insertion into the socket) • Sensors are made deliberately tight to start with and the locking tabs are slightly deformed to the correct shape during the first fitting. Soetimes the sensors are very tight and the user feels they will not turn further into the socket. • Take each sensor in turn and use an empty socket in the Hydrator Pack. Forcibly rotate the sensor fully clockwise in the socket until a definite click is felt (use a cloth or tool to hold the sensor if your fingers are easily damaged). Click and unclick the sensor into the socket a few times to complete the process. • The sensor can now be fitted to the headset, Make sure ou feel a distinct catch as ou rotate the sensor into the socket and the finger tabs are aligned along the axis of each arm. All sensors black except RED references (directly below ears on Contact Quality map) • Start with RUBBER COMFORT PADS in locations directly behind the ears. • The primary reference sensor locations are behind the head, elevated at about 30 degrees backwards behind the ears (see diagram in main section of this manual) • Ensure reference sensors and at least one forehead sensor are sufficiently wet • Ensure all sensors are properly located in the neuroheadset receptacles. They should not spin or fall out when gently moved. • Try to minimize the amount of hair trapped underneath the reference sensors. The neuroheadset can be wriggled to allow the sensors to pass through the hair, or you can try to displace some of the hair with a pencil or similar. EMOTIV EPOC USER MANUAL | BRAIN COMPUTER INTERFACE TECHNOLOGY 44
  • 45. Gently press reference sensors onto the head for at least 5 seconds, then release. It may take another 20 seconds or so for the sensors to respond. • Gently press wet forehead sensor for 5 seconds then release. It may take another 20 seconds or so for the sensors to respond. • If still no signals, switch reference sensors to the alternate location as follows: remove the RUBBER COMFORT PADS (including the plastic holders) from their location behind the ears. They should twist out just like any of the sensors. Move the felt pads from the usual reference locations and place them in the sockets recently vacated by the RUBBER COMFORT PADS. You can put the COMFORT PADS into the original reference sockets, or leave them out if you prefer. Make sure you don’t lose them if you choose to leave them out. • Make sure the sensors are sufficiently damp and repeat the above procedure, taking care to locate the new reference sensors onto a patch of bare skin on or near the bony lump located just behind the ear flap. Within a few seconds the sensors should come to life, especially if you press gently on some of the other sensors for a few seconds. One or both of the sensors immediately adjacent to the ears remains black. • These sensors are located on the main body of the Arm assembly, closest to the arm pivot point. They detect activity in the temporal lobes and are known as T7 (left side) and T8 (right side). A combination of the shape of the arm assembly and the user’s head shape (particularly long, narrow heads with relatively flat sides) can sometimes result in these sensors failing to touch the head, being held off by some of the other sensors. • Check that the sensors are clean and attached properly as per the general comments in the next section • Check that the sensors are clean and attached properly as per the general • Remove the RUBBER COMFORT PAD including the plastic holder, from the side or sides where the contact cannot be achieved. The neuroheadset can be worn comfortably without these pads for people with this head shape, and no harm will come to the connector sockets because they are fully enclosed. The change in balance point is usually sufficient to ensure contact occurs. • In the unlikely event that contact is still impossible to obtain, you can use a longer felt pad or use a cotton ball soaked in saline to fill the gap or replace the felt piece. EMOTIV EPOC USER MANUAL | BRAIN COMPUTER INTERFACE TECHNOLOGY 45
  • 46. One or more sensors remain black or red for every fitting and user • Check that the sensor is properly located in the socket. It should click firmly in place, the finger tabs should be aligned along the axis of the arm and it should not freely rotate in the socket. • Check that the sensor is sufficiently damp for operation • Check that the sensor is applying gentle but positive pressure to your head in this location. When pressed, it should not move inwards. You may find that slightly relocating the neuroheadset settles the sensors into a better location • Remove the neuroheadset and gently press the felt pad into the sensor. It should protrude by no more than 2mm. It should also feel damp and be free of obstructions. • Remove the sensor and inspect it. The sensor should have a felt pad on the front side and a domed gold-plated metal plate which is visible from the rear side. The metal plate should be clean and free of obstructions at least across the central third of the domed section in order to make proper contact when inserted. • Check the socket. Make sure the gold contact plate is clean and there is nothing trapped in the socket which could affect the contact. The gold contacts inside the socket consist of three spring tabs which bend slightly upwards towards the sensor. Make sure they are not bent away, damaged or dirty. • Swap a different sensor into that location from somewhere that is known to be working. This will eliminate a faulty sensor • Please contact Customer Service if you cannot resolve this problem and the location seems to be failing for each fitting and all users. If you have other problems or your problem is not rectified by the above procedures, please check the updated Troubleshooting information, visit our Live Chat Support, initiate a support ticket at www.emotiv.com or email support@emotiv.com for further assistance. . EMOTIV EPOC USER MANUAL | BRAIN COMPUTER INTERFACE TECHNOLOGY 46