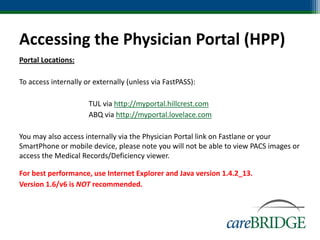
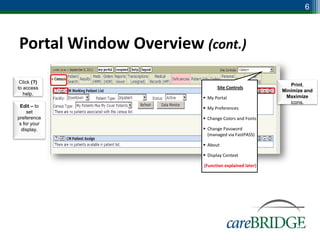
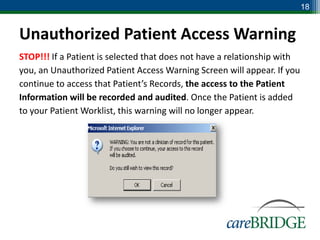
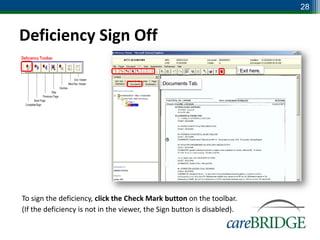
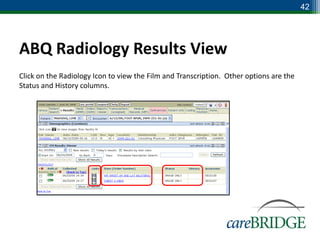
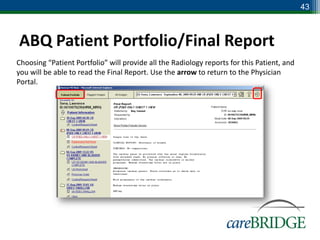
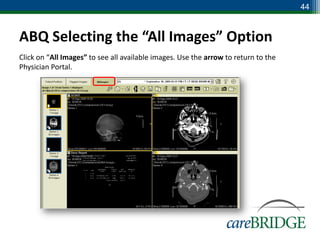
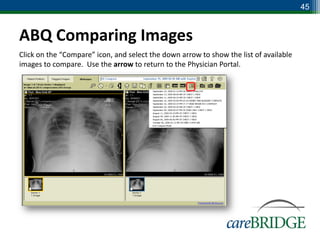
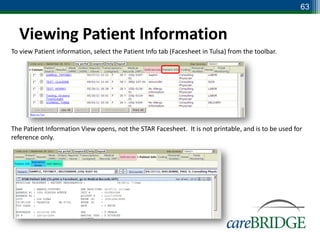
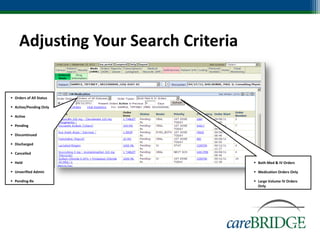
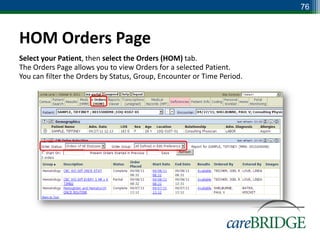
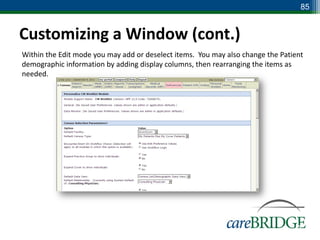
1) To access the Physician Portal, users can go to the internal URL http://myportal.hillcrest.com or http://myportal.lovelace.com. For external access, FastPASS is required unless the user accesses from a mobile device.
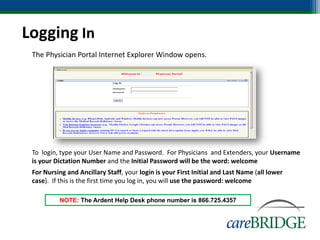
2) To log into the portal, users enter their username (dictation number for physicians and extenders, first initial and last name for others) and initial password which is "welcome".
3) If login issues occur, users should contact the Help Desk phone number 866.725.4357.
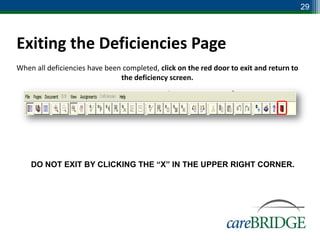
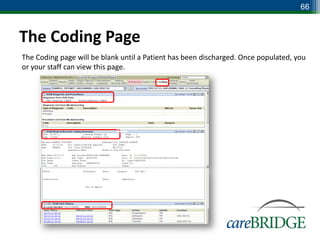
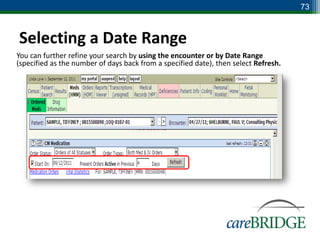
Software for Consulting Physicians from HospitalSoftwareShop.comhospitalsoftwareshop
Software for consulting physicians is an easy to use software for consulting physicians, physicians, general practitioners, GPs, GP, doctor's clinic, clinic software
Your clinic needs are answered with this web-based, turnkey solution that is as effective as it is user-friendly. The ClinicPro Online will help doctors and healthcare professionals:
- Have more mobility in accessing clinic records anytime, anywhere
- Efficiently manage flow of and documents in the clinic
- Organize and speed up access to patient information
- Produce great-looking prescriptions, reports and other documents.
PhamarTech Solution System is a Point Of Sale system which is basically customized to suite Chemist or Pharmacy.
It provides platform for;
Drug Inventory
Drug Dispensation-Prescription
Patient Info Managment
Transaction Pack reporting
System Usability tools
High Access Security
This is a brief overview of eMedRec. The presentation includes:
The login screen
Searching for a patient chart
The screen menu and tabs
The Facesheet
Printing Forms
The following slideshow is a brief overview of eMedRec including
Logging into the system
Searching for a Patient chart
Menu system and Tabs
Facesheet
Printing Forms
Candela retail system for pharmacies is specially tailored to cater to the industry specific needs like handling controlled drugs, maintaining manufacturer wise inventory, managing generic information, etc. Read on to refresh your knowledge of pharmacy specific features of Candela.
Building RAG with self-deployed Milvus vector database and Snowpark Container...Zilliz
This talk will give hands-on advice on building RAG applications with an open-source Milvus database deployed as a docker container. We will also introduce the integration of Milvus with Snowpark Container Services.
zkStudyClub - Reef: Fast Succinct Non-Interactive Zero-Knowledge Regex ProofsAlex Pruden
This paper presents Reef, a system for generating publicly verifiable succinct non-interactive zero-knowledge proofs that a committed document matches or does not match a regular expression. We describe applications such as proving the strength of passwords, the provenance of email despite redactions, the validity of oblivious DNS queries, and the existence of mutations in DNA. Reef supports the Perl Compatible Regular Expression syntax, including wildcards, alternation, ranges, capture groups, Kleene star, negations, and lookarounds. Reef introduces a new type of automata, Skipping Alternating Finite Automata (SAFA), that skips irrelevant parts of a document when producing proofs without undermining soundness, and instantiates SAFA with a lookup argument. Our experimental evaluation confirms that Reef can generate proofs for documents with 32M characters; the proofs are small and cheap to verify (under a second).
Paper: https://eprint.iacr.org/2023/1886
How to Get CNIC Information System with Paksim Ga.pptxdanishmna97
Pakdata Cf is a groundbreaking system designed to streamline and facilitate access to CNIC information. This innovative platform leverages advanced technology to provide users with efficient and secure access to their CNIC details.
Unlocking Productivity: Leveraging the Potential of Copilot in Microsoft 365, a presentation by Christoforos Vlachos, Senior Solutions Manager – Modern Workplace, Uni Systems
LF Energy Webinar: Electrical Grid Modelling and Simulation Through PowSyBl -...DanBrown980551
Do you want to learn how to model and simulate an electrical network from scratch in under an hour?
Then welcome to this PowSyBl workshop, hosted by Rte, the French Transmission System Operator (TSO)!
During the webinar, you will discover the PowSyBl ecosystem as well as handle and study an electrical network through an interactive Python notebook.
PowSyBl is an open source project hosted by LF Energy, which offers a comprehensive set of features for electrical grid modelling and simulation. Among other advanced features, PowSyBl provides:
- A fully editable and extendable library for grid component modelling;
- Visualization tools to display your network;
- Grid simulation tools, such as power flows, security analyses (with or without remedial actions) and sensitivity analyses;
The framework is mostly written in Java, with a Python binding so that Python developers can access PowSyBl functionalities as well.
What you will learn during the webinar:
- For beginners: discover PowSyBl's functionalities through a quick general presentation and the notebook, without needing any expert coding skills;
- For advanced developers: master the skills to efficiently apply PowSyBl functionalities to your real-world scenarios.
GraphSummit Singapore | The Art of the Possible with Graph - Q2 2024Neo4j
Neha Bajwa, Vice President of Product Marketing, Neo4j
Join us as we explore breakthrough innovations enabled by interconnected data and AI. Discover firsthand how organizations use relationships in data to uncover contextual insights and solve our most pressing challenges – from optimizing supply chains, detecting fraud, and improving customer experiences to accelerating drug discoveries.
Observability Concepts EVERY Developer Should Know -- DeveloperWeek Europe.pdfPaige Cruz
Monitoring and observability aren’t traditionally found in software curriculums and many of us cobble this knowledge together from whatever vendor or ecosystem we were first introduced to and whatever is a part of your current company’s observability stack.
While the dev and ops silo continues to crumble….many organizations still relegate monitoring & observability as the purview of ops, infra and SRE teams. This is a mistake - achieving a highly observable system requires collaboration up and down the stack.
I, a former op, would like to extend an invitation to all application developers to join the observability party will share these foundational concepts to build on:
20 Comprehensive Checklist of Designing and Developing a WebsitePixlogix Infotech
Dive into the world of Website Designing and Developing with Pixlogix! Looking to create a stunning online presence? Look no further! Our comprehensive checklist covers everything you need to know to craft a website that stands out. From user-friendly design to seamless functionality, we've got you covered. Don't miss out on this invaluable resource! Check out our checklist now at Pixlogix and start your journey towards a captivating online presence today.
Goodbye Windows 11: Make Way for Nitrux Linux 3.5.0!SOFTTECHHUB
As the digital landscape continually evolves, operating systems play a critical role in shaping user experiences and productivity. The launch of Nitrux Linux 3.5.0 marks a significant milestone, offering a robust alternative to traditional systems such as Windows 11. This article delves into the essence of Nitrux Linux 3.5.0, exploring its unique features, advantages, and how it stands as a compelling choice for both casual users and tech enthusiasts.
Epistemic Interaction - tuning interfaces to provide information for AI supportAlan Dix
Paper presented at SYNERGY workshop at AVI 2024, Genoa, Italy. 3rd June 2024
https://alandix.com/academic/papers/synergy2024-epistemic/
As machine learning integrates deeper into human-computer interactions, the concept of epistemic interaction emerges, aiming to refine these interactions to enhance system adaptability. This approach encourages minor, intentional adjustments in user behaviour to enrich the data available for system learning. This paper introduces epistemic interaction within the context of human-system communication, illustrating how deliberate interaction design can improve system understanding and adaptation. Through concrete examples, we demonstrate the potential of epistemic interaction to significantly advance human-computer interaction by leveraging intuitive human communication strategies to inform system design and functionality, offering a novel pathway for enriching user-system engagements.
Climate Impact of Software Testing at Nordic Testing DaysKari Kakkonen
My slides at Nordic Testing Days 6.6.2024
Climate impact / sustainability of software testing discussed on the talk. ICT and testing must carry their part of global responsibility to help with the climat warming. We can minimize the carbon footprint but we can also have a carbon handprint, a positive impact on the climate. Quality characteristics can be added with sustainability, and then measured continuously. Test environments can be used less, and in smaller scale and on demand. Test techniques can be used in optimizing or minimizing number of tests. Test automation can be used to speed up testing.
2. Accessing the Physician Portal (HPP)
Portal Locations:
To access internally or externally (unless via FastPASS):
TUL via http://myportal.hillcrest.com
ABQ via http://myportal.lovelace.com
You may also access internally via the Physician Portal link on Fastlane or your
SmartPhone or mobile device, please note you will not be able to view PACS images or
access the Medical Records/Deficiency viewer.
For best performance, use Internet Explorer and Java version 1.4.2_13.
Version 1.6/v6 is NOT recommended.
3. Logging In
• The Physician Portal Internet Explorer Window opens.
• To login, type your User Name and Password. For Physicians and Extenders, your Username
is your Dictation Number and the Initial Password will be the word: welcome
• For Nursing and Ancillary Staff, your login is your First Initial and Last Name (all lower
case). If this is the first time you log in, you will use the password: welcome
NOTE: The Ardent Help Desk phone number is 866.725.4357
4. Logging Out of Portal
When finished, log out of HPP using the Logout icon.
5. 5
Portal Window Overview
My Portal – Click Suspend – Temporarily Help - Displays Logout –
this to return to suspends the current the online help Will exit
the last page that session and hides the information. Portal.
you accessed. display. This will also auto
display after 15 minutes of
inactivity.
6. 6
Portal Window Overview (cont.)
Click (?)
Print,
to access Site Controls
Minimize and
help.
My Portal Maximize
icons.
Edit – to My Preferences
set
preference Change Colors and Fonts
s for your
display. Change Password
(managed via FastPASS)
About
Display Context
(Function explained later)
6
7. EMR 100 - Questions
1) If you encounter difficulties with your login password, who would you contact?
a. Unit Secretary
b. Help Desk
2) To log out of Portal, click the “X” in the top right corner.
a. True
b. False
9. 9
The Census Page
Portal will default to either the Census Page or Data Monitor View. If you have a
relationship with a Patient (Consulting, Primary Care or Referring), the Patient will
appear under the “CM Working Patient List” section. Post-discharge Patients will
remain on the Census List for 24 hours to allow time for follow-up if needed.
10. 10
Filter Options for the Patient List
The Patient List can be viewed by using the following filter options and clicking on the
down arrow to select from the drop-down list.
11. 11
Adding a Patient to Your Working List
Select the Patient Search tab in the toolbar, and set the Facility and Station. Check the
Add box next to the Patient’s name.
Select the tab:
The Patient is now added to your working list.
Click the + sign
next to the
Patient’s name
to view
previous
encounters .
12. 12
Patient Search
While using the MPI (Master Patient Index) you may find a Patient without an Add
Box. This indicates the Patient has been discharged. The Patient information can be
viewed, but the Patient cannot be added to your Census Page.
NOTE: If an “ADD” box does not appear, the Patient has been discharged. The Patient info can
be viewed, but it cannot be added to the Census page.
13. 13
Patient Census Tips
Click the Refresh button to refresh your list.
To alphabetize the list, click the Patient Name header or any header. The list may be
arranged in alphabetical or reverse alphabetical order.
If you can’t find your Patient, check your filter options (Facility, Patient Type, Status or
Census Type) and then click the Refresh button to reactivate your list.
You cannot “remove” a Patient from your list if you are the Admitting or Attending. But you
can make them Inactive, which will hide them in your list. Doing this will NOT impact your
Group’s list – the Patient will stay on their list. To view them again in your active Patient list,
change the Patient Type filter to show “inactive”. Select them and click the Active button.
14. 14
Searching for a Patient
Choose a Search option, and select the Patient Search Button from the toolbar.
Search by using:
Entire Master Patient Index (MPI) (including discharged Patients)
Active (to search only Inpatient and current active Patients) – OR –
Recent Encounter (last 30 days) and enter the encounter number in
the Account # field.
15. 15
CM Patient Search Fields
The guidelines for searching are listed below the First Name icon on the screen.
Enter the Last Name and First Name in the Search Boxes. To search by MRN, type the
MRN in the Last Name field. Birthday/Age and Sex can be added to refine the search
but are not required. Click “Search.”
16. 16
Adding a Patient to Your Worklist
Select the Patient Search tab in the toolbar, and select your Station Search options by
setting the Facility and Station. Click “Get Census.”
17. 17
Patient Listing
A list of Patients is displayed to match the criteria entered. Check the Add box next to
the Patient’s name.
The Patient(s) is/are added to your Worklist.
NOTE: To view previous encounters for your Patient, click the + sign next to the
Patient name.
18. 18
Unauthorized Patient Access Warning
STOP!!! If a Patient is selected that does not have a relationship with
you, an Unauthorized Patient Access Warning Screen will appear. If you
continue to access that Patient’s Records, the access to the Patient
Information will be recorded and audited. Once the Patient is added
to your Patient Worklist, this warning will no longer appear.
19. EMR110 - Questions
3) The Patient List can be viewed by using the following filter options and clicking on the down
arrow to select from the drop down list .
a. Status
b. Provider
c. Facility
d. Patient Type
e. Census
f. All of the above
g. Answers A, C, D, E
4) You must click “refresh” to display new criteria, after selecting an item from the drop down
menu.
a. True
b. False
5) When first searching for a specific patient, start by clicking on the Patients Search tab in the
toolbar. Select the best options from the list below:
a. Active patients and Discharged patients, Recent Encounter
b. Master Patient Index (MPI), Discharged patients and Active Patients
c. Active patients, Master patient Index (MPI) including (discharged patients)
and Recent Encounter
20. 6) If you know the Patient’s location, you can search by Facility or Department by utilizing the
existing drop down menus. After you perform one of the below (select the correct answer) , the list
of Patients will appear.
a. Then “Refresh” your screen
b. Click “Get Census”
7) To assign a Patient to your Working Patient List
a. Click on the “+” sign next to the Patient name.
b. Click on the “add” box, and “add to Patient list” button
8) If you select a Patient that does not have a relationship with you, an Unauthorized Patient
Access Warning Screen will appear. Access will be recorded and audited. However, once added
to your Working Patient List, the warning will disappear.
a. True
b. False
22. 22
Working Patient List – Data Monitor
On the Census page, click the Data Monitor button for a quick glance of Patients on
the Census list, and the highest level abnormal indicator for unviewed Ancillary
results. To return to the Census List, click on the Census List.
NOTE: The Census List and Data Monitor buttons toggle between each other.
23. 23
The Census List Results Page
Click on the New, Abnormal or Panic icon to see the result. Notice that you have been
redirected to the Results Page.
Click on the Census List tab to return to your Census List screen.
24. EMR120 - Questions
9) The Data Monitor screen gives you a quick glance of abnormal indicators and unviewed Ancillary
results.
a. True
b. False
10) To access the Census page or the Data Monitor page, click on Refresh:
a. True
b. False
11) Toggle between Census page and Data Monitor page:
a. True
b. False
12) While on the Data Monitor page, click on the New, Abnormal and Panic icons. This will redirect
you to:
a. The Census page
b. The Result page
13) Alert Warnings are viewable on the Census page.
a. True
b. False
26. 26
Deficiencies Tab
Select the Deficiencies Tab from the toolbar.
The Deficiency Worklist allows you to select the type of deficiencies you want to view such as
Missing Signatures, Dictation or Missing Text. ED Providers will not have deficiencies in HEC, but
can address them in Portal. They must sign off on their charts before the Patient is removed from
the Tracking Board.
Deficiency Types
Signature 5
Dictation 6
Missing Text 0
The Work List displays the total number of deficiencies for each category and allows you to select
the type of deficiency you wish to view. Select the deficiency, and allow the deficiency view to
open. After making a selection, you will be prompted to enter your pre-assigned PIN. This PIN
serves as your electronic signature.
27. Viewing Reports
Select the report to review from the list.
Review the report and identify the missing item.
No signature.
27
28. 28
Deficiency Sign Off
Exit here.
Documents Tab.
To sign the deficiency, click the Check Mark button on the toolbar.
(If the deficiency is not in the viewer, the Sign button is disabled).
29. 29
Exiting the Deficiencies Page
When all deficiencies have been completed, click on the red door to exit and return to
the deficiency screen.
DO NOT EXIT BY CLICKING THE “X” IN THE UPPER RIGHT CORNER.
30. EMR200 - Questions
14) Select the Deficiencies Tab from the toolbar. The Deficiencies Work List allows you to select the type
of deficiencies you want to view such as Missing Signatures, Dictation or Missing Text. After making a
selection, you will be prompted to enter
a. Your User number
b. Welcome password
c. Your pre-assigned PIN
15) To sign the deficiency, make sure the Deficiency is in the viewer and then click the Sign button from
the toolbar.
a. True
b. False
16) When all deficiencies have been completed, click on the (X) to exit and return to Deficiency Screen.
a. True
b. False
32. 32
Viewing Results for a Specific Patient
Select the Patient from the Census Page or Patient Search Page to view resulted
Orders. The Results Page will be activated.
Panic results will show in red before you view them
STAT or Abnormal (S/A) results will show in yellow before you view them
New results will show in green before you view them.
“V” denotes you’ve viewed the result.
(Note: Once a Patient is selected, the Results page is activated.)
33. 33
Changing the Type of Results and Encounters
You can view all Ancillary results or only Lab, Radiology or Emergency. If Go Back Days
are entered, all previous encounters will be displayed for that time period.
The list of result types can be filtered by changing the type from the drop-down list.
Once your settings have been identified, click “Refresh” to view the results.
All Ancillary
Lab Results
Radiology Res
Emergency Report
34. 34
Viewing Lab Results
After “Show Selected Items” is selected, the window will show the available items.
You can either check the box next to the item, or click the hyperlink (blue text) to view,
in this example, the final report.
35. 35
Selecting Results
When you select a Patient, the Result Tab will be auto-selected. Detailed information
will display, and can be viewed and trended.
37. 37
Comparing Results and Switching to Check 10
You can compare previous results for one or more selected components of a test. A
Check Five or Check Ten test results displays the last five or ten results of each
selected component for the current test based on the Start On date.
Values will be displayed in a spreadsheet format, comparing them side-by-side. These
values can be graphed as well, showing the High Normal and Low Normal based on
the Reference Range.
Scroll down to view
entire list.
38. 38
Check 10 Graph View
You can choose between Switch to Check 10 and Switch to Check 5 by
clicking on the hyperlink.
39. 39
Viewing a Report or Result History
Click on the item Select this Icon to
name to view the view the history of
Report Screen. the Order.
41. 41
ABQ Radiology Film Link
When you choose the Radiology Film Link for the first time, you will receive a security
message to install MI View in the event MI View is not installed.
NOTE: You will need Administrative Rights to be able to install MI View. If you are not an
Administrator, contact the Help Desk.
42. 42
ABQ Radiology Results View
Click on the Radiology Icon to view the Film and Transcription. Other options are the
Status and History columns.
43. 43
ABQ Patient Portfolio/Final Report
Choosing “Patient Portfolio” will provide all the Radiology reports for this Patient, and
you will be able to read the Final Report. Use the arrow to return to the Physician
Portal.
44. 44
ABQ Selecting the “All Images” Option
Click on “All Images” to see all available images. Use the arrow to return to the
Physician Portal.
45. 45
ABQ Comparing Images
Click on the “Compare” icon, and select the down arrow to show the list of available
images to compare. Use the arrow to return to the Physician Portal.
46. 46
TUL Radiology
When viewing the Radiology Reports from the Results Tab, click on the study to read
the report.
NOTE: You will need Administrative Rights to be able to install MI View. If you are
not an
Administrator, contact the Help Desk.
48. 48
TUL Radiology
To view Radiology Films, click on the PACS tab to login to the standalone SECTRA PACS
system.
49. 49
ED Chart
Emergency Results are linked to the ED chart. The Red Cross icon will appear in Portal
as soon as someone begins charting on a Patient in HEC. Click on the Emergency link
to view the ED Chart.
51. 51
Generating a Report
This page allows you to lookup and print a Transfer_Mrr (Medication
Reconciliation Record) report. Select the “Generate Report” button.
A screen will appear showing a report is being generated.
52. 52
Viewing the Report
When the report is ready, you will be instructed to click “here” to view.
The Transfer Mrr may be printed for your records, or to give to the Patient.
53. 53
Transcriptions Tab
The Transcription tab allows you to view signed and unsigned transcription reports for
a selected Patient.
Select the Patient for whom you wish view transcription reports, then select the
Transcription button from the toolbar.
Click the box before New Results, Today’s results, or Results by Test Class or Start on
(type in a date) and click the “Refresh” button.
54. 54
Viewing Unsigned Reports
To further define your view of unsigned transcription reports, do one of the
following:
Search by Encounter
To search for data by encounter: select an encounter in the Encounter drop-down list
to view all associated data.
Encounter
drop down list
55. 55
Search by Date
To search for data by date range: select the “Start On” check box.
Type the beginning date of the date range for which you want to view data in the
“Start On” text box and the number of days back to search in the “Go Back” box.
The “Start On” and “Go Back” date is defaulted to the current date for active
encounters. Data displayed using this option may span encounters.
Click “Refresh” to populate.
56. 56
Item Searches
In the Item Search box, enter any part of the title of the report on which you want to
focus your search. Leave the box blank if you want to include all report titles.
Click the Refresh button. The report list is updated to display only the reports in the
selected date range or encounter and having the title search parameter you entered.
57. 57
New Reports
The following icon will be displayed for individual reports:
View only reports that have
To view only reports that been returned today: To View reports categorized
you have not yet viewed. view only reports that have by test class.
been returned today
(“today” being the period
between 12:00 a.m. and
11:59 p.m.)
58. 58
Sorting the Report List
To sort the transcription reports list based on the contents of a column, click a column
header. For example, to sort by result level, click the column header RsltLvl.
The reports list will be rearranged to display the reports grouped by result level or
chronological order.
59. 59
Transcription Section
The Transcription section displays all the reports in a scrollable window with the first
report at the top.
Select “Request” for the report you wish to view:
60. 60
Accessing Medical Records
You can access the Medical Record View from the Patient Worklist. Identify and select
the Patient to search for data and documents.
The system will automatically launch the viewer when you click the Medical Records
View tab.
Check the name at the top of the window to ensure that the record you have accessed
the correct Patient Record.
61. 61
Medical Records View
The view is grouped in a document tree by encounters or documents depending on
which you used last in Medical Records view (bottom left). Records are for all encounters to
which you have permissions. The tree is sorted by most recent encounter and system
displays documents determined by the chart order.
The Medical
Records page
gives you the
ability to view
the whole
medical record,
by selecting the
document on
the left hand
side of the
viewer.
62. Viewing and Exiting
The view is grouped in a document tree by encounters or documents depending on
which you used last in Medical Records View (bottom left). Records are shown for all
encounters for which you have permissions. The tree is sorted by most recent
encounter, and the system displays documents determined by the chart order.
• View Documents buttons can include buttons such as fields, lists, grids, and links. Any
report in the Medical Records Viewer may be printed as well.
• When you are finished viewing the records, click on the Red Exit door in the toolbar
to return to the MR page.
63. 63
Viewing Patient Information
To view Patient information, select the Patient Info tab (Facesheet in Tulsa) from the toolbar.
The Patient Information View opens, not the STAR Facesheet. It is not printable, and is to be used for
reference only.
64. 64
Insurance Notes Tab
The Insurance Notes and Visit History are located within the Patient Information Page.
Visit History can also be found within the Coding Section.
Insurance Notes Tab
To view Insurance notes, click on the Insurance Notes tab. To verify Patient insurance
eligibility, click the check box and the “get selected” button.
66. 66
The Coding Page
The Coding page will be blank until a Patient has been discharged. Once populated, you
or your staff can view this page.
67. EMR300 - Questions
17) What are the colors of the Result icons? Choose the correct answer.
a. Panic is Yellow, STAT or Abnormal is Green and New Results is Red
b. Panic is Green, STAT or Abnormal is Yellow and New Results is Red
c. Panic is Red, STAT or Abnormal is Yellow and New Results is Green
18) After changing the Result Type to view Lab Results and clicking the Show Selected Results
button, the window will show the available items. To view the final result, click on the hyperlink :
a. True
b. False
19) You can trend the lab results. A Check 5 or Check 10 test results displays the last five or ten
results of each selected component for the current test based on the Start On date. You can toggle
between Check 5 and Check 10. If you have greater than 10 values, you can scroll using the Previous
10 or Next 10 values option.
a. True
b. False
68. 20) To view an ED chart:
a. Phone the ED and have a release put on the chart
b. Click on the Red Cross icon
c. In the Transcription area select New Results or Today’s Results
21) You have selected the Reports Viewer tab. This page allows you to lookup and print a Transfer_MRR
(Medication Reconciliation Record) report.
a. True
b. False
22) The Transcription tab allows you to view signed and unsigned transcription reports for a selected
Patient. Select the Patient for whom you wish to view the transcription reports and then select the
Transcription button from the toolbar. You can also review the FINAL transcription in Medical Records
(HPF).
a. True
b. False
69. 23) To sort the transcription reports list based on the contents of a column, click a column header.
a. True
b. False
24) Facesheets are sent to HPF when admission packets are printed. Typically, the facesheet
should be available in HPF within 30 minutes. When the top Medical Records (HPF) Tab is
selected, it will automatically launch the viewer.
a. True
b. False
71. 71
Ordered Meds Tab
STAR Adverse Reactions Viewing and Allergies
Horizon Medication Manager (HMM) opens to the Ordered Meds Tab, where you can
view a Patient’s allergy data using the drop down menu.
All
Drug
Environmental
Food
Miscellaneous
Other
72. Adjusting Your Search Criteria
Orders of All Status
Active/Pending Only
Active
Pending
Discontinued
Discharged
Cancelled
Held Both Med & IV Orders
Unverified Admin Medication Orders Only
Pending-Rx Large Volume IV Orders
Only
72
73. 73
Selecting a Date Range
You can further refine your search by using the encounter or by Date Range
(specified as the number of days back from a specified date), then select Refresh.
74. 74
TUL Drug Information Tab
Click on the Drug Information Tab to review brand name, primary AHFS number,
strengths available, form, and package size.
The search can be modified by generic brand, AHFS code or class.
Enter the drug name (you may use a partial spelling) in criteria and click “Search”.
75. 75
Meds Manager Drug Information Form
To access the Meds Manager Drug Information Form, click the box next to the name.
76. 76
HOM Orders Page
Select your Patient, then select the Orders (HOM) tab.
The Orders Page allows you to view Orders for a selected Patient.
You can filter the Orders by Status, Group, Encounter or Time Period.
77. 77
CM Order Selection
The Order Selection drop down list allows you to further refine your search by
changing the viewing Status (Active, Pending, All, etc.) or Group (Nursing, Blood Bank,
Radiology, Laboratory, etc.).
Orders of All Status
Active/Pending All Defined in Edit Preference
Active Blood Bank
Pending Activity/Safety
Started Anesthesia
Completed Assessment
Held Bronchoscopy
D/Ced Cardiology
Cancelled Cat Scan
Etc… Etc…
78. 78
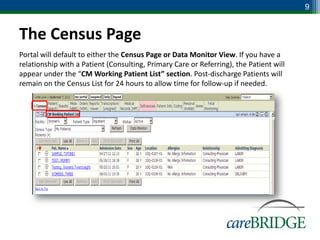
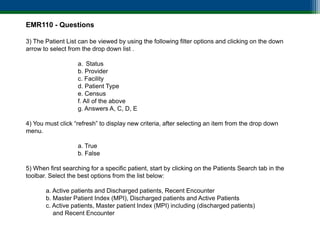
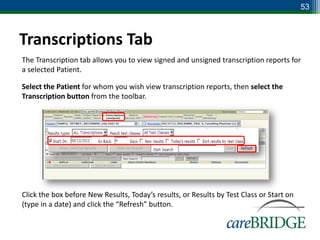
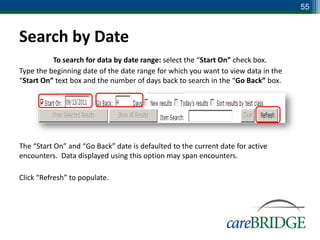
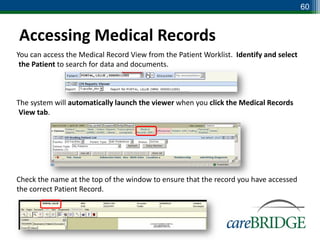
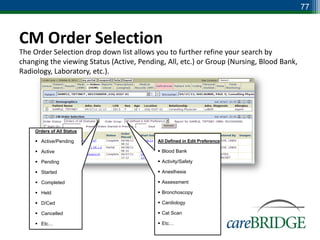
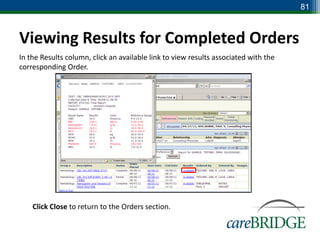
Changing the Date Range
To search by encounter or by date range (specified as the number of days previous
from the current date):
Select the Start On check box.
Enter the beginning date of the date range and the number of days back to search in
the Present Orders Active in Previous [n] Days box.
Select Refresh.
79. Viewing Order Details
To view Order details, Order Occurrence information or results for Completed Orders:
Under the Description Column header, select the
hyperlink to view additional details for that Order.
Click “Close” to return to the Orders (HOM) screen.
79
80. 80
Viewing Order Occurrence Information
Click a link in the Start Date column to view Occurrence information (including date
and time and placer order ID for each occurrence) for the corresponding Order.
Click Close to return to the Orders section.
81. 81
Viewing Results for Completed Orders
In the Results column, click an available link to view results associated with the
corresponding Order.
Click Close to return to the Orders section.
82. EMR400 - Questions
25) Horizon Medication Manager (HMM) opens to the Ordered Meds Tab, where you can view a Patient’s
allergy by utilizing the data dropdown menu.) The Allergy section has a dropdown menu to select
different types of allergies.
a. True
b. False
26) From the Medication section, you can adjust your search criteria by:
a. Using a dropdown menu to filter Order Status and Types
b. Selection New
c. Selection the Refresh button
27) You can further refine your search by using the encounter or by date range (specified as the number
of days previous from a specified date), then select Refresh. To search for data by date range, select the
Start On check box where the current date becomes the default date.
a. True
b. False
28) In the Results column, click an available link to view results associated with the corresponding order.
a. True
b. False
84. 84
Customizing a Window
Within the Edit mode you may add or deselect items. You may also change the Patient
demographic information by adding display columns, then rearranging the items as
needed.
NOTE: HPP will default these viewing options, but anytime you see the “edit” button you have the option of customizing your view.
84
85. 85
Customizing a Window (cont.)
Within the Edit mode you may add or deselect items. You may also change the Patient
demographic information by adding display columns, then rearranging the items as
needed.
85
86. 86
Moving Available Columns to Displayed Columns
Move Birth Date
to Displayed
Columns by using
the arrow.
NOTE: The Census and the Patient List are populated by STAR, the Admitting System.
88. 88
Edit Tips
Census Report Options. Select the “edit” button to customize how you print the Census
Report. Be sure to use the scroll bar to view all options.
Mom/Baby link is available in the edits section. The Mom or Baby results can be shown if
you link it to the Results tab.
89. 89
Links and Tasks Window
Select the Home Tab to access Links and Tasks. Click on “edit” to add bookmarks.
Some commonly viewed sites have been pre-loaded for your convenience.
90. 90
Links and Tasks URL Window
There is no limit to the number of URL Bookmarks you may add. Begin by typing the
full URL name (including http://www.....) in the URL Column, and click “Update”.
https://myemail.com
91. 91
Portal Support Tab
Another feature is the Support Documentation Tab.
This area contains reference material on utilizing Portal, and can be printed if desired.
Quick reference guides, tips and tools.
92. EMR700 - Questions
29) When initially logging into Portal, there are default settings for each tab as well as individual
sections, you are able to customize your view, by using the edit button. This will launch another
screen, where you will work to personalize your view.
a. True
b. False
30) Anytime you see the “Edit” button you have the option of customizing your view.
a. True
b. False
31) After customizing your work, always scroll to the bottom and save your settings.
a. True
b. False
93. 32) The Home Page is for your professional use. In the Links and Tasks section you can create
a list of To-Dos and added links. This site facilitates selecting your favorite links:
a. True
b. False
33) To add Bookmarks, just select the Links and Tasks button:
a. True
b. False
34) You may add as many URL links as you like. Blank rows are added in groups of 3. To add
additional blank rows, select the Update button.
a. True
b. False
35) Another feature is the Support Documentation Tab. This area contains helpful tips, access
to Quick Guides, instructions and system requirements.
a. True
b. False