This document provides instructions for installing SAP ERP 6.0 SR3 ABAP on Windows using an Oracle database. It includes chapters on planning the installation, required preparation steps, using SAPinst to perform the installation, and post-installation configuration and testing. The document provides detailed guidance on setting up a central or distributed SAP system with or without high availability using Microsoft Cluster Service.

![1 Introduction
1.1 New Features
n For downward-compatible releases of DB/OS platforms for SAP products, SAP plans to regularly
release the newest database (DB) and operating-system (OS) versions of SAP products. These
releases are downward-compatible with earlier SAP system releases.
Note that for already shipped SAP components, we only support the installation for database
versions proposed by the installation tool. Therefore, you must install an SAP component or
perform a system copy using a downward-compatible database as follows:
l Install the component with the old proposed database version.
l Upgrade the old database version to the downward-compatible new version.
1.1 New Features
The following tables provide an overview of the new features related to the installation of this release:
Caution
Make sure that you read the release notes for your SAP system. You can find these at
http://service.sap.com/releasenotes.
SAP System Installation
Area Description
SAPinst As of SAP NetWeaver 7.0, SAPinst has the following new features:
n You can check the prerequisites for your SAP system installation with the
Prerequisite Checker [page 37].
n You can install a central system in one of two modes:
l Typical Mode
If you choose Typical, your SAP system is installed with default settings. As
a result, you only have to respond to a small selection of prompts. If you
want to change any of the default settings, you can do so on the parameter
summary screen at the end of the installation.
l Custom Mode
If you choose Custom, you must manually enter all installation parameters.
You can change your values on the parameter summary screen at the end of
the installation.
n You can uninstall an SAP system or an SAP component with the SAPinst service
Uninstall ‒ System / Standalone Engines / Optional Standalone Unit.
n You can install the Java Add-In for an existing ABAP system. This means that you
run SAPinst to execute the following:
l Install the central services instance (SCS)
l Add the Java database schema to the existing ABAP database instance
l Add the Java central instance with usage types to the existing ABAP central
instance
The installation of the Java Add-In for an existing ABAP system is described in the
documentation Installation Guide ‒ <your product> ABAP+Java on <OS>: <Database>
available at http://service.sap.com/instguides.
8/164 PUBLIC 03/28/2008](https://image.slidesharecdn.com/ecc6sr3orawininstguide-130128021232-phpapp02/75/Ecc6-sr3-ora_win_instguide-8-2048.jpg)
![1 Introduction
1.1 New Features
Area Description
Note
You cannot install the Java Add-In for existing ABAP dialog instance(s). Instead,
you have to install new ABAP+Java dialog instance(s).
n You assign one master password to all users created by SAPinst. This password is
used for all user accounts and for the secure store key phrase.
n SAPinst fills in most of the input parameter fields with default values.
If required, you can change the default values on the Parameter Summary screen
before you start the actual installation.
Installation DVDs You start the installation from a single Installation Master DVD.
Usage type EP Core As of SAP NetWeaver 7.0 SR2, usage type Enterprise Portal (EP) has been separated
(EPC) into two closely related usage types: EP Core (EPC) and Enterprise Portal (EP). Usage
type EPC provides the core portal capabilities available in the former usage type EP.
Usage type EP now includes all portal add-on capabilities it provided before, but
without the core portal functionality.
n EP Core (EPC)
This usage type contains the core portal capabilities that were available in the
former usage type EP. This new usage type provides more flexibility when
implementing a portal where the full enterprise portal capabilities, such as
knowledge management and collaboration, are not needed. It contains the
portal, Guided Procedures (GP), and Universal Worklist (UWL).
n Enterprise Portal (EP)
This usage type includes Knowledge management, Collaboration, Composite
Application Framework Core (CAF-Core), Visual Composer, Web Dynpro
extension, and .NET PDK.
For more information about EPC and about how to use it in IT scenarios, see the
Master Guide and SAP Note 982502.
SAP SRM 5.0 as Add-On In SAP ERP 6.0, you can deploy SAP SRM Server as one of the following:
Component to SAP n An add-on to SAP ECC Server (product instance SAP ERP 6.0 ‒ SAP ECC) to
ERP 6.0 run SRM in one client of the ERP system. This deployment option is new in
SAP ERP 6.0.
n A separate installation from SAP ECC Server. This deployment option is the
same as in mySAP ERP 2004.
For more information, see the documentation Master Guide ‒ SAP ERP 6.0 powered by
SAP NetWeaver 7.0 at http://service.sap.com/erp-inst.
SAP Solution Manager You require a key to install your SAP system. You generate this key with your SAP Solution
Key Manager [page 54].
03/28/2008 PUBLIC 9/164](https://image.slidesharecdn.com/ecc6sr3orawininstguide-130128021232-phpapp02/75/Ecc6-sr3-ora_win_instguide-9-2048.jpg)

![2 Planning
2 Planning
This section tells you how to plan the installation of your SAP system.
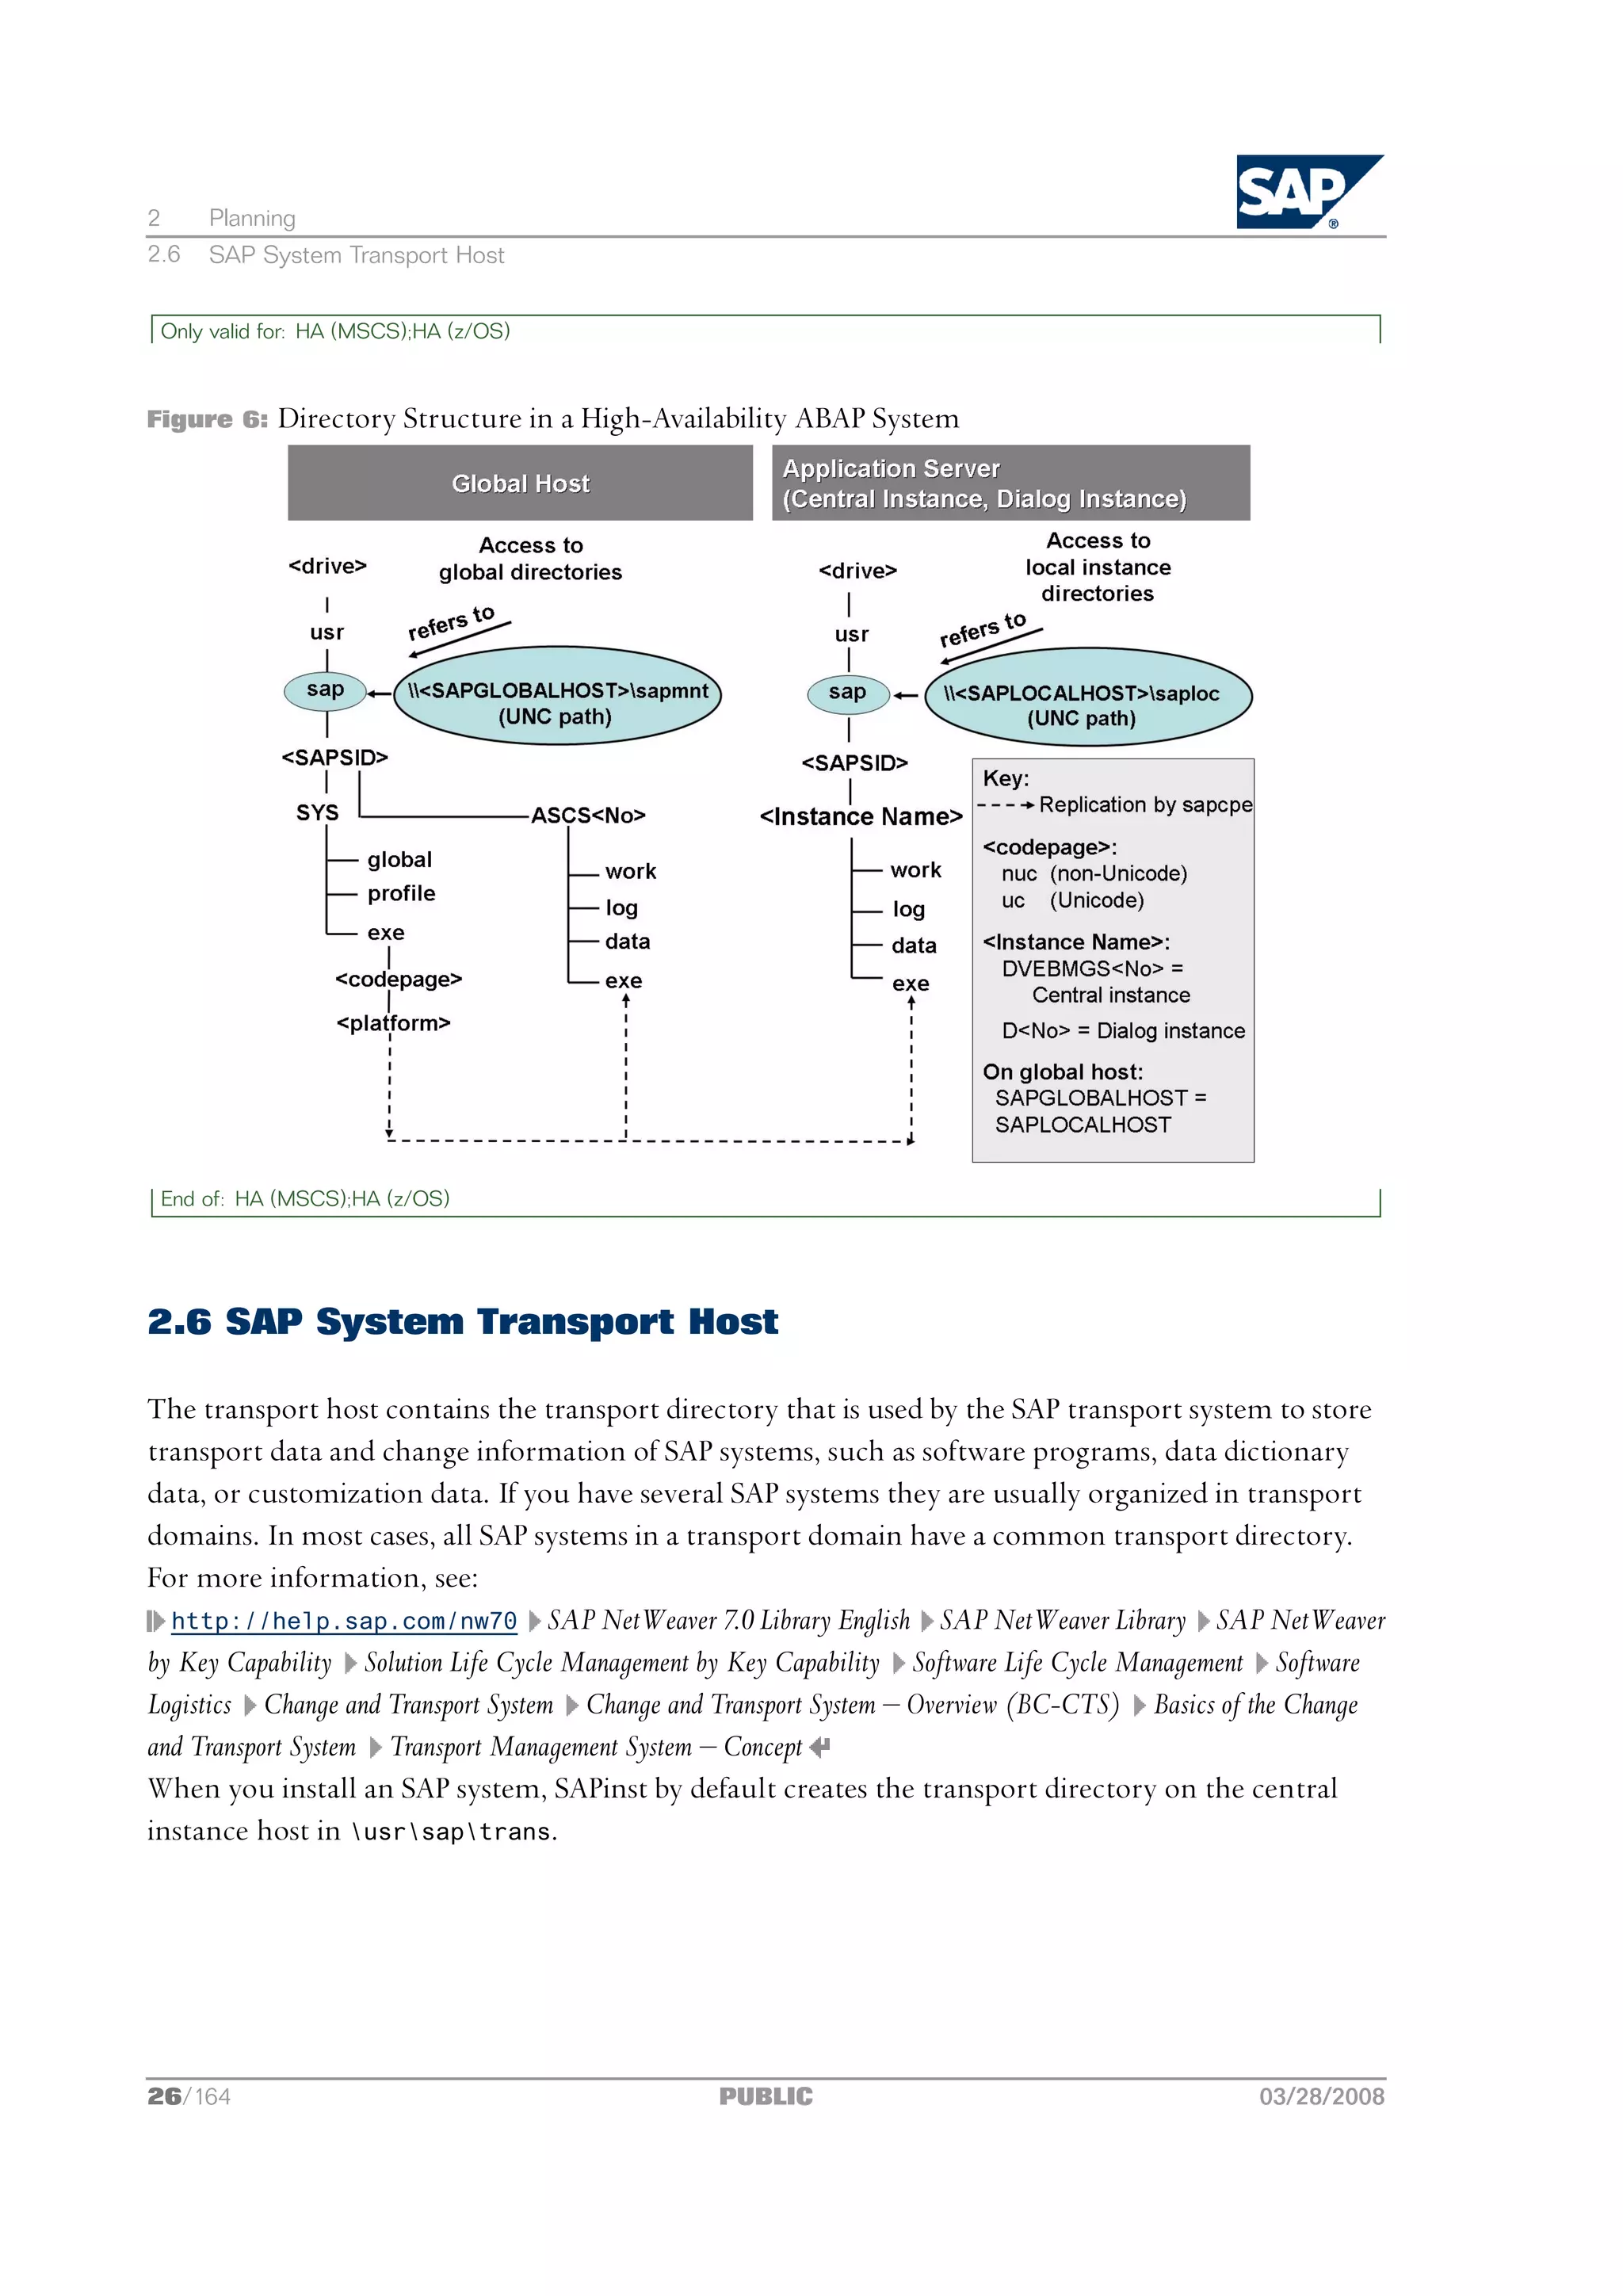
Only valid for: HA (MSCS)
If you want to perform a high-availability installation with Microsoft Cluster Service (MSCS), see
also the MSCS-specific planning activities [page 114].
End of: HA (MSCS)
You have to complete the following planning activities:
1. You plan your SAP system landscape according to the Master Guide.
In addition, we recommend that you read theTechnical Infrastructure Guide ‒ SAP NetWeaver 7.0, which
is available at: http://service.sap.com/installNW70.
2. You choose your basic system variant [page 17].
3. You decide whether you want to perform a domain or local installation [page 18].
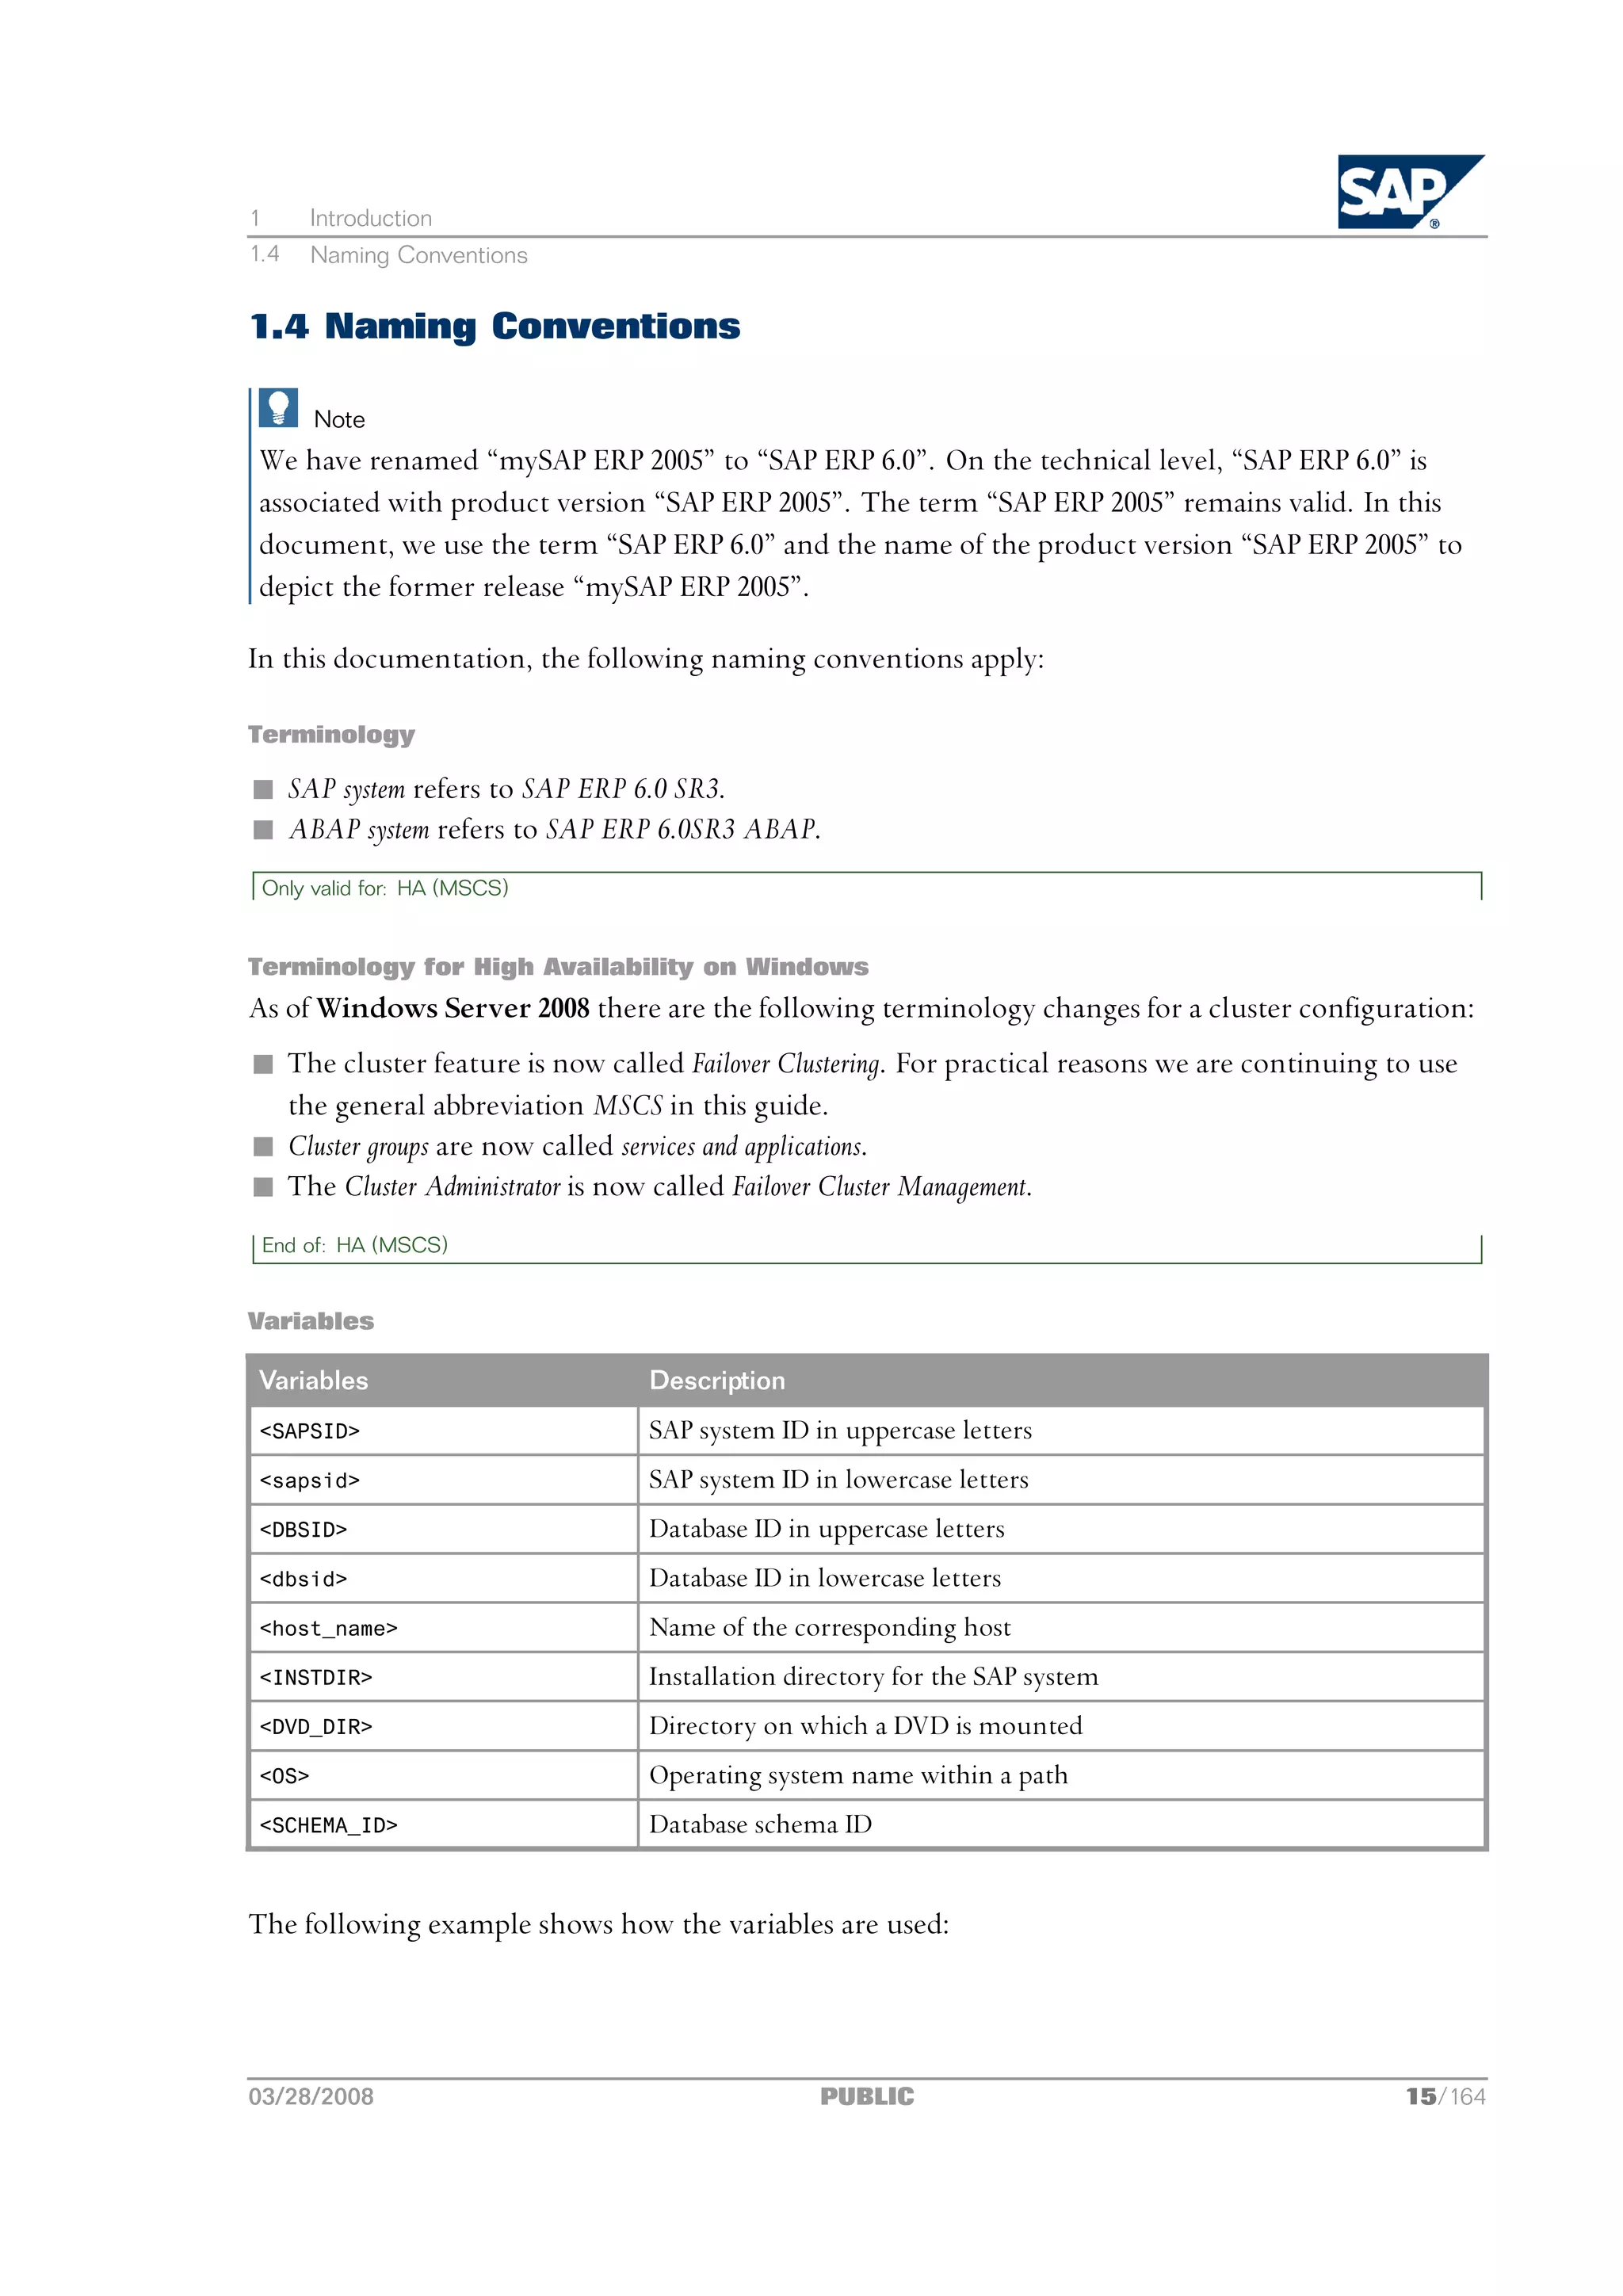
4. You plan how to distribute the instances to hosts [page 19].
5. For the database installation, you decide on how to distribute your database components to disk [page 20].
6. You read about the SAP directories [page 22].
7. You decide on the transport host to use [page 26].
8. You identify basic SAP system parameters [page 27].
9. You decide if you want to use Multiple Oracle Homes [page 32].
The following planning activity is optional:
n Installation of Multiple Components in One Database (MCOD) [page 91]
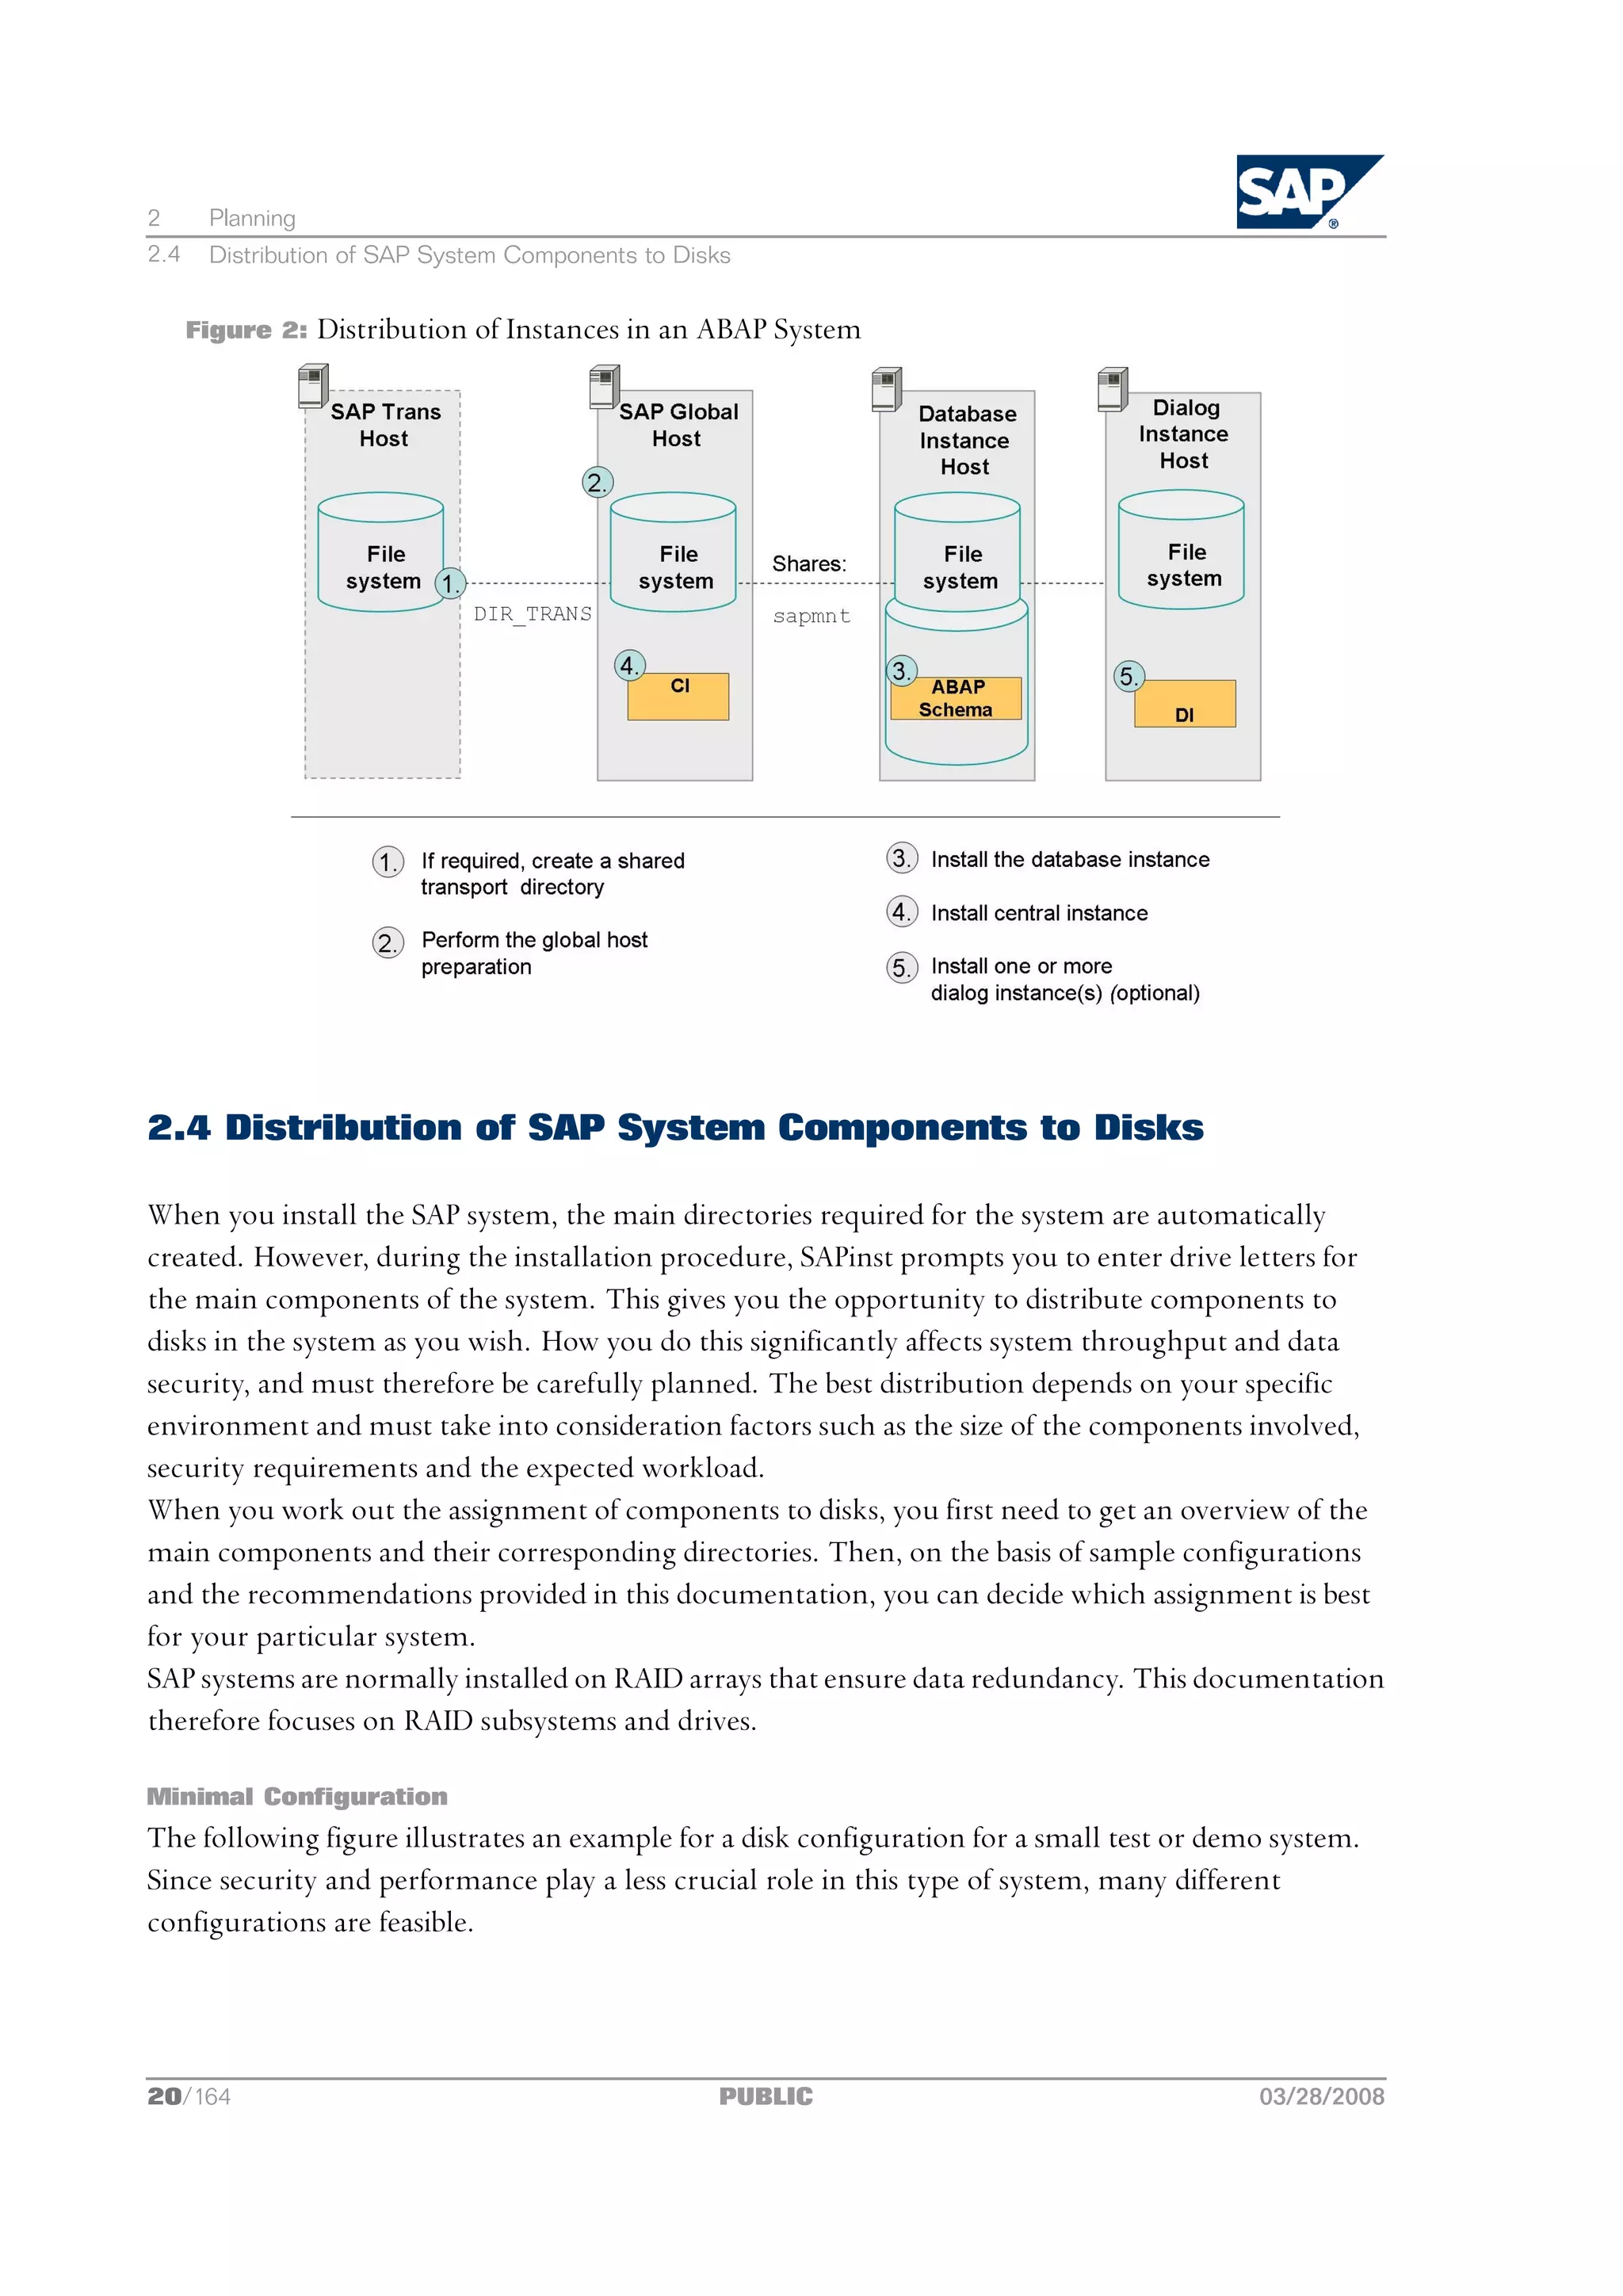
2.1 Basic System Variants
This section describes the basic system variants and shows how you can distribute SAP instances
within these variants.
Mandatory instances of an ABAP system are the central instance and the database instance.
Note
Optionally, you can install one or more dialog instances on a separate dialog instance host.
03/28/2008 PUBLIC 17/164](https://image.slidesharecdn.com/ecc6sr3orawininstguide-130128021232-phpapp02/75/Ecc6-sr3-ora_win_instguide-17-2048.jpg)
![2 Planning
2.2 Domain or Local Installation
The following graphics show examples for the distribution of the SAP instances in a central system,
where the mandatory instances are installed on one host, and a distributed system, where the
mandatory instances are installed on separate hosts.
Figure 1: ABAP System
More Information
Only valid for: HA (MSCS)
For more information about how to distribute SAP instances in a high-availability SAP system, see
System Configuration in MSCS [page 115].
End of: HA (MSCS)
2.2 Domain or Local Installation
Before you install the SAP system, you have to decide whether you want to perform a domain or
local installation, since this affects how the user account information is stored and accessed.
For more information about the differences between a local and domain installation, see the
Microsoft article Deciding Between Workgroups and Domains at:
http://technet2.microsoft.com/windowsserver/en/library/
Domain Installation
In a domain installation, the user account information is stored centrally in one database on the
domain controller and is accessible to all hosts in the system.
18/164 PUBLIC 03/28/2008](https://image.slidesharecdn.com/ecc6sr3orawininstguide-130128021232-phpapp02/75/Ecc6-sr3-ora_win_instguide-18-2048.jpg)
![2 Planning
2.3 How to Distribute Instances to Hosts
You have to perform a domain installation if one of the following applies:
n You install a distributed system (strongly recommended to avoid authorization problems).
Only valid for: HA (MSCS)
n You install a high-availability system with MSCS.
End of: HA (MSCS)
n You want to use Single Sign-On.
n You use a common transport host for several SAP systems running on different computers.
Local Installation
In a local installation, all Windows account information is stored locally on one host and is not
visible to any other hosts in the system.
If the SAP system is to run on a single machine (central system), you can perform a local installation.
Note
If your SAP system was installed as a local installation and you want to later change to a domain
installation, you must perform a homogeneous system copy. For more information, see the
documentation System Copy for SAP Systems based on SAP NetWeaver <release> <technology> at:
http://service.sap.com/instguides <your product>
More Information
n Required User Authorization for the Installation [page 48]
n Single Sign-On with Microsoft Kerberos SSP [page 98]
2.3 How to Distribute Instances to Hosts
The following provides information on how you can distribute the SAP instances for the different SAP
system variants. You use SAPinst to install the SAP instances as a:
n Central system on a single host
You run SAPinst and install all instances on one host.
n Distributed system on several hosts
You perform the following steps:
1. You specify or create a shared transport directory.
2. You run SAPinst and prepare the global host.
3. You run SAPinst and install the:
l Database instance on the database host
l Central instance on the global host
l Dialog instance(s), if required, on the dialog instance host(s)
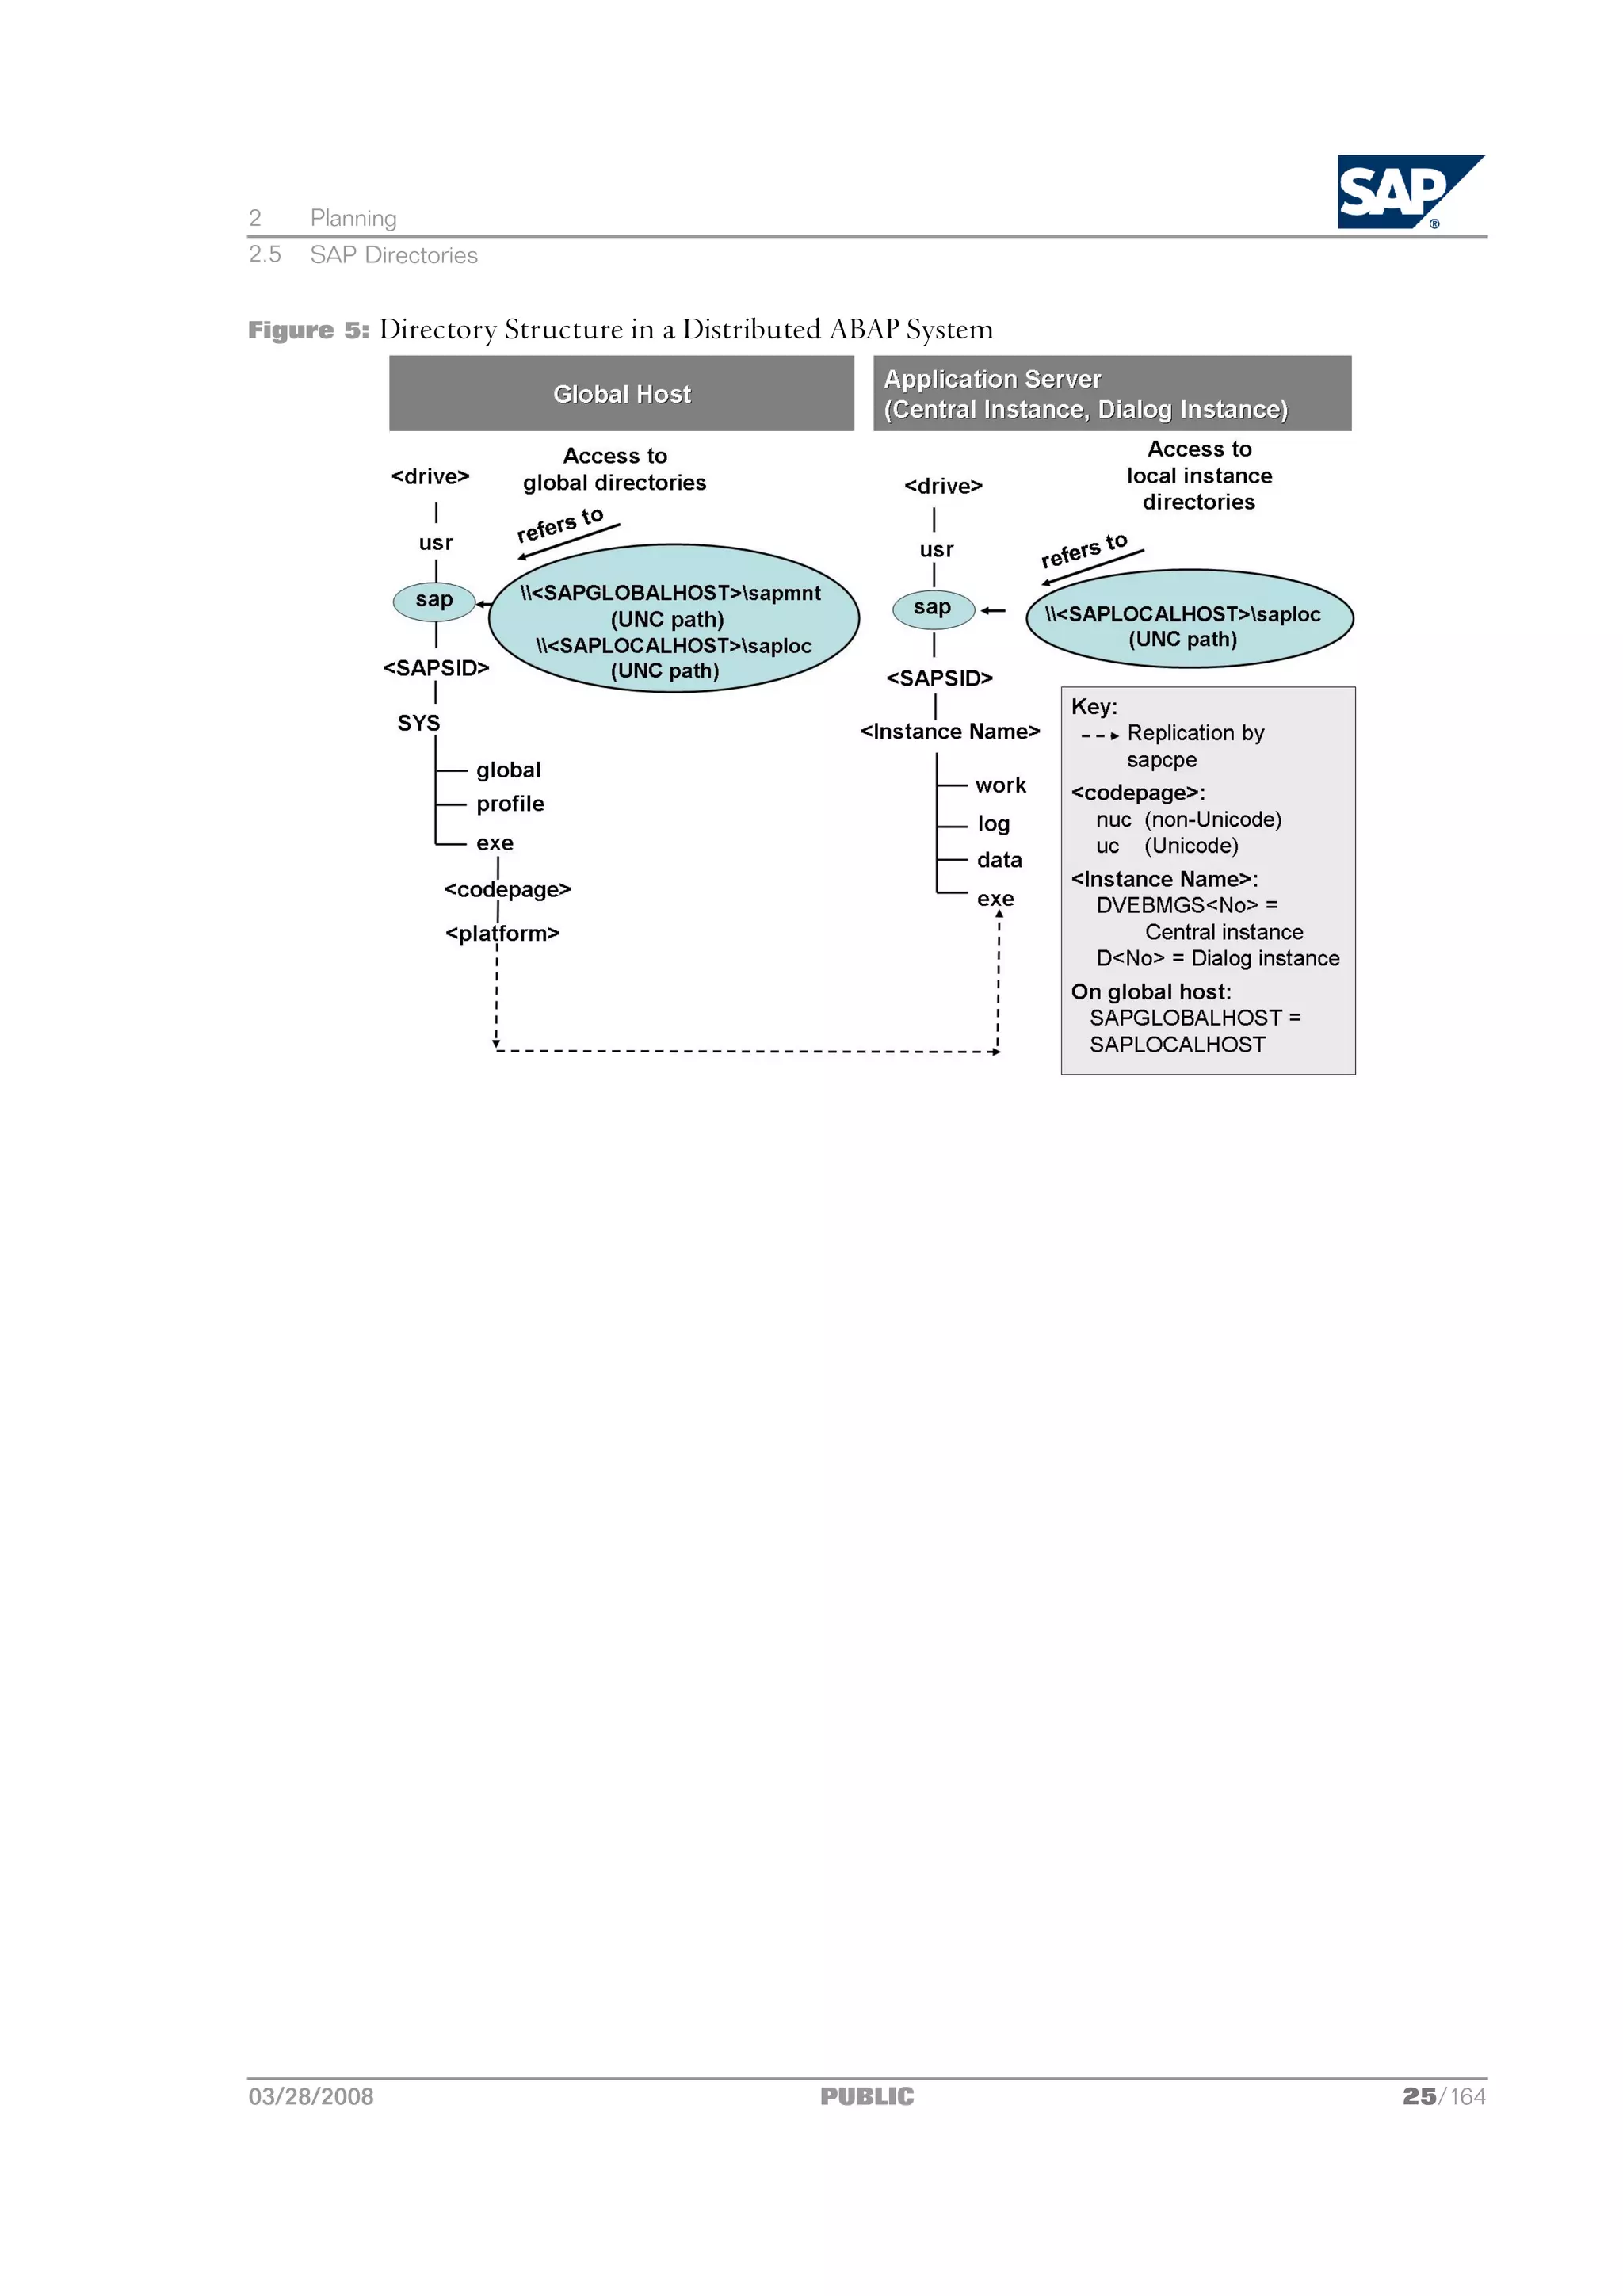
The following figure shows how to distribute your instances to several hosts:
03/28/2008 PUBLIC 19/164](https://image.slidesharecdn.com/ecc6sr3orawininstguide-130128021232-phpapp02/75/Ecc6-sr3-ora_win_instguide-19-2048.jpg)
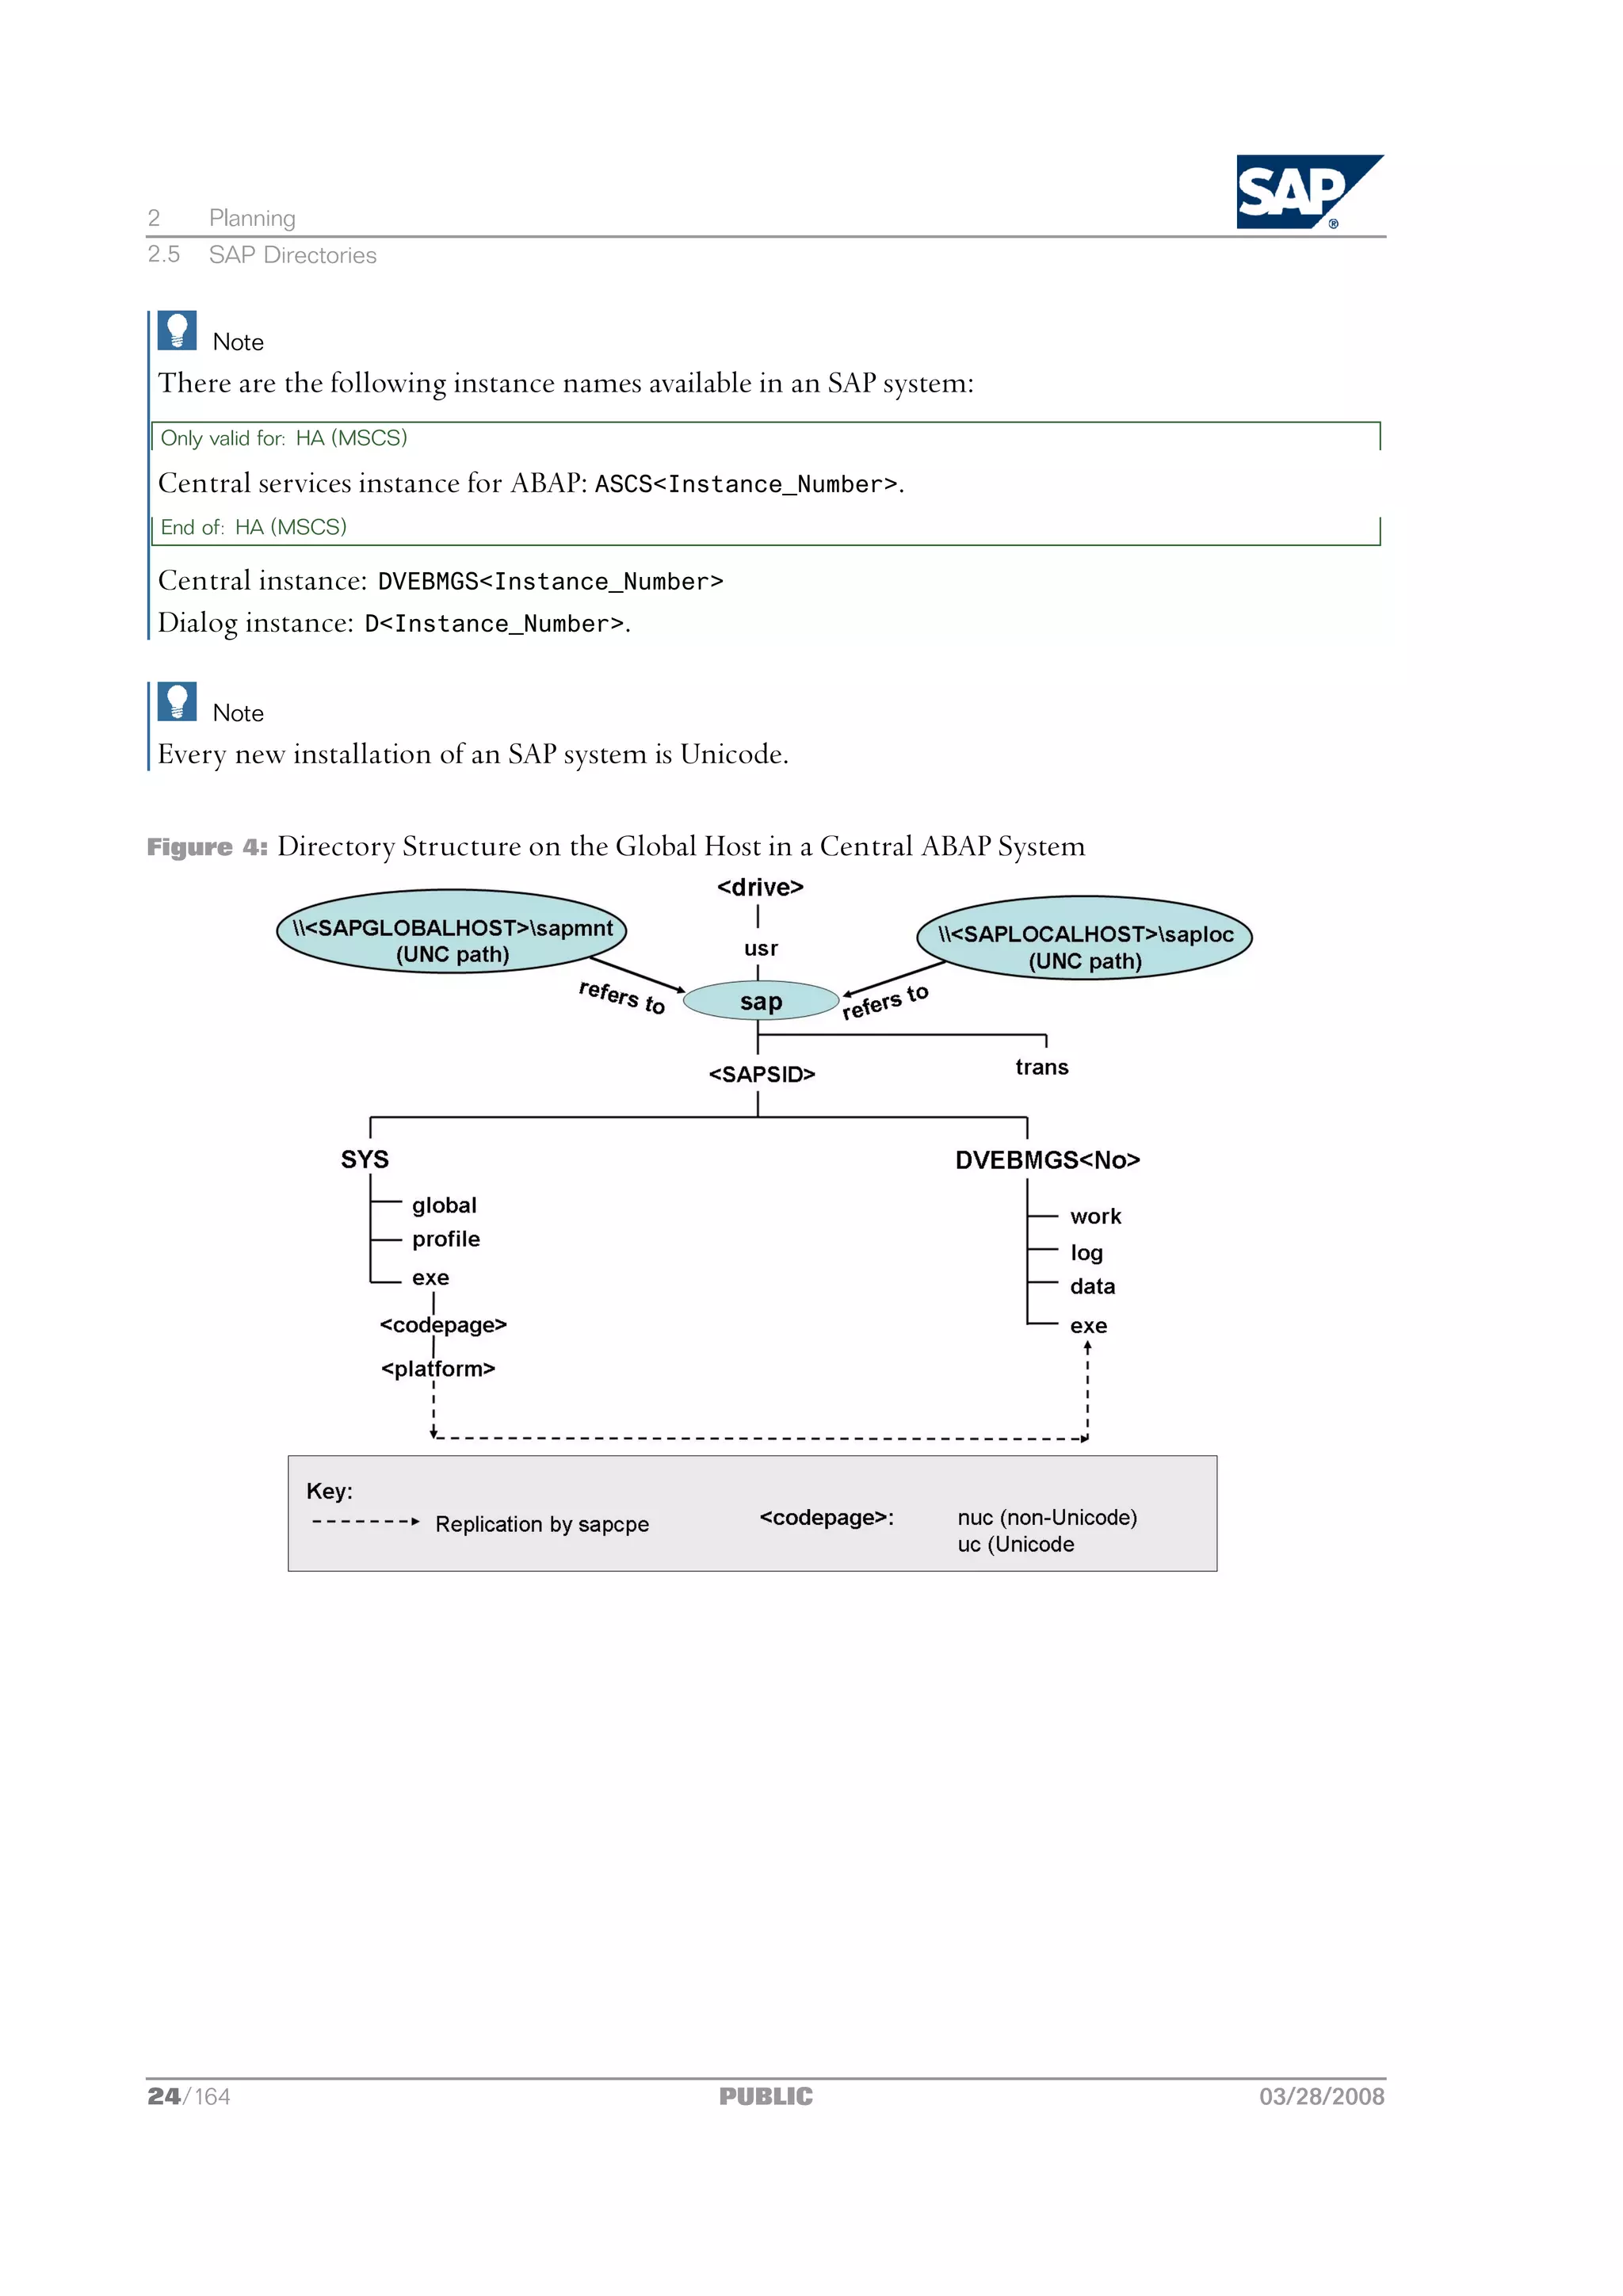
![2 Planning
2.5 SAP Directories
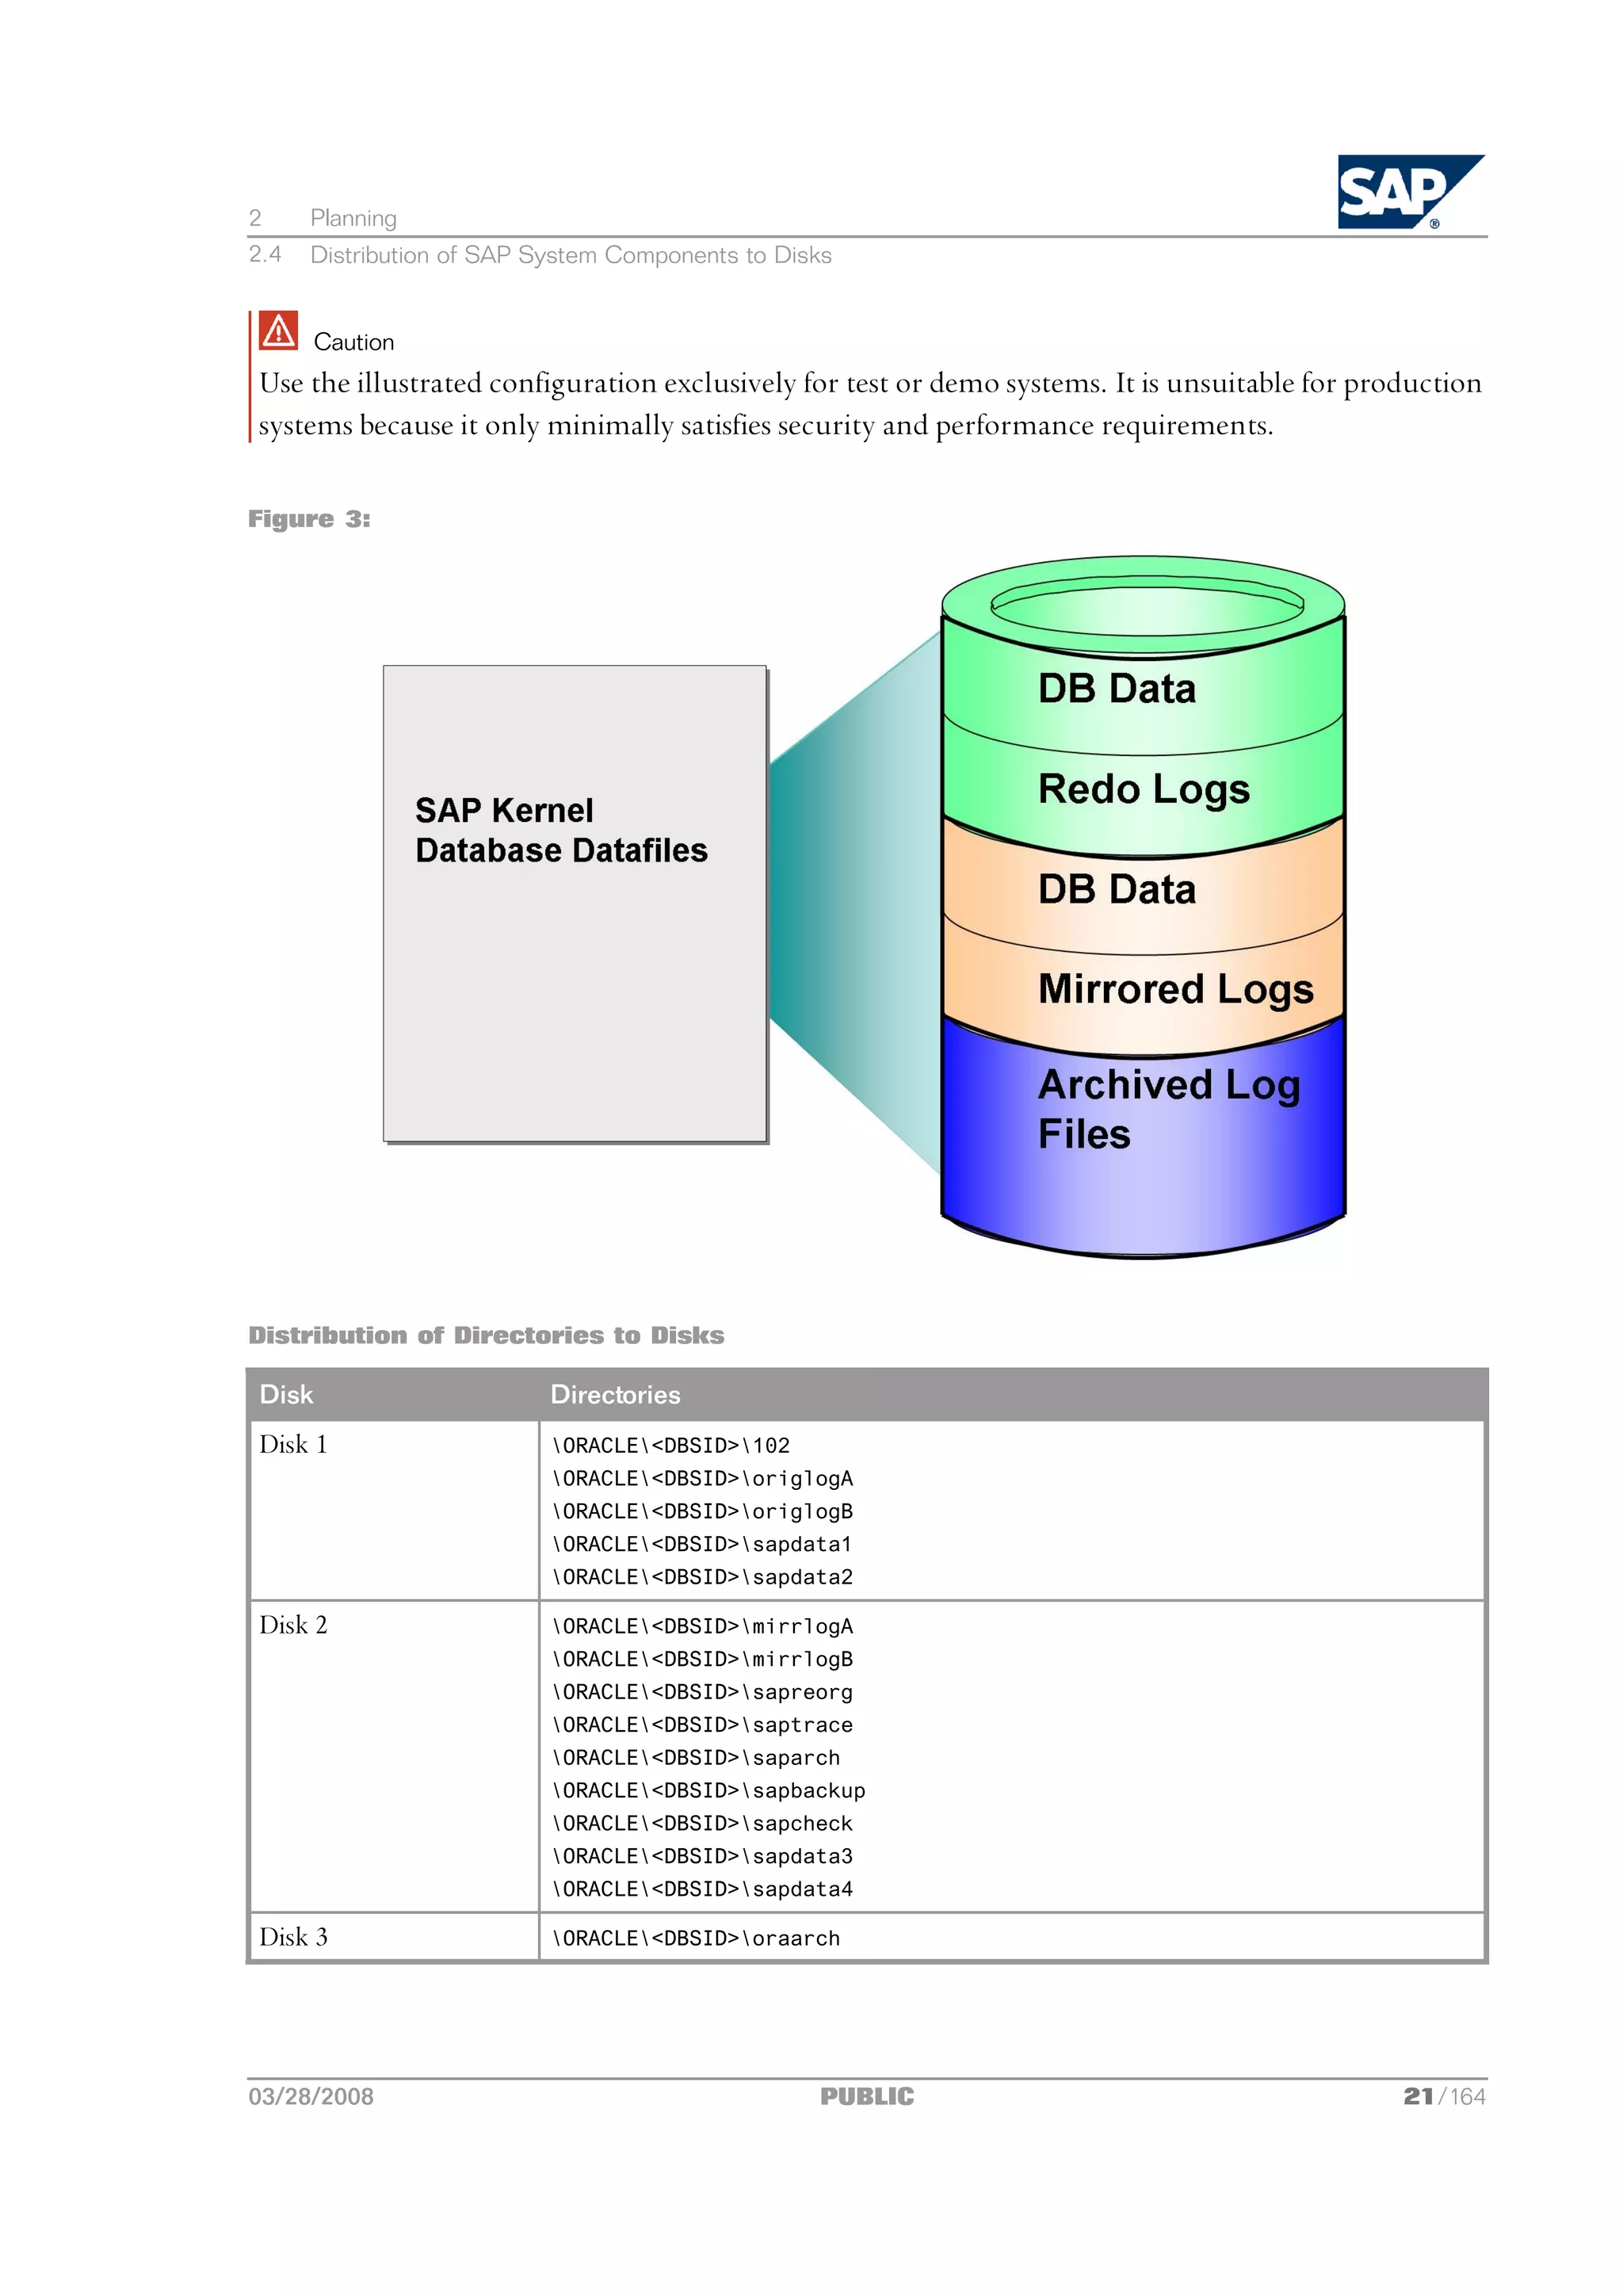
Comments
n The configuration ensures that no data can be lost, but the process for recovering a damaged
database is complicated and time-consuming.
n The redo logs and database files are located on the same disks. This means that a single disk failure
can result in the loss of both the redo logs and database data.
n The I/O-intensive redo logs are on the same disk volumes as the data files. This can impede
performance.
n An equally good alternative would be to simply place all components on a single RAID 5 array.
2.5 SAP Directories
This section describes the directories that are available in an SAP system.
Only valid for: HA (MSCS)
If you want to install an MSCS system, see also Directories in an MSCS Configuration [page 124].
End of: HA (MSCS)
SAPinst automatically creates the following directories during the installation:
n usrsap
This directory is created on the:
l Global host and shared with the network share sapmnt
Only valid for: non-HA
The global host is the host where the central instance is installed.
End of: non-HA
Only valid for: HA (MSCS)
The global host is the host where the ASCS instance is installed.
End of: HA (MSCS)
On global hosts, the usrsap directory contains general SAP software, global and local
(instance-specific) data. For this, SAPinst creates the global directory usrsap<SAPSID>SYS,
which physically exists only once for each SAP system. It consists of the following subdirectories:
u global ‒ contains globally shared data
u profile ‒ contains the profiles for all instances
u exe ‒ contains executable replication directory for all instances and platforms
l Local host and shared with the name saploc.
On local hosts, the usrsap<SAPSID><instance_name> directory contains copies of the SAP
software and local (instance-specific) data.
22/164 PUBLIC 03/28/2008](https://image.slidesharecdn.com/ecc6sr3orawininstguide-130128021232-phpapp02/75/Ecc6-sr3-ora_win_instguide-22-2048.jpg)
![2 Planning
2.5 SAP Directories
Note
Since SAP traces for the instance are created in usrsap, make sure there is sufficient space
available in this directory. Changes in SAP profiles can also affect the disk space.
Note
The executables on the local host are replicated from those on the global host every time
the local instance is started. The SAP copy program sapcpe compares the binaries in the
<platform> directory on the global host and the binaries in the exe directory on the
application server. If the binaries in the exe directory are elder than those in the <platform>
directory, sapcpe replaces them with the newer version of the global host.
Other application servers access the global data using the Universal Naming Convention (UNC)
path <SAPGLOBALHOST>sapmnt. The SAP programs access their instance-specific data with the
UNC path <SAPLOCALHOST>saploc. If the UNC path points to a local directory, the local path
(and not the UNC path) is used to access the directory.
The parameters SAPGLOBALHOST and SAPLOCALHOST have the same values on the global host.
Only valid for: HA (MSCS)
Note
Windows Server 2008 only:
In a high-availability system, file shares pointing to directories on shared disks are only visible or
accessible with the virtual host name of the cluster group the shared disks belong to.
This lets you have several shares with the same name pointing to different disks (multi-SID).
End of: HA (MSCS)
n usrsaptrans
The transport directory contains SAP software for the transport of objects between SAP systems.
SAPinst by default creates it on the SAPGLOBALHOST.
If you want to have it created on another host or if you want to use an existing transport host from
your SAP system landscape, you can specify another host during the installation. In this case, you
have to prepare that host for the new SAP system to use it. For more information, see Preparing
the SAP System Transport Host [page 52].
Directory Structure
The following figures show how the physical directory usrsap is shared on the global host in a
central and in a distributed system. In both cases, the UNC paths are used as follows:
n <SAPGLOBALHOST>sapmnt to access global directories
n <SAPLOCALHOST>saploc to access local instance-specific data
03/28/2008 PUBLIC 23/164](https://image.slidesharecdn.com/ecc6sr3orawininstguide-130128021232-phpapp02/75/Ecc6-sr3-ora_win_instguide-23-2048.jpg)
![2 Planning
2.7 Basic SAP System Parameters
Only valid for: HA (MSCS)
Note
In an MSCS configuration, SAPinst by default creates the transport directory on the (ABAP) central
services instance host in usrsaptrans.
End of: HA (MSCS)
You have to prepare this host for use by the new SAP system if one of the following applies to you:
n You want to locate the transport directory on another host.
n You want to use an existing transport host and directory in your SAP system landscape.
For more information, see Preparing the SAP System Transport Host [page 52].
More Information
SAP Directories [page 22]
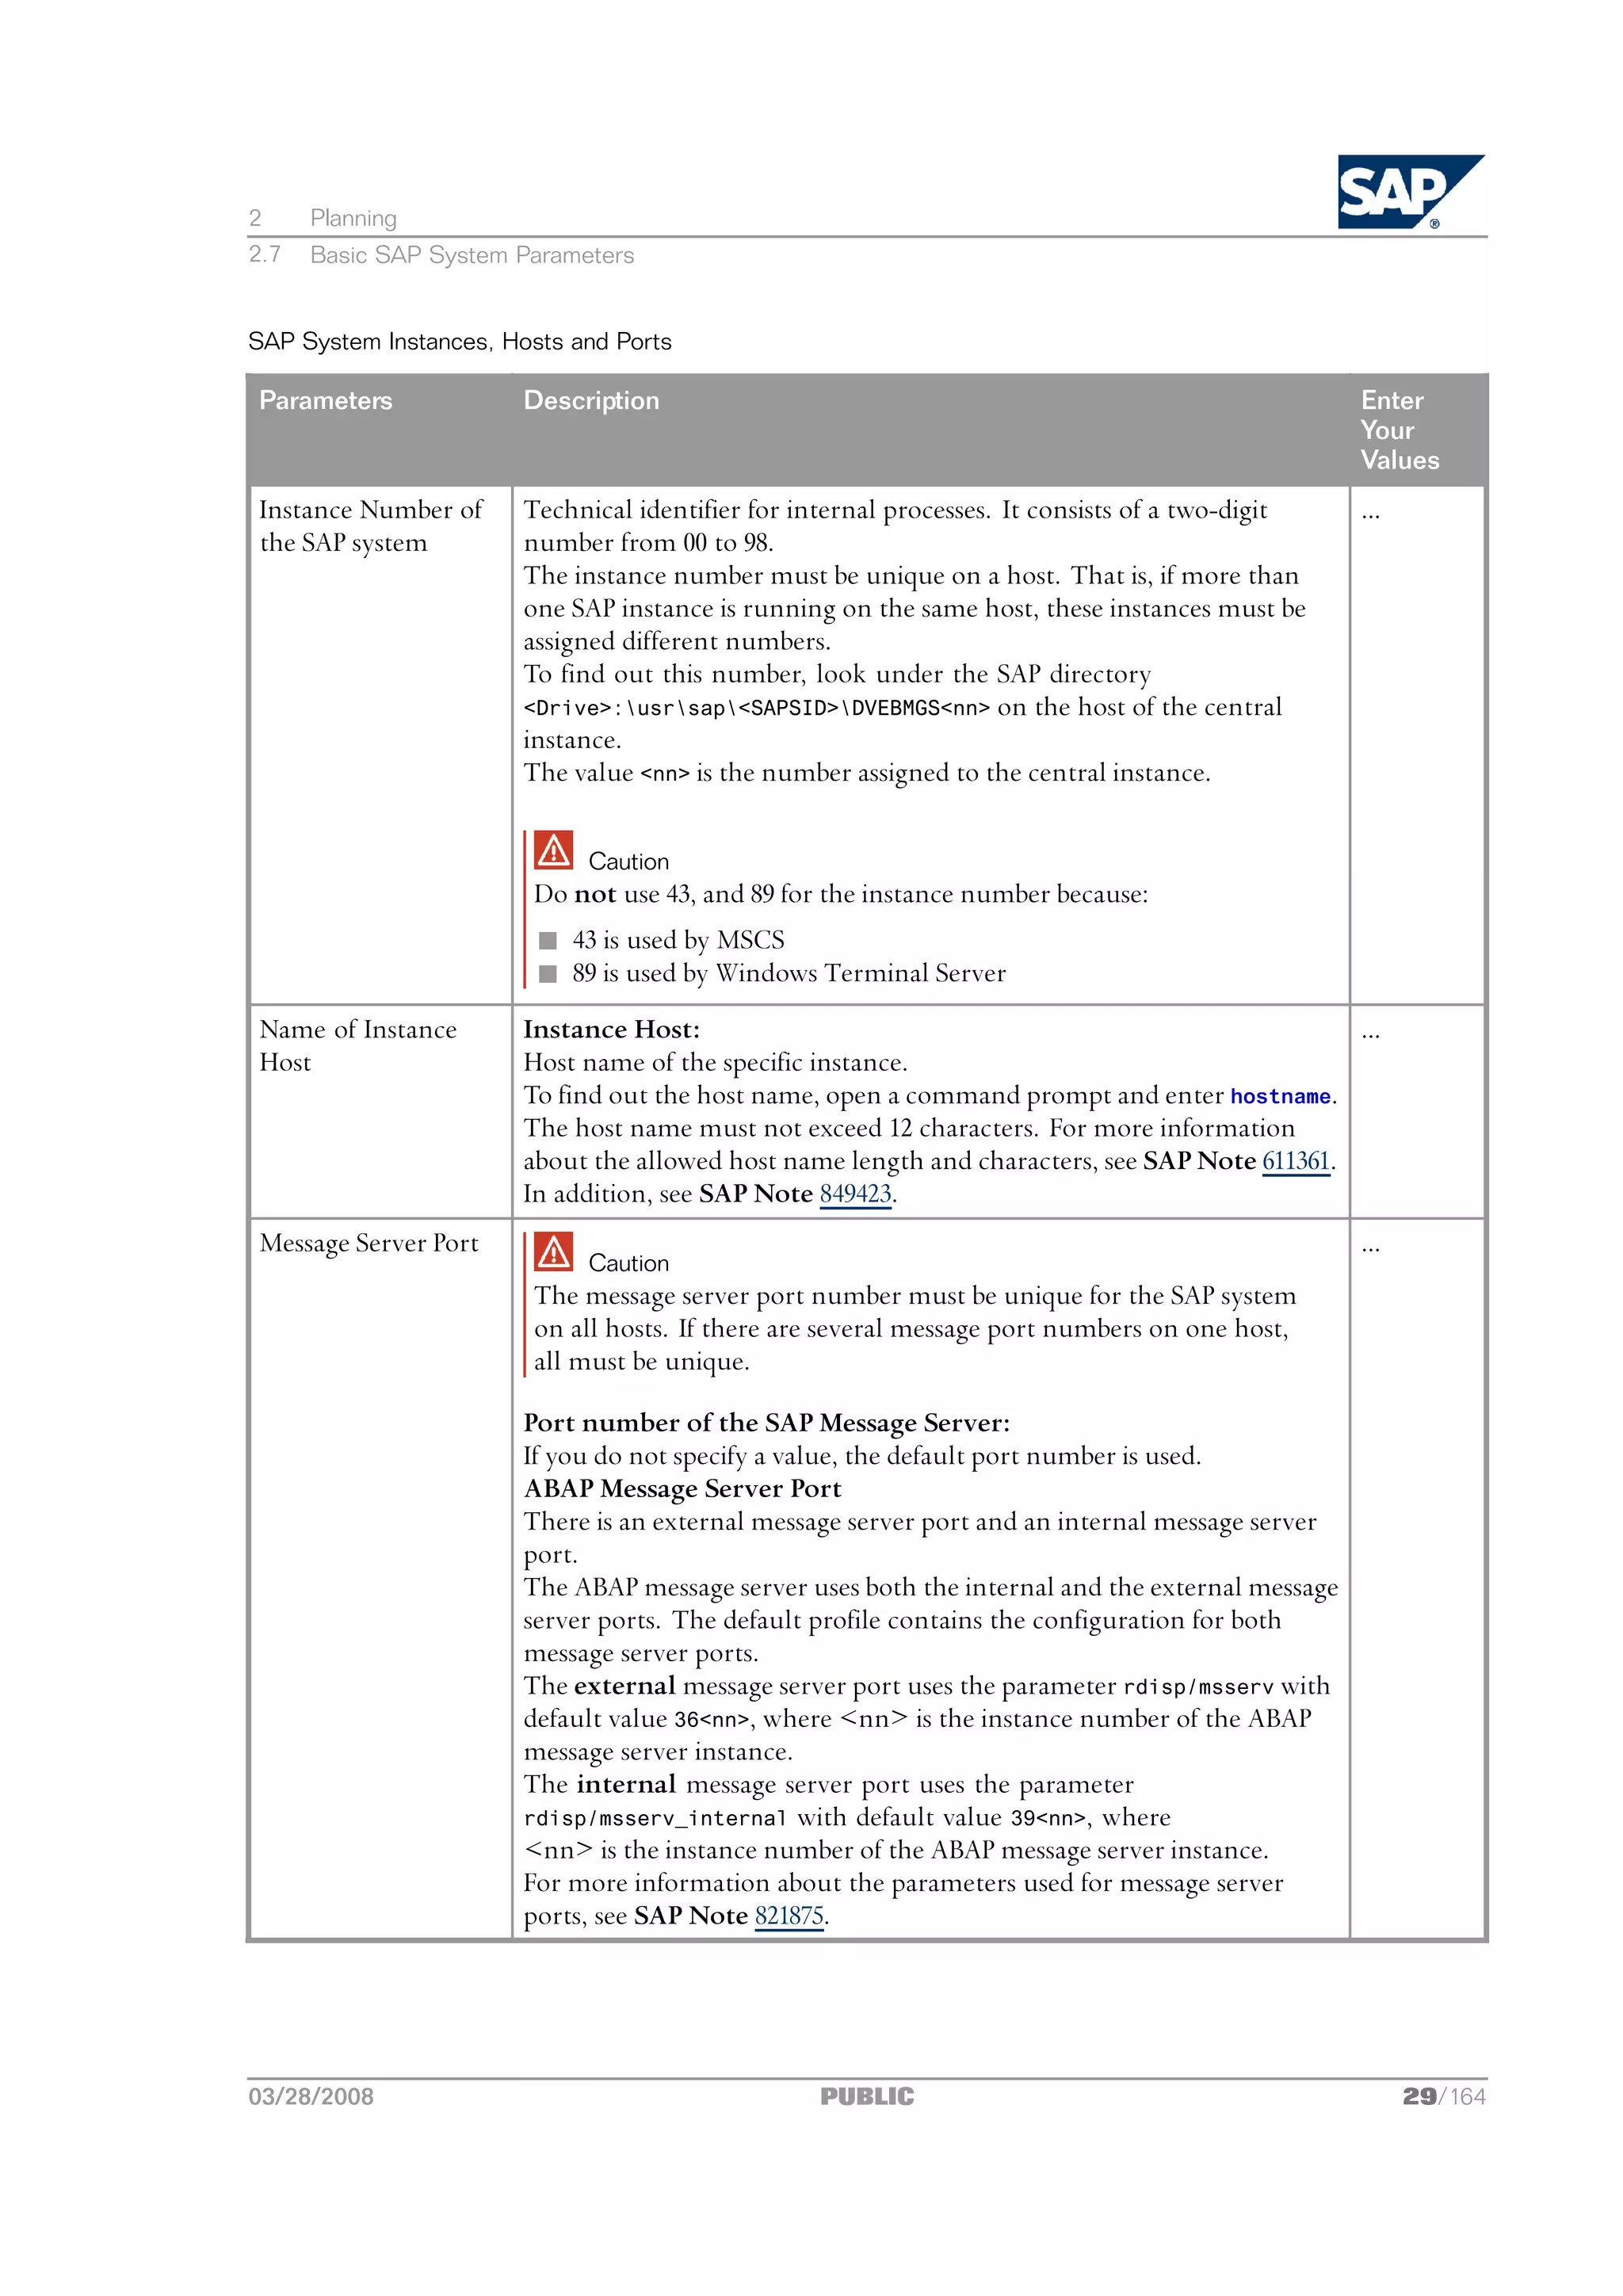
2.7 Basic SAP System Parameters
The tables below list the basic system parameters that you need to determine before installing your
SAP system. For all other SAP system parameters, use the F1 help in the SAPinst dialogs.
Note
In the column “Enter Your Values”, you write down the values that you plan to use, for example,
the Message Port Number.
SAP System ID and Database ID
Parameters Description Enter Your Values
SAP System ID The SAP System ID <SAPSID> identifies the whole SAP ...
<SAPSID> system.
Caution
Choose your SAP system ID carefully. You cannot change
the SAP system ID after the installation.
Make sure that your SAP system ID:
n Is unique throughout your organization
n Consists of exactly three alphanumeric characters
n Contains only uppercase letters
n Has a letter for the first character
n Does not include any of the following, which are reserved
IDs:
03/28/2008 PUBLIC 27/164](https://image.slidesharecdn.com/ecc6sr3orawininstguide-130128021232-phpapp02/75/Ecc6-sr3-ora_win_instguide-27-2048.jpg)
![2 Planning
2.7 Basic SAP System Parameters
Master Password
Parameters Description Enter Your Values
Master Password This password is used for all user accounts SAPinst creates and ...
for the secure store key phrase. The length has to be 8 to 14
characters.
Depending on your installation scenario there might be more
restrictions.
Caution
If you do not create the operating system users manually,
SAPinst creates them with the common master password (see
“Operating System Users”). In this case, make sure that the
master password meets the requirements of your operating
system and of your database.
Operating System Users
Parameters Description Enter Your Values
Password of Operating SAPinst processes the passwords of operating system users as ...
System Users follows:
n If the operating system users do not exist, SAPinst creates the
following users:
l <sapsid>adm
This user is the SAP system administrator user and is a
member of the local Administrators group.
l SAPService<SAPSID>
This user is the Windows account to run the SAP system.
It is not a member of the local Administrators group.
SAPinst sets the master password for these users by default.
You can overwrite and change the passwords either by using
the parameter mode Custom or by changing them on the
parameter summary screen.
n If the operating system users already exist, SAPinst prompts
you for the existing password, except if the password of these
users is the same as the master password.
Caution
Make sure that you have the required user authorization [page 48] for
these accounts before you start the installation.
30/164 PUBLIC 03/28/2008](https://image.slidesharecdn.com/ecc6sr3orawininstguide-130128021232-phpapp02/75/Ecc6-sr3-ora_win_instguide-30-2048.jpg)
![2 Planning
2.7 Basic SAP System Parameters
Internet Communication Manager (ICM) User Management
Parameter Description Enter Your Values
Password of webadm The administration user webadm is created to use the web ...
administration interface for Internet Communication Manager
(ICM) and Web Dispatcher.
SAPinst sets the master password by default. If required, you
can choose another password. The length of the password must
be between 5 and 128 characters.
Solution Manager Key
Parameters Description Enter Your Values
SAP Solution Manager To install your SAP system, you need to generate an SAP Solution ...
key Manager key [page 54], which the installation requires to continue.
For more information, see SAP Note 805390.
Parameters for SAPDATA Drives
Parameters Description Enter Your Values
Installation drive Base directory for the SAP ...
system. Do not add <SAPSID> as
subdirectory because the system
adds this directory automatically.
Example
If you enter D:, the system adds
the directory D:usrsapSAPSID.
Note
If you install a subsequent SAP
system, the saploc share already
exists and you cannot select the
installation drive. SAPinst uses
the installation drive where the
saploc share points to.
03/28/2008 PUBLIC 31/164](https://image.slidesharecdn.com/ecc6sr3orawininstguide-130128021232-phpapp02/75/Ecc6-sr3-ora_win_instguide-31-2048.jpg)
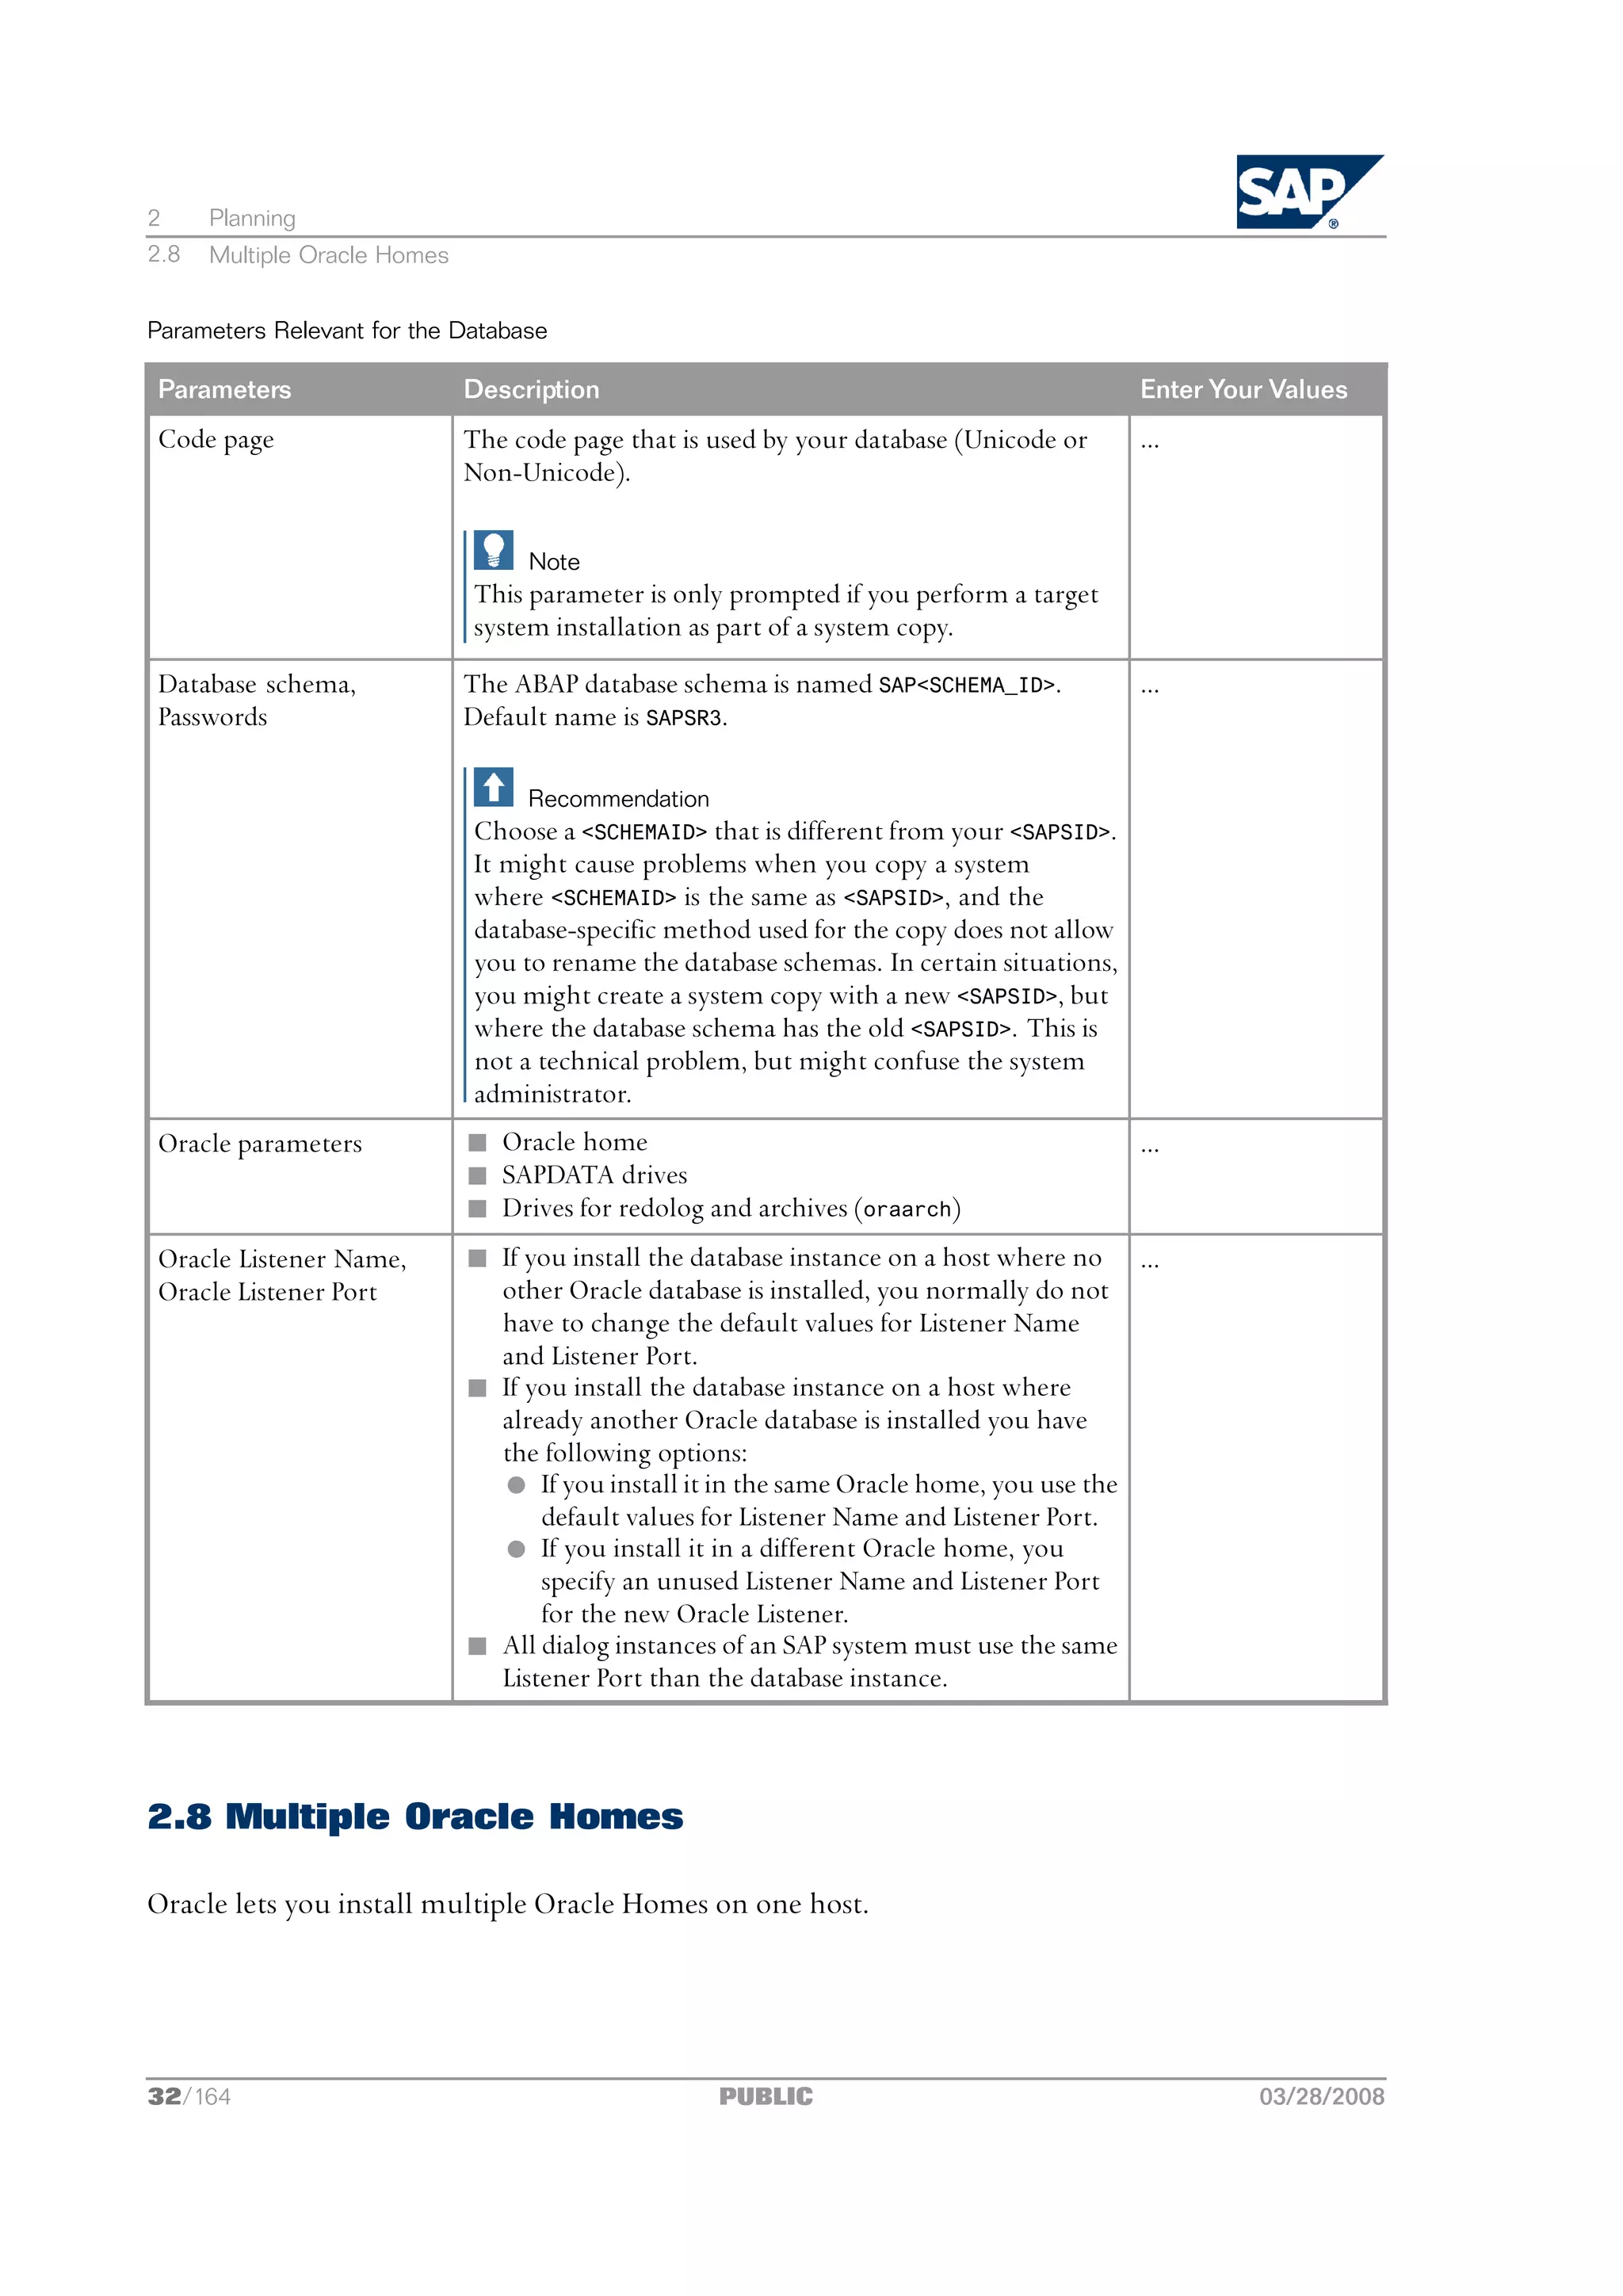
![2 Planning
2.8 Multiple Oracle Homes
Only valid for: HA (MSCS)
Note
MSCS only:
Multiple Oracle Homes for different database instances are not supported in an MSCS configuration.
End of: HA (MSCS)
Note the following about multiple Oracle Homes:
n Multiple Oracle Homes are necessary, if you install different Oracle versions for two or more
databases on the same host.
n If you use multiple Oracle Homes, you must use different port numbers for each listener.
n If you install the same Oracle database version on one host for different database instances, you
can use:
l Multiple Oracle Homes
With multiple Oracle Homes, you can administer your databases independently. For example,
if you want to install a patch set, you do not have to install them on both databases.
l One Oracle Home for two databases
You have to install the database software only once.
Note
In case you later want to use two multiple homes instead of one, you either have to perform a
new database instance installation or upgrade your database.
Before you install your Oracle database software, you need to decide whether you want to set up
multiple Oracle Homes as this influences the installation procedure. For more information, see
Setting Up Multiple Oracle Homes [page 61].
03/28/2008 PUBLIC 33/164](https://image.slidesharecdn.com/ecc6sr3orawininstguide-130128021232-phpapp02/75/Ecc6-sr3-ora_win_instguide-33-2048.jpg)

![3 Preparation
3 Preparation
Note
In a central system, all mandatory instances are installed on one host. Therefore, if you are installing
a central system, you can ignore references to other hosts.
You have to complete the following preparations:
1. You check the hardware and software requirements [page 35] on each host.
2. You check the Windows file system [page 46] on each host.
3. You check that your installation host belongs do the correct Windows domain [page 47].
4. You reduce the size of the file cache [page 48] on each host.
Note
This step is not required if you use Windows Server 2008.
5. You check that you have the required user authorization for the installation [page 48].
6. If required, you perform a domain installation without being a domain administrator [page 50].
7. If required, you prepare the SAP system transport host [page 52] for your SAP system.
8. You install the SAP front-end software [page 54] on the desktop of the end user.
9. You generate the SAP Solution Manager Key [page 54] for your SAP system.
10. You install the Java Runtime Environment [page 54].
11. You make the installation DVDs available [page 55] on each host.
12. If required, you download the installation DVDs from SAP Service Marketplace [page 57].
Only valid for: HA (MSCS)
13. For the installation of a high-availability system with Microsoft Cluster Service (MSCS), in
addition, you have to perform MSCS-specific preparation tasks [page 130].
End of: HA (MSCS)
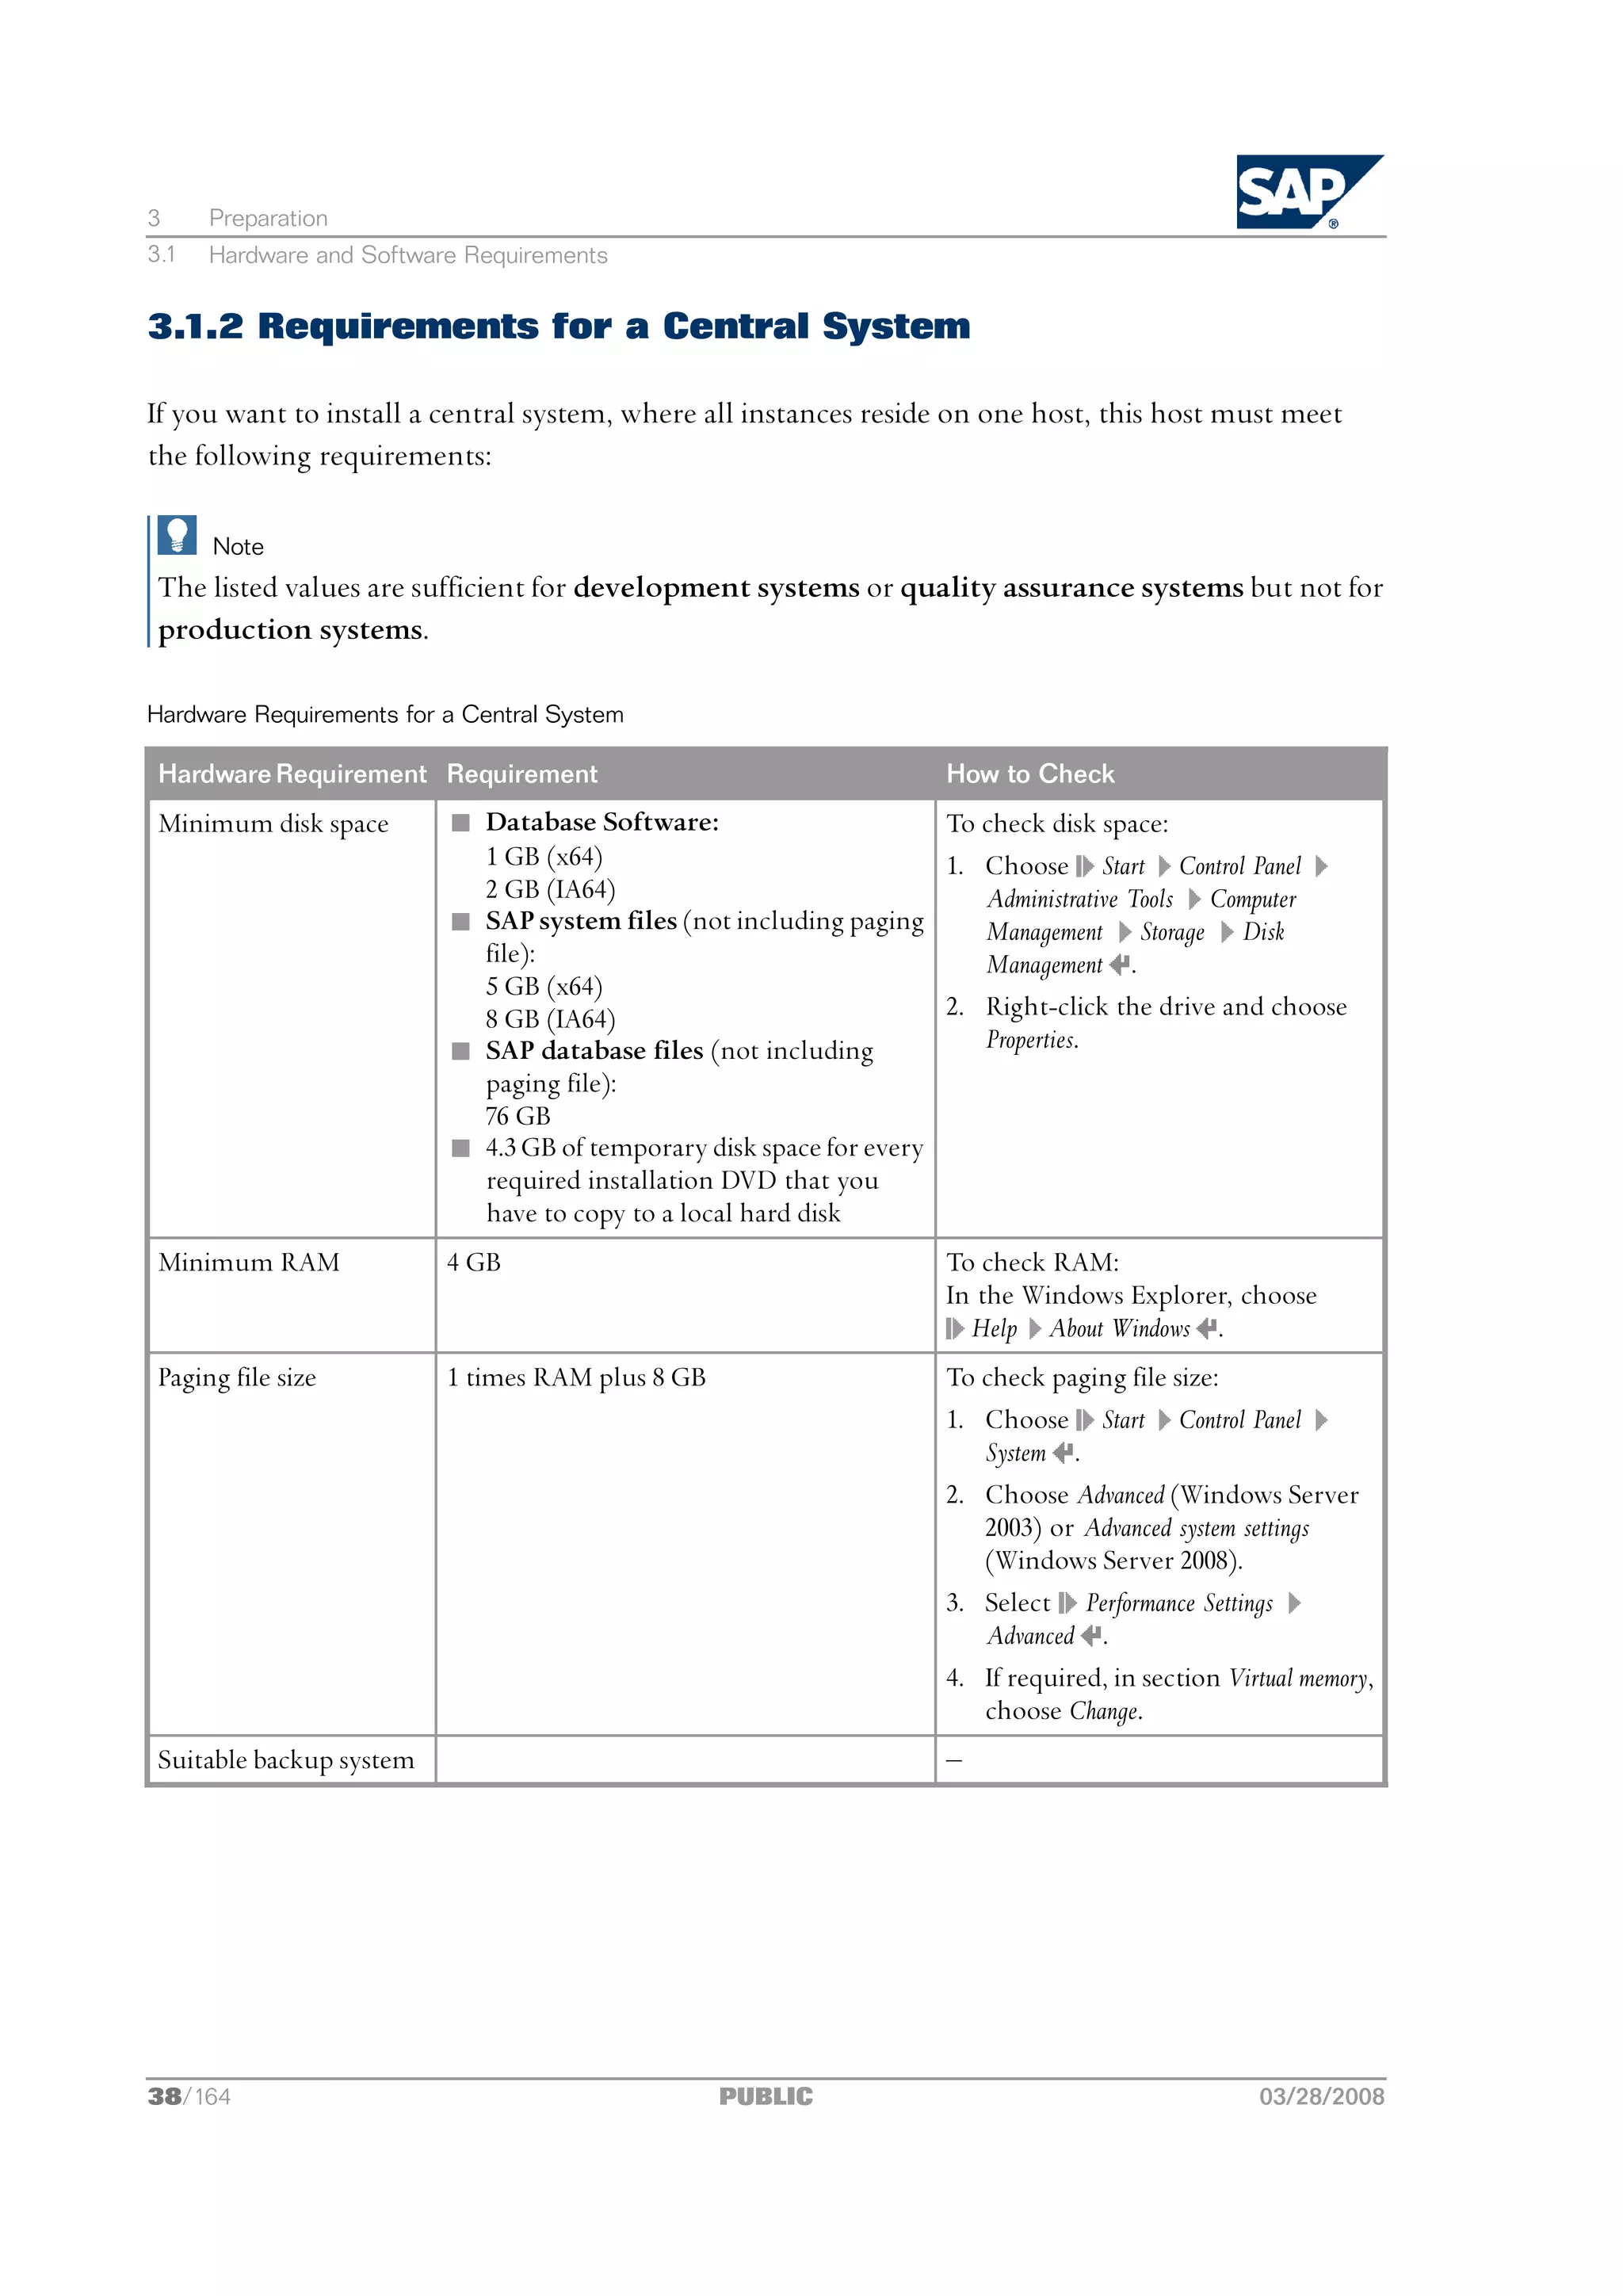
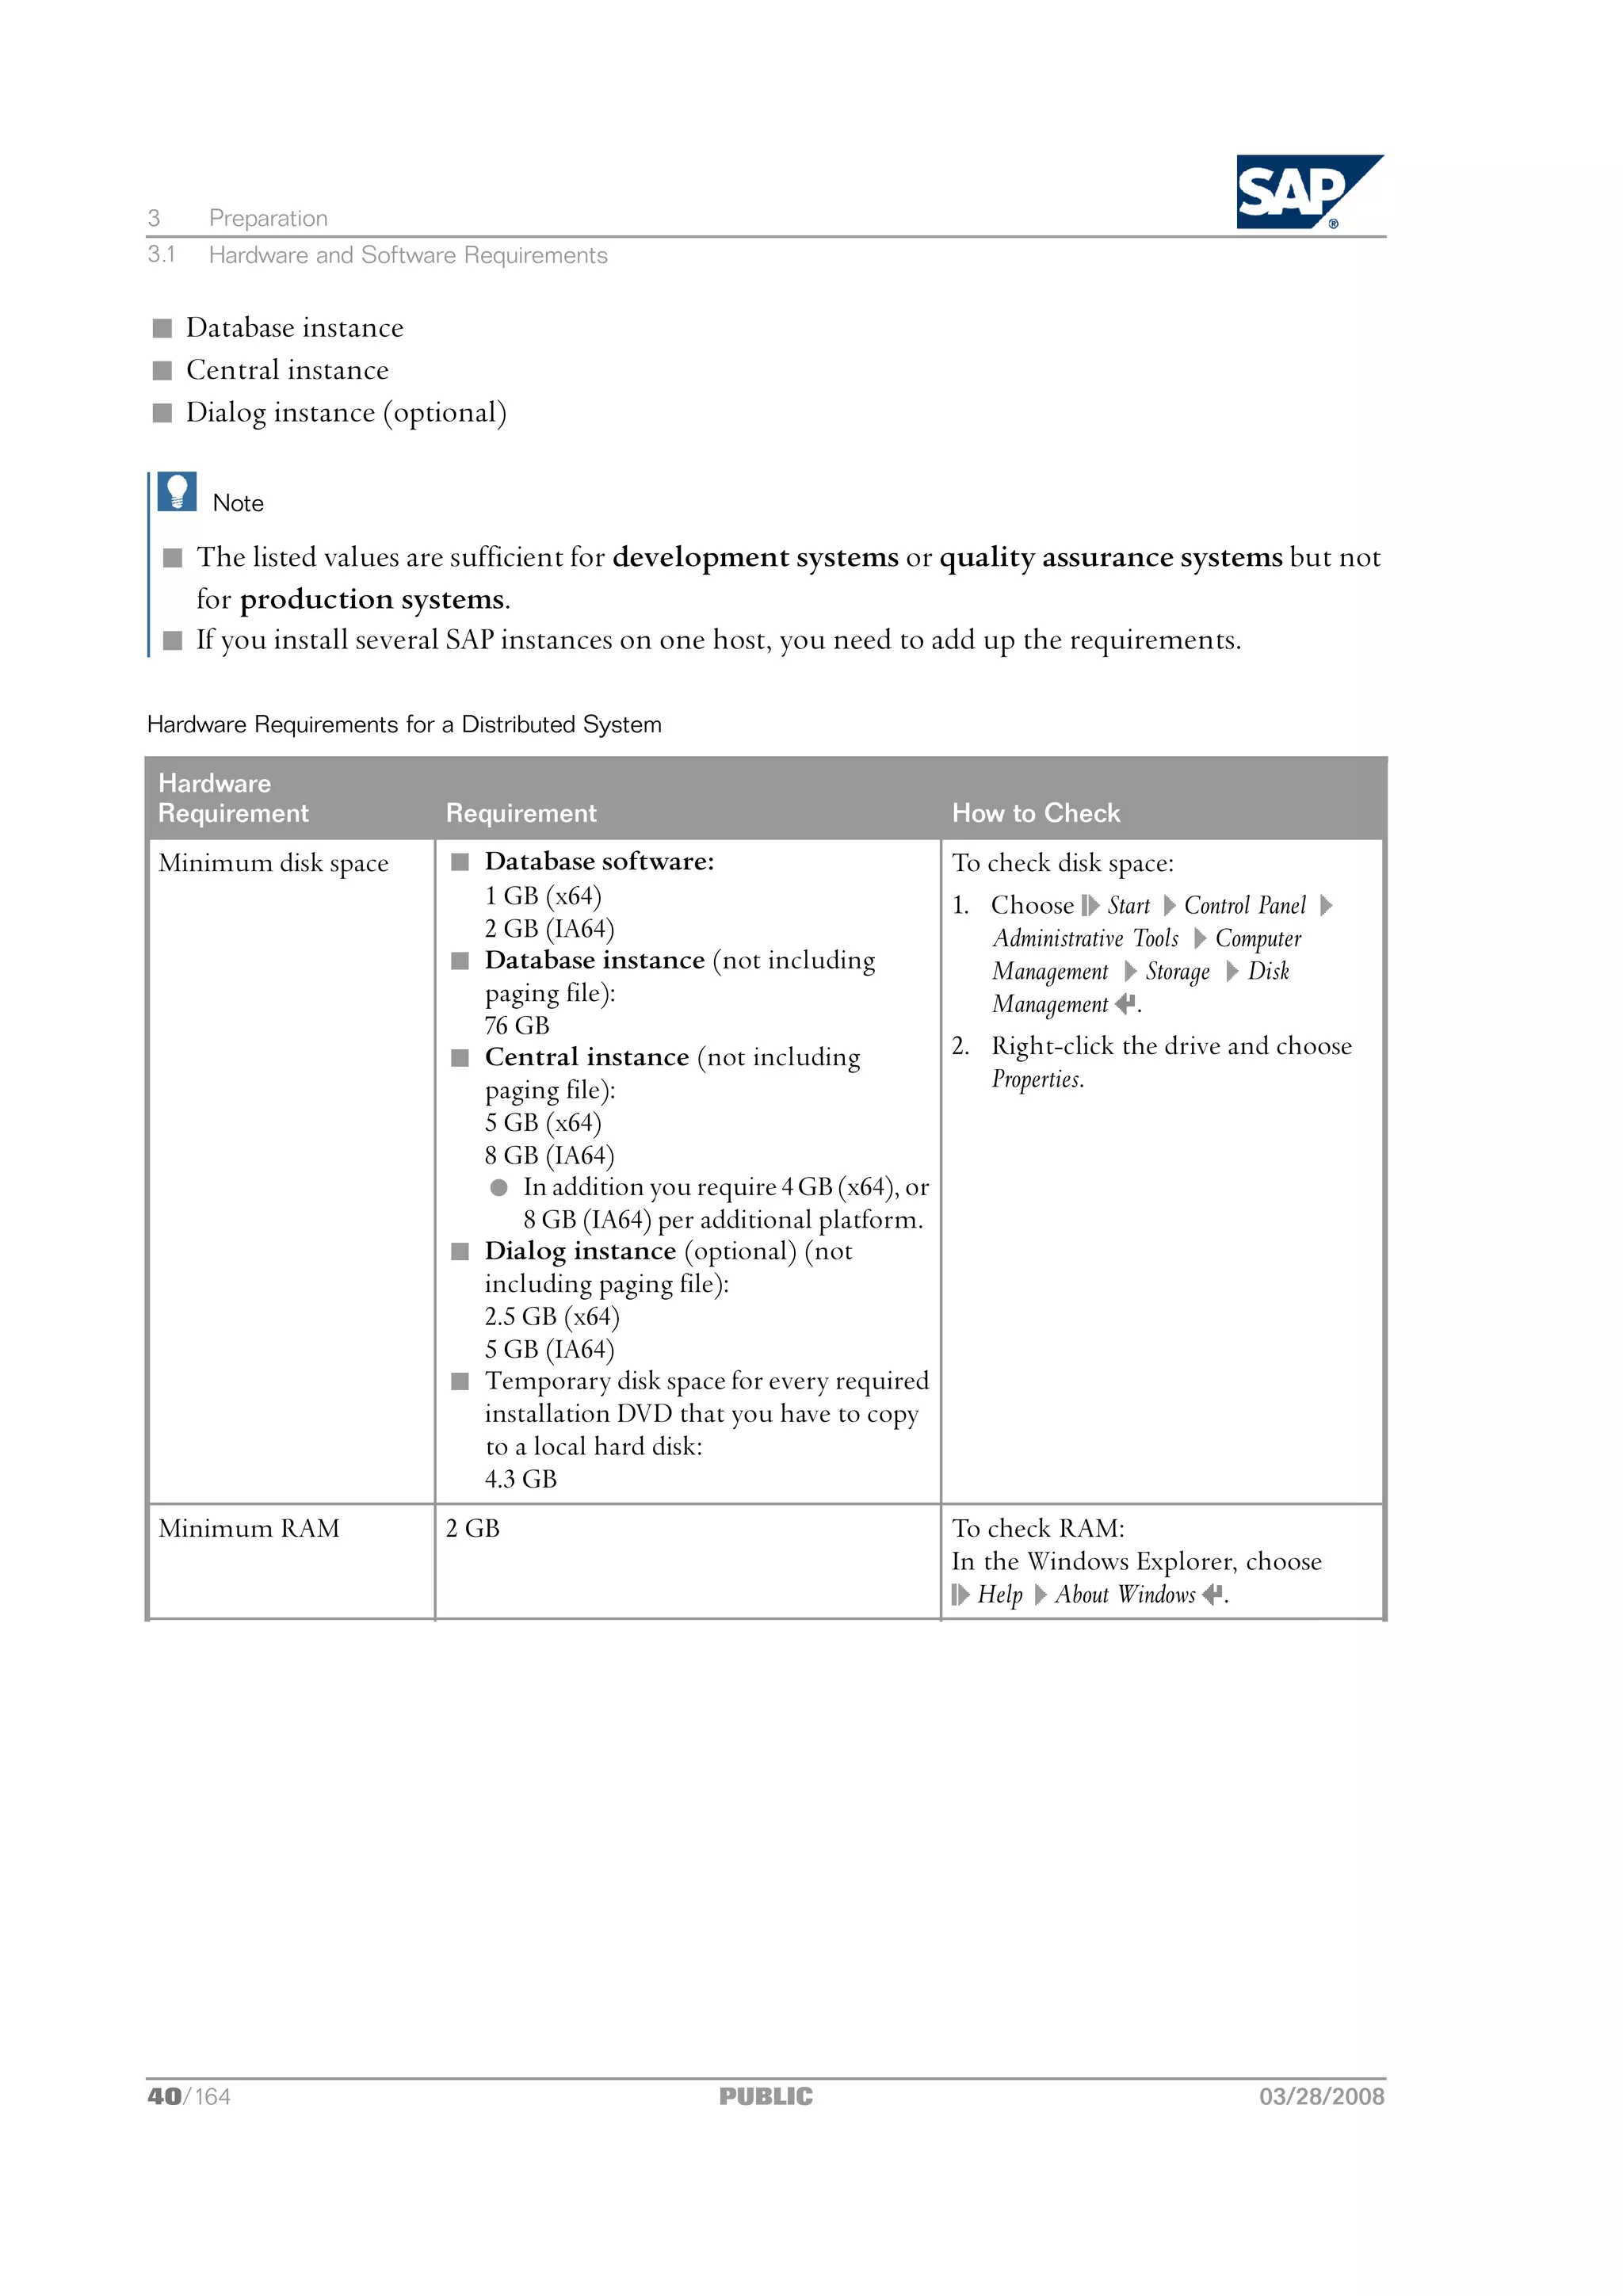
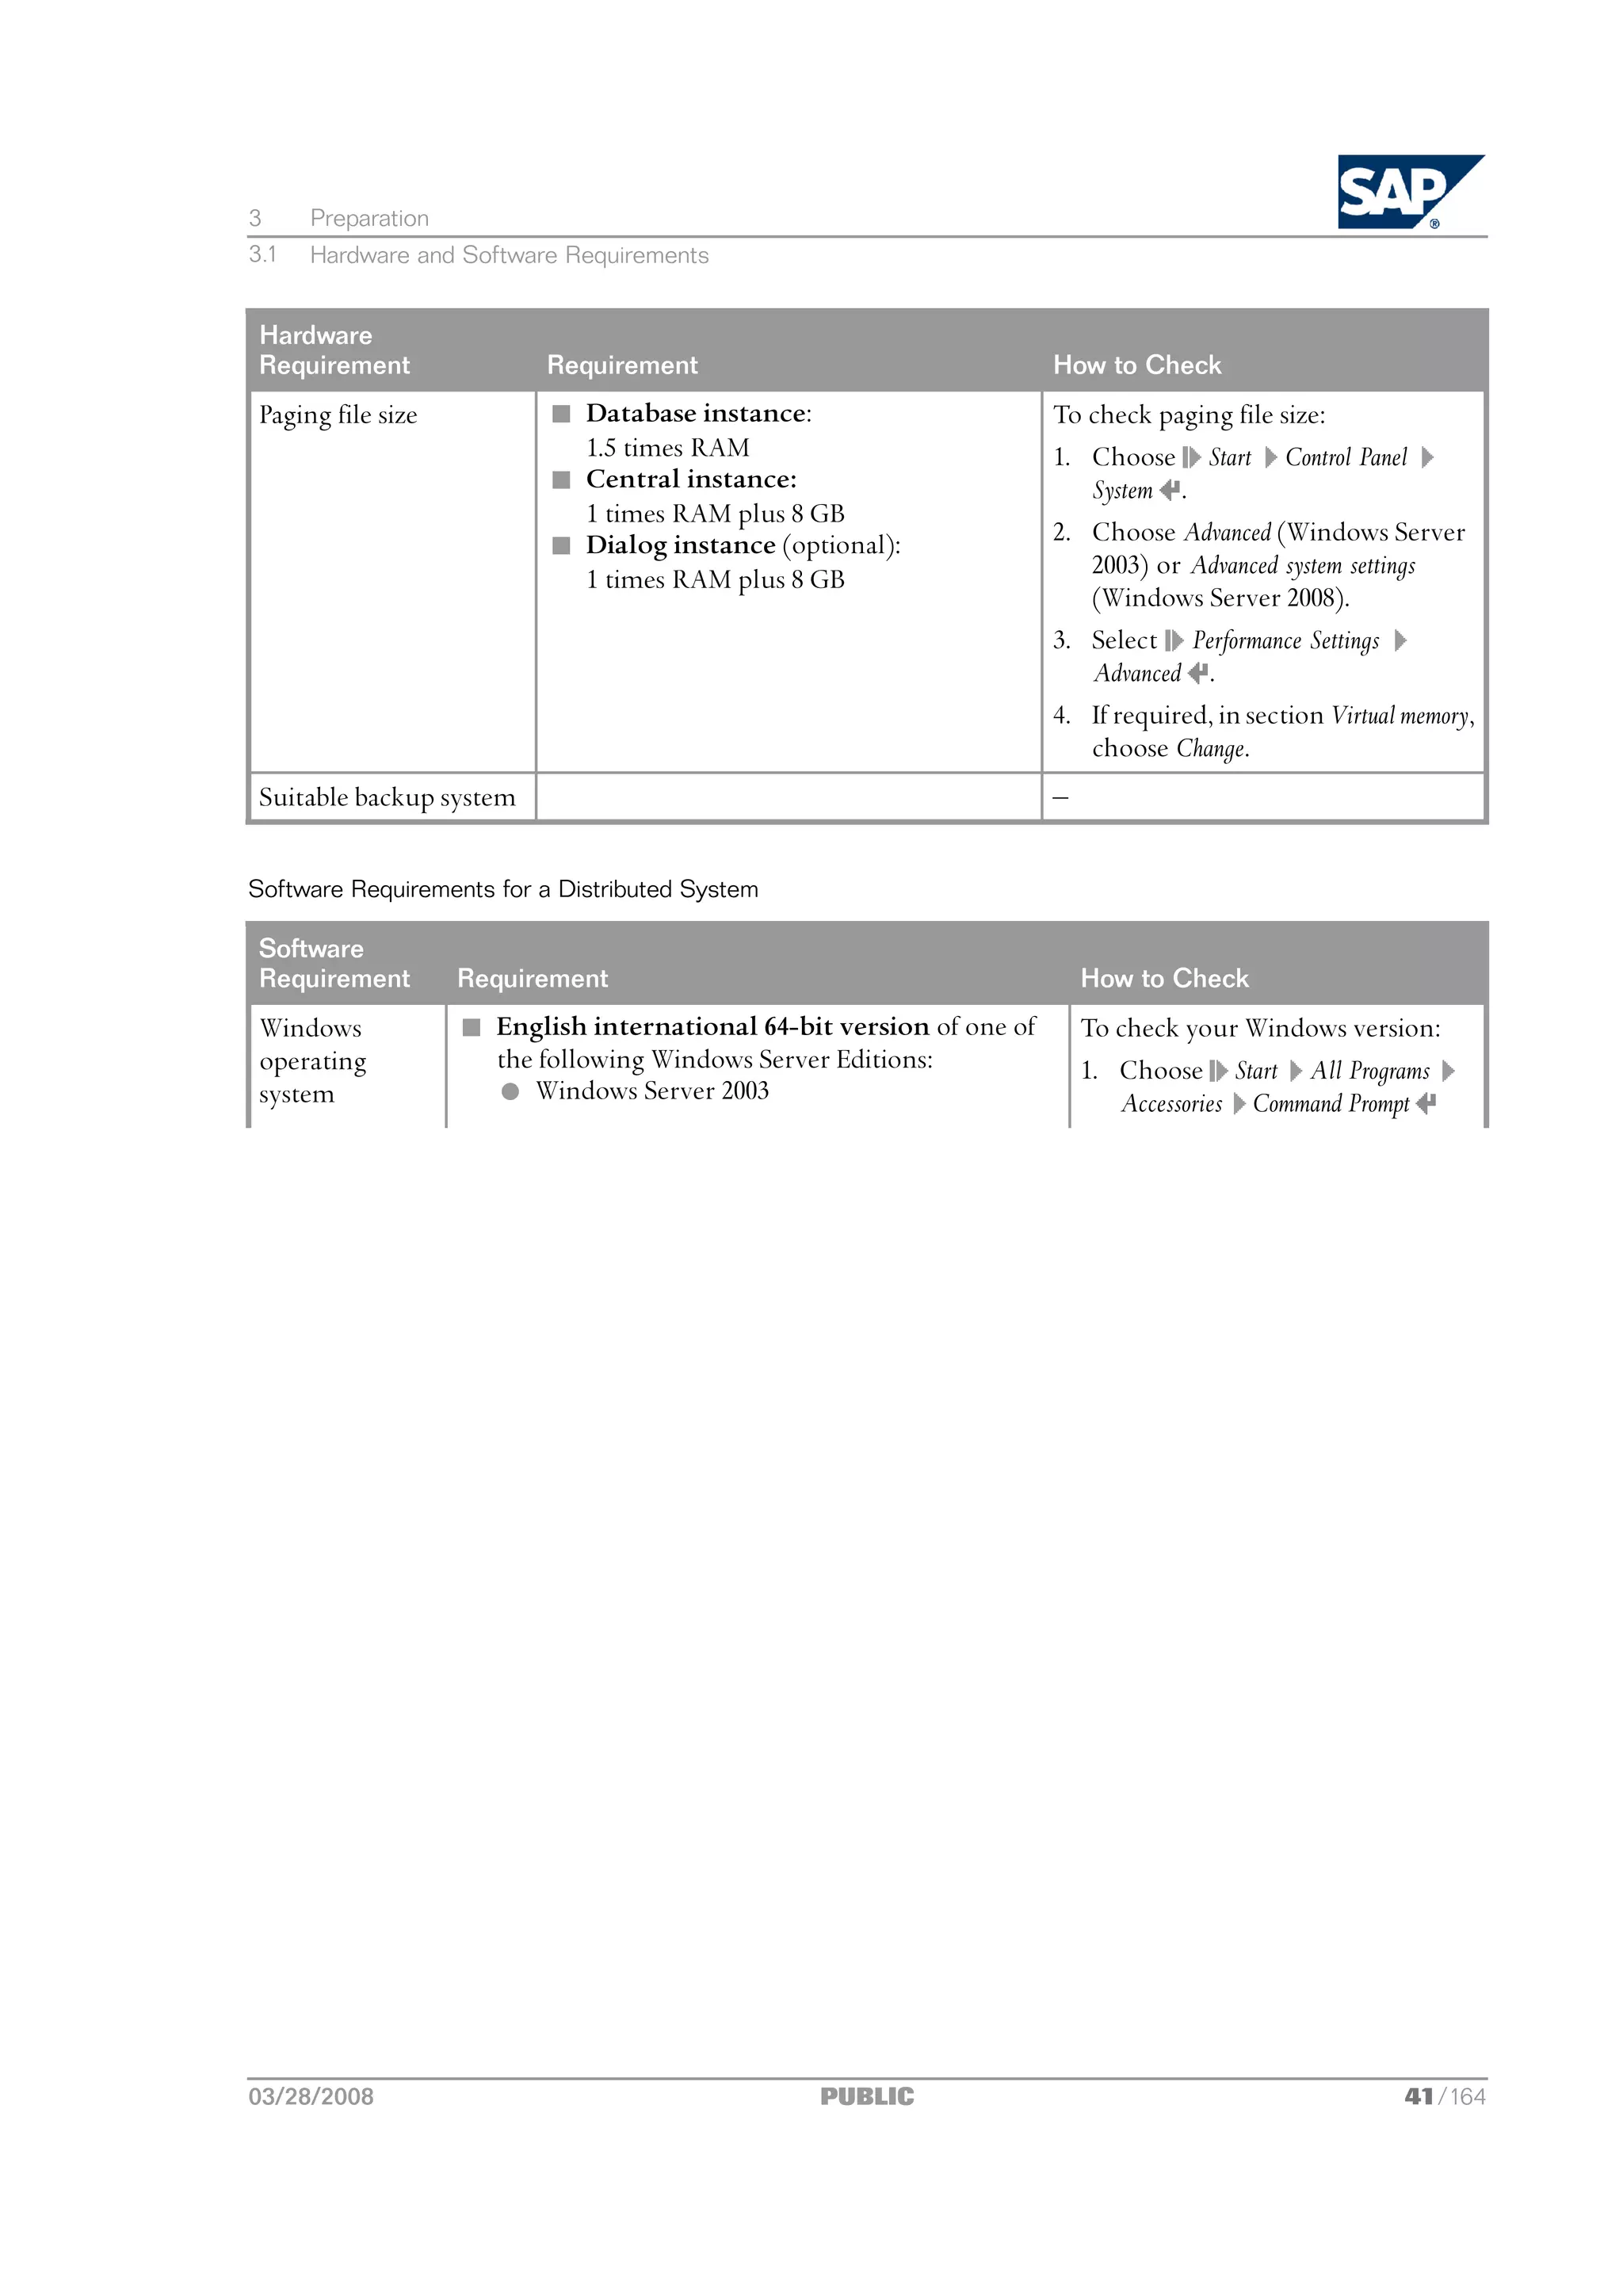
3.1 Hardware and Software Requirements
You check that your hosts meet the hardware and software requirements for your operating system
and the SAP instances.
03/28/2008 PUBLIC 35/164](https://image.slidesharecdn.com/ecc6sr3orawininstguide-130128021232-phpapp02/75/Ecc6-sr3-ora_win_instguide-35-2048.jpg)
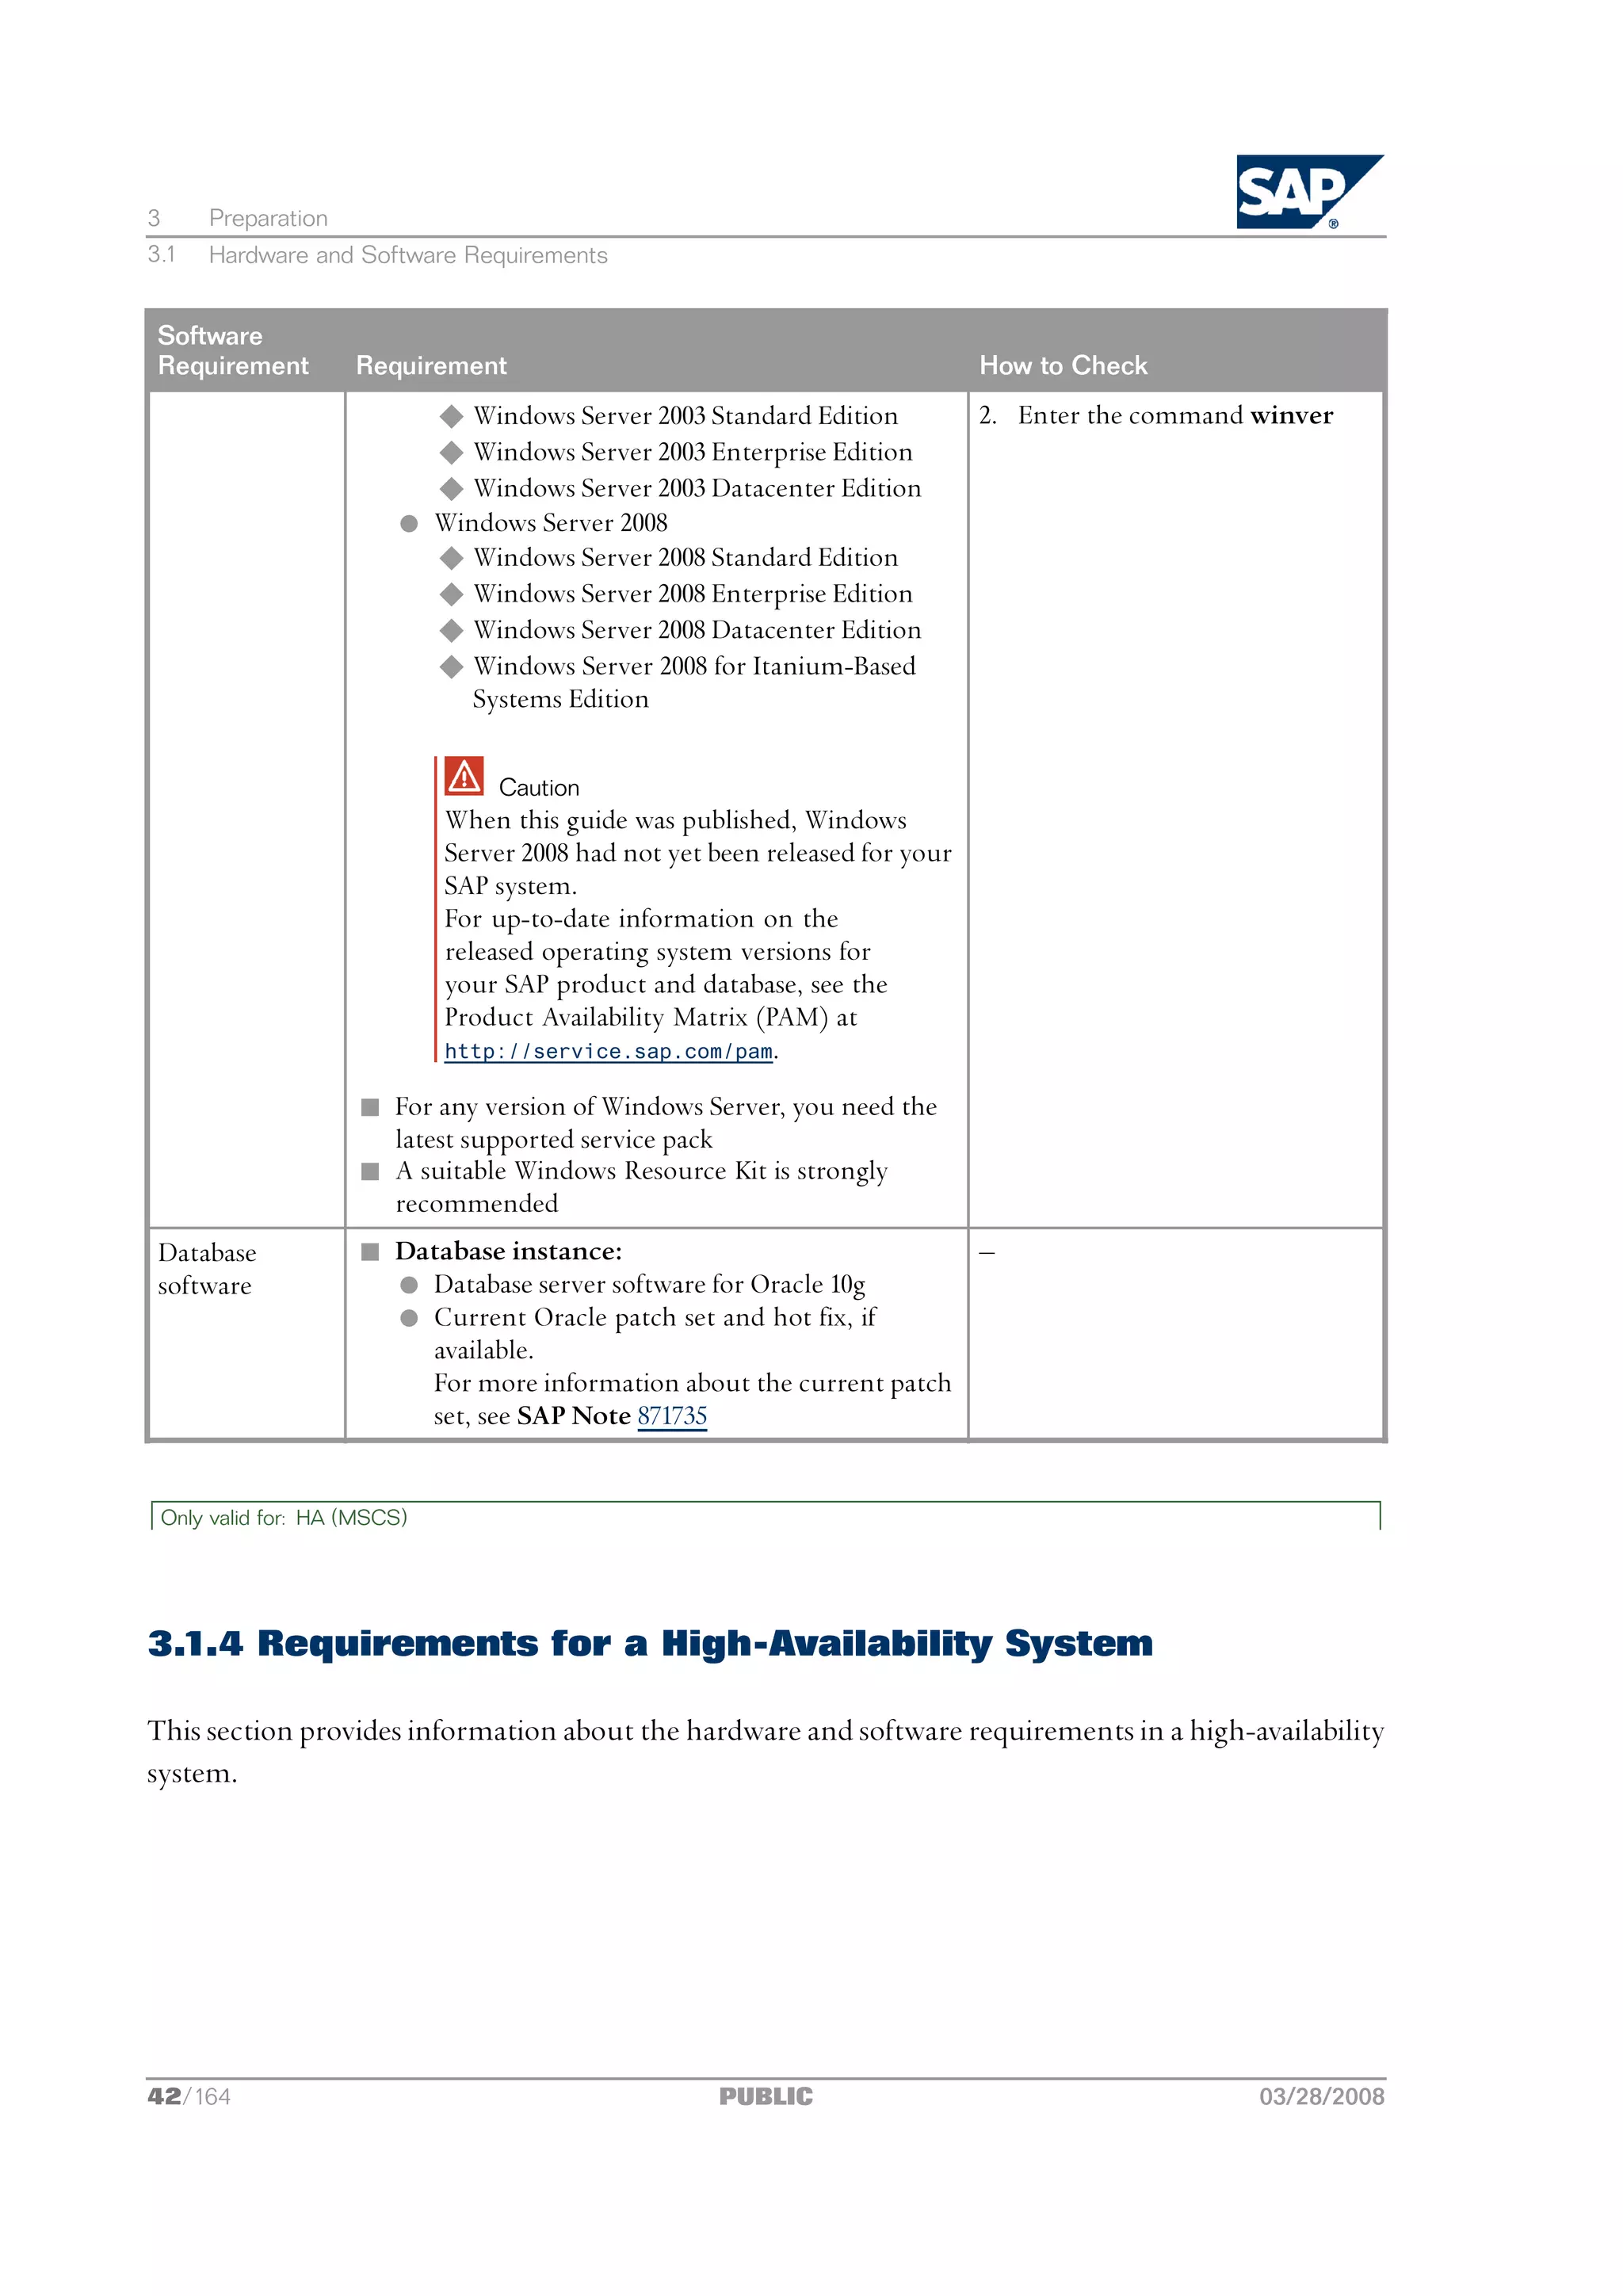
![3 Preparation
3.1 Hardware and Software Requirements
Caution
If your hosts do not fully meet the requirements, you might experience problems when working
with the SAP system.
Prerequisites
n Contact your OS vendor for the latest OS patches.
n Make sure that the host name meets the requirements listed in SAP Notes 611361 and 849423.
Process Flow
1. Check the Product Availability Matrix at http://service.sap.com/pam for supported operating
system releases.
2. Check the hardware and software requirements using:
n The Prerequisite Checker:
l Standalone (optional) before the installation process
For more information, see Running the Prerequisite Checker Standalone [page 37].
l Integrated in SAPinst (mandatory) as part of the installation process
For more information, see Running SAPinst on Windows [page 62]
Note
For the most recent updates to the Prerequisite Checker, always check SAP Note 855498.
n The hardware and software requirements checklists for:
l Central system [page 38]
l Distributed system [page 39]
Only valid for: HA (MSCS)
l High availability system with MSCS [page 42]
End of: HA (MSCS)
l If you want to install dialog instance(s), check the requirements for a
dialog instance [page 46].
Note
If you want to use 32-bit SAP NetWeaver components, first check whether these
components can run on 64-bit operating systems. If so, we recommend you to use 64-bit
systems. If not, you can install an SAP dialog instance on 32-bit operating systems to run
these components. For all other SAP instances, you must use 64-bit systems.
3. If you are installing a production system, the values provided by the Prerequisite Checker and the
hardware and software requirements checklists are not sufficient. In addition, do the following:
n You use the SAP Quick Sizer tool available at http://service.sap.com/sizing.
36/164 PUBLIC 03/28/2008](https://image.slidesharecdn.com/ecc6sr3orawininstguide-130128021232-phpapp02/75/Ecc6-sr3-ora_win_instguide-36-2048.jpg)
![3 Preparation
3.1 Hardware and Software Requirements
For more information about the SAP Quick Sizer and available sizing guides, see the Master Guide ‒
SAP NetWeaver 7.0 at http://service.sap.com/installnw70 Planning .
n You contact your hardware vendor, who can analyze the load and calculate suitable hardware
sizing depending on:
l The set of applications to be deployed
l How intensively the applications are to be used
l The number of users
3.1.1 Running the Prerequisite Checker in Standalone Mode
(Optional)
Before installing your SAP system, you can run the Prerequisite Checker in standalone mode to check the
hardware and software requirements for your operating system (OS) and the SAP instances.
Note
When installing your SAP system, SAPinst automatically starts the Prerequisite Checker and checks the
hardware and software requirements in the background.
Prerequisites
n You have installed the correct Java Runtime Environment (JRE) [page 54].
n You have prepared the installation master DVD on the required installation host [page 55].
Procedure
1. You start SAPinst [page 62].
2. On the Welcome screen, choose <SAP System> Software Life-Cycle Options Additional Preparation
Options Prerequisites Check .
3. Follow the instructions in the SAPinst dialogs and enter the required parameters.
Note
For more information about each parameter, position the cursor on the parameter field and
choose F1 in SAPinst.
When you have finished, the Parameter Summary screen appears summarizing all parameters you have
entered. If you want to make a change, select the relevant parameters and choose Revise.
4. To start the Prerequisite Checker, choose Start.
Result
The Prerequisite Check Results screen displays the results found. If required, you may also check the
results in file prerequisite_checker_results.html, which you find in the installation directory.
03/28/2008 PUBLIC 37/164](https://image.slidesharecdn.com/ecc6sr3orawininstguide-130128021232-phpapp02/75/Ecc6-sr3-ora_win_instguide-37-2048.jpg)

![3 Preparation
3.1 Hardware and Software Requirements
Note
1. Windows Server 2003 only:
You must check that your cluster hardware is certified.
AddOn Technology Center for SAP (Add On TCS) certifies hardware platforms for SAP on
Microsoft Windows. The cluster must be included in the Microsoft list of certified clusters and its
components. You can access the lists as follows:
n www.microsoft.com/whdc/hcl/default.mspx
n www.saponwin.com
2. Windows Server 2008 only:
a) Check that your cluster hardware is certified for Windows Server 2008 and has the Windows
Server 2008 logo.
b) You must validate your failover cluster configuration by running the Validate a Configuration
Wizard, which is included in the Failover Cluster Management snap-in. The Failover Cluster Validation
Report must not show any warnings and errors.
3. The MSCS nodes of the cluster must be connected by a private and public network:
n The public network enables communication from the MSCS nodes of the cluster to other
resources in the local area network (LAN).
n The private network enables internal communication between the MSCS nodes. In particular,
it enables the Cluster Service running on all MSCS nodes to regularly exchange messages on
the state of the MSCS nodes so that the failure of resources is quickly detected.
4. Each of the MSCS nodes in the cluster must have its own local disks and have access to shared
disks that can be reached by the MSCS nodes via a shared bus.
All software ‒ except the Windows operating system, the Oracle home directory, and the MSCS
software ‒ is stored on the shared disks.
One of the shared disks must be used exclusively by the quorum (if a single quorum device cluster
is used) that stores the cluster registry and records information about the state of the cluster.
You require at least four shared disks.
For more information about the distribution of components to local and shared disk, see
Distribution of Components to Disks for MSCS [page 120].
Caution
n All disk controllers must be able to support hardware-based RAID.
n You cannot use a host with a domain controller as an MSCS cluster node.
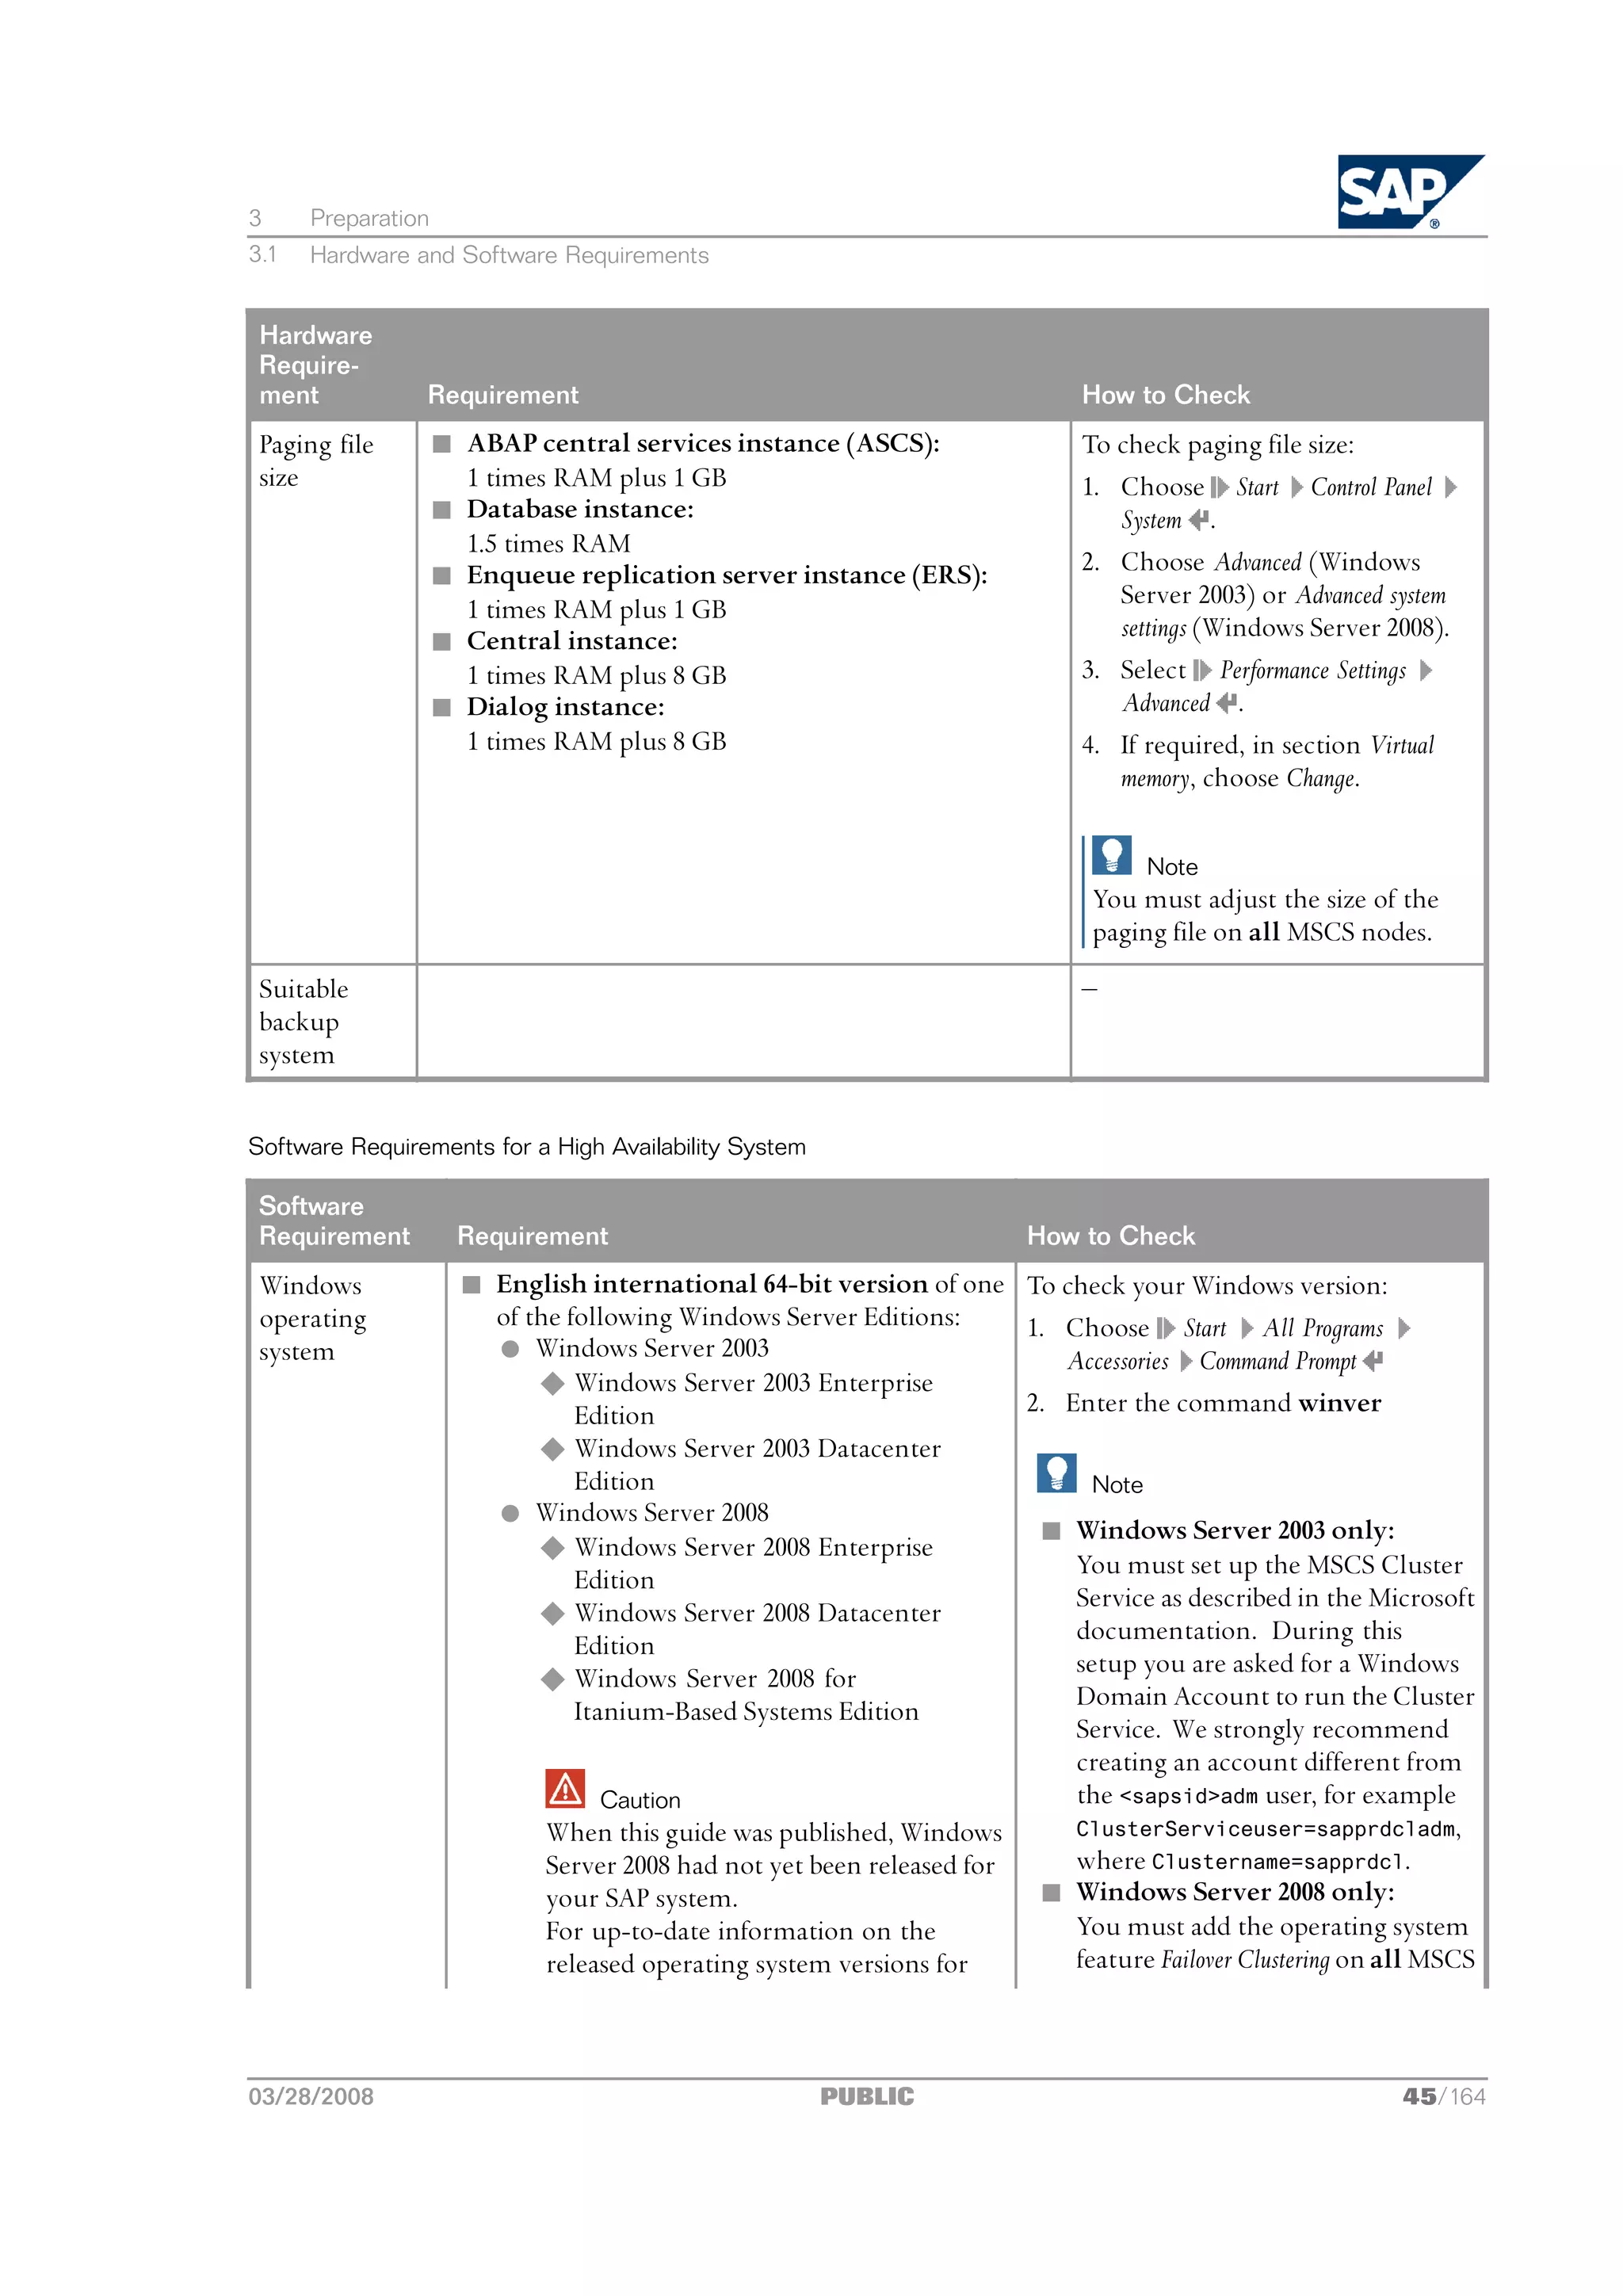
The following tables show the hardware and software requirements for the:
n ABAP central services instance (ASCS)
n Database instance
n Enqueue Replication Server instance (ERS)
03/28/2008 PUBLIC 43/164](https://image.slidesharecdn.com/ecc6sr3orawininstguide-130128021232-phpapp02/75/Ecc6-sr3-ora_win_instguide-43-2048.jpg)
![3 Preparation
3.2 Checking the Windows File System
Software
Requirement Requirement How to Check
your SAP product and database, see the nodes.
Product Availability Matrix (PAM) at
http://service.sap.com/pam.
n For any version of Windows Server, you need
the latest supported service pack
n A suitable Windows Resource Kit is strongly
recommended
Database n Database instance: ‒
software l Oracle 10g database server software
l Current Oracle patch set and hot fix, if
available.
For more information about the current
patch set, see SAP Note 871735
l Oracle Fail Safe software version 3.3.4
End of: HA (MSCS)
3.1.5 Requirements for the Dialog Instance
For more information about the hardware and software requirements for the dialog instance(s), see
one of the following sections:
n Requirements for a Distributed System [page 39]
Only valid for: HA (MSCS)
n Requirements for a High-Availability System [page 42]
End of: HA (MSCS)
3.2 Checking the Windows File System
You need to check that you are using the Windows file system NTFS on hosts where you want to
install the SAP system and database. NTFS supports full Windows security and long file names.
46/164 PUBLIC 03/28/2008](https://image.slidesharecdn.com/ecc6sr3orawininstguide-130128021232-phpapp02/75/Ecc6-sr3-ora_win_instguide-46-2048.jpg)
![3 Preparation
3.5 Required User Authorization for the Installation
Domain Installation
For a domain installation the account used for the installation needs to be a member of the local
Administrators and the domain Admins group of the domain involved. All machines in the system
must belong to the same domain. In a domain installation, the user information is stored centrally on
the domain controller and is accessible to all hosts in the system.
If the SAP system is to be distributed across more than one machine, SAP strongly recommends you
to perform a domain installation to avoid authorization problems.
Caution
n If you install a distributed system as a local installation, this can lead to authorization problems for
the operating system users <sapsid>adm and SAPService<SAPSID>. It can also lead to problems
with the transport directory, which is usually shared by several SAP systems. Therefore, SAP
does not support a local installation for a distributed system and recommends you to install a
distributed system as a domain installation.
If you still want to perform a local installation for a distributed system, make sure that:
l You use the same password for the <sapsid>adm or the SAPService<SAPSID> user on all hosts.
The password for the <sapsid>adm and SAPService<SAPSID> user can differ.
l You use the same master password on all hosts.
l All hosts belong to the same Windows work group.
Only valid for: HA (MSCS)
n In an MSCS configuration, you always have to perform a domain installation.
End of: HA (MSCS)
n For performance and security reasons, SAP does not support an SAP system installation on
a domain controller.
n If for any reason, the account used for the installation is not a member of the domain Admins
group, you can perform the installation with a domain user who is a member of the local
Administrators group. However, the domain administrator has to prepare the system
appropriately for you.
For more information, see Performing a Domain Installation without being a Domain Administrator [page 50].
For a domain installation, you need to:
1. Check that the account used for the installation is a member of the domain Admins group.
2. If required, obtain these rights by asking the system administrator to enter the account as a
member of the domain Admins group.
Local Installation
For a local installation the account used for the installation needs to be a member of the local
Administrators group of the machine involved. In a local installation, all Windows account
information is stored locally on one host and is not visible to any other hosts in the system.
03/28/2008 PUBLIC 49/164](https://image.slidesharecdn.com/ecc6sr3orawininstguide-130128021232-phpapp02/75/Ecc6-sr3-ora_win_instguide-49-2048.jpg)
![3 Preparation
3.6 Performing a Domain Installation Without Being a Domain Administrator
If the SAP system is to run on a single machine, you can perform a local installation.
For a local installation, you need to:
1. Check that the account used for the installation is a member of the local Administrators group.
2. If required, obtain these rights by asking the system administrator to enter the account as a
member of the local Administrators group.
3.6 Performing a Domain Installation Without Being a Domain
Administrator
You normally perform a domain installation of the SAP system with a user who is a member of the
domain Admins group, as described in Required User Authorization for the Installation [page 48]. If for any
reason, the account used for the installation is not a member of the domain Admins group, you can
perform the installation with a domain user who is a member of the local Administrators group. In
this case, the domain administrator has to prepare the system appropriately for you. The domain
administrator can perform the following steps either using SAPinst or manually:
1. Create the new global group SAP_<SAPSID>_GlobalAdmin.
2. Create the two new SAP system users <sapsid>adm and SAPService<SAPSID>.
3. Add the users <sapsid>adm and SAPService<SAPSID> to the newly created group
SAP_<SAPSID>_GlobalAdmin.
Prerequisites
n You must be domain administrator to perform the required steps.
n Windows Server 2008 only:
You must have installed the feature Remote Server Administration Tools as follows:
1. Choose Start Administrative Tools Server Manager .
2. In the Server Manager windows, select Features.
3. Select the feature Remote Server Administration Tools Role Administration Tools Active Directory
Domain Services Tools .
Creating the Required Uses and Groups Using SAPinst
On the host where the SAP system is to be installed, the domain administrator runs SAPinst [page 62]
and chooses Software Life-Cycle Options Additional Preparation Options Operating System and Users to
have the group and users created automatically.
Creating the Required Uses and Groups Manually
Creating the New Global Group SAP_<SAPSID>_GlobalAdmin
1. Log on as domain administrator.
50/164 PUBLIC 03/28/2008](https://image.slidesharecdn.com/ecc6sr3orawininstguide-130128021232-phpapp02/75/Ecc6-sr3-ora_win_instguide-50-2048.jpg)
![3 Preparation
3.7 Preparing the SAP System Transport Host
When you install an SAP system, SAPinst by default creates the transport directory on the central
instance host in usrsaptrans.
Only valid for: HA (MSCS)
Note
In an MSCS configuration, SAPinst by default creates the transport directory on the (ABAP) central
services instance host in usrsaptrans.
End of: HA (MSCS)
If you do not intend to use the directory structure of the system you are going to install, but want
to use another new transport directory or an already existing transport directory, you need to
prepare that transport host:
n If the directory structure already exists, you must set up its security to allow the new system to
write to it.
n If it does not yet exist, you must create the core directory structure and a share to export it for
other computers as well as set the security on it.
The global transport directory usrsaptrans is used by the Change and Transport System (CTS).
The CTS helps you to organize development projects in the ABAP Workbench and in Customizing,
and then transport the changes between the SAP systems in your system landscape. For more
information, see:
http://help.sap.com/nw70 SAP NetWeaver 7.0 Library English SAP NetWeaver Library SAP NetWeaver
by Key Capability Solution Life Cycle Management by Key Capability Software Life Cycle Management Software
Logistics Change and Transport System
Procedure
1. If the transport directory does not yet exist, do the following:
a) Create the directory usrsaptrans on the host to be used as the transport host.
b) Share the usrsap directory on the transport host as SAPMNT and put the security settings for
Everyone to Full Control for this share.
This enables SAPinst to address the transport directory in the standard way as
SAPTRANSHOSTSAPMNTtrans.
2. Grant Everyone the permission Full Control for the transport directory.
Caution
Remove the Full Control to Everyone permission after you have finished the installation with SAPinst
and only grant Full Control on this directory to the SAP_<SAPSID>_GlobalAdmin groups of all the
systems that are part of your transport infrastructure. SAPinst assigns the appropriate rights with
the help of an additional SAP_LocalAdmin group. For more information, see Automatic Creation of
Accounts and Groups [page 105].
03/28/2008 PUBLIC 53/164](https://image.slidesharecdn.com/ecc6sr3orawininstguide-130128021232-phpapp02/75/Ecc6-sr3-ora_win_instguide-53-2048.jpg)
![3 Preparation
3.11 Preparing the Installation DVDs
Note
If required, you can perform a remote installation using a standalone SAPinst GUI on a separate
Windows or UNIX host. This lets you perform the installation on a remote host, controlling it
with the SAPinst GUI from a local host. If you want to perform a remote installation, see Performing
a Remote Installation with SAPinst [page 72]. In this case, you need at least a JRE on the local host to
start the SAPinst GUI there.
Procedure
1. Check the JRE versions that are released for SAP systems in the Product Availability Matrix (PAM):
a) Go to http://service.sap.com/pam.
b) On the right-hand panel, choose SAP Application Components <your product> .
c) Choose tabstrip JSE Platforms.
Note
For more information about the recommended JRE version for your operating system and about
how to download it, see SAP Note 723909.
2. Make sure a valid JRE version is installed, as follows:
n If the JRE is not already installed, you need to download and install it.
n If the JRE is not already installed
Since the JRE is not part of the SAP shipment, you need to download and install it. The JRE
is part of the JDK (Java Development Kit).
n If the JRE is already installed
Check the installed version of the JRE by entering:
java -version
Note
SAPinst checks environment variable SAPINST_JRE_HOME for a valid Java runtime environment.
If SAPINST_JRE_HOME is not found, SAPinst also checks JAVA_HOME.
3.11 Preparing the Installation DVDs
This section describes how to prepare the installation DVDs, which are available as follows:
n You obtain the installation DVDs as part of the installation package.
n You can also download the installation DVDs from SAP Service Marketplace [page 57].
Procedure
1. Identify the required DVDs for your installation as listed below.
03/28/2008 PUBLIC 55/164](https://image.slidesharecdn.com/ecc6sr3orawininstguide-130128021232-phpapp02/75/Ecc6-sr3-ora_win_instguide-55-2048.jpg)

![4 Installation
4 Installation
This section provides information about how to perform a standard installation of your SAP system.
Only valid for: HA (MSCS)
Note
If you want to perform a Microsoft Cluster Service (MSCS) installation, see High Availability with
Microsoft Cluster Service [page 113].
End of: HA (MSCS)
You have to perform the following steps:
1. You install the Oracle database software [page 59].
Note
This step is not required if you install a system into an existing database (MCOD) [page 91].
2. If required, you set up multiple Oracle Homes [page 61].
Note
This step is not required if you install a system into an existing database (MCOD) [page 91].
3. You install the SAP system using SAPinst [page 62].
4.1 Installing the Oracle Database Software
This section describes how to install the database server software for Oracle 10g on the database host.
03/28/2008 PUBLIC 59/164](https://image.slidesharecdn.com/ecc6sr3orawininstguide-130128021232-phpapp02/75/Ecc6-sr3-ora_win_instguide-59-2048.jpg)
![4 Installation
4.1 Installing the Oracle Database Software
Note
n As of Oracle 10g there is no need to manually install the Oracle client software on the application
server, as SAPinst automatically installs the client software in the DIR_CT_RUN directory.
n For supplementary information about Oracle 10g, see the documentation provided by Oracle on
the RDBMS DVD under <DVD_Drive>:NT<platform>databasedocindex.htm
n If you have already installed an Oracle database instance or the Oracle software, and you want
to install an additional database instance, you have to decide whether you want to use single or
multiple Oracle Homes [page 32].
Only valid for: HA (MSCS)
Caution
You have to install the Oracle server software on both nodes.
End of: HA (MSCS)
Procedure
1. On the database server, start the Oracle Universal Installer as follows:
Place the Oracle in the DVD drive and change to the directory: <DVD_DRIVE>:NT<platform>
2. Double-click the file sapserver.cmd.
3. In the dos-box, specify the drive letter of the local disk where you want to install the Oracle
software, and the <DBSID>.
Note
The dos-box only appears if you perform a new installation (or under a different user), or if
<Oracle_Home> and <DBSID> are not set.
4. In the Oracle Universal Installer, enter the information as shown in the following table:
Window Entry
Specify File Locations If this screen appears, do the following:
n Under Source:
For Path:
Shows the path to the Oracle source software.
Do not change the path.
n Under Destination:
l For Name:
Enter the name of the new <Oracle_Home>
directory. We recommend that you use
the name <SAPSID><ORACLE_VERSION>, for
example, C12102
60/164 PUBLIC 03/28/2008](https://image.slidesharecdn.com/ecc6sr3orawininstguide-130128021232-phpapp02/75/Ecc6-sr3-ora_win_instguide-60-2048.jpg)
![4 Installation
4.2 Setting Up Multiple Homes (Optional)
Window Entry
l For Path:
Enter the path of a new
<Oracle_Home> directory. We
recommend that you use the path:
<DRIVE>:ORACLE<DBSID><ORACLE_VERSION>,
for example, C:ORACLEC12102
Note
Do not specify an already existing <Oracle_Home>
directory. You must specify a new directory.
Choose Next.
Summary Choose Install.
Oracle Net Configuration Assistant: Welcome If this dialog appears, select Perform typical configuration.
Configuration Assistants
Note
If you get an error message, choose OK. Ignore the
following Warning screen and choose OK.
Choose Next.
End of Installation Choose Exit to close the Oracle Universal Installer.
5. Install the latest patch set and hot fix (if available) as described in SAP Note 871735.
Note
Check SAP Note 839182, if you require an interim patch and the respective Perl version for the
Oracle database installation.
Only valid for: HA (MSCS)
Note
You have to install the current Oracle patch set and hot fix (if available) on both nodes.
End of: HA (MSCS)
4.2 Setting Up Multiple Homes (Optional)
This section only applies, if you want to use multiple Oracle Homes [page 32].
Procedure
1. Remove all parts referring to <Oracle_Home>bin from the system environment variable PATH:
03/28/2008 PUBLIC 61/164](https://image.slidesharecdn.com/ecc6sr3orawininstguide-130128021232-phpapp02/75/Ecc6-sr3-ora_win_instguide-61-2048.jpg)
![4 Installation
4.3 Installing an SAP System Using SAPinst
a) Start the Oracle Universal Installer with Start All Programs Oracle - <Home_Name> Oracle
Installation Products Universal Installer .
b) In the Welcome screen, choose Installed Products.
c) In the Inventory screen, choose the Environment tab.
d) Deselect all components and choose Apply.
2. Update or create, if not available, the user environment variable PATH of the user who performs the
installation with SAPinst:
a) Windows Server 2003 only:
Choose Start Control Panel System Advanced Environment Variables .
b) Windows Server 2008 only:
Choose Start Control Panel System Advanced system settings Environment Variables .
c) Under User variable for <user> modify or create, if not available, the value PATH to include the
<Oracle_Home>bin, which you want to use for the installation.
Note
You also have to modify the user environment variable PATH for all other users using the
Oracle software.
4.3 Installing an SAP System Using SAPinst
The following sections tell you how to install the various instances of an SAP system, or a standalone
engine:
n Running SAPinst on Windows [page 62]
n Using SAPinst GUI [page 69]
n Interrupted Installation with SAPinst [page 70]
n Performing a Remote Installation with SAPinst (Optional) [page 72]
n Starting SAPinst GUI Separately (Optional) [page 72].
n Entries in the Services File Created by SAPinst [page 74]
n How to Avoid Automatic Logoff by SAPinst [page 75]
4.3.1 Running SAPinst on Windows
This procedure tells you how to install an SAP system with SAPinst. SAPinst includes an SAPinst GUI
and a GUI server, which both use Java.
This section describes an installation where SAPinst, SAPinst GUI, and the GUI server are running
on the same host. If required, you can instead perform a remote installation with SAPinst [page 72], where
SAPinst GUI is running on a separate host from SAPinst and the GUI server.
Note the following information about SAPinst:
62/164 PUBLIC 03/28/2008](https://image.slidesharecdn.com/ecc6sr3orawininstguide-130128021232-phpapp02/75/Ecc6-sr3-ora_win_instguide-62-2048.jpg)
![4 Installation
4.3 Installing an SAP System Using SAPinst
n When you start SAPinst, SAPinst GUI and the GUI server also start. SAPinst GUI connects to the
GUI server with a secure SSL connection, and the GUI server connects to SAPinst.
n SAPinst creates the installation directory sapinst_instdir, where it keeps its log files, and which
is located directly in the Program Files directory. If SAPinst is not able to create sapinst_instdir
there, it tries to create sapinst_instdir in the directory defined by the environment variable TEMP.
Recommendation
We recommend that you keep all installation directories until the system is completely and
correctly installed.
n SAPinst creates a subdirectory for each installation option called
<sapinst_instdir><installation_option>, which is located in
%ProgramFiles%sapinst_instdir.
n The SAPinst Self-Extractor extracts the executables to a temporary directory (TEMP, TMP, TMPDIR, or
SystemRoot). These executables are deleted after SAPinst has stopped running.
Directories called sapinst_exe.xxxxxx.xxxx sometimes remain in the temporary directory.
You can safely delete them.
The temporary directory also contains the SAPinst Self-Extractor log file dev_selfex.out, which
might be useful if an error occurs.
Caution
If SAPinst cannot find a temporary directory, the installation terminates with the error FCO-00058.
n If you want to terminate SAPinst and the SAPinst Self-Extractor, choose one of the following
options:
l Right-click the icon for the SAPinst output window located in the Windows tray and choose Exit.
l Click the icon for the SAPinst output window located in the Windows tray and choose File
Exit .
Prerequisites
n You use an account with the required user authorization to install the SAP system with the SAPinst tool [page 48].
n You need at least 200 MB of free space in the installation directory for each installation option. In
addition, you need 60-200 MB free space for the SAPinst executables.
n If you are installing a second or subsequent SAP system into an existing database, make sure that
the database is up and running before starting the installation. For more information, see
Installation of Multiple Components in One Database [page 91].
n Dialog instance only: If your SAP System has been upgraded from an earlier release, and you
want to install a dialog instance, perform the following steps:
1. Make sure that the parameter DIR_CT_RUN has identical values in the instance profile and
the start profile of the central instance:
l If it is set in the instance profile, it must also be set in the start profile.
03/28/2008 PUBLIC 63/164](https://image.slidesharecdn.com/ecc6sr3orawininstguide-130128021232-phpapp02/75/Ecc6-sr3-ora_win_instguide-63-2048.jpg)

![4 Installation
4.3 Installing an SAP System Using SAPinst
Installation Services Remarks
Enqueue Replication Installs an enqueue replication server, which contains a replica of the lock
Server table (replication server)
Central Instance Installs a central instance
Dialog Instance Installs a dialog instance
Note
l You require at least one dialog instance in a high-availability system
configured with MSCS.
l If you want to use 32-bit SAP NetWeaver components, first check
whether these components can run on 64-bit operating systems. If so,
we recommend you to use 64-bit systems. If not, you can install an SAP
dialog instance on 32-bit operating systems to run these components.
For all other SAP instances, you must use 64-bit systems.
l If you want to use LDAP, you must choose the options under LDAP
Registration (see below) after you have installed an application server.
n Software Life-Cycle Options
You use this option to perform the following tasks or to install the following components:
Installation Service Remarks
Additional Preparation These preparation tasks comprise:
Options l Operating System Users and Groups
Creates all operating system users for your SAP system if they do
not yet exist.
Caution
u Perform this SAPinst option before you start the installation
of your SAP system.
u Make sure that you have the required user authorization [page 48] for
these accounts before you start the installation.
l Prerequisites Check
Checks your hardware and software requirements before you
start the installation.
Otherwise, SAPinst automatically checks the hardware and
software requirements during the installation with the Prerequisite
Checker. If any changes are necessary to the SAP system or operating
system settings, SAPinst automatically prompts you. For more
information, see Running the Prerequisites Checker in Standalone Mode [page
37].
03/28/2008 PUBLIC 67/164](https://image.slidesharecdn.com/ecc6sr3orawininstguide-130128021232-phpapp02/75/Ecc6-sr3-ora_win_instguide-67-2048.jpg)
![4 Installation
4.3 Installing an SAP System Using SAPinst
Installation Service Remarks
Application Server Choose Application Server <Database> Dialog Instance to install
one or more dialog instance(s) in an already installed SAP system,
if required.
Note
l If you want to use 32-bit SAP NetWeaver components, first check
whether these components can run on 64-bit operating systems.
If so, we recommend you to use 64-bit systems. If not, you can
install an SAP dialog instance on 32-bit operating systems to run
these components. For all other SAP instances, you must use
64-bit systems.
l If you want to use LDAP, you must choose the options under LDAP
Registration (see below) after you have installed an application
server.
LDAP Registration l Active Directory Configuration
Configures the Active Directory so that it can store SAP data.
Note
u We recommend you to choose this option before you install
the SAP system or an application server.
u You have to configure the active directory server only once.
Afterwards all SAP systems that should register in this
directory server can use this setup.
l LDAP Support
Sets up LDAP support for an application server instance.
Choose this option once per SAP system and after you have:
a) Performed the option Active Directory Configuration
b) Installed an application server instance.
For more information about LDAP and Active Directory, see Integration
of LDAP Directory Services [page 93].
System Copy Choose this service to perform a system copy.
For more information, see the system copy guide, which is available at:
http://service.sap.com/instguidesnw70 Installation Installation
‒ SAP NetWeaver Systems
Uninstall Choose this service to uninstall your SAP system, standalone engines,
or optional standalone units.
For more information, see Deleting an SAP System [page 107].
4. If SAPinst prompts you to log off from your system, log off and log on again.
SAPinst restarts automatically.
5. Follow the instructions in the SAPinst dialogs and enter the required parameters.
68/164 PUBLIC 03/28/2008](https://image.slidesharecdn.com/ecc6sr3orawininstguide-130128021232-phpapp02/75/Ecc6-sr3-ora_win_instguide-68-2048.jpg)
![4 Installation
4.3 Installing an SAP System Using SAPinst
Note
For more information about the input parameters, position the cursor in the field of the
respective parameter and press F1 .
Multiple Oracle Homes only:
SAPinst uses default values for the Oracle Home and Listener configuration. Therefore, if you
use multiple Oracle Homes, you must specify the new Oracle home, as well as the listener port
number. You can change these values on the SAPinstParameter Summary screen during the database
instance installation. On the Parameter Summary screen, check both Oracle > Database System and Oracle
> Listener Configuration and use the Revise button. On the upcoming screen, change the Oracle Home
and the Listener port number. Make sure to use a free port number, and do not use the numbers
1521 or 1527 as these may be already in use by default.
After you have entered all required input information, SAPinst starts the installation and displays
the progress of the installation. If the installation was successful, the screen Finished installation
successfully is displayed.
6. If you want to install an SAP system with ERP software units Self Services (XSS) and Business
Packages (Portal Content) (BP ERP) running directly on NetWeaver usage type EP Core (EPC) ‒
that is, without installing usage type EP ‒ proceed as follows:
a) On the screen SAP System > Software Units, select from the table Additional NetWeaver Software Units
only NetWeaver usage types AS Java and EP Core (EPC).
Caution
Do not select usage type EP.
b) Continue with the installation.
When the installation has successfully completed, SAPinst displays the screen Finished successfully.
7. We recommend you to delete all files in the directory %userprofile%.sdtgui.
More Information
Troubleshooting with SAPinst [page 107].
4.3.2 Using SAPinst GUI
The following table shows the most important functions that are available in SAPinst GUI:
03/28/2008 PUBLIC 69/164](https://image.slidesharecdn.com/ecc6sr3orawininstguide-130128021232-phpapp02/75/Ecc6-sr3-ora_win_instguide-69-2048.jpg)
![4 Installation
4.3 Installing an SAP System Using SAPinst
SAPinst GUI Functions
Input Type Label Description
Function key F1 Displays detailed information about each input parameter.
Menu option File Log off Stops the SAPinst GUI, but SAPinst and the GUI server continue
running.
Note
If for some reason you need to log off during the installation
from the host where you control the installation with SAPinst
GUI, the installation continues while you are logged off. You can
later reconnect to the same SAPinst installation from the same or
another host. For more information, see Starting SAPinst GUI Separately
[page 72].
Menu option File View Log Displays the installation log (sapinst_dev.log)
Menu option File Exit Cancels the installation with the following options:
n Stop
For more information, see the description of the message button
below.
n Continue
For more information, see the description of the message button
below.
Message button Retry Performs the installation step again (if an error has occurred).
Message button View Log Displays the installation log (sapinst_dev.log)
Message button Stop Stops the installation (SAPinst GUI, SAPinst and the GUI server)
without further changing the installation files. You can continue the
installation later from this point.
Message button Continue Continues with the option you have chosen before.
4.3.3 Interrupted Installation with SAPinst
The SAP system installation might be interrupted for one of the following reasons:
n An error occurred during the dialog or processing phase:
SAPinst does not abort the installation in error situations. If an error occurs, the installation pauses
and a dialog box appears. The dialog box contains a short description about the choices listed in
the table below as well as a path to a log file that contains detailed information about the error.
n You interrupted the installation by choosing Exit in the SAPinst menu.
The following table describes the options in the dialog box:
70/164 PUBLIC 03/28/2008](https://image.slidesharecdn.com/ecc6sr3orawininstguide-130128021232-phpapp02/75/Ecc6-sr3-ora_win_instguide-70-2048.jpg)
![4 Installation
4.3 Installing an SAP System Using SAPinst
4.3.4 Performing a Remote Installation with SAPinst
(Optional)
You use this procedure to install your SAP system on a remote host. In this case, SAPinst and the
GUI server run on the remote host, and SAPinst GUI runs on the local host. The local host is the
host from which you control the installation with SAPinst GUI.
Prerequisites
n The remote host meets the prerequisites before starting SAPinst as described in Running SAPinst
on Windows [page 62].
n Both computers are in the same network and can “ping” each other.
To test this:
l Log on to your remote host and enter the command ping <local host>.
l Log on to the local host and enter the command ping <remote host>.
Procedure
1. Log on to your remote host as a user who is a member of the local administrators group.
2. Insert the Installation Master DVD in the DVD drive on your remote host.
3. Open a command prompt and change to the required directory of the installation Master DVD.
Enter the following commands:
<DVD drive:>cd <DVD drive>:IM_WINDOWS_<platform>
sapinst.exe -nogui
For more information, see Running SAPinst on Windows [page 62].
SAPinst now starts and waits for the connection to the SAPinst GUI. You see the following at
the command prompt:
guiengine: no GUI connected; waiting for a connection on host <host_name>, port
<port_number> to continue with the installation
4. Start SAPinst GUI on your local host as described in Starting SAPinst GUI Separately [page 72].
4.3.5 Starting SAPinst GUI Separately (Optional)
You use this procedure to start SAPinst GUI separately. You might need to start SAPinst GUI
separately in the following cases:
n You have logged off from SAPinst.
If you logged off during the installation and you later want to reconnect to the installation while it
is still running, you can start SAPinst GUI separately.
n You want to perform a remote installation [page 72].
72/164 PUBLIC 03/28/2008](https://image.slidesharecdn.com/ecc6sr3orawininstguide-130128021232-phpapp02/75/Ecc6-sr3-ora_win_instguide-72-2048.jpg)
![4 Installation
4.3 Installing an SAP System Using SAPinst
If you want to run SAPinst GUI on a different host from SAPinst and the GUI server, you have to
start SAPinst GUI separately.
Prerequisites
You have installed the Java Runtime Environment [page 54] on the host on which you want to start SAPinst
without SAPinst GUI.
Starting SAPinst GUI on a Windows Platform
1. Log on as a member of the local administrators group.
2. Insert the SAP Installation Master DVD into your DVD drive.
3. Open a command prompt and change to the relevant directory:
<DVD drive>:IM_WINDOWS_<platform>
4. Start SAPinst GUI in one of the following ways:
n If SAPinst GUI runs on the same host as SAPinst and the GUI server, enter the following
command:
startinstgui.bat
SAPinst GUI uses the local host as default.
n If SAPinst and the GUI server runs on a different host from SAPinst GUI (remote installation),
enter the following command:
startinstgui.bat -host <host_name>
<host_name> is the host name of the installation host.
Note
l If you enter the command without additional parameters, SAPinst GUI uses the local host
as default. SAPinst GUI starts and tries to connect to the GUI server and SAPinst. Since
SAPinst and the GUI server are running on another host, SAPinst GUI cannot connect and
the SAP Installation GUI Connection dialog appears.
In this case, enter the name of the host on which SAPinst is running and choose Log on.
The first dialog of the installation appears and you can perform the remote installation
from your local host.
l For a list of options to start SAPinst GUI, change to the same directory as your SAPinst
executable and enter the command startinstgui.bat -h.
Starting SAPinst GUI on a UNIX Platform
1. Log on as user root.
Caution
Make sure that the root user has not set any environment variables for a different SAP system or
database.
03/28/2008 PUBLIC 73/164](https://image.slidesharecdn.com/ecc6sr3orawininstguide-130128021232-phpapp02/75/Ecc6-sr3-ora_win_instguide-73-2048.jpg)

![4 Installation
4.3 Installing an SAP System Using SAPinst
Note
If there is more than one entry for the same port number, this is not an error.
4.3.7 How to Avoid Automatic Logoff by SAPinst
When you install the SAP system with SAPinst, the SAPinst installation tool checks whether the user
account used for the installation has the required privileges and authorization.
For a domain installation, the account needs to be both a member of the local Administrators and
the domain Admins group. For a local installation, the account needs to be a member of the local
Administrators group.
In both cases, the user account must be authorized to:
n Act as part of the operating system
n Adjust memory quotas for a process
n Replace a process level token
If the user account does not have these rights assigned, SAPinst assigns them and automatically
logs the account off to activate them. To avoid SAPinst logging the account off, you can set these
rights manually before you start the installation.
Procedure
You perform the following steps to assign these rights to the user account used for the installation.
Caution
Be aware that domain policies override locally defined policies. This means that if you want to grant
domain administrator rights for a user who belongs to the local Administrators group, make sure
that you have also defined domain administrator rights for this user on domain level.
1. Choose Start Settings Control Panel Administrative Tools Local Security Policy .
2. In the Local Security Settings window, choose Local Policies User Rights Assignment. .
3. Double-click the required right under Policy and choose Add User or Group..
4. In the Select Users and Groups window, choose the required user and choose Add.
The selected user appears in the box below.
5. Confirm your entry and then repeat the steps for each remaining policy that the user requires
for the installation.
6. Log off and log on again to apply the changes.
More Information
Required User Authorization for the Installation [page 48]
03/28/2008 PUBLIC 75/164](https://image.slidesharecdn.com/ecc6sr3orawininstguide-130128021232-phpapp02/75/Ecc6-sr3-ora_win_instguide-75-2048.jpg)

![5 Post-Installation
5 Post-Installation
Note
In a central system, all mandatory instances are installed on one host. Therefore, if you are installing
a central system, you can ignore references to other hosts.
You perform the following post-installation steps:
1. You configure the Windows Server 2008 Firewall [page 78].
2. You check whether you can log on to the application server [page 79].
Note
In a distributed or high-availability system you check whether your can log on to every instance
of the SAP system that you installed.
3. You install the SAP license [page 80].
4. Windows Server 2008 only: If required, you set up symbolic links for application servers [page 80].
5. You install the SAP Online Documentation [page 81].
6. You configure the remote connection to SAP support [page 81].
7. On the central instance host, you apply the latest kernel and Support Packages [page 82].
8. You perform initial ABAP configuration [page 83].
9. On the database instance host, you perform the Oracle-specific post-installation steps [page 85].
Caution
This step does not apply to the installation of a Java Add-In for an existing ABAP system.
10. You perform the client copy [page 86]
11. You perform a full installation backup [page 87].
12. You implement ERP ABAP Add-On Components [page 87].
13. You ensure user security [page 88].
14. You can now start with the manual configuration of your IT scenarios for which you can find the
appropriate documentation in the SAP Solution Manager [page 89].
03/28/2008 PUBLIC 77/164](https://image.slidesharecdn.com/ecc6sr3orawininstguide-130128021232-phpapp02/75/Ecc6-sr3-ora_win_instguide-77-2048.jpg)

![6 Additional Information
6 Additional Information
The following sections provide additional information about optional preparation, installation
and post-installation tasks.
There is also a section describing how to delete an SAP system.
Preparation
n Installation of Multiple Components in One Database [page 91]
n Integration of LDAP Directory Services [page 93]
Post-Installation
n Starting and stopping the SAP system [page 97].
n You configure Single Sign-On with Microsoft Kerberos SSP [page 98].
n Configuration of the Connection to a central System Landscape Directory (SLD) [page 103]
n SAP System Security on Windows [page 103]
n Automatic Creation of Accounts and Groups [page 105]
n Troubleshooting [page 107]
Deleting an SAP System
n Deleting an SAP System [page 107]
6.1 Installation of Multiple Components in One Database
(Optional)
You can install multiple SAP systems in a single database. This is called Multiple Components
in One Database (MCOD).
Example
You install an SAP ERP central system and an SAP CRM central system in a single database.
MCOD is available with all SAP components. We are releasing this technology on all the major
databases for the SAP system, in line with our commitment to deliver platform-independent
solutions.
03/28/2008 PUBLIC 91/164](https://image.slidesharecdn.com/ecc6sr3orawininstguide-130128021232-phpapp02/75/Ecc6-sr3-ora_win_instguide-91-2048.jpg)
![6 Additional Information
6.2 Integration of LDAP Directory Services (Optional)
Constraints
Recommendation
We strongly recommend that you test MCOD in a test or development system.
We recommend that you run MCOD systems in the same context. We do not recommend that you
mix test, development, and production systems in the same MCOD.
n In the event of database failure, all SAP systems running on the single database are affected.
n Automated support in an MCOD landscape for the following administrative tasks depends on
your operating system and database:
l Copying a single component from an MCOD landscape to another database at database level.
l De-installing a single component from an MCOD landscape requires some additional steps.
You can use a remote connection to SAP support to request help with these tasks. For more
information, see http://service.sap.com/remoteconnection.
n You cannot install a Unicode SAP system with a non-Unicode SAP system in one database.
Only valid for: HA (MSCS)
n MSCS only: You cannot install multiple components in one database with Microsoft Cluster
Service (MSCS). For more information about MSCS, see High Availability with Microsoft Cluster Service
[page 113].
End of: HA (MSCS)
n For the second SAP system, you must use the same DBSID as for the first SAP system.
n If you install a system into an existing database (MCOD), the SYSTEM tablespace must contain
at least 400 MB of free space. If there is not enough space left, increase the size of this tablespace
with BRSPACE or BRTOOLS.
n If you decide to turn off archive log mode during the database load phase of the installation, you
need to plan downtime for all MCOD systems sharing the database.
6.2 Integration of LDAP Directory Services (Optional)
This section explains the benefits of using the SAP system with the Lightweight Directory Access
Protocol (LDAP) directory and gives an overview of the configuration steps required to use an SAP
system with the directory.
LDAP defines a standard protocol for accessing directory services, which is supported by various
directory products such as Microsoft Active Directory, and OpenLDAP slapd. Using directory services
enables important information in a corporate network to be stored centrally on a server. The
advantage of storing information centrally for the entire network is that you only have to maintain
data once, which avoids redundancy and inconsistency.
03/28/2008 PUBLIC 93/164](https://image.slidesharecdn.com/ecc6sr3orawininstguide-130128021232-phpapp02/75/Ecc6-sr3-ora_win_instguide-93-2048.jpg)
![6 Additional Information
6.2 Integration of LDAP Directory Services (Optional)
SAP Logon
Instead of using a fixed list of systems and message servers, you can configure the SAP Logon in the
sapmsg.ini configuration file to find SAP systems and their message servers from the directory. If
you configure SAP logon to use the LDAP directory, it queries the directory each time Server or Group
selection is chosen to fetch up-to-date information on available SAP systems.
To use LDAP operation mode, make sure that the sapmsg.ini file contains the following:
[Address]
Mode=LDAPdirectory
LDAPserver=
LDAPnode=
LDAPoptions=
Distinguish the following cases:
n If you use an Active Directory, you must set LDAPoptions=“DirType=NT5ADS”. For more
information, see the SAP system profile parameter ldap/options.
n You must specify the directory servers (for example, LDAPserver=pcintel6 p24709) if either of
the following is true:
l The client is not located in the same domain forest as the Active Directory
l The operating system does not have a directory service client (Windows NT and Windows 9X
without installed dsclient).
For more information, see the SAP system profile parameter ldap/servers.
n For other directory services, you can use LDAPnode to specify the distinguished name of the SAP
root node. For more information, see the SAP system profile parameter ldap/saproot.
SAP MMC
The SAP MMC is a graphical user interface (GUI) for administering and monitoring SAP systems from
a central location. It is automatically set up when you install an SAP system on Windows. If the SAP
system has been prepared correctly, the SAP MMC presents and analyzes system information that
it gathers from various sources, including the Active Directory.
Integrating the Active Directory as a source of information has advantages for the SAP MMC. It can
read system information straight from the directory that automatically registers changes to the
system landscape. As a result, up-to-date information about all SAP application servers, their status,
and parameter settings is always available in the SAP MMC.
If you need to administer distributed systems, we especially recommend that you use the SAP MMC
together with Active Directory services. You can keep track of significant events in all of the systems
from a single SAP MMC interface. You do not need to manually register changes in the system
configuration. Instead, such changes are automatically updated in the directory and subsequently
reflected in the SAP MMC.
If your SAP system is part of a heterogeneous SAP system landscape that comprises systems or
instances both on UNIX and Windows platforms, you can also use the SAP MMC for operating and
monitoring the instances running on UNIX.
03/28/2008 PUBLIC 95/164](https://image.slidesharecdn.com/ecc6sr3orawininstguide-130128021232-phpapp02/75/Ecc6-sr3-ora_win_instguide-95-2048.jpg)
![6 Additional Information
6.4 Single Sign-On with Microsoft Kerberos SSP
However, SAP does not and cannot provide support for third-party libraries loaded at the BC-SNC
interface. Documentation and support must be provided by the vendor or supplier of the third-party
software. Therefore, we recommend that customers use BC-SNC certified Single Sign-On solutions,
for which a single vendor has committed to provide implementation, documentation and support.
For more information, see http://www.sap.com/partners/directories/SearchSolution.epx
Under Certification Category, search for Secure network communication and choose Search.
Prerequisites
SSO based on Kerberos can only be set up for users that are members of a Windows 2000 and higher
domain.
Process Flow
To implement SSO with the Microsoft Kerberos SSP, you have to:
1. Prepare the central instance [page 99].
2. Configure the SAP front ends [page 100].
3. Configure the SAP logon [page 101].
4. Map SAP users to Windows users [page 102].
6.4.1 Preparing the Central Instance
To set up Single Sign-On (SSO) for Kerberos, you need to adapt the central instance profile and make
sure that the necessary Dynamic Link Library (DLL) is located in the Windows directory.
Procedure
1. Copy the Kerberos DLL for your platform to the following directory on the central instance:
<Drive>:%windir%system32.
Note
The following Kerberos DLLs are available:
gx64krb5.dll for Windows x64
gi64krb5.dll for Windows IA64
For more information about how to get the Kerberos 5 file, see SAP Note 595341.
2. In the instance profile of the central instance, set the SAP parameters:
snc/enable = 1
snc/gssapi_lib =<DRIVE>:%windir%system32<kerberos_file>.dll
snc/identity/as =p:SAPService<SAPSID>@<UPPERCASE_DNS_DOMAIN_NAME>
03/28/2008 PUBLIC 99/164](https://image.slidesharecdn.com/ecc6sr3orawininstguide-130128021232-phpapp02/75/Ecc6-sr3-ora_win_instguide-99-2048.jpg)
![6 Additional Information
6.4 Single Sign-On with Microsoft Kerberos SSP
<DNS_DOMAIN_NAME> is the Windows domain that the SAPService<SAPSID> user belongs to
and <UPPERCASE_DNS_DOMAIN_NAME> is the corresponding Kerberos Realm name, for example,
NT5.SAP-AG.DE.
Caution
<UPPERCASE_DNS_DOMAIN_NAME> and the SAPService<SAPSID> user are case-sensitive. Make sure
that you enter uppercase and lowercase correctly, for example:
p:SAPServiceC11@NT5.SAP-AG.DE.
Additional SNC Parameters
The following profile parameters let you continue with password-based access to the SAP system
when SNC has been enabled. To log on to the SAP system as an administrator to maintain the
mapping of Windows user accounts to SAP system user IDs (user and client), you have to use
these additional parameters at least once after enabling SNC. Once the mapping (at least for the
administrator) has been entered, you can disable further password-based logons by removing the
corresponding profile parameters.
snc/accept_insecure_cpic =1
snc/accept_insecure_gui =1
snc/accept_insecure_rfc =1
snc/permit_insecure_start =1
snc/permit_insecure_comm =1
3. Stop and restart the SAP system so that the profile parameters take effect.
6.4.2 Configuring the SAP Front End
To configure the SAP front end for SSO, you choose between the following approaches:
n Configure each SAP front end individually
You configure each machine where the SAP front end is running.
n Configure all SAP front ends automatically
You define a Group Policy for a Windows domain. This policy causes the wizard for configuring SSO
to be started automatically in the background the next time any member of the domain logs on
to an SAP front end.
These approaches are described below.
Prerequisites
You have completed Preparing the Central Instance [page 99].
Configuring SAP Front Ends Individually
1. Log on to the host where the SAP front end is running.
100/164 PUBLIC 03/28/2008](https://image.slidesharecdn.com/ecc6sr3orawininstguide-130128021232-phpapp02/75/Ecc6-sr3-ora_win_instguide-100-2048.jpg)
![6 Additional Information
6.4 Single Sign-On with Microsoft Kerberos SSP
Prerequisites
You have completed the following:
n Preparing the Central Instance [page 99]
n Configuring the SAP Front End [page 100]
Procedure
1. Right-click an entry in the SAP Logon window and choose Properties.
2. In the Network tab, select Activate Secure Network Communication..
3. In SNC name, enter:
p:SAPService<SAPSID>@<UPPERCASE_DOMAIN_NAME>
where <UPPERCASE_DOMAIN_NAME> is, for example, NT5.SAP-AG.DE.
Note
n Enter the same string that you entered in the central instance profile for
snc/identity/as
If the system C11 is running on account SAPServiceC11 of the domain NT5.SAP-AG.DE, you
enter:
P:SAPServiceC11@NT5.SAP-AG.DE
n If the entry you selected in the logon dialog box is a group entry, for example, C11 (PUBLIC),
the SNC name field is already filled.
4. Choose OK to confirm your entries.
The SAP Logon window now displays an icon with a key beside the system entry. This indicates that
Single Sign-On is active for the system.
6.4.4 Mapping SAP Users to Windows Users
Prerequisites
You have completed the following:
n Preparing the Central Instance [page 99]
n Configuring the SAP Front End [page 100]
n Activating Single Sign-On for the SAP Logon [page 101]
Procedure
1. Log on to the SAP system as administrator.
2. Choose Tools Administration Maintain Users Users or call transaction SU01.
The User Maintenance window appears.
3. Enter the name of the SAP user and choose User names Change .
102/164 PUBLIC 03/28/2008](https://image.slidesharecdn.com/ecc6sr3orawininstguide-130128021232-phpapp02/75/Ecc6-sr3-ora_win_instguide-102-2048.jpg)
![6 Additional Information
6.7 Automatic Creation of Accounts and Groups
Figure 7: User Groups and Accounts
Note
An access control list (ACL) controls access to SAP system objects. For maximum security in the SAP
system, only the following are members of all SAP system object ACLs:
n Local group SAP_<SAPSID>_LocalAdmin
n Group Administrators
n Account SYSTEM
6.7 Automatic Creation of Accounts and Groups
SAPinst automatically creates the accounts and groups required for the secure operation of the SAP system
with Windows [page 103] during the installation.
Features
The following figures show the steps that SAPinst performs to create the users and groups and assign
the required rights to SAP directories.
03/28/2008 PUBLIC 105/164](https://image.slidesharecdn.com/ecc6sr3orawininstguide-130128021232-phpapp02/75/Ecc6-sr3-ora_win_instguide-105-2048.jpg)
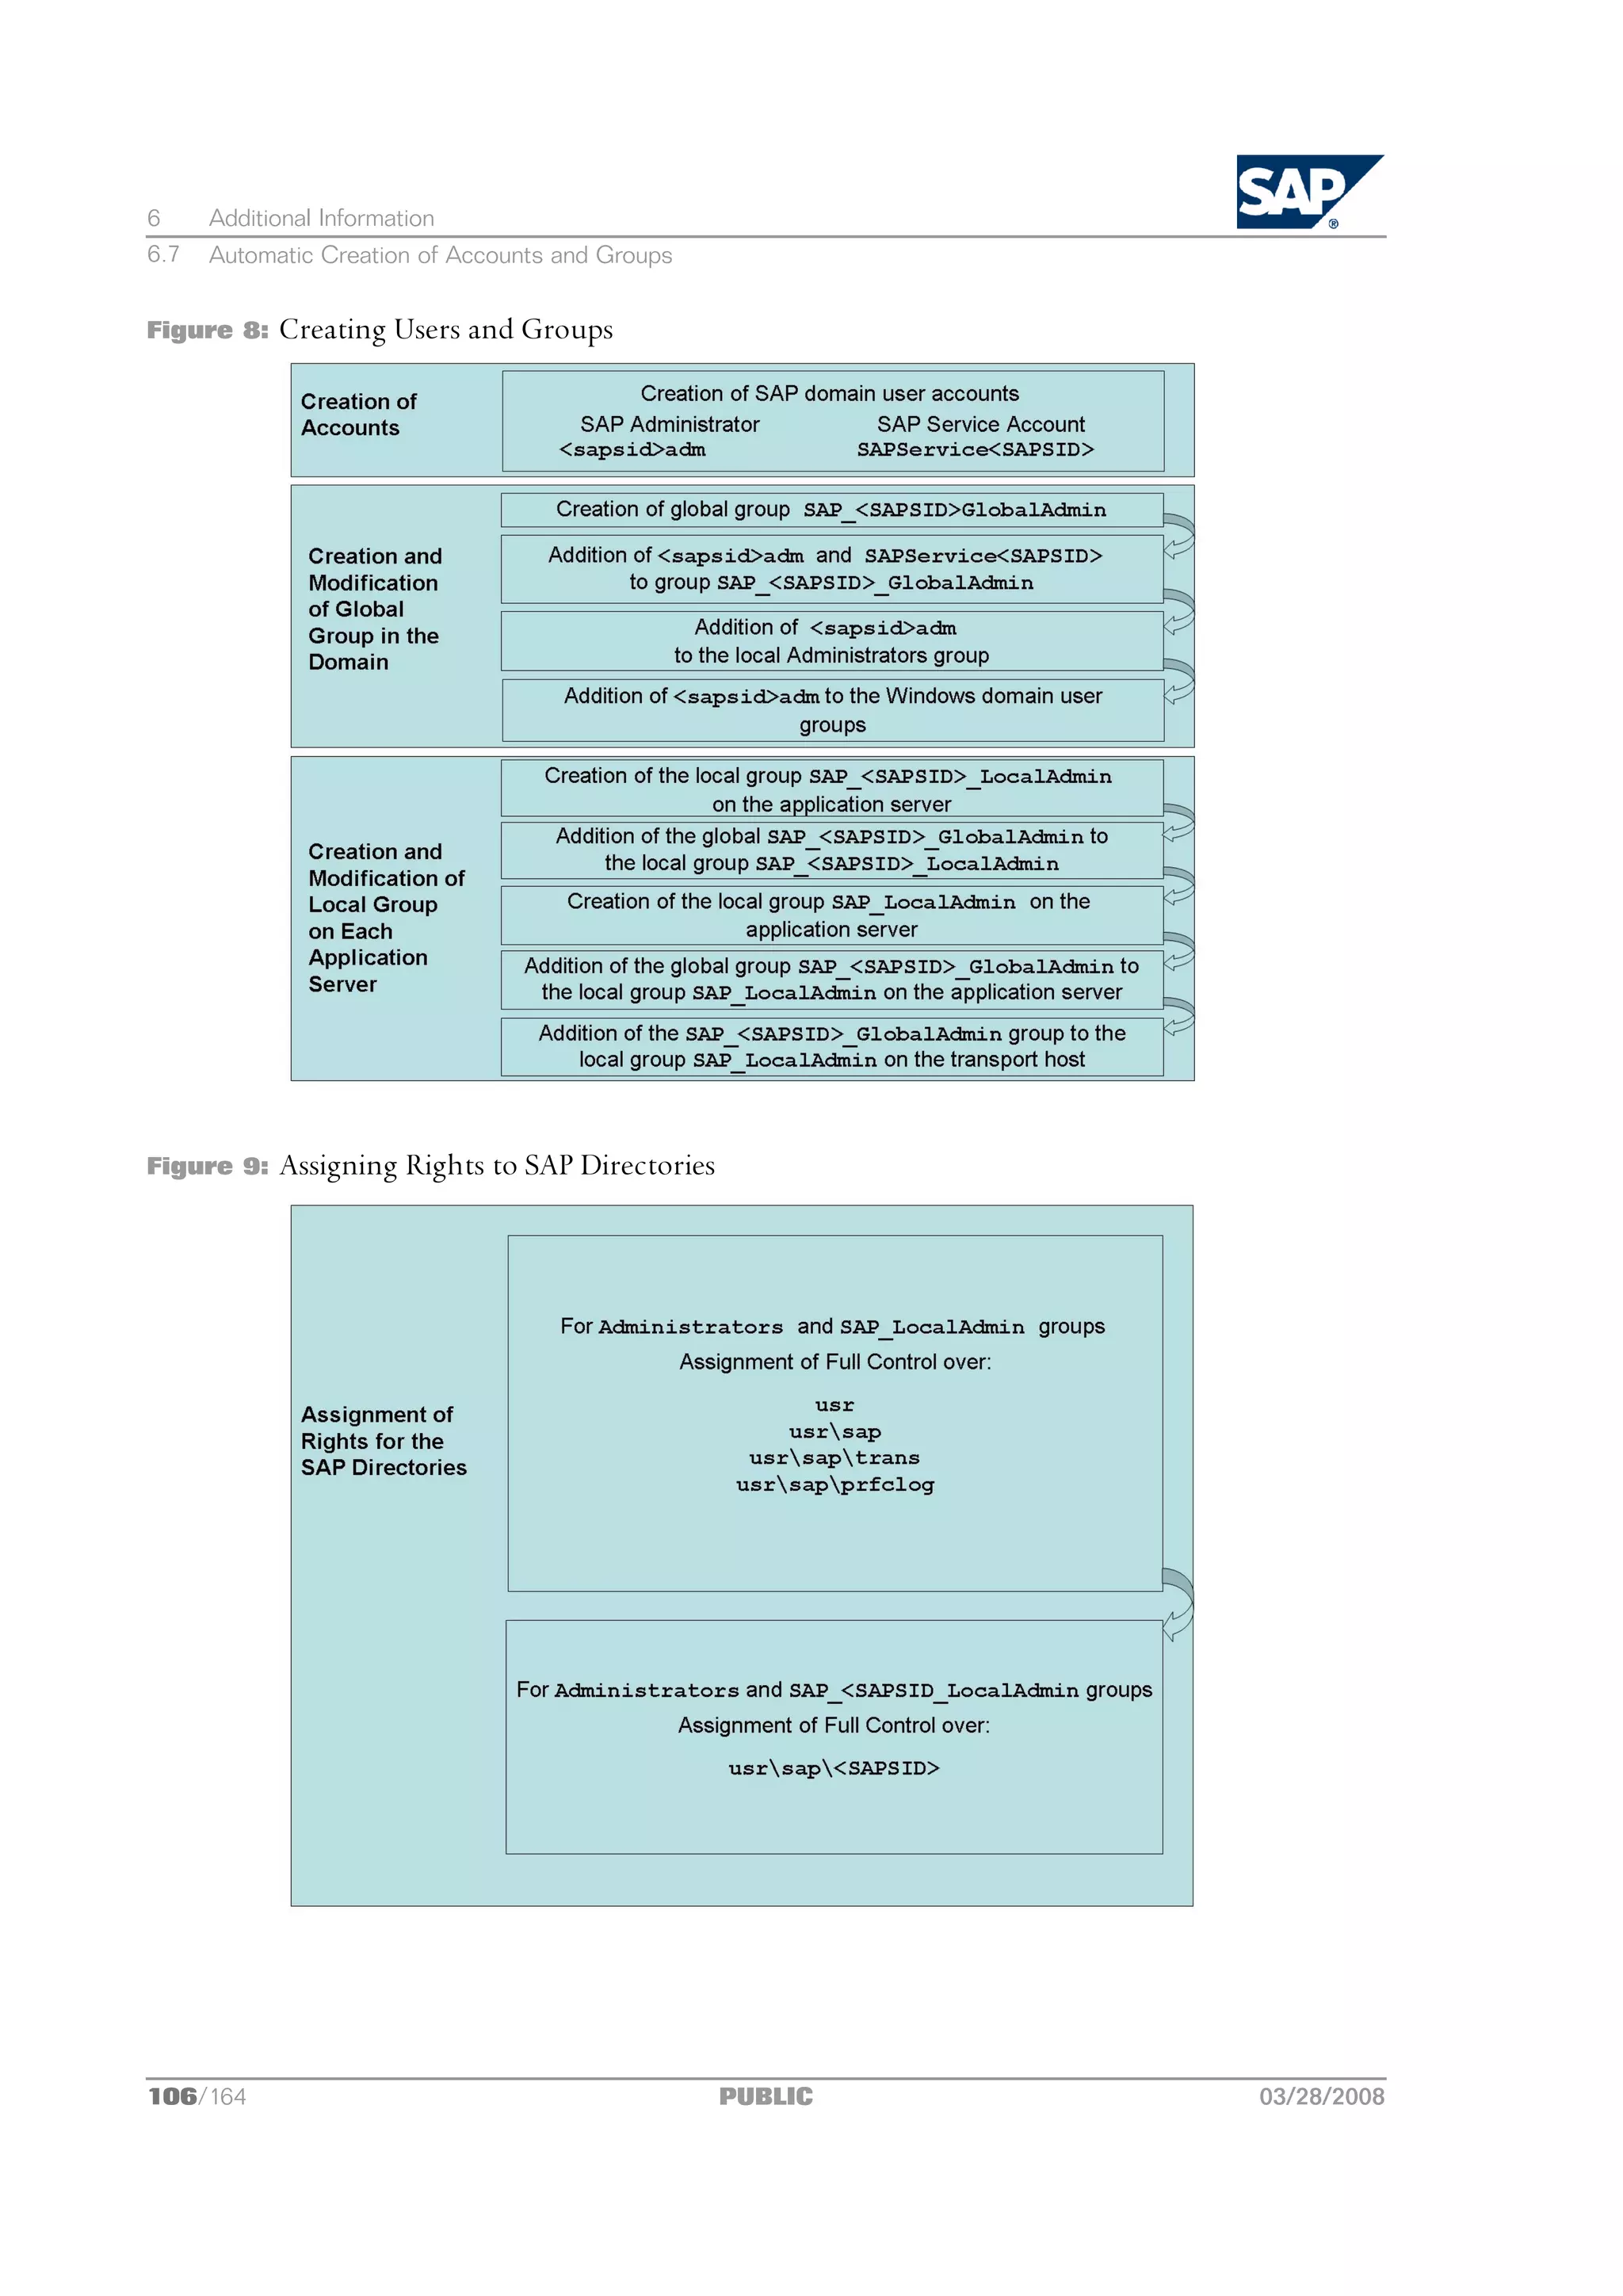
![6 Additional Information
6.8 Troubleshooting
6.8 Troubleshooting
The following section(s) describe the steps that you need to perform manually if SAPinst fails:
n Troubleshooting with SAPinst [page 107]
6.8.1 Troubleshooting with SAPinst
This section tells you how to proceed when errors occur during the installation with SAPinst.
If an error occurs, SAPinst:
n Stops the installation
n Displays a dialog informing you about the error
Procedure
1. To view the log file, choose View Logs.
2. If an error occurs during the dialog or processing phase, do either of the following:
n Try to solve the problem
n Abort the installation with Exit
For more information, see Interrupted Installation with SAPinst [page 70].
n Continue the installation by choosing Retry.
3. Check the log and trace files of the GUI server and SAPinst GUI in the directory
%userprofile%.sdtgui for errors.
4. If SAPinst GUI does not start, check the file sdtstart.err in the current %userprofile% directory.
5. If SAPinst GUI aborts during the installation without an error message, restart SAPinst GUI as
described in Starting SAPinst GUI Separately.
6.9 Deleting an SAP System
The following sections describe how to delete a single instance, a standalone engine or a complete
SAP system with SAPinst.
To delete your system, you use the SAPinst service <SAP System> Software Life-Cycle Options
Uninstall Uninstall System / Standalone Engine / Optional Standalone Unit .
Note
This description assumes that you have installed your SAP system with standard SAP tools according
to the installation documentation.
03/28/2008 PUBLIC 107/164](https://image.slidesharecdn.com/ecc6sr3orawininstguide-130128021232-phpapp02/75/Ecc6-sr3-ora_win_instguide-107-2048.jpg)
![6 Additional Information
6.9 Deleting an SAP System
Caution
n Make sure that all remaining instances are stopped before you delete the database instance.
n You cannot delete an SAP system remotely.
n SAPinst deletes the database instance but you have to delete the database software manually.
n If you delete network-wide users, groups or service entries in an environment with Network
Information System (NIS), other SAP installations might also be affected. Make sure that the
users, groups, and service entries to be deleted are no longer required.
Process Flow
n If you want to delete a central system, where all SAP instances reside on the same host, you can
do this in one SAPinst run [page 108].
Note
SAPinst deletes the database instance but you have to delete the Oracle database software [page 110]
manually.
n If you want to delete a distributed system, where the SAP instances reside on different hosts,
you have to run SAPinst [page 108] to delete the required instances locally on each host in the
following sequence:
1. You delete the dialog instance(s), if there are any.
2. You delete the database instance.
3. You delete the central instance.
Only valid for: HA (MSCS)
4. You delete the ABAP central services instance.
End of: HA (MSCS)
5. You delete the Oracle database software [page 110].
6.9.1 Running SAPinst to Delete an SAP System
This procedure tells you how to run the Uninstall option of SAPinst.
Prerequisites
You are logged on with a user account that has the required authorization to run the SAPinst tool
and the SAP system. For more information, see Required User Authorization for the Installation [page 48].
Procedure
1. Start SAPinst and on the Welcome screen, choose:
Software Life-Cycle Options Uninstall Uninstall System / Standalone Engine / Optional Standalone Unit
108/164 PUBLIC 03/28/2008](https://image.slidesharecdn.com/ecc6sr3orawininstguide-130128021232-phpapp02/75/Ecc6-sr3-ora_win_instguide-108-2048.jpg)
![6 Additional Information
6.9 Deleting an SAP System
Note
With this SAPinst option you do not delete the database software.
2. Follow the instructions in the SAPinst input dialogs.
Note
For more information about the input parameters, place the cursor on the relevant field and
press F1 in SAPinst.
SAPinst first asks you which SAP instances you want to delete.
Make sure that you delete the SAP instances in the correct order, as described in Deleting an SAP
System [page 107].
Caution
n SAPinst only stops local instances automatically.
Before you delete the database instance of a distributed system make sure that you stop all
remaining instances. You must stop the instance with the message server only after having
entered all SAPinst parameters for the deletion of the database instance.
n If SAPinst stops responding while trying to delete the central instance, close SAPinst with
Cancel and Exit. Log off and log on again. To complete the uninstall process of the central
instance, restart SAPinst.
3. Use the following options to delete the database instance and schema.
Options Remarks
Drop database Select this option if you want to delete the database instance, including
all database schemas, all tablespaces and their corresponding data files.
The database software is not deleted.
Select schemas and tablespaces Select this option only if you use MCOD and you want to delete the
to drop only selected database schema and the selected tablespaces.
The database instance and the database software is not deleted.
Caution
Before deleting any database schema, make sure that:
n You have performed a recent offline database backup.
n You have stopped or deleted all SAP instances belonging to this
database schema.
n If you have installed a Java system, you have stopped the J2EE Engine
with transaction SMICM.
n You only delete the tablespaces that belong to the selected schema.
03/28/2008 PUBLIC 109/164](https://image.slidesharecdn.com/ecc6sr3orawininstguide-130128021232-phpapp02/75/Ecc6-sr3-ora_win_instguide-109-2048.jpg)
![6 Additional Information
6.9 Deleting an SAP System
Options Remarks
The Java schema SAP<SAPSID>DB default belongs to the database
tablespace PSAP<SAPSID<DB. All other SAP tablespaces belong to the
ABAP schema SAP <SAPSID> or SAPR3.
Keep database and its content Select this option if you only want to delete the previously selected SAP
instance(s). With this option, you do not delete the database instance,
database content or the database software.
4. Delete the local user group SAP_<SAPSID>_LocalAdmin manually as follows:
a) Choose Start Programs Administrative Tools Computer Management
b) Choose Local Users and Groups Groups.
c) Right-click the local group SAP_<SAPSID>_LocalAdmin and choose Delete.
5. Delete the Oracle database software [page 110].
6. If required, you can delete the directory usrsaptrans and its contents manually.
SAPinst does not delete usrsaptrans because it might be shared.
6.9.2 Deleting the Oracle Database Software
You use the Oracle Universal Installer to delete the Oracle database software.
Prerequisites
Before you delete the database software, make sure that you delete the groups ORA_<DBSID>_DBA and
ORA_<DBSID>_OPER as follows:
1. Choose Start Control Panel Administrative Tools Computer Management
2. Choose Local Users and Groups Groups. .
3. Select and delete the local groups ORA_<DBSID>_DBA and ORA_<DBSID>_OPER with Action Delete .
Procedure
Note
The Oracle software is installed on all hosts where an SAP instance is running, for example, on a
central instance host, database host, or dialog instance host. Do not delete the Oracle database
software, if another SAP instance is running on the same host.
110/164 PUBLIC 03/28/2008](https://image.slidesharecdn.com/ecc6sr3orawininstguide-130128021232-phpapp02/75/Ecc6-sr3-ora_win_instguide-110-2048.jpg)


![7 High Availability with Microsoft Cluster Service
7.1 Planning
Note
n Make sure that you read SAP Note 1108852 , which contains the most recent information as well
as corrections for a high-availability installation. For more information, see the SAP installation
notes [page 11] before you begin the installation.
n In this documentation the hosts in an MSCS cluster are referred to as first MSCS node and
additional MSCS node(s).
n When you are setting up the SAP system with MSCS, you combine standard installation steps,
described earlier in this documentation, with cluster-specific steps, described here.
To install a new SAP system with MSCS, you have to perform a number of extra steps specially required
for the cluster and configure the SAP system so that it can take advantage of the cluster functionality:
n Since the cluster hardware has at least two nodes that have access to all local and shared storage
devices, you have to install some components on all nodes and observe special rules for distributing
components to local or shared disks.
n Since the correct configuration of network addresses is absolutely essential to enable the cluster
to function properly, you have to perform a number of additional steps that are necessary to
set up and check addressing.
Note
If you have an existing SAP system and plan to migrate to a cluster with new hardware, you install
the SAP system using a system copy. Therefore, you have to prepare for the installation by creating
a homogeneous or a heterogeneous copy of the database. After you have created a copy of the
database, you can install your system with MSCS. However, instead of loading the database from the
Export DVDs in the installation package, you load it using your exported database.
For more information about a homogeneous or heterogeneous system copy, see the
documentation Homogeneous and Heterogeneous System Copy for SAP Systems based on SAP NetWeaver at
http://service.sap.com/instguidesnw70 Installation . In addition, for more information about a
heterogeneous system copy, see http://service.sap.com/osdbmigration.
The documentation for a homogeneous or heterogeneous system copy does not include the
cluster-specific information, which is described here.
7.1 Planning
You have to complete the following planning activities for you SAP system using Microsoft Cluster
Service (MSCS):
1. You check that you have completed the general planning activities [page 17].
2. You decide how to set up your SAP system components in an MSCS configuration [page 115].
3. You decide how to distribute components to disks for MSCS [page 120].
114/164 PUBLIC 03/28/2008](https://image.slidesharecdn.com/ecc6sr3orawininstguide-130128021232-phpapp02/75/Ecc6-sr3-ora_win_instguide-114-2048.jpg)
![7 High Availability with Microsoft Cluster Service
7.1 Planning
4. You read Directories in an MSCS Configuration [page 124]
5. You read IP Addresses in an MSCS Configuration [page 125]
6. You obtain and check IP addresses for MSCS [page 128].
Note
Windows Server 2008 only:
This step is not required if you use DHCP-based IP addresses.
7.1.1 System Configuration in MSCS
The following chapters provide information about the configuration of your SAP system
configuration in MSCS. It describes the components you have to install for an SAP system running in
a cluster, and how to distribute them on the specific host. For more information, see:
n SAP System Components in an MSCS Configuration [page 115]
n Enqueue Replication Server in MSCS [page 119]
7.1.1.1 SAP System Components in an MSCS Configuration
In an MSCS configuration you have the following components for your SAP system:
SAP System Components in an MSCS Configuration
Number of Components per SAP
Component System Single Point of Failure (SPOF)
ASCS instance (message services 1 yes
and enqueue services)
Database instance 1 yes
Application server (central 1-<n> no
instance, dialog instance)
n To protect the SPOFs ((A)SCS instance, database instance) you have to use MSCS.
If a hardware or software problem occurs on the first MSCS node, the clustered (A)SCS instance
and the clustered database automatically fail over to the other node.
If you need to maintain the MSCS node where the (A)SCS instance and database are running you
can switch these instances to the other node. When maintenance work is finished you move the
(A)SCS and database instance back to the original node.
n To protect system components that are non-SPOFs, for example application servers, you have
to install them as multiple components. In this case you must install at least two application
03/28/2008 PUBLIC 115/164](https://image.slidesharecdn.com/ecc6sr3orawininstguide-130128021232-phpapp02/75/Ecc6-sr3-ora_win_instguide-115-2048.jpg)
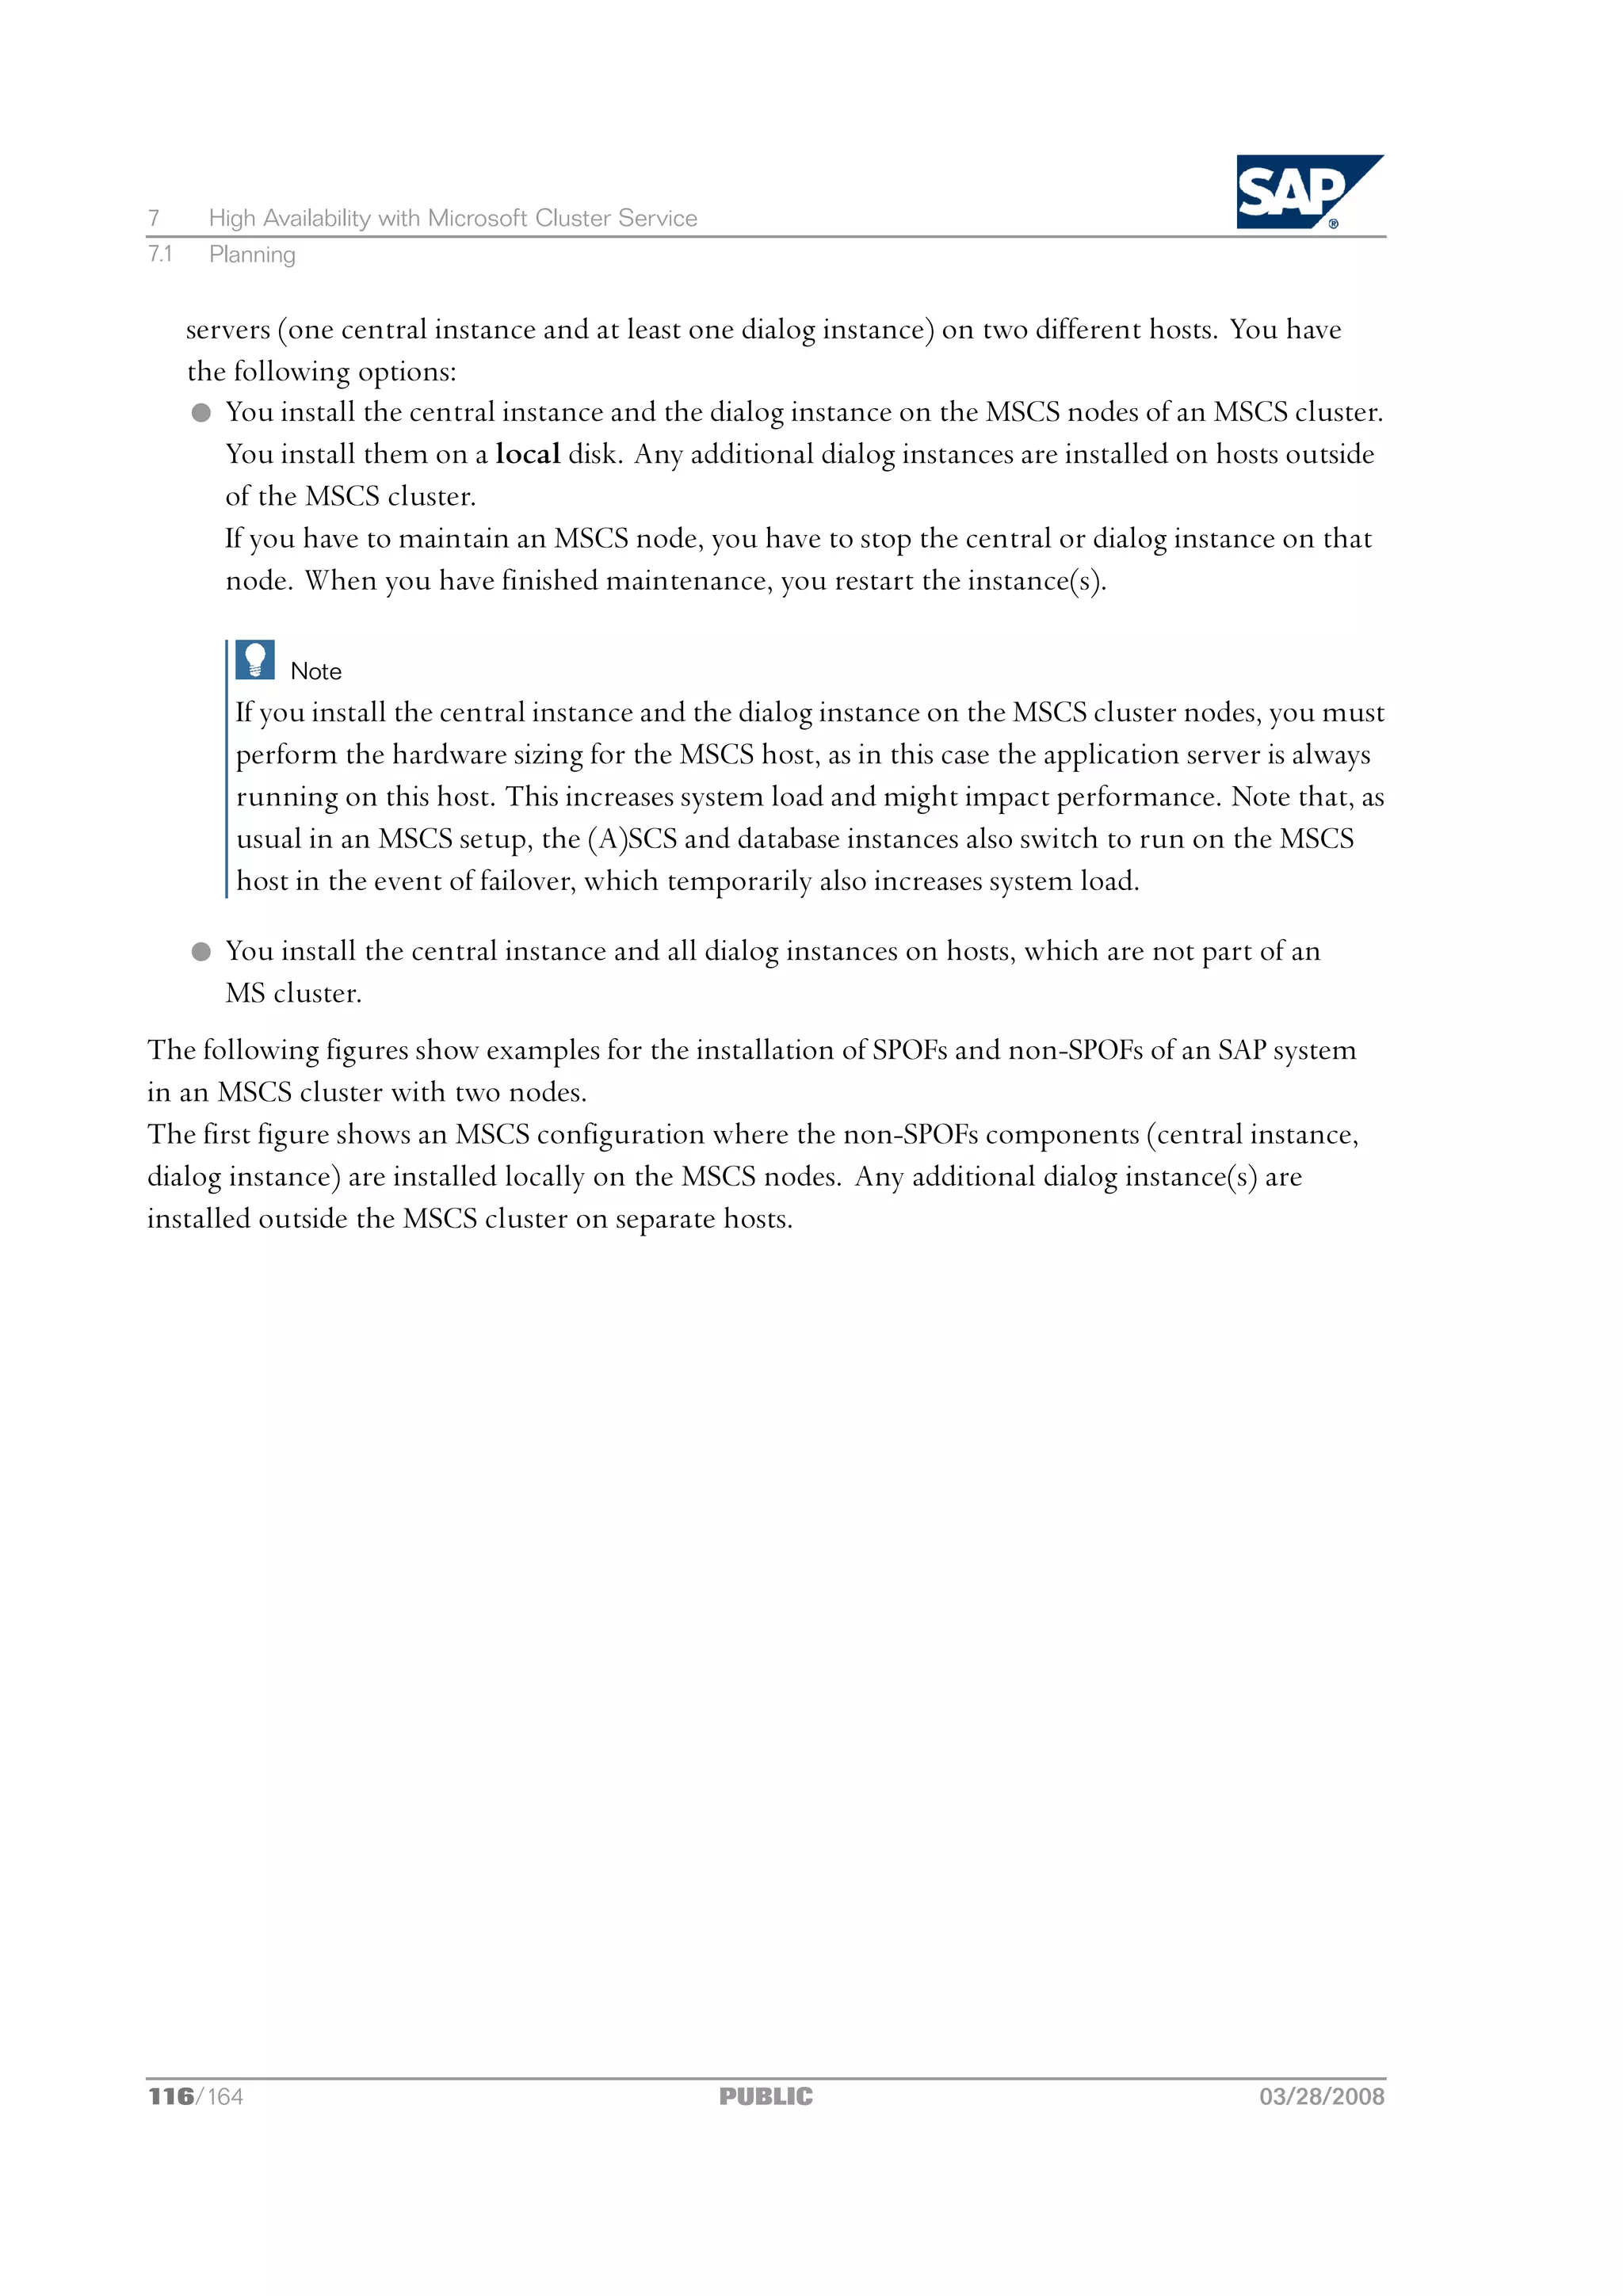
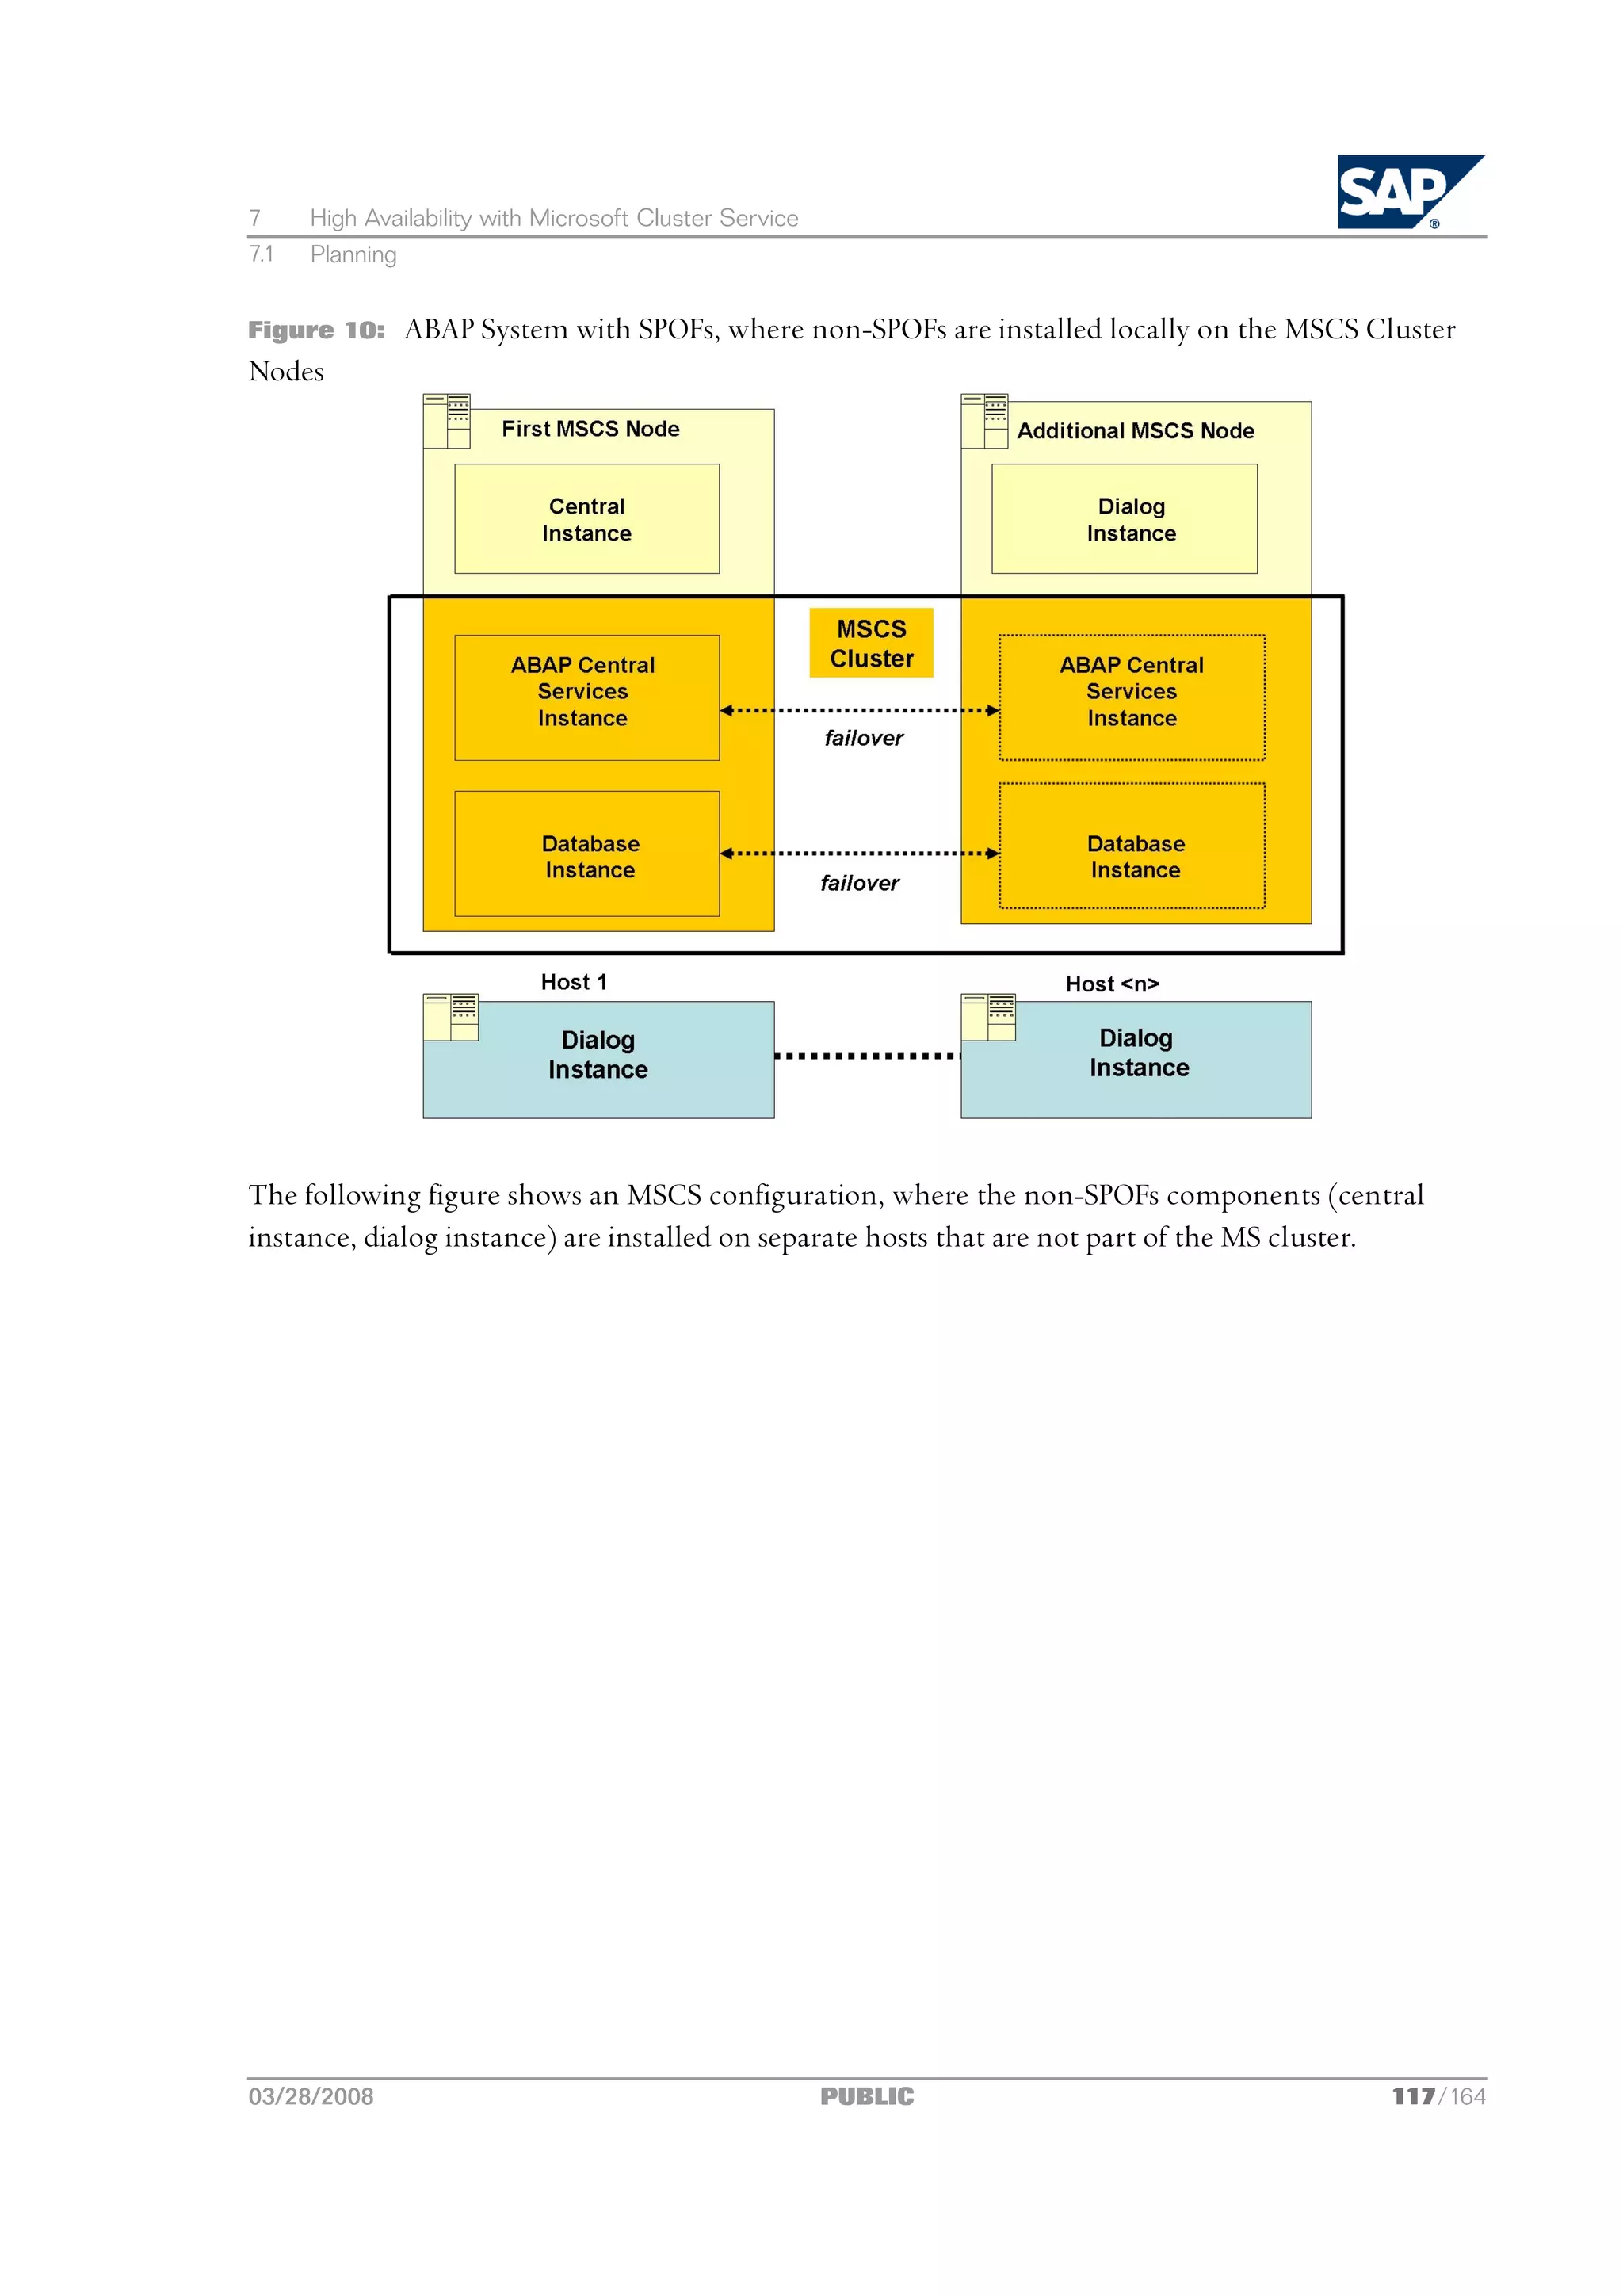
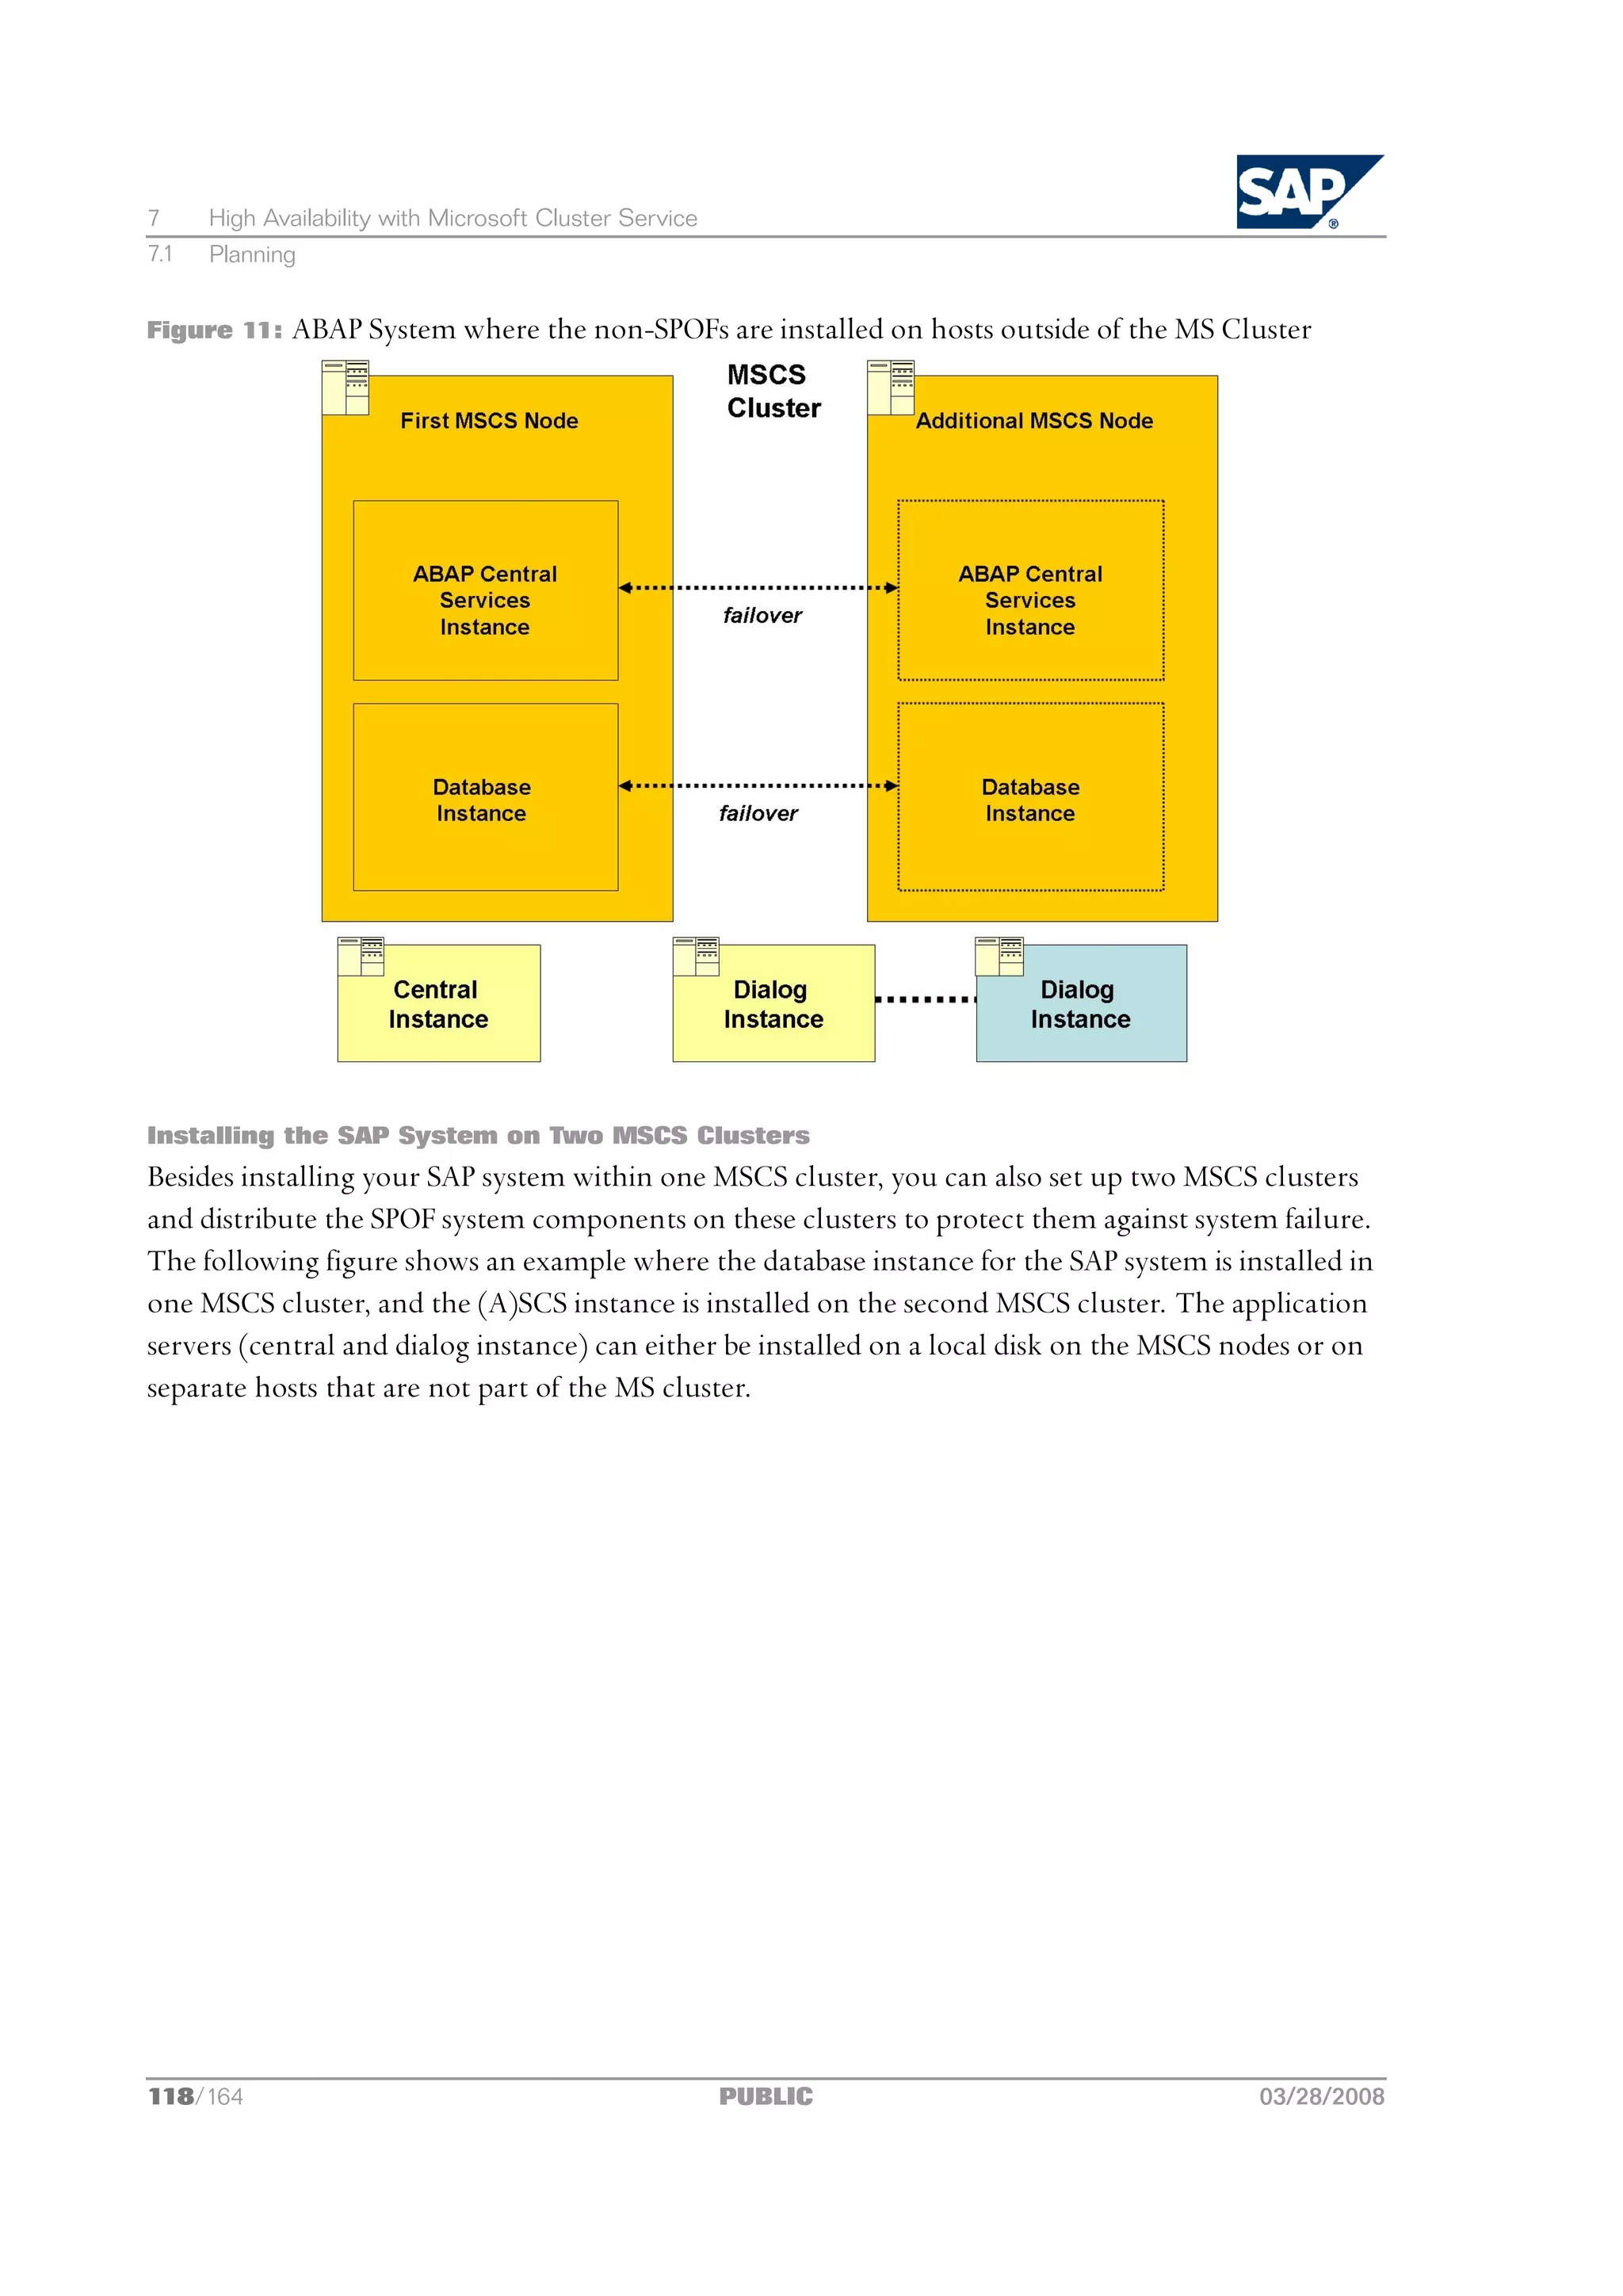
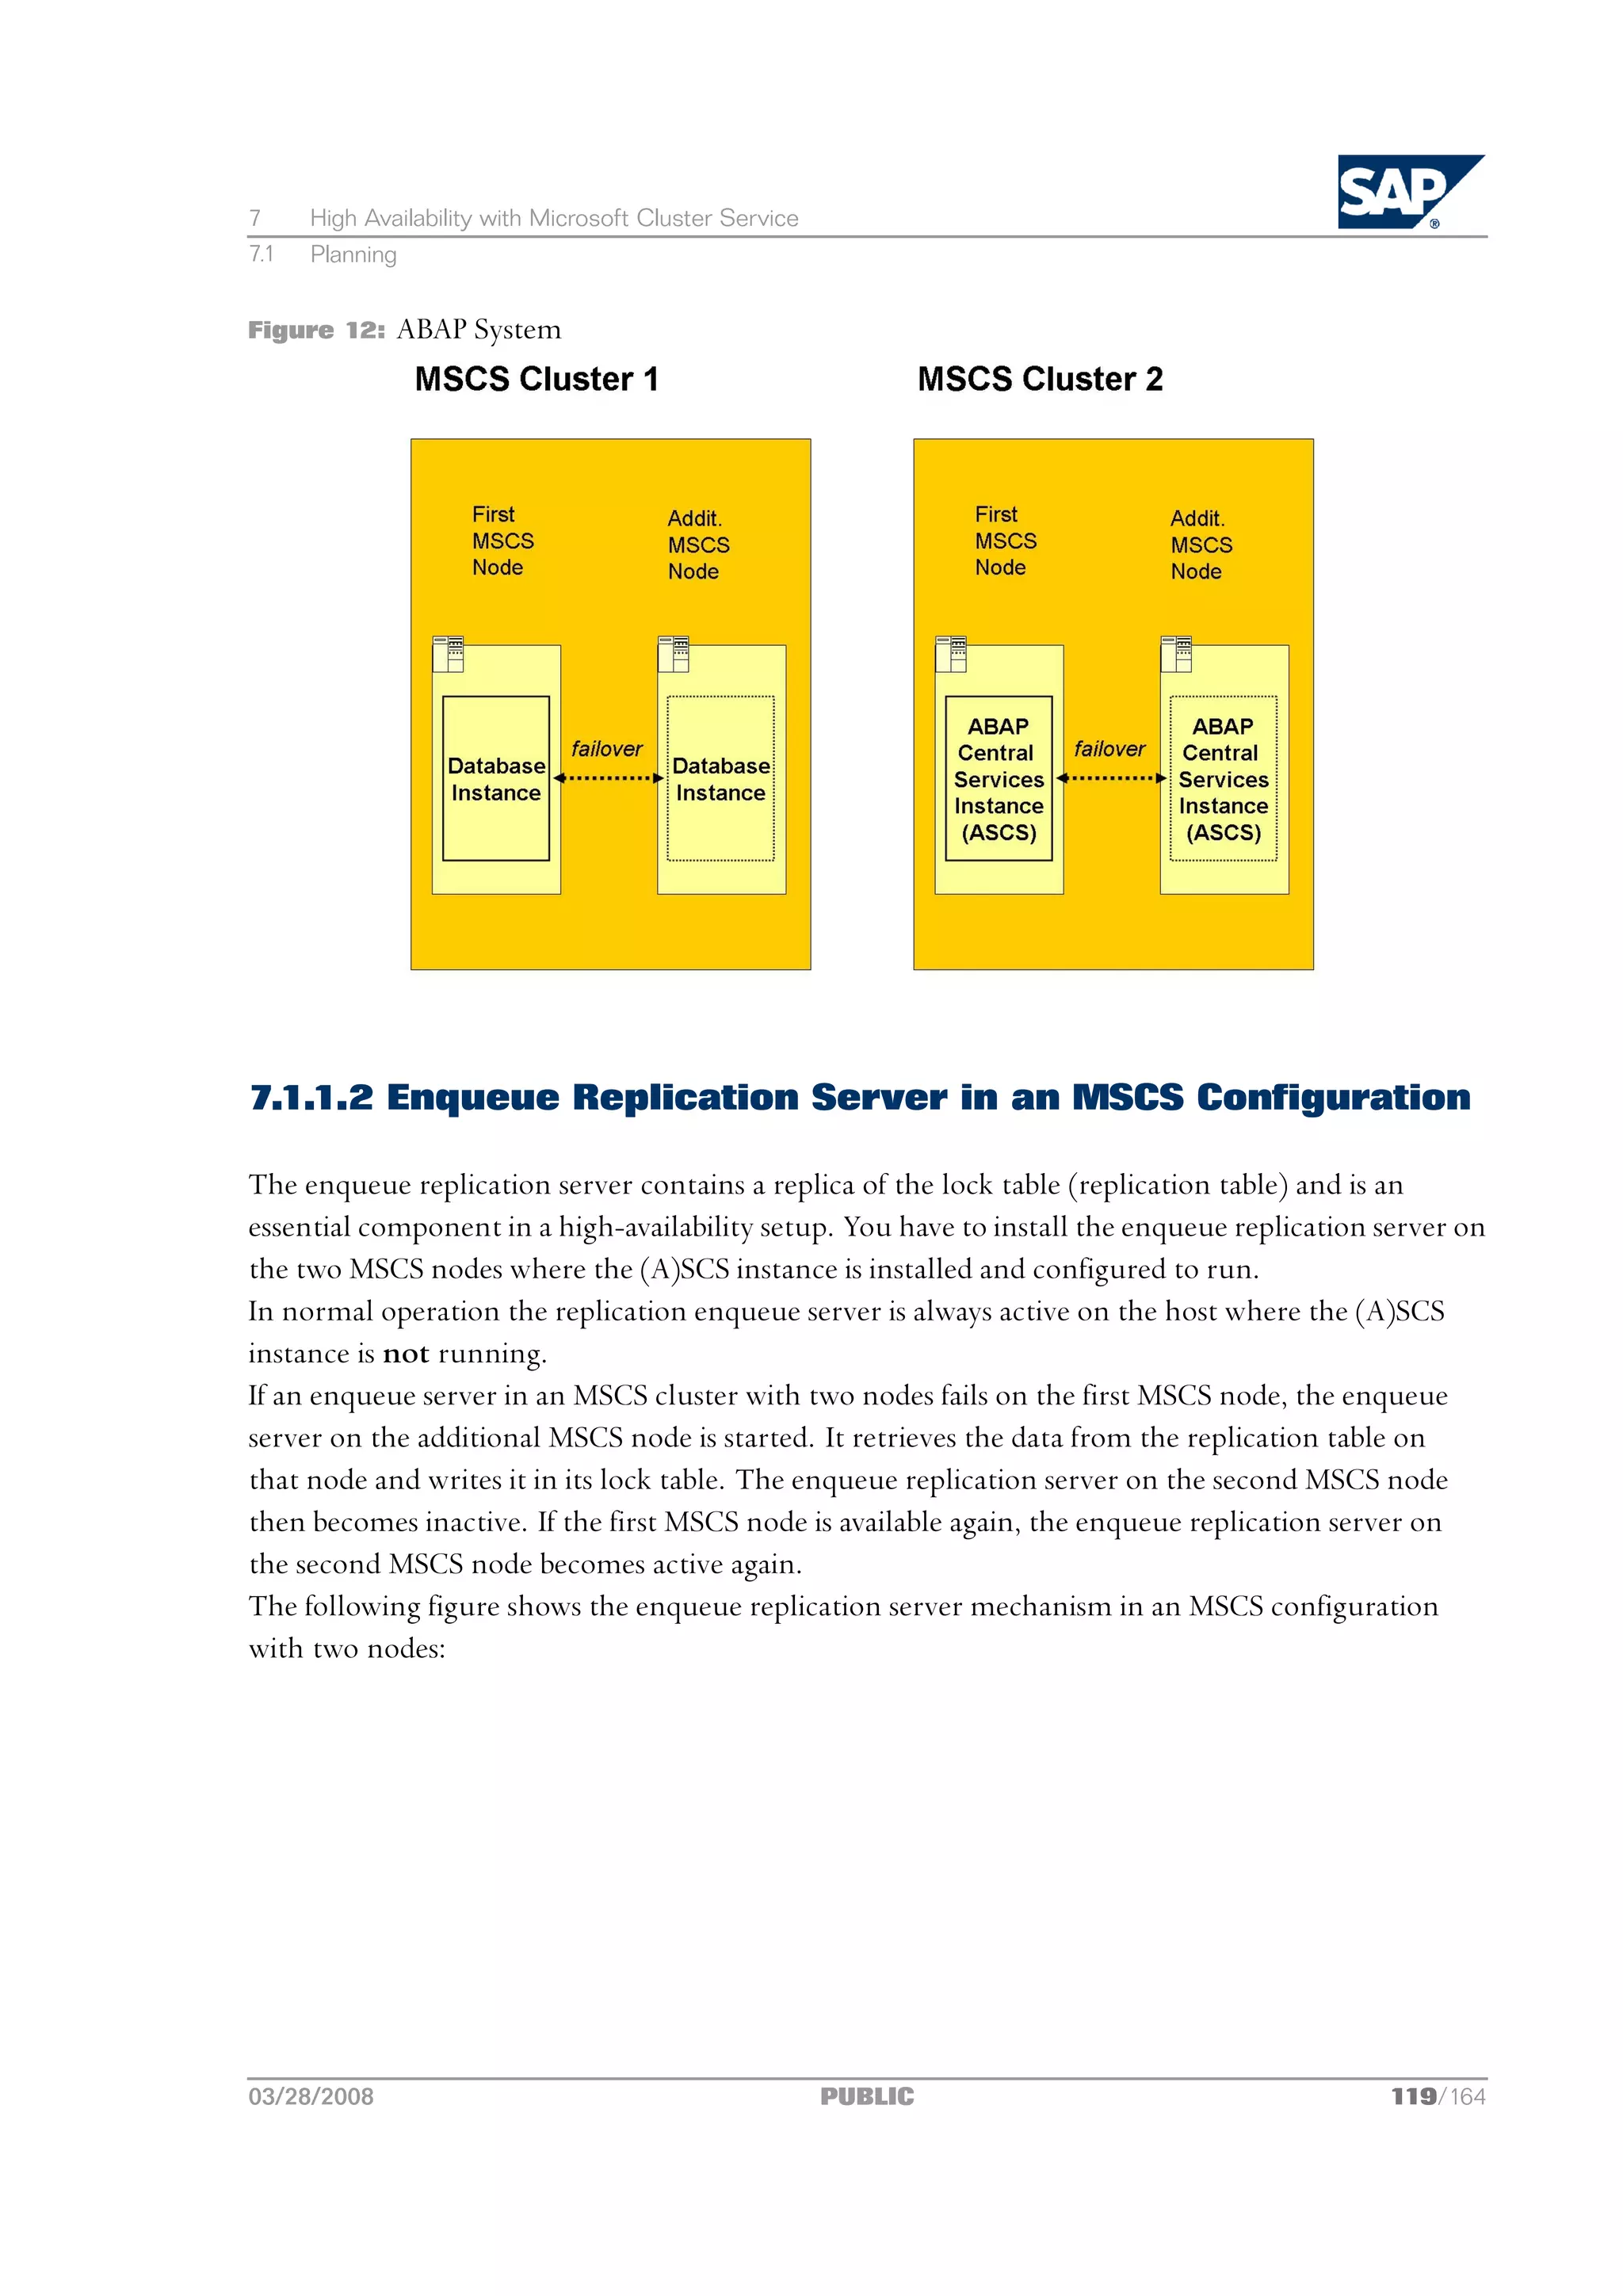
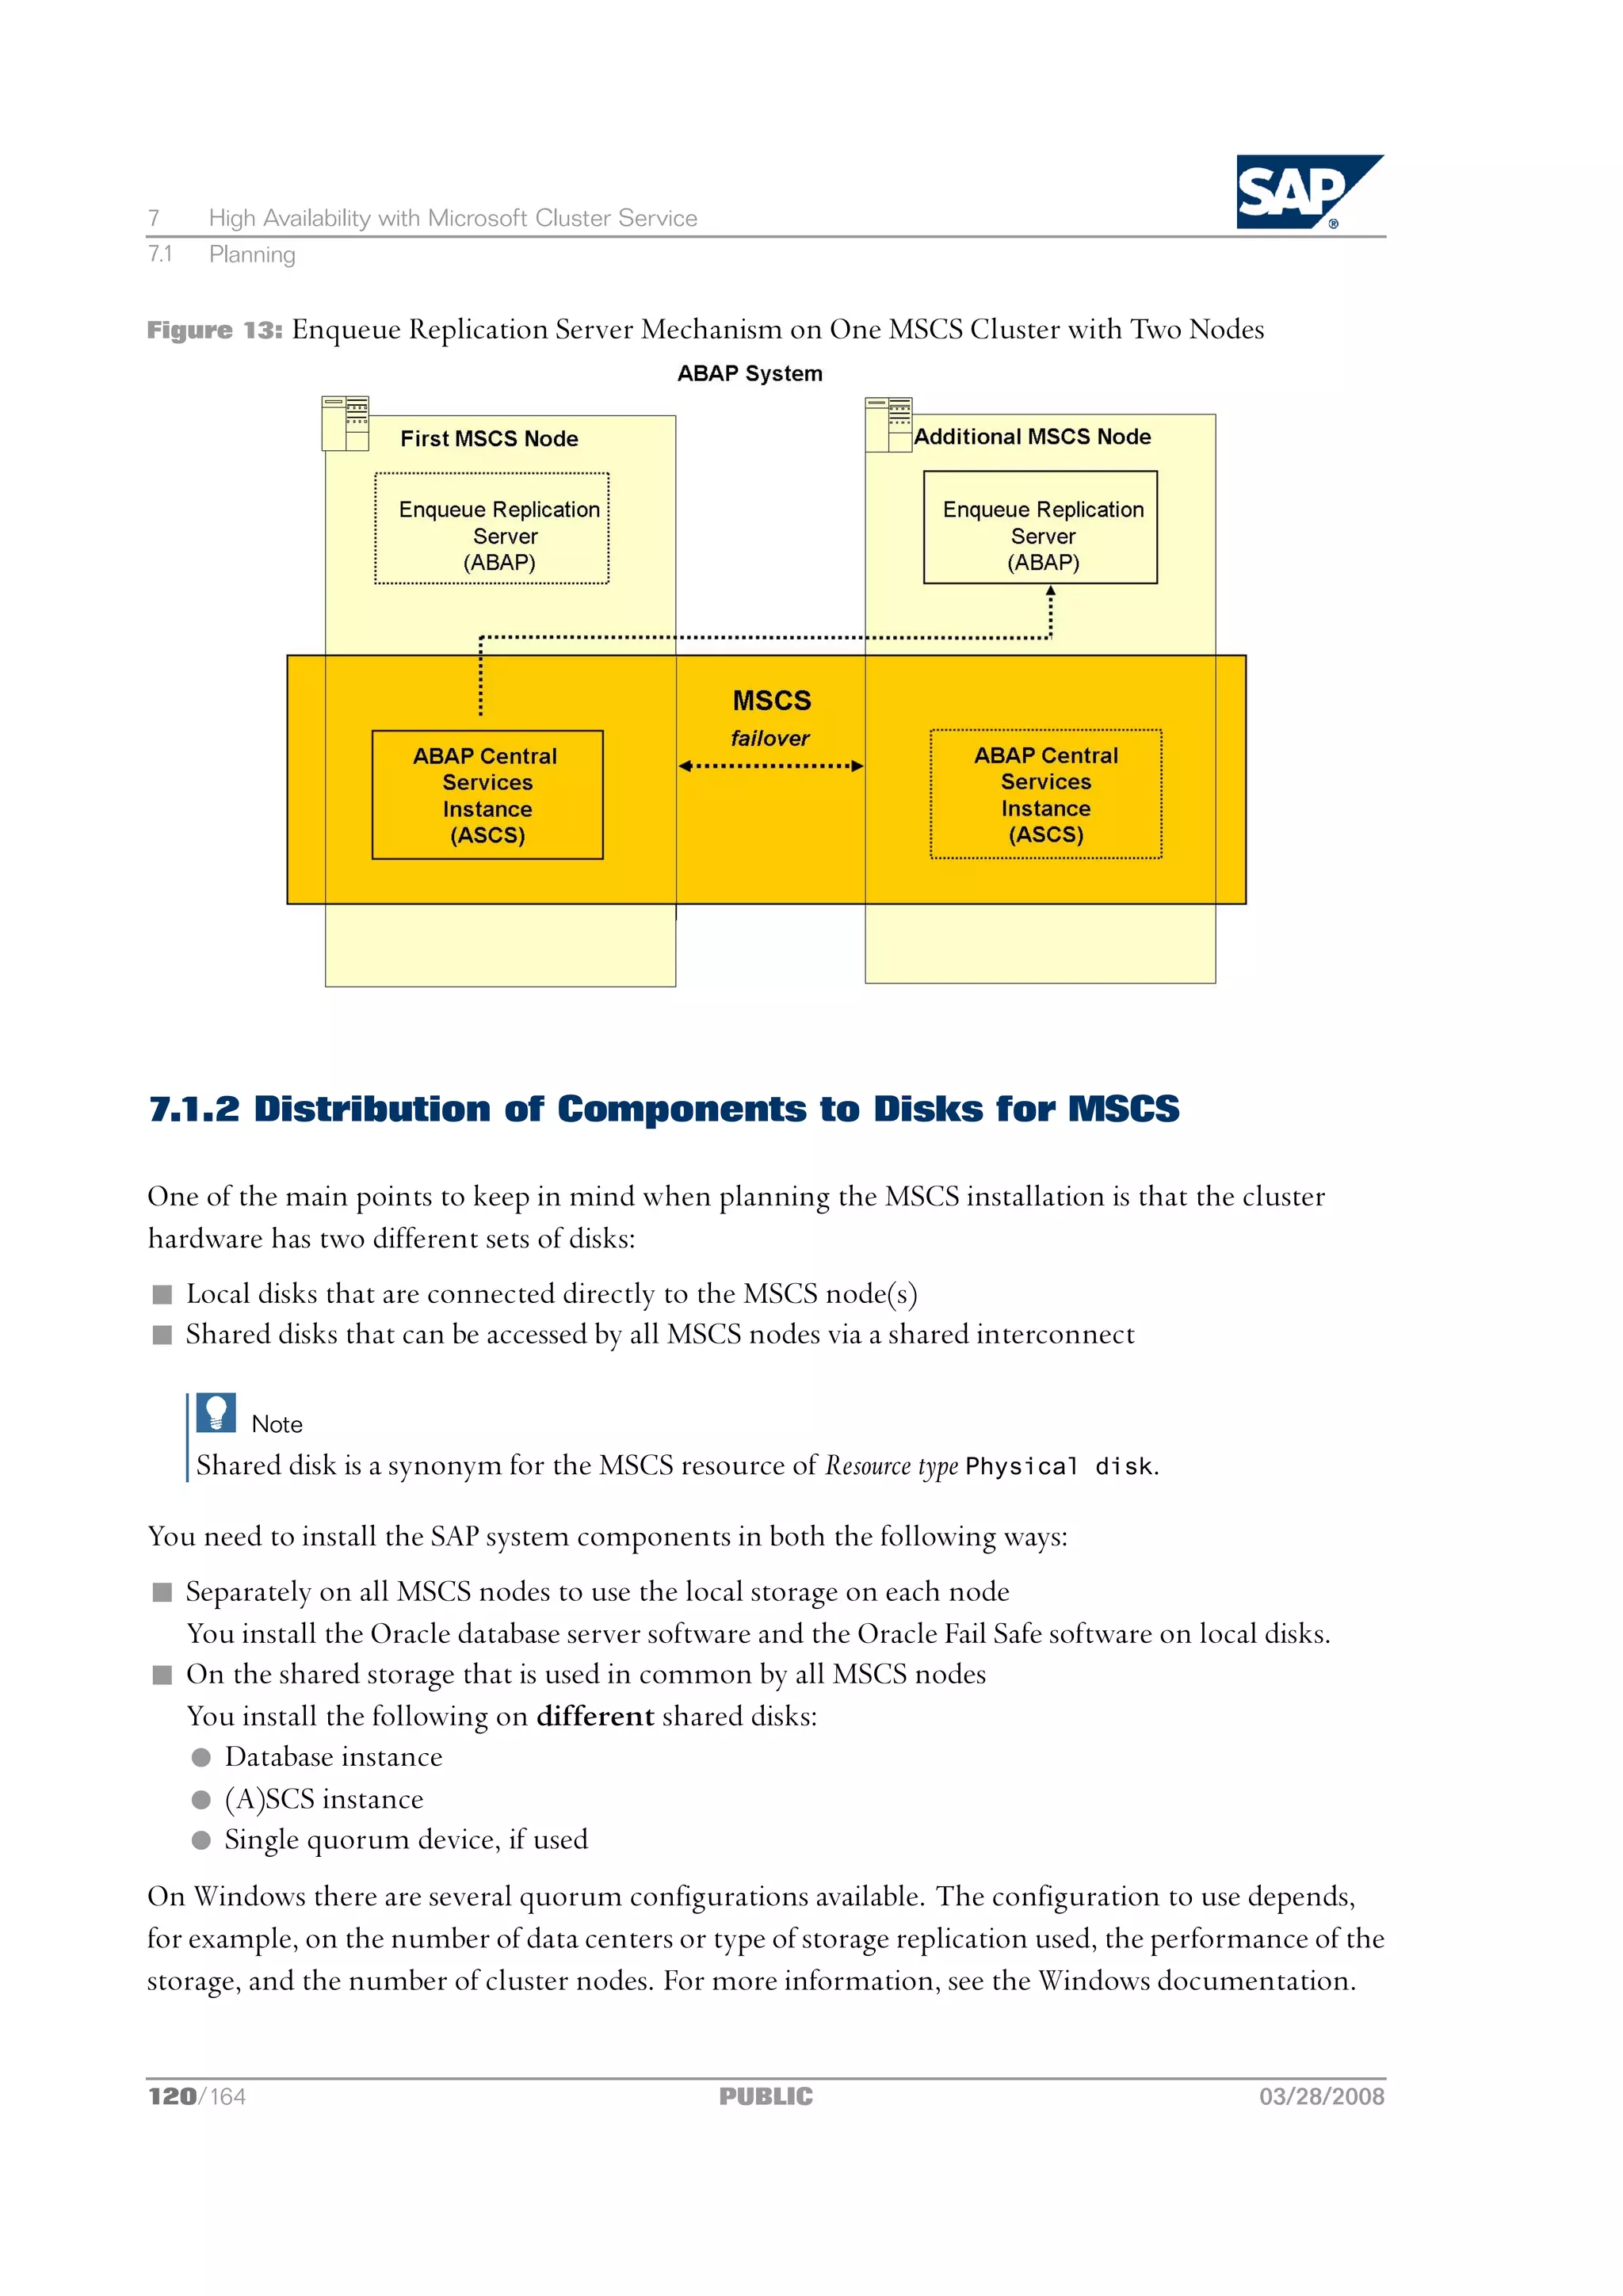
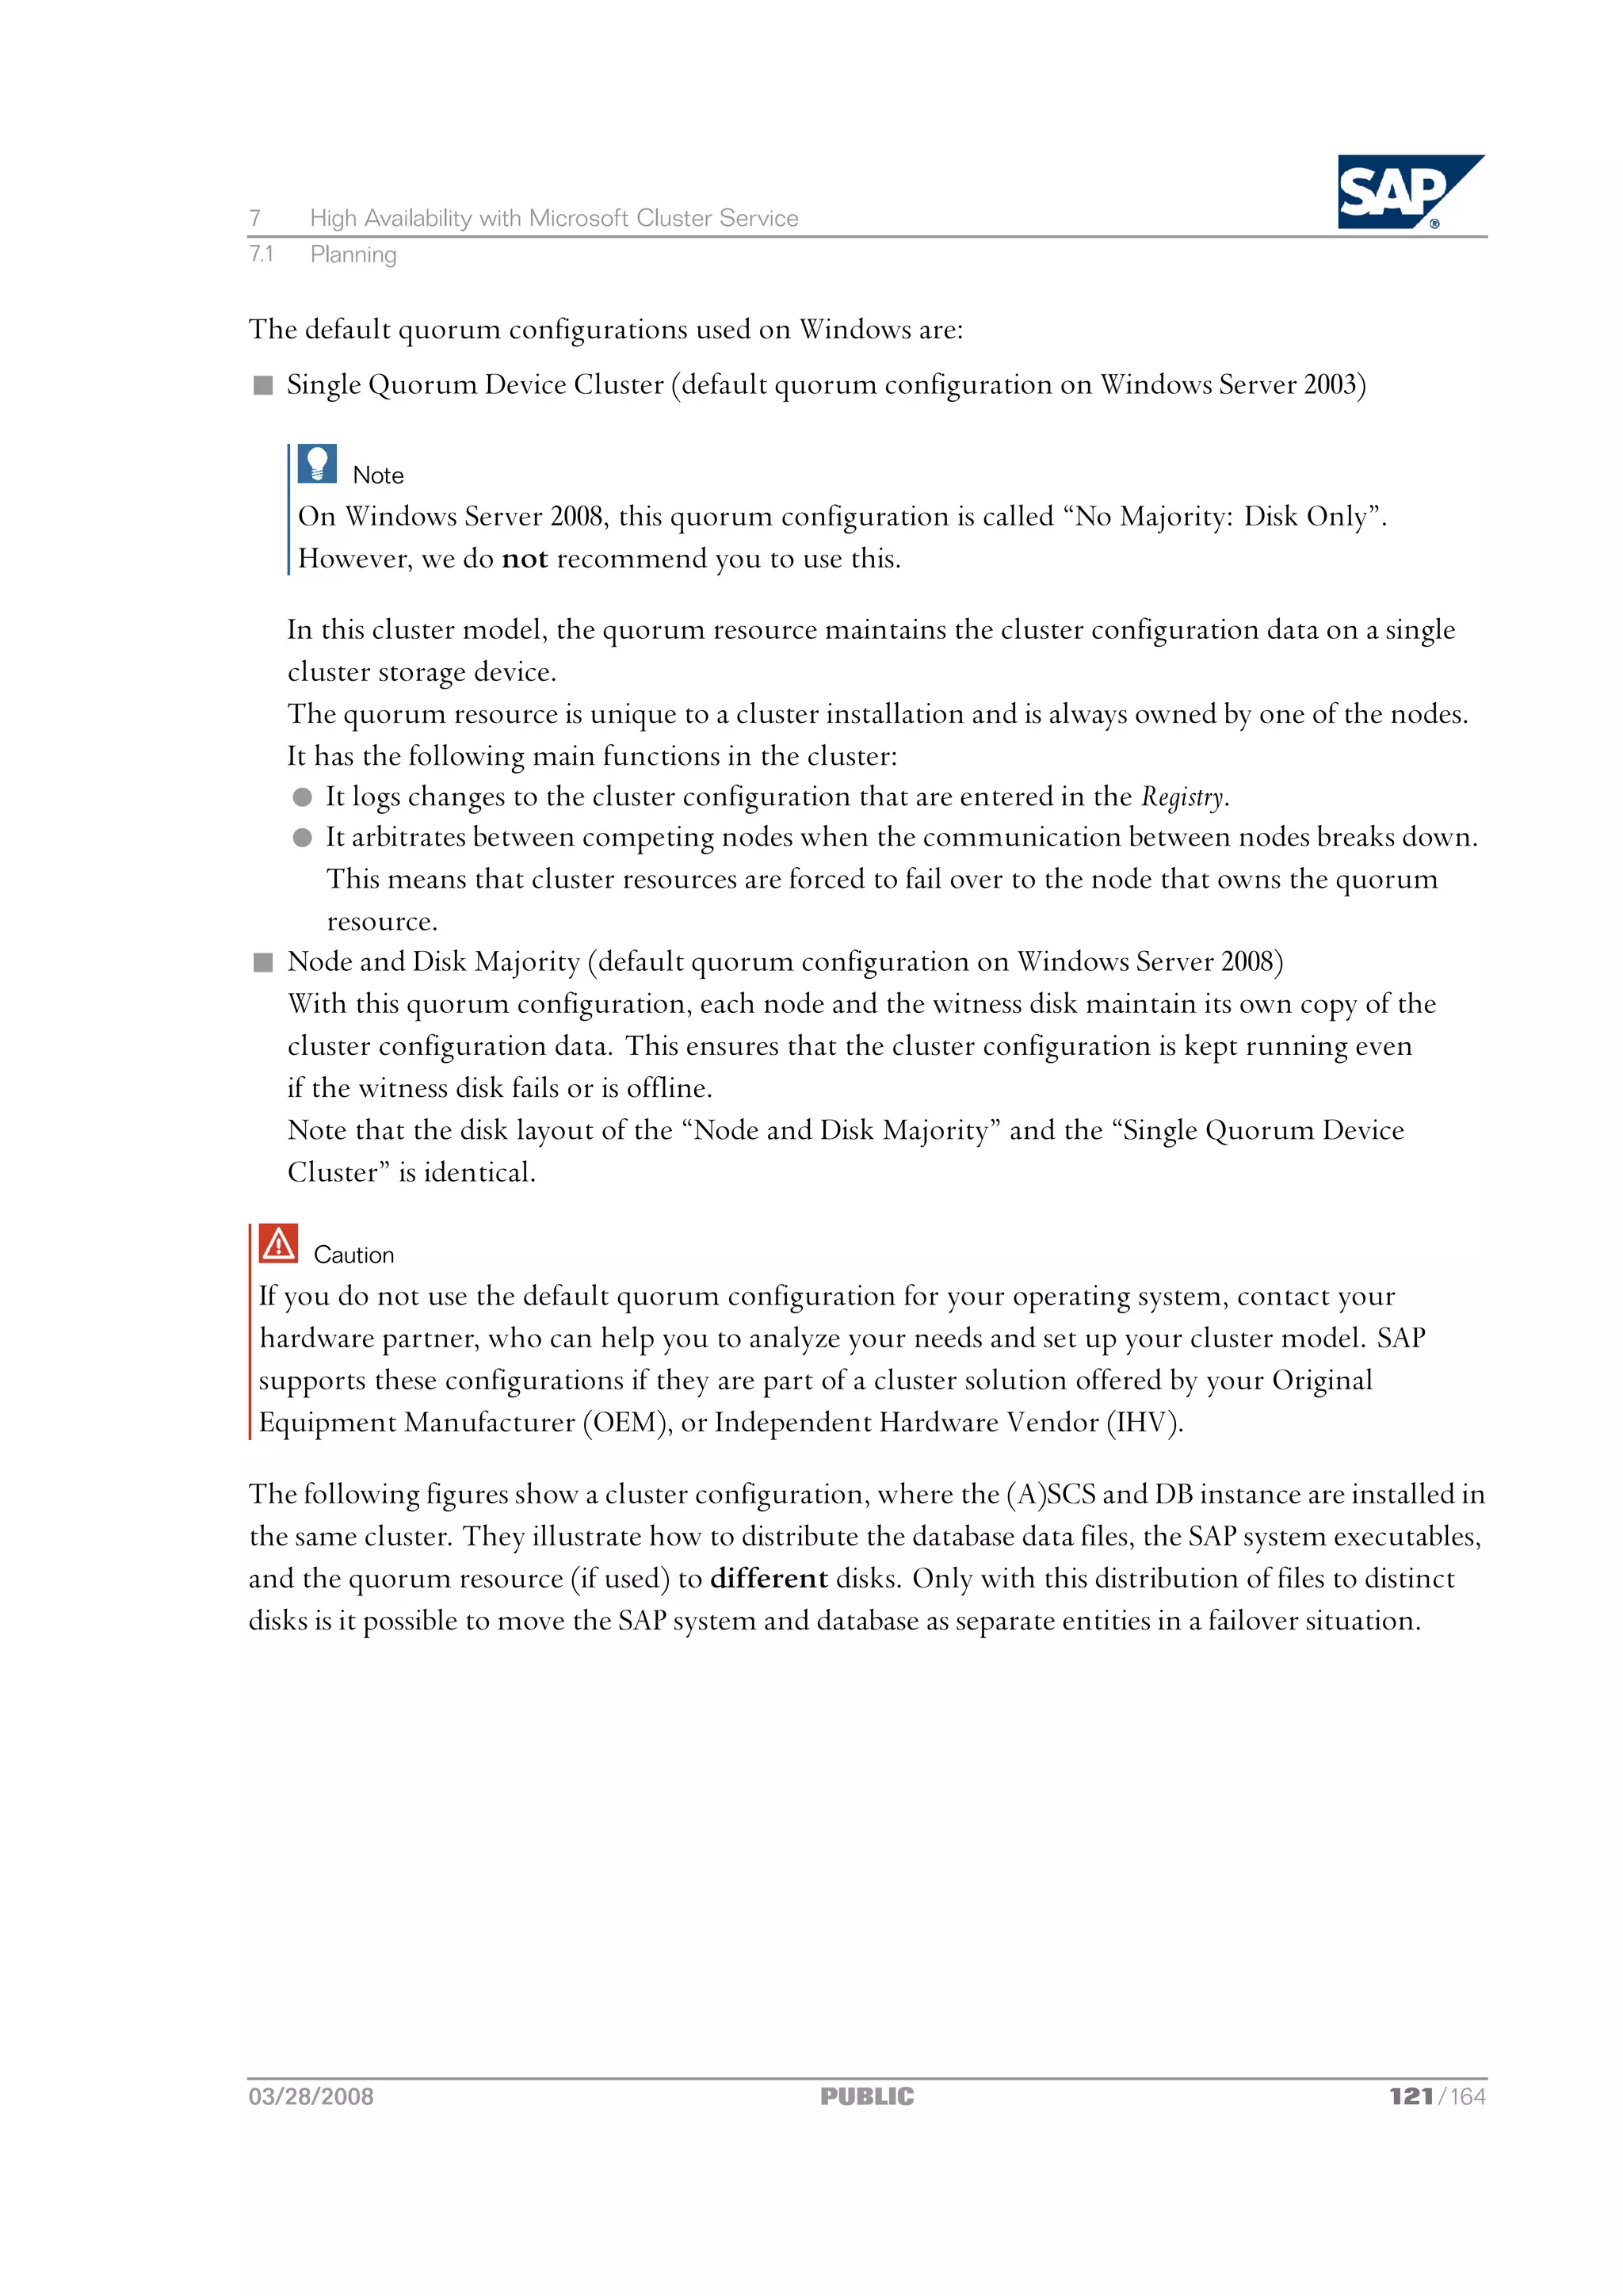
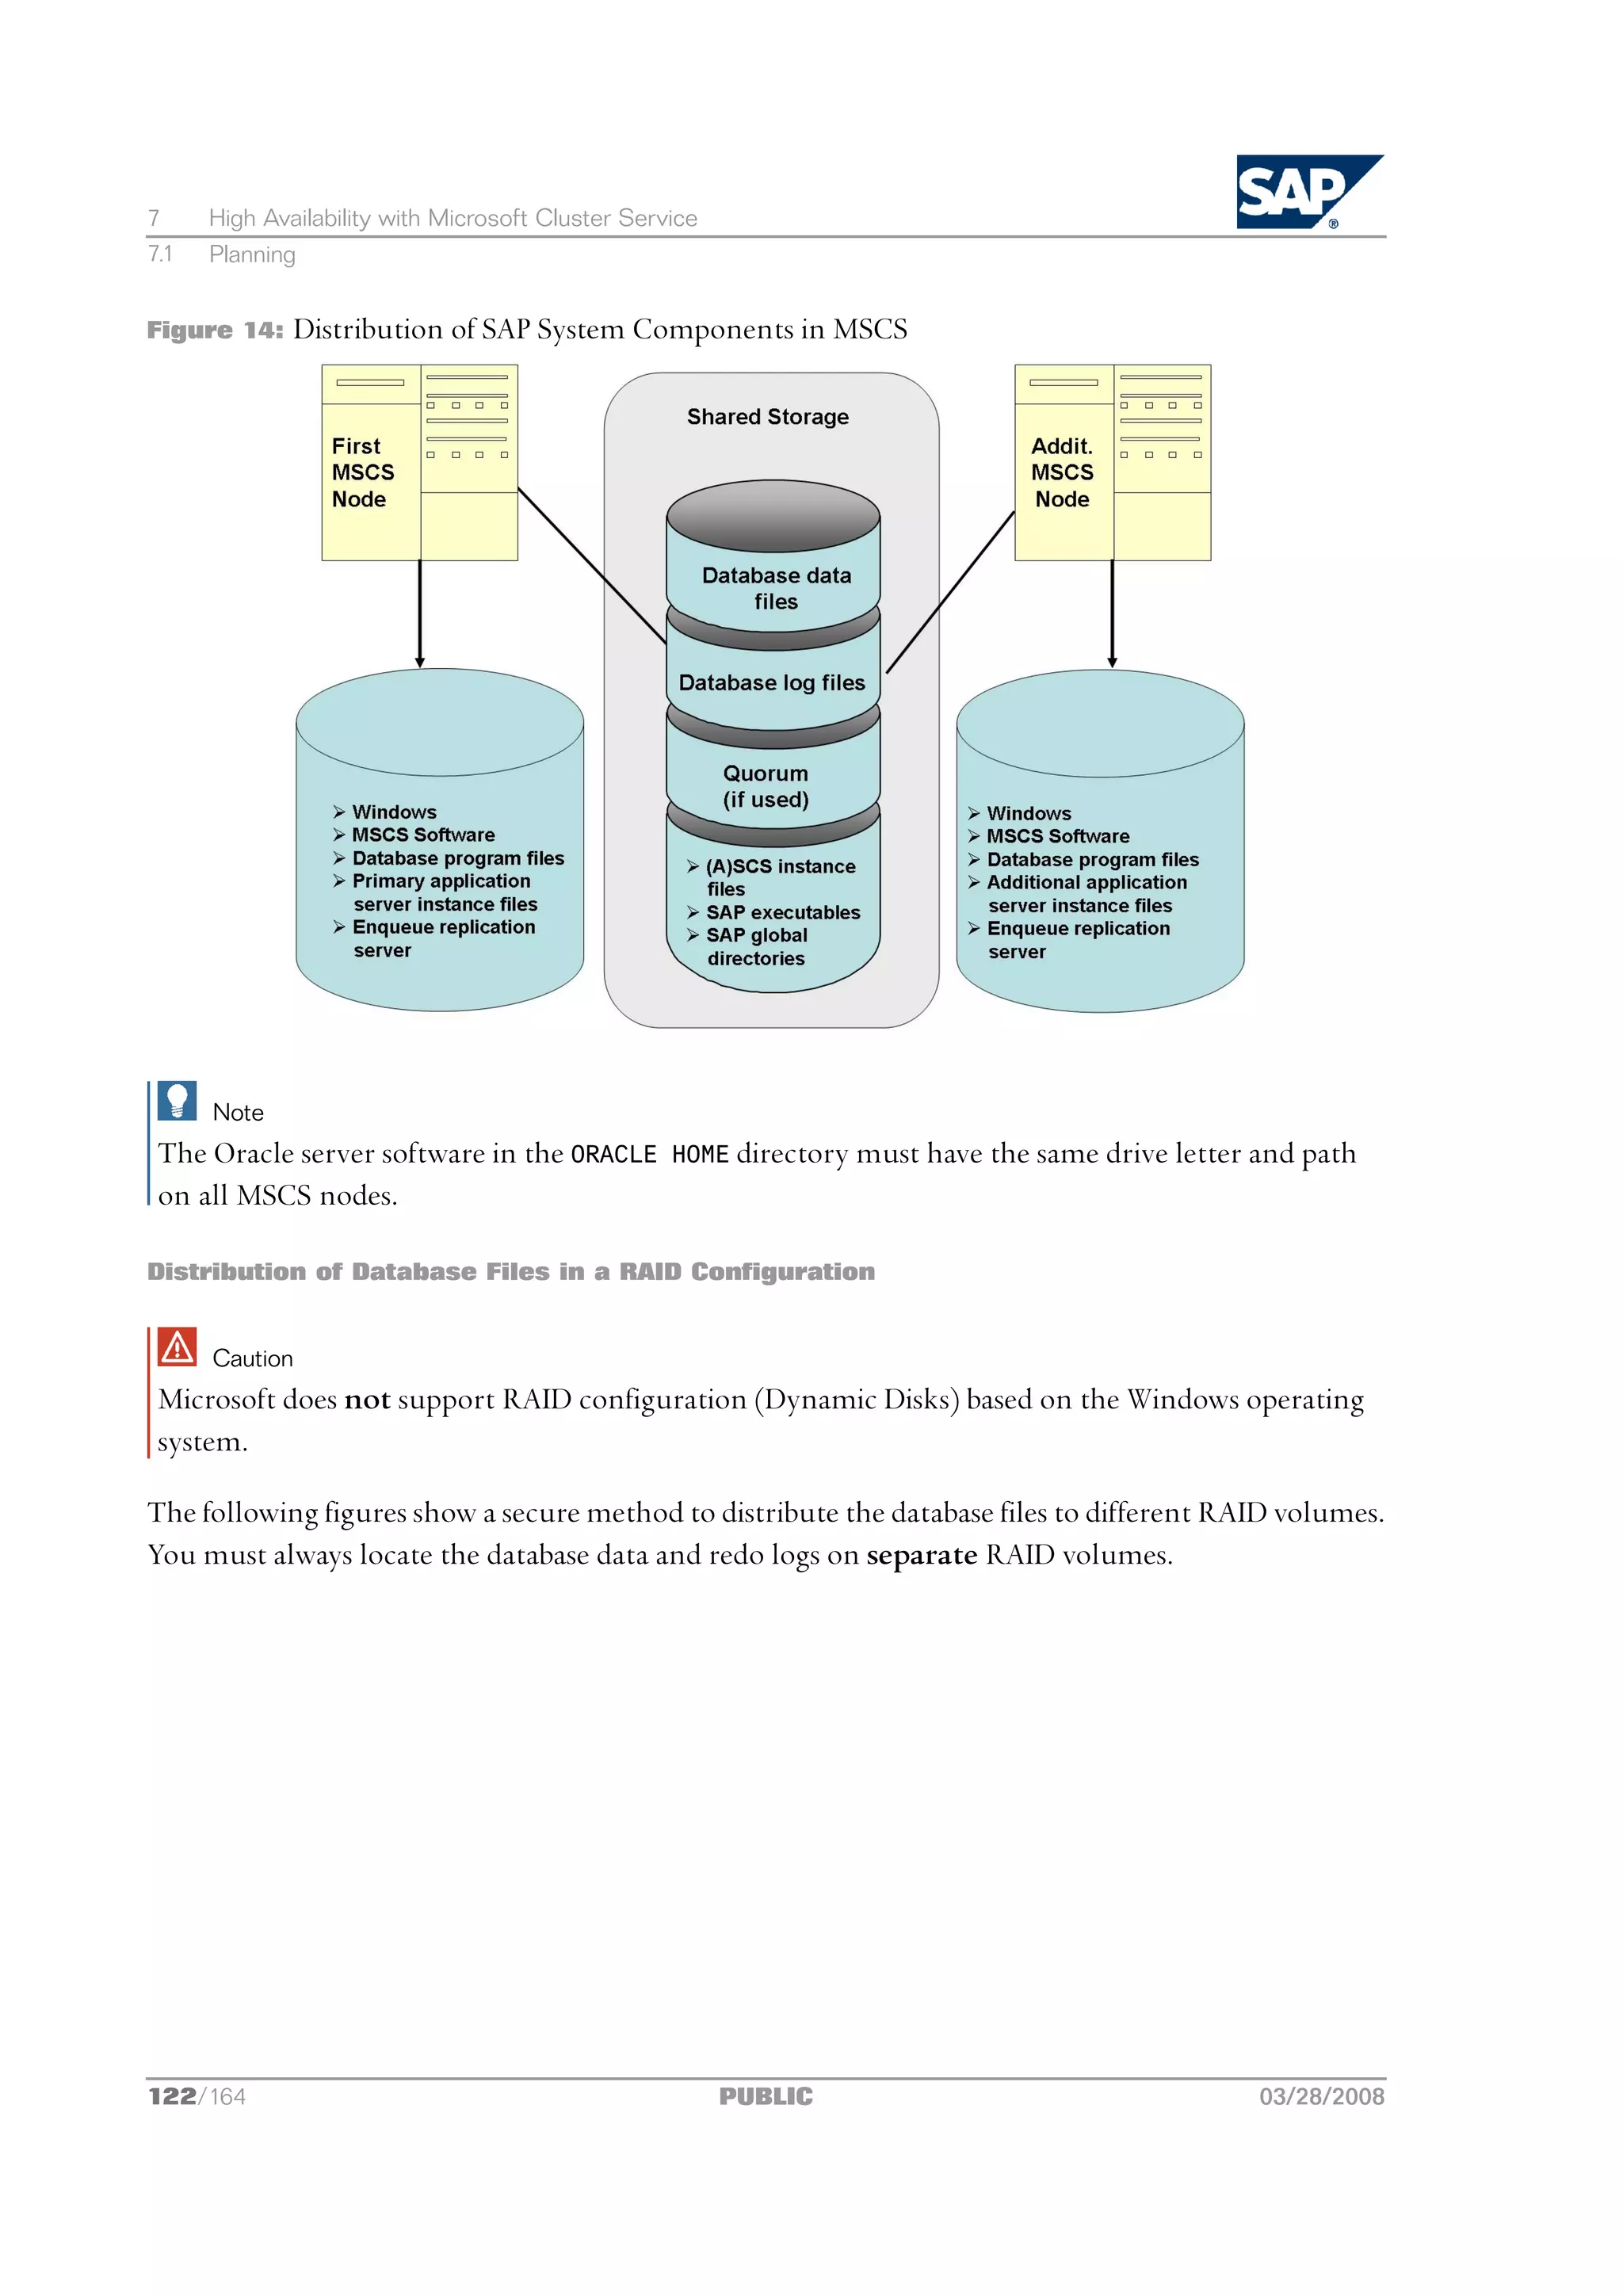
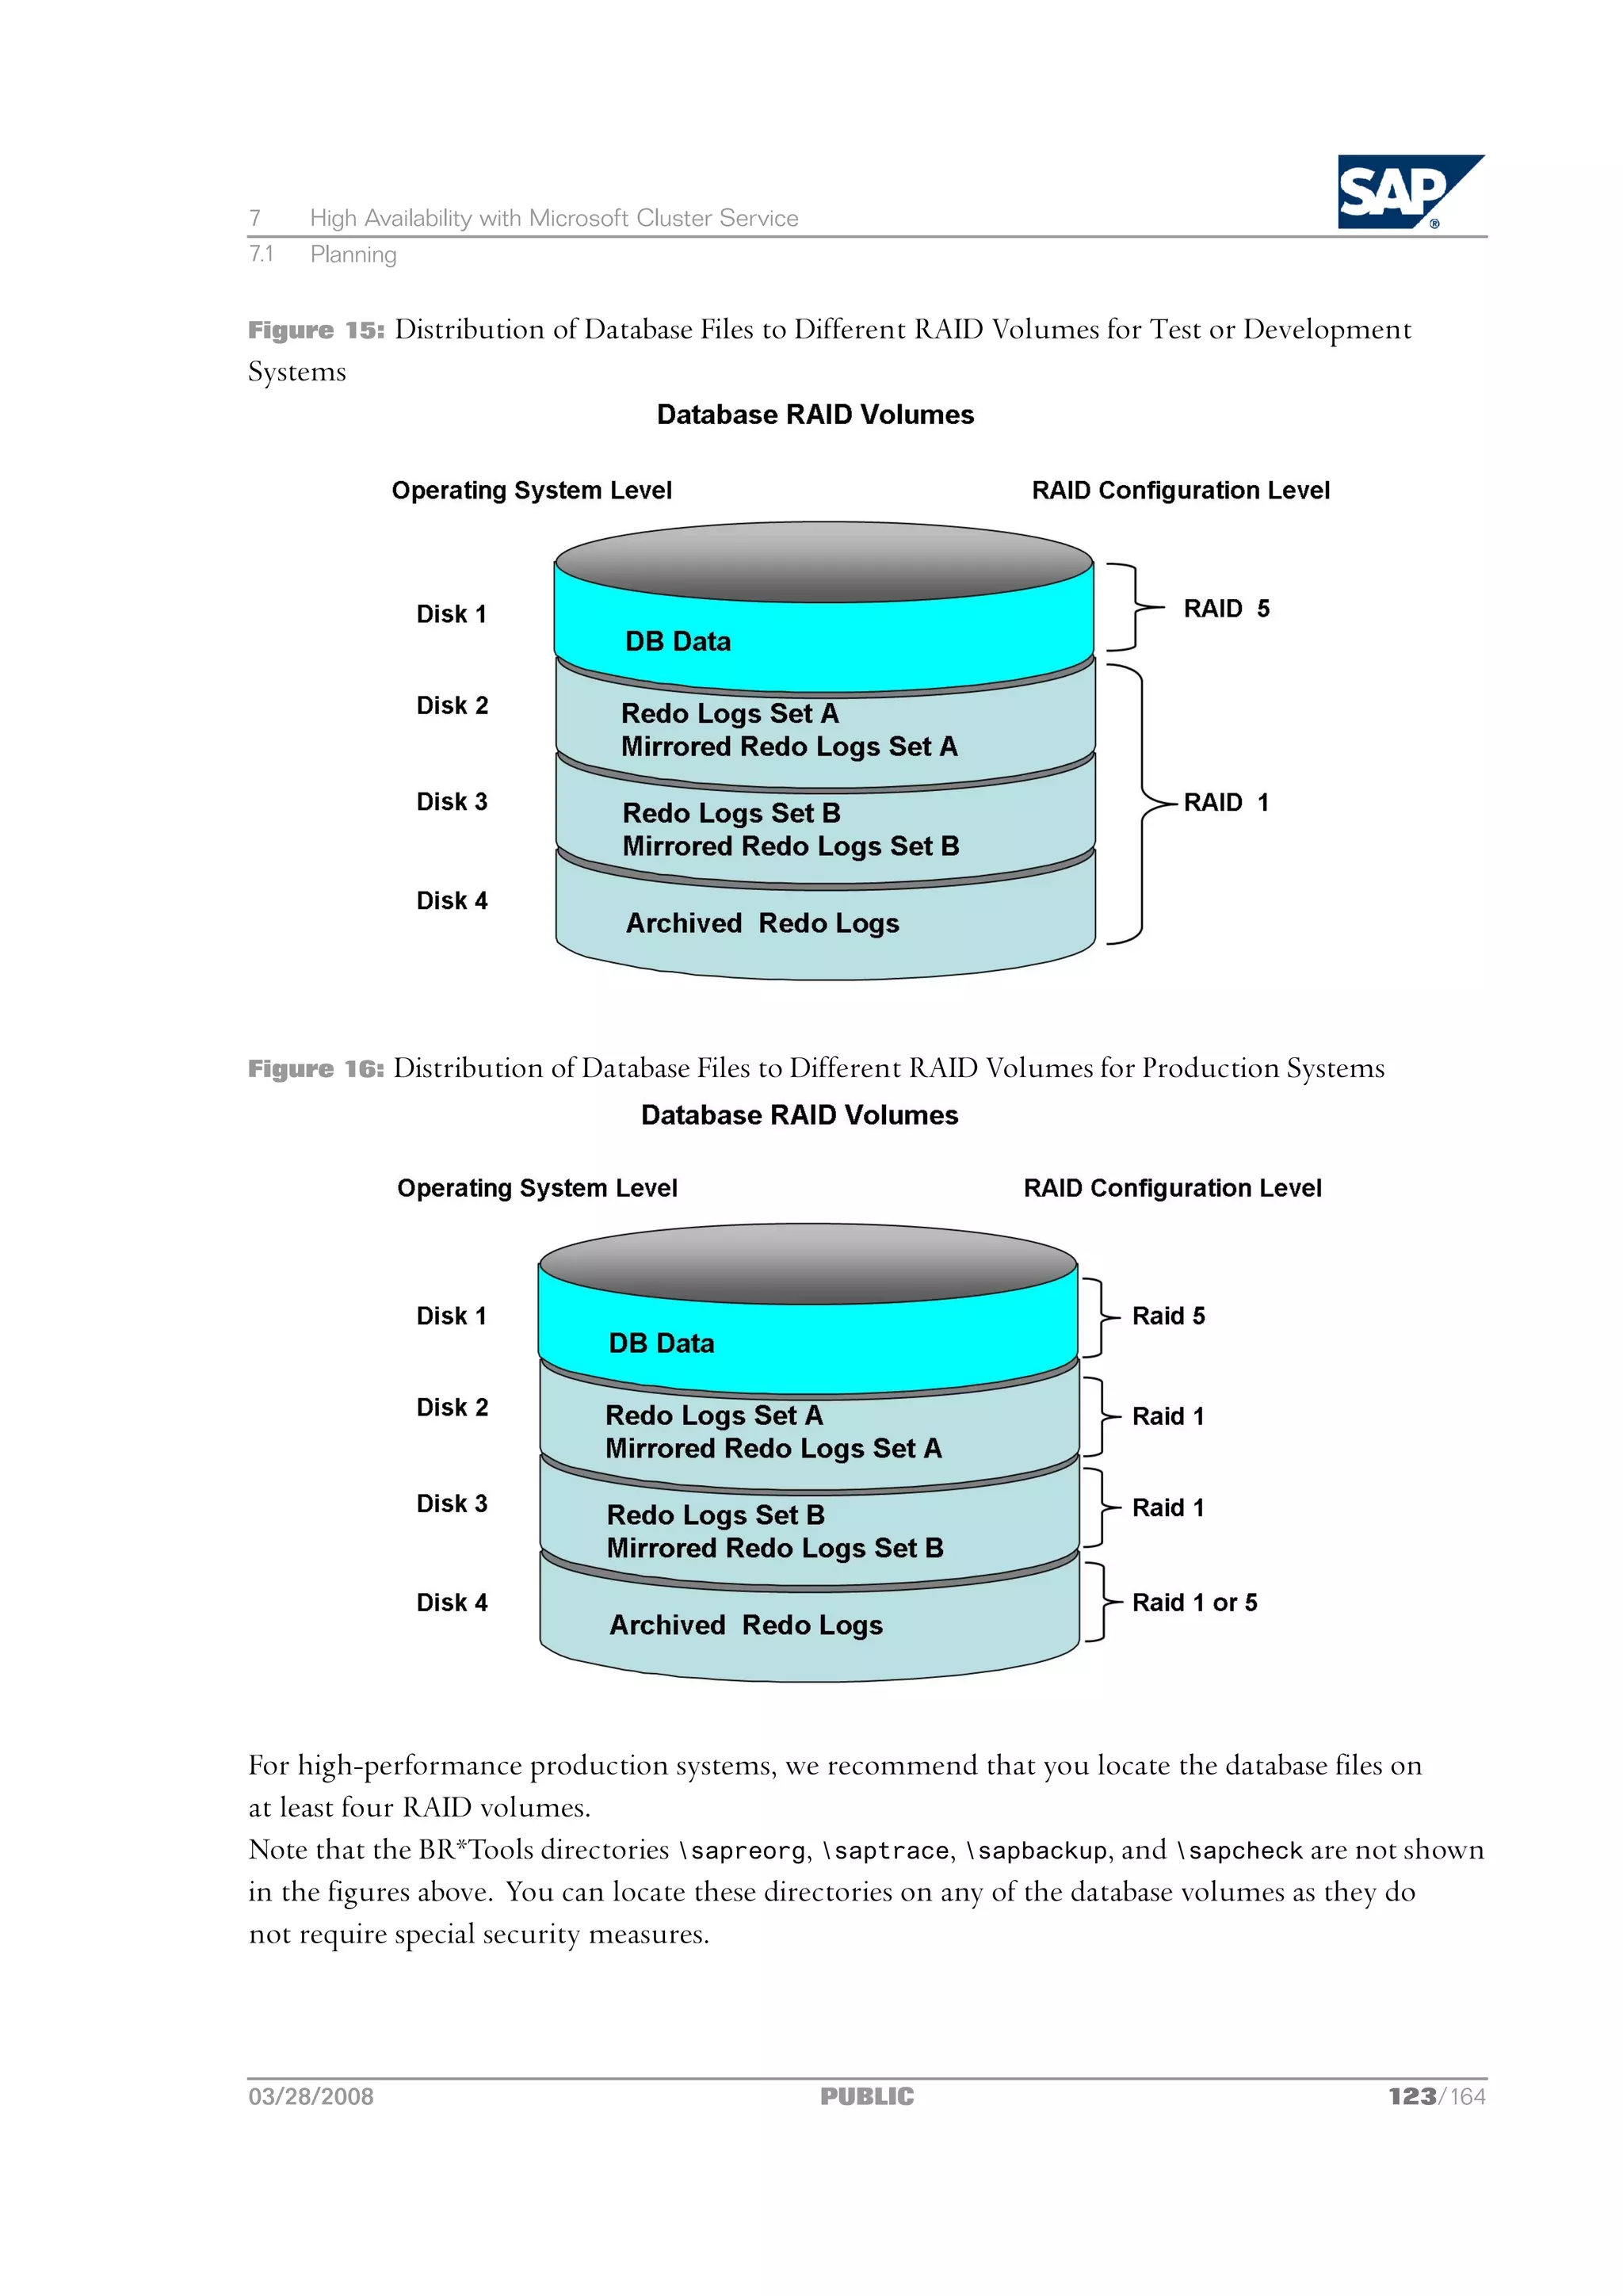
![7 High Availability with Microsoft Cluster Service
7.1 Planning
More Information
Directories in an MSCS Configuration [page 124]
7.1.3 Directories in an MSCS Configuration
The following tables show the directories where the main software components for the SAP cluster
installation are stored:
Directories on Local Disks on MSCS Nodes
Component Default Directory
A supported operating system [page 42] %windir%
MSCS software %windir%Cluster
SAP cluster files %windir%SAPCluster
Oracle server software <drive>:oracle<SAPSID>102
Oracle Fail Safe software <drive>:oracleOFS
Directories on Shared Disks
Component Default Directory
Cluster quorum resource <drive>:MSCS (Windows Server 2003)
<drive>:Cluster (Windows Server 2008)
SAP global and instance directories <drive>:usrsap ...
SAP data files <drive>:ORACLE<SAPSID><SAPSID>DATA1
...
<SAPSID>DATA<n>
Online redo logs, set A <drive>:ORACLE<SAPSID>origlogA
Online redo logs, set B <drive>:ORACLE<SAPSID>origlogB
Mirrored online redo logs, set A <drive>:ORACLE<SAPSID>mirrlogA
Mirrored online redo logs, set B ORACLE<SAPSID>mirrlogB
Backup of online redo logs <drive>:ORACLE<SAPSID>oraarch
BR*Tools directories ...sapreorg, saptrace,
...sapbackup, sapcheck,
...saparch
Note
In a live system with intense I/O activity, you must reserve at least three times the minimum amount
of space specified above for the redo logs and mirrored redo logs.
124/164 PUBLIC 03/28/2008](https://image.slidesharecdn.com/ecc6sr3orawininstguide-130128021232-phpapp02/75/Ecc6-sr3-ora_win_instguide-124-2048.jpg)
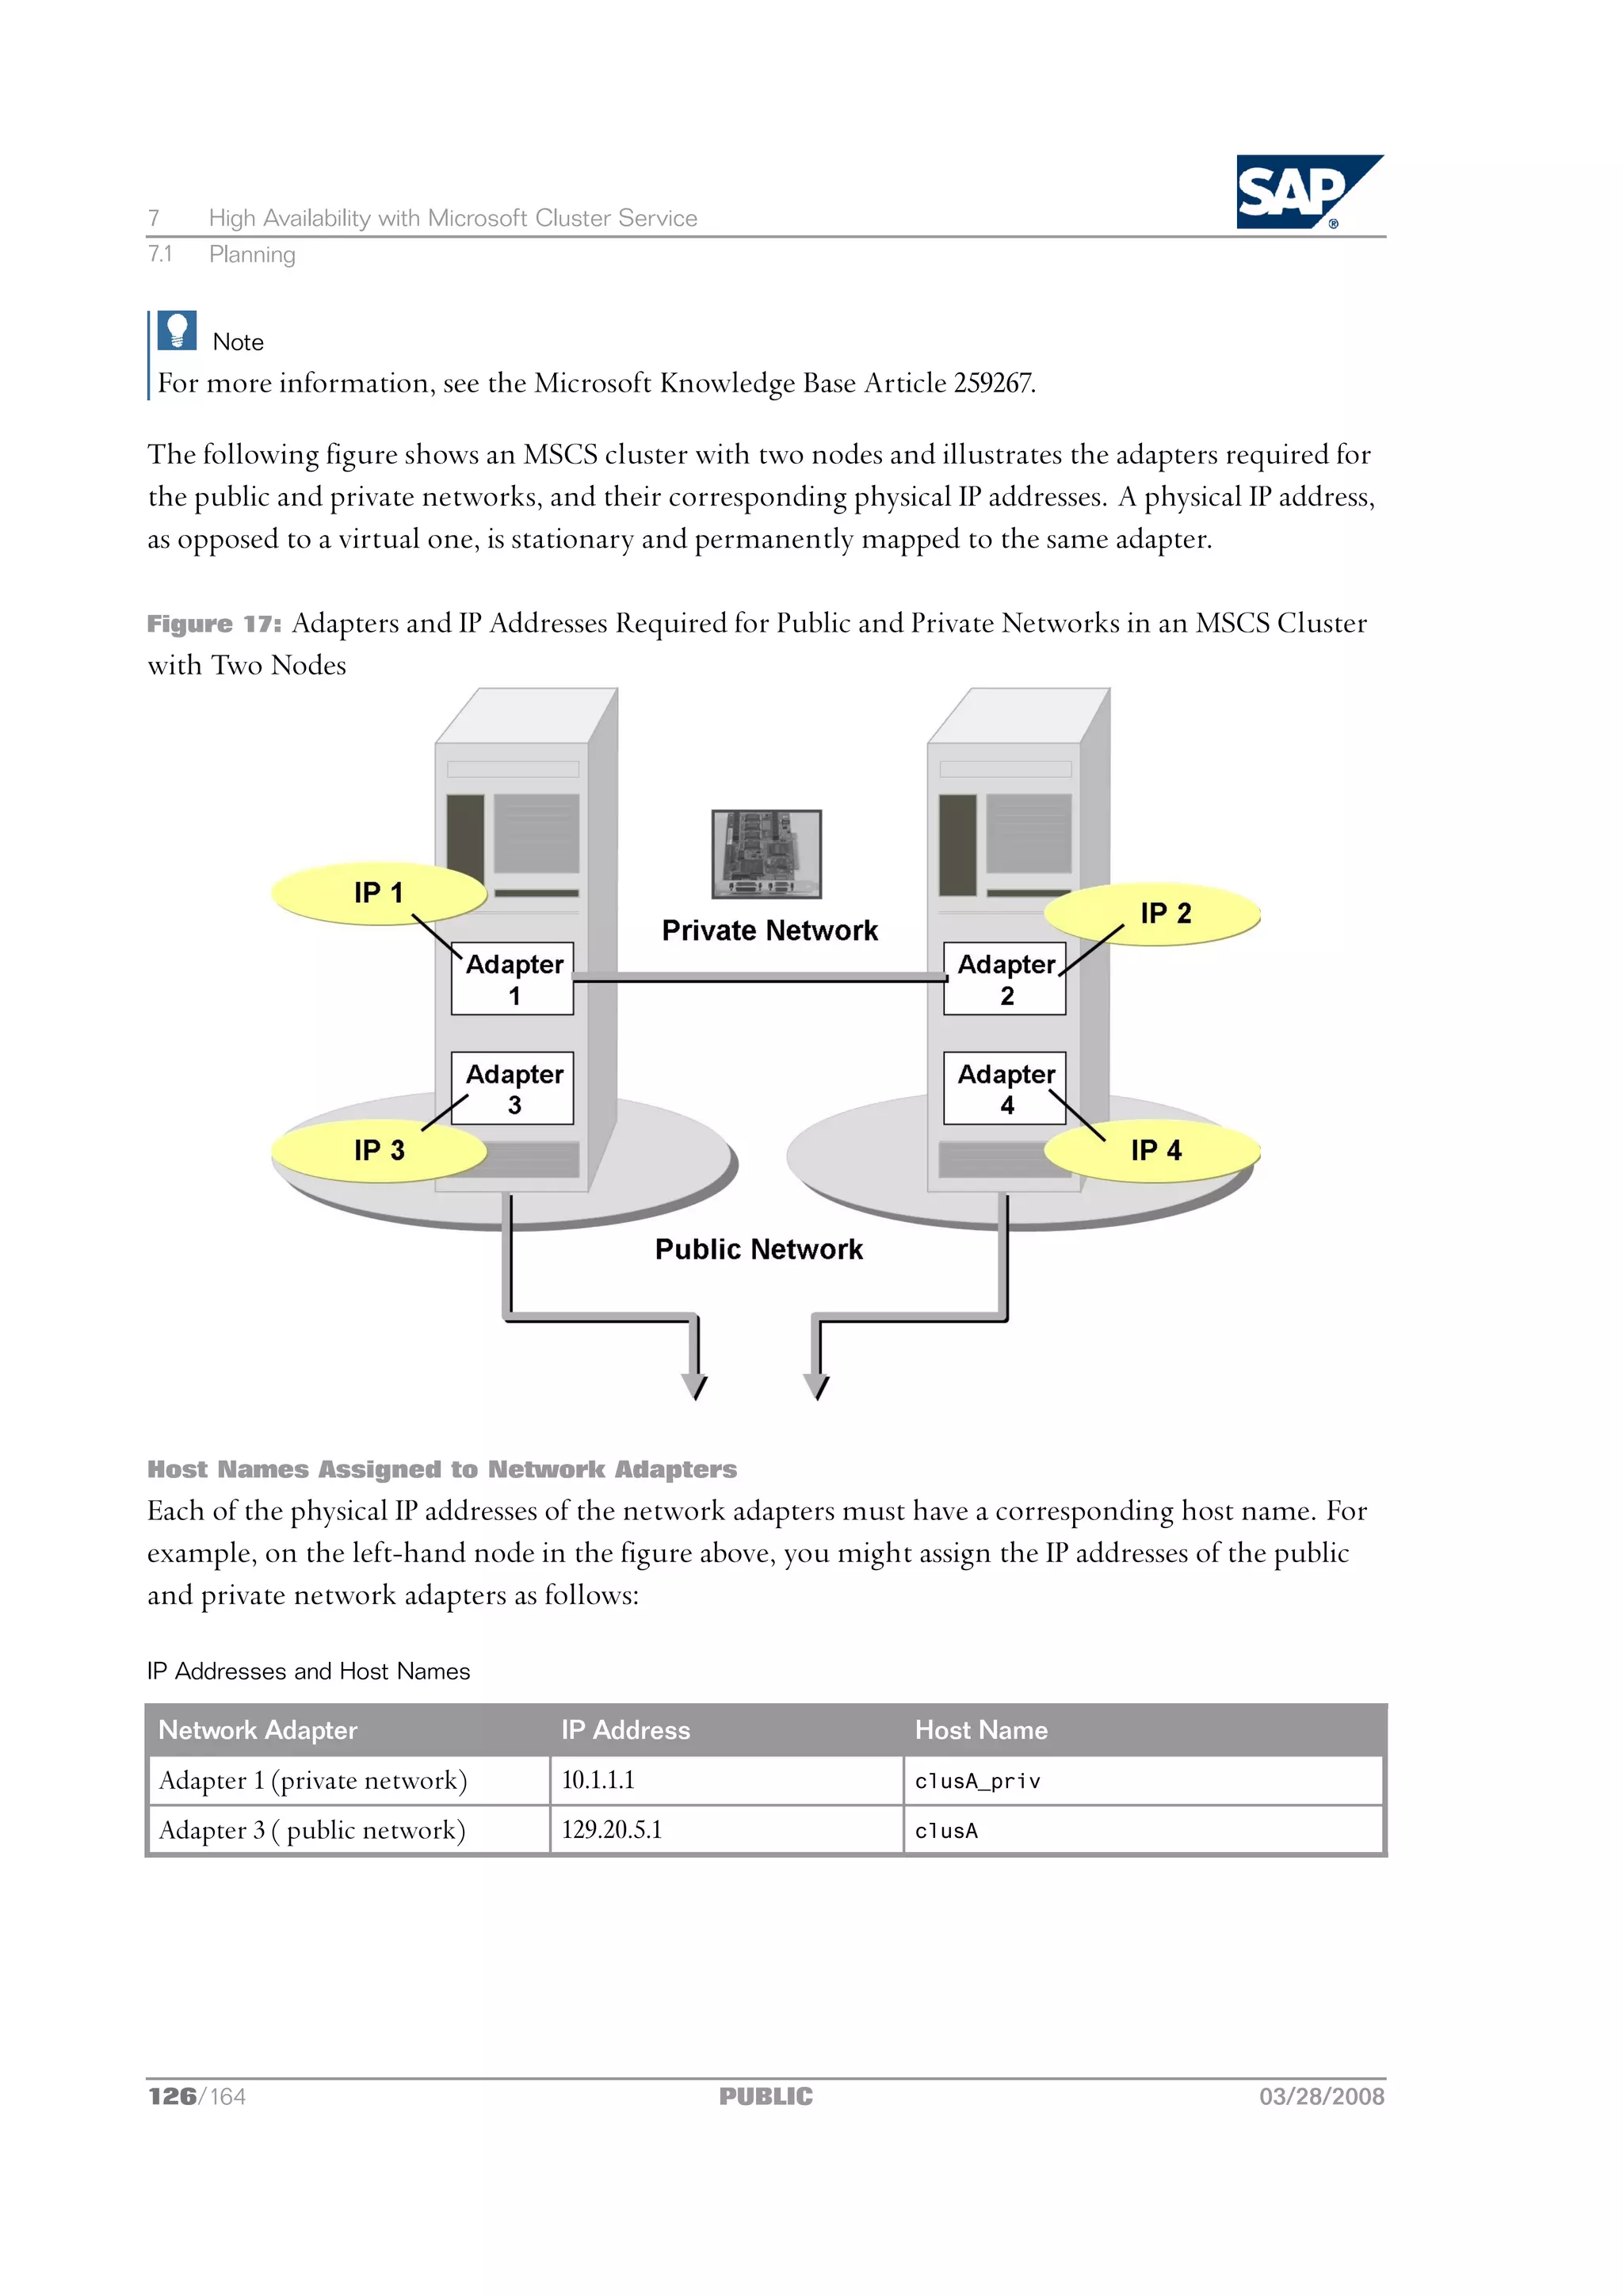
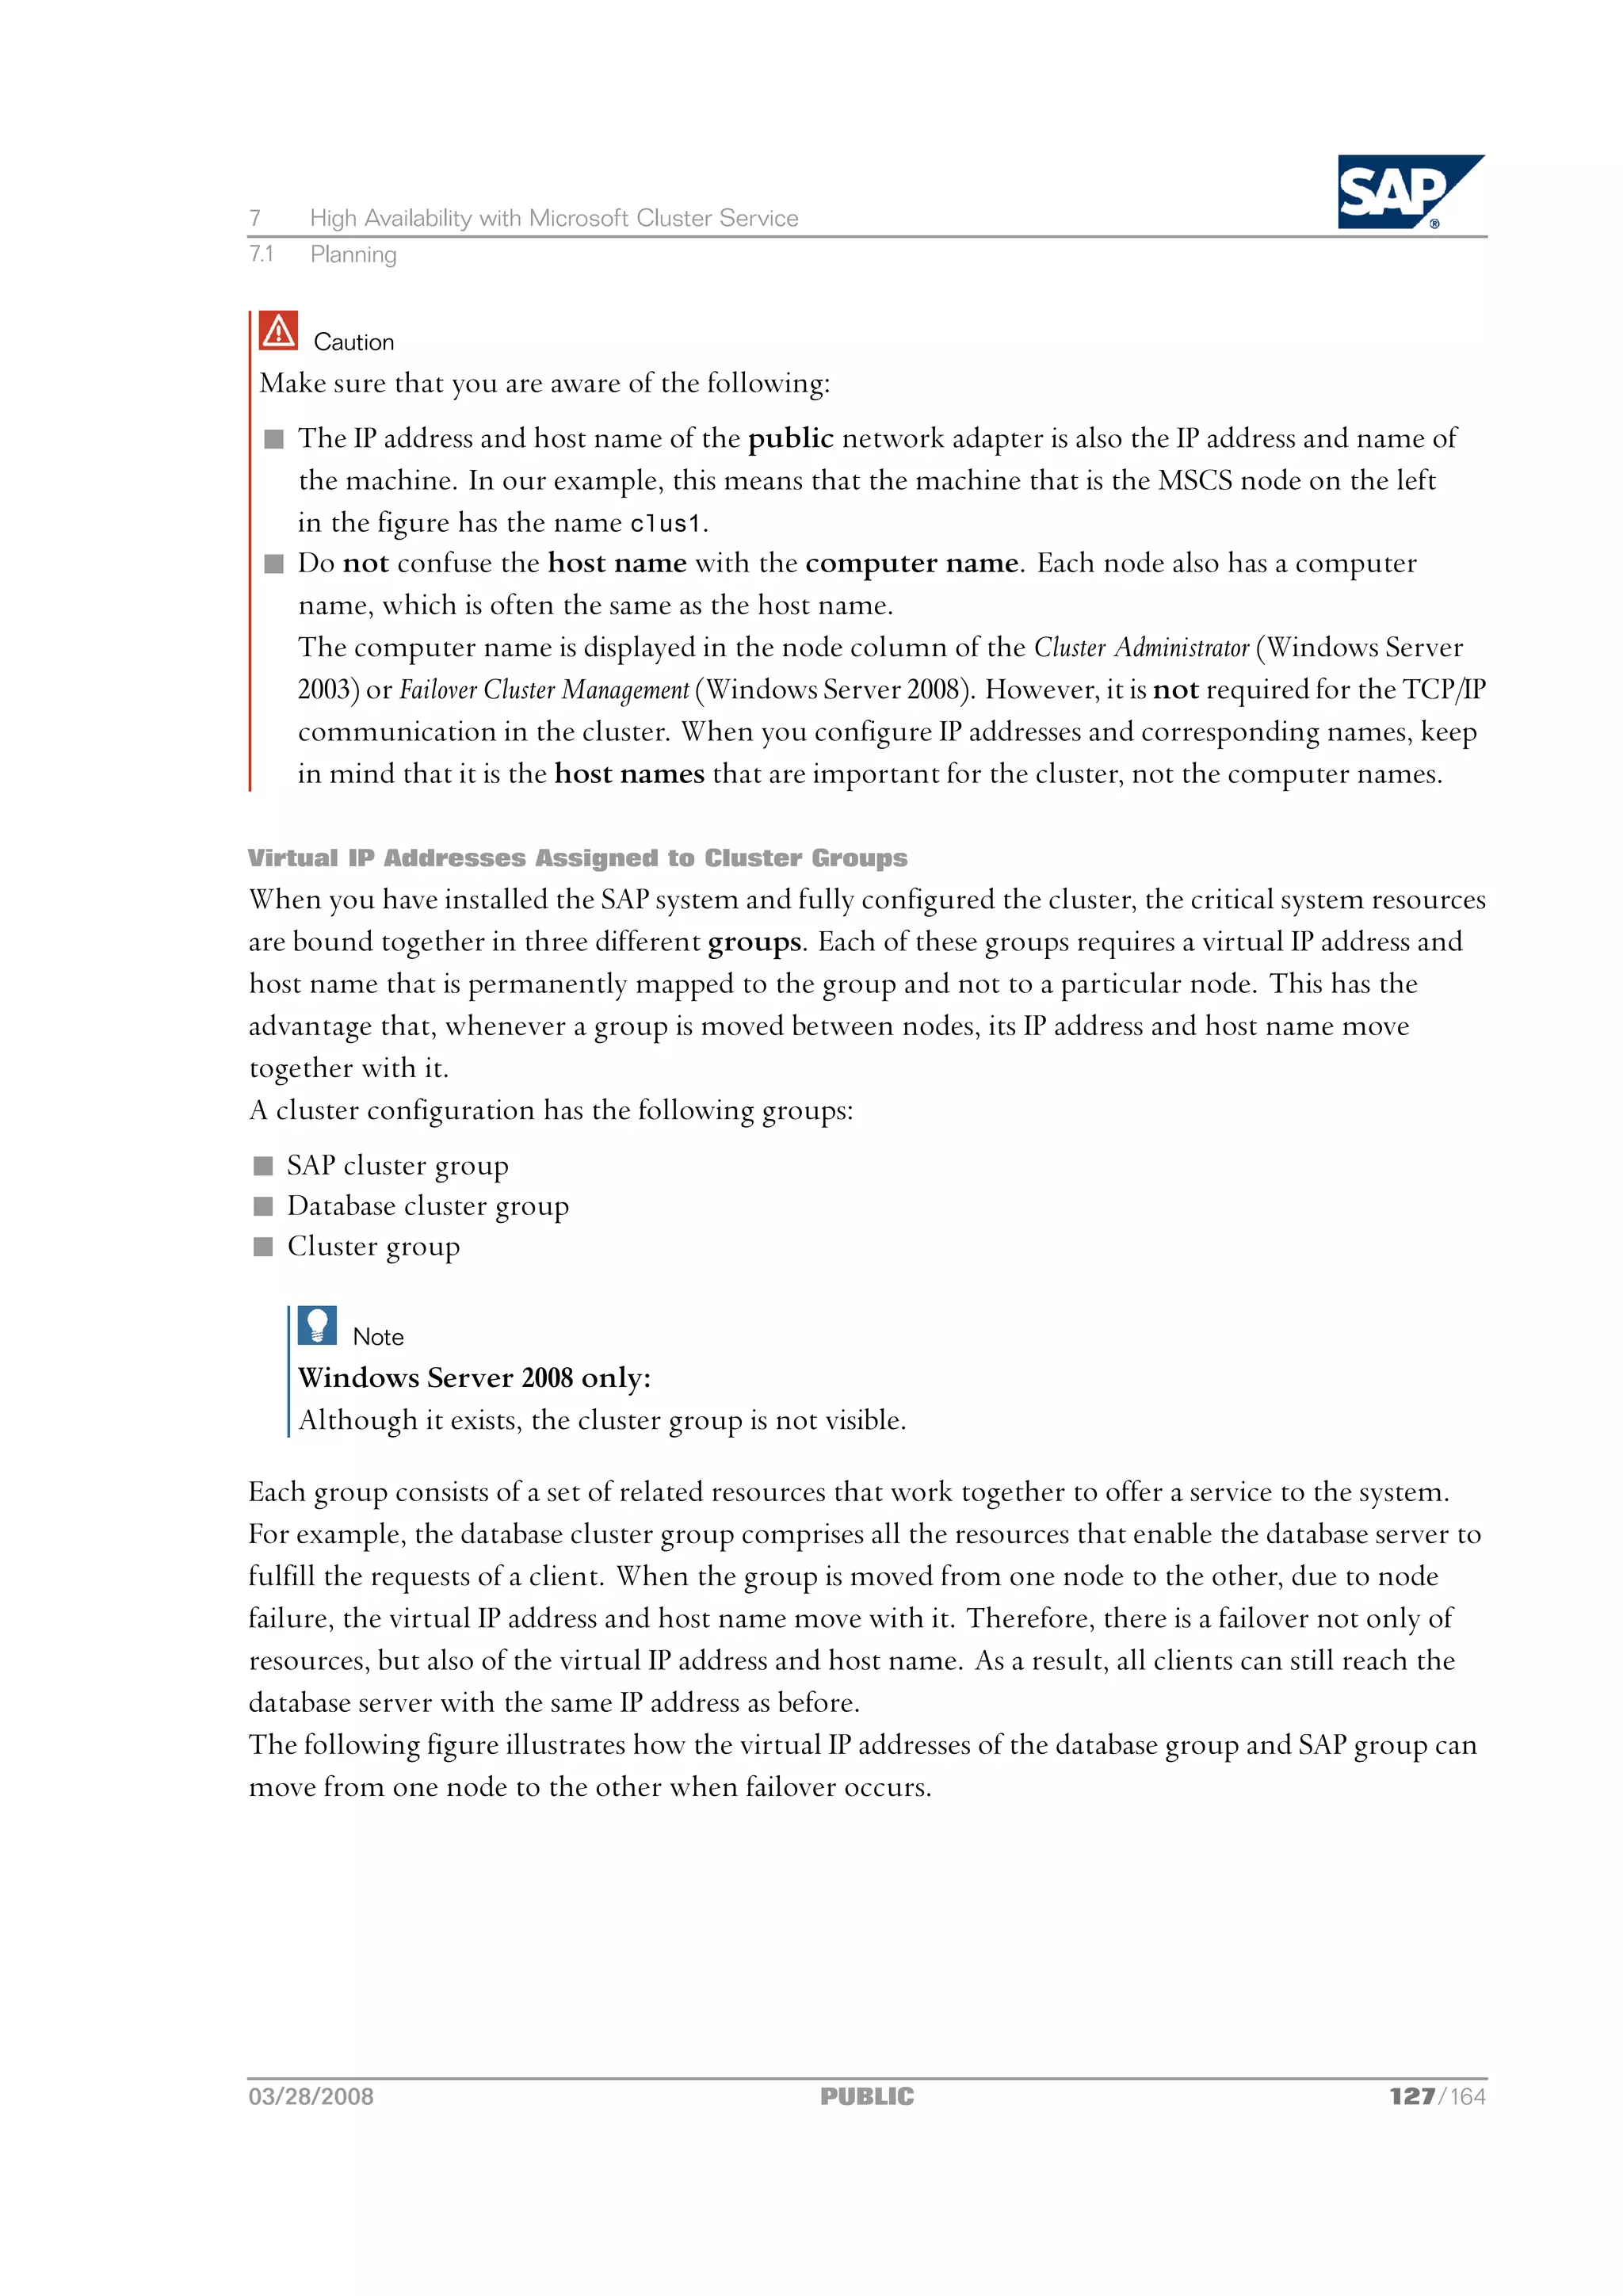
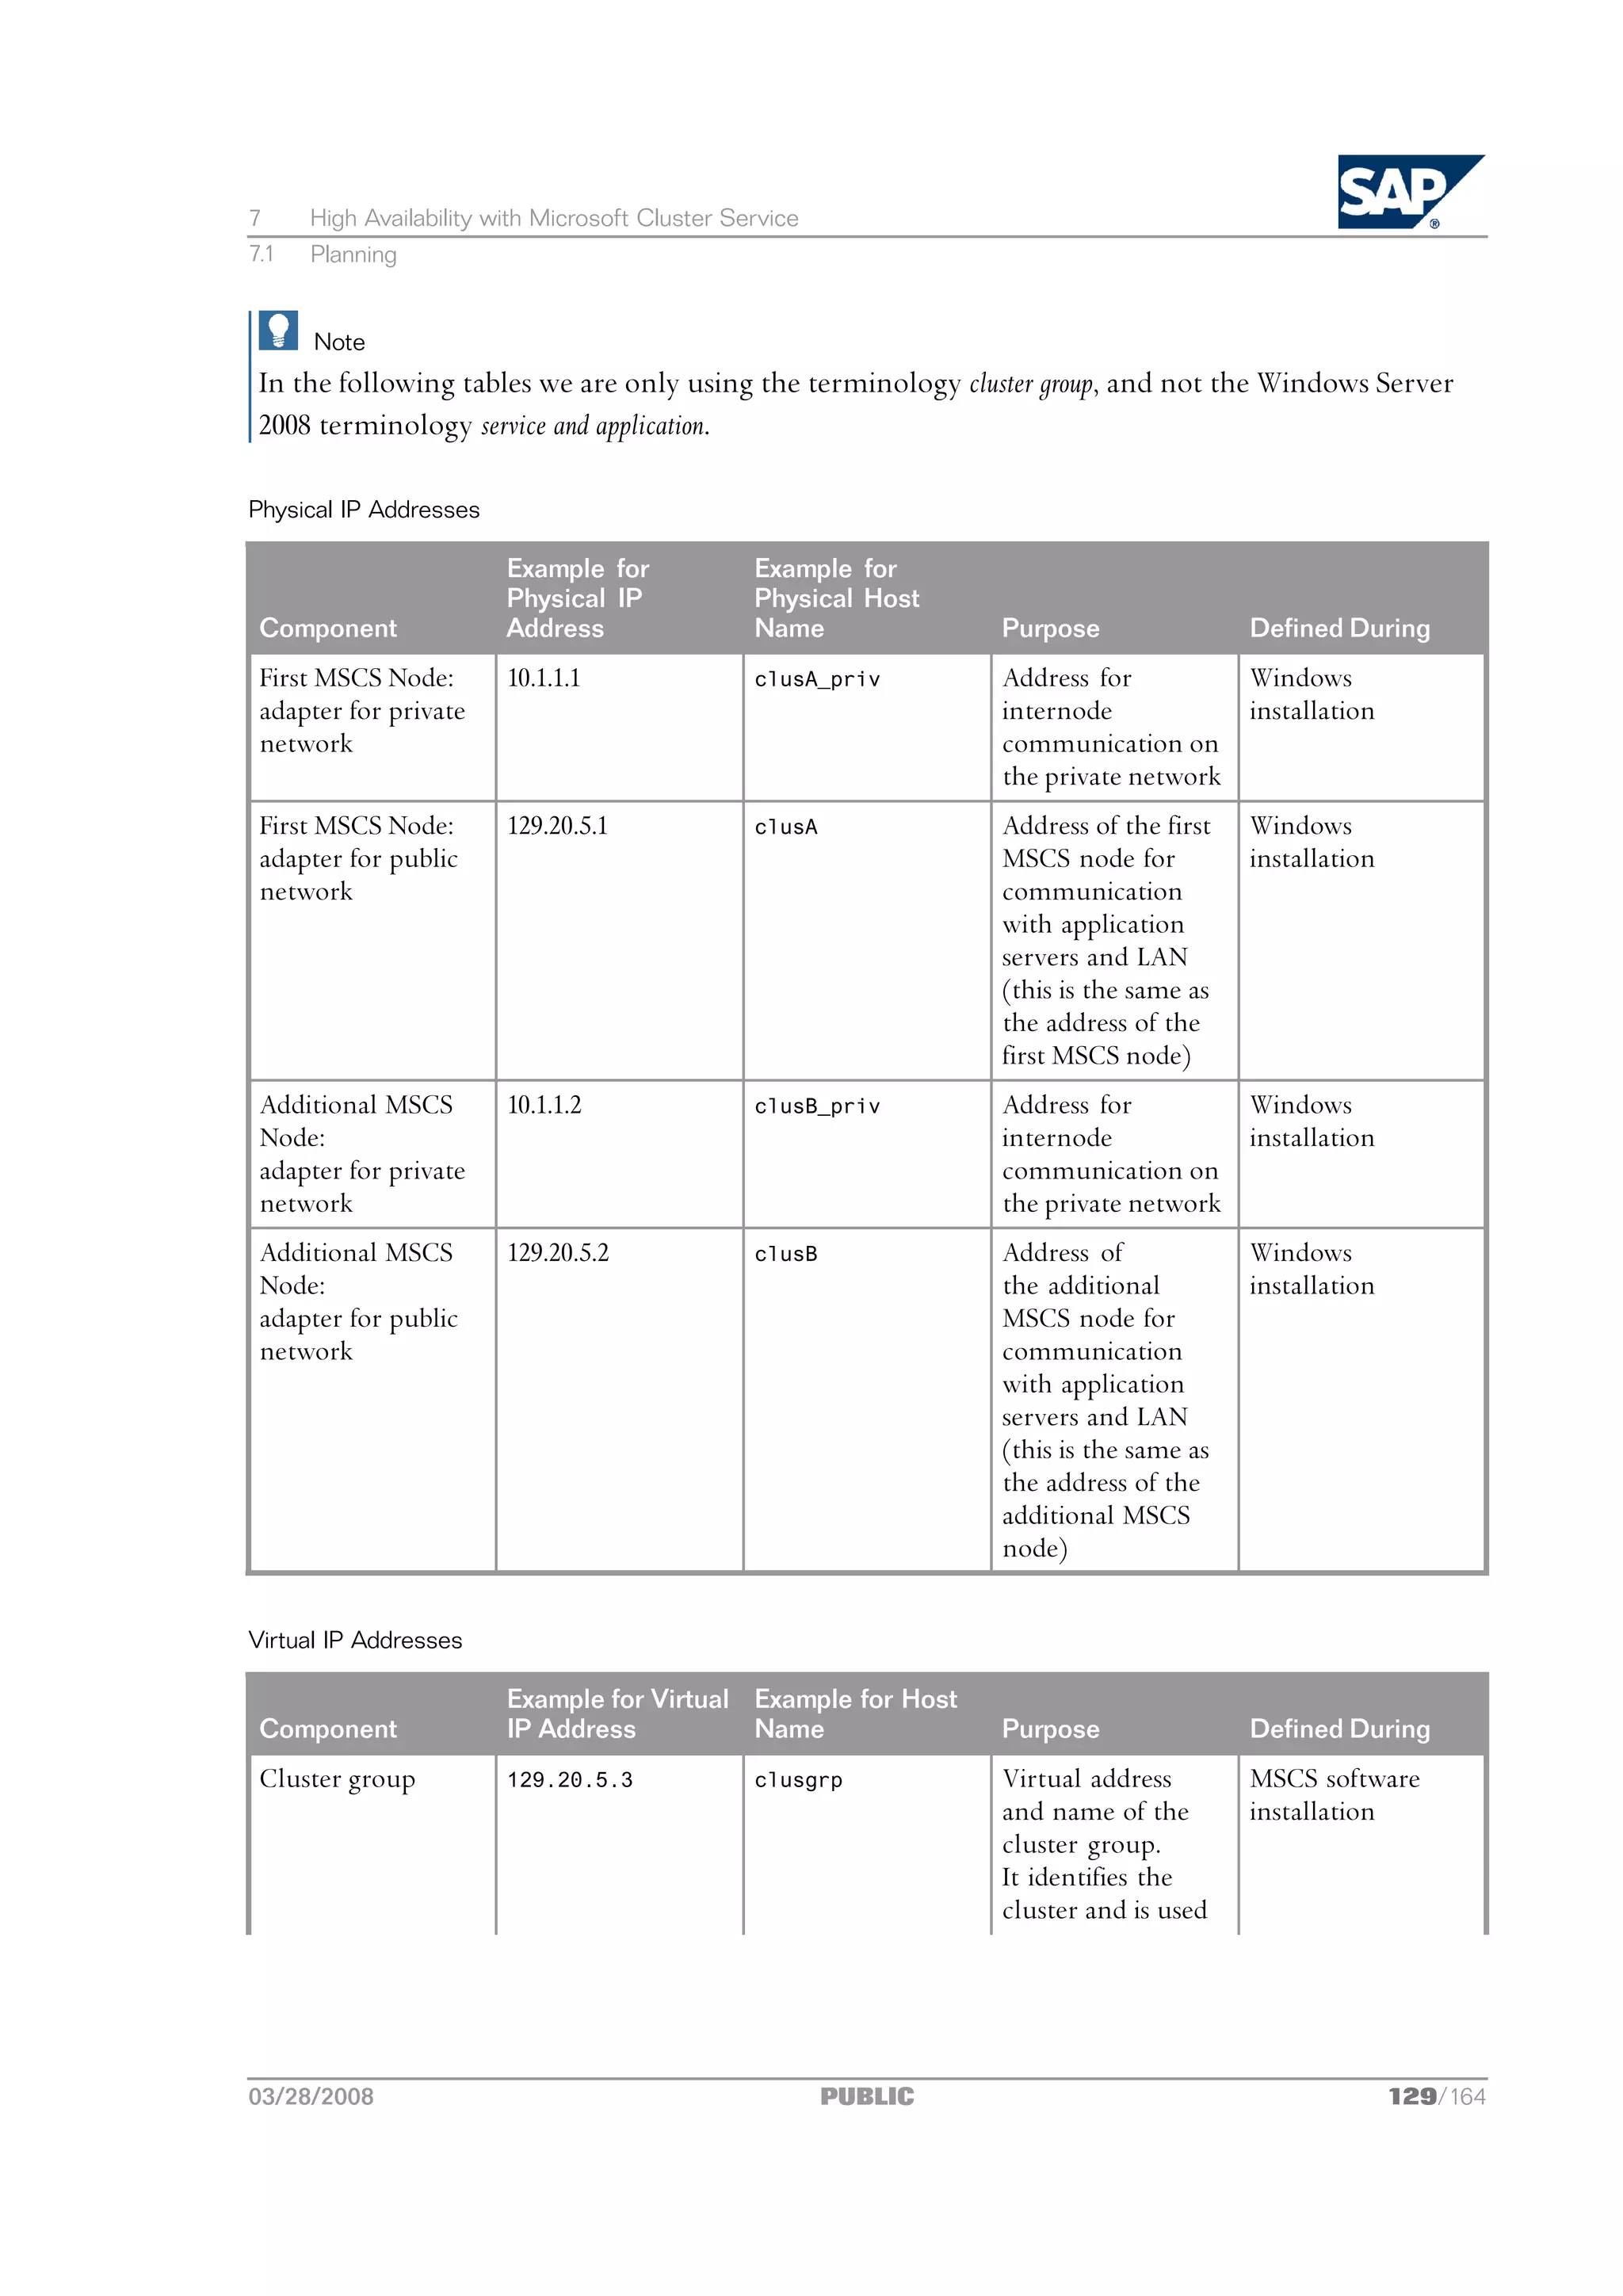
![7 High Availability with Microsoft Cluster Service
7.2 Preparation
Example for Virtual Example for Host
Component IP Address Name Purpose Defined During
for administration
purposes.
SAP cluster group 129.20.5.4 sapgrp Virtual address and Configuration of
name for accessing SAP system for
the group of SAP MSCS with SAPinst
resources, regardless on the first node
of the node it is
running on
Database cluster 129.20.5.5 dbgrp Virtual address and Execution of
group name for accessing MSCS wizard or
the group of database-specific
database resources, cluster scripts
regardless of the
node it is running
on
Determining Existing IP Addresses
To find out the existing IP addresses and corresponding host names and addresses, proceed as follows:
1. For Windows Server 2003 choose Start Control Panel Network Connections .
For Windows Server 2008 choose Start Control Panel Network and Sharing Center Manage network
connections .
2. Right-click one of the network cards (default name is Local Area Connection) that are displayed
and choose Properties.
3. Choose Internet Protocol (TCP/IP) Properties .
The Internet Protocol (TCP/IP) Properties dialog box appears and shows the IP address of the initially
selected network card.
4. To find out the host name that is mapped to the IP address, use the ping command:
ping -a <IP_Address>
The system returns the host name assigned to the IP address.
Do not forget to ping your local machine as well.
5. Repeat these steps for the other network cards.
For more information about IP addresses in the cluster environment, see IP Addresses in an MSCS
Configuration [page 125].
7.2 Preparation
For the installation of a high-availability system with Microsoft Cluster Service (MSCS), you have
to perform the same preparation tasks as for a non-HA system [page 35], including the hardware and software
requirements [page 42]. In addition, you have to perform the following MSCS-specific preparation tasks:
130/164 PUBLIC 03/28/2008](https://image.slidesharecdn.com/ecc6sr3orawininstguide-130128021232-phpapp02/75/Ecc6-sr3-ora_win_instguide-130-2048.jpg)
![7 High Availability with Microsoft Cluster Service
7.2 Preparation
1. On all MSCS nodes, you manually assign drive letters to the shared disks [page 131]. All MSCS nodes must
access the shared disks with the same drive letters.
2. You map the IP addresses to host names [page 131] on the Domain Name System (DNS) Server or in the
hosts file.
Note
Windows Server 2008 only:
This step is not required if you use DHCP-based IP addresses.
3. You check the mapping of host names for MSCS [page 132].
Note
Windows Server 2008 only:
This step is not required if you use DHCP-based IP addresses.
Note
To make sure that all preparation steps have been correctly performed, check that you can move
the disk resources from one node to another so that they are only accessible from a single node at
any time.
7.2.1 Assigning Drive Letters for MSCS
We recommend that you assign drive letters to the shared disks.
In an MSCS cluster, the shared disks that can be accessed by all nodes via a common bus must be
addressed by all nodes with the same drive letters.
Procedure
1. Choose Start Control Panel Administrative Tools Computer Management Storage Disk Management.
2. Select a disk and choose Action All tasks Change Drive Letter and Paths...
3. Enter a new drive letter.
7.2.2 Mapping Host Names to IP Addresses for MSCS
Note
Windows Server 2008 only:
This step is not required if you use DHCP-based IP addresses.
03/28/2008 PUBLIC 131/164](https://image.slidesharecdn.com/ecc6sr3orawininstguide-130128021232-phpapp02/75/Ecc6-sr3-ora_win_instguide-131-2048.jpg)
![7 High Availability with Microsoft Cluster Service
7.2 Preparation
To enable correct operation of the failover mechanism, you have to map all IP addresses in the MSCS
cluster to host names.
The mapping enables the system to translate host names into IP addresses. Host names are normally
used for administrative tasks because they are easier to use than the long, numeric IP addresses.
However, the system can only respond to host names if they are translated into IP addresses.
Prerequisites
n You have installed the Windows operating system.
n You have the list of IP addresses [page 128].
n You have correctly entered all seven IP addresses required for the MSCS configuration.
Caution
Missing or incorrect entries for the IP addresses can cause problems later during the installation.
Procedure
To map the host names to the IP addresses, do one of the following:
n Map the host names to IP addresses on a Domain Name System (DNS) server.
n Map the IP addresses in the Windows hosts file.
The file is located in the default Windows directory:
%SystemRoot%Drivesystem32driversetc
Recommendation
We recommend that you perform the mapping on the DNS server because this only requires a
single entry.
If you perform the mapping in the hosts file, you have to maintain the hosts file on all MSCS nodes
of the cluster, and on all application servers and front ends. This is necessary because each host
in the system has its own hosts file.
7.2.3 Checking the Mapping of Host Names for MSCS
Note
Windows Server 2008 only:
This step is not required if you use DHCP-based IP addresses.
You need to check the mapping of host names to IP addresses as otherwise you might have serious
problems later.
Prerequisites
You have mapped the host names to the IP addresses [page 131] on the DNS Server or in the hosts file.
132/164 PUBLIC 03/28/2008](https://image.slidesharecdn.com/ecc6sr3orawininstguide-130128021232-phpapp02/75/Ecc6-sr3-ora_win_instguide-132-2048.jpg)
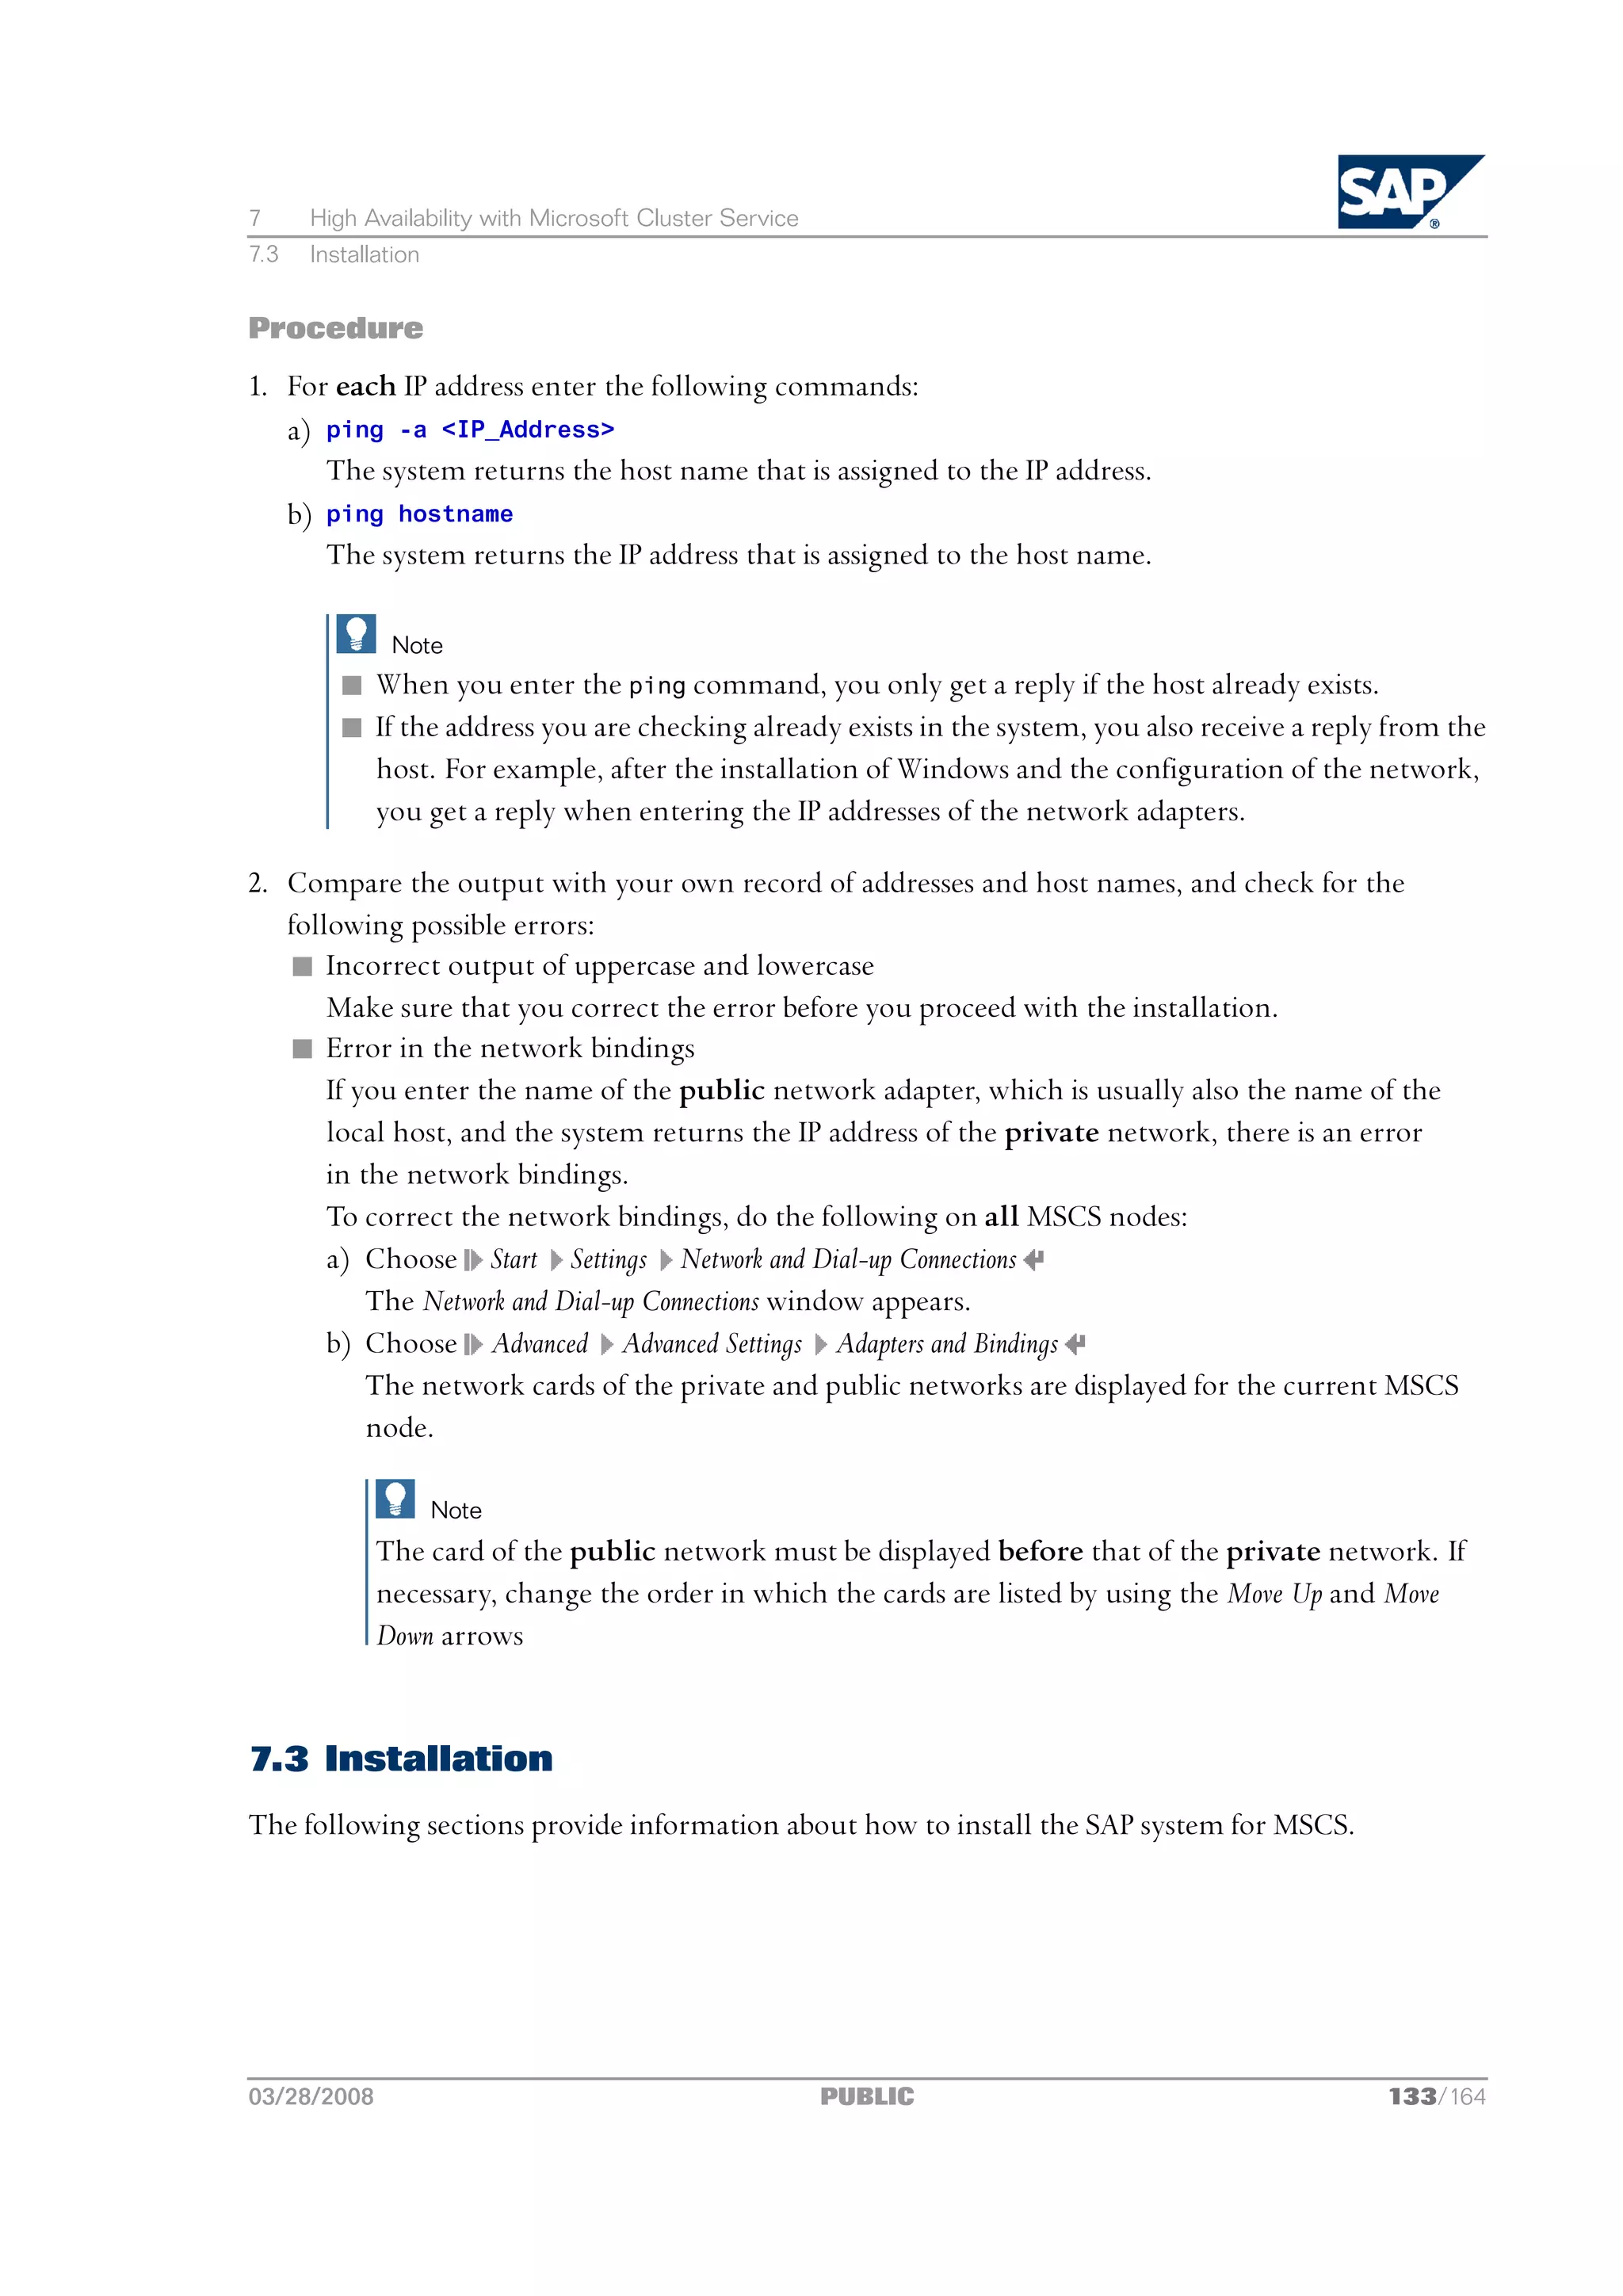
![7 High Availability with Microsoft Cluster Service
7.3 Installation
Note
n Make sure that you have not installed the Cluster Service and the Oracle Fail Safe service with the
<sapsid>adm user but with an SAP system independent user.
n Make sure that you are logged on as domain administrator, unless otherwise specified.
If for any reason, you are not granted domain administrators rights, you can perform the
installation as a domain user who is a member of the local administrators group. However, the
domain administrator has to prepare the system appropriately for you. Do not use the user
<sapsid>adm unless specified.
n On the first MSCS node, in the Cluster Administrator (Windows Server 2003) or Failover Cluster
Management (Windows Server 2008) make sure that all existing cluster groups are online.
n If you are prompted during the installation process, log off and log on again.
n When you reboot during the installation process [page 136], resources fail over to the other node(s).
Therefore, pause the other node(s) before the reboot.
You have to perform the following steps:
1. In the Cluster Administrator (Windows Server 2003) or Failover Cluster Management (Windows Server 2008)
you move all disk groups and the cluster group to the first MSCS node [page 135].
2. On all MSCS nodes of the host where the database instance is to run, you install the Oracle database
server software and the current patch set and hot fix (if available) [page 59].
3. If required, you set up multiple Oracle Homes [page 61].
Note
This step is not required if you install a system into an existing database (MCOD) [page 91].
4. On all MSCS nodes of the host where the database instance is to run, you install the Oracle Fail
Safe Software [page 137].
Caution
Do not install the Fail Safe Software in parallel on all MSCS nodes. You must install it on
one MSCS node at a time.
After the installation you reboot [page 136].
5. You perform additional steps for the Oracle Fail Safe configuration [page 144] on the host where the database
instance is to run.
6. You install the central services instance for ABAP (ASCS) on the first MSCS node [page 139] of the host where
the ASCS instance is to run.
7. You cluster the first MSCS node [page 140].
8. You install the database instance on the first MSCS node [page 141] of the host where the database instance
is to run.
9. You cluster the additional MSCS node [page 142].
134/164 PUBLIC 03/28/2008](https://image.slidesharecdn.com/ecc6sr3orawininstguide-130128021232-phpapp02/75/Ecc6-sr3-ora_win_instguide-134-2048.jpg)
![7 High Availability with Microsoft Cluster Service
7.3 Installation
10. You install an enqueue replication server [page 145] on the host where the (A)SCS instance runs.
11. You install the central instance [page 146] on the central instance host or on a local disk on the MSCS
node.
12. You create the Oracle Fail Safe group [page 147] on the database instance host.
13. You set up a shared database directory in your Oracle Home [page 148] on the database instance host.
14. You add the Oracle database resource to the Fail Safe group [page 150] on the database instance host.
15. You install at least one dialog instance [page 150] on the dialog instance host or on a local disk on the
MSCS node.
7.3.1 Moving MSCS Groups or Services and Applications
Note
As of Windows Server 2008 there are the following terminology changes:
n Cluster groups are now called services and applications.
We do not always use both names in this section.
n The Cluster Administrator is now called Failover Cluster Management.
During the cluster installation you have to move the database, SAP, or disk cluster groups from one
MSCS node to the other before you can continue. You use the Cluster Administrator (Windows Server
2003) or Failover Cluster Management (Windows Server 2008) for this.
With Oracle, you can also use the Fail Safe Manager.
Prerequisites
For more information if you need to reboot during the installation, see Rebooting During the Installation or
Conversion for MSCS [page 136].
Windows Server 2003: Moving Groups with the Cluster Administrator
You use the Cluster Administrator for groups that do not belong to the Oracle database groups.
1. Start the Cluster Administrator with Start All Programs Administrative Tools Cluster Administrator .
2. In the Cluster Administrator, select the group you want to move and drag it to the required MSCS
node on the left-hand pane.
3. Repeat the previous step for each group that you want to move.
Windows Server 2008: Moving Services and Applications with the
Failover Cluster Management
You use the Failover Cluster Management for groups that do not belong to the database groups.
Note
Only move disks that are assigned to services or applications.
03/28/2008 PUBLIC 135/164](https://image.slidesharecdn.com/ecc6sr3orawininstguide-130128021232-phpapp02/75/Ecc6-sr3-ora_win_instguide-135-2048.jpg)
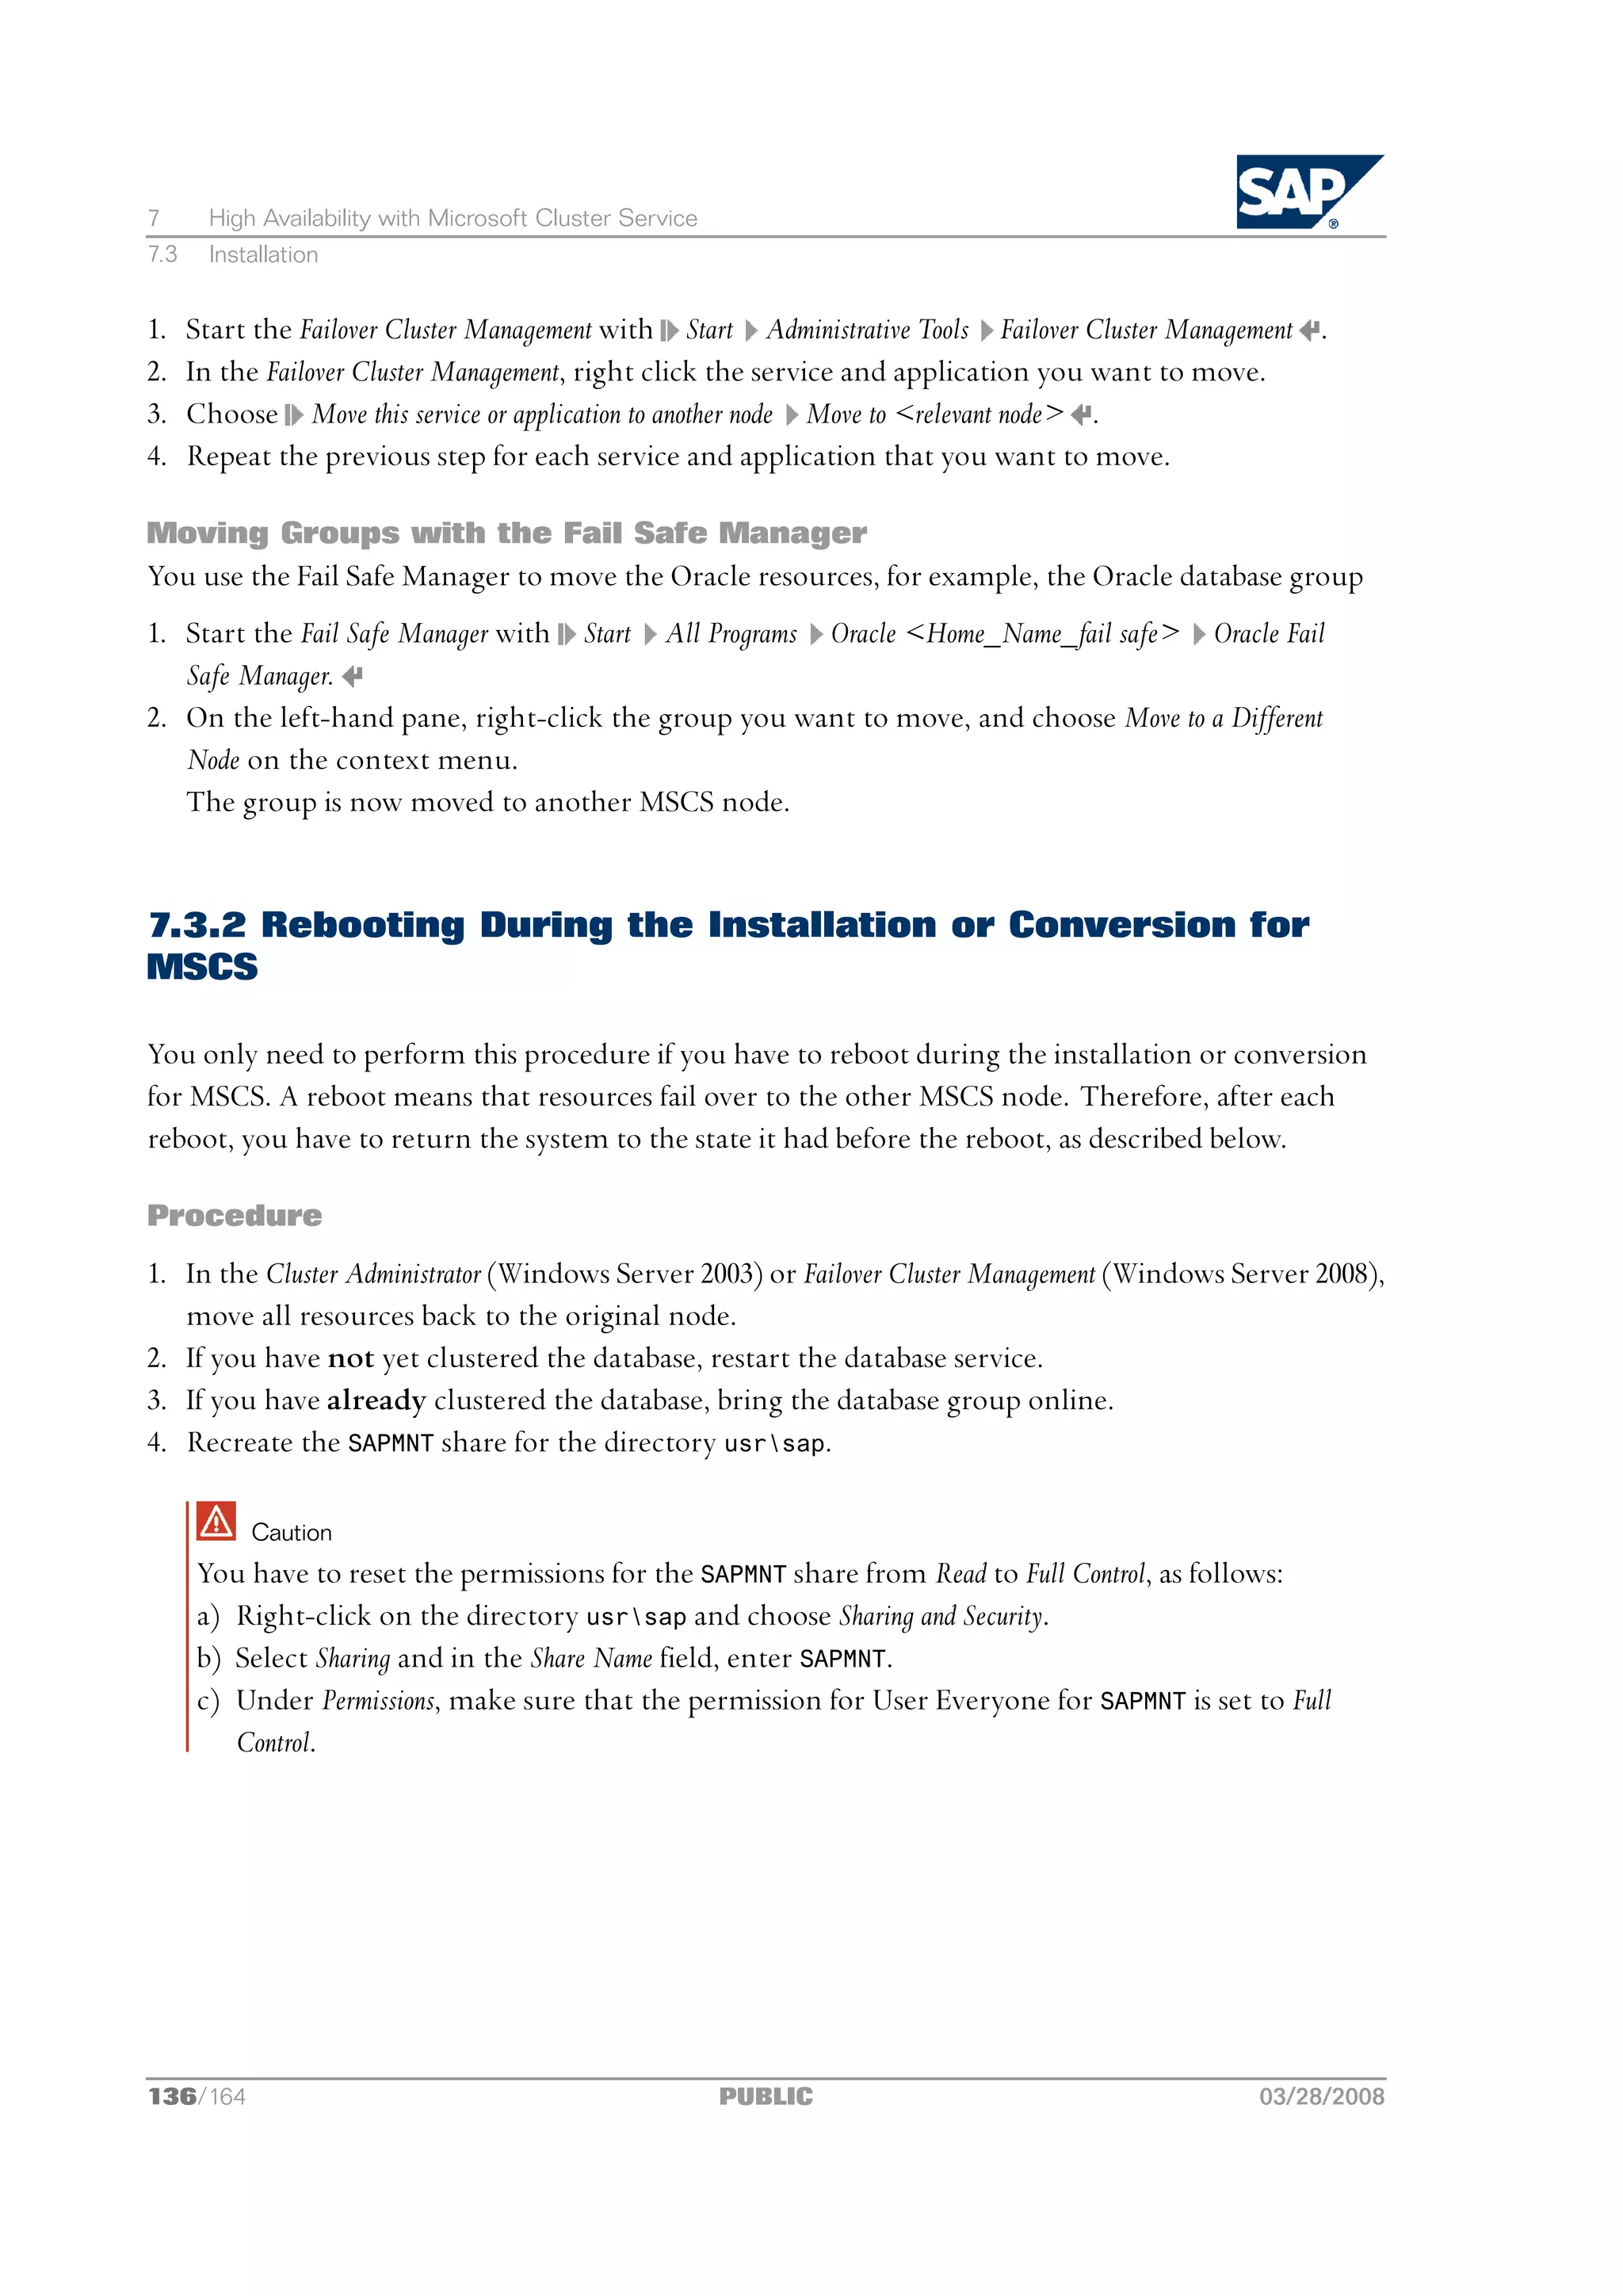
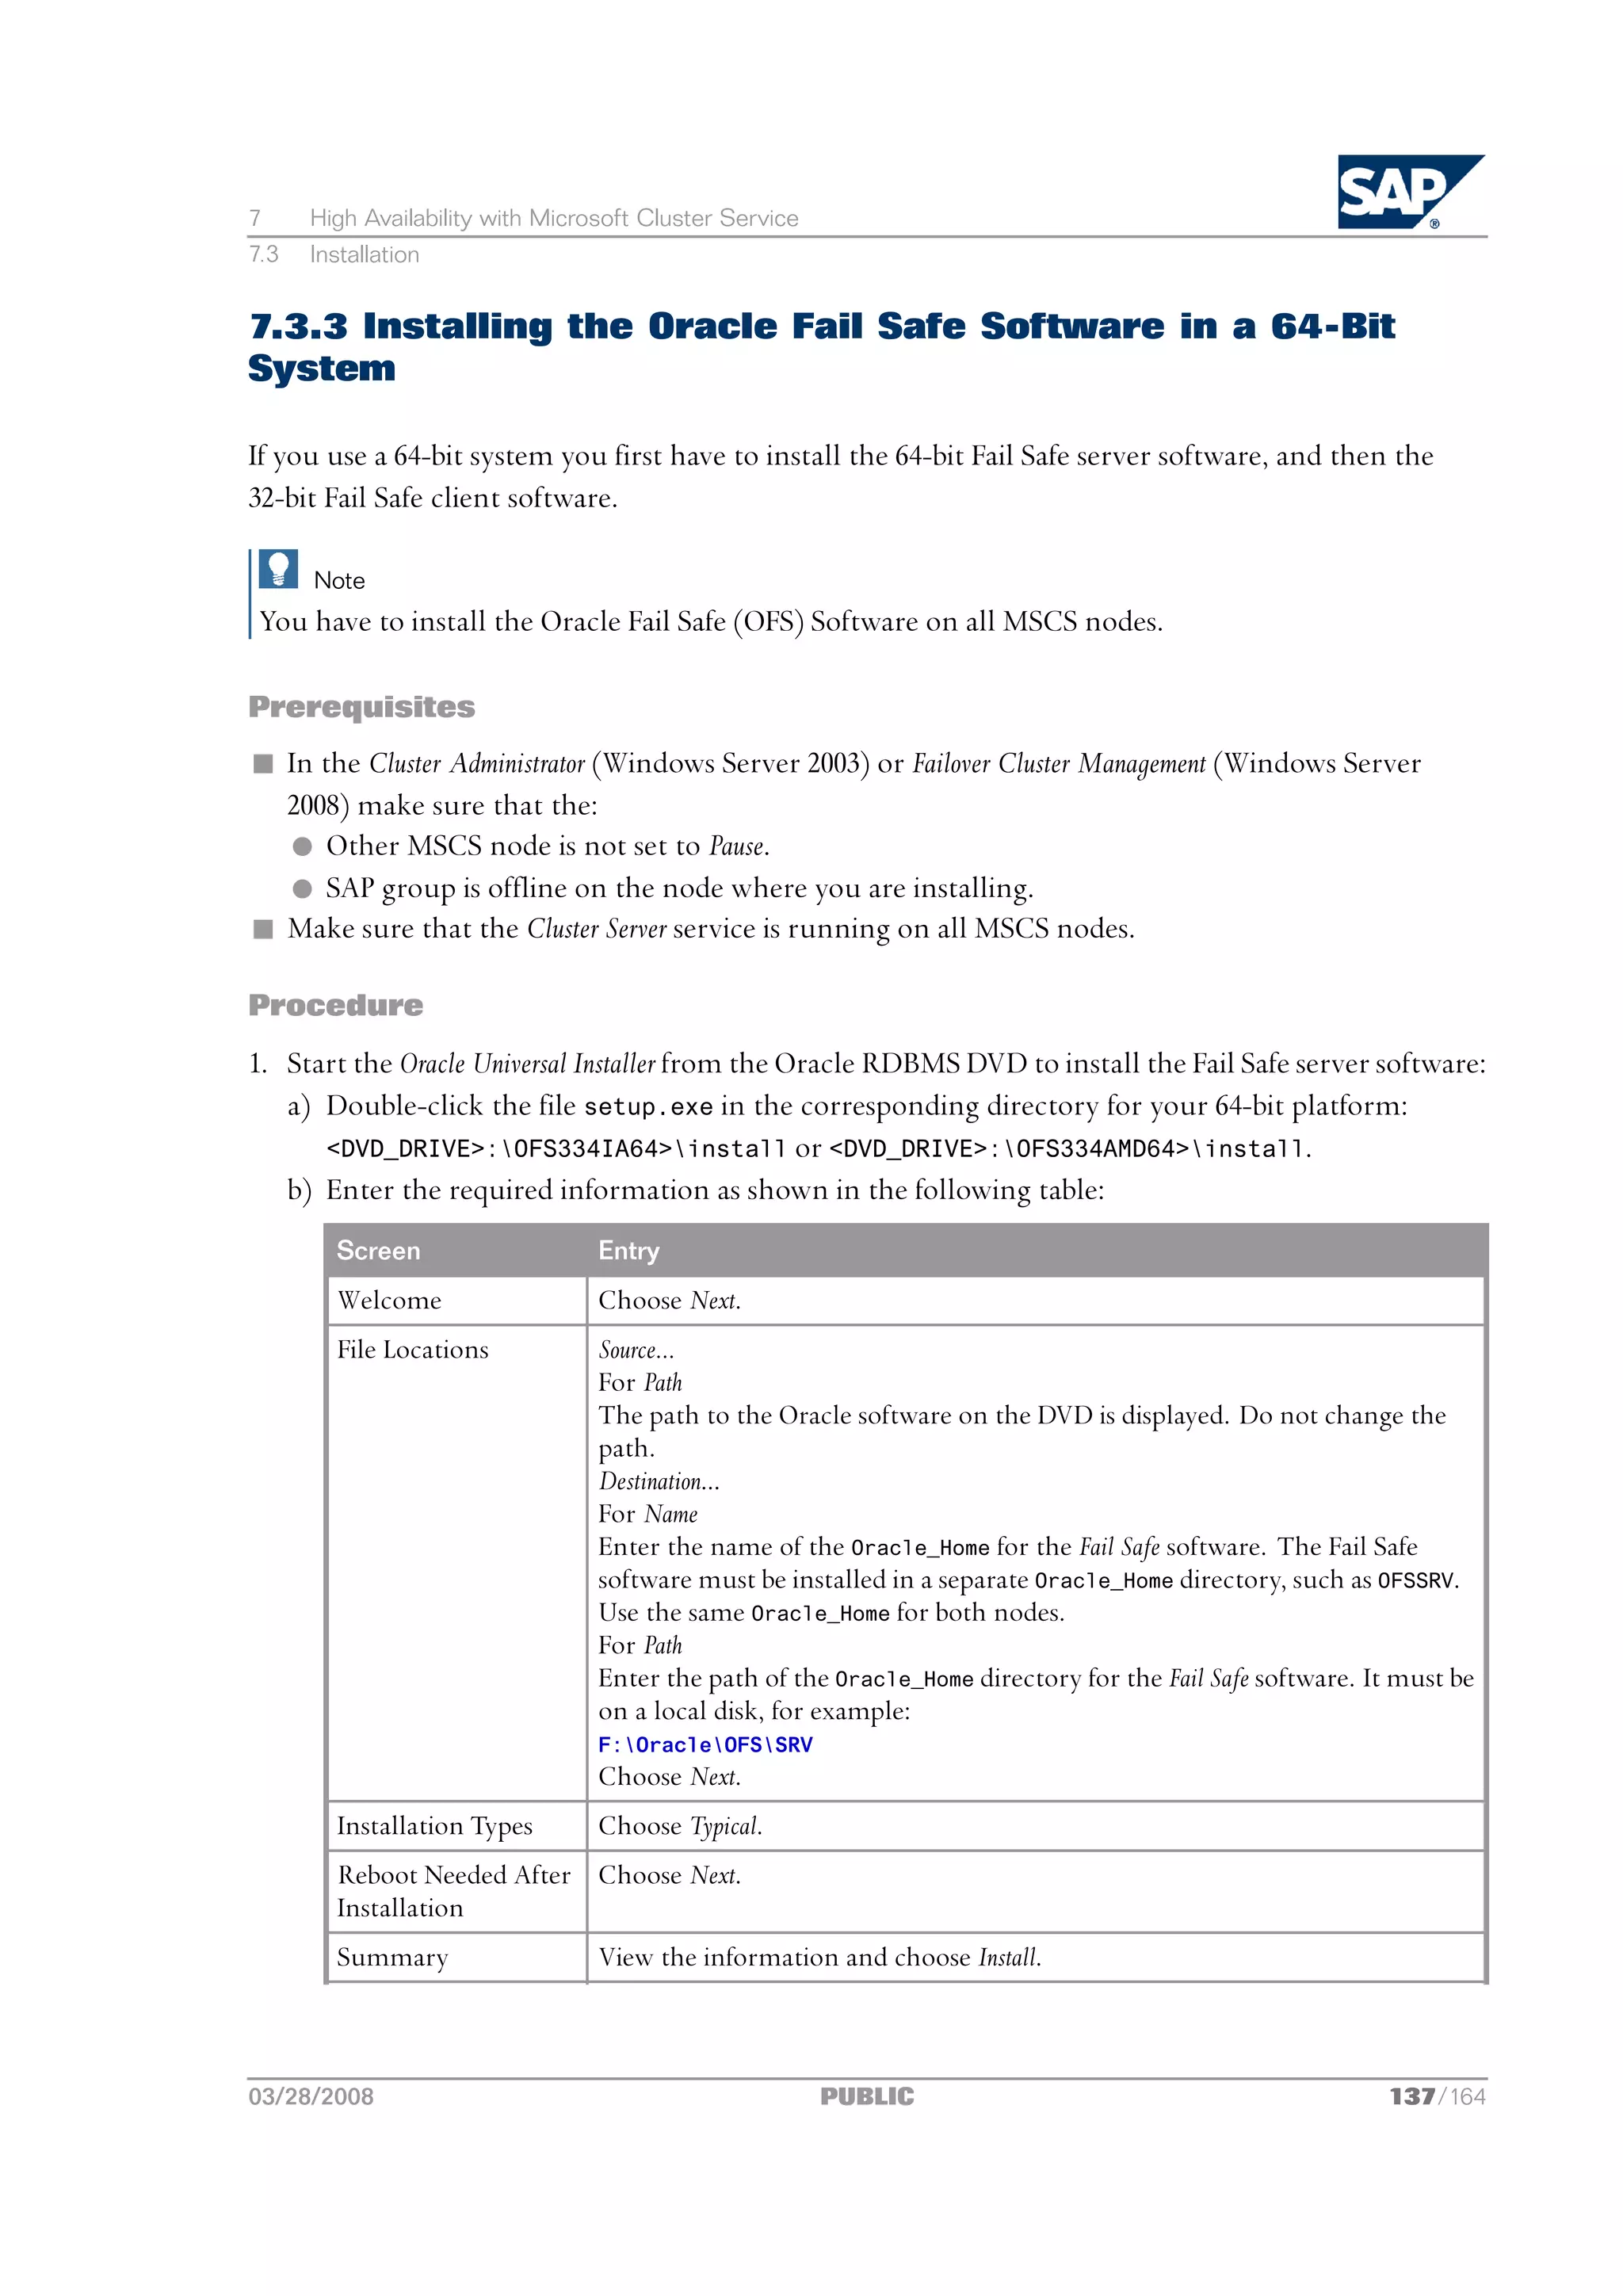
![7 High Availability with Microsoft Cluster Service
7.3 Installation
Caution
Do not reboot an MSCS node, if the installation of OFS 3.3.4 is in progress on another MSCS node.
7.3.4 Installing the Central Services Instance for ABAP (ASCS)
1. Windows Server 2008 only:
Before you install the central services instance for ABAP (ASCS), you must create the SAP Services
and Applications as follows:
a) Open the Failover Cluster Management Console.
b) Expand the navigation tree of the cluster.
c) Right-click Services and Applications.
d) Choose More Actions... Create Empty Service or Application .
e) Rename the newly created service and application to SAP <SAPSID>.
f) Right-click the service and application SAP <SAPSID> and choose Add Storage.
g) Select the disk where the SAP instance is to be installed and choose OK.
h) Right-click the service and application SAP <SAPSID>.
i) Select Add a resource Client Access Point .
j) In the Client Access Point wizard, under Name enter the virtual host name for the SCS instance and
choose Next and then Finish.
Note
Depending on whether you use DHCP, you might need to enter the IP Address details on the
second tab. Confirm your entries with Next and then Finish.
k) Right-click the service and application SAP <SAPSID>.
l) Choose Add a resource Add File Server .
m)Double-click New File Server.
n) In the New File Server Properties window, change the Resource Name from New File Server into SAP
<SAPSID> FileServer.
Caution
If you do not change the name, the clustering steps with SAPinst fail.
o) Go to the Dependencies tab and add the cluster disk resource to the dependencies list.
Add the Name:Virtual Networkname to the dependencies list.
p) Right-click the SAP <SAPSID> FileServer resource and choose Bring this resource online.
2. Start SAPinst [page 62].
03/28/2008 PUBLIC 139/164](https://image.slidesharecdn.com/ecc6sr3orawininstguide-130128021232-phpapp02/75/Ecc6-sr3-ora_win_instguide-139-2048.jpg)
![7 High Availability with Microsoft Cluster Service
7.3 Installation
Caution
Windows Server 2008 only:
Do not start the SAPinst executable sapinst.exe by double-clicking it in the Windows Explorer.
Instead, open a Command Prompt and change to the direc-
tory:<InstallationMasterDVD>:IM_WINDOWS_<platform>.
Enter sapinst.exe SAPINST_USE_HOSTNAME=<virtual hostname of (A)SCS instance>
3. Choose <Your SAP System> SAP Systems <Database> High-Availability System Based on <technical
stack> Central Services Instance for ABAP (ASCS) .
4. If you are installing the SCS instance with SAPinst for the first time and SAPinst prompts you to
log off, choose OK and log on again.
5. Follow the instructions in the SAPinst dialogs and enter the required parameters.
Note
For more information about the input parameters, position the cursor on a parameter and
press F1 in SAPinst.
Caution
The ASCS installation drive must be a shared disk that belongs to the SAP cluster group.
6. Check that the ASCS instance is running.
7.3.5 Configuring the First MSCS Node
To configure the first MSCS node so that it functions properly in MSCS, you have to run the cluster
configuration option offered by the SAPinst tool. When you run this option it:
n Creates the SAP cluster group
n Copies tools to the SAPCluster directory
n Sets the SAPService to manual
n Makes sure that the SAPOsCol service starts from the SAPCluster directory
Caution
When you reboot during the conversion to MSCS [page 136], resources fail over to the other MSCS node.
Therefore, after each reboot you have to return the system to the state it was in before the reboot.
140/164 PUBLIC 03/28/2008](https://image.slidesharecdn.com/ecc6sr3orawininstguide-130128021232-phpapp02/75/Ecc6-sr3-ora_win_instguide-140-2048.jpg)
![7 High Availability with Microsoft Cluster Service
7.3 Installation
Prerequisites
n You are logged on to the first MSCS node as domain administrator or as a local user with domain
administration rights. For more information, see Performing a Domain Installation without being a Domain
Administrator [page 50].
n The ASCS installation drive must be online on the first MSCS node.
Procedure
1. Run SAPinst and choose:
<Your SAP System> SAP Systems <Database> High-Availability System Based on <technical stack>
First MSCS Node
Note
If SAPinst prompts you to log off from your system, log off and log on again.
2. Enter the required parameter values.
Note
n Make sure that you choose instance type ABAP SCS Instance (ABAP only).
n On the SAPinst screen SAP System > MSCS Cluster do not select this checkbox:
Support of multiple SAP systems in one MSCS cluster?
Note
For more information about the input parameters, position the cursor on the parameter and
press F1 in SAPinst.
3. When the installation is finished, make sure that the following value is set in the default profile:
enque/serverhost=<Virtual_ASCS_HostName>
Result
SAPinst converts the SAP instances on the first MSCS node for operation in MSCS.
7.3.6 Installing the Database Instance
Prerequisites
n The SAP cluster group is Online on the first MSCS node.
n The Oracle shared disk is Online on the first MSCS node.
Procedure
Perform the following steps on the first MSCS node.
03/28/2008 PUBLIC 141/164](https://image.slidesharecdn.com/ecc6sr3orawininstguide-130128021232-phpapp02/75/Ecc6-sr3-ora_win_instguide-141-2048.jpg)
![7 High Availability with Microsoft Cluster Service
7.3 Installation
1. On the first MSCS node, run SAPinst [page 62] and choose:
<Your SAP System> SAP Systems <Database> High-Availability System Based on <technical stack>
Database Instance
2. Follow the instructions in the SAPinst dialogs and enter the required parameter values.
a) For the profile UNC path you have to use the virtual (A)SCS host name, for example:
<SAPGLOBALHOST>sapmnt<SAPSID>SYSprofile.
b) Make sure that in the database host field, the local database host is displayed.
Caution
By default, SAPinst locates the saparch, sapreorg, sapcheck and saptrace directories on the last
available drive. If this is a local drive, you must specify that these directories reside on a shared disk
by using Advanced Database Options, which you can find on the screen Oracle > Database Instance. Continue
with Next until you can select Windows Drive Mapping. Check the box and choose Next. Then relocate
all folders to a shared disk.
Note
For more information about the input parameters, position the cursor on a parameter and press the
F1 key in SAPinst.
7.3.7 Configuring the Additional MSCS Node
To configure the additional MSCS node in the cluster, you have to run the MSCS configuration
option for each additional MSCS node offered by the SAPinst tool. When you run this option it:
n Creates users and groups
n Sets the system and user environment
n Enters required port numbers in the Windows services file
n Creates the SAPService and SAPOsCol Services
Caution
When you reboot during the conversion to MSCS [page 136], resources fail over to the other MSCS node.
Therefore, after each reboot you have to return the system to the state it was in before the reboot.
Prerequisites
n You are logged on to the additional MSCS node as domain administrator or as a local user with
domain administration rights. For more information, see Performing ad Domain Installation without
being a Domain Administrator [page 50].
n You have already configured the first MSCS node [page 140].
142/164 PUBLIC 03/28/2008](https://image.slidesharecdn.com/ecc6sr3orawininstguide-130128021232-phpapp02/75/Ecc6-sr3-ora_win_instguide-142-2048.jpg)
![7 High Availability with Microsoft Cluster Service
7.3 Installation
Procedure
1. Run SAPinst [page 62] and choose Additional MSCS Node.
Note
If SAPinst prompts you to log off from your system, log off and log on again.
2. Run SAPinst and choose:
<SAP System> SAP Systems <Database> High-Availability System Based on <technical stack>
Additional MSCS Node
Note
If SAPinst prompts you to log off from your system, log off and log on again.
3. Enter the required parameter values.
Note
n Make sure that you choose instance type ABAP SCS Instance (ABAP only).
n On the SAPinst screen SAP System > MSCS Cluster do not select the following checkbox: Support of
multiple SAP systems in one MSCS cluster?
Note
For more information about the input parameters, position the cursor on the parameter and
press F1 in SAPinst.
When you have made all required entries, SAPinst begins processing and converts the SAP
instances on the other MSCS node for operation in MSCS.
4. When SAPinst has finished, start the SAP <SAPSID> cluster group (Windows Server 2003) or service
and application (Windows Server 2008) as follows:
Windows Server 2003 only:
a) Open the Cluster Administrator with:
Start Control Panel Administrative Tools Cluster Administrator
b) Select the SAP cluster group and bring it online.
Windows Server 2008 only:
a) Open the Failover Cluster Management with:
Start Control Panel Administrative Tools Failover Cluster Management
b) Right-click the service and application SAP <SAPSID> and bring it online.
03/28/2008 PUBLIC 143/164](https://image.slidesharecdn.com/ecc6sr3orawininstguide-130128021232-phpapp02/75/Ecc6-sr3-ora_win_instguide-143-2048.jpg)
![7 High Availability with Microsoft Cluster Service
7.3 Installation
7.3.9 Installing an Enqueue Replication Server
We recommend that you install an enqueue replication server with SAPinst on all MSCS nodes
where an ASCS instance is running.
Note
You have to perform the installation at least two times.
Prerequisites
n Your ASCS instance is already clustered with MSCS.
n You have to install the enqueue replication server on a local disk.
Procedure
1. On the first MSCS node, log on as domain user who is a member of the local administrators group.
2. Run SAPinst [page 62] and choose:
<SAP System> SAP Systems <Database> High-Availability System Based on <technical stack>
Enqueue Replication Server
3. Follow the instructions in the SAPinst dialogs and enter the required parameters.
Note the following, when entering the parameters
n On the SAPinst screen: SAP System > SAP Instance, enter the:
l SAP system ID <SAPSID> of your SAP system
l Instance number of the ASCS instance
l Virtual instance host name of the ASCS instance
n On the SAPinst screen SAP System > Enqueue Replication Server Instance, enter a unique instance
number that is not in use by another instance on this host.
n Decide if you want to restart the ASCS instance and service cluster resources with SAPinst
now, or later with the Cluster Administrator (Windows Server 2003) or Failover Cluster Management
(Windows Server 2008).
Note
You only need to do this once for all enqueue replication servers that you install on the
MSCS nodes.
After you have entered all required input information, SAPinst starts the installation and displays
the progress of the installation. During the process phase, the enqueue server instance is started.
SAPinst installs the enqueue replication server instance on a local disk in the following directory:
.usrsap<SAPSID>ERS<instance_number>
03/28/2008 PUBLIC 145/164](https://image.slidesharecdn.com/ecc6sr3orawininstguide-130128021232-phpapp02/75/Ecc6-sr3-ora_win_instguide-145-2048.jpg)
![7 High Availability with Microsoft Cluster Service
7.3 Installation
Note
The profile is replicated from the global host to the local instance profile folder. The enqueue
replication server instance uses the profile from the local instance profile folder:
.usrsap<SAPSID>ERS<instance_number>profile
4. On the additional MSCS node, start SAPinst to install the enqueue replication server for the
ASCS instance as described in step 2 above.
Note
There is no need to move the ASCS cluster group to another MSCS node.
5. Enter the required parameter values in the SAPinst dialogs as described above.
7.3.10 Installing the Central Instance
The following describes how to install the central instance for MSCS.
You have the following options to install the central instance:
n You install the central instance on an MSCS node.
In this case, bring the SAP cluster group online on this node, and make sure that the central
instance number is different from the (A)SCS instance number.
n You install the central instance on a host outside of MSCS.
Procedure
1. Run SAPinst [page 62] and choose:
<Your SAP System> SAP Systems <Database> High-Availability System Based on <technical stack>
Central Instance
2. If SAPinst prompts you to log off, choose OK and log on again.
3. Follow the instructions in the SAPinst dialogs and enter the required parameter values.
Note
For more information about the input parameters, position the cursor on a parameter and
press F1 in SAPinst.
146/164 PUBLIC 03/28/2008](https://image.slidesharecdn.com/ecc6sr3orawininstguide-130128021232-phpapp02/75/Ecc6-sr3-ora_win_instguide-146-2048.jpg)

![7 High Availability with Microsoft Cluster Service
7.3 Installation
n You install the dialog instance on an MSCS node.
In this case, bring the SAP cluster group online on this node, and make sure that the dialog
instance number is different from the (A)SCS instance number.
n You install the dialog instance on a host outside of MSCS.
Procedure
1. Run SAPinst [page 62] and choose:
<Your SAP System> SAP Systems <Database> High-Availability System Based on <technical stack>
Dialog Instance
2. If SAPinst prompts you to log off, choose OK and log on again.
3. Follow the instructions in the SAPinst dialogs and enter the required parameter values.
Note
For more information about the input parameters, position the cursor on a parameter and
press F1 in SAPinst.
Caution
n If you install the dialog instance on an MSCS node, make sure that on the screen SAP System
> General Parameters for the:
l Profile Directory, you use the UNC path of the virtual (A)SCS host name, for example:
<SAPGLOBALHOST>sapmnt<SAPSID>SYSprofile
l Installation Drive, you choose the local disk where you want to install the dialog instance. Do
not enter the shared disk for the (A)SCS instance.
Note
If the installation drive is not shown and you cannot select it, the saploc share already
exists. SAPinst then automatically takes the installation drive to be the drive where the
saploc share points to. Check that the saploc share points to a local drive before you
continue the installation. Since you already installed the ERS instance on the local drive
and the saploc share then points to that local drive, SAPinst automatically takes that
drive to be the installation drive.
4. If required, install additional dialog instances outside of MSCS.
Caution
Make sure that on the screen SAP System > General Parameters for the Profile Directory, you use the UNC
path of the virtual (A)SCS host name, for example:
<SAPGLOBALHOST>sapmnt<SAPSID>SYSprofile
03/28/2008 PUBLIC 151/164](https://image.slidesharecdn.com/ecc6sr3orawininstguide-130128021232-phpapp02/75/Ecc6-sr3-ora_win_instguide-151-2048.jpg)
![7 High Availability with Microsoft Cluster Service
7.4 Post-Installation
7.4 Post-Installation
This section describes how to complete and check the installation of the SAP system for an MSCS
configuration:
1. You start and stop the SAP system in an MSCS configuration [page 152].
2. You perform the post-installation checks for the enqueue replication server [page 153].
3. If required, you perform the general post-installation steps [page 77] listed in this guide.
7.4.1 Starting and Stopping the SAP System in an MSCS
Configuration
The following describes how to start or stop the SAP system in an MSCS configuration with:
n SAP MMC
With the SAP MMC you can start or stop the complete SAP system or single instances if they
are clustered or not.
n Cluster Administrator (Windows Server 2003) or Failover Cluster Management (Windows Server
2008)
With the Cluster Administrator or Failover Cluster Management you can only start or stop clustered
instances such as the (A)SCS instance. For all other nonclustered instances, such as dialog
instances or the central instance, you must use the SAP MMC.
Note
You also use the Cluster Administrator or Failover Cluster Management for all other administrative tasks
like moving clustered instances from one MSCS node to the other MSCS node.
n Oracle Fail Safe Manager
To start or stop the database instance you use the Oracle Fail Safe Manager.
Procedure
n To start or stop your SAP system with the SAP MMC, see Starting and Stopping the SAP System [page 97].
n Windows Server 2003 only:
To start or stop the clustered (A)SCS instance with the Cluster Administrator, or the database
instance with the Oracle Fail Safe Manager do the following:
1. Start the Cluster Administrator by choosing Start Control Panel Administrative Tools Cluster
Administrator .
2. To start or stop the (A)SCS instance of the SAP cluster group, right-click the relevant cluster
resource SAP <SAPSID> <instance_no> Instance and choose Bring online or Take offline.
3. To start or stop the database instance in the Oracle Fail Safe Manager, right-click the database
<DBSID>.world in the Fail Safe group ORACLE<DBSID> and choose Place online or Take offline.
152/164 PUBLIC 03/28/2008](https://image.slidesharecdn.com/ecc6sr3orawininstguide-130128021232-phpapp02/75/Ecc6-sr3-ora_win_instguide-152-2048.jpg)
![7 High Availability with Microsoft Cluster Service
7.4 Post-Installation
Note
If a dialog box appears, asking you how to take the database offline, choose Immediate.
n Windows Server 2008 only:
To start or stop the clustered (A)SCS instance with the Failover Cluster Management do the
following:
1. Start the Failover Cluster Management by choosing Start Administrative Tools Failover Cluster
Management .
2. To start or stop the (A)SCS instance, select the relevant service and application SAP <SAPSID>.
In the right-hand pane, under Other Resources, right-click the resource SAP <SAPSID>
<instance_no> Instance and choose Bring this resource online or Take this resource offline.
7.4.2 Post-Installation Checks for Enqueue Replication
Server
The following sections describe the tests you must perform to check whether the installed enqueue
replication server works properly. For these tests you use the ENQT and ENSMON command line
tools, which allow remote access to the enqueue server statistics. Before you can use these tools
you must copy them to the remote host where the Enqueue Replication Server is running and
from where you want to start the tests.
Note
Make sure that you have restarted the (A)SCS instance and service cluster resources SAP <SAPSID>
<(A)SCS_instance_number> Instance and SAP <SAPSID> <(A)SCS_instance_number> Service. You can do
this either with SAPinst while performing the installation, or with the Cluster Administrator (Windows
Server 2003) or Failover Cluster Management (Windows Server 2008).
You perform the following steps:
1. You copy ENQT.exe and ENSMON.exe from your cluster’s binary directory on the sapmnt share
<host>sapmnt<SAPSID>SYSexe<codepage><platform> to a directory on the remote
host from where you run the tests.
2. You check the status of the enqueue replication server with the ENSMON tool [page 154].
3. You check the fill status and ID of the lock table during failover with the ENQT tool [page 154].
03/28/2008 PUBLIC 153/164](https://image.slidesharecdn.com/ecc6sr3orawininstguide-130128021232-phpapp02/75/Ecc6-sr3-ora_win_instguide-153-2048.jpg)

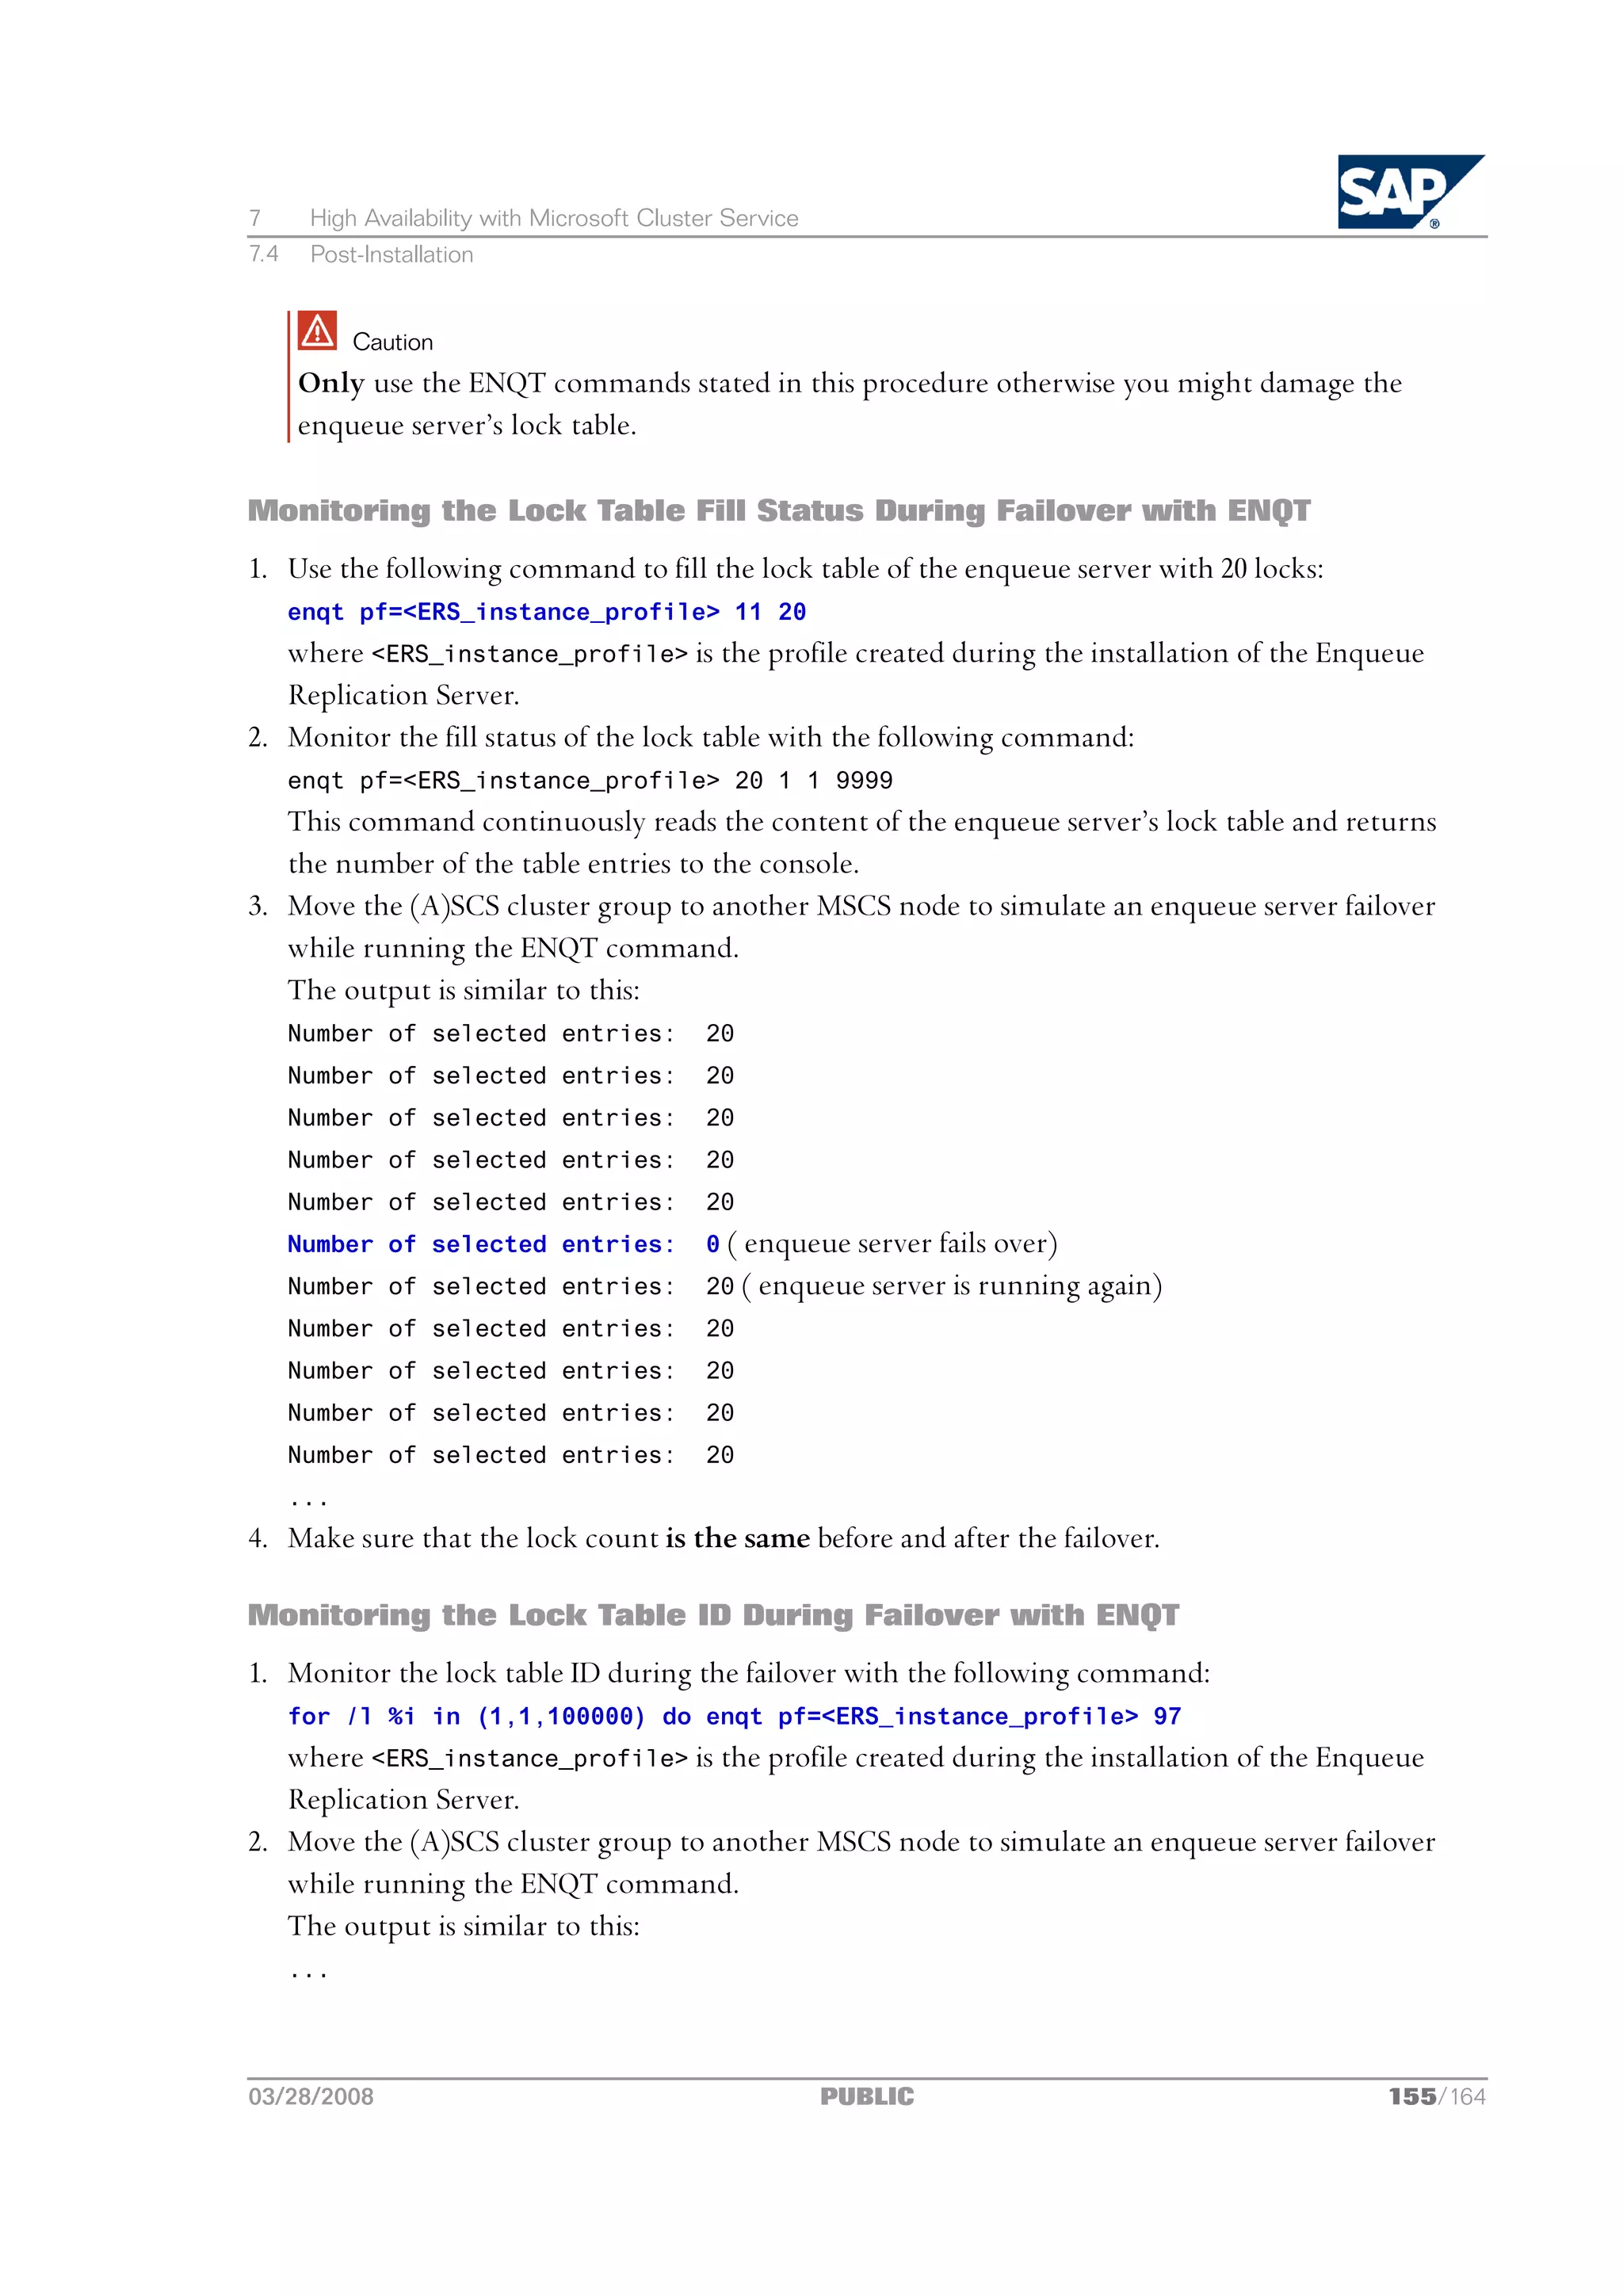
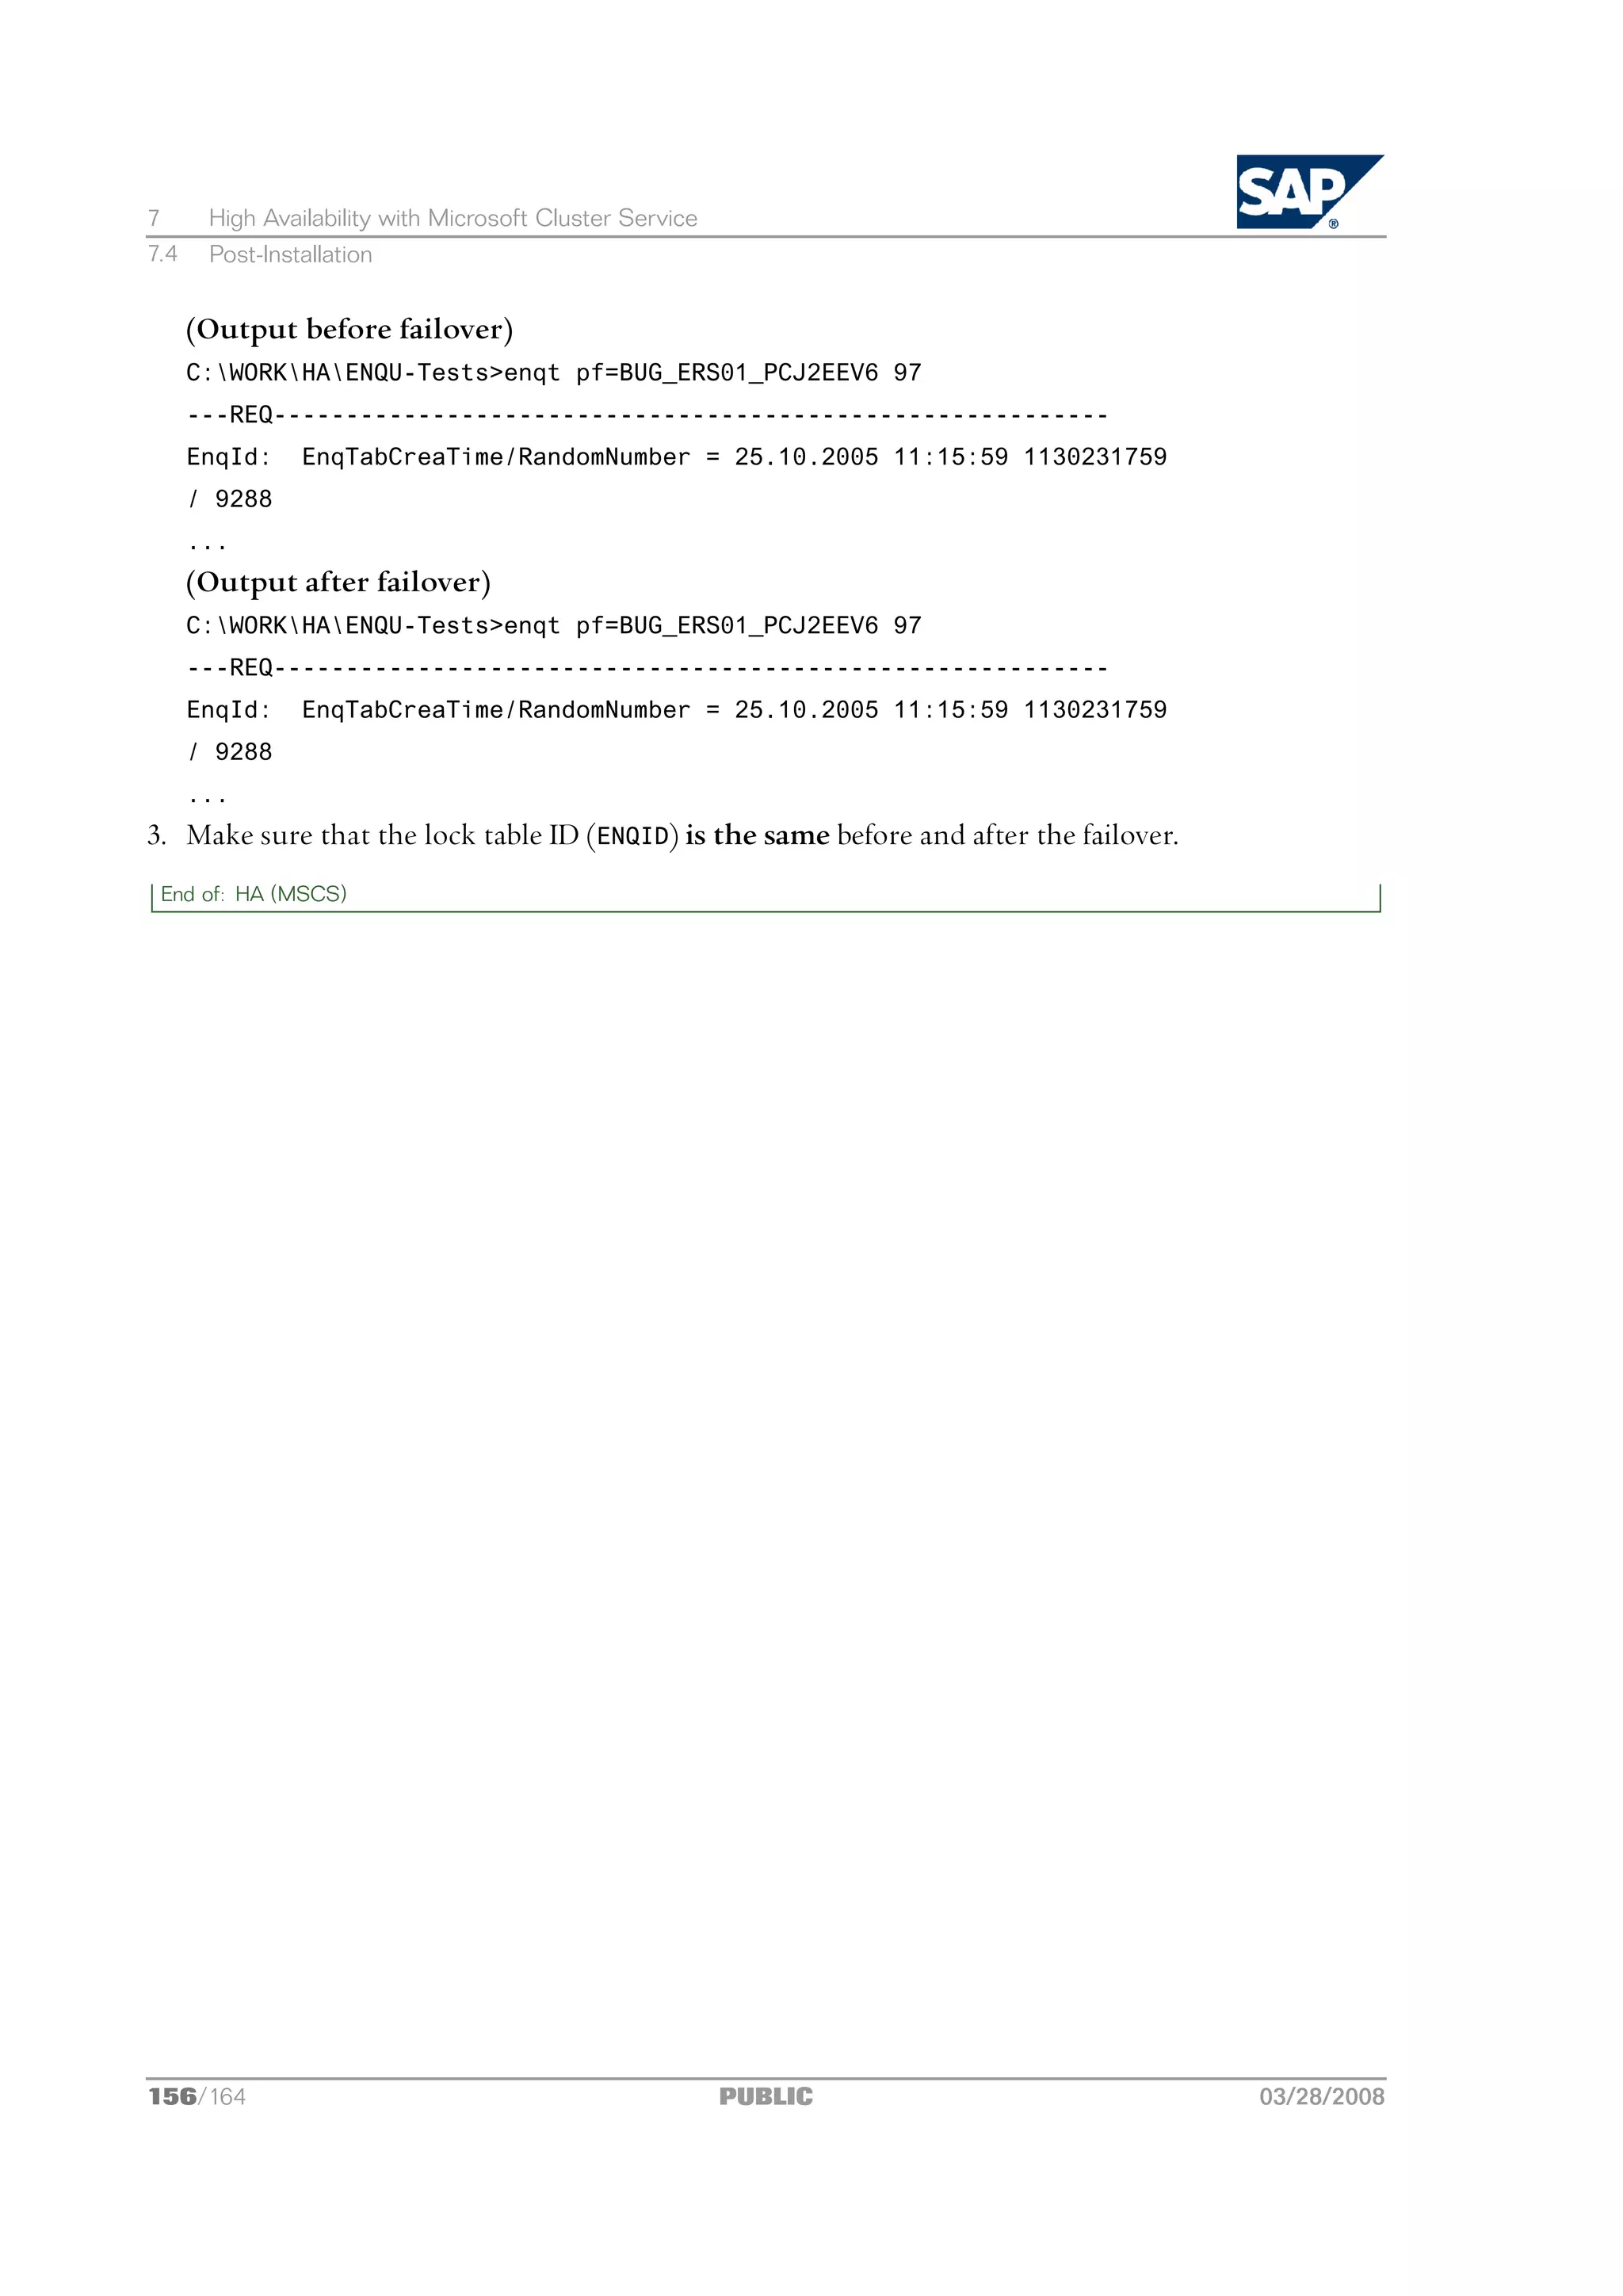
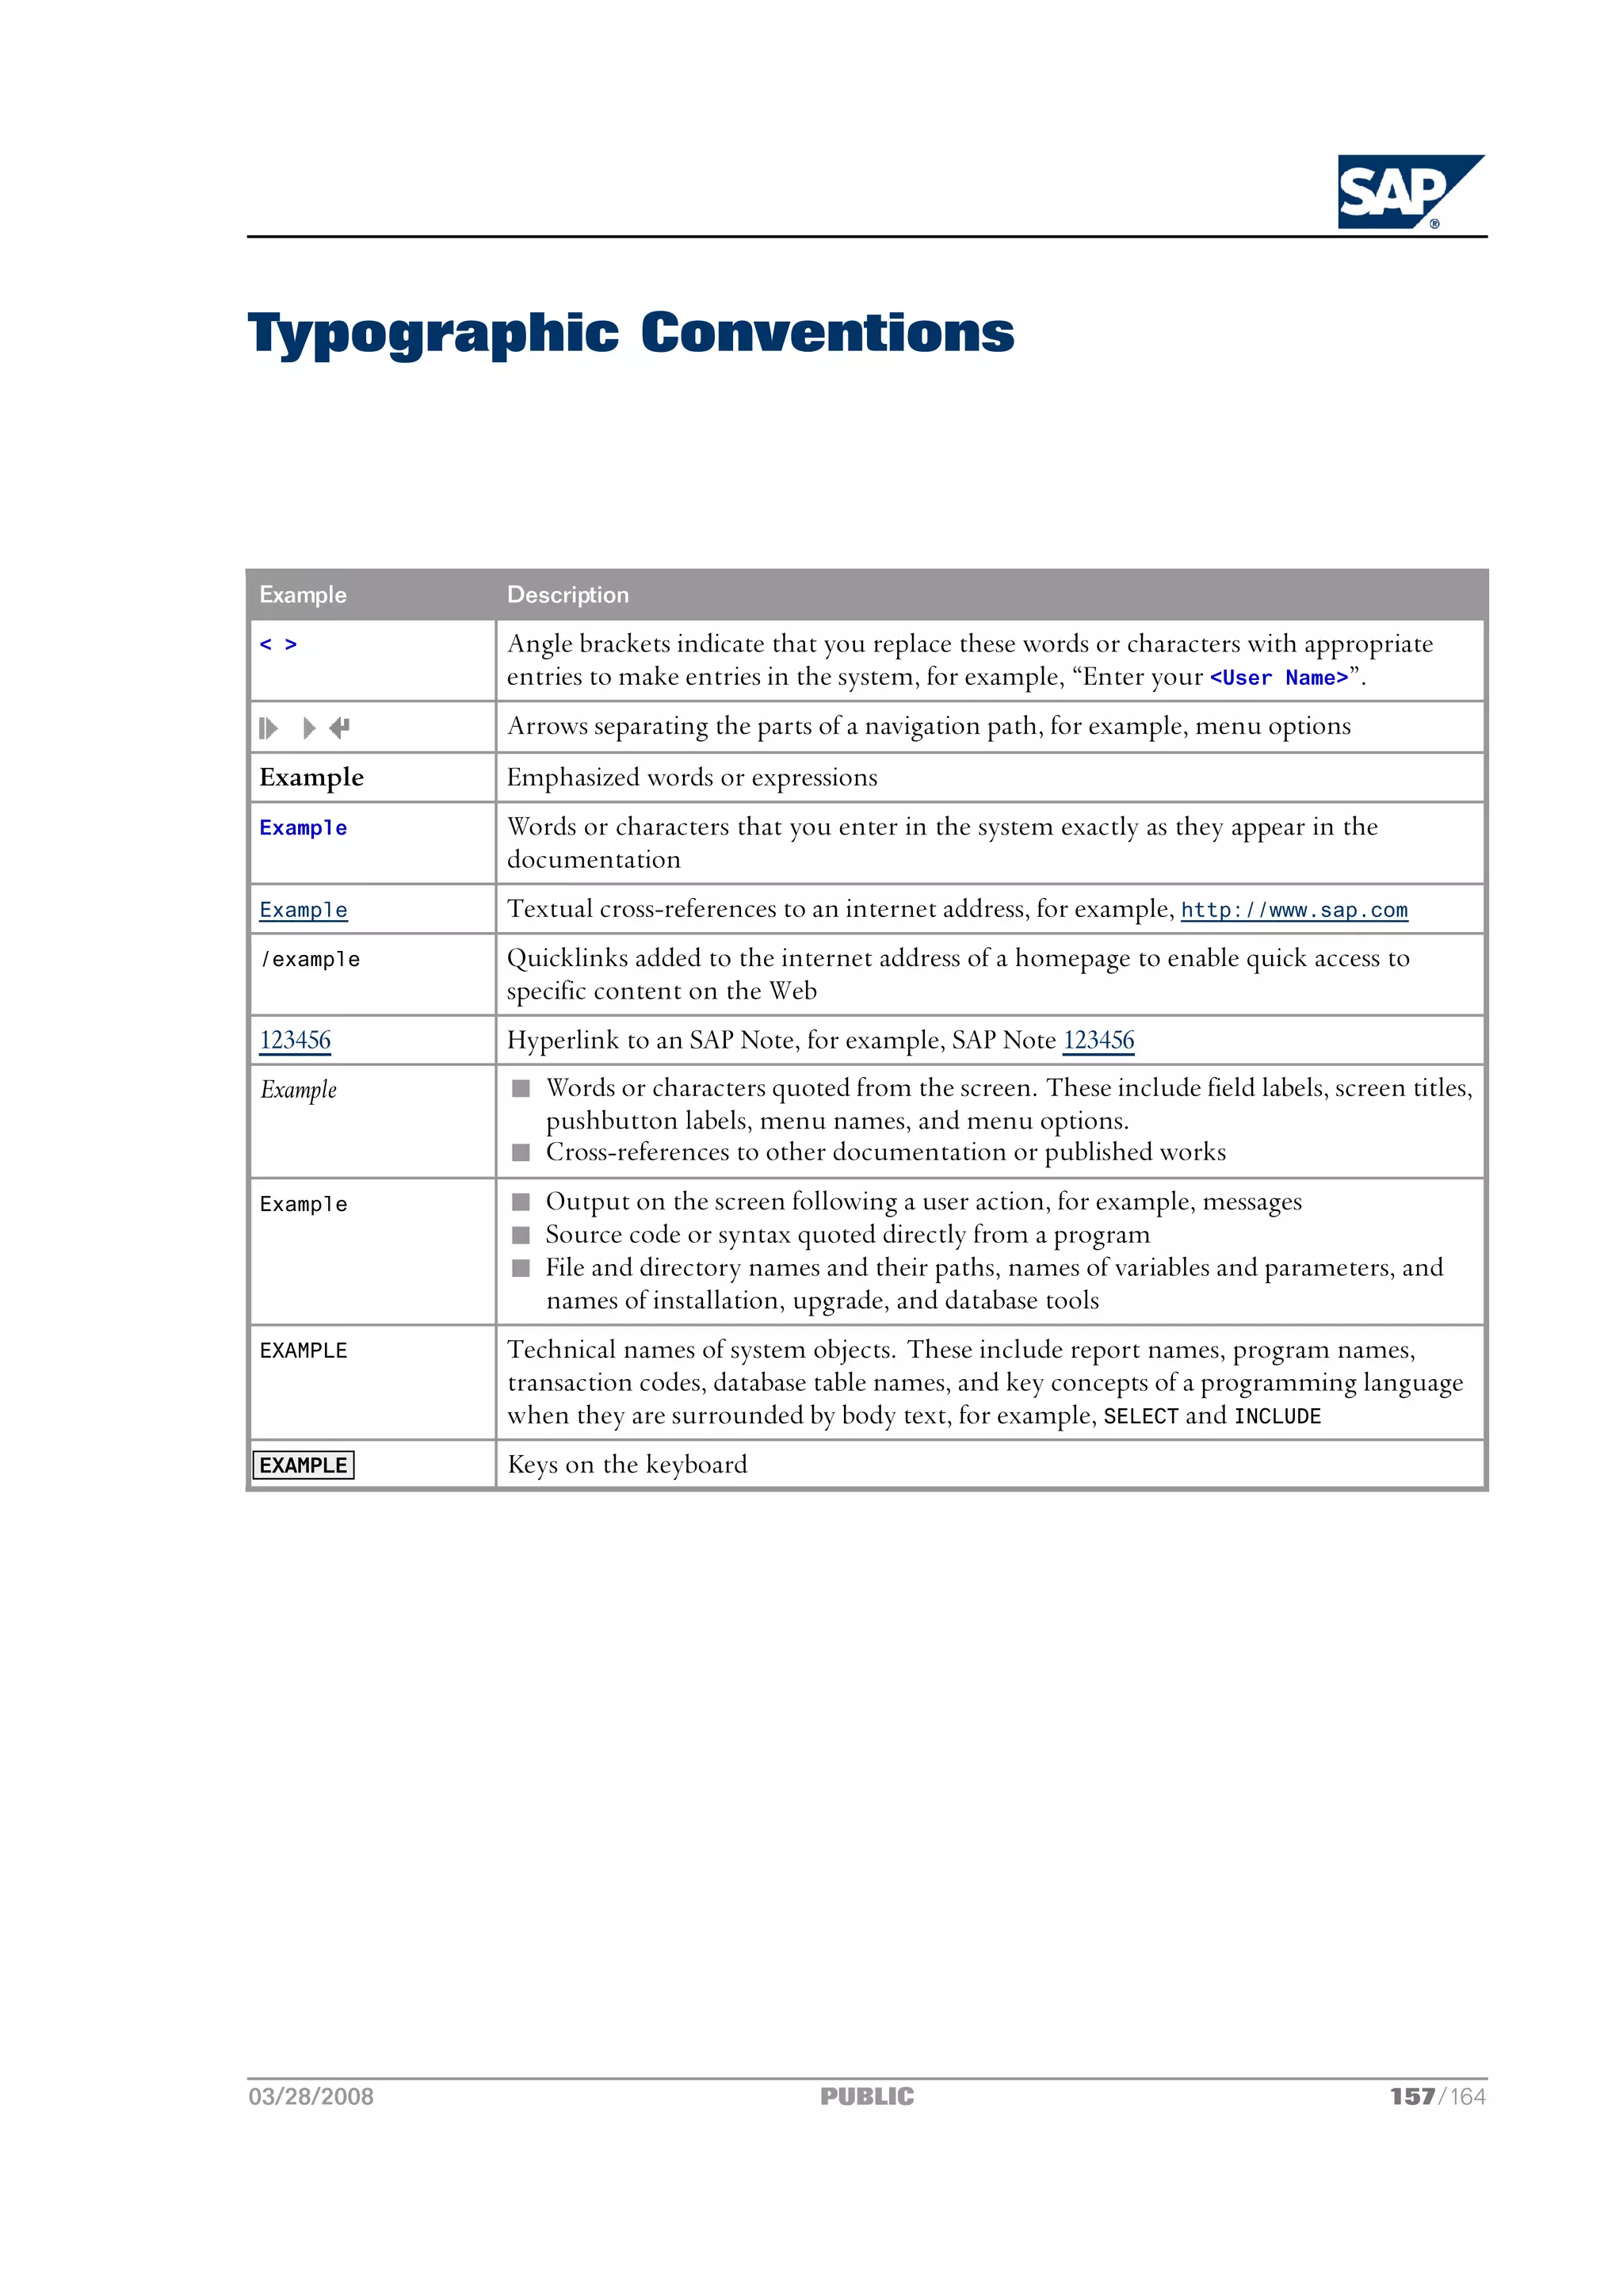
![SAP AG
Dietmar-Hopp-Allee 16
69190 Walldorf
Germany
T +49/18 05/34 34 34
F +49/18 05/34 34 20
www.sap.com
© Copyright 2008 SAP AG. All rights reserved.
No part of this publication may be reproduced or transmitted in any form or for any purpose without the express permission
of SAP AG. The information contained herein may be changed without prior notice.
Some software products marketed by SAP AG and its distributors contain proprietary software components of other
software vendors.
Microsoft, Windows, Excel, Outlook, and PowerPoint are registered trademarks of Microsoft Corporation.
IBM, DB2, DB2 Universal Database, OS/2, Parallel Sysplex, MVS/ESA, AIX, S/390, AS/400, OS/390, OS/400, iSeries, pSeries,
xSeries, zSeries, System i, System i5, System p, System p5, System x, System z, System z9, z/OS, AFP, Intelligent Miner,
WebSphere, Netfinity, Tivoli, Informix, i5/OS, POWER, POWER5, POWER5+, OpenPower and PowerPC are trademarks or
registered trademarks of IBM Corporation.
Adobe, the Adobe logo, Acrobat, PostScript, and Reader are either trademarks or registered trademarks of Adobe Systems
Incorporated in the United States and/or other countries.
Oracle is a registered trademark of Oracle Corporation.
UNIX, X/Open, OSF/1, and Motif are registered trademarks of the Open Group.
Citrix, ICA, Program Neighborhood, MetaFrame, WinFrame, VideoFrame, and MultiWin are trademarks or registered
trademarks of Citrix Systems, Inc.
HTML, XML, XHTML and W3C are trademarks or registered trademarks of W3C®, World Wide Web Consortium,
Massachusetts Institute of Technology.
Java is a registered trademark of Sun Microsystems, Inc.
JavaScript is a registered trademark of Sun Microsystems, Inc., used under license for technology invented and implemented
by Netscape.
SAP, R/3, xApps, xApp, SAP NetWeaver, Duet, PartnerEdge, ByDesign, SAP Business ByDesign, and other SAP products
and services mentioned herein as well as their respective logos are trademarks or registered trademarks of SAP AG in
Germany and in several other countries all over the world. All other product and service names mentioned are the
trademarks of their respective companies. Data contained in this document serves informational purposes only. National
product specifications may vary.
These materials are subject to change without notice. These materials are provided by SAP AG and its affiliated companies
("SAP Group") for informational purposes only, without representation or warranty of any kind, and SAP Group shall not
be liable for errors or omissions with respect to the materials. The only warranties for SAP Group products and services are
those that are set forth in the express warranty statements accompanying such products and services, if any. Nothing herein
should be construed as constituting an additional warranty.
This document was created using stylesheet 2006-12-31 (V5.1beta [= 6.0 for E3]) and XSLT processor SAXON 6.5.2 from
Michael Kay (http://saxon.sf.net/), XSLT version 1.
158/164 PUBLIC 03/28/2008](https://image.slidesharecdn.com/ecc6sr3orawininstguide-130128021232-phpapp02/75/Ecc6-sr3-ora_win_instguide-158-2048.jpg)