This presentation highlights the motor vehicles act, offences and penalties, procedure for filing claims, appeals against the decisions, assessment of claims and case laws
This presentation highlights the motor vehicles act, offences and penalties, procedure for filing claims, appeals against the decisions, assessment of claims and case laws
Motor Vehicles (Amendment) Act 2019 has been implemented throughout the country since September 1, 2019. This Presentation explains the Key Features and Penalties
Push-Pull Workout: Achieve Balanced Strength and MuscleAI AVENUE
Are you looking to enhance your fitness routine, achieve a well-rounded physique, and maximize muscle growth? Discover the power of the "Push-Pull Workout" strategy in this engaging SlideShare presentation.
In this presentation, we dive deep into the concept of the push-pull workout routine, a popular training approach among fitness enthusiasts and athletes. With a focus on balance and efficiency, the push-pull workout targets both major muscle groups and allows for effective recovery.
Key Highlights:
Understanding Push and Pull Movements: Learn the fundamental difference between push and pull exercises and why they matter in your fitness journey.
Benefits of Push-Pull Workouts: Explore the advantages of this versatile training method, including improved muscle symmetry, strength gains, and reduced risk of overtraining.
Sample Workouts: Get access to sample push-pull workout routines tailored for various fitness levels, from beginners to advanced athletes.
Nutrition and Recovery: Discover how proper nutrition and recovery strategies complement your push-pull training for optimal results.
Real Success Stories: Hear from individuals who have transformed their bodies and fitness levels using the push-pull workout approach.
Whether you're a fitness novice or an experienced gym-goer, this SlideShare presentation offers valuable insights, tips, and practical guidance to help you incorporate push-pull workouts into your fitness regimen. Unlock the potential for a balanced, strong, and sculpted physique with the push-pull workout method.
Join us on this fitness journey and take your strength training to the next level with the push-pull workout. Get started now!
do you want to jump higher, do you want to get some simple daily exercises that can get you jumping higher over a consistent period of time.This will surely help you out, it will provide you with simple exercises that you can do on a daily basis that can help your vertical jumping skills.
Stretching exercises for neck, trunk and lumbar spineSaima Mustafa
Stretching exercises for the neck, trunk, and lumbar spine can help improve flexibility, reduce muscle tension, and promote better posture. Remember to perform these stretches gently and smoothly, without bouncing, and never force your body into a position. If you have any existing medical conditions or concerns, it's advisable to consult with a healthcare professional or a qualified fitness instructor before starting a new stretching routine. Here are some stretches for the neck, trunk, and lumbar spine
Unit 8 - Information and Communication Technology (Paper I).pdfThiyagu K
This slides describes the basic concepts of ICT, basics of Email, Emerging Technology and Digital Initiatives in Education. This presentations aligns with the UGC Paper I syllabus.
Synthetic Fiber Construction in lab .pptxPavel ( NSTU)
Synthetic fiber production is a fascinating and complex field that blends chemistry, engineering, and environmental science. By understanding these aspects, students can gain a comprehensive view of synthetic fiber production, its impact on society and the environment, and the potential for future innovations. Synthetic fibers play a crucial role in modern society, impacting various aspects of daily life, industry, and the environment. ynthetic fibers are integral to modern life, offering a range of benefits from cost-effectiveness and versatility to innovative applications and performance characteristics. While they pose environmental challenges, ongoing research and development aim to create more sustainable and eco-friendly alternatives. Understanding the importance of synthetic fibers helps in appreciating their role in the economy, industry, and daily life, while also emphasizing the need for sustainable practices and innovation.
Honest Reviews of Tim Han LMA Course Program.pptxtimhan337
Personal development courses are widely available today, with each one promising life-changing outcomes. Tim Han’s Life Mastery Achievers (LMA) Course has drawn a lot of interest. In addition to offering my frank assessment of Success Insider’s LMA Course, this piece examines the course’s effects via a variety of Tim Han LMA course reviews and Success Insider comments.
Model Attribute Check Company Auto PropertyCeline George
In Odoo, the multi-company feature allows you to manage multiple companies within a single Odoo database instance. Each company can have its own configurations while still sharing common resources such as products, customers, and suppliers.
Read| The latest issue of The Challenger is here! We are thrilled to announce that our school paper has qualified for the NATIONAL SCHOOLS PRESS CONFERENCE (NSPC) 2024. Thank you for your unwavering support and trust. Dive into the stories that made us stand out!
2024.06.01 Introducing a competency framework for languag learning materials ...Sandy Millin
http://sandymillin.wordpress.com/iateflwebinar2024
Published classroom materials form the basis of syllabuses, drive teacher professional development, and have a potentially huge influence on learners, teachers and education systems. All teachers also create their own materials, whether a few sentences on a blackboard, a highly-structured fully-realised online course, or anything in between. Despite this, the knowledge and skills needed to create effective language learning materials are rarely part of teacher training, and are mostly learnt by trial and error.
Knowledge and skills frameworks, generally called competency frameworks, for ELT teachers, trainers and managers have existed for a few years now. However, until I created one for my MA dissertation, there wasn’t one drawing together what we need to know and do to be able to effectively produce language learning materials.
This webinar will introduce you to my framework, highlighting the key competencies I identified from my research. It will also show how anybody involved in language teaching (any language, not just English!), teacher training, managing schools or developing language learning materials can benefit from using the framework.
June 3, 2024 Anti-Semitism Letter Sent to MIT President Kornbluth and MIT Cor...Levi Shapiro
Letter from the Congress of the United States regarding Anti-Semitism sent June 3rd to MIT President Sally Kornbluth, MIT Corp Chair, Mark Gorenberg
Dear Dr. Kornbluth and Mr. Gorenberg,
The US House of Representatives is deeply concerned by ongoing and pervasive acts of antisemitic
harassment and intimidation at the Massachusetts Institute of Technology (MIT). Failing to act decisively to ensure a safe learning environment for all students would be a grave dereliction of your responsibilities as President of MIT and Chair of the MIT Corporation.
This Congress will not stand idly by and allow an environment hostile to Jewish students to persist. The House believes that your institution is in violation of Title VI of the Civil Rights Act, and the inability or
unwillingness to rectify this violation through action requires accountability.
Postsecondary education is a unique opportunity for students to learn and have their ideas and beliefs challenged. However, universities receiving hundreds of millions of federal funds annually have denied
students that opportunity and have been hijacked to become venues for the promotion of terrorism, antisemitic harassment and intimidation, unlawful encampments, and in some cases, assaults and riots.
The House of Representatives will not countenance the use of federal funds to indoctrinate students into hateful, antisemitic, anti-American supporters of terrorism. Investigations into campus antisemitism by the Committee on Education and the Workforce and the Committee on Ways and Means have been expanded into a Congress-wide probe across all relevant jurisdictions to address this national crisis. The undersigned Committees will conduct oversight into the use of federal funds at MIT and its learning environment under authorities granted to each Committee.
• The Committee on Education and the Workforce has been investigating your institution since December 7, 2023. The Committee has broad jurisdiction over postsecondary education, including its compliance with Title VI of the Civil Rights Act, campus safety concerns over disruptions to the learning environment, and the awarding of federal student aid under the Higher Education Act.
• The Committee on Oversight and Accountability is investigating the sources of funding and other support flowing to groups espousing pro-Hamas propaganda and engaged in antisemitic harassment and intimidation of students. The Committee on Oversight and Accountability is the principal oversight committee of the US House of Representatives and has broad authority to investigate “any matter” at “any time” under House Rule X.
• The Committee on Ways and Means has been investigating several universities since November 15, 2023, when the Committee held a hearing entitled From Ivory Towers to Dark Corners: Investigating the Nexus Between Antisemitism, Tax-Exempt Universities, and Terror Financing. The Committee followed the hearing with letters to those institutions on January 10, 202
Francesca Gottschalk - How can education support child empowerment.pptxEduSkills OECD
Francesca Gottschalk from the OECD’s Centre for Educational Research and Innovation presents at the Ask an Expert Webinar: How can education support child empowerment?
Instructions for Submissions thorugh G- Classroom.pptxJheel Barad
This presentation provides a briefing on how to upload submissions and documents in Google Classroom. It was prepared as part of an orientation for new Sainik School in-service teacher trainees. As a training officer, my goal is to ensure that you are comfortable and proficient with this essential tool for managing assignments and fostering student engagement.
The Roman Empire A Historical Colossus.pdfkaushalkr1407
The Roman Empire, a vast and enduring power, stands as one of history's most remarkable civilizations, leaving an indelible imprint on the world. It emerged from the Roman Republic, transitioning into an imperial powerhouse under the leadership of Augustus Caesar in 27 BCE. This transformation marked the beginning of an era defined by unprecedented territorial expansion, architectural marvels, and profound cultural influence.
The empire's roots lie in the city of Rome, founded, according to legend, by Romulus in 753 BCE. Over centuries, Rome evolved from a small settlement to a formidable republic, characterized by a complex political system with elected officials and checks on power. However, internal strife, class conflicts, and military ambitions paved the way for the end of the Republic. Julius Caesar’s dictatorship and subsequent assassination in 44 BCE created a power vacuum, leading to a civil war. Octavian, later Augustus, emerged victorious, heralding the Roman Empire’s birth.
Under Augustus, the empire experienced the Pax Romana, a 200-year period of relative peace and stability. Augustus reformed the military, established efficient administrative systems, and initiated grand construction projects. The empire's borders expanded, encompassing territories from Britain to Egypt and from Spain to the Euphrates. Roman legions, renowned for their discipline and engineering prowess, secured and maintained these vast territories, building roads, fortifications, and cities that facilitated control and integration.
The Roman Empire’s society was hierarchical, with a rigid class system. At the top were the patricians, wealthy elites who held significant political power. Below them were the plebeians, free citizens with limited political influence, and the vast numbers of slaves who formed the backbone of the economy. The family unit was central, governed by the paterfamilias, the male head who held absolute authority.
Culturally, the Romans were eclectic, absorbing and adapting elements from the civilizations they encountered, particularly the Greeks. Roman art, literature, and philosophy reflected this synthesis, creating a rich cultural tapestry. Latin, the Roman language, became the lingua franca of the Western world, influencing numerous modern languages.
Roman architecture and engineering achievements were monumental. They perfected the arch, vault, and dome, constructing enduring structures like the Colosseum, Pantheon, and aqueducts. These engineering marvels not only showcased Roman ingenuity but also served practical purposes, from public entertainment to water supply.
1. Page70
CHAPTER 9: DRILL AND CERMONY
DRILL PROCEDURES
Many drill procedures used by the United States Army today were developed during the Revolutionary
War. The purpose of the drill then was to instill discipline in American soldiers. As these soldiers
mastered the art of the drill, they began to work as a team and to develop a sense of pride in themselves
and in their unit. In today’s Army, the same objectives—teamwork, confidence, pride, alertness,
attention to detail, esprit de corps, and discipline—are accomplished by drill.
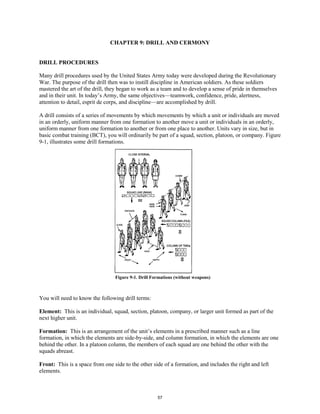
A drill consists of a series of movements by which movements by which a unit or individuals are moved
in an orderly, uniform manner from one formation to another move a unit or individuals in an orderly,
uniform manner from one formation to another or from one place to another. Units vary in size, but in
basic combat training (BCT), you will ordinarily be part of a squad, section, platoon, or company. Figure
9-1, illustrates some drill formations.
You will need to know the following drill terms:
Element: This is an individual, squad, section, platoon, company, or larger unit formed as part of the
next higher unit.
Formation: This is an arrangement of the unit’s elements in a prescribed manner such as a line
formation, in which the elements are side-by-side, and column formation, in which the elements are one
behind the other. In a platoon column, the members of each squad are one behind the other with the
squads abreast.
Front: This is a space from one side to the other side of a formation, and includes the right and left
elements.
Figure 9-1. Drill Formations (without weapons)
57
2. Page71
Depth: This is a space from the front to the rear of a formation, including the front and rear elements.
Distance: This is the space between elements that are one behind the other. The distance between
individuals is an arm’s length plus 6 inches, or approximately 36 inches, measured from the chest of one
soldier to the back of the soldier immediately to his or her front.
Interval: This is the space between side-by-side elements.
Rank: This is a line that is only one element in depth.
File: This is a column that has a front of one element.
Guide: This is the person responsible for maintaining the prescribed direction and rate of march.
Post: This is the correct place for an officer or noncommissioned officer to stand in a prescribed
formation.
Head: This is a column’s leading element.
Base: This is the element around which a movement is planned or regulated.
Cadence: This is a uniform rhythm or number of steps or counts per minute.
Quick Time: This is a cadence of 120 counts (steps per minute).
Double Time: This is a cadence of 180 counts (steps per minute).
Drill commands are oral orders given by your commander or leader, usually in two parts. The
preparatory command states the movement to be carried out and gets you ready to execute the order. The
command of execution tells when the movement is to be carried out. In the command “Forward, march,”
the preparatory command is “Forward,” and the command of execution is “March.”
In some commands, the preparatory command and the command of execution are combined, for
example, “Fall in”, “At ease,” and “Rest”. These commands are given without inflection and at a
uniformly high pitch and loudness comparable to that of a normal command of execution
STATIONARY MOVEMENT
Attention: Figure 9-2 illustrates the position of attention. You should assume this position on the
command “Fall in “or “Squad/Platoon, attention”.
Your weight should be distributed equally on the heels and balls of your feet. When you come to
attention, bring your heels together smartly with your toes forming a 45 degree angle, as shown in
Figure 2-2. Keep your legs straight without locking your knees. Hold your body erect with your hips
level, your chest lifted, and your shoulders square and even. Your arms should hang straight, but not
stiff, with the backs of your hands outward. Curl your fingers so that the tips of our thumbs are alongside
and touching the first joint of the forefingers. Your thumbs should be straight and along the seams of
your trousers or skirt. The first joint of your forefingers should touch the trousers or skirt. Keep your
head erect, and look straight to the front.
58
3. Page72
Practice assuming the position of attention so you can do it
properly. All movements except rest movements start from this
position.
Parade Rest: The command to assume this position is “Parade,
rest”. Parade rest is commanded only from the position of
attention (Figure 9-2). On the command of execution, “Rest”,
move your left foot l0 inches to the left of your right foot. Rest
your weight equally on the heels and balls of both feet, keeping
your legs straight without locking your knees. At the same time
you move your feet, place your hands at the small of the back,
centered on your belt. Keep the fingers of both hands extended
and joined, interlocking your thumbs, as shown in Figure 9-2,
so That the palm of your right hand is outward. Hold your head erect and look straight to the front.
Remain silent and do not move. If you are at the position of at ease, stand at ease, or rest, you should
assume the parade rest position on hearing the preparatory command for attention.
Stand at Ease: The stand at ease position is like parade rest, but with your head and eyes turned
directly toward the commander. The command for this position is “Stand at ease.“ “At ease “ or “Rest “
may be commanded from this position.
At Ease: The command for this movement is “At ease. “ On the command “At ease,” the soldier may
move; however, he or she must remain standing and silent with his or her right foot in place.
Rest: The command for this movement is “Rest”. On the command “Rest”, the soldier may move, talk,
smoke, or drink from a canteen unless otherwise directed. He or she must remain standing with his or
her right foot in place. “At ease” may be executed from this position.
Face to the Flank: Facing to the flank is a two-count movement for turning to one side or the other.
The command is “Left, face” or “Right, face”. Figure 9-3 illustrates “Left face”. On the command of
execution, “Face”, slightly raise your right heel and left toe and, with slight pressure on the ball of your
right foot, turn yourself 90 degrees to the left on your left heel. A slight pressure on the ball of your right
foot will help you do this correctly. Keep your right leg straight, but not stiff. On the second count, place
your right foot beside your left foot, and resume the position of attention. Hold your arms as you would
while at attention as you execute this movement. Right face will be executed in the very same way as
left face, simply substituting right for left and left for right.
Figure 9-2. Stationary positions
Figure 9-3. Face To the Flank.
59
4. Page73
Face to the Rear: Facing to the rear is also a two-count movement and is illustrated in Figure 9-4. The
command is “About, face”. On the command of execution, “Face”, touch the toe of your right foot to the
ground about half the length of your foot to the rear and slightly left of the left heel. Rest your weight on
the heel of your left foot, and allow your right knee to bend naturally. On the second count, turn 180
degrees to the right on the left heel and on the ball of the right foot, resuming the position of attention.
Hold your arms at attention when executing this movement.
Hand Salute: The hand salute is a one-count movement. he command is “Present, arms”. When
wearing headgear with a visor (with or without glasses), on the command of execution, “Arms”, raise
the right hand sharply, fingers and thumb extended and joined, palm facing down, and place the tip of
the right forefinger on the rim of the visor slightly to the right of the right eye. The outer edge of the
hand is slightly canted downward so that neither the back of the hand nor the palm is clearly visible from
the front. The hand and wrist are straight, the elbow inclined slightly forward, and the upper arm
horizontal as shown in Figure 9-5
.
When wearing headgear without a visor or when uncovered, and when not wearing glasses, execute the
hand salute in the same manner as previously described, except touch the tip of the right forefinger to the
forehead near the right eyebrow, slightly to the right of the right eye.
“Order, arms“ is a one-count movement from the hand salute. On the command of execution “Arms”,
return the hand sharply to the side, resuming the position of attention.
When reporting or rendering courtesy to an individual, turn the head and eyes toward the person
addressed and simultaneously salute. In this situation, the actions are executed without command. The
salute is initiated by the subordinate at the appropriate time and terminated upon acknowledgment.
Figure 9-4. Face to the Rear
Figure 9-5. Hand Salutes
60
5. Page74
The hand salute may be executed while marching. When double-timing, a soldier must come to quick
time before saluting. However, when a formation is marching at double time, only the individual in
charge assumes quick time and salutes.
STEPS AND MARCHING
All steps in marching are variations of 30 inch or 15 inch steps. You must learn these well before you
can proceed to unit drill. All marching movements executed from the halt begin from the position of
attention. All marching movements, except for route step, march, and at ease, can be executed from the
halt. All steps except right step begin with the left foot.
30-Inch Step: The command to march with a 30-inch step from the halt is “Forward, march”. When you
hear the “Forward”, shift your weight to the right leg without noticeable movement. On the command of
execution, ”March”, step forward with your left foot and continue marching with 30-inch steps, keeping
your head and eyes forward. Your arms should swing in a natural motion, without bending at the
elbows, approximately 9 inches straight forward and 6 inches to the rear of the seams of your trousers or
skirt. Keep your fingers curled as in the position of attention.
Change Step: The command “Change step, march“ is given as the right foot strikes the ground. When
you hear “March”, take one more step with your left foot. Then, in one count, place your right toe near
the heel of your left foot and step off again with your left foot. You should execute this movement
without command if you find yourself out of step with other members in your formation.
Rest Movement (30-inch step): When you hear the command “At ease, march”, you do not have to
march in cadence. You must remain silent and maintain the same interval and distance as before. The
command “Route step, march,” means the same as “At ease, march”, except that you may talk.
Half Step (15-inch step): The command for marching with a 15-inch step is “Half step, march”. This
command may be given from the halt, or it may be given to change a 30-inch step to a 15-inch step
while marching. If the command is given from the halt, proceed as for marching with the 30-inch step,
but take only 15-inch steps. If the command is given while you are marching with 30-inch steps, you
will hear the command “Execution, march.” Take one more 30-inch step and then begin marching with
15-inch steps. Allow your arms to swing naturally.
Halt: To halt while marching, the command “Squad/Platoon, halt” is given as either foot strikes the
ground. The movement is executed in two counts. On hearing “Halt”, take one more step and then bring
your trailing foot alongside your leading foot, resuming the position of attention.
Marching in Place: To march in place, the command is “Mark time, march”. When you hear “March”,
take one more step, bring the trailing foot alongside your leading foot, and begin marching in place. To
do this, raise each foot alternately two inches off the ground. Your arms should continue to swing
naturally.
15-Inch Step (Right/Left): To march with a 15-inch step right or left you must begin from the halt. The
command is “Right step, march.“ On hearing “March”, bend your right knee slightly, and raise your
right leg only high enough to allow freedom of movement. Place your right foot 15 inches to the right of
your left foot, then move the left foot (keeping your left knee straight) alongside the right foot
temporarily assuming the position of attention. To march to the left, go through the same movements in
response to the command “Left step, march”, except reverse the instructions. On hearing “Halt”, take
61
6. Page75
one more step with your lead foot, place your trailing foot alongside your lead foot, and resume the
position of attention.
15-Inch Step (Backward): The command to march with a 15 inch step backward is “Backward,
march”. When you hear “March”, take a 15 inch step backward with your left foot and continue
marching backward with 15-inch steps. Allow your arms to swing naturally.
30-Inch Step (Double Time): The command to march at 180 steps per minute is “Double time, march“
which can be given while at halt or while marching at quick time. When you are at halt and you hear
“Double time”, shift your weight to your right leg without noticeable movement. When you hear
“March”, raise your forearms to a horizontal position with your fingers and thumbs closed, knuckles out,
and at the same time step off with your left foot. Continue to march with 30-inch steps at the cadence of
double time. Let your arms swing naturally to the front and rear, while keeping your forearms
horizontal.
When you march with a 30 inch step in the cadence of quick time and hear “Double time, march”, take
one more step at quick time upon hearing “March”. Step off with your trailing foot, double-timing as
previously described.
To resume quick time marching from double-time marching, respond to the command “Quick time,
march”, take two more 30 inch steps at double time, lowering your hands to your sides, and resume
marching with a 30 inch step at quick time.
MANUAL OF ARMS (M16 RIFLE)
M16 Rifle: All soldiers must be able to execute the drill movements called the manual of arms with the
M16 rifle, both at halt and while marching. Do not carry the magazine in the weapon when you are
drilling. If you are performing duty that requires the use of the magazine, carry the weapon at sling arms.
Figure 9-6 shows the parts of the rifle referred to in the manual of arms.
Figure 9-6. Parts of a Rifle
62
7. Page76
Order Arms: Assume order arms on hearing the command
“Fall in" or, if at parade rest, on hearing the command of
execution, “Attention”. Order arms is the position of
attention with the rifle (Figure 9-7 on the following page).
Center the butt of the weapon on your right foot, with sights
to the rear. The toe of the butt should touch your foot so the
rear sight and pistol grip form a line straight to the front.
Hold the weapon with your right hand in a U formed by
extending your joined fingers and thumb. Hold the weapon
above the sight, with the right thumb and forefinger pointed
downward and on line with the flat surface of the hand guard.
Keep your right hand and arm behind the rifle so that your
thumb is along the seam of your trousers or skirt.
Rest Position (with M16 Rifle): Assume the rest
position with the rifle the same as you would without it
plus the following steps:
On the command "Parade, rest”, grasp the barrel with
the right hand and thrust the muzzle forward keeping
the right arm straight (Figure 9-8).
Execute stand at ease in the same manner as parade
rest with the rifle, except turn your head and eyes
toward the commander.
On the command “At ease" or “Rest”, "keep the butt of
the rifle in place.
Port Arms: Port arms from order arms is a two-count
movement. The command is “Port, arms”. On the
command of execution, "Arms”, grasp the rifle barrel
with the right hand and raise the rifle diagonally across
the body, keeping the right elbow down (without strain).
With the left hand, simultaneously grasp the hand guard
just forward of the slip ring so that the rifle is about four
inches from the belt. On the second count, re-grasp the
rifle at the small of the stock with the right hand. Hold
the rifle diagonally across the body about four inches
from the belt, with the right forearm horizontal and the
elbows close to the sides (Figure 9-9).
Figure 9-7. Order Arms (attention position)
Figure 9-8. Parade Rest (rest position)
Figure 9-9. Port Arms
63
8. Page77
Present Arms: Present arms from order arms is a three-count movement. The command is "Present,
arms”. On the command of execution, “Arms”, execute port arms in two counts. On the third count,
twist the rifle with the right hand so that the magazine well is to the front, and move the rifle to a vertical
position with the carrying handle about four inches in front of and centered on the body. Lower the rifle
until the left forearm is horizontal; keep the elbows in at the sides (Figure 9-10). To render reports or
courtesy to an individual from order arms, execute present arms as discussed, but turn your head and
eyes toward the individual addressed.
Inspection Arms: Inspection arms from order arms is a seven-count movement. The command is
“Inspection, arms”. On the command of execution, “Arms," execute port arms in two counts. On the
third count, move the left hand from the hand-guard and grasp the pistol grip, thumb over the lower
portion to the bolt catch. On the fourth count, release the grasp of the right hand, unlock the charging
handle with the thumb, and sharply pull the charging handle to the rear with the thumb and forefinger
(A, Figure 9-11A). At the same time, apply pressure on the lower portion of the bolt catch, locking the
bolt to the rear.
On the fifth count, without changing the grasp of the right hand, sharply push the charging handle
forward (B, Figure 9-11B) until it is locked into position (Figure C, 9-11B). Then re-grasp the rifle with
the right hand at the small of the stock. On the sixth count, remove the left hand, twist the rifle with the
right hand so that the ejection port is skyward. Re-grasp the hand-guard with the left hand just forward
of the slip ring, and visually inspect the receiver through the ejection port. On the seventh count, with
the right hand, twist the rifle so that the sights are up.
Figure 9-10. Present Arms
Figure 9-11A. Inspection Arms Figure 9-11B. Inspection Arms
64
9. Page78
“Ready, port, arms" is the only command given from inspection arms. On the command “Ready”, move
the left hand and re-grasp the rifle with the thumb and fingers forming a U at the magazine well and
trigger guard, and with the thumb (without pressure) on the upper part of the bolt catch (D, Figure 9-11
below). on the command "Port”, press the bolt catch and allow the bolt to go forward. With the
fingertips, push upward and close the dust cover. Grasp the pistol grip with the left hand and place the
left thumb on the trigger. On the command "Arms", pull the trigger and resume port arms.
Right Shoulder Arms: Right shoulder arms from order arms is a four-count movement. The command
is “Right shoulder; arms”. On the command of execution, “Arms”, grasp the barrel of the weapon with
the right hand and raise it diagonally across the body. With the left hand, grasp the hand-guard just in
front of the slip ring. On the second count, release the barrel with the right hand and grasp the butt,
positioning the rifle as shown in Figure 9-12. On the third count, twist the rifle and place it on the right
shoulder. At the same time, move the left hand to the small of the stock and guide the weapon to your
shoulder. Your left hand should be placed as shown in Figure 9-12, with the first joint of your left
forefinger touching the rear of the charging handle. On the fourth count, move your left hand back to
your side at attention.
Order arms from right shoulder arms is a four-count movement. The command is “order, arms” On
hearing “Arms”, press down quickly on the butt and guide the rifle diagonally across the body. At the
same time, turn butt to keep the sight up. Grasp the rifle at the hand-guard, just in front of the slip ring,
with the left hand, keeping your right hand on the butt of the rifle. On the second count, move your right
hand up and across your body and grasp the barrel. The third and fourth counts are the same as from port
arms to order arms.
Figure 9-11 Inspection Arms (continued)
Figure 9-12. Right Shoulder Arms
65
10. Page79
Left Shoulder Arms: Left shoulder arms from order arms is a four-count movement. The command is
"Left shoulder arms”. On the command of execution, "Arms”, execute port arms in two counts, then
proceed as shown in Figure 9-13.
Order arms from left shoulder arms is a five-count movement. The command is “Order, arms" on
hearing arms, "move your right hand up and across the body and grasp the small of the stock, keeping
the right elbow down. On the second count, move the rifle diagonally across your body with your right
hand while re-grasping the hand-guard just in front of the slip ring with your left hand. Counts three,
four, and five are the same as the order arms from port arms.
Sling Arms (with M16 Rifle). From the order arms
position (sling tight), the command is "Sling, arms”. On the
command of executions firms," raises the weapon
vertically, and with the left-hand place the butt on the right
hip. Cradle the weapon with the right arm, loosen the
keeper, and adjust the sling with both hands. Then sling the
weapon on the right shoulder in the most convenient
manner (Figure 9-14).
To return the weapon to order arms, the command is "Un-
sling, arms”. on hearing “firms”, reach across your body
with your left hand and grasp the sling at the shoulder. Un-
sling the weapon and return to the position of order arms.
Salute at Sling Arms. The command for saluting while at
sling arms is "Present, arms”. When you hear “Arms", reach across your body with your left hand and
grasp the sling just above the right hand. Release your right hand and execute the salute as shown in
Figure 9-14. If rendering reports or courtesies to an individual, execute the salute without an order.
Order arms at sling arms. To terminate the hand salute, the command is "Order, arms”. On the
command of execution, “Arms” lower the right hand sharply to the side as in the position of attention
and then re-grasp the sling at the original position with the right hand. Release the left hand and return it
sharply to your left side as in the position of attention.
Figure 9-13. Left Shoulder Arms
Figure 9-14. Positions at Sling Arms
66
11. Page80
Port arms from sling arms. The command for this movement is "Port, arms.” On hearing “Arms,"
reach across your body with your left hand and grasp the sling at the shoulder (Figure 9-15).
Lift the weapon by the sling, swing it to the front of your body, and grasp the small of the stock with
To resume sling arms, grasp the sling near the upper sling swivel with your left hand upon hearing
“arms” in the command "Sling, arms". Release your right hand and swing the weapon back onto your
shoulder by inserting your right arm through the sling, immediately resuming the position of sling arms.
Inspection arms from sling arms. The command for this movement is “inspection, arms”. On the
command of execution, “Arms”, execute port arms as described above, then execute counts three
through seven in the same manner as inspection arms from order arms (Figure 9-11).
Figure 9-15. Port Arms from Sling Arms
67