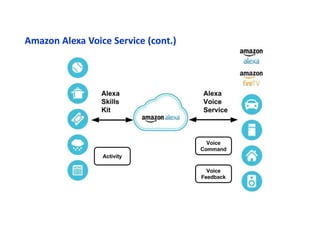
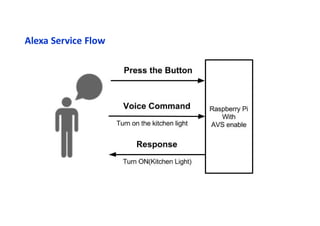
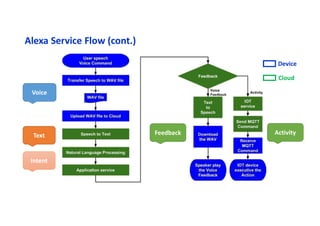
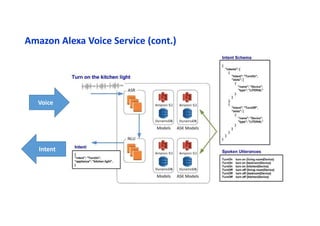
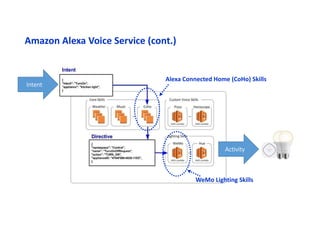
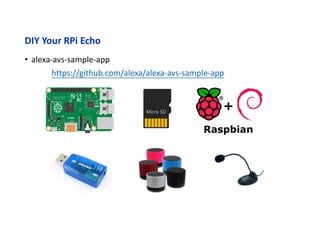
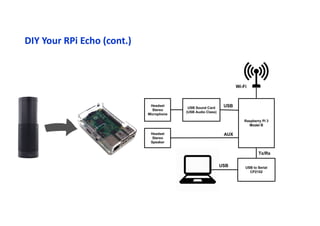
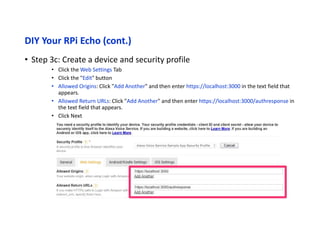
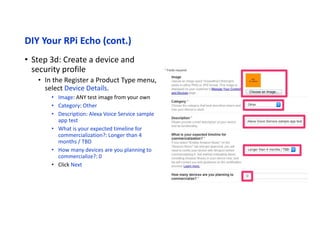
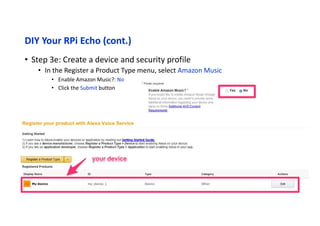
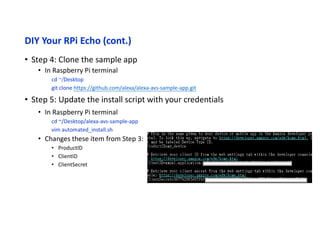
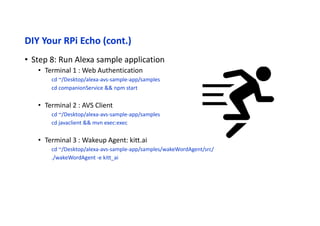
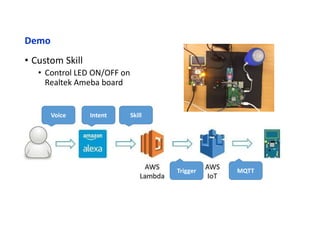
DIY Your Amazon Echo
Victor Sue
Agenda
• What is Amazon Echo
• Amazon Alexa Voice Service
• Alexa Service Flow
• DIY your RPi Echo
• Demo
• Next Step?
What is Amazon Echo?
Amazon Alexa Voice Service
Amazon Alexa Voice Service (cont.)
Alexa Service Flow
Alexa Service Flow (cont.)
Voice
Text
Intent
Feedback Activity
Device
Cloud
Alexa Service Flow (cont.)
Amazon Alexa Voice Service (cont.)
Voice
Intent
Amazon Alexa Voice Service (cont.)
Alexa Connected Home (CoHo) Skills
WeMo Lighting Skills
Intent
Activity
Alexa Service Flow (cont.)
DIY Your RPi Echo
• alexa-avs-sample-app
https://github.com/alexa/alexa-avs-sample-app
DIY Your RPi Echo (cont.)
• Step 1: Setting up your Pi
• Install Raspbian to SD card
• Expand filesystem the SD card
• Enable the Serial port
• Install the related Software
• sudo apt-get install openssh-server
• sudo apt-get install git
• sudo apt-get install vim
• sudo apt-get install tightvncserver
• sudo apt-get install nodejs npm
• Step 2:
• Register for an Amazon developer account
• https://developer.amazon.com/login.html
DIY Your RPi Echo (cont.)
• Step 3a: Create a device and security profile
• Login to Amazon Developer Portal
• https://developer.amazon.com/login.html
• Click on Apps & Services tab -> Alexa -> Alexa Voice Service -> Get Started
• In the Register a Product Type menu, select Device Type Info.
• Device Type ID: my_device
• Display Name: My Device
• Click Next
DIY Your RPi Echo (cont.)
• Step 3b: Create a device and security profile
• In the Register a Product Type menu, select Security Profile.
• Click on the Security Profile drop down and choose “Create a new profile”
• Click the General Tab
• Security Profile Name: Alexa Voice Service Sample App Security Profile
• Security Profile Description: Alexa Voice Service Sample App Security Profile Description
• Click Next
• And Client ID and Client Secret will be generated for you.
DIY Your RPi Echo (cont.)
• Step 3c: Create a device and security profile
• Click the Web Settings Tab
• Click the "Edit" button
• Allowed Origins: Click "Add Another" and then enter https://localhost:3000 in the text field that
appears.
• Allowed Return URLs: Click "Add Another" and then enter https://localhost:3000/authresponse in
the text field that appears.
• Click Next
DIY Your RPi Echo (cont.)
• Step 3d: Create a device and
security profile
• In the Register a Product Type menu,
select Device Details.
• Image: ANY test image from your own
• Category: Other
• Description: Alexa Voice Service sample
app test
• What is your expected timeline for
commercialization?: Longer than 4
months / TBD
• How many devices are you planning to
commercialize?: 0
• Click Next
DIY Your RPi Echo (cont.)
• Step 3e: Create a device and security profile
• In the Register a Product Type menu, select Amazon Music
• Enable Amazon Music?: No
• Click the Submit button
DIY Your RPi Echo (cont.)
• Step 4: Clone the sample app
• In Raspberry Pi terminal
cd ~/Desktop
git clone https://github.com/alexa/alexa-avs-sample-app.git
• Step 5: Update the install script with your credentials
• In Raspberry Pi terminal
cd ~/Desktop/alexa-avs-sample-app
vim automated_install.sh
• Changes these item from Step 3:
• ProductID
• ClientID
• ClientSecret
DIY Your RPi Echo (cont.)
• Step 6: Run the install script
• In Raspberry Pi terminal
cd ~/Desktop/alexa-avs-sample-app
. automated_install.sh
• Step 7: Fix the audio setting bug (!)
• In Raspberry Pi terminal
vim ~/.asoundrc
~/.asoundrc
pcm.!default
{
type asym
playback.pcm {
type hw
card 0
device 0
}
capture.pcm {
type plug
slave {
pcm {
type hw
card 1
device 0
}
}
}
}
DIY Your RPi Echo (cont.)
• Step 8: Run Alexa sample application
• Terminal 1 : Web Authentication
cd ~/Desktop/alexa-avs-sample-app/samples
cd companionService && npm start
• Terminal 2 : AVS Client
cd ~/Desktop/alexa-avs-sample-app/samples
cd javaclient && mvn exec:exec
• Terminal 3 : Wakeup Agent: kitt.ai
cd ~/Desktop/alexa-avs-sample-app/samples/wakeWordAgent/src/
./wakeWordAgent -e kitt_ai
Demo
• Custom Skill
• Control LED ON/OFF on
Realtek Ameba board
Voice Intent
Trigger
Skill
MQTT
Next Step?
• Alexa Pi
• Full python framework for AVS
• Turn a Raspberry Pi into a AVS client
https://github.com/sammachin/AlexaPi
DIY Your Amazon Echo

DIY Your Amazon Echo

  • 1.
    DIY Your AmazonEcho Victor Sue
  • 2.
    Agenda • What isAmazon Echo • Amazon Alexa Voice Service • Alexa Service Flow • DIY your RPi Echo • Demo • Next Step?
  • 3.
  • 4.
  • 5.
    Amazon Alexa VoiceService (cont.)
  • 6.
  • 7.
    Alexa Service Flow(cont.) Voice Text Intent Feedback Activity Device Cloud
  • 8.
  • 9.
    Amazon Alexa VoiceService (cont.) Voice Intent
  • 10.
    Amazon Alexa VoiceService (cont.) Alexa Connected Home (CoHo) Skills WeMo Lighting Skills Intent Activity
  • 11.
  • 12.
    DIY Your RPiEcho • alexa-avs-sample-app https://github.com/alexa/alexa-avs-sample-app
  • 13.
    DIY Your RPiEcho (cont.)
  • 14.
    DIY Your RPiEcho (cont.) • Step 1: Setting up your Pi • Install Raspbian to SD card • Expand filesystem the SD card • Enable the Serial port • Install the related Software • sudo apt-get install openssh-server • sudo apt-get install git • sudo apt-get install vim • sudo apt-get install tightvncserver • sudo apt-get install nodejs npm • Step 2: • Register for an Amazon developer account • https://developer.amazon.com/login.html
  • 15.
    DIY Your RPiEcho (cont.) • Step 3a: Create a device and security profile • Login to Amazon Developer Portal • https://developer.amazon.com/login.html • Click on Apps & Services tab -> Alexa -> Alexa Voice Service -> Get Started • In the Register a Product Type menu, select Device Type Info. • Device Type ID: my_device • Display Name: My Device • Click Next
  • 16.
    DIY Your RPiEcho (cont.) • Step 3b: Create a device and security profile • In the Register a Product Type menu, select Security Profile. • Click on the Security Profile drop down and choose “Create a new profile” • Click the General Tab • Security Profile Name: Alexa Voice Service Sample App Security Profile • Security Profile Description: Alexa Voice Service Sample App Security Profile Description • Click Next • And Client ID and Client Secret will be generated for you.
  • 17.
    DIY Your RPiEcho (cont.) • Step 3c: Create a device and security profile • Click the Web Settings Tab • Click the "Edit" button • Allowed Origins: Click "Add Another" and then enter https://localhost:3000 in the text field that appears. • Allowed Return URLs: Click "Add Another" and then enter https://localhost:3000/authresponse in the text field that appears. • Click Next
  • 18.
    DIY Your RPiEcho (cont.) • Step 3d: Create a device and security profile • In the Register a Product Type menu, select Device Details. • Image: ANY test image from your own • Category: Other • Description: Alexa Voice Service sample app test • What is your expected timeline for commercialization?: Longer than 4 months / TBD • How many devices are you planning to commercialize?: 0 • Click Next
  • 19.
    DIY Your RPiEcho (cont.) • Step 3e: Create a device and security profile • In the Register a Product Type menu, select Amazon Music • Enable Amazon Music?: No • Click the Submit button
  • 20.
    DIY Your RPiEcho (cont.) • Step 4: Clone the sample app • In Raspberry Pi terminal cd ~/Desktop git clone https://github.com/alexa/alexa-avs-sample-app.git • Step 5: Update the install script with your credentials • In Raspberry Pi terminal cd ~/Desktop/alexa-avs-sample-app vim automated_install.sh • Changes these item from Step 3: • ProductID • ClientID • ClientSecret
  • 21.
    DIY Your RPiEcho (cont.) • Step 6: Run the install script • In Raspberry Pi terminal cd ~/Desktop/alexa-avs-sample-app . automated_install.sh • Step 7: Fix the audio setting bug (!) • In Raspberry Pi terminal vim ~/.asoundrc ~/.asoundrc pcm.!default { type asym playback.pcm { type hw card 0 device 0 } capture.pcm { type plug slave { pcm { type hw card 1 device 0 } } } }
  • 22.
    DIY Your RPiEcho (cont.) • Step 8: Run Alexa sample application • Terminal 1 : Web Authentication cd ~/Desktop/alexa-avs-sample-app/samples cd companionService && npm start • Terminal 2 : AVS Client cd ~/Desktop/alexa-avs-sample-app/samples cd javaclient && mvn exec:exec • Terminal 3 : Wakeup Agent: kitt.ai cd ~/Desktop/alexa-avs-sample-app/samples/wakeWordAgent/src/ ./wakeWordAgent -e kitt_ai
  • 23.
    Demo • Custom Skill •Control LED ON/OFF on Realtek Ameba board Voice Intent Trigger Skill MQTT
  • 24.
    Next Step? • AlexaPi • Full python framework for AVS • Turn a Raspberry Pi into a AVS client https://github.com/sammachin/AlexaPi