
Recommended
More Related Content
Similar to DIY ESPwatch Kit - DIY Smartwatch Usage
Similar to DIY ESPwatch Kit - DIY Smartwatch Usage (20)
More from fanghe22
Recently uploaded
Recently uploaded (20)
DIY ESPwatch Kit - DIY Smartwatch Usage
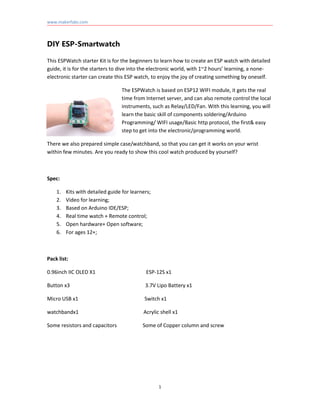
- 1. www.makerfabs.com 1 DIY ESP-Smartwatch This ESPWatch starter Kit is for the beginners to learn how to create an ESP watch with detailed guide, it is for the starters to dive into the electronic world, with 1~2 hours’ learning, a none- electronic starter can create this ESP watch, to enjoy the joy of creating something by oneself. The ESPWatch is based on ESP12 WIFI module, it gets the real time from Internet server, and can also remote control the local instruments, such as Relay/LED/Fan. With this learning, you will learn the basic skill of components soldering/Arduino Programming/ WIFI usage/Basic http protocol, the first& easy step to get into the electronic/programming world. There we also prepared simple case/watchband, so that you can get it works on your wrist within few minutes. Are you ready to show this cool watch produced by yourself? Spec: 1. Kits with detailed guide for learners; 2. Video for learning; 3. Based on Arduino IDE/ESP; 4. Real time watch + Remote control; 5. Open hardware+ Open software; 6. For ages 12+; Pack list: 0.96inch IIC OLED X1 ESP-12S x1 Button x3 3.7V Lipo Battery x1 Micro USB x1 Switch x1 watchbandx1 Acrylic shell x1 Some resistors and capacitors Some of Copper column and screw
- 2. www.makerfabs.com 2 DIY ESP-Smartwatch Guide 1. Set up Arduino IDE Follow the guide to setup Arduino IDE for ESP8266 https://arduino-esp8266.readthedocs.io/en/latest/installing.html 2. Hardware connection 2.1 Connect a battery 2.2 Connect GND, RX and TX to a USB-to-Serial adapter Watch USB to Serial GND GND TX RX RX TX 3. Download the code to smart watch and relay This example will get time from a NTP server, display date and time on OLED, and control the relay through MQTT message bus. 3.1 Dependencies arduino-mqtt ThingPulse ESP8266 OLED SSD1306 TimeLib
- 3. www.makerfabs.com 3 We can search "ntpclient","lwmqtt", "esp ssd1306" and "timekeeping" to find these libraries in Library Manager. Then install them.
- 4. www.makerfabs.com 4 3.2 Use CloudMQTT as the broker here. 3.2.1 Signup CloudMQTT and create the instance
- 6. www.makerfabs.com 6 3.3 Download the sketches watch/watch.ino to the watch 3.3.1 Open the watch.ino sketches, change SSID and passowrd of the Wi-Fi, and modify hostname, port, user and user_password for MQTT
- 7. www.makerfabs.com 7 3.3.2 Select the right board and com port 3.3.4 Hold the FLASH button; Power on the ESP8266 by the SW1 to put ESP8226 into bootloader mode
- 8. www.makerfabs.com 8 3.3.5 Click the upload button, upload the code
- 9. www.makerfabs.com 9 3.4 Download the sketches relay/relay.ino to the relay module 3.4.1 Open the sketches, change SSID and passowrd of the Wi-Fi, and modify hostname, port, user and user_password for MQTT Noted: port must same as the watch. 3.4.2 ESP-01S: Use the ESP8266 debugger, auto reset when upload the code. Same as the NodeMCU. 3.4.3 Plug the ESP-01 the ESP8266 debugger. 3.4.4 Open the sketches relay.ino
- 10. www.makerfabs.com 10 3.4.5 Select the right board
- 11. www.makerfabs.com 11 3.4.6 Click upload button upload the code.
- 12. www.makerfabs.com 12 4. Now you can use you smart watch to control the relay. 4.1 Smart watch time display: 4.2 Use the buttons "S1" and "S2" to control the Light and Fan. 1) Press the S1 select the Light control UI, press the S2 turn ON or turn OFF the light. 2) Press the S1 select the Fan control UI, press the S2 turn ON or turn OFF the Fan.