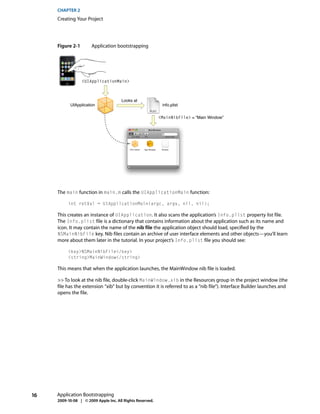
SlideShare a Scribd company logo
1 of 54
Download to read offline
Your First iPhone Application
General


          2009-10-08
IN NO EVENT WILL APPLE BE LIABLE FOR DIRECT,
                                                   INDIRECT, SPECIAL, INCIDENTAL, OR
Apple Inc.                                         CONSEQUENTIAL DAMAGES RESULTING FROM ANY
© 2009 Apple Inc.                                  DEFECT OR INACCURACY IN THIS DOCUMENT, even
                                                   if advised of the possibility of such damages.
All rights reserved.
                                                   THE WARRANTY AND REMEDIES SET FORTH ABOVE
                                                   ARE EXCLUSIVE AND IN LIEU OF ALL OTHERS, ORAL
No part of this publication may be reproduced,     OR WRITTEN, EXPRESS OR IMPLIED. No Apple
stored in a retrieval system, or transmitted, in   dealer, agent, or employee is authorized to make
                                                   any modification, extension, or addition to this
any form or by any means, mechanical,              warranty.
electronic, photocopying, recording, or            Some states do not allow the exclusion or limitation
otherwise, without prior written permission of     of implied warranties or liability for incidental or
                                                   consequential damages, so the above limitation or
Apple Inc., with the following exceptions: Any     exclusion may not apply to you. This warranty gives
person is hereby authorized to store               you specific legal rights, and you may also have
documentation on a single computer for             other rights which vary from state to state.
personal use only and to print copies of
documentation for personal use provided that
the documentation contains Apple’s copyright
notice.
The Apple logo is a trademark of Apple Inc.
Use of the “keyboard” Apple logo
(Option-Shift-K) for commercial purposes
without the prior written consent of Apple may
constitute trademark infringement and unfair
competition in violation of federal and state
laws.
No licenses, express or implied, are granted
with respect to any of the technology described
in this document. Apple retains all intellectual
property rights associated with the technology
described in this document. This document is
intended to assist application developers to
develop applications only for Apple-labeled
computers.
Every effort has been made to ensure that the
information in this document is accurate. Apple
is not responsible for typographical errors.
Apple Inc.
1 Infinite Loop
Cupertino, CA 95014
408-996-1010

Apple, the Apple logo, Cocoa, iPod, Mac,
Objective-C, and Xcode are trademarks of Apple
Inc., registered in the United States and other
countries.
Instruments and iPhone are trademarks of
Apple Inc.
Simultaneously published in the United States
and Canada.
Even though Apple has reviewed this document,
APPLE MAKES NO WARRANTY OR REPRESENTATION,
EITHER EXPRESS OR IMPLIED, WITH RESPECT TO
THIS DOCUMENT, ITS QUALITY, ACCURACY,
MERCHANTABILITY, OR FITNESS FOR A PARTICULAR
PURPOSE. AS A RESULT, THIS DOCUMENT IS
PROVIDED “AS IS,” AND YOU, THE READER, ARE
ASSUMING THE ENTIRE RISK AS TO ITS QUALITY
AND ACCURACY.
Contents

Introduction          Introduction 7

                      Organization of This Document 7


Chapter 1             Tutorial Overview and Design Patterns 9

                      Tutorial Overview 9
                      Design Patterns 10
                         Delegation 10
                         Model-View-Controller 10
                         Target-Action 11


Chapter 2             Creating Your Project 13

                      Xcode 13
                      Application Bootstrapping 15
                      Recap 18


Chapter 3             Adding a View Controller 19

                      Adding a View Controller Class 19
                      Adding a View Controller Property 20
                      Creating the View Controller Instance 21
                      Setting Up the View 23
                      Housekeeping 23
                      Implementation Source Listing 24
                      Test the Application 24
                      Recap 25


Chapter 4             Inspecting the Nib File 27

                      Interface Builder 27
                      Inspect the Nib File 27
                         File’s Owner 28
                         The View Outlet 29
                      Loading the Nib File 30
                      Test the Application 30
                      Recap 31


Chapter 5             Configuring the View 33

                      Adding the User Interface Elements 33


                                                                  3
            2009-10-08 | © 2009 Apple Inc. All Rights Reserved.
CONTENTS


                      The View Controller Interface Declaration 36
                      Making Connections 37
                      Testing 39
                      Recap 40


Chapter 6             Implementing the View Controller 41

                      The Properties 41
                      The changeGreeting: Method 41
                      The Text Field’s Delegate 42
                      Recap 43


Chapter 7             Troubleshooting 45

                      Code and Compiler Warnings 45
                      Check Connections in the Nib Files 45
                      Delegate Method Names 45


Chapter 8             Where to Next? 47

                      The User Interface 47
                      Creating User Interface Elements Programmatically 47
                      Installing on a Device 48
                      Additional Functionality 48


Appendix A            Code Listings 49

                      HelloWorldAppDelegate 49
                        The header file: HelloWorldAppDelegate.h 49
                        The implementation file: HelloWorldAppDelegate.m 49
                      MyViewController 50
                        The header file: MyViewController.h 50
                        The implementation file: MyViewController.m 50


                      Document Revision History 53


4
            2009-10-08 | © 2009 Apple Inc. All Rights Reserved.
Figures

Chapter 2             Creating Your Project 13

                      Figure 2-1         Application bootstrapping 16


Chapter 3             Adding a View Controller 19

                      Figure 3-1         MyViewController 20


Chapter 5             Configuring the View 33

                      Figure 5-1         View containing user interface elements and showing a guide line 34


                                                                                                               5
            2009-10-08 | © 2009 Apple Inc. All Rights Reserved.
FIGURES


6
    2009-10-08 | © 2009 Apple Inc. All Rights Reserved.
INTRODUCTION


      Introduction


      This tutorial shows how to create a simple iPhone application. It is not intended to give complete coverage
      of all the features available, but rather to introduce some of the technologies and give you a grounding in
      the fundamentals of the development process.

      You should read this document if you are just starting development with iPhone using Cocoa Touch. You
      should already have some familiarity with the basics of computer programming in general and the Objective-C
      language in particular. If you haven’t used Objective-C before, read through at least Learning Objective-C: A
      Primer.

      The goal here is not to create a finely polished application, but to illustrate:

      ■    How you create and manage a project using Xcode
      ■    The fundamental design patterns and techniques that underlie all iPhone development
      ■    The basics of using Interface Builder
      ■    How to make your application respond to user input using standard user interface controls

      A secondary goal is to point out other documents that you must also read to fully understand the iPhone
      development tools and techniques.

      Important: To follow this tutorial, you must have installed the iPhone SDK and developer tools available
      from the iPhone Dev Center.
      This document describes the tools that are available for iPhone SDK v3.0—check that your version of Xcode
      is at least 3.1.3.


Organization of This Document

      The document is split into the following chapters:

      ■    “Tutorial Overview and Design Patterns” (page 9)
      ■    “Creating Your Project” (page 13)
      ■    “Adding a View Controller” (page 19)
      ■    “Inspecting the Nib File” (page 27)
      ■    “Configuring the View” (page 33)
      ■    “Implementing the View Controller” (page 41)
      ■    “Troubleshooting” (page 45)
      ■    “Where to Next?” (page 47)


      Organization of This Document                                                                              7
      2009-10-08 | © 2009 Apple Inc. All Rights Reserved.
INTRODUCTION
    Introduction


8   Organization of This Document
    2009-10-08 | © 2009 Apple Inc. All Rights Reserved.
CHAPTER 1


      Tutorial Overview and Design Patterns


      This chapter provides an overview of the application you’re going to create and the design patterns you’ll
      use.


Tutorial Overview

      In this tutorial, you’re going to create a very simple application. It has a text field, a label, and a button. You
      can type your name into the text field then press the button and the label’s text will be updated to show
      “Hello, <Name>!”:


      Even though this is a very simple application, it introduces the fundamental design patterns, tools, and
      techniques that underlie all iPhone development using Cocoa Touch. Cocoa Touch comprises the UIKit and
      Foundation frameworks which provide the basic tools and infrastructure you need to implement graphical,
      event-driven applications in iPhone OS. It also includes several other frameworks that provide key services
      for accessing device features, such as the user’s contacts. To learn more about Cocoa Touch and where it fits
      into the iPhone OS, read iPhone OS Technology Overview. The main patterns you’re going to use are described
      in “Design Patterns” (page 10).


      Tutorial Overview                                                                                                9
      2009-10-08 | © 2009 Apple Inc. All Rights Reserved.
CHAPTER 1
      Tutorial Overview and Design Patterns


      In this tutorial, little regard is given to the user interface. Presentation is, however, a critical component of a
      successful iPhone application. You should read the iPhone Human Interface Guidelines and explore the sample
      code based on this tutorial (HelloWorld) to understand how the user interface might be improved for a
      full-fledged application.

      You’ll also start to gain an understanding of how view controllers work and how they fit into the architecture
      of an iPhone application.


Design Patterns

      If you haven’t already, you should make sure you read the design patterns chapter in Cocoa Fundamentals
      Guide, however the main patterns you’re going to use are:

      ■    Delegation
      ■    Model View Controller
      ■    Target-Action

      Here’s a quick summary of these patterns and an indication of where they’ll be used in the application.


      Delegation
      Delegation is a pattern where one object periodically sends messages to another object specified as its
      delegate to ask for input or to notify the delegate that an event is occurring. You use it as an alternative to
      class inheritance for extending the functionality of reusable objects.

      In this application, the application object tells its delegate that the main start-up routines have finished and
      that the custom configuration can begin. For this application, you want the delegate to create an instance
      of a controller to set up and manage the view. In addition, the text field will tell its delegate (which in this
      case will be the same controller) when the user has tapped the Return key.

      Delegate methods are typically grouped together into a protocol. A protocol is basically just a list of methods.
      If a class conforms to a protocol, it guarantees that it implements the required (some may be optional)
      methods of a protocol. The delegate protocol specifies all the messages an object might send to its delegate.
      To learn more about protocols and the role they play in Objective-C, see the Protocols chapter in The Objective-C
      Programming Language.


      Model-View-Controller
      The Model-View-Controller (or “MVC”) design pattern sets out three roles for objects in an application.

      Model objects represent data such as SpaceShips and Rockets in a game, ToDo items and Contacts in a
      productivity application, or Circles and Squares in a drawing application.

      In this application, the model is very simple—just a string—and it’s not actually used outside of a single
      method, so strictly speaking it’s not even necessary. It’s the principle that’s important here, though. In other
      applications the model will be more complicated and accessed from a variety of locations.


10    Design Patterns
      2009-10-08 | © 2009 Apple Inc. All Rights Reserved.
CHAPTER 1
Tutorial Overview and Design Patterns


View objects know how to display data (model objects) and may allow the user to edit the data.

In this application, you need a main view to contain several other views—a text field to capture information
from the user, a second text field to display text based on the user’s input, and a button to let the user tell
us that the secondary text should be updated.

Controller objects mediate between models and views.

In this application, the controller object takes the data from the input text field, store it in a string, and update
a second text field appropriately. The update is initiated as a result of an action sent by the button.


Target-Action
The target-action mechanism enables a control object—that is, an object such as a button or slider—in
response to a user event (such as a click or a tap) to send a message (the action) to another object (the target)
that can interpret the message and handle it as an application-specific instruction.

In this application, when it’s tapped, a button tells the controller to update its model and view based on the
user’s input.


Design Patterns                                                                                                   11
2009-10-08 | © 2009 Apple Inc. All Rights Reserved.
CHAPTER 1
     Tutorial Overview and Design Patterns


12   Design Patterns
     2009-10-08 | © 2009 Apple Inc. All Rights Reserved.
CHAPTER 2


        Creating Your Project


        In this first chapter, you create the project using Xcode and find out how an application launches.


Xcode

        The main tool you use to create applications for iPhone is Xcode—Apple’s IDE (integrated development
        environment). You can also use it to create a variety of other project types, including Cocoa and command-line
        utilities.

        Note: As a convention, >> denotes the beginning of a paragraph (sometimes including the following bulleted
        list) that contains steps that you must perform in the tutorial.
        In code listings, comments included in Xcode template files are not shown.


        >> Launch Xcode (by default it’s in /Developer/Applications), then create a new project by choosing
        File > New Project. You should see a new window similar to this:


        Xcode                                                                                                      13
        2009-10-08 | © 2009 Apple Inc. All Rights Reserved.
CHAPTER 2
     Creating Your Project


     Note: If you don’t see the “Use Core Data for storage” option, make sure you have installed version 3.0 of
     the iPhone OS SDK—you should have Xcode version 3.1.3 or later.


     >> Select the Window-Based Application and click Choose. (Do not select the option to use Core Data for
     storage. You don’t use Core Data in this example.)

     A sheet appears to allow you to select where your project will be saved.

     >> Select a suitable location for your project (such as the Desktop or a custom Projects directory), then give
     the project a name—HelloWorld—and click Save.

     Note: The remainder of the tutorial assumes that you named the project HelloWorld, so the application
     delegate class is called HelloWorldAppDelegate. If you name your project something else, then the
     application delegate class will be called YourProjectNameAppDelegate.


     You should see a new project window like this:


14   Xcode
     2009-10-08 | © 2009 Apple Inc. All Rights Reserved.
CHAPTER 2
      Creating Your Project


      If you haven’t used Xcode before, take a moment to explore the application. You should read Xcode Workspace
      Guide to understand the organization of the project window and how to perform basic tasks like editing and
      saving files. You can now build and run the application to see what the Simulator looks like.

      >> Choose Build > Build and Go (Run) or click the Build and Go button in the toolbar.

      The iPhone Simulator application should launch automatically, and when your application starts up you
      should simply see a white screen. To understand where the white screen came from, you need to understand
      how the application starts up.

      >> Quit the Simulator.


Application Bootstrapping

      The template project you created already sets up the basic application environment. It creates an application
      object, connects to the window server, establishes the run loop, and so on. Most of the work is done by the
      UIApplicationMain function as illustrated in Figure 2-1.


      Application Bootstrapping                                                                                 15
      2009-10-08 | © 2009 Apple Inc. All Rights Reserved.
CHAPTER 2
     Creating Your Project


     Figure 2-1        Application bootstrapping


                  <UIApplicationMain>


                                       Looks at
           UIApplication                                    info.plist

                                                           <MainNibFile> = “Main Window”


     The main function in main.m calls the UIApplicationMain function:

          int retVal = UIApplicationMain(argc, argv, nil, nil);

     This creates an instance of UIApplication. It also scans the application’s Info.plist property list file.
     The Info.plist file is a dictionary that contains information about the application such as its name and
     icon. It may contain the name of the nib file the application object should load, specified by the
     NSMainNibFile key. Nib files contain an archive of user interface elements and other objects—you’ll learn
     more about them later in the tutorial. In your project’s Info.plist file you should see:

          <key>NSMainNibFile</key>
          <string>MainWindow</string>

     This means that when the application launches, the MainWindow nib file is loaded.

     >> To look at the nib file, double-click MainWindow.xib in the Resources group in the project window (the
     file has the extension “xib” but by convention it is referred to as a “nib file”). Interface Builder launches and
     opens the file.


16   Application Bootstrapping
     2009-10-08 | © 2009 Apple Inc. All Rights Reserved.
CHAPTER 2
Creating Your Project


The Interface Builder document contains four items:

■    A File’s Owner proxy object. The File’s Owner object is actually the UIApplication instance—File’s
     Owner will be discussed later, in “File’s Owner” (page 28).
■    A First Responder proxy object. The First Responder is not used in this tutorial but you can learn more
     about it by reading Event Handling in iPhone Application Programming Guide.
■    An instance of HelloWorldAppDelegate set to be the application's delegate. Delegates will be discussed
     in the next section.
■    A window. The window has its background set to white and is set to be visible at launch. It’s this window
     that you see when the application launches.

After the application has finished launching, you can perform additional customization. A common
pattern—and the one you’ll follow in the next chapter—is illustrated in this diagram:


Application Bootstrapping                                                                                  17
2009-10-08 | © 2009 Apple Inc. All Rights Reserved.
CHAPTER 2
        Creating Your Project


                                            applicationDidFinishLaunching:
        1   Create UIViewController
        2   Get UIViewController’s view       UIApplication
        3   Put view in window
                                                                 Delegate


                                                                    2
              MyViewController 1                                    3
              view    LoadView
                (Loads nib file)


        When the application object has completed its setup, it sends its delegate an
        applicationDidFinishLaunching: message. Rather than configuring the user interface itself, the delegate
        typically creates a view controller object (a special controller responsible for managing a view—this adheres
        to the model-view-controller design pattern as described in “Model-View-Controller” (page 10)). The delegate
        asks the view controller for its view (which the view controller creates on demand) and adds that as a subview
        of the window.


Recap

        In this chapter you created a new project and learned about how the application launch process works. In
        the next chapter, you’ll define and create an instance of a view controller.


18      Recap
        2009-10-08 | © 2009 Apple Inc. All Rights Reserved.
CHAPTER 3


      Adding a View Controller


      In this application you’ll need two classes. Xcode’s application template provided an application delegate
      class and an instance is created in the nib file. You need to implement a view controller class and create an
      instance of it.


Adding a View Controller Class

      View controller objects play a central role in most iPhone applications. As the name implies, they’re responsible
      for managing a view, but on iPhone they also help with navigation and memory management. You’re not
      going to use the latter features here, but it’s important to be aware of them for future development. UIKit
      provides a special class—UIViewController—that encapsulates most of the default behavior you want
      from a view controller. You have to create a subclass to customize the behavior for your application.

      >> In Xcode, in the project organizer select either the project (HelloWorld at the top of the Groups and
      Files list) or the Classes group folder—the new files will be added to the current selection.

      >> Choose File > New File and in the New File window. Select the Cocoa Touch Classes group, then select
      UIViewController subclass. In the Options section, choose With XIB for user interface.


      Adding a View Controller Class                                                                                19
      2009-10-08 | © 2009 Apple Inc. All Rights Reserved.
CHAPTER 3
      Adding a View Controller


      Note: If you don’t see the “With XIB for user interface” option, make sure you have installed version 3.0 of
      the iPhone OS SDK—Xcode should show version 3.1.3 or later.


      Selecting “With XIB for user interface” means that Xcode creates a nib file to accompany the view controller,
      and adds it to the project. (Nib files are discussed in detail in the next chapter.)

      >> Click Next, and in the following screen give the file a new name such as MyViewController (by
      convention, class names begin with a capital letter). Make sure that both the .m and .h files are created and
      that the files are added to your project, as shown here:

      Figure 3-1        MyViewController


      >> Press Finish and make sure that the files were added to your project.

      If you look at the new source files, you’ll see that stub implementations of various methods are already given
      to you. These are all you need for the moment; the next task is to create an instance of the class.


Adding a View Controller Property

      You want to make sure that the view controller lasts for the lifetime of the application, so it makes sense to
      add it as an instance variable of the application delegate (which will also last for the lifetime of the application).
      (To understand why, consult Memory Management Programming Guide for Cocoa.)

      The instance variable will be an instance of the MyViewController class. The compiler will generate an
      error, though, if you declare the variable but you don’t tell it about the MyViewController class. You could
      import the header file, but typically in Cocoa you instead provide a forward declaration—a promise to the


20    Adding a View Controller Property
      2009-10-08 | © 2009 Apple Inc. All Rights Reserved.
CHAPTER 3
      Adding a View Controller


      compiler that MyViewController will be defined somewhere else and that it needn’t waste time checking
      for it now. (Doing this also avoids circularities if two classes need to refer to each other and would otherwise
      include each other’s header files.) You then import the header file itself in the implementation file.

      >> In the application delegate’s header file (HelloWorldAppDelegate.h), add this forward declaration
      before the interface declaration for HelloWorldAppDelegate:

      @class MyViewController;

      >> Add the instance variable by adding the following line between the braces:

      MyViewController *myViewController;

      >> Add a declaration for this property after the closing brace but before @end:

      @property (nonatomic, retain) MyViewController *myViewController;


      Important: Like C, Objective-C is case-sensitive. MyViewController refers to a class; myViewController
      is a variable that here contains an instance of MyViewController. When writing code, make sure you use
      the appropriate symbol.


      Properties are described in the Declared Properties chapter in The Objective-C Programming Language. Basically,
      though, this declaration specifies that an instance of HelloWorldAppDelegate has a property that you can
      access using the getter and setter methods myViewController and setMyViewController: respectively,
      and that the instance retains the property (retaining is discussed in more detail later).

      To make sure you’re on track, confirm that your HelloWorldAppDelegate class interface file
      (HelloWorldAppDelegate.h) looks like this (comments are not shown):

      #import <UIKit/UIKit.h>

      @class MyViewController;

      @interface HelloWorldAppDelegate : NSObject <UIApplicationDelegate> {
          UIWindow *window;
          MyViewController *myViewController;
      }

      @property (nonatomic, retain) IBOutlet UIWindow *window;
      @property (nonatomic, retain) MyViewController *myViewController;

      @end

      You can now create an instance of the view controller.


Creating the View Controller Instance

      Now that you’ve added the view controller property to the application delegate, you need to actually create
      an instance of the view controller and set it as the value for the property.


      Creating the View Controller Instance                                                                        21
      2009-10-08 | © 2009 Apple Inc. All Rights Reserved.
CHAPTER 3
     Adding a View Controller


     >> In the implementation file for the application delegate class (HelloWorldAppDelegate.m), create an
     instance of MyViewController by adding the following code as the first statements in the implementation
     of the applicationDidFinishLaunching: method:

     MyViewController *aViewController = [[MyViewController alloc]
                 initWithNibName:@"MyViewController" bundle:[NSBundle mainBundle]];
     [self setMyViewController:aViewController];
     [aViewController release];

     There’s quite a lot in just these three lines. What they do is:

     ■    Create and initialize an instance of the view controller class.
     ■    Set the new view controller to be the myViewController instance variable using an accessor method.
          Remember that you didn’t separately declare setMyViewController:, it was implied as part of the
          property declaration—see “Adding a View Controller Property” (page 20).
     ■    Adhere to memory management rules by releasing the view controller.

     You create the view controller object using alloc, then initialize it using initWithNibName:bundle:. The
     init method specifies first the name of the nib file the controller should load and second the bundle in
     which it should find it. A bundle is an abstraction of a location in the file system that groups code and
     resources that can be used in an application. The advantages of using bundles over locating resources yourself
     in the file-system are that bundles provide a convenient and simple API—the bundle object can locate a
     resource just by name—and they take account of localization for you. To learn more about bundles, see
     Resource Programming Guide.

     By convention, you own any objects you create using an alloc method (amongst others, see Memory
     Management Rules). You should also:

     ■    Relinquish ownership of any objects you create.
     ■    Typically use accessor methods to set instance variables anywhere other than in an initializer method.

     The second line in the implementation uses an accessor method to set the instance variable, and then the
     third line uses release to relinquish ownership.

     There are other ways to implement the above. You could, for example, replace the three lines with just two:

     MyViewController *aViewController = [[[MyViewController alloc]
                 initWithNibName:@"MyViewController" bundle:[NSBundle mainBundle]]
     autorelease];
     [self setMyViewController:aViewController];

     In this version, you use autorelease as a way to relinquish ownership of the new view controller but at
     some point in the future. To understand this, read Autorelease Pools in the Memory Management Programming
     Guide for Cocoa. In general, however, you should try to avoid using autorelease wherever possible as it’s
     a more resource intensive operation than release.

     You could also replace the last line with:

     self.myViewController = aViewController;

     The dot notation invokes exactly the same accessor method (setMyViewController:) as in the original
     implementation. The dot notation simply provides a more compact syntax—especially when you use nested
     expressions. Which syntax you choose is largely personal preference, although using the dot syntax does


22   Creating the View Controller Instance
     2009-10-08 | © 2009 Apple Inc. All Rights Reserved.
CHAPTER 3
      Adding a View Controller


      have some additional benefits when used in conjunction with properties—see Declared Properties in The
      Objective-C Programming Language. For more about the dot syntax, see “Dot Syntax” in The Objective-C
      Programming Language in Objects, Classes, and Messaging in The Objective-C Programming Language.


Setting Up the View

      The view controller is responsible for managing and configuring the view when asked. Rather than creating
      the window’s content view directly, therefore, you ask the view controller for its view and add that as the
      subview for the window.

      >> After releasing the view controller, add the following lines:

      UIView *controllersView = [myViewController view];
      [window addSubview:controllersView];

      You could do this in one line:

      [window addSubview:[myViewController view]];

      But breaking it into two serves to highlight the side of memory management that is the converse of that
      which you saw earlier. Because you didn’t create the controller view using any of the methods listed in
      Memory Management Rules in Memory Management Programming Guide for Cocoa, you don’t own the returned
      object. Consequently you can simply pass it to the window and forget about it (you don’t have to release it).

      The final line from the template:

      [window makeKeyAndVisible];

      causes the window—now complete with your view—to be displayed on screen. You add your view before
      the window is displayed so that the user doesn’t briefly see a blank screen before the real content appears.


Housekeeping

      There are a few unfinished tasks to complete: You need to import the view controller’s header file, synthesize
      the accessor methods, and—to conform to the rules of memory management—make sure the view controller
      is released in the dealloc method.

      >> In the implementation file for the application delegate class (HelloWorldAppDelegate.m), do the
      following:

      ■    At the top of the file, import the header file for MyViewController:

           #import "MyViewController.h"

      ■    In the @implementation block of the class, tell the compiler to synthesize the accessor methods for
           the view controller:

           @synthesize myViewController;

      ■    In the dealloc method, release the view controller in the first statement:


      Setting Up the View                                                                                        23
      2009-10-08 | © 2009 Apple Inc. All Rights Reserved.
CHAPTER 3
      Adding a View Controller


           [myViewController release];


Implementation Source Listing

      To make sure you’re still on track, confirm that your HelloWorldAppDelegate class implementation
      (HelloWorldAppDelegate.m) looks like this:

      #import "MyViewController.h"
      #import "HelloWorldAppDelegate.h"

      @implementation HelloWorldAppDelegate

      @synthesize window;
      @synthesize myViewController;


      - (void)applicationDidFinishLaunching:(UIApplication *)application {

           MyViewController *aViewController = [[MyViewController alloc]
                     initWithNibName:@"MyViewController" bundle:[NSBundle mainBundle]];
           [self setMyViewController:aViewController];
           [aViewController release];

           UIView *controllersView = [myViewController view];
           [window addSubview:controllersView];
           [window makeKeyAndVisible];
      }


      - (void)dealloc {
          [myViewController release];
          [window release];
          [super dealloc];
      }

      @end


Test the Application

      You can now test your application.

      >> Compile and run the project (choose Build > Build and Run, or click the Build and Run button in Xcode’s
      toolbar).

      Your application should compile without errors and you should again see a white screen in Simulator.


24    Implementation Source Listing
      2009-10-08 | © 2009 Apple Inc. All Rights Reserved.
CHAPTER 3
        Adding a View Controller


Recap

        In this section you added a new view controller class and its accompanying nib file. In the application delegate,
        you declared an instance variable and accessor methods for a view controller instance. You also synthesized
        the accessor methods and performed a few other housekeeping tasks. Most importantly, though, you created
        an instance of the view controller and passed its view to the window. In the next chapter you’ll use Interface
        Builder to configure the nib file the controller uses to load its view.


        Recap                                                                                                         25
        2009-10-08 | © 2009 Apple Inc. All Rights Reserved.
CHAPTER 3
     Adding a View Controller


26   Recap
     2009-10-08 | © 2009 Apple Inc. All Rights Reserved.
CHAPTER 4


       Inspecting the Nib File


       You use the Interface Builder application to create and configure nib files. There are two important concepts
       to introduce: outlets, and the File’s Owner proxy object.


Interface Builder

       Interface Builder is the application you use to create user interfaces. It doesn’t generate source code, instead
       it allows you to manipulate objects directly and then save those objects in an archive called a nib file.

       Terminology: Although an Interface Builder document may have a “.xib” extension, historically the extension
       was “.nib” (an acronym for “NextStep Interface Builder”) so they are referred to colloquially as “Nib files.”


       At runtime, when a nib file is loaded the objects are unarchived and restored to the state they were in when
       you saved the file—including all the connections between them. To learn more about Interface Builder, read
       Interface Builder User Guide.


Inspect the Nib File

       >> In Xcode, double-click the view controller’s XIB file (MyViewController.xib) to open the file in Interface
       Builder.

       The file contains three objects, the File’s Owner proxy, the First Responder proxy, and a view. The view is
       displayed in a separate window to allow you to edit it.


       Interface Builder                                                                                             27
       2009-10-08 | © 2009 Apple Inc. All Rights Reserved.
CHAPTER 4
     Inspecting the Nib File


     File’s Owner
     In an Interface Builder document, in contrast to the other objects you add to the interface, the File’s Owner
     object is not created when the nib file is loaded. It represents the object set to be the owner of the user
     interface—typically the object that loads the interface. This is discussed in more detail in Resource Programming
     Guide. In your application, the File’s Owner will be the instance of MyViewController.

     To allow you to make appropriate connections to and from the File’s Owner, Interface Builder has to know
     what sort of object File’s Owner is. You tell Interface Builder the class of the object using the Identity Inspector.
     It was actually set when you created the nib file together with the view controller classes, but it’s useful to
     look at the inspector now.

     >> In the Interface Builder document window, select the File’s Owner icon and then choose Tools > Identity
     Inspector to display the Identity inspector as shown here:


28   Inspect the Nib File
     2009-10-08 | © 2009 Apple Inc. All Rights Reserved.
CHAPTER 4
Inspecting the Nib File


In the Class field of the Class Identity section, you should see MyViewController. It’s important to understand
that this is just a promise to Interface Builder that the File’s Owner will be an instance of MyViewController.
Simply setting the class doesn’t ensure that the File’s Owner will be an instance of that class. The File’s Owner
will be whatever object you set when you load the nib file. If it’s an instance of a different class, the connections
you make in the nib file will not be properly established.


The View Outlet
You can look at—and make and break—an object’s connections using an inspector panel.

>> In the Interface Builder document window, Control-click on File’s Owner to display a translucent panel
showing File’s Owner’s connections:


Inspect the Nib File                                                                                             29
2009-10-08 | © 2009 Apple Inc. All Rights Reserved.
CHAPTER 4
      Inspecting the Nib File


      The only connection at the moment is the view controller’s view outlet. An outlet is just an attribute (typically
      an instance variable) that happens to connect to an item in a nib file. The outlet connection means that when
      the nib file is loaded and the UIView instance is unarchived, the view controller’s view instance variable is
      set to that view.


Loading the Nib File

      The view controller loads the nib file automatically in its loadView method. Recall that you specified the
      name of the nib file to load as the first argument to initWithNibName:bundle: (see “Creating the View
      Controller Instance” (page 21)). The loadView method is typically called once during a view controller’s
      lifetime and is used to create its view. When you invoke the view controller’s view method, the controller
      automatically calls its own loadView method if the view hasn’t been created. (If the view controller purges
      its view as a result of, for example, receiving a memory warning, then loadView will be invoked again to
      recreate the view if necessary.)

      If you want to create the view controller’s view programmatically, you can override loadView and create
      the view in your implementation.

      If you initialize a view controller using initWithNibName:bundle: but you want to perform additional
      configuration after the view is loaded, you override the controller’s viewDidLoad method.

      You can load nib files yourself using an instance of NSBundle. You can learn more about loading nib files in
      Resource Programming Guide.


Test the Application

      To make sure your application’s working correctly, you could set the background color of the view to something
      other than white and verify that the new color is displayed after the application launches.


30    Loading the Nib File
      2009-10-08 | © 2009 Apple Inc. All Rights Reserved.
CHAPTER 4
        Inspecting the Nib File


        >> In Interface Builder, select the view then choose Tools > Attributes Inspector to display the Attributes
        inspector.

        >> Click the frame of the Background color well to display the Colors panel, then select a different color.


        >> Save the nib file.

        >> Compile and run the project (click the Build and Go button in the toolbar).

        Your application should compile without errors and you should again see an appropriately-colored screen
        in Simulator.

        >> Restore the view’s background color to white and save the nib file.


Recap

        In this section you inspected a nib file, learned about outlets, and set the background color of a view. You
        also learned more about resource loading and how the view controller loads the nib file.

        In the next chapter you will add controls to the view.


        Recap                                                                                                         31
        2009-10-08 | © 2009 Apple Inc. All Rights Reserved.
CHAPTER 4
     Inspecting the Nib File


32   Recap
     2009-10-08 | © 2009 Apple Inc. All Rights Reserved.
CHAPTER 5


      Configuring the View


      Interface Builder provides a library of objects that you can add to a nib file. Some of these are user interface
      elements such as buttons and text fields, others are controller objects such as view controllers. Your nib file
      already contains a view—now you just need to add the button and text fields.


Adding the User Interface Elements

      You add user interface elements by dragging them from the Interface Builder library.

      >> In Interface Builder choose Tools > Library to display the library window

      You can drag view items from the library and drop them onto the view just as you might in a drawing
      application.


      >> Add a text field (UITextField), a label (UILabel), and a button (UIButton) to the view.

      You can then resize the items using resize handles where appropriate, and reposition them by dragging. As
      you move items within the view, alignment guides are displayed as dashed blue lines.

      >> Lay out the elements so that they look like this:


      Adding the User Interface Elements                                                                           33
      2009-10-08 | © 2009 Apple Inc. All Rights Reserved.
CHAPTER 5
     Configuring the View


     Figure 5-1        View containing user interface elements and showing a guide line


     >> Make the following changes:

     1.   Add a placeholder string Your Name to the text field by entering it in the Text Field Attributes inspector.

     2.   Resize the label so that it extends for the width of the view.

     3.   Delete the text (“Label”) from the label either using the Label Attributes inspector or by directly selecting
          the text in the label (double-click to make a selection) and press Delete.

     4.   Add a title to the button by double-clicking inside the button and typing Hello.

     5.   Use the inspector to set the text alignment for the text field and label to centered.


     You should end up with a view that looks like this:


34   Adding the User Interface Elements
     2009-10-08 | © 2009 Apple Inc. All Rights Reserved.
CHAPTER 5
Configuring the View


>> In the view section of the label’s Label Attributes inspector, select Clear Context Before Drawing. This
ensures that when you update the greeting the previous string is removed before the new one is drawn. If
you don’t do this, the strings are drawn on top of each other.

There are several other changes to make to the text field—it might be fairly obvious that the first change
applies to the text field, but the others are less obvious. First, you might want to ensure that names are
automatically capitalized. Second, you might want to make sure that the keyboard associated with the text
field is configured for entering names, and that the keyboard displays a Done button.

The guiding principle here is that: you know when you’re putting it on screen what a text field will contain.
You therefore design the text field to make sure that at runtime the keyboard can configure itself to best
suit the user’s task. You make all of these settings using text input traits.

>> In Interface Builder, select the text field then display the Attributes inspector. In the Text Input Traits
section:

■    In the Capitalize popup menu, select Words
■    In the Keyboard Type popup menu select, Default
■    In the Keyboard Return Key popup menu, select Done

>> Save the file.

If you build and run your application in Xcode, when it launches you should see the user interface elements
as you positioned them. If you press the button, it should highlight, and if you tap inside the text field, the
keyboard should appear. At the moment, though, after the keyboard appears, there’s no way to dismiss it.
To remedy this, and add other functionality, you need to make appropriate connections to and from the
view controller. These are described in the next section.


Adding the User Interface Elements                                                                               35
2009-10-08 | © 2009 Apple Inc. All Rights Reserved.
CHAPTER 5
      Configuring the View


The View Controller Interface Declaration

      To make connections to the user interface from the view controller, you need to specify outlets (recall that
      an outlet is just an instance variable). You also need a declaration for its very simple model object, the string.

      >> In Xcode, in MyViewController.h add the following instance variables to the MyViewController
      class:

      UITextField *textField;
      UILabel *label;
      NSString *string;

      >> You then need to add property declarations for the instance variables and a declaration for the
      changeGreeting: action method:

      @property (nonatomic, retain) IBOutlet UITextField *textField;
      @property (nonatomic, retain) IBOutlet UILabel *label;
      @property (nonatomic, copy) NSString *string;
      - (IBAction)changeGreeting:(id)sender;

      IBOutlet is a special keyword that is used only to tell Interface Builder to treat an instance variable or
      property as an outlet. It’s actually defined as nothing so it has no effect at compile time.

      IBAction is a special keyword that is used only to tell Interface Builder to treat a method as an action for
      target/action connections. It’s defined to void.

      The view controller is also going to be the text field’s delegate; as such, it must adopt the
      UITextFieldDelegate protocol. To specify that a class adopts a protocol, in the interface add the name
      of the protocol in angle brackets (<>) after the name of the class from which your class inherits.

      >> Specify that the UIViewController object adopts the UITextFieldDelegate protocol by adding
      <UITextFieldDelegate> after UIViewController.

      Your interface file should look like this:

      #import <UIKit/UIKit.h>

      @interface MyViewController : UIViewController <UITextFieldDelegate> {
           UITextField *textField;
           UILabel *label;
           NSString *string;
      }
      @property (nonatomic, retain) IBOutlet UITextField *textField;
      @property (nonatomic, retain) IBOutlet UILabel *label;
      @property (nonatomic, copy) NSString *string;
      - (IBAction)changeGreeting:(id)sender;
      @end

      >> Save the MyViewController.h file so that Interface Builder will notice the changes.

      So that you can test the project at the end of this section, in the implementation file (MyViewController.m)
      implement a stub changeGreeting: method.

      >> After the @implementation MyViewController line add:


36    The View Controller Interface Declaration
      2009-10-08 | © 2009 Apple Inc. All Rights Reserved.
CHAPTER 5
     Configuring the View


     - (IBAction)changeGreeting:(id)sender {
     }

     >> Save the file.


Making Connections

     Now that you’ve defined the view controller’s outlets and action, you can establish the connections in the
     nib file.

     >> Connect the File’s Owner’s label outlet. Control click File’s Owner to display a translucent panel that
     shows all the available outlets and actions, then drag from the circle to the right of the list to the destination
     to make the connection.

     You can resize the panel to show more or fewer outlets and actions at a time by dragging the resize handle
     at the bottom right of the panel. If there is not sufficient space to show all the outlets and actions, the panel
     displays a scroller to allow you to navigate within the list view.


     Interface Builder will not allow you to make connections to the wrong sort of element. For example, since
     you declared the label property to be an instance of UILabel, you cannot connect the label outlet to
     the text field.

     >> Connect the File’s Owner’s textField outlet to the text field in the same way you connected the label.


     Making Connections                                                                                             37
     2009-10-08 | © 2009 Apple Inc. All Rights Reserved.
CHAPTER 5
     Configuring the View


     >> Set the button’s action method by Control-clicking the button to show the inspector, then dragging from
     the open circle in the Touch Up Inside Events list to the File’s Owner icon and selecting changeGreeting:
     in the translucent panel that appears over File’s Owner (you may have to scroll within the inspector to reveal
     the Touch Up Inside connection).


38   Making Connections
     2009-10-08 | © 2009 Apple Inc. All Rights Reserved.
CHAPTER 5
      Configuring the View


      This means that when you run the application, when you lift your finger inside the button the button sends
      a changeGreeting: message to the File’s Owner object. (For a definition of all the control events, see
      UIControl.)

      The text field sends a message to its delegate when the user taps the Return button in the keyboard. You
      can use this callback to dismiss the keyboard (see “The Text Field’s Delegate” (page 42)).

      >> Set the text field’s delegate to be the File’s Owner (the view controller) by Control-dragging from the text
      field to the File’s Owner and selecting delegate in the translucent panel that appears.


Testing

      You can now test the application.

      >> Building and running the project.

      There will be several compiler warnings because you haven’t yet implemented accessor methods for the
      properties—you’ll fix these in the next chapter. You should find, though, that the button works (it highlights
      when you tap it). You should also find that if you touch in the text field, the keyboard appears and you enter
      text. There is, however, no way to dismiss the keyboard. To do that, you have to implement the relevant
      delegate method. You’ll also do that in the next chapter.


      Testing                                                                                                     39
      2009-10-08 | © 2009 Apple Inc. All Rights Reserved.
CHAPTER 5
        Configuring the View


Recap

        You added instance variables and property declarations, and a declaration for the action method, to the view
        controller class interface. You added a stub implementation of the action method to the class implementation.
        You also configured the nib file.


40      Recap
        2009-10-08 | © 2009 Apple Inc. All Rights Reserved.
CHAPTER 6


      Implementing the View Controller


      There are several parts to implementing the view controller. You need to deal with the instance
      variables—including memory management—implement the changeGreeting: method, and ensure that
      the keyboard is dismissed when the user taps Done.


The Properties

      You first need to tell the compiler to synthesize the accessor methods.

      >> In the MyViewController.m file, add the following after the @implementation MyViewController
      line:

      @synthesize textField;
      @synthesize label;
      @synthesize string;

      This tells the compiler to synthesize accessor methods for these properties according to the specification
      you gave in the interface file. For example, the declaration of the string property is @property
      (nonatomic, copy) NSString *string;), so the compiler generates two accessor methods: - (NSString
      *)string and - (void)setString:(NSString *)newString. In the setString: method a copy is
      made of the string that’s passed in. This is useful to ensure encapsulation (the passed-in string might be
      mutable—you want to make sure that the controller maintains its own copy). For more about encapsulation,
      see “Mechanisms Of Abstraction” in Object-Oriented Programming with Objective-C.

      You must relinquish ownership in the dealloc method because all of the property declarations specify that
      the view controller owns the instance variables (retain and copy imply ownership, see Memory Management
      Rules in Memory Management Programming Guide for Cocoa).

      >> In the MyViewController.m file, update the dealloc method to release the instance variables before
      invoking super’s implementation:

      - (void)dealloc {
          [textField release];
          [label release];
          [string release];
          [super dealloc];
      }


The changeGreeting: Method

      When it’s tapped, the button sends a changeGreeting: message to the view controller. The view controller
      then should retrieve the string from the text field and update the label appropriately.


      The Properties                                                                                         41
      2009-10-08 | © 2009 Apple Inc. All Rights Reserved.
CHAPTER 6
      Implementing the View Controller


      >> In the MyViewController.m file, complete the implementation of the changeGreeting: method as
      follows:

      - (IBAction)changeGreeting:(id)sender {

           self.string = textField.text;

          NSString *nameString = string;
          if ([nameString length] == 0) {
              nameString = @"World";
          }
          NSString *greeting = [[NSString alloc] initWithFormat:@"Hello, %@!",
      nameString];
          label.text = greeting;
          [greeting release];
      }

      There are several pieces to this method.

       ■   self.string = textField.text;

           This retrieves the text from the text field and sets the controller’s string instance variable to the result.
           In this case, you don’t actually use the string instance variable anywhere else, but it’s important to
           understand its role. It’s the very simple model object that the view controller is managing. In general,
           the controller should maintain information about application data in its own model objects—application
           data shouldn’t be stored in user interface elements.
       ■   @"World" is a string constant represented by an instance of NSString.

       ■   The initWithFormat: method creates a new string that follows the format specified by the format
           string, like the printf function. %@ indicates that a string object should be substituted. To learn more
           about strings, see String Programming Guide for Cocoa.


The Text Field’s Delegate

      If you build and run the application, you should find that if you tap the button, the label shows “Hello, World!”
      If you select the text field and start typing, though, you should find that you have no way to indicate that
      you’ve finished entering text and dismiss the keyboard.

      In an iPhone application, the keyboard is shown automatically when an element that allows text entry
      becomes the first responder, and is dismissed automatically when the element loses first responder status.
      (You can learn more about first responder by reading Event Handling in iPhone Application Programming
      Guide.) There’s no way to directly message the keyboard; you can, however, make it appear or disappear as
      a side-effect of toggling the first responder status of a text-entry element.

      In this application, the text field becomes first responder—and so the keyboard appears—when the user
      taps in the text field. You want the keyboard to disappear when the user taps the Done button on the
      keyboard.


42    The Text Field’s Delegate
      2009-10-08 | © 2009 Apple Inc. All Rights Reserved.
CHAPTER 6
        Implementing the View Controller


        The UITextFieldDelegate protocol includes a method, textFieldShouldReturn:, that the text field
        calls whenever the user taps the Return button (whatever text the button shows). Because you set the view
        controller as the text field’s delegate (“Making Connections” (page 37)), you can implement this method to
        force the text field to lose first responder status by sending it the resignFirstResponder message—which
        has the side-effect of dismissing the keyboard.

        >> In the MyViewController.m file, implement the textFieldShouldReturn: method as follows:

        - (BOOL)textFieldShouldReturn:(UITextField *)theTextField {
            if (theTextField == textField) {
                [textField resignFirstResponder];
            }
            return YES;
        }

        In this application, it’s not really necessary to include the theTextField == textField test since there’s
        only one text field. It’s worth pointing out the pattern, though, since there may be occasions when your
        object is the delegate of more than one object of the same type and you may need to differentiate between
        them.

        >> Build and run the application; it should behave as you expect. (Tap Done to dismiss the keyboard when
        you have entered your name, then tap the Hello button to display “Hello, <Your Name>!” in the label.)

        If the application doesn’t behave as you expect, you need to troubleshoot (see “Troubleshooting” (page 45)).


Recap

        You finished the implementation of the view controller and so completed your first iPhone application.
        Congratulations.

        Take a moment to think about how the view controller fits into the overall application architecture. You’re
        likely to use view controllers in most iPhone applications you write.

        Then take a break, and start to think about what you should do next.


        Recap                                                                                                    43
        2009-10-08 | © 2009 Apple Inc. All Rights Reserved.
CHAPTER 6
     Implementing the View Controller


44   Recap
     2009-10-08 | © 2009 Apple Inc. All Rights Reserved.
CHAPTER 7


      Troubleshooting


      This section describes some approaches to solving common problems that you may encounter.


Code and Compiler Warnings

      If things aren’t working as they should, first compare your code with the complete listings as given in “Code
      Listings” (page 49).

      Your code should compile without any warnings. Objective-C is a very flexible language, and so sometimes
      the most you get from the compiler is a warning. Typically you should treat warnings as very likely to be
      errors.


Check Connections in the Nib Files

      As a developer, if things don’t work correctly, your natural instinct is to check your source for bugs. Cocoa
      adds another dimension. Much of your application’s configuration may be “encoded” in the nib files. And if
      you haven’t made the correct connections, then your application won’t behave as you expect.

      If the text doesn’t update when you tap the button, it might be that you didn’t connect the button’s action
      to the view controller, or connect the view controller’s outlets to the text field or label.

      If the keyboard does not disappear when you tap Done, you may not have connected the text field’s delegate
      or connected the view controller’s textField outlet to the text field (see “Making Connections” (page 37)).
      If you have connected the delegate, there may be a more subtle problem (see “Delegate Method Names” (page
      45)).


Delegate Method Names

      A common mistake with delegates is to misspell the delegate method name. Even if you’ve set the delegate
      object correctly, if the delegate doesn’t implement the method with exactly the right name, it won’t be
      invoked. It’s usually best to copy and paste delegate method declarations from the documentation.


      Code and Compiler Warnings                                                                                45
      2009-10-08 | © 2009 Apple Inc. All Rights Reserved.
CHAPTER 7
     Troubleshooting


46   Delegate Method Names
     2009-10-08 | © 2009 Apple Inc. All Rights Reserved.
CHAPTER 8


         Where to Next?


         This chapter offers suggestions as to what directions you should take next in learning about iPhone
         development.


The User Interface

         In this tutorial, you created a very simple iPhone application. Cocoa Touch offers a rich development
         environment, though, and you’ve only scratched the surface. From here, you should explore further. Start
         with this application. As noted in the first chapter, the user interface is critical to a successful iPhone application.
         Try to improve the user interface. Add images and color to the elements. Add a background image and an
         icon for the application. Look at the inspectors in Interface Builder to see how else you can configure elements.


Creating User Interface Elements Programmatically

         In the tutorial, you created the user interface using Interface Builder. Interface Builder allows you to assemble
         user interface components quickly and easily. Sometimes, however, you may want—or need—to create user
         interface elements in code (for example, if you create a custom table view cell you typically create and lay
         out the subviews programmatically).

         First, open the MyViewController nib file and remove the text field from view.

         If you want to create the entire view hierarchy for a view controller in code, you override loadView. In this
         case, however, you want to load the nib file then perform additional configuration (add another view). You
         therefore override viewDidLoad instead. (The viewDidLoad method gives you a common override point
         you can use whether you load the main view using a nib file or by overriding loadView.)

         In MyViewController.m, add the following implementation of viewDidLoad:

- (void)viewDidLoad {

    CGRect frame = CGRectMake(20.0, 68.0, 280.0, 31.0);
    UITextField *aTextField = [[UITextField alloc] initWithFrame:frame];
    self.textField = aTextField;
    [aTextField release];

    textField.textAlignment = UITextAlignmentCenter;
    textField.borderStyle = UITextBorderStyleRoundedRect;

    textField.autocapitalizationType = UITextAutocapitalizationTypeWords;
    textField.keyboardType = UIKeyboardTypeDefault;
    textField.returnKeyType = UIReturnKeyDone;
    textField.delegate = self;
    [self.view addSubview:textField];


         The User Interface                                                                                                  47
         2009-10-08 | © 2009 Apple Inc. All Rights Reserved.
CHAPTER 8
      Where to Next?


}

      Notice that there’s quite a lot of code compared with how easy it was to create and configure the text field
      in Interface Builder.

      Build and run the application. Make sure it behaves as it did before.


Installing on a Device

      If you have a suitable device (iPhone or iPod Touch) connected to your computer via its 30-pin USB cable,
      and you have a valid certificate from the iPhone Developer Program, set the active SDK for your project to
      “iPhone OS” (instead of “iPhone OS Simulator”) and build and run the project. Assuming your code compiles
      successfully, Xcode then automatically uploads your application to your device. For more details, see iPhone
      Development Guide.


Additional Functionality

      Next you can try expanding on the functionality. There are many directions in which you can go:

       ■   Rather than using a view as a canvas on which to drop prebuilt user interface controls, you might try
           writing a custom view that draws its own content or responds to touch events. For inspiration, look at
           examples such as MoveMe and Metronome.
       ■   Although you used Interface Builder to layout the user interface for this application, many applications
           actually use table views to lay out the interface. This makes it easy to create an interface that extends
           beyond the bounds of the screen—allowing the user to easily scroll to reveal additional elements. You
           should first investigate how to create a simple list using a table view. There are several sample code
           projects that you can look at—including TableViewSuite—then you can create your own.
       ■   Navigation controllers and tab bar controllers provide an architecture that allow you to create drill-down
           style interfaces and let the user select different views in your application. Navigation controllers often
           work in conjunction with table views, but both navigation controllers and tab bar controllers work
           together with view controllers. Have a look at some of the sample applications—such as
           SimpleDrillDown—that use navigation controllers and expand on them to create your own applications.
       ■   You can often increase the size of your potential marketplace by localizing your application.
           Internationalization is the process of making your application localizable. To learn more about
           internationalization, read Internationalization Programming Topics.
       ■   Performance is critical to good user experience on iPhone. You should learn to use the various performance
           tools provided with Mac OS X—in particular Instruments—to tune your application so that it minimizes
           its resource requirements.

      The most important thing is to try out new ideas and to experiment—there are many code samples you can
      look at for inspiration, and the documentation will help you to understand concepts and programming
      interfaces.


48    Installing on a Device
      2009-10-08 | © 2009 Apple Inc. All Rights Reserved.
APPENDIX A


     Code Listings


     This appendix provides listings for the two classes you define. The listings don’t show comments and other
     method implementations from the file templates.


HelloWorldAppDelegate

     The header file: HelloWorldAppDelegate.h
     #import <UIKit/UIKit.h>

     @class MyViewController;

     @interface HelloWorldAppDelegate : NSObject <UIApplicationDelegate> {
         UIWindow *window;
         MyViewController *myViewController;
     }

     @property (nonatomic, retain) IBOutlet UIWindow *window;
     @property (nonatomic, retain) MyViewController *myViewController;

     @end


     The implementation file: HelloWorldAppDelegate.m
     #import "MyViewController.h"
     #import "HelloWorldAppDelegate.h"

     @implementation HelloWorldAppDelegate

     @synthesize window;
     @synthesize myViewController;


     - (void)applicationDidFinishLaunching:(UIApplication *)application {

          MyViewController *aViewController = [[MyViewController alloc]
                    initWithNibName:@"MyViewController" bundle:[NSBundle mainBundle]];
          [self setMyViewController:aViewController];
          [aViewController release];

          UIView *controllersView = [myViewController view];
          [window addSubview:controllersView];
          [window makeKeyAndVisible];
     }


     HelloWorldAppDelegate                                                                                  49
     2009-10-08 | © 2009 Apple Inc. All Rights Reserved.
APPENDIX A
      Code Listings


      - (void)dealloc {
          [myViewController release];
          [window release];
          [super dealloc];
      }

      @end


MyViewController

      The header file: MyViewController.h
      #import <UIKit/UIKit.h>

      @interface MyViewController : UIViewController <UITextFieldDelegate> {
          UITextField *textField;
          UILabel *label;
          NSString *string;
      }

      @property (nonatomic, retain) IBOutlet UITextField *textField;
      @property (nonatomic, retain) IBOutlet UILabel *label;
      @property (nonatomic, copy) NSString *string;

      - (IBAction)changeGreeting:(id)sender;

      @end


      The implementation file: MyViewController.m
      #import "MyViewController.h"

      @implementation MyViewController

      @synthesize textField;
      @synthesize label;
      @synthesize string;

      - (IBAction)changeGreeting:(id)sender {

           self.string = textField.text;

          NSString *nameString = string;
          if ([nameString length] == 0) {
              nameString = @"World";
          }
          NSString *greeting = [[NSString alloc] initWithFormat:@"Hello, %@!",
      nameString];
          label.text = greeting;
          [greeting release];


50   MyViewController
      2009-10-08 | © 2009 Apple Inc. All Rights Reserved.
APPENDIX A
Code Listings


}

- (BOOL)textFieldShouldReturn:(UITextField *)theTextField {
    if (theTextField == textField) {
        [textField resignFirstResponder];
    }
    return YES;
}

- (void)dealloc {
    [textField release];
    [label release];
    [string release];
    [super dealloc];
}

// Other methods from the template omitted
@end


MyViewController                                              51
2009-10-08 | © 2009 Apple Inc. All Rights Reserved.
APPENDIX A
     Code Listings


52   MyViewController
     2009-10-08 | © 2009 Apple Inc. All Rights Reserved.
REVISION HISTORY


Document Revision History


This table describes the changes to Your First iPhone Application.

 Date                          Notes

 2009-10-08                    Emphasized need to connect text field in Interface Builder.

 2009-08-10                    Removed a reference to dot syntax for an example that used an accessor method
                               directly.

 2009-06-15                    Updated for iPhone OS 3.0.

 2009-01-06                    Corrected typographical errors.

 2008-10-15                    Clarified description of the target-action design pattern.

 2008-09-09                    Minor corrections and clarifications.

 2008-06-09                    New document that introduces application development for iPhone.


                                                                                                          53
2009-10-08 | © 2009 Apple Inc. All Rights Reserved.
REVISION HISTORY
     Document Revision History


54
     2009-10-08 | © 2009 Apple Inc. All Rights Reserved.

More Related Content

What's hot

Eo gaddis java_chapter_11_5e
Eo gaddis java_chapter_11_5eEo gaddis java_chapter_11_5e
Eo gaddis java_chapter_11_5eGina Bullock
 
Eo gaddis java_chapter_13_5e
Eo gaddis java_chapter_13_5eEo gaddis java_chapter_13_5e
Eo gaddis java_chapter_13_5eGina Bullock
 
Mobile os by waqas
Mobile os by waqasMobile os by waqas
Mobile os by waqas8neutron8
 
I phone human interface guidlines
I phone human interface guidlinesI phone human interface guidlines
I phone human interface guidlineszhuxiongjie
 
Supplement J Eclipse
Supplement J EclipseSupplement J Eclipse
Supplement J Eclipsenga
 
Oracle upk pocketguide
Oracle upk pocketguideOracle upk pocketguide
Oracle upk pocketguidejaydezr1975
 
Jmp103-Get the Jump on Mobilizing Your Notes and Domino Applications Today!
Jmp103-Get the Jump on Mobilizing Your Notes and Domino Applications Today!Jmp103-Get the Jump on Mobilizing Your Notes and Domino Applications Today!
Jmp103-Get the Jump on Mobilizing Your Notes and Domino Applications Today!Howard Greenberg
 
Titanium Studio [Updated - 18/12/2011]
Titanium Studio [Updated - 18/12/2011]Titanium Studio [Updated - 18/12/2011]
Titanium Studio [Updated - 18/12/2011]Sentinel Solutions Ltd
 
Building apps for multiple devices
Building apps for multiple devicesBuilding apps for multiple devices
Building apps for multiple devicesTerry Ryan
 
Hospital app project (how to upload app)
Hospital app project (how to upload app)Hospital app project (how to upload app)
Hospital app project (how to upload app)MAHFUZ RAIHAN
 
Titanium appcelerator sdk
Titanium appcelerator sdkTitanium appcelerator sdk
Titanium appcelerator sdkAlessio Ricco
 
Windows phone 8 session 2
Windows phone 8 session 2Windows phone 8 session 2
Windows phone 8 session 2hitesh chothani
 
worklight_development_environment
worklight_development_environmentworklight_development_environment
worklight_development_environmentAravindharamanan S
 
Apple Policy Prohibits Distributing Enterprise Certificate Apps To Non-Employees
Apple Policy Prohibits Distributing Enterprise Certificate Apps To Non-EmployeesApple Policy Prohibits Distributing Enterprise Certificate Apps To Non-Employees
Apple Policy Prohibits Distributing Enterprise Certificate Apps To Non-EmployeesJosh Constine
 

What's hot (17)

Eo gaddis java_chapter_11_5e
Eo gaddis java_chapter_11_5eEo gaddis java_chapter_11_5e
Eo gaddis java_chapter_11_5e
 
Eo gaddis java_chapter_13_5e
Eo gaddis java_chapter_13_5eEo gaddis java_chapter_13_5e
Eo gaddis java_chapter_13_5e
 
Iphone development
Iphone developmentIphone development
Iphone development
 
Mobile os by waqas
Mobile os by waqasMobile os by waqas
Mobile os by waqas
 
I phone human interface guidlines
I phone human interface guidlinesI phone human interface guidlines
I phone human interface guidlines
 
Supplement J Eclipse
Supplement J EclipseSupplement J Eclipse
Supplement J Eclipse
 
Oracle upk pocketguide
Oracle upk pocketguideOracle upk pocketguide
Oracle upk pocketguide
 
Cocoa fundamentalswert
Cocoa fundamentalswertCocoa fundamentalswert
Cocoa fundamentalswert
 
Jmp103-Get the Jump on Mobilizing Your Notes and Domino Applications Today!
Jmp103-Get the Jump on Mobilizing Your Notes and Domino Applications Today!Jmp103-Get the Jump on Mobilizing Your Notes and Domino Applications Today!
Jmp103-Get the Jump on Mobilizing Your Notes and Domino Applications Today!
 
Titanium Studio [Updated - 18/12/2011]
Titanium Studio [Updated - 18/12/2011]Titanium Studio [Updated - 18/12/2011]
Titanium Studio [Updated - 18/12/2011]
 
Building apps for multiple devices
Building apps for multiple devicesBuilding apps for multiple devices
Building apps for multiple devices
 
Hospital app project (how to upload app)
Hospital app project (how to upload app)Hospital app project (how to upload app)
Hospital app project (how to upload app)
 
Titanium appcelerator sdk
Titanium appcelerator sdkTitanium appcelerator sdk
Titanium appcelerator sdk
 
New Dot Net SDK
New Dot Net SDKNew Dot Net SDK
New Dot Net SDK
 
Windows phone 8 session 2
Windows phone 8 session 2Windows phone 8 session 2
Windows phone 8 session 2
 
worklight_development_environment
worklight_development_environmentworklight_development_environment
worklight_development_environment
 
Apple Policy Prohibits Distributing Enterprise Certificate Apps To Non-Employees
Apple Policy Prohibits Distributing Enterprise Certificate Apps To Non-EmployeesApple Policy Prohibits Distributing Enterprise Certificate Apps To Non-Employees
Apple Policy Prohibits Distributing Enterprise Certificate Apps To Non-Employees
 

Viewers also liked

Computer Programming Chapter 7: Object and Class
Computer Programming Chapter 7: Object and ClassComputer Programming Chapter 7: Object and Class
Computer Programming Chapter 7: Object and ClassAtit Patumvan
 
Pembebasan irian barat
Pembebasan irian baratPembebasan irian barat
Pembebasan irian barathermangenius
 
10 Insightful Quotes On Designing A Better Customer Experience
10 Insightful Quotes On Designing A Better Customer Experience10 Insightful Quotes On Designing A Better Customer Experience
10 Insightful Quotes On Designing A Better Customer ExperienceYuan Wang
 
Learn BEM: CSS Naming Convention
Learn BEM: CSS Naming ConventionLearn BEM: CSS Naming Convention
Learn BEM: CSS Naming ConventionIn a Rocket
 
How to Build a Dynamic Social Media Plan
How to Build a Dynamic Social Media PlanHow to Build a Dynamic Social Media Plan
How to Build a Dynamic Social Media PlanPost Planner
 
SEO: Getting Personal
SEO: Getting PersonalSEO: Getting Personal
SEO: Getting PersonalKirsty Hulse
 
Lightning Talk #9: How UX and Data Storytelling Can Shape Policy by Mika Aldaba
Lightning Talk #9: How UX and Data Storytelling Can Shape Policy by Mika AldabaLightning Talk #9: How UX and Data Storytelling Can Shape Policy by Mika Aldaba
Lightning Talk #9: How UX and Data Storytelling Can Shape Policy by Mika Aldabaux singapore
 

Viewers also liked (8)

Computer Programming Chapter 7: Object and Class
Computer Programming Chapter 7: Object and ClassComputer Programming Chapter 7: Object and Class
Computer Programming Chapter 7: Object and Class
 
Pembebasan irian barat
Pembebasan irian baratPembebasan irian barat
Pembebasan irian barat
 
10 Insightful Quotes On Designing A Better Customer Experience
10 Insightful Quotes On Designing A Better Customer Experience10 Insightful Quotes On Designing A Better Customer Experience
10 Insightful Quotes On Designing A Better Customer Experience
 
Learn BEM: CSS Naming Convention
Learn BEM: CSS Naming ConventionLearn BEM: CSS Naming Convention
Learn BEM: CSS Naming Convention
 
How to Build a Dynamic Social Media Plan
How to Build a Dynamic Social Media PlanHow to Build a Dynamic Social Media Plan
How to Build a Dynamic Social Media Plan
 
SEO: Getting Personal
SEO: Getting PersonalSEO: Getting Personal
SEO: Getting Personal
 
Lightning Talk #9: How UX and Data Storytelling Can Shape Policy by Mika Aldaba
Lightning Talk #9: How UX and Data Storytelling Can Shape Policy by Mika AldabaLightning Talk #9: How UX and Data Storytelling Can Shape Policy by Mika Aldaba
Lightning Talk #9: How UX and Data Storytelling Can Shape Policy by Mika Aldaba
 
Succession “Losers”: What Happens to Executives Passed Over for the CEO Job?
Succession “Losers”: What Happens to Executives Passed Over for the CEO Job? Succession “Losers”: What Happens to Executives Passed Over for the CEO Job?
Succession “Losers”: What Happens to Executives Passed Over for the CEO Job?
 

Similar to Dev101

Info plistkeyreference
Info plistkeyreferenceInfo plistkeyreference
Info plistkeyreferenceywego
 
Oracle Cloud native functions - create application from cli
Oracle Cloud native functions - create application from cliOracle Cloud native functions - create application from cli
Oracle Cloud native functions - create application from cliJohan Louwers
 
I phone first app ducat
I phone first app ducatI phone first app ducat
I phone first app ducatPragati Singh
 
Get the Jump on Mobilizing your Notes and Domino Applications Today! (JMP103...
Get the Jump on Mobilizing your Notes and Domino Applications Today!  (JMP103...Get the Jump on Mobilizing your Notes and Domino Applications Today!  (JMP103...
Get the Jump on Mobilizing your Notes and Domino Applications Today! (JMP103...Paul Della-Nebbia
 
IBM Collaboration Solutions Application Development - Frequently Asked Questions
IBM Collaboration Solutions Application Development - Frequently Asked QuestionsIBM Collaboration Solutions Application Development - Frequently Asked Questions
IBM Collaboration Solutions Application Development - Frequently Asked QuestionsNiklas Heidloff
 
Building Mobile Apps: A PhoneGap Enterprise Introduction for Developers
Building Mobile Apps: A PhoneGap Enterprise Introduction for DevelopersBuilding Mobile Apps: A PhoneGap Enterprise Introduction for Developers
Building Mobile Apps: A PhoneGap Enterprise Introduction for Developersarumsey
 
Concierge: Bringing OSGi (Back) to Embedded Devices
Concierge: Bringing OSGi (Back) to Embedded DevicesConcierge: Bringing OSGi (Back) to Embedded Devices
Concierge: Bringing OSGi (Back) to Embedded DevicesJan S. Rellermeyer
 
Dr. Strangelove, or how I learned to love plugin development
Dr. Strangelove, or how I learned to love plugin developmentDr. Strangelove, or how I learned to love plugin development
Dr. Strangelove, or how I learned to love plugin developmentUlrich Krause
 
Making apps for the Apple TV
Making apps for the Apple TVMaking apps for the Apple TV
Making apps for the Apple TVSally Shepard
 
Codemotion rome 2015 bluemix lab tutorial -- Codemotion Rome 2015
Codemotion rome 2015   bluemix lab tutorial -- Codemotion Rome 2015Codemotion rome 2015   bluemix lab tutorial -- Codemotion Rome 2015
Codemotion rome 2015 bluemix lab tutorial -- Codemotion Rome 2015Codemotion
 
Starting mobile development
Starting mobile developmentStarting mobile development
Starting mobile developmentMihai Corlan
 

Similar to Dev101 (20)

Drugs
DrugsDrugs
Drugs
 
Oop obj c
Oop obj cOop obj c
Oop obj c
 
Info plistkeyreference
Info plistkeyreferenceInfo plistkeyreference
Info plistkeyreference
 
Oracle Cloud native functions - create application from cli
Oracle Cloud native functions - create application from cliOracle Cloud native functions - create application from cli
Oracle Cloud native functions - create application from cli
 
I phone first app ducat
I phone first app ducatI phone first app ducat
I phone first app ducat
 
Open sap ui5 - week_2 unit_1_syjewa_exercises
Open sap ui5  - week_2 unit_1_syjewa_exercisesOpen sap ui5  - week_2 unit_1_syjewa_exercises
Open sap ui5 - week_2 unit_1_syjewa_exercises
 
Get the Jump on Mobilizing your Notes and Domino Applications Today! (JMP103...
Get the Jump on Mobilizing your Notes and Domino Applications Today!  (JMP103...Get the Jump on Mobilizing your Notes and Domino Applications Today!  (JMP103...
Get the Jump on Mobilizing your Notes and Domino Applications Today! (JMP103...
 
IBM MobileFirst Platform v7.0 Pot Intro v0.1
IBM MobileFirst Platform v7.0 Pot Intro v0.1IBM MobileFirst Platform v7.0 Pot Intro v0.1
IBM MobileFirst Platform v7.0 Pot Intro v0.1
 
IBM MobileFirst Platform v7.0 pot intro v0.1
IBM MobileFirst Platform v7.0 pot intro v0.1IBM MobileFirst Platform v7.0 pot intro v0.1
IBM MobileFirst Platform v7.0 pot intro v0.1
 
flex_4_tutorials
flex_4_tutorialsflex_4_tutorials
flex_4_tutorials
 
flex_4_tutorials
flex_4_tutorialsflex_4_tutorials
flex_4_tutorials
 
IBM Collaboration Solutions Application Development - Frequently Asked Questions
IBM Collaboration Solutions Application Development - Frequently Asked QuestionsIBM Collaboration Solutions Application Development - Frequently Asked Questions
IBM Collaboration Solutions Application Development - Frequently Asked Questions
 
Building Mobile Apps: A PhoneGap Enterprise Introduction for Developers
Building Mobile Apps: A PhoneGap Enterprise Introduction for DevelopersBuilding Mobile Apps: A PhoneGap Enterprise Introduction for Developers
Building Mobile Apps: A PhoneGap Enterprise Introduction for Developers
 
Concierge: Bringing OSGi (Back) to Embedded Devices
Concierge: Bringing OSGi (Back) to Embedded DevicesConcierge: Bringing OSGi (Back) to Embedded Devices
Concierge: Bringing OSGi (Back) to Embedded Devices
 
jfx
jfxjfx
jfx
 
Dr. Strangelove, or how I learned to love plugin development
Dr. Strangelove, or how I learned to love plugin developmentDr. Strangelove, or how I learned to love plugin development
Dr. Strangelove, or how I learned to love plugin development
 
Making apps for the Apple TV
Making apps for the Apple TVMaking apps for the Apple TV
Making apps for the Apple TV
 
Codemotion rome 2015 bluemix lab tutorial -- Codemotion Rome 2015
Codemotion rome 2015   bluemix lab tutorial -- Codemotion Rome 2015Codemotion rome 2015   bluemix lab tutorial -- Codemotion Rome 2015
Codemotion rome 2015 bluemix lab tutorial -- Codemotion Rome 2015
 
Starting mobile development
Starting mobile developmentStarting mobile development
Starting mobile development
 
I phone versus windows phone 7 coding
I phone versus windows phone 7 codingI phone versus windows phone 7 coding
I phone versus windows phone 7 coding
 

Recently uploaded

Introduction to AI in Higher Education_draft.pptx
Introduction to AI in Higher Education_draft.pptxIntroduction to AI in Higher Education_draft.pptx
Introduction to AI in Higher Education_draft.pptxpboyjonauth
 
The basics of sentences session 2pptx copy.pptx
The basics of sentences session 2pptx copy.pptxThe basics of sentences session 2pptx copy.pptx
The basics of sentences session 2pptx copy.pptxheathfieldcps1
 
Micromeritics - Fundamental and Derived Properties of Powders
Micromeritics - Fundamental and Derived Properties of PowdersMicromeritics - Fundamental and Derived Properties of Powders
Micromeritics - Fundamental and Derived Properties of PowdersChitralekhaTherkar
 
18-04-UA_REPORT_MEDIALITERAСY_INDEX-DM_23-1-final-eng.pdf
18-04-UA_REPORT_MEDIALITERAСY_INDEX-DM_23-1-final-eng.pdf18-04-UA_REPORT_MEDIALITERAСY_INDEX-DM_23-1-final-eng.pdf
18-04-UA_REPORT_MEDIALITERAСY_INDEX-DM_23-1-final-eng.pdfssuser54595a
 
Presiding Officer Training module 2024 lok sabha elections
Presiding Officer Training module 2024 lok sabha electionsPresiding Officer Training module 2024 lok sabha elections
Presiding Officer Training module 2024 lok sabha electionsanshu789521
 
Measures of Central Tendency: Mean, Median and Mode
Measures of Central Tendency: Mean, Median and ModeMeasures of Central Tendency: Mean, Median and Mode
Measures of Central Tendency: Mean, Median and ModeThiyagu K
 
_Math 4-Q4 Week 5.pptx Steps in Collecting Data
_Math 4-Q4 Week 5.pptx Steps in Collecting Data_Math 4-Q4 Week 5.pptx Steps in Collecting Data
_Math 4-Q4 Week 5.pptx Steps in Collecting DataJhengPantaleon
 
Software Engineering Methodologies (overview)
Software Engineering Methodologies (overview)Software Engineering Methodologies (overview)
Software Engineering Methodologies (overview)eniolaolutunde
 
Organic Name Reactions for the students and aspirants of Chemistry12th.pptx
Organic Name Reactions  for the students and aspirants of Chemistry12th.pptxOrganic Name Reactions  for the students and aspirants of Chemistry12th.pptx
Organic Name Reactions for the students and aspirants of Chemistry12th.pptxVS Mahajan Coaching Centre
 
Crayon Activity Handout For the Crayon A
Crayon Activity Handout For the Crayon ACrayon Activity Handout For the Crayon A
Crayon Activity Handout For the Crayon AUnboundStockton
 
MENTAL STATUS EXAMINATION format.docx
MENTAL     STATUS EXAMINATION format.docxMENTAL     STATUS EXAMINATION format.docx
MENTAL STATUS EXAMINATION format.docxPoojaSen20
 
“Oh GOSH! Reflecting on Hackteria's Collaborative Practices in a Global Do-It...
“Oh GOSH! Reflecting on Hackteria's Collaborative Practices in a Global Do-It...“Oh GOSH! Reflecting on Hackteria's Collaborative Practices in a Global Do-It...
“Oh GOSH! Reflecting on Hackteria's Collaborative Practices in a Global Do-It...Marc Dusseiller Dusjagr
 
Kisan Call Centre - To harness potential of ICT in Agriculture by answer farm...
Kisan Call Centre - To harness potential of ICT in Agriculture by answer farm...Kisan Call Centre - To harness potential of ICT in Agriculture by answer farm...
Kisan Call Centre - To harness potential of ICT in Agriculture by answer farm...Krashi Coaching
 
Employee wellbeing at the workplace.pptx
Employee wellbeing at the workplace.pptxEmployee wellbeing at the workplace.pptx
Employee wellbeing at the workplace.pptxNirmalaLoungPoorunde1
 
BASLIQ CURRENT LOOKBOOK LOOKBOOK(1) (1).pdf
BASLIQ CURRENT LOOKBOOK  LOOKBOOK(1) (1).pdfBASLIQ CURRENT LOOKBOOK  LOOKBOOK(1) (1).pdf
BASLIQ CURRENT LOOKBOOK LOOKBOOK(1) (1).pdfSoniaTolstoy
 
How to Make a Pirate ship Primary Education.pptx
How to Make a Pirate ship Primary Education.pptxHow to Make a Pirate ship Primary Education.pptx
How to Make a Pirate ship Primary Education.pptxmanuelaromero2013
 
CARE OF CHILD IN INCUBATOR..........pptx
CARE OF CHILD IN INCUBATOR..........pptxCARE OF CHILD IN INCUBATOR..........pptx
CARE OF CHILD IN INCUBATOR..........pptxGaneshChakor2
 

Recently uploaded (20)

Introduction to AI in Higher Education_draft.pptx
Introduction to AI in Higher Education_draft.pptxIntroduction to AI in Higher Education_draft.pptx
Introduction to AI in Higher Education_draft.pptx
 
The basics of sentences session 2pptx copy.pptx
The basics of sentences session 2pptx copy.pptxThe basics of sentences session 2pptx copy.pptx
The basics of sentences session 2pptx copy.pptx
 
Staff of Color (SOC) Retention Efforts DDSD
Staff of Color (SOC) Retention Efforts DDSDStaff of Color (SOC) Retention Efforts DDSD
Staff of Color (SOC) Retention Efforts DDSD
 
Micromeritics - Fundamental and Derived Properties of Powders
Micromeritics - Fundamental and Derived Properties of PowdersMicromeritics - Fundamental and Derived Properties of Powders
Micromeritics - Fundamental and Derived Properties of Powders
 
18-04-UA_REPORT_MEDIALITERAСY_INDEX-DM_23-1-final-eng.pdf
18-04-UA_REPORT_MEDIALITERAСY_INDEX-DM_23-1-final-eng.pdf18-04-UA_REPORT_MEDIALITERAСY_INDEX-DM_23-1-final-eng.pdf
18-04-UA_REPORT_MEDIALITERAСY_INDEX-DM_23-1-final-eng.pdf
 
Presiding Officer Training module 2024 lok sabha elections
Presiding Officer Training module 2024 lok sabha electionsPresiding Officer Training module 2024 lok sabha elections
Presiding Officer Training module 2024 lok sabha elections
 
Measures of Central Tendency: Mean, Median and Mode
Measures of Central Tendency: Mean, Median and ModeMeasures of Central Tendency: Mean, Median and Mode
Measures of Central Tendency: Mean, Median and Mode
 
TataKelola dan KamSiber Kecerdasan Buatan v022.pdf
TataKelola dan KamSiber Kecerdasan Buatan v022.pdfTataKelola dan KamSiber Kecerdasan Buatan v022.pdf
TataKelola dan KamSiber Kecerdasan Buatan v022.pdf
 
_Math 4-Q4 Week 5.pptx Steps in Collecting Data
_Math 4-Q4 Week 5.pptx Steps in Collecting Data_Math 4-Q4 Week 5.pptx Steps in Collecting Data
_Math 4-Q4 Week 5.pptx Steps in Collecting Data
 
Software Engineering Methodologies (overview)
Software Engineering Methodologies (overview)Software Engineering Methodologies (overview)
Software Engineering Methodologies (overview)
 
Organic Name Reactions for the students and aspirants of Chemistry12th.pptx
Organic Name Reactions  for the students and aspirants of Chemistry12th.pptxOrganic Name Reactions  for the students and aspirants of Chemistry12th.pptx
Organic Name Reactions for the students and aspirants of Chemistry12th.pptx
 
Crayon Activity Handout For the Crayon A
Crayon Activity Handout For the Crayon ACrayon Activity Handout For the Crayon A
Crayon Activity Handout For the Crayon A
 
MENTAL STATUS EXAMINATION format.docx
MENTAL     STATUS EXAMINATION format.docxMENTAL     STATUS EXAMINATION format.docx
MENTAL STATUS EXAMINATION format.docx
 
“Oh GOSH! Reflecting on Hackteria's Collaborative Practices in a Global Do-It...
“Oh GOSH! Reflecting on Hackteria's Collaborative Practices in a Global Do-It...“Oh GOSH! Reflecting on Hackteria's Collaborative Practices in a Global Do-It...
“Oh GOSH! Reflecting on Hackteria's Collaborative Practices in a Global Do-It...
 
Kisan Call Centre - To harness potential of ICT in Agriculture by answer farm...
Kisan Call Centre - To harness potential of ICT in Agriculture by answer farm...Kisan Call Centre - To harness potential of ICT in Agriculture by answer farm...
Kisan Call Centre - To harness potential of ICT in Agriculture by answer farm...
 
Model Call Girl in Bikash Puri Delhi reach out to us at 🔝9953056974🔝
Model Call Girl in Bikash Puri  Delhi reach out to us at 🔝9953056974🔝Model Call Girl in Bikash Puri  Delhi reach out to us at 🔝9953056974🔝
Model Call Girl in Bikash Puri Delhi reach out to us at 🔝9953056974🔝
 
Employee wellbeing at the workplace.pptx
Employee wellbeing at the workplace.pptxEmployee wellbeing at the workplace.pptx
Employee wellbeing at the workplace.pptx
 
BASLIQ CURRENT LOOKBOOK LOOKBOOK(1) (1).pdf
BASLIQ CURRENT LOOKBOOK  LOOKBOOK(1) (1).pdfBASLIQ CURRENT LOOKBOOK  LOOKBOOK(1) (1).pdf
BASLIQ CURRENT LOOKBOOK LOOKBOOK(1) (1).pdf
 
How to Make a Pirate ship Primary Education.pptx
How to Make a Pirate ship Primary Education.pptxHow to Make a Pirate ship Primary Education.pptx
How to Make a Pirate ship Primary Education.pptx
 
CARE OF CHILD IN INCUBATOR..........pptx
CARE OF CHILD IN INCUBATOR..........pptxCARE OF CHILD IN INCUBATOR..........pptx
CARE OF CHILD IN INCUBATOR..........pptx
 

Dev101

  • 1. Your First iPhone Application General 2009-10-08
  • 2. IN NO EVENT WILL APPLE BE LIABLE FOR DIRECT, INDIRECT, SPECIAL, INCIDENTAL, OR Apple Inc. CONSEQUENTIAL DAMAGES RESULTING FROM ANY © 2009 Apple Inc. DEFECT OR INACCURACY IN THIS DOCUMENT, even if advised of the possibility of such damages. All rights reserved. THE WARRANTY AND REMEDIES SET FORTH ABOVE ARE EXCLUSIVE AND IN LIEU OF ALL OTHERS, ORAL No part of this publication may be reproduced, OR WRITTEN, EXPRESS OR IMPLIED. No Apple stored in a retrieval system, or transmitted, in dealer, agent, or employee is authorized to make any modification, extension, or addition to this any form or by any means, mechanical, warranty. electronic, photocopying, recording, or Some states do not allow the exclusion or limitation otherwise, without prior written permission of of implied warranties or liability for incidental or consequential damages, so the above limitation or Apple Inc., with the following exceptions: Any exclusion may not apply to you. This warranty gives person is hereby authorized to store you specific legal rights, and you may also have documentation on a single computer for other rights which vary from state to state. personal use only and to print copies of documentation for personal use provided that the documentation contains Apple’s copyright notice. The Apple logo is a trademark of Apple Inc. Use of the “keyboard” Apple logo (Option-Shift-K) for commercial purposes without the prior written consent of Apple may constitute trademark infringement and unfair competition in violation of federal and state laws. No licenses, express or implied, are granted with respect to any of the technology described in this document. Apple retains all intellectual property rights associated with the technology described in this document. This document is intended to assist application developers to develop applications only for Apple-labeled computers. Every effort has been made to ensure that the information in this document is accurate. Apple is not responsible for typographical errors. Apple Inc. 1 Infinite Loop Cupertino, CA 95014 408-996-1010 Apple, the Apple logo, Cocoa, iPod, Mac, Objective-C, and Xcode are trademarks of Apple Inc., registered in the United States and other countries. Instruments and iPhone are trademarks of Apple Inc. Simultaneously published in the United States and Canada. Even though Apple has reviewed this document, APPLE MAKES NO WARRANTY OR REPRESENTATION, EITHER EXPRESS OR IMPLIED, WITH RESPECT TO THIS DOCUMENT, ITS QUALITY, ACCURACY, MERCHANTABILITY, OR FITNESS FOR A PARTICULAR PURPOSE. AS A RESULT, THIS DOCUMENT IS PROVIDED “AS IS,” AND YOU, THE READER, ARE ASSUMING THE ENTIRE RISK AS TO ITS QUALITY AND ACCURACY.
  • 3. Contents Introduction Introduction 7 Organization of This Document 7 Chapter 1 Tutorial Overview and Design Patterns 9 Tutorial Overview 9 Design Patterns 10 Delegation 10 Model-View-Controller 10 Target-Action 11 Chapter 2 Creating Your Project 13 Xcode 13 Application Bootstrapping 15 Recap 18 Chapter 3 Adding a View Controller 19 Adding a View Controller Class 19 Adding a View Controller Property 20 Creating the View Controller Instance 21 Setting Up the View 23 Housekeeping 23 Implementation Source Listing 24 Test the Application 24 Recap 25 Chapter 4 Inspecting the Nib File 27 Interface Builder 27 Inspect the Nib File 27 File’s Owner 28 The View Outlet 29 Loading the Nib File 30 Test the Application 30 Recap 31 Chapter 5 Configuring the View 33 Adding the User Interface Elements 33 3 2009-10-08 | © 2009 Apple Inc. All Rights Reserved.
  • 4. CONTENTS The View Controller Interface Declaration 36 Making Connections 37 Testing 39 Recap 40 Chapter 6 Implementing the View Controller 41 The Properties 41 The changeGreeting: Method 41 The Text Field’s Delegate 42 Recap 43 Chapter 7 Troubleshooting 45 Code and Compiler Warnings 45 Check Connections in the Nib Files 45 Delegate Method Names 45 Chapter 8 Where to Next? 47 The User Interface 47 Creating User Interface Elements Programmatically 47 Installing on a Device 48 Additional Functionality 48 Appendix A Code Listings 49 HelloWorldAppDelegate 49 The header file: HelloWorldAppDelegate.h 49 The implementation file: HelloWorldAppDelegate.m 49 MyViewController 50 The header file: MyViewController.h 50 The implementation file: MyViewController.m 50 Document Revision History 53 4 2009-10-08 | © 2009 Apple Inc. All Rights Reserved.
  • 5. Figures Chapter 2 Creating Your Project 13 Figure 2-1 Application bootstrapping 16 Chapter 3 Adding a View Controller 19 Figure 3-1 MyViewController 20 Chapter 5 Configuring the View 33 Figure 5-1 View containing user interface elements and showing a guide line 34 5 2009-10-08 | © 2009 Apple Inc. All Rights Reserved.
  • 6. FIGURES 6 2009-10-08 | © 2009 Apple Inc. All Rights Reserved.
  • 7. INTRODUCTION Introduction This tutorial shows how to create a simple iPhone application. It is not intended to give complete coverage of all the features available, but rather to introduce some of the technologies and give you a grounding in the fundamentals of the development process. You should read this document if you are just starting development with iPhone using Cocoa Touch. You should already have some familiarity with the basics of computer programming in general and the Objective-C language in particular. If you haven’t used Objective-C before, read through at least Learning Objective-C: A Primer. The goal here is not to create a finely polished application, but to illustrate: ■ How you create and manage a project using Xcode ■ The fundamental design patterns and techniques that underlie all iPhone development ■ The basics of using Interface Builder ■ How to make your application respond to user input using standard user interface controls A secondary goal is to point out other documents that you must also read to fully understand the iPhone development tools and techniques. Important: To follow this tutorial, you must have installed the iPhone SDK and developer tools available from the iPhone Dev Center. This document describes the tools that are available for iPhone SDK v3.0—check that your version of Xcode is at least 3.1.3. Organization of This Document The document is split into the following chapters: ■ “Tutorial Overview and Design Patterns” (page 9) ■ “Creating Your Project” (page 13) ■ “Adding a View Controller” (page 19) ■ “Inspecting the Nib File” (page 27) ■ “Configuring the View” (page 33) ■ “Implementing the View Controller” (page 41) ■ “Troubleshooting” (page 45) ■ “Where to Next?” (page 47) Organization of This Document 7 2009-10-08 | © 2009 Apple Inc. All Rights Reserved.
  • 8. INTRODUCTION Introduction 8 Organization of This Document 2009-10-08 | © 2009 Apple Inc. All Rights Reserved.
  • 9. CHAPTER 1 Tutorial Overview and Design Patterns This chapter provides an overview of the application you’re going to create and the design patterns you’ll use. Tutorial Overview In this tutorial, you’re going to create a very simple application. It has a text field, a label, and a button. You can type your name into the text field then press the button and the label’s text will be updated to show “Hello, <Name>!”: Even though this is a very simple application, it introduces the fundamental design patterns, tools, and techniques that underlie all iPhone development using Cocoa Touch. Cocoa Touch comprises the UIKit and Foundation frameworks which provide the basic tools and infrastructure you need to implement graphical, event-driven applications in iPhone OS. It also includes several other frameworks that provide key services for accessing device features, such as the user’s contacts. To learn more about Cocoa Touch and where it fits into the iPhone OS, read iPhone OS Technology Overview. The main patterns you’re going to use are described in “Design Patterns” (page 10). Tutorial Overview 9 2009-10-08 | © 2009 Apple Inc. All Rights Reserved.
  • 10. CHAPTER 1 Tutorial Overview and Design Patterns In this tutorial, little regard is given to the user interface. Presentation is, however, a critical component of a successful iPhone application. You should read the iPhone Human Interface Guidelines and explore the sample code based on this tutorial (HelloWorld) to understand how the user interface might be improved for a full-fledged application. You’ll also start to gain an understanding of how view controllers work and how they fit into the architecture of an iPhone application. Design Patterns If you haven’t already, you should make sure you read the design patterns chapter in Cocoa Fundamentals Guide, however the main patterns you’re going to use are: ■ Delegation ■ Model View Controller ■ Target-Action Here’s a quick summary of these patterns and an indication of where they’ll be used in the application. Delegation Delegation is a pattern where one object periodically sends messages to another object specified as its delegate to ask for input or to notify the delegate that an event is occurring. You use it as an alternative to class inheritance for extending the functionality of reusable objects. In this application, the application object tells its delegate that the main start-up routines have finished and that the custom configuration can begin. For this application, you want the delegate to create an instance of a controller to set up and manage the view. In addition, the text field will tell its delegate (which in this case will be the same controller) when the user has tapped the Return key. Delegate methods are typically grouped together into a protocol. A protocol is basically just a list of methods. If a class conforms to a protocol, it guarantees that it implements the required (some may be optional) methods of a protocol. The delegate protocol specifies all the messages an object might send to its delegate. To learn more about protocols and the role they play in Objective-C, see the Protocols chapter in The Objective-C Programming Language. Model-View-Controller The Model-View-Controller (or “MVC”) design pattern sets out three roles for objects in an application. Model objects represent data such as SpaceShips and Rockets in a game, ToDo items and Contacts in a productivity application, or Circles and Squares in a drawing application. In this application, the model is very simple—just a string—and it’s not actually used outside of a single method, so strictly speaking it’s not even necessary. It’s the principle that’s important here, though. In other applications the model will be more complicated and accessed from a variety of locations. 10 Design Patterns 2009-10-08 | © 2009 Apple Inc. All Rights Reserved.
  • 11. CHAPTER 1 Tutorial Overview and Design Patterns View objects know how to display data (model objects) and may allow the user to edit the data. In this application, you need a main view to contain several other views—a text field to capture information from the user, a second text field to display text based on the user’s input, and a button to let the user tell us that the secondary text should be updated. Controller objects mediate between models and views. In this application, the controller object takes the data from the input text field, store it in a string, and update a second text field appropriately. The update is initiated as a result of an action sent by the button. Target-Action The target-action mechanism enables a control object—that is, an object such as a button or slider—in response to a user event (such as a click or a tap) to send a message (the action) to another object (the target) that can interpret the message and handle it as an application-specific instruction. In this application, when it’s tapped, a button tells the controller to update its model and view based on the user’s input. Design Patterns 11 2009-10-08 | © 2009 Apple Inc. All Rights Reserved.
  • 12. CHAPTER 1 Tutorial Overview and Design Patterns 12 Design Patterns 2009-10-08 | © 2009 Apple Inc. All Rights Reserved.
  • 13. CHAPTER 2 Creating Your Project In this first chapter, you create the project using Xcode and find out how an application launches. Xcode The main tool you use to create applications for iPhone is Xcode—Apple’s IDE (integrated development environment). You can also use it to create a variety of other project types, including Cocoa and command-line utilities. Note: As a convention, >> denotes the beginning of a paragraph (sometimes including the following bulleted list) that contains steps that you must perform in the tutorial. In code listings, comments included in Xcode template files are not shown. >> Launch Xcode (by default it’s in /Developer/Applications), then create a new project by choosing File > New Project. You should see a new window similar to this: Xcode 13 2009-10-08 | © 2009 Apple Inc. All Rights Reserved.
  • 14. CHAPTER 2 Creating Your Project Note: If you don’t see the “Use Core Data for storage” option, make sure you have installed version 3.0 of the iPhone OS SDK—you should have Xcode version 3.1.3 or later. >> Select the Window-Based Application and click Choose. (Do not select the option to use Core Data for storage. You don’t use Core Data in this example.) A sheet appears to allow you to select where your project will be saved. >> Select a suitable location for your project (such as the Desktop or a custom Projects directory), then give the project a name—HelloWorld—and click Save. Note: The remainder of the tutorial assumes that you named the project HelloWorld, so the application delegate class is called HelloWorldAppDelegate. If you name your project something else, then the application delegate class will be called YourProjectNameAppDelegate. You should see a new project window like this: 14 Xcode 2009-10-08 | © 2009 Apple Inc. All Rights Reserved.
  • 15. CHAPTER 2 Creating Your Project If you haven’t used Xcode before, take a moment to explore the application. You should read Xcode Workspace Guide to understand the organization of the project window and how to perform basic tasks like editing and saving files. You can now build and run the application to see what the Simulator looks like. >> Choose Build > Build and Go (Run) or click the Build and Go button in the toolbar. The iPhone Simulator application should launch automatically, and when your application starts up you should simply see a white screen. To understand where the white screen came from, you need to understand how the application starts up. >> Quit the Simulator. Application Bootstrapping The template project you created already sets up the basic application environment. It creates an application object, connects to the window server, establishes the run loop, and so on. Most of the work is done by the UIApplicationMain function as illustrated in Figure 2-1. Application Bootstrapping 15 2009-10-08 | © 2009 Apple Inc. All Rights Reserved.
  • 16. CHAPTER 2 Creating Your Project Figure 2-1 Application bootstrapping <UIApplicationMain> Looks at UIApplication info.plist <MainNibFile> = “Main Window” The main function in main.m calls the UIApplicationMain function: int retVal = UIApplicationMain(argc, argv, nil, nil); This creates an instance of UIApplication. It also scans the application’s Info.plist property list file. The Info.plist file is a dictionary that contains information about the application such as its name and icon. It may contain the name of the nib file the application object should load, specified by the NSMainNibFile key. Nib files contain an archive of user interface elements and other objects—you’ll learn more about them later in the tutorial. In your project’s Info.plist file you should see: <key>NSMainNibFile</key> <string>MainWindow</string> This means that when the application launches, the MainWindow nib file is loaded. >> To look at the nib file, double-click MainWindow.xib in the Resources group in the project window (the file has the extension “xib” but by convention it is referred to as a “nib file”). Interface Builder launches and opens the file. 16 Application Bootstrapping 2009-10-08 | © 2009 Apple Inc. All Rights Reserved.
  • 17. CHAPTER 2 Creating Your Project The Interface Builder document contains four items: ■ A File’s Owner proxy object. The File’s Owner object is actually the UIApplication instance—File’s Owner will be discussed later, in “File’s Owner” (page 28). ■ A First Responder proxy object. The First Responder is not used in this tutorial but you can learn more about it by reading Event Handling in iPhone Application Programming Guide. ■ An instance of HelloWorldAppDelegate set to be the application's delegate. Delegates will be discussed in the next section. ■ A window. The window has its background set to white and is set to be visible at launch. It’s this window that you see when the application launches. After the application has finished launching, you can perform additional customization. A common pattern—and the one you’ll follow in the next chapter—is illustrated in this diagram: Application Bootstrapping 17 2009-10-08 | © 2009 Apple Inc. All Rights Reserved.
  • 18. CHAPTER 2 Creating Your Project applicationDidFinishLaunching: 1 Create UIViewController 2 Get UIViewController’s view UIApplication 3 Put view in window Delegate 2 MyViewController 1 3 view LoadView (Loads nib file) When the application object has completed its setup, it sends its delegate an applicationDidFinishLaunching: message. Rather than configuring the user interface itself, the delegate typically creates a view controller object (a special controller responsible for managing a view—this adheres to the model-view-controller design pattern as described in “Model-View-Controller” (page 10)). The delegate asks the view controller for its view (which the view controller creates on demand) and adds that as a subview of the window. Recap In this chapter you created a new project and learned about how the application launch process works. In the next chapter, you’ll define and create an instance of a view controller. 18 Recap 2009-10-08 | © 2009 Apple Inc. All Rights Reserved.
  • 19. CHAPTER 3 Adding a View Controller In this application you’ll need two classes. Xcode’s application template provided an application delegate class and an instance is created in the nib file. You need to implement a view controller class and create an instance of it. Adding a View Controller Class View controller objects play a central role in most iPhone applications. As the name implies, they’re responsible for managing a view, but on iPhone they also help with navigation and memory management. You’re not going to use the latter features here, but it’s important to be aware of them for future development. UIKit provides a special class—UIViewController—that encapsulates most of the default behavior you want from a view controller. You have to create a subclass to customize the behavior for your application. >> In Xcode, in the project organizer select either the project (HelloWorld at the top of the Groups and Files list) or the Classes group folder—the new files will be added to the current selection. >> Choose File > New File and in the New File window. Select the Cocoa Touch Classes group, then select UIViewController subclass. In the Options section, choose With XIB for user interface. Adding a View Controller Class 19 2009-10-08 | © 2009 Apple Inc. All Rights Reserved.
  • 20. CHAPTER 3 Adding a View Controller Note: If you don’t see the “With XIB for user interface” option, make sure you have installed version 3.0 of the iPhone OS SDK—Xcode should show version 3.1.3 or later. Selecting “With XIB for user interface” means that Xcode creates a nib file to accompany the view controller, and adds it to the project. (Nib files are discussed in detail in the next chapter.) >> Click Next, and in the following screen give the file a new name such as MyViewController (by convention, class names begin with a capital letter). Make sure that both the .m and .h files are created and that the files are added to your project, as shown here: Figure 3-1 MyViewController >> Press Finish and make sure that the files were added to your project. If you look at the new source files, you’ll see that stub implementations of various methods are already given to you. These are all you need for the moment; the next task is to create an instance of the class. Adding a View Controller Property You want to make sure that the view controller lasts for the lifetime of the application, so it makes sense to add it as an instance variable of the application delegate (which will also last for the lifetime of the application). (To understand why, consult Memory Management Programming Guide for Cocoa.) The instance variable will be an instance of the MyViewController class. The compiler will generate an error, though, if you declare the variable but you don’t tell it about the MyViewController class. You could import the header file, but typically in Cocoa you instead provide a forward declaration—a promise to the 20 Adding a View Controller Property 2009-10-08 | © 2009 Apple Inc. All Rights Reserved.
  • 21. CHAPTER 3 Adding a View Controller compiler that MyViewController will be defined somewhere else and that it needn’t waste time checking for it now. (Doing this also avoids circularities if two classes need to refer to each other and would otherwise include each other’s header files.) You then import the header file itself in the implementation file. >> In the application delegate’s header file (HelloWorldAppDelegate.h), add this forward declaration before the interface declaration for HelloWorldAppDelegate: @class MyViewController; >> Add the instance variable by adding the following line between the braces: MyViewController *myViewController; >> Add a declaration for this property after the closing brace but before @end: @property (nonatomic, retain) MyViewController *myViewController; Important: Like C, Objective-C is case-sensitive. MyViewController refers to a class; myViewController is a variable that here contains an instance of MyViewController. When writing code, make sure you use the appropriate symbol. Properties are described in the Declared Properties chapter in The Objective-C Programming Language. Basically, though, this declaration specifies that an instance of HelloWorldAppDelegate has a property that you can access using the getter and setter methods myViewController and setMyViewController: respectively, and that the instance retains the property (retaining is discussed in more detail later). To make sure you’re on track, confirm that your HelloWorldAppDelegate class interface file (HelloWorldAppDelegate.h) looks like this (comments are not shown): #import <UIKit/UIKit.h> @class MyViewController; @interface HelloWorldAppDelegate : NSObject <UIApplicationDelegate> { UIWindow *window; MyViewController *myViewController; } @property (nonatomic, retain) IBOutlet UIWindow *window; @property (nonatomic, retain) MyViewController *myViewController; @end You can now create an instance of the view controller. Creating the View Controller Instance Now that you’ve added the view controller property to the application delegate, you need to actually create an instance of the view controller and set it as the value for the property. Creating the View Controller Instance 21 2009-10-08 | © 2009 Apple Inc. All Rights Reserved.
  • 22. CHAPTER 3 Adding a View Controller >> In the implementation file for the application delegate class (HelloWorldAppDelegate.m), create an instance of MyViewController by adding the following code as the first statements in the implementation of the applicationDidFinishLaunching: method: MyViewController *aViewController = [[MyViewController alloc] initWithNibName:@"MyViewController" bundle:[NSBundle mainBundle]]; [self setMyViewController:aViewController]; [aViewController release]; There’s quite a lot in just these three lines. What they do is: ■ Create and initialize an instance of the view controller class. ■ Set the new view controller to be the myViewController instance variable using an accessor method. Remember that you didn’t separately declare setMyViewController:, it was implied as part of the property declaration—see “Adding a View Controller Property” (page 20). ■ Adhere to memory management rules by releasing the view controller. You create the view controller object using alloc, then initialize it using initWithNibName:bundle:. The init method specifies first the name of the nib file the controller should load and second the bundle in which it should find it. A bundle is an abstraction of a location in the file system that groups code and resources that can be used in an application. The advantages of using bundles over locating resources yourself in the file-system are that bundles provide a convenient and simple API—the bundle object can locate a resource just by name—and they take account of localization for you. To learn more about bundles, see Resource Programming Guide. By convention, you own any objects you create using an alloc method (amongst others, see Memory Management Rules). You should also: ■ Relinquish ownership of any objects you create. ■ Typically use accessor methods to set instance variables anywhere other than in an initializer method. The second line in the implementation uses an accessor method to set the instance variable, and then the third line uses release to relinquish ownership. There are other ways to implement the above. You could, for example, replace the three lines with just two: MyViewController *aViewController = [[[MyViewController alloc] initWithNibName:@"MyViewController" bundle:[NSBundle mainBundle]] autorelease]; [self setMyViewController:aViewController]; In this version, you use autorelease as a way to relinquish ownership of the new view controller but at some point in the future. To understand this, read Autorelease Pools in the Memory Management Programming Guide for Cocoa. In general, however, you should try to avoid using autorelease wherever possible as it’s a more resource intensive operation than release. You could also replace the last line with: self.myViewController = aViewController; The dot notation invokes exactly the same accessor method (setMyViewController:) as in the original implementation. The dot notation simply provides a more compact syntax—especially when you use nested expressions. Which syntax you choose is largely personal preference, although using the dot syntax does 22 Creating the View Controller Instance 2009-10-08 | © 2009 Apple Inc. All Rights Reserved.
  • 23. CHAPTER 3 Adding a View Controller have some additional benefits when used in conjunction with properties—see Declared Properties in The Objective-C Programming Language. For more about the dot syntax, see “Dot Syntax” in The Objective-C Programming Language in Objects, Classes, and Messaging in The Objective-C Programming Language. Setting Up the View The view controller is responsible for managing and configuring the view when asked. Rather than creating the window’s content view directly, therefore, you ask the view controller for its view and add that as the subview for the window. >> After releasing the view controller, add the following lines: UIView *controllersView = [myViewController view]; [window addSubview:controllersView]; You could do this in one line: [window addSubview:[myViewController view]]; But breaking it into two serves to highlight the side of memory management that is the converse of that which you saw earlier. Because you didn’t create the controller view using any of the methods listed in Memory Management Rules in Memory Management Programming Guide for Cocoa, you don’t own the returned object. Consequently you can simply pass it to the window and forget about it (you don’t have to release it). The final line from the template: [window makeKeyAndVisible]; causes the window—now complete with your view—to be displayed on screen. You add your view before the window is displayed so that the user doesn’t briefly see a blank screen before the real content appears. Housekeeping There are a few unfinished tasks to complete: You need to import the view controller’s header file, synthesize the accessor methods, and—to conform to the rules of memory management—make sure the view controller is released in the dealloc method. >> In the implementation file for the application delegate class (HelloWorldAppDelegate.m), do the following: ■ At the top of the file, import the header file for MyViewController: #import "MyViewController.h" ■ In the @implementation block of the class, tell the compiler to synthesize the accessor methods for the view controller: @synthesize myViewController; ■ In the dealloc method, release the view controller in the first statement: Setting Up the View 23 2009-10-08 | © 2009 Apple Inc. All Rights Reserved.
  • 24. CHAPTER 3 Adding a View Controller [myViewController release]; Implementation Source Listing To make sure you’re still on track, confirm that your HelloWorldAppDelegate class implementation (HelloWorldAppDelegate.m) looks like this: #import "MyViewController.h" #import "HelloWorldAppDelegate.h" @implementation HelloWorldAppDelegate @synthesize window; @synthesize myViewController; - (void)applicationDidFinishLaunching:(UIApplication *)application { MyViewController *aViewController = [[MyViewController alloc] initWithNibName:@"MyViewController" bundle:[NSBundle mainBundle]]; [self setMyViewController:aViewController]; [aViewController release]; UIView *controllersView = [myViewController view]; [window addSubview:controllersView]; [window makeKeyAndVisible]; } - (void)dealloc { [myViewController release]; [window release]; [super dealloc]; } @end Test the Application You can now test your application. >> Compile and run the project (choose Build > Build and Run, or click the Build and Run button in Xcode’s toolbar). Your application should compile without errors and you should again see a white screen in Simulator. 24 Implementation Source Listing 2009-10-08 | © 2009 Apple Inc. All Rights Reserved.
  • 25. CHAPTER 3 Adding a View Controller Recap In this section you added a new view controller class and its accompanying nib file. In the application delegate, you declared an instance variable and accessor methods for a view controller instance. You also synthesized the accessor methods and performed a few other housekeeping tasks. Most importantly, though, you created an instance of the view controller and passed its view to the window. In the next chapter you’ll use Interface Builder to configure the nib file the controller uses to load its view. Recap 25 2009-10-08 | © 2009 Apple Inc. All Rights Reserved.
  • 26. CHAPTER 3 Adding a View Controller 26 Recap 2009-10-08 | © 2009 Apple Inc. All Rights Reserved.
  • 27. CHAPTER 4 Inspecting the Nib File You use the Interface Builder application to create and configure nib files. There are two important concepts to introduce: outlets, and the File’s Owner proxy object. Interface Builder Interface Builder is the application you use to create user interfaces. It doesn’t generate source code, instead it allows you to manipulate objects directly and then save those objects in an archive called a nib file. Terminology: Although an Interface Builder document may have a “.xib” extension, historically the extension was “.nib” (an acronym for “NextStep Interface Builder”) so they are referred to colloquially as “Nib files.” At runtime, when a nib file is loaded the objects are unarchived and restored to the state they were in when you saved the file—including all the connections between them. To learn more about Interface Builder, read Interface Builder User Guide. Inspect the Nib File >> In Xcode, double-click the view controller’s XIB file (MyViewController.xib) to open the file in Interface Builder. The file contains three objects, the File’s Owner proxy, the First Responder proxy, and a view. The view is displayed in a separate window to allow you to edit it. Interface Builder 27 2009-10-08 | © 2009 Apple Inc. All Rights Reserved.
  • 28. CHAPTER 4 Inspecting the Nib File File’s Owner In an Interface Builder document, in contrast to the other objects you add to the interface, the File’s Owner object is not created when the nib file is loaded. It represents the object set to be the owner of the user interface—typically the object that loads the interface. This is discussed in more detail in Resource Programming Guide. In your application, the File’s Owner will be the instance of MyViewController. To allow you to make appropriate connections to and from the File’s Owner, Interface Builder has to know what sort of object File’s Owner is. You tell Interface Builder the class of the object using the Identity Inspector. It was actually set when you created the nib file together with the view controller classes, but it’s useful to look at the inspector now. >> In the Interface Builder document window, select the File’s Owner icon and then choose Tools > Identity Inspector to display the Identity inspector as shown here: 28 Inspect the Nib File 2009-10-08 | © 2009 Apple Inc. All Rights Reserved.
  • 29. CHAPTER 4 Inspecting the Nib File In the Class field of the Class Identity section, you should see MyViewController. It’s important to understand that this is just a promise to Interface Builder that the File’s Owner will be an instance of MyViewController. Simply setting the class doesn’t ensure that the File’s Owner will be an instance of that class. The File’s Owner will be whatever object you set when you load the nib file. If it’s an instance of a different class, the connections you make in the nib file will not be properly established. The View Outlet You can look at—and make and break—an object’s connections using an inspector panel. >> In the Interface Builder document window, Control-click on File’s Owner to display a translucent panel showing File’s Owner’s connections: Inspect the Nib File 29 2009-10-08 | © 2009 Apple Inc. All Rights Reserved.
  • 30. CHAPTER 4 Inspecting the Nib File The only connection at the moment is the view controller’s view outlet. An outlet is just an attribute (typically an instance variable) that happens to connect to an item in a nib file. The outlet connection means that when the nib file is loaded and the UIView instance is unarchived, the view controller’s view instance variable is set to that view. Loading the Nib File The view controller loads the nib file automatically in its loadView method. Recall that you specified the name of the nib file to load as the first argument to initWithNibName:bundle: (see “Creating the View Controller Instance” (page 21)). The loadView method is typically called once during a view controller’s lifetime and is used to create its view. When you invoke the view controller’s view method, the controller automatically calls its own loadView method if the view hasn’t been created. (If the view controller purges its view as a result of, for example, receiving a memory warning, then loadView will be invoked again to recreate the view if necessary.) If you want to create the view controller’s view programmatically, you can override loadView and create the view in your implementation. If you initialize a view controller using initWithNibName:bundle: but you want to perform additional configuration after the view is loaded, you override the controller’s viewDidLoad method. You can load nib files yourself using an instance of NSBundle. You can learn more about loading nib files in Resource Programming Guide. Test the Application To make sure your application’s working correctly, you could set the background color of the view to something other than white and verify that the new color is displayed after the application launches. 30 Loading the Nib File 2009-10-08 | © 2009 Apple Inc. All Rights Reserved.
  • 31. CHAPTER 4 Inspecting the Nib File >> In Interface Builder, select the view then choose Tools > Attributes Inspector to display the Attributes inspector. >> Click the frame of the Background color well to display the Colors panel, then select a different color. >> Save the nib file. >> Compile and run the project (click the Build and Go button in the toolbar). Your application should compile without errors and you should again see an appropriately-colored screen in Simulator. >> Restore the view’s background color to white and save the nib file. Recap In this section you inspected a nib file, learned about outlets, and set the background color of a view. You also learned more about resource loading and how the view controller loads the nib file. In the next chapter you will add controls to the view. Recap 31 2009-10-08 | © 2009 Apple Inc. All Rights Reserved.
  • 32. CHAPTER 4 Inspecting the Nib File 32 Recap 2009-10-08 | © 2009 Apple Inc. All Rights Reserved.
  • 33. CHAPTER 5 Configuring the View Interface Builder provides a library of objects that you can add to a nib file. Some of these are user interface elements such as buttons and text fields, others are controller objects such as view controllers. Your nib file already contains a view—now you just need to add the button and text fields. Adding the User Interface Elements You add user interface elements by dragging them from the Interface Builder library. >> In Interface Builder choose Tools > Library to display the library window You can drag view items from the library and drop them onto the view just as you might in a drawing application. >> Add a text field (UITextField), a label (UILabel), and a button (UIButton) to the view. You can then resize the items using resize handles where appropriate, and reposition them by dragging. As you move items within the view, alignment guides are displayed as dashed blue lines. >> Lay out the elements so that they look like this: Adding the User Interface Elements 33 2009-10-08 | © 2009 Apple Inc. All Rights Reserved.
  • 34. CHAPTER 5 Configuring the View Figure 5-1 View containing user interface elements and showing a guide line >> Make the following changes: 1. Add a placeholder string Your Name to the text field by entering it in the Text Field Attributes inspector. 2. Resize the label so that it extends for the width of the view. 3. Delete the text (“Label”) from the label either using the Label Attributes inspector or by directly selecting the text in the label (double-click to make a selection) and press Delete. 4. Add a title to the button by double-clicking inside the button and typing Hello. 5. Use the inspector to set the text alignment for the text field and label to centered. You should end up with a view that looks like this: 34 Adding the User Interface Elements 2009-10-08 | © 2009 Apple Inc. All Rights Reserved.
  • 35. CHAPTER 5 Configuring the View >> In the view section of the label’s Label Attributes inspector, select Clear Context Before Drawing. This ensures that when you update the greeting the previous string is removed before the new one is drawn. If you don’t do this, the strings are drawn on top of each other. There are several other changes to make to the text field—it might be fairly obvious that the first change applies to the text field, but the others are less obvious. First, you might want to ensure that names are automatically capitalized. Second, you might want to make sure that the keyboard associated with the text field is configured for entering names, and that the keyboard displays a Done button. The guiding principle here is that: you know when you’re putting it on screen what a text field will contain. You therefore design the text field to make sure that at runtime the keyboard can configure itself to best suit the user’s task. You make all of these settings using text input traits. >> In Interface Builder, select the text field then display the Attributes inspector. In the Text Input Traits section: ■ In the Capitalize popup menu, select Words ■ In the Keyboard Type popup menu select, Default ■ In the Keyboard Return Key popup menu, select Done >> Save the file. If you build and run your application in Xcode, when it launches you should see the user interface elements as you positioned them. If you press the button, it should highlight, and if you tap inside the text field, the keyboard should appear. At the moment, though, after the keyboard appears, there’s no way to dismiss it. To remedy this, and add other functionality, you need to make appropriate connections to and from the view controller. These are described in the next section. Adding the User Interface Elements 35 2009-10-08 | © 2009 Apple Inc. All Rights Reserved.
  • 36. CHAPTER 5 Configuring the View The View Controller Interface Declaration To make connections to the user interface from the view controller, you need to specify outlets (recall that an outlet is just an instance variable). You also need a declaration for its very simple model object, the string. >> In Xcode, in MyViewController.h add the following instance variables to the MyViewController class: UITextField *textField; UILabel *label; NSString *string; >> You then need to add property declarations for the instance variables and a declaration for the changeGreeting: action method: @property (nonatomic, retain) IBOutlet UITextField *textField; @property (nonatomic, retain) IBOutlet UILabel *label; @property (nonatomic, copy) NSString *string; - (IBAction)changeGreeting:(id)sender; IBOutlet is a special keyword that is used only to tell Interface Builder to treat an instance variable or property as an outlet. It’s actually defined as nothing so it has no effect at compile time. IBAction is a special keyword that is used only to tell Interface Builder to treat a method as an action for target/action connections. It’s defined to void. The view controller is also going to be the text field’s delegate; as such, it must adopt the UITextFieldDelegate protocol. To specify that a class adopts a protocol, in the interface add the name of the protocol in angle brackets (<>) after the name of the class from which your class inherits. >> Specify that the UIViewController object adopts the UITextFieldDelegate protocol by adding <UITextFieldDelegate> after UIViewController. Your interface file should look like this: #import <UIKit/UIKit.h> @interface MyViewController : UIViewController <UITextFieldDelegate> { UITextField *textField; UILabel *label; NSString *string; } @property (nonatomic, retain) IBOutlet UITextField *textField; @property (nonatomic, retain) IBOutlet UILabel *label; @property (nonatomic, copy) NSString *string; - (IBAction)changeGreeting:(id)sender; @end >> Save the MyViewController.h file so that Interface Builder will notice the changes. So that you can test the project at the end of this section, in the implementation file (MyViewController.m) implement a stub changeGreeting: method. >> After the @implementation MyViewController line add: 36 The View Controller Interface Declaration 2009-10-08 | © 2009 Apple Inc. All Rights Reserved.
  • 37. CHAPTER 5 Configuring the View - (IBAction)changeGreeting:(id)sender { } >> Save the file. Making Connections Now that you’ve defined the view controller’s outlets and action, you can establish the connections in the nib file. >> Connect the File’s Owner’s label outlet. Control click File’s Owner to display a translucent panel that shows all the available outlets and actions, then drag from the circle to the right of the list to the destination to make the connection. You can resize the panel to show more or fewer outlets and actions at a time by dragging the resize handle at the bottom right of the panel. If there is not sufficient space to show all the outlets and actions, the panel displays a scroller to allow you to navigate within the list view. Interface Builder will not allow you to make connections to the wrong sort of element. For example, since you declared the label property to be an instance of UILabel, you cannot connect the label outlet to the text field. >> Connect the File’s Owner’s textField outlet to the text field in the same way you connected the label. Making Connections 37 2009-10-08 | © 2009 Apple Inc. All Rights Reserved.
  • 38. CHAPTER 5 Configuring the View >> Set the button’s action method by Control-clicking the button to show the inspector, then dragging from the open circle in the Touch Up Inside Events list to the File’s Owner icon and selecting changeGreeting: in the translucent panel that appears over File’s Owner (you may have to scroll within the inspector to reveal the Touch Up Inside connection). 38 Making Connections 2009-10-08 | © 2009 Apple Inc. All Rights Reserved.
  • 39. CHAPTER 5 Configuring the View This means that when you run the application, when you lift your finger inside the button the button sends a changeGreeting: message to the File’s Owner object. (For a definition of all the control events, see UIControl.) The text field sends a message to its delegate when the user taps the Return button in the keyboard. You can use this callback to dismiss the keyboard (see “The Text Field’s Delegate” (page 42)). >> Set the text field’s delegate to be the File’s Owner (the view controller) by Control-dragging from the text field to the File’s Owner and selecting delegate in the translucent panel that appears. Testing You can now test the application. >> Building and running the project. There will be several compiler warnings because you haven’t yet implemented accessor methods for the properties—you’ll fix these in the next chapter. You should find, though, that the button works (it highlights when you tap it). You should also find that if you touch in the text field, the keyboard appears and you enter text. There is, however, no way to dismiss the keyboard. To do that, you have to implement the relevant delegate method. You’ll also do that in the next chapter. Testing 39 2009-10-08 | © 2009 Apple Inc. All Rights Reserved.
  • 40. CHAPTER 5 Configuring the View Recap You added instance variables and property declarations, and a declaration for the action method, to the view controller class interface. You added a stub implementation of the action method to the class implementation. You also configured the nib file. 40 Recap 2009-10-08 | © 2009 Apple Inc. All Rights Reserved.
  • 41. CHAPTER 6 Implementing the View Controller There are several parts to implementing the view controller. You need to deal with the instance variables—including memory management—implement the changeGreeting: method, and ensure that the keyboard is dismissed when the user taps Done. The Properties You first need to tell the compiler to synthesize the accessor methods. >> In the MyViewController.m file, add the following after the @implementation MyViewController line: @synthesize textField; @synthesize label; @synthesize string; This tells the compiler to synthesize accessor methods for these properties according to the specification you gave in the interface file. For example, the declaration of the string property is @property (nonatomic, copy) NSString *string;), so the compiler generates two accessor methods: - (NSString *)string and - (void)setString:(NSString *)newString. In the setString: method a copy is made of the string that’s passed in. This is useful to ensure encapsulation (the passed-in string might be mutable—you want to make sure that the controller maintains its own copy). For more about encapsulation, see “Mechanisms Of Abstraction” in Object-Oriented Programming with Objective-C. You must relinquish ownership in the dealloc method because all of the property declarations specify that the view controller owns the instance variables (retain and copy imply ownership, see Memory Management Rules in Memory Management Programming Guide for Cocoa). >> In the MyViewController.m file, update the dealloc method to release the instance variables before invoking super’s implementation: - (void)dealloc { [textField release]; [label release]; [string release]; [super dealloc]; } The changeGreeting: Method When it’s tapped, the button sends a changeGreeting: message to the view controller. The view controller then should retrieve the string from the text field and update the label appropriately. The Properties 41 2009-10-08 | © 2009 Apple Inc. All Rights Reserved.
  • 42. CHAPTER 6 Implementing the View Controller >> In the MyViewController.m file, complete the implementation of the changeGreeting: method as follows: - (IBAction)changeGreeting:(id)sender { self.string = textField.text; NSString *nameString = string; if ([nameString length] == 0) { nameString = @"World"; } NSString *greeting = [[NSString alloc] initWithFormat:@"Hello, %@!", nameString]; label.text = greeting; [greeting release]; } There are several pieces to this method. ■ self.string = textField.text; This retrieves the text from the text field and sets the controller’s string instance variable to the result. In this case, you don’t actually use the string instance variable anywhere else, but it’s important to understand its role. It’s the very simple model object that the view controller is managing. In general, the controller should maintain information about application data in its own model objects—application data shouldn’t be stored in user interface elements. ■ @"World" is a string constant represented by an instance of NSString. ■ The initWithFormat: method creates a new string that follows the format specified by the format string, like the printf function. %@ indicates that a string object should be substituted. To learn more about strings, see String Programming Guide for Cocoa. The Text Field’s Delegate If you build and run the application, you should find that if you tap the button, the label shows “Hello, World!” If you select the text field and start typing, though, you should find that you have no way to indicate that you’ve finished entering text and dismiss the keyboard. In an iPhone application, the keyboard is shown automatically when an element that allows text entry becomes the first responder, and is dismissed automatically when the element loses first responder status. (You can learn more about first responder by reading Event Handling in iPhone Application Programming Guide.) There’s no way to directly message the keyboard; you can, however, make it appear or disappear as a side-effect of toggling the first responder status of a text-entry element. In this application, the text field becomes first responder—and so the keyboard appears—when the user taps in the text field. You want the keyboard to disappear when the user taps the Done button on the keyboard. 42 The Text Field’s Delegate 2009-10-08 | © 2009 Apple Inc. All Rights Reserved.
  • 43. CHAPTER 6 Implementing the View Controller The UITextFieldDelegate protocol includes a method, textFieldShouldReturn:, that the text field calls whenever the user taps the Return button (whatever text the button shows). Because you set the view controller as the text field’s delegate (“Making Connections” (page 37)), you can implement this method to force the text field to lose first responder status by sending it the resignFirstResponder message—which has the side-effect of dismissing the keyboard. >> In the MyViewController.m file, implement the textFieldShouldReturn: method as follows: - (BOOL)textFieldShouldReturn:(UITextField *)theTextField { if (theTextField == textField) { [textField resignFirstResponder]; } return YES; } In this application, it’s not really necessary to include the theTextField == textField test since there’s only one text field. It’s worth pointing out the pattern, though, since there may be occasions when your object is the delegate of more than one object of the same type and you may need to differentiate between them. >> Build and run the application; it should behave as you expect. (Tap Done to dismiss the keyboard when you have entered your name, then tap the Hello button to display “Hello, <Your Name>!” in the label.) If the application doesn’t behave as you expect, you need to troubleshoot (see “Troubleshooting” (page 45)). Recap You finished the implementation of the view controller and so completed your first iPhone application. Congratulations. Take a moment to think about how the view controller fits into the overall application architecture. You’re likely to use view controllers in most iPhone applications you write. Then take a break, and start to think about what you should do next. Recap 43 2009-10-08 | © 2009 Apple Inc. All Rights Reserved.
  • 44. CHAPTER 6 Implementing the View Controller 44 Recap 2009-10-08 | © 2009 Apple Inc. All Rights Reserved.
  • 45. CHAPTER 7 Troubleshooting This section describes some approaches to solving common problems that you may encounter. Code and Compiler Warnings If things aren’t working as they should, first compare your code with the complete listings as given in “Code Listings” (page 49). Your code should compile without any warnings. Objective-C is a very flexible language, and so sometimes the most you get from the compiler is a warning. Typically you should treat warnings as very likely to be errors. Check Connections in the Nib Files As a developer, if things don’t work correctly, your natural instinct is to check your source for bugs. Cocoa adds another dimension. Much of your application’s configuration may be “encoded” in the nib files. And if you haven’t made the correct connections, then your application won’t behave as you expect. If the text doesn’t update when you tap the button, it might be that you didn’t connect the button’s action to the view controller, or connect the view controller’s outlets to the text field or label. If the keyboard does not disappear when you tap Done, you may not have connected the text field’s delegate or connected the view controller’s textField outlet to the text field (see “Making Connections” (page 37)). If you have connected the delegate, there may be a more subtle problem (see “Delegate Method Names” (page 45)). Delegate Method Names A common mistake with delegates is to misspell the delegate method name. Even if you’ve set the delegate object correctly, if the delegate doesn’t implement the method with exactly the right name, it won’t be invoked. It’s usually best to copy and paste delegate method declarations from the documentation. Code and Compiler Warnings 45 2009-10-08 | © 2009 Apple Inc. All Rights Reserved.
  • 46. CHAPTER 7 Troubleshooting 46 Delegate Method Names 2009-10-08 | © 2009 Apple Inc. All Rights Reserved.
  • 47. CHAPTER 8 Where to Next? This chapter offers suggestions as to what directions you should take next in learning about iPhone development. The User Interface In this tutorial, you created a very simple iPhone application. Cocoa Touch offers a rich development environment, though, and you’ve only scratched the surface. From here, you should explore further. Start with this application. As noted in the first chapter, the user interface is critical to a successful iPhone application. Try to improve the user interface. Add images and color to the elements. Add a background image and an icon for the application. Look at the inspectors in Interface Builder to see how else you can configure elements. Creating User Interface Elements Programmatically In the tutorial, you created the user interface using Interface Builder. Interface Builder allows you to assemble user interface components quickly and easily. Sometimes, however, you may want—or need—to create user interface elements in code (for example, if you create a custom table view cell you typically create and lay out the subviews programmatically). First, open the MyViewController nib file and remove the text field from view. If you want to create the entire view hierarchy for a view controller in code, you override loadView. In this case, however, you want to load the nib file then perform additional configuration (add another view). You therefore override viewDidLoad instead. (The viewDidLoad method gives you a common override point you can use whether you load the main view using a nib file or by overriding loadView.) In MyViewController.m, add the following implementation of viewDidLoad: - (void)viewDidLoad { CGRect frame = CGRectMake(20.0, 68.0, 280.0, 31.0); UITextField *aTextField = [[UITextField alloc] initWithFrame:frame]; self.textField = aTextField; [aTextField release]; textField.textAlignment = UITextAlignmentCenter; textField.borderStyle = UITextBorderStyleRoundedRect; textField.autocapitalizationType = UITextAutocapitalizationTypeWords; textField.keyboardType = UIKeyboardTypeDefault; textField.returnKeyType = UIReturnKeyDone; textField.delegate = self; [self.view addSubview:textField]; The User Interface 47 2009-10-08 | © 2009 Apple Inc. All Rights Reserved.
  • 48. CHAPTER 8 Where to Next? } Notice that there’s quite a lot of code compared with how easy it was to create and configure the text field in Interface Builder. Build and run the application. Make sure it behaves as it did before. Installing on a Device If you have a suitable device (iPhone or iPod Touch) connected to your computer via its 30-pin USB cable, and you have a valid certificate from the iPhone Developer Program, set the active SDK for your project to “iPhone OS” (instead of “iPhone OS Simulator”) and build and run the project. Assuming your code compiles successfully, Xcode then automatically uploads your application to your device. For more details, see iPhone Development Guide. Additional Functionality Next you can try expanding on the functionality. There are many directions in which you can go: ■ Rather than using a view as a canvas on which to drop prebuilt user interface controls, you might try writing a custom view that draws its own content or responds to touch events. For inspiration, look at examples such as MoveMe and Metronome. ■ Although you used Interface Builder to layout the user interface for this application, many applications actually use table views to lay out the interface. This makes it easy to create an interface that extends beyond the bounds of the screen—allowing the user to easily scroll to reveal additional elements. You should first investigate how to create a simple list using a table view. There are several sample code projects that you can look at—including TableViewSuite—then you can create your own. ■ Navigation controllers and tab bar controllers provide an architecture that allow you to create drill-down style interfaces and let the user select different views in your application. Navigation controllers often work in conjunction with table views, but both navigation controllers and tab bar controllers work together with view controllers. Have a look at some of the sample applications—such as SimpleDrillDown—that use navigation controllers and expand on them to create your own applications. ■ You can often increase the size of your potential marketplace by localizing your application. Internationalization is the process of making your application localizable. To learn more about internationalization, read Internationalization Programming Topics. ■ Performance is critical to good user experience on iPhone. You should learn to use the various performance tools provided with Mac OS X—in particular Instruments—to tune your application so that it minimizes its resource requirements. The most important thing is to try out new ideas and to experiment—there are many code samples you can look at for inspiration, and the documentation will help you to understand concepts and programming interfaces. 48 Installing on a Device 2009-10-08 | © 2009 Apple Inc. All Rights Reserved.
  • 49. APPENDIX A Code Listings This appendix provides listings for the two classes you define. The listings don’t show comments and other method implementations from the file templates. HelloWorldAppDelegate The header file: HelloWorldAppDelegate.h #import <UIKit/UIKit.h> @class MyViewController; @interface HelloWorldAppDelegate : NSObject <UIApplicationDelegate> { UIWindow *window; MyViewController *myViewController; } @property (nonatomic, retain) IBOutlet UIWindow *window; @property (nonatomic, retain) MyViewController *myViewController; @end The implementation file: HelloWorldAppDelegate.m #import "MyViewController.h" #import "HelloWorldAppDelegate.h" @implementation HelloWorldAppDelegate @synthesize window; @synthesize myViewController; - (void)applicationDidFinishLaunching:(UIApplication *)application { MyViewController *aViewController = [[MyViewController alloc] initWithNibName:@"MyViewController" bundle:[NSBundle mainBundle]]; [self setMyViewController:aViewController]; [aViewController release]; UIView *controllersView = [myViewController view]; [window addSubview:controllersView]; [window makeKeyAndVisible]; } HelloWorldAppDelegate 49 2009-10-08 | © 2009 Apple Inc. All Rights Reserved.
  • 50. APPENDIX A Code Listings - (void)dealloc { [myViewController release]; [window release]; [super dealloc]; } @end MyViewController The header file: MyViewController.h #import <UIKit/UIKit.h> @interface MyViewController : UIViewController <UITextFieldDelegate> { UITextField *textField; UILabel *label; NSString *string; } @property (nonatomic, retain) IBOutlet UITextField *textField; @property (nonatomic, retain) IBOutlet UILabel *label; @property (nonatomic, copy) NSString *string; - (IBAction)changeGreeting:(id)sender; @end The implementation file: MyViewController.m #import "MyViewController.h" @implementation MyViewController @synthesize textField; @synthesize label; @synthesize string; - (IBAction)changeGreeting:(id)sender { self.string = textField.text; NSString *nameString = string; if ([nameString length] == 0) { nameString = @"World"; } NSString *greeting = [[NSString alloc] initWithFormat:@"Hello, %@!", nameString]; label.text = greeting; [greeting release]; 50 MyViewController 2009-10-08 | © 2009 Apple Inc. All Rights Reserved.
  • 51. APPENDIX A Code Listings } - (BOOL)textFieldShouldReturn:(UITextField *)theTextField { if (theTextField == textField) { [textField resignFirstResponder]; } return YES; } - (void)dealloc { [textField release]; [label release]; [string release]; [super dealloc]; } // Other methods from the template omitted @end MyViewController 51 2009-10-08 | © 2009 Apple Inc. All Rights Reserved.
  • 52. APPENDIX A Code Listings 52 MyViewController 2009-10-08 | © 2009 Apple Inc. All Rights Reserved.
  • 53. REVISION HISTORY Document Revision History This table describes the changes to Your First iPhone Application. Date Notes 2009-10-08 Emphasized need to connect text field in Interface Builder. 2009-08-10 Removed a reference to dot syntax for an example that used an accessor method directly. 2009-06-15 Updated for iPhone OS 3.0. 2009-01-06 Corrected typographical errors. 2008-10-15 Clarified description of the target-action design pattern. 2008-09-09 Minor corrections and clarifications. 2008-06-09 New document that introduces application development for iPhone. 53 2009-10-08 | © 2009 Apple Inc. All Rights Reserved.
  • 54. REVISION HISTORY Document Revision History 54 2009-10-08 | © 2009 Apple Inc. All Rights Reserved.