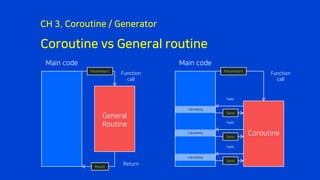
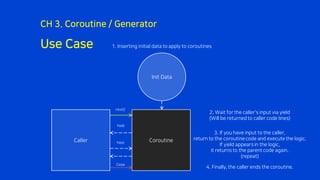
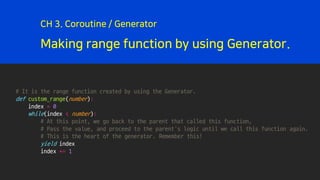
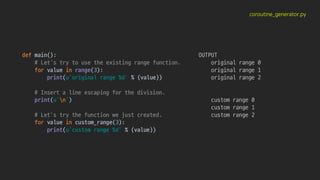
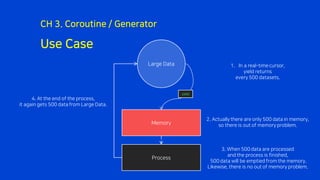
Dealing with Python Reactively
PyCon Korea 2017
Kenneth
SPEAKER
Editor
Dev team leader
Kenneth
INTRODUCTION
Ractive Progamming
RxPy
Coroutine / Generator
CH1.
CH2.
CH3.
CH1.
Reactive Programming
What is reactive programming?
CH 1. Reactive Programming
The new paradigm that focused
on the asynchronous data flow
Difficult
Key keyword #1
CH 1. Reactive Programming
Asynchronous
It can be received the data that is not guaranteed
In the asynchronous environment sequentially,
And also it can be processed the data flexible.
Key keyword #2
CH 1. Reactive Programming
Reactive
It is not executed if there is no operation (input) from the outside.
Key keyword #3
CH 1. Reactive Programming
Lightweight
Data flow can be subdivided for each purpose,
And also it can be merged again.
This makes it possible to reduce the weight.
The data flows.
CH 1. Reactive Programming
However it does not flow at the same time.
So we can not guarantee
that the data always comes.
CH 1. Reactive Programming
It can not be easy to process the data
that comes every another times.
CH 1. Reactive Programming
.next() .subscribe()
Controlling multiple data flows.
Reactive programming makes it possible.
CH 1. Reactive Programming
The data that comes from each different times concurrently,
To be sequentially
It only see the data flows.
That’s why it’s intuitive.
CH 1. Reactive Programming
Map
Filter
Merge Reduce
On Complete
On Error
Retry
Skip Buffer
CH2.
RxPy
ReactiveX (RX)
CH 2. RxPy
Microsoft announced `Volta` project in 2007
It is officially known as `Reactive Extensions` in 2009
It was gradually released as open source since 2012
def observer_generator(observer):
# It passes the string “hello” through the observer.
observer.on_next("hello")
# Likewise, it passes the string "world!" through the observer.
observer.on_next("world!")
def main():
# Create an observer, passes it to a predefined function, and receives an object that can receive it.
observable = Observable.create(observer_generator)
# Receive the observer, At this time the observer read the variable that passed at on_next.
# Oh! After the below subscribe is started, the above observer_generator will be executed.
observable.subscribe(on_next=lambda value: print(value))
hello_world.py
observable.create (Create an observer)
observer_generator
observer
def observer_generator(observer):
# It passes the string “hello” through the observer.
observer.on_next("hello")
# Likewise, it passes the string "world!" through the observer.
observer.on_next("world!")
def main():
# Create an observer, passes it to a predefined function, and receives an object that can receive it.
observable = Observable.create(observer_generator)
# Receive the observer, At this time the observer read the variable that passed at on_next.
# Oh! After the below subscribe is started, the above observer_generator will be executed.
observable.subscribe(on_next=lambda value: print(value))
hello_world.py
observable
1. next(‘hello’)
2. next(‘world!’)
observer
1. print(‘hello’)
2. print(‘world!’)
It passes the data through on_next
Print the message that received from on_next
from rx import Observable, Observer
class PrintObserver(Observer):
def on_next(self, value):
print('on_next value:%s’ % (value))
def on_completed(self):
print('on_completed !')
def on_error(self, value):
print('on_error value:%s’ % (value))
def observer_generator(observer):
observer.on_next(“break")
observer.on_next(“the ice!")
while True:
message = input()
if message:
observer.on_next(message)
else:
observer.on_completed()
break
def main():
observable = Observable.create(observer_generator)
observable.subscribe(PrintObserver())
ice_breaking.py
Observable
(Data forwarder)
Observable
(Data receiver)
subscribe()
next(‘break’)
next(‘the ice!’)
next(‘message’)
print()
print()
print()
on_next
on_next
on_next
completed()
on_completed print()
1. You can expand incoming messages by using
Predefined object in Subscribe method.
CH3.
Coroutine / Generator
Coroutine?
CH 3. Coroutine / Generator
Unlike functions,
Routines whose parents are
“equivalent” to the called function.
Python only: Coroutine can process
only the received data.
Coroutine vs General routine
CH 3. Coroutine / Generator
General
Routine
Function
call
Return
Parameters
Result
Coroutine
Function
call
Parameters
Yield
Yield
Yield
Main code Main code
Calculating
Calculating
Calculating
Send
Send
Send
Use Case
CH 3. Coroutine / Generator
Init Data
Caller Coroutine
2. Wait for the caller's input via yield
(Will be returned to caller code lines)
1. Inserting initial data to apply to coroutines
3. If you have input to the caller,
return to the coroutine code and execute the logic.
If yield appearsin the logic,
it returns to the parent code again.
(repeat)
next()
Yield
Yield
4. Finally, the caller ends the coroutine.
Close
Generator?
CH 3. Coroutine / Generator
If Coroutine is a gourmand,
The Generator is the giving tree.
A generator is a `generator`
that generates data through yield.
Do you know range function?
CH 3. Coroutine / Generator
def main():
# Use the range function to insert each value from 0 to 2
# into value and repeat it three times.
for value in range(3):
print(u’current value %d' % (value))
OUTPUT:
current_value 0
current_value 1
current_value 2
Making range function by using Generator.
CH 3. Coroutine / Generator
# It is the range function created by using the Generator.
def custom_range(number):
index = 0
while(index < number):
# At this point, we go back to the parent that called this function,
# Pass the value, and proceed to the parent's logic until we call this function again.
# This is the heart of the generator. Remember this!
yield index
index += 1
coroutine_generator.py
def main():
# Let's try to use the existing range function.
for value in range(3):
print(u'original range %d' % (value))
# Insert a line escaping for the division.
print(u'n')
# Let's try the function we just created.
for value in custom_range(3):
print(u'custom range %d' % (value))
OUTPUT
original range 0
original range 1
original range 2
custom range 0
custom range 1
custom range 2
Use Case
CH 3. Coroutine / Generator
Large Data
Memory
Process
yield
1. In a real-time cursor,
yield returns
every 500 datasets.
2. Actually there are only 500 data in memory,
so there is out of memory problem.
3. When 500 data are processed
and the process is finished,
500 data will be emptied from the memory.
Likewise, there is no out of memory problem.
4. At the end of the process,
it again gets 500 data from Large Data.
Conclusion about Generator
CH 3. Coroutine / Generator
Data that comes in real time
can be used to stabilize
the memory by using the generator!
(Performance difference is insignificant)
What is the difference
Between Coroutine and Generator?
CH 3. Coroutine / Generator
Corutine
Function
call
Parameters
Yield
Yield
Yield
Main code
Calculating
Calculating
Calculating
Send
Send
Generator
Function
call
Parameters
Yield
Yield
Yield
Main code
Calculating
Calculating
Calculating
Return
Return
Return
Send
Question
Thank you
Kennethan@nhpcw.com
http://github.com/KennethanCeyer/pycon-kr-2017
Email
GitHub

Dealing with Python Reactively - PyCon Korea 2017

  • 1.
    Dealing with PythonReactively PyCon Korea 2017 Kenneth
  • 2.
  • 3.
  • 4.
  • 5.
    What is reactiveprogramming? CH 1. Reactive Programming The new paradigm that focused on the asynchronous data flow
  • 6.
  • 7.
    Key keyword #1 CH1. Reactive Programming Asynchronous It can be received the data that is not guaranteed In the asynchronous environment sequentially, And also it can be processed the data flexible.
  • 8.
    Key keyword #2 CH1. Reactive Programming Reactive It is not executed if there is no operation (input) from the outside.
  • 9.
    Key keyword #3 CH1. Reactive Programming Lightweight Data flow can be subdivided for each purpose, And also it can be merged again. This makes it possible to reduce the weight.
  • 10.
    The data flows. CH1. Reactive Programming
  • 11.
    However it doesnot flow at the same time. So we can not guarantee that the data always comes. CH 1. Reactive Programming
  • 12.
    It can notbe easy to process the data that comes every another times. CH 1. Reactive Programming .next() .subscribe()
  • 13.
    Controlling multiple dataflows. Reactive programming makes it possible. CH 1. Reactive Programming The data that comes from each different times concurrently, To be sequentially
  • 14.
    It only seethe data flows. That’s why it’s intuitive. CH 1. Reactive Programming Map Filter Merge Reduce On Complete On Error Retry Skip Buffer
  • 15.
  • 16.
    ReactiveX (RX) CH 2.RxPy Microsoft announced `Volta` project in 2007 It is officially known as `Reactive Extensions` in 2009 It was gradually released as open source since 2012
  • 17.
    def observer_generator(observer): # Itpasses the string “hello” through the observer. observer.on_next("hello") # Likewise, it passes the string "world!" through the observer. observer.on_next("world!") def main(): # Create an observer, passes it to a predefined function, and receives an object that can receive it. observable = Observable.create(observer_generator) # Receive the observer, At this time the observer read the variable that passed at on_next. # Oh! After the below subscribe is started, the above observer_generator will be executed. observable.subscribe(on_next=lambda value: print(value)) hello_world.py observable.create (Create an observer) observer_generator observer
  • 18.
    def observer_generator(observer): # Itpasses the string “hello” through the observer. observer.on_next("hello") # Likewise, it passes the string "world!" through the observer. observer.on_next("world!") def main(): # Create an observer, passes it to a predefined function, and receives an object that can receive it. observable = Observable.create(observer_generator) # Receive the observer, At this time the observer read the variable that passed at on_next. # Oh! After the below subscribe is started, the above observer_generator will be executed. observable.subscribe(on_next=lambda value: print(value)) hello_world.py observable 1. next(‘hello’) 2. next(‘world!’) observer 1. print(‘hello’) 2. print(‘world!’) It passes the data through on_next Print the message that received from on_next
  • 19.
    from rx importObservable, Observer class PrintObserver(Observer): def on_next(self, value): print('on_next value:%s’ % (value)) def on_completed(self): print('on_completed !') def on_error(self, value): print('on_error value:%s’ % (value)) def observer_generator(observer): observer.on_next(“break") observer.on_next(“the ice!") while True: message = input() if message: observer.on_next(message) else: observer.on_completed() break def main(): observable = Observable.create(observer_generator) observable.subscribe(PrintObserver()) ice_breaking.py Observable (Data forwarder) Observable (Data receiver) subscribe() next(‘break’) next(‘the ice!’) next(‘message’) print() print() print() on_next on_next on_next completed() on_completed print() 1. You can expand incoming messages by using Predefined object in Subscribe method.
  • 20.
  • 21.
    Coroutine? CH 3. Coroutine/ Generator Unlike functions, Routines whose parents are “equivalent” to the called function. Python only: Coroutine can process only the received data.
  • 22.
    Coroutine vs Generalroutine CH 3. Coroutine / Generator General Routine Function call Return Parameters Result Coroutine Function call Parameters Yield Yield Yield Main code Main code Calculating Calculating Calculating Send Send Send
  • 23.
    Use Case CH 3.Coroutine / Generator Init Data Caller Coroutine 2. Wait for the caller's input via yield (Will be returned to caller code lines) 1. Inserting initial data to apply to coroutines 3. If you have input to the caller, return to the coroutine code and execute the logic. If yield appearsin the logic, it returns to the parent code again. (repeat) next() Yield Yield 4. Finally, the caller ends the coroutine. Close
  • 24.
    Generator? CH 3. Coroutine/ Generator If Coroutine is a gourmand, The Generator is the giving tree. A generator is a `generator` that generates data through yield.
  • 25.
    Do you knowrange function? CH 3. Coroutine / Generator def main(): # Use the range function to insert each value from 0 to 2 # into value and repeat it three times. for value in range(3): print(u’current value %d' % (value)) OUTPUT: current_value 0 current_value 1 current_value 2
  • 26.
    Making range functionby using Generator. CH 3. Coroutine / Generator # It is the range function created by using the Generator. def custom_range(number): index = 0 while(index < number): # At this point, we go back to the parent that called this function, # Pass the value, and proceed to the parent's logic until we call this function again. # This is the heart of the generator. Remember this! yield index index += 1
  • 27.
    coroutine_generator.py def main(): # Let'stry to use the existing range function. for value in range(3): print(u'original range %d' % (value)) # Insert a line escaping for the division. print(u'n') # Let's try the function we just created. for value in custom_range(3): print(u'custom range %d' % (value)) OUTPUT original range 0 original range 1 original range 2 custom range 0 custom range 1 custom range 2
  • 28.
    Use Case CH 3.Coroutine / Generator Large Data Memory Process yield 1. In a real-time cursor, yield returns every 500 datasets. 2. Actually there are only 500 data in memory, so there is out of memory problem. 3. When 500 data are processed and the process is finished, 500 data will be emptied from the memory. Likewise, there is no out of memory problem. 4. At the end of the process, it again gets 500 data from Large Data.
  • 29.
    Conclusion about Generator CH3. Coroutine / Generator Data that comes in real time can be used to stabilize the memory by using the generator! (Performance difference is insignificant)
  • 30.
    What is thedifference Between Coroutine and Generator? CH 3. Coroutine / Generator Corutine Function call Parameters Yield Yield Yield Main code Calculating Calculating Calculating Send Send Generator Function call Parameters Yield Yield Yield Main code Calculating Calculating Calculating Return Return Return Send
  • 31.
  • 32.