The document provides instructions for a tutorial on how to write your own JavaServer Faces (JSF) components. The tutorial is broken into 7 steps, with each step building on the previous one. In step 1, the reader creates a basic component that renders a <div> tag with some text inside. This establishes the foundation for the component. Step 2 will add attributes to the component to make the rendered output more visually appealing.
Big Data, AI Technology Expert Grup DataEdu Co.,Ltd
(주) 데이터에듀는 BigData , A.I Technology Expert Group' 슬로건을 바탕으로 지난 5 년간 다양한 산업분야의 데이터 , AI 컨설팅 및 솔루션 사업화 적용을 성공적으로 수행하였습니다 ‘데이터에듀 만이 제안할 수 있는 빅데이터 , A.I 컨설팅과 솔루션 제공을 통해 기관 및 기업 데이터 사업의 베스트 비즈니스 파트너로 함께 하겠습니다.
E-mail : partner@dataedu.co.kr
Tel :+82 51-523-4566
デスクトップ仮想化の実践 - powered by Windows Server 2016 & Azure - (Microsoft de:code 2016)Takamasa Maejima
2016年5月に開催された Microsoft de:code 2016 での、RDS (Remote Desktop Services) on Microsoft Azure に関するセッションスライドです。
[イベント名] Microsoft de:code 2016
[開催日] 2016年5月24日
[セッションID] INF-012
[セッションタイトル] デスクトップ仮想化の実践 - powered by Windows Server 2016 & Azure -
This text presentation attempts to hit on the highlight features and structure of Django and its ecco-system. It is intended as an introduction for those who are curious about , what is it?
Learn simple, proven and exciting ways to build a successful business using online marketing strategies. Internet marketing can include your website, search engine optimization, pay per click advertising, local search services, online reviews and social media.
Mikki Barker, owner of Web Concepts, will lead this exciting and informative session. She will base her presentation on a WordPress site that is online and you will be able to log into and work along with her if they want. Bring your laptop if you want to work along with Mikki.
단순한 디지털 트랜스포메이션에서 더 나아가 AI 트랜스포메이션으로 가고 있는 요즘.
AI가 어느새 바로 가까이 다가옴을 느끼는 지금.
선두 Telco 기술에 더하여 AI Company로 나아가는 SKT가 클라우드 기반 AI, Data 사업을 하는 기업 고객들에게 꼭 필요한 기술과 솔루션/서비스를 사례 중심으로 이야기하고자 합니다.
I did this presentation for one of my java user groups at work.
Basically, this is a mashed up version of various presentations, slides and images that I gathered over the internet.
I've quoted the sources in the end. Feel free to reuse it as you like.
At the Devoxx 2015 conference in Belgium, Guillaume Laforge, Product Ninja & Advocate at Restlet, presented about the never-ending REST API design debate, covering many topics like HTTP status codes, Hypermedia APIs, pagination/searching/filtering, and more.
Introduction to web application development with Vue (for absolute beginners)...Lucas Jellema
In this slide deck I show you how you can easily and quickly create quite rich web applications with Vue 3 – without having to study complex concepts or understand many technical details. I have only recently learned how to work with Vue 3 myself and now is the best time for me to share my learning experience (and my enthusiasm) with you. I know what I found essential to understand and what most got me excited in these early steps (what was a little bit hard to grasp). I believe that I can present my steps and guide you to experience the same fun and have a similarly gratifying experience. I am not an expert in this subject – I have barely learned how to walk and that is why I can help you with these first steps with Vue.
In this deck, I do not explain how Vue works. I do not really know that. I will show you how to work with it and how to create web applications that are functional, appealing, fast and responsive.
The approach I am taking is straightforward:
• I will tell you a little bit about web development, browsers and reactive frameworks
• I will show the hello world of Vue applications
• I will explain about components and nesting, events, data binding and reactive behavior and demonstrate these concepts
• I will introduce Vue UI Component libraries – and with no effort at all we will launch our application to the next level – with rich components to explore, manipulate, visualize data collections
• We will publish the web application from our development environment to where the whole world could see it – using GitHub Pages
• As bonus topic – we discuss state management
At the end of this session you will be able to quickly create a simple yet rich web application with Vue 3. You have a starting point to further evolve your skills with the many online resources I am convinced that you will enjoy your newfound powers and the simplicity and power of Vue 3.
Note: a tutorial accompanies this slide deck - see https://github.com/lucasjellema/code-face-vue3-intro-reactiive-webapps-aug2023/blob/main/README.md
PoP - “Platform of Platforms”: Framework for building Single-Page Application...Leonardo Losoviz
PoP creates Single-Page Application websites, by combining Wordpress and Handlebars into an MVC architecture framework:
- Wordpress is the model/back-end
- Handlebars templates are the view/front-end
- the PoP engine is the controller
For more information, visit https://getpop.org
I am Kefa J. I am a Database Management Homework Expert at databasehomeworkhelp.com. I hold a Ph.D. in Programming, Princeton University, USA. I have been helping students with their homework for the past 12 years. I solve homework related to Database Management.
Visit databasehomeworkhelp.com or email info@databasehomeworkhelp.com. You can also call on +1 678 648 4277 for any assistance with Database Management Homework.
This is what I created in 2006 - 2007. Inspired by Ruby on Rails, I wanted to have something similar for Java, J2EE that would accelerate building web apps. I have built few projects on top it and those worked pretty well.
We don't this. Java also has many solid options now like Play, Spring and more.
Mastering Test Automation: How To Use Selenium SuccessfullySpringPeople
In this slide, identify what to test and choose the best language for automation. Learn to write maintainable and reusable Selenium tests and add UI layout test as part of automation using Galen framework. This slide will also guide you in reporting structure by using external plugin's, an illustration covering cross browser testing (Running selenium grid with Docker) and explain Code repository (Git) and Jenkins CI tool.
Getting Started with React, When You’re an Angular DeveloperFabrit Global
If you’re an Angular developer looking into expanding your stack with React, this presentation will come in handy! It is an insightful introduction to React in comparison with Angular, where you will find all the basic knowledge you need to get started.
We’ll deep-dive into tech details such as:
● Virtual DOM
● JSX
● Functional vs Class-Based Components
● State
● How to Style
● Requests
● Upgrading: Redux and Flux and more!
You can also check out the full article version here: https://blog.fabritglobal.com/product-development/getting-started-with-react-angular-developer/
VirtualNuggets Offering All Java Technologies Corporate Online Training Services .Here VirtualNuggets Publishing Free Hibernate Tutorials For Java Learners .Topics Covers in Tutorial are Spring Overview,
Spring Architecture,
Spring Environment Setup
Spring Hello World Example
Spring IoC Containers
Spring Bean Definition
Spring Bean Scopes
Spring Bean Life Cycle
Spring Bean Post Processors
Spring Bean Definition Inheritance
Spring Dependency Injection
Spring Injecting Inner Beans
Spring Injecting Collection
Spring Beans Auto-Wiring
Spring Annotation Based Configuration
Spring Java Based Configuration
Spring Event Handling in Spring
Spring Custom Events in Spring
Spring AOP with Spring Framework
Spring JDBC Framework
Spring Transaction Management
Spring Web MVC Framework
Spring Logging with Log4J
Spring boot is a suite, pre-configured, pre-sugared set of frameworks/technologies to reduce boilerplate configuration providing you the shortest way to have a Spring web application up and running with smallest line of code/configuration out-of-the-box.
Dive into the innovative world of smart garages with our insightful presentation, "Exploring the Future of Smart Garages." This comprehensive guide covers the latest advancements in garage technology, including automated systems, smart security features, energy efficiency solutions, and seamless integration with smart home ecosystems. Learn how these technologies are transforming traditional garages into high-tech, efficient spaces that enhance convenience, safety, and sustainability.
Ideal for homeowners, tech enthusiasts, and industry professionals, this presentation provides valuable insights into the trends, benefits, and future developments in smart garage technology. Stay ahead of the curve with our expert analysis and practical tips on implementing smart garage solutions.
Expert Accessory Dwelling Unit (ADU) Drafting ServicesResDraft
Whether you’re looking to create a guest house, a rental unit, or a private retreat, our experienced team will design a space that complements your existing home and maximizes your investment. We provide personalized, comprehensive expert accessory dwelling unit (ADU)drafting solutions tailored to your needs, ensuring a seamless process from concept to completion.
Hello everyone! I am thrilled to present my latest portfolio on LinkedIn, marking the culmination of my architectural journey thus far. Over the span of five years, I've been fortunate to acquire a wealth of knowledge under the guidance of esteemed professors and industry mentors. From rigorous academic pursuits to practical engagements, each experience has contributed to my growth and refinement as an architecture student. This portfolio not only showcases my projects but also underscores my attention to detail and to innovative architecture as a profession.
Can AI do good? at 'offtheCanvas' India HCI preludeAlan Dix
Invited talk at 'offtheCanvas' IndiaHCI prelude, 29th June 2024.
https://www.alandix.com/academic/talks/offtheCanvas-IndiaHCI2024/
The world is being changed fundamentally by AI and we are constantly faced with newspaper headlines about its harmful effects. However, there is also the potential to both ameliorate theses harms and use the new abilities of AI to transform society for the good. Can you make the difference?
Transforming Brand Perception and Boosting Profitabilityaaryangarg12
In today's digital era, the dynamics of brand perception, consumer behavior, and profitability have been profoundly reshaped by the synergy of branding, social media, and website design. This research paper investigates the transformative power of these elements in influencing how individuals perceive brands and products and how this transformation can be harnessed to drive sales and profitability for businesses.
Through an exploration of brand psychology and consumer behavior, this study sheds light on the intricate ways in which effective branding strategies, strategic social media engagement, and user-centric website design contribute to altering consumers' perceptions. We delve into the principles that underlie successful brand transformations, examining how visual identity, messaging, and storytelling can captivate and resonate with target audiences.
Methodologically, this research employs a comprehensive approach, combining qualitative and quantitative analyses. Real-world case studies illustrate the impact of branding, social media campaigns, and website redesigns on consumer perception, sales figures, and profitability. We assess the various metrics, including brand awareness, customer engagement, conversion rates, and revenue growth, to measure the effectiveness of these strategies.
The results underscore the pivotal role of cohesive branding, social media influence, and website usability in shaping positive brand perceptions, influencing consumer decisions, and ultimately bolstering sales and profitability. This paper provides actionable insights and strategic recommendations for businesses seeking to leverage branding, social media, and website design as potent tools to enhance their market position and financial success.
1. Exadel, Inc.
“Professional Tools for Open Source”
1855 Gateway Blvd., Suite 770
Concord, CA 94520
info@exadel.com
www.exadel.com
925-363-9510
How to Write
Your Own JSF Components
Introduction......................................................................................................................................2
Building Instructions for This Tutorial............................................................................................3
Ant Folder....................................................................................................................................3
ExtLib Folder...............................................................................................................................4
JavaSource Folder........................................................................................................................4
WebContent Folder......................................................................................................................4
Root Folder ..................................................................................................................................4
General Tips for Building Components...........................................................................................5
Step 1: Components Skeleton..........................................................................................................6
Step 2: Adding Simple Attributes..................................................................................................11
Step 3: Adding JSF Support Attributes..........................................................................................16
Step 4: Attribute Binding...............................................................................................................18
Step 5: Component Binding...........................................................................................................21
Step 6: Final Version .....................................................................................................................24
Step 7: Creating a Deployable Jar File ..........................................................................................29
What Next? ....................................................................................................................................32
Additional Topics ......................................................................................................................32
JSF Resources............................................................................................................................32
2. How to Write Your Own JSF Components Introduction
page 2 of 32
Introduction
JavaServerTM
Faces is a technology that helps to build a user interface based on the
components approach. Using UI Components as building blocks simplifies the development,
slashes the number of code lines, and allows reusing the same components from one project to
the next.
What are the components we are speaking about? The Sun reference implementation of JSF
provides just a few very common components for Web forms, primitive tags for page layout, and
“dataTable” as a way to show the data set. The open source implementations of JSF don’t
provide much more. The commercial implementation of GUI Tools for JSF such as WebSphere
Application Developer and Java Studio Creator do come with significant additions to the set of
components that allows creating interfaces similar to that of Swing applications. However,
traditionally, the Web interface lacks all of the richness of thick-client analogs. A customer
might have an existing design that is not covered by the set of standard controls. Third-party
components vendors will try to create the most common components with a multitude of custom
parameters, but still these do not match the requirements for an individual Web application.
The JSF Specification in Section 1.2.2 mentions the Component Writer role along with Page
Writer and Application Developer roles. Writing a specific component set for a particular Web
application might be a good solution instead of trying to use existing ones that a customer might
not even accept.
Is it easy to write your own JSF UI component? Sun’s J2EE tutorial provides a section
dedicated to this topic. This paragraph describes an example with Map components giving an
overview of almost all the features you might need in developing your own components.
However, the example itself seems too complicated to use it as a beginning “kick start” type of
application. It gives a good overview of the technology, but does not give enough details for the
specific steps you would need to go through to write your own components.
This tutorial is dedicated to closing this gap. It is written in a step-by-step manner where
each step is extremely easy to understand. The provided example does not cover all the aspects
of components development, but it is a very good start to understand the idea. Topics not covered
in this tutorial are set forth in the last section.
3. How to Write Your Own JSF Components Building Instructions for This Tutorial
page 3 of 32
Building Instructions for This Tutorial
The tutorial consists of seven separate steps for building up an example application. Each
step adds new code to the previous example. The tutorial includes code representing the result of
each step. If you are lost, you can compare these target results with your results. Also, you might
want to add some extra feature to the code to test how it works. If this messes things up, you can
just replace your code with the included code to go on to the next step.
The tutorial material is divided into seven folders with the names Step1, Step2, Step3, Step4,
Step5, Step6, and Step7. Each folder contains only one subfolder named “ticker”. This subfolder
contains a working example that represents the result up to that particular step. Additionally, a
folder named Step0 contains the skeleton for starting the JSF project.
For this tutorial, you can use any tools that allow you to work directly with source code. We
recommend you to use Exadel JSF Studio. JSF Studio allows the running of JSF applications
without redeployment. This is extremely important when you play with the code by adding new
features to test how they work. At the same time, JSF Studio allows you to have full control over
the source code. We even recommend turning on the “Use Source Tab as a default for multi-tab
editors” option in the Preferences Editor (Exadel->Editors section). You can always use the GUI
feature of JSF Studio later to slash the development time when you start to understand enough
how things works on the source code level. The provided example is fully adapted to work with
Exadel JSF Studio.
Exadel JSF Studio allows debugging Web applications in the same manner in which you can
debug a regular Java application within the Eclipse environment. This is an extremely important
feature for learning.
To start working with the tutorial example, copy the “ticker” folder to a new place on the
disk. If you use JSF Studio, copy this folder to the Eclipse workspace folder (or wherever you
usually keep projects) and then import this project using the Eclipse File->Import menu. Leave
the server.xml registration option checked on the second screen of wizard. This allows you to
change and then run an application without any special redeployment.
Each ticker folder contains four subfolders:
• ant
• ExtLib
• JavaSource
• WebContent
Ant Folder
The ant folder contains the build.xml file that can be used to compile the example and
deploy it to a target servlet container to run. In order to use this script be sure that ant is in your
system path. The default Ant target is “deploy”, so if you launch Ant without parameters, it
create an additional folder named deploy and puts the deployable war file into it. If you want,
you can provide another folder as the target for deployment. Open the build.xml file for editing
and set the “deploy-dir” Ant property to the different target folder.
4. How to Write Your Own JSF Components Building Instructions for This Tutorial
page 4 of 32
ExtLib Folder
The ExtLib folder just contains the servlet.jar file that is required to be in the classpath to
have the code compiled. This jar file is added to the classpath only when you use the Ant script.
(This file is not used by JSF Studio). If you want, you can any replace it with you own library
that contains required classes for compilation. Replace the property with name ‘servlet.path’ for
this purpose.
JavaSource Folder
The JavaSource folder contains the java source files and resource bundle files.
WebContent Folder
The WebContent folder contains the pre-deployment structure for a standard J2EE
application.
Root Folder
Additionally, the root folder contains four files start with dot. Those files contain the
configuration for JSF Studio only.
5. How to Write Your Own JSF Components General Tips for Building Components
page 5 of 32
General Tips for Building Components
• Simulate a rendered result before implement it. Use any HTML editor with a
preview option to see how the HTML you are going to produce works buy itself. If
some HTML construction doesn’t work for you, you save time seeing the problem
before you start to implement the component that produces the unsatisfactory HTML
code.
• Localize the JavaScript functions. If the rendered code contains JavaScript, be sure
this JavaScript code doesn’t collide with JavaScript coding in other components that
will work on the same page.
• Test how your component works together with other JSF Components. Check the
situation where your components insert other components or are themselves inserted
as children for other components.
• Check how the rendered code works in the different browser. Avoid browser-specific
tags or attributes.
6. How to Write Your Own JSF Components Step 1: Components Skeleton
page 6 of 32
Step 1: Components Skeleton
Before we start, let’s see what we have at the beginning. The initial project taken from the
Step0 folder contains a short example that does nothing except open the bannerpage.jsp page
when the application starts. This JSP page will be used as a testing area for testing the rendered
component output.
After the final step we have got a scrollable area with the text inside. It will look like the
following picture:
In the first step we create a component that will be rendered into the following code in the
resulting HTML page:
<div>Hello JSF Component</div>
On the original JSF page we will have:
<d:ticker>
<f:verbatim>Hello JSF Component</f:verbatim>
</d:ticker>
Let’s start with creating the tag library definition file. Open the WEB-INF folder and create
a “ticker.tld” file that contains the following code:
<?xml version="1.0" encoding="UTF-8"?>
<!DOCTYPE taglib PUBLIC "-//Sun Microsystems, Inc.//DTD JSP Tag Library 1.2//EN"
"http://java.sun.com/dtd/web-jsptaglibrary_1_2.dtd">
<taglib>
<tlib-version>1.0</tlib-version>
<jsp-version>1.2</jsp-version>
<short-name>d</short-name>
<uri>http://jsftutorials.com/</uri>
<tag>
<name>ticker</name>
<tag-class>ticker.TickerTag</tag-class>
<body-content>JSP</body-content>
</tag>
</taglib>
We have declared the new tag with the name “ticker” and defined ticker.TickerTag as a tag
class. Open JavaSource folder; create a package “ticker” there and the class TickerTag there that
contains the following code:
7. How to Write Your Own JSF Components Step 1: Components Skeleton
page 7 of 32
package ticker;
import javax.faces.component.UIComponent;
import javax.faces.webapp.UIComponentTag;
public class TickerTag extends UIComponentTag{
public void release() {
// the super class method should be called
super.release();
}
protected void setProperties(UIComponent component) {
// the super class method should be called
super.setProperties(component);
}
public String getComponentType() {
return "ticker";
}
public String getRendererType() {
// null means the component renders itself
return null;
}
}
The class TickerTag processes the tag attribute. Such a class name has the suffix ”Tag” by a
naming convention. The TickerTag class extends UIConponentTag and implements four
methods.
The getComponentType() method returns the symbolic name of the component type. We
will define the class for this type latter in the faces-config file.
The getRendererType() method returns the symbolic name of the renderer. If
getRendererType() returns null, it means that the renderer name is not defined and the
component will render it by itself.
The release() method releases any resources allocated during the execution of this tag
handler. We will use this method to reset the attribute values. The release() method should call
the release() method of the super class.
And the last (but not least) method, setProperties(UIComponent component), is used to pass
attributes taken from the JSP page to the renderer. You can use the JSF Expression Language in
the value for the tag attribute. This is also resolved by the setProperties method. We will return
back to this theme in step 4 of this tutorial.
Now let’s define the component class for the component type declared above. Open WEB-
INF/faces-config.xml and put the declaration there. The faces-config.xml should contain the
following code:
<?xml version="1.0" encoding="UTF-8"?>
<!DOCTYPE faces-config PUBLIC "-//Sun Microsystems, Inc.//DTD JavaServer Faces Config 1.0//EN"
"http://java.sun.com/dtd/web-facesconfig_1_0.dtd">
<faces-config>
<component>
<component-type>ticker</component-type>
<component-class>ticker.UITicker</component-class>
</component>
<lifecycle/>
8. How to Write Your Own JSF Components Step 1: Components Skeleton
page 8 of 32
<application>
<locale-config/>
</application>
<factory/>
</faces-config>
We have defined the ticker.UITicker class as a component class for the “ticker” type. By a
naming convention, such a class starts with the “UI” prefix. The component class provides a
rendering user interface, state saving and restoring, and processing of user input.
Create the tickerUITicker class with the following content:
package ticker;
import java.io.IOException;
import javax.faces.component.UIOutput;
import javax.faces.context.FacesContext;
import javax.faces.context.ResponseWriter;
public class UITicker extends UIOutput {
public void encodeBegin(FacesContext context) throws IOException {
ResponseWriter writer = context.getResponseWriter();
writer.startElement("div", this);
}
public void encodeEnd(FacesContext context) throws IOException {
ResponseWriter writer = context.getResponseWriter();
writer.endElement("div");
}
}
Because our custom component does not provide for any user input, we extend the class
from the UIOutput. The UITicker class implements two methods encodeBegin(FacesContext
context) and encodeEnd(FacesContext context). The first method encodes the opening tag; the
second one encodes the closing tag. However, if your tags do not contain a body, it is
recommended to encode everything using only the encodeEnd(FacesContext context) method.
Now let’s create the page where our custom tag will be used. Open the bannerpage.jsp page
located inside the WebContent folder and add a taglib declaration and our tag with test output.
The page should look like:
<%@ taglib uri="http://java.sun.com/jsf/html" prefix="h" %>
<%@ taglib uri="http://java.sun.com/jsf/core" prefix="f" %>
<%@ taglib uri="http://jsftutorials.com/" prefix="d" %>
<html>
<head>
<title>Show Custom Component</title>
</head>
<body>
<f:view>
<d:ticker>
<f:verbatim>Hello JSF Component</f:verbatim>
</d:ticker>
</f:view>
</body>
</html>
9. How to Write Your Own JSF Components Step 1: Components Skeleton
page 9 of 32
There are two things important to mention here. The first thing concerns the URI attribute.
Many people think that this attribute must be a reference to an existing URL, but this is not quite
true. A URI is not the same as a URL. The target of this attribute is defining the unique string
that will distinguish this particular taglib from the others.
The second important thing is using <f:verbatim> </f:verbatim> around the plain text. When
the JSF Components tree is rendered, it contains only the JSF Components. So, any children in
the hierarchy must be JSF components. If you run the first example, there might not be any
difference, because <d:ticker> is a root node of the JSF Component hierarchy. However, in case
you add <h:gridPanel>, for example, around it, you will find that the plain text without
<f:verbatim> will be pushed out of the <div></div> in the rendered page.
At this point, our first step has been finished. We can compile, deploy, and run the result
application. If you use Ant to do this job, run Ant so that the ticker.war file is copied to the
servlet container to run.
If you’re using JSF Studio, click the Start Tomcat Server button on the toolbar, and then
click the Run Web Application button. The default browser should be launched and show the
result of page rendering.
You can see the “Hello JSF Component” text in the browser window. Because <div> itself
does not provide any visual effect, you can recognize that the page is rendered as we expected
only if you look at the source of the result page. It should contain the “<div>Hello JSF
Component</div>” text. If so, the first step is done. You have already written you first JSF
Component. Of course, it has very limited functionality, but we just laid the foundation. The
component will be improved in the next step.
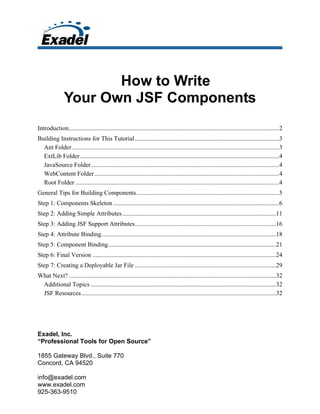
Before we go any further, let’s survey the relationships among the different JSF artifacts we
are using here. The following picture shows this relationship:
10. How to Write Your Own JSF Components Step 1: Components Skeleton
page 10 of 32
11. How to Write Your Own JSF Components Step 2: Adding Simple Attributes
page 11 of 32
Step 2: Adding Simple Attributes
This step is devoted to adding attributes to our custom tag. As we mentioned for the first
step, tag <div> does not provide any visible effect. So, in the second step, we will add attributes
that make more visible results. Commonly, visual JSF tags define the tag style directly with style
and styleClass attributes or indirectly by using the Cascading Style Sheet file.
Let’s start with the style attribute. Add it to the JSP page. The JSP page will look like this:
<%@ taglib uri="http://java.sun.com/jsf/html" prefix="h" %>
<%@ taglib uri="http://java.sun.com/jsf/core" prefix="f" %>
<%@ taglib uri="http://jsftutorials.com/" prefix="d" %>
<html>
<head>
<title>Show Custom Component</title>
</head>
<body>
<f:view>
<d:ticker style="border:1px solid darkblue;width:100px">
<f:verbatim>Hello JSF Component</f:verbatim>
</d:ticker>
</f:view>
</body>
</html>
Add the tag attribute to the ticker.tld file:
<?xml version="1.0" encoding="UTF-8"?>
<!DOCTYPE taglib PUBLIC "-//Sun Microsystems, Inc.//DTD JSP Tag Library 1.2//EN"
"http://java.sun.com/dtd/web-jsptaglibrary_1_2.dtd">
<taglib>
<tlib-version>1.0</tlib-version>
<jsp-version>1.2</jsp-version>
<short-name>d</short-name>
<uri>http://jsftutorials.com/</uri>
<tag>
<name>ticker</name>
<tag-class>ticker.TickerTag</tag-class>
<body-content>JSP</body-content>
<attribute>
<name>style</name>
</attribute>
</tag>
</taglib>
Add the following code marked with bold to the TickerTag class:
package ticker;
import javax.faces.component.UIComponent;
import javax.faces.webapp.UIComponentTag;
public class TickerTag extends UIComponentTag{
String style;
public String getStyle() {
return style;
}
public void setStyle(String style) {
this.style = style;
}
12. How to Write Your Own JSF Components Step 2: Adding Simple Attributes
page 12 of 32
public void release() {
// the super class method should be called
super.release();
style = null ;
}
protected void setProperties(UIComponent component) {
// the super class method should be called
super.setProperties(component);
if(style != null)
component.getAttributes().put("style", style);
}
public String getComponentType() {
return "ticker";
}
public String getRendererType() {
// null means the component renders itself
return null;
}
}
First, we have added a new property with the name ”style” and provided the getter and setter
for it. Then, we reset the property in the release() method. Finally, we have set the new value for
the component property in the setProperties(UIComponent component) method. The last step is
important. If you forget to do so, you cannot get to the value in the component type class later
on.
Add the code marked with bold to the ticker.UITicker class:
package ticker;
import java.io.IOException;
import javax.faces.component.UIOutput;
import javax.faces.context.FacesContext;
import javax.faces.context.ResponseWriter;
public class UITicker extends UIOutput {
public void encodeBegin(FacesContext context) throws IOException {
ResponseWriter writer = context.getResponseWriter();
writer.startElement("div", this);
String style = (String)getAttributes().get("style");
if (style!=null)
writer.writeAttribute("style", style, null);
}
public void encodeEnd(FacesContext context) throws IOException {
ResponseWriter writer = context.getResponseWriter();
writer.endElement("div");
}
}
In the first added line, we have taken the value of the style attribute, checked if it’s set, and
then assigned the style attribute with the new value. Do not forget to check for null, otherwise
you will get a NullPointer Exception when a tag without this attribute set is rendered.
13. How to Write Your Own JSF Components Step 2: Adding Simple Attributes
page 13 of 32
Now, we are done with the style attribute. If you use JSF Studio just click the Run Web
Application button to get a result. If you are using an Ant script, run it, deploy the result war file
under the servlet container, then launch your browser and type the application URL.
The result page should see the box with dark blue border and the Hello JSF Component text
inside this box.
Adding the styleClass component is very similar to what we did for style. Here is a
bannerpage.jsp content:
<%@ taglib uri="http://java.sun.com/jsf/html" prefix="h" %>
<%@ taglib uri="http://java.sun.com/jsf/core" prefix="f" %>
<%@ taglib uri="http://jsftutorials.com/" prefix="d" %>
<html>
<head>
<title>Show Custom Component</title>
<style>
.banner {
border: 1px solid darkblue;
padding: 5px 5px 5px 5px;
}
</style>
</head>
<body>
<f:view>
<d:ticker styleClass="banner" style="width:100px">
<f:verbatim>Hello JSF Component</f:verbatim>
</d:ticker>
</f:view>
</body>
</html>
This is the ticker.tld file content:
<?xml version="1.0" encoding="UTF-8"?>
<!DOCTYPE taglib PUBLIC "-//Sun Microsystems, Inc.//DTD JSP Tag Library 1.2//EN"
"http://java.sun.com/dtd/web-jsptaglibrary_1_2.dtd">
<taglib>
<tlib-version>1.0</tlib-version>
<jsp-version>1.2</jsp-version>
<short-name>d</short-name>
<uri>http://jsftutorials.com/</uri>
<tag>
<name>ticker</name>
<tag-class>ticker.TickerTag</tag-class>
<body-content>JSP</body-content>
<attribute>
<name>style</name>
</attribute>
<attribute>
<name>styleClass</name>
</attribute>
</tag>
</taglib>
This is the TickerTag.java class content:
package ticker;
import javax.faces.component.UIComponent;
import javax.faces.webapp.UIComponentTag;
public class TickerTag extends UIComponentTag{
String style;
14. How to Write Your Own JSF Components Step 2: Adding Simple Attributes
page 14 of 32
String styleClass;
public String getStyle() {
return style;
}
public void setStyle(String style) {
this.style = style;
}
public String getStyleClass() {
return styleClass;
}
public void setStyleClass(String styleClass) {
this.styleClass = styleClass;
}
public void release() {
// the super class method should be called
super.release();
style = null ;
styleClass = null ;
}
protected void setProperties(UIComponent component) {
// the super class method should be called
super.setProperties(component);
if(style != null)
component.getAttributes().put("style", style);
if(styleClass != null)
component.getAttributes().put("styleClass", styleClass);
}
public String getComponentType() {
return "ticker";
}
public String getRendererType() {
// null means the component renders itself
return null;
}
}
This is the UITicker.java file content:
package ticker;
import java.io.IOException;
import javax.faces.component.UIOutput;
import javax.faces.context.FacesContext;
import javax.faces.context.ResponseWriter;
public class UITicker extends UIOutput {
public void encodeBegin(FacesContext context) throws IOException {
ResponseWriter writer = context.getResponseWriter();
writer.startElement("div", this);
String style = (String)getAttributes().get("style");
if (style!=null)
15. How to Write Your Own JSF Components Step 2: Adding Simple Attributes
page 15 of 32
writer.writeAttribute("style", style, null);
String styleClass = (String)getAttributes().get("styleClass");
if (styleClass!=null)
writer.writeAttribute("class", styleClass, null);
}
public void encodeEnd(FacesContext context) throws IOException {
ResponseWriter writer = context.getResponseWriter();
writer.endElement("div");
}
}
Now, step 2 is done. Run the resulting application. The browser window should show the
bordered box with the Hello JSF Component text inside. Unlike the previous run, you will see 5
pixels of space between the text and the border.
16. How to Write Your Own JSF Components Step 3: Adding JSF Support Attributes
page 16 of 32
Step 3: Adding JSF Support Attributes
Looking at the source code of pages rendered by the JSF run-time you can see that most
components have an id. They have this attribute assigned even you don’t explicitly define it for
the JSF tags.
Also, JSF has its own naming convention for the component id. While you might specify
something like id=”myId” for h:inputText, the rendered code will contain something like
id=”_id0:myId”. This is done to ensure the uniqueness of each element in the JSF Component
tree. It is especially important for components that process user input. Having the full control
over the rendered code you can assign any value for id, but we recommend you to follow the
rules of the game.
In step 3, we will assign a value for our component that will be the same value that JSF run-
time assigns for it.
Any attribute should be present in the tag library definition file. So, open our ticker.tld file
and add the following code snippet next to the other tag attributes:
<attribute>
<name>id</name>
</attribute>
Add the following code marked with bold in the encodeBegin method of the UITicker.java:
public void encodeBegin(FacesContext context) throws IOException {
ResponseWriter writer = context.getResponseWriter();
writer.startElement("div", this);
writer.writeAttribute("id", getClientId(context), null);
String style = (String)getAttributes().get("style");
if (style!=null)
writer.writeAttribute("style", style, null);
String styleClass = (String)getAttributes().get("styleClass");
if (styleClass!=null)
writer.writeAttribute("class", styleClass, null);
}
When you run the application at this point, you can see that the id attribute of the <div> tag
is assigned. Because the id attribute has no visual effect, you have to open the source of the
resulting page to see it.
Provide your id for the <d:ticker> component and run the application again. Then, you will
see that the id you have for the rendered code is the same that you assign. This happens because
the <d:ticker> is a root element of the component tree. If you add <h:form> or <h:subview>
around it, you can the that the same prefix is added to the value you assigned for id.
We are done with “id” attribute. Now, let’s use the “rendered” attribute. This attribute can
be used with any JSF Component, because it is inherited from the UIComponent class, the top
level of the JSF Component hierarchy. The “rendered” attribute itself is not passed through to the
17. How to Write Your Own JSF Components Step 3: Adding JSF Support Attributes
page 17 of 32
HTML code as a tag attribute, but, if it has been set to “false,” the tag with all of its children will
not be rendered at all.
It is pretty easy to add a “rendered” attribute. Just add it into the ticker.tld and all is set.
<attribute>
<name>rendered</name>
</attribute>
Add rendered=”false” to the <d:ticker> tag, run the application and see what happens. The
browser should show the empty page. When you assign the ”true” value, the page will show the
box with a greeting again.
This is a good time to show why <f:verbatim> is important for this construction. Remove
<f:verbatim> around the Hello JSF Component text, write rendered=”false” and run the
application. You can see that the box disappears, but the greeting text is still there. Looking at
the resulting code, you can realize that the <div> tag is stripped out.
18. How to Write Your Own JSF Components Step 4: Attribute Binding
page 18 of 32
Step 4: Attribute Binding
Attribute binding is one of the most powerful JSF features. You can take the value from a
bean property or resource bundle property rather than just hardcode it into your JSP file. In step
4, we add one new attribute with the name “title” whose value will be taken from the resource
bundle instead of defining it directly in the JSP file (that’s also possible).
In order to separate the designed component and the code that test it, lets create an additional
package with the name “demo” within the JavaSource folder. In the “demo” package, create the
file with the name “resources.properties” with the following content:
banner_title=Creating JSF Components. Step-By-Step Tutorial.
Add the new attribute with the name “title” to the ticker.tld file next to the other attribute of
the “ticker” tag.
<attribute>
<name>title</name>
</attribute>
Add the text marked with bold to the ticker.TickerTag.java file:
package ticker;
import javax.faces.component.UIComponent;
import javax.faces.el.ValueBinding;
import javax.faces.webapp.UIComponentTag;
public class TickerTag extends UIComponentTag{
String style;
String styleClass;
String title;
public String getStyle() {
return style;
}
public void setStyle(String style) {
this.style = style;
}
public String getStyleClass() {
return styleClass;
}
public void setStyleClass(String styleClass) {
this.styleClass = styleClass;
}
public String getTitle() {
return title;
}
public void setTitle(String title) {
this.title = title;
}
public void release() {
19. How to Write Your Own JSF Components Step 4: Attribute Binding
page 19 of 32
// the super class method should be called
super.release();
style = null ;
styleClass = null ;
title = null;
}
protected void setProperties(UIComponent component) {
// the super class method should be called
super.setProperties(component);
if(style != null)
component.getAttributes().put("style", style);
if(styleClass != null)
component.getAttributes().put("styleClass", styleClass);
if (title != null) {
if (isValueReference(title)) {
ValueBinding vb =
getFacesContext().getApplication().
createValueBinding(title);
component.setValueBinding("title", vb);
} else {
component.getAttributes().put("title", title);
}
}
}
public String getComponentType() {
return "ticker";
}
public String getRendererType() {
// null means the component renders itself
return null;
}
}
The most important part of the added code is inside the SetProperties method. We check
there to see if this value is referenced and if so we create the value binding. Otherwise, we just
pass the value taken from the JSP page.
The other code is similar to what we did previously. Add the code marked with bold to the
encodeBegin method of the ticker.UITicker.java file:
public void encodeBegin(FacesContext context) throws IOException {
ResponseWriter writer = context.getResponseWriter();
writer.startElement("div", this);
writer.writeAttribute("id", getClientId(context), null);
String style = (String)getAttributes().get("style");
if (style!=null)
writer.writeAttribute("style", style, null);
String styleClass = (String)getAttributes().get("styleClass");
if (styleClass!=null)
writer.writeAttribute("class", styleClass, null);
String title = (String)getAttributes().get("title");
if (title!=null)
writer.writeAttribute("title", title, null);
}
20. How to Write Your Own JSF Components Step 4: Attribute Binding
page 20 of 32
Add the following code marked with bold to the bannerpage.jsp file:
<%@ taglib uri="http://java.sun.com/jsf/html" prefix="h" %>
<%@ taglib uri="http://java.sun.com/jsf/core" prefix="f" %>
<%@ taglib uri="http://jsftutorials.com/" prefix="d" %>
<f:loadBundle basename="demo.resources" var="bundle" />
<html>
<head>
<title>Show Custom Component</title>
<style>
.banner {
border: 1px solid darkblue;
padding: 5px 5px 5px 5px;
}
</style>
</head>
<body>
<f:view>
<d:ticker id="banner"
styleClass="banner"
style="width:100px"
rendered="true"
title="#{bundle.banner_title}">
<f:verbatim>Hello JSF Component</f:verbatim>
</d:ticker>
</f:view>
</body>
</html>
We have added here the reference to our bundle and taken the banner_title property as a title
attribute for the <d:ticker> tag.
Now, we are done with step 4 of our tutorial. Run the application and hold the mouse cursor
over the box. The tip message should appear. If you look at the source code on the rendered
page, you can see the title attribute set to a value taken from the resource bundle property.
21. How to Write Your Own JSF Components Step 5: Component Binding
page 21 of 32
Step 5: Component Binding
One more powerful feature of the JSF technology is component binding. Unlike value
binding, component binding allows controlling all of the aspects of a bound component and its
child hierarchy from a Java class that is usually called a “backing bean.”
In step 5, we will demonstrate how this mechanism works. We will add a form with two
buttons to our bannerpage.jsp page. One button will hide the box for our greeting message; the
other button will return it back to the page. We will also create a backing bean that will control
the form and the component located inside the form.
Actually, the binding mechanism is provided by the super class of our component. All we
have to do it to add a new attribute with the name “binding” to the ticker.tld file. All other stuff
added on this step has a testing purpose.
So, this is our ticker.tld file content:
<?xml version="1.0" encoding="UTF-8"?>
<!DOCTYPE taglib PUBLIC "-//Sun Microsystems, Inc.//DTD JSP Tag Library 1.2//EN"
"http://java.sun.com/dtd/web-jsptaglibrary_1_2.dtd">
<taglib>
<tlib-version>1.0</tlib-version>
<jsp-version>1.2</jsp-version>
<short-name>d</short-name>
<uri>http://jsftutorials.com/</uri>
<tag>
<name>ticker</name>
<tag-class>ticker.TickerTag</tag-class>
<body-content>JSP</body-content>
<attribute>
<name>style</name>
</attribute>
<attribute>
<name>styleClass</name>
</attribute>
<attribute>
<name>id</name>
</attribute>
<attribute>
<name>rendered</name>
</attribute>
<attribute>
<name>title</name>
</attribute>
<attribute>
<name>binding</name>
</attribute>
</tag>
</taglib>
Add the code marked with bold to the faces-config.xml file:
<?xml version="1.0" encoding="UTF-8"?>
<!DOCTYPE faces-config
PUBLIC "-//Sun Microsystems, Inc.//DTD JavaServer Faces Config 1.0//EN"
"http://java.sun.com/dtd/web-facesconfig_1_0.dtd">
<faces-config>
<component>
<component-type>ticker</component-type>
<component-class>ticker.UITicker</component-class>
</component>
<managed-bean>
22. How to Write Your Own JSF Components Step 5: Component Binding
page 22 of 32
<managed-bean-name>BannerPageBean</managed-bean-name>
<managed-bean-class>demo.BannerPageBean</managed-bean-class>
<managed-bean-scope>request</managed-bean-scope>
<managed-property>
<property-name>rendered</property-name>
<property-class>java.lang.Boolean</property-class>
<value>true</value>
</managed-property>
</managed-bean>
<lifecycle/>
<application>
<locale-config/>
</application>
<factory/>
</faces-config>
We have added the managed bean with name BannerPageBean that will play the role on
backing bean for our form. We also have defined the “rendered” property that is set to true by
default.
Create new file with the name BannerPageBean.java inside the “demo” package. Here is the
content of this file:
package demo;
import ticker.UITicker;
public class BannerPageBean {
Boolean rendered;
UITicker ticker;
public Boolean getRendered() {
return rendered;
}
public void setRendered(Boolean rendered) {
this.rendered = rendered;
}
public UITicker getTicker() {
return ticker;
}
public void setTicker(UITicker ticker) {
this.ticker = ticker;
}
public UITicker getTiker() {
return ticker;
}
public void setTiker(UITicker tiker) {
this.ticker = tiker;
}
public String TurnOn() {
ticker.setRendered(true);
return null;
}
public String TurnOff() {
ticker.setRendered(false);
return null;
}
23. How to Write Your Own JSF Components Step 5: Component Binding
page 23 of 32
}
The bean has two properties: rendered that has a Boolean type and ticker that has a type of
our UITicker class. The two last methods will be called when you click the buttons on the page.
Those methods call the setter of the “rendered” property of the ticker. Actually, you have full
control over the ticker component here and can change any attribute you need.
The bannerpage.jsp file should contain the following:
<%@ taglib uri="http://java.sun.com/jsf/html" prefix="h" %>
<%@ taglib uri="http://java.sun.com/jsf/core" prefix="f" %>
<%@ taglib uri="http://jsftutorials.com/" prefix="d" %>
<f:loadBundle basename="demo.resources" var="bundle" />
<html>
<head>
<title>Show Custom Component</title>
<style>
.banner {
border: 1px solid darkblue;
padding: 5px 5px 5px 5px;
}
</style>
</head>
<body>
<f:view>
<h:form>
<h:commandButton value="Turn Off" action="#{BannerPageBean.TurnOff}"/>
<h:commandButton value="Turn On" action="#{BannerPageBean.TurnOn}"/>
<d:ticker id="banner"
styleClass="banner"
style="width:100px"
title="#{bundle.banner_title}"
binding="#{BannerPageBean.ticker}">
<f:verbatim>Hello JSF Component</f:verbatim>
</d:ticker>
</h:form>
</f:view>
</body>
</html>
The “binding” attribute of our component refers to the “ticker” property of the backing bean.
The buttons action attribute calls the corresponding method.
We are done with step 5. When you launch your application you can see our fancy box and
two buttons above them. Click the “Turn Off” button and the box disappears, click the “Turn
On” button and the box appears again.
24. How to Write Your Own JSF Components Step 6: Final Version
page 24 of 32
Step 6: Final Version
In this step, we set up our component with the look and feel we mentioned in the first step.
Additionally, we assign a couple new attributes: width and height. It will be more convenient to
define the value directly rather then use the style attribute. If you define width and height in the
style and add width and height attributes for the custom tag at the same time, the attributes will
overwrite the values defined with the style.
Add “width” and “height” attribute to the ticker.tld file. Here is the final version of it:
<?xml version="1.0" encoding="UTF-8"?>
<!DOCTYPE taglib PUBLIC "-//Sun Microsystems, Inc.//DTD JSP Tag Library 1.2//EN"
"http://java.sun.com/dtd/web-jsptaglibrary_1_2.dtd">
<taglib>
<tlib-version>1.0</tlib-version>
<jsp-version>1.2</jsp-version>
<short-name>d</short-name>
<uri>http://jsftutorials.com/</uri>
<tag>
<name>ticker</name>
<tag-class>ticker.TickerTag</tag-class>
<body-content>JSP</body-content>
<attribute>
<name>style</name>
</attribute>
<attribute>
<name>styleClass</name>
</attribute>
<attribute>
<name>id</name>
</attribute>
<attribute>
<name>rendered</name>
</attribute>
<attribute>
<name>title</name>
</attribute>
<attribute>
<name>binding</name>
</attribute>
<attribute>
<name>width</name>
</attribute>
<attribute>
<name>height</name>
</attribute>
</tag>
</taglib>
Add the code marked with bold to the TickerTag.java file:
package ticker;
import javax.faces.component.UIComponent;
import javax.faces.el.ValueBinding;
import javax.faces.webapp.UIComponentTag;
public class TickerTag extends UIComponentTag{
String style;
String styleClass;
String title;
String width;
String height;
25. How to Write Your Own JSF Components Step 6: Final Version
page 25 of 32
public String getHeight() {
return height;
}
public void setHeight(String height) {
this.height = height;
}
public String getWidth() {
return width;
}
public void setWidth(String width) {
this.width = width;
}
public String getStyle() {
return style;
}
public void setStyle(String style) {
this.style = style;
}
public String getStyleClass() {
return styleClass;
}
public void setStyleClass(String styleClass) {
this.styleClass = styleClass;
}
public String getTitle() {
return title;
}
public void setTitle(String title) {
this.title = title;
}
public void release() {
// the super class method should be called
super.release();
style = null ;
styleClass = null ;
title = null;
height = null;
width = null;
}
protected void setProperties(UIComponent component) {
// the super class method should be called
super.setProperties(component);
if(style != null)
component.getAttributes().put("style", style);
if(styleClass != null)
component.getAttributes().put("styleClass", styleClass);
if(width != null)
component.getAttributes().put("width", width);
if(height != null)
component.getAttributes().put("height", height);
if (title != null) {
if (isValueReference(title)) {
ValueBinding vb =
26. How to Write Your Own JSF Components Step 6: Final Version
page 26 of 32
getFacesContext().getApplication().
createValueBinding(title);
component.setValueBinding("title", vb);
} else {
component.getAttributes().put("title", title);
}
}
}
public String getComponentType() {
return "ticker";
}
public String getRendererType() {
// null means the component renders itself
return null;
}
}
This is a final version of the UITicker.java file:
package ticker;
import java.io.IOException;
import javax.faces.component.UIOutput;
import javax.faces.context.FacesContext;
import javax.faces.context.ResponseWriter;
public class UITicker extends UIOutput {
public void encodeBegin(FacesContext context) throws IOException {
ResponseWriter writer = context.getResponseWriter();
writer.startElement("div", this);
writer.writeAttribute("id", getClientId(context), null);
String width = (String)getAttributes().get("width");
String height = (String)getAttributes().get("height");
String style = (String)getAttributes().get("style");
style= (style!=null) ? style + ";" : "";
if (width != null) style += "width:" + width + ";";
if (height != null) style += "height:" + height+ ";";
writer.writeAttribute("style", style, null);
String styleClass = (String)getAttributes().get("styleClass");
if (styleClass!=null)
writer.writeAttribute("class", styleClass, null);
String title = (String)getAttributes().get("title");
if (title!=null)
writer.writeAttribute("title", title, null);
}
public void encodeEnd(FacesContext context) throws IOException {
ResponseWriter writer = context.getResponseWriter();
writer.endElement("div");
}
27. How to Write Your Own JSF Components Step 6: Final Version
page 27 of 32
}
The HTML <div> tag itself does not have the “width” and “height” attributes. So, we use a
little trick here. We add the width and height to the tail of the style attribute. If style attribute
does not exist we create it.
This is a final version of the bannerpage.jsp file:
<%@ taglib uri="http://java.sun.com/jsf/html" prefix="h" %>
<%@ taglib uri="http://java.sun.com/jsf/core" prefix="f" %>
<%@ taglib uri="http://jsftutorials.com/" prefix="d" %>
<f:loadBundle basename="demo.resources" var="bundle" />
<html>
<head>
<title>Show Custom Component</title>
<style>
.banner {
border: 1px solid darkblue;
padding: 5px 5px 5px 5px;
overflow: auto;
}
</style>
</head>
<body>
<f:view>
<h:form>
<h:commandButton value="Turn Off" action="#{BannerPageBean.TurnOff}"/>
<h:commandButton value="Turn On" action="#{BannerPageBean.TurnOn}"/>
<d:ticker id="banner"
width="300px"
height="200px"
styleClass="banner"
title="#{bundle.banner_title}"
binding="#{BannerPageBean.ticker}">
<h:panelGrid columns="1">
<h:outputText value="Introduction"/>
<h:outputText value="Building Instructions for This Tutorial"/>
<h:outputText value="General Tips for Building Components"/>
<h:outputText value="Step 1: Components Skeleton"/>
<h:outputText value="Step 2: Adding Simple Attributes"/>
<h:outputText value="Step 3: Adding JSF Support Attributes"/>
<h:outputText value="Step 4: Attribute Binding"/>
<h:outputText value="Step 5: Component Binding"/>
<h:outputText value="Step 6: Final Version"/>
<h:outputText value="Step 7: Creating a Deployable Jar File"/>
<h:outputText value="What Next?"/>
</h:panelGrid>
</d:ticker>
</h:form>
</f:view>
</body>
</html>
We have added the “overflow: auto” to the style class to make our text area scrollable,
replaced a style attribute with the two size attributes and, finally, replaced the text greeting
message with something new one. You can put any other code here if you want.
Run and test the application. It should show the scrollable text area with the dark blue border
around it. If you see this, you have successfully passed the tutorial. We have only one more
28. How to Write Your Own JSF Components Step 6: Final Version
page 28 of 32
question to answer: How to distribute what we have done? We will dedicate the last step to this
question.
29. How to Write Your Own JSF Components Step 7: Creating a Deployable Jar File
page 29 of 32
Step 7: Creating a Deployable Jar File
OK. We have created our own JSF component or, even have written a whole custom tag
library. How do we make it reusable? How do we distribute it?
Of course, you can copy your classes and TLD file to the new project and add records to the
faces-config.xml file. It will work. However, this would be inconvenient to do each time,
especially if your library contains several dozen tags with double that number of class files all
requiring filling in the faces-config.xml file with references to those classes. No, this is definitely
not a good way. We will choice another one.
We will gather all of the information inside just one jar file and this will be the only one file
we have to distribute.
To make a long story short, this is the structure of our taglib jar file:
The package “ticker” contains compiled classes for our ticker component. The top level
META-INF folder contains the TLD file. It also contains the faces-config.xml file where the
components, but nothing else are defined.
To separate the components configuration from other stuff in the configuration file, let’s
split faces-config.xml into two files.
Create the WEB-INF/faces-config-demo.xml file with the following content:
<?xml version="1.0" encoding="UTF-8"?>
<!DOCTYPE faces-config PUBLIC "-//Sun Microsystems, Inc.//DTD JavaServer Faces Config 1.0//EN"
"http://java.sun.com/dtd/web-facesconfig_1_0.dtd">
<faces-config>
<managed-bean>
<managed-bean-name>BannerPageBean</managed-bean-name>
<managed-bean-class>demo.BannerPageBean</managed-bean-class>
<managed-bean-scope>request</managed-bean-scope>
<managed-property>
<property-name>rendered</property-name>
<property-class>java.lang.Boolean</property-class>
<value/>
</managed-property>
</managed-bean>
<application>
<locale-config/>
</application>
<factory/>
<lifecycle/>
</faces-config>
Remove the information about the managed bean from the faces-config.xml file. The
resulting content of this file will then be the following:
<?xml version="1.0" encoding="UTF-8"?>
30. How to Write Your Own JSF Components Step 7: Creating a Deployable Jar File
page 30 of 32
<!DOCTYPE faces-config PUBLIC "-//Sun Microsystems, Inc.//DTD JavaServer Faces Config 1.0//EN"
"http://java.sun.com/dtd/web-facesconfig_1_0.dtd">
<faces-config>
<component>
<component-type>ticker</component-type>
<component-class>ticker.UITicker</component-class>
</component>
<application>
<locale-config/>
</application>
<factory/>
<lifecycle/>
</faces-config>
To have our demo application working, we have to add the information about the new
configuration file into the web.xml. This will be the content of this file:
<?xml version="1.0" encoding="UTF-8"?>
<web-app xmlns="http://java.sun.com/xml/ns/j2ee"
xmlns:xsi="http://www.w3.org/2001/XMLSchema-instance"
xsi:schemaLocation="http://java.sun.com/xml/ns/j2ee web-app_2_4.xsd" version="2.4">
<context-param>
<param-name>javax.faces.STATE_SAVING_METHOD</param-name>
<param-value>server</param-value>
</context-param>
<context-param>
<param-name>javax.faces.CONFIG_FILES</param-name>
<param-value>/WEB-INF/faces-config.xml,/WEB-INF/faces-config-demo.xml</param-value>
</context-param>
<listener>
<listener-class>com.sun.faces.config.ConfigureListener</listener-class>
</listener>
<servlet>
<servlet-name>Faces Servlet</servlet-name>
<servlet-class>javax.faces.webapp.FacesServlet</servlet-class>
<load-on-startup>1</load-on-startup>
</servlet>
<servlet-mapping>
<servlet-name>Faces Servlet</servlet-name>
<url-pattern>*.jsf</url-pattern>
</servlet-mapping>
</web-app>
To make assembling the resulting jar file archive easier, we need to add the following code
into the build.xml file:
<property name="taglib.distname" value="mylib.jar"/>
<property name="taglibdeploy.dir" value="deploy"/>
<target name="createtaglib" depends="compile"
description="Create deployable tag libraries file">
<delete dir="${build.dir}"/>
<mkdir dir="${build.dir}"/>
<mkdir dir="${build.dir}/META-INF"/>
<copy todir="${build.dir}/ticker">
<fileset dir="${webinf.dir}/classes/ticker"/>
</copy>
<copy file="${webinf.dir}/faces-config.xml" todir="${build.dir}/META-INF"/>
<copy file="${webinf.dir}/ticker.tld" todir="${build.dir}/META-INF"/>
<mkdir dir="${taglibdeploy.dir}"/>
<jar basedir="${build.dir}" jarfile="${taglibdeploy.dir}/${taglib.distname}"/>
</target>
31. How to Write Your Own JSF Components Step 7: Creating a Deployable Jar File
page 31 of 32
In this file, the first property defines the name of the result archive. The second one defines
the folder where the archive will be placed. To use the new Ant target coding we added, go to the
Ant folder and run the script by typing from the command line:
ant createtaglib
To see how this works now, copy the mylib.jar file to the WEB-INF/lib folder of any JSF
project. Then insert your new custom tag on one of the JSP pages. Don’t forget to insert at the
top of the page the definition:
<%@ taglib uri="http://jsftutorials.com/" prefix="d" %>
If you do everything right, the custom tag should work properly.
32. How to Write Your Own JSF Components What Next?
page 32 of 32
What Next?
In this tutorial we have created new JSF components all the way from scratch to a
deployable package. In this example, we have covered the major points you will need in order to
create any JSF component. However, our example does not show all of the aspects of JSF
component building. You now have just the basic knowledge. If writing JSF components is
going to be your job, you will need to learn more before you will become an expert in this area.
Additional Topics
Some of the aspects you will need to learn that were not covered in this tutorial are
mentioned below.
Processing user input. If your component accepts data entered or selected by the user, you
need to take care of encoding or decoding the date. Such a component might need to support
validators, value changed listener, data converters.
Working with Facets. Facets are similar to children, but they have names. It is up to the
component how to process them. For example, the gridPanel from the standard JSF library has
two facet elements for header and footer. It does not matter where the facet is located in the JSP
code, the renderer always puts the header at the top and footer at the bottom.
Custom rendering of the existing components. In our example, the getRendererType
method of the TickerTag returns null. This means that the component renders itself. If this
method returns any value, it makes it possible to overwrite the default rendering provided by the
UITicker class. For this purpose, you or anybody else can add a new renderer with the defined
name to the render-kit section of the faces configuration file. In the same way, you can
implement rendered for any standard JSF components. All of the render type names can be found
in the JSF specification.
Action components. You can extend your component from the UICommand class. This
allows you to write components similar to a command button or a link, but with advanced
behavior. For example, you can implement tabbed panels or drop-down menus.
JSF Resources
Beyond this tutorial, there are many resources that will help you go further with JSF. There
are already a number of published books dedicated to JavaServer Faces. We recommend reading
chapter 9 of the Core JavaServer Faces book by David Geary and Cay Horstmann. It contains
very useful information regarding JSF component development.
There are also several other types of resources available. We support the jsftutorials.net Web
site where you can read other JSF tutorials. Also, if you or your company are interesting in
learning JSF technology, Exadel, Inc. has introduced a new JSF Course. You can read
information about it on this CD. We are going to prepare several more courses that cover all
levels from beginner to expert. The first course for beginners will be completed in the near
future. For more information visit our corporate Web site at www.exadel.com