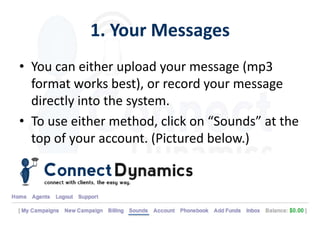
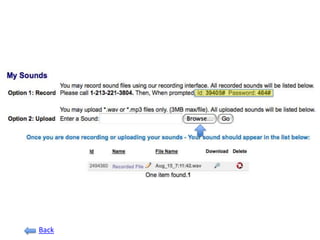
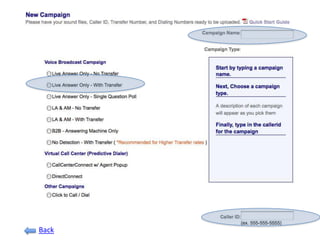
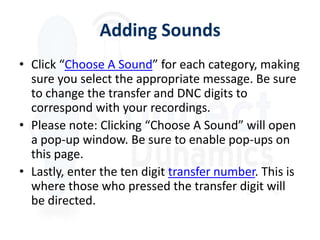
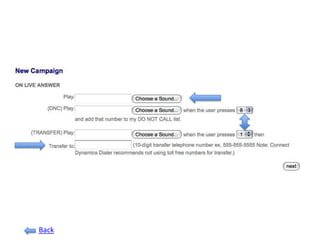
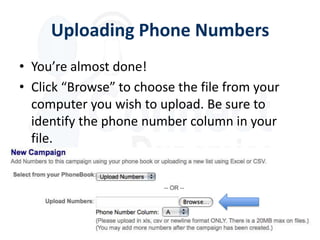
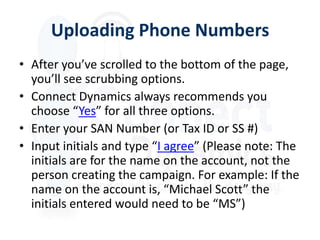
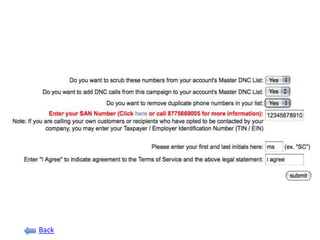
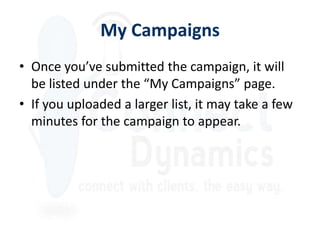
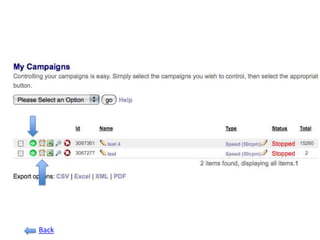
Creating a Voice Broadcast
        Campaign
      Connect Dynamics, LLC
Thank You for Choosing Connect
             Dynamics!
We’re glad you’re here. We hope to make
your voice broadcasting experience as
simple and enjoyable as possible.
This presentation will cover the essentials
of a voice broadcast campaign and take
you, step-by-step, through the setup
process. *Please Note: To use the hyperlinks between slides, you’ll
need to download the presentation. You can do so here.]
Where to Login
• Enter the following web address in the URL bar of
  your web browser; login.connectdynamics.com
• It should bring you here:


• Enter your login information and click “Login”
Campaign Essentials
• In order to create a campaign, you’ll need
  these four things available:
  ① Your messages
  ② Your phone list(s), ready to upload
  ③ Social Security, Tax ID, or SAN Number (also
    called an Organization ID Number)
  ④ Funds in the account
1. Your Messages
• You can either upload your message (mp3
  format works best), or record your message
  directly into the system.
• To use either method, click on “Sounds” at the
  top of your account. (Pictured below.)
Messages
• To upload, click the “Browse” option and select
  the file from your computer.
• To record, dial the phone number provided and
  follow the prompts using the ID and password
  provided. (Use ID & Password in your account.)
• Your message should appear momentarily after
  saving. (Please note: it may take a few moments
  for messages to be available for use as we review
  each message to prevent fraud and malicious
  activity.)
Back
Messages
• For the popular, “Press One to Transfer”
  campaign, you’ll need three messages.
     1 Main Message – The reason your calling. This
       message will also need to contain your transfer digit
       (Ex: “Press 1 to transfer”) as well as your DNC digit
       (Ex: “Press 8 to be removed”).
     2 Transfer Message – The message to confirm transfer
       (Ex: “Please hold while we transfer you.”)
     3 DNC Message – The message to confirm removal
       from list. (Ex: “Thank you. You’ve been removed from
       our list.”)
     • Useful Tip: After recording a message, use the pencil
       icon to modify the file name. This makes identifying
       your messages later on much, much easier.
2. Phone List
• To prepare your phone list for upload, make
  sure it is formatted accordingly:
  – All phone numbers must be in a separate column
  – The file is saved as a csv. or txt. file.
3. SAN Number
• A SAN Number can be acquired by visiting
  https://telemarketing.donotcall.gov/Profile/Cr
  eate.aspx It is free. After registering, it will be
  sent to your email address.
• Or, if you choose, you may bypass the SAN
  number and have your business TAX ID or
  Social Security Number available instead.
4. Adding Funds
• To add funds, simply click on “Add Funds” in
  the top left hand corner of your account.
• You may then deposit funds into your account
  via Google Checkout. (Please note: It will take
  15-20 minutes for the funds to show in the
  account.)
• If you wish to deposit funds via another
  method, please contact us as 877 566 9005, or
  support@connectdynamics.com
Creating the Campaign
• You are now ready to begin the setup process.
• You may begin by clicking “New Campaign”
  and following these steps:

1. Name your campaign.
2. Choose your campaign type.The most popular
   campaign is the “Live Answer Only - With Transfer”
3. Finally, enter your Caller ID Number. Please note: This
   must be a valid phone number.,
Back
Adding Sounds
• Click “Choose A Sound” for each category, making
  sure you select the appropriate message. Be sure
  to change the transfer and DNC digits to
  correspond with your recordings.
• Please note: Clicking “Choose A Sound” will open
  a pop-up window. Be sure to enable pop-ups on
  this page.
• Lastly, enter the ten digit transfer number. This is
  where those who pressed the transfer digit will
  be directed.
Back
Test Call
• THIS IS IMPORTANT: When sending a test
  call, be sure to clearly say “Hello” when you
  answer the phone. The system is voice
  activated. Thus, it waits for a voice before
  playing the message.
Uploading Phone Numbers
• You’re almost done!
• Click “Browse” to choose the file from your
  computer you wish to upload. Be sure to
  identify the phone number column in your
  file.
Uploading Phone Numbers
• After you’ve scrolled to the bottom of the page,
  you’ll see scrubbing options.
• Connect Dynamics always recommends you
  choose “Yes” for all three options.
• Enter your SAN Number (or Tax ID or SS #)
• Input initials and type “I agree” (Please note: The
  initials are for the name on the account, not the
  person creating the campaign. For example: If the
  name on the account is, “Michael Scott” the
  initials entered would need to be “MS”)
Back
My Campaigns
• Once you’ve submitted the campaign, it will
  be listed under the “My Campaigns” page.
• If you uploaded a larger list, it may take a few
  minutes for the campaign to appear.
Running the Campaign
• To run the campaign, you may either start it
  manually, or schedule the campaign.
• To start it manually, click the Green Arrow to
  the left of the campaign. (To stop, click the
  Red Stop Sign.)
• To schedule the campaign, click the Alarm
  Clock figure to the left of the campaign.
Back
Adding A Schedule
• Adding a schedule allows you to choose the
  day and duration of your campaign.
• Please be aware, to abide by dialing
  restrictions, it is best to run your campaign(s)
  between 9AM and 9PM local time.
• After choosing your schedule options, click
  “Add.”
• Your campaign will now run as scheduled. You
  do not need to do anything else.
Further Questions/Training
• This was a basic overview.
• If you have further questions or would like to
  learn more about our service, please call us at
  877 566 9005. Or, email us at
  support@connectdynamics.com
• Thank you again for choosing Connect
  Dynamics. We look forward to working with
  you and watching your business grow!
Connect Dynamics Training Demo

Connect Dynamics Training Demo

  • 1.
    Creating a VoiceBroadcast Campaign Connect Dynamics, LLC
  • 2.
    Thank You forChoosing Connect Dynamics! We’re glad you’re here. We hope to make your voice broadcasting experience as simple and enjoyable as possible. This presentation will cover the essentials of a voice broadcast campaign and take you, step-by-step, through the setup process. *Please Note: To use the hyperlinks between slides, you’ll need to download the presentation. You can do so here.]
  • 3.
    Where to Login •Enter the following web address in the URL bar of your web browser; login.connectdynamics.com • It should bring you here: • Enter your login information and click “Login”
  • 4.
    Campaign Essentials • Inorder to create a campaign, you’ll need these four things available: ① Your messages ② Your phone list(s), ready to upload ③ Social Security, Tax ID, or SAN Number (also called an Organization ID Number) ④ Funds in the account
  • 5.
    1. Your Messages •You can either upload your message (mp3 format works best), or record your message directly into the system. • To use either method, click on “Sounds” at the top of your account. (Pictured below.)
  • 6.
    Messages • To upload,click the “Browse” option and select the file from your computer. • To record, dial the phone number provided and follow the prompts using the ID and password provided. (Use ID & Password in your account.) • Your message should appear momentarily after saving. (Please note: it may take a few moments for messages to be available for use as we review each message to prevent fraud and malicious activity.)
  • 7.
  • 8.
    Messages • For thepopular, “Press One to Transfer” campaign, you’ll need three messages. 1 Main Message – The reason your calling. This message will also need to contain your transfer digit (Ex: “Press 1 to transfer”) as well as your DNC digit (Ex: “Press 8 to be removed”). 2 Transfer Message – The message to confirm transfer (Ex: “Please hold while we transfer you.”) 3 DNC Message – The message to confirm removal from list. (Ex: “Thank you. You’ve been removed from our list.”) • Useful Tip: After recording a message, use the pencil icon to modify the file name. This makes identifying your messages later on much, much easier.
  • 9.
    2. Phone List •To prepare your phone list for upload, make sure it is formatted accordingly: – All phone numbers must be in a separate column – The file is saved as a csv. or txt. file.
  • 10.
    3. SAN Number •A SAN Number can be acquired by visiting https://telemarketing.donotcall.gov/Profile/Cr eate.aspx It is free. After registering, it will be sent to your email address. • Or, if you choose, you may bypass the SAN number and have your business TAX ID or Social Security Number available instead.
  • 11.
    4. Adding Funds •To add funds, simply click on “Add Funds” in the top left hand corner of your account. • You may then deposit funds into your account via Google Checkout. (Please note: It will take 15-20 minutes for the funds to show in the account.) • If you wish to deposit funds via another method, please contact us as 877 566 9005, or support@connectdynamics.com
  • 12.
    Creating the Campaign •You are now ready to begin the setup process. • You may begin by clicking “New Campaign” and following these steps: 1. Name your campaign. 2. Choose your campaign type.The most popular campaign is the “Live Answer Only - With Transfer” 3. Finally, enter your Caller ID Number. Please note: This must be a valid phone number.,
  • 13.
  • 14.
    Adding Sounds • Click“Choose A Sound” for each category, making sure you select the appropriate message. Be sure to change the transfer and DNC digits to correspond with your recordings. • Please note: Clicking “Choose A Sound” will open a pop-up window. Be sure to enable pop-ups on this page. • Lastly, enter the ten digit transfer number. This is where those who pressed the transfer digit will be directed.
  • 15.
  • 16.
    Test Call • THISIS IMPORTANT: When sending a test call, be sure to clearly say “Hello” when you answer the phone. The system is voice activated. Thus, it waits for a voice before playing the message.
  • 17.
    Uploading Phone Numbers •You’re almost done! • Click “Browse” to choose the file from your computer you wish to upload. Be sure to identify the phone number column in your file.
  • 18.
    Uploading Phone Numbers •After you’ve scrolled to the bottom of the page, you’ll see scrubbing options. • Connect Dynamics always recommends you choose “Yes” for all three options. • Enter your SAN Number (or Tax ID or SS #) • Input initials and type “I agree” (Please note: The initials are for the name on the account, not the person creating the campaign. For example: If the name on the account is, “Michael Scott” the initials entered would need to be “MS”)
  • 19.
  • 20.
    My Campaigns • Onceyou’ve submitted the campaign, it will be listed under the “My Campaigns” page. • If you uploaded a larger list, it may take a few minutes for the campaign to appear.
  • 21.
    Running the Campaign •To run the campaign, you may either start it manually, or schedule the campaign. • To start it manually, click the Green Arrow to the left of the campaign. (To stop, click the Red Stop Sign.) • To schedule the campaign, click the Alarm Clock figure to the left of the campaign.
  • 22.
  • 23.
    Adding A Schedule •Adding a schedule allows you to choose the day and duration of your campaign. • Please be aware, to abide by dialing restrictions, it is best to run your campaign(s) between 9AM and 9PM local time. • After choosing your schedule options, click “Add.” • Your campaign will now run as scheduled. You do not need to do anything else.
  • 24.
    Further Questions/Training • Thiswas a basic overview. • If you have further questions or would like to learn more about our service, please call us at 877 566 9005. Or, email us at support@connectdynamics.com • Thank you again for choosing Connect Dynamics. We look forward to working with you and watching your business grow!