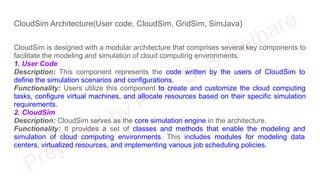
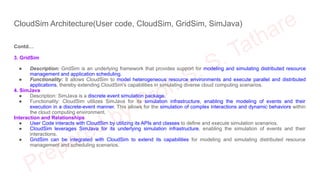
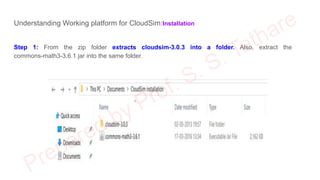
SlideShare a Scribd company logo
1 of 64
Download to read offline
CLOUDSIM,OPENSTACK,AWS
By,
Prof. S. S. Tathare,
Assistant Professor,
Comp Engg Dept,
GIT Lavel
CONTENTS
● CloudSim: Introduction to Simulator, understanding CloudSim simulator,
CloudSim Architecture(User code, CloudSim, GridSim, SimJava)
Understanding Working platform for CloudSim
● OpenStack: Introduction to OpenStack, OpenStack test-drive, Basic
OpenStack operations, OpenStack CLI and APIs, Tenant model operations,
Quotas, Private cloud building blocks, Controller deployment, Networking
deployment, Block Storage deployment, Compute deployment, deploying and
utilizing OpenStack in production environments, Building a production
environment, Application orchestration using OpenStack Heat
● AWS: Architecting on AWS, Building complex solutions with Amazon Virtual
Private Cloud (Amazon VPC)
CloudSim: Introduction to Simulator, understanding CloudSim simulator, CloudSim
Architecture(User code, CloudSim, GridSim, SimJava) Understanding Working
platform for CloudSim
CloudSim: Introduction to Simulator, understanding CloudSim simulator
● open-source framework-used to simulate cloud computing infrastructure and services.
● developed by the CLOUDS Lab organization and is written entirely in Java.
● used for modelling and simulating a cloud computing environment as a means for
evaluating a hypothesis prior to software development in order to reproduce tests and
results.
● For example, if you were to deploy an application or a website on the cloud and wanted to
test the services and load that your product can handle and also tune its performance to
overcome bottlenecks before risking deployment, then such evaluations could be performed
by simply coding a simulation of that environment with the help of various flexible and
scalable classes provided by the CloudSim package, free of cost.
CloudSim: Introduction to Simulator, understanding CloudSim simulator
Benefits of Simulation over the Actual Deployment:
Following are the benefits of CloudSim:
● No capital investment involved. With a simulation tool like CloudSim there is
no installation or maintenance cost.
● Easy to use and Scalable. You can change the requirements such as adding
or deleting resources by changing just a few lines of code.
● Risks can be evaluated at an earlier stage. In Cloud Computing utilization of
real testbeds limits the experiments to the scale of the testbed and makes the
reproduction of results an extremely difficult undertaking. With simulation, you
can test your product against test cases and resolve issues before actual
deployment without any limitations.
CloudSim: Introduction to Simulator, understanding CloudSim simulator
Why use CloudSim?
Below are a few reasons to opt for CloudSim:
● Open source and free of cost, so it favours researchers/developers working in the field.
● Easy to download and set-up.
● It is more generalized and extensible to support modelling and experimentation.
● Does not require any high-specs computer to work on.
● Provides pre-defined allocation policies and utilization models for managing resources, and
allows implementation of user-defined algorithms as well.
● The documentation provides pre-coded examples for new developers to get familiar with
the basic classes and functions.
● Tackle bottlenecks before deployment to reduce risk, lower costs, increase performance,
and raise revenue.
CloudSim Architecture(User code, CloudSim, GridSim, SimJava)
● CloudSim Core Simulation Engine: provides interfaces for the management
of resources such as VM, memory and bandwidth of virtualized Datacenters.
● CloudSim layer manages the creation and execution of core entities such as
VMs, Cloudlets, Hosts etc. It also handles network-related execution along
with the provisioning of resources and their execution and management.
● User Code is the layer controlled by the user. The developer can write the
requirements of the hardware specifications in this layer according to the
scenario.
CloudSim Architecture(User code, CloudSim, GridSim, SimJava)
Some of the most common classes used during simulation are:
● Datacenter: used for modelling the foundational hardware equipment of any cloud environment, that is the Datacenter. This
class provides methods to specify the functional requirements of the Datacenter as well as methods to set the allocation
policies of the VMs etc.
● Host: this class executes actions related to management of virtual machines. It also defines policies for provisioning memory
and bandwidth to the virtual machines, as well as allocating CPU cores to the virtual machines.
● VM: this class represents a virtual machine by providing data members defining a VM’s bandwidth, RAM, mips (million
instructions per second), size while also providing setter and getter methods for these parameters.
● Cloudlet: a cloudlet class represents any task that is run on a VM, like a processing task, or a memory access task, or a file
updating task etc. It stores parameters defining the characteristics of a task such as its length, size, mi (million instructions)
and provides methods similarly to VM class while also providing methods that define a task’s execution time, status, cost and
history.
● DatacenterBroker: is an entity acting on behalf of the user/customer. It is responsible for functioning of VMs, including VM
creation, management, destruction and submission of cloudlets to the VM.
● CloudSim: this is the class responsible for initializing and starting the simulation environment after all the necessary cloud
entities have been defined and later stopping after all the entities have been destroyed.
CloudSim Architecture(User code, CloudSim, GridSim, SimJava)
CloudSim is designed with a modular architecture that comprises several key components to
facilitate the modeling and simulation of cloud computing environments.
1. User Code
Description: This component represents the code written by the users of CloudSim to
define the simulation scenarios and configurations.
Functionality: Users utilize this component to create and customize the cloud computing
tasks, configure virtual machines, and allocate resources based on their specific simulation
requirements.
2. CloudSim
Description: CloudSim serves as the core simulation engine in the architecture.
Functionality: It provides a set of classes and methods that enable the modeling and
simulation of cloud computing environments. This includes modules for modeling data
centers, virtualized resources, and implementing various job scheduling policies.
CloudSim Architecture(User code, CloudSim, GridSim, SimJava)
Contd…
3. GridSim
● Description: GridSim is an underlying framework that provides support for modeling and simulating distributed resource
management and application scheduling.
● Functionality: It allows CloudSim to model heterogeneous resource environments and execute parallel and distributed
applications, thereby extending CloudSim's capabilities in simulating diverse cloud computing scenarios.
4. SimJava
● Description: SimJava is a discrete event simulation package.
● Functionality: CloudSim utilizes SimJava for its simulation infrastructure, enabling the modeling of events and their
execution in a discrete-event manner. This allows for the simulation of complex interactions and dynamic behaviors within
the cloud computing environment.
Interaction and Relationships
● User Code interacts with CloudSim by utilizing its APIs and classes to define and execute simulation scenarios.
● CloudSim leverages SimJava for its underlying simulation infrastructure, enabling the simulation of events and their
interactions.
● GridSim can be integrated with CloudSim to extend its capabilities for modeling and simulating distributed resource
management and scheduling scenarios.
Understanding Working platform for CloudSim:Installation
Step 1: From the zip folder extracts cloudsim-3.0.3 into a folder. Also, extract the
commons-math3-3.6.1 jar into the same folder.
Understanding Working platform for CloudSim:Installation
Step 2: Open Eclipse IDE and go to File -> New -> Java Project.
Understanding Working platform for CloudSim:Installation
Step 3: Enter any name for your project and then uncheck the Use default location box just under it and click on Browse.
Browse to the folder where you extracted your files and select the cloudsim-3.0.3 folder. Don’t click on Finish yet,
because we need to add a jar file to our project.
Understanding Working platform for CloudSim:Installation
Step 4: Click Next and go to Libraries -> Add External JARs. Now browse to the same folder where you extracted your
commons-math3 jar file and Open it.
.
Understanding Working platform for CloudSim:Installation
Step 5. Finally click on Finish and wait for the project to build. After the project has been built, from the Project Explorer you can click
on your project and from the dropdown go-to examples -> org.cloudbus.cloudsim.examples where you can find pre-written sample
codes and try to run them.
.
Understanding Working platform for CloudSim:
Here’s how Cloudsim works:
1. Simulation Environment Setup:
o Developers create a simulation environment using CloudSim where components
such as virtual machines (VMs), data centers, and cloudlets (representing tasks or
workloads) are defined
o Parameters like VM types, resource capacities, and network characteristics are
specified.
2. Execution Flow:
o CloudSim Core Engine manages the simulation by scheduling events (such as
VM creation, task execution, resource allocation) based on timestamps.
o Events trigger actions like VM provisioning, data transfer, and task execution.
o Resource utilization and performance metrics are tracked.
Understanding Working platform for CloudSim:
contd..
3. Resource Management:
o CloudSim provides predefined allocation policies (e.g., First Come First Serve,
Round Robin) and utilization models (CPU, memory, bandwidth) OR can also
implement custom resource allocation algorithms.
o VMs are allocated resources based on demand and availability.
4. Execution of Cloudlets:
o Cloudlets represent user tasks (e.g., web requests, data processing)which are
submitted to VMs for execution.
o CloudSim tracks execution time, resource usage, and completion status.
Understanding Working platform for CloudSim:
contd..
5. Metrics and Analysis:
o Developers collect performance metrics (e.g., response time, throughput,
resource utilization) which help evaluate system behavior under different
conditions.
o Researchers analyze results to optimize resource allocation, scalability, and
cost-effectiveness.
6. Experimentation and Hypothesis Testing:
o Researchers can test hypotheses related to cloud services. For eg. they can
assess the impact of VM placement policies on response time.
o Experiments are repeatable and controlled.
OpenStack: Introduction to OpenStack, OpenStack test-drive, Basic OpenStack
operations, OpenStack CLI and APIs, Tenant model operations, Quotas, Private cloud
building blocks, Controller deployment, Networking deployment, Block Storage
deployment, Compute deployment, deploying and utilizing OpenStack in production
environments, Building a production environment, Application orchestration using
OpenStack Heat
Introduction to OpenStack
1. open-source cloud computing platform that provides a set of software tools for building and managing public, private, and
hybrid clouds.
2. OpenStack consists of a set of interrelated components, each of which provides a specific function in the cloud computing
environment. These components include:
● Compute (Nova): This component provides virtualization services and manages the creation and scheduling of virtual
machines.
● Networking (Neutron): This component provides network connectivity services and manages the creation and configuration
of virtual networks.
● Storage (Cinder and Swift): These components provide storage services and manage the creation and management of
block and object storage.
● Identity (Keystone): This component provides authentication and authorization services and manages the creation and
management of user accounts.
● Dashboard (Horizon): This component provides a web-based user interface for managing the cloud computing
environment.
● Orchestration (Heat): This component provides automated deployment and management of cloud applications.
● Telemetry (Ceilometer): This component provides monitoring and metering services for the cloud computing environment
Introduction to OpenStack
contd…
3. OpenStack is designed to be highly scalable and flexible, allowing it to be used
in a wide range of cloud computing environments.
4. OpenStack has a large and active community of developers, users, and
vendors, who contribute to the development and support of the platform.
OPENSTACK TEST-DRIVE
1. To test-drive OpenStack, you can use one of the available OpenStack distributions or deploy
your own OpenStack environment. Here are the general steps to follow:
2. Choose an OpenStack distribution: Several vendors offer pre-packaged OpenStack
distributions, such as Red Hat OpenStack, Canonical OpenStack, and MirantisOpenStack. You
can also choose to deploy OpenStack directly from the source code.
3. Set up a testing environment: You will need a testing environment with adequate resources
to deploy OpenStack, such as a dedicated server or a virtual machine. You can use a cloud
provider like AWS or Google Cloud to set up the testing environment.
4. Install OpenStack: Follow the installation instructions provided by the OpenStack distribution
or the official OpenStack documentation to install the necessary components.
5. Configure OpenStack: Once OpenStack is installed, you will need to configure it to suit your
needs. This includes setting up users, roles,and permissions; configuring network settings; and
defining storage policies.
OPENSTACK TEST-DRIVE
6. Use OpenStack: Once OpenStack is up and running, you can use it to create
virtual machines, configure networks, and store data. You can use the OpenStack
dashboard or the command-line interface to manage the cloud computing
environment.
7. Test OpenStack: To test OpenStack, you can create and deploy virtual
machines, test network connectivity, and simulate workload scenarios to test the
performance and scalability of the environment.
8. Keep in mind that deploying and configuring OpenStack can be a complex
process, and it requires some level of expertise in cloud computing and
networking. You may want to seek assistance from the OpenStack community or a
professional services provider to ensure a smooth and successful deployment.
OPENSTACK TEST-DRIVE
9. Pre-built OpenStack environment: Several companies offer pre-built OpenStack environments that
you can use to test-drive the platform. These environments are typically available as virtual appliances or
cloud images that you can download and run on your own computer or cloud environment. Some
examples of pre-built OpenStack environments include: MirantisOpenstack Express, Canonical’s Ubuntu
Openstack, RedHat Openstack platform
10. Deploy your own OpenStack environment: If you want to deploy your own OpenStack environment,
you can use tools such as DevStack or Packstack. DevStack is a script that automates the installation of
OpenStack on a single machine, while Packstack is a similar tool that can be used to deploy OpenStack
on multiple machines. To deploy OpenStack on your own, you will need to have a server or virtual machine
that meets the hardware and software requirements for OpenStack.
11. Once you have a test environment set up, you can use the OpenStack web interface (Horizon) or
command-line interface (CLI) to create virtual machines, networks, and storage resources.
Basic OpenStack operations
Some basic OpenStack operations include:
1. Creating instances: OpenStack instances are virtual machines that can be used to run applications and services. To create an
instance, you can use the OpenStack web interface (Horizon) or command-line interface (CLI). You will need to specify the flavor
(CPU, memory, and disk configuration), image (operating system and software), network, and security settings for the instance.
2. Managing networks: OpenStack provides a networking service (Neutron) that allows you to create and manage virtual networks.
To create a network, you can use the OpenStack web interface or CLI and specify the network name, subnet, and IP address range.
You can also attach instances to networks and configure security settings for the network.
3. Managing storage: OpenStack provides two storage services, Cinder (block storage) and Swift (object storage). To create a
block storage volume, you can use the OpenStack web interface or CLI and specify the volume size, type, and other settings. To
create an object storage container, you can use the Swift CLI and specify the container name and access settings.
4. Managing users and projects: OpenStack provides an identity service (Keystone) that allows you to create and manage users,
projects, and roles. Users are granted roles that define their level of access to OpenStack resources. To create a user, you can use
the OpenStack web interface or CLI and specify the user name, password, and other settings. To create a project, you can also use
the OpenStack web interface or CLI and specify the project name and description.
Basic OpenStack operations
contd…
5. Monitoring and logging: OpenStack provides several tools for monitoring and logging OpenStack resources. The telemetry
service (Ceilometer) provides monitoring and metering of OpenStack resources, while the logging service (Logstash) provides
centralized logging for OpenStack components. You can use these tools to monitor performance, detect errors, and troubleshoot
issues in your OpenStack environment.
6. These are just a few examples of basic OpenStack operations. OpenStack provides a wide range of functionality, and the
operations required will depend on your specific use case and requirements.
7. Here are some basic OpenStack operations that you can perform using the Horizon web interface or the OpenStack
command-line interface (CLI):
Launch an instance: and clicking on
● Launch an Instance: You can create a new virtual machine instance by selecting the compute tab in the horizon dashboard
and clicking on “Launch Instance”. You will be prompted to select a flavor (virtual machine size), an image (operating
system), and other configuration options.
● To launch an instance using CLI, you can use the openstack server create command and specify the necessary
parameters.
● Create a network: You can create a new network for your instances by selecting the network tab in the horizon dashboard
and clicking on “create network”. You will be prompted to specify the network type, subnet details, and other configuration
options.
Basic OpenStack operations
Contd..
● To create a network using CLI, you can use the openstack network create command and specify the
necessary parameters.
● Attach a volume: You can attach a volume to an instance to provide additional storage by selecting the
Compute tab in the Horizon dashboard, clicking on the instance, and selecting "Attach Volume."
● To attach a volume using CLI you can use the openstack server add volume command and specify the
necessary parameters.
● Manage Security groups:You can manage security groups to control incoming and outgoing traffic to your
instances by selecting the Compute tab in the Horizon dashboard and clicking on "Access & Security." You can
create new security groups, add rules, and associate them with instances
● To manage security groups using CLI you can use the openstack security group create and openstack
security group rule create commands.
● Resize an instance: You can resize an instance to a different flavor(virtual machine size) by selecting the
Compute tab in the Horizon dashboard, clicking on the instance, and selecting "Resize Instance.". You will be
prompted to select the new flavor.
● To resize an instance using CLI you can use the openstack server resize command and specify the
necessary parameters.
OpenStack CLI and APIs
1. OpenStack provides a command-line interface (CLI) and APIs that allow you to manage and automate
your cloud resources.
2. The OpenStack CLI is a tool that allows you to interact with OpenStack services from the command line.
It is a powerful tool that allows you to automate tasks and perform complex operations.
3. The CLI uses the OpenStack API to communicate with the OpenStack services. The CLI is available for
all OpenStack services, including Compute, Networking, Identity, Image, and Block Storage.
4. To use the OpenStack CLI, you need to install the OpenStack client on your local machine. The client is
available for Linux, macOS, and Windows. Once you have installed the client, you can use the openstack
command to interact with OpenStack services.
5. The OpenStack APIs are a set of RESTful APIs that allow you to programmatically interact with
OpenStack services. The APIs provide a standardized way of accessing OpenStack services and can be
used by developers to create custom applications and tools that interact with OpenStack services.
OpenStack CLI and APIs
6. The OpenStack APIs are available for all OpenStack services, including
Compute, Networking, Identity, Image, and Block Storage. The APIs are based on
industry standards such as JSON, XML, and HTTP. You can use any programming
language that supports HTTP to interact with the OpenStack APIs.
7. OpenStack also provides software development kits (SDKs) for popular
programming languages such as Python, Java, and Ruby. The SDKs provide a
higher-level interface to the OpenStack APIs and make it easier to build
applications that interact with OpenStack services.
Overall, the OpenStack CLI and APIs are powerful tools that allow you to manage
and automate your cloud resources. Whether you prefer to use the CLI or APIs,
OpenStack provides a flexible and extensible platform for building and managing
cloud infrastructure.
Tenant model operations
1. The tenant model is a core concept in OpenStack that enables multi tenancy within a cloud
environment. Tenants are logical groups of resources that are isolated from each other, allowing multiple
organizations to share the same infrastructure without interfering with each other.
2. Here are some basic OpenStack tenant model operations:
● Creating a Tenant: You can create a new tenant using Openstack CLI or APIs. When you create a
tenant, you specify a name and an optional description.
● Creating Users: Once you have created a tenant, you can create one or more users within that
tenant. Users are granted access to the resources associated with their tenant.
● Assigning roles: You can assign roles to users within a tenant. Roles are used to define what
actions a user can perform on a specific resource. For example, you might assign a user the role of
"admin" for a particular project, giving them full access to all resources within that project.
● Creating Projects: Projects are containers for resources within a tenant. You can create one or
more projects within a tenant, and assign users and roles to those projects.
● Managing quotas: Openstack allows you to set quotas for resources within a tenant such as the
number of instances or the amount of storage that can be used. You can set and manage quotas
using the OpenStack CLI or APIs.
Tenant model operations
Contd..
● Monitoring usage: Openstack provides tools for monitoring resource usage
within a tenant, allowing you to track usage and ensure that tenants are not
exceeding their quotas.
● Managing user access to tenants: You can control which user has access
to tenant's resources by assigning roles to those users. You can assign
multiple roles to a user, and you can assign roles to users at the tenant level
or the project level.
● Managing resources: Once you have created a tenant, you can create and
manage resources within that tenant. You can create instances, volumes,
networks, and images, and you can assign those resources to the tenant.
Tenant model operations
3. Overall, the tenant model is a powerful feature of OpenStack that allows you to
create a secure and scalable multi-tenant cloud environment. By using tenants,
users, roles, and projects, you can create a flexible and customizable cloud
infrastructure that meets the needs of your organization.
4. In OpenStack, a tenant is a logical grouping of resources that allows you to
isolate and control access to those resources. A tenant can be a department, a
project, or any other organizational unit. Each tenant in OpenStack has its own set
of resources, including instances, volumes, networks, and images.
5. Overall, the tenant model in OpenStack provides a flexible and powerful way to
manage and control access to cloud resources.
Quotas, Private cloud building blocks
1. Quotas in OpenStack are limits that are imposed on the amount of resources that a tenant can use.
Quotas are used to prevent a tenant from using too many resources and degrading the performance of the
cloud infrastructure. Quotas can be set for individual resources, such as instances, volumes, and
networks, as well as for aggregate resources, such as CPU cores and RAM.
2. Here are some examples of quotas that can be set in OpenStack:
● Instance quotas: This set a limit on the number of instances that a tenant can create
● Volume quotas: This set a limit on the amount of storage that a tenant can allocate to volumes.
● Network Quotas: This set a limit on the number of networks and subnets that a tenant can create.
● Floating IP quotas:This set a limit on the number of floating IPs that a tenant can allocate.
3. Private cloud building blocks are the components that are used to build a private cloud infrastructure.
These components include the physical hardware, such as servers and storage devices, as well as the
software, such as OpenStack, that is used to manage the cloud infrastructure.
Quotas, Private cloud building blocks
4. Here are some examples of private cloud building blocks
● Compute Nodes: These are physical servers that are used to host virtual
machines.
● Storage nodes: These are the physical servers that are used to provide
storage for the cloud infrastructure.
● Networking Hardware: This includes switches and routers that are used to
connect the cloud infrastructure to the external network.
● Virtualization software: This is the software used to create and manage virtual
machines.
● Cloud Management software: This includes openstack and other software
tools that are used to manage the cloud infrastructure.
Quotas, Private cloud building blocks
5. Overall, the private cloud building blocks are the foundation of a private cloud infrastructure, and they
must be carefully selected and configured to ensure that the cloud infrastructure is reliable, scalable, and
secure. Quotas play an important role in ensuring that tenants use resources responsibly and that the
cloud infrastructure performs well.
6. Quotas in OpenStack are used to limit the amount of resources that a tenant or user can consume. You
can set quotas for different resources such as CPU, memory, storage, and network usage. Quotas can be
set at the tenant level or the user level, and you can customize the quotas based on your specific needs.
7. Setting quotas helps to prevent overutilization of resources and ensure fair resource allocation among
different tenants and users. Quotas can be managed using the OpenStack CLI or APIs.
8. A private cloud is a cloud infrastructure that is dedicated to a single organization. Private clouds offer
several benefits, including enhanced security, greater control over resources, and increased flexibility.
Quotas, Private cloud building blocks
9. Here are some common building blocks of a private cloud infrastructure:
● Hypervisor: software that enables virtualization of physical servers, allows multiple virtual machines to run on
it.
● Storage: different types of storage such as block storage, object storage, and file storage depending on your
needs.
● Networking: Networking is essential for connecting different components of a private cloud infrastructure.
eg.SDN
● Orchestration: automation of the deployment and management of cloud resources.eg. OpenStack Heat/ AWS
CloudFormation are used to automate the creation and management of resources in your private cloud.
● Identity and Access Management (IAM): to manage user access to cloud resources. You can use IAM tools
such as OpenStack Keystone to authenticate and authorize users and assign roles and permissions.
● Monitoring and Management: these tools are used to ensure that your private cloud infrastructure is running
smoothly. eg.Nagios or Zabbix are used to monitor system performance and detect issues
10. Overall, these building blocks are the foundation of a private cloud infrastructure, and they enable you to create a
flexible, scalable, and secure cloud environment that meets your organization's needs.
Controller deployment
1. In OpenStack, the controller node is a critical component of the infrastructure & is
responsible for managing and coordinating all the other nodes in the OpenStack
deployment, such as compute, storage, and network nodes.
2. The controller node typically runs the following OpenStack services:
● Identity(Keystone): Provides authentication and authorization services for
OpenStack services and tenants
● Image(Glance): Stores and retrieves virtual machine images
● Dashboard(Horizon): Provides a web-based user interface for Openstack services.
● Orchestration(Heat): Provides an API for defining and automating the deployment
of infrastructure resources.
● Telemetry(Ceilometer):Collects metrics and data on OpenStack services
● Networking(Neutron):Provides networking services for virtual machines and other
OpenStack components
Controller deployment
3. Here are some general steps for deploying the controller node:
● Install the base operating system: The first step is to install the operating system on the
server that will become the controller node. Many OpenStack distributions provide
pre-configured images that you can use
● Install OpenStack packages: Next, you need to install the OpenStack packages on the
controller node using package managers like yum or apt-get
● Configure the services: Once the OpenStack packages are installed, you need to
configure the services on the controller node. This includes setting up the database for each
service, configuring the messaging system, and configuring the service endpoints.
● Verify the installation: After the services are configured, you can verify that they are
working properly by running various tests and checks. For example, you can use the
OpenStack CLI to check that you can authenticate and access OpenStack services.
● Configure additional services: Finally you want to configure additional services on the
controller node, such as load balancing or firewall services.
Controller deployment
4. It's important to note that the controller node deployment process can vary depending on the specific
OpenStack distribution and version you are using, as well as the requirements of your environment. It's
always a good idea to consult the documentation and follow best practices for your particular deployment.
5. In OpenStack, the controller node is the central management component of the cloud infrastructure. It
provides the API services that enable users to interact with the cloud infrastructure, as well as the
scheduling and orchestration of resources.
6. Here are the steps for deploying an OpenStack controller node:
● Prepare the controller node: The first step is to prepare the controller node by installing the
operating system and configuring the network interfaces. You should also configure the hostname,
domain name and time zone
● Install the OpenStack packages: The next step is to install the OpenStack packages including the
identity service (Keystone), the image service (Glance), the compute service (Nova), the network
service (Neutron), and the dashboard (Horizon). You can use the package manager of your
operating system (e.g., apt-get or yum) to install the packages.
Controller deployment
contd..
● Configure the database: OpenStack uses a database to store configuration information
and metadata about resources. You need to configure the database service(eg. MySQL or
MariaDB) and create the necessary databases and users.
● Configure the message queue: OpenStack uses a message queue (e.g.,RabbitMQ or
Qpid) to communicate between the different components of the infrastructure. You need to
configure the message queue service and create the necessary users and permissions.
● Start the services: After configuring the services, you can start them on the controller node
using the service manager of your operating system (e.g., systemctl or service).
● Verify the installation: Finally, you should verify that the OpenStack services are running
correctly by using the OpenStack CLI or API to create and manage resources.
7. Overall, deploying an OpenStack controller node requires careful planning and configuration,
but it is a critical step in creating a functional and scalable cloud infrastructure.
Networking deployment
1. In OpenStack, the networking component is responsible for providing network connectivity to
instances (virtual machines).
2. Here are the steps for deploying networking in OpenStack:
● Install and configure the Neutron service: The first step is to install the Neutron service
on the controller node and configure it to provide network connectivity. This involves
configuring the Neutron server, the Neutron API, and the Neutron plugin (e.g., ML2). You
also need to configure the Neutron database and the message queue service.
● Configure the OVS agent: The next step is to configure the Open vSwitch (OVS) agent,
which provides virtual network connectivity to instances. This involves configuring the OVS
service, creating the necessary bridges and ports, and configuring the OVS firewall.
● Configure network nodes: If you have multiple network nodes, you need to configure
them to provide network connectivity to instances. This involves configuring the network
node, the OVS agent, and the Neutron agent.
Networking deployment
Contd…
● Create networks, subnets and routers: Once the Neutron service and OVS agent are
configured, you can create networks, subnets, and routers. A network is a logical
abstraction that provides connectivity between instances, while a subnet is a range of IP
addresses that can be used by instances in a network. A router is a virtual device that
connects two or more networks.
● Create security groups and rules: To control network access and security, you can create
security groups and rules. A security group is a set of firewall rules that define the allowed
inbound and outbound traffic for instances.
● Launch Instances: Finally, you can launch instances and attach them to the networks and
security groups you created. The instances should be able to communicate with each other
and with the external network through the router.
3. Overall, deploying networking in OpenStack requires careful planning and configuration,
but it is a critical step in creating a functional and scalable cloud infrastructure.
Block Storage deployment
1. In OpenStack, block storage provides persistent storage for instances (virtual machines) that requires data to
persist beyond the lifetime of the instance.
2. The block storage deployment process involves configuring and deploying the Cinder service, which manages the
creation, deletion, and management of block storage volumes.
3. Here are the steps for deploying block storage in OpenStack:
● Install and configure the Cinder service: The first step is to install the Cinder service on the controller node
and configure it to provide block storage. This involves configuring the Cinder server, the Cinder API, the Cinder
scheduler, and the Cinder volume service.
● Configure the storage backends: Now you need to configure the storage backends that will provide the
physical storage for block volumes. OpenStack supports a variety of storage backends, including local disks,
iSCSI, NFS, and Ceph. You need to configure the appropriate drivers for your storage backend.
● Create storage pools: A storage pool is a group of storage devices that are managed together. You need to
create storage pools for each storage backend you configured.
● Create volume types: A volume type is a way to define the characteristics of a block volume, such as the size,
performance, and availability; need to create volume types that reflect the different needs of your applications.
Block Storage deployment
contd…
● Create block volumes: Once the storage backends and volume types are configured, you can
create block volumes. A block volume is a persistent block storage device that can be attached to an
instance.
● Attach block volumes to instances: Finally you can attach block volumes to instances. This allows
the instance to access the persistent storage provided by the block volume.
● Create volume types and encryption: To provide advanced features and security, you can create
volume types and enable encryption. A volume type is a set of characteristics that define a volume,
such as its size, performance, and availability. Encryption is a feature that encrypts the data stored
on the volume to provide additional security.
● Attach volumes to instances: Finally you can attach the volumes to instances and use them as
persistent storage. The volumes can be attached and detached from instances as needed, and they
can be used to store data that needs to persist across instance reboots or terminations.
4. Overall, deploying block storage in OpenStack requires careful planning and configuration, but it is a
critical step in creating a functional and scalable cloud infrastructure & providing persistent storage to
instances and enabling advanced features and security.
Compute deployment
1. Compute deployment is a critical component of deploying and utilizing OpenStack in production environments. Here are the steps
involved in deploying and utilizing OpenStack Compute in a production environment:
● Install and configure the Nova compute service: Install and configure the nova compute service on each compute node.
This involves installing the necessary packages, configuring the Nova compute service, and setting up the networking.
● Configure the Hypervisor: Now you need to configure the hypervisor which is the software layer that enables virtualization
on the compute nodes. There are different types of hypervisors that can be used with OpenStack Compute, such as KVM,
Xen, and VMware.
● Create and manage instances: Now, you can create and manage instances. An instance is a virtual machine that runs on
the compute node and provides computing resources to users. You can create instances using the OpenStack dashboard,
CLI, or API.
● Configure security and networking: To ensure security and connectivity, you need to configure security groups, firewalls,
and networking. Security groups are sets of firewall rules that define which traffic is allowed in and out of an instance.
Networking involves configuring the network interfaces and IP addresses of the instances.
● Monitor and Troubleshoot: Finally, you need to monitor and troubleshoot the compute environment to ensure it is running
smoothly. This involves monitoring the performance of the instances and the compute nodes, as well as identifying and
resolving any issues that arise.
Deploying and utilizing OpenStack in production environments
1. Deploying and utilizing OpenStack Compute in a production environment requires careful planning, configuration, and
management. It is important to follow best practices and security guidelines to ensure the compute environment is secure, reliable,
and scalable.
2. Deploying OpenStack Compute (Nova) involves installing and configuring the Nova services and components, including the Nova
API, Nova compute nodes, Nova scheduler, and the Nova database.
Here are the steps involved in deploying Nova:
● Install and configure the Nova services: Install and configure the Nova services on the controller node. This involves
configuring the Nova API, the Nova conductor, and the Nova database.
● Install and configure the Nova compute nodes: Now install and configure the Nova compute nodes. This involves
configuring the Nova compute service, setting up networking, and configuring the hypervisor.
● Configure the Nova scheduler: The Nova scheduler is responsible for selecting the appropriate compute node for a given
instance. You can configure the scheduler to use different algorithms to select the node based on various criteria, such as
available resources, affinity, and anti-affinity.
● Create flavors: Flavors are predefined templates that define the size, CPU, memory, and disk specifications of an instance.
You can create different flavors based on the requirements of your applications and workloads.
● Create and manage instances: Once Nova is deployed, you can create and manage instances using the Nova API or the
OpenStack dashboard. You can select the appropriate flavor for your instances, attach storage volumes, and configure
networking.
Deploying and utilizing OpenStack in production environments
Contd..
3. To deploy and utilize OpenStack in production environments, it is essential to follow best practices and ensure high availability,
scalability, and security. Here are some tips for deploying and utilizing OpenStack in production:
● Use high availability(HA) deployment: To ensure high availability and minimize downtime, it is recommended to deploy
OpenStack in an HA configuration. This involves setting up multiple instances of the services, load balancers, and
databases.
● Configure security: OpenStack provides several security features such as role-based access control (RBAC), network
security groups (NSGs), and encryption. It is essential to configure these features based on your security requirements to
protect your cloud environment
● Monitor and Manage resources: To ensure optimal performance and and utilization of resources, it is recommended to
monitor and manage your OpenStack resources regularly. Monitoring tools-Ceilometer, Aodh, and Gnocchi-to monitor the
performance of your resources.
● Plan for Scalability: OpenStack is designed to scale horizontally, which means you can add more nodes to handle
increased workloads. It is essential to plan for scalability and ensure that your deployment can handle future growth.
● Ensure backup and disaster recovery: It is essential to to ensure backup and disaster recovery of your OpenStack
environment to protect against data loss and minimize downtime in the event of a disaster. backup and recovery
tools-Freezer and Barman
4. Overall, deploying and utilizing OpenStack in production environments requires careful planning, configuration, and management.
By following best practices and utilizing OpenStack's features and tools, you can build a robust, scalable, and secure cloud
infrastructure that meets your business requirements.
Building a production environment
1. Building a production environment for OpenStack involves several steps and considerations. Here
are some key steps:
● Planning: Before starting the deployment, plan the architecture of the production environment. This
includes defining the number of nodes required for each component, network topology, storage
requirements, and security considerations.
● Hardware Requirements: Ensure that the hardware meets the minimum requirements for running
OpenStack. Consider using hardware that is scalable and can be easily upgraded.
● Operating System: Choose the operating system for the nodes, and ensure that it is compatible
with the OpenStack version.
● Networking: Setup the networking infrastructure for the environment. Consider using redundant
network paths, VLANs, and subnets.
● Storage: Choose the storage solution for the environment and ensure that it is compatible with
OpenStack. Consider using redundant storage systems for high availability.
● Install OpenStack: Install the OpenStack components on the nodes.
Building a production environment
Contd..
Follow the documentation for the version of OpenStack being installed.
● Configure OpenStack: After installation, configure OpenStack according to the
requirements of the production environment. This includes configuring computer,
networking, and storage.
● Testing: After configuration, test the environment thoroughly to ensure that all components
are working correctly.
● Monitoring: Setup monitoring for the production environment to ensure that it is running
smoothly. Consider using monitoring tools such as Nagios, Zabbix, or Prometheus.
● Maintenance: Perform regular maintenance tasks such as patching, upgrades, and
backups.
2. Building a production environment for OpenStack can be complex and time-consuming, but
proper planning and execution can result in a highly scalable, flexible, and reliable cloud
platform.
Application orchestration using OpenStack Heat
1. OpenStack Heat is a service that provides orchestration capabilities to OpenStack. Heat enables automated provisioning of
infrastructure and applications on top of OpenStack, by defining templates that describe the desired configuration of the resources.
2. Application orchestration using OpenStack Heat involves the following steps:
● Create a Heat template: A heat template is a text file that defines the resources required to deploy an application. The
template is written in YAML or JSON format and includes a description of the resources, their dependencies, and their
configuration.
● Upload the template to Heat: Once the template is created, it needs to be uploaded to Heat. This can be done through the
OpenStack CLI or web interface.
● Launch the stack: After the template is uploaded, it can be used to launch a stack. A stack is a collection of resources that
are created and managed by Heat. The stack creation process involves validating the template, creating the necessary
resources, and configuring them according to the template.
● Monitor the stack: After the stack is launched, it can be monitored through the OpenStack web interface or CLI. Heat
provides visibility into the status of the resources, and the ability to perform actions on them, such as scaling or deleting.
● Update the stack: If changes need to be made to the stack, the Heat template can be modified and uploaded to Heat. Heat
will then update the stack by making the necessary changes to the resources.
3. By using Heat for application orchestration, it is possible to automate the deployment and management of complex applications
on OpenStack. Heat provides a standardized way of defining Infrastructure and application resources, making it easier to manage
and scale deployments.
AWS: Architecting on AWS, Building complex solutions with Amazon Virtual Private Cloud
(Amazon VPC)
Architecting on AWS
● Amazon Web Services (AWS) is a platform that allows the development of flexible
applications by providing solutions for elastic infrastructure scalability, messaging, and data
storage.
● The platform is accessible through SOAP or RESTful Web service interfaces and provides
a Web-based console where users can handle administration and monitoring of the
resources required, as well as their expenses computed on a pay-as-you-go basis.
● Architecting on AWS involves designing and implementing solutions using the various
services provided by Amazon Web Services (AWS) to meet specific business requirements.
Here's a general guide to architecting on AWS:
1. Understand Requirements: Begin by understanding the business requirements, including
performance,scalability, availability, security, compliance, and budget constraints.
2. Selecting the Right AWS Services: AWS offers a wide range of services for compute,
storage, networking, databases, machine learning, analytics, security, and more. Choose
the services that best fit your requirements.
Architecting on AWS
Contd..
3. Design for High Availability and Fault Tolerance: AWS provides regions and availability zones to
ensure high availability and fault tolerance. Distribute your application across multiple availability zones
within a region to minimize downtime and improve fault tolerance.
4. Scalability: Design your architecture to handle varying levels of traffic by using AWS services such as
Auto Scaling, Elastic Load Balancing, and AWS Lambda.
5. Security: Implement security best practices using AWS Identity and Access Management (IAM) for user
management and access control, encryption using AWS Key Management Service (KMS), and network
security using Virtual Private Cloud (VPC), security groups, and Network Access Control Lists (NACLs).
6. Data Storage and Management: Choose appropriate AWS storage services based on your data
requirements, such as Amazon S3 for object storage, Amazon RDS for relational databases, Amazon
DynamoDB for NoSQL databases, Amazon Redshift for data warehousing, etc.
7. Monitoring and Logging: Use AWS CloudWatch for monitoring your AWS resources, setting alarms,
and collecting metrics. Utilize AWS CloudTrail for logging API calls made to your AWS account.
Architecting on AWS
Contd..
8. Automation and Infrastructure as Code (IaC): Automate the provisioning and management of your infrastructure
using AWS CloudFormation or tools like AWS CDK (Cloud Development Kit) to treat infrastructure as code.
9. Cost Optimization: Implement cost optimization strategies such as choosing the right pricing model (on-demand,
reserved instances, or spot instances), right-sizing instances, and leveraging services like AWS Cost Explorer and
AWS Budgets for cost management.
10. Disaster Recovery: Implement disaster recovery solutions using AWS services like AWS Backup, AWS Storage
Gateway, and AWS Disaster Recovery.
11. Compliance and Governance: Ensure compliance with industry standards and regulations by using AWS
services like AWS Config, AWS Trusted Advisor, and AWS Artifact.
12. Performance Optimization: Continuously monitor and optimize the performance of your applications by using
AWS services like Amazon CloudFront for content delivery, Amazon ElastiCache for caching, and Amazon Route 53
for DNS management.
By following these principles and best practices, you can architect scalable, secure, and cost-effective solutions on
AWS to meet your business needs.
Architecting on AWS
Building complex solutions with Amazon Virtual Private Cloud (Amazon VPC)
Building complex solutions with Amazon Virtual Private Cloud (Amazon VPC) involves designing and
implementing network architectures that meet specific business requirements while leveraging the
flexibility and scalability offered by AWS. Here's a guide to building complex solutions with Amazon VPC:
1. Understand Requirements: Begin by understanding the business requirements, including security,
performance, scalability, compliance, and connectivity needs.
2. Plan IP Addressing: Design the IP addressing scheme for your VPC, including CIDR blocks for
subnets, and consider future scalability requirements.
3. Design Subnets: Divide your VPC into subnets based on the logical separation of resources, such as
public subnets for resources that need direct internet access and private subnets for internal resources.
4. Gateway and Connectivity:
● Internet Gateway (IGW): Attach an IGW to allow instances in public subnets to communicate with the
internet.
● Virtual Private Gateway (VGW): Connect your VPC to corporate data centers or other VPCs using
VPN or Direct Connect.
5. Network Access Control: Use network ACLs (NACLs) and security groups to control traffic at the
subnet and instance level, respectively.
Building complex solutions with Amazon Virtual Private Cloud (Amazon VPC)
Contd..
6. Route Tables: Define route tables to specify the routing for traffic within the VPC and to
external destinations.
7. Elastic IP Addresses: Allocate and associate Elastic IP addresses to instances that require
static public IP addresses.
8. NAT Gateway or Instance: Use NAT gateway or instance in a public subnet to allow
instances in private subnets to initiate outbound traffic to the internet while preventing inbound
traffic initiated from the internet.
9. VPC Peering: Establish VPC peering connections to allow communication between instances
in different VPCs as if they are on the same network.
10. Endpoint Services: Utilize VPC endpoints to connect to AWS services such as S3,
DynamoDB, and others without requiring internet gateway or NAT instances.
11. Flow Logs: Enable VPC Flow Logs to capture information about the IP traffic going to and
from network interfaces in your VPC.
Building complex solutions with Amazon Virtual Private Cloud (Amazon VPC)
Contd..
12. High Availability and Redundancy:
● Spread resources across multiple Availability Zones (AZs) for fault tolerance.
● Design for high availability by using load balancers and auto-scaling groups.
13. Security Best Practices:
● Encrypt traffic using AWS Key Management Service (KMS) and SSL/TLS.
● Implement strong IAM policies to control access to VPC resources.
● Regularly audit security configurations and monitor VPC traffic for anomalies.
14. Automate with Infrastructure as Code (IaC): Use tools like AWS CloudFormation or Terraform to define and
provision your VPC infrastructure as code.
15. Testing and Monitoring:
● Test the VPC architecture thoroughly to ensure it meets performance, security, and scalability requirements.
● Implement monitoring and alerting using AWS CloudWatch to monitor VPC metrics and set up alarms for critical
events.
By following these best practices and principles, you can design and implement complex solutions using Amazon
VPC that are scalable, secure, and aligned with your business needs.
Building complex solutions with Amazon Virtual Private Cloud (Amazon VPC)
● Let's walk through an example of creating a simple Amazon VPC using AWS
CloudFormation, which allows you to define infrastructure as code.
● In this example, we'll create a VPC with two public subnets, two private
subnets, an internet gateway, route tables, and associated resources.
Here are the steps:
1. Write CloudFormation Template: Create a CloudFormation template in YAML or
JSON format. Below is a basic example in YAML:
Building complex solutions with Amazon Virtual Private Cloud (Amazon VPC)
2. Deploy the CloudFormation Stack: Use the AWS Management Console, AWS CLI, or SDKs to deploy the
CloudFormation stack using the template you created.
3. Verify Resources: After the stack is created successfully, verify the resources created in your AWS account:
● VPC
● Subnets (Public and Private)
● Internet Gateway
● Route Tables
● Subnet associations
4. Optional Enhancements:
● Add security groups, network ACLs, and route tables as per your requirements.
● Configure NAT gateways or instances for private subnets to access the internet.
● Implement VPC peering for communication between VPCs.
This example provides a basic setup of a VPC with public and private subnets. You can further enhance and
customize the VPC based on your specific use case and requirements. Additionally, you can use AWS
CloudFormation to update or delete the stack, ensuring that your infrastructure remains consistent and manageable
over time.
Building complex solutions with Amazon Virtual Private Cloud (Amazon VPC)
Amazon Virtual Private Cloud (VPC) is a service that allows you to create a logically isolated
section of the AWS Cloud where you can launch AWS resources in a virtual network that you
define. With Amazon VPC, you have complete control over your virtual networking environment,
including selection of your IP address range, creation of subnets, and configuration of route
tables and network gateways. Here's an overview of Amazon VPC:
Key Features and Concepts:
1. Isolated Virtual Network: Amazon VPC provides isolation for your resources, allowing you to
create a private network within the AWS Cloud.
2. Subnets: You can divide your VPC into multiple subnets, each mapped to an Availability Zone
(AZ). Subnets enable you to organize resources and control network traffic within your VPC.
3. Internet Gateway (IGW): An IGW allows resources within your VPC to access the internet
and enables internet-initiated traffic to reach your instances.
4. Route Tables: Route tables define the rules for routing traffic within your VPC and between
your VPC and the internet.
Building complex solutions with Amazon Virtual Private Cloud (Amazon VPC)
Contd…
5. Network Access Control Lists (NACLs): NACLs act as stateless firewalls that control traffic entering
and leaving subnets in your VPC.
6. Security Groups: Security groups act as stateful firewalls that control traffic to and from instances.
They allow you to specify the inbound and outbound traffic rules for your instances.
7. Elastic IP Addresses (EIPs): EIPs are static IP addresses that you can assign to your instances. They
allow you to maintain the same IP address even if you stop and start your instances.
8. Virtual Private Network (VPN) Connections and Direct Connect: Amazon VPC allows you to
establish secure connections between your corporate data center and your VPC using VPN connections
or AWS Direct Connect.
9. VPC Peering: VPC peering allows you to connect your VPC with another VPC within the same region,
enabling you to route traffic between the two VPCs privately.
10. Endpoint Services: Amazon VPC endpoints allow you to privately connect your VPC to supported
AWS services without requiring internet gateways, NAT devices, VPN connections, or AWS Direct Connect
connections.

More Related Content

Similar to Cloudsim_openstack_aws_lastunit_bsccs_cloud computing

Strata CA 2019: From Jupyter to Production Manu Mukerji
Strata CA 2019: From Jupyter to Production Manu MukerjiStrata CA 2019: From Jupyter to Production Manu Mukerji
Strata CA 2019: From Jupyter to Production Manu MukerjiManu Mukerji
 
Demystifying Machine Learning with AWS (ACD Mumbai)
Demystifying Machine Learning with AWS (ACD Mumbai)Demystifying Machine Learning with AWS (ACD Mumbai)
Demystifying Machine Learning with AWS (ACD Mumbai)AWS User Group Pune
 
Trenowanie i wdrażanie modeli uczenia maszynowego z wykorzystaniem Google Clo...
Trenowanie i wdrażanie modeli uczenia maszynowego z wykorzystaniem Google Clo...Trenowanie i wdrażanie modeli uczenia maszynowego z wykorzystaniem Google Clo...
Trenowanie i wdrażanie modeli uczenia maszynowego z wykorzystaniem Google Clo...Sotrender
 
Introduction to Google Cloud & GCCP Campaign
Introduction to Google Cloud & GCCP CampaignIntroduction to Google Cloud & GCCP Campaign
Introduction to Google Cloud & GCCP CampaignGDSCVJTI
 
CloudExpo NYC - Citrix Cloud Platforms Best Practices for Architecting Your C...
CloudExpo NYC - Citrix Cloud Platforms Best Practices for Architecting Your C...CloudExpo NYC - Citrix Cloud Platforms Best Practices for Architecting Your C...
CloudExpo NYC - Citrix Cloud Platforms Best Practices for Architecting Your C...mormullins
 
Welcome to International Journal of Engineering Research and Development (IJERD)
Welcome to International Journal of Engineering Research and Development (IJERD)Welcome to International Journal of Engineering Research and Development (IJERD)
Welcome to International Journal of Engineering Research and Development (IJERD)IJERD Editor
 
Training and deploying ML models with Google Cloud Platform
Training and deploying ML models with Google Cloud PlatformTraining and deploying ML models with Google Cloud Platform
Training and deploying ML models with Google Cloud PlatformSotrender
 
Up is Down, Black is White: Using SCCM for Wrong and Right
Up is Down, Black is White: Using SCCM for Wrong and RightUp is Down, Black is White: Using SCCM for Wrong and Right
Up is Down, Black is White: Using SCCM for Wrong and Rightenigma0x3
 
Introduction To Cloud Computing
Introduction To Cloud ComputingIntroduction To Cloud Computing
Introduction To Cloud Computingkevnikool
 
Cloudify workshop at CCCEU 2014
Cloudify workshop at CCCEU 2014 Cloudify workshop at CCCEU 2014
Cloudify workshop at CCCEU 2014 Uri Cohen
 
Exploring Cloud Computing with Amazon Web Services (AWS)
Exploring Cloud Computing with Amazon Web Services (AWS)Exploring Cloud Computing with Amazon Web Services (AWS)
Exploring Cloud Computing with Amazon Web Services (AWS)Kalema Edgar
 
Isolation of vm
Isolation of vmIsolation of vm
Isolation of vmHome
 
9. virtualization virtualization
9. virtualization virtualization9. virtualization virtualization
9. virtualization virtualizationSagarR24
 
An overview and survey of simulation models
An overview and survey of simulation modelsAn overview and survey of simulation models
An overview and survey of simulation modelsAnjandeep Rai
 
Cloud Computing Presentation
Cloud Computing PresentationCloud Computing Presentation
Cloud Computing PresentationMohammed Kharma
 

Similar to Cloudsim_openstack_aws_lastunit_bsccs_cloud computing (20)

Strata CA 2019: From Jupyter to Production Manu Mukerji
Strata CA 2019: From Jupyter to Production Manu MukerjiStrata CA 2019: From Jupyter to Production Manu Mukerji
Strata CA 2019: From Jupyter to Production Manu Mukerji
 
Demystifying Machine Learning with AWS (ACD Mumbai)
Demystifying Machine Learning with AWS (ACD Mumbai)Demystifying Machine Learning with AWS (ACD Mumbai)
Demystifying Machine Learning with AWS (ACD Mumbai)
 
Cloud ppt
Cloud pptCloud ppt
Cloud ppt
 
Trenowanie i wdrażanie modeli uczenia maszynowego z wykorzystaniem Google Clo...
Trenowanie i wdrażanie modeli uczenia maszynowego z wykorzystaniem Google Clo...Trenowanie i wdrażanie modeli uczenia maszynowego z wykorzystaniem Google Clo...
Trenowanie i wdrażanie modeli uczenia maszynowego z wykorzystaniem Google Clo...
 
Pyramid patterns
Pyramid patternsPyramid patterns
Pyramid patterns
 
Introduction to Google Cloud & GCCP Campaign
Introduction to Google Cloud & GCCP CampaignIntroduction to Google Cloud & GCCP Campaign
Introduction to Google Cloud & GCCP Campaign
 
CloudExpo NYC - Citrix Cloud Platforms Best Practices for Architecting Your C...
CloudExpo NYC - Citrix Cloud Platforms Best Practices for Architecting Your C...CloudExpo NYC - Citrix Cloud Platforms Best Practices for Architecting Your C...
CloudExpo NYC - Citrix Cloud Platforms Best Practices for Architecting Your C...
 
Welcome to International Journal of Engineering Research and Development (IJERD)
Welcome to International Journal of Engineering Research and Development (IJERD)Welcome to International Journal of Engineering Research and Development (IJERD)
Welcome to International Journal of Engineering Research and Development (IJERD)
 
Training and deploying ML models with Google Cloud Platform
Training and deploying ML models with Google Cloud PlatformTraining and deploying ML models with Google Cloud Platform
Training and deploying ML models with Google Cloud Platform
 
Up is Down, Black is White: Using SCCM for Wrong and Right
Up is Down, Black is White: Using SCCM for Wrong and RightUp is Down, Black is White: Using SCCM for Wrong and Right
Up is Down, Black is White: Using SCCM for Wrong and Right
 
Introduction To Cloud Computing
Introduction To Cloud ComputingIntroduction To Cloud Computing
Introduction To Cloud Computing
 
Cloudify workshop at CCCEU 2014
Cloudify workshop at CCCEU 2014 Cloudify workshop at CCCEU 2014
Cloudify workshop at CCCEU 2014
 
Exploring Cloud Computing with Amazon Web Services (AWS)
Exploring Cloud Computing with Amazon Web Services (AWS)Exploring Cloud Computing with Amazon Web Services (AWS)
Exploring Cloud Computing with Amazon Web Services (AWS)
 
Isolation of vm
Isolation of vmIsolation of vm
Isolation of vm
 
Ccl basics
Ccl basicsCcl basics
Ccl basics
 
Cloud sim report
Cloud sim reportCloud sim report
Cloud sim report
 
Ml ops on AWS
Ml ops on AWSMl ops on AWS
Ml ops on AWS
 
9. virtualization virtualization
9. virtualization virtualization9. virtualization virtualization
9. virtualization virtualization
 
An overview and survey of simulation models
An overview and survey of simulation modelsAn overview and survey of simulation models
An overview and survey of simulation models
 
Cloud Computing Presentation
Cloud Computing PresentationCloud Computing Presentation
Cloud Computing Presentation
 

Recently uploaded

PANDITA RAMABAI- Indian political thought GENDER.pptx
PANDITA RAMABAI- Indian political thought GENDER.pptxPANDITA RAMABAI- Indian political thought GENDER.pptx
PANDITA RAMABAI- Indian political thought GENDER.pptxakanksha16arora
 
Spellings Wk 4 and Wk 5 for Grade 4 at CAPS
Spellings Wk 4 and Wk 5 for Grade 4 at CAPSSpellings Wk 4 and Wk 5 for Grade 4 at CAPS
Spellings Wk 4 and Wk 5 for Grade 4 at CAPSAnaAcapella
 
COMMUNICATING NEGATIVE NEWS - APPROACHES .pptx
COMMUNICATING NEGATIVE NEWS - APPROACHES .pptxCOMMUNICATING NEGATIVE NEWS - APPROACHES .pptx
COMMUNICATING NEGATIVE NEWS - APPROACHES .pptxannathomasp01
 
Towards a code of practice for AI in AT.pptx
Towards a code of practice for AI in AT.pptxTowards a code of practice for AI in AT.pptx
Towards a code of practice for AI in AT.pptxJisc
 
AIM of Education-Teachers Training-2024.ppt
AIM of Education-Teachers Training-2024.pptAIM of Education-Teachers Training-2024.ppt
AIM of Education-Teachers Training-2024.pptNishitharanjan Rout
 
Accessible Digital Futures project (20/03/2024)
Accessible Digital Futures project (20/03/2024)Accessible Digital Futures project (20/03/2024)
Accessible Digital Futures project (20/03/2024)Jisc
 
Tatlong Kwento ni Lola basyang-1.pdf arts
Tatlong Kwento ni Lola basyang-1.pdf artsTatlong Kwento ni Lola basyang-1.pdf arts
Tatlong Kwento ni Lola basyang-1.pdf artsNbelano25
 
QUATER-1-PE-HEALTH-LC2- this is just a sample of unpacked lesson
QUATER-1-PE-HEALTH-LC2- this is just a sample of unpacked lessonQUATER-1-PE-HEALTH-LC2- this is just a sample of unpacked lesson
QUATER-1-PE-HEALTH-LC2- this is just a sample of unpacked lessonhttgc7rh9c
 
21st_Century_Skills_Framework_Final_Presentation_2.pptx
21st_Century_Skills_Framework_Final_Presentation_2.pptx21st_Century_Skills_Framework_Final_Presentation_2.pptx
21st_Century_Skills_Framework_Final_Presentation_2.pptxJoelynRubio1
 
How to Add New Custom Addons Path in Odoo 17
How to Add New Custom Addons Path in Odoo 17How to Add New Custom Addons Path in Odoo 17
How to Add New Custom Addons Path in Odoo 17Celine George
 
Simple, Complex, and Compound Sentences Exercises.pdf
Simple, Complex, and Compound Sentences Exercises.pdfSimple, Complex, and Compound Sentences Exercises.pdf
Simple, Complex, and Compound Sentences Exercises.pdfstareducators107
 
How to Manage Call for Tendor in Odoo 17
How to Manage Call for Tendor in Odoo 17How to Manage Call for Tendor in Odoo 17
How to Manage Call for Tendor in Odoo 17Celine George
 
On National Teacher Day, meet the 2024-25 Kenan Fellows
On National Teacher Day, meet the 2024-25 Kenan FellowsOn National Teacher Day, meet the 2024-25 Kenan Fellows
On National Teacher Day, meet the 2024-25 Kenan FellowsMebane Rash
 
Understanding Accommodations and Modifications
Understanding  Accommodations and ModificationsUnderstanding  Accommodations and Modifications
Understanding Accommodations and ModificationsMJDuyan
 
Python Notes for mca i year students osmania university.docx
Python Notes for mca i year students osmania university.docxPython Notes for mca i year students osmania university.docx
Python Notes for mca i year students osmania university.docxRamakrishna Reddy Bijjam
 
HMCS Max Bernays Pre-Deployment Brief (May 2024).pptx
HMCS Max Bernays Pre-Deployment Brief (May 2024).pptxHMCS Max Bernays Pre-Deployment Brief (May 2024).pptx
HMCS Max Bernays Pre-Deployment Brief (May 2024).pptxEsquimalt MFRC
 
FICTIONAL SALESMAN/SALESMAN SNSW 2024.pdf
FICTIONAL SALESMAN/SALESMAN SNSW 2024.pdfFICTIONAL SALESMAN/SALESMAN SNSW 2024.pdf
FICTIONAL SALESMAN/SALESMAN SNSW 2024.pdfPondicherry University
 
How to Add a Tool Tip to a Field in Odoo 17
How to Add a Tool Tip to a Field in Odoo 17How to Add a Tool Tip to a Field in Odoo 17
How to Add a Tool Tip to a Field in Odoo 17Celine George
 
80 ĐỀ THI THỬ TUYỂN SINH TIẾNG ANH VÀO 10 SỞ GD – ĐT THÀNH PHỐ HỒ CHÍ MINH NĂ...
80 ĐỀ THI THỬ TUYỂN SINH TIẾNG ANH VÀO 10 SỞ GD – ĐT THÀNH PHỐ HỒ CHÍ MINH NĂ...80 ĐỀ THI THỬ TUYỂN SINH TIẾNG ANH VÀO 10 SỞ GD – ĐT THÀNH PHỐ HỒ CHÍ MINH NĂ...
80 ĐỀ THI THỬ TUYỂN SINH TIẾNG ANH VÀO 10 SỞ GD – ĐT THÀNH PHỐ HỒ CHÍ MINH NĂ...Nguyen Thanh Tu Collection
 
REMIFENTANIL: An Ultra short acting opioid.pptx
REMIFENTANIL: An Ultra short acting opioid.pptxREMIFENTANIL: An Ultra short acting opioid.pptx
REMIFENTANIL: An Ultra short acting opioid.pptxDr. Ravikiran H M Gowda
 

Recently uploaded (20)

PANDITA RAMABAI- Indian political thought GENDER.pptx
PANDITA RAMABAI- Indian political thought GENDER.pptxPANDITA RAMABAI- Indian political thought GENDER.pptx
PANDITA RAMABAI- Indian political thought GENDER.pptx
 
Spellings Wk 4 and Wk 5 for Grade 4 at CAPS
Spellings Wk 4 and Wk 5 for Grade 4 at CAPSSpellings Wk 4 and Wk 5 for Grade 4 at CAPS
Spellings Wk 4 and Wk 5 for Grade 4 at CAPS
 
COMMUNICATING NEGATIVE NEWS - APPROACHES .pptx
COMMUNICATING NEGATIVE NEWS - APPROACHES .pptxCOMMUNICATING NEGATIVE NEWS - APPROACHES .pptx
COMMUNICATING NEGATIVE NEWS - APPROACHES .pptx
 
Towards a code of practice for AI in AT.pptx
Towards a code of practice for AI in AT.pptxTowards a code of practice for AI in AT.pptx
Towards a code of practice for AI in AT.pptx
 
AIM of Education-Teachers Training-2024.ppt
AIM of Education-Teachers Training-2024.pptAIM of Education-Teachers Training-2024.ppt
AIM of Education-Teachers Training-2024.ppt
 
Accessible Digital Futures project (20/03/2024)
Accessible Digital Futures project (20/03/2024)Accessible Digital Futures project (20/03/2024)
Accessible Digital Futures project (20/03/2024)
 
Tatlong Kwento ni Lola basyang-1.pdf arts
Tatlong Kwento ni Lola basyang-1.pdf artsTatlong Kwento ni Lola basyang-1.pdf arts
Tatlong Kwento ni Lola basyang-1.pdf arts
 
QUATER-1-PE-HEALTH-LC2- this is just a sample of unpacked lesson
QUATER-1-PE-HEALTH-LC2- this is just a sample of unpacked lessonQUATER-1-PE-HEALTH-LC2- this is just a sample of unpacked lesson
QUATER-1-PE-HEALTH-LC2- this is just a sample of unpacked lesson
 
21st_Century_Skills_Framework_Final_Presentation_2.pptx
21st_Century_Skills_Framework_Final_Presentation_2.pptx21st_Century_Skills_Framework_Final_Presentation_2.pptx
21st_Century_Skills_Framework_Final_Presentation_2.pptx
 
How to Add New Custom Addons Path in Odoo 17
How to Add New Custom Addons Path in Odoo 17How to Add New Custom Addons Path in Odoo 17
How to Add New Custom Addons Path in Odoo 17
 
Simple, Complex, and Compound Sentences Exercises.pdf
Simple, Complex, and Compound Sentences Exercises.pdfSimple, Complex, and Compound Sentences Exercises.pdf
Simple, Complex, and Compound Sentences Exercises.pdf
 
How to Manage Call for Tendor in Odoo 17
How to Manage Call for Tendor in Odoo 17How to Manage Call for Tendor in Odoo 17
How to Manage Call for Tendor in Odoo 17
 
On National Teacher Day, meet the 2024-25 Kenan Fellows
On National Teacher Day, meet the 2024-25 Kenan FellowsOn National Teacher Day, meet the 2024-25 Kenan Fellows
On National Teacher Day, meet the 2024-25 Kenan Fellows
 
Understanding Accommodations and Modifications
Understanding  Accommodations and ModificationsUnderstanding  Accommodations and Modifications
Understanding Accommodations and Modifications
 
Python Notes for mca i year students osmania university.docx
Python Notes for mca i year students osmania university.docxPython Notes for mca i year students osmania university.docx
Python Notes for mca i year students osmania university.docx
 
HMCS Max Bernays Pre-Deployment Brief (May 2024).pptx
HMCS Max Bernays Pre-Deployment Brief (May 2024).pptxHMCS Max Bernays Pre-Deployment Brief (May 2024).pptx
HMCS Max Bernays Pre-Deployment Brief (May 2024).pptx
 
FICTIONAL SALESMAN/SALESMAN SNSW 2024.pdf
FICTIONAL SALESMAN/SALESMAN SNSW 2024.pdfFICTIONAL SALESMAN/SALESMAN SNSW 2024.pdf
FICTIONAL SALESMAN/SALESMAN SNSW 2024.pdf
 
How to Add a Tool Tip to a Field in Odoo 17
How to Add a Tool Tip to a Field in Odoo 17How to Add a Tool Tip to a Field in Odoo 17
How to Add a Tool Tip to a Field in Odoo 17
 
80 ĐỀ THI THỬ TUYỂN SINH TIẾNG ANH VÀO 10 SỞ GD – ĐT THÀNH PHỐ HỒ CHÍ MINH NĂ...
80 ĐỀ THI THỬ TUYỂN SINH TIẾNG ANH VÀO 10 SỞ GD – ĐT THÀNH PHỐ HỒ CHÍ MINH NĂ...80 ĐỀ THI THỬ TUYỂN SINH TIẾNG ANH VÀO 10 SỞ GD – ĐT THÀNH PHỐ HỒ CHÍ MINH NĂ...
80 ĐỀ THI THỬ TUYỂN SINH TIẾNG ANH VÀO 10 SỞ GD – ĐT THÀNH PHỐ HỒ CHÍ MINH NĂ...
 
REMIFENTANIL: An Ultra short acting opioid.pptx
REMIFENTANIL: An Ultra short acting opioid.pptxREMIFENTANIL: An Ultra short acting opioid.pptx
REMIFENTANIL: An Ultra short acting opioid.pptx
 

Cloudsim_openstack_aws_lastunit_bsccs_cloud computing

  • 1. CLOUDSIM,OPENSTACK,AWS By, Prof. S. S. Tathare, Assistant Professor, Comp Engg Dept, GIT Lavel
  • 2. CONTENTS ● CloudSim: Introduction to Simulator, understanding CloudSim simulator, CloudSim Architecture(User code, CloudSim, GridSim, SimJava) Understanding Working platform for CloudSim ● OpenStack: Introduction to OpenStack, OpenStack test-drive, Basic OpenStack operations, OpenStack CLI and APIs, Tenant model operations, Quotas, Private cloud building blocks, Controller deployment, Networking deployment, Block Storage deployment, Compute deployment, deploying and utilizing OpenStack in production environments, Building a production environment, Application orchestration using OpenStack Heat ● AWS: Architecting on AWS, Building complex solutions with Amazon Virtual Private Cloud (Amazon VPC)
  • 3. CloudSim: Introduction to Simulator, understanding CloudSim simulator, CloudSim Architecture(User code, CloudSim, GridSim, SimJava) Understanding Working platform for CloudSim
  • 4. CloudSim: Introduction to Simulator, understanding CloudSim simulator ● open-source framework-used to simulate cloud computing infrastructure and services. ● developed by the CLOUDS Lab organization and is written entirely in Java. ● used for modelling and simulating a cloud computing environment as a means for evaluating a hypothesis prior to software development in order to reproduce tests and results. ● For example, if you were to deploy an application or a website on the cloud and wanted to test the services and load that your product can handle and also tune its performance to overcome bottlenecks before risking deployment, then such evaluations could be performed by simply coding a simulation of that environment with the help of various flexible and scalable classes provided by the CloudSim package, free of cost.
  • 5. CloudSim: Introduction to Simulator, understanding CloudSim simulator Benefits of Simulation over the Actual Deployment: Following are the benefits of CloudSim: ● No capital investment involved. With a simulation tool like CloudSim there is no installation or maintenance cost. ● Easy to use and Scalable. You can change the requirements such as adding or deleting resources by changing just a few lines of code. ● Risks can be evaluated at an earlier stage. In Cloud Computing utilization of real testbeds limits the experiments to the scale of the testbed and makes the reproduction of results an extremely difficult undertaking. With simulation, you can test your product against test cases and resolve issues before actual deployment without any limitations.
  • 6. CloudSim: Introduction to Simulator, understanding CloudSim simulator Why use CloudSim? Below are a few reasons to opt for CloudSim: ● Open source and free of cost, so it favours researchers/developers working in the field. ● Easy to download and set-up. ● It is more generalized and extensible to support modelling and experimentation. ● Does not require any high-specs computer to work on. ● Provides pre-defined allocation policies and utilization models for managing resources, and allows implementation of user-defined algorithms as well. ● The documentation provides pre-coded examples for new developers to get familiar with the basic classes and functions. ● Tackle bottlenecks before deployment to reduce risk, lower costs, increase performance, and raise revenue.
  • 7. CloudSim Architecture(User code, CloudSim, GridSim, SimJava)
  • 8. CloudSim Architecture(User code, CloudSim, GridSim, SimJava) ● CloudSim Core Simulation Engine: provides interfaces for the management of resources such as VM, memory and bandwidth of virtualized Datacenters. ● CloudSim layer manages the creation and execution of core entities such as VMs, Cloudlets, Hosts etc. It also handles network-related execution along with the provisioning of resources and their execution and management. ● User Code is the layer controlled by the user. The developer can write the requirements of the hardware specifications in this layer according to the scenario.
  • 9. CloudSim Architecture(User code, CloudSim, GridSim, SimJava) Some of the most common classes used during simulation are: ● Datacenter: used for modelling the foundational hardware equipment of any cloud environment, that is the Datacenter. This class provides methods to specify the functional requirements of the Datacenter as well as methods to set the allocation policies of the VMs etc. ● Host: this class executes actions related to management of virtual machines. It also defines policies for provisioning memory and bandwidth to the virtual machines, as well as allocating CPU cores to the virtual machines. ● VM: this class represents a virtual machine by providing data members defining a VM’s bandwidth, RAM, mips (million instructions per second), size while also providing setter and getter methods for these parameters. ● Cloudlet: a cloudlet class represents any task that is run on a VM, like a processing task, or a memory access task, or a file updating task etc. It stores parameters defining the characteristics of a task such as its length, size, mi (million instructions) and provides methods similarly to VM class while also providing methods that define a task’s execution time, status, cost and history. ● DatacenterBroker: is an entity acting on behalf of the user/customer. It is responsible for functioning of VMs, including VM creation, management, destruction and submission of cloudlets to the VM. ● CloudSim: this is the class responsible for initializing and starting the simulation environment after all the necessary cloud entities have been defined and later stopping after all the entities have been destroyed.
  • 10. CloudSim Architecture(User code, CloudSim, GridSim, SimJava) CloudSim is designed with a modular architecture that comprises several key components to facilitate the modeling and simulation of cloud computing environments. 1. User Code Description: This component represents the code written by the users of CloudSim to define the simulation scenarios and configurations. Functionality: Users utilize this component to create and customize the cloud computing tasks, configure virtual machines, and allocate resources based on their specific simulation requirements. 2. CloudSim Description: CloudSim serves as the core simulation engine in the architecture. Functionality: It provides a set of classes and methods that enable the modeling and simulation of cloud computing environments. This includes modules for modeling data centers, virtualized resources, and implementing various job scheduling policies.
  • 11. CloudSim Architecture(User code, CloudSim, GridSim, SimJava) Contd… 3. GridSim ● Description: GridSim is an underlying framework that provides support for modeling and simulating distributed resource management and application scheduling. ● Functionality: It allows CloudSim to model heterogeneous resource environments and execute parallel and distributed applications, thereby extending CloudSim's capabilities in simulating diverse cloud computing scenarios. 4. SimJava ● Description: SimJava is a discrete event simulation package. ● Functionality: CloudSim utilizes SimJava for its simulation infrastructure, enabling the modeling of events and their execution in a discrete-event manner. This allows for the simulation of complex interactions and dynamic behaviors within the cloud computing environment. Interaction and Relationships ● User Code interacts with CloudSim by utilizing its APIs and classes to define and execute simulation scenarios. ● CloudSim leverages SimJava for its underlying simulation infrastructure, enabling the simulation of events and their interactions. ● GridSim can be integrated with CloudSim to extend its capabilities for modeling and simulating distributed resource management and scheduling scenarios.
  • 12. Understanding Working platform for CloudSim:Installation Step 1: From the zip folder extracts cloudsim-3.0.3 into a folder. Also, extract the commons-math3-3.6.1 jar into the same folder.
  • 13. Understanding Working platform for CloudSim:Installation Step 2: Open Eclipse IDE and go to File -> New -> Java Project.
  • 14. Understanding Working platform for CloudSim:Installation Step 3: Enter any name for your project and then uncheck the Use default location box just under it and click on Browse. Browse to the folder where you extracted your files and select the cloudsim-3.0.3 folder. Don’t click on Finish yet, because we need to add a jar file to our project.
  • 15. Understanding Working platform for CloudSim:Installation Step 4: Click Next and go to Libraries -> Add External JARs. Now browse to the same folder where you extracted your commons-math3 jar file and Open it. .
  • 16. Understanding Working platform for CloudSim:Installation Step 5. Finally click on Finish and wait for the project to build. After the project has been built, from the Project Explorer you can click on your project and from the dropdown go-to examples -> org.cloudbus.cloudsim.examples where you can find pre-written sample codes and try to run them. .
  • 17. Understanding Working platform for CloudSim: Here’s how Cloudsim works: 1. Simulation Environment Setup: o Developers create a simulation environment using CloudSim where components such as virtual machines (VMs), data centers, and cloudlets (representing tasks or workloads) are defined o Parameters like VM types, resource capacities, and network characteristics are specified. 2. Execution Flow: o CloudSim Core Engine manages the simulation by scheduling events (such as VM creation, task execution, resource allocation) based on timestamps. o Events trigger actions like VM provisioning, data transfer, and task execution. o Resource utilization and performance metrics are tracked.
  • 18. Understanding Working platform for CloudSim: contd.. 3. Resource Management: o CloudSim provides predefined allocation policies (e.g., First Come First Serve, Round Robin) and utilization models (CPU, memory, bandwidth) OR can also implement custom resource allocation algorithms. o VMs are allocated resources based on demand and availability. 4. Execution of Cloudlets: o Cloudlets represent user tasks (e.g., web requests, data processing)which are submitted to VMs for execution. o CloudSim tracks execution time, resource usage, and completion status.
  • 19. Understanding Working platform for CloudSim: contd.. 5. Metrics and Analysis: o Developers collect performance metrics (e.g., response time, throughput, resource utilization) which help evaluate system behavior under different conditions. o Researchers analyze results to optimize resource allocation, scalability, and cost-effectiveness. 6. Experimentation and Hypothesis Testing: o Researchers can test hypotheses related to cloud services. For eg. they can assess the impact of VM placement policies on response time. o Experiments are repeatable and controlled.
  • 20. OpenStack: Introduction to OpenStack, OpenStack test-drive, Basic OpenStack operations, OpenStack CLI and APIs, Tenant model operations, Quotas, Private cloud building blocks, Controller deployment, Networking deployment, Block Storage deployment, Compute deployment, deploying and utilizing OpenStack in production environments, Building a production environment, Application orchestration using OpenStack Heat
  • 21. Introduction to OpenStack 1. open-source cloud computing platform that provides a set of software tools for building and managing public, private, and hybrid clouds. 2. OpenStack consists of a set of interrelated components, each of which provides a specific function in the cloud computing environment. These components include: ● Compute (Nova): This component provides virtualization services and manages the creation and scheduling of virtual machines. ● Networking (Neutron): This component provides network connectivity services and manages the creation and configuration of virtual networks. ● Storage (Cinder and Swift): These components provide storage services and manage the creation and management of block and object storage. ● Identity (Keystone): This component provides authentication and authorization services and manages the creation and management of user accounts. ● Dashboard (Horizon): This component provides a web-based user interface for managing the cloud computing environment. ● Orchestration (Heat): This component provides automated deployment and management of cloud applications. ● Telemetry (Ceilometer): This component provides monitoring and metering services for the cloud computing environment
  • 22. Introduction to OpenStack contd… 3. OpenStack is designed to be highly scalable and flexible, allowing it to be used in a wide range of cloud computing environments. 4. OpenStack has a large and active community of developers, users, and vendors, who contribute to the development and support of the platform.
  • 23. OPENSTACK TEST-DRIVE 1. To test-drive OpenStack, you can use one of the available OpenStack distributions or deploy your own OpenStack environment. Here are the general steps to follow: 2. Choose an OpenStack distribution: Several vendors offer pre-packaged OpenStack distributions, such as Red Hat OpenStack, Canonical OpenStack, and MirantisOpenStack. You can also choose to deploy OpenStack directly from the source code. 3. Set up a testing environment: You will need a testing environment with adequate resources to deploy OpenStack, such as a dedicated server or a virtual machine. You can use a cloud provider like AWS or Google Cloud to set up the testing environment. 4. Install OpenStack: Follow the installation instructions provided by the OpenStack distribution or the official OpenStack documentation to install the necessary components. 5. Configure OpenStack: Once OpenStack is installed, you will need to configure it to suit your needs. This includes setting up users, roles,and permissions; configuring network settings; and defining storage policies.
  • 24. OPENSTACK TEST-DRIVE 6. Use OpenStack: Once OpenStack is up and running, you can use it to create virtual machines, configure networks, and store data. You can use the OpenStack dashboard or the command-line interface to manage the cloud computing environment. 7. Test OpenStack: To test OpenStack, you can create and deploy virtual machines, test network connectivity, and simulate workload scenarios to test the performance and scalability of the environment. 8. Keep in mind that deploying and configuring OpenStack can be a complex process, and it requires some level of expertise in cloud computing and networking. You may want to seek assistance from the OpenStack community or a professional services provider to ensure a smooth and successful deployment.
  • 25. OPENSTACK TEST-DRIVE 9. Pre-built OpenStack environment: Several companies offer pre-built OpenStack environments that you can use to test-drive the platform. These environments are typically available as virtual appliances or cloud images that you can download and run on your own computer or cloud environment. Some examples of pre-built OpenStack environments include: MirantisOpenstack Express, Canonical’s Ubuntu Openstack, RedHat Openstack platform 10. Deploy your own OpenStack environment: If you want to deploy your own OpenStack environment, you can use tools such as DevStack or Packstack. DevStack is a script that automates the installation of OpenStack on a single machine, while Packstack is a similar tool that can be used to deploy OpenStack on multiple machines. To deploy OpenStack on your own, you will need to have a server or virtual machine that meets the hardware and software requirements for OpenStack. 11. Once you have a test environment set up, you can use the OpenStack web interface (Horizon) or command-line interface (CLI) to create virtual machines, networks, and storage resources.
  • 26. Basic OpenStack operations Some basic OpenStack operations include: 1. Creating instances: OpenStack instances are virtual machines that can be used to run applications and services. To create an instance, you can use the OpenStack web interface (Horizon) or command-line interface (CLI). You will need to specify the flavor (CPU, memory, and disk configuration), image (operating system and software), network, and security settings for the instance. 2. Managing networks: OpenStack provides a networking service (Neutron) that allows you to create and manage virtual networks. To create a network, you can use the OpenStack web interface or CLI and specify the network name, subnet, and IP address range. You can also attach instances to networks and configure security settings for the network. 3. Managing storage: OpenStack provides two storage services, Cinder (block storage) and Swift (object storage). To create a block storage volume, you can use the OpenStack web interface or CLI and specify the volume size, type, and other settings. To create an object storage container, you can use the Swift CLI and specify the container name and access settings. 4. Managing users and projects: OpenStack provides an identity service (Keystone) that allows you to create and manage users, projects, and roles. Users are granted roles that define their level of access to OpenStack resources. To create a user, you can use the OpenStack web interface or CLI and specify the user name, password, and other settings. To create a project, you can also use the OpenStack web interface or CLI and specify the project name and description.
  • 27. Basic OpenStack operations contd… 5. Monitoring and logging: OpenStack provides several tools for monitoring and logging OpenStack resources. The telemetry service (Ceilometer) provides monitoring and metering of OpenStack resources, while the logging service (Logstash) provides centralized logging for OpenStack components. You can use these tools to monitor performance, detect errors, and troubleshoot issues in your OpenStack environment. 6. These are just a few examples of basic OpenStack operations. OpenStack provides a wide range of functionality, and the operations required will depend on your specific use case and requirements. 7. Here are some basic OpenStack operations that you can perform using the Horizon web interface or the OpenStack command-line interface (CLI): Launch an instance: and clicking on ● Launch an Instance: You can create a new virtual machine instance by selecting the compute tab in the horizon dashboard and clicking on “Launch Instance”. You will be prompted to select a flavor (virtual machine size), an image (operating system), and other configuration options. ● To launch an instance using CLI, you can use the openstack server create command and specify the necessary parameters. ● Create a network: You can create a new network for your instances by selecting the network tab in the horizon dashboard and clicking on “create network”. You will be prompted to specify the network type, subnet details, and other configuration options.
  • 28. Basic OpenStack operations Contd.. ● To create a network using CLI, you can use the openstack network create command and specify the necessary parameters. ● Attach a volume: You can attach a volume to an instance to provide additional storage by selecting the Compute tab in the Horizon dashboard, clicking on the instance, and selecting "Attach Volume." ● To attach a volume using CLI you can use the openstack server add volume command and specify the necessary parameters. ● Manage Security groups:You can manage security groups to control incoming and outgoing traffic to your instances by selecting the Compute tab in the Horizon dashboard and clicking on "Access & Security." You can create new security groups, add rules, and associate them with instances ● To manage security groups using CLI you can use the openstack security group create and openstack security group rule create commands. ● Resize an instance: You can resize an instance to a different flavor(virtual machine size) by selecting the Compute tab in the Horizon dashboard, clicking on the instance, and selecting "Resize Instance.". You will be prompted to select the new flavor. ● To resize an instance using CLI you can use the openstack server resize command and specify the necessary parameters.
  • 29. OpenStack CLI and APIs 1. OpenStack provides a command-line interface (CLI) and APIs that allow you to manage and automate your cloud resources. 2. The OpenStack CLI is a tool that allows you to interact with OpenStack services from the command line. It is a powerful tool that allows you to automate tasks and perform complex operations. 3. The CLI uses the OpenStack API to communicate with the OpenStack services. The CLI is available for all OpenStack services, including Compute, Networking, Identity, Image, and Block Storage. 4. To use the OpenStack CLI, you need to install the OpenStack client on your local machine. The client is available for Linux, macOS, and Windows. Once you have installed the client, you can use the openstack command to interact with OpenStack services. 5. The OpenStack APIs are a set of RESTful APIs that allow you to programmatically interact with OpenStack services. The APIs provide a standardized way of accessing OpenStack services and can be used by developers to create custom applications and tools that interact with OpenStack services.
  • 30. OpenStack CLI and APIs 6. The OpenStack APIs are available for all OpenStack services, including Compute, Networking, Identity, Image, and Block Storage. The APIs are based on industry standards such as JSON, XML, and HTTP. You can use any programming language that supports HTTP to interact with the OpenStack APIs. 7. OpenStack also provides software development kits (SDKs) for popular programming languages such as Python, Java, and Ruby. The SDKs provide a higher-level interface to the OpenStack APIs and make it easier to build applications that interact with OpenStack services. Overall, the OpenStack CLI and APIs are powerful tools that allow you to manage and automate your cloud resources. Whether you prefer to use the CLI or APIs, OpenStack provides a flexible and extensible platform for building and managing cloud infrastructure.
  • 31. Tenant model operations 1. The tenant model is a core concept in OpenStack that enables multi tenancy within a cloud environment. Tenants are logical groups of resources that are isolated from each other, allowing multiple organizations to share the same infrastructure without interfering with each other. 2. Here are some basic OpenStack tenant model operations: ● Creating a Tenant: You can create a new tenant using Openstack CLI or APIs. When you create a tenant, you specify a name and an optional description. ● Creating Users: Once you have created a tenant, you can create one or more users within that tenant. Users are granted access to the resources associated with their tenant. ● Assigning roles: You can assign roles to users within a tenant. Roles are used to define what actions a user can perform on a specific resource. For example, you might assign a user the role of "admin" for a particular project, giving them full access to all resources within that project. ● Creating Projects: Projects are containers for resources within a tenant. You can create one or more projects within a tenant, and assign users and roles to those projects. ● Managing quotas: Openstack allows you to set quotas for resources within a tenant such as the number of instances or the amount of storage that can be used. You can set and manage quotas using the OpenStack CLI or APIs.
  • 32. Tenant model operations Contd.. ● Monitoring usage: Openstack provides tools for monitoring resource usage within a tenant, allowing you to track usage and ensure that tenants are not exceeding their quotas. ● Managing user access to tenants: You can control which user has access to tenant's resources by assigning roles to those users. You can assign multiple roles to a user, and you can assign roles to users at the tenant level or the project level. ● Managing resources: Once you have created a tenant, you can create and manage resources within that tenant. You can create instances, volumes, networks, and images, and you can assign those resources to the tenant.
  • 33. Tenant model operations 3. Overall, the tenant model is a powerful feature of OpenStack that allows you to create a secure and scalable multi-tenant cloud environment. By using tenants, users, roles, and projects, you can create a flexible and customizable cloud infrastructure that meets the needs of your organization. 4. In OpenStack, a tenant is a logical grouping of resources that allows you to isolate and control access to those resources. A tenant can be a department, a project, or any other organizational unit. Each tenant in OpenStack has its own set of resources, including instances, volumes, networks, and images. 5. Overall, the tenant model in OpenStack provides a flexible and powerful way to manage and control access to cloud resources.
  • 34. Quotas, Private cloud building blocks 1. Quotas in OpenStack are limits that are imposed on the amount of resources that a tenant can use. Quotas are used to prevent a tenant from using too many resources and degrading the performance of the cloud infrastructure. Quotas can be set for individual resources, such as instances, volumes, and networks, as well as for aggregate resources, such as CPU cores and RAM. 2. Here are some examples of quotas that can be set in OpenStack: ● Instance quotas: This set a limit on the number of instances that a tenant can create ● Volume quotas: This set a limit on the amount of storage that a tenant can allocate to volumes. ● Network Quotas: This set a limit on the number of networks and subnets that a tenant can create. ● Floating IP quotas:This set a limit on the number of floating IPs that a tenant can allocate. 3. Private cloud building blocks are the components that are used to build a private cloud infrastructure. These components include the physical hardware, such as servers and storage devices, as well as the software, such as OpenStack, that is used to manage the cloud infrastructure.
  • 35. Quotas, Private cloud building blocks 4. Here are some examples of private cloud building blocks ● Compute Nodes: These are physical servers that are used to host virtual machines. ● Storage nodes: These are the physical servers that are used to provide storage for the cloud infrastructure. ● Networking Hardware: This includes switches and routers that are used to connect the cloud infrastructure to the external network. ● Virtualization software: This is the software used to create and manage virtual machines. ● Cloud Management software: This includes openstack and other software tools that are used to manage the cloud infrastructure.
  • 36. Quotas, Private cloud building blocks 5. Overall, the private cloud building blocks are the foundation of a private cloud infrastructure, and they must be carefully selected and configured to ensure that the cloud infrastructure is reliable, scalable, and secure. Quotas play an important role in ensuring that tenants use resources responsibly and that the cloud infrastructure performs well. 6. Quotas in OpenStack are used to limit the amount of resources that a tenant or user can consume. You can set quotas for different resources such as CPU, memory, storage, and network usage. Quotas can be set at the tenant level or the user level, and you can customize the quotas based on your specific needs. 7. Setting quotas helps to prevent overutilization of resources and ensure fair resource allocation among different tenants and users. Quotas can be managed using the OpenStack CLI or APIs. 8. A private cloud is a cloud infrastructure that is dedicated to a single organization. Private clouds offer several benefits, including enhanced security, greater control over resources, and increased flexibility.
  • 37. Quotas, Private cloud building blocks 9. Here are some common building blocks of a private cloud infrastructure: ● Hypervisor: software that enables virtualization of physical servers, allows multiple virtual machines to run on it. ● Storage: different types of storage such as block storage, object storage, and file storage depending on your needs. ● Networking: Networking is essential for connecting different components of a private cloud infrastructure. eg.SDN ● Orchestration: automation of the deployment and management of cloud resources.eg. OpenStack Heat/ AWS CloudFormation are used to automate the creation and management of resources in your private cloud. ● Identity and Access Management (IAM): to manage user access to cloud resources. You can use IAM tools such as OpenStack Keystone to authenticate and authorize users and assign roles and permissions. ● Monitoring and Management: these tools are used to ensure that your private cloud infrastructure is running smoothly. eg.Nagios or Zabbix are used to monitor system performance and detect issues 10. Overall, these building blocks are the foundation of a private cloud infrastructure, and they enable you to create a flexible, scalable, and secure cloud environment that meets your organization's needs.
  • 38. Controller deployment 1. In OpenStack, the controller node is a critical component of the infrastructure & is responsible for managing and coordinating all the other nodes in the OpenStack deployment, such as compute, storage, and network nodes. 2. The controller node typically runs the following OpenStack services: ● Identity(Keystone): Provides authentication and authorization services for OpenStack services and tenants ● Image(Glance): Stores and retrieves virtual machine images ● Dashboard(Horizon): Provides a web-based user interface for Openstack services. ● Orchestration(Heat): Provides an API for defining and automating the deployment of infrastructure resources. ● Telemetry(Ceilometer):Collects metrics and data on OpenStack services ● Networking(Neutron):Provides networking services for virtual machines and other OpenStack components
  • 39. Controller deployment 3. Here are some general steps for deploying the controller node: ● Install the base operating system: The first step is to install the operating system on the server that will become the controller node. Many OpenStack distributions provide pre-configured images that you can use ● Install OpenStack packages: Next, you need to install the OpenStack packages on the controller node using package managers like yum or apt-get ● Configure the services: Once the OpenStack packages are installed, you need to configure the services on the controller node. This includes setting up the database for each service, configuring the messaging system, and configuring the service endpoints. ● Verify the installation: After the services are configured, you can verify that they are working properly by running various tests and checks. For example, you can use the OpenStack CLI to check that you can authenticate and access OpenStack services. ● Configure additional services: Finally you want to configure additional services on the controller node, such as load balancing or firewall services.
  • 40. Controller deployment 4. It's important to note that the controller node deployment process can vary depending on the specific OpenStack distribution and version you are using, as well as the requirements of your environment. It's always a good idea to consult the documentation and follow best practices for your particular deployment. 5. In OpenStack, the controller node is the central management component of the cloud infrastructure. It provides the API services that enable users to interact with the cloud infrastructure, as well as the scheduling and orchestration of resources. 6. Here are the steps for deploying an OpenStack controller node: ● Prepare the controller node: The first step is to prepare the controller node by installing the operating system and configuring the network interfaces. You should also configure the hostname, domain name and time zone ● Install the OpenStack packages: The next step is to install the OpenStack packages including the identity service (Keystone), the image service (Glance), the compute service (Nova), the network service (Neutron), and the dashboard (Horizon). You can use the package manager of your operating system (e.g., apt-get or yum) to install the packages.
  • 41. Controller deployment contd.. ● Configure the database: OpenStack uses a database to store configuration information and metadata about resources. You need to configure the database service(eg. MySQL or MariaDB) and create the necessary databases and users. ● Configure the message queue: OpenStack uses a message queue (e.g.,RabbitMQ or Qpid) to communicate between the different components of the infrastructure. You need to configure the message queue service and create the necessary users and permissions. ● Start the services: After configuring the services, you can start them on the controller node using the service manager of your operating system (e.g., systemctl or service). ● Verify the installation: Finally, you should verify that the OpenStack services are running correctly by using the OpenStack CLI or API to create and manage resources. 7. Overall, deploying an OpenStack controller node requires careful planning and configuration, but it is a critical step in creating a functional and scalable cloud infrastructure.
  • 42. Networking deployment 1. In OpenStack, the networking component is responsible for providing network connectivity to instances (virtual machines). 2. Here are the steps for deploying networking in OpenStack: ● Install and configure the Neutron service: The first step is to install the Neutron service on the controller node and configure it to provide network connectivity. This involves configuring the Neutron server, the Neutron API, and the Neutron plugin (e.g., ML2). You also need to configure the Neutron database and the message queue service. ● Configure the OVS agent: The next step is to configure the Open vSwitch (OVS) agent, which provides virtual network connectivity to instances. This involves configuring the OVS service, creating the necessary bridges and ports, and configuring the OVS firewall. ● Configure network nodes: If you have multiple network nodes, you need to configure them to provide network connectivity to instances. This involves configuring the network node, the OVS agent, and the Neutron agent.
  • 43. Networking deployment Contd… ● Create networks, subnets and routers: Once the Neutron service and OVS agent are configured, you can create networks, subnets, and routers. A network is a logical abstraction that provides connectivity between instances, while a subnet is a range of IP addresses that can be used by instances in a network. A router is a virtual device that connects two or more networks. ● Create security groups and rules: To control network access and security, you can create security groups and rules. A security group is a set of firewall rules that define the allowed inbound and outbound traffic for instances. ● Launch Instances: Finally, you can launch instances and attach them to the networks and security groups you created. The instances should be able to communicate with each other and with the external network through the router. 3. Overall, deploying networking in OpenStack requires careful planning and configuration, but it is a critical step in creating a functional and scalable cloud infrastructure.
  • 44. Block Storage deployment 1. In OpenStack, block storage provides persistent storage for instances (virtual machines) that requires data to persist beyond the lifetime of the instance. 2. The block storage deployment process involves configuring and deploying the Cinder service, which manages the creation, deletion, and management of block storage volumes. 3. Here are the steps for deploying block storage in OpenStack: ● Install and configure the Cinder service: The first step is to install the Cinder service on the controller node and configure it to provide block storage. This involves configuring the Cinder server, the Cinder API, the Cinder scheduler, and the Cinder volume service. ● Configure the storage backends: Now you need to configure the storage backends that will provide the physical storage for block volumes. OpenStack supports a variety of storage backends, including local disks, iSCSI, NFS, and Ceph. You need to configure the appropriate drivers for your storage backend. ● Create storage pools: A storage pool is a group of storage devices that are managed together. You need to create storage pools for each storage backend you configured. ● Create volume types: A volume type is a way to define the characteristics of a block volume, such as the size, performance, and availability; need to create volume types that reflect the different needs of your applications.
  • 45. Block Storage deployment contd… ● Create block volumes: Once the storage backends and volume types are configured, you can create block volumes. A block volume is a persistent block storage device that can be attached to an instance. ● Attach block volumes to instances: Finally you can attach block volumes to instances. This allows the instance to access the persistent storage provided by the block volume. ● Create volume types and encryption: To provide advanced features and security, you can create volume types and enable encryption. A volume type is a set of characteristics that define a volume, such as its size, performance, and availability. Encryption is a feature that encrypts the data stored on the volume to provide additional security. ● Attach volumes to instances: Finally you can attach the volumes to instances and use them as persistent storage. The volumes can be attached and detached from instances as needed, and they can be used to store data that needs to persist across instance reboots or terminations. 4. Overall, deploying block storage in OpenStack requires careful planning and configuration, but it is a critical step in creating a functional and scalable cloud infrastructure & providing persistent storage to instances and enabling advanced features and security.
  • 46. Compute deployment 1. Compute deployment is a critical component of deploying and utilizing OpenStack in production environments. Here are the steps involved in deploying and utilizing OpenStack Compute in a production environment: ● Install and configure the Nova compute service: Install and configure the nova compute service on each compute node. This involves installing the necessary packages, configuring the Nova compute service, and setting up the networking. ● Configure the Hypervisor: Now you need to configure the hypervisor which is the software layer that enables virtualization on the compute nodes. There are different types of hypervisors that can be used with OpenStack Compute, such as KVM, Xen, and VMware. ● Create and manage instances: Now, you can create and manage instances. An instance is a virtual machine that runs on the compute node and provides computing resources to users. You can create instances using the OpenStack dashboard, CLI, or API. ● Configure security and networking: To ensure security and connectivity, you need to configure security groups, firewalls, and networking. Security groups are sets of firewall rules that define which traffic is allowed in and out of an instance. Networking involves configuring the network interfaces and IP addresses of the instances. ● Monitor and Troubleshoot: Finally, you need to monitor and troubleshoot the compute environment to ensure it is running smoothly. This involves monitoring the performance of the instances and the compute nodes, as well as identifying and resolving any issues that arise.
  • 47. Deploying and utilizing OpenStack in production environments 1. Deploying and utilizing OpenStack Compute in a production environment requires careful planning, configuration, and management. It is important to follow best practices and security guidelines to ensure the compute environment is secure, reliable, and scalable. 2. Deploying OpenStack Compute (Nova) involves installing and configuring the Nova services and components, including the Nova API, Nova compute nodes, Nova scheduler, and the Nova database. Here are the steps involved in deploying Nova: ● Install and configure the Nova services: Install and configure the Nova services on the controller node. This involves configuring the Nova API, the Nova conductor, and the Nova database. ● Install and configure the Nova compute nodes: Now install and configure the Nova compute nodes. This involves configuring the Nova compute service, setting up networking, and configuring the hypervisor. ● Configure the Nova scheduler: The Nova scheduler is responsible for selecting the appropriate compute node for a given instance. You can configure the scheduler to use different algorithms to select the node based on various criteria, such as available resources, affinity, and anti-affinity. ● Create flavors: Flavors are predefined templates that define the size, CPU, memory, and disk specifications of an instance. You can create different flavors based on the requirements of your applications and workloads. ● Create and manage instances: Once Nova is deployed, you can create and manage instances using the Nova API or the OpenStack dashboard. You can select the appropriate flavor for your instances, attach storage volumes, and configure networking.
  • 48. Deploying and utilizing OpenStack in production environments Contd.. 3. To deploy and utilize OpenStack in production environments, it is essential to follow best practices and ensure high availability, scalability, and security. Here are some tips for deploying and utilizing OpenStack in production: ● Use high availability(HA) deployment: To ensure high availability and minimize downtime, it is recommended to deploy OpenStack in an HA configuration. This involves setting up multiple instances of the services, load balancers, and databases. ● Configure security: OpenStack provides several security features such as role-based access control (RBAC), network security groups (NSGs), and encryption. It is essential to configure these features based on your security requirements to protect your cloud environment ● Monitor and Manage resources: To ensure optimal performance and and utilization of resources, it is recommended to monitor and manage your OpenStack resources regularly. Monitoring tools-Ceilometer, Aodh, and Gnocchi-to monitor the performance of your resources. ● Plan for Scalability: OpenStack is designed to scale horizontally, which means you can add more nodes to handle increased workloads. It is essential to plan for scalability and ensure that your deployment can handle future growth. ● Ensure backup and disaster recovery: It is essential to to ensure backup and disaster recovery of your OpenStack environment to protect against data loss and minimize downtime in the event of a disaster. backup and recovery tools-Freezer and Barman 4. Overall, deploying and utilizing OpenStack in production environments requires careful planning, configuration, and management. By following best practices and utilizing OpenStack's features and tools, you can build a robust, scalable, and secure cloud infrastructure that meets your business requirements.
  • 49. Building a production environment 1. Building a production environment for OpenStack involves several steps and considerations. Here are some key steps: ● Planning: Before starting the deployment, plan the architecture of the production environment. This includes defining the number of nodes required for each component, network topology, storage requirements, and security considerations. ● Hardware Requirements: Ensure that the hardware meets the minimum requirements for running OpenStack. Consider using hardware that is scalable and can be easily upgraded. ● Operating System: Choose the operating system for the nodes, and ensure that it is compatible with the OpenStack version. ● Networking: Setup the networking infrastructure for the environment. Consider using redundant network paths, VLANs, and subnets. ● Storage: Choose the storage solution for the environment and ensure that it is compatible with OpenStack. Consider using redundant storage systems for high availability. ● Install OpenStack: Install the OpenStack components on the nodes.
  • 50. Building a production environment Contd.. Follow the documentation for the version of OpenStack being installed. ● Configure OpenStack: After installation, configure OpenStack according to the requirements of the production environment. This includes configuring computer, networking, and storage. ● Testing: After configuration, test the environment thoroughly to ensure that all components are working correctly. ● Monitoring: Setup monitoring for the production environment to ensure that it is running smoothly. Consider using monitoring tools such as Nagios, Zabbix, or Prometheus. ● Maintenance: Perform regular maintenance tasks such as patching, upgrades, and backups. 2. Building a production environment for OpenStack can be complex and time-consuming, but proper planning and execution can result in a highly scalable, flexible, and reliable cloud platform.
  • 51. Application orchestration using OpenStack Heat 1. OpenStack Heat is a service that provides orchestration capabilities to OpenStack. Heat enables automated provisioning of infrastructure and applications on top of OpenStack, by defining templates that describe the desired configuration of the resources. 2. Application orchestration using OpenStack Heat involves the following steps: ● Create a Heat template: A heat template is a text file that defines the resources required to deploy an application. The template is written in YAML or JSON format and includes a description of the resources, their dependencies, and their configuration. ● Upload the template to Heat: Once the template is created, it needs to be uploaded to Heat. This can be done through the OpenStack CLI or web interface. ● Launch the stack: After the template is uploaded, it can be used to launch a stack. A stack is a collection of resources that are created and managed by Heat. The stack creation process involves validating the template, creating the necessary resources, and configuring them according to the template. ● Monitor the stack: After the stack is launched, it can be monitored through the OpenStack web interface or CLI. Heat provides visibility into the status of the resources, and the ability to perform actions on them, such as scaling or deleting. ● Update the stack: If changes need to be made to the stack, the Heat template can be modified and uploaded to Heat. Heat will then update the stack by making the necessary changes to the resources. 3. By using Heat for application orchestration, it is possible to automate the deployment and management of complex applications on OpenStack. Heat provides a standardized way of defining Infrastructure and application resources, making it easier to manage and scale deployments.
  • 52. AWS: Architecting on AWS, Building complex solutions with Amazon Virtual Private Cloud (Amazon VPC)
  • 53. Architecting on AWS ● Amazon Web Services (AWS) is a platform that allows the development of flexible applications by providing solutions for elastic infrastructure scalability, messaging, and data storage. ● The platform is accessible through SOAP or RESTful Web service interfaces and provides a Web-based console where users can handle administration and monitoring of the resources required, as well as their expenses computed on a pay-as-you-go basis. ● Architecting on AWS involves designing and implementing solutions using the various services provided by Amazon Web Services (AWS) to meet specific business requirements. Here's a general guide to architecting on AWS: 1. Understand Requirements: Begin by understanding the business requirements, including performance,scalability, availability, security, compliance, and budget constraints. 2. Selecting the Right AWS Services: AWS offers a wide range of services for compute, storage, networking, databases, machine learning, analytics, security, and more. Choose the services that best fit your requirements.
  • 54. Architecting on AWS Contd.. 3. Design for High Availability and Fault Tolerance: AWS provides regions and availability zones to ensure high availability and fault tolerance. Distribute your application across multiple availability zones within a region to minimize downtime and improve fault tolerance. 4. Scalability: Design your architecture to handle varying levels of traffic by using AWS services such as Auto Scaling, Elastic Load Balancing, and AWS Lambda. 5. Security: Implement security best practices using AWS Identity and Access Management (IAM) for user management and access control, encryption using AWS Key Management Service (KMS), and network security using Virtual Private Cloud (VPC), security groups, and Network Access Control Lists (NACLs). 6. Data Storage and Management: Choose appropriate AWS storage services based on your data requirements, such as Amazon S3 for object storage, Amazon RDS for relational databases, Amazon DynamoDB for NoSQL databases, Amazon Redshift for data warehousing, etc. 7. Monitoring and Logging: Use AWS CloudWatch for monitoring your AWS resources, setting alarms, and collecting metrics. Utilize AWS CloudTrail for logging API calls made to your AWS account.
  • 55. Architecting on AWS Contd.. 8. Automation and Infrastructure as Code (IaC): Automate the provisioning and management of your infrastructure using AWS CloudFormation or tools like AWS CDK (Cloud Development Kit) to treat infrastructure as code. 9. Cost Optimization: Implement cost optimization strategies such as choosing the right pricing model (on-demand, reserved instances, or spot instances), right-sizing instances, and leveraging services like AWS Cost Explorer and AWS Budgets for cost management. 10. Disaster Recovery: Implement disaster recovery solutions using AWS services like AWS Backup, AWS Storage Gateway, and AWS Disaster Recovery. 11. Compliance and Governance: Ensure compliance with industry standards and regulations by using AWS services like AWS Config, AWS Trusted Advisor, and AWS Artifact. 12. Performance Optimization: Continuously monitor and optimize the performance of your applications by using AWS services like Amazon CloudFront for content delivery, Amazon ElastiCache for caching, and Amazon Route 53 for DNS management. By following these principles and best practices, you can architect scalable, secure, and cost-effective solutions on AWS to meet your business needs.
  • 57. Building complex solutions with Amazon Virtual Private Cloud (Amazon VPC) Building complex solutions with Amazon Virtual Private Cloud (Amazon VPC) involves designing and implementing network architectures that meet specific business requirements while leveraging the flexibility and scalability offered by AWS. Here's a guide to building complex solutions with Amazon VPC: 1. Understand Requirements: Begin by understanding the business requirements, including security, performance, scalability, compliance, and connectivity needs. 2. Plan IP Addressing: Design the IP addressing scheme for your VPC, including CIDR blocks for subnets, and consider future scalability requirements. 3. Design Subnets: Divide your VPC into subnets based on the logical separation of resources, such as public subnets for resources that need direct internet access and private subnets for internal resources. 4. Gateway and Connectivity: ● Internet Gateway (IGW): Attach an IGW to allow instances in public subnets to communicate with the internet. ● Virtual Private Gateway (VGW): Connect your VPC to corporate data centers or other VPCs using VPN or Direct Connect. 5. Network Access Control: Use network ACLs (NACLs) and security groups to control traffic at the subnet and instance level, respectively.
  • 58. Building complex solutions with Amazon Virtual Private Cloud (Amazon VPC) Contd.. 6. Route Tables: Define route tables to specify the routing for traffic within the VPC and to external destinations. 7. Elastic IP Addresses: Allocate and associate Elastic IP addresses to instances that require static public IP addresses. 8. NAT Gateway or Instance: Use NAT gateway or instance in a public subnet to allow instances in private subnets to initiate outbound traffic to the internet while preventing inbound traffic initiated from the internet. 9. VPC Peering: Establish VPC peering connections to allow communication between instances in different VPCs as if they are on the same network. 10. Endpoint Services: Utilize VPC endpoints to connect to AWS services such as S3, DynamoDB, and others without requiring internet gateway or NAT instances. 11. Flow Logs: Enable VPC Flow Logs to capture information about the IP traffic going to and from network interfaces in your VPC.
  • 59. Building complex solutions with Amazon Virtual Private Cloud (Amazon VPC) Contd.. 12. High Availability and Redundancy: ● Spread resources across multiple Availability Zones (AZs) for fault tolerance. ● Design for high availability by using load balancers and auto-scaling groups. 13. Security Best Practices: ● Encrypt traffic using AWS Key Management Service (KMS) and SSL/TLS. ● Implement strong IAM policies to control access to VPC resources. ● Regularly audit security configurations and monitor VPC traffic for anomalies. 14. Automate with Infrastructure as Code (IaC): Use tools like AWS CloudFormation or Terraform to define and provision your VPC infrastructure as code. 15. Testing and Monitoring: ● Test the VPC architecture thoroughly to ensure it meets performance, security, and scalability requirements. ● Implement monitoring and alerting using AWS CloudWatch to monitor VPC metrics and set up alarms for critical events. By following these best practices and principles, you can design and implement complex solutions using Amazon VPC that are scalable, secure, and aligned with your business needs.
  • 60. Building complex solutions with Amazon Virtual Private Cloud (Amazon VPC) ● Let's walk through an example of creating a simple Amazon VPC using AWS CloudFormation, which allows you to define infrastructure as code. ● In this example, we'll create a VPC with two public subnets, two private subnets, an internet gateway, route tables, and associated resources. Here are the steps: 1. Write CloudFormation Template: Create a CloudFormation template in YAML or JSON format. Below is a basic example in YAML:
  • 61. Building complex solutions with Amazon Virtual Private Cloud (Amazon VPC)
  • 62. Building complex solutions with Amazon Virtual Private Cloud (Amazon VPC) 2. Deploy the CloudFormation Stack: Use the AWS Management Console, AWS CLI, or SDKs to deploy the CloudFormation stack using the template you created. 3. Verify Resources: After the stack is created successfully, verify the resources created in your AWS account: ● VPC ● Subnets (Public and Private) ● Internet Gateway ● Route Tables ● Subnet associations 4. Optional Enhancements: ● Add security groups, network ACLs, and route tables as per your requirements. ● Configure NAT gateways or instances for private subnets to access the internet. ● Implement VPC peering for communication between VPCs. This example provides a basic setup of a VPC with public and private subnets. You can further enhance and customize the VPC based on your specific use case and requirements. Additionally, you can use AWS CloudFormation to update or delete the stack, ensuring that your infrastructure remains consistent and manageable over time.
  • 63. Building complex solutions with Amazon Virtual Private Cloud (Amazon VPC) Amazon Virtual Private Cloud (VPC) is a service that allows you to create a logically isolated section of the AWS Cloud where you can launch AWS resources in a virtual network that you define. With Amazon VPC, you have complete control over your virtual networking environment, including selection of your IP address range, creation of subnets, and configuration of route tables and network gateways. Here's an overview of Amazon VPC: Key Features and Concepts: 1. Isolated Virtual Network: Amazon VPC provides isolation for your resources, allowing you to create a private network within the AWS Cloud. 2. Subnets: You can divide your VPC into multiple subnets, each mapped to an Availability Zone (AZ). Subnets enable you to organize resources and control network traffic within your VPC. 3. Internet Gateway (IGW): An IGW allows resources within your VPC to access the internet and enables internet-initiated traffic to reach your instances. 4. Route Tables: Route tables define the rules for routing traffic within your VPC and between your VPC and the internet.
  • 64. Building complex solutions with Amazon Virtual Private Cloud (Amazon VPC) Contd… 5. Network Access Control Lists (NACLs): NACLs act as stateless firewalls that control traffic entering and leaving subnets in your VPC. 6. Security Groups: Security groups act as stateful firewalls that control traffic to and from instances. They allow you to specify the inbound and outbound traffic rules for your instances. 7. Elastic IP Addresses (EIPs): EIPs are static IP addresses that you can assign to your instances. They allow you to maintain the same IP address even if you stop and start your instances. 8. Virtual Private Network (VPN) Connections and Direct Connect: Amazon VPC allows you to establish secure connections between your corporate data center and your VPC using VPN connections or AWS Direct Connect. 9. VPC Peering: VPC peering allows you to connect your VPC with another VPC within the same region, enabling you to route traffic between the two VPCs privately. 10. Endpoint Services: Amazon VPC endpoints allow you to privately connect your VPC to supported AWS services without requiring internet gateways, NAT devices, VPN connections, or AWS Direct Connect connections.