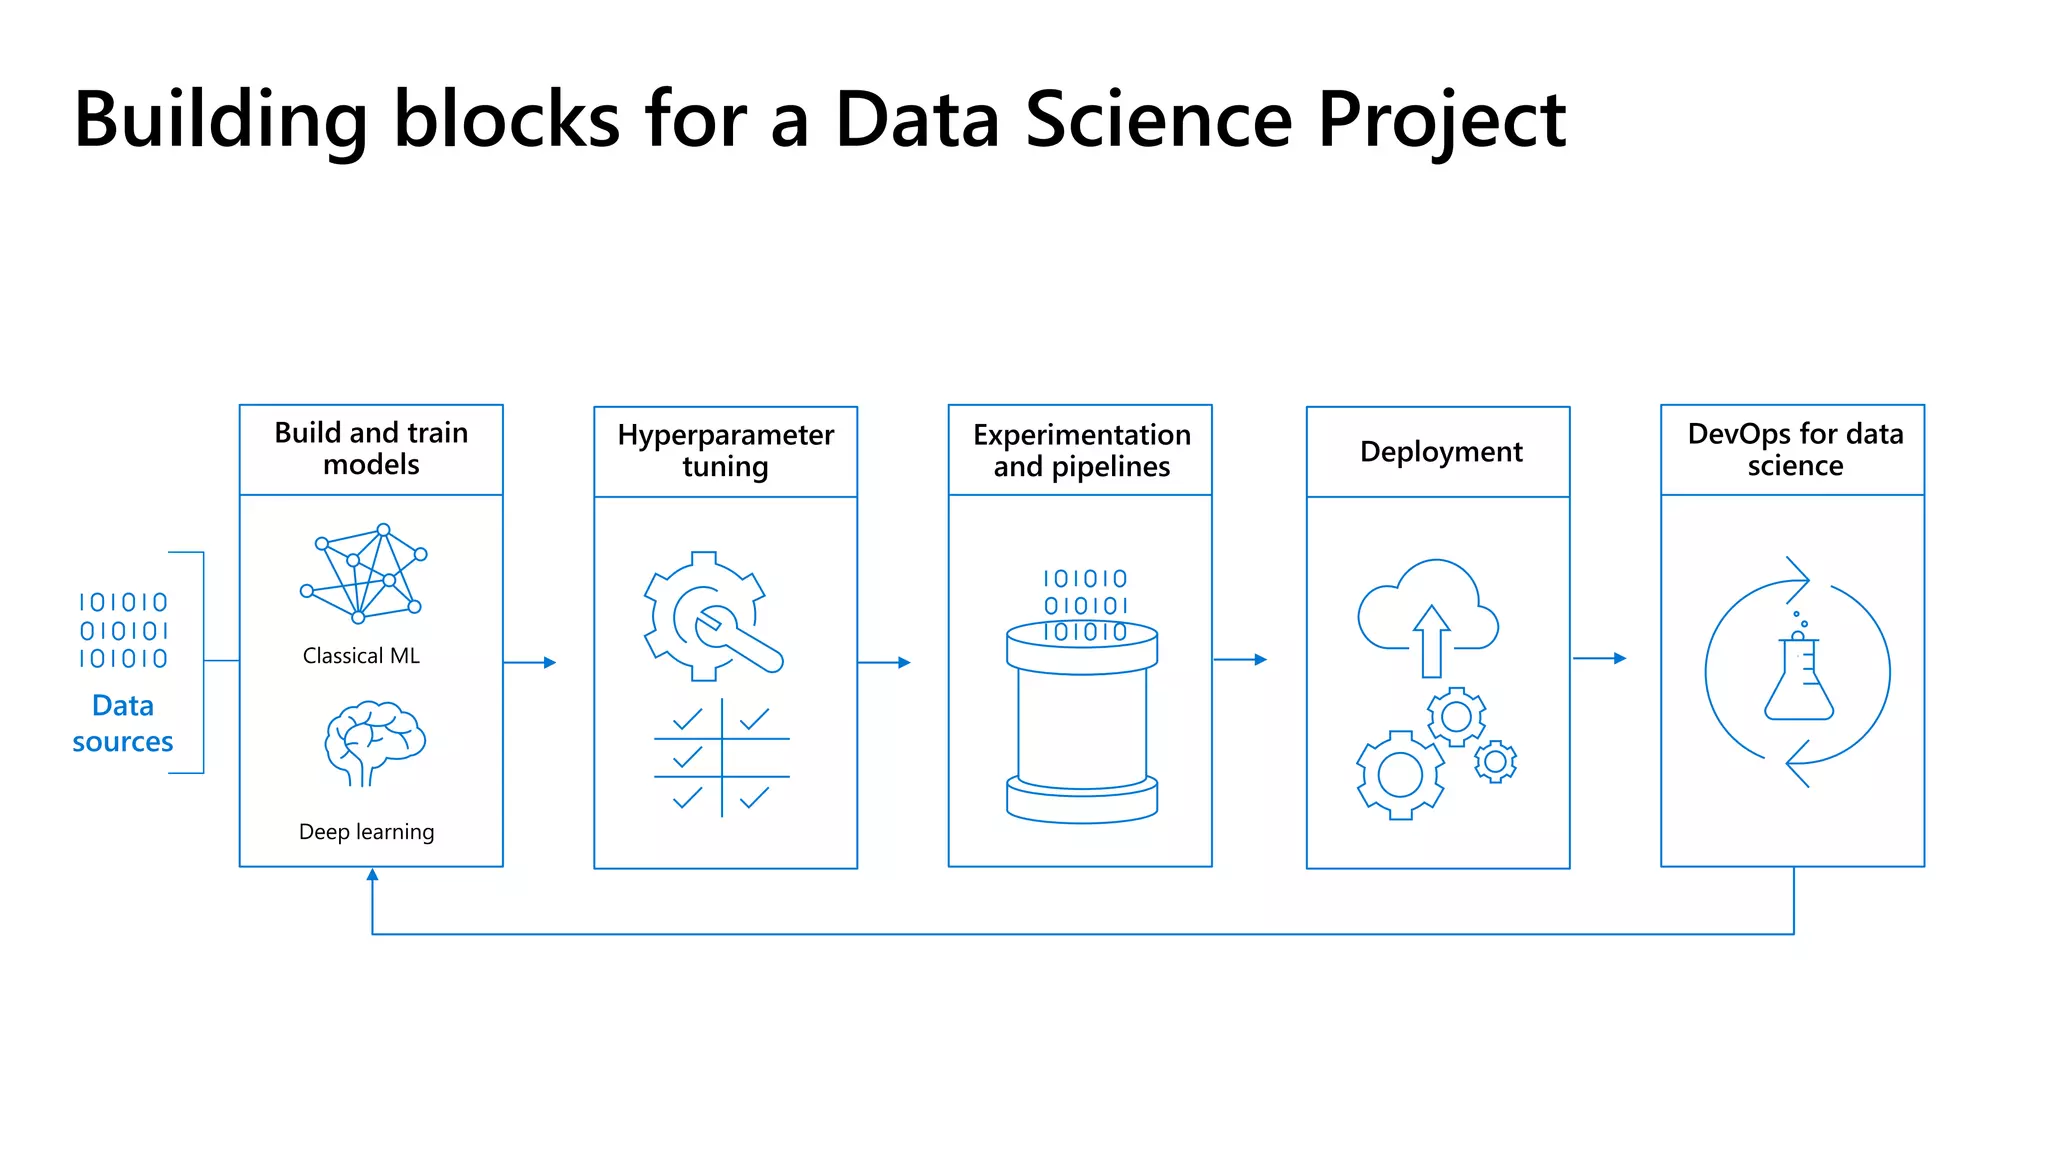
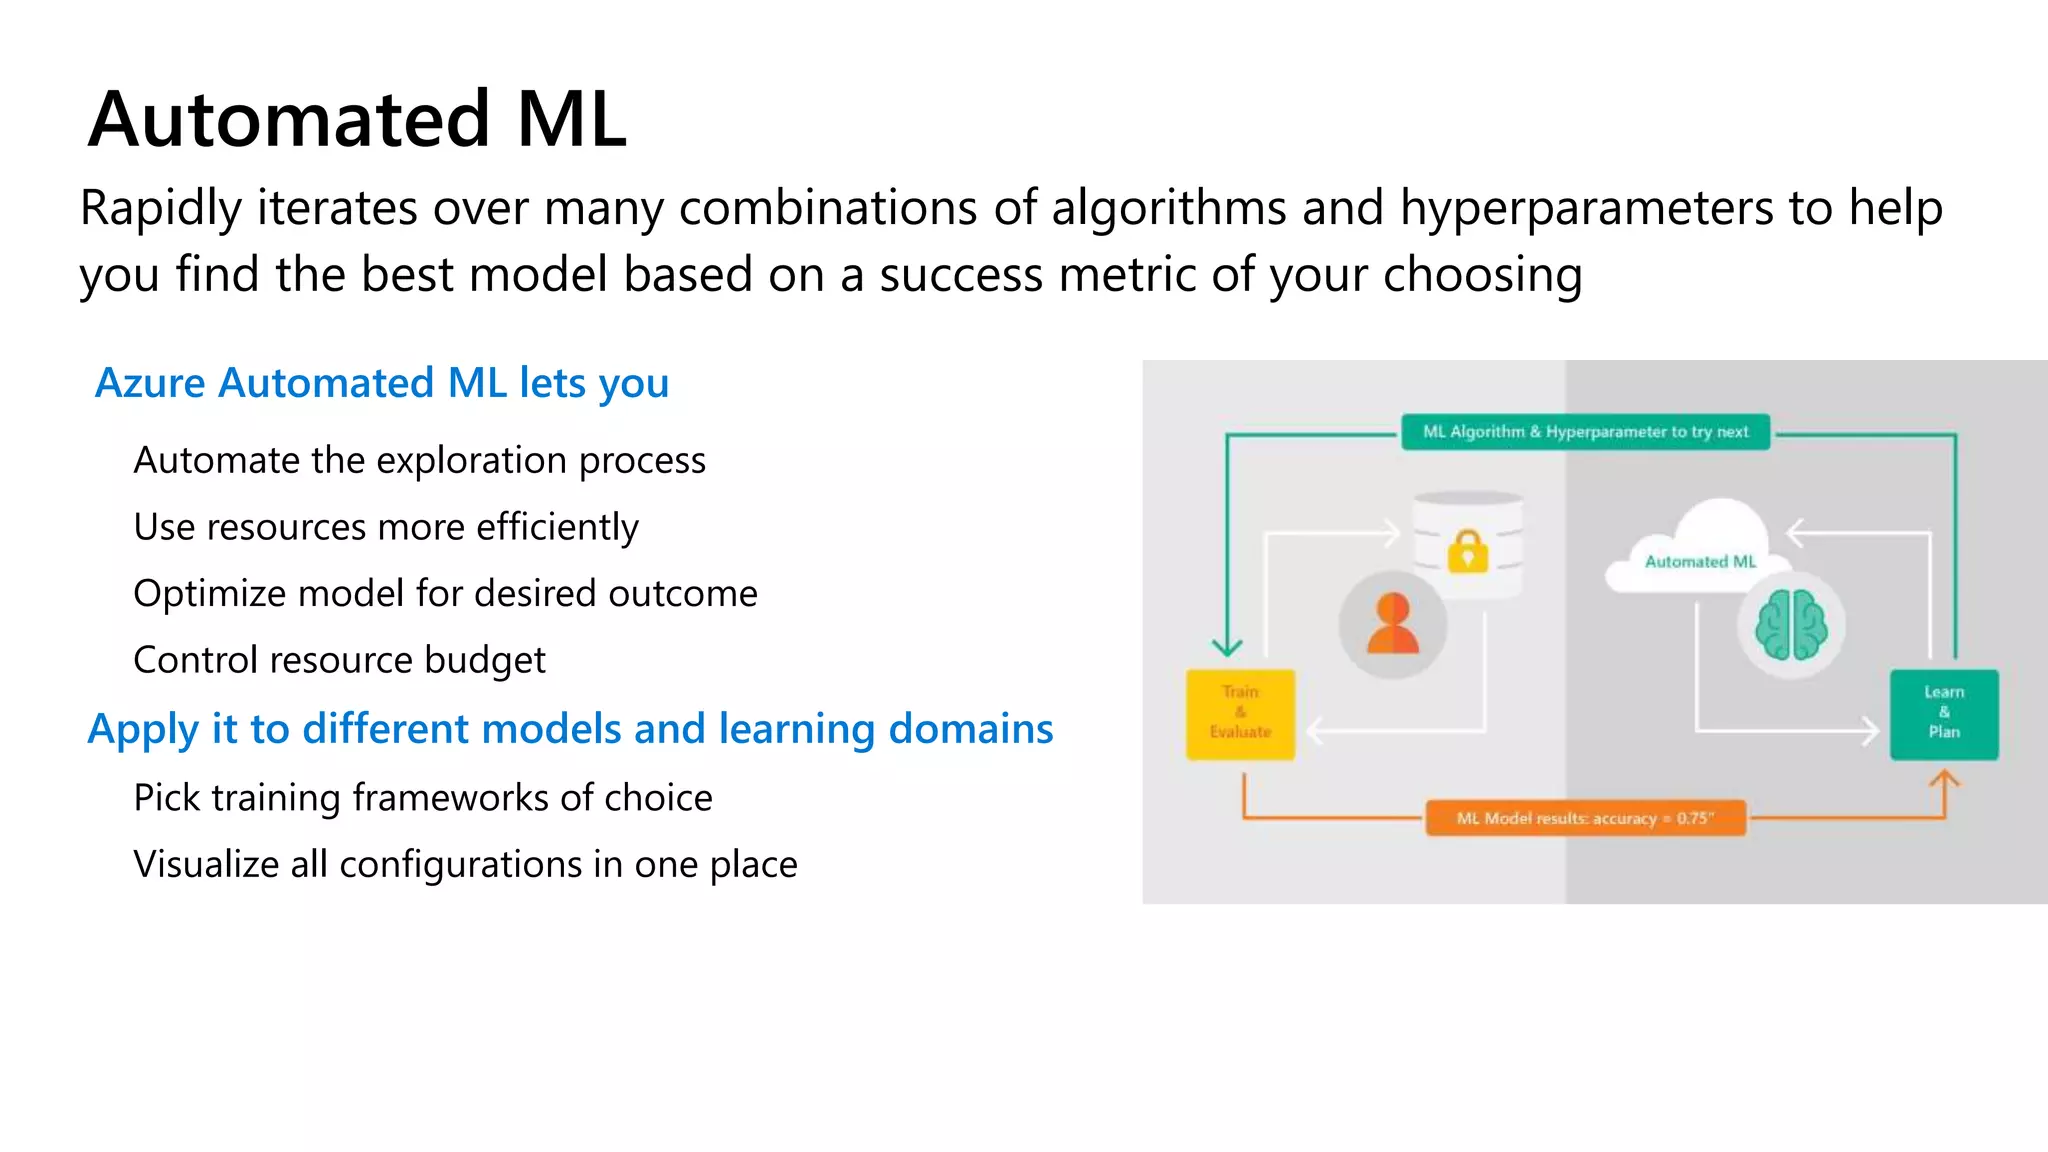
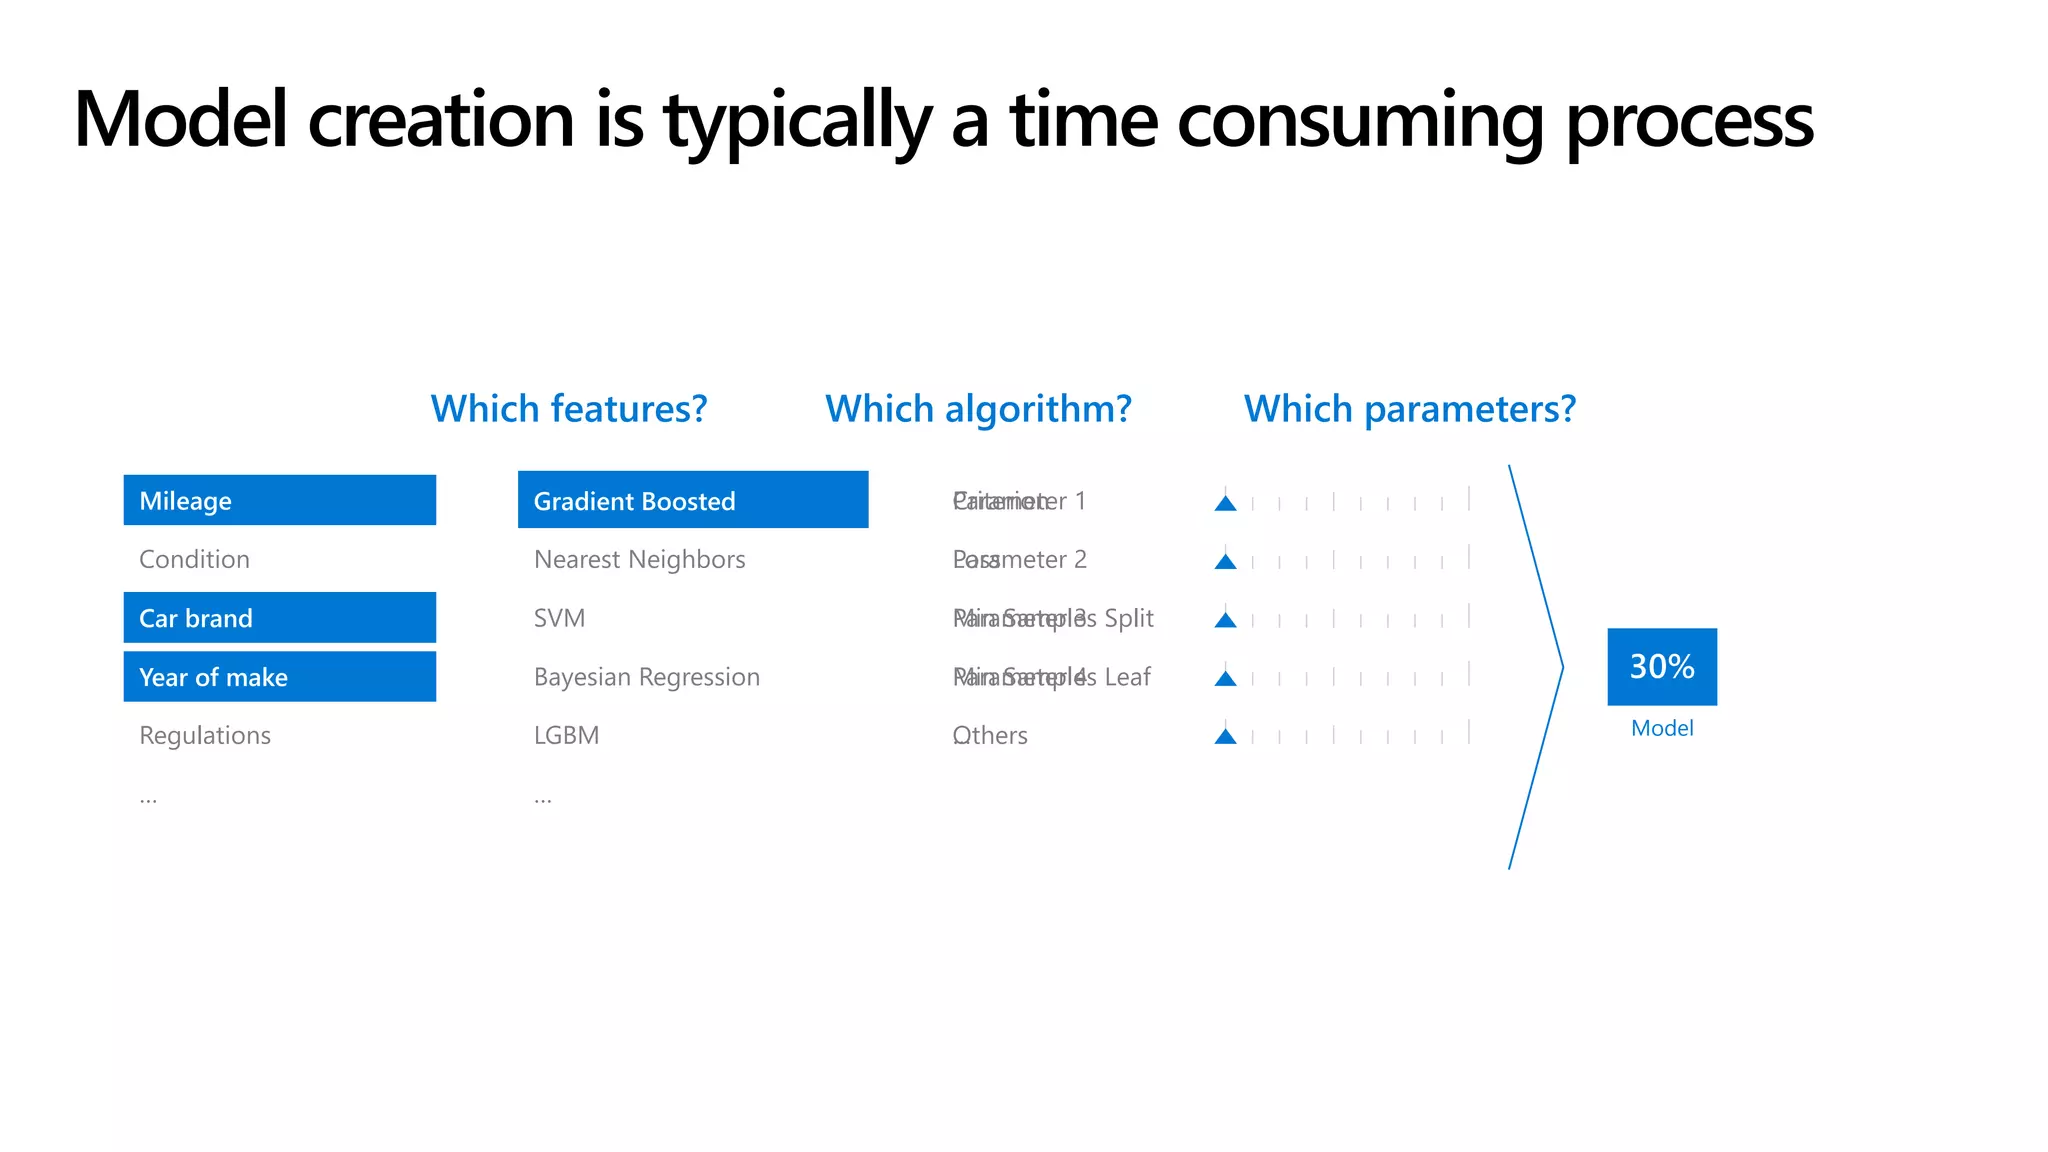
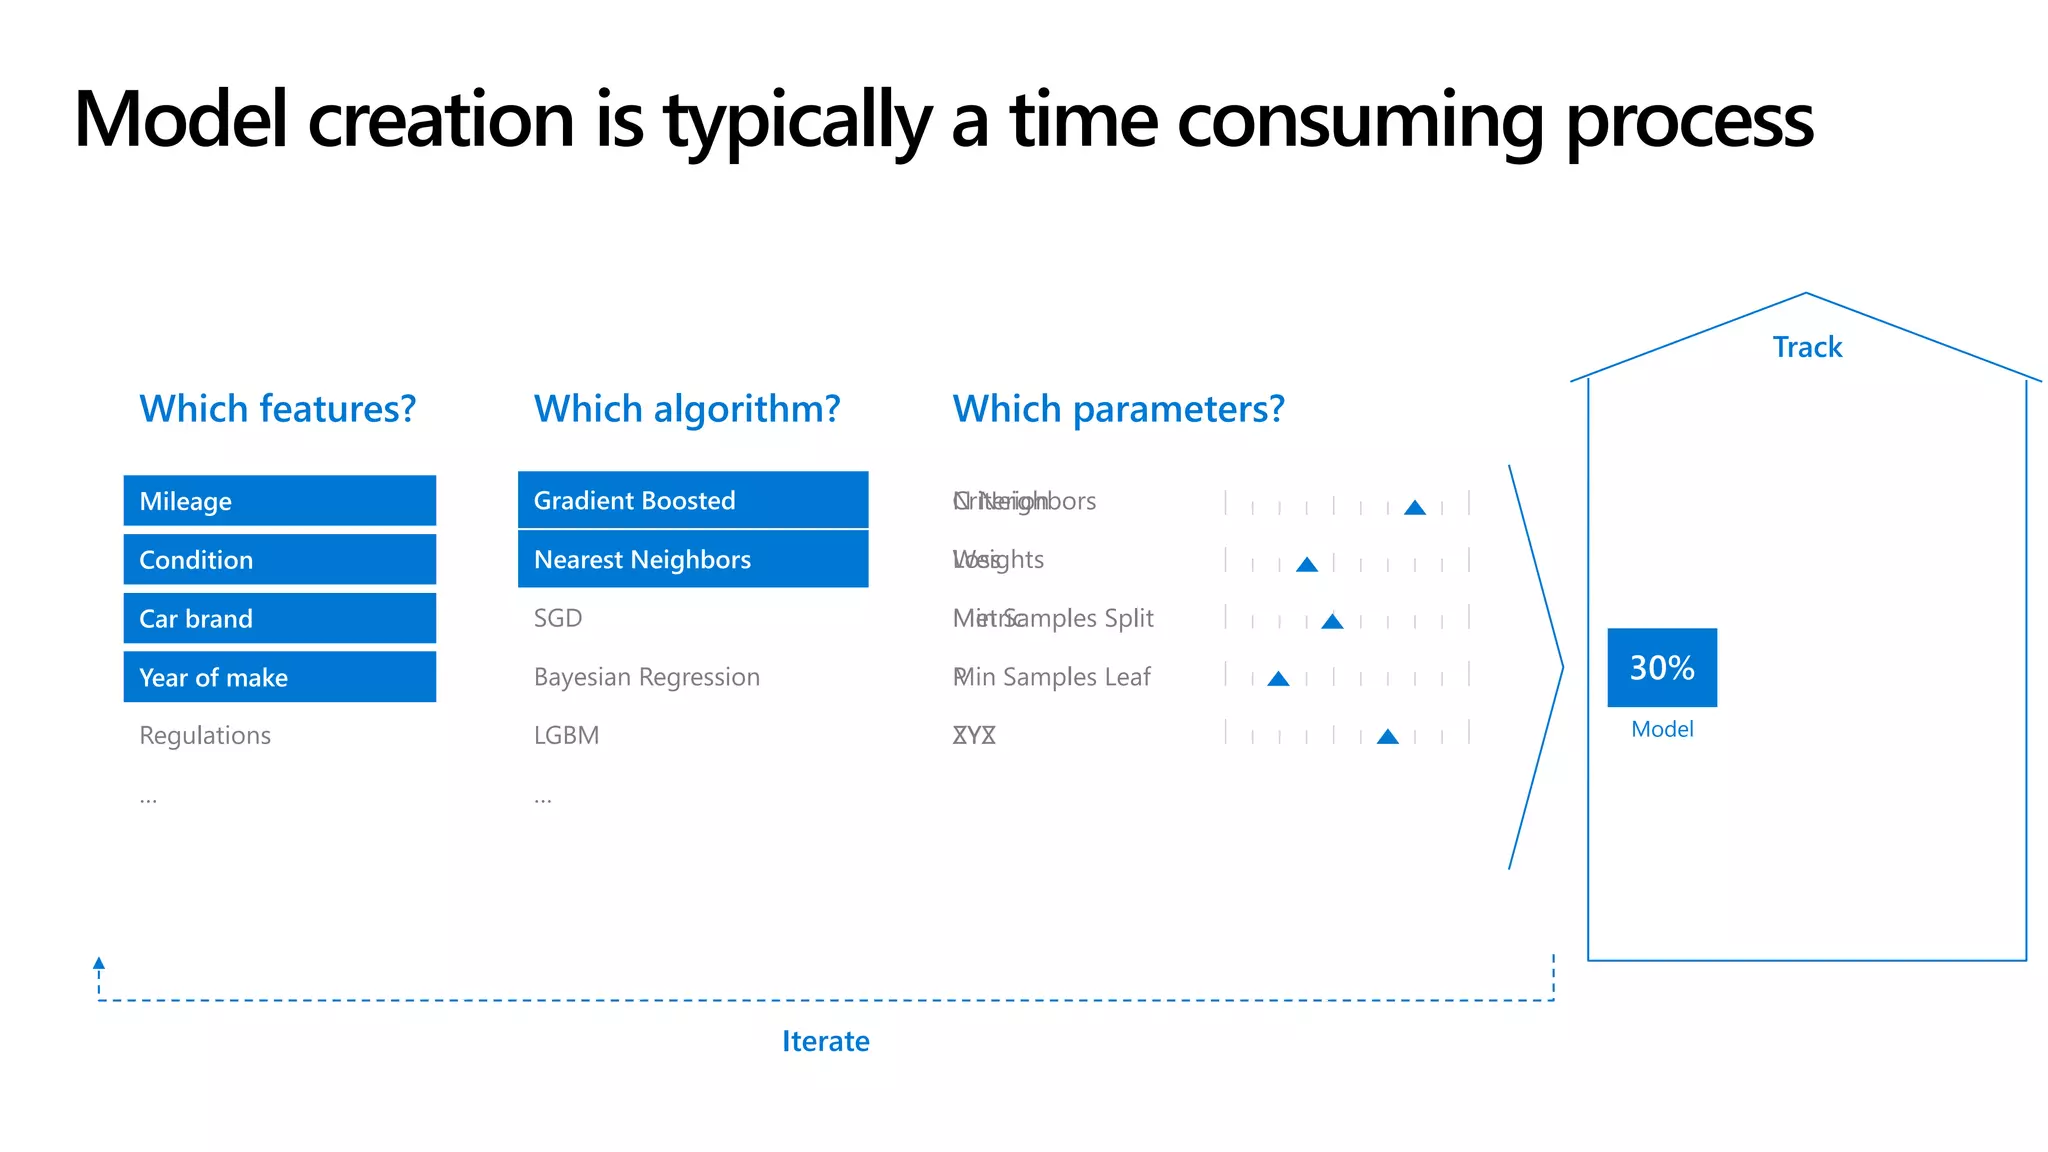
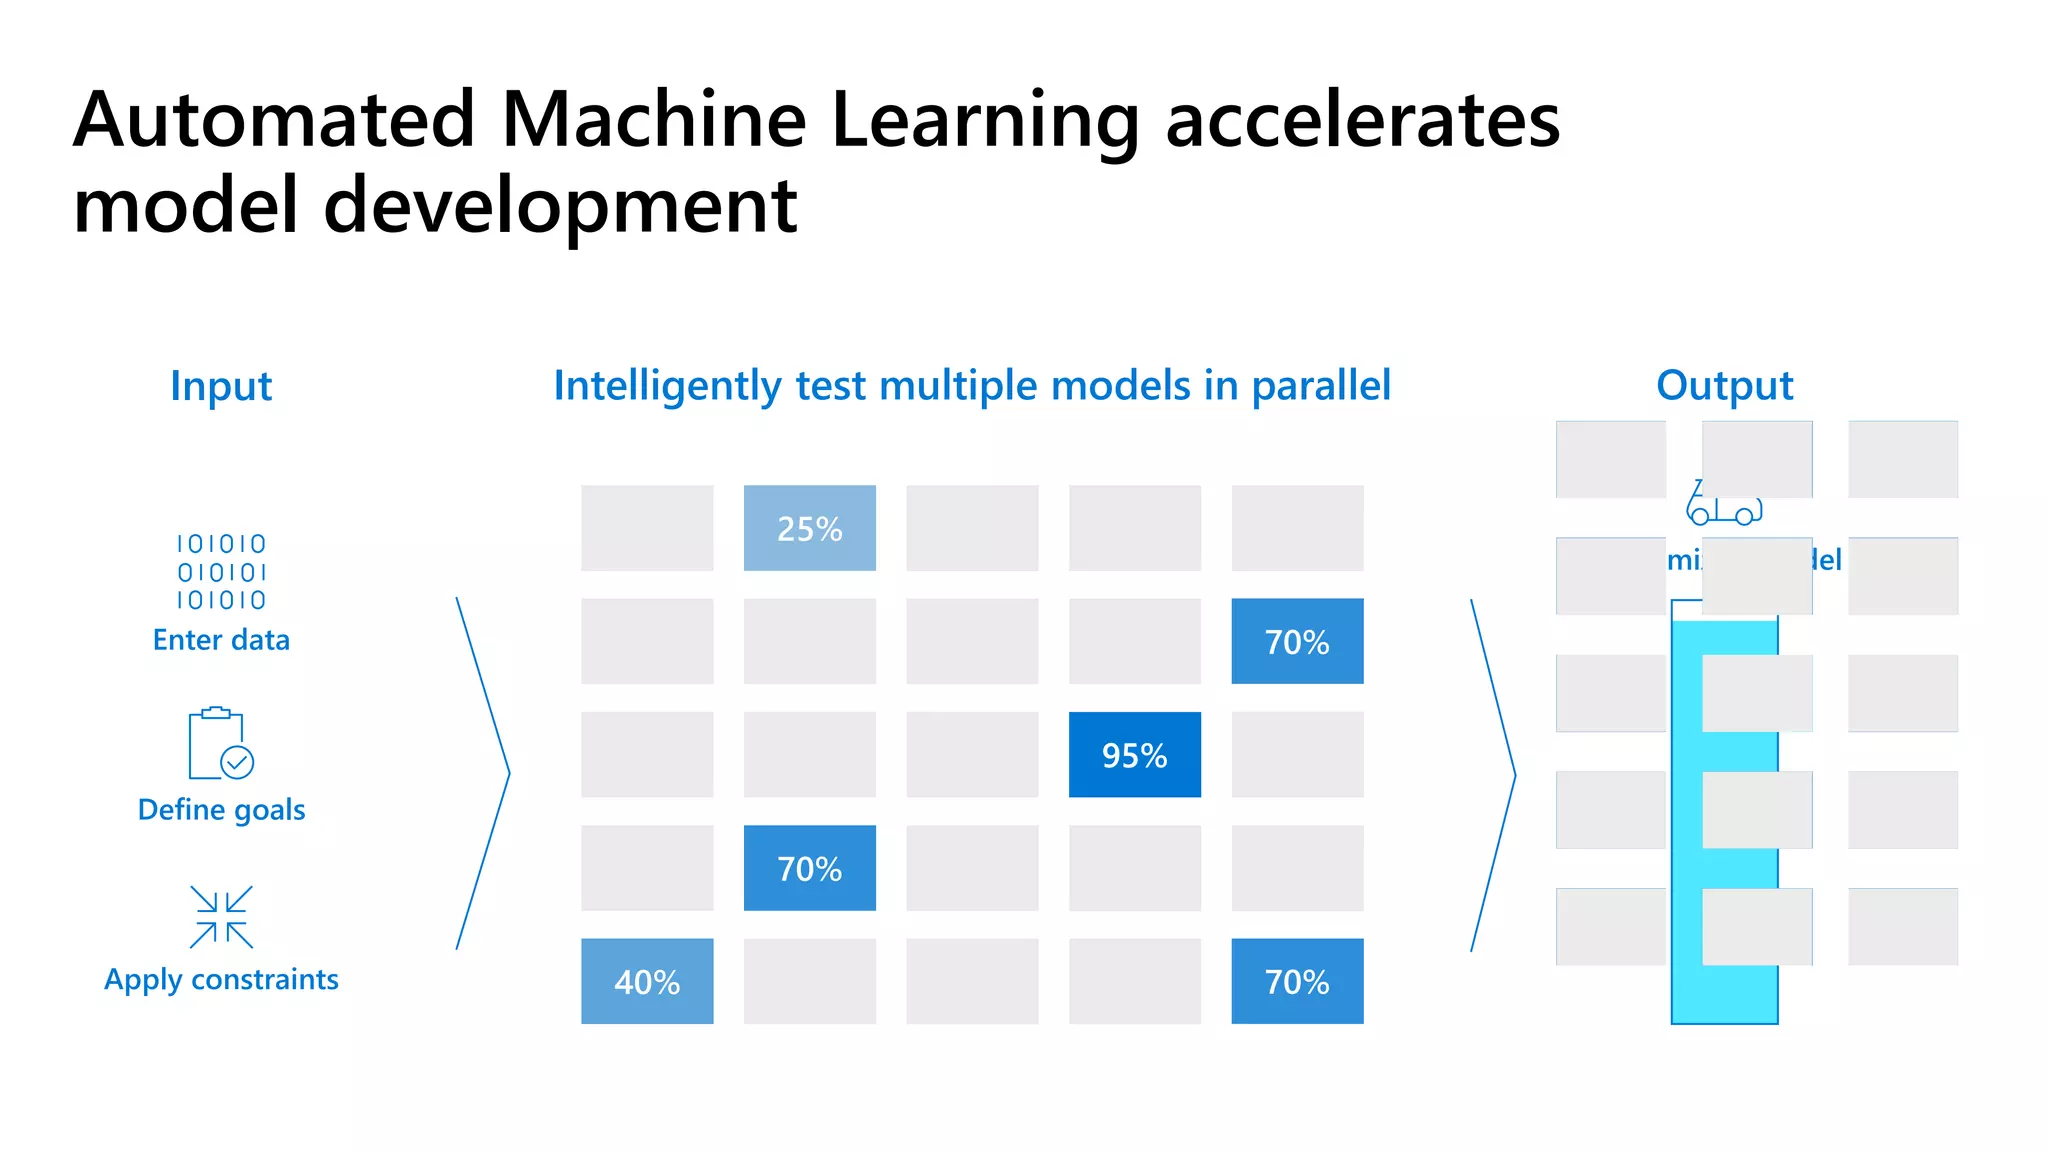
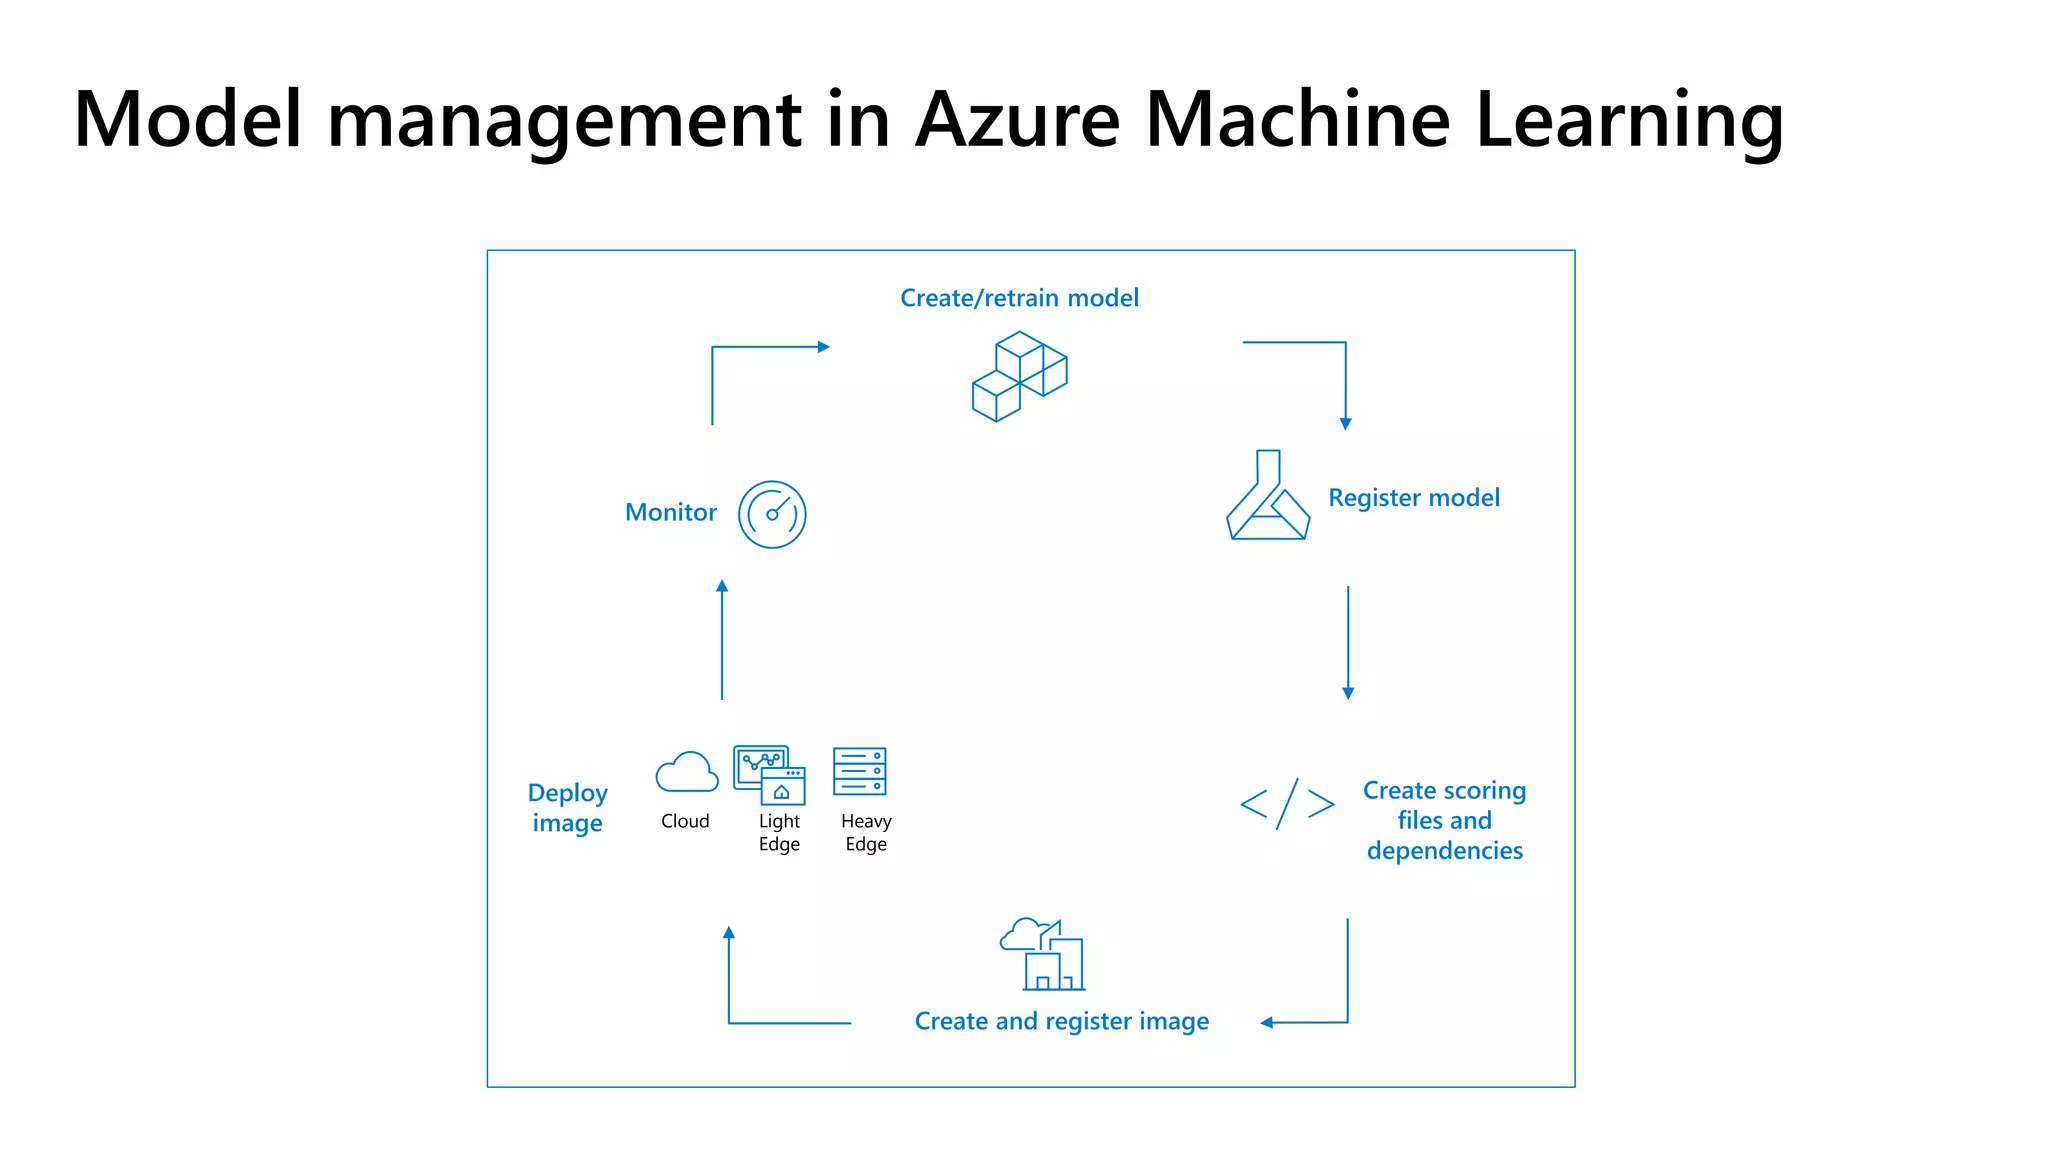
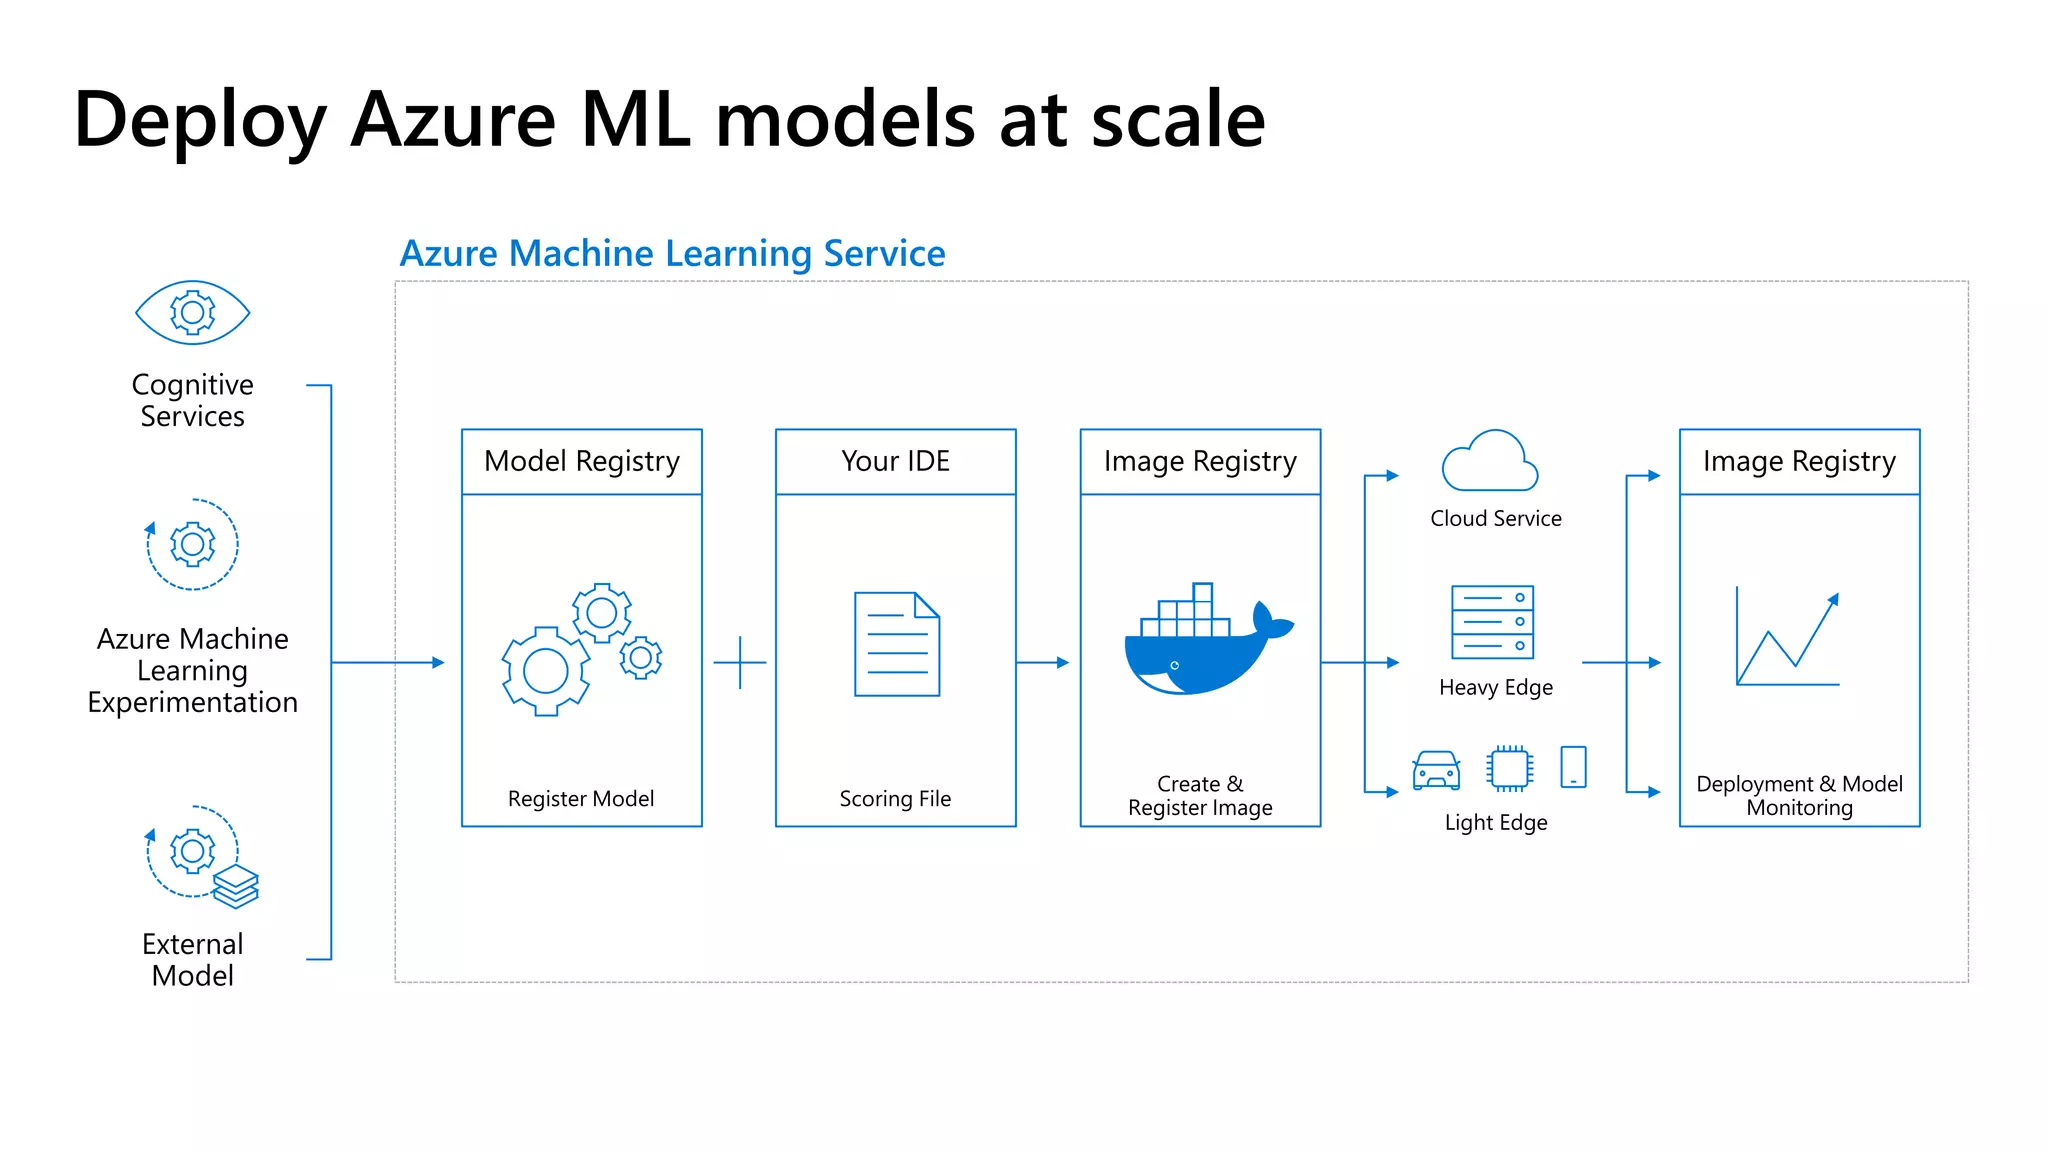
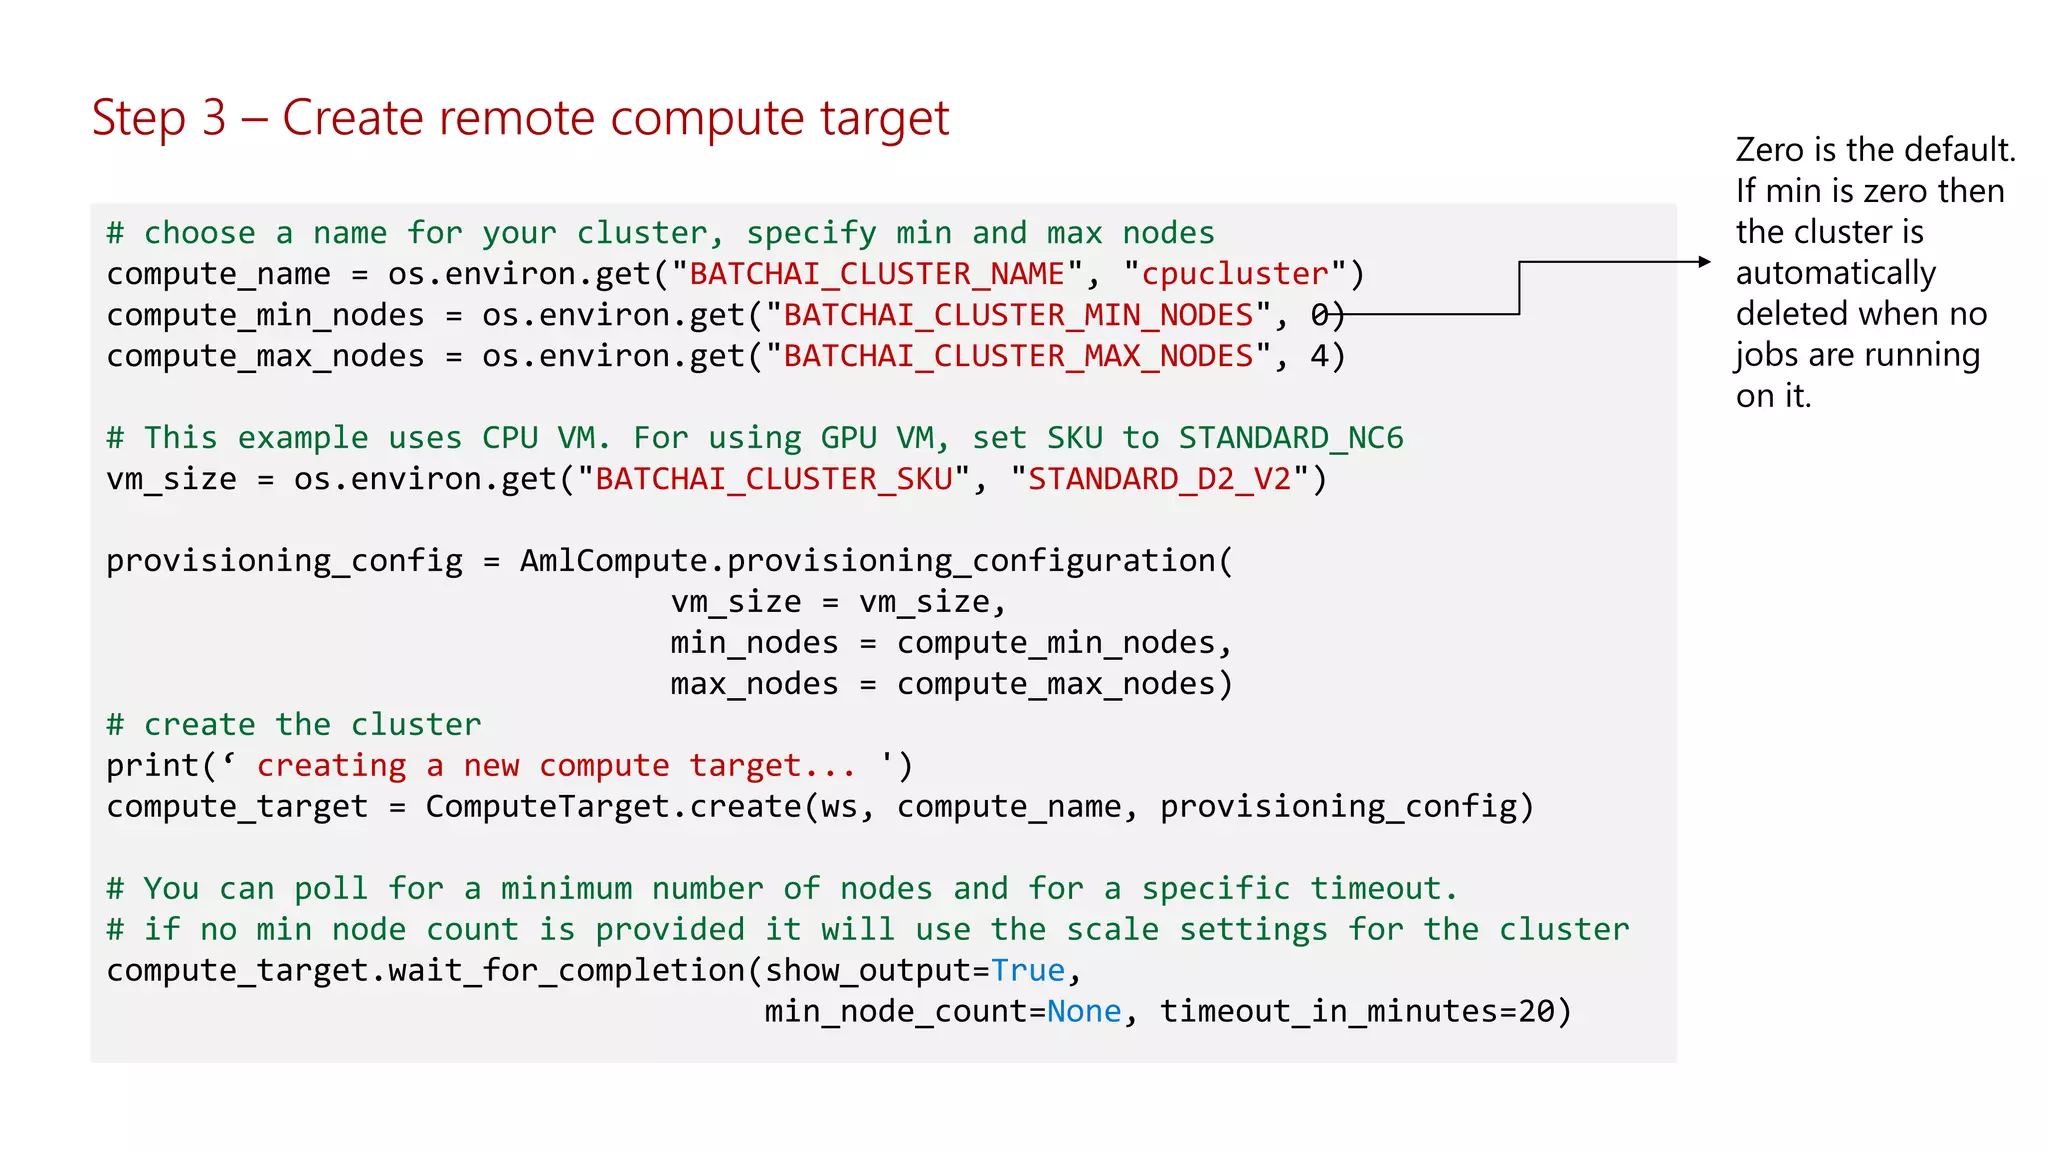
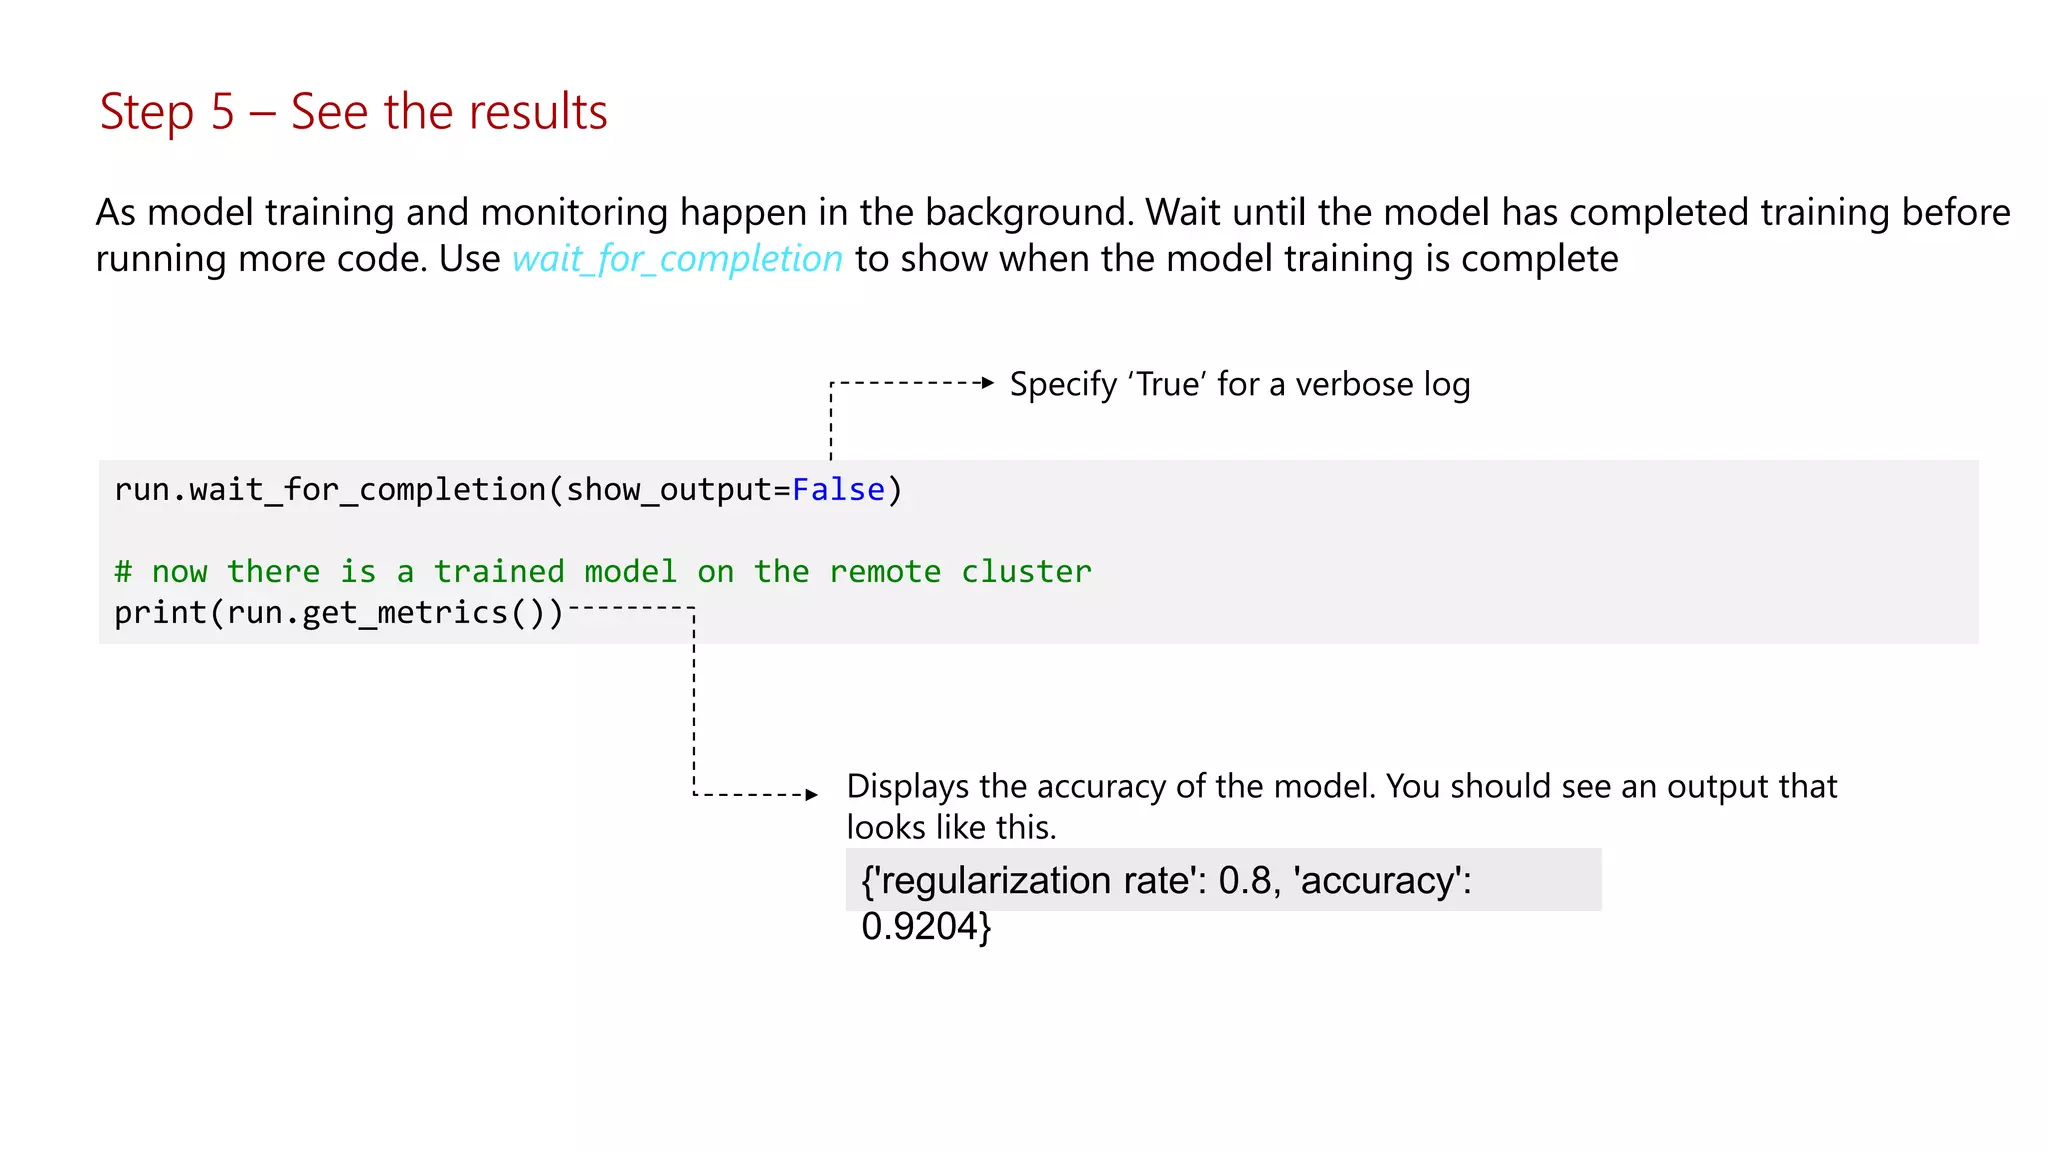
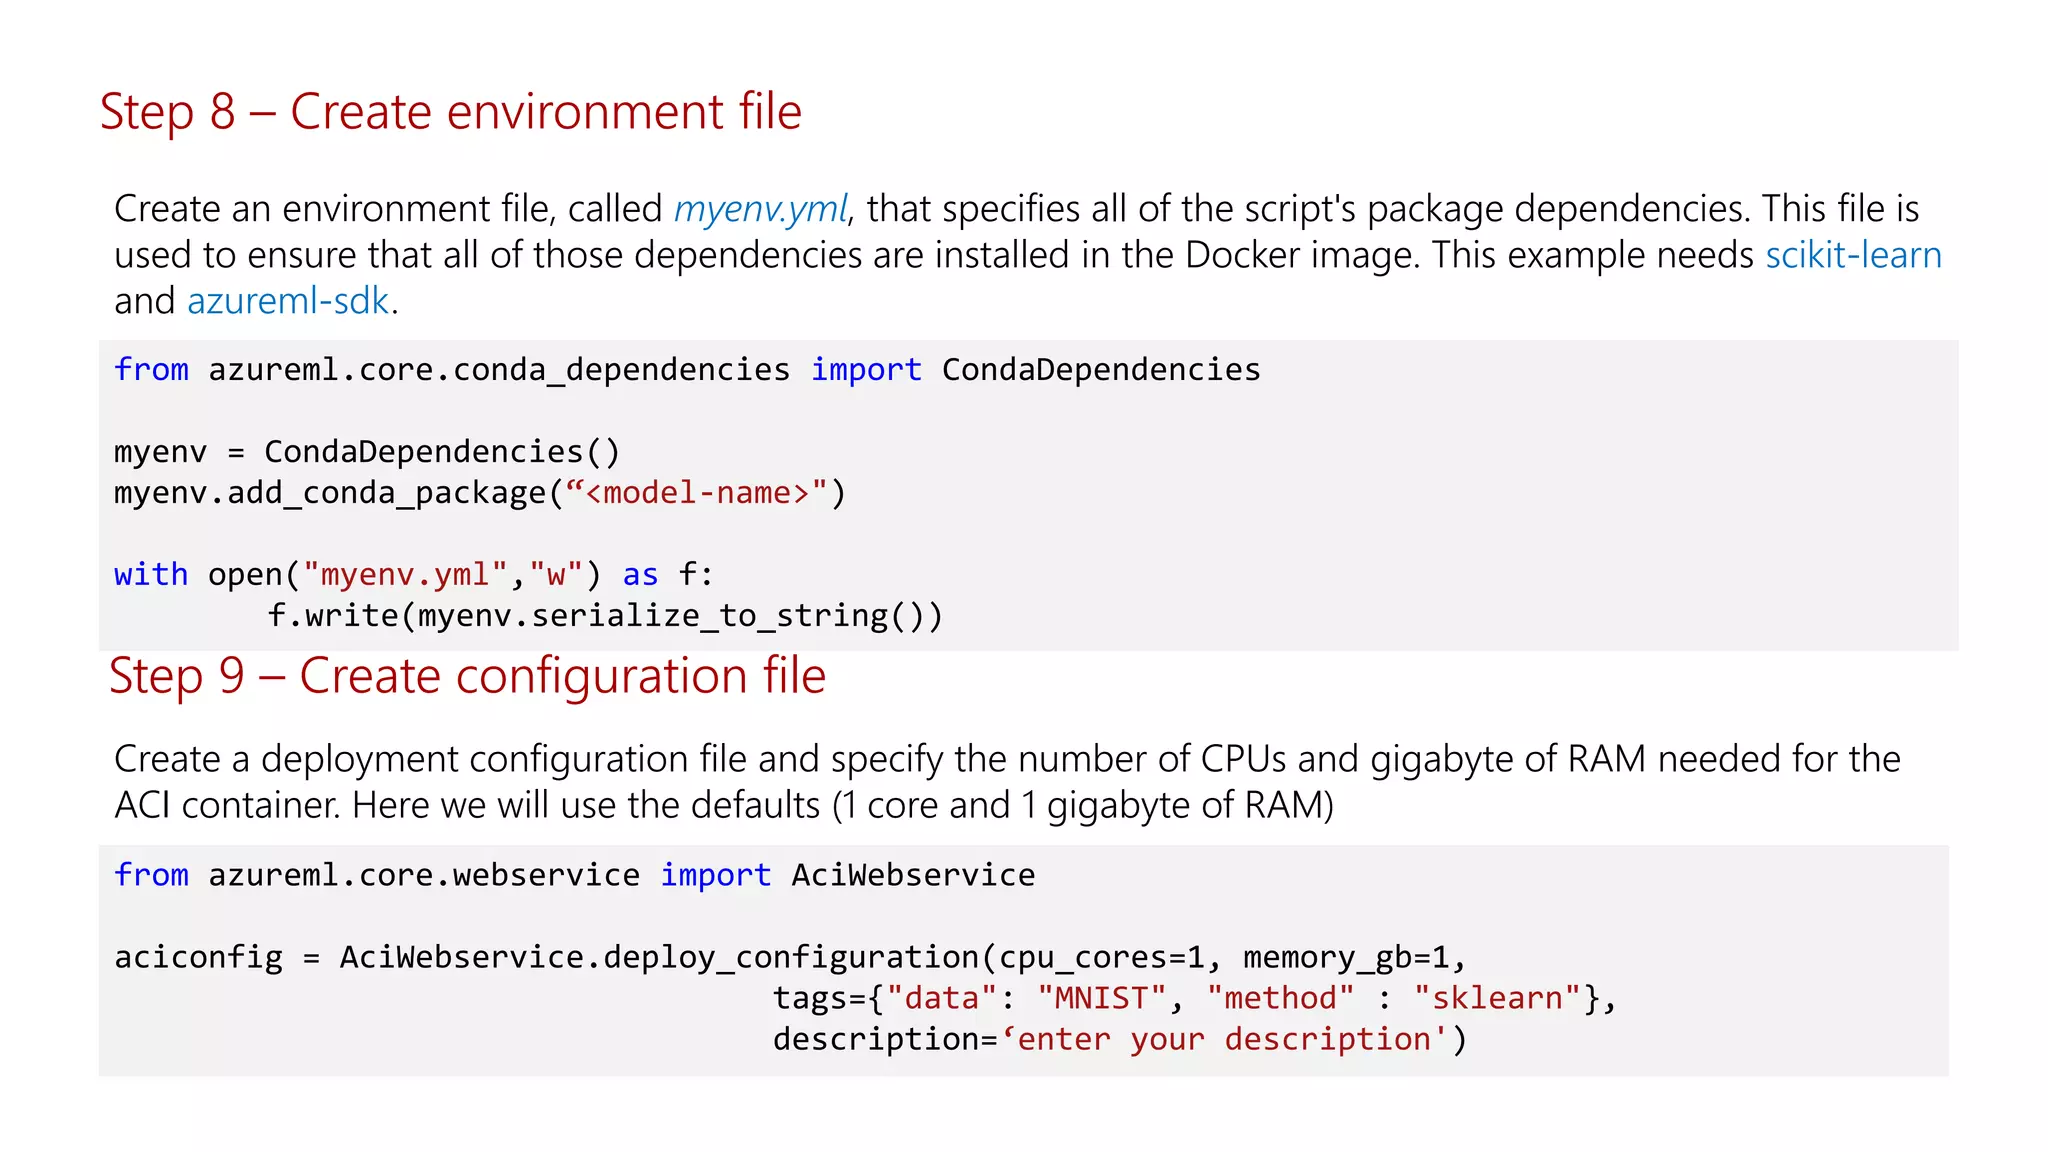
This slide deck gives an overview of the Azure Machine Learning Service. It highlights benefits of Azure Machine Learning Workspace, Automated Machine Learning and integration Notebook scripts
3. Azure ML service Artifact
Workspace
It provides a centralized place to work with all the artifacts you create when using Azure Machine
Learning service.
It also keeps a history of the training runs, including logs, metrics, output, and a snapshot of your
scripts.
Models are registered with the workspace.
You can create multiple workspaces, and each workspace can be shared by multiple people.
When you create a new workspace, it automatically creates these Azure resources:
Azure Container Registry - Registers docker containers that are used during training and when
deploying a model.
Azure Storage - Used as the default datastore for the workspace.
Azure Application Insights - Stores monitoring information about your models.
Azure Key Vault - Stores secrets used by compute targets and other sensitive information needed
by the workspace.
5. Automated ML
Azure Automated ML lets you
Automate the exploration process
Use resources more efficiently
Optimize model for desired outcome
Control resource budget
Apply it to different models and learning domains
Pick training frameworks of choice
Visualize all configurations in one place
Rapidly iterates over many combinations of algorithms and hyperparameters to help
you find the best model based on a success metric of your choosing
6. Mileage
Condition
Car brand
Year of make
Regulations
…
Parameter 1
Parameter 2
Parameter 3
Parameter 4
…
Gradient Boosted
Nearest Neighbors
SVM
Bayesian Regression
LGBM
…
Mileage Gradient Boosted Criterion
Loss
Min Samples Split
Min Samples Leaf
Others Model
Which algorithm? Which parameters?Which features?
Car brand
Year of make
Model creation is typically a time consuming process
7. Which algorithm? Which parameters?Which features?
Mileage
Condition
Car brand
Year of make
Regulations
…
Gradient Boosted
Nearest Neighbors
SGD
Bayesian Regression
LGBM
…
Nearest Neighbors
Criterion
Loss
Min Samples Split
Min Samples Leaf
XYZ Model
Iterate
Gradient Boosted N Neighbors
Weights
Metric
P
ZYX
Mileage
Car brand
Year of make
Car brand
Year of make
Condition
Track
Model creation is typically a time consuming process
8. Track
Which algorithm? Which parameters?Which features?
Iterate
Model creation is typically a time consuming process
9. Enter data
Define goals
Apply constraints
Output
Automated Machine Learning accelerates
model development
Input Intelligently test multiple models in parallel
Optimized model
10. Machine Learning on Azure
Domain specific pretrained models
To reduce time to market
Azure
Databricks
Machine
Learning VMs
Popular frameworks
To build advanced deep learning solutions
TensorFlowPytorch Onnx
Azure Machine
Learning
LanguageSpeech
…
SearchVision
Productive services
To empower data science and development teams
Powerful infrastructure
To accelerate deep learning
Scikit-Learn
PyCharm Jupyter
Familiar Data Science tools
To simplify model development
Visual Studio Code Command line
CPU GPU FPGA
From the Intelligent Cloud to the Intelligent Edge
11. Model management in Azure Machine Learning
Create/retrain model
Create scoring
files and
dependencies
Create and register image
Monitor
Register model
Cloud Light
Edge
Heavy
Edge
Deploy
image
12. Deploy Azure ML models at scale
Azure Machine Learning Service
14. from azureml.core import Workspace
ws = Workspace.create(name='myworkspace',
subscription_id='<azure-subscription-id>',
resource_group='myresourcegroup',
create_resource_group=True,
location='eastus2' # or other supported Azure region
)
# see workspace details
ws.get_details()
Step 2 – Create an Experiment
experiment_name = ‘my-experiment-1'
from azureml.core import Experiment
exp = Experiment(workspace=ws, name=experiment_name)
Step 1 – Create a workspace
15. Step 3 – Create remote compute target
# choose a name for your cluster, specify min and max nodes
compute_name = os.environ.get("BATCHAI_CLUSTER_NAME", "cpucluster")
compute_min_nodes = os.environ.get("BATCHAI_CLUSTER_MIN_NODES", 0)
compute_max_nodes = os.environ.get("BATCHAI_CLUSTER_MAX_NODES", 4)
# This example uses CPU VM. For using GPU VM, set SKU to STANDARD_NC6
vm_size = os.environ.get("BATCHAI_CLUSTER_SKU", "STANDARD_D2_V2")
provisioning_config = AmlCompute.provisioning_configuration(
vm_size = vm_size,
min_nodes = compute_min_nodes,
max_nodes = compute_max_nodes)
# create the cluster
print(‘ creating a new compute target... ')
compute_target = ComputeTarget.create(ws, compute_name, provisioning_config)
# You can poll for a minimum number of nodes and for a specific timeout.
# if no min node count is provided it will use the scale settings for the cluster
compute_target.wait_for_completion(show_output=True,
min_node_count=None, timeout_in_minutes=20)
16. To submit a training job to your cluster
Step 4 – Train model on your cluster
17. What happens after you submit the job?
Post-Processing
The ./outputs directory of the run is copied
over to the run history in your workspace
so you can access these results.
Running
In this stage, the necessary scripts and files are
sent to the compute target, then data stores are
mounted/copied, then the entry_script is run.
While the job is running, stdout and the ./logs
directory are streamed to the run history. You can
monitor the run's progress using these logs.
Image creation
A Docker image is created matching the Python
environment specified by the estimator. The image
is uploaded to the workspace. Image creation and
uploading takes about 5 minutes.
This happens once for each Python environment
since the container is cached for subsequent runs.
During image creation, logs are streamed to the
run history. You can monitor the image creation
progress using these logs.
Scaling
If the remote cluster requires more nodes
to execute the run than currently available,
additional nodes are added automatically.
Scaling typically takes about 5 minutes.
18. Step 5 – See the results
As model training and monitoring happen in the background. Wait until the model has completed training before
running more code. Use wait_for_completion to show when the model training is complete
run.wait_for_completion(show_output=False)
# now there is a trained model on the remote cluster
print(run.get_metrics())
{'regularization rate': 0.8, 'accuracy':
0.9204}
19. Step 6 – Register the model
This wrote the file ‘outputs/<model-name>l.pkl’ in a directory named ‘outputs’ in the VM of the cluster where the
job is executed.
• outputs is a special directory in that all content in this directory is automatically uploaded to your workspace.
• This content appears in the run record in the experiment under your workspace.
• Hence, the model file is now also available in your workspace.
joblib.dump(value=clf, filename='outputs/<model-name>.pkl')
Recall that the last step in the training script is:
# register the model in the workspace
model = run.register_model (
model_name=‘<model-name>’,
model_path='outputs/<model-name>.pkl’)
The model is now available to query, examine, or deploy
20. Step 7 – Create the scoring script
Create the scoring script, called score.py, used by the web service call to show how to use the model.
It requires two functions – init() and run (input data)
from azureml.core.model import Model
def init():
global model
# retreive the path to the model file using the model name
model_path = Model.get_model_path(‘<model-name>’)
model = joblib.load(model_path)
def run(raw_data):
data = np.array(json.loads(raw_data)['data’])
# make prediction
y_hat = model.predict(data) return json.dumps(y_hat.tolist())
21. Step 8 – Create environment file
Create an environment file, called myenv.yml, that specifies all of the script's package dependencies. This file is
used to ensure that all of those dependencies are installed in the Docker image. This example needs scikit-learn
and azureml-sdk.
from azureml.core.conda_dependencies import CondaDependencies
myenv = CondaDependencies()
myenv.add_conda_package(“<model-name>")
with open("myenv.yml","w") as f:
f.write(myenv.serialize_to_string())
Step 9 – Create configuration file
Create a deployment configuration file and specify the number of CPUs and gigabyte of RAM needed for the
ACI container. Here we will use the defaults (1 core and 1 gigabyte of RAM)
from azureml.core.webservice import AciWebservice
aciconfig = AciWebservice.deploy_configuration(cpu_cores=1, memory_gb=1,
tags={"data": "MNIST", "method" : "sklearn"},
description=‘enter your description')
22. Step 10 – Deploy the model to ACI
%%time
from azureml.core.webservice import Webservice
from azureml.core.image import ContainerImage
# configure the image
image_config = ContainerImage.image_configuration(
execution_script ="score.py",
runtime ="python",
conda_file ="myenv.yml")
service = Webservice.deploy_from_model(workspace=ws, name='sklearn-mnist-svc’,
deployment_config=aciconfig, models=[model],
image_config=image_config)
service.wait_for_deployment(show_output=True)
23. Step 11 – Test the deployed model using the HTTP end point
Test the deployed model by using HTTP endpoint in you ML workspace
24. Developer Environments for Azure Machine
Learning
Environment Pros Cons
Cloud-based notebook VM
Easiest way to get started. The entire SDK is already
installed in your workspace VM, and notebook
tutorials are pre-cloned and ready to run.
Lack of control over your development environment and
dependencies. Additional cost incurred for Linux VM (VM
can be stopped when not in use to avoid charges). See
pricing details.
Local environment
Full control of your development environment and
dependencies. Run with any build tool, environment,
or IDE of your choice.
Takes longer to get started. Necessary SDK packages
must be installed, and an environment must also be
installed if you don't already have one.
Azure Databricks
Ideal for running large-scale intensive machine
learning workflows on the scalable Apache Spark
platform.
Overkill for experimental machine learning, or smaller-scale
experiments and workflows. Additional cost incurred for
Azure Databricks. See pricing details.
The Data Science Virtual Machine (DSVM)
Similar to the cloud-based notebook VM (Python and
the SDK are pre-installed), but with additional popular
data science and machine learning tools pre-installed.
Easy to scale and combine with other custom tools
and workflows.
A slower getting started experience compared to the
cloud-based notebook VM.
Azure Notebooks
Free and light weight getting started experience, with
Python and the SDK pre-installed.
Less-powerful VM's available compared to cloud-
based notebook VM. Isolated from workspace and
other resources.
25. Try it for free
http://aka.ms/azuremlfreeaccount
Learn more: http://aka.ms/aml-doc
Visit demos:
• http://aka.ms/diabetes-notebook-experience
• https://aka.ms/azure-automl
Editor's Notes
Our approach to ML frameworks is simple.
We give customers the flexibility to choose their deep learning framework, without getting locked one framework.
To help with this we’ve created a community project in partnership with Facebook that allows customers to train in one framework and use another one for inference
Now, let me move to the ML services on Azure
Use your favorite IDE, built into your favorite IDE (VS Code only @ Public Preview)
Use any framework or library and the most popular languages
Faster, easier training