SlideShare a Scribd company logo
ProRoc gypsum board is
very easy to work with and
cutting is quite simple. To
make a cut, score the paper
on the face side with a util-
ity knife along the edge of
your T-square. Apply firm,
but even, pressure to snap
the board along the score. Then fold the board along
the score and cut the paper along the crease with the
utility knife. Lastly, smooth the rough edges with a
sanding block or drywall rasp.
Remember, always wear safety glasses when cutting or
sanding boards.
ATTACHING PROROC BOARDS
You can attach your
ProRoc boards to studs or
joists using nails, screws.
We recommend using
drywall screws for opti-
mum installation and
professional finish. You
might wish to consult
with your dealer when considering the different appli-
cation methods.
Always install ceiling first, then install walls, allowing
a space of at least 1/2” off of the floor. Keep fasteners
6-inches away from the interior ceiling and ensure that
nails or screws are not less than 3/8” from the ends
and edges of the boards.
Installing ceiling boards can be tricky and requires two
people. In addition, you will find it much easier if you
use T-braces or a drywall lift to hold the boards in
place until they are fastened.
You can build T-braces
yourself! You’ll need a two
by four that is an inch
longer than the distance
from the floor to the ceil-
ing framing members, as
well as, 2-two foot lengths
of one by fours.
One piece of the 1 x 4 should be used for the top of
the “T”, while the second piece should be used as a
brace and attached diagonally from the top piece to
the stem. You’ll need to make sure the T stays square.
Have your helper use one T-brace, while you manage
the other to lift the board into place. Your drywall
screws should be installed 12” to the joists. If using
nails, they should be placed 6” apart. Install nails or
screws slightly indented into the surface, without
breaking the paper face or damaging the gypsum core.
If you do break the paper, remove the fastener and
replace with one 2” away.
WALLS
When installing gypsum board, install the upper board
first, ensuring that you push the board firmly against the
ceiling and that tapered edges are in contact. Then fasten
with drywall screws spaced 16” apart (or preferably double
nails 6” apart) working from the center out to the edges.
To put the lower panel into place, you may wish to use
a wedge or wallboard lifter. Put the angled edge under
the board and use it as a lever to jack it up against the
top panel.
CUTOUTS
You will need to cut openings in your ProRoc boards
to accommodate electrical outlets, light fixtures,
windows and doors.
For light fixtures and
electrical boxes, measure
the distance from the
edge of the adjacent board
to the near and far sides
of the installed fixture
box. Then measure from
the top edge of the panel
to the top and bottom of the box. Trace the outline of
the box in the position you just measured on the
board. Cut the opening with a drywall saw.
For larger openings, install the panels directly across the
openings. Then use a drywall saw to cut the panels, using
the framing as your guide. As you install the boards,
make sure that you do not place joints at the edges of
doors or windows. If you do, as the door or window is
opened and closed over time, the joint will crack.
INSIDE CORNER
To join boards at an inside corner, simply butt the
second board against the first and fasten its end to
a framing member.
OUTSIDE CORNER
On outside corners, be sure to cover the end of the
first installed board with that of the second. Fasten
both ends of the boards to the common stud.
To prepare the corner for
finishing, install a corner
bead. Measure the length
needed, then cut the bead
with tin snips, cutting
through each flange
towards the nose, then
bending the bead to break.
After selecting the corner bead of your choice, follow
the manufacturer’s instructions for installation.
CERTAINTEED PROROC®
A durable, lightweight, cost-effective building material
for interior walls and ceilings.
Consisting of a premium quality, non-combustible
gypsum core, ProRoc gypsum board is encased in a
smooth face (front) and back covering of 100% recycled
paper. The tapered edges are precision manufactured
and paper bound for easy joint finishing, making
ProRoc gypsum board the ideal choice for finishing
interior walls and ceilings. Once primed, it can be painted,
wallpapered or textured for a look that works for you.
TOOLS YOU WILL NEED
To properly install ProRoc gypsum board, you’ll need
the following tools:
❏ Tape measure
❏ 4-foot T-square or straight edge
❏ Utility knife with extra blades
❏ Step ladder
❏ Marking pencil
❏ Wallboard Saw
❏ Tin snips
❏ “Mud” Hawk or Pan
❏ 2-1/2”, 4”, 7” and 12” finishing knife
❏ Drywall rasp
❏ Dust mask
❏ Safety glasses or goggles
❏ 150-180 grit sandpaper
❏ Sanding pad and pole sander
❏ Sponge
❏ Drywall hammer or regular carpenter’s hammer
(if installing with drywall nails)
❏ Electric screw gun or standard drill with dimpler
attachment (if installing with drywall screws)
Installation Instructions
Planning the Job
It’s best to plan your ProRoc installation with the least
amount of joints (the seam where boards meet).
Fewer joints will mean less finishing work.
We recommend installing ProRoc boards perpendicular
to studs or joists. ProRoc boards comes in 4-foot wide
and various lengths and thicknesses. However, most
common are 8”, 10”, 12”. You may find it easiest to
work with 8-foot boards.
If you are intending to finish your ceilings with a water
based texture, you should use ProRoc 1/2” Interior
Ceiling Board on maximum 24” on centre joists, in
order to avoid sagging.
To determine how many ProRoc boards you will need,
simply calculate the total surface area of your walls
and/or ceiling by multiplying the length by the width.
You might wish to draw a sketch of the room/area you
are working on to make things easier. When calculat-
ing, do not subtract windows or door areas. Divide
your total square footage by the square footage of
your boards (32-feet for an 8-foot board) and round
up to find the number of boards you need.
Based on the square footage of your project area,
you’ll need the following materials per 100-square-feet:
❏ 100 1-1/4” drywall screws (or 1/2 lb of nails)
❏ 30-feet of CertainTeed Marco Joint Tape
❏ 4.5L of ProRoc joint compound
CUTTING THE BOARD CEILING
20'–0"
12'
12'8'
8'
directionof
studsorjoints
24'–0"
8' 8' 8'
C e r t a i n Te e d
Installation Guide
Gypsum Wallboard Panels
C e r t a i n Te e d
Gypsum Wallboard Panels
Begin with the butt joints – the areas where the
unfinished ends of ProRoc boards meet.
First, apply a coat of
ProRoc joint compound
over the joint with your
four-inch knife. Then,
press the tape firmly into
the compound by press-
ing your knife over the
tape. Squeeze out excess
compound, making sure that there is enough ProRoc
joint compound under tape to make a good bond.
Allow each coat to dry thoroughly before applying the
next coat (24-hours between coats). If the tape does
lift along the edges after drying; simply cut out the
affected area in the shape of a canoe before applying
the next coat. If the tape lifts in the centre, you must
tear out affected area and re-tape.
Apply a second coat
using a 7” taping knife
and this coat should
extend approximately 4” -
6” beyond each side of
the joint. After the coat
dries approximately
24 hours, sand the area
Apply a third coat using a
12” taping knife and this
coat should be a thin coat
and should extend
approximately 7-12”
beyond each side of the
joint. The further you
feather the compound
out, the harder it will be to see imperfections.
When you are finished, you may want to test the fin-
ishing by holding your 12-inch finishing knife blade
across the joint. If the blade rocks, you’ll know there is
still a hump, which will need further feathering.
SANDING
Do not sand after applying tape, remove small lumps
behind with your knife before applying 2nd coat.
When sanding use 150-180 grit paper and always sand
along the outside edge well, so that the transition
between the compound and the ProRoc boards are
smooth with no imperfections. Then sand the rest of
the joint lightly in order to make smooth. Be careful
not to sand too much off. If too much is sanded off,
you will need to apply additional coats of compound.
INSIDE CORNERS
Inside corners will need to be taped as well. First,
apply a thin layer of ProRoc joint compound on both
sides of the corners using a 2-1/2” taping knife,
extending the compound slightly beyond where the
tape would extend.
Next, fold the tape and
lightly press it into the
corner with your knife.
Once it is in place, using
your 2-1/2” knife or a
corner tool to firmly
embed the tape into the
compound. Allow to dry for 24-hours, then apply a sec-
ond coat using a 7” taping knife to one side of the cor-
ner. You can only do one side of the corner today, as
the compound must dry completely so the other side
can be finished tomorrow. Do the same for the third
coat, using a 12” taping knife.
Measure bead and cut to
right length; a snug fit
from floor to ceiling
(about 1/4” shorter than
the wall height). With a
7” knife apply a
generous amount of
ProRoc joint compound
on either side of corner.
Using even pressure, press
paper / metal bead onto
corner into position,
ensuring it is aligned;
embed it into compound
by running the knife at
45° angle. Let dry for 24-hours. Apply a second coat
with the 7” knife, allowing knife to rest on nose of the
bead. Let dry for 24-hours and apply a third coat. After
another 24-hours, sand the corner to a smooth finish.
FINISHING FASTENERS
You will want to coat each of the nail or screw heads used
to fasten your ProRoc boards with ProRoc joint compound.
After the first coat has dried completely, you will need
to sand and apply two more coats to the fasteners,
sanding between each coat.
Joint treatment and taping
The finishing process requires patience! You should
apply three coats of ProRoc joint compound through
the process and allow 24-hours of drying time
between applications. The first coat is used to embed
the tape, while the two finishing coats feather out the
compound, resulting in a uniform, smooth finished
surface.
A few pointers for easy and safe application:
❏ Always wear a dust mask when sanding
❏ Use only a 150 - 180 grit sandpaper, designed espe-
cially for joint compound
❏ Keep your knife clean by drawing it over the edge
of the mudpan or hawk.
❏ Throw out any dried bits of ProRoc joint
compound… they will leave scratches
❏ Don’t worry about a smooth finish on the first
coat… the finishing coats will take care of that.
❏ Stir joint compound well before use. Add clear
water for desired consistency.
❏ ProRoc joint compound should never be frozen.
In cold weather compound should be at room
temperature 24 hours before using.
TAPING AND FINISHING OUTSIDE CORNERS
Characteristics, properties or performance of materials or systems manufactured by CertainTeed herein described are derived from data obtained under controlled test conditions. CertainTeed makes no warranties, express or
implied, as to their characteristics, properties or performance under any variations from such conditions in actual construction. CertainTeed assumes no responsibility for the effects of structural movement.
™® CertainTeed and the tag line “Quality made certain. Satisfaction guaranteed.” are trademarks of CertainTeed Corporation. All other trademarks are the property of BPB plc or its affiliates and related companies.
NOTICE: The information in this document is subject to change without notice. CertainTeed assumes no responsibility for any errors that may inadvertently appear in this document.
©01/07 CertainTeed Corporation. Printed in Canada on recycled paper. C March 2007 Form #: L-TP-001-E
CertainTeed Corporation
P.O. Box 860
Valley Forge, PA 19482
Professional: 800-233-8990
Consumer: 800-782-8777
www.certainteed.com
Finishing Guide

More Related Content

What's hot

Timber Panels Installation
Timber Panels InstallationTimber Panels Installation
Timber Panels Installation
Deziner Panels
 
Painting interior panel doors
Painting interior panel doorsPainting interior panel doors
Painting interior panel doorsZulaiha Amaria
 
Fairbox 2.1 build instructions
Fairbox 2.1 build instructionsFairbox 2.1 build instructions
Fairbox 2.1 build instructions
clearviewdesign
 
How to build a retaining wall
How to build a retaining wallHow to build a retaining wall
How to build a retaining wallPraveen Sudarsan
 
Wall and Floor Tiling - Tools and Equipment: An Introduction
Wall and Floor Tiling -  Tools and Equipment: An IntroductionWall and Floor Tiling -  Tools and Equipment: An Introduction
Wall and Floor Tiling - Tools and Equipment: An Introduction
DjCurrie
 
Foundation and plain paper power point
Foundation and plain paper power pointFoundation and plain paper power point
Foundation and plain paper power point
DjCurrie
 
Ppt by maruthish on floors
Ppt by maruthish on floorsPpt by maruthish on floors
Ppt by maruthish on floors
Maruthish Shankar
 
14 trending and elegant ceiling texture types
14 trending and elegant ceiling texture types14 trending and elegant ceiling texture types
14 trending and elegant ceiling texture types
JenniferWilson298
 
How to tile a floor
How to tile a floorHow to tile a floor
How to tile a floor
HSS Hire
 
Sealing a Terrazzo Floor
Sealing a Terrazzo FloorSealing a Terrazzo Floor
Sealing a Terrazzo Floor
Terrazzco
 
10 flooring
10 flooring10 flooring
10 flooring
bakyalakshmig
 
Types of flooring
Types of flooringTypes of flooring
Types of flooring
Kavita Sharma
 
How to construct a suimple garden pond
How to construct a suimple garden pondHow to construct a suimple garden pond
How to construct a suimple garden pondPraveen Sudarsan
 
Wall and floor tiling tools and equipment
Wall and floor tiling tools and equipmentWall and floor tiling tools and equipment
Wall and floor tiling tools and equipment
deaftc232
 
How to build a raised formal pool
How to build a raised formal poolHow to build a raised formal pool
How to build a raised formal poolPraveen Sudarsan
 
Flooring
FlooringFlooring
Flooring
harpreet singh
 

What's hot (19)

Timber Panels Installation
Timber Panels InstallationTimber Panels Installation
Timber Panels Installation
 
Painting interior panel doors
Painting interior panel doorsPainting interior panel doors
Painting interior panel doors
 
Fairbox 2.1 build instructions
Fairbox 2.1 build instructionsFairbox 2.1 build instructions
Fairbox 2.1 build instructions
 
How to build a retaining wall
How to build a retaining wallHow to build a retaining wall
How to build a retaining wall
 
Wall and Floor Tiling - Tools and Equipment: An Introduction
Wall and Floor Tiling -  Tools and Equipment: An IntroductionWall and Floor Tiling -  Tools and Equipment: An Introduction
Wall and Floor Tiling - Tools and Equipment: An Introduction
 
Hanging a door
Hanging a doorHanging a door
Hanging a door
 
Floor finishes
Floor finishesFloor finishes
Floor finishes
 
Foundation and plain paper power point
Foundation and plain paper power pointFoundation and plain paper power point
Foundation and plain paper power point
 
Ppt by maruthish on floors
Ppt by maruthish on floorsPpt by maruthish on floors
Ppt by maruthish on floors
 
14 trending and elegant ceiling texture types
14 trending and elegant ceiling texture types14 trending and elegant ceiling texture types
14 trending and elegant ceiling texture types
 
How to tile a floor
How to tile a floorHow to tile a floor
How to tile a floor
 
Sealing a Terrazzo Floor
Sealing a Terrazzo FloorSealing a Terrazzo Floor
Sealing a Terrazzo Floor
 
10 flooring
10 flooring10 flooring
10 flooring
 
Types of flooring
Types of flooringTypes of flooring
Types of flooring
 
How to construct a suimple garden pond
How to construct a suimple garden pondHow to construct a suimple garden pond
How to construct a suimple garden pond
 
Wall and floor tiling tools and equipment
Wall and floor tiling tools and equipmentWall and floor tiling tools and equipment
Wall and floor tiling tools and equipment
 
Timber floor
Timber floorTimber floor
Timber floor
 
How to build a raised formal pool
How to build a raised formal poolHow to build a raised formal pool
How to build a raised formal pool
 
Flooring
FlooringFlooring
Flooring
 

Similar to Certainteed Drywall Installation Guide

Lean-toToolShed.pdf
Lean-toToolShed.pdfLean-toToolShed.pdf
Lean-toToolShed.pdf
neetubansal19
 
Lean-toToolShed.pdf
Lean-toToolShed.pdfLean-toToolShed.pdf
Lean-toToolShed.pdf
neetubansal19
 
Lean-toToolShed.pdf
Lean-toToolShed.pdfLean-toToolShed.pdf
Lean-toToolShed.pdf
neetubansal19
 
How to install False Ceiling?
How to install False Ceiling?How to install False Ceiling?
How to install False Ceiling?
BuildingandInteriors.com
 
Installing deck boards
Installing deck boardsInstalling deck boards
Installing deck boardsZulaiha Amaria
 
Wallpapering techniques
Wallpapering techniquesWallpapering techniques
Wallpapering techniquesZulaiha Amaria
 
Installing the deck railing
Installing the deck railingInstalling the deck railing
Installing the deck railingZulaiha Amaria
 
Reznoclad Brochure final_2016
Reznoclad Brochure final_2016Reznoclad Brochure final_2016
Reznoclad Brochure final_2016Reznoclad HPL
 
Corrugated sheet roofing
Corrugated sheet roofingCorrugated sheet roofing
Corrugated sheet roofingZulaiha Amaria
 
400 proyectos de_mini_reloj[1]
400 proyectos de_mini_reloj[1]400 proyectos de_mini_reloj[1]
400 proyectos de_mini_reloj[1]
ruper montes
 
How to Install Allure GripStrip Flooring - Official Installation Instructions...
How to Install Allure GripStrip Flooring - Official Installation Instructions...How to Install Allure GripStrip Flooring - Official Installation Instructions...
How to Install Allure GripStrip Flooring - Official Installation Instructions...
AllureFlooring
 
Longboard Installation Instructions
Longboard Installation InstructionsLongboard Installation Instructions
Longboard Installation Instructionsjhaveruk
 
12BY8SHED.pdf
12BY8SHED.pdf12BY8SHED.pdf
12BY8SHED.pdf
Demetris D-Papa
 
How To Install Cedar Shingles
How To Install Cedar ShinglesHow To Install Cedar Shingles
How To Install Cedar Shingles
wildeagle
 

Similar to Certainteed Drywall Installation Guide (20)

Lean-toToolShed.pdf
Lean-toToolShed.pdfLean-toToolShed.pdf
Lean-toToolShed.pdf
 
Lean-toToolShed.pdf
Lean-toToolShed.pdfLean-toToolShed.pdf
Lean-toToolShed.pdf
 
Lean-toToolShed.pdf
Lean-toToolShed.pdfLean-toToolShed.pdf
Lean-toToolShed.pdf
 
Build a carport
Build a carportBuild a carport
Build a carport
 
How to install False Ceiling?
How to install False Ceiling?How to install False Ceiling?
How to install False Ceiling?
 
Installing deck boards
Installing deck boardsInstalling deck boards
Installing deck boards
 
Installing wallpaper
Installing wallpaperInstalling wallpaper
Installing wallpaper
 
Wallpapering techniques
Wallpapering techniquesWallpapering techniques
Wallpapering techniques
 
Installing the deck railing
Installing the deck railingInstalling the deck railing
Installing the deck railing
 
Reznoclad Brochure final_2016
Reznoclad Brochure final_2016Reznoclad Brochure final_2016
Reznoclad Brochure final_2016
 
Deck marking
Deck markingDeck marking
Deck marking
 
Corrugated sheet roofing
Corrugated sheet roofingCorrugated sheet roofing
Corrugated sheet roofing
 
400 proyectos de_mini_reloj[1]
400 proyectos de_mini_reloj[1]400 proyectos de_mini_reloj[1]
400 proyectos de_mini_reloj[1]
 
Wallpaper a ceiling
Wallpaper a ceilingWallpaper a ceiling
Wallpaper a ceiling
 
Wall tiling
Wall tilingWall tiling
Wall tiling
 
How to Install Allure GripStrip Flooring - Official Installation Instructions...
How to Install Allure GripStrip Flooring - Official Installation Instructions...How to Install Allure GripStrip Flooring - Official Installation Instructions...
How to Install Allure GripStrip Flooring - Official Installation Instructions...
 
Longboard Installation Instructions
Longboard Installation InstructionsLongboard Installation Instructions
Longboard Installation Instructions
 
12BY8SHED.pdf
12BY8SHED.pdf12BY8SHED.pdf
12BY8SHED.pdf
 
Artex and plaster
Artex and plasterArtex and plaster
Artex and plaster
 
How To Install Cedar Shingles
How To Install Cedar ShinglesHow To Install Cedar Shingles
How To Install Cedar Shingles
 

More from Western-Building-Center

Channellock Ratchet Flyer
Channellock Ratchet FlyerChannellock Ratchet Flyer
Channellock Ratchet Flyer
Western-Building-Center
 
Channellock Tool Book
Channellock Tool BookChannellock Tool Book
Channellock Tool Book
Western-Building-Center
 
Tool Book March - June 2016
Tool Book March - June 2016Tool Book March - June 2016
Tool Book March - June 2016
Western-Building-Center
 
Delta Catalog 2015
Delta Catalog 2015Delta Catalog 2015
Delta Catalog 2015
Western-Building-Center
 
2015 Lighting Catalog
2015 Lighting Catalog2015 Lighting Catalog
2015 Lighting Catalog
Western-Building-Center
 
Home Impressions Catalog 2015
Home Impressions Catalog 2015Home Impressions Catalog 2015
Home Impressions Catalog 2015
Western-Building-Center
 
2015 Ceiling Fan Catalog
2015 Ceiling Fan Catalog2015 Ceiling Fan Catalog
2015 Ceiling Fan Catalog
Western-Building-Center
 
SawStop Job Site Saw Pricelist
SawStop Job Site Saw PricelistSawStop Job Site Saw Pricelist
SawStop Job Site Saw Pricelist
Western-Building-Center
 
SawStop Job Site Saw Flyer
SawStop Job Site Saw FlyerSawStop Job Site Saw Flyer
SawStop Job Site Saw Flyer
Western-Building-Center
 
WBC Barn Special
WBC Barn SpecialWBC Barn Special
WBC Barn Special
Western-Building-Center
 
Medallion Specials 2016
Medallion Specials 2016Medallion Specials 2016
Medallion Specials 2016
Western-Building-Center
 
WBC Monthly Specials February 2016
WBC Monthly Specials February 2016WBC Monthly Specials February 2016
WBC Monthly Specials February 2016
Western-Building-Center
 
40' x 60' x 16' Pole Barn
40' x 60' x 16' Pole Barn40' x 60' x 16' Pole Barn
40' x 60' x 16' Pole Barn
Western-Building-Center
 
30' x 40' x 12' Pole Barn
30' x 40' x 12' Pole Barn30' x 40' x 12' Pole Barn
30' x 40' x 12' Pole Barn
Western-Building-Center
 
24' x 24' x 10' Pole Barn
24' x 24' x 10' Pole Barn24' x 24' x 10' Pole Barn
24' x 24' x 10' Pole Barn
Western-Building-Center
 
Keeping the Dream Alive
Keeping the Dream AliveKeeping the Dream Alive
Keeping the Dream Alive
Western-Building-Center
 
WBC Makita Sale Catalog
WBC Makita Sale CatalogWBC Makita Sale Catalog
WBC Makita Sale Catalog
Western-Building-Center
 
Do it Best Outdoor Living Catalog
Do it Best Outdoor Living CatalogDo it Best Outdoor Living Catalog
Do it Best Outdoor Living Catalog
Western-Building-Center
 
Do it Best Home Decor Catalog
Do it Best Home Decor CatalogDo it Best Home Decor Catalog
Do it Best Home Decor Catalog
Western-Building-Center
 
Fence Brochure
Fence BrochureFence Brochure
Fence Brochure
Western-Building-Center
 

More from Western-Building-Center (20)

Channellock Ratchet Flyer
Channellock Ratchet FlyerChannellock Ratchet Flyer
Channellock Ratchet Flyer
 
Channellock Tool Book
Channellock Tool BookChannellock Tool Book
Channellock Tool Book
 
Tool Book March - June 2016
Tool Book March - June 2016Tool Book March - June 2016
Tool Book March - June 2016
 
Delta Catalog 2015
Delta Catalog 2015Delta Catalog 2015
Delta Catalog 2015
 
2015 Lighting Catalog
2015 Lighting Catalog2015 Lighting Catalog
2015 Lighting Catalog
 
Home Impressions Catalog 2015
Home Impressions Catalog 2015Home Impressions Catalog 2015
Home Impressions Catalog 2015
 
2015 Ceiling Fan Catalog
2015 Ceiling Fan Catalog2015 Ceiling Fan Catalog
2015 Ceiling Fan Catalog
 
SawStop Job Site Saw Pricelist
SawStop Job Site Saw PricelistSawStop Job Site Saw Pricelist
SawStop Job Site Saw Pricelist
 
SawStop Job Site Saw Flyer
SawStop Job Site Saw FlyerSawStop Job Site Saw Flyer
SawStop Job Site Saw Flyer
 
WBC Barn Special
WBC Barn SpecialWBC Barn Special
WBC Barn Special
 
Medallion Specials 2016
Medallion Specials 2016Medallion Specials 2016
Medallion Specials 2016
 
WBC Monthly Specials February 2016
WBC Monthly Specials February 2016WBC Monthly Specials February 2016
WBC Monthly Specials February 2016
 
40' x 60' x 16' Pole Barn
40' x 60' x 16' Pole Barn40' x 60' x 16' Pole Barn
40' x 60' x 16' Pole Barn
 
30' x 40' x 12' Pole Barn
30' x 40' x 12' Pole Barn30' x 40' x 12' Pole Barn
30' x 40' x 12' Pole Barn
 
24' x 24' x 10' Pole Barn
24' x 24' x 10' Pole Barn24' x 24' x 10' Pole Barn
24' x 24' x 10' Pole Barn
 
Keeping the Dream Alive
Keeping the Dream AliveKeeping the Dream Alive
Keeping the Dream Alive
 
WBC Makita Sale Catalog
WBC Makita Sale CatalogWBC Makita Sale Catalog
WBC Makita Sale Catalog
 
Do it Best Outdoor Living Catalog
Do it Best Outdoor Living CatalogDo it Best Outdoor Living Catalog
Do it Best Outdoor Living Catalog
 
Do it Best Home Decor Catalog
Do it Best Home Decor CatalogDo it Best Home Decor Catalog
Do it Best Home Decor Catalog
 
Fence Brochure
Fence BrochureFence Brochure
Fence Brochure
 

Certainteed Drywall Installation Guide

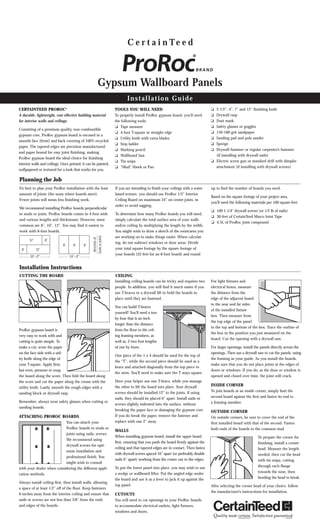
  • 1. ProRoc gypsum board is very easy to work with and cutting is quite simple. To make a cut, score the paper on the face side with a util- ity knife along the edge of your T-square. Apply firm, but even, pressure to snap the board along the score. Then fold the board along the score and cut the paper along the crease with the utility knife. Lastly, smooth the rough edges with a sanding block or drywall rasp. Remember, always wear safety glasses when cutting or sanding boards. ATTACHING PROROC BOARDS You can attach your ProRoc boards to studs or joists using nails, screws. We recommend using drywall screws for opti- mum installation and professional finish. You might wish to consult with your dealer when considering the different appli- cation methods. Always install ceiling first, then install walls, allowing a space of at least 1/2” off of the floor. Keep fasteners 6-inches away from the interior ceiling and ensure that nails or screws are not less than 3/8” from the ends and edges of the boards. Installing ceiling boards can be tricky and requires two people. In addition, you will find it much easier if you use T-braces or a drywall lift to hold the boards in place until they are fastened. You can build T-braces yourself! You’ll need a two by four that is an inch longer than the distance from the floor to the ceil- ing framing members, as well as, 2-two foot lengths of one by fours. One piece of the 1 x 4 should be used for the top of the “T”, while the second piece should be used as a brace and attached diagonally from the top piece to the stem. You’ll need to make sure the T stays square. Have your helper use one T-brace, while you manage the other to lift the board into place. Your drywall screws should be installed 12” to the joists. If using nails, they should be placed 6” apart. Install nails or screws slightly indented into the surface, without breaking the paper face or damaging the gypsum core. If you do break the paper, remove the fastener and replace with one 2” away. WALLS When installing gypsum board, install the upper board first, ensuring that you push the board firmly against the ceiling and that tapered edges are in contact. Then fasten with drywall screws spaced 16” apart (or preferably double nails 6” apart) working from the center out to the edges. To put the lower panel into place, you may wish to use a wedge or wallboard lifter. Put the angled edge under the board and use it as a lever to jack it up against the top panel. CUTOUTS You will need to cut openings in your ProRoc boards to accommodate electrical outlets, light fixtures, windows and doors. For light fixtures and electrical boxes, measure the distance from the edge of the adjacent board to the near and far sides of the installed fixture box. Then measure from the top edge of the panel to the top and bottom of the box. Trace the outline of the box in the position you just measured on the board. Cut the opening with a drywall saw. For larger openings, install the panels directly across the openings. Then use a drywall saw to cut the panels, using the framing as your guide. As you install the boards, make sure that you do not place joints at the edges of doors or windows. If you do, as the door or window is opened and closed over time, the joint will crack. INSIDE CORNER To join boards at an inside corner, simply butt the second board against the first and fasten its end to a framing member. OUTSIDE CORNER On outside corners, be sure to cover the end of the first installed board with that of the second. Fasten both ends of the boards to the common stud. To prepare the corner for finishing, install a corner bead. Measure the length needed, then cut the bead with tin snips, cutting through each flange towards the nose, then bending the bead to break. After selecting the corner bead of your choice, follow the manufacturer’s instructions for installation. CERTAINTEED PROROC® A durable, lightweight, cost-effective building material for interior walls and ceilings. Consisting of a premium quality, non-combustible gypsum core, ProRoc gypsum board is encased in a smooth face (front) and back covering of 100% recycled paper. The tapered edges are precision manufactured and paper bound for easy joint finishing, making ProRoc gypsum board the ideal choice for finishing interior walls and ceilings. Once primed, it can be painted, wallpapered or textured for a look that works for you. TOOLS YOU WILL NEED To properly install ProRoc gypsum board, you’ll need the following tools: ❏ Tape measure ❏ 4-foot T-square or straight edge ❏ Utility knife with extra blades ❏ Step ladder ❏ Marking pencil ❏ Wallboard Saw ❏ Tin snips ❏ “Mud” Hawk or Pan ❏ 2-1/2”, 4”, 7” and 12” finishing knife ❏ Drywall rasp ❏ Dust mask ❏ Safety glasses or goggles ❏ 150-180 grit sandpaper ❏ Sanding pad and pole sander ❏ Sponge ❏ Drywall hammer or regular carpenter’s hammer (if installing with drywall nails) ❏ Electric screw gun or standard drill with dimpler attachment (if installing with drywall screws) Installation Instructions Planning the Job It’s best to plan your ProRoc installation with the least amount of joints (the seam where boards meet). Fewer joints will mean less finishing work. We recommend installing ProRoc boards perpendicular to studs or joists. ProRoc boards comes in 4-foot wide and various lengths and thicknesses. However, most common are 8”, 10”, 12”. You may find it easiest to work with 8-foot boards. If you are intending to finish your ceilings with a water based texture, you should use ProRoc 1/2” Interior Ceiling Board on maximum 24” on centre joists, in order to avoid sagging. To determine how many ProRoc boards you will need, simply calculate the total surface area of your walls and/or ceiling by multiplying the length by the width. You might wish to draw a sketch of the room/area you are working on to make things easier. When calculat- ing, do not subtract windows or door areas. Divide your total square footage by the square footage of your boards (32-feet for an 8-foot board) and round up to find the number of boards you need. Based on the square footage of your project area, you’ll need the following materials per 100-square-feet: ❏ 100 1-1/4” drywall screws (or 1/2 lb of nails) ❏ 30-feet of CertainTeed Marco Joint Tape ❏ 4.5L of ProRoc joint compound CUTTING THE BOARD CEILING 20'–0" 12' 12'8' 8' directionof studsorjoints 24'–0" 8' 8' 8' C e r t a i n Te e d Installation Guide Gypsum Wallboard Panels
  • 2. C e r t a i n Te e d Gypsum Wallboard Panels Begin with the butt joints – the areas where the unfinished ends of ProRoc boards meet. First, apply a coat of ProRoc joint compound over the joint with your four-inch knife. Then, press the tape firmly into the compound by press- ing your knife over the tape. Squeeze out excess compound, making sure that there is enough ProRoc joint compound under tape to make a good bond. Allow each coat to dry thoroughly before applying the next coat (24-hours between coats). If the tape does lift along the edges after drying; simply cut out the affected area in the shape of a canoe before applying the next coat. If the tape lifts in the centre, you must tear out affected area and re-tape. Apply a second coat using a 7” taping knife and this coat should extend approximately 4” - 6” beyond each side of the joint. After the coat dries approximately 24 hours, sand the area Apply a third coat using a 12” taping knife and this coat should be a thin coat and should extend approximately 7-12” beyond each side of the joint. The further you feather the compound out, the harder it will be to see imperfections. When you are finished, you may want to test the fin- ishing by holding your 12-inch finishing knife blade across the joint. If the blade rocks, you’ll know there is still a hump, which will need further feathering. SANDING Do not sand after applying tape, remove small lumps behind with your knife before applying 2nd coat. When sanding use 150-180 grit paper and always sand along the outside edge well, so that the transition between the compound and the ProRoc boards are smooth with no imperfections. Then sand the rest of the joint lightly in order to make smooth. Be careful not to sand too much off. If too much is sanded off, you will need to apply additional coats of compound. INSIDE CORNERS Inside corners will need to be taped as well. First, apply a thin layer of ProRoc joint compound on both sides of the corners using a 2-1/2” taping knife, extending the compound slightly beyond where the tape would extend. Next, fold the tape and lightly press it into the corner with your knife. Once it is in place, using your 2-1/2” knife or a corner tool to firmly embed the tape into the compound. Allow to dry for 24-hours, then apply a sec- ond coat using a 7” taping knife to one side of the cor- ner. You can only do one side of the corner today, as the compound must dry completely so the other side can be finished tomorrow. Do the same for the third coat, using a 12” taping knife. Measure bead and cut to right length; a snug fit from floor to ceiling (about 1/4” shorter than the wall height). With a 7” knife apply a generous amount of ProRoc joint compound on either side of corner. Using even pressure, press paper / metal bead onto corner into position, ensuring it is aligned; embed it into compound by running the knife at 45° angle. Let dry for 24-hours. Apply a second coat with the 7” knife, allowing knife to rest on nose of the bead. Let dry for 24-hours and apply a third coat. After another 24-hours, sand the corner to a smooth finish. FINISHING FASTENERS You will want to coat each of the nail or screw heads used to fasten your ProRoc boards with ProRoc joint compound. After the first coat has dried completely, you will need to sand and apply two more coats to the fasteners, sanding between each coat. Joint treatment and taping The finishing process requires patience! You should apply three coats of ProRoc joint compound through the process and allow 24-hours of drying time between applications. The first coat is used to embed the tape, while the two finishing coats feather out the compound, resulting in a uniform, smooth finished surface. A few pointers for easy and safe application: ❏ Always wear a dust mask when sanding ❏ Use only a 150 - 180 grit sandpaper, designed espe- cially for joint compound ❏ Keep your knife clean by drawing it over the edge of the mudpan or hawk. ❏ Throw out any dried bits of ProRoc joint compound… they will leave scratches ❏ Don’t worry about a smooth finish on the first coat… the finishing coats will take care of that. ❏ Stir joint compound well before use. Add clear water for desired consistency. ❏ ProRoc joint compound should never be frozen. In cold weather compound should be at room temperature 24 hours before using. TAPING AND FINISHING OUTSIDE CORNERS Characteristics, properties or performance of materials or systems manufactured by CertainTeed herein described are derived from data obtained under controlled test conditions. CertainTeed makes no warranties, express or implied, as to their characteristics, properties or performance under any variations from such conditions in actual construction. CertainTeed assumes no responsibility for the effects of structural movement. ™® CertainTeed and the tag line “Quality made certain. Satisfaction guaranteed.” are trademarks of CertainTeed Corporation. All other trademarks are the property of BPB plc or its affiliates and related companies. NOTICE: The information in this document is subject to change without notice. CertainTeed assumes no responsibility for any errors that may inadvertently appear in this document. ©01/07 CertainTeed Corporation. Printed in Canada on recycled paper. C March 2007 Form #: L-TP-001-E CertainTeed Corporation P.O. Box 860 Valley Forge, PA 19482 Professional: 800-233-8990 Consumer: 800-782-8777 www.certainteed.com Finishing Guide