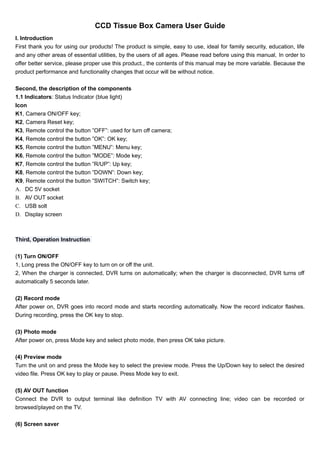
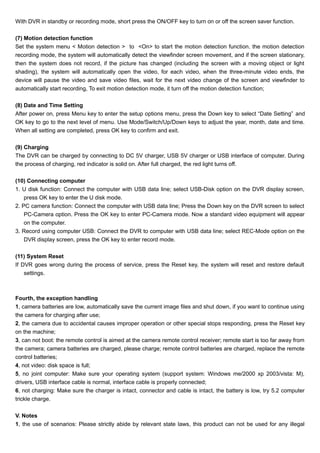
CCD Tissue Box Camera User Guide 
I. Introduction 
First thank you for using our products! The product is simple, easy to use, ideal for family security, education, life 
and any other areas of essential utilities, by the users of all ages. Please read before using this manual, In order to 
offer better service, please proper use this product., the contents of this manual may be more variable. Because the 
product performance and functionality changes that occur will be without notice. 
Second, the description of the components 
1.1 Indicators: Status Indicator (blue light) 
Icon 
K1, Camera ON/OFF key; 
K2, Camera Reset key; 
K3, Remote control the button ”OFF”: used for turn off camera; 
K4, Remote control the button ”OK”: OK key; 
K5, Remote control the button ”MENU”: Menu key; 
K6, Remote control the button ”MODE”: Mode key; 
K7, Remote control the button ”R/UP”: Up key; 
K8, Remote control the button ”DOWN”: Down key; 
K9, Remote control the button ”SWITCH”: Switch key; 
A. DC 5V socket 
B. AV OUT socket 
C. USB solt 
D. Display screen 
Third, Operation Instruction 
(1) Turn ON/OFF 
1, Long press the ON/OFF key to turn on or off the unit. 
2, When the charger is connected, DVR turns on automatically; when the charger is disconnected, DVR turns off 
automatically 5 seconds later. 
(2) Record mode 
After power on, DVR goes into record mode and starts recording automatically. Now the record indicator flashes. 
During recording, press the OK key to stop. 
(3) Photo mode 
After power on, press Mode key and select photo mode, then press OK take picture. 
(4) Preview mode 
Turn the unit on and press the Mode key to select the preview mode. Press the Up/Down key to select the desired 
video file. Press OK key to play or pause. Press Mode key to exit. 
(5) AV OUT function 
Connect the DVR to output terminal like definition TV with AV connecting line; video can be recorded or 
browsed/played on the TV. 
(6) Screen saver
With DVR in standby or recording mode, short press the ON/OFF key to turn on or off the screen saver function. 
(7) Motion detection function 
Set the system menu < Motion detection > to <On> to start the motion detection function. the motion detection 
recording mode, the system will automatically detect the viewfinder screen movement, and if the screen stationary, 
then the system does not record, if the picture has changed (including the screen with a moving object or light 
shading), the system will automatically open the video, for each video, when the three-minute video ends, the 
device will pause the video and save video files, wait for the next video change of the screen and viewfinder to 
automatically start recording, To exit motion detection mode, it turn off the motion detection function; 
(8) Date and Time Setting 
After power on, press Menu key to enter the setup options menu, press the Down key to select “Date Setting” and 
OK key to go to the next level of menu. Use Mode/Switch/Up/Down keys to adjust the year, month, date and time. 
When all setting are completed, press OK key to confirm and exit. 
(9) Charging 
The DVR can be charged by connecting to DC 5V charger, USB 5V charger or USB interface of computer. During 
the process of charging, red indicator is solid on. After full charged, the red light turns off. 
(10) Connecting computer 
1. U disk function: Connect the computer with USB data line; select USB-Disk option on the DVR display screen, 
press OK key to enter the U disk mode. 
2. PC camera function: Connect the computer with USB data line; Press the Down key on the DVR screen to select 
PC-Camera option. Press the OK key to enter PC-Camera mode. Now a standard video equipment will appear 
on the computer. 
3. Record using computer USB: Connect the DVR to computer with USB data line; select REC-Mode option on the 
DVR display screen, press the OK key to enter record mode. 
(11) System Reset 
If DVR goes wrong during the process of service, press the Reset key, the system will reset and restore default 
settings. 
Fourth, the exception handling 
1, camera batteries are low, automatically save the current image files and shut down, if you want to continue using 
the camera for charging after use; 
2, the camera due to accidental causes improper operation or other special stops responding, press the Reset key 
on the machine; 
3, can not boot: the remote control is aimed at the camera remote control receiver; remote start is too far away from 
the camera; camera batteries are charged, please charge; remote control batteries are charged, replace the remote 
control batteries; 
4, not video: disk space is full; 
5, no joint computer: Make sure your operating system (support system: Windows me/2000 xp 2003/vista: M), 
drivers, USB interface cable is normal, interface cable is properly connected; 
6, not charging: Make sure the charger is intact, connector and cable is intact, the battery is low, try 5.2 computer 
trickle charge. 
V. Notes 
1, the use of scenarios: Please strictly abide by relevant state laws, this product can not be used for any illegal
purpose, or peril. 
2, on the battery: With the increased use of time, battery life has been shortened, long unused, in fully charged 
before use. 
3, the actual memory capacity of slightly less than the nominal capacity, is a normal phenomenon. 
4, file security: This product is non-professional storage equipment, does not guarantee the complete line of internal 
storage files and security, real-time on the computer or other storage device to back up your important files. 
5, video quality: This product is non-professional video equipment, does not guarantee the effectiveness of the 
video file can be up to your expectations. 
6, the working temperature :0-50 ℃. 
7, camera illumination: a well-lit environment, do not use the camera directly at the sun and other strong light 
sources, optical components so as not to suffer injury. 
8, can not be directly immersed in water. 
9, the cleaning requirements: Do not dust density is too large to use the environment to avoid dust contamination of 
lenses and other components, affect the camera effects. 
10,Other matters: The product belongs to sophisticated electronic products, please do not subject it to strong shock 
and vibration, not in strong magnetic fields or strong electric field to use. 
11, disposal: Please note that environmental protection, not free to discard this product is prohibited to throw in the 
fire of this product, they may explode. 
12,Additional information: Do not disassemble the machine, other unknown matters, please contact your dealer.
Ccd tissue box camera user guide

Ccd tissue box camera user guide

  • 1.
    CCD Tissue BoxCamera User Guide I. Introduction First thank you for using our products! The product is simple, easy to use, ideal for family security, education, life and any other areas of essential utilities, by the users of all ages. Please read before using this manual, In order to offer better service, please proper use this product., the contents of this manual may be more variable. Because the product performance and functionality changes that occur will be without notice. Second, the description of the components 1.1 Indicators: Status Indicator (blue light) Icon K1, Camera ON/OFF key; K2, Camera Reset key; K3, Remote control the button ”OFF”: used for turn off camera; K4, Remote control the button ”OK”: OK key; K5, Remote control the button ”MENU”: Menu key; K6, Remote control the button ”MODE”: Mode key; K7, Remote control the button ”R/UP”: Up key; K8, Remote control the button ”DOWN”: Down key; K9, Remote control the button ”SWITCH”: Switch key; A. DC 5V socket B. AV OUT socket C. USB solt D. Display screen Third, Operation Instruction (1) Turn ON/OFF 1, Long press the ON/OFF key to turn on or off the unit. 2, When the charger is connected, DVR turns on automatically; when the charger is disconnected, DVR turns off automatically 5 seconds later. (2) Record mode After power on, DVR goes into record mode and starts recording automatically. Now the record indicator flashes. During recording, press the OK key to stop. (3) Photo mode After power on, press Mode key and select photo mode, then press OK take picture. (4) Preview mode Turn the unit on and press the Mode key to select the preview mode. Press the Up/Down key to select the desired video file. Press OK key to play or pause. Press Mode key to exit. (5) AV OUT function Connect the DVR to output terminal like definition TV with AV connecting line; video can be recorded or browsed/played on the TV. (6) Screen saver
  • 2.
    With DVR instandby or recording mode, short press the ON/OFF key to turn on or off the screen saver function. (7) Motion detection function Set the system menu < Motion detection > to <On> to start the motion detection function. the motion detection recording mode, the system will automatically detect the viewfinder screen movement, and if the screen stationary, then the system does not record, if the picture has changed (including the screen with a moving object or light shading), the system will automatically open the video, for each video, when the three-minute video ends, the device will pause the video and save video files, wait for the next video change of the screen and viewfinder to automatically start recording, To exit motion detection mode, it turn off the motion detection function; (8) Date and Time Setting After power on, press Menu key to enter the setup options menu, press the Down key to select “Date Setting” and OK key to go to the next level of menu. Use Mode/Switch/Up/Down keys to adjust the year, month, date and time. When all setting are completed, press OK key to confirm and exit. (9) Charging The DVR can be charged by connecting to DC 5V charger, USB 5V charger or USB interface of computer. During the process of charging, red indicator is solid on. After full charged, the red light turns off. (10) Connecting computer 1. U disk function: Connect the computer with USB data line; select USB-Disk option on the DVR display screen, press OK key to enter the U disk mode. 2. PC camera function: Connect the computer with USB data line; Press the Down key on the DVR screen to select PC-Camera option. Press the OK key to enter PC-Camera mode. Now a standard video equipment will appear on the computer. 3. Record using computer USB: Connect the DVR to computer with USB data line; select REC-Mode option on the DVR display screen, press the OK key to enter record mode. (11) System Reset If DVR goes wrong during the process of service, press the Reset key, the system will reset and restore default settings. Fourth, the exception handling 1, camera batteries are low, automatically save the current image files and shut down, if you want to continue using the camera for charging after use; 2, the camera due to accidental causes improper operation or other special stops responding, press the Reset key on the machine; 3, can not boot: the remote control is aimed at the camera remote control receiver; remote start is too far away from the camera; camera batteries are charged, please charge; remote control batteries are charged, replace the remote control batteries; 4, not video: disk space is full; 5, no joint computer: Make sure your operating system (support system: Windows me/2000 xp 2003/vista: M), drivers, USB interface cable is normal, interface cable is properly connected; 6, not charging: Make sure the charger is intact, connector and cable is intact, the battery is low, try 5.2 computer trickle charge. V. Notes 1, the use of scenarios: Please strictly abide by relevant state laws, this product can not be used for any illegal
  • 3.
    purpose, or peril. 2, on the battery: With the increased use of time, battery life has been shortened, long unused, in fully charged before use. 3, the actual memory capacity of slightly less than the nominal capacity, is a normal phenomenon. 4, file security: This product is non-professional storage equipment, does not guarantee the complete line of internal storage files and security, real-time on the computer or other storage device to back up your important files. 5, video quality: This product is non-professional video equipment, does not guarantee the effectiveness of the video file can be up to your expectations. 6, the working temperature :0-50 ℃. 7, camera illumination: a well-lit environment, do not use the camera directly at the sun and other strong light sources, optical components so as not to suffer injury. 8, can not be directly immersed in water. 9, the cleaning requirements: Do not dust density is too large to use the environment to avoid dust contamination of lenses and other components, affect the camera effects. 10,Other matters: The product belongs to sophisticated electronic products, please do not subject it to strong shock and vibration, not in strong magnetic fields or strong electric field to use. 11, disposal: Please note that environmental protection, not free to discard this product is prohibited to throw in the fire of this product, they may explode. 12,Additional information: Do not disassemble the machine, other unknown matters, please contact your dealer.